

Page 1
SINGLE SERVE
COFFEE MAKER
WITH WATER TANK
CAFETERA
DE MONODOSIS CON
TANQUE DE AGUA
Instruction Manual
Manual de instrucciones
Register your product and get support at:
Para registrar su producto y obtener asistencia:
www.bellahousewares.com/welcome
Page 2

Page 3

Table of Contents
Important Safeguards .................................................................................................................................. 2
Additional Important Safeguards ...............................................................................................................3
Notes on the Plug .........................................................................................................................................3
Notes on the Cord.........................................................................................................................................3
Plasticizer Warning ....................................................................................................................................... 3
Electric Power................................................................................................................................................3
Getting to Know Your Dualbrew Single Serve Coffee Maker.................................................................4
Introduction ................................................................................................................................................... 5
Before Using for the First Time .................................................................................................................. 5
Brewing Instructions ................................................................................................................................... 5
Adjusting the drip tray ................................................................................................................................. 5
Setting up your Dualbrew Single Serve Coffee Maker using the capsule adaptor. ............................6
Setting up your Dualbrew Single Serve Coffee Maker using the ground coffee adaptor. .............6-7
Setting up your Dualbrew Single Serve Coffee Maker to boil water .................................................... 7
Setting Up your Single-Serve Coffee Maker for Iced Beverages .......................................................... 7
Brewing Another Cup ...................................................................................................................................8
User Maintenance Instructions ...................................................................................................................8
Care & Cleaning Instructions ......................................................................................................................8
Descaling Instructions .................................................................................................................................8
Storing Instructions ......................................................................................................................................8
Warranty ........................................................................................................................................................9
Índice
Medidas de seguridad importantes .................................................................................................... 10-11
Otras medidas de seguridad importantes .............................................................................................. 11
Notas sobre el enchufe .............................................................................................................................. 12
Notas sobre el cable ...................................................................................................................................12
Advertencia sobre plasticantes .............................................................................................................. 12
Corriente eléctrica ...................................................................................................................................... 12
Descripción de la cafetera de monodosis ............................................................................................... 13
Introducción ................................................................................................................................................ 14
Antes de utilizar por primera vez ............................................................................................................. 14
Instrucciones de elaboración .................................................................................................................... 14
Ajuste de la bandeja de goteo .................................................................................................................. 15
Conguración de la cafetera de monodosis con el adaptador de cápsulas .................................15-16
Conguración de la cafetera de monodosis con el adaptador de café molido ................................. 16
Conguración de la cafetera de monodosis para que hierva agua ..................................................... 17
Elaboración de tazas adicionales .............................................................................................................17
Instrucciones de mantenimiento para el usuario .................................................................................. 17
Instrucciones de cuidado y limpieza ........................................................................................................ 18
Instrucciones para la desincrustación ..................................................................................................... 18
Instrucciones de almacenamiento ........................................................................................................... 18
Garantía........................................................................................................................................................19
Page 4

IMPORTANT SAFEGUARDS
When using electrical appliances, basic safety precautions should always be
followed including the following:
1. Read all instructions.
2. Do not touch hot surfaces. Use handles or knobs.
3. To protect against re, electric shock and injury to persons do not immerse cord,
plugs, or appliance in water or other liquids.
4. This appliance is not intended for use by persons (including children) with
reduced physical, sensory or mental capabilities, or lack of experience and
knowledge, unless they have been given supervision or instruction concerning
use of the appliance by a person responsible for their safety.
5. Children should be supervised to ensure that they do not play with the appliance.
6. Unplug from outlet when not in use and before cleaning. Allow to cool before
putting on or taking off parts, and before cleaning the appliance.
7. Do not operate any appliance with a damaged cord or plug or after the
appliance malfunctions, or has been damaged in any manner. Return appliance
to a qualied technician for examination, repair or electrical or mechanical
adjustment.
8. Close supervision is necessary when any appliance is used by or near children.
NOTE: DO NOT ATTEMPT TO REPAIR THE UNIT YOURSELF. THIS WILL VOID
THE WARRANTY.
9. The use of accessories or attachments is not recommended by the manufacturer
and may result in re, electric shock or injury.
10. Do not use outdoors.
11. Do not let the cord hang over the edge of a table or counter, as it can cause a
tripping hazard that could result in personal injury.
12. DO NOT place this appliance on or near hot surfaces, hot gas/electric burner
or in a heated oven as these actions could cause the appliance or cord to melt
13. Always ll the water tank rst, then plug the cord into the wall outlet.
This will reduce the risk of electrical shock or re
14. To interrupt the brewing cycle at any time, press either the Ground Coffee
orCapsules button.
Then remove plug from wall outlet.
15. Unplug the power cord from the electrical outlet when the appliance is not in use.
16. Do not use appliance for other than intended use.
17. Do not attempt to move the appliance when it contains hot liquids as there is risk
for personal injuries/burns. Allow liquids to cool before you move the appliance.
18. Scalding may occur if the lid is removed during the brewing cycles
CAUTION: There are two sharp needles that puncture the capsules. One is located
inside the capsule adaptor and the other is located on the top underside of the
adaptor compartment. To avoid risk of injury do not place ngers inside either parts.
Also exercise caution when cleaning the parts.
CAUTION: There is boiling water in the front tab lid section during the brew process.
Do not open the lid at any time for risk of injury.
FOR HOUSEHOLD USE ONLY
SAVE THESE INSTRUCTIONS
2
Page 5

ADDITIONAL IMPORTANT
SAFEGUARDS
WARNING: This appliance generates heat and escaping steam during use.
Proper precautions must be taken to prevent the risk of burns, res, or other injury
to persons or damage to property.
1. All users of this appliance must read and understand this Instruction Manual
before operating or cleaning this appliance.
2. The cord to this appliance should be plugged into a 120V AC electrical outlet only.
3. Use water only in this appliance. Do not put any other liquids or food products in
this appliance. Do not mix or add anything to the water placed in this appliance,
except as instructed in the User Maintenance Instructions to clean the appliance.
4. DO NOT attempt to move an appliance containing hot liquids.
Allow appliance to cool completely before moving.
5. Keep appliance at least 4 inches away from walls or other objects during
operation. Do not place any objects on top of appliance while it is operating.
Place the appliance on a surface that is resistant to heat.
6. If this appliance begins to malfunction during use, press either the GroundCoffee
or Capsules button. Then remove plug from wall outlet.
Do not use or attempt to repair the malfunctioning appliance.
7. Do not use this appliance after it has fallen into or has become immersed
inwater. Doing so could result in personal injury or property damage.
8. It is recommended to let this appliance cool down for at least 5 minutes
between brewing cycles. Wait at least 5 minutes before relling the water
reservoir. Adding water before the appliance cools down could result
in personal injury due to steam exposure.
9. Always use fresh, cool water in your appliance. Warm water or other liquids,
except as listed in cleaning section, may cause damage to the appliance.
NOTES ON THET PLUG
This appliance has a polarized plug (one blade is wider than the other).
To reduce the risk of electric shock, this plug will t in a polarized outlet only one way.
If the plug does not t fully into the outlet, reverse the plug. If it still does not t,
contact a qualied electrician. Do not modify the plug in any way.
NOTES ON THE CORD
The provided short power-supply cord (or detachable power-supply cord) should be used
to reduce the risk resulting from becoming entangled in or tripping over a longer cord.
Do not use an extension cord with this product. Always plug directly into a wall
outlet/receptacle.
PLASTICIZER WARNING
CAUTION: To prevent Plasticizers from migrating to the nish of the counter top
or table top or other furniture, place NON-PLASTIC coasters or place mats between
the appliance and the nish of the counter top or table top. Failure to do so may
cause the nish to darken; permanent blemishes may occur or stains can appear.
ELECTRIC POWER
If the electrical circuit is overloaded with other appliances, your appliance may not operate
properly. It should be operated on a separate electrical circuit from other appliances.
3
Page 6
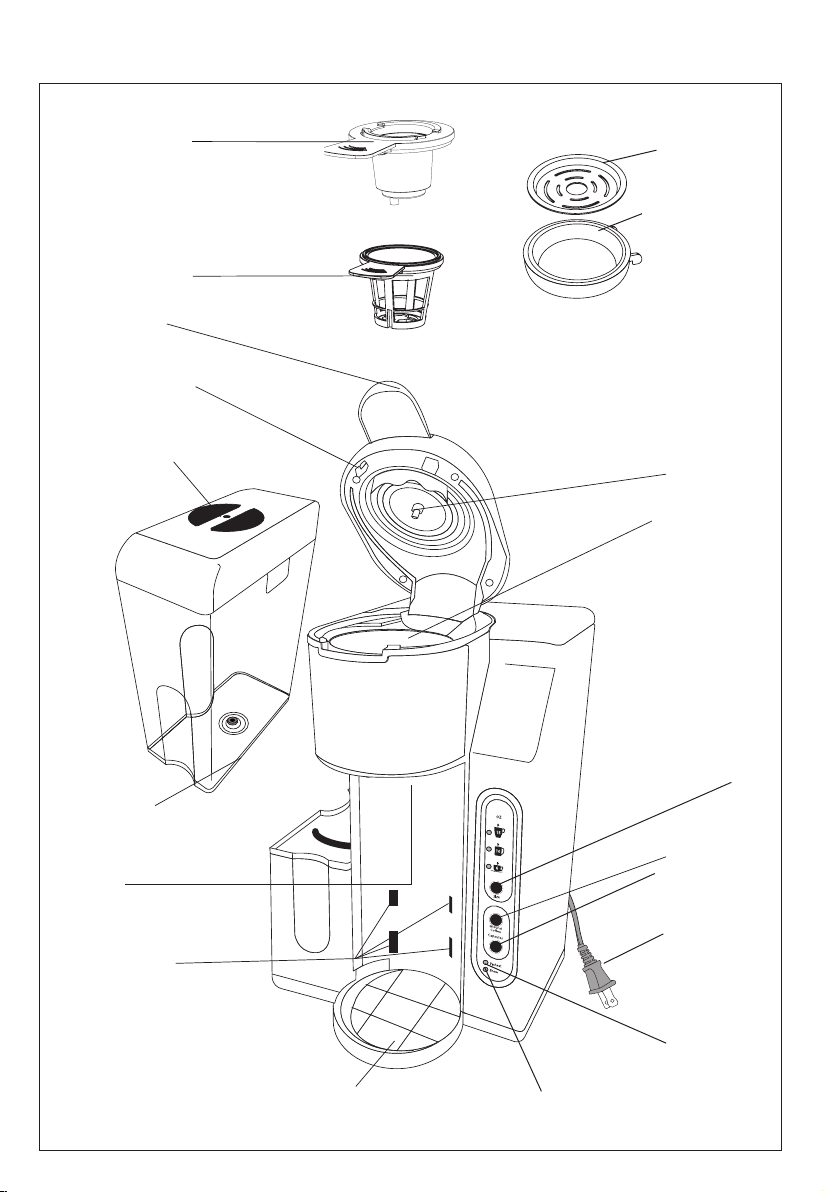
Getting To Know Your Dual Brew Single Serve Coffee Maker
Product may vary slightly from illustration
Capsule Adaptor
Reusable Ground
Coffee Adaptor
Front Lid Tab
Locking Adaptor
Compartment Lid
Water Tank Lid
Drip Tray Cover
Adjustable Height
Drip Tray with
Back Tab
Capsule Punch
Adaptor Compartment
Removable 42 oz Water Tank
Nozzle
Drip Tray Slots
Base
Size Button
Ground Coffee Button
Capsule Button
Electric Cord with
Polarized Plug
Red PREHEAT
Indicator Light
Blue BREW
Indicator Light
4
Page 7
Introduction
• This single-serve Coffee Maker uses a pressurized system to brew a perfect single hot beverage.
• The adjustable drip tray accommodates most cup sizes, mugs, tall travel mugs or tumblers.
• Use the ground coffee adaptor (included) to create special blends of your favorite coffee.
For added personalization, add a dash of your favorite spice, from cinnamon, orange peel,
cardamom or vanilla bean to name a few.
• Using the reusable ground coffee adaptor is an environmentally-friendly choice that will also save you money!
Before Using for the First Time
CAUTION: To protect against electrical shock, do not immerse the Coffee Maker or allow the power cord
to come into contact with water or other liquids.
1. Remove all packing material and labels from the inside and outside of the Coffee Maker.
Place the unit on a at, clean surface. Make sure to remove both adaptors from the inner packaging.
2. Before use, thoroughly clean both adaptors with warm soapy water.
3. To clean the inside of the unit, it is recommended to brew a full tank of water, which corresponds
to brew 3 to 4 tall cups.
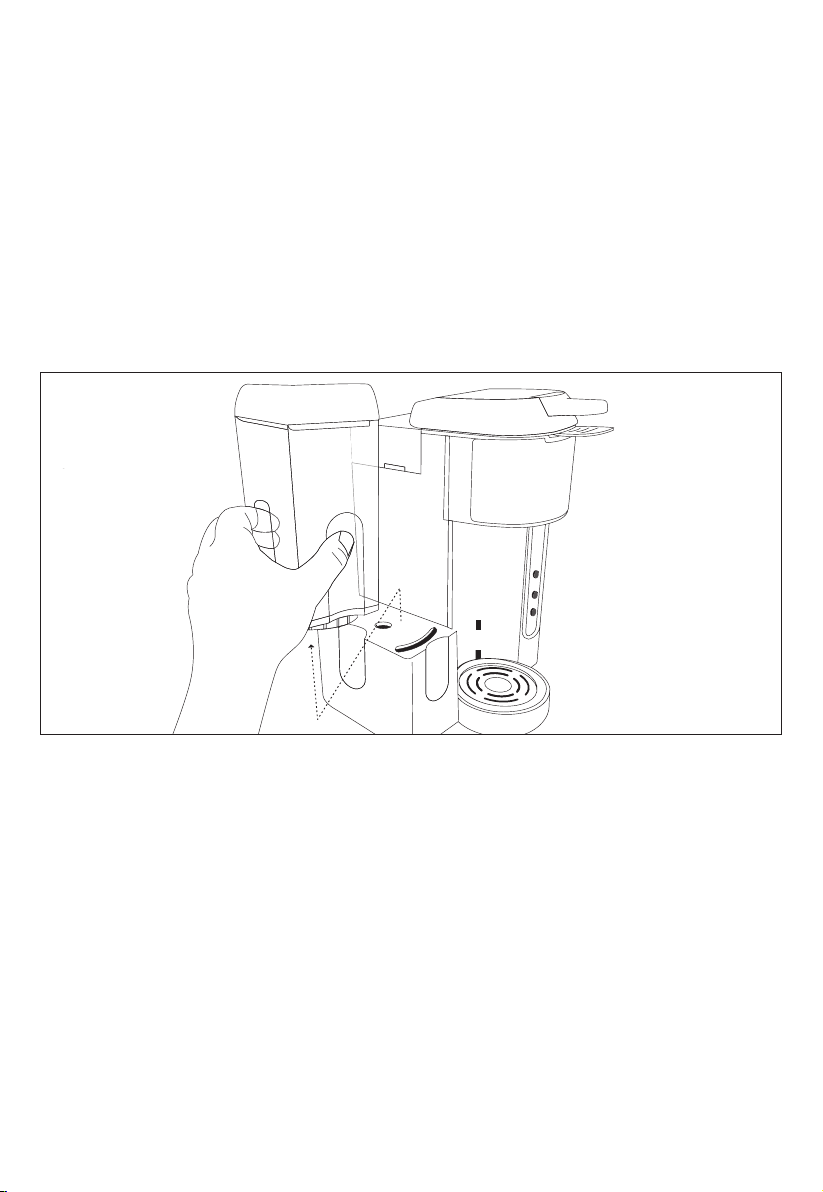
4. Grasp the removal water tank using the designated grips. Lift the water tank up and remove it from the base
of the unit. (See Figure 1).
Figure 1
5. Remove the lid and ll the water tank to the MAX indicator line with cold water.
NOTE: Never ll the water tank past the MA X indicator line and ensure water level is above the MIN
indicator line.
6. Put the lid back and put the water tank back into place. Place down rmly to make sure it is securely in place.
7. Select the desired height for the drip tray, depending on the size of the cup, mug, or tumbler being used.
8. Place the empty cup, mug, or tumbler in position on the drip tray cover.
NOTE: Do not add any adaptor for this initial cleaning.
9. To select the brew size (6 oz., 10 oz., or 15 oz.), press the Size button until the indicator light illuminates
the desired size.
10. Press either the Ground Coffee or Capsules button.
11. The red PREHEAT indicator light will begin to ash as the Cof fee Maker begins heating the water.
12. When water has reached the optimum temperature, the PREHEAT light will go out and the blue BREW
light will illuminate. Water will begin to stream through the nozzle. At the end of the cycle,
the Coffee Maker and all indicator lights will automatically turn OFF.
IMPORTANT: Repeat this process twice to thoroughly clean the machine before using for the rst time.
13. Unplug the Coffee Maker when not in use.
Brewing Instructions
The drip tray adjusts to two heights to accommodate shorter cups or mugs to taller travel mugs/tumblers.
For taller travel mugs and tumblers, make sure the drip tray and cover are properly placed in the lower position.
(See Figure 2.) When brewing a smaller cup, raise the drip tray to the upper level to avoid splatter. (See Figure 4.)
5
Page 8
Adjusting the Drip Tray
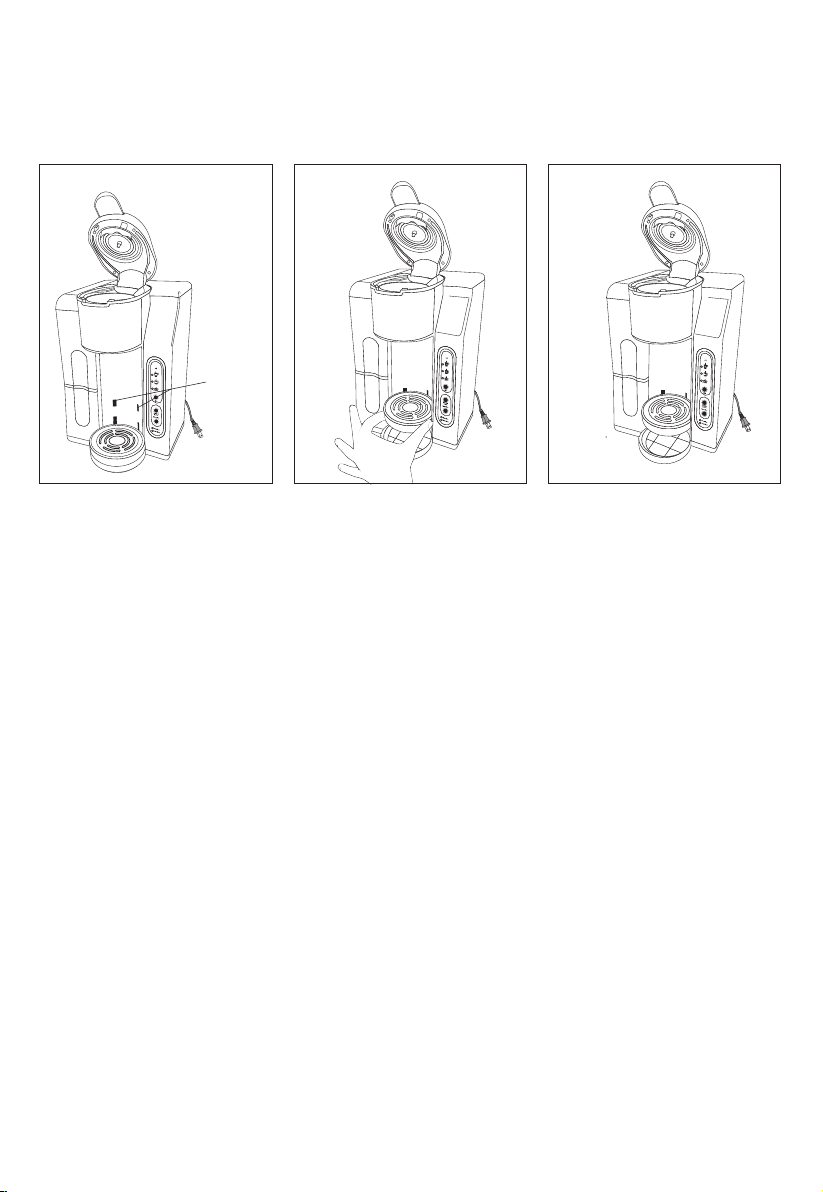
1. Grasp the drip tray and cover from the base. (See Figure 2.)
2. Holding on to both pieces, slightly tilt upwards and slide out from the unit. (See Figure 3.)
3. Using the tab on the back of the drip tray as your guide, again slightly tilt both pieces upwards and
glide the tabs into the upper slots on the Coffee Maker body. (See Figure 4.) Press down on the drip tray
your hand to make sure it is rmly and properly attached before placing the cup or mug on top.
with
Figure 2 Figure 3 Figure 4
Upper
Slots
Setting Up your Dualbrew Single Serve Coffee Maker Using the Capsule Adaptor
WARNING: Before brewing, it is recommended the water tank be lled at least to the MIN indicator line.
To avoid damage to your Coffee Maker, never operate your Single Serve Coffee Maker when the water tank is empty.
1. Grasp the removal water tank using the designated grips. Lift the water tank up and remove it from
the base of the unit. (See Figure 1.)
2. Remove the lid and ll the water tank to the MAX indicator line with cold water.
NOTE: Never ll the water tank past the MAX indicator line and ensure water level is above the MIN
indicator line.
IMPORTANT: For optimal avor, distilled water is preferred.
3. Put the lid back and put the water tank back into place. Place down rmly to make sure it is securely in place.
4. Select the desired height for the drip tray, depending on the size of the cup, mug, or tumbler being used
5. Place the empty cup, mug, or tumbler in position on the drip tray cover
6. Pull the adaptor compartment’s front tab up to unlock and lift the lid.
7. Choose the capsule adaptor. Add the capsule of your choice into the adaptor. Press down on the capsule
until it is ush with the adaptor.You will hear a pierce as the needle penetrates the capsule.
8. With the handle facing front, place the capsule adaptor into the adaptor compartment.
Slide the adaptor handle in to the grooves at the front of the Coffee Maker.
9. Press the adaptor compartment’s lid down rmly. An audible click can be heard as the lid is locked
rmly into position, and the top of the capsule will be punctured.
10. Plug the Coffee Maker into a 120V AC electrical wall outlet
11. To select the brew size (6 oz., 10 oz., or 15 oz.), press the Size button until the indicator light illuminates
the desired size.
12. Press the Capsules button to begin the brew cycle.
13. The red PREHEAT indicator light will begin to ash as the Cof fee Maker begins heating the water.
14. When the water has reached the optimum temperature, the preheat light will go out
and the blue BREW light will illuminate.
15. The pump will then activate and cof fee will begin to stream through the nozzle.
16 To interrupt the brewing cycle at any time, press the Capsules button.
Then remove the plug from the wall outlet.
17. At the end of the cycle, the Coffee Maker and all indicator lights will automatically turn OFF.
18. Allow unit to cool before removing the used capsule to discard.
19. Unplug the Coffee Maker when not in use.
6
Page 9

Setting Up your Single Serve Coffee Maker with Water Tank Using the Ground Coffee Adaptor
The ground coffee adaptor allows you to create your own favorite blend of coffee. Personalize your blends
adding a dash of cinnamon, orange peel, cardamom or vanilla bean for avoring, to name a few options.
by
NOTE: For best results, use medium ground coffee.
WARNING: Before brewing, it is recommended the water tank be lled at least to the MIN indicator line.
To avoid damage to your Coffee Maker, never operate your Single Serve Coffee Maker when the water tank is empty.
1. Grasp the removal water tank using the designated grips. Lift the water tank up and remove it from the base
of the unit. (See Figure 1)
2. Remove the lid and ll the water tank to the MAX indicator line with cold water.
NOTE: Never ll the water tank past the MAX indicator line and ensure water level is above
the MIN indicator line.
IMPORTANT: For optimal avor, distilled water is preferred.
3. Put the lid back and put the water tank back into place. Place down rmly to make sure it is securely in place.
4. Select the desired height for the drip tray, depending on the size of the cup, mug, or tumbler being used.
5. Place the empty cup, mug, or tumbler in position on the drip tray cover.
6. Pull the adaptor compartment’s front tab up to unlock and lift the lid.
7. Choose the ground coffee adaptor. Fill the reusable ground coffee adaptor to the designated ll line,
to taste. DO NOT EXCEED the MAX ll line. It is recommended to use one 1 tbsp of ground cof fee
or
ever y cup of water.
for
8. With the handle facing front, place the ground cof fee adaptor into the adaptor compartment.
Slide the adaptor handle into the grooves at the front of the Coffee Maker.
9. Press the adaptor compartment’s lid down rmly. An audible click can be heard as the lid is locked
rmly into position.
10. Plug the Coffee Maker into a 120V AC electrical wall outlet.
11. To select the brew size (6 oz., 10 oz., or 15 oz.), press the Size button until the indicator light illuminates
the desired size.
12. Press the Ground Cof fee button to begin the brew cycle.
13. The red PREHEAT indicator light will begin to ash as the Cof fee Maker begins heating the water.
14. When the water has reached the optimum temperature, the preheat light will go out and
the blue BREW light will illuminate.
15. The pump will then activate and cof fee will begin to stream through the nozzle.
16. To interrupt the brewing cycle at any time, press the Ground Coffee button.
Then remove the plug from the wall outlet.
17. At the end of the cycle, the Coffee Maker and all indicator lights will automatically turn OFF.
18. Unplug the Coffee Maker when not in use.
Setting Up your Single Serve Coffee Maker with Water Tank to Boil Water
Heating plain water in your Single Serve Coffee Maker is quick and easy. Water is dispensed at the perfect
temperature for preparing single cups of bagged teas, instant soups, quick cooking oats, packaged hot
chocolate, hot apple cider or anything that requires boiling water.
WARNING: Before brewing, it is recommended the water tank be lled at least to the MIN indicator line.
To avoid damage to your Coffee Maker, never operate your Single Serve Coffee Maker when the water tank is empty
IMPORTANT: To prevent tainted or “off” avors when changing hot beverages, while the unit is OFF,
use a damp paper towel to completely remove any residue from the adaptor compartment.
1. Follow detailed brewing instructions described previously.
2. Prepare your cup, mug, or tumbler by placing the item of your choice into the mug
3. Select either adaptor. With the handle facing front, place the adaptor of choice into the adaptor
compartment. Slide the adaptor handle into the grooves at the front of the cof fee maker.
4. Following detailed instructions described previously, adjust the drip tray to accommodate your cup,
mug, or tumbler.
5. Center the cup under the nozzle
6. Select the brew size by pressing the Size button until the indicator light illuminates the desired size
and press the Capsules button.
7. After water has been heated and dispensed, stir contents of mug well.
7
Page 10

Setting Up your Single-Serve Coffee Maker for Iced Beverages Using a Capsule:
Follow the “SETTING UP YOUR SINGLE-SERVE COFFEE MAKER USING THE CAPSULE ADAPTOR” instructions
with the following adjustments:
1. Use K-Cup® capsule with a stronger avour.
2. Use a tall (approximately 16-oz.) cup/tumbler lled with ice cubes.
CAUTION: Do not use with a glass cup/tumbler as there is risk the glass may crack or break.
Using Ground Coffee:
Follow the “SETTING UP YOUR SINGLE-SERVE COFFEE MAKER USING THE GROUND COFFEE ADAPTOR”
instructions.
1. Fill the reusable ground coffee adaptor to the MA X ll line.
2. Use a tall (approximately 16-oz.) cup/tumbler lled with ice cubes.
CAUTION: : Do not use with a glass cup/tumbler as there is risk the glass may crack or break.
Brewing Another Cup
1. You can brew cup after cup of your favorite hot beverage
User Maintenance Instructions
This appliance requires little maintenance. It contains no user-serviceable parts. Any servicing requiring
disassembly other than cleaning must be performed by a qualied appliance repair technician.
Care & Cleaning Instructions
1. Always make sure Coffee Maker is unplugged and the drip tray and cover are cool before removing
from the base.
2. Rinse drip tray and cover and replace in the Coffee Maker base.
3. Press the adaptor compartment’s front lid to unlock and lift the lid.
4. Remove the used capsule from the capsule adaptor and discard. Rinse the capsule adaptor in warm
water before each use.
5. When using the reusable ground coffee adaptor, discard the used coffee. Wash adaptor in warm,
soapy water, to remove all coffee grinds. Rinse well.
NOTE: Both the capsule and the ground cof fee adaptors are top rack dishwasher safe.
6. Use a damp paper towel or sponge to completely remove any residue from the adaptor compartment.
7. Wipe the exterior of the Coffee Maker with a damp cloth to remove super cial stains.
For stubborn stains, use a nylon or plastic pad with a non-abrasive cleanser.
Do not use metal scouring pads or abrasive cleansers.
8
Page 11

Descaling Instructions
Special cleaning of your Coffee Maker is recommended at least twice a year, depending on frequency of
use and quality of water used in the unit. If water in your area is especially hard, the following cleaning
procedure should be performed more often, since minerals in water can detract from the avor of the
coffee and possibly lengthen brew time.
1. Fill water tank with 1 part white vinegar (3-oz.) to 3 parts cold water (9-oz.).
2. Do not add any adaptor.
3. Place an empt y tumbler in position on the drip tray cover
4. Select a brew size by pressing the Size button until the indicator light illuminates the desired size.
5. Press either the Ground Coffee or Capsules button.
6. The red PREHEAT indicator light will begin to ash as the Coffee Maker begins heating the cleaning solution.
7. The blue BREW light will illuminate as the cleaning solution begins to stream through the nozzle.
At the end of the cycle, the Cof fee Maker and all indicator lights will automatically turn OFF.
8. Repeat steps 3 to 5 until the water tank is empty.
9. Following the same procedure, continue to run clean water through the Coffee Maker three times,
or until water is clean and fresh and no residual vinegar odor or avor remains.
10. Unplug the Coffee Maker when not in use.
11. Dr y parts thoroughly. Wipe the Coffee Maker’s exterior with a dry cloth
Storing Instructions
11. Unplug unit and allow to cool.
2. Never wrap cord tightly around the appliance. Do not put any stress on the cord where it enters the unit,
as it could cause the cord to fray and break.
3. Store one clean adaptor in the Coffee Maker’s adaptor compartment.
4. Store the other adapter with the unit.
5. Store the Cof fee Maker in a cool, dry place.
6. Never store unit while it is still plugged in.
9
Page 12

Limited TWO-YEAR Warranty
SENSIO Inc. hereby warrants that for a period of TWO YEARS from the date
of purchase, this product will be free from mechanical defects in material and
workmanship, and for 90 days in respect to non-mechanical parts. At its sole
discretion, SENSIO Inc. will either repair or replace the product found to be defective,
or issue a refund on the product during the warranty period.
The warranty is only valid for the original retail purchaser from the date of initial retail
purchase and is not transferable. Keep the original sales receipt, as proof of purchase is
required to obtain warranty validation. Retail stores selling this product do not have the
right to alter, modify, or in any way revise the terms and conditions of the warranty.
EXCLUSIONS:
The warranty does not cover normal wear of parts or damage resulting from
any of the following: negligent use of the product, use of improper voltage or
current, improper routine maintenance, use contrary to the operating instructions,
disassembly, repair, or alteration by anyone other than qualied SENSIO Inc.
personnel. Also, the warranty does not cover Acts of God such as re, oods,
hurricanes, or tornadoes.
SENSIO Inc. shall not be liable for any incidental or consequential damages caused
by the breach of any express or implied warranty. Apart from the extent prohibited
by applicable law, any implied warranty of merchantability or tness for a particular
purpose is limited in time to the duration of the warranty. Some states, provinces or
jurisdictions do not allow the exclusion or limitation of incidental or consequential
damages, or limitations on how long an implied warranty lasts, and therefore, the
above exclusions or limitations may not apply to you. The warranty covers specic
legal rights which may vary by state, province and/or jurisdiction.
HOW TO OBTAIN WARRANTY SERVICE:
You must contact Customer Service at our toll-free number: 1-866-832-4843.
A Customer Service Representative will attempt to resolve warranty issues over the
phone. If the Customer Service Representative is unable to resolve the problem,
you will be provided with a case number and asked to return the product to SENSIO
Inc. Attach a tag to the product that includes: your name, address, daytime contact
telephone number, case number, and description of the problem. Also, include a
copy of the original sales receipt. Carefully package the tagged product with the sales
receipt, and send it (with shipping and insurance prepaid) to SENSIO Inc.’s address.
SENSIO Inc. shall bear no responsibility or liability for the returned product while in
transit to SENSIO Inc.’s Customer Service Center.
10
Page 13

MEDIDAS DE SEGURIDAD
IMPORTANTES
Cuando se utilizan aparatos eléctricos, se deben seguir precauciones de seguridad
básicas, entre ellas:
1. Lea todas las instrucciones.
2. No toque las supercies calientes. Utilice las asas o manijas.
3. Para protegerse del riesgo de incendios, descargas eléctricas o heridas a personas,
no sumerja el cable, el enchufe ni el electrodoméstico en agua ni en ningún
otroslíquidos.
4. Este dispositivo no está diseñado para ser utilizado por personas
(incluidosniños) con capacidades físicas, sensoriales o mentales reducidas,
o falta de experiencia y conocimiento, a menos que una persona responsable
desu seguridad los supervise o instruya en el uso del aparato.
5. Se debe supervisar a los niños para evitar que jueguen con el aparato.
6. Desenchufe el aparato del tomacorriente cuando no lo utilice o antes
delimpiarlo. Deje enfriar el aparato antes de colocar o retirarle piezas
y antes de limpiarlo.
7. No utilice ningún aparato si el cable o el enchufe están dañados, o si el aparato
no funciona bien o se ha dañado de alguna forma. Llévelo a un técnico calicado
para que lo examine, repare o realice ajustes eléctricos o mecánicos.
8. Es necesario que haya una supervisión estricta cuando el electrodoméstico sea
utilizado por niños o cerca de ellos.
NOTA: NO INTENTE REPARAR LA UNIDAD USTED MISMO. SI LO HACE,
LAGARANTÍA NO TENDRÁ VALIDEZ.
9. El uso de accesorios que no estén recomendados por el fabricante puede
provocar un incendio, una descarga eléctrica o lesiones.
10. No lo utilice en exteriores.
11. No permita que el cable cuelgue del borde de la mesa o mesada, ya que puede
representar un peligro de tropiezo que puede ocasionar lesiones personales.
12. NO coloque el aparato encima ni cerca de un quemador eléctrico o de gas
calientes, ni de un horno caliente, ya que estas acciones pueden hacer
que el aparato o el cable se derritan.
13. Siempre llene el tanque de agua en primer lugar; luego, enchufe el cable al
tomacorriente de pared. De este modo, disminuirá el riesgo de descarga eléctrica
o incendio.
14. Para interrumpir el ciclo de elaboración en cualquier momento, presione el botón
Ground Coffee (café molido) o Capsules (cápsulas). Luego, desenchufe la unidad
del tomacorriente de la pared.
15. Desenchufe el cable de alimentación del tomacorriente cuando no use el aparato.
16. No le dé al aparato otro uso que no sea el indicado.
17. No intente trasladar el aparato si contiene líquidos calientes, ya que puede
presentar un riesgo de lesiones personales o quemaduras. Deje que los líquidos
se enfríen antes de trasladar el aparato.
18. Puede sufrir quemaduras si retira la tapa durante los ciclos de preparación.
PRECAUCIÓN: Hay dos agujas losas que perforan las cápsulas. Una se
encuentra dentro del adaptador de cápsulas y la otra, en la cara inferior de la
parte superior del compartimiento del adaptador. Para evitar el riesgo lesiones,
no coloque los dedos dentro de ninguna de las piezas. Tenga cuidado cuando
limpia las piezas.
11
Page 14

PRECAUCIÓN: Hay agua hirviendo en la lengüeta delantera de la tapa durante
el proceso de elaboración. No abra la tapa en ningún momento para evitar
elriesgo de lesiones.
PARA USO DOMÉSTICO
ÚNICAMENTE
GUARDE ESTAS
INSTRUCCIONES
OTRAS MEDIDAS DE
SEGURIDAD IMPORTANTES
ADVERTENCIA: Este aparato genera calor y vapor de escape durante el uso.
Se deben tomar las medidas necesarias para evitar riesgos de quemaduras,
incendios u otras lesiones a personas o daños a la propiedad.
1. Todos los usuarios de este aparato deben leer y comprender este manual
deinstrucciones antes de manejar o limpiar la unidad.
2. El cable del aparato se debe enchufar únicamente a un tomacorriente eléctrico
de 120 V de CA.
3. ¡Use solo agua en este aparato! No coloque otros líquidos ni productos
alimenticios en este aparato. No mezcle nada con el agua que coloca
en el aparato ni le agregue nada, a excepción de lo que se indica en las
Instrucciones de mantenimiento para el usuario a n de limpiar el aparato.
4. NO intente trasladar un aparato que contiene líquidos calientes. Deje que
elaparato se enfríe completamente antes de trasladarlo.
5. Mantenga el aparato alejado al menos 1 cm (4 pulg.) de las paredes u otros
objetos durante su funcionamiento. No coloque ningún objeto en la parte
superior del aparato mientras está en funcionamiento. Coloque el aparato
enuna supercie resistente al calor.
6. Si este aparato comienza a funcionar mal durante el uso, presione el botón
Ground Coffee (café molido) o Capsules (cápsulas). Luego, desenchufe la unidad
del tomacorriente de la pared. No utilice el aparato ni intente repararlo
si funciona mal.
7. No use este aparato luego de haberse caído al agua o sumergido en ella.
De lo contrario, podrían ocasionarse lesiones personales o daños a la propiedad.
8. Se recomienda esperar al menos 5 minutos entre ciclos de elaboración para
dejar que el aparato se enfríe. Espere al menos 5 minutos antes de volver
allenar el depósito de agua. Si agrega agua antes de que el aparato se enfríe,
podría sufrir lesiones personales debido a la exposición al vapor.
9. Siempre use agua fresca y fría en el aparato. El agua caliente u otros líquidos,
aexcepción de los enumerados en la sección de limpieza, pueden ocasionar
daños al aparato.
12
Page 15

NOTAS SOBRE EL ENCHUFE
Este aparato tiene un enchufe polarizado (una clavija es más ancha que la otra).
Para reducir el riesgo de descarga eléctrica, este enchufe debe colocarse en un tomacorriente
polarizado en una sola dirección. Si no entra completamente, dé vuelta el enchufe.
Siaun así no encaja, llame a un electricista calicado. No modique el enchufe
de ninguna manera.
NOTAS SOBRE EL CABLE
Se debe usar el cable de alimentación corto (o cable de alimentación separable)
para reducir el riesgo de enredarse o tropezarse con un cable más largo.
No utilice un cable de extensión con este producto. Siempre enchufe el aparato
directamente en un enchufe/receptáculo de pared.
ADVERTENCIA SOBRE PLASTIFICANTES
PRECAUCIÓN: A n de evitar que los plasticantes se adhieran al acabado de la mesada,
lamesa u otro mueble, coloque un posafuentes o salvamanteles que NO SEA DE PLÁSTICO
entre el aparato y la supercie de la mesada o mesa. Si no se hace esto, es posible que
el acabado se oscurezca; se pueden formar marcas permanentes o aparecer manchas.
CORRIENTE ELÉCTRICA
Si se recarga el circuito eléctrico con otros aparatos, es posible que este aparato
no funcione correctamente. Se debe utilizar en un circuito eléctrico separado de los
otros aparatos.
13
Page 16

Descripción de la cafetera de monodosis
El producto puede diferir levemente de las ilustraciones.
Adaptador de cápsulas
Adaptador reutilizable
de café molido
Lengüeta delantera
de la tapa
Tapa de bloqueo
del compartimiento
del adaptador
Cubierta de la
bandeja de goteo
Bandeja de goteo
de altura ajustable
con lengüeta trasera
Tapa del tanque
de agua
Tanque de agua
removible
Boquilla
Ranura de la
bandeja de goteo
Punzón para cápsulas
Compartimiento
del adaptador
Botón de
selección de
tamaño
Botón de la
cápsula
Botón del café
molido
Electric Cord with
Polarized Plug
Base
Luz indicadora roja de
PRECALENTAR
Luz indicadora
azul de ELABORAR
14
Page 17

Introducción
• Esta c afe tera d e monodosis e mple a un sistema presurizado para elaborar una bebida caliente individual p erf ecta .
• En la bandeja de goteo ajustable, se pueden colocar tazas, vasos, tazas de viaje altas o cubiletes
de cualquier tamaño.
• Use el adaptador de café molido (incluido) para crear mezclas especiales de su café preferido.
Para personalizar su café aún más, agregue una pizca de su especia favorita, como canela,
cáscara de naranja, cardamomo o vaina de vainilla, entre otras.
• El adaptador reutilizable de café molido es una opción ecológica que también le permitirá ahorrar dinero.
Antes de utilizar por primera vez
PRECAUCIÓN: Para protegerse contra una descarga eléctrica, no sumerja la cafetera ni permita que el cable
eléctrico entre en contacto con agua u otros líquidos.
1. Quite todos los materiales de empaque y las etiquetas del interior y exterior de la cafetera.
Coloque la unidad sobre una super cie plana y limpia. Asegúrese de sacar los adaptadores del envase interior.
2. Antes de usar, limpie minuciosamente ambos adaptadores con agua tibia y jabón.
3. Para limpiar el interior de la unidad, se recomienda preparar un tanque lleno de agua,
lo que corresponde a elaborar 3 a 4 tazas grandes solo con agua.
4. Agarra el tanque de agua removible por las ranuras. Levantarlo hacia arriba y quitarlo de la base de la unidad.
(Ver Figura 1)
Figure 1
5. Retire la tapa y llenar el tanque de agua hasta la línea indicadora MA X (máximo) con agua fría.
NOTA: NO EXCEDA la línea de llenado MÁX (máximo) y asegúrese de que el nivel de agua este
encima de la línea de llenado MIN (mínimo).
6. Tape el tanque de agua y colóquelo en su lugar. Coloque rmemente hacia abajo para asegurarse
de que no se mueva
7. Seleccione la altura deseada para la bandeja de goteo, dependiendo del tamaño de la taza,
el vaso o el cubilete que utilice.
8. Coloque la taza vacía, o el vaso en posición sobre la cubierta de la bandeja de goteo.
NOTA: No añade ningún adaptador para esta limpieza inicial.
9. Para seleccionar el tamaño de café (6 oz, 10 oz, o 15 onzas), presione el botón Size (Tamaño) hasta
que la luz indicadora ilumine el tamaño deseado.
10. Presione el botón Ground Coffee (café molido) o Capsules (cápsulas).
11. La luz indicadora PREHEAT (PRECALENTAR) comenzará a parpadear a medida que la cafetera comienza
a calentar el agua.
12. Cuando el agua haya alcanzado la temperatura óptima, la luz PREHEAT (PRECALENTAR)
se apagará y la luz azul BREW (ELABORAR) se encenderá. El agua comenzará a uir por la boquilla.
Cuando el ciclo nalice, la cafetera y todas las luces indicadoras se apagarán automáticamente.
IMPORTANTE: Repita este proceso dos veces para limpiar la máquina minuciosamente antes de usarla
por primera vez.
13. Desenchufe la cafetera cuando no la use.
15
Page 18

Instrucciones de elaboración
La altura de la bandeja de goteo se puede ajustar para poder colocarle desde tazas o vasos bajos hasta tazas
de viaje altas o cubiletes. En el caso de las tazas de viaje altas y los cubiletes, procure que la bandeja de goteo
y la cubierta estén colocadas en la posición más baja (vea la gura 2). Cuando elabore el café en una taza más
pequeña, eleve la bandeja de goteo hasta el nivel superior para evitar salpicaduras (vea la gura 4).
Ajuste de la bandeja de goteo
1. Tome la bandeja de goteo y la cubier ta de los huecos de la base (vea la gura 2).
2. Mientras sostiene ambas piezas, inclínelas levemente hacia arriba y deslícelas para extraerlas
de la unidad (vea la gura 3).
3. Usando la lengüeta que está en la parte trasera de la bandeja de goteo como guía, incline nuevamente
ambas piezas hacia arriba y deslice las lengüetas dentro de las ranuras superiores del cuerpo
de la cafetera (vea la gura 4). Presione la bandeja de goteo con la mano para garantizar que esté rme
y correctamente sujetada antes de colocarle la taza o el vaso en la parte superior.
Figure 2 Figure 3 Figure 4
Upper
Slots
Conguración de la cafetera de monodosis con el adaptador de cápsulas
ADVERTENCIA: Antes de la elaboración, se recomienda llenar el tanque de agua al menos hasta la línea
indicadora MIN (mínimo). Para evitar ocasionar daños a la cafetera, nunca permita que esta funcione
si el tanque de agua está vacío
1. Agarra el tanque de agua removible por las ranuras. Levantarlo hacia arriba y quitarlo de la base
de la unidad. (Ver Figura 1).
2. Retire la tapa y llenar el tanque de agua hasta la línea indicadora MA X (máximo) con agua fría.
NOTA: NO EXCEDA la línea de llenado MÁX (máximo) y asegúrese de
que el nivel de agua este encima de la línea de llenado MIN (mínimo).
IMPORTANTE: Para lograr un sabor óptimo, utilice agua destilada.
3. Tape el tanque de agua y colóquelo en su lugar. Coloque rmemente hacia abajo para asegurarse
de que no se mueva
4. Seleccione la altura deseada para la bandeja de goteo, dependiendo del tamaño de la taza,
el vaso o el cubilete que utilice.
5. Coloque la taza vacía, o el vaso en posición sobre la cubierta de la bandeja de goteo.
6. Tire la lengüeta delantera del compartimiento del adaptador para destrabar y levantar la tapa.
7. Elija el ad aptador de cáp sulas. Agregue la cápsula de su preferencia en el adaptador de cápsulas.
Presione rmemente la cápsula hasta que sea colocada en el adaptador.
Oirá un clic cuando la aguja penetra la cápsula.
8. Con el mango orientado hacia el frente, coloque el adaptador de cápsulas dentro del compartimiento
del adaptador. Deslice el mango del adaptador dentro de las ranuras de la parte delantera de la cafetera.
9. Presione rmemente la tapa del compartimiento del adaptador.
Oirá un clic cuando la tapa se trabe correctamente y la parte superior de la cápsula será perforada.
10. Enchufe la cafetera a un tomacorriente eléctrico de pared de 120 V de CA.
11. Para seleccionar el tamaño de café (6 oz, 10 oz, o 15 onzas), presione el botón Size (Tamaño) hasta que
la luz indicadora ilumine el tamaño deseado.
12. Presione el botón Capsules (cápsulas) para iniciar el ciclo de elaboración.
16
Page 19

13. La luz indicadora PREHEAT (PRECALENTAR) comenzará a parpadear a medida que la cafetera comienza
a calentar el agua.
14. Cuando el agua haya alcanzado la temperatura óptima, la luz PREHEAT (PRECALENTAR) se apagará
y la luz azul BREW (ELABORAR) se encenderá.
15. La bomba se activará y el café comenzará a uir por la boquilla.
16. Para interrumpir el ciclo de elaboración en cualquier momento, presione el botón Capsules (cápsulas)
Luego, desconecte el enchufe del tomacorriente de la pared.
17. Cuando el ciclo nalice, la cafetera y todas las luces indicadoras se apagarán automáticamente.
18 Deje que la cafetera se enfrié antes de sacar la cápsula usada para descartarla.
19. Desenchufe la cafetera cuando no la use.
Conguración de la cafetera de monodosis con el adaptador de café molido
El adaptador de café molido le permite crear su propia mezcla preferida de café. Para personalizar sus mezclas,
agregue una pizca de canela, cáscara de naranja, cardamomo o vaina de vainilla como aromatizante.
NOTA: Para obtener mejores resultados, use café molido medio, o cualquier otro ingrediente.
ADVERTENCIA: Antes de la elaboración, se recomienda llenar el tanque de agua al menos hasta la línea
indicadora MIN (mínimo). Para evitar ocasionar daños a la cafetera, nunca permita que esta funcione
si el tanque de agua está vacío
1. Agarra el tanque de agua removible por las ranuras. Levantarlo hacia arriba y quitarlo de la base
de la unidad. (Ver Figura 6).
2. Retire la tapa y llenar el tanque de agua hasta la línea indicadora MA X (máximo) con agua fría
NOTA: NO EXCEDA la línea de llenado MÁX (máximo) y asegúrese de que el nivel de agua este encima
de la línea de llenado MIN (mínimo).
IMPORTANTE: Para lograr un sabor óptimo, utilice agua destilada.
3. Tape el tanque de agua y colóquelo en su lugar. Coloque rmemente hacia abajo para asegurarse
de que no se mueva
4. Seleccione la altura deseada para la bandeja de goteo, dependiendo del tamaño de la taza,
el vaso o el cubilete que utilice.
5. Coloque la taza vacía, o el vaso en posición sobre la cubierta
de la bandeja de goteo.
6. Tire la lengüeta delantera del compartimiento del adaptador para destrabar y levantar la tapa.
7. Elija el adaptador de café molido. Llene el adaptador reutilizable
de café molido hasta la línea de llenado designada, o a gusto.
NO EXCEDA la línea de llenado MÁX.
8. Con el mango orientado hacia el frente, coloque el adaptador de café molido dentro del compartimiento
del adaptador. Deslice el mango
del adaptador dentro de las ranuras de la parte delantera de la cafetera (vea la gura 1).
9. Presione rmemente la tapa del compartimiento del adaptador.
Oirá un clic cuando la tapa se trabe correctamente.
10. Enchufe la cafetera a un tomacorriente eléctrico de pared de 120 V de CA.
11. Para seleccionar el tamaño de café (6 oz, 10 oz, o 15 onzas), presione el botón Size (Tamaño) hasta que
la luz indicadora ilumine el tamaño deseado.
12. Presione el botón Ground Coffee (café molido) para iniciar el ciclo de elaboración.
13. La luz indicadora PREHEAT (PRECALENTAR) comenzará a parpadear a medida que la cafetera comienza
a calentar el agua.
14. Cuando el agua haya alcanzado la temperatura óptima, la luz PREHEAT (PRECALENTAR) se apagará
y la luz azul BREW (ELABORAR) se encenderá.
15. La bomba se activará y el café comenzará a uir por la boquilla.
16. Para interrumpir el ciclo de elaboración en cualquier momento, presione el botón Ground Coffee (café molido).
Luego, desconecte el enchufe del tomacorriente de la pared.
17. Cuando el ciclo nalice, la cafetera y todas las luces indicadoras se apagarán automáticamente.
18. Desenchufe la cafetera cuando no la use.
17
Page 20

Conguración de la cafetera de monodosis para que hierva agua
Calentar agua corriente en su cafetera de monodosis es rápido y fácil. El agua se dispensa a la temperatura
perfecta para preparar tazas individuales de bolsitas de té, sopas instantáneas, avenas de preparación rápida,
chocolate caliente envasado, sidra de manzana caliente o cualquier cosa que requiera agua hirviendo.
ADVERTENCIA: Antes de la elaboración, se recomienda llenar el tanque de agua al menos hasta la línea
indicadora MIN (mínimo). Para evitar ocasionar daños a la cafetera, nunca permita que esta funcione si el tanque
de agua está vacío
IMPORTANTE: Para evitar la alteración de sabores al cambiar de bebidas, mientras la unidad está apagada,
use una servilleta de papel húmeda para eliminar por completo cualquier residuo del compartimiento del adaptador.
1. Siga las instrucciones de elaboración detalladas descritas anteriormente.
2. Prepare su taza, vaso o cubilete, y colocar el contenido de su elección.
3. Seleccione cualquier adaptador. Con el mango hacia delante, coloque el adaptador de su elección
en el compartimiento del adaptador. Deslizar el mango de adaptador en las ranuras en la parte
delantera de la cafetera.
4. Siguiendo las instrucciones detalladas descritas anteriormente, ajuste la bandeja de goteo de modo
que pueda colocarle la taza, el vaso o el cubilete.
5. Centre la taza debajo de la boquilla.
6. Seleccione el tamaño presionando el botón Size (Tamaño) hasta que la luz indicadora ilumine el tamaño
deseado y presione el botón Capsules (cápsulas).
7. Una vez calentada y dispensada el agua, mezcle bien el contenido.
Conguraciòn de la cafetera de una sola taza para bebidas con hielo
Usando una cápsula:
Siga las instrucciones en “CONFIGURACIÓN DE LA CAFETERA DE UNA SOLA TAZA USANDO UN
ADAPTADOR DE CÁPSULA” con los siguientes ajustes:
1. Use una cápsula K-Cup® con un sabor más intenso.
2. Use una taza o cubilete alto (de aproximadamente 16 oz [500 cm3]) con cubos de hielo.
PRECAUCIÓN: No use con una taza o cubilete de vidrio, ya que el vidrio se puede quebrar o romper.
Usando café molido:
Siga las instrucciones en “CONFIGURACIÓN DE LA CAFETERA DE UNA SOLA TAZA USANDO
UN ADAPTADOR DE CAFÉ MOLIDO”.
1. Llene el adaptador reutilizable de café molido hasta la línea de llenado “MAX” (Máx.).
2. Use una taza o cubilete alto (de aproximadamente 6 oz [177 cm3]) con cubos de hielo.
PRECAUCIÓN: No use con una taza o cubilete de vidrio, ya que el vidrio se puede quebrar o romper.
Elaboración de tazas adicionales
1. Puede elaborar una taza tras otra de su bebida caliente preferida.
Instrucciones de mantenimiento para el usuario
Este aparato requiere de poco mantenimiento. No contiene piezas que el usuario pueda reparar.
Cualquier servicio en el que la unidad deba desarmarse, con la excepción de la limpieza, debe realizarlo
un técnico de reparación de aparatos eléctricos calicado.
18
Page 21

Instrucciones de cuidado y limpieza
1. Procure siempre que la cafetera esté desenchufada y que la bandeja de goteo se haya enfriado antes
de extraerla de la base.
2. Enjuague la bandeja de goteo y la cubierta, y vuelva a colocarlas en la base de la cafetera.
3. Presione la lengüeta delantera del compartimiento del adaptador para destrabar y levantar la tapa.
4. Extraiga la cápsula del adaptador de cápsulas y deséchela. Enjuague el adaptador de cápsulas
con agua tibia antes de cada uso.
5. Cuando use el adaptador reutilizable de café molido, deseche el café usado. Lave el adaptador con agua
tibia y jabón. Para quitar el café enjuáguelo bien.
NOTA: Los adaptadores de cápsulas y de café molido son aptos para el estante superior del lavavajillas.
6. Use una servilleta de papel o una esponja húmedas para eliminar por completo cualquier residuo
del compartimiento del adaptador.
7. Limpie el exterior de la cafetera con un paño húmedo para eliminar las manchas superciales.
Para las manchas difíciles, use una almohadilla de nilón o plástico con un limpiador no abrasivo.
No use esponjas metálicas abrasivas ni limpiadores abrasivos.
Instrucciones para la desincrustación
Se recomienda hacer una limpieza especial a su cafetera al menos dos veces al año, de acuerdo con la frecuencia
de uso y la calidad de agua que se usa en la unidad. Si el agua de su zona es especialmente dura, debe realizar
el siguiente procedimiento de limpieza con más frecuencia, ya que los minerales presentes en el agua pueden
aplacar el sabor del café y, probablemente, extender el tiempo de elaboración
1. Llene el tanque de agua con 1 medida de vinagre blanco (89 ml/3 onzas) por 3 medidas de agua fría
(266 ml/9 onzas).
2. No agregue ningún adaptador.
3. Coloque una taza vacía, o el vaso en posición sobre la cubierta de la bandeja de goteo.
4. Seleccione el tamaño presionando el botón Size (Tamaño) hasta que la luz indicadora ilumine
el tamaño deseado
5. Presione el botón Ground Coffee (café molido) o Capsules (cápsulas).
6. La luz indicadora PREHEAT (PRECALENTAR) comenzará a parpadear a medida que la cafetera comienza
a calentar la solución de limpieza.
7. La luz indicadora azul BREW (ELABORAR) se encenderá a medida que la solución de limpieza comienza
a uir por la boquilla. Cuando el ciclo nalice, la cafetera y todas las luces indicadoras se apagarán
automáticamente.
8. Repita les etapas 3 a 5 hasta que el tanque de agua esté vacío.
9. Desenchufe la cafetera cuando no la use.
10. Seque las piezas completamente. Limpie el exterior de la cafetera con un paño seco.
Instrucciones de almacenamiento
1. Desenchufe la unidad y deje que se enfríe.
2. Nunca ate el cable de forma ceñida alrededor del aparato. No ejerza fuerza sobre el cable cuando
lo introduce en el aparato, ya que esto podría ocasionar que el cable se desgaste o rompa.
3. Guarde un adaptador limpio en el compartimiento del adaptador de la cafetera.
4. Guarde el otro adaptador con la unidad.
5. Almacene la cafetera en un lugar fresco y seco.
6. Nunca almacene la unidad si sigue estando enchufada
19
Page 22

Garantía limitada de DOS AÑOS
Mediante la presente, SENSIO Inc. garantiza que, durante el plazo de DOS AÑOS a
partir de la fecha de compra, este producto no presentará defectos mecánicos en el
material ni en la mano de obra, y durante 90 días, no los presentará en las piezas no
mecánicas. A su entera discreción, SENSIO Inc. reparará o reemplazará el producto
que resulte defectuoso, o emitirá un reembolso por el producto durante el plazo de
garantía.
Esta garantía es válida únicamente para el comprador minorista original a partir de la
fecha de compra minorista inicial y no es transferible. Conserve el recibo de compra
original, ya que se exige una prueba de compra para obtener la validación de la
garantía. Las tiendas minoristas no tienen derecho a alterar, modicar ni corregir de
ninguna manera los términos y condiciones de la garantía.
EXCLUSIONES:
La garantía no cubre el desgaste normal de las piezas ni el daño ocasionado por
cualquiera de las siguientes causas: uso negligente del producto, uso de un voltaje
o corriente incorrectos, mantenimiento de rutina inadecuado, uso contrario al de
las instrucciones de funcionamiento, desarmado, reparación o alteración a cargo de
personas que no sean miembros del personal calicado de SENSIO Inc. Asimismo, la
garantía no cubre actos de la naturaleza, como incendios, inundaciones, huracanes o
tornados.
SENSIO Inc. no asumirá responsabilidad por daños incidentales o resultantes
ocasionados por la violación de cualquier garantía expresa o implícita. Salvo en
la medida en que lo prohíban las leyes aplicables, cualquier garantía implícita de
comerciabilidad o aptitud para un propósito particular se limita temporalmente a la
duración de la garantía. Algunos estados, provincias o jurisdicciones no permiten la
exclusión ni la limitación de daños incidentales o resultantes, o limitaciones sobre
la duración de una garantía implícita y, por lo tanto, es posible que las exclusiones o
limitaciones mencionadas no le correspondan. La garantía cubre derechos legales
especícos que pueden variar de un estado, una provincia o una jurisdicción a otros.
CÓMO OBTENER EL SERVICIO DE GARANTÍA:
Debe comunicarse con el Servicio de atención al cliente a nuestro número telefónico
gratuito: 1-866-832-4843. Un representante del Servicio de atención al cliente
intentará resolver los problemas referidos a la garantía por teléfono. Si este no puede
resolver el problema, le proporcionarán un número de caso y le solicitarán que
devuelva el producto a SENSIO Inc. Adhiera una etiqueta al producto que incluya: su
nombre, dirección, número telefónico de contacto durante el día, número de caso y
descripción del problema. Además, incluya una copia del recibo de compra original.
Envuelva cuidadosamente el producto etiquetado con el recibo de compra, y envíelo
(con el envío y el seguro prepagados) a la dirección de SENSIO Inc. SENSIO Inc. no
asumirá obligación ni responsabilidad alguna por el producto devuelto que esté en el
trayecto hacia el Centro de servicio al cliente de SENSIO Inc.
20
Page 23

Page 24

bellahousewares.com
Dudas o comentarios contactar el departamento de servicio al cliente
BellaLife
BellaLife
BellaLifestyle
BellaLifestyle
For customer service questions or comments
1-866-832-4843
www.sensioinc.com
BELLA is a registered trademark of Sensio Inc., Montréal, Canada H3B 3X9.
All rights reserved.
BELLA es una marca registrada de Sensio Inc., Montréal, Canada H3B 3X9.
Todos los derechos reservados.
SO-313576
 Loading...