

BELLA 14528 Instruction Manual
ROTATING
WAFFLE MAKER
GAUFRIER ROTATIF
WAFLERA GIRATORIA
Instruction Manual
Recipe Guide
Manuel d’instructions
Guide de recettes
Manual de instrucciones
Guía de recetas
Register your product and get support at:
Pour vous inscrire et obtenir l’aide de votre produit:
Para registrar y obtener asistencia de su producto ir:
www.bellahousewares.com/welcome
SO-312942_14528, 14531_BELLA_Rotating WM nonStick_WM US_IM_R4 (145x210mm).indd 1 2015-11-10 11:32 AM

SO-312942_14528, 14531_BELLA_Rotating WM nonStick_WM US_IM_R4 (145x210mm).indd 2 2015-11-10 11:32 AM

Table of Contents
Important Safeguards ................................................................................................................................. 4
Notes on the Cord .......................................................................................................................................5
Notes on the Plug ........................................................................................................................................ 5
Before Using for the First Time .................................................................................................................. 5
Know your Wafe Maker ............................................................................................................................. 6
To Use the Wafe Maker.............................................................................................................................. 6
Locking and Unlocking your Wafe Maker ............................................................................................... 6
Cleaning and Maintenance .......................................................................................................................... 6
Recipes ...........................................................................................................................................................7
Warranty ........................................................................................................................................................8
Table des matières
Consignes de sécurité importantes ...........................................................................................................9
Notes sur le cordon .................................................................................................................................... 10
Notes sur la che ........................................................................................................................................10
Avant la première utilisation ..................................................................................................................... 10
Connaître votre appareil à gaufres ..........................................................................................................11
Utilisation de votre appareil à gaufres .................................................................................................... 11
Verrouillage et déverroulillage de l’appareil à gaufres ......................................................................... 11
Nettoyage et entretien ............................................................................................................................... 11
Recettes .......................................................................................................................................................12
Garantie........................................................................................................................................................13
Índice
Medidas de seguridad importantes ......................................................................................................... 14
Notas sobre el cable ................................................................................................................................... 15
Notas sobre el enchute ..............................................................................................................................15
Antes del primer uso .................................................................................................................................. 15
Conozca su Waera .................................................................................................................................... 16
Para usar la Waera ...................................................................................................................................16
Para colocar y quitar el seguro de la Waera ......................................................................................... 16
Limpieza y mantenimiento ........................................................................................................................ 16
Recetas .........................................................................................................................................................17
Garantía........................................................................................................................................................18
SO-312942_14528, 14531_BELLA_Rotating WM nonStick_WM US_IM_R4 (145x210mm).indd 3 2015-11-10 11:32 AM

IMPORTANT SAFEGUARDS
When using electrical appliances, basic safety precautions should always be
followed, including the following:
1. READ ALL INSTRUCTIONS CAREFULLY.
2. Do not touch hot surfaces. Use handles or knobs.
3. To protect against risk of re, electric shock and injury to persons,
DO NOT IMMERSE CORD, PLUG OR APPLIANCE in water or other liquid.
4. Close supervision is necessary when any appliance is used by or
nearchildren.
5. Unplug unit when not in use and before cleaning. Todisconnect, grasp plug,
and pull from wall. Never yank on cord.
6. Allow cooling before putting on or taking off parts.
7. Do not operate any appliance with a damaged cord or plug or after
the appliance malfunctions or is dropped or damaged in any manner.
Bringtheappliance to a qualied service agent for examination, repair
orelectrical or mechanical adjustment to avoid hazard.
8. The use of accessory attachments not recommended or sold by the appliance
manufacturer may cause re, electric shock, or injury to persons.
9. Do not use outdoors.
10. Do not let cord hang over edge of table or counter or touch hot surfaces,
including the stove.
11. Do not allow appliance to come into contact with any materials that are
ammable such as draperies, walls, etc.
12. Do not place on or near a hot gas or electric burner or in a heated oven.
13. When nished baking wafes remove plug from wall outlet.
14. Do not use this appliance for other than intended use.
15. Do not clean with metal scouring pads; pieces can break off the pad
andtouch electrical parts, creating a risk of electrical shock.
16. Extreme caution must be used when moving an appliance containing
hotoilor other hot liquids.
17. This appliance is for household use only.
FOR HOUSEHOLD USE ONLY
SAVE THESE INSTRUCTIONS
4
SO-312942_14528, 14531_BELLA_Rotating WM nonStick_WM US_IM_R4 (145x210mm).indd 4 2015-11-10 11:32 AM

NOTES ON THE CORD
The provided short power-supply cord (or detachable power-supply cord) should
be used to reduce the risk resulting from becoming entangled in or tripping over
alonger cord. Do not use an extension cord with this product.
NOTES ON THE PLUG
This appliance has a polarized plug (one blade is wider than the other).
Toreducethe risk of electric shock, this plug will t in a polarized outlet only
oneway. If the plug does not t fully into the outlet, reverse the plug. If it still
does not t, contact a qualied electrician. Do not modify the plug in any way.
PLASTICIZER WARNING
CAUTION: To prevent Plasticizers from migrating to the nish of the counter
top or table top or other furniture, place NON-PLASTIC coasters or place
mats between the appliance and the nish of the counter top or table top.
Failuretodoso may cause the nish to darken; permanent blemishes may
occuror stains can appear.
ELECTRIC POWER
If the electrical circuit is overloaded with other appliances, your appliance
maynotoperate properly. It should be operated on a separate electrical circuit
from other appliances.
BEFORE USING FOR THE FIRST TIME
• Remove all parts included in the box.
• Wash all the parts thoroughly (refer to Cleaning and Maintenance section
formore information).
NOTE: Your Wafe Maker may emit a small amount of smoke and/or odor
whenyou use it for the rst time. This is normal and harmless, however we
recommend that you do not eat the rst wafe you make with the Wafe Maker.
5
SO-312942_14528, 14531_BELLA_Rotating WM nonStick_WM US_IM_R4 (145x210mm).indd 5 2015-11-10 11:32 AM
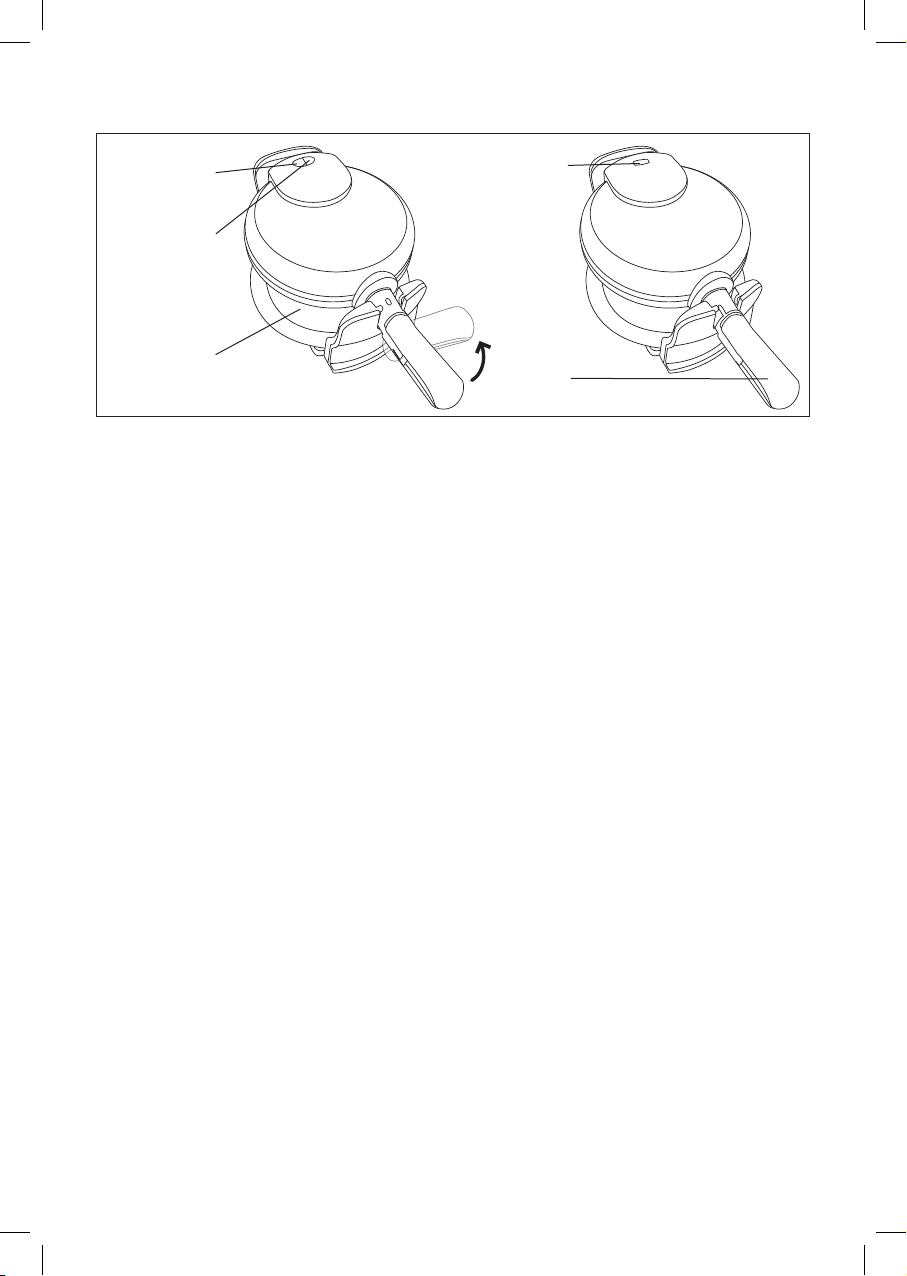
Know your wafe maker
Product may vary slightly from illustration
Red Power
Light
Green Ready
Light
Drip Tray*
* Drip tray included to collect overow of batter and crumbs.
Green Ready
Light
Handle
To use the Wafe Maker
1. Plug the cord into your 110 - 120 V AC wall outlet. The Red Power Light will turn on indicating
theappliance is preheating.
NOTE: The Red Power Light will remain on until the appliance is unplugged.
2. The Green Ready Light will turn on when the appliance reaches proper cooking temperature.
Thisshould take approximately 3 to 5 minutes. Once heated, ready times will be faster.
3. When the Green Ready Light turns on, open the Wafe Maker, and apply a light layer of vegetable
oil or melted shortening to the heating plates. Spread the wafe batter evenly onto the lower
heating plate.
4. Close the Waf e Maker and rotate the handle 180º clockwise (right) until it locks for cooking.
5. When the Green Ready Light turns on again, rotate the handle 180º counter-clockwise (left)
tounlock and then carefully open the Wafe Maker.
6. If the wafes are not dark enough, close the Wafe Maker, rotate to lock, and then wait
another30seconds. Repeat as needed.
7. When you are satised with your wafes, use a non-metallic utensil to remove them from
theheating plates.
8. To make more wafes, close the Wafe Maker until the Green Ready Light comes on,
then repeat from step 3.
9. When you are nished, unplug it from the wall outlet. After it has sufciently cooled, the heating
plates may be wiped clean.
Locking and Unlocking your Wafe Maker
Your Wafe Maker is unlocked when the side with 2 indicator lights are facing up and is locked when
the2indicators lights are facing down. You can only open the Wafe Maker in the unlocked position.
Cleaning and Maintenance
1. Unplug it and allow it to cool down before cleaning.
2. You can easily remove any excess oils or crumbs without disassembling the appliance.
3. Never submerge the appliance in water or place it in the dishwasher.
4. Use only plastic or wooden utensils on the heating plates. Metal may damage the plates.
5. Use a soft cloth on the heating plates and occasionally a metal polish intended for stainless steel
onthe outer housing. Never use abrasive scouring pads or steel wool.
6
SO-312942_14528, 14531_BELLA_Rotating WM nonStick_WM US_IM_R4 (145x210mm).indd 6 2015-11-10 11:32 AM
 Loading...