

Page 1
CAN OPENER
ABRELATAS
Instruction Manual
Manual de instrucciones
Register your product and get support at:
Pour vous inscrire et obtenir l’aide de votre produit:
Para registrar y obtener asistencia de su producto ir:
www.bellahousewares.com
Page 2

Page 3

Table of Contents
Important Safeguards ........................................................................................................................................ 3
Notes on the Cord............................................................................................................................................... 3
Notes on the Plug ............................................................................................................................................... 3
Getting To Know Your Can Opener .................................................................................................................. 4
Before Using for the First Time ........................................................................................................................ 4
Assembly Instructions ....................................................................................................................................... 4
Operating Instructions ................................................................................................................................... 5-6
Cleaning and Maintenance ................................................................................................................................ 6
Warranty ..............................................................................................................................................................7
Índice
Medidas de seguridad importantes ................................................................................................................. 8
Notas sobre el cable ........................................................................................................................................... 8
Notas sobre el enchufe ...................................................................................................................................... 8
Conozca su abrelatas ......................................................................................................................................... 9
Antes de usar el abrelatas bella por primera vez .......................................................................................... 9
Instrucciones de armado ................................................................................................................................... 9
Instrucciones de funcionamiento .............................................................................................................. 10 -11
Limpieza y mantenimiento .............................................................................................................................. 11
Garantía.............................................................................................................................................................. 12
Page 4

IMPORTANT SAFEGUARDS
When using electrical appliances, basic safety precautions should always be followed,
including the following:
1. READ ALL INSTRUCTIONS BEFORE USING THIS UNIT.
2. To protect against electric shock, do not immerse the can opener body,
cord or plug in water or other liquid.
3. Unplug from outlet when not in use, before putting on or taking off parts,
and before cleaning.
4. Close supervision is necessary when appliance is used by or near children.
5. Avoid contact with moving parts.
6. Do not operate any appliance with a damaged cord or plug, or after the
appliance malfunctions, or if it has been dropped or damaged in any manner.
Call our toll- free customer service number for information on examination,
repair or electrical or mechanical adjustment.
7. The use of attachments not recommended or sold by the manufacturer may
cause re, electrical shock or injury.
8. Do not let cord hang over edge of table or counter nor touch hot surfaces,
including the stove.
9. Do not use outdoors or for commercial purposes.
10. Do not open pressurized (aerosol-type) cans.
11. Do not open cans of ammable liquids such as lighter uids.
SAVE THESE INSTRUCTIONS
FOR HOUSEHOLD USE ONLY
Notes on the Plug
This appliance has a polarized plug (one blade is wider than the other).
To reduce the risk of electric shock, this plug will t in a polarized outlet only
one way. If the plug does not t fully into the outlet, reverse the plug. If it still does
not t, contact a qualied electrician. Do not modify the plug in any way.
Notes on the Cord
The provided short power-supply cord (or detachable power-supply cord) should
be used to reduce the risk resulting from becoming entangled in or tripping over a
longer cord. Do not use an extension cord with this product.
3
Page 5
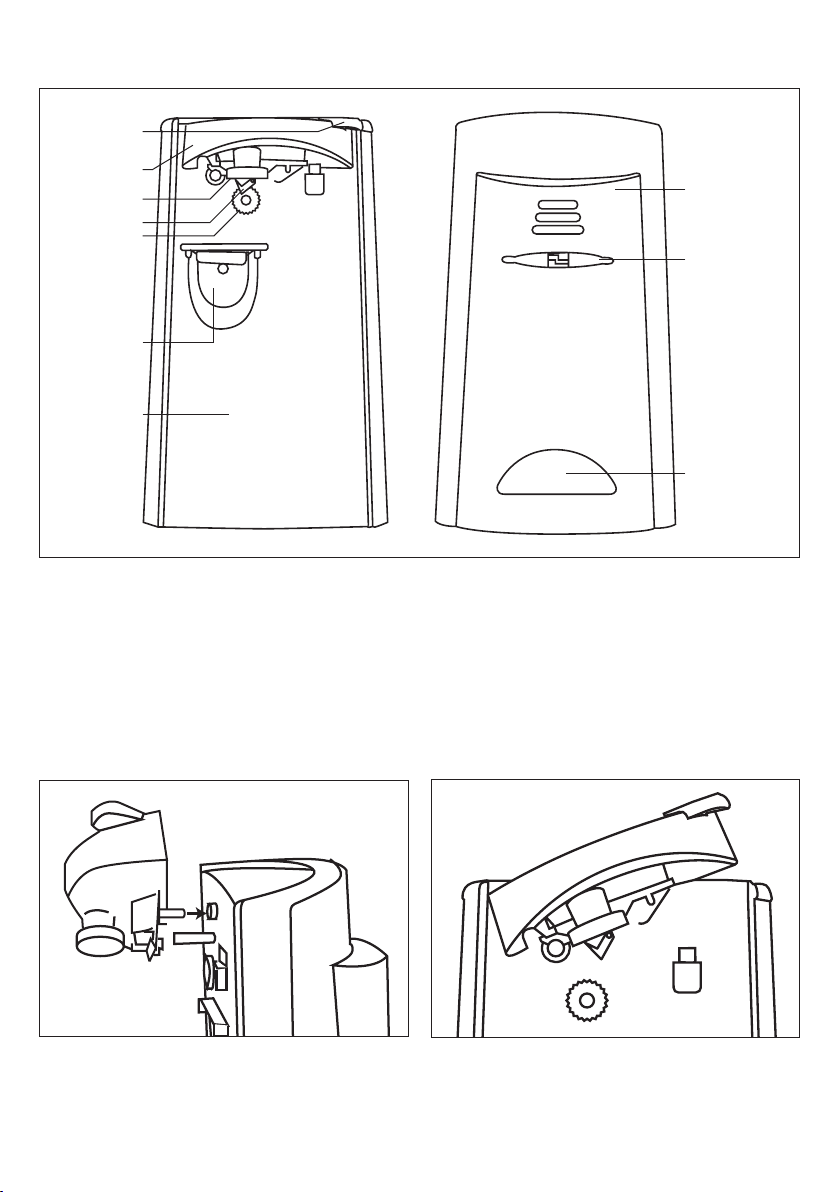
Getting To Know Your Can Opener
Product may vary slightly from illustration
Figure 1
On/Off button
Blade Bracket
Magnet
Blade
Drive wheel
Bottle opener
Front housing
Back Housing
Blade
sharpener
Cord storage
Before Using for the First Time
1. Carefully unpack the can op ener and remove all packaging materials. Check the contents to ensure that all
parts are pr esent, and have been r eceived in good condition.
2. Handle the cut ting lever with care. The cutting blade is sharp.
3. Wash the c utting lever in soapy water before rst use. Rinse and dr y thoroughly.
4. The motor base may be wiped with a damp cloth.
Assembly Instructions
1. Attach cutting lever to the can opener by aligning the key tabs with the key slots . Push the cut ting lever in.
(see Fig. 2).
2. Press the lever down to ensure the lever has been prop erly assembled (se e Fig. 3).
Figure 2 Figure 3
4
Page 6

Operating Instructions
Can Opener
1. Lift the blade bracket and plug the unit into an
electrical outlet.
2. Tip the c an for ward so that its rim is under the
locating post and the against the drive wheel.
Press down the cut ting lever and make sure the
blade is inside the rim (see Fig. 4).
3. The can will rotate and the blade will cut the can
lid open. Because of the hands-fr ee fea ture, it
is not ne cessary to hold blade bracket down or
support the can during cut ting.
NOTE: In case the total weight of a can is over
18oz, it is necessary to press and hold the can
opener to avoid overturning.
4. When the can is opened, the can opener will
stop automatically. To remove the can, hold it
with one hand and raise the blade bracket with
the other one.
5. CAUTION: Avoid contact with the cut edges of
the can or lids as they are sharp, carefully remove
the lid from the magnet and discard.
NOTE: The time of continuously opening cans should not exceed 3 minutes.
6. The excess cord can b e stuffed into cord storage at the back of the uni t. Feed the cord through the notch
for convenient storage.
Warning: The cans opened with this can opener must be less than 21 oz in weight.
Can Opening Tips
1. This can opener should not be used to open can s designed to be opened by another method, such as a
pull tab, peel-of f foil seal, or rolling key. This can op ener will not op en rimless cans or cans with angled
corners.
2. If there is a dent in the rim of a can, open the
other end or start the cut ting action just beyond
the dent.
3. Cans with heavy seams, uneven rims or odd
shape s may cause the c an opener to stall. If this
occurs, turn the can slightly by hand to aid the
cutting action.
4. Cans with aluminum lids will not s tick to
the magnet.
Bottle Opener
Before opening bot tles, unplug the power supply
from the electric outlet.
1. To open a bot tle, grasp it and position the cap
under the metal hook part in the bot tle opener
(see Fig. 5).
NOTE: Be sure the bot tle neck is not under the
metal hook part, or the glass may break. Hold
the can opener with one hand and pull down to
pop the cap off with the other one.
2. The bottle opener at the front of the unit will only
remove metal b ottle caps. Do not use it for the
bottle with screw-off cap or pull ring.
Figure 5
Hold the can
opener with
one hand
Pull down and
pop the cap of
with the other
hand
Figure 4
5
Page 7

Knife Sharpener
1. Before opening bot tles, unplug the power supply
from the electric outlet.
2. Place the knife intended to b e sharpened in the
slot of knife sharpener loc ated at the back of
the unit.
3. For best results, sharp en the entire length
carefully to pull the k nife through the slot back
and for th (see Fig. 6), until desired sharpness
achieved.
4. After sharpening is completed, wash and dry
the knife.
NOTE: Be cautious with knife after sharpening.
Knife Sharpening Tips
1. Clean and dry knives b efore sharp ening.
2. Do not attempt to sharpen serrated blades, as this
will smooth their edges.
3. Do not attempt to sharpen sciss ors.
Figure 6
Hold the can
opener with
one hand
Cleaning and Maintenance
1. Before cleaning any part of the can op ener, unplug the cord.
2. To remove the cutting lever for easy cleaning, lif t the c utting lever up and pull it out. The blade ass embly
can be cleane d with a damp cloth, then wiped w ith a sponge and dried thoroughly. Rever se the procedure
to replace the cutting lever.
3. Before replacing the cut ting lever, wipe the can op ener housing, and area around the drive wheel with a
slightly damp cloth or sponge. To remove stubborn spot s, wipe surfaces with nylon cloth or mesh pad and
sudsy water, following w ith a clean, damp cloth dry thoroughly. Do not use abrasive cleaners on any par t
of the can opener as they can damage the nish.
4. Do not immerse main par t of can opener into water as it can give an elec tric shock .
Note: This item is not dishwasher-safe.
6
Page 8

Limited TWO-YEAR Warranty
SENSIO Inc. hereby warrants that for a period of TWO YEARS from the date
of purchase, this product will be free from mechanical defects in material and
workmanship, and for 90 days in respect to non-mechanical parts. At its sole
discretion, SENSIO Inc. will either repair or replace the product found to be defective,
or issue a refund on the product during the warranty period.
The warranty is only valid for the original retail purchaser from the date of initial retail
purchase and is not transferable. Keep the original sales receipt, as proof of purchase is
required to obtain warranty validation. Retail stores selling this product do not have the
right to alter, modify, or in any way revise the terms and conditions of the warranty.
EXCLUSIONS:
The warranty does not cover normal wear of parts or damage resulting from any of the
following: negligent use of the product, use of improper voltage or current, improper
routine maintenance, use contrary to the operating instructions, disassembly, repair,
or alteration by anyone other than qualied SENSIO Inc. personnel. Also, the warranty
does not cover Acts of God such as re, oods, hurricanes, or tornadoes.
SENSIO Inc. shall not be liable for any incidental or consequential damages caused
by the breach of any express or implied warranty. Apart from the extent prohibited
by applicable law, any implied warranty of merchantability or tness for a particular
purpose is limited in time to the duration of the warranty. Some states, provinces or
jurisdictions do not allow the exclusion or limitation of incidental or consequential
damages, or limitations on how long an implied warranty lasts, and therefore, the
above exclusions or limitations may not apply to you. The warranty covers specic
legal rights which may vary by state, province and/or jurisdiction.
HOW TO OBTAIN WARRANTY SERVICE:
You must contact Customer Service at our toll-free number: 1-866-832-4843.
A Customer Service Representative will attempt to resolve warranty issues over the
phone. If the Customer Service Representative is unable to resolve the problem, you will
be provided with a case number and asked to return the product to SENSIO Inc. Attach
a tag to the product that includes: your name, address, daytime contact telephone
number, case number, and description of the problem. Also, include a copy of the
original sales receipt. Carefully package the tagged product with the sales receipt,
and send it (with shipping and insurance prepaid) to SENSIO Inc.’s address. SENSIO
Inc. shall bear no responsibility or liability for the returned product while in transit to
SENSIO Inc.’s Customer Service Center.
7
Page 9

MEDIDAS DE SEGURIDAD
IMPORTANTES
Al utilizar electrodomésticos, siempre deben cumplirse las precauciones de seguridad
básicas, incluyendo las siguientes:
1. Lea todas las instrucciones.
2. Para protegerse del riesgo de descarga eléctrica, no sumerja el cuerpo del abrelatas,
el cable ni el enchufe en agua ni en ningún otro líquido.
3. Desenchufe el aparato del tomacorriente cuando no lo usa, antes de colocarle o
extraerle piezas, y antes de limpiarlo.
4. Es necesario que haya una supervisión estricta cuando el electrodoméstico sea
utilizado por niños o cerca de ellos.
5. Evite tocar las piezas móviles.
6. No utilice ningún electrodoméstico que tenga un cable o enchufe dañado, que
muestre un funcionamiento defectuoso, que se haya caído o dañado de cualquier
manera. Si desea obtener información sobre la revisión, reparación o el ajuste
eléctrico o mecánico, llame al número gratuito de Servicio de atención al cliente.
7. El uso de aditamentos no recomendados por el fabricante puede provocar incendios,
descargas eléctricas o lesiones físicas.
8. No permita que el cable cuelgue del borde de la mesa o encimera. No permita que la
unidad toque supercies calientes, incluida la estufa.
9. No lo utilice al aire libre o con nes comerciales.
10. No abra latas presurizadas (tipo aerosol).
11. No abra latas de líquidos inamables tales como combustibles de encendedor.
GUARDE ESTAS INSTRUCCIONES
PARA USO DOMÉSTICO
ÚNICAMENTE
NOTAS SOBRE EL ENCHUFE
Este electrodoméstico cuenta con un enchufe polarizado (una pata es más ancha
que la otra). Para reducir el riesgo de descarga eléctrica, este enchufe encaja de
una sola manera en un tomacorriente polarizado. Si el enchufe no encaja bien en
el tomacorriente, delo vuelta. Si aun así no encaja, comuníquese con un electricista
calicado. No realice ningún tipo de modicación al enchufe.
NOTAS SOBRE EL CABLE
Se debe usar el cable de alimentación corto provisto (o un cable de alimentación
desmontable) para reducir el riesgo de enredarse o tropezarse con un cable más largo.
No utilice un prolongador con este producto.
8
Page 10

Conozca su abrelatas
Figure 1
Soporte de la
cuchilla
Botón
Encendido/
Apagado
Imán
Cuchilla
Rueda de
tracción
Abrebotellas
Carcasa
frontal
Carcasa
trasera
Alador de
cuchilla
Almacenamiento
del cable
Antes de usar el abrelatas bella por primera vez
1. Desempaque con cuidado el abrelatas y quite tod os los materiales de empaque. Verique el contenido y
procure que todas las piezas estén presentes y que las haya recibido en buenas condicione s.
2. Manipule la palanca de c orte con cuidado. L a cuchilla de corte e s muy losa.
3. Lave la palanca de cor te con agua y jabón antes del primer uso. Enjuague y seque completamente.
4. La base de motor se puede limpiar con un paño húmedo.
Instrucciones de armado
1. Coloque la palanca de corte en el abrelatas; par a ello, mantenga alineadas las lengüetas del abrelatas c on
las ranuras de este. Presione la palanca de corte (vea la Figura 2).
2. Presione la palanca hacia abajo para asegurarse de haber colocado la palanc a correct amente
(vea la Figura 3).
Figura 2 Figura 3
9
Page 11

Instrucciones de funcionamiento
Abrelatas
1. Levante el soporte de la cuchilla y enchufe la
unidad en un tomacorriente.
2. Incline la lata hacia adelante de manera que el
borde quede debajo del poste de ubicación y
contra la rueda de tracción. Presione la palanc a
de cor te hac ia abajo y asegúrese de que la
cuchilla quede dentro del borde (vea la Figura 4).
3. La lata girará y la cuchilla cor tará y abrirá la tapa
de la lat a. Debido a su característica de manos
libres, no es necesario mantener presionado el
sopor te de la cuchilla ni sos tener la lata durante
el cor te.
NOTA: Sostenga el abrelatas desde arriba cuando
abra latas con un volumen superior a 18 onzas
(500 g).
4. El abrelatas se detiene automáticamente cuando
la lata se abre. Para quitar la lata, sosténgala con
una mano y levante el soporte de la cuchilla con
la otra.
PRECAUCIÓN: Evite tocar los bordes cortados de la lata o las tapas, ya que son losos. Quite con cuidado
la tapa del imán y deséchela.
NOTA: No se deben superar los 3 minutos de uso continuo del abrelatas.
5. El cable eléctrico se puede colo car en el compartimiento para almacenamiento del cable ubic ado en la
parte posterior de la unidad para un almacenamiento conveniente.
Advertencia: Solo abra latas de menos de 18 onzas (500 g) de peso con este abrelatas.
Consejos para abrir latas
1. No debe usar este abrelatas con latas diseñadas para abrirse con otro método, como abre fácil, tapa
metálica de sprendible o llave giratoria. Este abrelatas no abre lat as sin bordes o latas con ángulos en
punta.
2. Si el borde de la lata está abollado, abra desde
otro ex tremo o comience la acción de cor te lejos
de la abolladura.
3. Las latas con unione s gruesas, bordes d esparejos
o formas inusuales pueden atascar el abrelatas.
En ese caso, gire la lata suavemente con la mano
para permitir la acción de corte.
4. Las latas con tapas de aluminio no se adhieren
al imán.
Abrebotellas
Antes de abrir las botellas, desenchufe la fuente de
alimentación del tomacorriente.
1. Para abrir una botella, sujétela y colo que la tapa
debajo de la pieza del gancho de metal en el
abreb otellas (vea la Figura 5).
NOTA: Asegúrese de que el cuello de la botella
no se encuentre debajo de la pieza del gancho de
metal; de lo contrario, se podría romper el vidrio.
Sostenga el abrelatas con una mano y jale la
botella hacia abajo con la otra mano para quitar
la tapa.
2. El abreb otellas en el frente de la unidad solo
quitará tapas metálicas de botellas. No lo use
para botellas con tapa a rosca o anillo para jalar.
Figura 5
Sostenga el
abrelatas con
una mano
Con la otra
mano, jale la
botella hacia
abajo para quitar
la tap
Figura 4
10
Page 12

Alador de cuchillos
1. Antes de alar un cuchillo, desenchufe la fuente
de alimentación del tomacorriente.
2. Coloque el cuchillo que desea alar en la ranura
del alador de cuchillos ubic ado en la parte
posterior de la unidad.
3. Para obtener mejores resultados, ale toda la
extensión c uidadosamente para pasar el cuchillo
por la ranura hac ia adelante y hacia atrás
(vea la Figura 6) has ta obtener el lo des eado.
4. Después de alar el cuchillo, lávelo y séquelo.
NOTA: Tenga cuidado con el cuchillo después
de alarlo. Siempre sostenga los cuchillos del
mango correspondiente.
Consejos para alar cuchillos
1. Limpie y s eque los cuchillos antes de alarlos.
2. No intente alar cuchillas dentadas, ya que se
alisar án los bordes .
3. No intente alar tijeras.
Figura 6
Sostenga el
abrelatas con
una mano
Limpieza y mantenimiento
1. Antes de limpiar cualquier pieza del abrelatas, desenchufe la unidad.
2. Para una limpieza fácil, quite la palanc a de cor te, levantándola hacia arriba. Para limpiar el ensamblaje de
la cuchilla, use un paño húmedo y luego límpielo con una esp onja y séquelo bien. Siga el procedimiento
en sentido inverso para colo car la palanca de cor te.
3. Antes de volver a colocar la palanca d e cor te, limpie la carcasa del abrelatas y el área alrededor de la
rueda de trac ción con una esponja o un paño ligeramente húmedo. Para quitar manchas rebeldes,
limpie las supercies con una esponja de nailon y agua con jabón. Luego frote ligeramente con un paño
limpio y húmedo ha sta que la manc ha desaparezca. No utilice limpiadore s abrasivos sobre ninguna pie za
del abrelatas, ya que podría dañar el acabado.
4. No sumerja la par te principal del abrelat as en agua; podría sufr ir una descarga eléctrica.
Nota: Este producto NO es apto para lavaplatos.
11
Page 13

Garantía limitada de DOS AÑOS
Mediante la presente, SENSIO Inc. garantiza que, durante el plazo de DOS AÑOS a
partir de la fecha de compra, este producto no presentará defectos mecánicos en el
material ni en la mano de obra, y durante 90 días, no los presentará en las piezas no
mecánicas. A su entera discreción, SENSIO Inc. reparará o reemplazará el producto
que resulte defectuoso, o emitirá un reembolso por el producto durante el plazo de
garantía.
Esta garantía es válida únicamente para el comprador minorista original a partir de la
fecha de compra minorista inicial y no es transferible. Conserve el recibo de compra
original, ya que se exige una prueba de compra para obtener la validación de la
garantía. Las tiendas minoristas no tienen derecho a alterar, modicar ni corregir de
ninguna manera los términos y condiciones de la garantía.
EXCLUSIONES:
La garantía no cubre el desgaste normal de las piezas ni el daño ocasionado por
cualquiera de las siguientes causas: uso negligente del producto, uso de un voltaje
o corriente incorrectos, mantenimiento de rutina inadecuado, uso contrario al de
las instrucciones de funcionamiento, desarmado, reparación o alteración a cargo de
personas que no sean miembros del personal calicado de SENSIO Inc. Asimismo, la
garantía no cubre actos de la naturaleza, como incendios, inundaciones, huracanes o
tornados.
SENSIO Inc. no asumirá responsabilidad por daños incidentales o resultantes
ocasionados por la violación de cualquier garantía expresa o implícita. Salvo en
la medida en que lo prohíban las leyes aplicables, cualquier garantía implícita de
comerciabilidad o aptitud para un propósito particular se limita temporalmente a la
duración de la garantía. Algunos estados, provincias o jurisdicciones no permiten la
exclusión ni la limitación de daños incidentales o resultantes, o limitaciones sobre
la duración de una garantía implícita y, por lo tanto, es posible que las exclusiones o
limitaciones mencionadas no le correspondan. La garantía cubre derechos legales
especícos que pueden variar de un estado, una provincia o una jurisdicción a otros.
CÓMO OBTENER EL SERVICIO DE GARANTÍA:
Debe comunicarse con el Servicio de atención al cliente a nuestro número telefónico
gratuito: 1-866-832-4843. Un representante del Servicio de atención al cliente intentará
resolver los problemas referidos a la garantía por teléfono. Si este no puede resolver
el problema, le proporcionarán un número de caso y le solicitarán que devuelva el
producto a SENSIO Inc. Adhiera una etiqueta al producto que incluya: su nombre,
dirección, número telefónico de contacto durante el día, número de caso y descripción
del problema. Además, incluya una copia del recibo de compra original. Envuelva
cuidadosamente el producto etiquetado con el recibo de compra, y envíelo (con el
envío y el seguro prepagados) a la dirección de SENSIO Inc. SENSIO Inc. no asumirá
obligación ni responsabilidad alguna por el producto devuelto que esté en el trayecto
hacia el Centro de servicio al cliente de SENSIO Inc.
12
Page 14

Page 15

Page 16

bellahousewares.com
Dudas o comentarios contactar el departamento de servicio al cliente
BellaLife
BellaLife
BellaLifestyle
BellaLifestyle
For customer service questions or comments
Pour le service à la clientèle, question ou commentaires
1-866-832-4843
www.sensioinc.com
BELLA is a registered trademark of Sensio Inc., Montréal, Canada H3B 3X9.
All rights reserved.
BELLA est une marque déposée de Sensio Inc., Montréal, Canada H3B 3X9.
Tous droits réservés.
BELLA es una marca registrada de Sensio Inc., Montréal, Canada H3B 3X9.
Todos los derechos reservados.
SO_3126412
 Loading...