

Page 1
SO-307610_13540 BELLA Ultimate Brownie Maker Cover r1_Layout 1 11-04-13 12:02 PM Page 1
INSTRUCTION MANUAL / RECIPE GUIDE
MANUEL D’INSTRUCTIONS / GUIDE DE RECETTES
MANUAL DE INSTRUCCIÓNES / GUÍA DE RECETAS
For customer service questions or comments
Pour le service à la clientèle, questions ou commentaires
Dudas o commentarios para departamento de servico a clientes
1-866-832-4843
www.sensioinc.com
©2011 Sensio.
BELLA® is a registered trademark of Sensio Inc., Montréal, Canada H3B 3X9
ULTIMATE BROWNIE MAKER
CUISEUR À BROWNIES DE LUXE
MÁQUINA PARA BROWNIES ULTIMATE
Page 2

SO-307610_13540 BELLA Ultimate Brownie Maker Interior_Layout 1 11-04-18 10:42 AM Page 1
TABLE OF CONTENTS
Important Safeguards ............................................................................................................2
Additional Important Safeguards............................................................................................3
Notes on the Plug .................................................................................................................3
Notes on the Cord.................................................................................................................3
Getting to Know Your Ultimate Brownie Maker ......................................................................4
Before Using for the First Time ..............................................................................................5
Operating Instructions ...........................................................................................................5
General Brownie Baking Procedures ..................................................................................5-6
User Maintenance Instructions...............................................................................................6
Care & Cleaning Instructions ..............................................................................................6-7
Storing Instructions................................................................................................................7
Recipes............................................................................................................................8-18
TABLE DES MATIÈRES
Consignes de sécurité importantes......................................................................................19
Consignes de sécurité importantes additionnelles ...............................................................20
Notes
sur la fiche.................................................................................................................20
Notes sur le cordon.............................................................................................................20
Connaître son cuiseur à brownies de luxe ...........................................................................21
Avant d’utiliser l’appareil pour la première fois .....................................................................22
Instructions d’utilisation .......................................................................................................22
Directives générales pour la cuisson des brownies.........................................................22-23
Instructions pour l’entretien .................................................................................................24
Instructions d’entretien et de nettoyage...............................................................................24
Instructions de rangement ...................................................................................................25
Recettes.........................................................................................................................26-36
TABLA DE CONTENIDO
Medidas de seguridad importantes .....................................................................................37
Otras medidas de seguridad importantes............................................................................38
Notas sobre el enchufe........................................................................................................38
Notas sobre el cable............................................................................................................38
Conozca su máquina para brownies Ultimate......................................................................39
Antes de utilizar por primera vez..........................................................................................40
Instrucciones de funcionamiento .........................................................................................40
Procedimientos generales para hornear brownies..........................................................40-41
Instrucciones de mantenimiento para el usuario ..................................................................42
Instrucciones de limpieza y cuidado ....................................................................................42
Instrucciones de almacen
Recetas..........................................................................................................................44-54
amiento........................................................................................43
Page 3

SO-307610_13540 BELLA Ultimate Brownie Maker Interior_Layout 1 11-04-18 10:42 AM Page 2
IMPORTANT SAFEGUARDS
WARNING: When using electrical appliances, basic safety precautions should always
be followed, including the following:
1. Read all instructions before using appliance.
2. The cord to this appliance should be plugged into a 120V AC electrical outlet only.
3. To protect against risk of electric shock, do not immerse the cord, plug or cooking unit
in water or any other liquid.
4. Do not touch hot surfaces. Use handles or knobs.
5. This appliance is not intended for use by persons (including children) with reduced
physical, sensory or mental capabilities, or lack of experience and knowledge,
unless they have been given supervision or instruction concerning use of the appliance
by a person responsible for their safety.
6. Children should be supervised to ensure that they do not play with the appliance.
Close supervision is necessary when any appliance is used by or near children.
7. Unplug from wall outlet when not in use and before cleaning. Allow to cool before
cleaning or storing this appliance.
8. Never yank the cord to disconnect the cooking unit from the outlet. Instead,
grasp the plug and pull to disconnect.
9. Do not operate any appliance if the cord is damaged. Do not use this appliance if the unit
malfunctions,
the risk of an electric shock, never try to repair the Ultimate Brownie Maker yourself.
Bring it to a qualified technician for examination, repair or electrical or mechanical
adjustment. An incorrect reassembly could present a risk of electric shock
when the Ultimate Brownie Maker is used.
10. The use of accessories or attachments not recommended by the manufacturer
may cause fire, electrical shock or injury.
11. Do not use outdoors or for commercial purposes.
12. Do not use this appliance for purposes other than the one for which it was designed.
13. Do not let the electrical cord hang over the edge of the table or countertop,
or touch hot surfaces.
14. Do not place on or near a hot gas or electric burner or heated oven.
15. Use on a heat-resistant, flat level surface only.
16. Use extreme caution when moving any appliance containing hot food, water,
oil or other liquids.
17. To disconnect, remove plug from outlet.
18. Always unplug after use. The appliance will remain ON unless unplugged.
19. CAUTION HOT SURFACES: This appliance generates heat during use.
Proper precautions must be taken to prevent the risk of burns, fire or other damage
to persons or property.
20. When using this appliance, provide adequate ventilation above and on all sides
for air circulation. Do not allow this appliance to touch curtains, wall coverings, clothing,
dish towels or other flammable materials during use.
21. Use with wall receptacle only.
if it is dropped or has been damaged in any manner. In order to avoid
FOR HOUSEHOLD USE ONLY
SAVE THESE INSTRUCTIONS
2
Page 4

SO-307610_13540 BELLA Ultimate Brownie Maker Interior_Layout 1 11-04-18 10:42 AM Page 3
ADDITIONAL
IMPORTANT SAFEGUARDS
CAUTION: This appliance is hot during operation and retains heat for some time after
turning OFF. Always wear oven mitts when handling hot materials and allow metal parts
to cool before cleaning. Do not place anything on top of the appliance while
it is operating or while it is hot.
1. All users of this appliance must read and understand this Instruction Manual
before operating or cleaning this appliance.
2. Do not leave this appliance unattended during use.
3. WARNING: To avoid burns and personal injury, do not grasp the metal brownie cutter
insert’s side handles during or after baking to raise the lid. Always use the lid handle
to open the Ultimate Brownie Maker.
4. WARNING: The metal brownie cutter insert gets hot during preheating and baking.
Always wear oven mitts when handling and allow to cool before cleaning.
NOTES ON THE PLUG
This appliance has a polarized plug (one blade is wider than the other). To reduce the risk
of electric shock, this plug will fit in a polarized outlet only one way. If the plug does not fit fully
into the outlet, reverse the plug. If it still does not fit, contact a qualified electrician.
Do not modify the plug in any way.
NOTES ON THE CORD
The provided short power-supply cord (or detachable power-supply cord) should be used
to reduce the risk resulting from becoming entangled in or tripping over a longer cord.
Do not use an extension cord with this product.
PLASTICIZER WARNING
CAUTION: To prevent Plasticizers from migrating to the finish of the counter top or table top
or other furniture, place NON-PLASTIC coasters or place mats between the appliance
and the finish of the counter top or table top. Failure to do so may cause the finish to darken;
permanent blemishes may occur or stains can appear.
ELECTRIC POWER
If the electrical circuit is overloaded with other appliances, your appliance may not operate
properly. It should be operated on a separate electrical circuit from other appliances.
3
Page 5
SO-307610_13540 BELLA Ultimate Brownie Maker Interior_Layout 1 11-04-18 10:42 AM Page 4
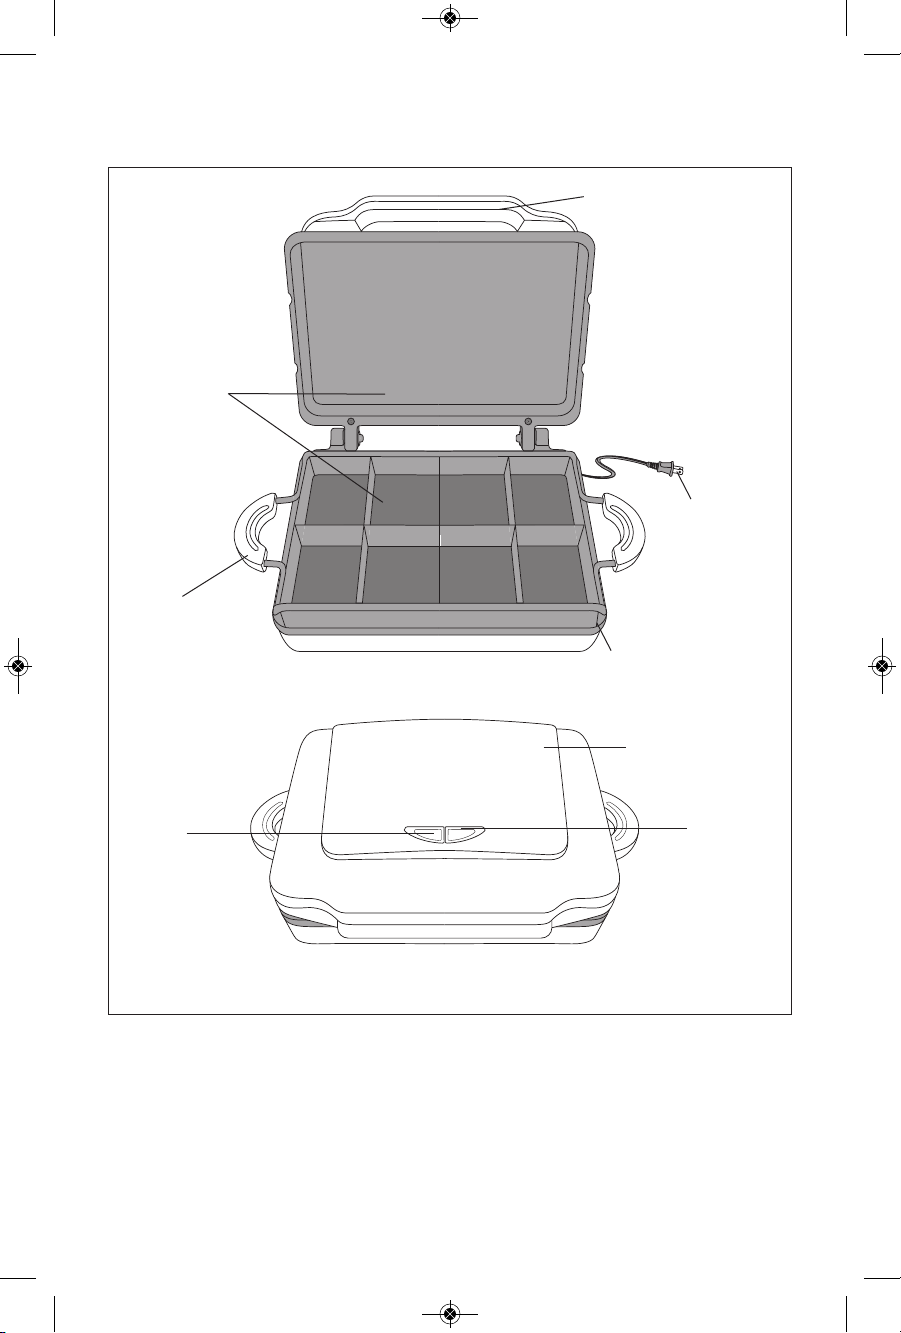
GETTING TO KNOW YOUR ULTIMATE BROWNIE MAKER
Product may vary slightly from illustrations.
Figure 1
Non-Stick Upper
and Lower
Cooking Plates
Metal Brownie Cutter
Insert Side Handles
Lid Handle
Polarized Plug
Non-Stick Metal Brownie
Cutter Insert (8 brownies)
Lid
Orange
POWER ON
Light
Green READY
Light
4
Page 6

SO-307610_13540 BELLA Ultimate Brownie Maker Interior_Layout 1 11-04-18 10:42 AM Page 5
BEFORE USING FOR THE FIRST TIME
1. Carefully unpack the Ultimate Brownie Maker and remove all packaging and materials.
2. Before using your Ultimate Brownie Maker for the first time, wipe the cooking plates
with a damp cloth to remove all dust, and then dry.
3. Wipe outer surfaces with a slightly damp, soft cloth or sponge.
4. Rinse the metal brownie cutter insert and dry.
CAUTION: Take care to prevent water from running into the appliance.
IMMERSE ULTIMATE BROWNIE MAKER BODY IN WATER
NEVER
OR ANY OTHER LIQUIDS!
5. Set the appliance on a dry, clean and flat surface. Keep the Ultimate Brownie Maker
closed until needed.
OPERATING INSTRUCTIONS
1. Place the brownie cutter insert onto the lower cooking plate. Make sure the insert’s
handle fits into the notches in the body of the Ultimate Brownie Maker. (See Figure 2.)
Figure 2
IMPORTANT: Lower the lid to make sure the insert is assembled properly
and that the lid closes completely.
2. Plug closed Ultimate Brownie Maker unit into a 120V AC electrical outlet to preheat.
The orange POWER ON light will illuminate.
NOTE: When the Ultimate Brownie Maker is heated for the first time, it may emit slight
smoke or odor. This is normal and should disappear after 1 or 2 uses. This does not
affect the safety of the appliance. However, as it may affect the flavor of the first brownies
prepared in the Ultimate Brownie Maker, it is recommended that these be discarded.
3. While preheating, prepare brownie batter. When the green READY light illuminates,
(allow 2 minutes) the Ultimate Brownie Maker is preheated.
GENERAL BROWNIE BAKING PROCEDURES
1. Brush both the lower and upper cooking plates with vegetable oil to assist in the removal
of the brownies after baking. Brush the brownie cutter insert with a generous coat
of vegetable oil while it sits on the lower cooking plate. Depending on the recipe, some
brownies may be more difficult to remove and may require a more generous application.
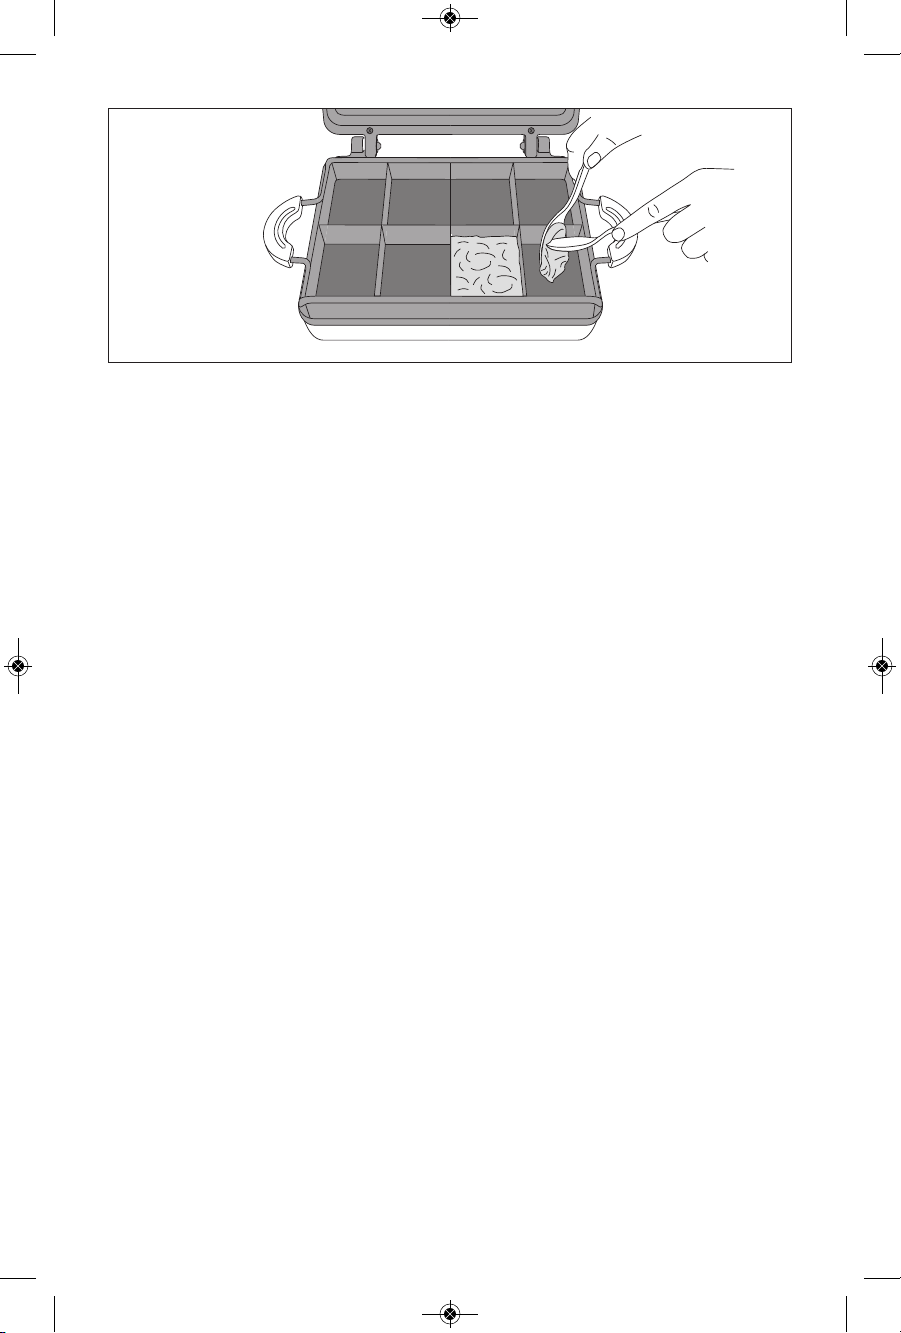
2. Use 2 tablespoons to add batter to the Ultimate Brownie Maker (one to add, the other
to push batter into Maker). Add 1 heaping tablespoon of batter to each of the 8 brownie
sections. (See Figure 3.) Add batter to all 8 sections.
CAUTION: It is recommended that all 8 brownie sections be filled when using
the Ultimate Brownie Maker. If there is not enough batter, do NOT attempt to bake
a short batch. A smaller amount may cause the baking times to change and may produce
inconsistent and unsatisfactory baking results.
5
Page 7
SO-307610_13540 BELLA Ultimate Brownie Maker Interior_Layout 1 11-04-18 10:42 AM Page 6
Figure 3
IMPORTANT: Do not fill batter more than 1⁄2 to 2⁄3-way up the cutter sides.
Brownies will expand when baked. Results may vary by recipe.
3. After batter has been added, use the lid handle to lower the top lid and bake
for approximately 8 minutes.
NOTE: The green READY light will cycle on and off as the unit maintains baking
temperatures.
NOTE: As brownies bake, steam will be emitted from the Ultimate Brownie Maker.
This is normal.
4. After 8 minutes, wearing a protective oven mitt or potholder, use the lid handle to lift
the top lid to the open position.
WARNING: Do not grasp the insert’s side handles. Use the lid handle.
5. Lift the top lid to expose the baked brownies and allow to cook (opened)
for 1 additional minute.
NOTE: Cooking times may vary slightly based on the temperature of the Ultimate Brownie
Maker, amount of batter, and brownie batter recipe.
6. If necessary, lower the lid and continue cooking for 15 seconds at a time until brownies
are baked to your liking.
7. Wearing oven mitts, grasp the metal brownie cutter insert’s side handles,
lift slowly and carefully up and out of the lower cooking plate. Set aside.
8. Use a heat-proof plastic or wooden spatula to remove cut baked brownies.
NOTE: If additional brownies are to be baked, wearing a protective oven mitt,
wipe
the cooking plates clean with a dry cloth or paper towel. Keep the Ultimate Brownie
Maker closed to retain heat. Always wait until the green READY light illuminates
before baking more brownies.
9. Oil both the lower and upper cooking plates and metal brownie cutter insert
with a generous coat of vegetable oil, add batter and bake following the instructions
previously described.
10. When all brownie baking is complete, unplug the power cord from electric outlet.
11. Do not clean unit until it is fully cooled.
USER MAINTENANCE INSTRUCTIONS
This appliance requires little maintenance. It contains no user serviceable parts. Do not try
to repair it yourself. Contact a qualified appliance repair technician if the product requires
servicing.
CARE & CLEANING INSTRUCTIONS
CAUTION: Unplug from electrical outlet and allow to cool thoroughly before cleaning.
1. Remove the metal brownie cutter before cleaning. The metal brownie cutter is top-rack
dishwasher safe or can be hand washed in hot, soapy water.
2. The Ultimate Brownie Maker unit does not disassemble for cleaning.
6
Page 8
SO-307610_13540 BELLA Ultimate Brownie Maker Interior_Layout 1 11-04-18 10:42 AM Page 7
3. Never immerse appliance in water or other liquids. Never place the Ultimate Brownie
Maker in dishwasher.
4. The cooking plates should be cleaned and conditioned before each heating.
5. Brush cooking plates with a clean, soft pastry brush or cloth. To condition plates,
lightly coat the cooking surfaces with solid vegetable shortening or vegetable oil.
Carefully follow suggested cleaning procedures below.
To protect the premium quality non-stick surfaces, use a heat-proof plastic
6.
or a wooden spatula to remove cut brownies.
WARNING: The Ultimate Brownie Maker is very hot during use. Never use plastic
or nylon utensils that are not marked heat-proof as they may melt and damage
the non-stick cooking surfaces.
7. To remove any batter baked onto the cooking plates or brownie cutter insert,
pour a small amount of cooking oil onto the hardened batter. Allow to set for 5 minutes,
then
wipe softened batter off with a paper towel or soft cloth. Remove stubborn stains
with a plastic mesh puff or pad. A clean, round kitchen brush or a toothbrush works
well to remove baked-on batter from the metal brownie cutter insert. For best results,
use only products with directions stating they are safe for cleaning non-stick cooking
surfaces. Do not use steel wool or coarse scouring pads.
8. The exterior finish should be cleaned with a non-abrasive cleaner and a soft, damp cloth.
Dry thoroughly.
STORING INSTRUCTIONS
1. Make sure Ultimate Brownie Maker is unplugged and fully cooled.
2. Lower the lid.
3. WARNING: Never store Ultimate Brownie Maker while it is hot or still plugged in.
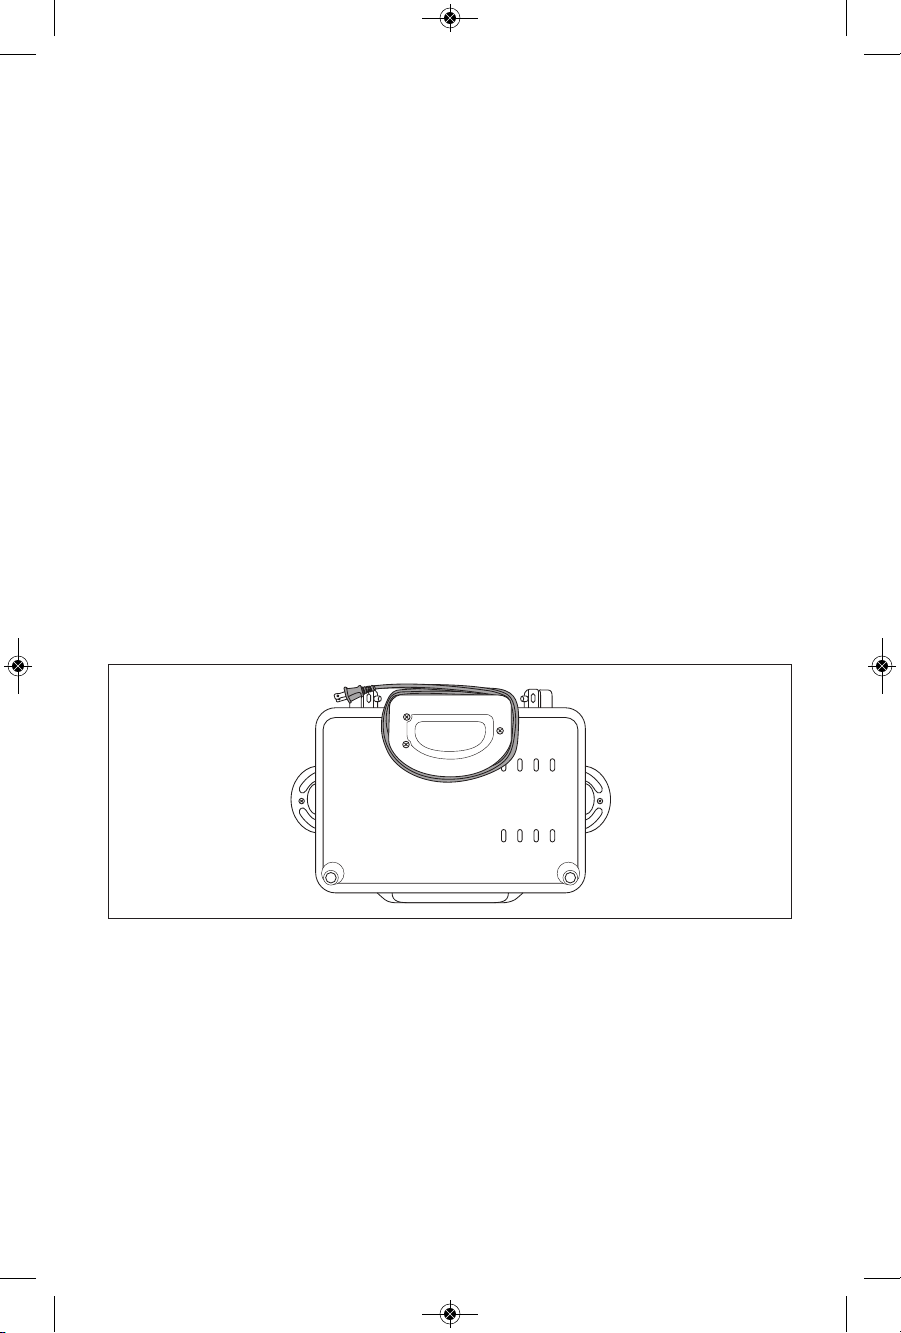
4. Use the cord wrap on the bottom of the Ultimate Brownie Maker to store the cord.
(See Figure 4.)
Figure 4
5. Do not put any stress on the cord where it enters unit, as this could cause the cord
to fray and break.
6. Store Ultimate Brownie Maker in its box or in a clean, dry area.
7
Page 9

SO-307610_13540 BELLA Ultimate Brownie Maker Interior_Layout 1 11-04-18 10:42 AM Page 8
RECIPES
–––––––––––––––––––––––––––––––––––––––––––––––––––––––––––––
CAKE-LIKE BROWNIES
–––––––––––––––––––––––––––––––––––––––––––––––––––––––––––––
DECADENT DOUBLE CHOCOLATE ROCKY ROAD SUNDAE
–––––––––––––––––––––––––––––––––––––––––––––––––––––––––––––
BLONDIES HAVE MORE FUN!
–––––––––––––––––––––––––––––––––––––––––––––––––––––––––––––
CREAM CHEESE MARBLE BROWNIES
–––––––––––––––––––––––––––––––––––––––––––––––––––––––––––––
MINTY GRASSHOPPER BROWNIES
–––––––––––––––––––––––––––––––––––––––––––––––––––––––––––––
ROCKY ROCKY ROAD BROWNIES
–––––––––––––––––––––––––––––––––––––––––––––––––––––––––––––
PEANUT BUTTER SWIRL BROWNIES
–––––––––––––––––––––––––––––––––––––––––––––––––––––––––––––
CHOCOLATE MACAROON BROWNIES
–––––––––––––––––––––––––––––––––––––––––––––––––––––––––––––
HAZELNUT GLAZED BROWNIES
–––––––––––––––––––––––––––––––––––––––––––––––––––––––––––––
MONKEY
–––––––––––––––––––––––––––––––––––––––––––––––––––––––––––––
BUSINESS (CHOCOLATE/BANANA/
RAISIN/WALNUT) BROWNIES
ULTIMATE CHERRY RED BROWNIES
8
Page 10

SO-307610_13540 BELLA Ultimate Brownie Maker Interior_Layout 1 11-04-18 10:42 AM Page 9
Here’s a great trick to convert boxed chewy brownies
into delicious cake-like bars of goodness.
CAKE-LIKE BROWNIES
1 (19 to 21 oz.) package brownie mix (13x9-inch pan size)
Water, vegetable oil and egg called for on brownie mix box
1 cup sour cream
________________________________________________________________
1. Preheat Brownie Maker.
2. Prepare brownie mix according to package directions.
3. Fold in sour cream. Batter will be creamy.
4. Bake brownies following the instructions outlined
in General Brownie Baking Procedures in this instruction manual.
________________________________________________________________
Makes: 32 – 40 ultimate brownies (4 to 5 batches)
________________________________________________________________
DECADENT DOUBLE CHOCOLATE
ROCKY ROAD SUNDAE
Microwave brownie in a microwave-safe bowl for 30 seconds,
until warm. Add a scoop of chocolate ice cream,
drizzle with fudge or caramel sauce and sprinkle with chips,
marshmallows and more nuts. These scratch brownies
are rich and flavorful without being too sweet.
________________________________________________________________
9
Page 11

SO-307610_13540 BELLA Ultimate Brownie Maker Interior_Layout 1 11-04-18 10:42 AM Page 10
BLONDIES HAVE MORE FUN!
1 cup sifted all-purpose flour
1/2 teaspoon baking powder
1/4 teaspoon baking soda
1/2 teaspoon salt
1/2 cup chopped cashews
1/4 cup semisweet chocolate chips
1/4 cup butterscotch chips
6 tablespoons unsalted butter
1 cup packed brown sugar
1 egg
2 teaspoons vanilla extract
________________________________________________________________
1. Preheat Brownie Maker.
2. Place flour, baking powder, baking soda, and salt
6. Beat egg in small bowl and add to wet ingredients.
8. Add dry ingredients slowly to the wet ingredients,
10. Following the instructions outlined in General Brownie
11. Baking Procedures in this instruction manual,
add batter to the Ultimate Brownie Maker, evenly distribute
remaining batter to each brownie section, then bake.
in a medium bowl. Sift together.
3. Add chopped nuts and chips.
4. Mix dry ingredients well and set aside.
5. Melt butter. Add 1 cup firmly packed brown
sugar and mix well. Allow to cool slightly.
7. Add vanilla and mix until well blended.
mixing well. Batter will be thick.
9. Separate batter into 2 equal batches.
________________________________________________________________
Makes: 16 ultimate brownies
________________________________________________________________
10
Page 12

SO-307610_13540 BELLA Ultimate Brownie Maker Interior_Layout 1 11-04-18 10:42 AM Page 11
CREAM CHEESE
MARBLE BROWNIES
1 (19 to 21 oz.) package brownie mix (13x9-inch pan size)
Water, vegetable oil and egg called for on brownie mix box
1 (8 oz.) package cream cheese, room temperature
1/3 cup confectioner’s sugar
1 egg
1/2 teaspoon vanilla extract
________________________________________________________________
1. Prepare brownie mix according to package directions.
2. Prepare cream cheese marble.
3. In a separate bowl, use a hand mixer
to beat cream cheese until smooth.
4. Add sugar, egg and vanilla; mix well.
5. Following the instructions outlined in General Brownie
Baking Procedures in this instruction manual,
NOTE: Do not fill batter more than 1/2-way up the cutter sides.
6. Using a small teaspoon, add a dollop of cream cheese mixture
7. Using a small plastic knife, swirl cream cheese marble into batter.
8. Bake according to the General Brownie Baking Procedures.
add batter to the Ultimate Brownie Maker.
to the top of each unbaked brownie.
________________________________________________________________
Makes: 32 ultimate brownies
________________________________________________________________
11
Page 13
SO-307610_13540 BELLA Ultimate Brownie Maker Interior_Layout 1 11-04-18 10:42 AM Page 12
The beautiful and refreshing minty green color looks amazing
on any Christmas holiday table and promises to become
a family favorite. And… a wonderful way to use those colorful holiday
peppermint candy canes!
MINTY GRASSHOPPER
BROWNIES
1 (19 to 21 oz.) package brownie mix (13x9-inch pan size)
Water, vegetable oil and egg called for on brownie mix box
1 (8 oz.) package cream cheese, room temperature
3 cups confectioner’s sugar
1/4 cup unsalted butter, softened
2 tablespoons milk
1/4 teaspoon mint extract
4 to 5 drops green food coloring
1 cup crushed peppermint sticks or candy canes, optional
________________________________________________________________
1. Prepare brownie mix according to package directions.
2. Bake brownies following the instructions outlined in General
Brownie Baking Procedures in this instruction manual.
3. Place candy in a large zip lock bag.
4. Using a rolling pin or mallet, crush candy into small pieces.
5. In a large bowl, use a hand mixer to beat
all frosting ingredients until smooth.
6. Fold candy pieces into whipped frosting. Set aside.
7. Frost cooled brownies with Green Grasshopper Mint Frosting.
________________________________________________________________
Makes: 32 ultimate brownies
________________________________________________________________
12
Page 14

SO-307610_13540 BELLA Ultimate Brownie Maker Interior_Layout 1 11-04-18 10:42 AM Page 13
ROCKY ROCKY
ROAD BROWNIES
1 (19 to 21 oz.) package brownie mix (13x9-inch pan size)
Water, vegetable oil and egg called for on brownie mix box
1-1/3 cups (8 oz) chocolate chips or mini-chips
(choice of: dark, light, white chocolate or any combination)
any chocolate covered nuts, cashews, macadamia or pistachios)
________________________________________________________________
NOTE: Closing the lid may cause the marshmallows to burn
3/4 to 1 cup chopped nuts (recommended:
1 to 1-1/2 cups miniature marshmallows
1. Preheat Ultimate Brownie Maker.
2. Prepare brownie mix according to package directions.
3. Fold in chips and nuts.
4. Following the instructions outlined in General
Brownie Baking Procedures in this instruction manual,
add batter to the Ultimate Brownie Maker.
IMPORTANT: After 8 minutes of the initial baking,
lift the lid and place 6 to 10 miniature marshmallows
on top of each brownie.
5. Allow to sit in opened Brownie Maker for 1 minute
until marshmallows are slightly melted.
and stick to the upper cooking plate.
________________________________________________________________
Makes: 32 – 40 ultimate brownies
________________________________________________________________
13
Page 15

SO-307610_13540 BELLA Ultimate Brownie Maker Interior_Layout 1 11-04-18 10:42 AM Page 14
PEANUT BUTTER
SWIRL BROWNIES
1/2 lb. unsalted butter
2/3 cup semi-sweet chocolate chips
2/3 cup milk chocolate chocolate chips
1-1/2 oz. semi-sweet chocolate
3 extra-large eggs
3 tablespoons maple syrup
1 tablespoon pure vanilla extract
1-1/2 cups brown sugar
2/3 cup all-purpose flour
1 teaspoon baking powder
1/2 teaspoon kosher salt
12 teapoons smooth peanut butter
(4 teaspoons per batch)*
________________________________________________________________
2. Melt butter, chocolate chips, and semi-sweet chocolate
in a medium bowl over simmering water. Allow to cool slightly.
3. In a large bowl, stir (do not beat) the eggs,
4. Add the warm chocolate mixture to the egg mixture
5.
Sift the flour, baking powder, and salt in a medium bowl.
6. Before preparing each batch of brownies, melt 4 teaspoons*
7. Following the instructions outlined in General Brownie
Baking Procedures in this instruction manual,
NOTE: Do not fill batter more than 1/2-way up the cutter sides.
8. Add 1/2 teaspoon of warm peanut butter to each
9. Bake according to the General Brownie Baking Procedures.
________________________________________________________________
________________________________________________________________
*may add more to your liking
1. Preheat Ultimate Brownie Maker.
maple syrup, vanilla, and sugar.
and allow to cool to room temperature.
Add to the cooled chocolate mixture.
of peanut butter in a microwave-safe bowl
on HIGH for about 20 seconds.
add batter to the Ultimate Brownie Maker.
unbaked brownie and swirl into batter.
Makes: 24 ultimate brownies
14
Page 16

SO-307610_13540 BELLA Ultimate Brownie Maker Interior_Layout 1 11-04-18 10:42 AM Page 15
CHOCOLATE MACAROON
BROWNIES
1/2 cup unsalted butter, softened
1 cup brown sugar
2 eggs
1 teaspoon vanilla extract
1 cup all-purpose flour
1/2 teaspoon cream of tartar
1/4 cup unsweetened cocoa powder
1/2 cup chopped almonds, optional
1/2 cup milk
1 cup mini marshmallows
1 cup shredded, sweetened coconut
________________________________________________________________
1. Preheat Ultimate Brownie Maker.
2. In a large bowl, cream together the butter and brown sugar.
3.
Beat in the eggs, one at a time, then stir in vanilla.
4. In a separate bowl, combine the flour, cream of tartar and cocoa;
stir into the egg mixture until well blended. Fold in nuts.
5. Prepare the coconut topping. Place milk and marshmallows
in a microwave-safe bowl. Add coconut on top.
NOTE: Marshmallows expand when heated.
6. Make sure the coconut is on top
of the marshmallows to contain the topping.
7. Microwave on HIGH for 1 minute 30 seconds. Mix well.
8. Following the instructions outlined in General Brownie
Baking Procedures in this instruction manual,
add batter to the Ultimate Brownie Maker.
NOTE: To avoid burning the coconut tops, do not fill batter
9. Using a small teaspoon, add coconut topping to each brownie.
10. Bake according to the General Brownie Baking Procedures.
________________________________________________________________
________________________________________________________________
more than 1/2-way up the cutter sides.
Makes: 16 ultimate brownies
15
Page 17

SO-307610_13540 BELLA Ultimate Brownie Maker Interior_Layout 1 11-04-18 10:42 AM Page 16
HAZELNUT GLAZED
BROWNIES
1 (19 to 21 oz.) package brownie mix (13x9-inch pan size)
Water, vegetable oil and egg called for on brownie mix box
1 cup sour cream
1 cup milk chocolate chips
1/2 cup chopped hazelnuts
1 cup heavy cream
1/2 cup Nutella
________________________________________________________________
1. Preheat the Ultimate Brownie Maker
2. Prepare brownie mix according to package directions.
3. Fold in sour cream, chocolate chips and nuts
and mix well. Batter will be loose.
4. Bake brownies following the instructions outlined
in General Brownie Baking Procedures in this instruction manual.
5. Prepare the glaze. In small saucepan, heat cream to just boiling.
6. Remove from heat and add Nutella®.
7. Allow to sit 5 minutes and then stir until well blended.
8. Spoon warm Hazelnut Glaze over cooled brownies and serve.
________________________________________________________________
Makes: 32 – 40 ultimate brownies
________________________________________________________________
®
16
Page 18

SO-307610_13540 BELLA Ultimate Brownie Maker Interior_Layout 1 11-04-18 10:42 AM Page 17
Fresh bananas add a fresh, flavorful moist topping to these treats.
MONKEY BUSINESS
(CHOCOLATE/BANANA/
RAISIN/WALNUT) BROWNIES
1 (19 to 21 oz.) package brownie mix (13x9-inch pan size)
Water, vegetable oil and egg called for on brownie mix box
1/2 cup milk chocolate chips
1/2 cup white milk chocolate chips
1/2 cup chocolate covered or white yogurt covered raisins
1/2 cup chopped walnuts (or any nut of your choice)
bananas,
________________________________________________________________
1. Preheat the Ultimate Brownie Maker.
2. Prepare brownie mix according to package directions.
3. Fold in chips, raisins, and chopped nuts.
4. Following the instructions outlined in General Brownie
Baking Procedures in this instruction manual,
add batter to the Ultimate Brownie Maker.
NOTE: To avoid over-browned bananas, do not fill batter
more than 1/2-way up the cutter sides.
5. To encourage more banana browning, fill metal brownie
cutter up to 2/3 with batter (Bananas get sweeter as they brown.)
6. Before baking, add one slice of banana to the top of each brownie.
7. Bake according to the General Brownie Baking Procedures.
________________________________________________________________
Makes: 32 – 40 ultimate brownies
________________________________________________________________
sliced
17
Page 19

SO-307610_13540 BELLA Ultimate Brownie Maker Interior_Layout 1 11-04-18 10:42 AM Page 18
ULTIMATE CHERRY
RED BROWNIES
1 (19 to 21 oz.) package brownie mix (13x9-inch pan size)
egg (as called for on brownie mix box)
cherry pie filling, canned
________________________________________________________________
1. Preheat the Ultimate Brownie Maker.
2. Replace an equal amount of water and vegetable oil
(as called for on brownie mix box) with cherry pie filling
3. Combine and mix all ingredients in a medium bowl.
4. Bake brownies following the instructions outlined in General
Brownie Baking Procedures in this instruction manual.
________________________________________________________________
Makes: 32 ultimate brownies
________________________________________________________________
18
Page 20

SO-307610_13540 BELLA Ultimate Brownie Maker Interior_Layout 1 11-04-18 10:42 AM Page 19
CONSIGNES DE SÉCURITÉ
IMPORTANTES
AVERTISSEMENT : Lorsqu'on utilise des appareils électriques, certaines mesures de sécurité
élémentaires doivent être respectées :
1. Lire toutes les consignes avant d’utiliser l’appareil.
2. La fiche de cet appareil doit être branchée dans une prise murale de 120 V c.a.
seulement.
3. Afin de prévenir tout risque de choc électrique, ne pas immerger le cordon, la fiche
ou l’unité de cuisson dans l’eau ou dans tout autre liquide.
4.
Ne pas toucher les surfaces chaudes. Utiliser les poignées.
5. Cet appareil n'est pas destiné à être utilisé par des personnes (y compris des enfants)
aux capacités physiques, sensorielles ou mentales réduites ou n'ayant pas
les connaissances et l'expérience nécessaires, sauf si elles sont supervisées
ou si les personnes responsables de leur sécurité leur ont donné des instructions.
6. Une surveillance étroite est requise en présence d’enfants pour s’assurer qu’ils ne jouent
pas avec l’appareil.
7. Débrancher l’appareil de la prise murale lorsqu’il n’est pas utilisé et avant le nettoyage.
Laisser l’appareil refroidir avant de le nettoyer ou de le ranger.
8. Ne jamais tirer brusquement sur le cordon pour débrancher l’unité de cuisson
de la prise murale ; plutôt, saisir la fiche et la tirer pour débrancher l’appareil.
9. Ne pas faire fonctionner l’appareil si le cordon est endommagé. Ne pas utiliser
cet appareil s’il est défectueux, s’il a été échappé ou endommagé d'une quelconque
façon. Pour éviter le risque de choc électrique, ne jamais tenter de réparer le cuiseur
à brownies de luxe soi-même. On doit le faire examiner, réparer ou faire faire
un ajustement mécanique ou électrique par un technicien qualifié. Un réassemblage
incorrect peut causer un risque de choc électrique lorsque le cuiseur à brownies de luxe
est utilisé.
10. L’utilisation d’accessoires non recommandés par le fabricant de l’appareil peut entraîner
un incendie, une électrocution ou des blessures corporelles.
11. Ne pas utiliser l’appareil à l’extérieur ou pour un usage commercial.
12. Ne pas utiliser cet appareil à des fins autres que celles pour lesquelles il a été conçu.
13. Ne pas laisser le cordon pendre d’un bord de table ou d’un comptoir, ni entrer en contact
avec une surface chaude.
14. Ne pas placer sur ou à proximité d'un élément de cuisinière électrique ou à gaz
ni dans un four chaud.
15. Utiliser l’appareil seulement sur une surface plane, horizontale et résistante à la chaleur.
16. Faire preuve d’une extrême prudence en déplaçant un appareil s’il contient des aliments
chauds, de l'eau, de l’huile ou d’autres liquides chauds.
17. Pour débrancher l’appareil, retirer la fiche de la prise de courant murale.
18. Toujours débrancher l’appareil après utilisation. L’appareil restera en MARCHE
tant qu'il n'est pas débranché.
19. MISE EN GARDE - SURFACES CHAUDES : Cet appareil génère de la chaleur lorsqu’il
fonctionne. Prendre les précautions d’usage afin de prévenir les risques de brûlures,
d’incendie ou autres blessures et dommages matériels.
20. Pour permettre une bonne circulation d’air, prévoir une ventilation suffisante au-dessus
et autour de l’appareil lorsqu’il est en marche. Ne pas laisser cet appareil entrer
en contact avec des rideaux, des draperies, des vêtements, des linges à vaisselle
ou d’autres matériaux inflammables, lorsqu’il fonctionne.
21. Brancher seulement dans une prise murale.
19
Page 21

SO-307610_13540 BELLA Ultimate Brownie Maker Interior_Layout 1 11-04-18 10:42 AM Page 20
CONSIGNES DE SÉCURITÉ
IMPORTANTES ADDITIONNELLES
MISE EN GARDE : Cet appareil devient chaud pendant son utilisation et demeure chaud
pendant quelque temps lorsqu'il est éteint. Toujours porter des gants isolants
lorsqu’on manipule des objets chauds et laisser aux parties métalliques le temps
de refroidir avant de nettoyer l'appareil. Ne placer aucun objet sur le dessus de l’appareil
lorsqu'il est en marche ou lorsqu'il est chaud.
1. Les personnes qui utilisent cet appareil doivent lire le mode d’emploi et le comprendre
avant d’utiliser cet appareil ou de le nettoyer.
2. Ne jamais laisser cet appareil en marche sans surveillance.
3. AVERTISSEMENT : Pour prévenir les brûlures et blessures, ne pas saisir les poignées
latérales du moule à découper durant ou après la cuisson pour soulever le couvercle.
Toujours
4. AVERTISSEMENT : Le moule à découper pour brownies en métal devient chaud durant
le préchauffage et la cuisson. Toujours utiliser des gants isolants lorsqu’on manipule
l’appareil et laisser le temps de refroidir avant de nettoyer l'appareil.
NOTES SUR LA FICHE
Cet appareil est muni d’une fiche polarisée (une lame plus large que l’autre). Afin d’éviter
tout risque d’électrocution, on ne peut brancher la fiche que dans un seul sens. Si la fiche
ne s’insère pas complètement dans la prise, on doit la tourner dans l’autre sens. Si cela
ne fonctionne toujours pas, on doit communiquer avec un électricien qualifié. On ne doit
en aucun cas modifier la fiche soi-même.
utiliser la poignée du couvercle pour ouvrir le cuiseur à brownies de luxe.
NOTES SUR LE CORDON
Le cordon court fourni (ou cordon amovible) devrait être utilisé afin de prévenir tout risque
d’enchevêtrement ou de trébuchement sur un plus long cordon. Ne pas utiliser de rallonge
avec ce produit.
AVERTISSEMENT DE MIGRATION DE PLASTIFIANTS
MISE EN GARDE : Afin d’éviter la migration de plastifiants vers le fini de comptoirs, de tables
ou de tout autre meuble, placer des sous-verres faits de matière NON PLASTIQUE
ou des napperons entre l’appareil et la surface du comptoir ou de la table. Si cette consigne
n’est pas respectée, le fini du comptoir ou de la table noircira et s’en suivront des ternissures
permanentes ou des taches indélébiles.
ALIMENTATION ÉLECTRIQUE
Si le circuit électrique est surchargé parce qu’il doit alimenter d’autres appareils en plus
du nouvel appareil, ce dernier ne fonctionnera pas correctement. Il est conseillé de faire
fonctionner l’appareil sur un circuit électrique distinct.
POUR USAGE DOMESTIQUE
SEULEMENT
CONSERVER CES CONSIGNES
20
Page 22

SO-307610_13540 BELLA Ultimate Brownie Maker Interior_Layout 1 11-04-18 10:42 AM Page 21
CONNAÎTRE SON CUISEUR À BROWNIES DE LUXE
Le produit peut légèrement différer des illustrations.
Figure 1
Plaques de cuisson
antiadhésives
supérieure
et inférieure
Poignées latérales
du moule à découper
pour brownies
en métal
Poignée du couvercle
Fiche polarisée
Moule à découper pour brownies
en métal antiadhésif (8 brownies)
Couvercle
Voyant
d'alimentation
orange
Voyant
vert PRÊT
21
Page 23

SO-307610_13540 BELLA Ultimate Brownie Maker Interior_Layout 1 11-04-18 10:42 AM Page 22
AVANT D’UTILISER L’APPAREIL POUR LA PREMIÈRE FOIS
1. Déballer avec soin le cuiseur à brownies de luxe et retirer tous les matériaux d’emballage.
2. Avant d’utiliser le cuiseur à brownies de luxe pour la première fois, essuyer les plaques
de cuisson avec un chiffon humide pour enlever toute la poussière et les sécher.
3. Essuyer les surfaces extérieures avec un chiffon doux ou une éponge légèrement humide.
4. Rincer le moule à découper pour brownies en métal et le sécher.
MISE EN GARDE : Éviter que de l’eau n’entre dans l’appareil. NE JAMAIS IMMERGER
LE BOÎTIER DU CUISEUR À BROWNIES DE LUXE DANS DE L'EAU OU DANS TOUT
AUTRE LIQUIDE !
5. Déposer l’appareil sur une surface sèche, propre et plane. Garder le cuiseur à brownies
de luxe fermé jusqu'au moment de l'utilisation.
INSTRUCTIONS D’UTILISATION
1. Placer le moule à découper pour brownies sur la plaque de cuisson inférieure.
S’assurer que la poignée du moule à découper s'insère dans les encoches du boîtier
du cuiseur de brownies de luxe. (Voir Figure 2.)
Figure 2
IMPORTANT : Abaisser le couvercle pour s’assurer que le moule à découper
est assemblé correctement et que le couvercle ferme complètement.
2. Brancher l’unité du cuiseur à brownies de luxe fermée dans une prise électrique
de 120 V c.a. pour la préchauffer. Le voyant d'alimentation orange (POWER ON)
s'allumera.
REMARQUE : Lorsque le cuiseur à brownies de luxe est chauffé pour la première fois,
une fumée ou une légère odeur de fumée peut en émaner. Ceci est tout à fait normal
et disparaîtra après une ou deux utilisations. Cela n’aura aucun effet sur la sécurité
de l’appareil. Cependant, cela peut avoir un effet sur la saveur des premiers brownies
préparés dans le cuiseur à brownies de luxe. Il est recommandé de jeter ces premiers
brownies.
3. Pendant le préchauffage, préparer la pâte à brownies. Lorsque le voyant vert PRÊT
s'allume, après environ 2 minutes, le cuiseur à brownies de luxe est préchauffé.
DIRECTIVES GÉNÉRALES POUR LA CUISSON DES BROWNIES
1. Brosser les plaques de cuisson supérieure et inférieure avec de l’huile végétale,
ce qui permet de retirer plus facilement les brownies après la cuisson. Étendre
une généreuse couche d’huile végétale à l’aide d’une brosse sur le moule à découper
pour brownies lorsque ce dernier se trouve sur la plaque de cuisson inférieure.
Selon la recette, certains brownies peuvent être plus difficiles à retirer et peuvent
nécessiter l’application de plus d’huile.
2. Utiliser 2 cuillères à thé pour ajouter la pâte au cuiseur à brownies de luxe
(une pour ajouter et l’autre pour pousser la pâte dans le cuiseur). Ajouter 1 cuillerée
à soupe généreuse de pâte à chacun des 8 sections de brownies. (Voir Figure 3.)
Ajouter la pâte aux 8 sections.
22
Page 24

SO-307610_13540 BELLA Ultimate Brownie Maker Interior_Layout 1 11-04-18 10:42 AM Page 23
MISE EN GARDE : Il est recommandé de remplir les 8 sections à brownies lors
de l’utilisation du cuiseur à brownies de luxe. S’il n’y a pas assez de pâte,
ne PAS tenter de cuire une petite fournée. Une petite quantité peut entraîner
des modifications dans les temps de cuisson et peut produire des résultats de cuisson
non constants et insatisfaisants.
Figure 3
IMPORTANT : Ne pas remplir au-delà de la moitié ou des deux tiers de la hauteur
du moule à découper. Les brownies prendront de l’expansion lors de la cuisson.
Les résultats peuvent varier selon la recette.
3. Après l’ajout de la pâte, utiliser la poignée de couvercle pour abaisser le couvercle
supérieur et cuire pendant approximativement 8 minutes.
REMARQUE : Le voyant vert PRÊT s'allumera et s'éteindra plusieurs fois pendant
la cuisson, indiquant que l’appareil maintient la température de cuisson.
REMARQUE : Pendant que les brownies cuisent, de la vapeur s’échappera du cuiseur
à brownies de luxe. Cela est normal.
4. Après 8 minutes, à l'aide de poignées ou de gants de cuisson, saisir la poignée
pour soulever le couvercle et l'ouvrir complètement.
AVERTISSEMENT : Ne pas saisir les poignées latérales du moule à découper.
Utiliser la poignée du couvercle.
5.
Ouvrir le couvercle pour exposer les brownies cuits et les laisser cuire (ouvert)
pendant 1 minute supplémentaire.
REMARQUE : Les temps de cuisson peuvent varier légèrement selon la température
du cuiseur à brownies de luxe, la quantité de pâte et la recette de pâte à brownies.
6. Si nécessaire, abaisser le couvercle et continuer la cuisson pendant 15 secondes
à la fois, jusqu’à ce que les brownies soient cuits au goût.
7. À l’aide de gants de cuisson, saisir les poignées latérales du moule à découper,
soulever lentement et prudemment et éloigner le moule à découper de la plaque
de cuisson inférieure. Mettre de côté.
8. Utiliser une spatule en plastique ou en bois résistant à la chaleur pour retirer les brownies
cuits.
REMARQUE : Si d'autres brownies doivent être cuits, à l’aide d’un gant de cuisson,
essuyer les plaques de cuisson avec un chiffon sec ou un essuie-tout. Garder le cuiseur
à brownies de luxe fermé pour conserver la chaleur. Toujours attendre que le voyant vert
PRÊT soit allumé avant de cuire d’autres brownies.
9. Huiler les plaques de cuisson inférieure et supérieure et le moule à découper
avec une généreuse couche d’huile végétale, ajouter la pâte et cuire selon les instructions
décrites précédemment.
10. Lorsque tous les brownies ont été cuits, débrancher la fiche de la prise murale.
11. Ne pas nettoyer l’appareil avant qu'il ait complètement refroidi.
23
Page 25

SO-307610_13540 BELLA Ultimate Brownie Maker Interior_Layout 1 11-04-18 10:42 AM Page 24
INSTRUCTIONS POUR L’ENTRETIEN
Cet appareil requiert peu d’entretien. Il ne contient pas de pièces réparables par l’utilisateur.
Ne pas tenter de le réparer soi-même. Communiquer avec un technicien qualifié en réparation
d’appareils si l’appareil nécessite une réparation.
INSTRUCTIONS D’ENTRETIEN ET DE NETTOYAGE
MISE EN GARDE : Débrancher l’appareil de la prise murale et le laisser refroidir complètement
avant de le nettoyer.
1. Retirer le moule à découper pour brownies en métal avant le nettoyage.
Le moule à découper pour brownies en métal peut être lavé dans le panier supérieur
du lave-vaisselle ou à la main, à l'eau chaude savonneuse.
2. Le cuiseur à brownies de luxe ne se démonte pas pour le nettoyage.
3. Ne jamais immerger l’appareil dans l’eau ou d’autres liquides. Ne jamais mettre le cuiseur
à brownies de luxe au lave-vaisselle.
4. Les plaques de cuisson doivent être nettoyées et huilées avant chaque utilisation.
5. Brosser les plaques de cuisson avec un chiffon ou un pinceau doux propre.
Pour préparer les plaques, badigeonner légèrement les surfaces de cuisson
avec de la graisse alimentaire végétale solide ou de l’huile végétale.
Suivre soigneusement les procédures de nettoyage suggérées ci-dessous.
6. Pour protéger les surfaces antiadhésives de qualité supérieure, utiliser seulement
des ustensiles en plastique ou en bois résistants à la chaleur pour retirer les brownies.
AVERTISSEMENT : Le cuiseur à brownies de luxe est très chaud durant son utilisation.
Ne jamais utiliser d’ustensiles en plastique ou en nylon s'ils ne sont pas résistants
à la chaleur, puisqu’ils peuvent fondre et endommager les surfaces de cuisson
antiadhésives.
7. Pour retirer de la pâte cuite sur les plaques de cuisson ou le moule à découper,
verser une petite quantité d’huile de cuisson sur la pâte durcie. Laisser reposer 5 minutes
et essuyer ensuite la pâte ramollie avec un essuie-tout ou un chiffon doux.
Éliminer les taches tenaces avec un tampon à récurer en plastique. Une brosse
de cuisine ronde ou une brosse à dents propre fonctionne bien pour décoller la pâte cuite
du moule à découper pour brownies. Pour obtenir des résultats optimaux,
utiliser seulement des produits dont les instructions stipulent qu’ils sont sécuritaires
pour nettoyer des surfaces antiadhésives. Ne pas utiliser de laine d’acier ou de tampons
à récurer grossiers.
8. Le fini extérieur devrait être nettoyé avec un nettoyant non abrasif et un chiffon doux
humide. Bien sécher.
24 24
Page 26

SO-307610_13540 BELLA Ultimate Brownie Maker Interior_Layout 1 11-04-18 10:42 AM Page 25
INSTRUCTIONS DE RANGEMENT
1. S’assurer que l’appareil est débranché et complètement froid.
2. Abaisser le couvercle.
3. AVERTISSEMENT : Ne jamais ranger le cuiseur à brownies de luxe s’il est encore chaud
ou s’il n'est pas débranché.
4. Utiliser le range-cordon sur le dessous du cuiseur à brownies de luxe pour ranger
le cordon. (Voir Figure 4.)
Figure 4
5. Ne jamais mettre de pression sur le cordon, tout particulièrement où il se fixe à l’appareil,
6. Ranger l’appareil dans sa boîte ou dans un endroit sec et propre.
il pourrait s’effilocher et se briser.
car
25
Page 27

SO-307610_13540 BELLA Ultimate Brownie Maker Interior_Layout 1 11-04-18 10:42 AM Page 26
RECIPES
–––––––––––––––––––––––––––––––––––––––––––––––––––––––––––––
BROWNIES DE STYLE GÂTEAU
–––––––––––––––––––––––––––––––––––––––––––––––––––––––––––––
COUPE GLACÉE AUX BROWNIES ROCHER DÉCADENTS
–––––––––––––––––––––––––––––––––––––––––––––––––––––––––––––
CARRÉS BLONDS AMUSANTS
–––––––––––––––––––––––––––––––––––––––––––––––––––––––––––––
BROWNIES MARBRÉS AU FROMAGE À LA CRÈME
–––––––––––––––––––––––––––––––––––––––––––––––––––––––––––––
BROWNIES À LA MENTHE
–––––––––––––––––––––––––––––––––––––––––––––––––––––––––––––
BROWNIES ROCHER DÉCADENTS
–––––––––––––––––––––––––––––––––––––––––––––––––––––––––––––
BROWNIES AU TOURBILLON DE BEURRE D'ARACHIDE
–––––––––––––––––––––––––––––––––––––––––––––––––––––––––––––
BROWNIES MACARONS AU CHOCOLAT
–––––––––––––––––––––––––––––––––––––––––––––––––––––––––––––
BROWNIES GLACÉS À LA NOISETTE
–––––––––––––––––––––––––––––––––––––––––––––––––––––––––––––
BROWNIES « LE RÉGAL DES PETITS SINGES »
(CHOCOLAT, BANANE, RAISINS ET NOIX)
–––––––––––––––––––––––––––––––––––––––––––––––––––––––––––––
BROWNIES ROUGES AUX CERISES DE LUXE
26
Page 28

SO-307610_13540 BELLA Ultimate Brownie Maker Interior_Layout 1 11-04-18 10:42 AM Page 27
Voici une recette qui vous permettra de convertir une boîte de mélange à
brownies en délicieuses barres de style gâteau.
BROWNIES DE STYLE GÂTEAU
1 paquet (19 à 21 oz) de mélange à brownies
(pour un moule de 13 po x 9 po)
Eau, huile végétale et œuf, tel qu'indiqué
sur la boîte du mélange
1 tasse de crème sure
________________________________________________________________
1. Préchauffer le cuiseur à brownies.
2. Préparer le mélange à brownies en suivant les directives
de l'emballage. Incorporer délicatement la crème sûre.
3. Cuire les brownies en suivant les instructions présentées
dans la section Procédure de cuisson générale pour les brownies
________________________________________________________________
Donne : 32 à 40 brownies de luxe (4 à 5 fournées)
________________________________________________________________
La pâte sera crémeuse.
dans le présent manuel.
COUPE GLACÉE AUX BROWNIES
ROCHER DÉCADENTS
Chauffer les brownies dans un bol allant au four à micro-ondes
pendant 30 secondes, jusqu'à ce qu'ils soient chauds.
Ajouter une boule de crème glacée au chocolat, napper de sauce
au chocolat ou au caramel et parsemer de grains de chocolat,
________________________________________________________________
faciles à préparer, ces brownies sont riches et savoureux
Très
________________________________________________________________
de guimauves et de noix.
sans toutefois être trop sucrés.
27 27
Page 29

SO-307610_13540 BELLA Ultimate Brownie Maker Interior_Layout 1 11-04-18 10:42 AM Page 28
CARRÉS BLONDS
AMUSANTS
1 tasse de farine tout usage tamisée
1/2 cuillerée à thé de poudre à pâte (levure chimique)
1/4 cuillerée à thé de bicarbonate de soude
1/2 cuillerée à thé de sel
1/2 tasse de noix de cajou hachées
1/4 tasse de grains de chocolat mi-sucré
1/4 tasse de grains de caramel écossais
6 cuillerées à soupe de beurre non salé
1 tasse de cassonade tassée
1 œuf2 cuillerées à thé d'extrait de vanille
________________________________________________________________
1. Préchauffer le cuiseur à brownies.
2. Placer la farine, la poudre à pâte, le bicarbonate de soude
et le sel dans un bol moyen. Tamiser les ingrédients ensemble.
Ajouter les noix hachées et les grains. Bien mélanger
3. Faire fondre le beurre. Ajouter 1 tasse de cassonade
bien tassée et bien mélanger. Laisser légèrement refroidir.
4.
Battre l'œuf dans un petit bol et l'ajouter aux ingrédients
humides. Ajouter la vanille et battre jusqu'à ce que les ingrédients
5. Ajouter lentement les ingrédients secs sur les ingrédients
6. Séparer la pâte en 2 portions égales. Suivre les instructions
présentées dans la section Procédure de cuisson générale
pour les brownies du présent manuel et répartir la pâte également
dans les sections du moule à découper du cuiseur à brownies.
________________________________________________________________
________________________________________________________________
les ingrédients secs et les réserver.
soient bien mélangés.
humides et bien mélanger. La pâte sera épaisse.
Donne : 16 brownies de luxe
28
Page 30

SO-307610_13540 BELLA Ultimate Brownie Maker Interior_Layout 1 11-04-18 10:42 AM Page 29
BROWNIES MARBRÉS AU
FROMAGE À LA CRÈME
1 paquet (19 à 21 oz) de mélange à brownies
(pour un moule de 13 po x 9 po)
Eau, huile végétale et œuf, tel qu'indiqué sur la boîte du mélange
Marbrures de fromage à la crème
1 paquet (8 oz) de fromage à la crème, à température de la pièce
1/3 tasse de sucre glace
1 œuf
1/2 cuillerée à thé d'extrait de vanille
________________________________________________________________
1. Préparer le mélange à brownies en suivant
les directives de l'emballage.
2. Préparer les marbrures de fromage à la crème. Dans un bol séparé,
utiliser un batteur électrique pour battre le fromage à la crème
jusqu'à ce qu'il soit onctueux. Ajouter le sucre, l'œuf et la vanille;
3. Suivre les instructions présentées dans la section Procédure
de cuisson générale pour les brownies dans le présent manuel
et ajouter la pâte dans le cuiseur à brownies de luxe.
REMARQUE : Ne pas remplir au-delà de la moitié de la hauteur
4. À l'aide d'une petite cuillère à thé, ajouter une petite quantité
du mélange de fromage à la crème sur chaque brownie non cuit.
À l'aide d'un petit couteau de plastique, créer un tourbillon
de fromage à la crème dans la pâte.
5. Cuire en suivant les directives de la section Procédure
de cuisson générale pour les brownies.
________________________________________________________________
________________________________________________________________
bien mélanger.
du moule à découper.
Donne : 32 brownies de luxe
29
Page 31

SO-307610_13540 BELLA Ultimate Brownie Maker Interior_Layout 1 11-04-18 10:42 AM Page 30
Leur couleur vert menthe est rafraîchissante et décore superbement
une table de Noël; toute la famille adoptera ces brownies.
Voilà aussi une excellente manière d'utiliser toutes
ces cannes de Noël à la menthe poivrée.
BROWNIES À LA MENTHE
1 paquet (19 à 21 oz) de mélange à brownies
(pour un moule de 13 po x 9 po)
Eau, huile végétale et œuf, tel qu'indiqué
sur la boîte du mélange
Glaçage vert à la menthe
1 paquet (8 oz) de fromage à la crème,
à température de la pièce
3 tasses de sucre glace
1/4 tasse de beurre non salé, ramolli
2 cuillerées à soupe de lait
1/4 cuillerée à thé d'extrait de menthe
4 à 5 gouttes de colorant alimentaire vert
1 tasse de bâtons ou de cannes de bonbon
à la menthe écrasés, facultatifs
________________________________________________________________
1. Préparer le mélange à brownies en suivant
les
directives de l'emballage.
2. Cuire les brownies en suivant les instructions présentées
dans la section Procédure de cuisson générale pour les brownies
3. Placer les bonbons dans un grand sac en plastique refermable.
À l'aide d'un rouleau à pâte ou d'un maillet, briser les bonbons
4. Dans un grand bol, utiliser un batteur électrique pour
battre les ingrédients du crémage jusqu'à ce qu'ils soient onctueux.
Incorporer les morceaux de bonbons dans la garniture fouettée.
5. Glacer les brownies refroidis avec le glaçage vert à la menthe.
________________________________________________________________
________________________________________________________________
dans le présent manuel.
en petits morceaux.
Mettre de côté.
Donne : 32 brownies de luxe
30
Page 32

SO-307610_13540 BELLA Ultimate Brownie Maker Interior_Layout 1 11-04-18 10:42 AM Page 31
BROWNIES ROCHER DÉCADENTS
1 paquet (19 à 21 oz) de mélange à brownies
(pour un moule de 13 po x 9 po)
Eau, huile végétale et œuf, tel qu'indiqué sur la boîte du mélange
1 1/3 tasse (8 oz) de grains de chocolat
ou de pépites de chocolat miniatures
(chocolat noir, léger, blanc ou toute combinaison)
3/4 à 1 tasse de noix hachées
(recommandé : des noix, des noix de cajou,
de macadamia ou des pistaches recouvertes de chocolat)
1 à 1 1/2 tasse de guimauves miniatures
________________________________________________________________
1. Préchauffer le cuiseur à brownies de luxe.
2. Préparer le mélange à brownies en suivant
les directives de l'emballage.
3. Incorporer les grains de chocolat et les noix.
4. Suivre les instructions présentées dans la section Procédure
de cuisson générale pour les brownies dans le présent manuel
et ajouter la pâte dans le cuiseur à brownies de luxe.
5. IMPORTANT: 8 minutes après le début de la cuisson,
soulever le couvercle et placer 6 à 10 guimauves miniatures
sur chaque brownie. Laisser reposer dans le cuiseur
à brownies pendant 1 minute, jusqu'à ce que les guimauves
REMARQUE: Un couvercle fermé pourrait faire brûler
les guimauves et les faire coller à la plaque de cuisson supérieure.
________________________________________________________________
aient légèrement fondu.
Donne : 32 à 40 brownies de luxe
________________________________________________________________
31
Page 33

SO-307610_13540 BELLA Ultimate Brownie Maker Interior_Layout 1 11-04-18 10:42 AM Page 32
BROWNIES AU TOURBILLON
DE BEURRE D'ARACHIDE
Donne : 24 brownies de luxe
________________________________________________________________
1/2 lb de beurre non salé
2/3 tasse de grains de chocolat mi-sucré
2/3 tasse de grains de chocolat au lait
1 1/2 oz de chocolat mi-sucré
3 très gros œufs
3 cuillerées à soupe de sirop d'érable
1 cuillerée à soupe d'extrait de vanille pur
1 ½ tasse de cassonade
2/3 tasse de farine tout-usage
1
cuillerée à thé de poudre à pâte
1/2 cuillerée à thé de sel
12 cuillerées à thé de beurre d'arachide crémeux
________________________________________________________________
2. Faire fondre le beurre, les grains de chocolat et les grains
de chocolat mi-sucré dans un bol moyen sur une casserole
3. Dans un grand bol, mélanger (sans battre) les œufs,
le sirop d'érable, la vanille et le sucre. Ajouter le mélange de chocolat
tiède au mélange d'œufs et laisser refroidir à température ambiante.
4. Tamiser la farine, la poudre à pâte et le sel dans un bol moyen.
5. Avant de préparer chaque fournée de brownies, faire fondre
4 cuillerées à thé* de beurre d'arachide dans un bol allant au four
à micro-ondes à intensité ÉLEVÉE pendant environ 20 secondes.
6. Suivre les instructions présentées dans la section Procédure
de cuisson générale pour les brownies dans le présent manuel
et ajouter la pâte dans le cuiseur à brownies de luxe.
REMARQUE : Ne pas remplir au-delà de la moitié
7. Ajouter 1/2 cuillerée à thé de beurre d'arachide chaud
à chaque brownie non cuit et faire un tourbillon dans la pâte.
8. Cuire en suivant les directives de la section
Procédure de cuisson générale pour les brownies.
(4 cuillerées à thé par fournée)*
*la quantité peut être augmentée, au goût
1. Préchauffer le cuiseur à brownies de luxe.
d'eau bouillante. Laisser légèrement refroidir.
Ajouter le mélange refroidi de chocolat.
de la hauteur du moule à découper.
32
Page 34

SO-307610_13540 BELLA Ultimate Brownie Maker Interior_Layout 1 11-04-18 10:42 AM Page 33
BROWNIES MACARONS
AU CHOCOLAT
Donne : 16 brownies de luxe
________________________________________________________________
1/2 tasse de beurre non salé, ramolli
1 tasse de cassonade
2 œufs
1 cuillerée à thé d'extrait de vanille
1 tasse de farine tout usage
1/2 cuillerée à thé de crème de tartre
1/4 tasse de poudre de cacao non sucré
1/2 tasse d'amandes hachées (facultatif)
Garniture à la noix de coco
1/2 tasse de lait
1 tasse de guimauves miniatures
________________________________________________________________
2. Dans un grand bol, battre le beurre et la cassonade.
3. Incorporer les œufs en battant, un à la fois, puis la vanille.
4. Dans un autre bol, combiner la farine, la crème de tartre
et le cacao; incorporer en remuant le mélange d'œuf jusqu'à
ce
que les ingrédients soient bien mélangés. Incorporer les noix.
5. Préparer la garniture à la noix de coco. Verser le lait
et les guimauves dans un bol allant au four à micro-ondes.
REMARQUE: Les guimauves gonflent lorsqu'elles sont chauffées.
S'assurer de disposer la noix de coco à la surface des guimauves
6. Chauffer au four à micro-ondes à intensité ÉLEVÉE
7. Suivre les instructions présentées dans la section Procédure
de cuisson générale pour les brownies dans le présent manuel
REMARQUE: Pour éviter de brûler la garniture de noix de coco, ne pas
et ajouter la pâte dans le cuiseur à brownies de luxe.
remplir au-delà de la moitié de la hauteur du moule à découper.
8. À l'aide d'une petite cuillère à thé, ajouter la garniture
1 tasse de noix de coco râpée sucrée
1. Préchauffer le cuiseur à brownies de luxe.
Ajouter la noix de coco sur le dessus.
pour contenir le gonflement.
pendant 1 minute 30 secondes. Bien mélanger.
à la noix de coco sur chaque brownie.
9. Cuire en suivant les directives de la section
Procédure de cuisson générale pour les brownies.
33
Page 35

SO-307610_13540 BELLA Ultimate Brownie Maker Interior_Layout 1 11-04-18 10:42 AM Page 34
BROWNIES GLACÉS
À LA NOISETTE
1 paquet (19 à 21 oz) de mélange à brownies
(pour un moule de 13 po x 9 po)
Eau, huile végétale et œuf, tel qu'indiqué sur la boîte du mélange
1 tasse de crème sure
1 tasse de grains de chocolat au lait
1/2 tasse de noisettes hachées
Glaçage au Nutella
1 tasse de crème fraîche épaisse
½ tasse de Nutella
________________________________________________________________
1. Préchauffer le cuiseur à brownies de luxe.
2. Préparer le mélange à brownies en suivant
les directives de l'emballage.
3. Incorporer la crème sure, les grains de chocolat et les noix;
bien mélanger. La pâte aura une texture lâche.
4. Cuire les brownies en suivant les instructions présentées
dans la section Procédure de cuisson générale pour les brownies
dans le présent manuel.
5. Préparer le glaçage. Dans une petite casserole, chauffer la crème
fraîche épaisse jusqu'à ébullition. Retirer immédiatement du feu
et ajouter le Nutella®. Laisser reposer 5 minutes et remuer
jusqu'à ce que les ingrédients soient bien mélangés.
6. À l'aide d'une cuillère, garnir les brownies
refroidis de glaçage à la noisette et servir.
________________________________________________________________
Une garniture de bananes fraîches et moelleuses ajoute
une touche de fraîcheur à ces gâteries.
________________________________________________________________
Donne : 32 à 40 brownies de luxe
________________________________________________________________
®
®
34
Page 36

SO-307610_13540 BELLA Ultimate Brownie Maker Interior_Layout 1 11-04-18 10:42 AM Page 35
BROWNIES « LE RÉGAL DES
PETITS SINGES » (CHOCOLAT,
BANANE, RAISINS ET NOIX)
1 paquet (19 à 21 oz) de mélange à brownies
(pour un moule de 13 po x 9 po)
Eau, huile végétale et œuf, tel qu'indiqué sur la boîte du mélange
1/2 tasse de grains de chocolat au lait
1/2 tasse de grains de chocolat blanc au lait
1/2 tasse de raisins enrobés de chocolat ou de yogourt
1/2 tasse de noix hachées (ou de pacanes, etc.)
________________________________________________________________
1.
Préchauffer le cuiseur à brownies de luxe.
2. Préparer le mélange à brownies en suivant
3. Incorporer les grains de chocolat, les noix hachées et les raisins.
4. Suivre les instructions présentées dans la section
Procédure de cuisson générale pour les brownies dans le présent
manuel et ajouter la pâte dans le cuiseur à brownies de luxe.
REMARQUE: Pour éviter de brûler les bananes, ne pas remplir
au-delà de la moitié de la hauteur du moule à découper.
Pour faciliter la cuisson des bananes, remplir le moule
à découper pour brownies aux deux tiers avec la pâte
(les bananes deviennent plus sucrées en cuisant).
5. Avant la cuisson, ajouter une tranche
6. Cuire en suivant les directives de la section
Procédure de cuisson générale pour les brownies.
________________________________________________________________
________________________________________________________________
bananes tranchées
les directives de l'emballage.
de banane sur chaque brownie.
Donne : 32 à 40 brownies de luxe
35
Page 37

SO-307610_13540 BELLA Ultimate Brownie Maker Interior_Layout 1 11-04-18 10:42 AM Page 36
BROWNIES ROUGES
AUX CERISES DE LUXE
1 paquet (19 à 21 oz) de mélange à brownies
(pour un moule de 13 po x 9 po)
œuf (tel qu'indiqué sur la boîte du mélange à brownies)
________________________________________________________________
4. Cuire les brownies en suivant les instructions présentées
________________________________________________________________
________________________________________________________________
remplissage pour tarte aux cerises en boîte
1. Préchauffer le cuiseur à brownies de luxe.
2. Remplacer une quantité égale d'eau et d'huile végétale
(tel qu'indiqué sur la boîte de mélange à brownies)
par du remplissage pour tarte aux cerises.
3. Combiner tous les ingrédients
dans un bol moyen et mélanger.
dans la section Procédure de cuisson générale
pour les brownies dans le présent manuel.
Donne : 32 brownies de luxe
36
Page 38

SO-307610_13540 BELLA Ultimate Brownie Maker Interior_Layout 1 11-04-18 10:42 AM Page 37
MEDIDAS DE SEGURIDAD
IMPORTANTES
ADVERTENCIA: Al utilizar electrodomésticos, siempre deben cumplirse las precauciones
de seguridad básicas, incluidas las siguientes:
1. Lea todas las instrucciones antes de utilizar el electrodoméstico.
2. El cable de este electrodoméstico sólo debe enchufarse en un tomacorriente eléctrico
de CA de 120 V.
3. Para protegerse del riesgo de descarga eléctrica, no sumerja el cable, el enchufe
ni
la unidad de cocción en agua ni en ningún otro líquido.
4. No toque las superficies calientes. Utilice el mango.
5. Este electrodoméstico no debe ser utilizado por personas (incluidos niños)
con capacidades físicas, sensoriales o mentales reducidas, o con falta de experiencia
y conocimientos, a menos que una persona responsable de su seguridad les haya
brindado supervisión o instrucciones sobre su uso.
6. Se debe vigilar a los niños para asegurar que no jueguen con el aparato.
Poner extra atención cuando este aparato sea usado cerca de niños,
y si es usado por ellos es necessario supervisar de cerca.
7. Desenchufe el electrodoméstico del tomacorriente de pared cuando no lo utilice
y antes de limpiarlo. Deje enfriar el electrodoméstico antes de limpiarlo o guardarlo.
8. Nunca tire del cable para desconectar la unidad de cocción del tomacorriente.
En lugar de eso, tome el enchufe y tire para desconectar.
9. No utilice ningún electrodoméstico si el cable está dañado. No utilice este
electrodoméstico si la unidad presenta un funcionamiento defectuoso, si se ha caído
o se ha dañado de alguna manera. Para evitar el riesgo de descargas eléctricas,
nunca trate de reparar la máquina para brownies Ultimate usted mismo.
Llévelo a un técnico autorizado para que lo examine, lo repare o le haga ajustes
eléctricos o mecánicos. Si la máquina para brownies Ultimate se vuelve a armar
de manera incorrecta, se corre el riesgo de sufrir una descarga eléctrica al utilizarla.
10. El uso de accesorios o dispositivos no recomendados por el fabricante puede provocar
incendios, descargas eléctricas o lesiones.
11. No utilice este electrodoméstico en exteriores ni para propósitos comerciales.
12. No utilice el electrodoméstico para otros fines que no sean aquellos
para los que fue diseñado.
13. No permita que el cable eléctrico cuelgue del borde de la mesa o encimera
ni toque superficies calientes.
14. No coloque el electrodoméstico sobre un quemador a gas o eléctrico, o cerca de él,
ni en un horno caliente.
15. Utilícelo solamente sobre una superficie plana, nivelada y resistente al calor.
16. Sea extremadamente cuidadoso al mover cualquier electrodoméstico que contenga
comida, agua, aceite u otros líquidos calientes.
17. Para desconectar, retire el enchufe del tomacorriente.
18. Siempre desenchufe el electrodoméstico después de su uso. De lo contrario,
permanecerá encendido.
19. PRECAUCIÓN, SUPERFICIES CALIENTES: Este electrodoméstico genera calor
mientras está en uso. Se deben tomar las medidas adecuadas para evitar el riesgo
de quemaduras, incendios u otro tipo de daño a personas o a la propiedad.
20. Cuando utilice el electrodoméstico, proporcione una buena ventilación por encima
y a los lados de la unidad para que circule el aire. No permita que el electrodoméstico
entre en contacto con cortinas, recubrimientos de pared, ropa, paños de cocina
ni otros materiales inflamables mientras está en uso.
21. Utilícelo solamente con un receptáculo de pared.
37
Page 39

SO-307610_13540 BELLA Ultimate Brownie Maker Interior_Layout 1 11-04-18 10:42 AM Page 38
OTRAS MEDIDAS DE SEGURIDAD
IMPORTANTES
PRECAUCIÓN: Este electrodoméstico se calienta durante el funcionamiento y mantiene
el calor un tiempo después de apagado. Siempre use manoplas al manipular materiales
calientes y deje que las piezas metálicas se enfríen antes de limpiarlas. No coloque
nada sobre el electrodoméstico mientras esté en funcionamiento o mientras
esté caliente.
1. Todos los usuarios de este electrodoméstico deben leer y comprender este manual
de instrucciones antes de ponerlo en funcionamiento o limpiarlo.
2. No descuide el electrodoméstico mientras esté en funcionamiento.
3. ADVERTENCIA: A fin de evitar quemaduras o lesiones, no debe tomar los mangos
laterales del accesorio de metal para cortar brownies para levantar la tapa, durante
la cocción o después de ésta. Siempre use el mango de la tapa para abrir la máquina
para
brownies Ultimate.
4. ADVERTENCIA: El accesorio de metal para cortar brownies se calienta al precalentar
la unidad y durante la cocción. Siempre use manoplas al manipular la unidad
y déjela enfriar antes de limpiarla.
NOTAS SOBRE EL ENCHUFE
Este electrodoméstico tiene un enchufe polarizado (una pata es más ancha que la otra).
A fin de reducir el riesgo de una descarga eléctrica, el enchufe entra en un tomacorriente
polarizado en un solo sentido. Si el enchufe no entra completamente en el tomacorriente,
invierta la posición del enchufe. Si aun así no entra, consulte a un electricista autorizado.
No realice ninguna modificación al enchufe.
NOTAS SOBRE EL CABLE
El cable de alimentación corto (o el cable de alimentación desmontable) suministrado
se debe utilizar para reducir los riesgos de enredarse o tropezar con un cable más largo.
No utilice un cable de extensión con este producto.
ADVERTENCIA SOBRE EL PLASTIFICANTE
PRECAUCIÓN: Para evitar que el plastificante se transfiera sobre el acabado de la encimera,
la superficie de trabajo u otro mueble, coloque posavasos o manteles individuales
NO PLÁSTICOS entre el electrodoméstico y el acabado de la encimera o la superficie.
De lo contrario, el acabado puede oscurecerse o pueden aparecer manchas o marcas
permanentes.
ENERGÍA ELÉCTRICA
Si el circuito eléctrico está sobrecargado con otros artefactos, su electrodoméstico puede
dejar de funcionar correctamente. El electrodoméstico debe funcionar en un circuito eléctrico
separado de otros artefactos.
PARA USO DOMÉSTICO
ÚNICAMENTE
GUARDE ESTAS INSTRUCCIONES
38
Page 40

SO-307610_13540 BELLA Ultimate Brownie Maker Interior_Layout 1 11-04-18 10:43 AM Page 39
CONOZCA SU MÁQUINA PARA BROWNIES ULTIMATE
El producto puede diferir levemente de las ilustraciones.
Figura 1
Placas de cocción
antiadherentes
superior e inferior
Mangos laterales del
accesorio de metal
para cortar brownies
Mango de la tapa
Enchufe polarizado
Accesorio de metal antiadherente
para cortar brownies (8 brownies)
Tapa
Luz
anaranjada
POWER ON
(Encendido)
Luz verde
READY (Listo)
39
Page 41

SO-307610_13540 BELLA Ultimate Brownie Maker Interior_Layout 1 11-04-18 10:43 AM Page 40
ANTES DE UTILIZAR POR PRIMERA VEZ
1. Retire con cuidado la máquina para brownies Ultimate y todos los materiales
del embalaje.
2. Antes de utilizar la máquina para brownies Ultimate por primera vez, limpie las placas
de cocción con un paño húmedo para quitar el polvo y luego, séquelas.
3. Limpie la superficie exterior con un paño suave o una esponja ligeramente húmeda.
4. Enjuague el accesorio de metal para cortar brownies y séquelo.
PRECAUCIÓN: Asegúr
NUNCA SUMERJA LA MÁQUINA PARA BROWNIES ULTIMATE EN AGUA
NI EN NINGÚN OTRO LÍQUIDO.
5. Coloque el electrodoméstico sobre una superficie plana, seca y limpia.
Mantenga la máquina para brownies Ultimate cerrada hasta que la necesite.
ese de evitar que el agua ingrese en el electrodoméstico.
INSTRUCCIONES DE FUNCIONAMIENTO
1. Coloque el accesorio de metal para cortar brownies en la placa de cocción inferior.
Asegúrese de que el mango del accesorio encaje en las muescas del cuerpo
de la máquina para brownies Ultimate. (Ver figura 2).
Figura 2
IMPORTANTE: Baje la tapa para asegurarse de que el accesorio esté colocado
correctamente y de que la tapa cierra completamente.
2. Enchufe la máquina para brownies Ultimate en un tomacorriente eléctrico
de CA de 120 V para precalentarla. La luz anaranjada POWER ON (Encendido)
se prenderá.
NOTA: Cuando la máquina para brownies Ultimate se calienta por primera vez,
puede emitir un poco de humo u olor. Esto es normal y debería desaparecer después
de 1 ó 2 usos. Esto no afecta la seguridad del electrodoméstico. Sin embargo,
se recomienda descartar los primeros brownies preparados en la máquina para brownies
Ultimate ya que su sabor puede verse afectado.
3. Mientras se precalienta, prepare la mezcla para brownies. Cuando se enciende
la luz verde READY (Listo) (espere 2 minutos), la máquina para brownies Ultimate
está precalentada.
PROCEDIMIENTOS GENERALES PARA HORNEAR BROWNIES
1. Pinte las placas de cocción superior e inferior con aceite vegetal para poder retirar
os brownies después del horneado. Pinte el accesorio para cortar brownies
con una generosa cantidad de aceite vegetal cuando éste se encuentra sobre la placa
de cocción inferior. Según la receta, puede resultar más difícil retirar algunos brownies
y es posible que deba colocar una mayor cantidad de aceite.
2. Use 2 cucharas para agregar la mezcla a la máquina para brownies Ultimate
(una para agregarla y la otra para esparcir la mezcla en la máquina). Agregue 1 cucharada
colmada de mezcla en cada una de las 8 secciones para brownies. (Ver figura 3).
Agregue la mezcla a las 8 secciones.
40
Page 42

SO-307610_13540 BELLA Ultimate Brownie Maker Interior_Layout 1 11-04-18 10:43 AM Page 41
PRECAUCIÓN: Al usar la máquina para brownies Ultimate, se recomienda llenar
las 8 secciones para brownies. Si no tiene suficiente mezcla, NO intente cocinar
una tanda más chica ya que cambian los tiempos de cocción y pueden producirse
resultados inconsistentes y deficientes.
Figura 3
IMPORTANTE: Agregue mezcla hasta 1⁄2 o 2⁄3 de los lados del accesorio para cortar.
Los brownies se expandirán durante la cocción. Los resultados pueden variar según
la receta.
3. Después de haber agregado la mezcla, use el mango de la tapa para bajar la tapa
superior y cocine durante aproximadamente 8 minutos.
NOTA: La luz verde READY (Listo) se encenderá y se apagará mientras la unidad
mantiene la temperatura de cocción.
NOTA: A medida que se cocinan los brownies, saldrá vapor de la máquina para brownies
Ultimate. Esto es normal.
4. Después de 8 minutos y con una manopla o un agarrador, tome el mango de la tapa
para levantar la tapa superior hasta alcanzar la posición abierta.
ADVERTENCIA: No agarre los mangos laterales del accesorio. Use el mango de la tapa.
5. Levante la tapa superior para exponer los brownies horneados y siga cocinándolos
(con la unidad abierta) durante 1 minuto más.
NOTA: Los tiempos de cocción pueden diferir levemente según la temperatura
de
la máquina para brownies Ultimate, la cantidad de mezcla y la receta de la mezcla
para brownies.
6. Si es necesario, baje la tapa y continúe cocinando durante 15 segundos por vez hasta
que los brownies estén dorados a su gusto.
7. Usando manoplas, sujete los mangos laterales del accesorio de metal para cortar
brownies, levántelo lentamente y con cuidado y retírelo de la placa de cocción inferior.
Déjelo a un lado.
8. Use una espátula de madera o de plástico resistente al calor para retirar los brownies
horneados.
NOTA: Si se van a cocinar más brownies, use una manopla y limpie las placas
de cocción con un paño seco o una servilleta de papel. Mantenga la máquina
para brownies Ultimate cerrada para conservar el calor. Antes de hornear más brownies,
espere hasta que se encienda la luz verde READY (Listo).
9. Pinte las placas de cocción superior e inferior y el accesorio de metal para cortar
brownies con una generosa cantidad de aceite vegetal, agregue la mezcla y cocine según
las indicaciones descritas anteriormente.
10. Cuando termine de cocinar todos los brownies, desenchufe el cable de alimentación
del tomacorriente.
11. No limpie la unidad hasta que se haya enfriado completamente.
41
Page 43

SO-307610_13540 BELLA Ultimate Brownie Maker Interior_Layout 1 11-04-18 10:43 AM Page 42
INSTRUCCIONES DE MANTENIMIENTO PARA EL USUARIO
Este electrodoméstico requiere poco mantenimiento. No contiene piezas que puedan
ser reparadas por el usuario. No intente repararlo usted mismo. Si el producto necesita
mantenimiento, consulte a un técnico autorizado para reparar electrodomésticos.
INSTRUCCIONES DE LIMPIEZA Y CUIDADO
PRECAUCIÓN: Desenchufe el electrodoméstico del tomacorriente y deje que se enfríe
completamente antes de limpiarlo.
1. Retire el accesorio de metal para cortar brownies antes de limpiar la unidad.
El accesorio de metal para cortar brownies se puede lavar en el estante superior
del lavavajillas o con agua caliente y jabón.
2. La máquina para brownies Ultimate no se desarma para la limpieza.
3. Nunca sumerja el electrodoméstico en agua ni en ningún otro líquido. Nunca coloque
la máquina para brownies Ultimate en el lavavajillas.
4. Las placas de cocción deben estar limpias y acondicionadas antes de calentarlas.
5. Limpie las placas de cocción con un pincel de repostería o un paño limpio y suave.
Para acondicionar las placas, cubra ligeramente las superficies de cocción con manteca
vegetal sólida o aceite vegetal. Siga cuidadosamente los procedimientos de limpieza
que se mencionan a continuación.
6. Para proteger las superficies antiadherentes de primera calidad, sólo utilice una espátula
de madera o de plástico resistente al calor para retirar los brownies.
ADVERTENCIA: La máquina para brownies Ultimate se calienta mucho mientras
está en funcionamiento. Nunca utilice utensilios de plástico o nailon que no sean
resistentes al calor, ya que podrían derretirse y dañar las superficies de cocción
antiadherentes.
7. Para retirar la mezcla adherida a las placas de cocción o al accesorio para cortar
brownies, vierta una pequeña cantidad de aceite de cocina en la mezcla endurecida.
Deje reposar durante 5 minutos, luego limpie la mezcla ablandada con una servilleta
de papel o un paño suave. Quite las manchas rebeldes con una esponja plástica
o de malla. Para retirar la mezcla adherida al accesorio de metal para cortar brownies,
se puede utilizar un cepillo de dientes o un cepillo de cocina redondo limpio.
Para obtener mejores resultados, utilice solamente productos en cuyas instrucciones
se indique que son seguros para limpiar superficies de cocción antiadherentes.
No utilice lana de acero ni esponjas metálicas gruesas.
8. El acabado exterior se debe limpiar con un producto de limpieza no abrasivo
y un paño suave y húmedo. Seque completamente.
42
Page 44

SO-307610_13540 BELLA Ultimate Brownie Maker Interior_Layout 1 11-04-18 10:43 AM Page 43
INSTRUCCIONES DE ALMACENAMIENTO
1. Asegúrese de que la máquina para brownies Ultimate esté desenchufada
y se haya enfriado completamente.
2. Baje la tapa.
3. ADVERTENCIA: Nunca guarde la máquina para brownies Ultimate mientras esté caliente
o enchufada.
4. Guarde el cable en el envoltorio del cable que se encuentra en la parte posterior
de la máquina para brownies Ultimate. (Ver figura 4).
5. No ejerza presión sobre el cable donde ingresa en la unidad, ya que esto podría hacer
6. Guarde la máquina para brownies Ultimate en la caja o en un lugar limpio y seco.
el cable se desgaste y se rompa.
que
Figure 4
43
Page 45

SO-307610_13540 BELLA Ultimate Brownie Maker Interior_Layout 1 11-04-18 10:43 AM Page 44
RECIPES
–––––––––––––––––––––––––––––––––––––––––––––––––––––––––––––
BROWNIES ESPONJOSOS
–––––––––––––––––––––––––––––––––––––––––––––––––––––––––––––
DOBLE SUNDAE ROCKY ROAD
DE CHOCOLATE DECADENTE
–––––––––––––––––––––––––––––––––––––––––––––––––––––––––––––
LAS RUBIAS SE DIVIERTEN MÁS
–––––––––––––––––––––––––––––––––––––––––––––––––––––––––––––
BROWNIES MARMOLADOS CON QUESO CREMA
–––––––––––––––––––––––––––––––––––––––––––––––––––––––––––––
BROWNIES SALTAMONTES DE MENTA
–––––––––––––––––––––––––––––––––––––––––––––––––––––––––––––
BROWNIES SALTAMONTES DE MENTA
–––––––––––––––––––––––––––––––––––––––––––––––––––––––––––––
REMOLINO DE BROWNIES Y MANTEQUILLA DE MANÍ
–––––––––––––––––––––––––––––––––––––––––––––––––––––––––––––
BROWNIES DE CHOCOLATE MACAROON
–––––––––––––––––––––––––––––––––––––––––––––––––––––––––––––
BROWNIES GLASEADOS CON AVELLANAS
–––––––––––––––––––––––––––––––––––––––––––––––––––––––––––––
BROWNIES PARA MONOS (CHOCOLATE/BANANA/
PASAS/NUECES)
–––––––––––––––––––––––––––––––––––––––––––––––––––––––––––––
BROWNIES ULTIMATE DE CEREZAS
44
Page 46

SO-307610_13540 BELLA Ultimate Brownie Maker Interior_Layout 1 11-04-18 10:43 AM Page 45
A continuación encontrará un gran truco para convertir los brownies duros de
caja en nutritivas barras esponjosas.
BROWNIES ESPONJOSOS
1 (19 a 21 onzas) caja de mezcla para brownies
Agua, aceite vegetal y huevo según se indica en la caja
________________________________________________________________
las indicaciones del paquete. Agregue la crema ácida
3. Cocine los brownies siguiendo las instrucciones
descritas en la sección Procedimientos generales para hornear
________________________________________________________________
________________________________________________________________
(molde de 13 x 9 pulgadas)
de la mezcla para brownies
1 taza de crema ácida
1. Precaliente la máquina para brownies.
2. Prepare la mezcla para brownies según
la mezcla se tornará cremosa.
brownies de este manual de instrucciones.
Rinde de 32 a 40 brownies (4 a 5 tandas)
DOBLE SUNDAE ROCKY ROAD
DE CHOCOLATE DECADENTE
Caliente los brownies en el microondas durante 30 segundos,
en un tazón apto para microondas, hasta que estén calientes.
Agregue una cucharada de helado de chocolate, báñelo con caramelo
de dulce de leche o salsa de caramelo y espolvoree chispas,
________________________________________________________________
brownies son ricos y sabrosos y no son excesivamente dulces.
Estos
________________________________________________________________
malvaviscos y más nueces.
45
Page 47

SO-307610_13540 BELLA Ultimate Brownie Maker Interior_Layout 1 11-04-18 10:43 AM Page 46
LAS RUBIAS SE
DIVIERTEN MÁS
1 taza de harina común tamizada
1/2 cucharadita de polvo para hornear
1/4 cucharadita de bicarbonato de sodio
1/2 cucharadita de sal
1/2 taza de castañas de cajú picadas
1/4 taza de chispas de chocolate semiamargo
1/4 taza de chispas de sirope de caramelo
6 cucharadas de mantequilla sin sal
1 taza repleta de azúcar moreno
1 huevo
________________________________________________________________
2. Coloque en un tazón mediano la harina, el polvo para hornear,
el bicarbonato de sodio y la sal. Tamícelos. Agregue las nueces
3. Derrita mantequilla. Agregue 1 taza firmemente llena
de azúcar moreno y mezcle bien. Deje que se enfríe ligeramente.
4.
En un tazón pequeño, bata el huevo y agréguelo a los ingredientes
húmedos. Agregue la vainilla y mezcle hasta que se mezcle bien.
5. Agregue los ingredientes secos lentamente a los ingredientes
húmedos y mézclelos bien. La mezcla se tornará espesa.
6. Separe la mezcla en dos tandas iguales. Siguiendo
las instrucciones descritas en la sección Procedimientos
generales para hornear brownies de este manual de instrucciones,
agregue la mezcla a la máquina para brownies Ultimate
y distribuya el resto de la mezcla en cada sección para brownies
________________________________________________________________
________________________________________________________________
2 cucharaditas de extracto de vanilla
1. Precaliente la máquina para brownies.
picadas y las chispas. Mezcle bien los ingredientes
secos y déjelos a un lado.
de manera uniforme. Luego, hornéelos.
Rinde 16 brownies Ultimate
46
Page 48

SO-307610_13540 BELLA Ultimate Brownie Maker Interior_Layout 1 11-04-18 10:43 AM Page 47
BROWNIES MARMOLADOS
CON QUESO CREMA
1 (19 a 21 onzas) caja de mezcla para brownies
1 paquete (de 8 onzas) de queso crema a temperatura ambiente
________________________________________________________________
2. Prepare la preparación marmolada con queso crema.
En un tazón separado, bata el queso crema con una batidora
de mano hasta obtener una mezcla homogénea.
Agregue el azúcar, el huevo, la vainilla y mezcle bien.
3. Siguiendo las instrucciones descritas en la sección
Procedimientos generales para hornear brownies
de este manual de instrucciones, agregue la mezcla
NOTA: Agregue mezcla hasta la mitad de los lados
4. Con una cuchara pequeña, agregue una porción
de mezcla de queso crema a la parte superior de cada
brownie sin hornear. Con un cuchillo pequeño de plástico,
mezcle la preparación marmolada con queso crema con la mezcla.
________________________________________________________________
________________________________________________________________
(molde de 13 x 9 pulgadas)
Agua, aceite vegetal y huevo según se indica
en la caja de la mezcla para brownies
Preparación marmolada con queso crema
1/3 taza de azúcar impalpable
1 huevo
1/2 cucharadita de extracto de vainilla
1. Prepare la mezcla para brownies según
las indicaciones del paquete.
a la máquina para brownies Ultimate.
del accesorio para cortar.
5. Cocínelos según los procedimientos
generales para hornear brownies.
Rinde 32 brownies Ultimate
47
Page 49

SO-307610_13540 BELLA Ultimate Brownie Maker Interior_Layout 1 11-04-18 10:43 AM Page 48
Este lindo y refrescante color verde menta es sorprendente
en una mesa de Navidad y promete convertirse en favorito
para toda la familia. Además, es una excelente manera de usar
esas latas de coloridas golosinas de menta.
BROWNIES SALTAMONTES
DE MENTA
1 (19 a 21 onzas) caja de mezcla para brownies
4 a 5 gotas de colorante verde para alimentos
1 taza de barritas o golosinas de menta molidas, opcional
________________________________________________________________
2. Cocine los brownies siguiendo las instrucciones descritas
en la sección Procedimientos generales para hornear
3. Coloque las golosinas en una bolsa Ziplock grande.
4. En un tazón grande, bata todos los ingredientes del baño
con una batidora de mano hasta obtener una mezcla homogénea.
Agregue las golosinas trituradas al baño batido. Déjelo a un lado.
5. Bañe los brownies fríos con el Baño de menta saltamontes.
________________________________________________________________
________________________________________________________________
(molde de 13 x 9 pulgadas)
Agua, aceite vegetal y huevo según se indica
en la caja de la mezcla para brownies
Baño de menta saltamonte
1 paquete (de 8 onzas) de queso crema
a temperatura ambiente
3 tazas de azúcar impalpable
1/4 taza de mantequilla sin sal, blanda
2 cucharadas de leche
1/4 cucharadita de extracto de menta
1. Prepare la mezcla para brownies según
las indicaciones del paquete.
brownies de este manual de instrucciones.
Triture las golosinas en trozos pequeños
con un rodillo o un mazo.
Rinde 32 brownies Ultimate
48
Page 50

SO-307610_13540 BELLA Ultimate Brownie Maker Interior_Layout 1 11-04-18 10:43 AM Page 49
BROWNIES ROCKY
ROCKY ROAD
1 (19 a 21 onzas) caja de mezcla para brownies
1-1/3 taza (8 onzas) de chispas o mini chispas de chocolate
(recomendación: nueces cubiertas con chocolate,
1. Precaliente la máquina para brownies Ultimate.
4. Siguiendo las instrucciones descritas en la sección
Procedimientos generales para hornear brownies
de este manual de instrucciones, agregue la mezcla
5. IMPORTANTE: Después de 8 minutos de cocción inicial,
levante la tapa y coloque 6 a 10 mini malvaviscos en la parte
superior de cada brownie. Déjelo reposar con la máquina
para brownies abierta durante 1 minuto hasta que los malvaviscos
NOTA: Si cierra la tapa, los malvaviscos pueden quemarse
________________________________________________________________
________________________________________________________________
(molde de 13 x 9 pulgadas)
Agua, aceite vegetal y huevo según se indica
en la caja de la mezcla para brownies
(puede elegir: oscuras, claras, de chocolate
blanco o cualquier combinación)
3/4 a 1 taza de nueces picadas
castañas de cajú, macadamia o pistachos)
1 a 1-1/2 tazas de mini malvaviscos
2. Prepare la mezcla para brownies según
las indicaciones del paquete.
3. Agregue las chispas y las nueces.
a la máquina para brownies Ultimate.
estén ligeramente mezclados.
y adherirse a la placa de cocción superior.
Rinde 32 a 40 brownies Ultimate
49
Page 51

SO-307610_13540 BELLA Ultimate Brownie Maker Interior_Layout 1 11-04-18 10:43 AM Page 50
REMOLINO DE BROWNIES
Y MANTEQUILLA DE MANÍ
Rinde 24 brownies Ultimate
________________________________________________________________
½ lb de mantequilla sin sal
2/3 taza de chispas de chocolate semi amargo
2/3 taza de chispas de chocolate con leche
1-1/2 onzas de chocolate semi amargo
3 huevos extra grandes
3 cucharadas de jarabe de arce
1 cucharada de extracto de vainilla puro
1 1/2 taza de azúcar moreno
2/3 taza de harina común
1 cucharadita de polvo de hornear
1/2 cucharadita de sal kosher
12 cucharaditas de mantequilla de maní
suave (4 cucharaditas por tanda)*
________________________________________________________________
1. Precaliente la máquina para brownies Ultimate.
2. Derrita mantequilla, las chispas de chocolate y el chocolate
semi amargo en un tazón mediano sobre agua hirviendo
3. En un tazón grande, revuelva (no bata) los huevos,
4. Agregue la mezcla de chocolate caliente a la mezcla
de los huevos y deje enfriar a temperatura ambiente.
5. Tamice la harina, el polvo para hornear y la sal
en un tazón mediano. Agréguelo a la mezcla de chocolate fría.
6. Antes de preparar cada tanda de brownies, derrita 4 cucharaditas*
de mantequilla de maní en un tazón apto para microondas
en HIGH (Alto) durante aproximadamente 20 segundos.
6. Siguiendo las instrucciones descritas en la sección
Procedimientos generales para hornear brownies de este manual de
instrucciones, agregue la mezcla a la máquina para brownies Ultimate.
NOTA: Agregue mezcla hasta la mitad de los lados
7.Agregue 1/2 cucharadita de mantequilla de maní caliente
en cada brownie sin hornear y mézclela con la mezcla.
8. Cocínelos según los procedimientos generales para hornear brownies.
*puede agregar más a su gusto
a
fuego lento. Deje que se enfríe ligeramente.
el jarabe de arce, la vainilla y el azúcar.
del accesorio para cortar.
50
Page 52

SO-307610_13540 BELLA Ultimate Brownie Maker Interior_Layout 1 11-04-18 10:43 AM Page 51
BROWNIES DE CHOCOLATE
MACAROON
Rinde 16 brownies Ultimate
________________________________________________________________
1/2 taza de mantequilla sin sal, blanda
1 taza de azúcar moreno
2 huevos
1 cucharadita de extracto de vainilla
1 taza de harina común
1/2 cucharadita de crémor tartárico
1/4 taza de cacao en polvo sin azúcar
1/2 de taza de almendras picadas (opcional)
Cobertura de coco
1/2 taza de leche
1 taza de mini malvaviscos
________________________________________________________________
1. Precaliente la máquina para brownies Ultimate.
2. Bata la mezcla y el azúcar moreno en un tazón grande.
3. Agregue los huevos, uno por vez y luego incorpore la vainilla.
4. En otro tazón, mezcle la harina, el crémor tartárico y el cacao;
revuélvalo con la mezcla de los huevos hasta que se mezcle bien.
5. Prepare la cobertura de coco. Coloque la leche y los malvaviscos
en un tazón apto para microondas. Agregue coco.
NOTA: Los malvaviscos se expanden cuando se calientan.
Asegúrese de que el coco esté en la parte superior
de los malvaviscos para que contengan cobertura.
6. Caliente en el microondas en HIGH (Alto) durante
7. Siguiendo las instrucciones descritas en la sección
Procedimientos generales para hornear brownies de este
NOTA: Para evitar que se queme la cobertura de coco, agregue
mezcla hasta la mitad de los lados del accesorio para cortar.
8. Con una cuchara pequeña, agregue la cobertura
9. Cocínelos según los procedimientos generales para hornear brownies.
1 taza de coco rallado azucarado
Agregue
1 minuto y 30 segundos. Mezcle bien.
manual de instrucciones, agregue la mezcla
a la máquina para brownies Ultimate.
de coco a cada brownie.
las nueces.
51
Page 53

SO-307610_13540 BELLA Ultimate Brownie Maker Interior_Layout 1 11-04-18 10:43 AM Page 52
BROWNIES GLASEADOS
CON AVELLANAS
1 (19 a 21 onzas) caja de mezcla para brownies
Agua, aceite vegetal y huevo según se indica en la caja
________________________________________________________________
1. Precaliente la máquina para brownies Ultimate.
3. Agregue la crema ácida, las chispas de chocolate
y las nueces y mezcle bien. La mezcla no será firme.
4. Cocine los brownies siguiendo las instrucciones descritas
en la sección Procedimientos generales para hornear
5. Prepare el glaseado. En una cacerola pequeña, caliente
la crema al punto de ebullición. Retírela del fuego
y agregue Nutella®. Déjelo reposar durante 5 minutos
y luego revuelva hasta que se mezcle bien.
6. Espolvoree glaseado de avellanas caliente sobre
________________________________________________________________
Las bananas frescas agregan una cobertura húmeda,
________________________________________________________________
(molde de 13 x 9 pulgadas)
de la mezcla para brownies
1 taza de crema ácida
1 taza de chispas de chocolate con leche
1/2 taza de avellanas picadas
Glaseado Nutella
1 taza de crema entera
1/2 taza de Nutella
2. Prepare la mezcla para brownies según
las indicaciones del paquete.
brownies de este manual de instrucciones.
los brownies fríos y sirva.
Rinde 32 a 40 brownies Ultimate
fresca y sabrosa a estas exquisiteces.
®
®
52
Page 54

SO-307610_13540 BELLA Ultimate Brownie Maker Interior_Layout 1 11-04-18 10:43 AM Page 53
BROWNIES PARA MONOS
(CHOCOLATE/BANANA/
PASAS/NUECES)
1 (19 a 21 onzas) caja de mezcla para brownies
Agua, aceite vegetal y huevo según se indica en la caja
1/2 taza de chispas de chocolate blanco con leche
½ taza de pasas cubiertas con chocolate o yogur blanco
1/2 taza de nueces picadas (o cualquier fruto seco de su elección)
________________________________________________________________
1. Precaliente la máquina para brownies Ultimate.
3. Agregue las chispas, las pasas y las nueces picadas.
4. Siguiendo las instrucciones descritas en la sección
Procedimientos generales para hornear brownies de este manual de
instrucciones, agregue la mezcla a la máquina para brownies Ultimate.
NOTA: Para evitar que las bananas se doren
excesivamente, agregue mezcla hasta la mitad de los lados
del accesorio para cortar. Para que las bananas estén más doradas,
agregue mezcla hasta 2/3 del accesorio de metal para cortar
brownies (las bananas son más dulces cuando se doran).
5. Antes de la cocción, agregue una rodaja de banana
6. Cocínelos según los procedimientos generales
________________________________________________________________
________________________________________________________________
(molde de 13 x 9 pulgadas)
de la mezcla para brownies
1/2 taza de chispas de chocolate con leche
Bananas
2. Prepare la mezcla para brownies según
las indicaciones del paquete.
a la parte superior de cada brownie.
Rinde 32 a 40 brownies Ultimate
cortadas en rodajas
para hornear brownies.
53
Page 55

SO-307610_13540 BELLA Ultimate Brownie Maker Interior_Layout 1 11-04-18 10:43 AM Page 54
BROWNIES ULTIMATE
DE CEREZAS
1 (19 a 21 onzas) caja de mezcla para brownies
Huevo (según se indica en la caja de la mezcla para brownies)
________________________________________________________________
1. Precaliente la máquina para brownies Ultimate.
2. Reemplace una medida equivalente de agua
y aceite vegetal (según se indica en la caja de la mezcla
para brownies) por relleno para pastel de cereza
4. Cocine los brownies siguiendo las instrucciones descritas
en la sección Procedimientos generales para hornear
________________________________________________________________
________________________________________________________________
(molde de 13 x 9 pulgadas)
Relleno para pastel de cereza en lata
3. Coloque todos los ingredientes
en un tazón mediano y mézclelos.
brownies de este manual de instrucciones.
Rinde 32 brownies Ultimate
54
 Loading...