

Page 1

TABLE OF CONTENTS
Important Safeguards ............................................................................................................2
Additional Important Safeguards............................................................................................3
Notes on the Cord.................................................................................................................3
Notes on the Plug .................................................................................................................3
Getting to Know Your Waffle Cone Maker..............................................................................4
Before Using for the First Time ..............................................................................................5
Operating Instructions ...........................................................................................................5
User Maintenance Instructions...............................................................................................6
Care & Cleaning Instructions..................................................................................................6
Storing Instructions................................................................................................................7
Recipes............................................................................................................................8-12
TABLA DE CONTENIDO
Medidas de seguridad importantes .....................................................................................13
Otras medidas de seguridad importantes............................................................................14
Notas sobre el cable............................................................................................................14
Notas sobre el enchufe........................................................................................................14
Conozca su máquina para hacer cucuruchos de barquillo ..................................................15
Antes de utilizar por primera vez..........................................................................................16
Instrucciones de funcionamiento .........................................................................................16
Instrucciones de mantenimiento para el usuario ..................................................................17
Instrucciones de limpieza y cuidado ....................................................................................17
Instrucciones de almacenamiento........................................................................................18
Recetas..........................................................................................................................19-26
SO-308687_13468 BC Waffle Cone Maker INTERIOR_Layout 1 11-11-14 9:50 AM Page 1
Page 2

IMPORTANT SAFEGUARDS
WARNING: When using electrical appliances, basic safety precautions should always
be followed, including the following:
1. The cord to this appliance should be plugged into a 120 V AC electrical outlet only.
2. To protect against risk of electric shock, do not immerse the cord, plug or cooking unit
in water or any other liquid.
3. Do not touch hot surfaces. Use handles.
4. This appliance is not intended for use by persons (including children) with reduced
physical, sensory or mental capabilities, or lack of experience and knowledge,
unless they have been given supervision or instruction concerning use of the appliance
by a person responsible for their safety.
5. Children should be supervised to ensure that they do not play with the appliance.
6. Unplug from wall outlet when not in use and before cleaning. Allow to cool before cleaning
or storing this appliance.
7. Never yank the cord to disconnect the cooking unit from the outlet. Instead,
grasp the plug and pull to disconnect.
8. Do not operate any appliance if the cord is damaged. Do not use this appliance if the unit
malfunctions, if it is dropped or has been damaged in any manner. In order to avoid
the risk of an electric shock, never try to repair the Waffle Cone Maker yourself.
Bring it to a qualified technician for examination, repair or electrical or mechanical
adjustment. An incorrect reassembly could present a risk of electric shock when
the Waffle Cone Maker is used.
9. The use of accessories or attachments not recommended by the manufacturer
may cause fire, electrical shock or injury.
10. Do not use outdoors or for commercial purposes.
11. Do not use this appliance for purposes other than the one for which it was designed.
12. Do not let the electrical cord hang over the edge of the table or countertop,
or touch hot surfaces.
13. Do not place on or near a hot gas or electric burner or heated oven.
14. Use on a heat-resistant, flat level surface only.
15. Use extreme caution when moving any appliance containing hot food, water,
oil or other liquids.
16. To disconnect, remove plug from outlet.
17. Always unplug after use. The appliance will remain ON unless unplugged.
18. CAUTION HOT SURFACES: This appliance generates heat during use.
Proper precautions must be taken to prevent the risk of burns, fire or other damage
to persons or property.
19. When using this appliance, provide adequate ventilation above and on all sides
for air circulation. Do not allow this appliance to touch curtains, wall coverings, clothing,
dish towels or other flammable materials during use.
20. Use with wall receptacle only.
FOR HOUSEHOLD USE ONLY
SAVE THESE INSTRUCTIONS
2
SO-308687_13468 BC Waffle Cone Maker INTERIOR_Layout 1 11-11-14 9:50 AM Page 2
Page 3

ADDITIONAL
IMPORTANT SAFEGUARDS
CAUTION: This appliance is hot during operation and retains heat for some time after
turning OFF. Always use oven mitts when handling hot materials and allow metal parts
to cool before cleaning. Do not place anything on top of the appliance while
it is operating or while it is hot.
1. All users of this appliance must read and understand this Instruction Manual
before operating or cleaning this appliance.
2. Do not leave this appliance unattended during use.
NOTES ON THE CORD
The provided short power-supply cord (or detachable power-supply cord) should be used
to reduce the risk resulting from becoming entangled in or tripping over a longer cord.
Do not use an extension cord with this product.
NOTES ON THE PLUG
This appliance has a polarized plug (one blade is wider than the other). To reduce the risk
of electric shock, this plug will fit in a polarized outlet only one way. If the plug does not fit fully
into the outlet, reverse the plug. If it still does not fit, contact a qualified electrician.
Do not modify the plug in any way.
PLASTICIZER WARNING
CAUTION: To prevent Plasticizers from migrating to the finish of the counter top or table top
or other furniture, place NON-PLASTIC coasters or place mats between the appliance
and the finish of the counter top or table top. Failure to do so may cause the finish to darken;
permanent blemishes may occur or stains can appear.
ELECTRIC POWER
If the electrical circuit is overloaded with other appliances, your appliance may not operate
properly. It should be operated on a separate electrical circuit from other appliances.
3
SO-308687_13468 BC Waffle Cone Maker INTERIOR_Layout 1 11-11-14 9:50 AM Page 3
Page 4
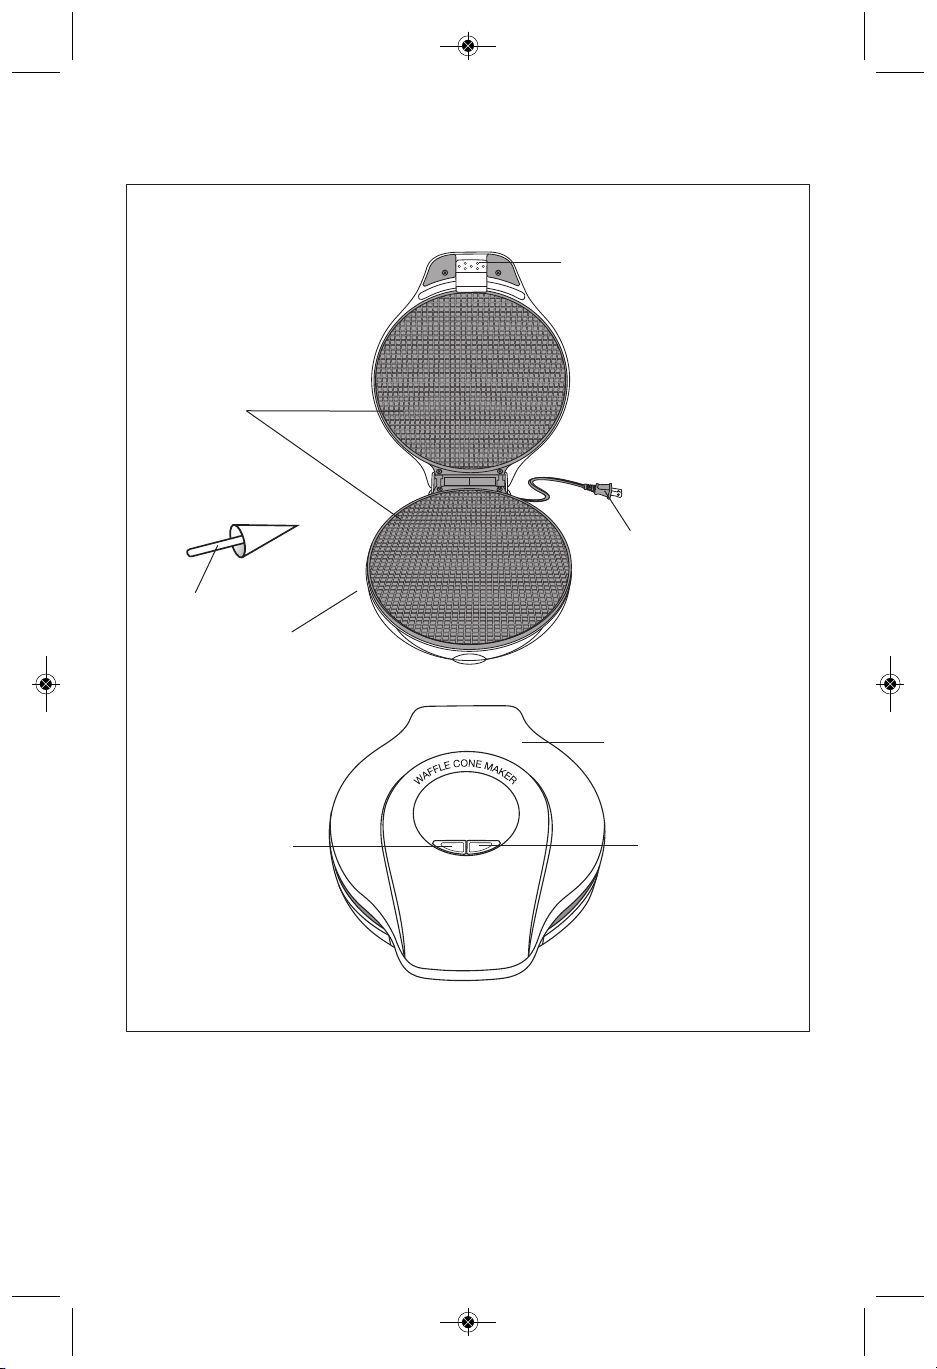
GETTING TO KNOW YOUR WAFFLE CONE MAKER
Product may vary slightly from illustrations.
4
Latch Lock
Figure 1
Polarized Plug
Lid
Non-Stick Upper
and Lower
Cooking Plates
Green READY Light
Non-skid Feet
(Not Shown)
Orange POWER ON
Light
Waffle Cone Mold
SO-308687_13468 BC Waffle Cone Maker INTERIOR_Layout 1 11-11-14 9:50 AM Page 4
Page 5
BEFORE USING FOR THE FIRST TIME
1. Carefully unpack the Waffle Cone Maker and remove all packaging and materials.
2. Before using your Waffle Cone Maker for the first time, wipe both the upper
and the cooking plates with a damp cloth to remove all dust, and then dry.
Wipe outer surfaces with a slightly damp, soft cloth or sponge.
CAUTION: Take care to prevent water from running into the appliance. NEVER IMMERSE
WAFFLE CONE MAKER BODY IN WATER OR ANY OTHER LIQUIDS!
3. Set the appliance on a dry, clean and flat surface. Keep the Waffle Cone Maker closed
until use.
OPERATING INSTRUCTIONS
1. Use the lid handle to lift the top lid to the open position.
2. Before making the first waffle cones of the day, pour a teaspoon of vegetable oil
onto both the top and bottom waffle cone cooking plates. Spread with an absorbent kitchen
towel and wipe off any excess oil.
3. Plug unit into a 120 V AC electrical outlet to preheat. The orange POWER ON light
and green READY light will illuminate. Close the lid.
NOTE: When your Waffle Cone Maker is heated for the first time, it may emit slight smoke
or odor. This is normal and should disappear after 1 or 2 uses. This does not affect
the safety of the appliance. However, as it may affect the flavor of the first waffle cones
prepared in the Waffle Cone Maker, it is recommended that these be discarded.
4. While preheating, prepare waffle cone batter.
5. After approximately 2 to 3 minutes, the green READY light will turn off, indicating the unit
is preheated and is ready for use.
6. For best results, use a non-stick cooking spray to lightly coat the non-stick plates
before cooking. This will assist in the removal of the waffle cones after cooking.
7. Recipes will vary in cook time and brownness; batters with more sugar will brown quicker.
Note the perfect bake times for each batter recipe for future use.
8. Spoon 1-3 tablespoons of batter into the center of the Waffle Cone Maker.
NOTE: The batter should be thick, but spoonable.
9. Lower the top lid, press down so that the latch lock is secured.
10. Bake for 11⁄2 minutes then check for proper color. Cook an additional 5 to 10 seconds
if necessary.
NOTE: As the waffle cones use a small amount of batter, and the Waffle Cone Maker
cooking plates are very hot, the cooking time is generally shorter rather than longer.
Be careful not to burn waffle cones.
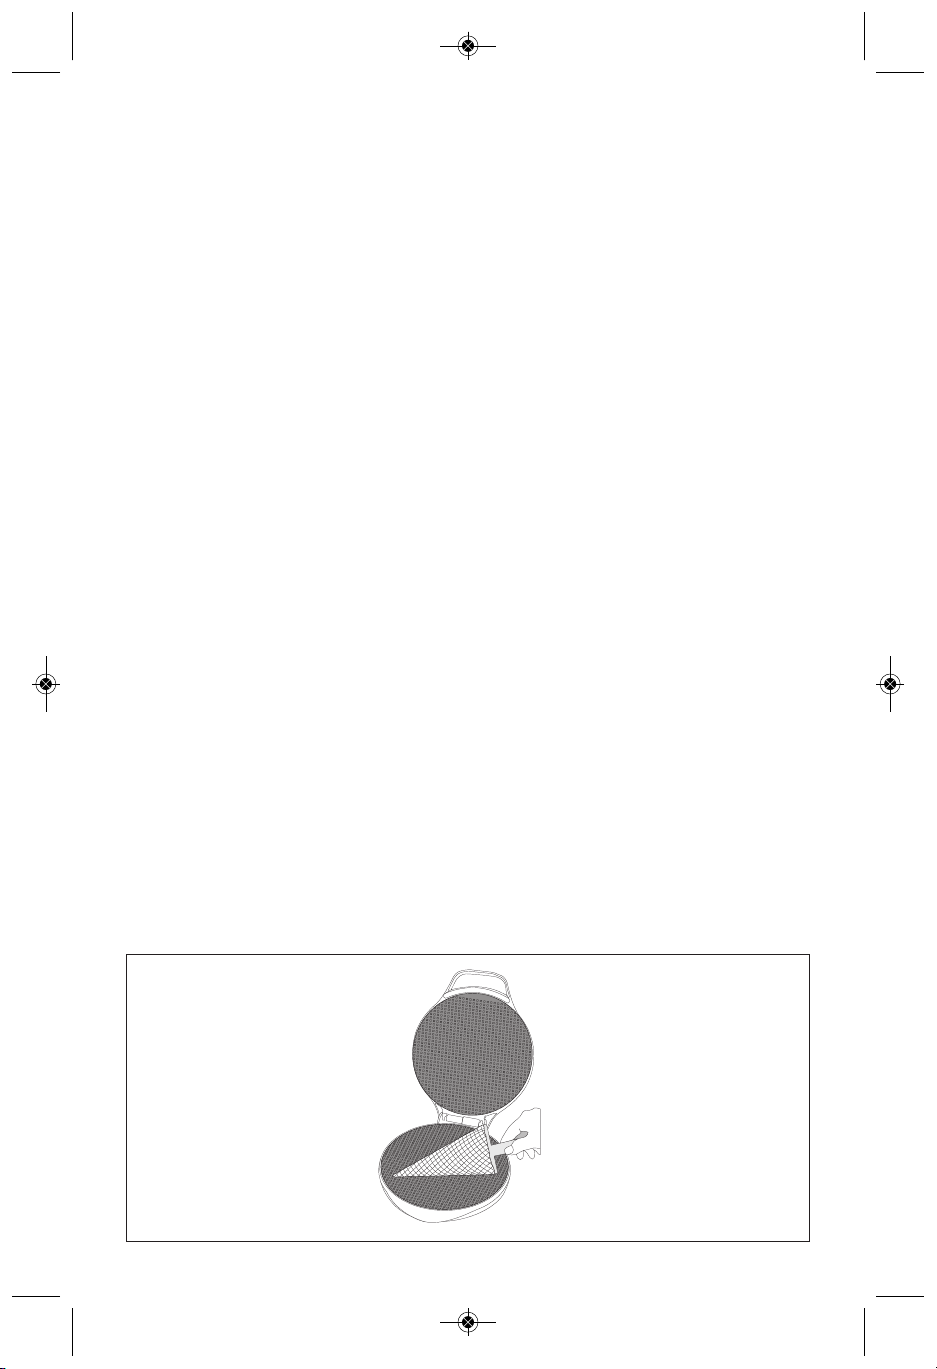
11. Wearing oven mitts, using a flat, firm plastic spatula, quickly remove the warm, flat cooked
dough from the Waffle Cone Maker onto a clean cloth towel. Use the cloth
to help lift and roll the dough around the waffle cone mold. Remove the cloth.
Hold the cone a few seconds to set its shape. (See Figure 2.)
5
Figure 2
SO-308687_13468 BC Waffle Cone Maker INTERIOR_Layout 1 11-11-14 9:50 AM Page 5
Page 6

12. Place on a wire rack to cool.
NOTE: If additional waffle cones are to be baked, keep the Waffle Cone Maker closed
to retain heat. Always wait until the green READY light turns off before baking more
waffle cones.
NOTE: Waffle Cones made later will bake faster because extra heat has been retained.
It may be necessary to adjust to a shorter cooking time to accommodate.
13. When baking is complete, after waffle cones have been removed, unplug the power cord
from electric outlet. Lift the top lid to expose the cooking plates and allow unit to cool.
14. Do not clean until unit has been fully cooled.
USER MAINTENANCE INSTRUCTIONS
This appliance requires little maintenance. It contains no user serviceable parts.
Do not try to repair it yourself. Contact a qualified appliance repair technician if the product
requires servicing.
CARE AND CLEANING
CAUTION: Unplug from electrical outlet and allow to cool thoroughly before cleaning.
1. The Waffle Cone Maker does not disassemble for cleaning.
2. Never immerse appliance in water or other liquids. Never place Waffle Cone Maker
in dishwasher.
3. The waffle cone cooking plates should be cleaned and conditioned before each heating.
4. Brush cooking plates with a clean, soft pastry brush or cloth. To condition plates,
lightly coat the cooking surfaces with solid vegetable shortening or vegetable oil. Carefully
follow suggested cleaning procedures below. After a time, if waffle cones show signs
of sticking, recondition as needed.
5. To protect the premium quality non-stick surfaces, use only plastic, nylon
or wooden utensils.
6. To remove any batter baked onto the cooking plates, pour a small amount of cooking oil
onto the hardened batter. Allow to set for 5 minutes, then wipe softened batter off
with a paper towel or soft cloth. Remove stubborn stains with a plastic mesh puff or pad.
A clean round kitchen brush or a toothbrush works well to remove baked-on batter
from the cooking plates. For best results, use only products with directions stating
they are safe for cleaning non-stick cooking surfaces. Do not use steel wool
or coarse scouring pads.
7. The exterior finish should be cleaned with a non-abrasive cleaner and a soft, damp cloth.
Dry thoroughly.
6
SO-308687_13468 BC Waffle Cone Maker INTERIOR_Layout 1 11-11-14 9:50 AM Page 6
Page 7
STORING INSTRUCTIONS
1. Make sure unit is unplugged and fully cooled.
2. Secure the lid shut with the latch.
WARNING: Never store Waffle Cone Maker while it is hot or still plugged in.
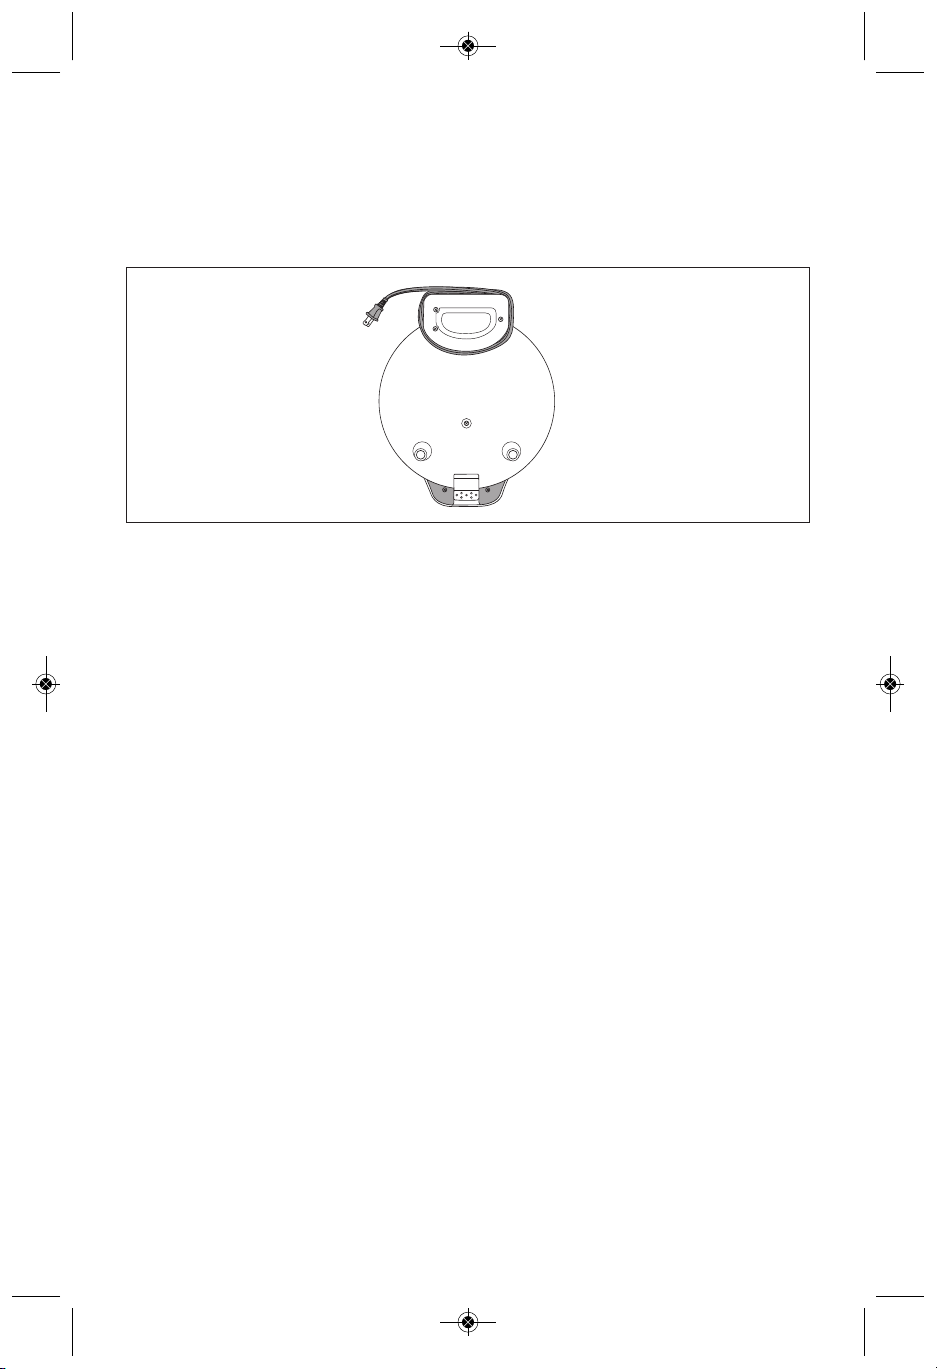
3. Use the cord wrap on the bottom of the Waffle Cone Maker to store the cord.
(See Figure 3.)
4. Do not put any stress on cord where it enters unit, as this could cause cord to fray
and break.
5. Store Waffle Cone Maker in its box or stand unit on its end for easy and compact storage.
7
Figure 3
SO-308687_13468 BC Waffle Cone Maker INTERIOR_Layout 1 11-11-14 9:50 AM Page 7
Page 8

8
–––––––––––––––––––––––––––––––––––––––––––––––––––––––
CHOCOLATE WAFFLE CONES
–––––––––––––––––––––––––––––––––––––––––––––––––––––––
ORANGE CINNAMON WAFFLE CONES
–––––––––––––––––––––––––––––––––––––––––––––––––––––––
SIMPLY VANILLA WAFER CONES
–––––––––––––––––––––––––––––––––––––––––––––––––––––––
VARIATIONS
–––––––––––––––––––––––––––––––––––––––––––––––––––––––
RECIPES
SO-308687_13468 BC Waffle Cone Maker INTERIOR_Layout 1 11-11-14 9:50 AM Page 8
Page 9

9
CHOCOLATE WAFFLE CONES
Makes about 6 cones
–––––––––––––––––––––––––––––––––––––––––––––––––––––––
1. Preheat the Waffle Cone Maker.
2. Melt chocolate and butter in a small microwave safe bowl.
Stir to combine then set aside to cool for 5 minutes.
3. In a medium-sized bowl, beat the eggs and salt
with a fork until well blended.
4. Using an electric mixer, beat in the sugar until the eggs
have lightened in color slightly, about 1 minute.
5. Stir in the melted chocolate, vanilla extract, and butter.
6. Add the flour and hot chocolate mix, stirring slowly
until dry ingredients are moistened. Beat another 15 seconds
to incorporate the flour and remove all lumps.
*The batter should be somewhat thick,
but spoonable onto the cooking plate.
Spoon 1 to 3 tablespoons of batter into the center
of the Waffle Cone cooking plate. Bake for 1 minute then check
for proper color. Cook an additional 5 to 10 seconds if necessary.
7. Using a flat, firm plastic spatula, quickly remove the waffle
from the Waffle Cone Maker onto a clean cloth towel.
Use the cloth to help lift and roll the dough around
the waffle cone mold. Remove the cloth. Hold the cone
a few seconds to set its shape. (See Figure 2.)
8. Place on a wire rack to cool.
9. Drop a miniature marshmallow into the bottom of the cone
to prevent ice cream from spilling out.
10. Store leftover batter in the refrigerator for up to 2 days.
Make sure refrigerated batter is at room temperature before using.
1 ounce unsweetened chocolate
2 tablespoon butter
2 eggs
1/4 teaspoon salt
1/2 cup brown sugar
1/2 cup all-purpose flour
2 tablespoons Swiss Miss
®
Milk
Chocolate Hot Chocolate Mix
1 teaspoon vanilla extract
1/3 to 1/2 cup of water or milk
SO-308687_13468 BC Waffle Cone Maker INTERIOR_Layout 1 11-11-14 9:50 AM Page 9
Page 10

10
ORANGE CINNAMON
WAFFLE CONES
Makes about 6 cones
–––––––––––––––––––––––––––––––––––––––––––––––––––––––
1. Preheat the Waffle Cone Maker.
2. Beat the egg, egg white and salt in a small bowl
with a fork until well blended.
3. Using an electric mixer, beat in the sugar until the eggs
have lightened in color slightly, about 1 minute.
4. Add the flour and stir slowly until all flour is moistened.
Beat another 15 seconds to incorporate the flour
and cinnamon and remove all lumps.
5. Add the melted butter and orange extract.
Stir until well blended.
6. Spoon 1 to 3 tablespoons of batter
into the center of the Waffle Cone Maker.
7. Bake for 1 minute then check for proper color.
Cook an additional 5 to 10 seconds if necessary.
8. Using a flat, firm plastic spatula, quickly remove the waffle
from the Waffle Cone Maker onto a clean cloth towel.
Use the cloth to help lift and roll the dough around
the waffle cone mold. Remove the cloth. Hold the cone
a few seconds to set its shape. (See Figure 2.)
9. Place on a wire rack to cool.
10. Drop a miniature marshmallow into the bottom
of the cone to prevent ice cream from spilling out.
11. Store leftover batter in the refrigerator for up to 2 days.
Make sure refrigerated batter is at room temperature before using.
1 whole egg
+ 1 egg white
1/4 teaspoon salt
1/2 cup granulated sugar
1 teaspoon ground cinnamon
2/3 cup sifted all-purpose flour
2 tablespoons butter, melted
and cooled slightly
1 teaspoon orange extract
1/3 to 1/2 cup of water or milk
SO-308687_13468 BC Waffle Cone Maker INTERIOR_Layout 1 11-11-14 9:50 AM Page 10
Page 11

11
SIMPLY VANILLA
WAFER CONES
Makes about 6 cones
Use cake flour to create this delicate wafer cone.
–––––––––––––––––––––––––––––––––––––––––––––––––––––––
1. Preheat the Waffle Cone Maker.
2. Beat the egg, egg white and salt in a small bowl
with a fork until well blended.
3. Using an electric mixer, beat in the sugar until the eggs
have lightened in color slightly, about 1 minute.
4. Stir in the oil. Add the cake flour and stir slowly
until all flour is moistened.
5. Beat another 15 seconds to incorporate
the flour and remove all lumps.
6. Stir in the vanilla extract until well blended.
7. Spoon 1 to 3 tablespoons of batter
into the center of the Waffle Cone Maker.
8. Bake for 1 minute then check for proper color.
Cook and additional 5 to 10 seconds if necessary.
9. Using a flat, firm plastic spatula, quickly remove the waffle
from the Waffle Cone Maker onto a clean cloth towel.
Use the cloth to help lift and roll the dough around
the waffle cone mold. Remove the cloth. Hold the cone
a few seconds to set its shape. (See Figure 2.)
10. Place on a wire rack to cool.
11. Drop a miniature marshmallow into the bottom
of the cone to prevent ice cream from spilling out.
12. Store leftover batter in the refrigerator for up to 2 days.
Make sure refrigerated batter is at room temperature before using.
2 whole eggs
1/4 teaspoon salt
2/3 cup granulated sugar
2 tablespoons vegetable oil
1 cup cake flour
1 teaspoon
vanilla extract
1/3 to 1/2 cup of water or milk
SO-308687_13468 BC Waffle Cone Maker INTERIOR_Layout 1 11-11-14 9:50 AM Page 11
Page 12

12
VARIATIONS
For a colorful, fun time presentation,
liven up your cones with extra sweets.
Gather small bowls of colored jimmies, sprinkles,
nuts, candies, toffee, etc.
–––––––––––––––––––––––––––––––––––––––––––––––––––––––
1. Place chocolate chips into wide-mouth microwave-safe container.
2. Microwave at MEDIUM (50%) 1 minute; stir.
If necessary, microwave at MEDIUM an additional
10 seconds at a time, stirring after each heating,
until chocolate is melted and smooth when stirred.
3. Dip the top of cone into the warm mixture
and then into the topping of your choice.
4. Allow to cool fully before adding ice cream.
5. Drop a miniature marshmallow into the bottom
of the cone to prevent ice cream from spilling out.
SO-308687_13468 BC Waffle Cone Maker INTERIOR_Layout 1 11-11-14 9:50 AM Page 12
Page 13

MEDIDAS DE SEGURIDAD IMPORTANTES
ADVERTENCIA: Al utilizar electrodomésticos, siempre se deben cumplir las precauciones
de seguridad básicas, incluidas las siguientes:
1. El cable de este electrodoméstico sólo debe enchufarse en un tomacorriente eléctrico
de CA de 120 V.
2. Para protegerse del riesgo de descarga eléctrica, no sumerja el cable, el enchufe
ni la unidad de cocción en agua ni en ningún otro líquido.
3. No toque las superficies calientes. Utilice el mango.
4. Este electrodoméstico no debe ser utilizado por personas (incluidos niños)
con capacidades físicas, sensoriales o mentales reducidas, o con falta de experiencia
y conocimientos, a menos que una persona responsable de su seguridad les haya
brindado supervisión o instrucciones sobre su uso.
5. Se debe controlar a los niños para asegurarse de que no jueguen con el aparato.
6. Desenchufe el electrodoméstico del tomacorriente de pared cuando no lo utilice
y antes de limpiarlo. Deje enfriar el electrodoméstico antes de limpiarlo o guardarlo.
7. Nunca tire del cordón para desconectar la unidad de cocción del tomacorriente.
En lugar de eso, tome el enchufe y tire para desconectar.
8. No utilice ningún electrodoméstico si el cable está dañado. No utilice este
electrodoméstico si la unidad presenta un funcionamiento defectuoso, si se ha caído
o se ha dañado de cualquier manera. Para evitar el riesgo de descargas eléctricas,
nunca trate de reparar la máquina para hacer cucuruchos de barquillo usted mismo.
Llévela a un técnico autorizado para que la examine, la repare o le haga ajustes eléctricos
o mecánicos. Si la máquina para hacer cucuruchos de barquillo se vuelve a armar
de manera incorrecta, se corre el riesgo de sufrir una descarga eléctrica al utilizarla.
9. El uso de accesorios o dispositivos no recomendados por el fabricante puede provocar
incendios, descargas eléctricas o lesiones.
10. No utilice este electrodoméstico en exteriores ni para propósitos comerciales.
11. No utilice el electrodoméstico para otros fines que no sean aquellos para los que fue
diseñado.
12. No permita que el cable eléctrico cuelgue del borde de la mesa o encimera ni que toque
superficies calientes.
13. No coloque el electrodoméstico sobre un quemador a gas o eléctrico, o cerca de él,
ni en un horno caliente.
14. Utilícelo solamente sobre una superficie plana, nivelada y resistente al calor.
15. Sea extremadamente cuidadoso al mover cualquier electrodoméstico que contenga
comida, agua, aceite u otro líquido caliente.
16. Para desconectar, retire el enchufe del tomacorriente.
17. Desenchufe el electrodoméstico después de su uso; de lo contrario, permanecerá
encendido.
18. PRECAUCIÓN, SUPERFICIES CALIENTES: Este electrodoméstico genera calor mientras
está en uso. Se deben tomar las medidas adecuadas para evitar el riesgo
de quemaduras, incendios u otro tipo de daño a personas o a la propiedad.
19. Cuando utilice el electrodoméstico, proporcione una buena ventilación por encima
y a los lados de la unidad para que circule el aire. No permita que el electrodoméstico
entre en contacto con cortinas, recubrimientos de pared, ropa, paños de cocina
ni otros materiales inflamables mientras está en uso.
20. Utilícelo solamente con un receptáculo de pared.
PARA USO DOMÉSTICO ÚNICAMENTE
GUARDE ESTAS INSTRUCCIONES
13
SO-308687_13468 BC Waffle Cone Maker INTERIOR_Layout 1 11-11-14 9:50 AM Page 13
Page 14

OTRAS MEDIDAS DE SEGURIDAD
IMPORTANTES
PRECAUCIÓN: Este electrodoméstico se calienta durante el funcionamiento y mantiene
el calor un tiempo después de apagado. Siempre use manoplas al manipular materiales
calientes y deje que las piezas metálicas se enfríen antes de limpiarlas. No coloque nada
sobre el electrodoméstico mientras esté en funcionamiento o esté caliente.
1. Todos los usuarios de este aparato deben leer y comprender este manual
de instrucciones antes de ponerlo en funcionamiento o limpiarlo.
2. No descuide el electrodoméstico mientras está en funcionamiento.
NOTAS SOBRE EL CABLE
El cable de alimentación corto (o el cable de alimentación desmontable) suministrado se debe
utilizar para reducir los riesgos de enredarse o tropezar con un cable más largo. No utilice
un cable de extensión con este producto.
NOTAS SOBRE EL ENCHUFE
Este aparato tiene un enchufe polarizado (una pata es más ancha que la otra). A fin de reducir
el riesgo de descarga eléctrica, el enchufe entra en un tomacorriente polarizado en un solo
sentido. Si el enchufe no entra completamente en el tomacorriente, invierta el enchufe. Si aun
así no entra, consulte a un electricista autorizado. No realice ninguna modificación al enchufe.
ADVERTENCIA SOBRE EL PLASTIFICANTE
PRECAUCIÓN: Para evitar que el plastificante se transfiera sobre el acabado de la encimera,
la superficie de trabajo u otro mueble, coloque posavasos o manteles individuales
NO PLÁSTICOS entre el electrodoméstico y el acabado de la encimera o la superficie.
De lo contrario, el acabado puede oscurecerse o pueden aparecer manchas
o marcas permanentes.
ENERGÍA ELÉCTRICA
Si el circuito eléctrico está sobrecargado con otros artefactos, su electrodoméstico puede dejar
de funcionar correctamente. El electrodoméstico debe funcionar en un circuito eléctrico
separado de otros artefactos.
14
SO-308687_13468 BC Waffle Cone Maker INTERIOR_Layout 1 11-11-14 9:50 AM Page 14
Page 15

CONOZCA SU MÁQUINA PARA HACER CUCURUCHOS DE BARQUILLO
El producto puede diferir levemente de las ilustraciones.
15
Traba de cierre
Figura 1
Enchufe polarizado
Tapa
Placas de cocción
antiadherentes
superior e inferior
Luz verde READY
(Listo)
Patas antideslizantes
(no mostrada)
Luz naranja POWER
ON (Encendido)
Molde para cucuruchos
de barquillo
SO-308687_13468 BC Waffle Cone Maker INTERIOR_Layout 1 11-11-14 9:50 AM Page 15
Page 16

ANTES DE UTILIZAR POR PRIMERA VEZ
1. Retire con cuidado la máquina para hacer cucuruchos de barquillo y todos los materiales
del embalaje.
2. Antes de utilizar la máquina para hacer cucuruchos de barquillo por primera vez,
limpie las placas de cocción con un paño húmedo para quitar el polvo y luego séquelas.
Limpie la superficie exterior con un paño suave o una esponja ligeramente húmeda.
PRECAUCIÓN: Asegúrese de evitar que el agua ingrese en el electrodoméstico.
¡NUNCA SUMERJA LA MÁQUINA PARA HACER CUCURUCHOS DE BARQUILLO
EN AGUA O CUALQUIER OTRO LÍQUIDO!
3. Coloque el electrodoméstico sobre una superficie plana, seca y limpia. Mantenga
la máquina para hacer cucuruchos de barquillo cerrada hasta que la utilice.
INSTRUCCIONES DE FUNCIONAMIENTO
1. Utilice el mango de la tapa para levantar y abrir la tapa superior.
2. Antes de preparar los primeros cucuruchos de barquillo del día, vierta una cucharada
de aceite vegetal en las placas de cocción superior e inferior para cucuruchos
de barquillo. Esparza con un paño de cocina absorbente y limpie los excesos de aceite.
3. Enchufe la unidad en un tomacorriente eléctrico de CA de 120 V. La luz naranja
de POWER/COOK (Encendido/Cocción) y la luz Verde de LISTO se prenderán mientras
se precalienta la máquina para hacer cucuruchos de barquillo.
NOTA: Cuando la máquina para hacer cucuruchos de barquillo se calienta por primera
vez, puede emitir un poco de humo u olor. Esto es normal y debería desaparecer después
de 1 ó 2 usos. Esto no afecta la seguridad del electrodoméstico. Sin embargo, se
recomienda descartar los primeros cucuruchos de barquillo preparados en la máquina
para hacer cucuruchos de barquillo ya que su sabor puede verse afectado.
4. Mientras se precalienta, prepare la mezcla para cucuruchos de barquillo.
5. Después de aproximadamente 2 a 3 minutos, se apagará la luz verde READY (Listo) para
indicar que la unidad está precalentada y lista para ser utilizada.
6. Para obtener mejores resultados, utilice un aceite antiadherente en aerosol para cubrir
ligeramente las placas antiadherentes antes de cocinar. Esto ayudará a retirar
los cucuruchos de barquillo después de la cocción.
7. El tiempo de cocción y el tostado de las recetas variarán; las mezclas que tienen
más azúcar se dorarán más rápido. Tenga en cuenta los tiempos de horneado ideales
para todas las recetas de mezcla para uso futuro.
8. Coloque 1-3 cucharadas de mezcla en el centro de la máquina para hacer cucuruchos
de barquillo.
NOTA: La mezcla debe estar espesa, pero debe poder colocarla con una cuchara.
9. Baje la tapa superior, presiónela para colocar la traba de cierre.
10. Hornee durante 11⁄2 minutos; luego, controle si obtuvo el color adecuado. Si es necesario,
cocine durante 5 a 10 segundos más.
NOTA: Debido a que los cucuruchos de barquillo utilizan una pequeña cantidad
de mezcla y que las placas de la máquina para hacer cucuruchos de barquillo
se calientan mucho, el tiempo de cocción generalmente es menor en lugar de ser mayor.
Procure no quemar los cucuruchos de barquillo.
11. Usando manoplas, con una espátula de plástico plana y firme, retire rápidamente la masa
cocida caliente y plana de la máquina para hacer cucuruchos de barquillo y colóquela
sobre un paño de cocina limpio. Use el paño para levantar y enrollar la masa alrededor del
molde para cucuruchos de barquillo. Retire el paño. Sostenga el cucurucho durante
algunos segundos para adaptar la forma. (Ver Figura 2).
16
SO-308687_13468 BC Waffle Cone Maker INTERIOR_Layout 1 11-11-14 9:50 AM Page 16
Page 17

12. Colóquelo sobre una rejilla para que se enfríe.
NOTA: Si se hornearán cucuruchos de barquillo adicionales, mantenga la máquina para
hacer cucuruchos de barquillo cerrada para conservar el calor. Antes de hornear más
cucuruchos de barquillo, espere hasta que se apague la luz verde READY (Listo).
NOTA: Los cucuruchos de barquillo que se preparen más tarde se hornearán más rápido
porque se ha mantenido calor extra. Es posible que deba cocinarlos durante
menos tiempo.
13. Cuando termine de hornear, después de haber retirado los cucuruchos de barquillo,
desenchufe el cable de alimentación del tomacorriente. Levante la tapa superior
para exponer las placas de cocción y deje que se enfríe la unidad.
14. No limpie la unidad hasta que se haya enfriado completamente.
INSTRUCCIONES DE MANTENIMIENTO PARA EL USUARIO
Este aparato requiere poco mantenimiento. No contiene piezas que puedan ser reparadas
por el usuario. No intente repararlo usted mismo. Si el producto necesita mantenimiento,
consulte a un técnico autorizado para reparar electrodomésticos.
INSTRUCCIONES DE LIMPIEZA Y CUIDADO
PRECAUCIÓN: Desenchufe el electrodoméstico del tomacorriente y deje que se enfríe
completamente antes de limpiarlo.
1. La máquina para hacer cucuruchos de barquillo no se desarma para la limpieza.
2. Nunca sumerja el electrodoméstico en agua o cualquier otro líquido. Nunca coloque
la máquina para hacer cucuruchos de barquillo en el lavavajillas.
3. Las placas de cocción para cucuruchos de barquillo deben estar limpias
y acondicionadas antes de calentarlas.
4. Limpie las placas de cocción con un pincel de repostería o un paño limpio y suave.
Para acondicionar las placas, cubra ligeramente las superficies de cocción con manteca
vegetal sólida o aceite vegetal. Siga cuidadosamente los procedimientos de limpieza
que se mencionan a continuación. Si después de un tiempo, los cucuruchos de barquillo
comienzan a pegarse, vuelva a acondicionar la unidad según sea necesario.
5. Para proteger las superficies antiadherentes de primera calidad, sólo utilice utensilios
de plástico, nailon o madera.
17
Figura 2
SO-308687_13468 BC Waffle Cone Maker INTERIOR_Layout 1 11-11-14 9:50 AM Page 17
Page 18

6. Para retirar la mezcla adherida a las placas de cocción, vierta una pequeña cantidad
de aceite de cocina en la mezcla endurecida. Deje reposar durante 5 minutos,
luego limpie la mezcla ablandada con una servilleta de papel o un paño suave. Retire
las manchas rebeldes con una esponja plástica o de malla. Para retirar la mezcla adherida
a las placas de cocción, se puede utilizar un cepillo de dientes o un cepillo
de cocina redondo limpio. Para obtener mejores resultados, utilice solamente productos en
cuyas instrucciones se indique que son seguros para limpiar superficies de cocción
antiadherentes. No utilice lana de acero ni esponjas metálicas gruesas.
7. El acabado exterior se debe limpiar con un producto de limpieza no abrasivo
y un paño suave y húmedo. Seque completamente.
INSTRUCCIONES DE ALMACENAMIENTO
1. Asegúrese de que la unidad esté desenchufada y se haya enfriado completamente.
2. Cierre bien la tapa con la traba.
ADVERTENCIA: Nunca guarde la máquina para hacer cucuruchos de barquillo mientras
está caliente o enchufada.
3. Guarde el cable en el envoltorio del cable que se encuentra en la parte posterior
de la máquina para hacer cucuruchos de barquillo. (Ver Figura 3).
4. No ejerza presión sobre el cable donde ingresa en la unidad, ya que esto podría hacer
que el cable se desgaste y se rompa.
5. Guarde la máquina para hacer cucuruchos de barquillo en la caja o en el soporte
que se encuentra en su extremo para que ocupe menos lugar.
18
Figura 3
SO-308687_13468 BC Waffle Cone Maker INTERIOR_Layout 1 11-11-14 9:50 AM Page 18
Page 19

19 19
–––––––––––––––––––––––––––––––––––––––––––––––––––––––
CUCURUCHOS DE BARQUILLO DE CHOCOLATE
–––––––––––––––––––––––––––––––––––––––––––––––––––––––
CUCURUCHOS DE BARQUILLO DE CANELA Y NARANJA
–––––––––––––––––––––––––––––––––––––––––––––––––––––––
CUCURUCHOS DE BARQUILLO SIMPLES DE VAINILLA
–––––––––––––––––––––––––––––––––––––––––––––––––––––––
VARIACIÓN
–––––––––––––––––––––––––––––––––––––––––––––––––––––––
RECETAS
SO-308687_13468 BC Waffle Cone Maker INTERIOR_Layout 1 11-11-14 9:50 AM Page 19
Page 20

20 20
CUCURUCHOS DE BARQUILLO
DE CHOCOLATE
Para aproximadamente 6 cucuruchos
1 onza de chocolate sin azúcar
2 cucharadas de manteca
2 huevos
1/4 cucharadita de sal
1/2 taza de azúcar moreno
1/2 taza de harina común
2 cucharadas de mezcla para chocolate caliente
de chocolate para leche Swiss Miss
®
1 cucharadita de extracto de vanilla
1/3 a 1/2 taza de agua o de leche
–––––––––––––––––––––––––––––––––––––––––––––––––––––––
1. Precaliente la máquina para hacer cucuruchos de barquillo.
2. Derrita el chocolate y la manteca en un tazón pequeño
apto para microondas. Revuelva para mezclar y coloque
la preparación a un lado durante 5 minutos para que se enfríe.
3. En un tazón mediano, bata los huevos y la sal con
un tenedor hasta que queden bien mezclados.
4. Con una batidora eléctrica, agregue el azúcar
y bata aproximadamente 1 minuto hasta que el color
de los huevos se haya aclarado.
5. Agregue el chocolate derretido, el extracto de vanilla
y la manteca y revuelva.
SO-308687_13468 BC Waffle Cone Maker INTERIOR_Layout 1 11-11-14 9:50 AM Page 20
Page 21

21 21
6. Agregue la harina y la mezcla para chocolate caliente,
revuelva lentamente hasta que los ingredientes secos
se humedezcan. Bata durante 15 segundos más
para incorporar la harina hasta que desaparezcan los grumos.
*La mezcla debe estar espesa, pero debe poder
colocarla en las placas de cocción con una cuchara.
Coloque 1 a 3 cucharadas de mezcla en el centro de la placa
de cocción de la máquina para hacer cucuruchos de barquillo.
Hornee durante 1 minuto; luego, controle si obtuvo
el color adecuado. Si es necesario, cocine durante
5 a 10 segundos más.
7. Con una espátula de plástico plana y firme,
retire rápidamente el barquillo de la máquina para hacer
cucuruchos de barquillo y colóquela sobre un paño
de cocina limpio. Use el paño para levantar y enrollar
la masa alrededor del molde para cucuruchos de barquillo.
Retire el paño. Sostenga el cucurucho durante
algunos segundos para adaptar la forma. (Ver Figura 2).
8. Colóquelo sobre una rejilla para que se enfríe.
9. Coloque un mini malvavisco en la parte inferior
del cucurucho para evitar que el helado se escape.
10. Guarde la mezcla restante en el refrigerador
por hasta 2 días. Asegúrese de que la mezcla
refrigerada esté a temperatura ambiente antes de usarla.
SO-308687_13468 BC Waffle Cone Maker INTERIOR_Layout 1 11-11-14 9:50 AM Page 21
Page 22

22 22
CUCURUCHOS DE BARQUILLO
DE CANELA Y NARANJA
Para aproximadamente 6 cucuruchos
1 huevo entero y 1 clara
1/4 cucharadita de sal
1/2 taza de azúcar granulada
1 cucharadita de canela en polvo
2/3 tazas de harina común tamizada
2 cucharadas de manteca derretida y ligeramente enfriada
1 cucharadita de extracto de naranja
1/3 a 1/2 taza de agua o de leche
–––––––––––––––––––––––––––––––––––––––––––––––––––––––
1. Precaliente la máquina para hacer cucuruchos de barquillo.
2. En un tazón pequeño, bata el huevo, la clara
y la sal con un tenedor hasta que queden bien mezclados.
3. Con una batidora eléctrica, agregue el azúcar y bata
aproximadamente 1 minuto hasta que el color
de los huevos se haya aclarado.
4. Agregue la harina y revuelva lentamente hasta que la harina
se humedezca. Bata durante 15 segundos más
para incorporar la harina y la canela hasta
que desaparezcan los grumos.
5. Agregue la manteca derretida y el extracto de naranja.
Revuelva hasta que se mezcle bien.
6. Coloque 1 a 3 cucharadas de mezcla en el centro
de la máquina para hacer cucuruchos de barquillo.
7. Hornee durante 1 minuto; luego, controle si obtuvo
el color adecuado. Si es necesario, cocine durante
5 a 10 segundos más.
SO-308687_13468 BC Waffle Cone Maker INTERIOR_Layout 1 11-11-14 9:50 AM Page 22
Page 23

23 23
8. Con una espátula de plástico plana y firme,
retire rápidamente el barquillo de la máquina
para hacer cucuruchos de barquillo y colóquela
sobre un paño de cocina limpio. Use el paño
para levantar y enrollar la masa alrededor del molde
para cucuruchos de barquillo. Retire el paño.
Sostenga el cucurucho durante algunos segundos
para adaptar la forma. (Ver Figura 2).
9. Colóquelo sobre una rejilla para que se enfríe.
10. Coloque un mini malvavisco en la parte inferior
del cucurucho para evitar que el helado se escape.
11. Guarde la mezcla restante en el refrigerador
por hasta 2 días. Asegúrese de que la mezcla refrigerada
esté a temperatura ambiente antes de usarla.
SO-308687_13468 BC Waffle Cone Maker INTERIOR_Layout 1 11-11-14 9:50 AM Page 23
Page 24

24 24
CUCURUCHOS DE BARQUILLO
SIMPLES DE VAINILLA
Para aproximadamente 6 cucuruchos
Para crear este cucurucho de barquillo delicado,
use harina para tortas.
2 huevos enteros
1/4 cucharadita de sal
2/3 taza de azúcar granulada
2 cucharadas de aceite vegetal
1 taza de harina para tortas
1 cucharadita de extracto de vanilla
1/3 a 1/2 taza de agua o de leche
–––––––––––––––––––––––––––––––––––––––––––––––––––––––
1. Precaliente la máquina para hacer cucuruchos de barquillo.
2. En un tazón pequeño, bata el huevo, la clara y la sal con un
tenedor hasta que queden bien mezclados.
3. Con una batidora eléctrica, agregue el azúcar
y bata aproximadamente 1 minuto hasta que el color
de los huevos se haya aclarado.
4. Agregue el aceite y revuelva. Agregue la harina para
tortas y revuelva lentamente hasta que la harina se humedezca.
5. Bata durante 15 segundos más para incorporar la harina
hasta que desaparezcan los grumos.
6. Agregue el extracto de vanilla y revuelva
hasta que se mezcle bien.
7. Coloque 1 a 3 cucharadas de mezcla en el centro
de la máquina para hacer cucuruchos de barquillo.
SO-308687_13468 BC Waffle Cone Maker INTERIOR_Layout 1 11-11-14 9:50 AM Page 24
Page 25

25 25
8. Hornee durante 1 minuto; luego, controle si obtuvo
el color adecuado. Si es necesario, cocine durante
5 a 10 segundos más.
9. Con una espátula de plástico plana y firme,
retire rápidamente el barquillo de la máquina
para hacer cucuruchos de barquillo y colóquela
sobre un paño de cocina limpio. Use el paño
para levantar y enrollar la masa alrededor del
molde para cucuruchos de barquillo. Retire el paño.
Sostenga el cucurucho durante algunos segundos
para adaptar la forma. (Ver Figura 2).
10. Colóquelo sobre una rejilla para que se enfríe.
11. Coloque un mini malvavisco en la parte inferior del cucurucho
para evitar que el helado se escape.
12. Guarde la mezcla restante en el refrigerador por hasta
2 días. Asegúrese de que la mezcla refrigerada
esté a temperatura ambiente antes de usarla.
SO-308687_13468 BC Waffle Cone Maker INTERIOR_Layout 1 11-11-14 9:50 AM Page 25
Page 26

26 26
VARIACIÓN
Para una presentación colorida y divertida,
decore sus cucuruchos con dulces.
Prepare tazones pequeños de granas de chocolate,
grageas, nueces, caramelos, toffee, etc.
–––––––––––––––––––––––––––––––––––––––––––––––––––––––
1. Coloque chispas de chocolate en un recipiente de boca amplia
apto para microondas.
2. Caliente en el microondas durante 1 minuto
a temperatura media (50%); revuelva. Si es necesario,
caliente en el microondas durante 10 segundos
más a temperatura media por vez y revuelva
después de calentarlo hasta que se derrita
el chocolate y quede consistente al revolverlo.
3. Sumerja la parte superior del cucurucho en la mezcla
caliente y luego en la cobertura de su elección.
4. Déjelo enfriar completamente antes de agregar el helado.
5.Coloque un mini malvavisco en la parte inferior
del cucurucho para evitar que el helado se escape.
SO-308687_13468 BC Waffle Cone Maker INTERIOR_Layout 1 11-11-14 9:50 AM Page 26
Page 27

SO-308687_13468 BC Waffle Cone Maker INTERIOR_Layout 1 11-11-14 9:50 AM Page 27
Page 28

SO-308687_13468 BC Waffle Cone Maker INTERIOR_Layout 1 11-11-14 9:50 AM Page 28
 Loading...