


MANUALLY CONFIGURING YOUR ROUTER
SECTIONSTable of Contents 1 2 3 4 6 7 8 9 105
Saving/Backing up Current Settings
You can save your current configuration by using this feature� Saving your configuration will allow you to restore it later if your settings are lost or
changed� It is recommended that you back up your current configuration before performing a firmware update�
1. Click “Save”� A window called “File Download” will open�
Click “Save”�
G Wirel ess Modem Ro uter
2. A window will open that allows you to select the location in which
to save the configuration file� Select a location� There are no
restrictions on the file name; however, be sure to name the file
so you can locate it yourself later� When you have selected the
location and entered the file name, click “Save”�
49
MANUALLY CONFIGURING YOUR ROUTER
SECTIONSTable of Contents 1 2 3 4 6 7 8 9 105
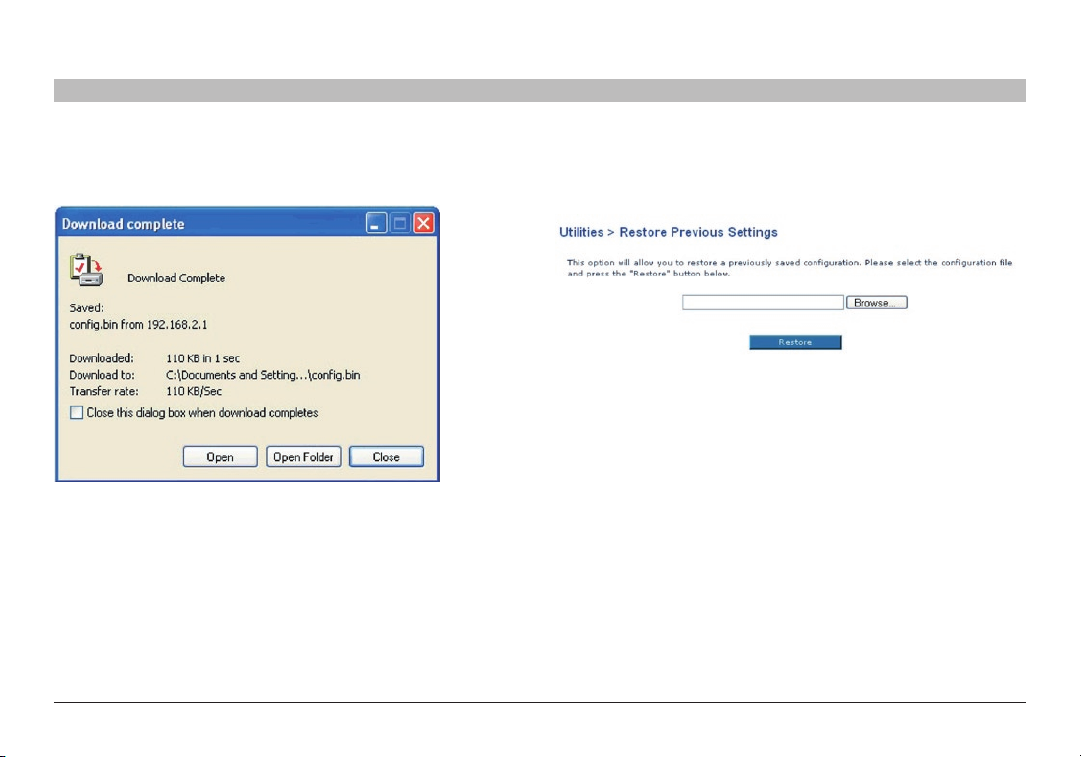
3. When the save is complete, you will see the window below� Click
“Close”� The configuration is now saved�
G Wirel ess Modem Ro uter
Restore Previous Settings
This option will allow you to restore a previously saved configuration�
1. Click “Browse”� A window will open that allows you to select the
location of the configuration file� Locate the configuration file,
“config�bin”, and double-click on it�
2. Then, click “Open”�
50
MANUALLY CONFIGURING YOUR ROUTER
SECTIONSTable of Contents 1 2 3 4 6 7 8 9 105
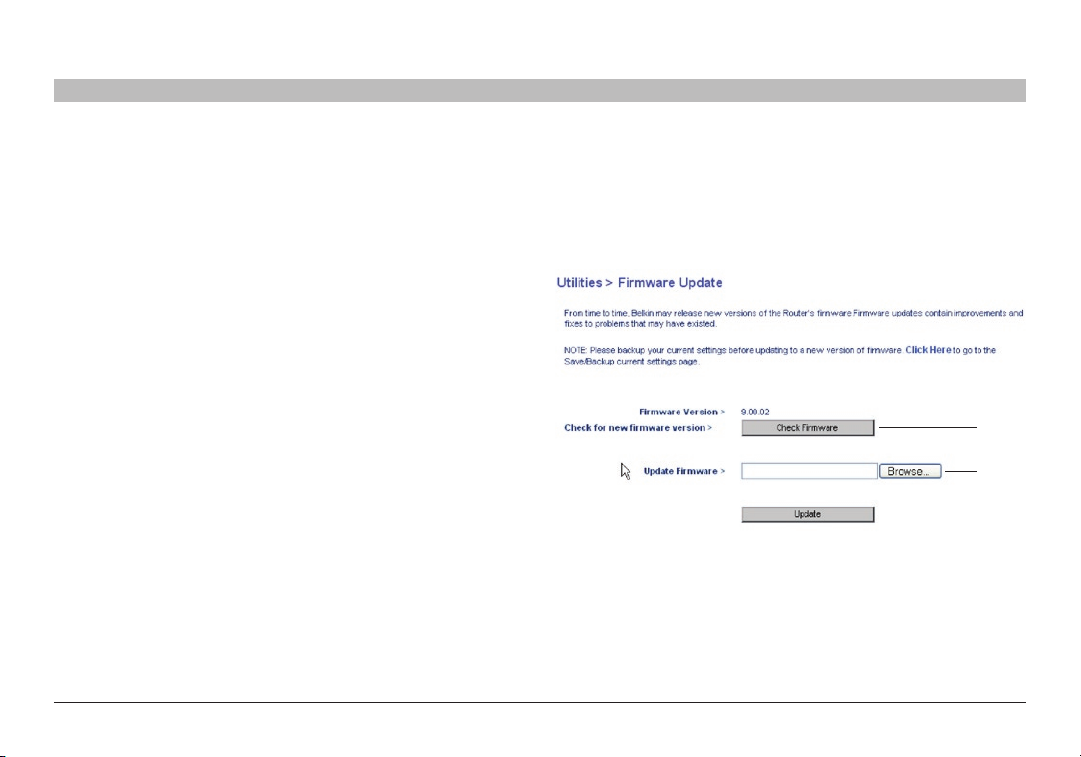
Updating Firmware
From time to time, Belkin may release new versions of the Router’s
firmware� Firmware updates contain feature improvements and fixes to
problems that may have existed� When Belkin releases new firmware,
you can download the firmware from the Belkin website and update your
Router’s firmware to the latest version�
G Wirel ess Modem Ro uter
Checking for a New Version of Firmware
The “Check Firmware” (1) button allows you to instantly check for a new
version of firmware� When you click the button, a new browser window
will appear informing you that either no new firmware is available or that
there is a new version available� If a new version is available, you will
have the option to download it�
(1)
(2)
51
MANUALLY CONFIGURING YOUR ROUTER
SECTIONSTable of Contents 1 2 3 4 6 7 8 9 105
Downloading a New Version of Firmware
If you click the “Check Firmware” button and a new version of firmware is available, you will see a screen similar to the one below�
1. To download the new version of firmware, click “Download”�
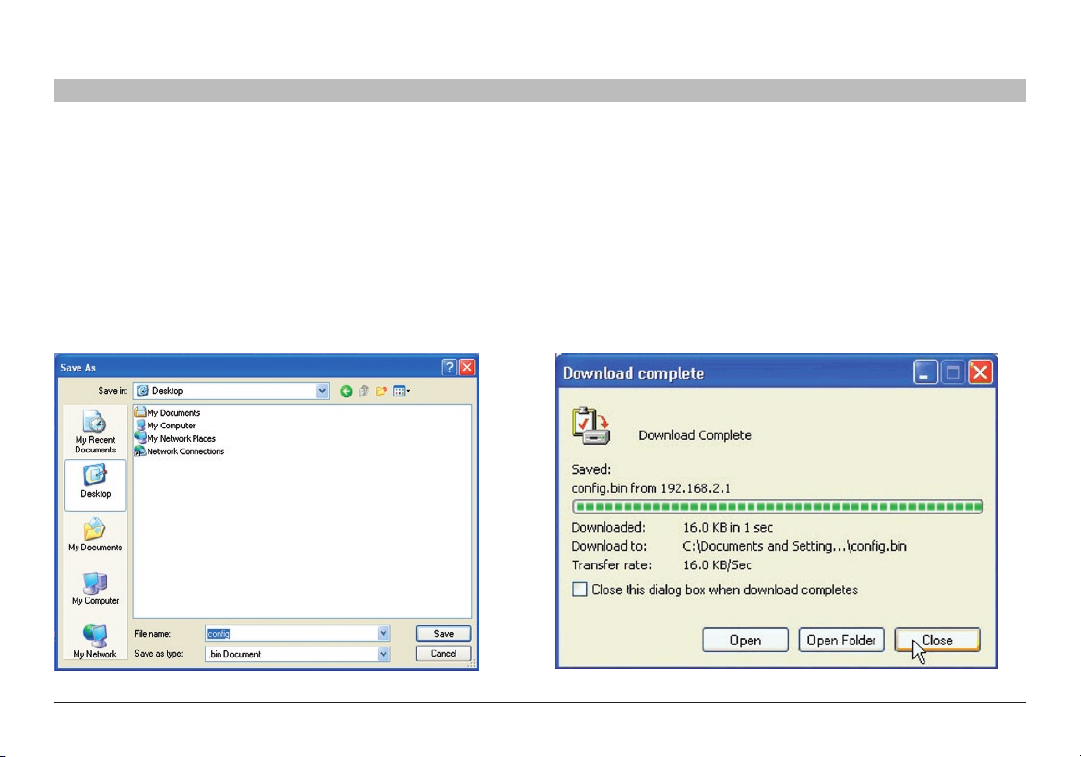
2. A window will open that allows you to select the location where you
want to save the firmware file� Select a location� You can name the
file anything you want, or use the default name� Be sure to locate
the file in a place where you can locate it yourself later� When you
have selected the location, click “Save”�
G Wirel ess Modem Ro uter
3. When the save is complete, you will see the following window�
Click “Close”� The download of the firmware is complete� To
update the firmware, follow the next steps in “Updating the
Router’s Firmware”�
52
MANUALLY CONFIGURING YOUR ROUTER
SECTIONSTable of Contents 1 2 3 4 6 7 8 9 105
Updating the Router’s Firmware
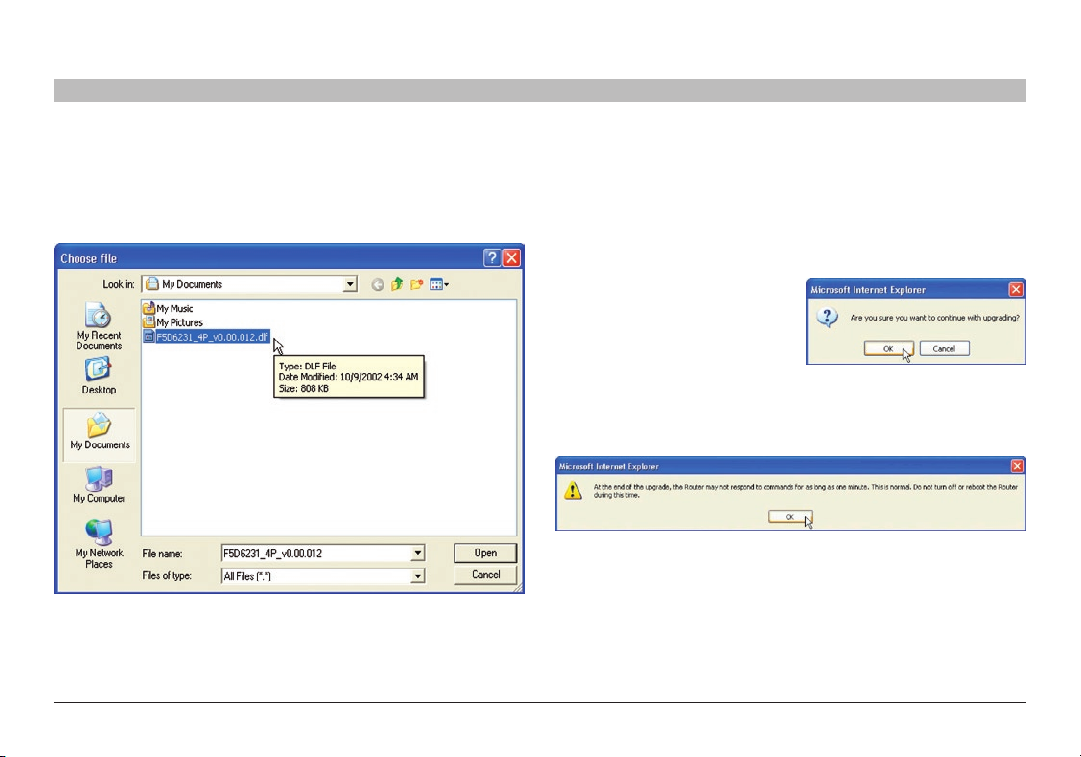
1. In the “Firmware Update” page, click “Browse” (2)� A window
will open that allows you to select the location of the firmware
update file�
2. Browse to the firmware file you downloaded� Select the file by
double-clicking on the file name�
3. The “Update Firmware” box will now display the location and name
of the firmware file you just selected� Click “Update”�
4. You will be asked if you are
sure you want to continue�
Click “OK”�
5. You will see one more message� This message tells you that the
Router may not respond for as long as one minute as the firmware
is loaded into the Router and the Router is rebooted� Click “OK”�
A 60-second countdown will appear on the screen� When the
countdown reaches zero, the Router firmware update will be complete�
The Router home page should appear automatically� If not, type in
the Router’s address (default = 192�168�2�1) into the navigation bar of
your browser�
G Wirel ess Modem Ro uter
53

MANUALLY CONFIGURING YOUR ROUTER
SECTIONSTable of Contents 1 2 3 4 6 7 8 9 105
System Settings
The “System Settings” page is where you can enter a new administrator
password, set the time zone, enable remote management, and turn on
and off the UPnP function of the Router�
Setting or Changing the Administrator Password
The Router ships with NO password entered� If you wish to add a
password for greater security, you can set a password here� Write down
your password and keep it in a safe place, as you will need it if you need
to log in to the Router in the future� It is also recommended that you
set a password if you plan to use the remote-management feature of
your Router�
Changing the Login Time-Out Setting
The login time-out option allows you to set the period of time that you
can be logged into the Router’s advanced setup interface� The timer
starts when there has been no activity� For example, you have made
some changes in the advanced setup interface, then left your computer
alone without clicking “Logout”� Assuming the time-out is set to 10
minutes, then 10 minutes after you leave, the login session will expire�
You will have to log in to the Router again to make any more changes�
The login time-out option is for security purposes and the default is
set to 10 minutes� Note: Only one computer can be logged in to the
Router’s advanced setup interface at one time�
G Wirel ess Modem Ro uter
Setting the Time and Time Zone
The Router keeps time by connecting to a Simple Network Time
Protocol (SNTP) server� This allows the Router to synchronize the system
clock to the global Internet� The synchronized clock in the Router is
used to record the security log and control client filtering� Select the
time zone in which you reside� If you reside in an area that observes
daylight saving time, then place a check mark in the box next to
“Daylight Savings”� The system clock may not update immediately� Allow
at least 15 minutes for the Router to contact the time servers on the
Internet and get a response� You cannot set the clock yourself� You now
have the option to select a primary and a backup NTP server to keep
your Router’s clock synchronized with different NTP time servers on the
Internet� Select your desired NTP server from the drop-down boxes, or
simply keep it as is�
54
MANUALLY CONFIGURING YOUR ROUTER
SECTIONSTable of Contents 1 2 3 4 6 7 8 9 105
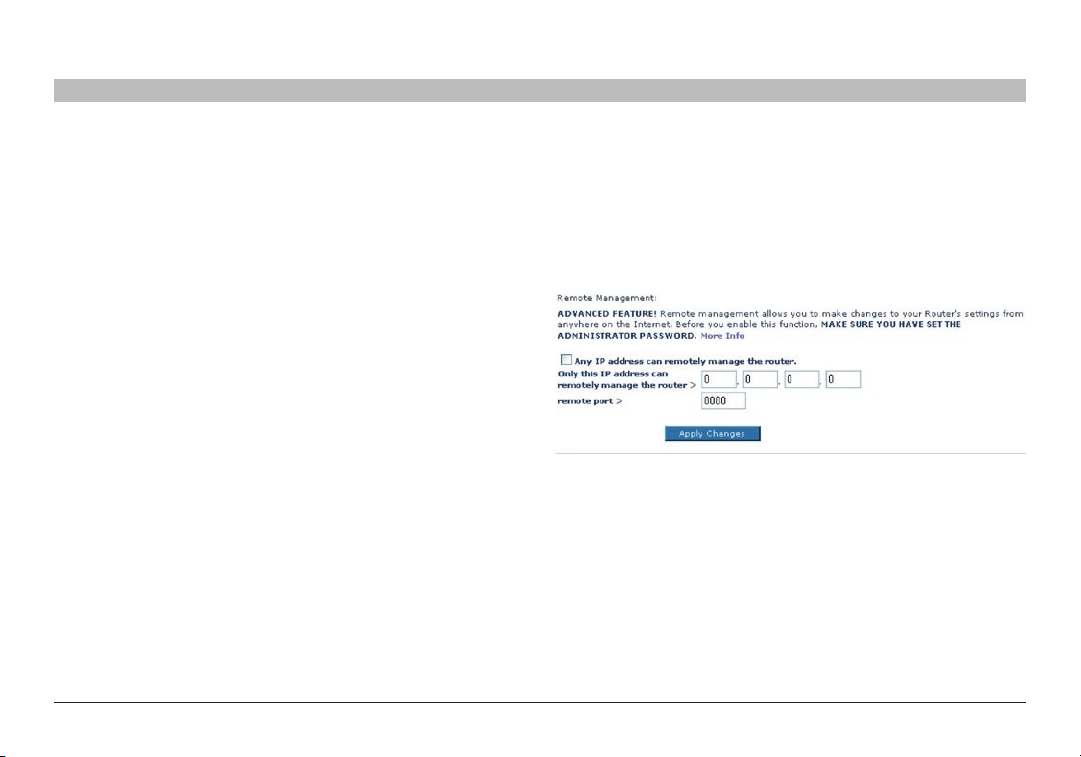
Enabling Remote Management
Before you enable this advanced feature of your Belkin Router, MAKE
SURE YOU HAVE SET THE ADMINISTRATOR PASSWORD� Remote
management allows you to make changes to your Router’s settings from
anywhere on the Internet�
There are two methods of remotely managing the Router� The first
is to allow access to the Router from anywhere on the Internet by
selecting, “Any IP address can remotely manage the Router”� By typing
in your WAN IP address from any computer on the Internet, you will be
presented with a login screen where you need to type in the password
of your Router� The second method is to allow a specific IP address
only to remotely manage the Router� This is more secure, but less
convenient� To use this method, enter the IP address from which you
know you will be accessing the Router in the space provided and select,
“Only this IP address can remotely manage the Router”�
Before you enable this function, it is STRONGLY RECOMMENDED that
you set your administrator password� Leaving the password empty
will potentially open your Router to intrusion� The remote-access port
defaults to port 8080� You can choose a different port by entering a new
port number in the “remote port” field� Click on the “Apply Changes”
button to save your settings�
G Wirel ess Modem Ro uter
55

MANUALLY CONFIGURING YOUR ROUTER
SECTIONSTable of Contents 1 2 3 4 6 7 8 9 105
Enabling/Disabling Network Address Translation (NAT)
Note: This advanced feature should be employed by advanced users
only� Before enabling this function, MAKE SURE YOU HAVE SET THE
ADMINISTRATOR PASSWORD� NAT is the method by which the Router
shares the single IP address assigned by your ISP with the other
computers on your network� This function should only be used if your
ISP assigns you multiple IP addresses or you need NAT disabled for an
advanced system configuration� If you have a single IP address and you
turn off NAT, the computers on your network will not be able to access
the Internet� Other problems may also occur� Turning off NAT will disable
your firewall functions�
Enabling/Disabling Universal Plug-and-Play (UPnP)
UPnP is yet another advanced feature offered by your Belkin Router� It is
a technology that offers seamless operation of voice messaging, video
messaging, games, and other applications that are UPnP-compliant�
Some applications require the Router’s firewall to be configured in a
specific way to operate properly� This usually requires opening TCP and
UDP ports, and in some instances, setting trigger ports� An application
that is UPnP-compliant has the ability to communicate with the Router,
basically “telling” the Router which way it needs the firewall configured�
The Router ships with the UPnP feature disabled� If you are using any
applications that are UPnP-compliant, and wish to take advantage of the
UPnP features, you can enable the UPnP feature� Simply select “Enable”
in the “UPnP Enabling” section of the “Utilities” page� Click “Apply
Changes” to save the change�
G Wirel ess Modem Ro uter
Enabling/Disabling Auto Firmware Update
This innovation provides the Router with the built-in capability to
automatically check for a new version of firmware and alert you that
the new firmware is available� When you log into the Router’s WebBased Advanced User Interface, the Router will perform a check to see
if new firmware is available� If so, you will be notified� You can choose
to download the new version or ignore it� The Router ships with this
feature disabled� If you want to disable it, select “Enable” and click
“Apply Changes”�
56
MANUALLY CONFIGURING NETWORK ADAPTERS
SECTIONSTable of Contents 1 2 3 4 5 7 8 9 10
6
Setting up your Computers
In order for your computer to properly communicate with your Router, you will need to change your computer’s “TCP/IP/Ethernet” settings to “Obtain
an IP address automatically/Using DHCP”� This is normally the default setting in most home computers�
You can set up the computer that is connected to the ADSL modem FIRST using these steps� You can also use these steps to add computers to your
Router after the Router has been set up to connect to the Internet�
Windows XP, 2000, or NT
1. Click “Start”, “Settings”, then “Control Panel”�
2. Double-click on the “Network and dial-up connections” icon
(Windows 2000) or the “Network” icon (Windows XP)�
3. Right-click on the “Local Area Connection” associated
with your network adapter and select “Properties” from the
drop-down menu�
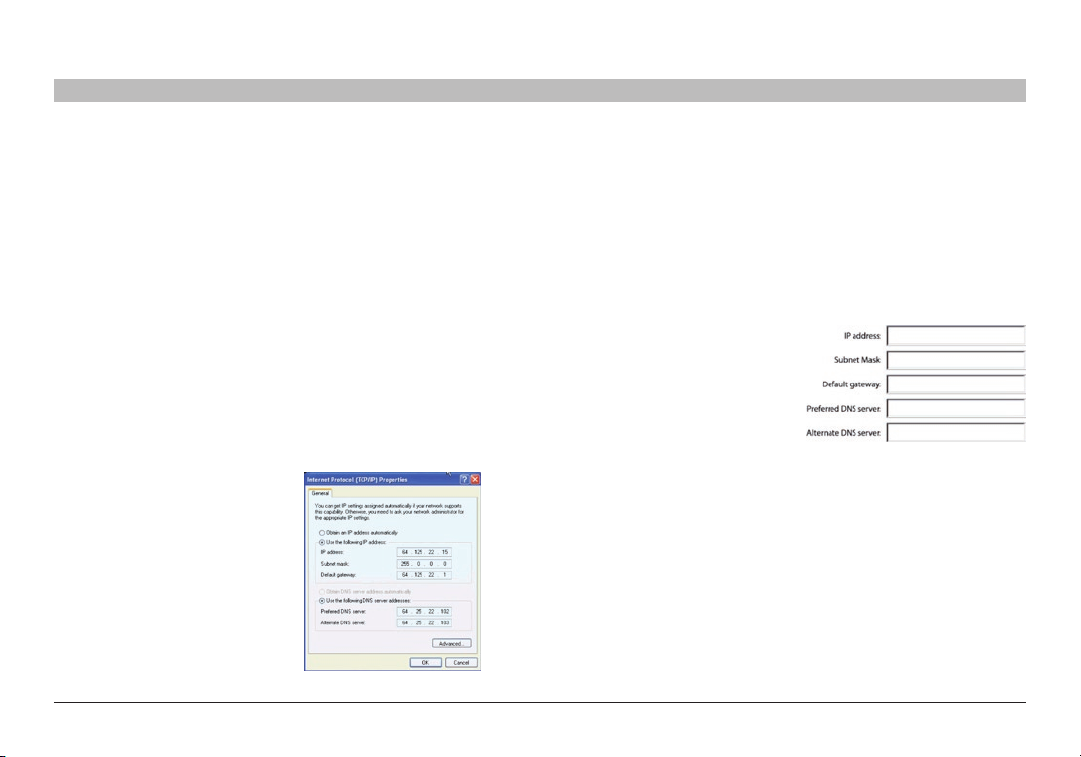
4. In the “Local Area
Connection Properties”
window, click “Internet
Protocol (TCP/IP)” and click
the “Properties” button� The
following screen will appear:
5. If “Use the following IP
address” (2) is selected,
your Router will need to
be set up for a static IP
connection type� Write the
address information in the
table below� You will need
to enter this information into
the Router�
6. If not already selected, select “Obtain an IP address automatically”
(1) and “Obtain DNS server address automatically” (3)� Click
“OK”� Your network adapter(s) are now configured for use with
the Router�
G Wirel ess Modem Ro uter
57
MANUALLY CONFIGURING NETWORK ADAPTERS
SECTIONSTable of Contents 1 2 3 4 5 7 8 9 106
Windows 98SE or Me
1. Right-click on “My Network Neighborhood” and select “Properties”
from the drop-down menu�
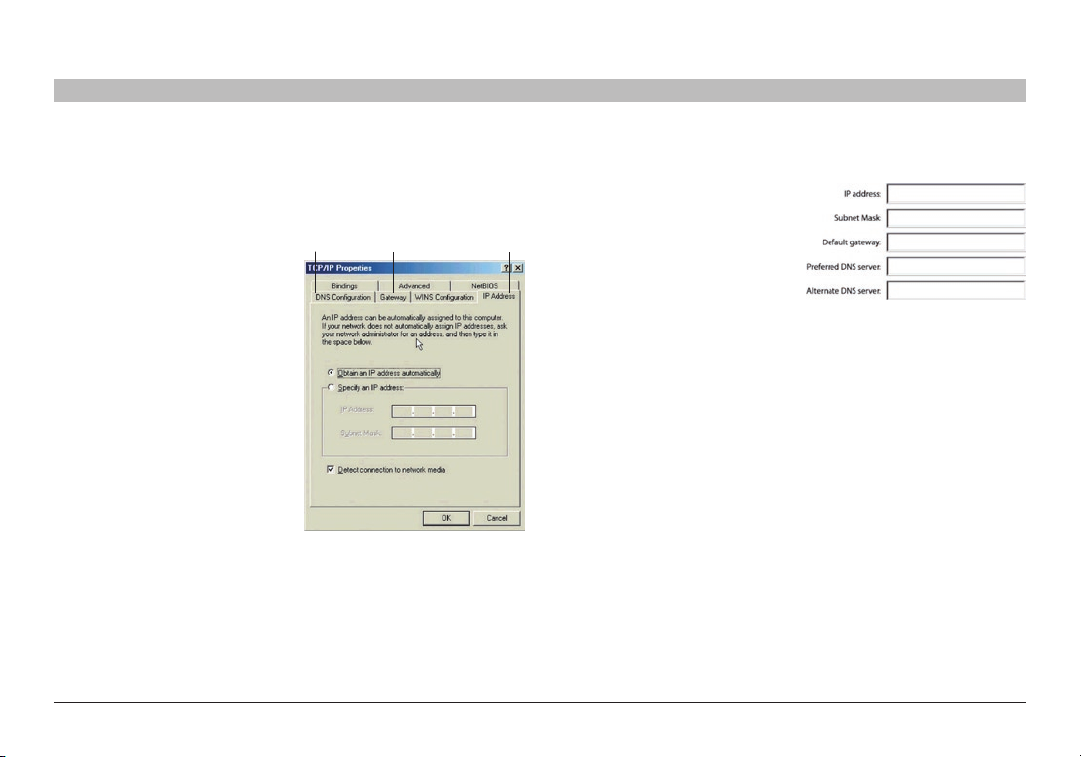
2. Select “TCP/IP -> settings”
for your installed network
adapter� You will see the
following window�
(1) (2) (3)
3. If “Specify an IP address”
is selected, your Router will
need to be set up for a static
IP connection type� Write
the address information
in the table below� You
will need to enter this
information into the Router�
4. Write down the IP address and subnet mask from the “IP
Address” tab (3)�
5. Click the “Gateway” tab (2)� Write down the gateway address in
the chart�
6. Click the “DNS Configuration” tab (1)� Write down the DNS
address(es) in the chart�
7. If not already selected, select “Obtain an IP address automatically”
on the “IP Address” tab� Click “OK”� Restart the computer� When
the computer restarts, your network adapter(s) are now configured
for use with the Router� Set up the computer that is connected to
the cable or DSL modem by FIRST using these steps� You can also
use these steps to add computers to your Router after the Router
has been set up to connect to the Internet�
G Wirel ess Modem Ro uter
58
MANUALLY CONFIGURING NETWORK ADAPTERS
SECTIONSTable of Contents 1 2 3 4 5 7 8 9 106
Mac OS up to 9.x
In order for your computer to properly communicate with your Router, you will need to change your Mac computer’s TCP/IP settings to DHCP�
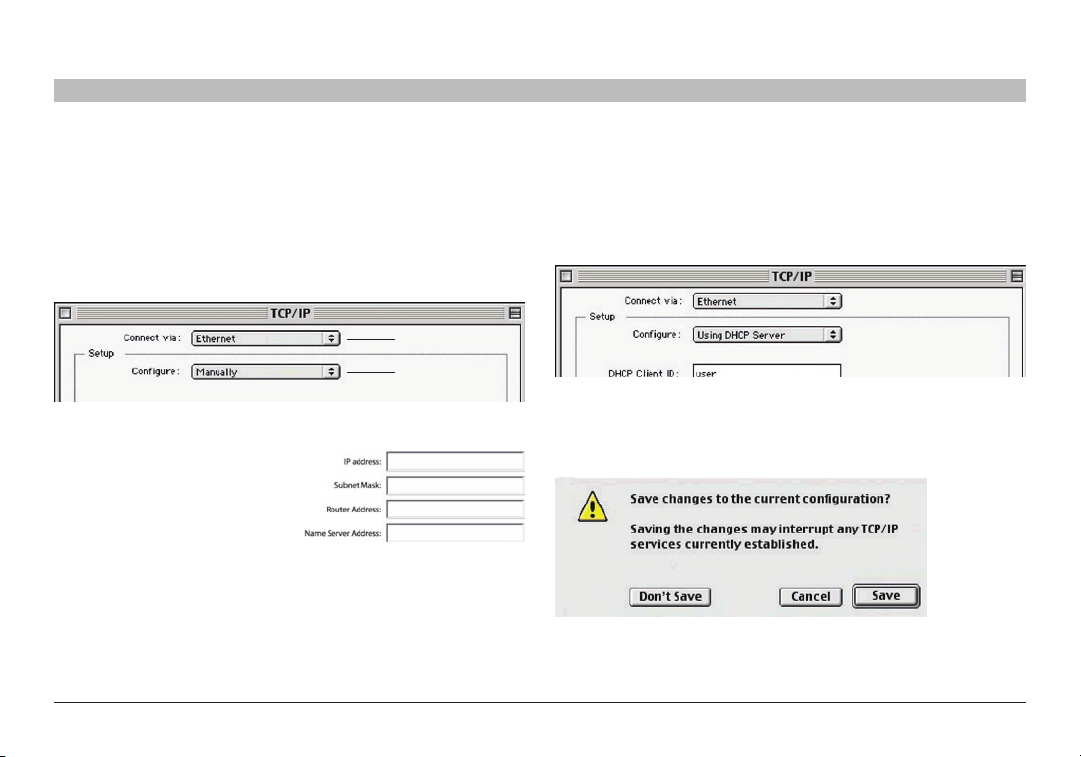
1. Pull down the Apple menu� Select “Control Panels” and select
“T CP/I P”�
2. You will see the TCP/IP control panel� Select “Ethernet Built-In” or
“Ethernet” in the “Connect via:” drop-down menu (1)�
(1)
(2)
3. Next to “Configure” (2),
if “Manually” is selected,
your Router will need to
be set up for a static IP
connection type� Write the
address information in the
table below� You will need
to enter this information into
the Router�
G Wirel ess Modem Ro uter
4. If not already set, at “Configure:”, choose “Using DHCP Server”�
This will tell the computer to obtain an IP address from the Router�
5. Close the window� If you made any changes, the following window
will appear� Click “Save”�
Restart the computer� When the computer restarts, your network
settings are now configured for use with the Router�
59

MANUALLY CONFIGURING NETWORK ADAPTERS
SECTIONSTable of Contents 1 2 3 4 5 7 8 9 106
Mac OS X
1. Click on the “System
Preferences” icon�
2. Select “Network” (1) from the “System Preferences” menu�
(1)
G Wirel ess Modem Ro uter
3. Select “Built-in Ethernet” (2) next to “Show” in the
“Network” menu�
(3)
60
(2)
(5)
(4)

MANUALLY CONFIGURING NETWORK ADAPTERS
SECTIONSTable of Contents 1 2 3 4 5 7 8 9 106
4. Select the “TCP/IP” tab (3)� Next to “Configure” (4), you should see
“Manually” or “Using DHCP”� If you do not, check the PPPoE tab
(5) to make sure that “Connect using PPPoE” is NOT selected� If it
is, you will need to configure your Router for a PPPoE connection
type using your user name and password�
G Wirel ess Modem Ro uter
5. If “Manually” is selected,
your Router will need to
be set up for a static IP
connection type� Write the
address information in the
table below� You will need
to enter this information into
the Router�
6. If not already selected, select “Using DHCP” next to “Configure”
(4), then click “Apply Now”�
Your network adapter(s) are now configured for use with the Router�
61
RECOMMENDED WEB BROWSER SETTINGS
SECTIONSTable of Contents 1 2 3 4 5 6 8 9 10
In most cases, you will not need to make any changes to your web browser’s settings� If you are having trouble accessing the Internet or the
Web-Based Advanced User Interface, then change your browser’s settings to the recommended settings in this section�
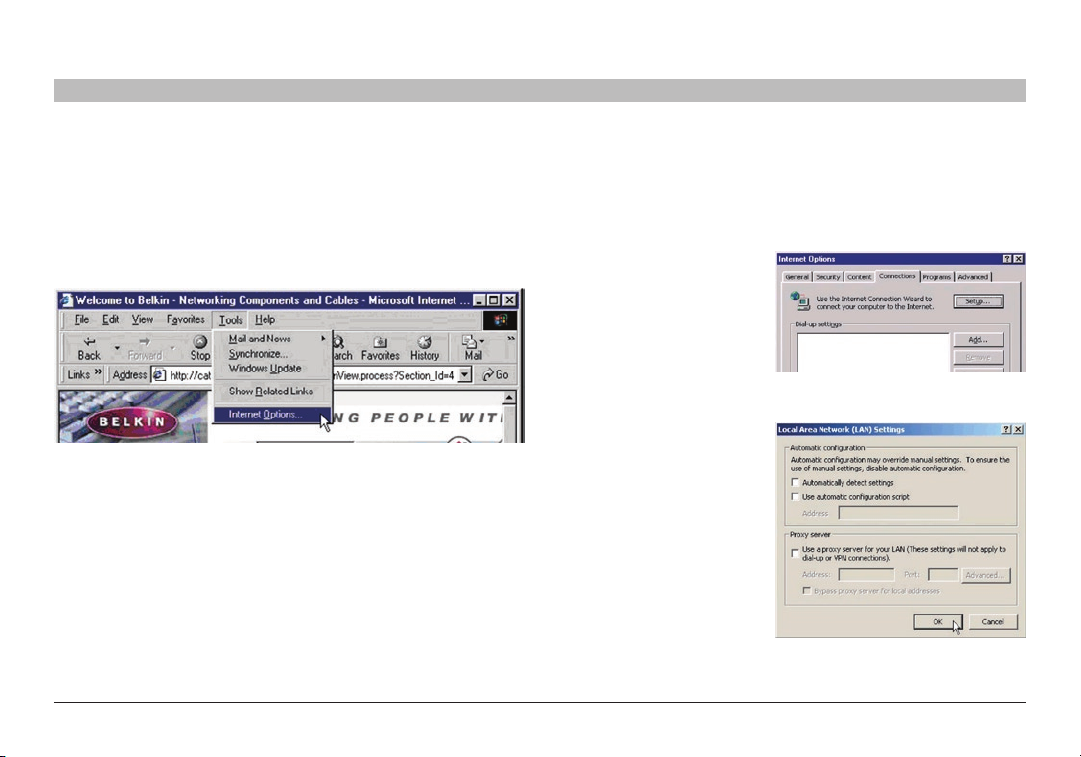
Microsoft Internet Explorer 4.0 or Higher
1. Start your web browser� Select “Tools” then “Internet Options”�
2. In the “Internet Options” screen, there are three selections: “Never
dial a connection”, “Dial whenever a network connection is not
present”, and “Always dial my default connection”� If you can make
a selection, select, “Never dial a connection”� If you cannot make a
selection, go to the next step�
3. Under the “Internet
Options” screen, click on
“Connections” and select
“LAN Settings…”�
4. Make sure there are no
check marks next to any
of the displayed options:
“Automatically detect
settings”, “Use automatic
configuration script”, and
“Use a proxy server”�
Click “OK”� Then, click
“OK” again in the “Internet
Options” page�
7
G Wirel ess Modem Ro uter
62
 Loading...