

Page 1

Instruction Manual
WD290
Article number: 10268-0068
Version: 001-03/08
Page 2

Inhaltsverzeichnis
1 Introduction . . . . . . . . . . . . . . . . . . . . . . . . . . . . . . . . . . . . . . . . . . . 4
1.1 Before you read on . . . . . . . . . . . . . . . . . . . . . . . . . . . . . . . . . . . . . . 4
1.2 Target group . . . . . . . . . . . . . . . . . . . . . . . . . . . . . . . . . . . . . . . . . . . 4
1.3 Amendments. . . . . . . . . . . . . . . . . . . . . . . . . . . . . . . . . . . . . . . . . . . 4
1.4 Symbols and references used . . . . . . . . . . . . . . . . . . . . . . . . . . . . . 4
2 For your safety . . . . . . . . . . . . . . . . . . . . . . . . . . . . . . . . . . . . . . . . 5
2.1 Intended use . . . . . . . . . . . . . . . . . . . . . . . . . . . . . . . . . . . . . . . . . . . 5
2.2 Duty of care in handling the device. . . . . . . . . . . . . . . . . . . . . . . . . . 5
2.3 Non-intended use . . . . . . . . . . . . . . . . . . . . . . . . . . . . . . . . . . . . . . . 5
2.4 Instruction of personnel. . . . . . . . . . . . . . . . . . . . . . . . . . . . . . . . . . . 5
2.5 Fields of application for the device . . . . . . . . . . . . . . . . . . . . . . . . . . 6
2.6 Process validation . . . . . . . . . . . . . . . . . . . . . . . . . . . . . . . . . . . . . . . 6
3 Device description . . . . . . . . . . . . . . . . . . . . . . . . . . . . . . . . . . . . . 7
3.1 Device unclean side (US) . . . . . . . . . . . . . . . . . . . . . . . . . . . . . . . . . 7
3.2 Device clean side (CS) . . . . . . . . . . . . . . . . . . . . . . . . . . . . . . . . . . . 8
3.3 Controller unclean side (US) . . . . . . . . . . . . . . . . . . . . . . . . . . . . . . . 9
3.4 Controller clean side (CS) . . . . . . . . . . . . . . . . . . . . . . . . . . . . . . . . . 9
4 Pre-treating medical devices . . . . . . . . . . . . . . . . . . . . . . . . . . . . 10
4.1 Responsibility for pre-treatment . . . . . . . . . . . . . . . . . . . . . . . . . . . 10
4.1.1 SOPs (Standard Operating Procedures) . . . . . . . . . . . . . . . . . . . . 10
4.2 Preparing medical devices . . . . . . . . . . . . . . . . . . . . . . . . . . . . . . . 10
4.3 Pre-cleaning pre-treatment . . . . . . . . . . . . . . . . . . . . . . . . . . . . . . . 11
4.3.1 Avoiding subsequent cleaning . . . . . . . . . . . . . . . . . . . . . . . . . . . . 11
5 Preparing the device. . . . . . . . . . . . . . . . . . . . . . . . . . . . . . . . . . . 12
6 Self-disinfection . . . . . . . . . . . . . . . . . . . . . . . . . . . . . . . . . . . . . . 13
6.1 Why self-disinfection? . . . . . . . . . . . . . . . . . . . . . . . . . . . . . . . . . . . 13
6.2 Starting self-disinfection . . . . . . . . . . . . . . . . . . . . . . . . . . . . . . . . . 13
7 User identification. . . . . . . . . . . . . . . . . . . . . . . . . . . . . . . . . . . . . 15
7.1 Identification via operating panel . . . . . . . . . . . . . . . . . . . . . . . . . . 15
7.2 Identification via barcode reader . . . . . . . . . . . . . . . . . . . . . . . . . . . 16
8 Loading and identifying racks . . . . . . . . . . . . . . . . . . . . . . . . . . . 17
8.1 Loading racks . . . . . . . . . . . . . . . . . . . . . . . . . . . . . . . . . . . . . . . . . 17
8.2 Rack identification . . . . . . . . . . . . . . . . . . . . . . . . . . . . . . . . . . . . . . 17
8.2.1 Rack identification via the operating panel . . . . . . . . . . . . . . . . . . . 17
8.2.2 Rack identification via barcode . . . . . . . . . . . . . . . . . . . . . . . . . . . . 17
9 Identification of batch content. . . . . . . . . . . . . . . . . . . . . . . . . . . 18
9.1 Batch content identification via operating panel . . . . . . . . . . . . . . . 18
9.2 Batch content identification via barcode . . . . . . . . . . . . . . . . . . . . . 18
10 Loading from the unclean side . . . . . . . . . . . . . . . . . . . . . . . . . . 19
10.1 Manual loading . . . . . . . . . . . . . . . . . . . . . . . . . . . . . . . . . . . . . . . . 19
10.2 Automatic rack station (optional). . . . . . . . . . . . . . . . . . . . . . . . . . . 21
2/39
11 Washing and disinfection . . . . . . . . . . . . . . . . . . . . . . . . . . . . . . 22
001 Instruction Manual WD290
10268 © Belimed
Page 3

11.1 General information . . . . . . . . . . . . . . . . . . . . . . . . . . . . . . . . . . . . 22
11.2 Washing, disinfecting . . . . . . . . . . . . . . . . . . . . . . . . . . . . . . . . . . . 22
12 Unloading from the clean side. . . . . . . . . . . . . . . . . . . . . . . . . . . 23
13 Switching off the device . . . . . . . . . . . . . . . . . . . . . . . . . . . . . . . . 24
14 Daily servicing and cleaning work . . . . . . . . . . . . . . . . . . . . . . . 25
14.1 Servicing in general . . . . . . . . . . . . . . . . . . . . . . . . . . . . . . . . . . . . 25
14.2 Servicing the bottom washing arm . . . . . . . . . . . . . . . . . . . . . . . . . 25
14.3 Servicing the top washing arm . . . . . . . . . . . . . . . . . . . . . . . . . . . . 26
14.4 Cleaning the surface sieve and coarse sieve . . . . . . . . . . . . . . . . . 27
15 Device fails to clean properly . . . . . . . . . . . . . . . . . . . . . . . . . . . 28
15.1 Checking the device . . . . . . . . . . . . . . . . . . . . . . . . . . . . . . . . . . . . 28
15.2 Checking dosing . . . . . . . . . . . . . . . . . . . . . . . . . . . . . . . . . . . . . . . 28
15.3 Checking rack loading. . . . . . . . . . . . . . . . . . . . . . . . . . . . . . . . . . . 28
16 Faults . . . . . . . . . . . . . . . . . . . . . . . . . . . . . . . . . . . . . . . . . . . . . . . 29
16.1 Fault text without process interruption . . . . . . . . . . . . . . . . . . . . . . 29
16.2 Fault text with process interruption . . . . . . . . . . . . . . . . . . . . . . . . . 30
16.3 Device does not run . . . . . . . . . . . . . . . . . . . . . . . . . . . . . . . . . . . . 30
17 Options . . . . . . . . . . . . . . . . . . . . . . . . . . . . . . . . . . . . . . . . . . . . . 31
17.1 Modem connection . . . . . . . . . . . . . . . . . . . . . . . . . . . . . . . . . . . . . 31
17.1.1 Activating the connection . . . . . . . . . . . . . . . . . . . . . . . . . . . . . . . . 31
17.2 Independent measurement data acquisition IPD . . . . . . . . . . . . . . 31
17.3 Tank heating manually switchable . . . . . . . . . . . . . . . . . . . . . . . . . 32
17.3.1 Function . . . . . . . . . . . . . . . . . . . . . . . . . . . . . . . . . . . . . . . . . . . . . 32
17.3.2 Operation . . . . . . . . . . . . . . . . . . . . . . . . . . . . . . . . . . . . . . . . . . . . 32
17.4 Built-in printer CS / US . . . . . . . . . . . . . . . . . . . . . . . . . . . . . . . . . . 33
17.4.1 Function . . . . . . . . . . . . . . . . . . . . . . . . . . . . . . . . . . . . . . . . . . . . . 33
17.4.2 Operation . . . . . . . . . . . . . . . . . . . . . . . . . . . . . . . . . . . . . . . . . . . . 34
17.4.3 Changing paper rolls . . . . . . . . . . . . . . . . . . . . . . . . . . . . . . . . . . . . 34
17.5 Emergency stop CS . . . . . . . . . . . . . . . . . . . . . . . . . . . . . . . . . . . . 34
17.5.1 Function . . . . . . . . . . . . . . . . . . . . . . . . . . . . . . . . . . . . . . . . . . . . . 34
17.5.2 Operation . . . . . . . . . . . . . . . . . . . . . . . . . . . . . . . . . . . . . . . . . . . . 34
18 Conformity and certifications . . . . . . . . . . . . . . . . . . . . . . . . . . . 35
19 Glossary. . . . . . . . . . . . . . . . . . . . . . . . . . . . . . . . . . . . . . . . . . . . . 36
20 Organisation Belimed AG . . . . . . . . . . . . . . . . . . . . . . . . . . . . . . 38
20.1 Manufacturer. . . . . . . . . . . . . . . . . . . . . . . . . . . . . . . . . . . . . . . . . . 38
20.2 Subsidiaries, Customer Service . . . . . . . . . . . . . . . . . . . . . . . . . . . 38
21 Notes . . . . . . . . . . . . . . . . . . . . . . . . . . . . . . . . . . . . . . . . . . . . . . . 39
Instruction Manual WD290 001
© Belimed 10268
3/39
Page 4
Introduction
1 Introduction
1.1 Before you read on
Your product meets high standards and is easy to operate. Nevertheless, please
take time to read these instructions carefully. You will become familiarised with
your product and be able to use it to its best.
1.2 Target group
These instructions are a component of the product and are intended for the owner, users, operators, as well as servicing personnel. They must be accessible for
this group of persons.
1.3 Amendments
The text, graphics and data correspond to the technical status of the product at
the time of going to print. Amendments in the sense of technical development remain reserved.
1.4 Symbols and references used
The following symbols and references to occupational safety used throughout
the documentation are important to avoid harm to health and life.
DANGER!
There is an imminent risk to the life and health of persons.
WARNING!
There may be a risk to the life and health of persons.
CAUTION!
A situation for which there is a warning of damage to property and equipment.
NOTE
User tips and useful information on the best possible use of the equipment.
4/39
001 Instruction Manual WD290
10268 © Belimed
Page 5

For your safety
2 For your safety
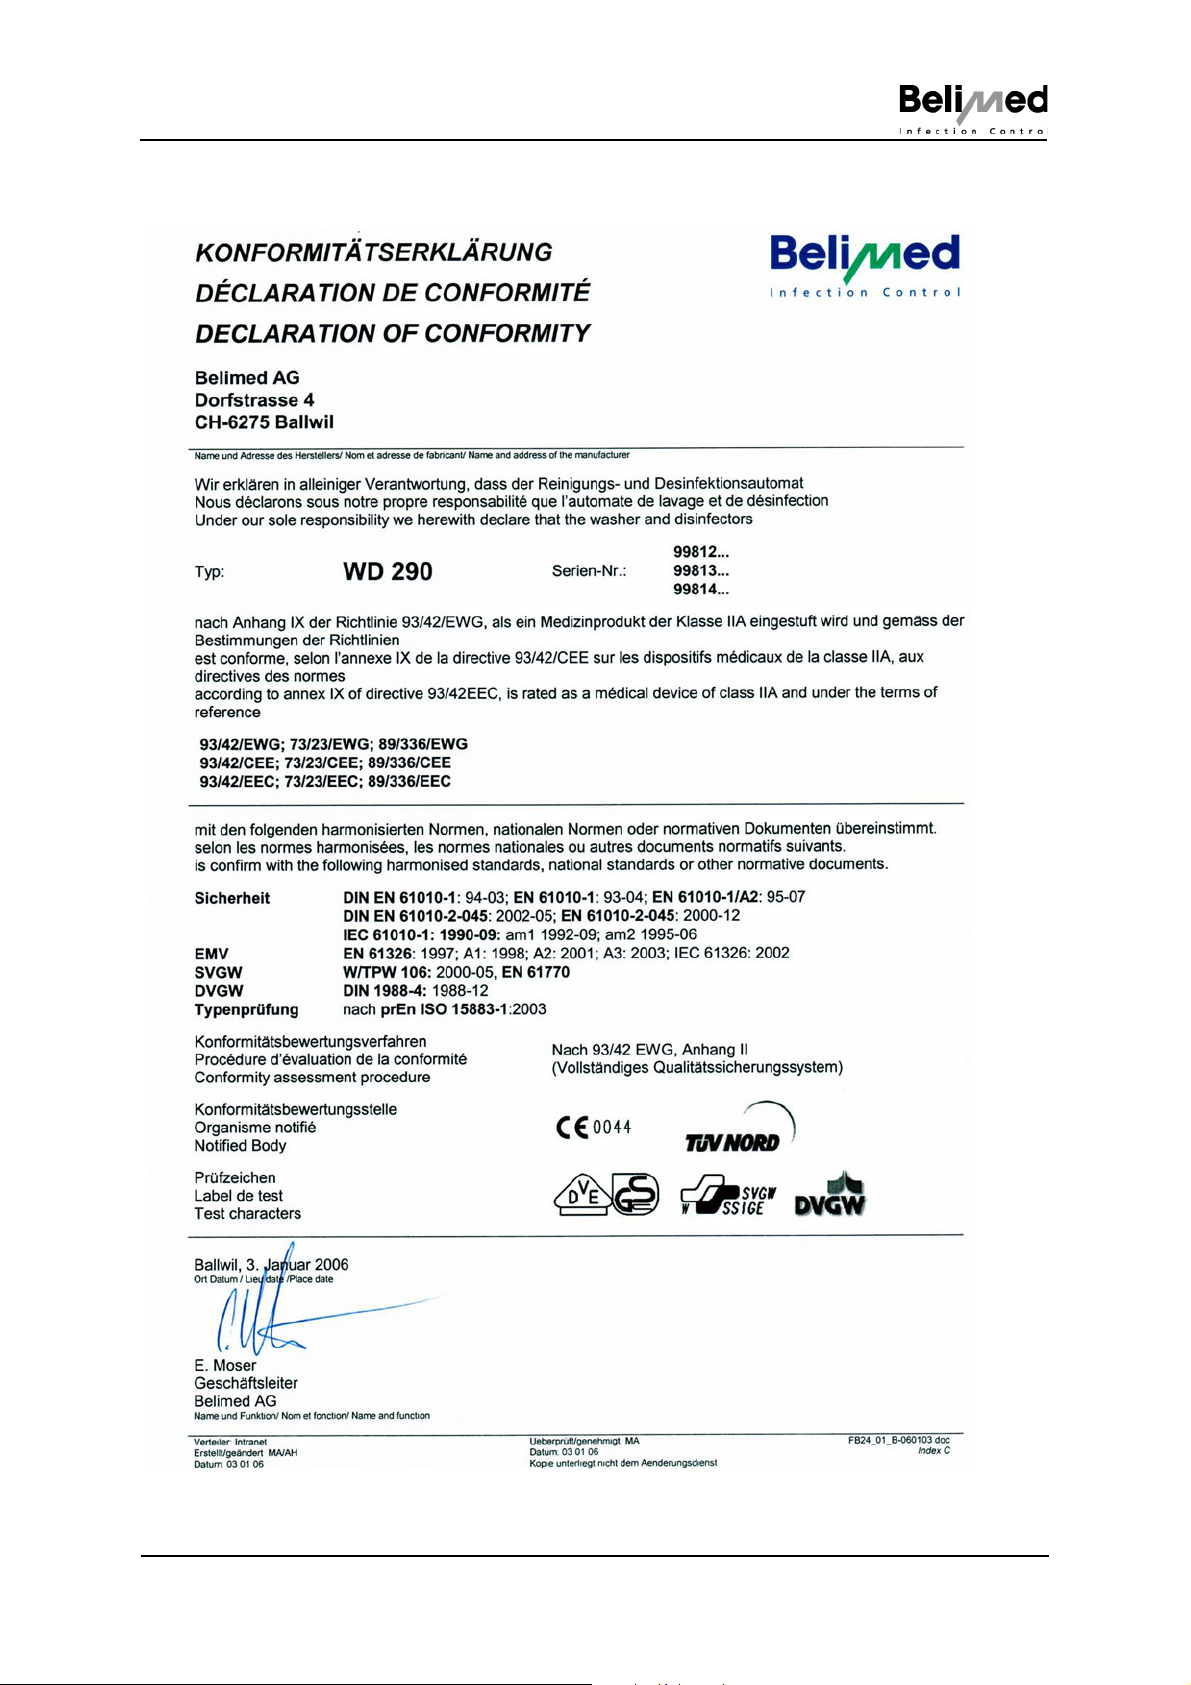
With the EC Declaration of Conformity and the CE mark, we affiirm that this product complies with the basic health and safety requirements in accordance with
Directive 93/42/EEC Annex II (see Chap. 18 "Conformity and certifications")
Hazards may still arise from the product if it is used incorrectly by inadequately
trained personnel or not as intended.
2.1 Intended use
This product is exclusively approved for the uses stated in the instructions.
Namely for central sterilisation, substerilisation in surgery, in hospitals, clinical
laboratories and in industry.
2.2 Duty of care in handling the device
• Only use original racks, spare parts and accessories
• Load the racks as intended (see Chap. 8 "Loading and identifying racks")
• Daily servicing work on the device must be carried out regularly and in ac-
cordance with regulations (see Chap. 14 "Daily servicing and cleaning work")
• Validation of the programme parameters must be performed regularly (see
Chap. 2.6 "Process validation")
• Installation, deinstallation, servicing or modification must only be carried
out by persons authorised by Belimed
• In the case ofincorrectly installed, operated or maintained devices all
warranty claims are invalidated
2.3 Non-intended use
All other applications are considered as non-intended use.
Damages caused by operator error, non-intended use, failure to observe the instructions, operation by untrained personnel, unauthorised modifications and
conversions without the written consent of the manufacturer, are not permitted
and preclude the manufacturer's liability for the ensuing damage to property and
personal injury.
2.4 Instruction of personnel
This product must only be used, maintained and repaired by authorised, trained
and briefed personnel. This assumes that these instructions are read and understood.
Responsibilities and competencies in operation, servicing and maintenance
must be clearly defined and observed.
Instruction Manual WD290 001
© Belimed 10268
5/39
Page 6
For your safety
2.5 Fields of application for the device
Cleaning and conditioning of:
• Surgical instruments
• Minimal-invasive instruments
• Instruments for anaesthesia and intensive care
• Baby bottles and teats
• Containers
• OP shoes
• Laboratory instruments from research and production
• Rigid endoscopes
• Eye instruments
• Neurosurgery
2.6 Process validation
The aim of process validation is to achieve a high level of safety in the reconditioning of medical devices in order to afford the operators and patients the greatest possible protection.
Process validation consists of:
a) Type testing / factory testing
b) Process validation consisting of:
• IQ - Installation Qualification
• OQ - Operational Qualification
• PQ - Performance Qualification
c) Routine testing / Annual requalification
(refer to appendix EN ISO 15883-1 November 2001, Chap. 6, Pages 35-37)
6/39
NOTE
Further information on process validation may be obtained from Belimed
Customer Service.
CAUTION!
Validation must only be carried out by authorised persons!
Devices must only be operated with processes validated in accordance with
regulations! Only use components (items to be washed, racks, programmes,
chemicals) which have been validated together.
The safety of operators and patients may be compromised if the devices
used are not validated in accordance with regulations.
001 Instruction Manual WD290
10268 © Belimed
Page 7
Device description
1
3
4
5
2
8
7
9
10
Abb 201
6
3 Device description
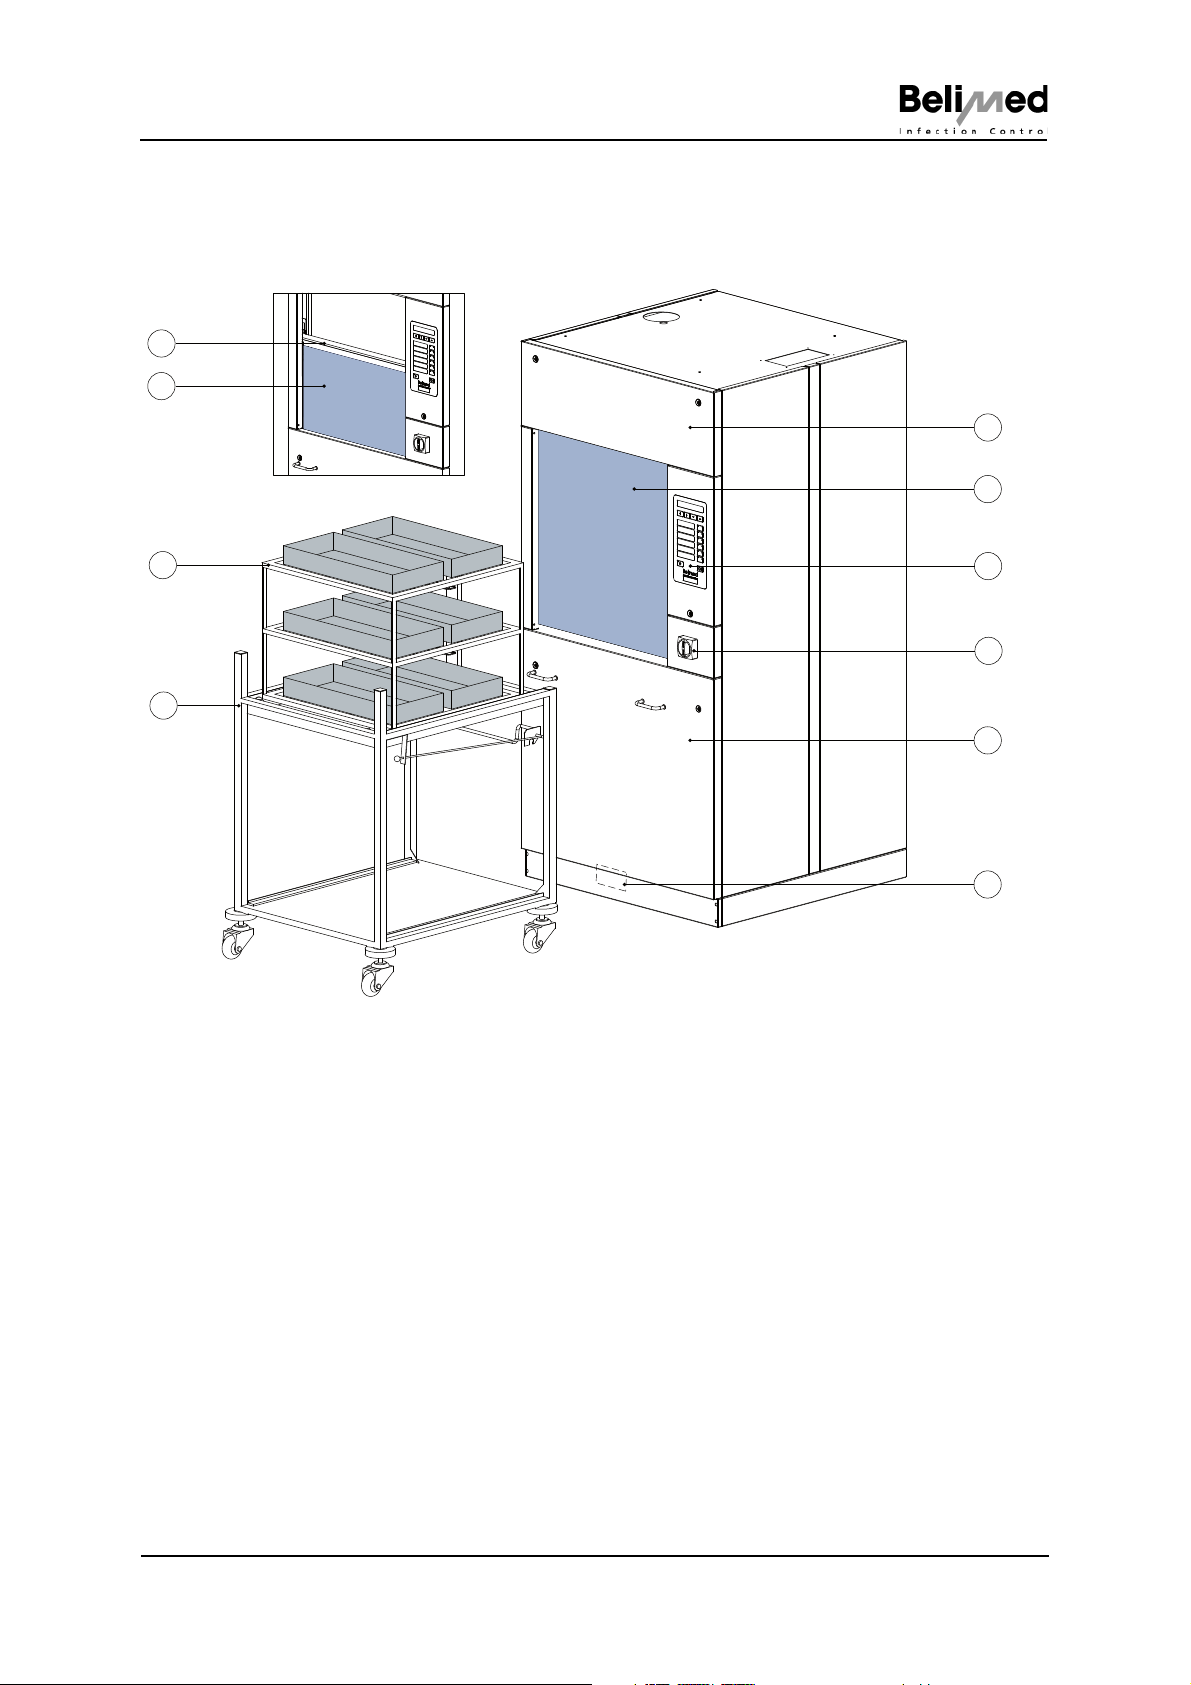
3.1 Device unclean side (US)
1 Door drive (behind the panel)
2 Wash compartment doors made of double-layer safety glass
3 Operating panel
4 Main switch (with EMERGENCY OFF function)
5 Service panel
6 Location type plate
7 Transfer trolley
8 Rack
9 Automatic wash compartment doors
10 Door safety switching strip
Instruction Manual WD290 001
© Belimed 10268
7/39
Page 8
Device description
1
2
4
3
Abb 301
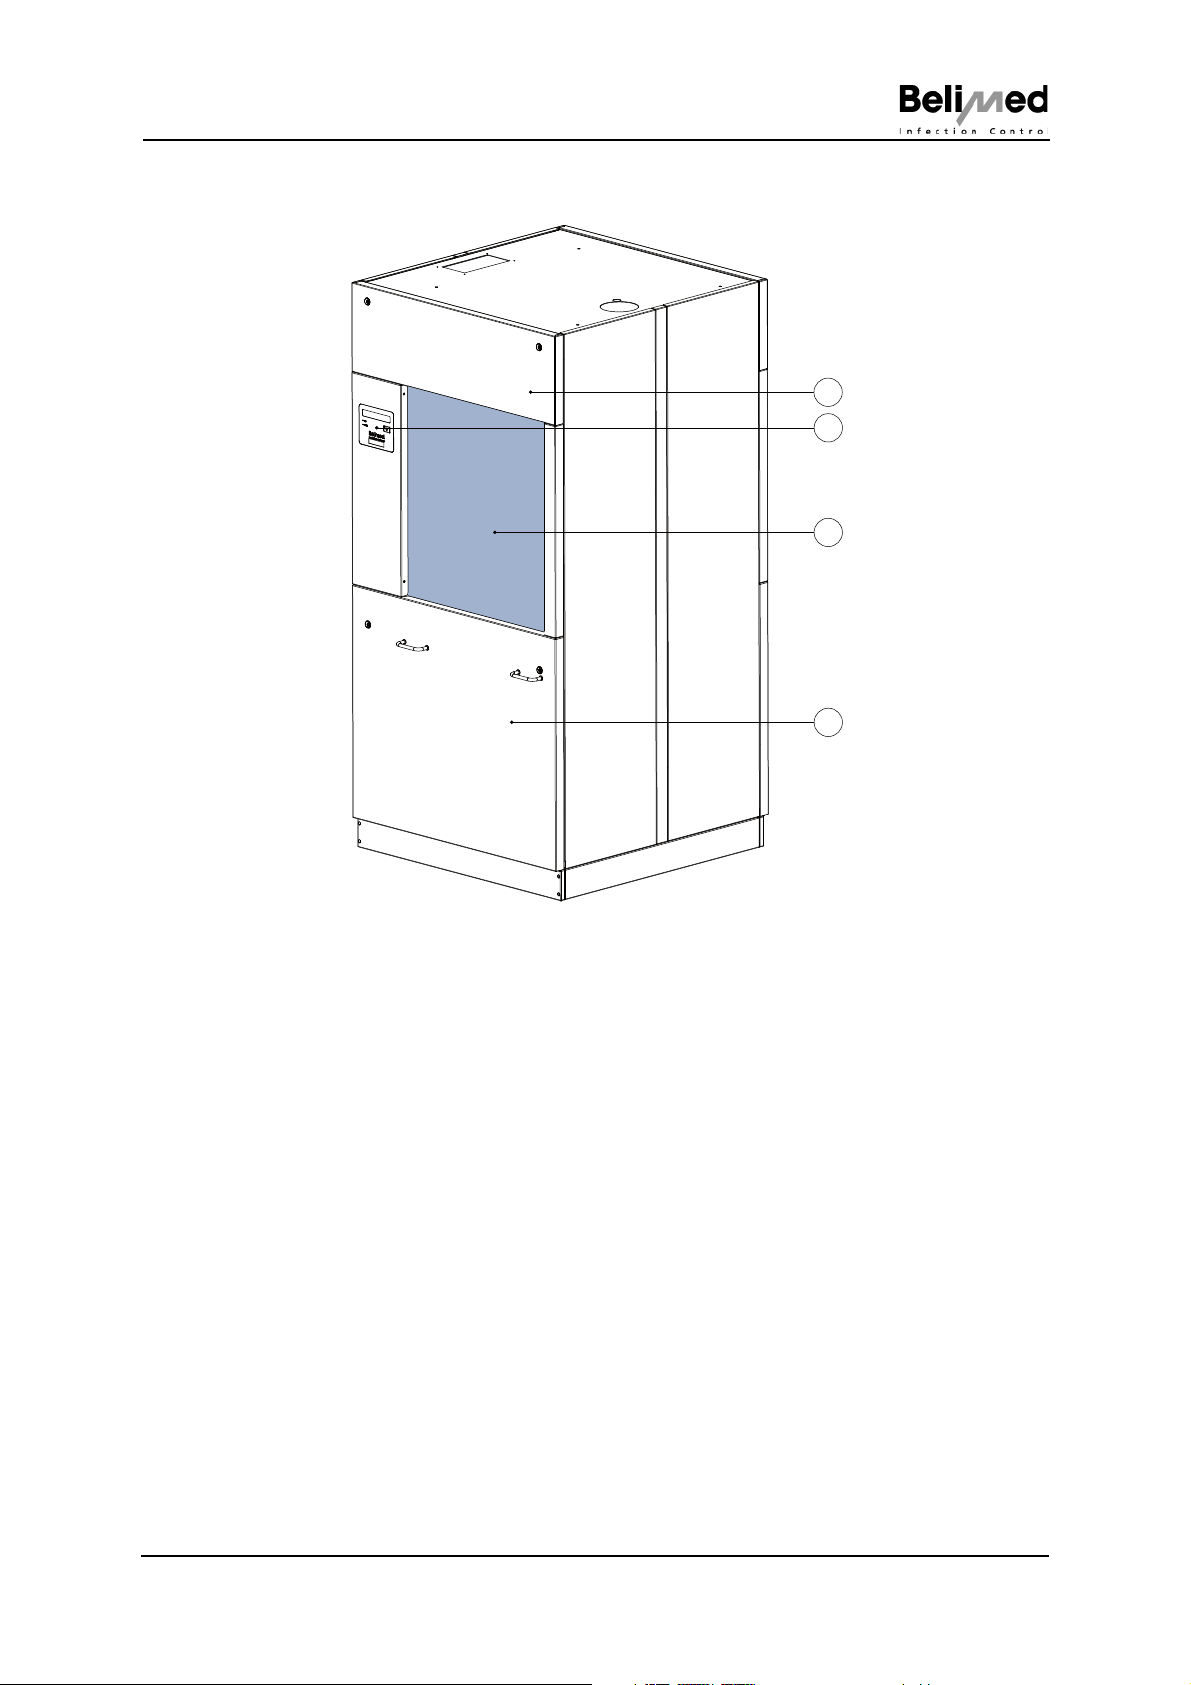
3.2 Device clean side (CS)
8/39
1 Door drive (behind the panel)
2 Operating panel with door button
3 Wash compartment doors made of double-layer safety glass
4 Service panel
001 Instruction Manual WD290
10268 © Belimed
Page 9
Device description
1
2
3
4
5
6
Program 1
Program 2
Program 3
Program 4
Program 5
Program 6
1
432
5
6
7
8
Abb 179
RUN
ERROR
1
2
Abb 178
4
3
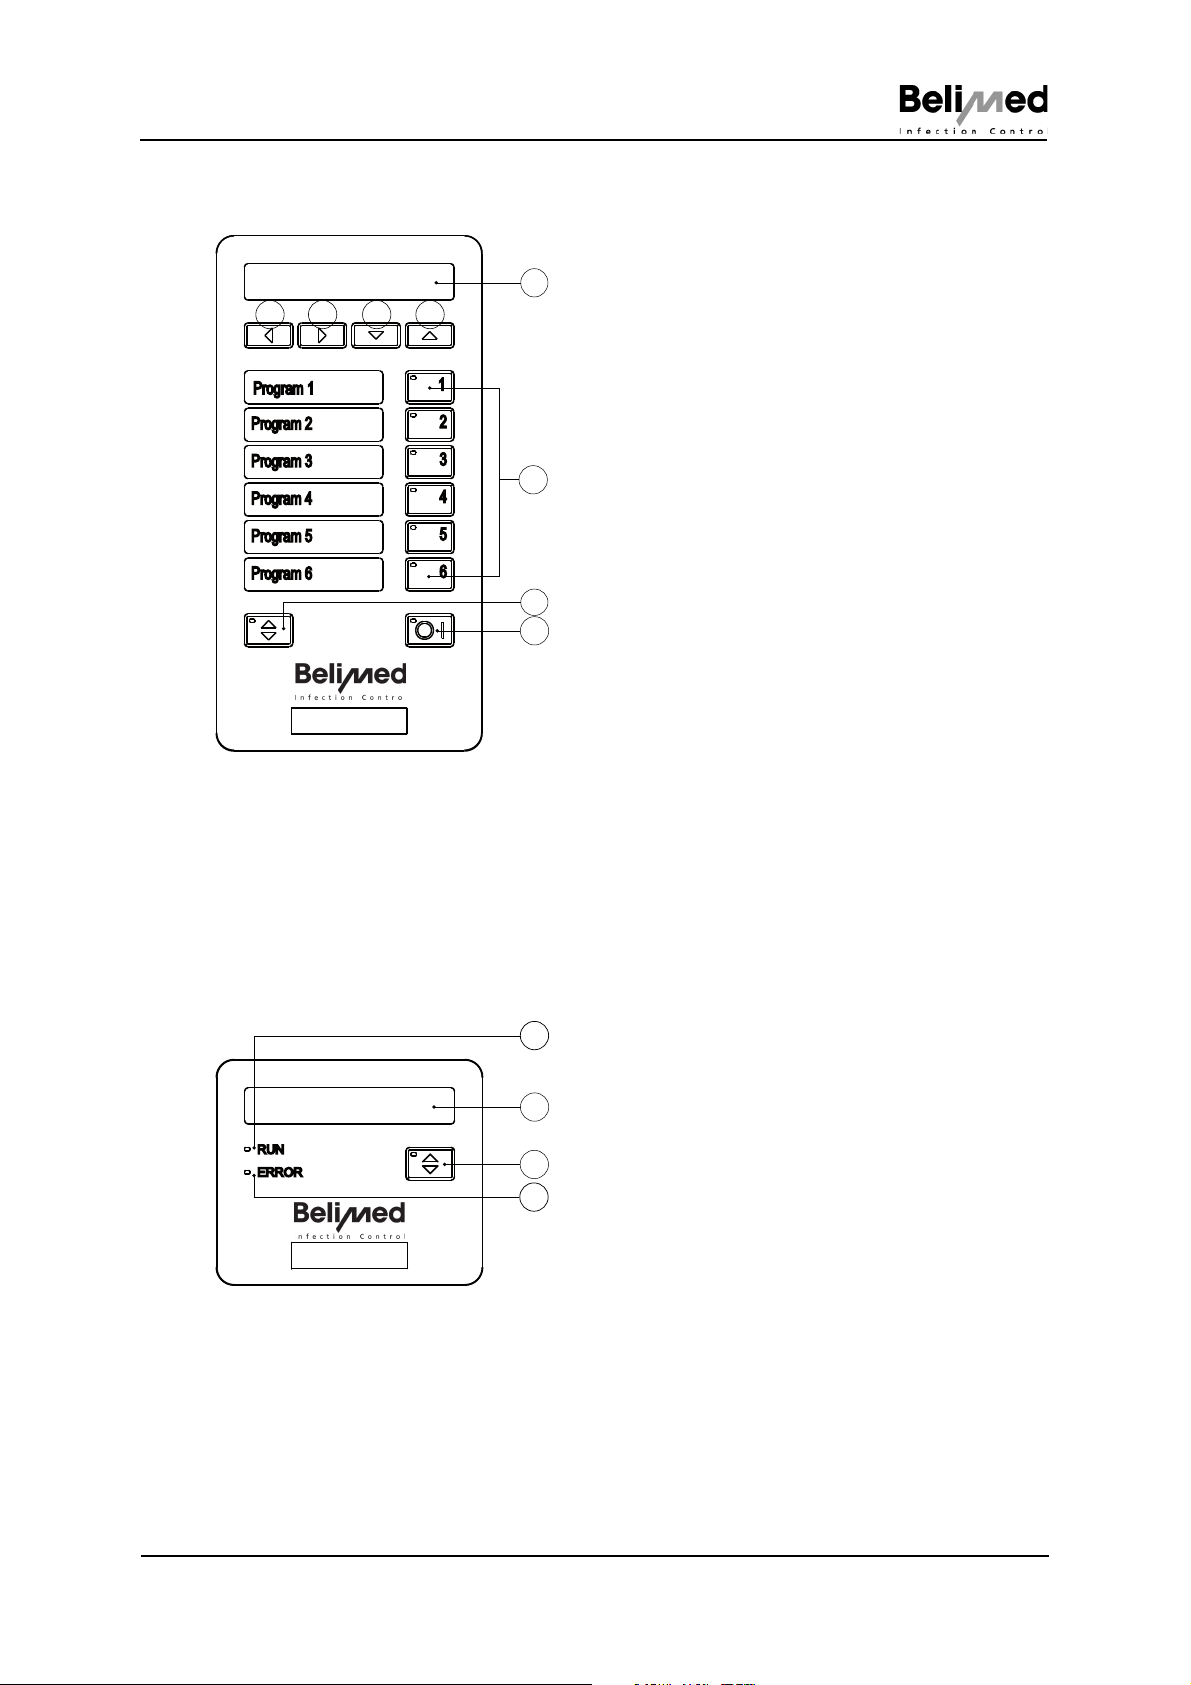
3.3 Controller unclean side (US)
1) Display
– With screensaver "BELIMED INFEC-
TION CONTROL"; this means that
this display automatically appears after approx. 1 h. Press any button, display"Program ready" appears again
2) Cursor left
– Print operating data such as program
formula and setup parameters
– Self disinfection On/Off
– IPD verification On/Off
3) Cursor right
– Acoustic signal On/Off
4) Cursor down
– Printer On/Off
5) Cursor up
– Shift button Programs P7 - P12
6) Program buttons
– Selection of Programs P1 - P6, with
Shift P7 - P12
7) Door button
– Opens/close door
8) On/Off button
– Display batch number (press 4 sec-
onds)
3.4 Controller clean side (CS)
Instruction Manual WD290 001
© Belimed 10268
1) Display
– With screensaverBELIMED INFEC-
TION CONTROL; this means that this
display automatically appears after
approx. 1 h. Press any button, dis-
play"Program ready" appears again
2) Door button
– Door opens/closes
3) RUN
LED lit = In progress
4) ERROR
LED lit = Fault
(See Chap. 16 "Faults")
9/39
Page 10
Pre-treating medical devices
4 Pre-treating medical devices
4.1 Responsibility for pre-treatment
CAUTION!
Always observe the specifications from the medical device manufacturer!
The owner is responsible for pre-treatment of medical devices. The best possible
washing results are only to be achieved with correct pre-treatment as intended.
Various treatments fix proteins and may contribute to preserving prion infectivity.
CAUTION!
The air bubbles in the foam prevent pressure building-up in the cleaning system and therefore the best possible contact between the cleaning agent and
the items to be washed.
4.1.1 SOPs (Standard Operating Procedures)
The contents of the following criteria and specifications must be regulated:
• Product responsibility
• Transport routes and duration of waste disposal (time for soiling to dry in)
• Type of soiling (blood, ointments, bone meal...)
• Material properties and compatibility of the items to be washed (risk groups
acc. to RKI Ordinance)
• Consideration of all operating instructions and reconditioning regulations for
medical devices
• Necessary knowledge of the medical devices to be reconditioned
• Maintenance plan and regular inspections
Belimed recommends producing work instructions which describe the procedure
within a working process.
4.2 Preparing medical devices
CAUTION!
Not all medical devices are suitable for mechanical reconditioning (see Chap.
2.5 "Fields of application for the device")
All inner and outer surfaces must be accessible for cleaning (open valves, taps,
joint instruments...) Special caution is required for the lumen. Disassemble MIC
or other complex instruments according to the manufacturer's specifications.
10/39
001 Instruction Manual WD290
10268 © Belimed
Page 11

Pre-treating medical devices
4.3 Pre-cleaning pre-treatment
Remove coarse soiling immediately after use. Dried-on blood or tissue reduces
the effectiveness of cleaning.
4.3.1 Avoiding subsequent cleaning
Various treatments fix proteins and may contribute to preserving prion infectivity.
The following pre-treatment methods may cause impairments in subsequent
washing:
• Pre-treatment with aldehydic disinfectants
• Pre-treatment with alcohol solutions
• Pouring antiseptic solutions on the items to be rinsed
• Aldehyde and alcohol vapours
• Heat pre-treatment
Small quantities of foam are permissible with manual cleaning in the immersion
bath or ultrasonic cleaning.
Instruction Manual WD290 001
© Belimed 10268
11/39
Page 12
Preparing the device
0 I
Abb 209
5 Preparing the device
WARNING!
Only operate the device if it is in a technically faultless condition! Damaged or
defected components must be reported to the technical specialist.
After a prolonged period of disuse (approx. 1 week), the daily servicing work
must be carried out to prepare the device (see Chap.14 "Daily servicing and
cleaning work").
Check the quantity of detergents (see Chap. 16 "Faults")
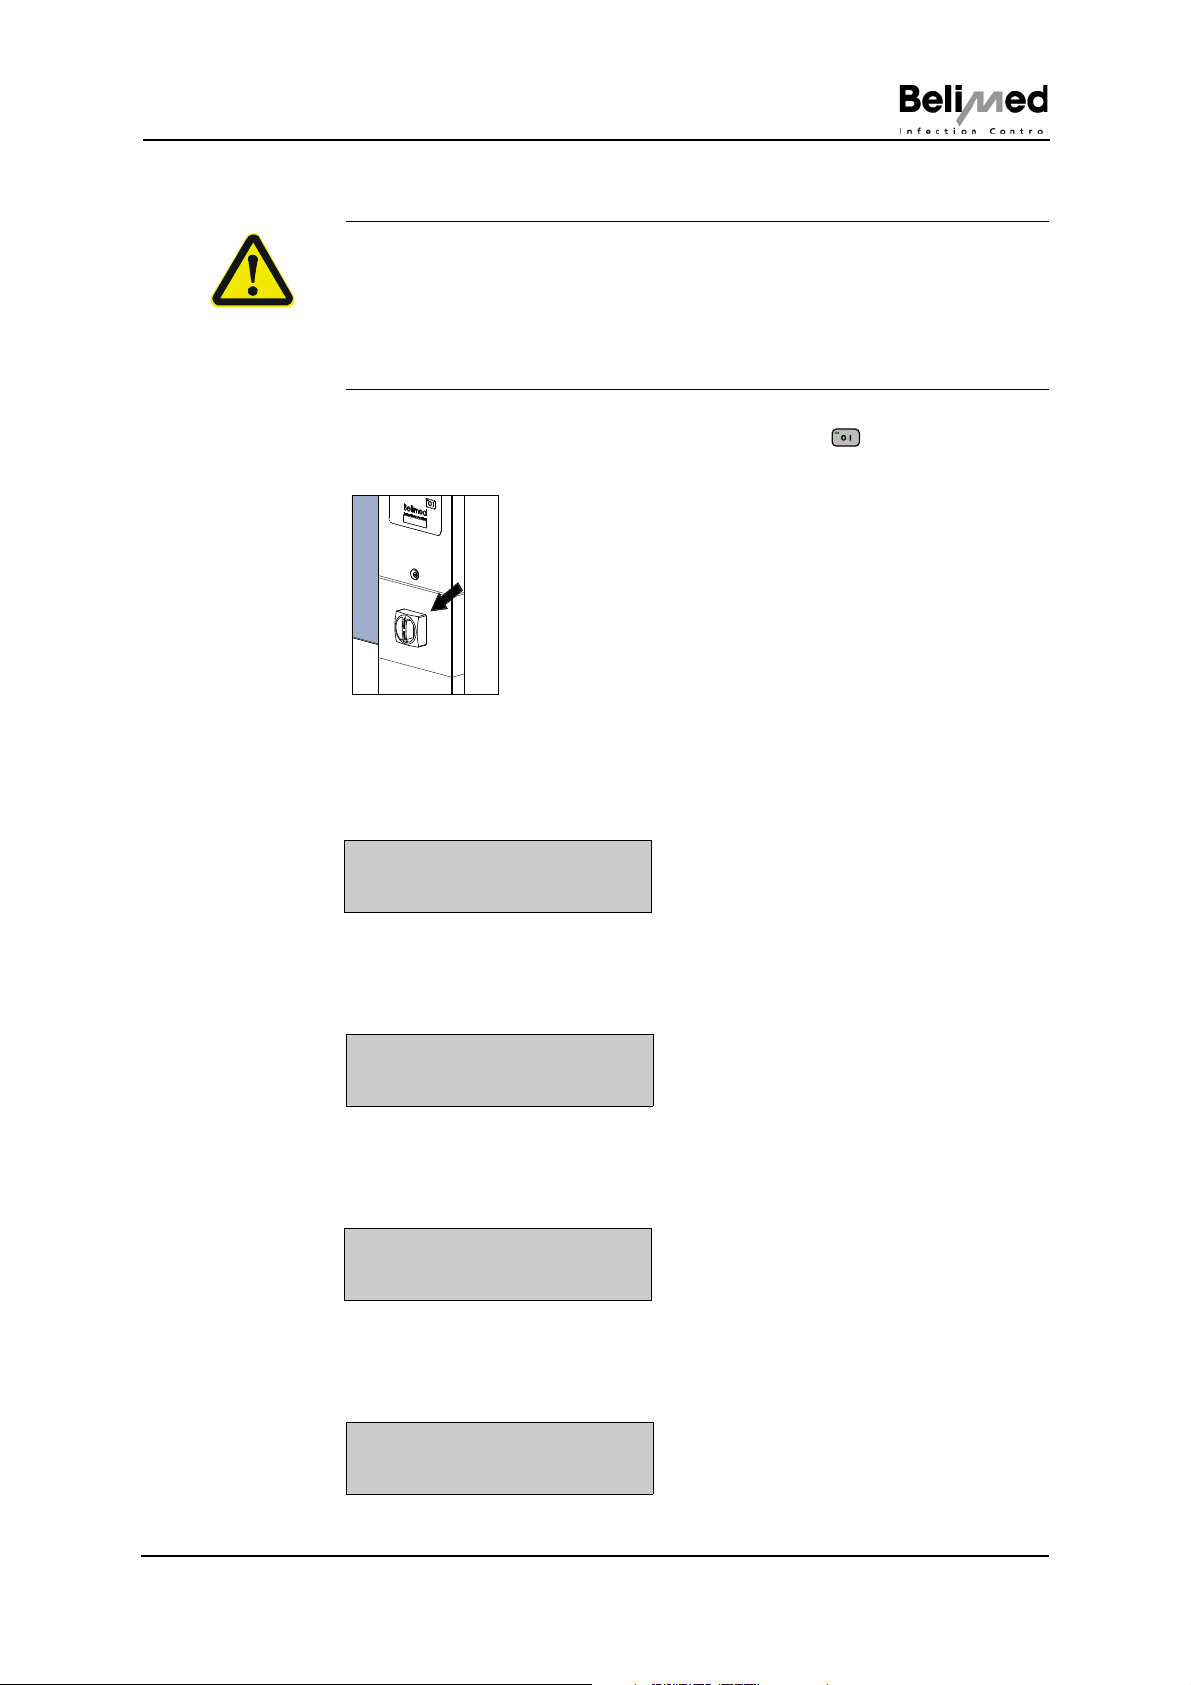
Switch the device on at the main switch (Fig. 209) with the button. Four
possible display texts may now appear
Performing self-disinfection
(See Chap. 6 "Self-disinfection")
Display text:
Self-disinfection
Start
Program ready
Continue with program flow (see Chap. 7 "User identification")
Display text:
Program ready
Fault without process interruption
Rectify fault (see Chap. 16 "Faults")
Example display text:
Dosing device
Empty
Fault with process interruption
Report to the technical specialist
Example display text:
No pressure
Fault Code 110
12/39
001 Instruction Manual WD290
10268 © Belimed
Page 13
Self-disinfection
1
6
6 Self-disinfection
6.1 Why self-disinfection?
Microorganisms form in the washing chamber, tubing and DI boiler after a prolonged period of disuse. Following thermal disinfection step, residues of dead
bacteria on the medical device may constitute a risk for patients.
In the case ofactive self-disinfection the owner is requested to perform self-disinfection after a programmed period (24 hours as standard) following the last program run.
NOTE
If there is no mains supply (mains switch OFF) the timer is not active, as the
request for"Self Disinfection Start" always appears when active self-disinfection is switched on.
6.2 Starting self-disinfection
Open the door with the button
Slide in the empty rack
CAUTION!
Do not wash any items with the self-disinfection program! There is no cold
pre-rinse. There is the risk of excessive foam formation and fixing proteins.
Close the wash compartment door with the button
User identification (see Chap. 7 "User identification")
WARNING!
Do not touch the door or its surrounding paneling during the closing process.
A crushing hazard exists.
If any objects are trapped between the panel and door, the technical personnel must be informed to rectify the problem.
The device is ready to start
Display text:
Self Disinfection
Start
Press any program button to
Display text:
SD |_| 13min
Desinf A068 89°C
Legend:
SD |_| = program step status
13min = remaining run time
Desinf = program name
A068 = current A0 value
89°C = temperature of rinsing agent or drying air
Instruction Manual WD290 001
© Belimed 10268
13/39
Page 14
Self-disinfection
0 I
Procedure in case of faults:
If a fault occurs during operation, acknowledge with the button
If the fault persists (see Chap. 16 "Faults")
If the fault cannot be rectified, the technical specialist must be informed
DANGER!
If smoke is emitted or water escapes, immediately turn off at the main
switch and isolate the device from the mains supply. Inform the technical
specialist.
The end of the program is indicated with an acoustic signal
Display text:
Program name
Correctly Finished
NOTE
For manual loading/unloading, unload the rack back to the US again at the
end of the program. The CS door remains locked.
Self-disinfection is inactive for automatic loading/unloading.
14/39
001 Instruction Manual WD290
10268 © Belimed
Page 15
User identification
7 User identification
The user must logon each time before using the device. The password identification is forwarded to the printer or the digital documentation system and assigned to the relevant batch.
Detection takes place via the operating panel or by means of barcode reader.
7.1 Identification via operating panel
User identification is requested once the device is switched on.
User Name o No.?
--
Inputting the identification number via the operating panel
NOTE
For input via the operating panel we recommend a list of numbers with the
corresponding names (Example 1).
The identification number must lie within the range 11-65. Only the digits 1-6
can be used for a number. (Not possible: 17, 18, 19, 27, 28, 29....)
For an input of No. 0 or 66 "No identification" is output.
Example 1:
No. Name
11 M. Smith
12 H. Jones
0 No Identification
66 No Identification
Device ready
Display text:
Program ready
Display text for a prolonged period of disuse (see Chap. 6 "Self-disinfection"):
Self Disinfection
Start
Instruction Manual WD290 001
© Belimed 10268
15/39
Page 16
User identification
Abb 182
7.2 Identification via barcode reader
User identification is requested once the device is switched on.
Display text:
User Name o No.?
--
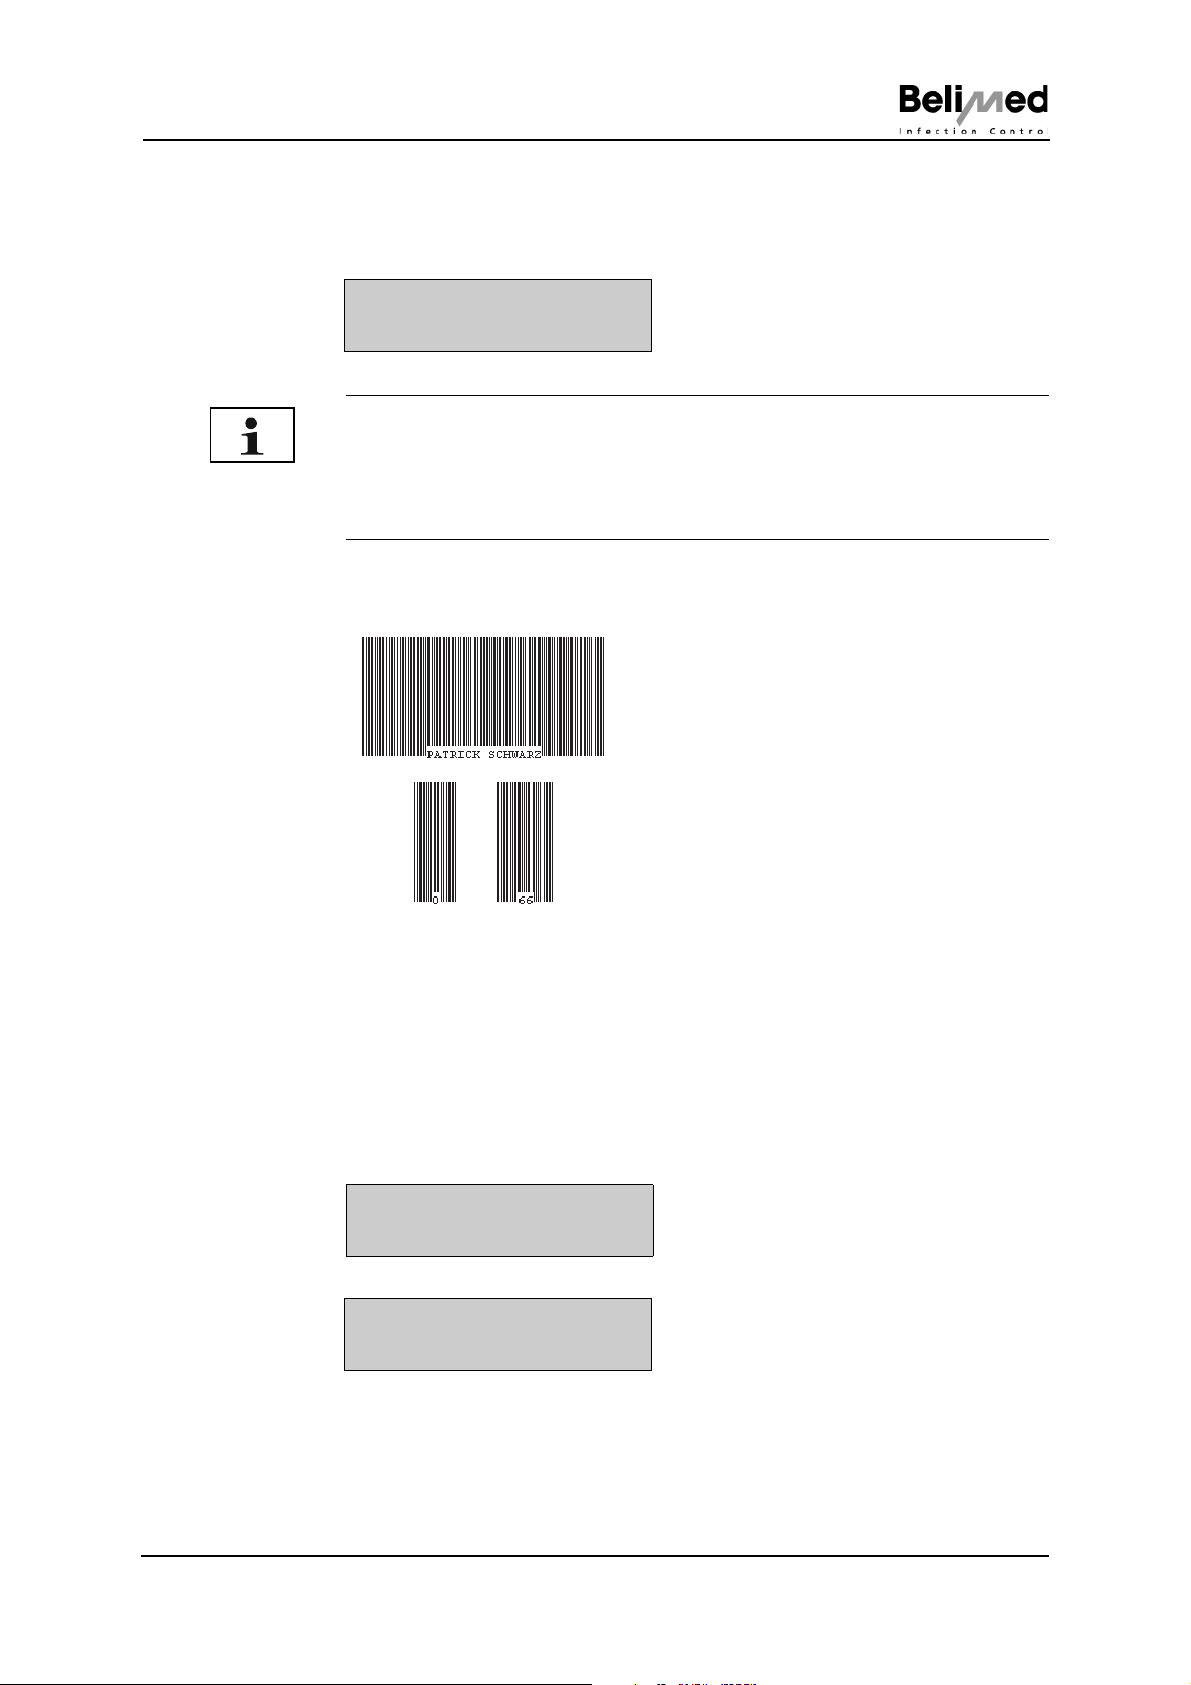
Reading the barcode with the barcode reader
NOTE
The length of the name input is limited to 20 characters. If the no. 0 or 66 is
read"No identification" is output (see Example 2)
Barcodes for name labels can be produced oneself from the Internet (free of
charge). (http://www.barcodemagic.com/barcodemagic.html).
Display text:
Example 2:
First name / last name
Heike Meyer
No Identification
0 / 66
Program ready
Display text:
Program ready
--.--.---- --:--
Display text for a prolonged period of disuse (see Chap. 6 "Self-disinfection"):
Self Disinfection
Start
16/39
001 Instruction Manual WD290
10268 © Belimed
Page 17
Loading and identifying racks
8 Loading and identifying racks
8.1 Loading racks
The loading of racks has a significant influence on the washing outcome. For
correct and intended loading it is absolutely necessary to follow the instructions supplied with the rack.
DANGER!
Always wear protective goggles and gloves when handling the items to be
washed. Soiled items to be washed may cause infections!
8.2 Rack identification
The rack identification is forwarded to the printer or the digital document system
and assigned to the relevant batch.
Detection takes place via the operating panel or by means of barcode reader.
8.2.1 Rack identification via the operating panel
Display text:
Rack Name o No.?
--
Inputting the identification number via the operating panel
NOTE
The identification number must lie within the range 11-65. Only the digits 1-6
can be used for a number. (Not possible: 17, 18, 19, 27, 28, 29....)
For an input of No. 0 or 66 "No identification" is output.
8.2.2 Rack identification via barcode
Display text:
Rack Name o No.?
--
Read barcode
NOTE
The length of the name input is limited to 12 characters. If the no. 0 or 66 is
read"No identification" is output (see Chap. 7.2 "Identification via barcode
reader")
Barcodes can be produced oneself from the Internet (free of charge). (http://
www.barcodemagic.com/barcodemagic.html).
Instruction Manual WD290 001
© Belimed 10268
17/39
Page 18
Identification of batch content
0 I
Abb 227
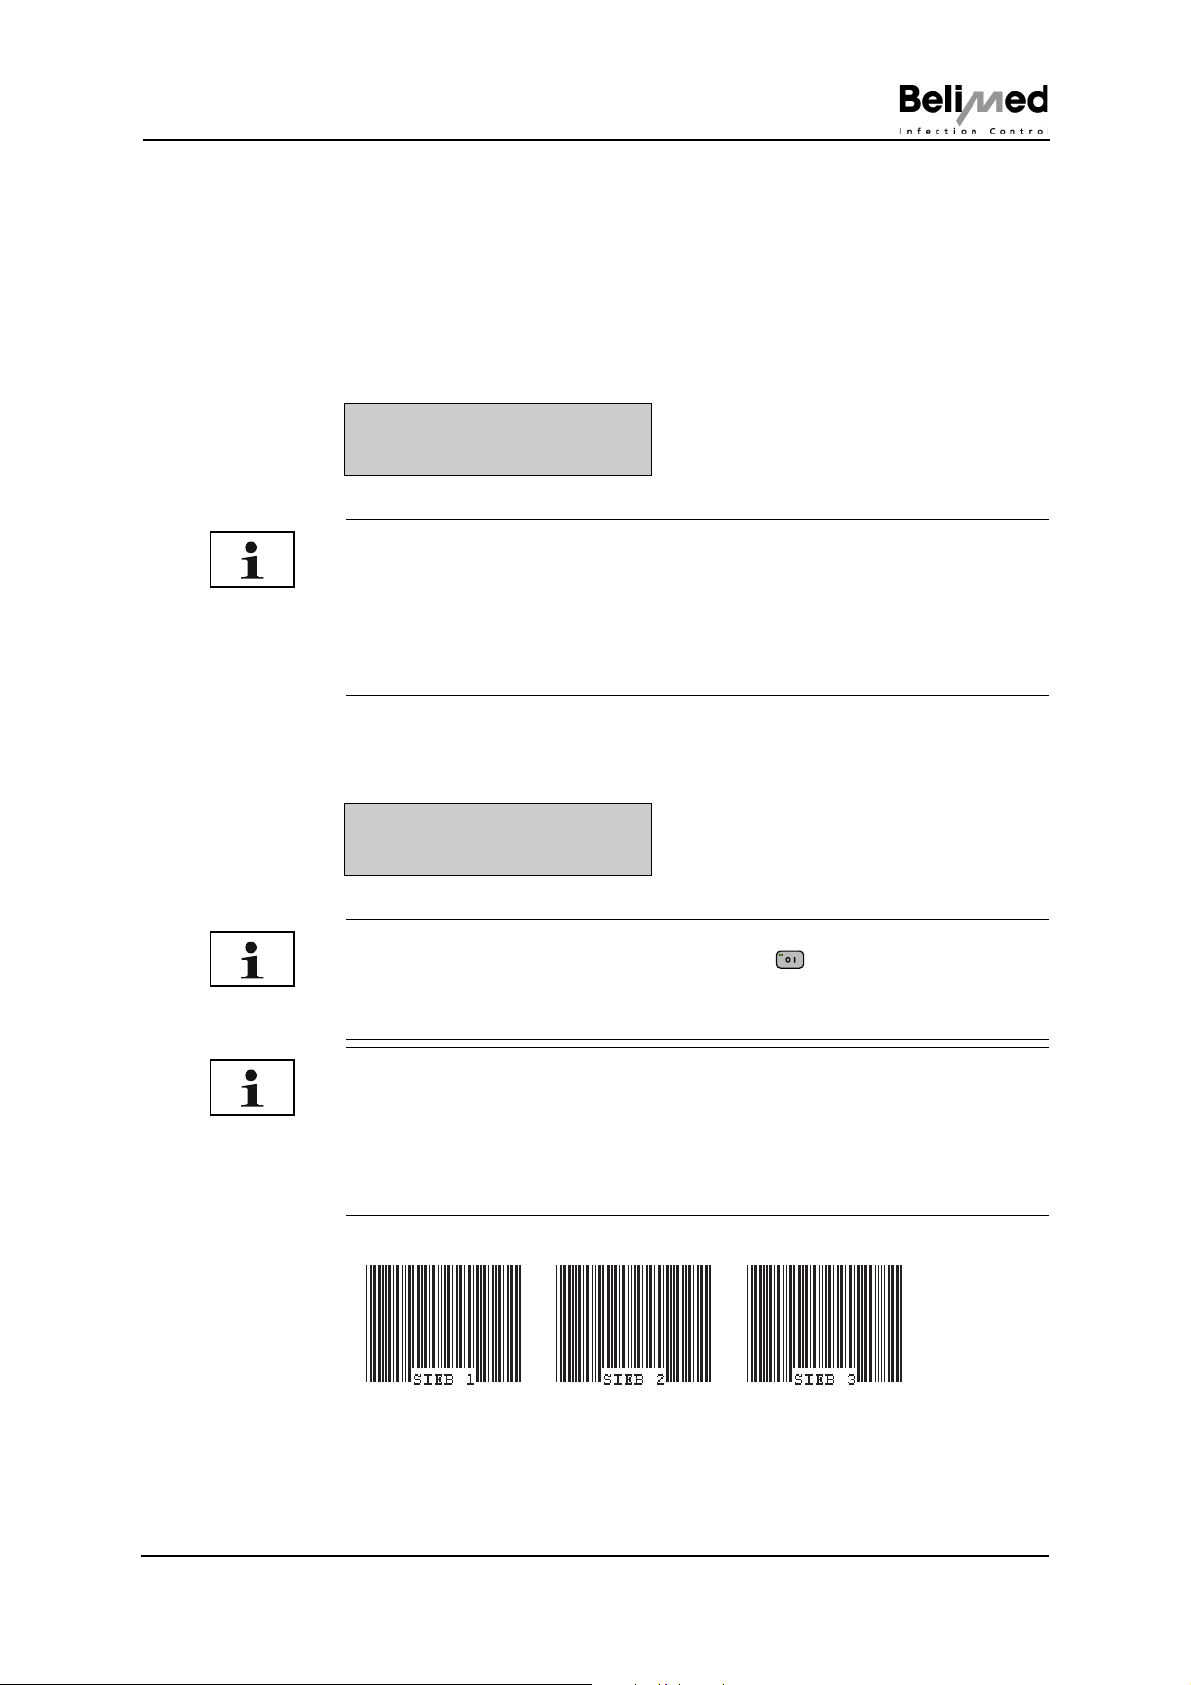
9 Identification of batch content
The identification of batch content is forwarded to the printer or the digital documentation system and assigned to the relevant batch.
Detection takes place via the operating panel or by means of barcode reader.
9.1 Batch content identification via operating panel
Display text:
Read Content No.
No=--?
Inputting the identification number via the operating panel
NOTE
The identification number must lie within the range 11-65. Only the digits 1-6
can be used for a number. (Not possible: 17, 18, 19, 27, 28, 29....)
For an input No. 66 "No identification" is output.
A maximum of 18 objects can be identified. The same number cannot be
input twice. Always complete input with 66.
9.2 Batch content identification via barcode
Display text:
Quantity of Contents
--
Reading the batch content with the barcode reader
NOTE
The reading process can be cancelled with the button. Always conclude
with no. 66.
Reading is terminated after reaching a max. 18 batch contents.
NOTE
The length of the name input is limited to 12 characters. If the no. 0 or 66 is
read "No identification" is output (see Chap. 7.2 "Identification via barcode
reader")
Barcodes can be produced oneself from the Internet (free of charge). (http://
www.barcodemagic.com/barcodemagic.html).
Example:
18/39
001 Instruction Manual WD290
10268 © Belimed
Page 19
Loading from the unclean side
1
3
2
4
Abb 203
10 Loading from the unclean side
DANGER!
Always wear protective goggles and gloves when loading. Soiled items to
be washed may cause infections!
10.1 Manual loading
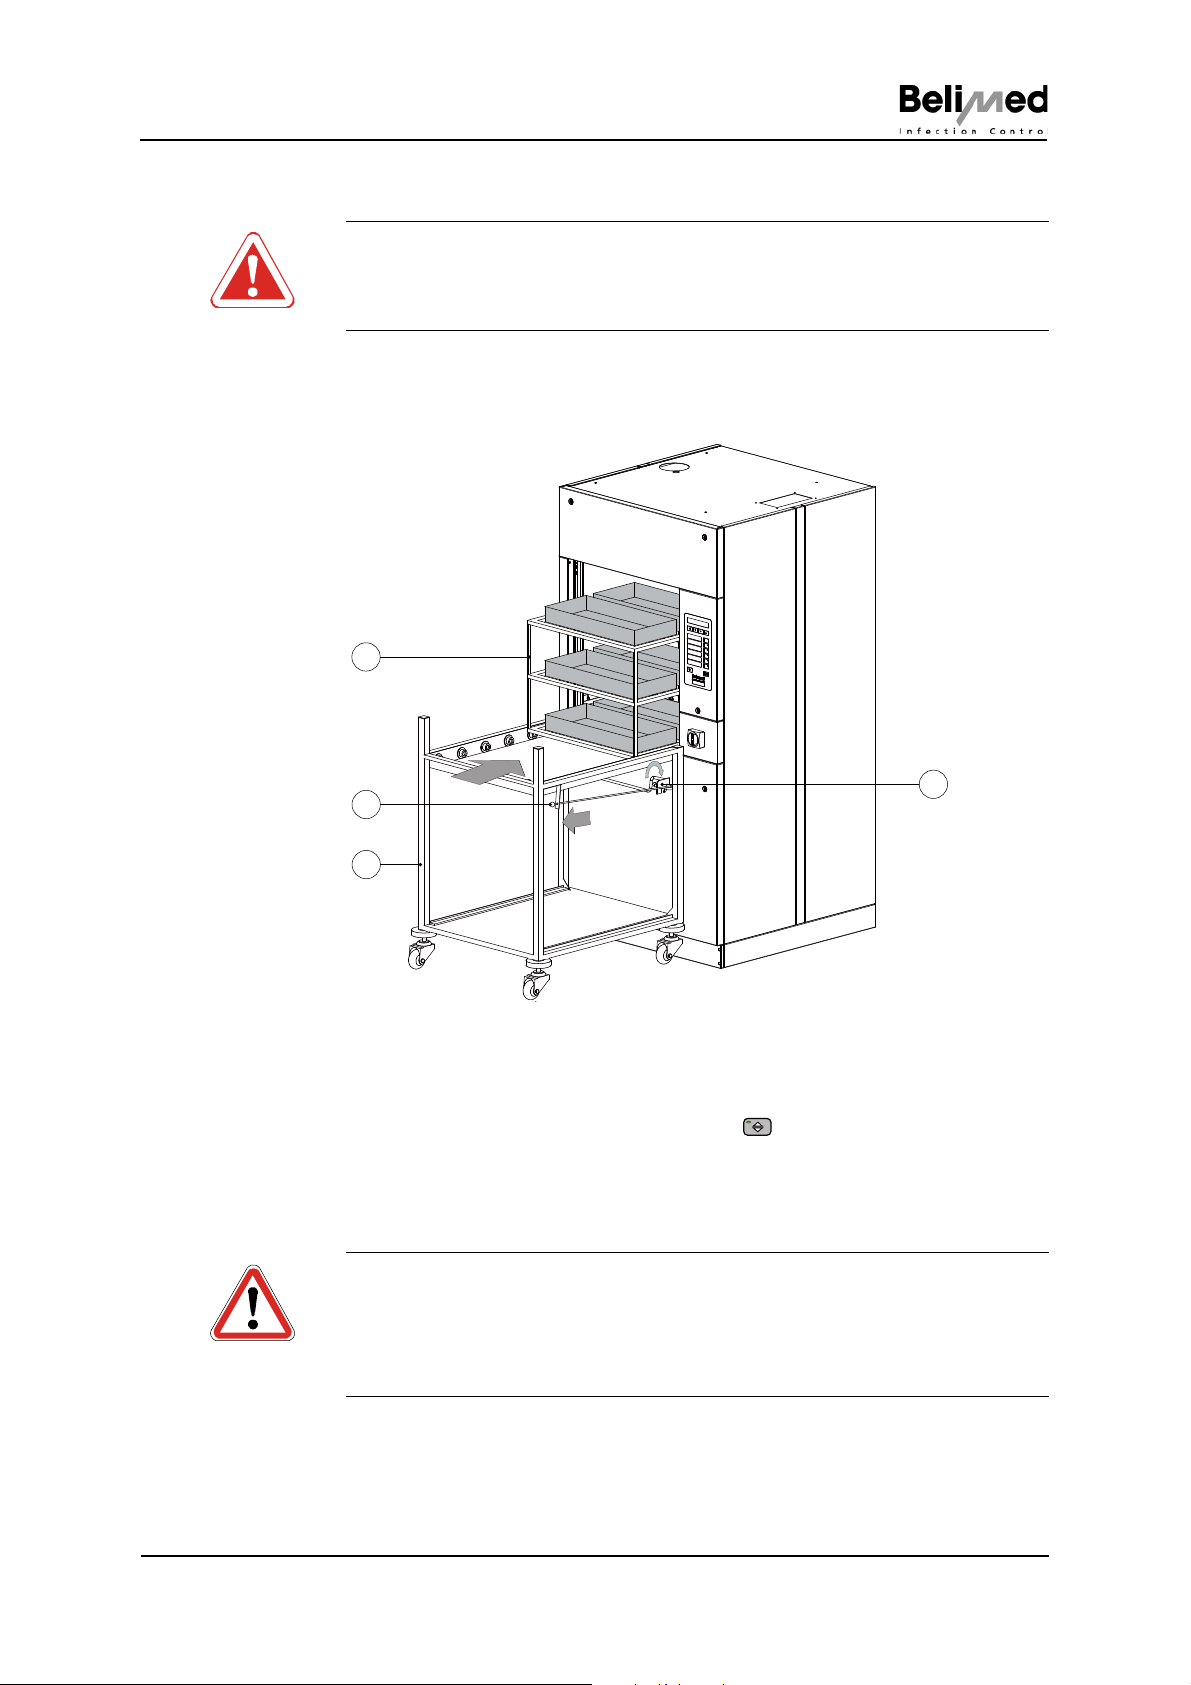
Attach the transfer trolley with the loaded rack to the device (Fig. 203 Pos. 1)
1 Attachment and detachment hook
2 Rack
3 Locking hook
4 Transfer trolley
Open the washing compartment with the button
Slide the loaded rack into the washing chamber (Fig. 203)
- Rack docking must coincide with the device docking
- The rack has to lock into the guide (Fig. 168)
CAUTION!
Sharp or pointed objects may fall down when sliding the rack. This can cause
injuries.
The rinsing arms must not be blocked by too high objects or objects
protruding downwards. Check rotation by hand!
Instruction Manual WD290 001
© Belimed 10268
19/39
Page 20
Loading from the unclean side
Abb 168
1
2
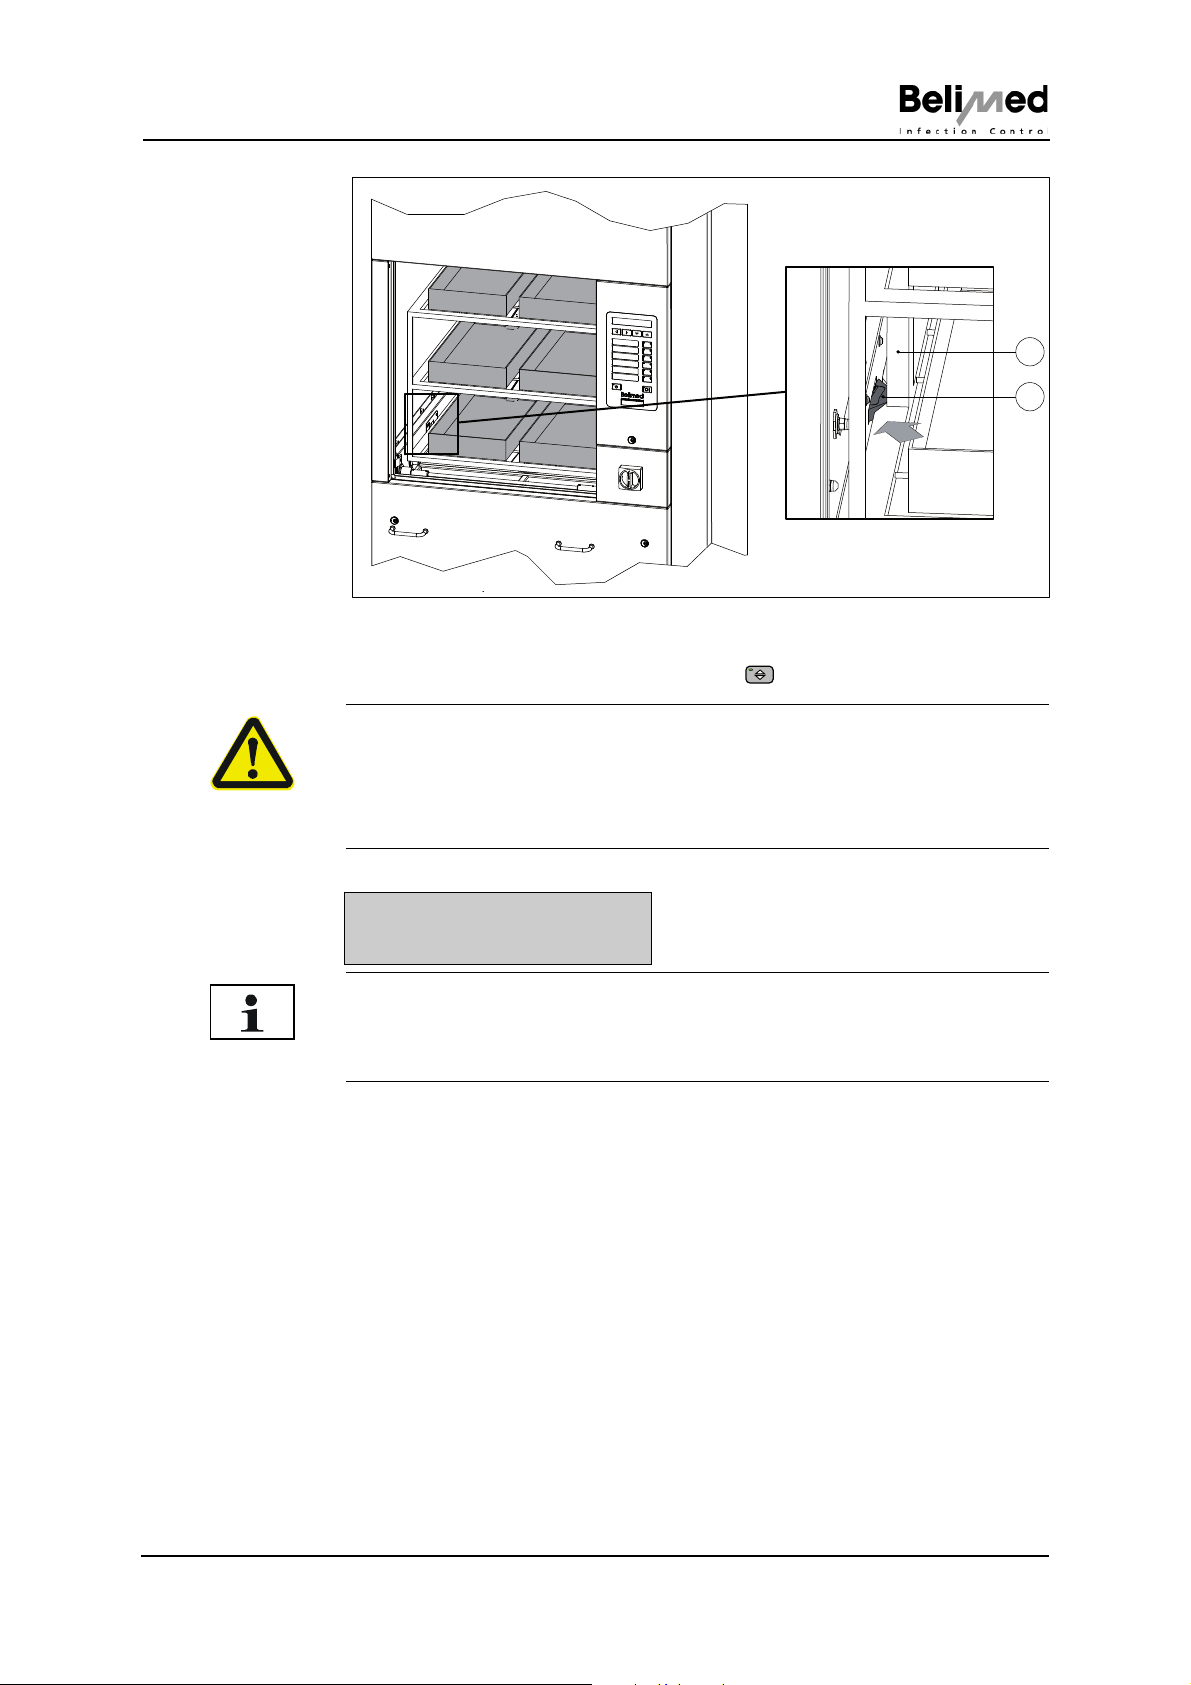
1 Rack
2 Rack downholder
Close the washing compartment with the button
WARNING!
Do not touch the door or its surrounding panel during the closing process. A
crushing hazard exists.
If any objects are trapped between the panel and door, the technical personnel must be informed to rectify the problem.
The device is ready to start.
Program ready
dd.mm.20yy hh:mm
NOTE
Check that the date and time are correct. This is important for the batch documentation. Report discrepancies to the technical specialist!
20/39
001 Instruction Manual WD290
10268 © Belimed
Page 21
Loading from the unclean side
Abb 206
1
5
2
3
4
10.2 Automatic rack station (optional)
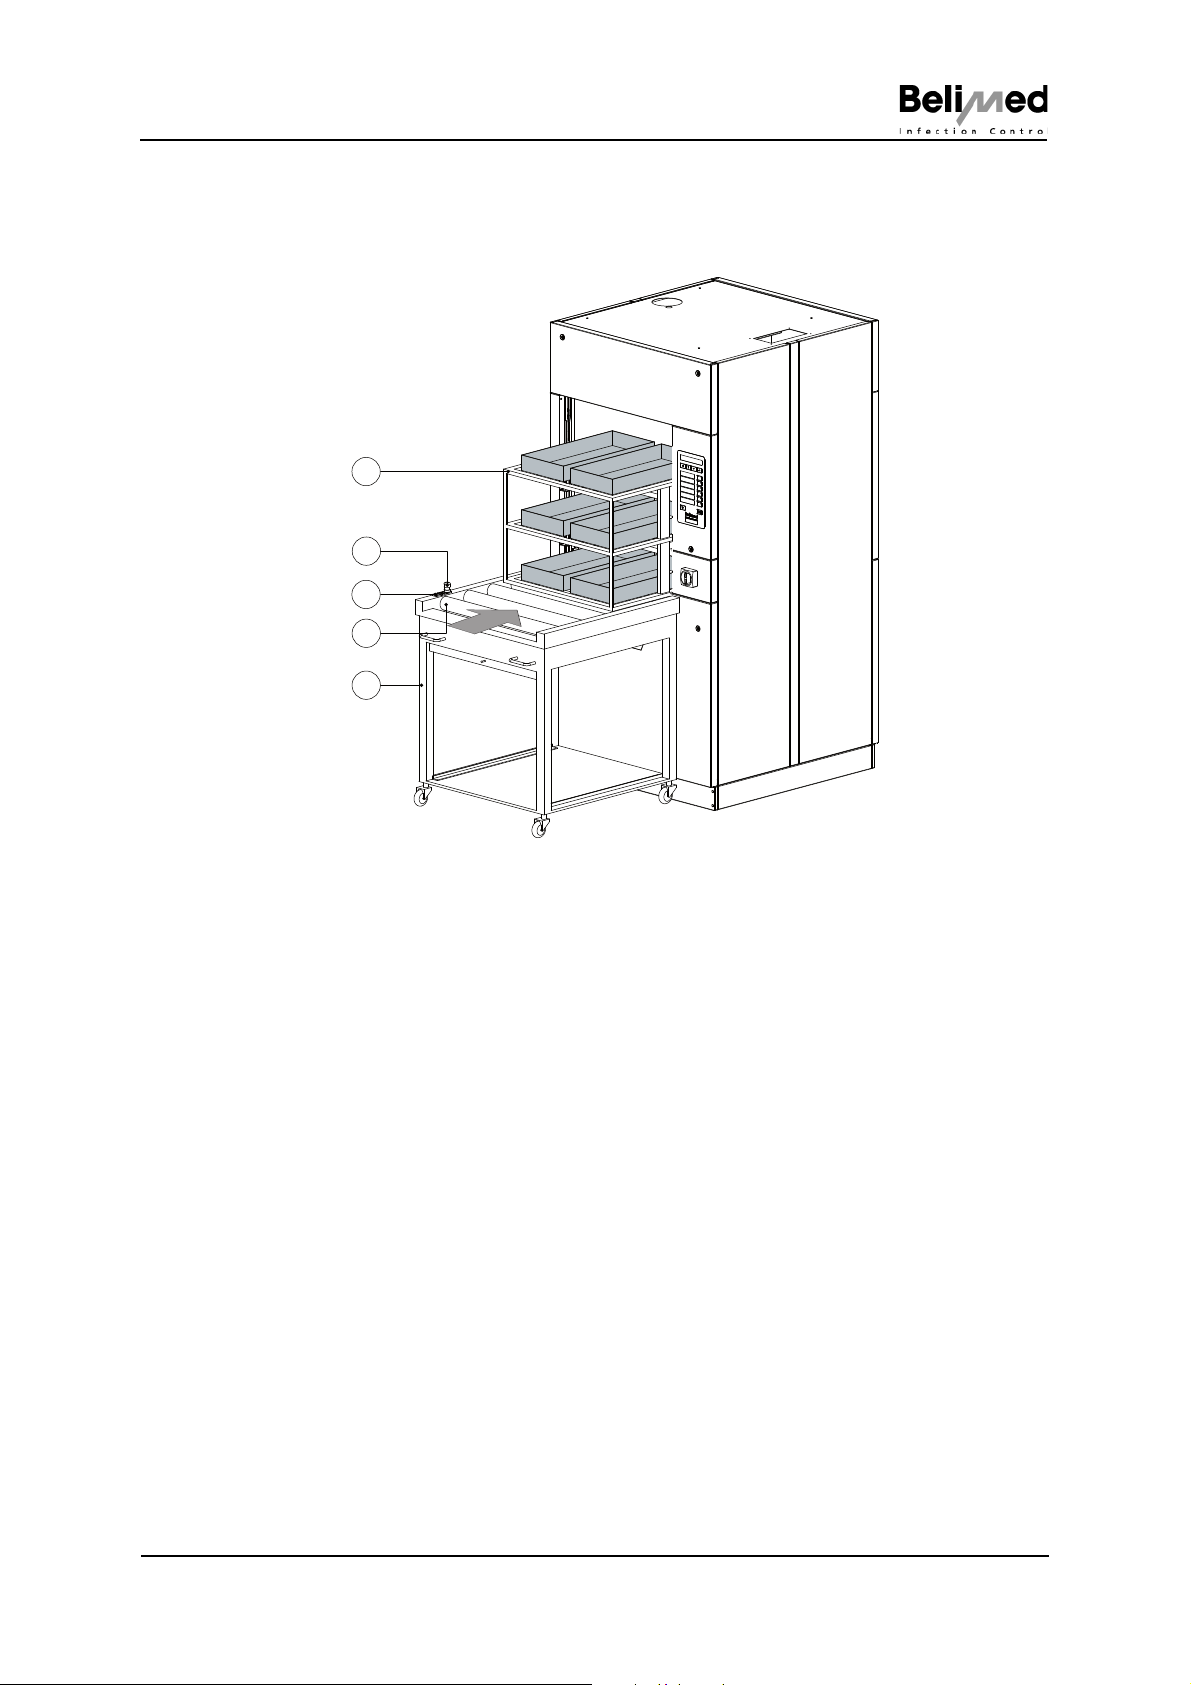
For correct and intended operation and servicing it is absolutely necessary to follow the instructions supplied wit the automated rack station.
1 Rack
2 Rack station Emergency Stop
3 Rack station operating buttons
4 Automatically driven rollers
5 Rack station
Instruction Manual WD290 001
© Belimed 10268
21/39
Page 22
Washing and disinfection
1
6
0 I
11 Washing and disinfection
11.1 General information
WARNING!
Only operate the device with the original metal paneling! Uncontrolled escape
of water due to a burst pipe or split tubing can cause scalding. Only remove
the metal panel once the device is isolated from the mains supply.
11.2 Washing, disinfecting
Press the required button to
This step proceeds automatically for automated program recognition (optional)
NOTE
In the case of "automatic program recognition" check the items to be washed
against the program name!
Program flow
Display text:
P2|____| 13min
Wash 36°C
P2|____| = program step status
13min = remaining run time
Wash = current step
36°C = temperature of washing agent or drying air
Procedure in case of faults:
If a fault occurs during operation, acknowledge with the button
If the fault persists (see Chap. 16 "Faults")
If the fault cannot be rectified, the technical specialist must be informed
DANGER!
If smoke is emitted or water escapes, immediately turn off at the main
switch and isolate the device from the mains supply. Inform the technical
specialist.
The end of the program is indicated with an acoustic signal
Display text:
Program name
Correctly Finished
22/39
001 Instruction Manual WD290
10268 © Belimed
Page 23
Unloading from the clean side
1
2
3
4
5
Abb 204
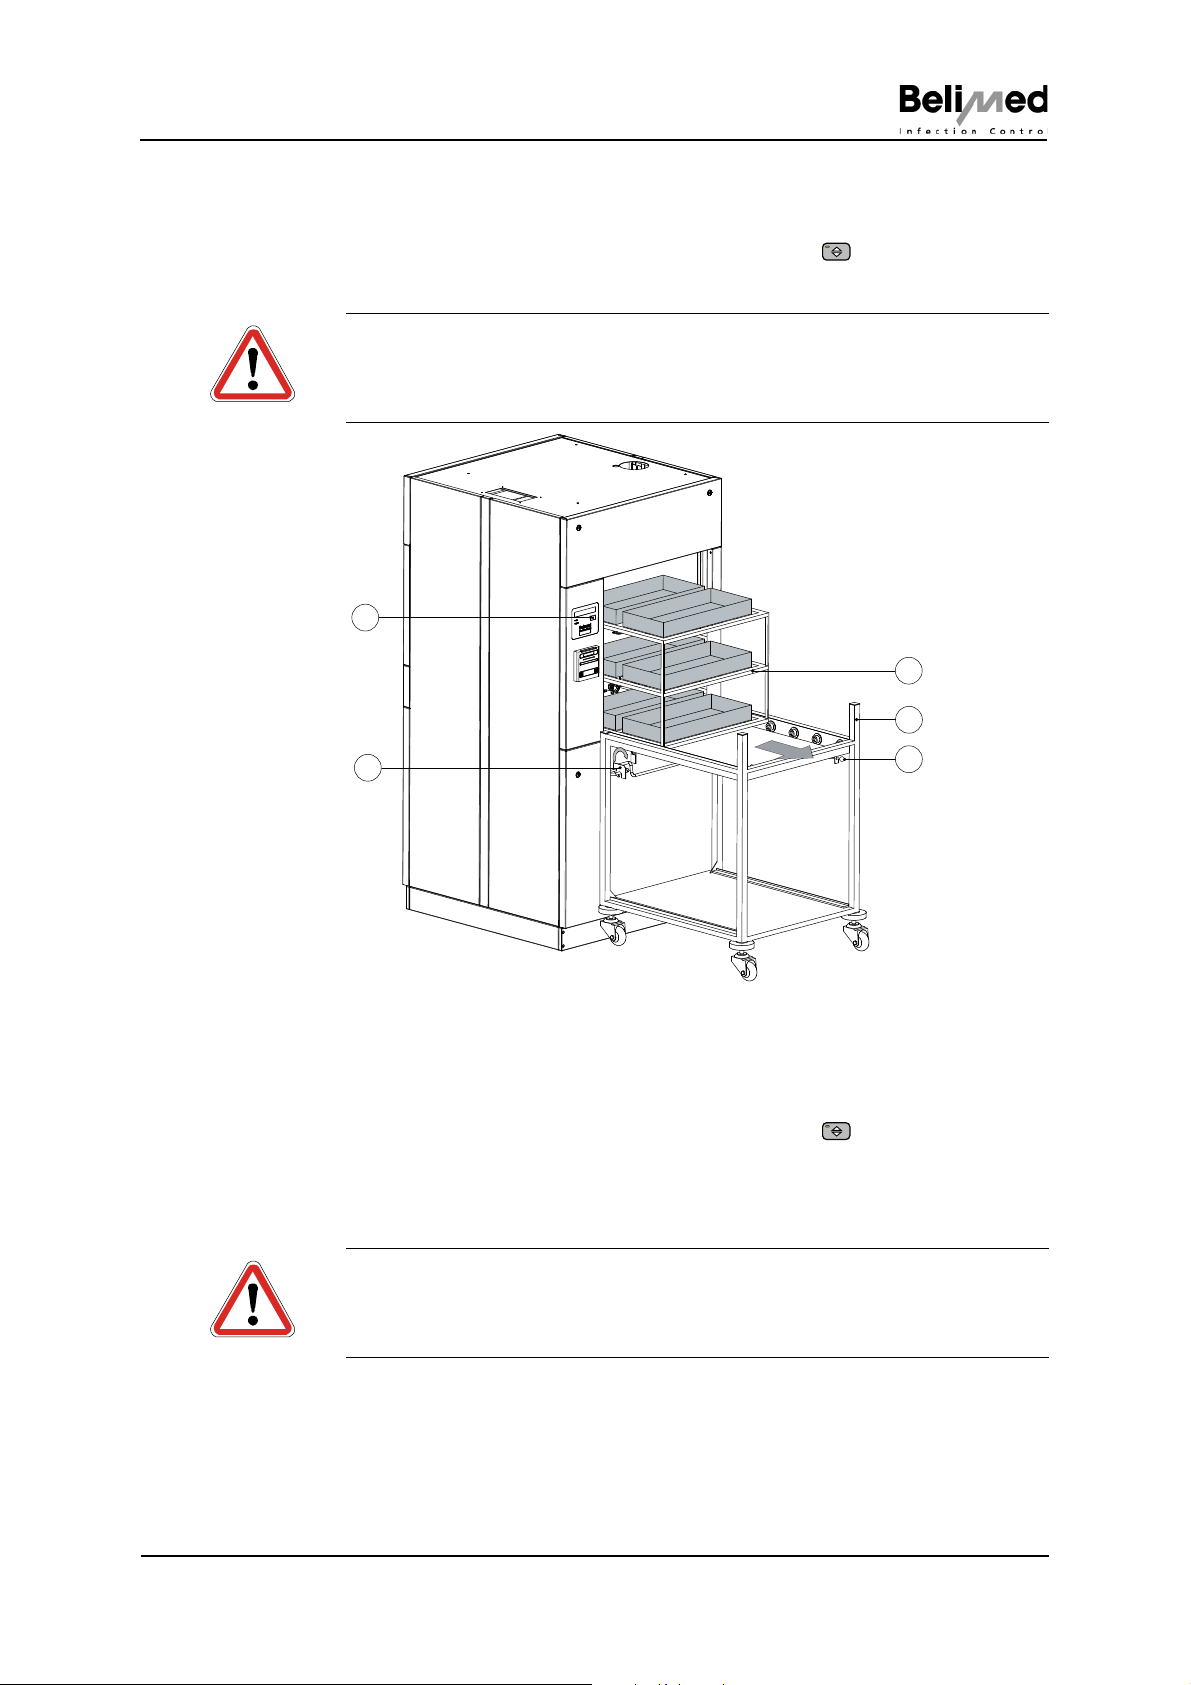
12 Unloading from the clean side
Attach the transfer trolly to the device
Open the CS washing compartment door with the button.
Remove the washed items (Fig. 204)
CAUTION!
The washed items and washing chamber are hot! Always wear protective
goggles and gloves when unloading.
1 Rack
2 Transfer trolley
3 Unlocking lever
4 CS door button
5 Attachment and detachment hook
Open the CS washing compartment door with the button
On the display appears "Program ready"
Visually inspect the results of cleaning. In the case of washed items that are
unclean, repeat washing with the same program!
CAUTION!
There must be no more soiling (incrustations, depositions) visible.
Detach the transfer trolley with the lever (Fig. 204 Pos. 3)
Washed items ready for further processing
Instruction Manual WD290 001
© Belimed 10268
23/39
Page 24

Switching off the device
0 I
13 Switching off the device
Switch off the device after use
CAUTION!
Switch off the device with the button .
For servicing, switch off the device at the main switch (see Chap. 14.1 "Servicing in general").
NOTE
If the device is switched off at the main switch, the controller is also no longer
active. Consequently, the water level is not checked and, in the case of a broken valve, water can overflow.
24/39
001 Instruction Manual WD290
10268 © Belimed
Page 25
Daily servicing and cleaning work
2
1
5
4
3
6
Abb 177
7
14 Daily servicing and cleaning work
14.1 Servicing in general
The owner is responsible for carrying out servicing and cleaning work.
DANGER!
Switch off at the main switch prior to all servicing work.
Only carry out servicing and cleaning work with safety goggles and gloves!
Soiling residues can cause infections!
CAUTION!
Never spray the device for cleaning. The device is not water-jet-proof.
Only use chrome steel cleaning agents or surface disinfectants for cleaning
the outside of the device. No solvents!
14.2 Servicing the bottom washing arm
WARNING!
Pointed or sharp objects can cause injuries when washing the device.
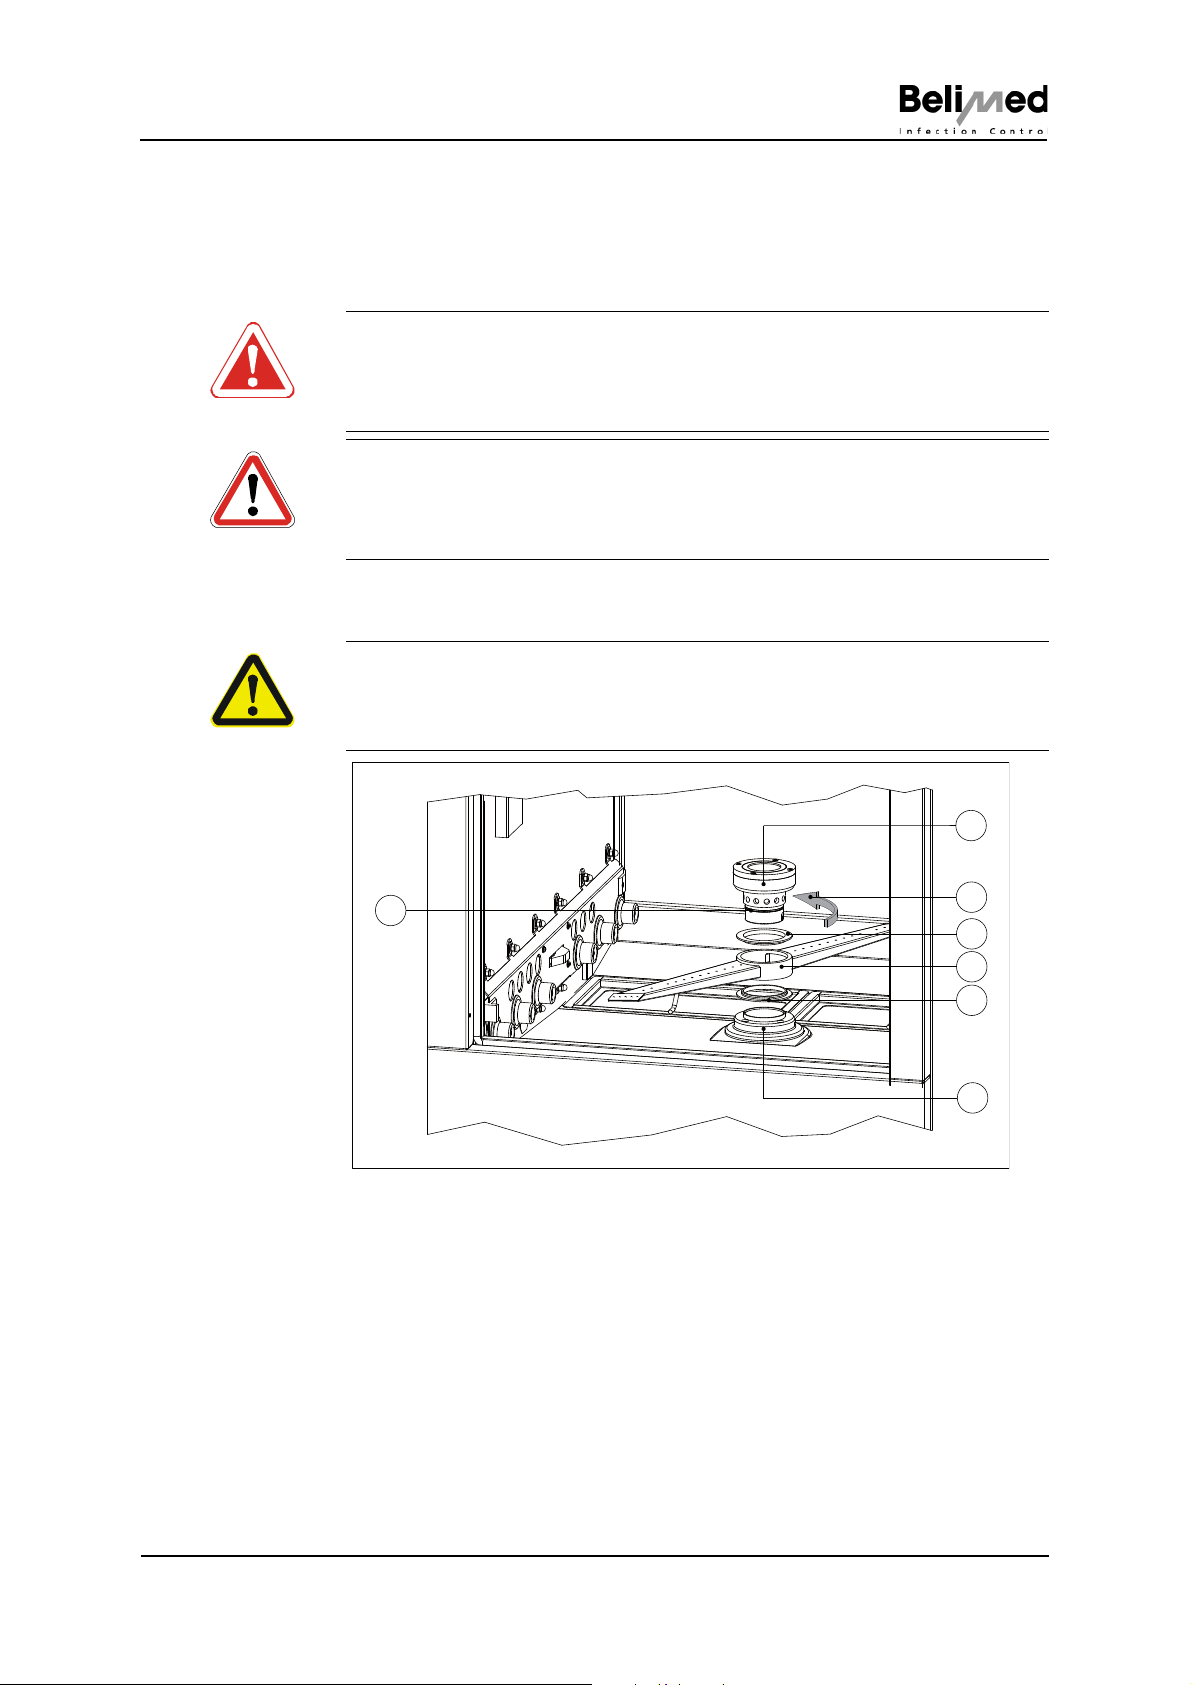
1 Clamping fixture
2 Direction for loosening
3 Top bearing yoke
4 Bottom washing arm
5 Bottom bearing yoke
6 Supporting bearing
7 Sealing O-ring for clamping fixture
Twist the clamping fixture (Fig. 177 Pos. 1) counter-clockwise and pull it up-
wards
Disassemble the remaining components acc. to Fig. 177
Check the seal on the clamping fixture (Fig. 188 Pos. 7) for damage
Instruction Manual WD290 001
© Belimed 10268
25/39
Page 26
Daily servicing and cleaning work
Abb 108
2
1
4
3
5
Check the washing arm (Fig. 177 Pos. 4) for clogged nozzles and clean as
required
Clean the bearing yokes (Fig. 177 Pos. 2+5), check for wear and replace as
required
Replacement criteria: Score marks or deep scratches
Reassemble components
CAUTION!
Rinsing nozzles upwards!
Check the rotation of the washing arm
14.3 Servicing the top washing arm
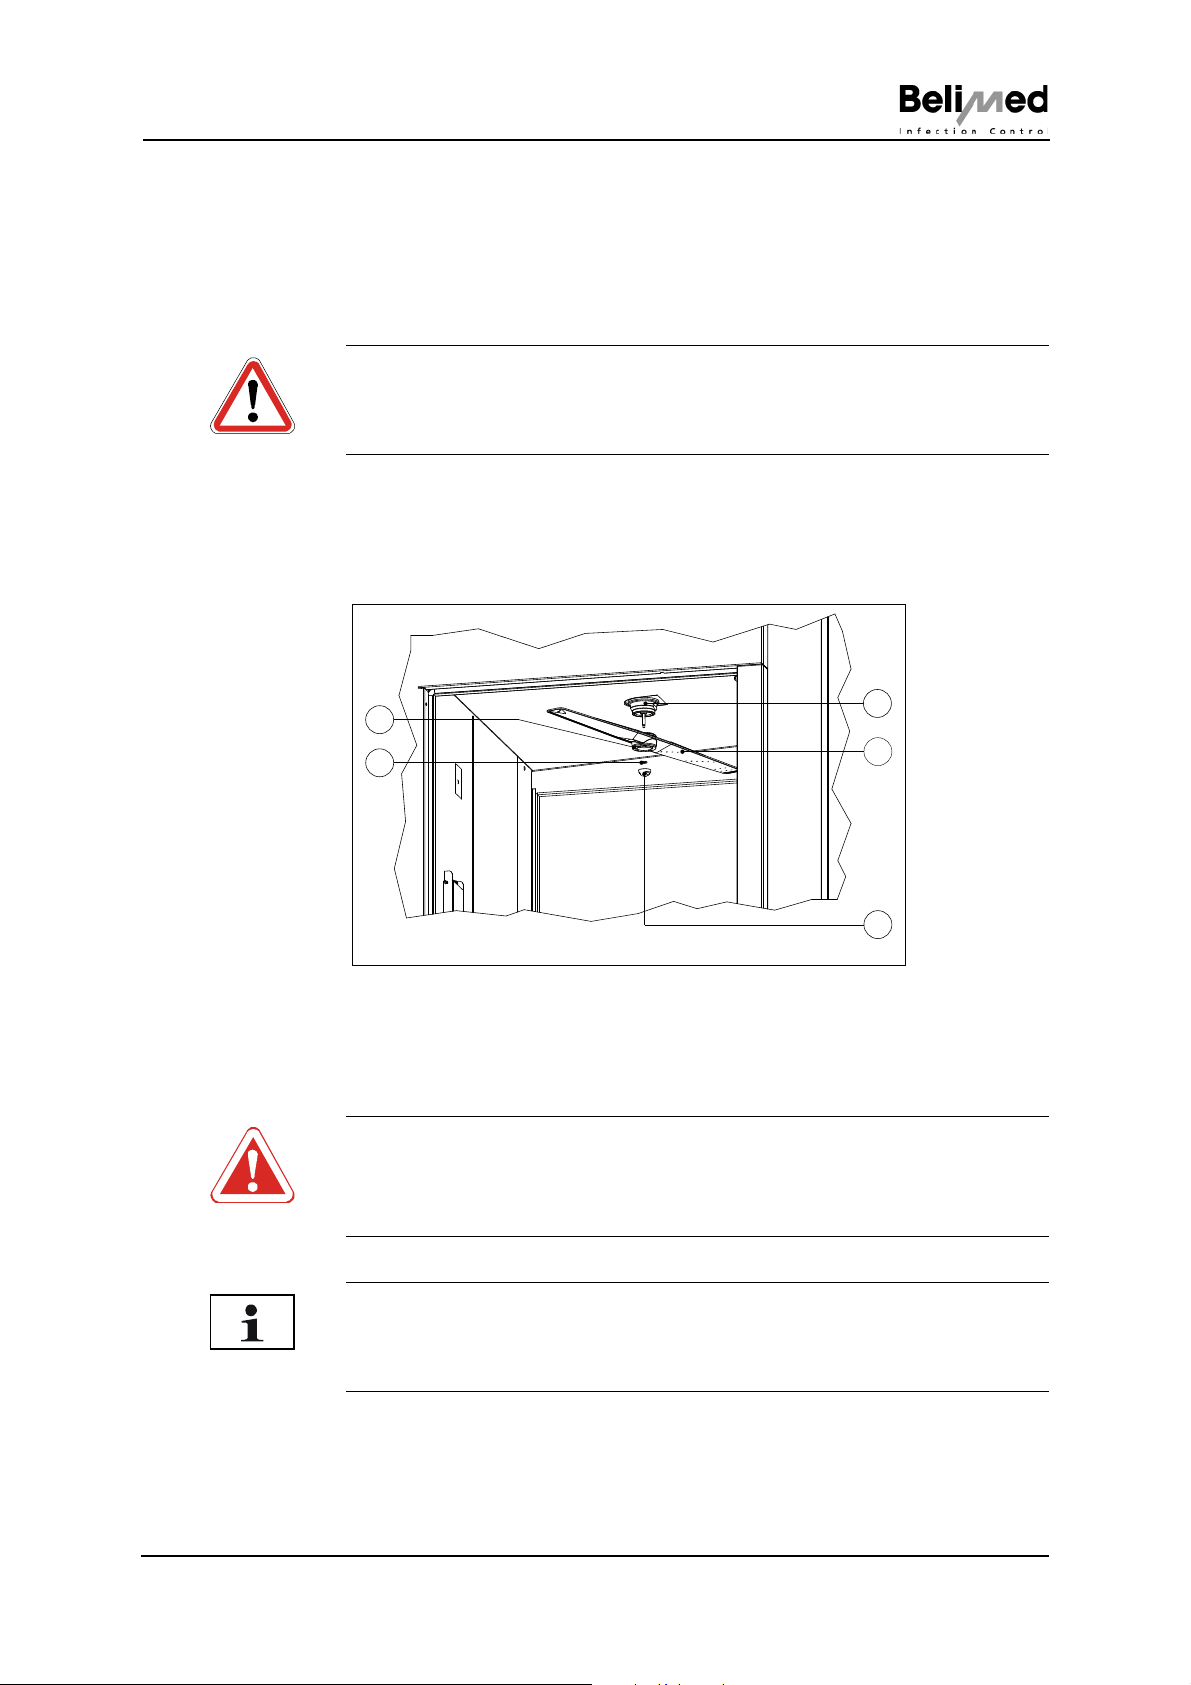
The washing arm must be checked daily and clogged nozzles cleaned.
1 Washing arm
2 Top washing arm
3 Dome nut
4 Slide ring
5 Rotor bearing
DANGER!
Switch off at the main switch prior to all servicing work.
Only carry out servicing and cleaning work with safety goggles and gloves!
Soiling residues can cause infections!
Loosen dome nut (Fig. 108 Pos. 3)
NOTE
Do not lose the washer (Fig. 108 Pos. 4)!
Disassemble components (Fig. 108)
Check the washing arm (Fig. 108 Pos. 2) for clogged nozzles and clean as
required
Check the rotor bearing (Fig. 108 Pos. 5) for wear and replace as required
26/39
001 Instruction Manual WD290
10268 © Belimed
Page 27
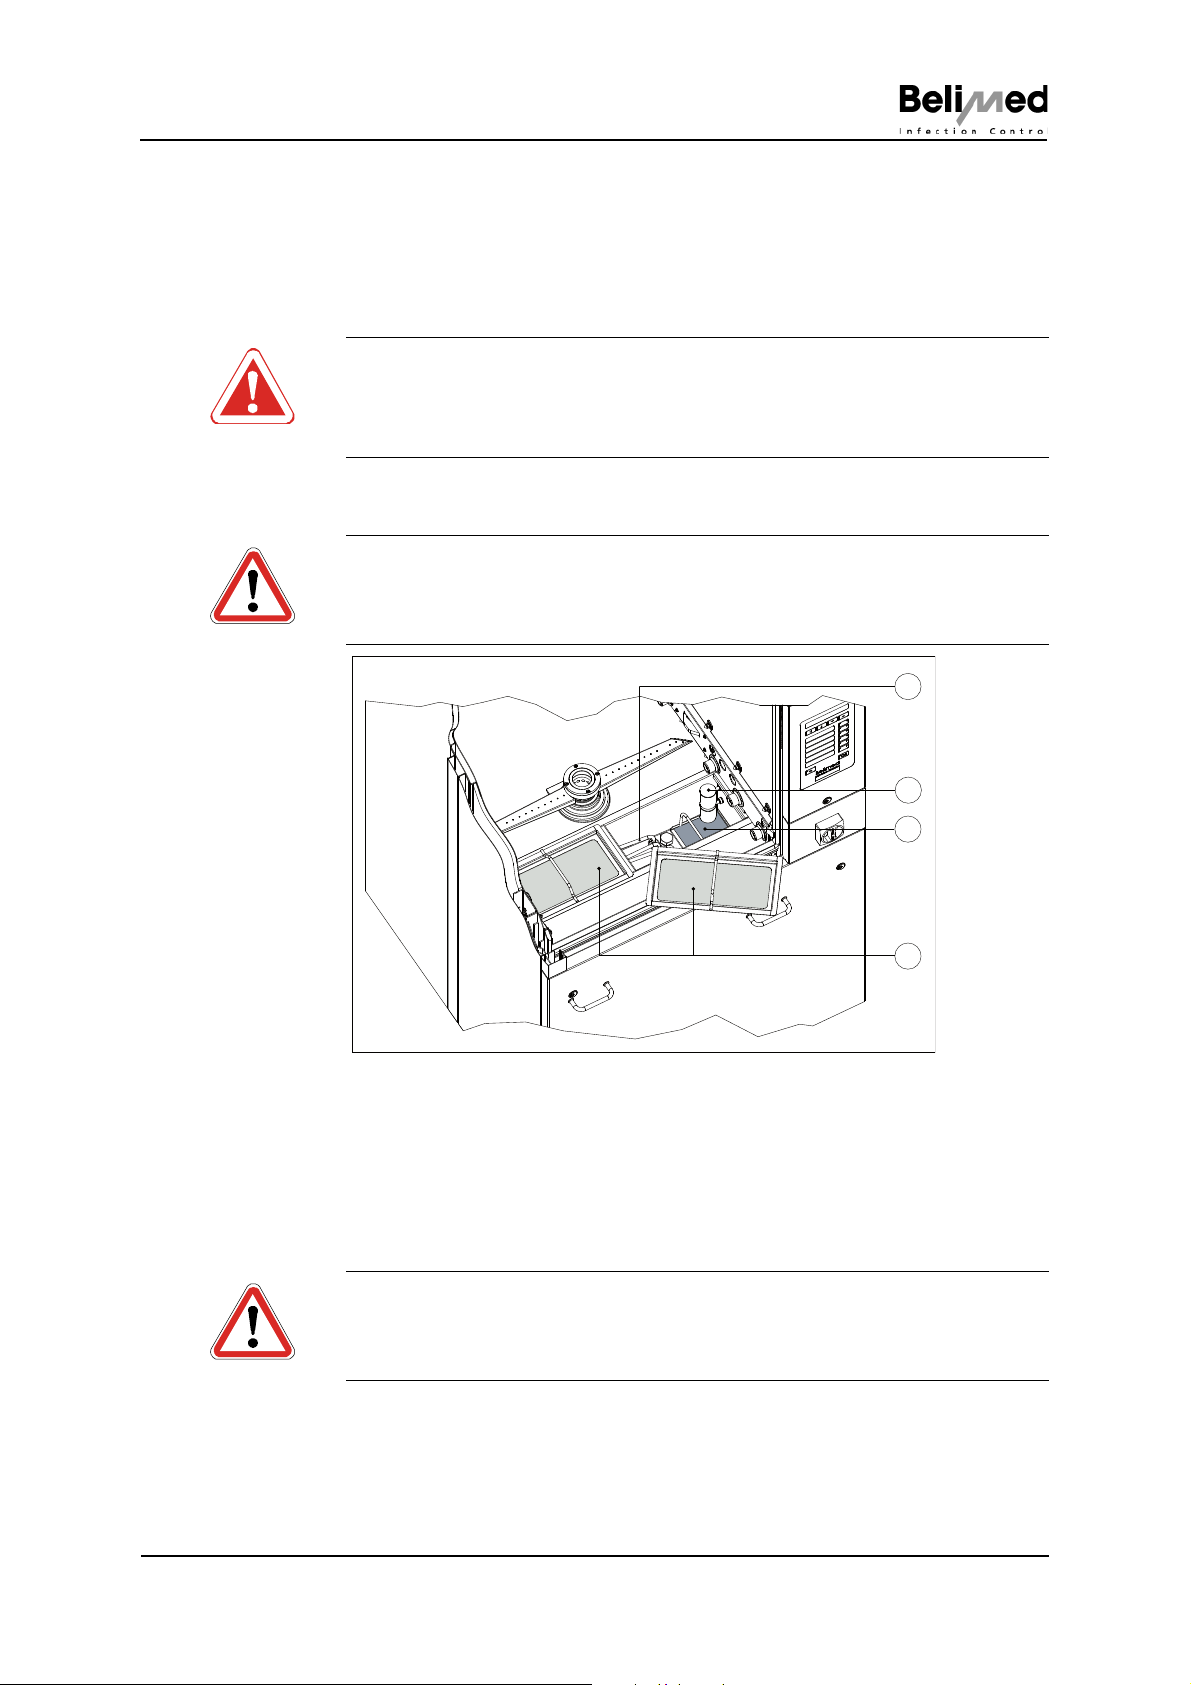
Daily servicing and cleaning work
Abb 96
3
4
1
2
Replacement criteria: Score marks or deep scratches
Reassemble components
Check the rotation of the washing arm
14.4 Cleaning the surface sieve and coarse sieve
DANGER!
Switch off at the main switch prior to all servicing work.
Only carry out servicing and cleaning work with safety goggles and gloves!
Soiling residues can cause infections!
Remove surface sieve (Fig. 96 Pos. 4) and clean as required
Remove coarse sieve (Fig. 96 Pos. 3) and clean as required
CAUTION!
The tank heating elements can be very hot!
1 Tank heating elements
2 Level float
3 Coarse sieve
4 Surface sieve
Removing foreign bodies from the washing compartment
Reinsert the coarse sieve correctly
Reinsert the surface sieve correctly
CAUTION!
Never rinse without the surface sieve and coarse sieve!
Instruction Manual WD290 001
© Belimed 10268
27/39
Page 28

Device fails to clean properly
15 Device fails to clean properly
15.1 Checking the device
• Is the right program selected for the items to be washed?
• Do the washing arms rotate? (See Chap. 14 "Daily servicing and cleaning
work")
• Are the washing arms correctly installed? (See Chap. 14 "Daily servicing and
cleaning work")
• Are the washing arm nozzles clogged? (See Chap. 14 "Daily servicing and
cleaning work")
• Are the suction and intermediate sieves clogged or absent? (See Chap. 14.4
"Cleaning the surface sieve and coarse sieve")
• Does the trolly dock to the device properly? (See Chap. 14.2 "Servicing the
bottom washing arm")
• Are the waste water and media connections correctly established? (See
Chap. 5 "Preparing the device") The checks are to be performed by the
technical specialist!
15.2 Checking dosing
• Is there sufficient cleaning agent in the containers? (See Chap. 16.1 "Fault
text without process interruption")
15.3 Checking rack loading
• Are the items to be washed properly loaded on the trolley provided for this
purpose? (See Chap. 8 "Loading and identifying racks")
• Are the washing nozzles on the rack clogged? (See Chap. 8.1 "Loading
racks")
• Is the rack inserted correctly? (See Chap. 10.1 "Manual loading")
• Have the items to be washed been proberly pre-treated? (See Chap. 4 "Pretreating medical devices")
28/39
001 Instruction Manual WD290
10268 © Belimed
Page 29
Faults
0 I
0 I
16 Faults
16.1 Fault text without process interruption
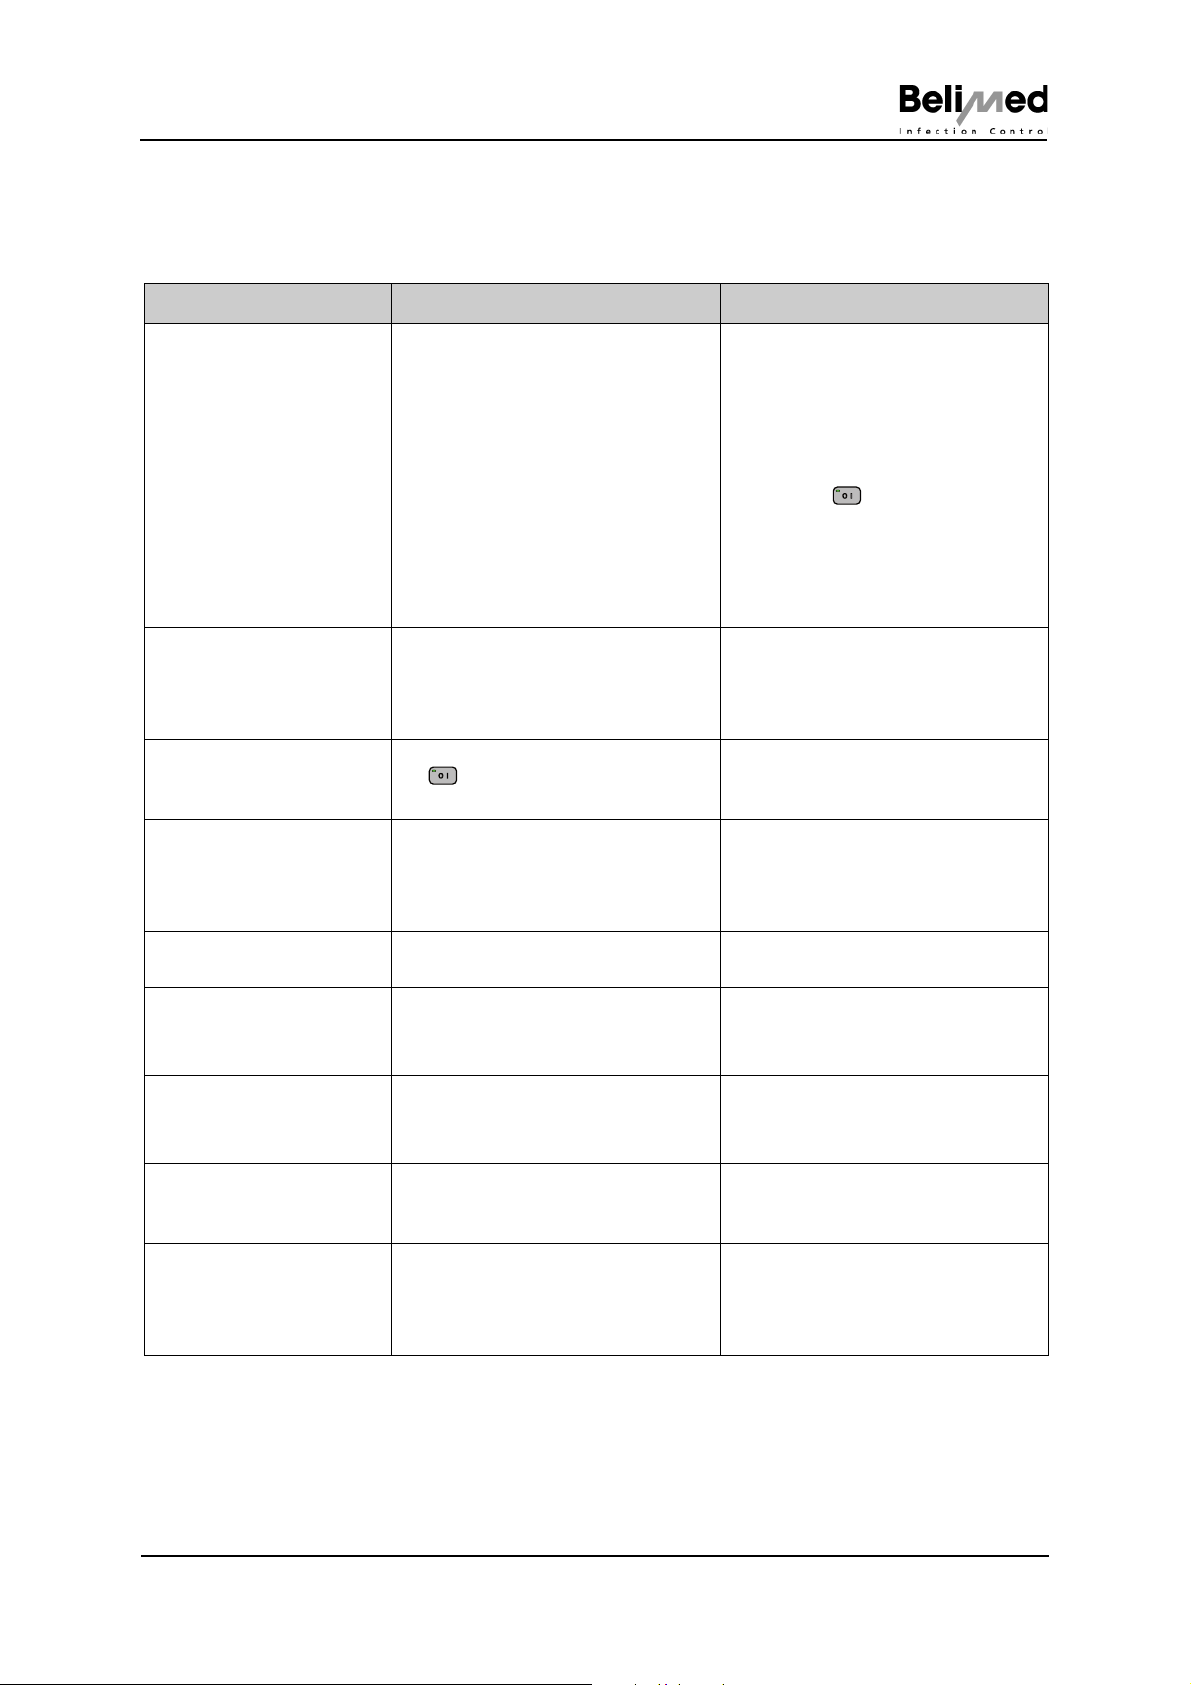
Fault text display Cause Remedy
Doser _ _ _ _
Empty
Program Recognition
Fault Code 118
Door Interlock
Select Pr again
Probe Difference
Is too Large
Replace Filter
Periodical Service
Exhaust facility
defective
Peak Load Block
No Communication
Documentation system
Doser container is empty.
Empty indicator float incorrectly fitted or defective.
1) Fit a new canister
2) Pull the empty indicator lance
out of the empty canister and
correctly insert it into the new
canister.
3) Activate the washing program
with the button
Caution!
Always use protective goggles
and gloves when refilling the
detergents!
The rack position in the washing
chamber is not correct.
Reed sensor for"automatic program
Pull out the rack and slide it in
again.
Inform the technical specialist.
recognition" is defective.
If the program is interrupted with
New program can be selected.
the button the washing compartment door remains locked.
Difference between the monitoring
probe and the regulating probe is
too large (+- 2°C).
New program can be selected.
Inform the technical specialist
immediately. Recalibrate the probes
at least at 80°C.
The sterile filter for drying is
clogged.
Servicing promt after the specified
batch number. (Generally every
1500 batches)
Inform the technical specialist
immediately.
New program can be selected.
Initiate service call from contractual
partner.
Building exhaust facility failure. New program can be selected.
Inform the technical specialist
immediately.
The building peak load management has blocked the device as a
load.
Connection to PC for batch recording is interrupted.
A new program cannot be selected.
Wait until it is enabled once again.
New program can be selected.
Re-establish the connection
between the device and PC for
batch recording.
Instruction Manual WD290 001
© Belimed 10268
29/39
Page 30
Faults
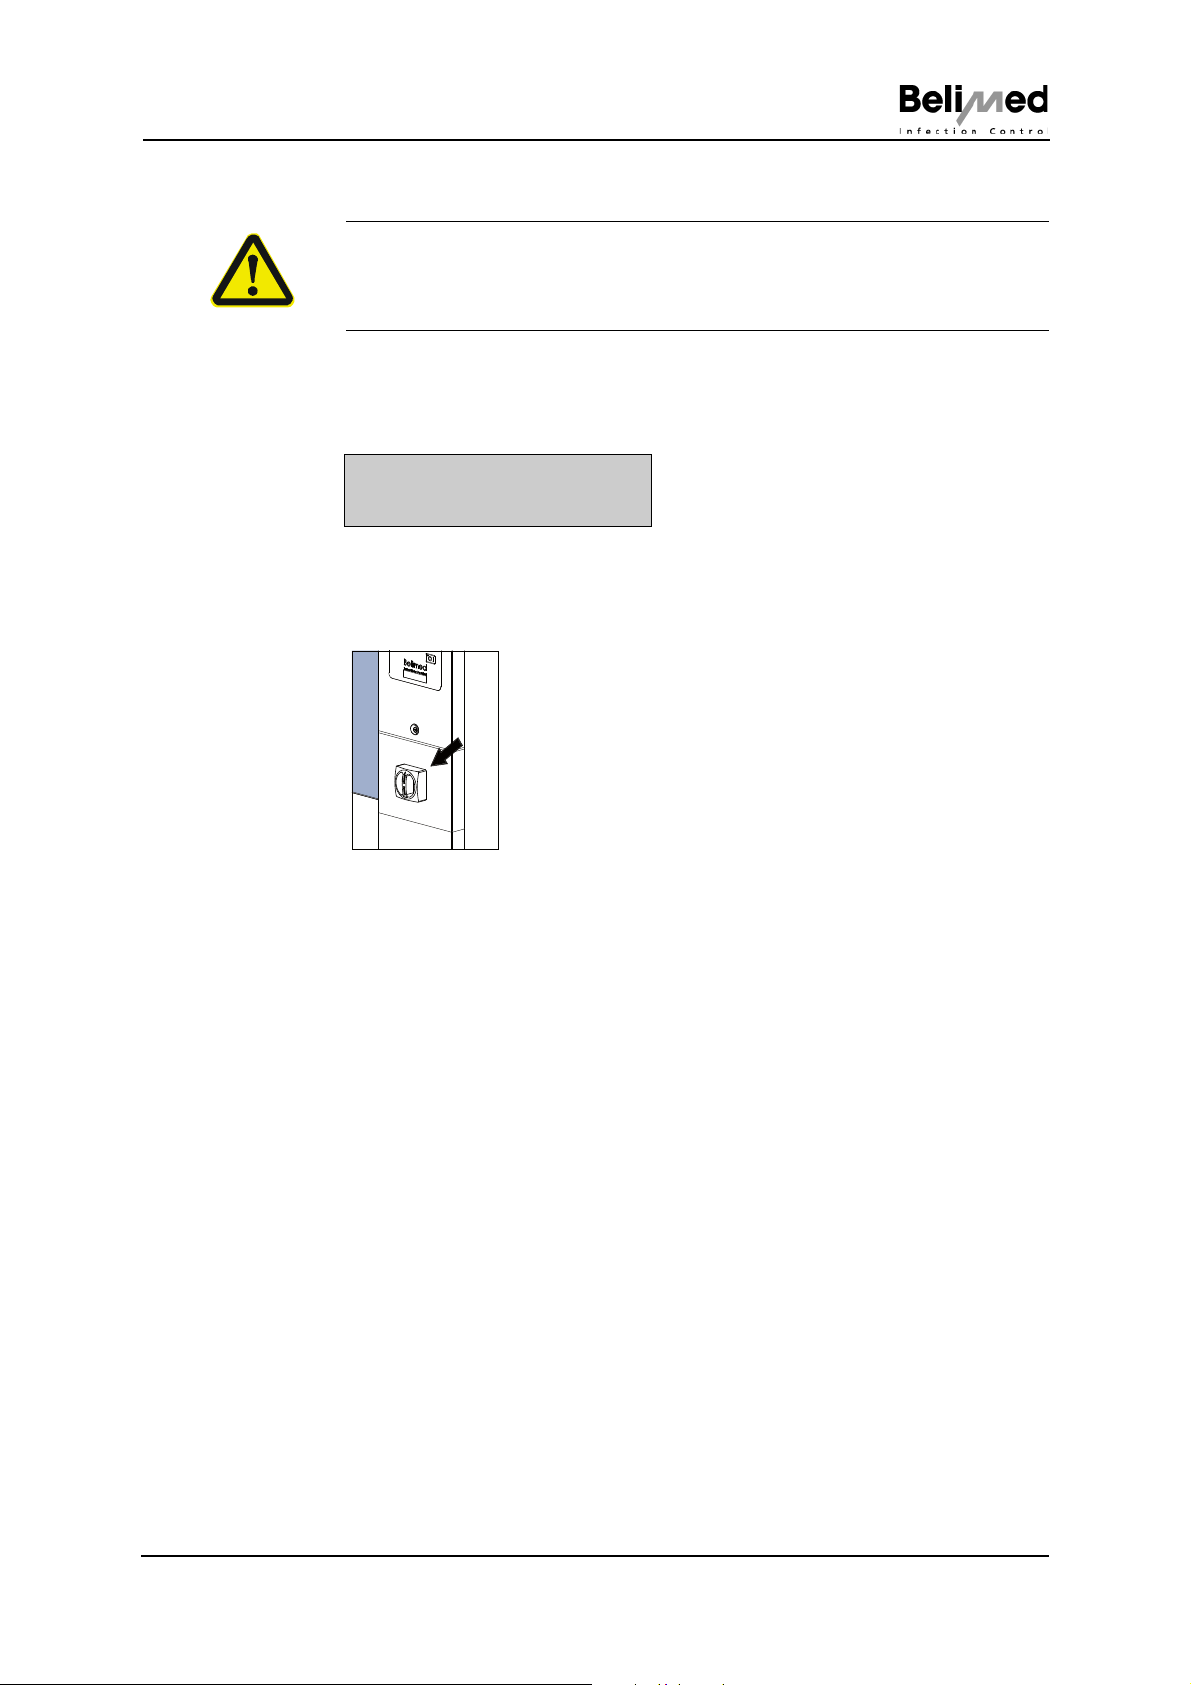
Abb 209
16.2 Fault text with process interruption
WARNING!
Report fault text with process interruption to the technical specialist immediately. Under no circumstances continue working with the device!
Fault texts with process interruption appear during the program flow. The fault
code and the cause of the fault blink alternately on the display (exception Fault
Code 101).
Example:
Leakage Pan
Fault Code 112
16.3 Device does not run
• Is the device switched on at the main switch? (Fig. 209)
• Are the fuses intact? (inspection by the technical specialist)
• Are the washing compartment doors correctly locked? (See Chap. 5 "Preparing the device")
• Fault code on the display? (See Chap. 16 "Faults")
30/39
001 Instruction Manual WD290
10268 © Belimed
Page 31
Options
0 I
17 Options
17.1 Modem connection
If a modem is installed, the device can be linked with the Belimed Service Centre.
Inform the Service Centre before activating the modem (see Chap. 20 "Organisation Belimed AG".
17.1.1 Activating the connection
Display text Description
Program ready
XX.XX.XXXX 12:00
Password ?
---
Remote Support
Initialize Modem
Remote Support
Not Connected
Remote Control
Connected
In standby mode press the button for 4 seconds
Press the button for 4 seconds
Modem connection is established
Modem connection could not be established
Modem connection is established. Device is
remote controlled
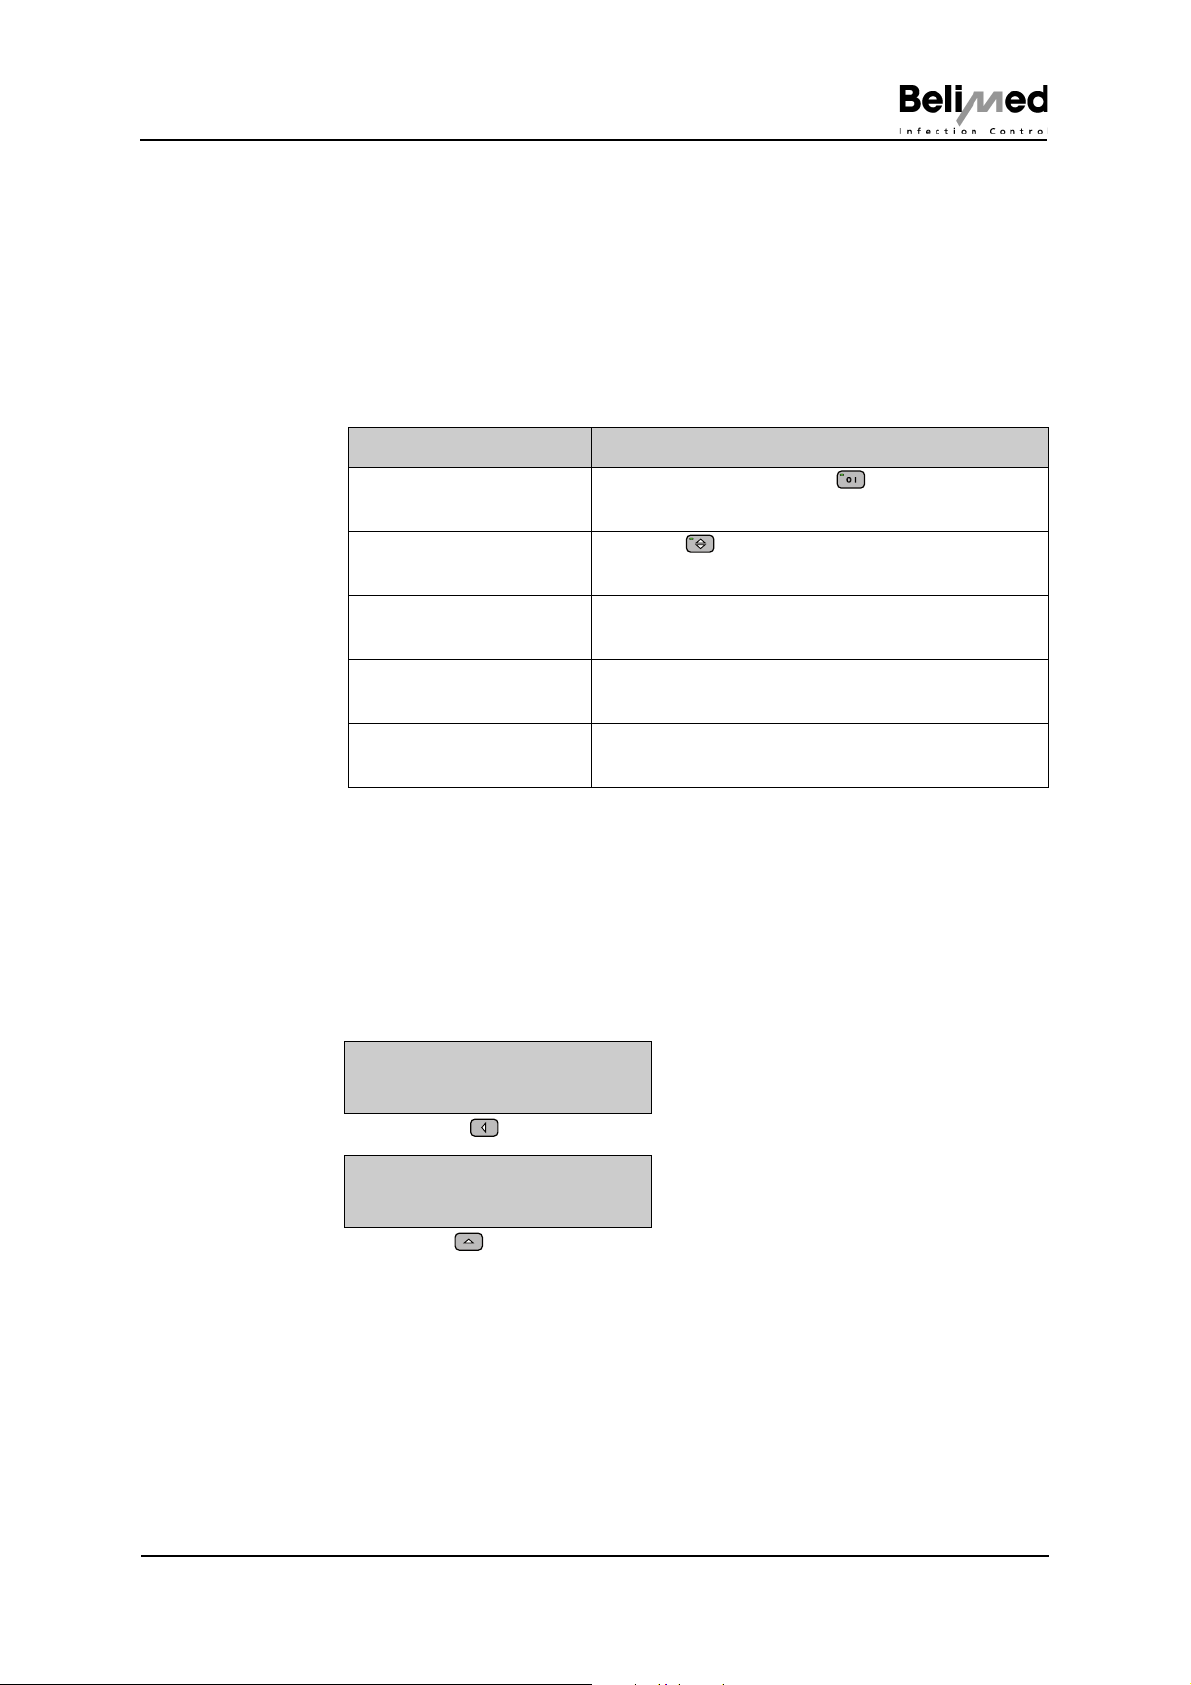
17.2 Independent measurement data acquisition IPD
With automatic verification, the ongoing process is interrupted with the relevant
error message. The function can be switched on and off from the operating panel.
For function "On" a process interruption follows, for "Off" only a text on the display.
Activation:
Device must be on the status
Program ready
dd.mm.20yy hh:mm
Press the button 3 times until"Verification On/Off" appears
Process Verification
On
Use the button to switch between "On" or "Off"
Instruction Manual WD290 001
© Belimed 10268
31/39
Page 32
Options
Abb 231
2
1
3
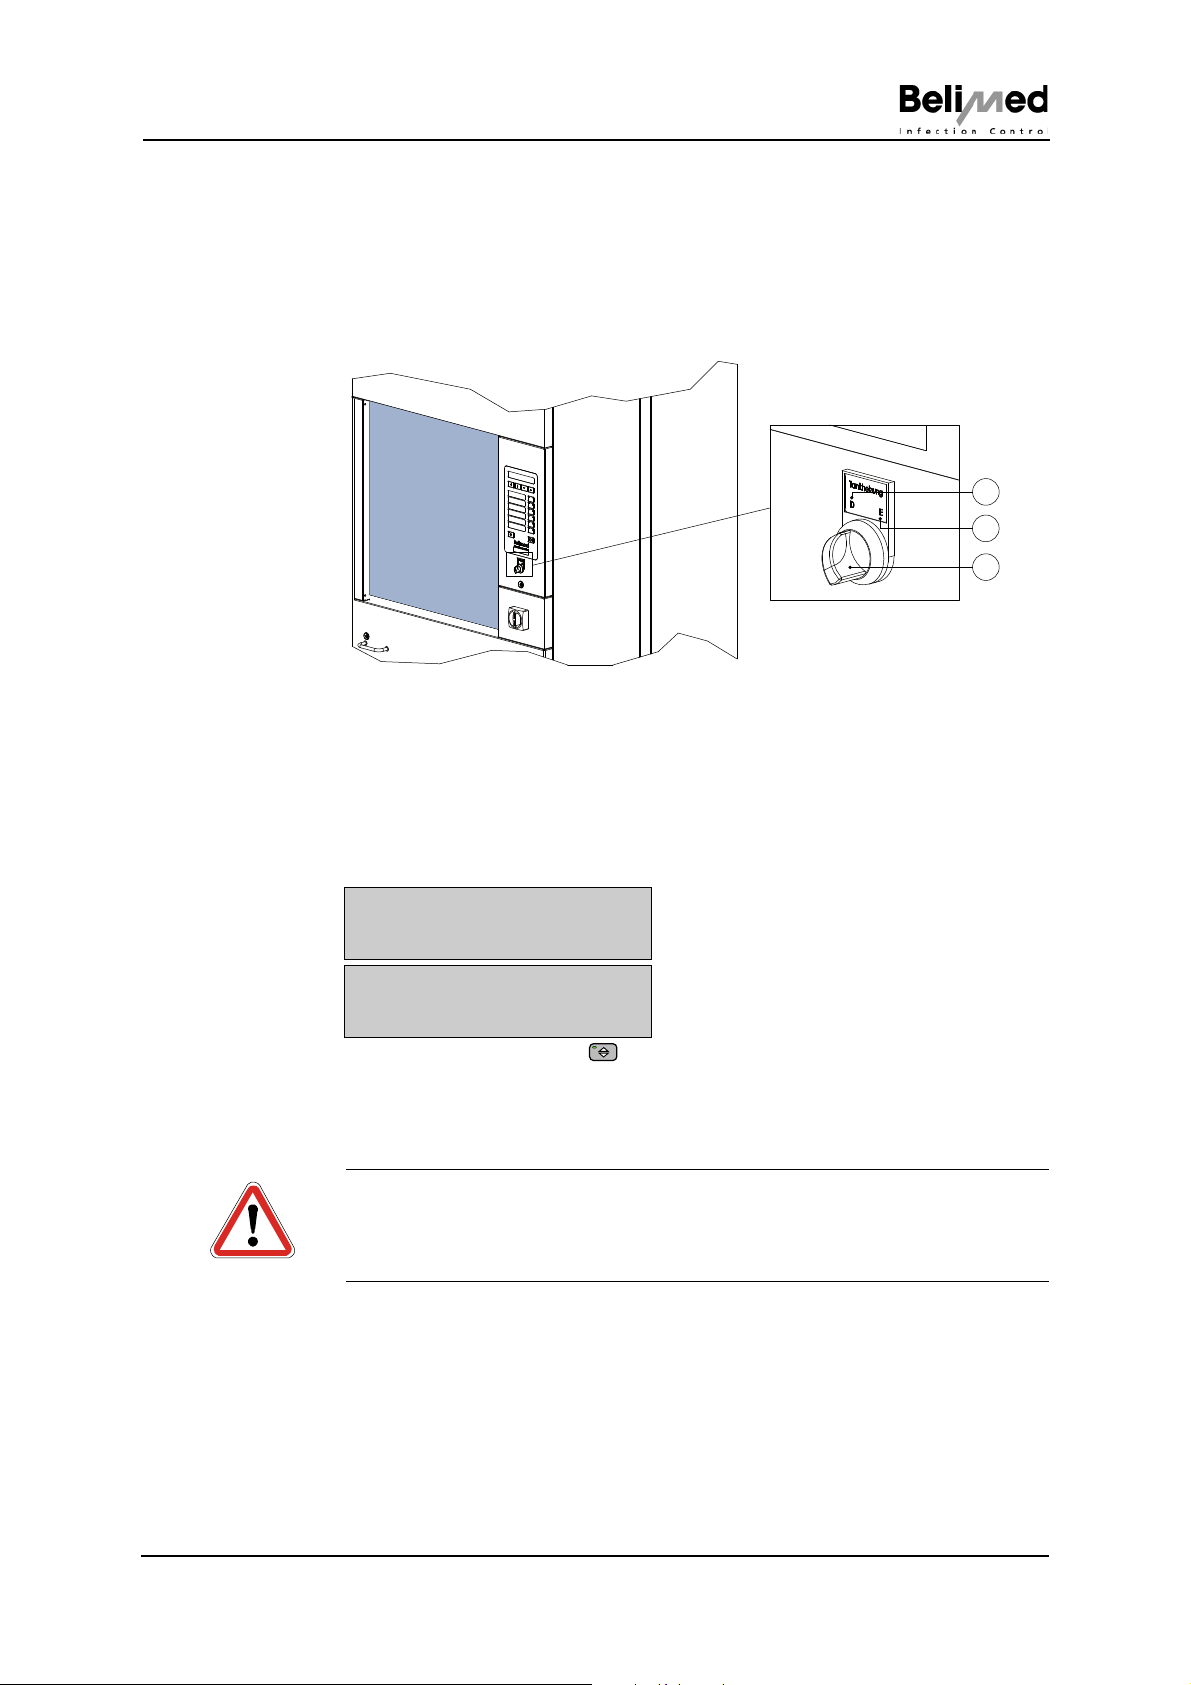
17.3 Tank heating manually switchable
17.3.1 Function
The selection switch (Fig. 231 Pos.3) is used to switch between electrical heating
E (Fig. 231 Pos. 2) for the washing chamber and steam heating D (Fig. 231
Pos.1).
1 Steam heating
2 Electrical heating
3 Manual selection switch
17.3.2 Operation
Fault 161 or 162 appears
No heat
Fault Code 161
No heat
Fault Code 162
Acknowledge fault with door button
Manual switching with the selection switch (Fig. 231 Pos. 3) from electrical
heating (Fig. 231 Pos. 2) to steam heating (Fig. 231 Pos. 1)
Restart program
CAUTION!
If the same fault still occurs after switching to steam, the technical specialist
must be informed immediately (see Chap. 16.2 "Fault text with process interruption")
32/39
001 Instruction Manual WD290
10268 © Belimed
Page 33
Options
Abb 232
2
4
5
1
3
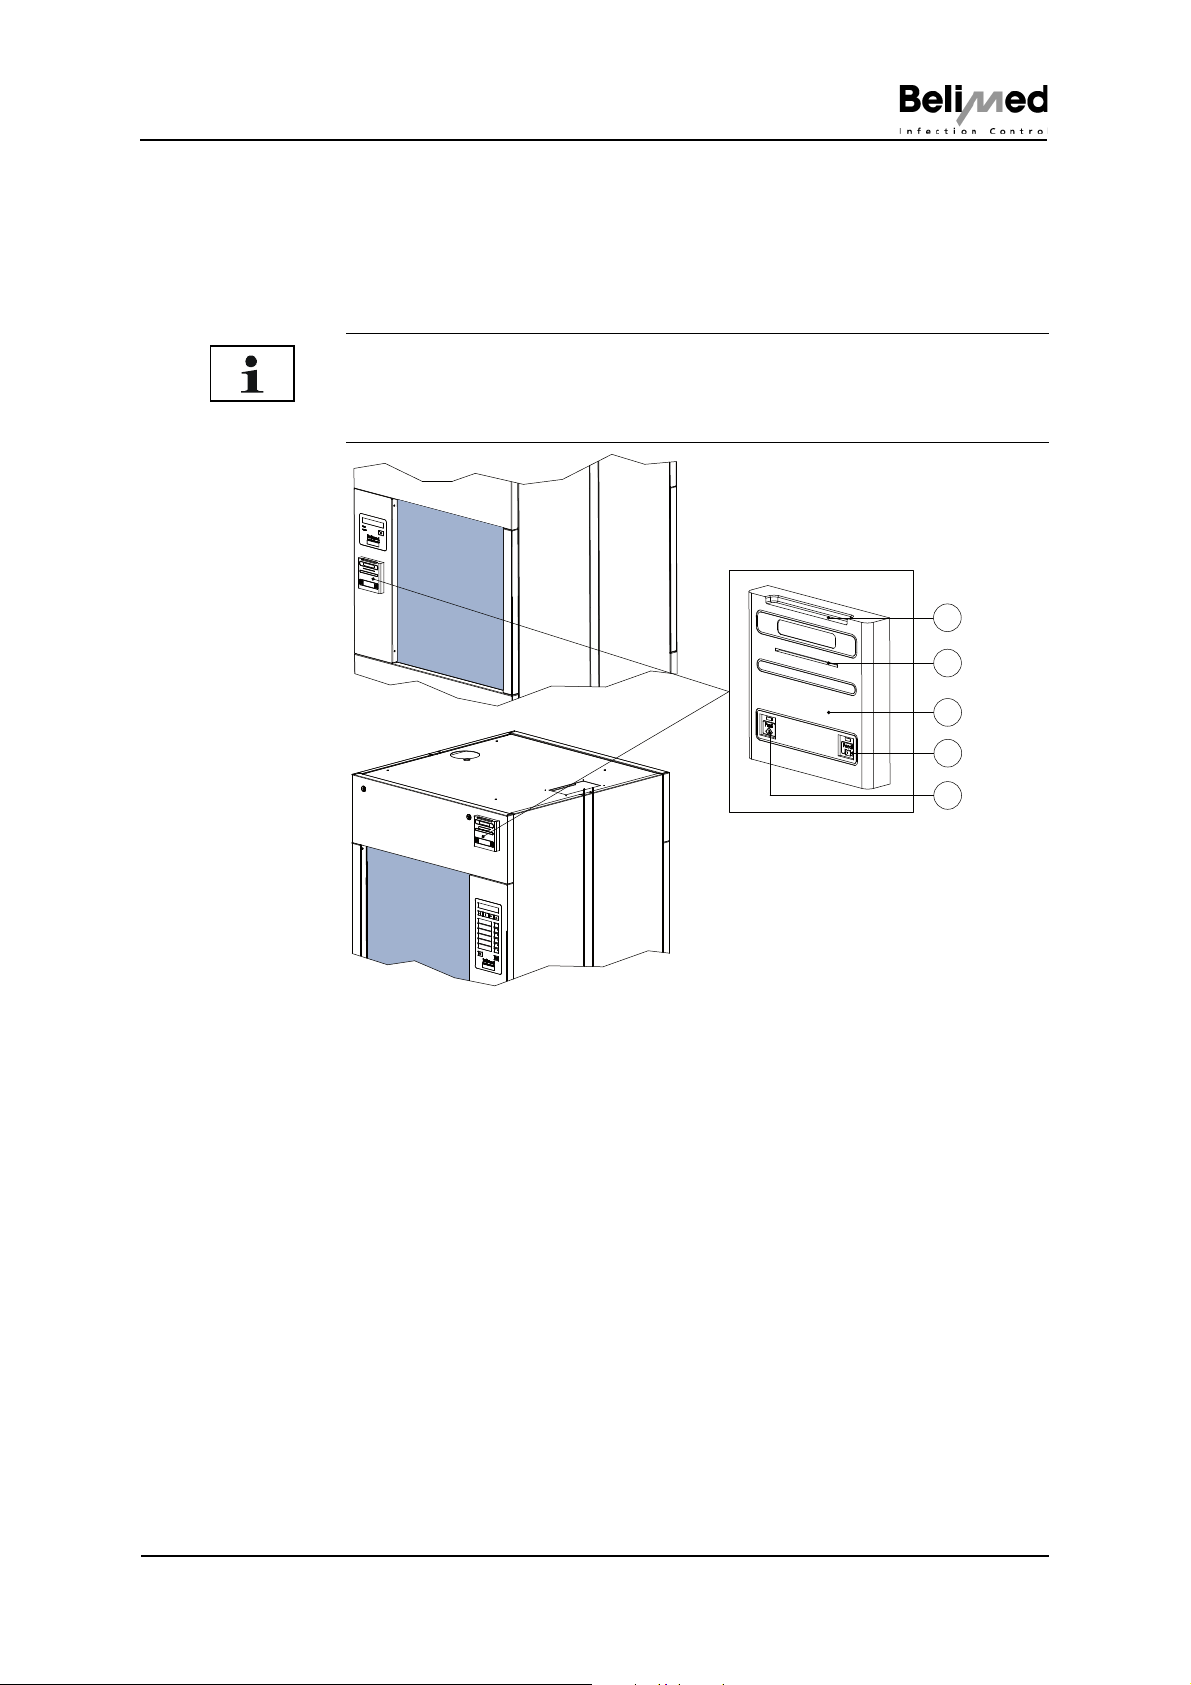
17.4 Built-in printer CS / US
17.4.1 Function
The built-in printer allows operating data, such as process steps and error messages, to be recorded and printed out.
NOTE
The function of the built-in printer is the same for both built-in versions CS/
US.
1 Recess lid opens upwards
2 Paper slit
3 Costom built-in printer
4 Paper feed button
5 Print button (not active)
Instruction Manual WD290 001
© Belimed 10268
33/39
Page 34
Options
4
2
5
4
Abb 233
17.4.2 Operation
Display text "Program ready"
Activate printer with the button
Archiving printed data
Use the button and the button to print out operating data
Deactivate the printer with the button
17.4.3 Changing paper rolls
Open up the lid on the recess (Fig. 232 Pos. 1)
Replace roll acc. to brief instructions on the inside of the lid
Close lid. Feed paper through the paper slit (Fig. 232 Pos. 2)
Printer ready for operation again
17.5 Emergency stop CS
All program steps, faults and program interruptions are now recorded and
printed out
Operating data = program formulas, setup data
17.5.1 Function
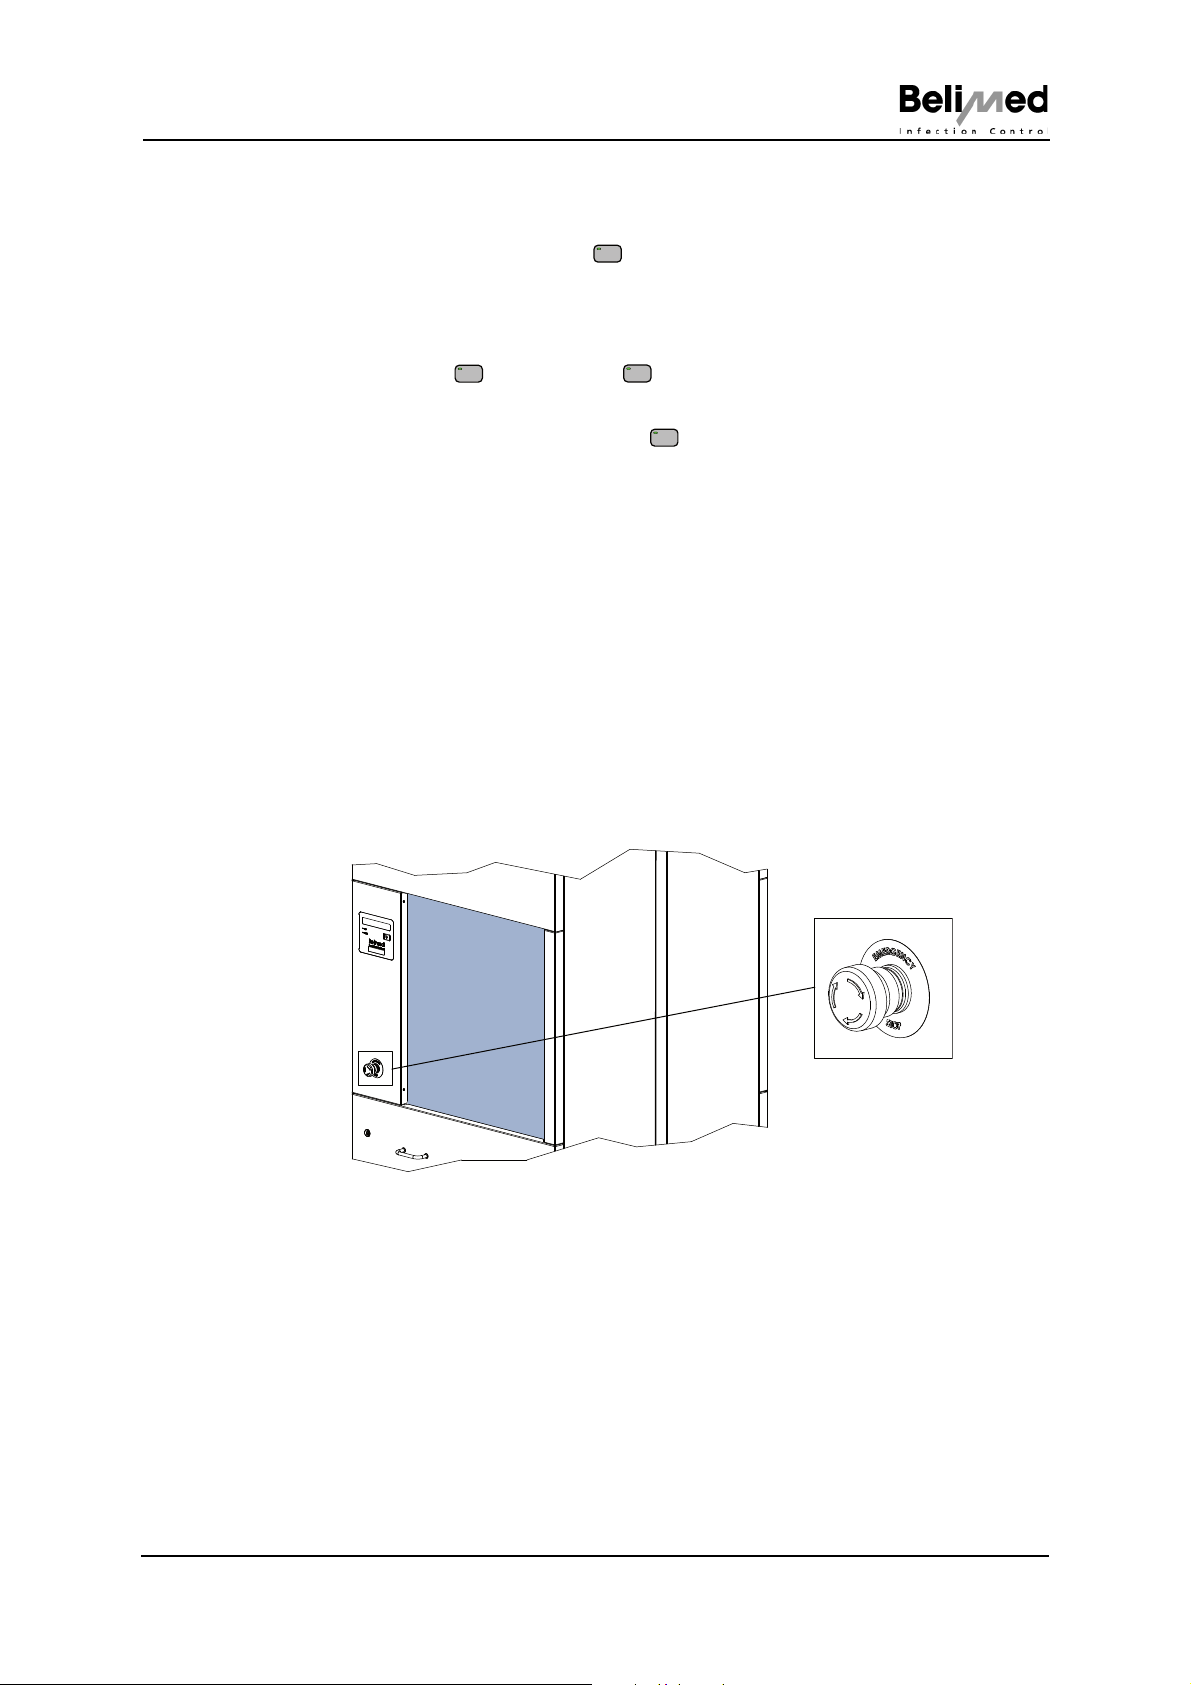
If necessary, an ongoing process can be interrupted on the clean side with the
additional emergency stop.
17.5.2 Operation
If a problem occurs during a process, implement the following steps without delay:
Press the emergency stop (Fig. 233)
The ongoing process is interrupted immediately
Rectify fault (see Chap. 16 "Faults")
Restart program
34/39
001 Instruction Manual WD290
10268 © Belimed
Page 35
Conformity and certifications
18 Conformity and certifications
Instruction Manual WD290 001
© Belimed 10268
35/39
Page 36

Glossary
19 Glossary
Authorised
persons
Approval for special persons, especially the issuance of rights, for third-party usage as applicable.
Operators Persons who load the device and perform simple washing and servicing work.
Loading Collective term to describe all items, devices and materials that are inserted into
a washing/disinfection device for the purpose of treatment in a cycle.
Intended use Use of the device in accordance with the information provided in the user infor-
mation.
Boiler Closed vessel in which water is heated indirectly by the flow of a heated medium
by means of a heat exchanger at a pressure higher than atmospheric pressure.
Disinfection Reduction in the number of viable microorganisms on a product to a predefined
level suitable for its continued handling or use.
Performance
qualification
System with which the process cycle can be interrupted or modified depending
on requirements; illustrative and documenting evidence that the device, as it is
installed and operated according to the operating procedures, works durably in
accordance with the predefined criteria and therefore products are obtained that
fulfil their definitions, i.e. the washing/disinfection device delivers products that
are cleaned and disinfected according to the required standard.
Error, error
message
State of a unit in which it is incapable of fulfilling the required function, whereby
the functionality caused by servicing or other planned actions or the absence of
external resources is excluded.
Hazard Potential source of damage.
Device Aggregate of parts or assemblies combined together, of which at least one is
movable with the corresponding drive elements, control and energy circuits
joined together for a specific application, especially for processing, treatment,
transporting or packaging of a material.
Device for
continuous
Device that automatically transports for loading through each individual process
cycle.
operation
Glove Alkali and acid resistant glove
Installation
qualification
Illustrative and documenting evidence that the device has been equipped and installed in accordance with the relevant definitions.
CW Cold water
Medical devices All individual or interconnected instruments, apparatuses, device materials or
other objects including the software used for he proper function of the medical
device that are determined by the manufacturer for use on persons for the following purposes:
• identification, prevention, monitoring, treatment or alleviation of diseases;
• Identification, monitoring, treatment, alleviation or compensation of injuries or
disabilities;
• examination, replacement or modification of the anatomical structure or of a
physiological process;
• contraception,
and their proper main function in or on the human body is neither achieved by
pharmacological, immunological nor metabolic means, but whose mode of action
may be supported by these means.
Washing Removal of contamination from the surface to be washed with an aqueous me-
dium with or without process chemicals depending on requirements.
36/39
001 Instruction Manual WD290
10268 © Belimed
Page 37

Glossary
Washing/
disinfection device
Device for washing and disinfecting medical products and other objects used in
the areas of medicine, dental medicine, pharmaceuticals and veterinary medicine.
Note: Device types are excludes that are designed specifically to wash cloths or
other laundry. Definitions for devices intended for sterilisation or termed as "sterilisers" are specified in other standards , e.g. in EN 285.
Washing/
disinfection device
for instruments
Two-door washing/
Washing/disinfection device intended for washing and disinfecting loads containing surgical instruments, anaesthetic accessories, containers, devices, glass devices and similar objects.
Washing/disinfection device with separate doors for loading and unloading.
disinfection device
Risk Combination of the probability of occurrence of damage or the extent of damage.
RKI The task assigned to theRobert KochInstitute includes both the observation of
occurrence of diseases and the relevant health hazards for the population, as
well as the deriving and scientifically establishing the required measures for effective protection of the health of the population.
CS Clean side
Protective goggles Alkali and acid resistant fully closed protective goggles
Safety Term for a state free of unjustifiable risks or impairment or seen as being free of
hazards.
SOP Standard Operating Procedure is a document describing the approach within an
operational working process. Frequently recurring workflows are described in
texts and provided for the person implementing the task.
Controller Installation that controls the washing/disinfection device step-by step through the
required phases of the process cycle(s) or the process according to the defined
process parameters.
Fault Identification by the automated controller that the prescribed process variable for
the process cycle of the washing/disinfection device are not adhered to.
Tank Container permanently installed in the washing/disinfection device to store solu-
tions consumed during the process.
Technical specialist Technical specialist responsible for performing simple service and maintenance
work on the device.
Door Mechanism for closing and sealing the chamber.
US Unclean side
Validation, process
validation
Documented procedure for achieving, recording and interpreting the required results to demonstrate that a procedure always agrees wit the prescribed specifications.
Lock, locked Mechanical, electrical or other type of mechanism having the purpose of prevent-
ing the execution of hazardous device functions under defined conditions.
Verification Affirmation by providing objective proof that the defined requirements have been
fulfilled [EN ISO 9000:2000]
DI water Deionised or demineralised or fully demineralised water (H2O) without the min-
erals (salts, ions) occurring in normal spring water and mains water.
Rack Mechanism for the correct loading and washing of items.
Washing chamber The part of the washing/disinfection device in which the load is treated.
Note: Steam generator, piping, e.g. drains and connections, from which the
chamber is separated, are not included.
WW Warm water
Instruction Manual WD290 001
© Belimed 10268
37/39
Page 38

Organisation Belimed AG
Belgium
Belimed SA
Rue de Clairvaux 8
1348 Louvain-La-Neuve
Phone +32 10 42 02 40
Fax +32 10 42 02 49
[email protected]
Germany
Belimed Deutschland GmbH
Edisonstrasse 7a
84453 Mühldorf am Inn
Phone +49 8631 9896 0
Fax +49 8631 9896 300
[email protected]
Branch Office West
Belimed Deutschland GmbH
Emil-Hoffmann-Strasse 27
50996 Köln
Phone +49 2236 9642 0
Fax +49 2236 9642 200
[email protected]
France
Belimed SAS
Parc GIVIO
330 Allée des Hetres, Hall E
69760 Limonest
Phone +33 4 37 41 63 03
Fax +33 4 37 41 63 04
[email protected]
Pharma
Belimed SAS
Parc Espale
1, av. Pierre Pflimlin
68390 Sausheim
Phone +33 3 89 63 65 40
Fax +33 3 89 63 65 41
[email protected]
United Kingdom
Belimed Limited
Unit 4 Newbuildings Place
Dragons Green Road
West Sussex, RH13 8GQ
Phone +44 1403 738 811
Fax +44 1403 730 830
[email protected]
Netherlands
Belimed B.V.
Energieweg 8
6658 AD Beneden-Leeuwen
Phone +31 487 59 11 00
Fax +31 487 59 15 90
[email protected]
Austria
Belimed GmbH
Grüne Lagune
8350 Fehring
Phone +43 3155 40 6990
Fax +43 3155 40 699 10
[email protected]
Switzerland
Belimed Sauter AG
Zelgstrasse 8
8583 Sulgen
Phone +41 71 644 85 00
Fax + 41 71 644 86 00
[email protected]
Slowenia
Belimed d.o.o.
Kosovelova cesta 2
1290 Grosuplje
Phone +386 1 7866 010
Fax +386 1 7866 011
[email protected]
USA
Belimed Inc.
2284 Clements Ferry Road
Charleston, SC 29492
Phone +001 843 216 7424
Fax +001 843 216 7707
[email protected]
Other Countries Medical
Belimed AG
Dorfstrasse 4
6275 Ballwil
Phone +41 41 449 78 88
Fax +41 41 449 78 89
[email protected]
Other Countries Pharma
Belimed Sauter AG
Zelgstrasse 8
8583 Sulgen
Phone +41 71 644 85 00
Fax + 41 71 644 86 00
[email protected]
Abb 150
China
Belimed Medical Equipment
(Shanghai) Co. Ltd
CaiLun Road 780
ZhangJiang Hi-Te ch Park
201203 Pudong, Shanghai
Phone +86 21 513 709 98
Fax +86 21 513 709 96
[email protected]
Branch Office West
Belimed Sauter AG
Ehrlenauweg 17
Phone +41 31 720 44 55
Fax +41 31 720 44 50
[email protected]
20 Organisation Belimed AG
20.1 Manufacturer
Belimed AG, Dorfstrasse 4, CH-6275 Ballwil (Switzerland)
Phone +41 41 449 78 88
Fax +41 41 449 78 89
20.2 Subsidiaries, Customer Service
38/39
001 Instruction Manual WD290
10268 © Belimed
Page 39

Notes
21 Notes
Instruction Manual WD290 001
© Belimed 10268
39/39
 Loading...