

Beko CSA4706FFX User Manual

CSA4706FF
CSA4706FFX
BEKO plc
Beko House
Caxton Way
Watford
Hertfordshire
WD18 8UF
Tel: 01923 654650
Fax: 01923 819653
e-mail: service@beko.co.uk
website: www.beko.co.uk
Printed in Turkey
Part no: 48 1713 00 01
Revision no: 1

first of all !
Congratulations on your choice of a Beko quality Combi fridge/freezer,
which has been designed to give you service for many years.
Important
•
Do not connect your appliance to the electricity supply until all packing
and transit protectors have been removed.
•
Leave to stand for at least 4 hours before switching on to allow the system
to settle if transported horizontally.
•
This appliance must only be used for its intended purpose, ie the storing
and freezing of edible foodstuff.
•
We do not recommend use of this appliance in an unheated, cold room
e.g. garage, conservatory, annex, shed, out-house, etc., see ‘Location’.
•
To obtain the best possible performance and trouble free operation from
your appliance, it is very important to carefully read these instructions.
•
On delivery, check to make sure that the product is not damaged and that
all the parts and accessories are in perfect condition.
•
We do not recommend the use of extension leads and multi-way adapters.
•
Failure to observe these instructions may invalidate your right to free service
during the guarantee period. BEKO plc declines to accept any liability should
the instructions not be followed.
•
Do not dispose of the appliance on a fire. At BEKO, the care and protection
of our environment is an ongoing commitment. This appliance which is
among the latest range introduced is particularly environmentally. Your
appliance contains non CFC / HFC natural substances in the cooling system
(Called R600a) and in the insulation (Called cyclopentane) which are
potentially flammable if exposed to fire. Therefore, take care not to damage,
the cooling circuit / pipes of the appliance in transportation and in use.
In case of a damage do not expose the appliance to fire, potential ignition
source and immediately ventilate the room where the appliance is situated.
•
We suggest you contact your local authority for disposal information and
facilities available.
•
Do not use mechanical devices or other means to accelerate the defrosting
process, other than those recommended by the manufacturer.
•
Do not damage the refrigerant circuit.
•
Do not use electrical appliances inside the food storage compartments of
the appliance, unless they are of the type recommended by the manufacturer.
•
We suggest you keep these instructions in a safe place for easy reference.
specification
Performance Model
CSA4706FF / CSA4706FFX
Energy efficiency class A
Energy consumption Kwh/year 340
Net storage volumes:
fresh food litres (cu.ft.) 162 (5.7)
frozen food litres (cu.ft.) 96 (3.4)
Total litres (cu.ft.) 258 (9.1)
Frozen food compartment rating 4 star
Conservation time from failure 11 hours
Freezing capacity kg (lbs) 6 (13)
Climate class SN
Operating noise level dB(A) 43
Operating temperature range +2 to +32 degrees C
Because we continually strive to improve our products, we may
change our specifications and designs without prior notice.
2
contents
Electrical 4
Transportation 5
Location 5
Repositioning the doors 6-7
Installation 6
Temperature display & adjustment 8
Switching on for the first time 9
Short term storage in the fridge compartment 10
Long term storage in the freezer compartment 11
Defrosting 12
Energy saving tips 12
Care & cleaning 13
Stainless steel door cleaning instructions 14
Internal light 15
Trouble shooting 15
Disposal 15
Guarantee 16
Service under guarantee 17
Service out of guarantee 17
3
electrical
Electrical requirements
Before you insert the plug into the wall socket make sure that the
voltage and the frequency shown in the rating label, which is on the
left hand side of the fridge inner liner corresponds to your electricity
supply.
We recommend that this appliance be connected to the mains supply
via a suitable switched and fused socket in a readily accessible position.
Should the mains lead of the appliance become damaged or need
replacing at any time, it must be replaced by a special purpose made
mains lead which can only be obtained from a Beko Authorized Service
Agent.
Warning
This appliance must be earthed
If the fitted moulded plug is not suitable for your socket, then the
plug should be cut off and an appropriate plug fitted.
Destroy the old plug, which is cut off as a plug with a bared cord could
cause a shock hazard if inserted into a socket elsewhere in the house.
The moulded plug on this appliance incorporates a 13A fuse. Should
the fuse need to be replaced an ASTA approved BS1362 fuse of the
same rating must be used. Do not forget to refit the fuse cover. In the
event of losing the fuse cover, the plug must not be used until a
replacement fuse cover has been fitted. Colour of the replacement fuse
cover must be the same colour as that visible on the pin face of the
plug. Fuse covers are available from any good electrical store.
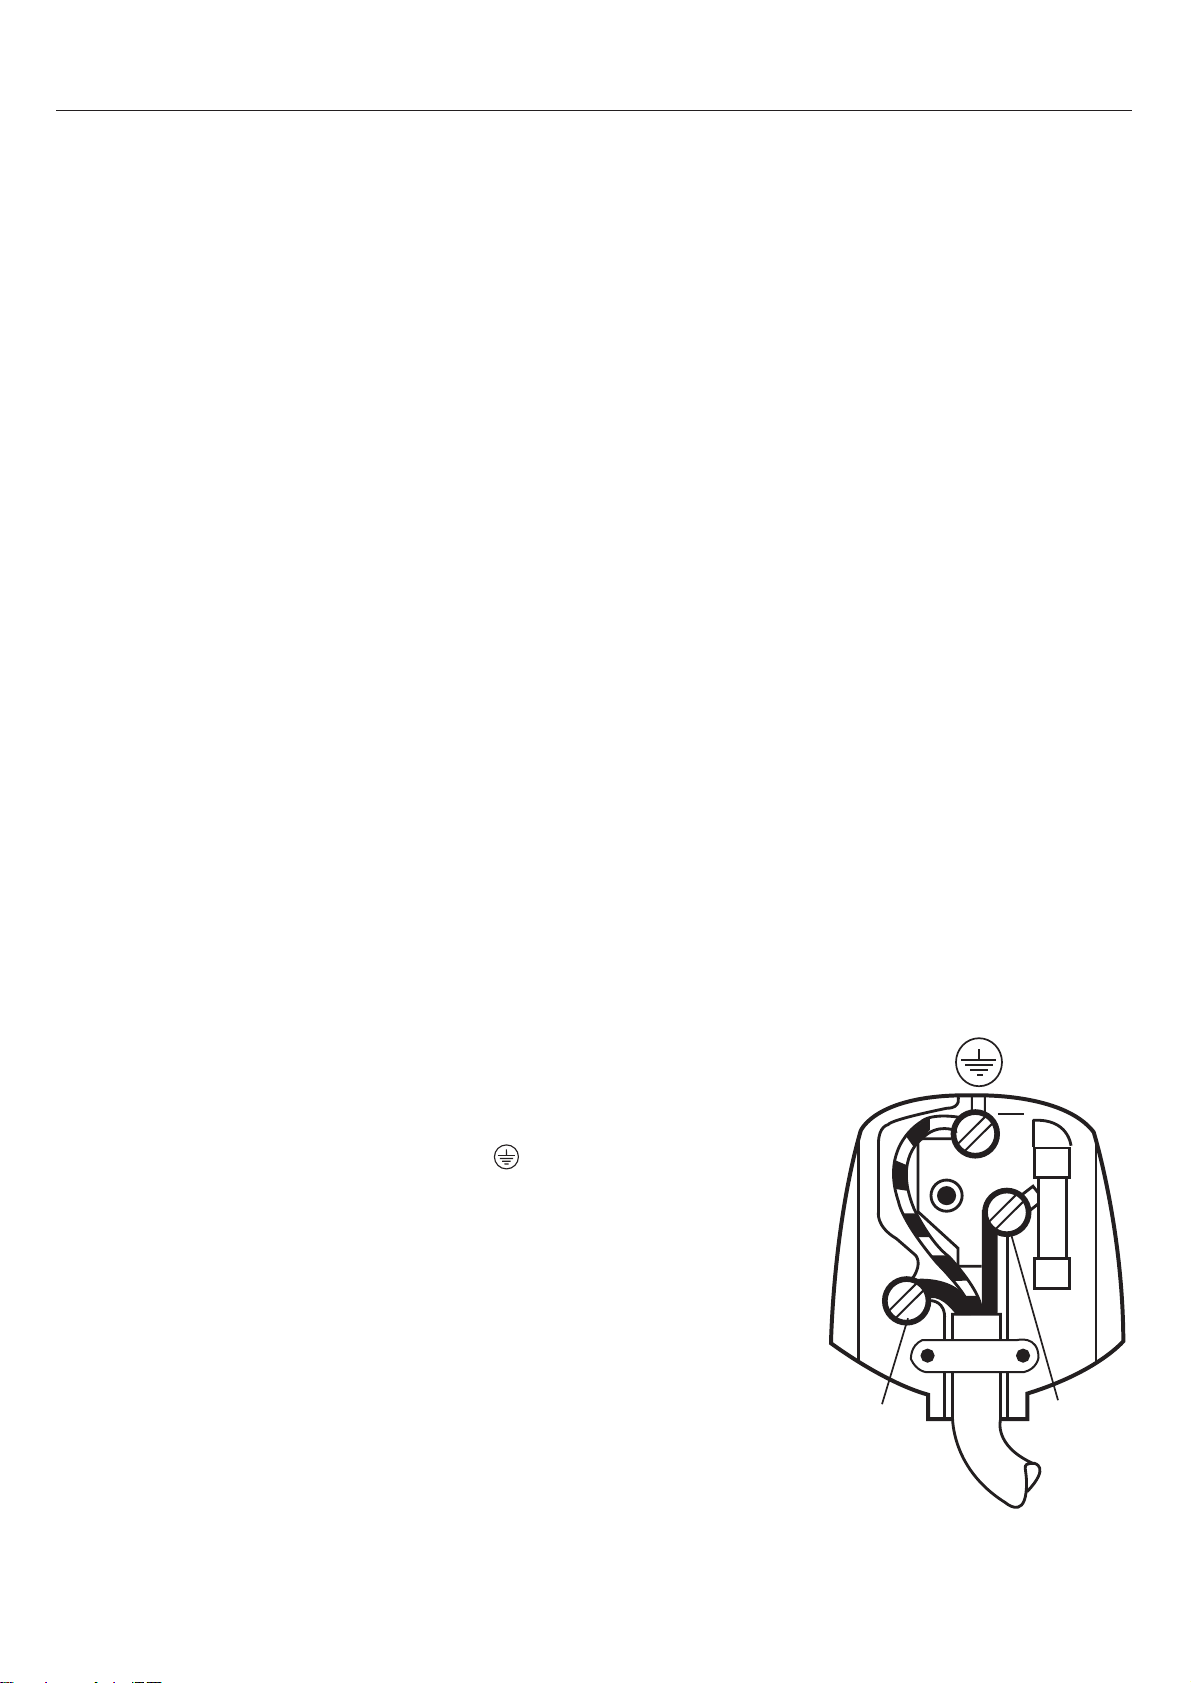
Important
Fitting a different plug
As the colours of the wires in the mains lead of this appliance may
not correspond with the coloured markings identifying the terminals
on your plug, proceed as follows:
1 Connect the green - yellow or green (earth) wire to the terminal in
the plug marked ‘E’ or with the symbol
yellow or green.
2 Connect the blue (neutral) wire to the terminal in the plug marked
‘N’ or coloured black.
3 Connect the brown (live) wire to the terminal in the plug marked ‘L’
or coloured red.
With the alternative plugs a 13A fuse must be fitted either in the
plug or adaptor or in the main fuse box. If in doubt contact a qualified
electrician.
or coloured green and
Green and yellow
or green
N L
Blue or
black
Brown or
red
4

transportation
The appliance should be transported only in a vertical upright
•
position. The packing as supplied must be intact during transportation.
If during the course of transport the appliance has to be
•
transported horizontally, the product must only be laid on its
right hand side (when facing the door front) and it must not be
operated for at least 4 hours to allow the system to settle after
the appliance is brought back to upright position.
Failure to comply with the instructions could result in damage
•
occurring to the appliance. The manufacturer will not be held
responsible if these instructions are disregarded.
The appliance must be protected against rain, moisture and
•
other atmospheric influences.
When positioning your appliance take care not to damage your
•
flooring, pipes, wall coverings etc. Do not move the appliance by
pulling by the door or handle.
Empty any water in the drain tray before moving. See section
•
‘Defrosting’ and ‘Care & cleaning’ for further information.
Make sure that the defrost water pipe at the back of the product
•
is fixed to the plastic evaporating pan on the top of the compressor,
to avoid defrost water spillage on the floor.
Important Care must be taken when carrying the appliance
to avoid touching the bottom of the condenser metal
support/pipework at the back of the appliance as you might injure
your fingers and hands or damage your product.
Important Make sure that mains cable is not caught under the
•
appliance during and after carrying/moving the appliance, to avoid
the mains cable becoming cut or damaged.
Do not attempt to sit or stand on top of your appliance. You
•
could injure yourself and damage the appliance.
BEKO plc declines to accept any liability should the instructions not
be followed.
location
•
Do not put your appliance in a cold room where the temperature
is likely to go below +2 degrees C (36 degrees F) during night time
and/or especially in winter.
•
This appliance has been designed to operate in room (ambient)
temperatures between +2 and +32 degrees C (36 and 90 degrees
F). Therefore if it is installed in an unheated/cold room (eg conservatory,
annex, shed, garage, etc.) then it will not operate causing the freezer
compartment to run warmer and as a result the storage time of
frozen food may be reduced.
•
Do not place the appliance near cookers, radiators, or in direct
sunlight as this will cause it to work harder. If installed next to a
source of heat, maintain the following minimum side clearances:
From cookers 50mm (2")
From radiators 300mm (12")
•
Make sure that sufficient room is provided around the appliance to
4
ensure free air circulation. We recommend 20mm ( ") clearance
on both sides. The clearance at the back is ensured when the wall
spacers are fitted, see ‘Installation’.
/
5
5
repositioning the doors (see diagram on the opposite page)
OFF
Min. • Max.
Switch off at the socket outlet and pull out
1
the mains plug.
Remove all food, loose items and fittings.
2
Carefully lay the appliance on its right hand
3
side. (You may need somebody to help
you.) Take care not to damage the appliance
by laying on some protective material (e.g.
its original packaging). Make sure that you
lay the appliance on its right hand side,
otherwise compressor oil may block the
pipes and you may damage the appliance.
Unscrew and remove the adjustable feet and
4
screws from the bottom of the cabinet.
Unscrew the bottom hinge and screws.
5
Remove the freezer door from the cabinet.
6
Unscrew the middle hinge from the cabinet
7
while holding the fridge compartment door
and remove the door carefully.
Reposition the plugs and door hinge
8
bushings on the opposite side. Remove plugs
with the tip of a small screwdriver.
Reposition the plugs on the other side.
9
Remove the top hinge pin and washer
10
underneath the front top trim.
Refit the top hinge pin and washer on the
11
other side.
Refit the fridge compartment door.
12
Locate middle hinge in door and fit to the
13
cabinet.
Refit the freezer compartment door.
14
Refit the bottom hinge on the opposite side.
15
Refit the adjustable feet and screws.
16
Carefully stand the appliance upright.
17
Adjust the feet if necessary.
18
Replace all loose items and fittings.
19
Wait for at least 4 hours to allow the system
20
to settle before switching on.
Spare plastic hinge bushing supplied with the
appliance are for your future use.
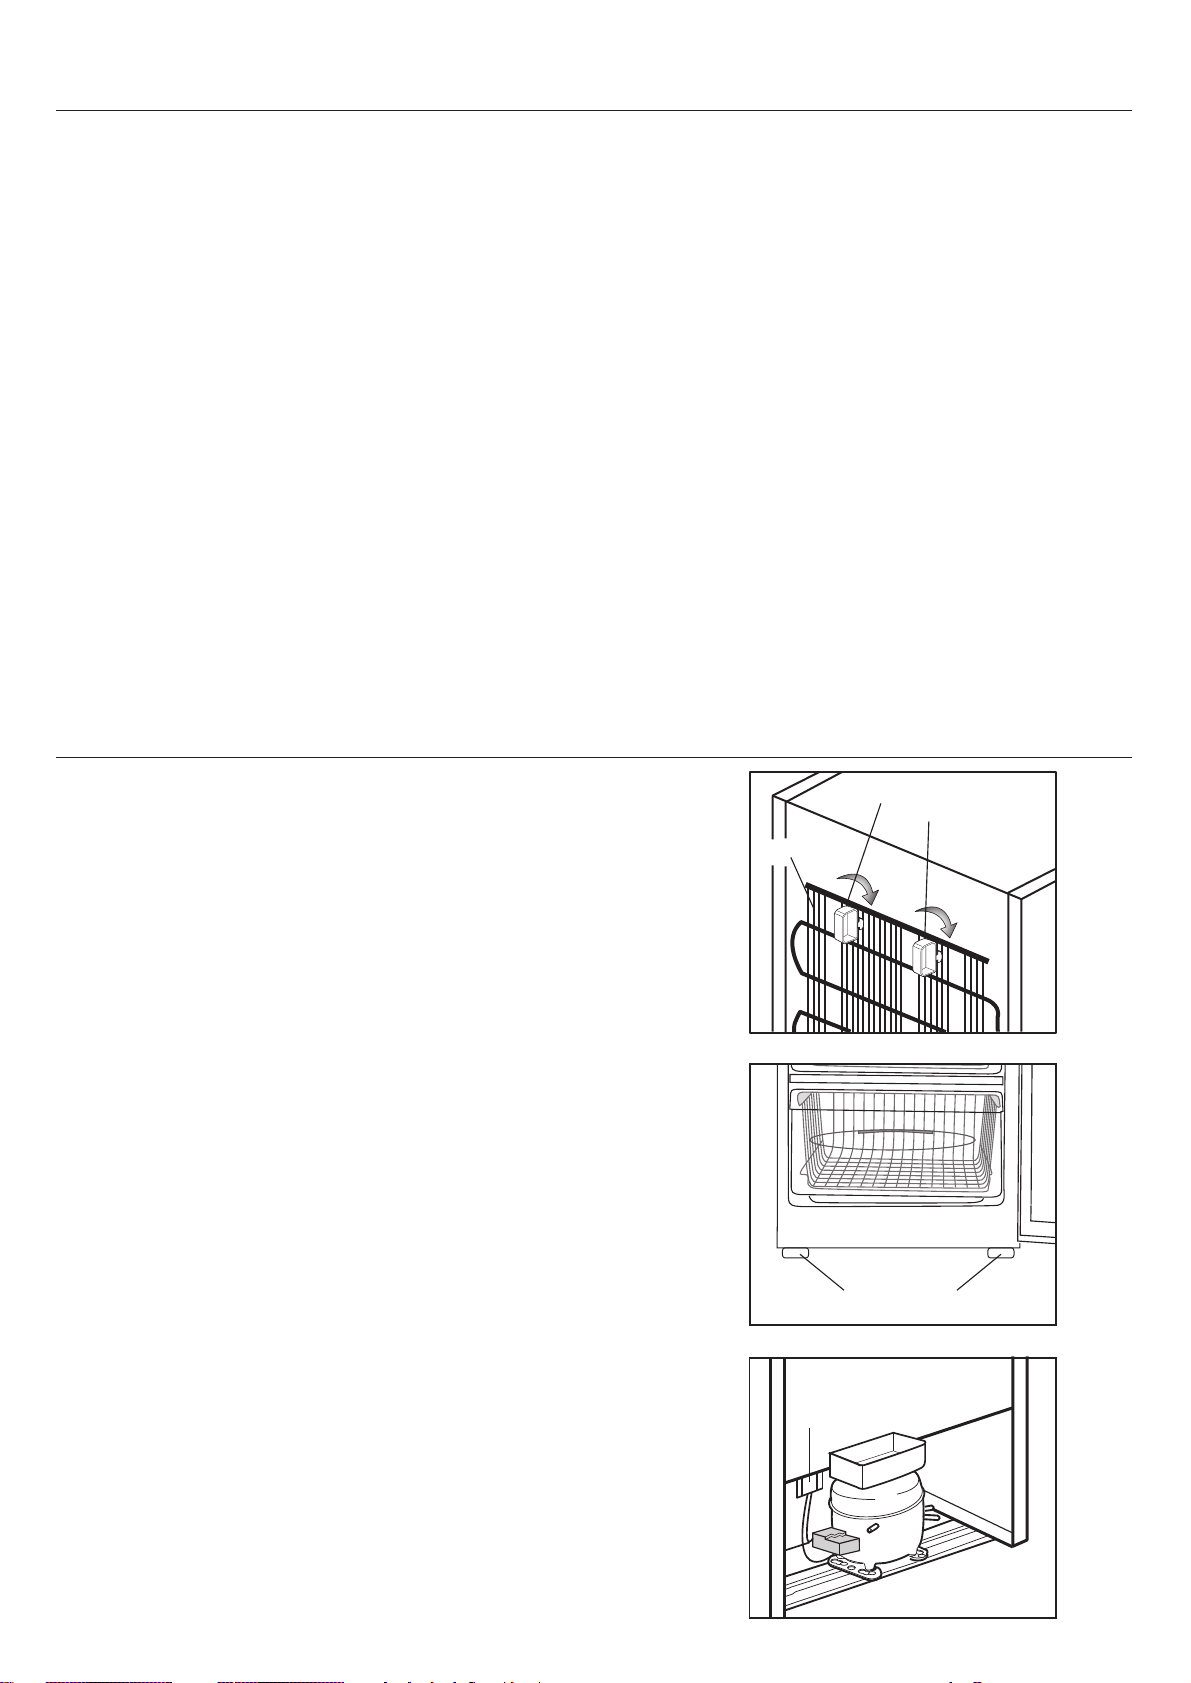
installation
1
Fit the two plastic wall spacers supplied with the appliance,
1
rotating turn to the condenser at the back of the appliance.
2
Locate the appliance on a smooth surface.
3
To ensure it is standing upright adjust the two front feet by
turning clockwise or anti-clockwise, until it is in firm contact
with the floor. Correct adjustment of feet avoids excessive
vibration and noise.
4
A special receptacle is supplied to store the mains plug during
transit. The receptacle is fixed at the back of the cabinet on the
side of the compressor. Gently remove the plug from the
receptacle. Never pull the mains cord, you may damage the
appliance. In case of transportation, ensure you locate the
plug in the receptacle provided to avoid transit damage.
/
4
Wall spacers
Condenser
Adjustable feet
Plug receptacle
5
The space in the room where the appliance is installed must
not be smaller than 10 cubic metres.
6
 Loading...