

Beko BHCB61632XH User Manual
Hood
User Manual
BHCB 61632 XH
EN ES KA NL PT RO
SQ CZ
01M-8897273200-4820-06

Please read this guide first!
Dear Customer,
Thank you for choosing a BEKO product. We would like you to achieve the optimal effi-
ciency from this high quality product which has been manufactured with state of the art
technology. Please make sure you read and understand this guide and supplementary
documentation fully before use and keep it as a reference. Include this guide with the
unit if you hand it over to someone else. Observe all warnings and information herein
and follow the instructions.
Keep in mind that this user guide may apply to several product models. The guide
clearly indicates any variations of different models.
Symbols and their meanings
These symbols are used throughout this guide:
Important information and recommen-
C
A
dations regarding the use of the appliance.
CAUTION: Warnings on personal injury
or property damage.
B
Electric shock warning,
Risk of fire warning.
This product has been manufactured at modern facilities respectful to the environment without
harming nature.
Complies with WEEE Regulations.
No PCB Included.

CONTENTS
ENGLISH 04-16
ESPAÑOL 17-34
KARTULİ 35-53
NEDERLANDS 54-69
PORTUGUÊS 70-86
ROMÂNĂ 87-104
SHQIPTARE 105-120
ČESKY 121-136
Cooker Hood / User Manual
3 / EN

1 Important Safety and Environmental Instructions
1.1 General Safety
Important Safety Instructions Read Carefully
And Keep For Future Reference This section
contains safety instructions that will help pro
tect from risk of fire, electric shock, exposure
to leak microwave energy, personal injury or
property damage. Failure to follow these in
structions shall void any warranty.
• Beko products comply with the applicable
safety standards; therefore, in case of any
damage on the appliance or power cable,
it should be repaired or replaced by the
dealer, service center or a specialist and
authorized service alike to avoid any dan
ger. Faulty or unqualified repair work may
be dangerous and cause risk to the user.
• This appliance is intended to be used in
household and similar applications such
as:
– Staff kitchen areas in shops, offices and
other working environments;
– Farm houses
– By clients in hotels, and other residential
type environments;
– Bed and Breakfast type environments.
• Operate the appliance for its intended pur-
pose only as described in this manual.
• The manufacturer cannot be held liable for
damages resulting from improper installa
tion or misuse of the product.
• This appliance can be used by children
aged from 8 years and above and persons
-
-
-
-
with reduced physical, sensory or men
tal capabilities or lack of experience and
knowledge if they have been given super
vision or instruction concerning use of the
appliance in a safe way and understand the
hazards involved.
• Children shall not be allowed play with the
appliance. Cleaning and user maintenance
shall not be made by children without su
pervision.
• The minimum distance between the sup-
porting surface for the cooking vessels on
the hob and the lowest part of your product
must be at least 65 cm.
• If the instructions for installation for the gas
hob specify a greater distance, this has to
be taken into account.
• Make sure that your mains power supply
complies with the information supplied on
the rating plate of the appliance.
• Never use the appliance if the power cable
or the appliance itself is damaged.
• Prevent damage to the power cable by not
squeezing, bending, or rubbing it on sharp
edges. Keep the power cable away from
hot surfaces and naked flame.
• Use the appliance with a grounded outlet
only.
WARNING: Do not connect the appliance to
the mains until the installation is fully com
-
plete.
• Place the appliance in a way so that the
4 / EN
Cooker Hood / User Manual

1 Important Safety and Environmental Instructions
plug is always accessible.
• Do not touch the lamps if they have oper-
ated for a long time. They can burn your
hands since they will be hot.
• Follow the regulations set out by compe-
tent authorities on discharge of the exhaust
air (this warning is not applicable for use
without Chimney ).
• Operate your appliance after putting a pot,
pan etc. on the hob. Otherwise, high heat
may cause deformation in some parts of
your product.
• Turn off the hob before taking the pot, pan
etc. from it.
• Do not leave hot oil on the hob. Pans with
hot oil may cause self combustion.
• Pay attention to your curtains and covers
since oil may catch fire while cooking food
such as fries.
• Grease filter must be replaced at least
monthly. Carbon filter must be replaced at
least every 3 months.
• Product shall be cleaned accordance with
user manual. If cleaning was not carried
out in accordance with user manual, there
may be fire risk.
• Do not use non-fire-resistant filtering ma-
terials instead of the current filter.
• Only use the original parts or parts recom-
mended by the manufacturer.
• Do not operate the product without the fil-
ter and do not remove the filters while the
product is running.
• In the event of be started any flame,
de-energize your product and cooking ap
pliances.
• In the event of be started any flame, cover
the flame and never use water to extin
guish.
• Unplug the appliance before each cleaning
and when the appliance is not in use.
• The negative pressure in the environment
should not exceed 4 Pa (4 x 10 bar) while
the hood for electric hob and appliances
running on another type of energy but elec
tricity operate simultaneously.
• In the environment where the appliance is
being used, the exhaust of devices running
on fuel oil or gas, such as room heater
must be absolutely isolated or device must
be hermetical type.
• When connecting the Chimney , use pipes
with a diameter of 120 or 150 mm. Pipe
connection must be as short as possible
and have as few elbows as possible.
Danger of choking! Keep all the packaging
materials away from children.
CAUTION: Accessible parts may become hot
when used with cooking appliances.
• The product outlet must not be connected
to air channels that include other smoke.
• The ventilation in the room may be insuf-
ficient when the hood for electric hob is
-
-
-
Cooker Hood / User Manual
5 / EN
1 Important Safety and Environmental Instructions
used simultaneously with the devices operating on gas or other fuels (this may not
apply to appliances that only discharge the
air back into the room).
• Objects placed on the product may fall. Do
not place any objects on the product.
• Do not flambe under the your product.
WARNING: Before installing the Hood, re
move the protective films.
• Never leave high naked flames under the
in recovering and recycling of old appliance.
Appropriate disposal of used appliance helps
prevent potential negative consequences for
the environment and human health.
1.3 Compliance with RoHS Directive
The product you have purchased complies
with EU RoHS Directive (2011/65/EU). It does
not contain
harmful and prohibited materials specified in
the Directive.
hood when it is in operation
1.4 Package Information
• Deep fat fryers must be continuously mon-
itored during use: overheated oil can burst
into flames.
1.2 Compliance with the WEEE Directive
and Disposing of the Waste Product:
This product complies with EU WEEE Direc
tive (2012/19/EU). This product bears a classification
symbol for waste electrical and electronic
National
Environment Regulations. Do not dispose of
the packaging materials together with the
domestic or other wastes. Take them to the
packaging material collection points desig
nated by the local authorities
equipment (WEEE).
Packaging materials of the product
are manufactured from recyclable
materials in accordance with our
-
.
This symbol indicates that this
product shall not be disposed with
other household wastes at the end
of its service life. Used device must
be returned to offical collection point for re
-
cycling of electrical and electronic devices.
To find these collection systems please con
-
tact to your local authorities or retailer where
the product was puchased. Each household
performs important role
6 / EN
Cooker Hood / User Manual
2 General Appearance
n 643 Max 1023
2.1 Overview
261
25
80
380
20
590
250
BHCB 61632 XH
53
504
2.2 Technical Data
Model
Supply voltage
Lamp Power
Motor Power
Flow rate (m³/h) – 3. Level
Insulation Class of Motor
Insulation Class
598
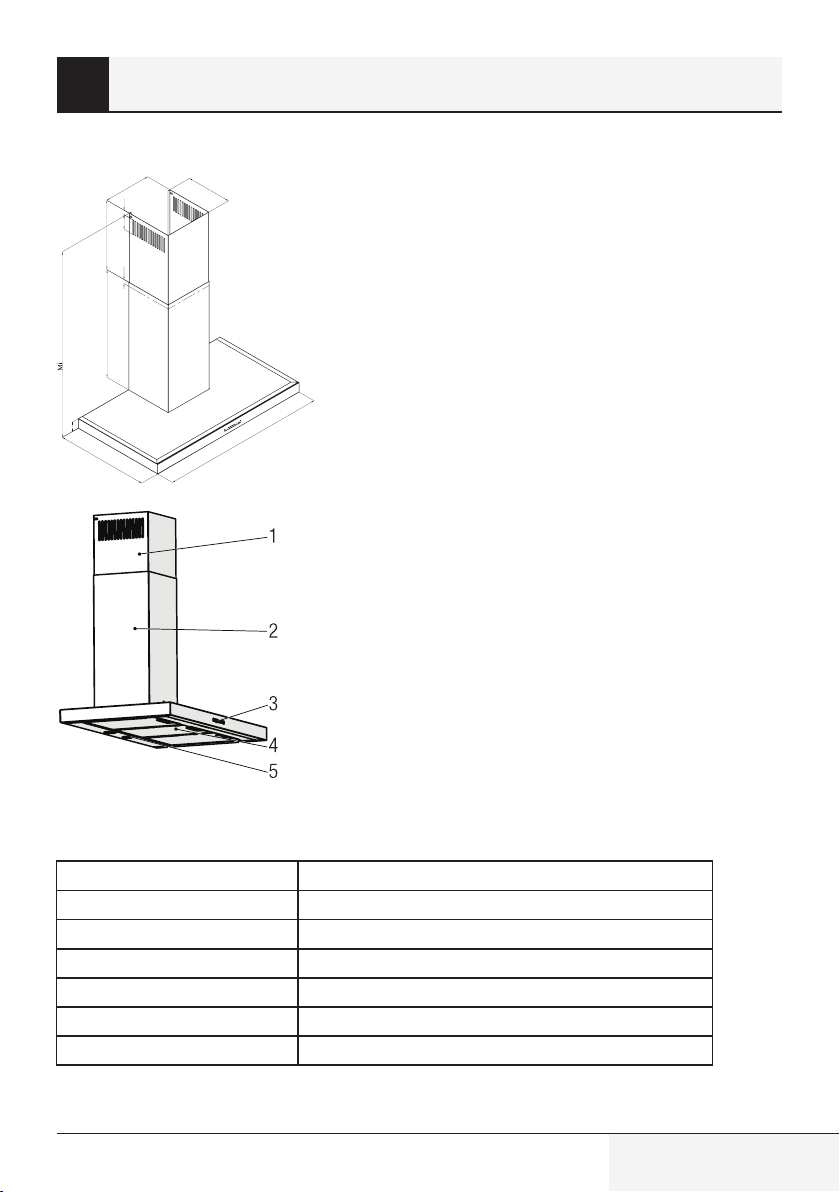
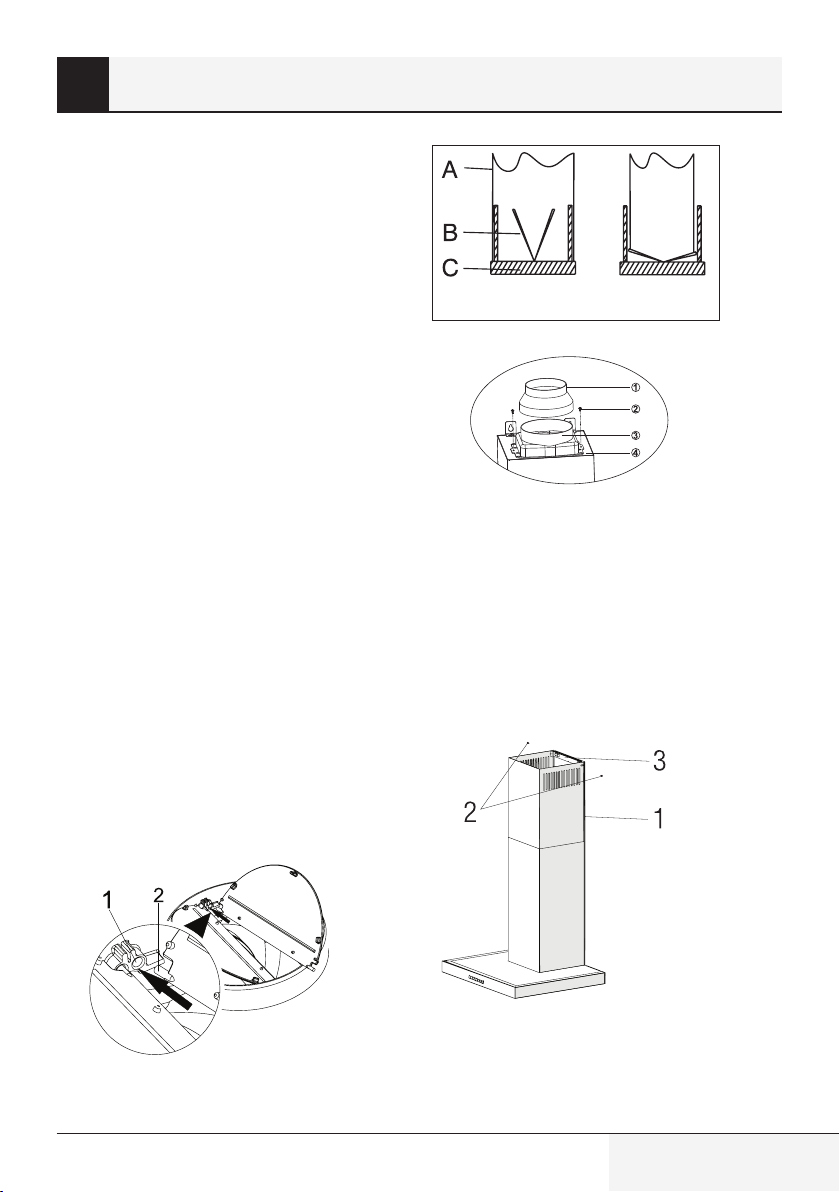
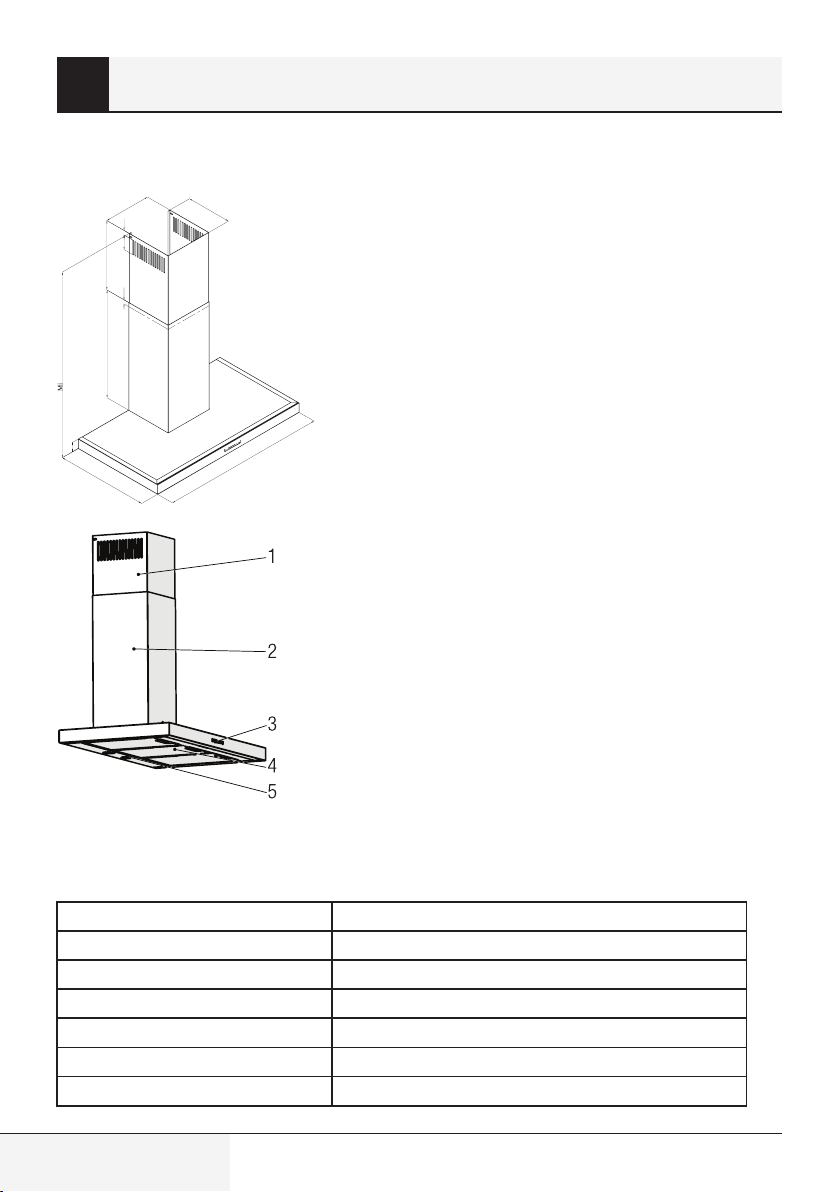
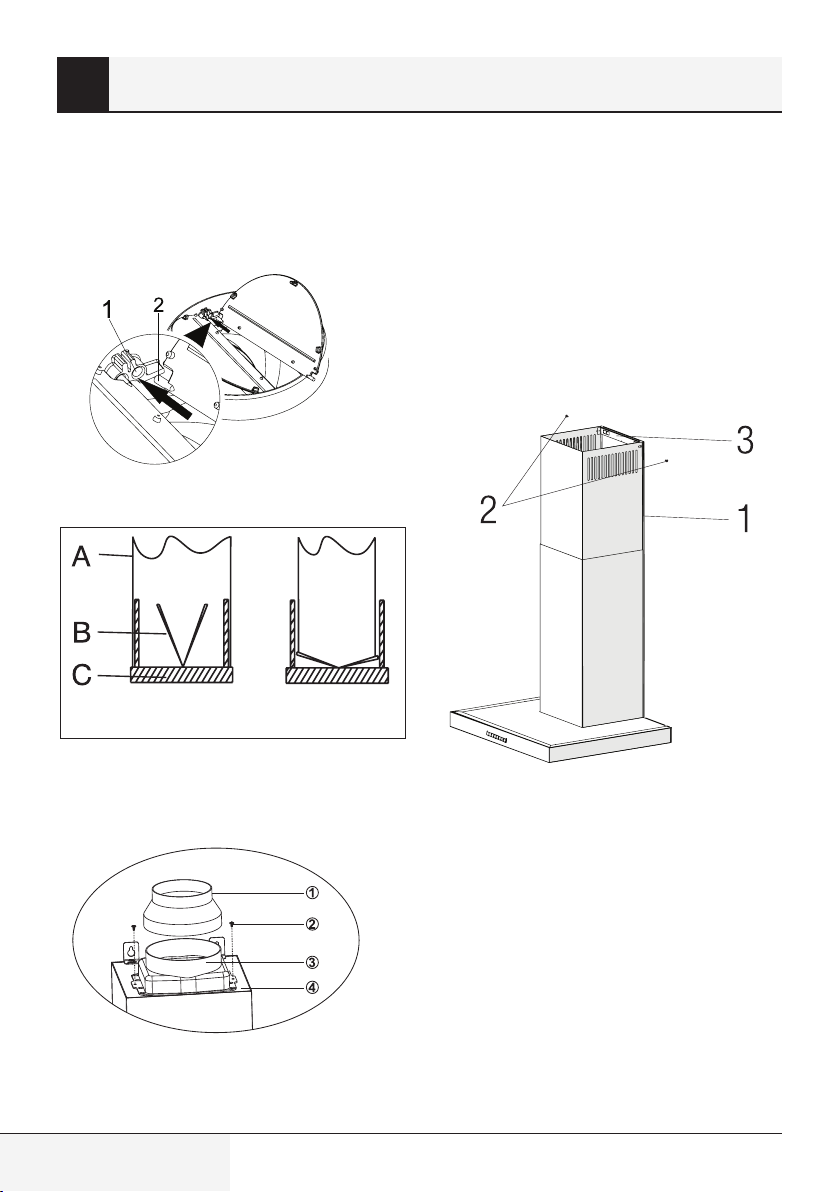
(Figure 1)
1. Inner Chimney
2. Outer Chimney
3. Control Panel
4. Aluminum Grease Filter
5. Lighting
(Figure 2)
BHCB 61632 XH
220-240V ~ 50 Hz
2 x 3 W
210 W
612 m³/h
Class F
Class I
Cooker Hood / User Manual
7 / EN
3 Operation of the Appliance
3.1 Controlling the Appliance
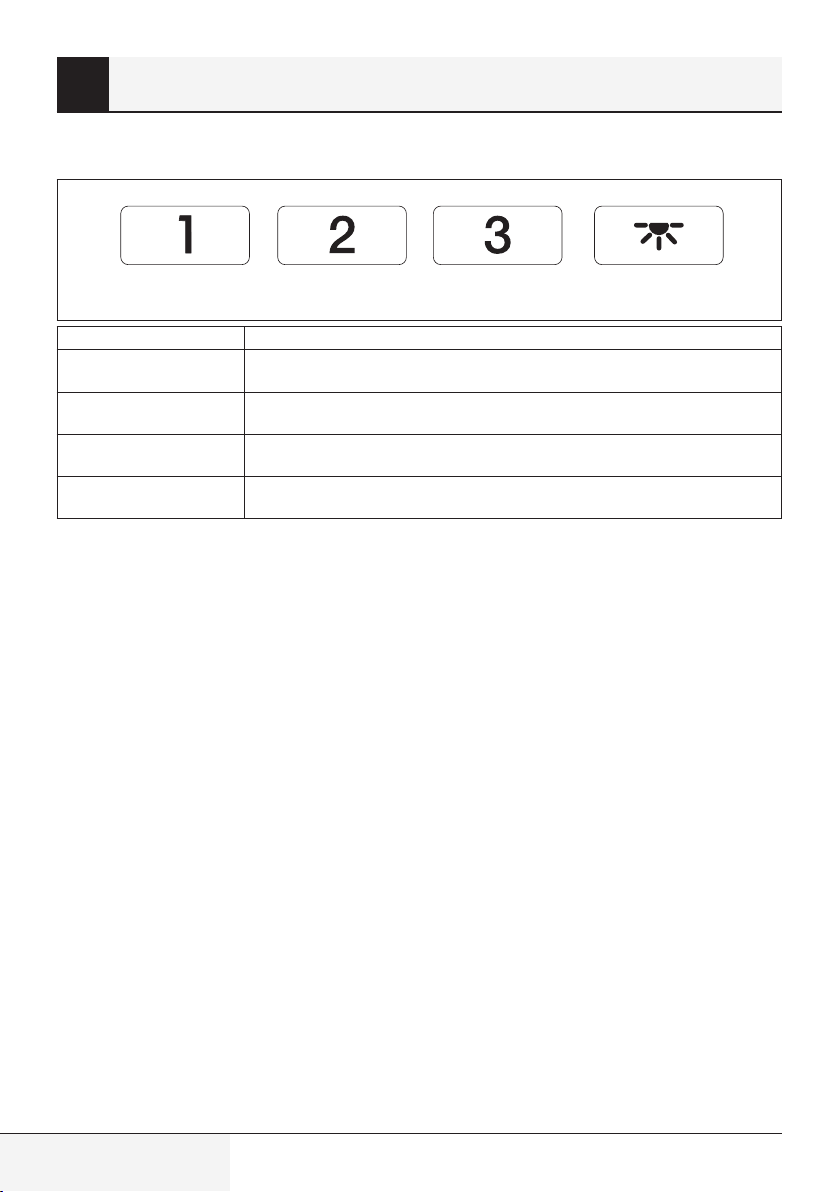
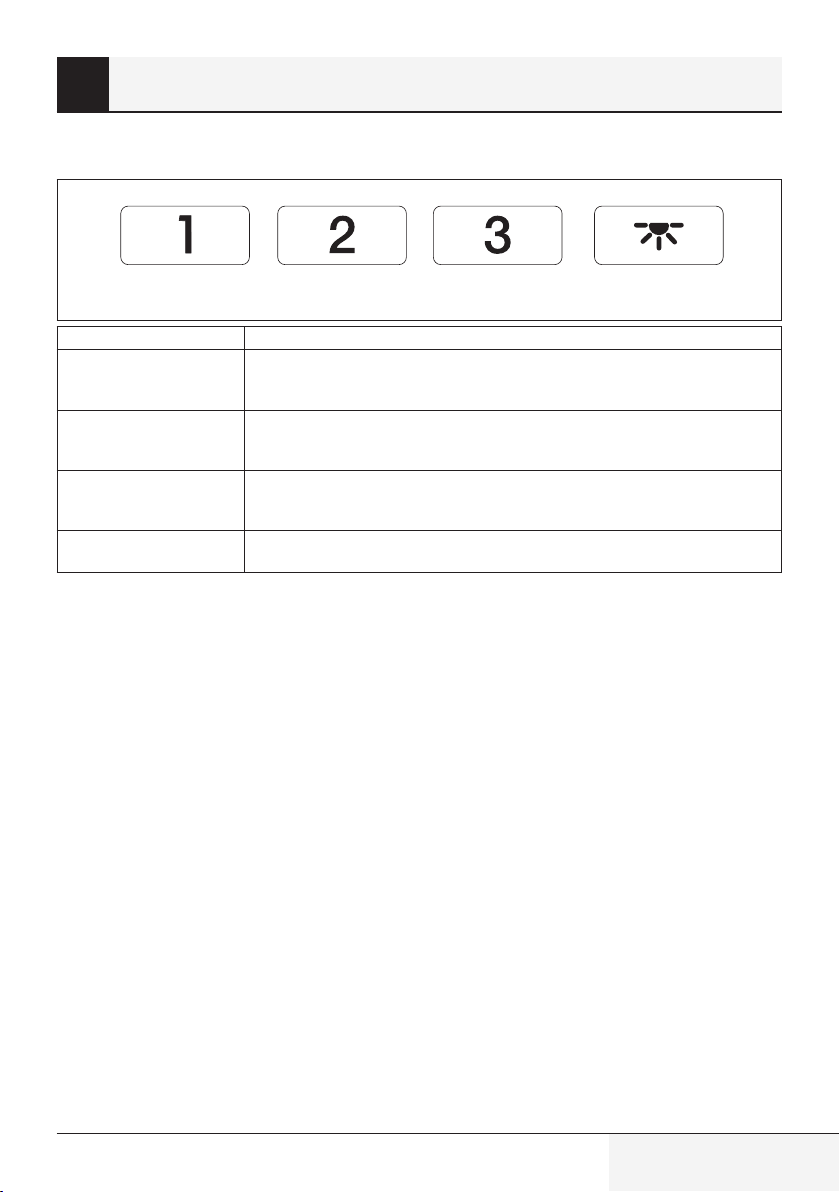
A B C D
KEY FUNCTION
(A) : 1. Stage Button
(B) : 2. Stage Button
(C) : 3rd Stage Button
(D) : Light On / Off
Operates the appliance on 1st speed. When you press this button again to turn off
the appliance, the screen speed stage turns off.
Operates the appliance on 2nd speed. When you press this button again to turn
off the appliance, the screen speed stage turns off.
Operates the appliance on 3rd speed. When you press this button again to turn off
the appliance, the screen speed stage turns off.
You may illuminate the cooking area by pressing this button. Re-press the button
to turn off the lamp.
3.2 Energy Efficient Usage
• When using your appliance, adjust the speed
settings according to vapour and odour intensity,
in order to save energy.
• Use low speeds (1-2) under normal conditions,
and high speed (3) for intense odour and vapour.
• * The lamps on the hood are placed for illuminat-
ing the cooking area.
Using them for environmental lighting shall cause
unnecessary energy expenditure and insufficient
lighting.
8 / EN
3.3 Operating the Hood
• Your appliance contains a motor that has various
speeds.
• For better performance, we recommend using
low speeds under normal conditions and high
speeds in cases of strong odours and intense
vapour.
• You can start your appliance by pressing on the
desired speed setting button. (A, B, C)
• You may illuminate the cooking area by pressing
the lamp (D).
Cooker Hood / User Manual
3 Operation of the Appliance
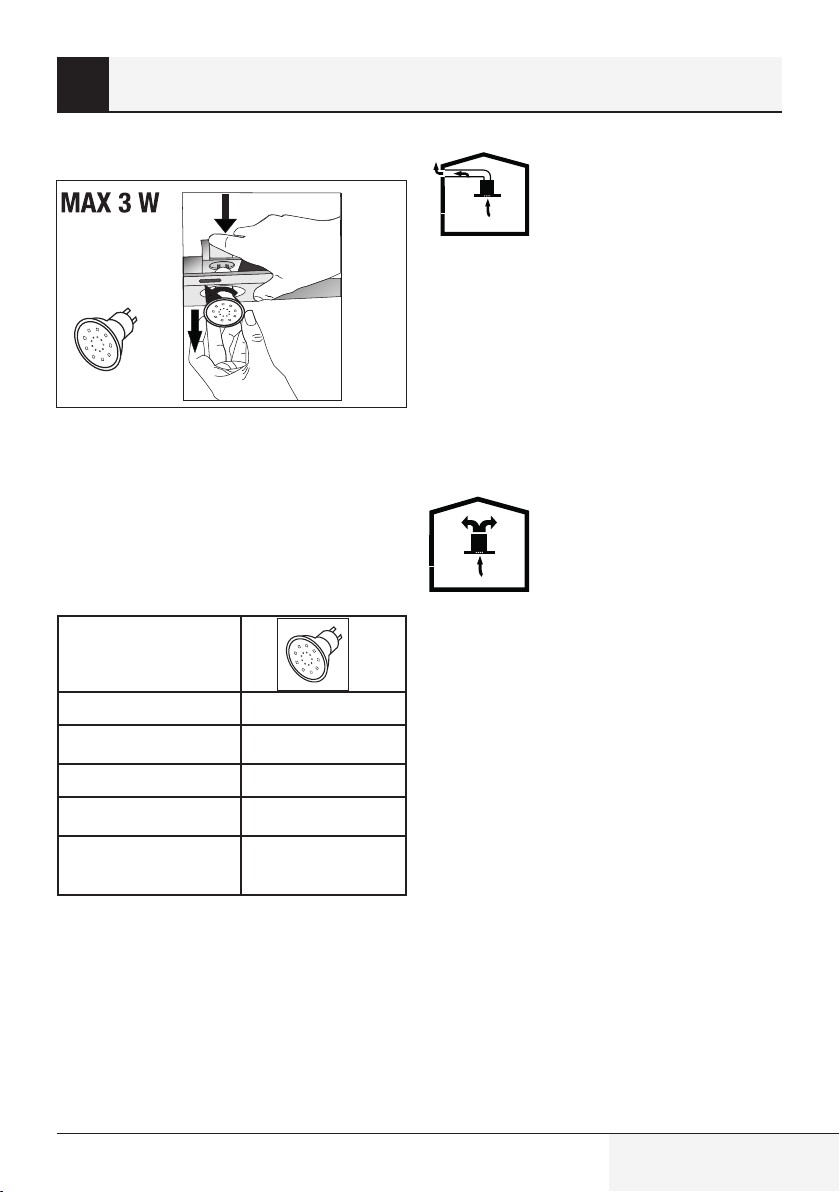
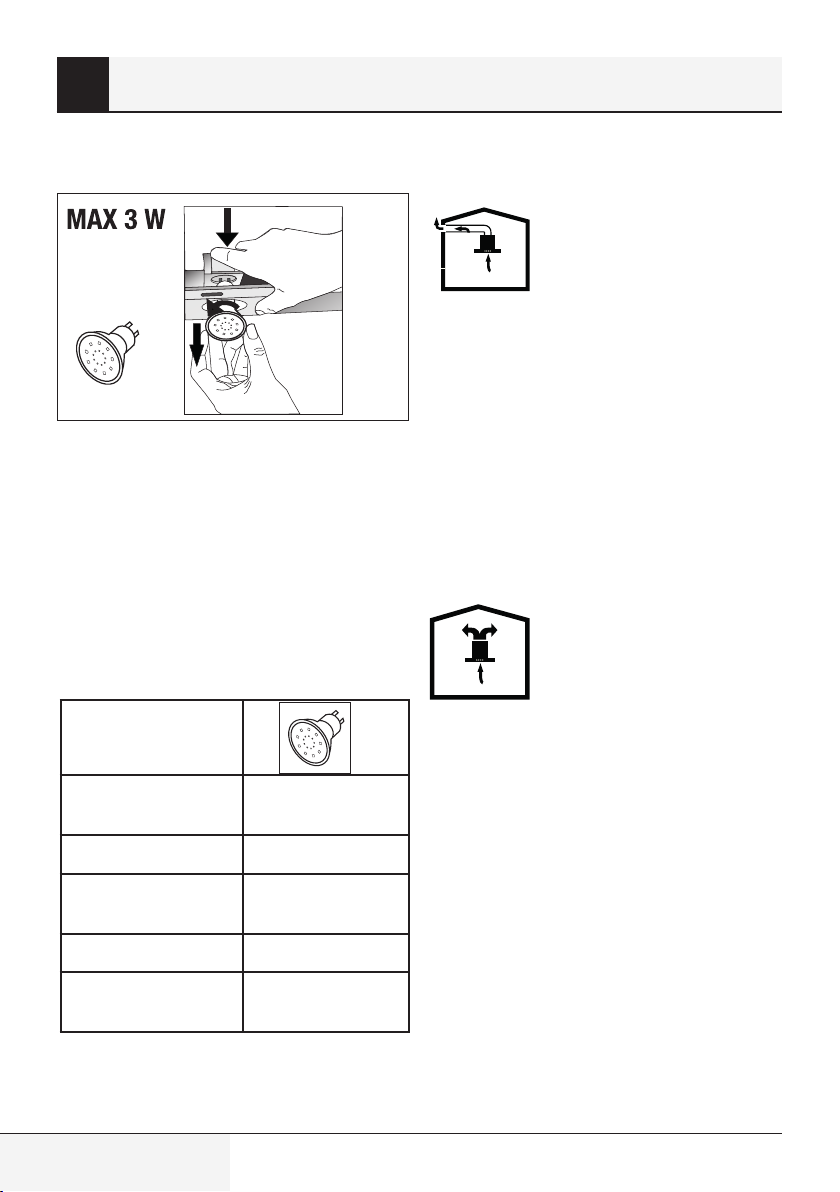
3.4 Replacement of Lamp
(Figure 3)
Make the electrical connections of the appliance. Your appliance uses 3W spot LED lamp.
For replacing the lamps, push downwards
on the holder from its behind, turn it counter-clockwise, and take it out downwards.
Apply the above operation in reverse to install
new lamps (Figure 3).
Bulb
Bulb Power (W) 3
Holder / Socket GZ 10
Bulb Voltage (V) 220 - 240
Size (mm) 53 x 50
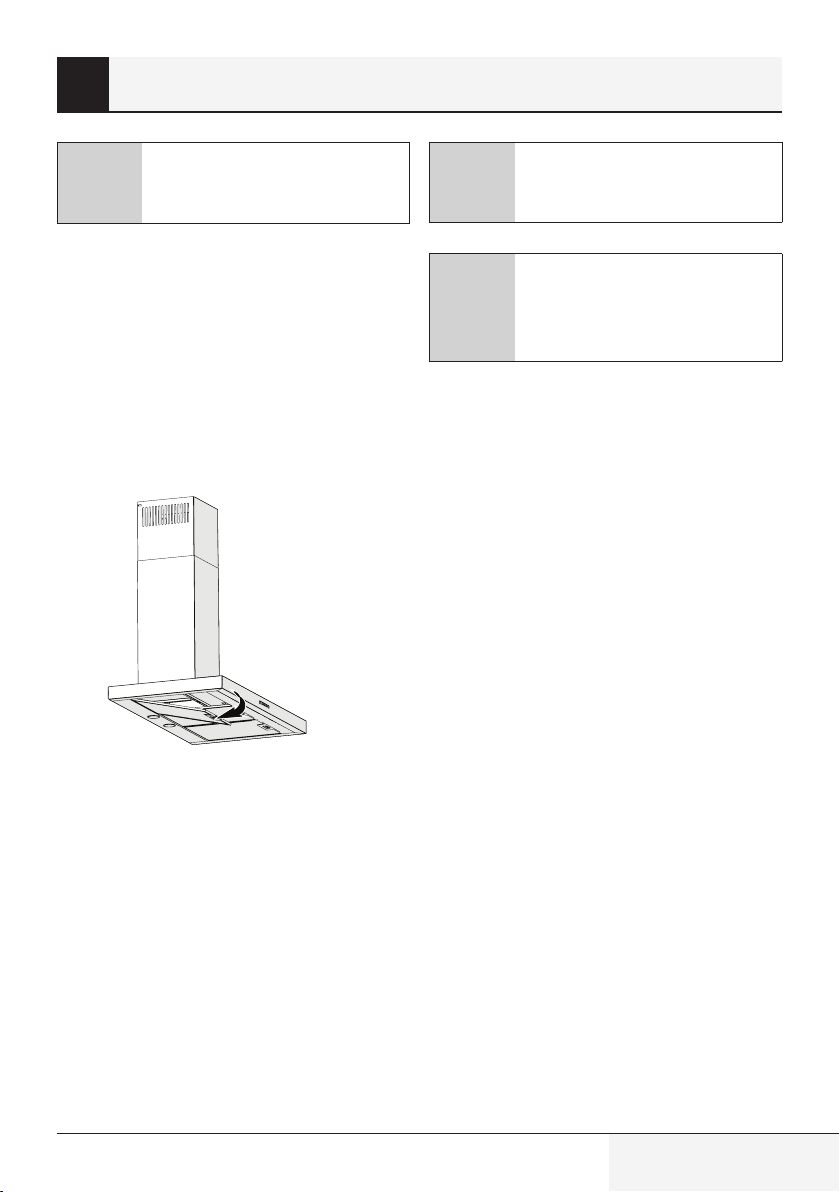
3.5 Operation with
Chimney Connection
• Vapour is extracted through
the flue duct, which is fas-
tened to the connection head on the hood.
• The diameter of the flue duct must be the
same as the connection ring. In horizontal
settings, the pipe has to have a slight upward slope (around 10º) so that the air can
exit the room easily.
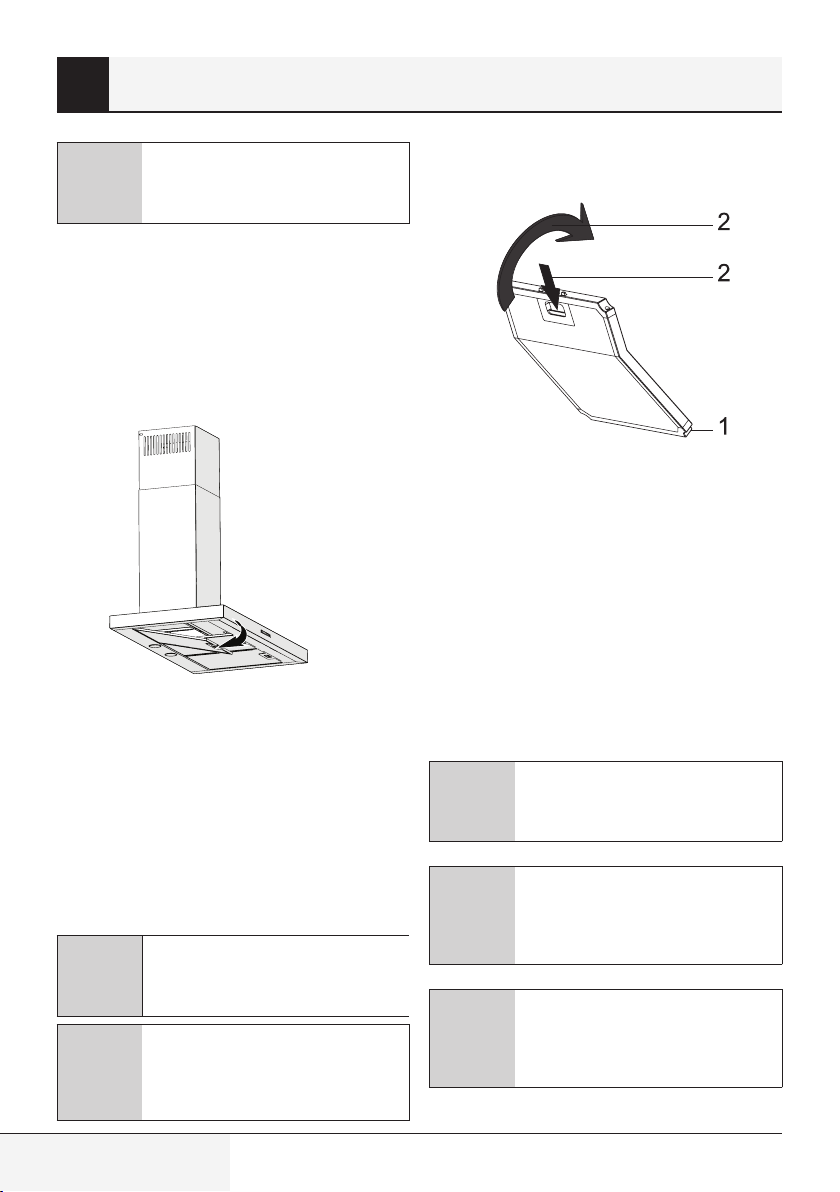
3.6 Operation without Chimney
Connection
• Air is filtered through the
carbon filter and recirculated
in the room. Carbon filter is
used when it is impossible to
use a flue in the house.
• In flueless use, remove the flaps inside the
flue adapter.
• Remove the aluminum grease filter. To in-
stall the carbon filter, fit the filter to the tabs
by centring it on the plastic piece on both
sides of the fan body. tighten it by turning
right or left.
• Replace aluminum grease filter.
ILCOS Code DR/F3-220-240-
GZ10-50-53
Cooker Hood / User Manual
9 / EN
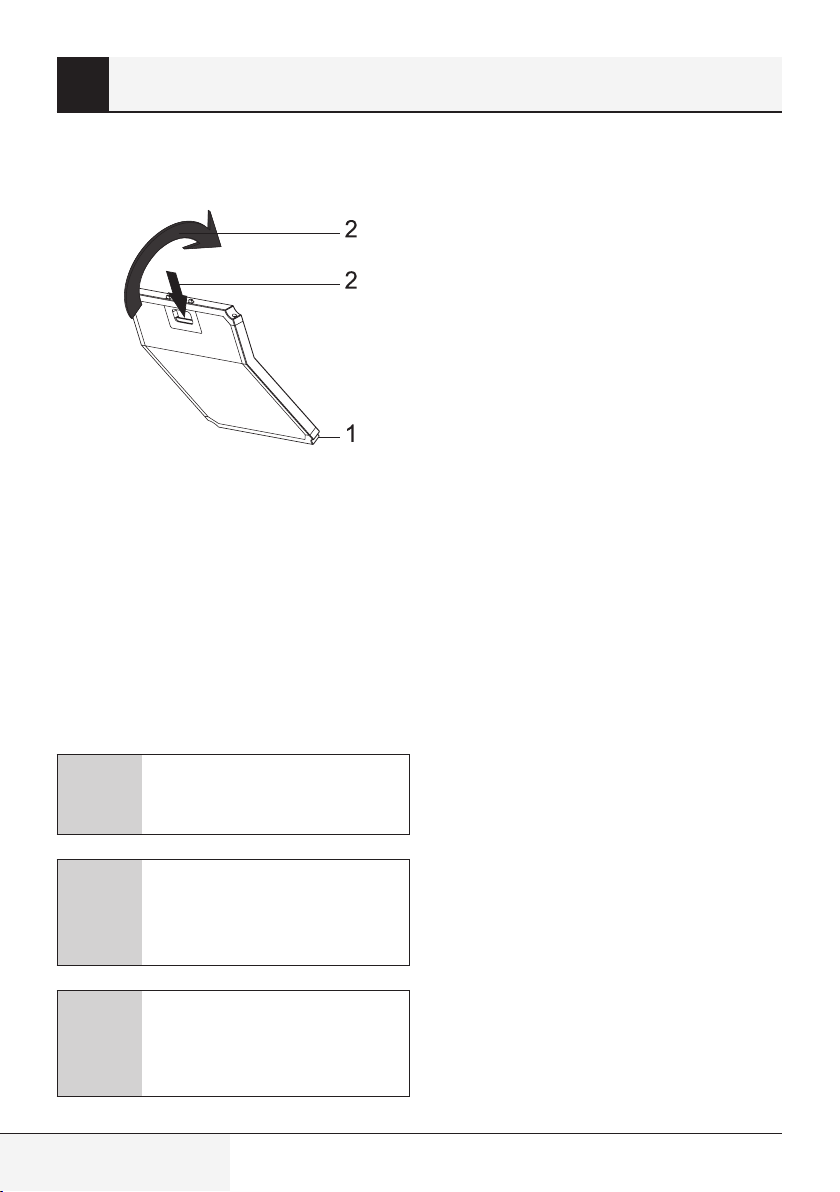
4 Cleaning and Maintenance
Before cleaning and maintenance, unplug the product or
C
turn off the switch.
4.1 Cleaning of Aluminum
Grease Filter
Aluminum grease filter is used to retain the
oil particles in the air. Aluminum grease filter
may change colour after repeated cleaning.
This is normal, and you do not have to replace
your filters.
(Figure 4)
• Push the aluminum grease filter lock for-
ward.
• Then pull it slightly down and pull it out
(Figure 4). Otherwise, you may bend the filter. Wash and rinse aluminum grease filter
with liquid detergent and replace aluminum
grease filter to their seats by carrying out
the steps specified above in reverse order.
These aluminum grease filter are used to
retain the oil particles in the air.
You may also wash the aluminum grease filter in the washing
C
A
machine.
CAUTION
In case of normal use, clean your
aluminum grease filter once in
a month.
4.2 Replacement of Carbon
Filters
(Fig. 5)
The appliance you have purchased is appropriate for use with carbon filters.
• Remove the aluminum grease filter
(Figure 4).
• Place the lower part of the carbon filter to the
motor cabinet (Figure 5).
• Press on the tab of the carbon filter and
push it forward, and ensure that the tabs
of carbon filter are engaged and locked.
(Figure 5).
• Attach the aluminum grease filter.
CAUTION
A
A
A
Carbon filter shall never be
washed.
CAUTION
Replace carbon filters once
every 3 months.
CAUTION
You can obtain the carbon filter
from the authorized services.
10 / EN
Cooker Hood / User Manual
5 Installation Of Appliance
WARNING!
Before starting the installation,
A
read the safety information on
User Manual.
WARNING!
Failure to install with screws and
stabilizers in accordance with these
A
instructions may result in electric
shock.
For the installation of the hood, please contact
the nearest Authorized Service.
It is the customer's responsibility to prepare
the location and electrical installation of the
hood.
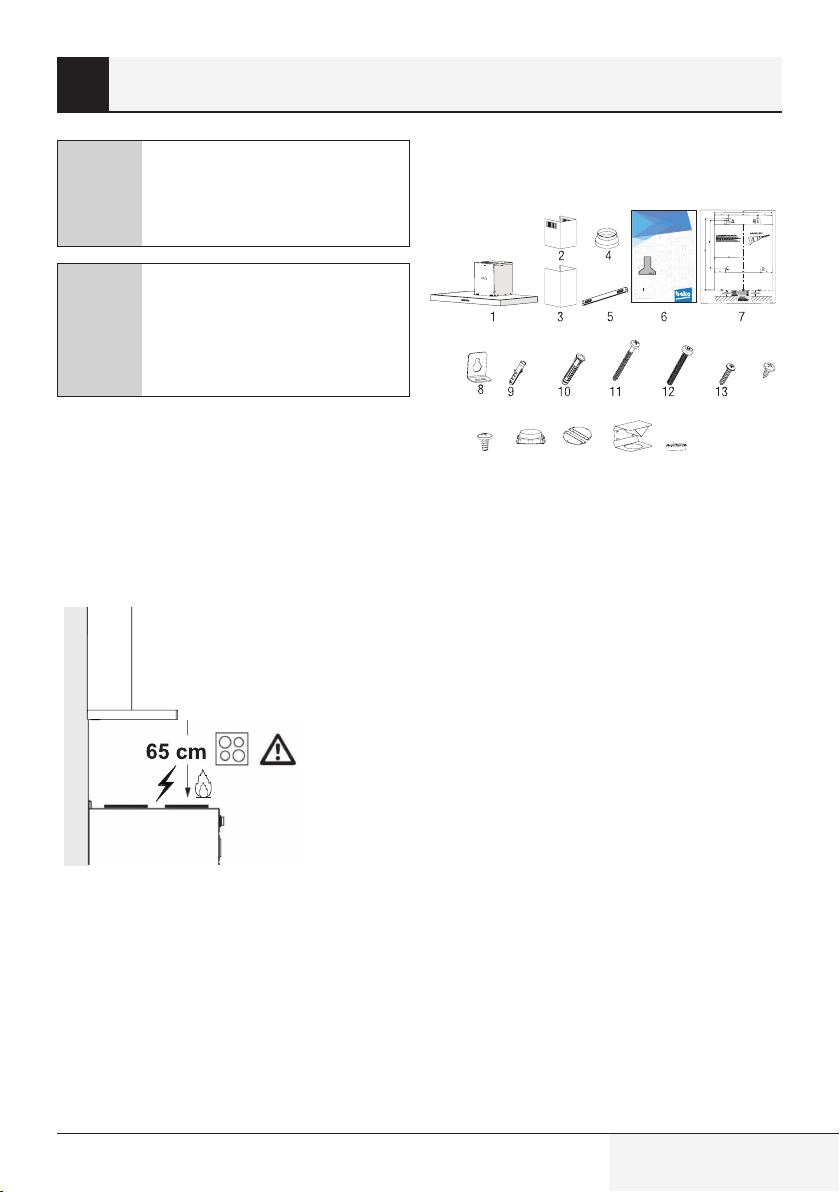
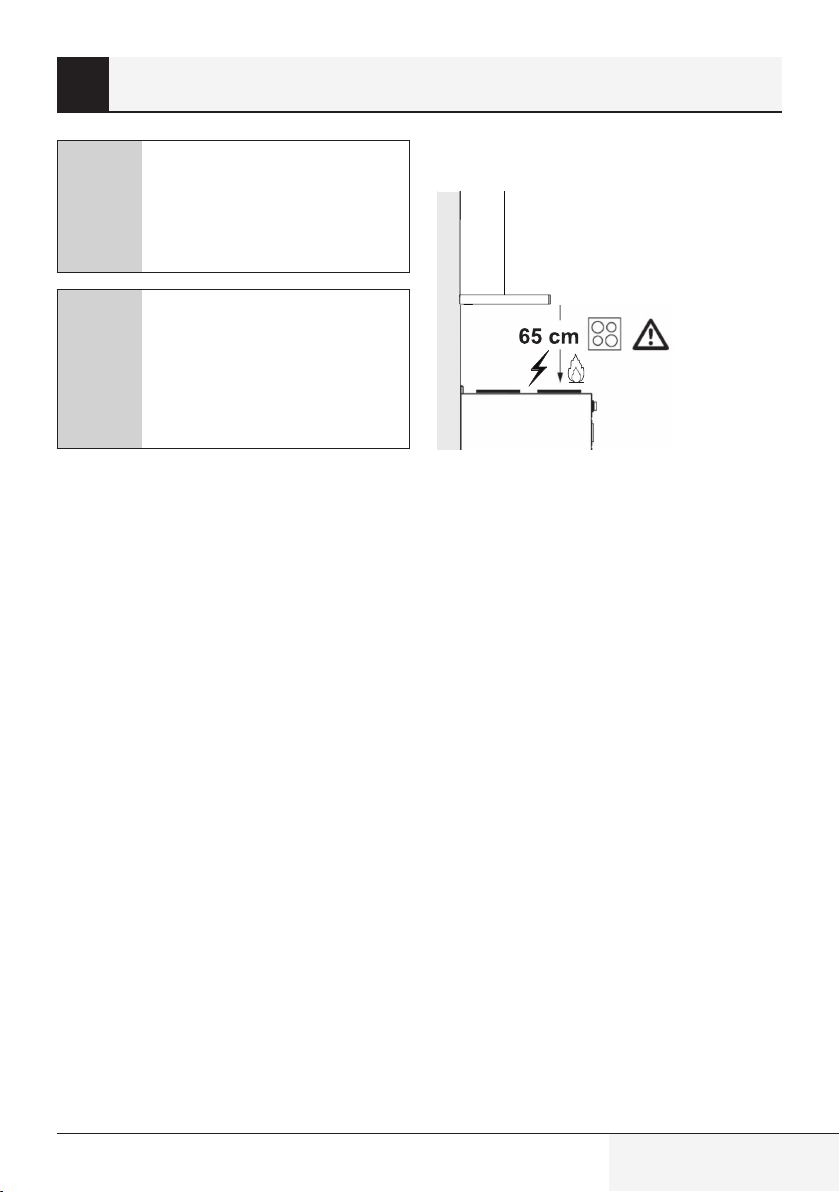
5.1 Position of the Appliance
(Figure 6)
• Distance between the cooker and the cooker
hood must be considered prior to assembly.
This distance should be 65 cm (Figure 6).
• Distance must be measured from the sur-
face of grate for gas cookers,
• from surface of glass for electric cookers.
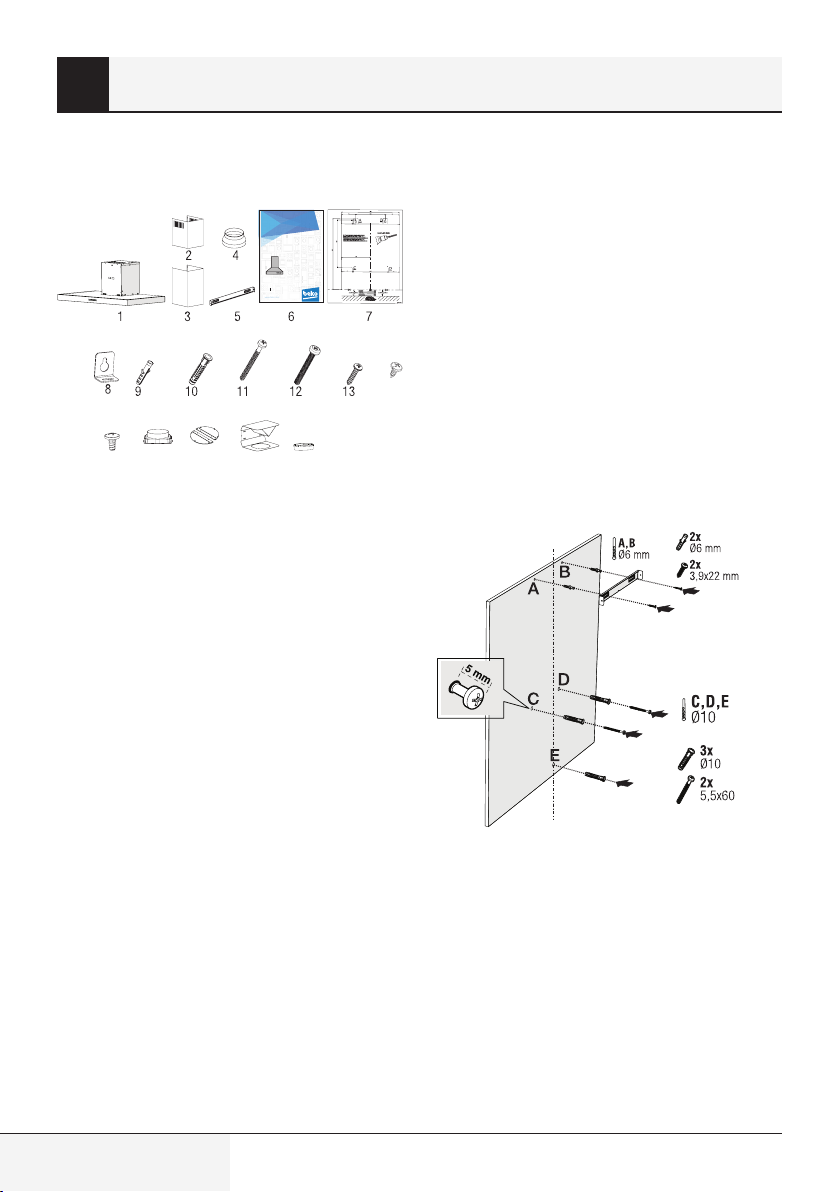
5.2 Installation Accessories
Davlumbaz
Kullanma kılavuzu
BDT6050I
BDT9050I
TR
www.beko.com
14
15 16 17 18
1. Product
2. Inner Chimney
3. Outer Chimney
4. Ø150/120 mm Plastic Flue Adapter
5. Chimney Connection Plate
6. User Manual
7. Assembly Pattern
8. 6x Hanging Plates
9. 6x Ø6mm Plastic Dowel
10. 3x Ø10mm Plastic Dowel
11. 3x 5.5x60 Wall Mount Screw
12. 2x M5x35 Hanging Plate Connection
Screw
13. 6x 3.9x22 Chimney Connection Plate
Screw
14. 2x 3,5x9,5 Chimney Connection Plate
Screw
15. 2X 3,5X9,5 Blind Screw
16. Plastic Adapter (Square to Round)
17. Non-Return Valve
18. Air Baffle
19. Plastic Adapter (Air Diverter)
The information required to make the location
suitable for the installation of the hood is given below.
19
Cooker Hood / User Manual
11 / EN
5 Installation Of Appliance
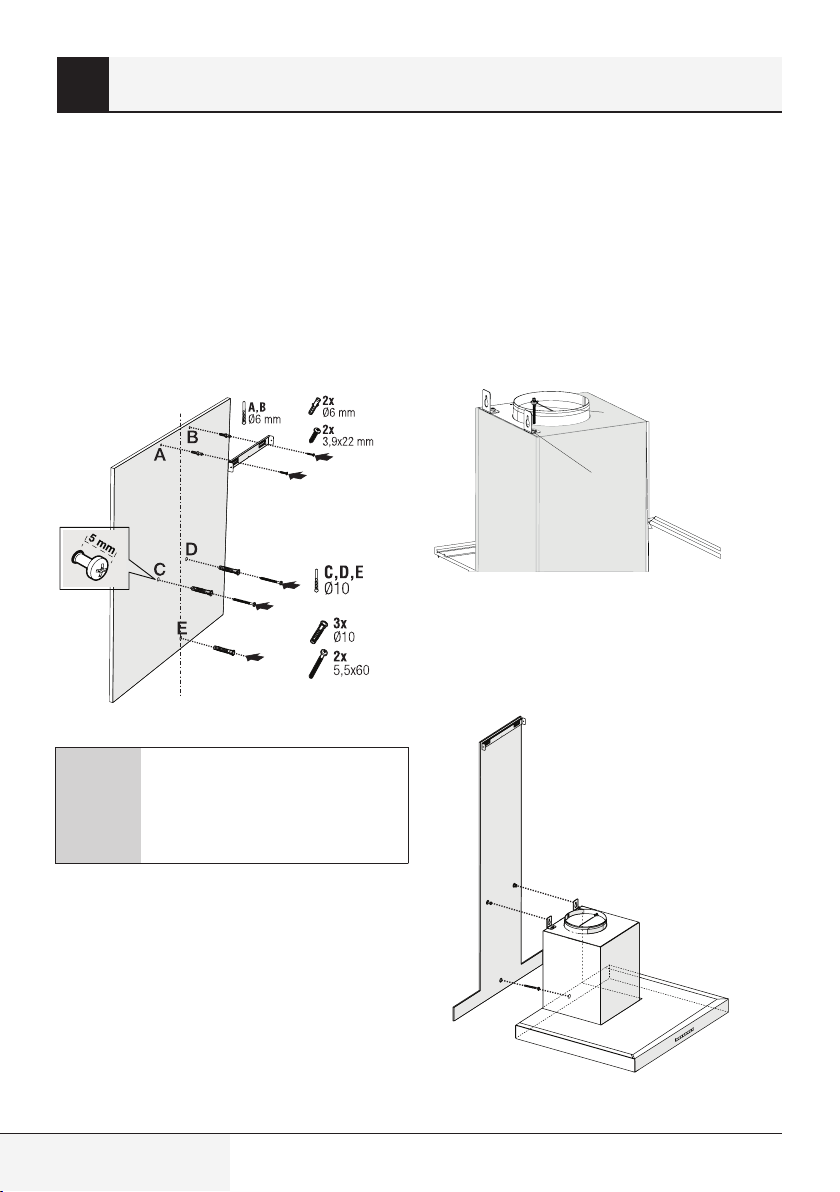
5.3 Wall Mounting
• Wall must be flat, straight and have the
sufficient bearing capacity.
• Depth of drilling holes must comply with
the length of bolts.
• The bolts and dowels provided are suitable
for brick walls. For other construction
material (e.g. drywall, plate, porous
concrete), suitable fixing dowels and nuts
shall be used.
(Figure 7)
the chimney connection plate to the wall with
2 pieces of 3.9x22 screws (Figure 8).
To install the hood body, drill points C,D,E
specified in the installation template with a
Ø10mm drill bit and tap Ø10mm plastic dowels to these points (Figure 8).
Install 2 pieces of 5.5x60 mounting screws to
points C and D with a clearance of 5 mm between the screw head and the wall (Figure 8).
1
2
(Figure 8)
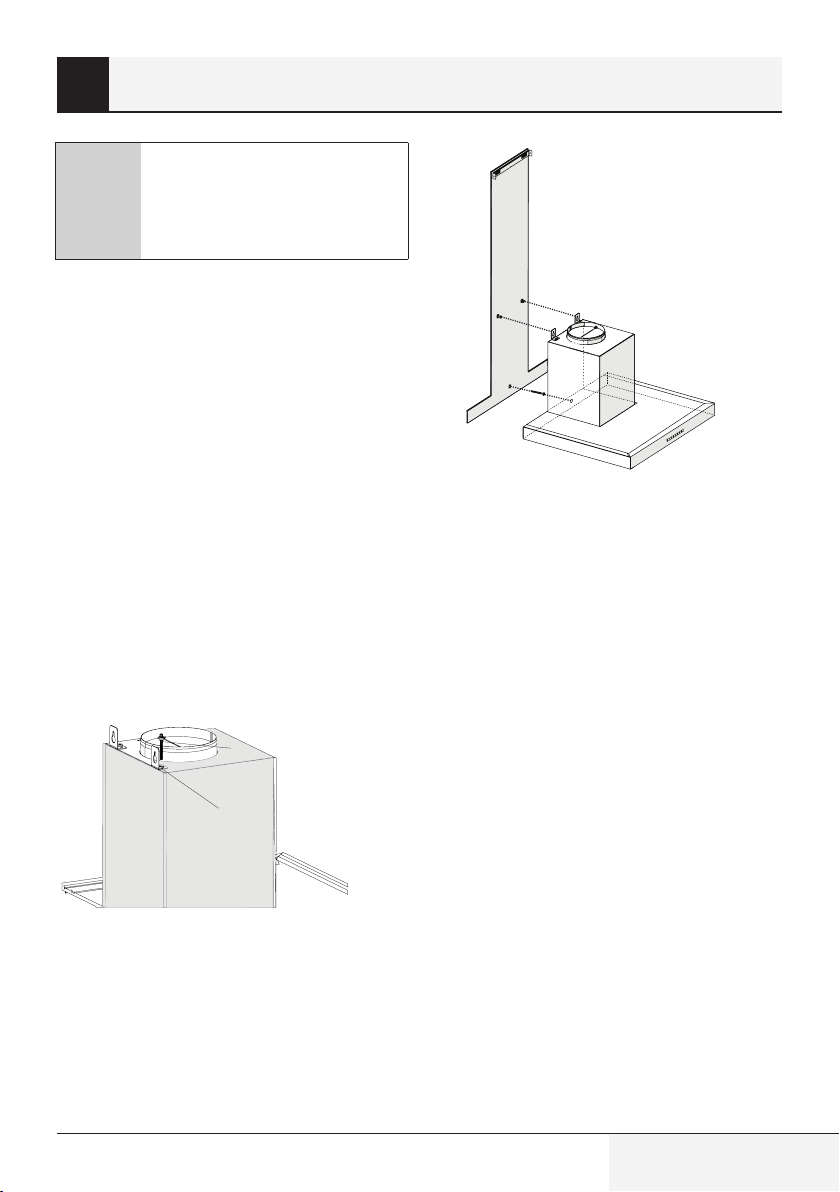
Install two pieces of hanging plates to the
body of the hood with M5x35 mounting
screws (Figure 8).
CAUTION
Before drilling, ensure that there
are no power, gas or water pipes
A
in the close proximity of the
drilling locations.
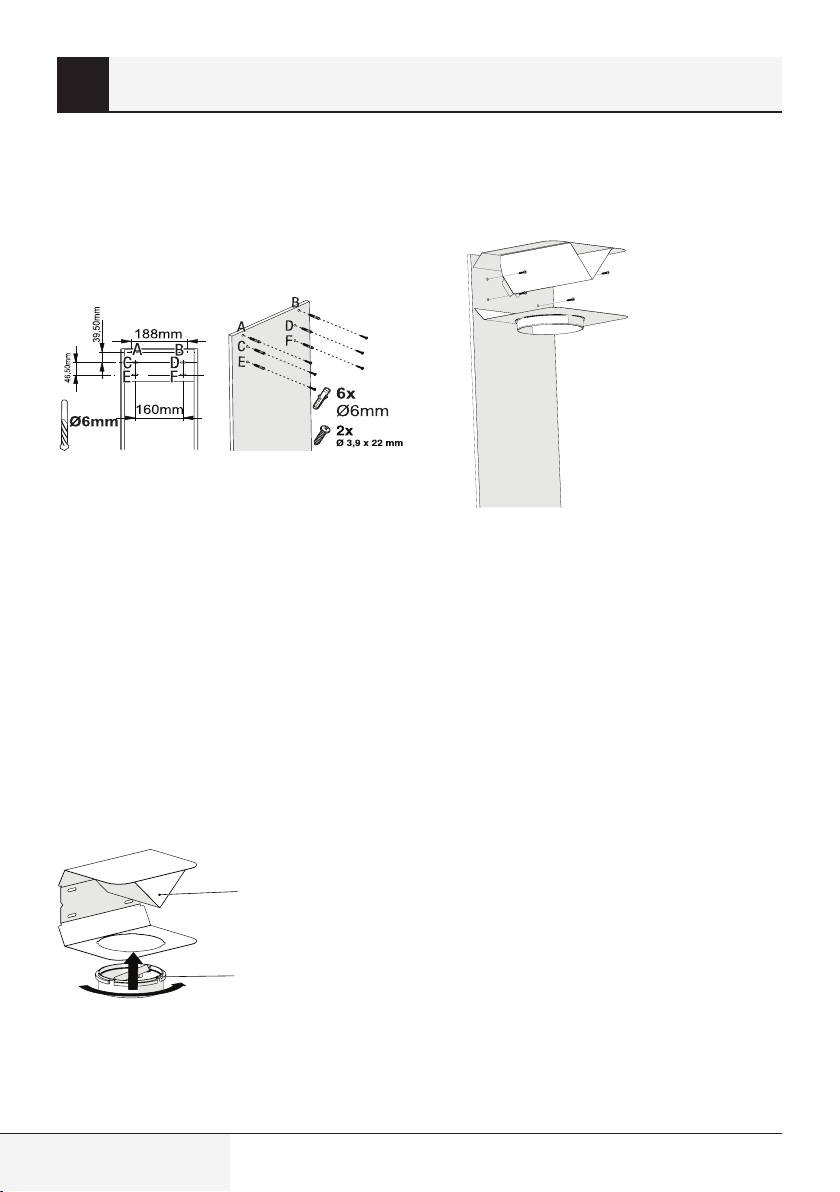
Draw a mid location line from the ceiling perpendicular to the lower edge of the hood ().
Fix the assembly scheme on the wall. For
points A and B, take the maximum dimensions of the hood as reference, and drill points
A and B you have marked with a Ø6mm drill
bit, and tap Ø6mm plastic wall plugs. Install
12 / EN
(Figure 9)
Cooker Hood / User Manual
5 Installation Of Appliance
Hold the cooker hood by its body and place it
on the mounting screws on the wall and tighten the screws (Figure 9).
Secure the cooker hood with 5.5x60 screws
to the wall through the mounting hole on the
interior of the appliance (Figure 9).
5.4 Connecting to Chimney
If you are going to use the Ø 120/150 mm
plastic Chimney adapter, connect one end of
the pipe to this adapter, if you are not going
to use it, to the direct output on the product.
Connect the other end of the pipe to your
Chimney . Check that these two connections
are tight enough so they will not come out
when the appliance runs on full power. Check
if the flaps inside the Chimney operate when
they are tightened
with clamps. Connect the Chimney connection duct outside the adapter (Figure 11/a).
If the connection duct is fitted inside the
adapter, suction of air shall not occur as the
Chimney flap that prevents the return of air
will remain closed (Figure 11 / b). The length
of the pipe connection as well as the number
of elbows must be as minimum as possible.
A : Chimney exit pipe
B : Non return flaps
C: Plastic flue
The valves are closed then the appliance is
not operating and prevent possible outside
odour and dust from entering inside.
(a) (b)
Ok Not Ok
(Figure 11)
(Figure 12)
5.5 Installation of the Hood to
the Chimney
Make the electrical connection of your hood
before starting the installation of the Chimney
. Slip the Chimney plates around the body.
Install the Chimney plate to the Chimney fastening plate that is secured to the wall from its
upper outer edges (Figure 13).
Cooker Hood / User Manual
(Figure 10)
(Figure 13)
1. Inner Chimney
2. 3.5x9.5 Screw
3. Chimney Connection Plate
13 / EN
5 Installation Of Appliance
5.6 Installation of Air Baffle
While using with the carbon filter, air baffle is
provided with your appliance with the aim of
re-releasing the air which is cleaned with carbon filter from the perforated located on the
Chimney . Assemble the air baffle as below.
(Fig. 14)
There is a tab in the middle of the Chimney
connection plate. Place the middle point of
this tab on the line that is drawn perpendicular to the wall. Align horizontally and mark
the holes where the connection plate will be
mounted via a pen (Figure 14 / A, B).
Drill the marked points with Ø6mm drill and
insert two Ø6mm plastic dowels in the drilled
holes (Figure 14 / A, B).
Fix the Chimney connection plate to the wall
with 3.9x22 screws (Figure 14/ A, B).
Attach the plastic Chimney adapter, which is
included in the package, in the direction of the
air baffle. Lock the Chimney adapter by turning it in the direction of the arrow (Figure 15).
(Figure 16)
Assemble the air baffle group with 3.9 x 22
screws from point C, D, E, F that you have
already prepared (Figure 14).
Assemble the hood body (Page 12 / Figure 7).
For air baffle assembly, install point C, D, E,
F with Ø6mm drill and Ø6mm plastic dowels
(Figure 14).
1
2
(Fig. 15)
1- Air Baffle
2- Plastic Chimney
14 / EN
Cooker Hood / User Manual
5 Installation Of Appliance
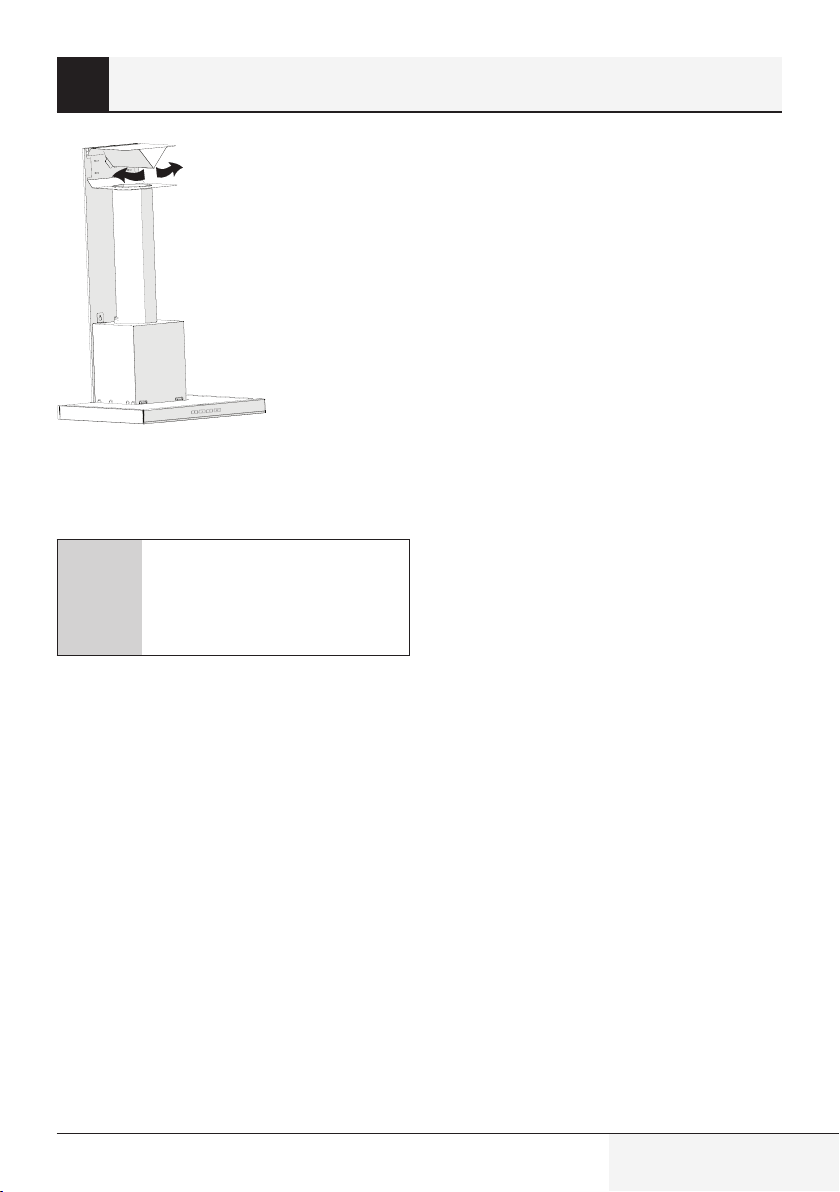
(Fig. 17)
1- Aluminium Air Outlet Pipe
Make the air outlet pipe assembly (Figure 17).
Since twists and bends in the
-
C
aluminium pipe will lead to re
duction in the air suction power,
avoid using twists and bends as
much as possible.
Install the Chimney plates of the hood (Page
13 / Figure 13)
Cooker Hood / User Manual
15 / EN
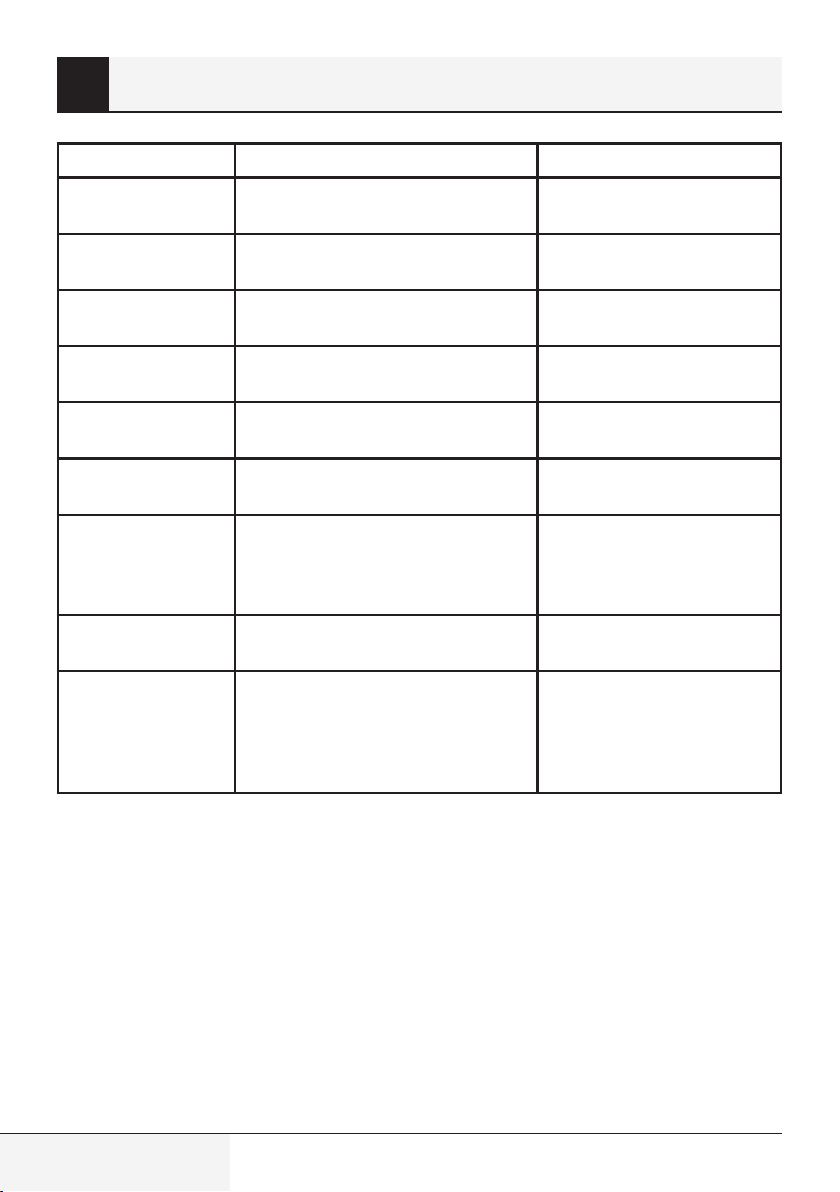
6 Troubleshooting
Troubleshooting Root Cause Help
Appliance is not
working.
Appliance is not
working.
Appliance is not
working.
Illumination light
does not operate.
Illumination light
does not operate.
Illumination light
does not operate.
Air inlet of the appli-
ance is inadequate.
Air inlet of the appli-
ance is inadequate.
Air inlet of the appli-
ance is inadequate.
Check your fuses. Fuse may be blown, inspect
and restore it.
Check the electrical connection. Mains voltage shall be
between 220 and 240 V.
Check the electrical connection. Check if other appliance in
your kitchen operate.
Check the electrical connection. Mains voltage shall be
between 220 and 240 V.
Inspect the lamp switch. Lamp switch shall be at "on"
position.
Inspect the lamps. The lamps of the appliance
shall illuminate.
Inspect the aluminium filter. Under normal operating
conditions, aluminum grease
filter shall be cleaned at
least once in a month.
Check the air discharge chimney . The air discharge chimney
shall be at “on” position.
Inspect the carbon filter. The filters of the appliances
with carbon filters shall
be replaced once in every
3 months under normal
conditions.
16 / EN
Cooker Hood / User Manual
¡Por favor, lea esta guía primero!
Estimado cliente,
Gracias por elegir un producto BEKO. Nos gustaría que sacara el máximo provecho
de este producto de alta calidad que ha sido fabricado con tecnología punta. Por
favor, asegúrese de leer y entender completamente esta guía y la documentación
complementaria antes de usarla y guárdela como referencia. Entregue esta guía junto
al aparato si se entrega o vende a otra persona. Observe todas las advertencias e
información aquí contenidas y siga las instrucciones.
Tenga en cuenta que esta guía del usuario se puede aplicar a varios modelos de
aparato. La guía indica claramente las posibles variaciones de los diferentes modelos.
Símbolos y sus significados
Estos símbolos se utilizan a lo largo de esta guía:
Información importante y recomenda-
C
A
ciones sobre el uso del aparato.
PRECAUCIÓN: Advertencias sobre lesiones personales o daños a la propiedad.
B
Advertencia de descarga eléctrica,
Riesgo de fuego.
Este producto fue fabricado sin dañar la naturaleza en instalaciones modernas
respetuosas con el medio ambiente.
Cumple con la Directiva WEEE.
No incluye PCB.

1 nn Instrucciones importantes sobre seguridad y medio ambiente
1.1 Seguridad general
Lea las instrucciones importantes de
seguridad y guárdelas para su futura
consulta
Esta sección contiene instrucciones
de seguridad que ayudarán a la pro
tección contra los riesgos de incendio, descargas eléctricas, exposición
a la energía de microondas, lesiones
personales o daño a la propiedad. El
incumplimiento de estas instruccio
nes anulará cualquier tipo de garan-
tía.
• Los productos Beko cumplen con
todas las normas de seguridad
aplicables; por ello, si el cable o el
aparato presentan daños, deberán
ser reparados o sustituidos por el
distribuidor, un servicio técnico o
una persona cualificada y autori
zada para evitar cualquier peligro.
Los trabajos de reparación defi
cientes o realizados por personal
no cualificado puede ser peligrosos
y entrañar riesgos para el usuario.
• Este aparato está destinado al uso
doméstico y aplicaciones pareci
das, como por ejemplo:
– Cocinas para uso del personal de
tiendas, oficinas y otros entornos
laborales;
– Casa rurales;
– Por clientes en hoteles o cualquier
otro tipo de entorno residencial;
– Entornos de tipo «Habitación y
desayuno» (Bed and Breakfast).
• Utilice este aparato únicamente
para su uso previsto, tal como se
describe en este manual.
• El fabricante no se hace responsa-
ble de los daños provocados por
una instalación incorrecta o un uso
-
inapropiado del producto.
• Este aparato puede ser utilizado
por niños mayores de 8 años y por
personas con capacidades físicas,
sensoriales o mentales reducidas
o con falta de experiencia y cono
cimientos, siempre que estén bajo
supervisión o hayan recibido ins
trucciones pertinentes sobre el uso
del aparato de manera segura y
comprendan los peligros que con
lleva.
-
• No deje que los niños jueguen con
el aparato. La limpieza y manteni
miento del usuario no deben ser
realizados por niños sin supervi
sión.
-
• La distancia mínima entre la super-
ficie de soporte de los recipientes
para cocinar en los fogones y la
parte más baja de su aparato debe
ser de al menos 65 cm.
-
-
-
-
-
18 / ES
Campana de cocina / Manual de usuario

1 Instrucciones importantes sobre seguridad y medio ambiente
• Si en las instrucciones de instala-
ción de la placa de gas se indica
una distancia superior, deberá te
nerse en cuenta este hecho.
• Asegúrese de que la fuente de ali-
mentación cumpla con la información que se indica en la placa de
datos del aparato.
• Nunca utilice el aparato si está da-
ñado el cable de alimentación o el
mismo aparato.
• Evite daños al cable procurando
que no sufra tirones, no se doble
y no roce con bordes afilados para
evitar dañarlo. Mantenga el cable
de corriente alejado de superficies
calientes y llamas descubiertas.
• Use el aparato únicamente con un
enchufe con toma a tierra.
ADVERTENCIA: No conecte el aparato
a la red eléctrica antes de que la ins
talación se haya realizado por completo.
• Coloque siempre el aparato de
forma que el enchufe quede a
mano.
• No toque las lámparas si han es-
tado en funcionamiento durante
mucho tiempo. Pueden ocasionar
quemaduras en las manos ya que
estarán calientes.
• Siga las normas establecidas por
las autoridades competentes para
la descarga del aire de salida (esta
-
advertencia no es aplicable sin la
conexión de la chimenea).
• Encienda el aparato después de
colocar una olla, una sartén, etc,
en los fogones. De lo contrario, las
altas temperaturas pueden provo
car deformaciones en algunas partes del aparato.
• Apague los fogones antes de retirar
las ollas, los sartenes, etc.
• No deje aceite caliente en los fo-
gones. Las sartenes con aceite
caliente pueden ocasionar auto
combustión.
• Preste atención a las cortinas y los
estores, ya que, al cocinar platos
como patatas fritas, el aceite puede
originar un incendio.
-
• El filtro antigrasa se debe reempla-
zar por lo menos una vez al mes. El
filtro de carbón se debe reemplazar
por lo menos cada 3 meses.
• El producto se debe limpiar si-
guiendo las instrucciones del manual de usuario. Si la limpieza no
se ha llevado a cabo siguiendo el
manual de usuario, puede haber
riesgo de incendio.
• No use materiales filtrantes que no
resistan el fuego en vez del filtro ac
-
-
-
Campana de cocina / Manual de usuario
19 / ES

1 Instrucciones importantes sobre seguridad y medio ambiente
tual.
• Utilice únicamente accesorios origi-
nales o bien los que recomiende el
fabricante.
• No use el aparato sin el filtro y no
retire los filtros mientras el aparato
esté en funcionamiento.
• En caso de fuego, desactive su
producto y los aparatos de cocina.
• En caso de fuego, cubra la llama
y nunca utilice agua para apagarlo.
• Desenchufe el aparato antes de
cada limpieza y cuando no esté en
uso.
¡Peligro de descarga eléctrica! Man
tenga todos los materiales de embalaje alejados de los niños.
PRECAUCIÓN: Las partes accesibles
pueden alcanzar temperaturas ele
vadas al usarse con cocinas.
• El canal de salida del aparato no
debe estar conectado a canales de
aire por los que pasan humo.
• La ventilación de la estancia puede
ser insuficiente cuando la campana
extractora para placas eléctricas
se utiliza al mismo tiempo que los
aparatos que funcionan con gas u
otros combustibles (esto puede no
• La presión negativa de la estancia
no debe superar los 4 Pa (4 x 10
bar) cuando la campana para una
placa eléctrica funcione simultá
neamente con dispositivos de otro
tipo de energía excepto la electri
cidad.
ser aplicable a los aparatos que so
lamente descargan el aire de nuevo
en la estancia).
-
• Los objetos colocados encima del
producto pueden caerse. No colo
que ningún objeto encima del apa-
rato.
• En la estancia en donde se encuen-
tra el aparato, el escape de equipos de combustible o gas, como
calefactores, deben ser herméticos
o estar absolutamente aislados.
• Para la conexión de la chimenea,
use tuberías de 120 o 150 mm de
diámetro. La conexión de las tube
rías debe ser lo más corta posible y
tener la menor cantidad de codos
de tubería.
• No flambear debajo del aparato.
ADVERTENCIA: Antes de instalar la
campana, retire las películas protec
toras.
• No dejar llamas altas descubiertas
debajo de la campana extractora
cuando está en funcionamiento
-
• Las freidoras se deberán vigilar
continuamente durante su utiliza
ción: el aceite sobrecalentado es
-
-
-
-
-
-
20 / ES
Campana de cocina / Manual de usuario
1 Instrucciones importantes sobre seguridad y medio ambiente
inflamable.
1.2 De conformidad con la Directiva RAEE
y eliminación del producto al final de su
(2011/65/UE). No contiene materia
les peligrosos ni prohibidos especificados en la Directiva.
vida útil:
1.4 Información sobre el embalaje
Este producto cumple con la Directiva
RAEE de la UE (2012/19/UE). Este
producto lleva un símbolo de clasifi
-
cación de residuos de aparatos eléctricos y electrónicos (RAEE).
Este símbolo indica que este
producto no debe eliminarse
con otros residuos domésti
cos al final de su vida útil. El
aparato usado debe ser devuelto al
punto de recogida oficial para el reci
claje de aparatos eléctricos y electró-
bles de acuerdo con nuestra
Normativa Medioambiental Nacional.
No deseche los materiales de emba
laje junto con los residuos domésti-
cos o de otro tipo. Llévelos a los
puntos de recogida de material de
embalaje designados por las autori
dades locales
nicos. Para encontrar estos sistemas
de recogida, por favor, póngase en
contacto con las autoridades locales
o con el distribuidor donde se com
-
pró el producto. Cada hogar desempeña un papel importante en la recuperación y el reciclaje de los aparatos
viejos.
-
Los materiales de embalaje
del producto están fabrica
-
dos con materiales recicla-
-
-
.
La eliminación adecuada de los apa
-
ratos usados ayuda a prevenir las
posibles consecuencias negativas
para el medio ambiente y la salud
humana.
1.3 Conformidad con la Directiva RoHS
El producto que ha adquirido cum
-
ple con la Directiva RoHS de la UE
Campana de cocina / Manual de usuario
21 / ES
2 Apariencia general
n 643 Max 1023
2.1 Visión de conjunto
261
25
80
380
20
590
53
504
250
BHCB 61632 XH
598
(Imagen 1)
1. Conducto interno
2. Conducto exterior
3. Panel de control
4. Filtros de aceite de aluminio
5. Iluminación de la estufa
2.2 Datos técnicos
Modelo
Tensión de alimentación
Potencia de la lámpara (W)
Potencia del motor (W)
Caudal (m³/h) - 3. Nivel
Clase de aislamiento del motor
Clase de aislamiento
22 / ES
(Imagen 2)
BHCB 61632 XH
220-240V ~ 50 Hz
2 x 3 W
210 W
612 m³/h
Clas F
Class I
Campana de cocina / Manual de usuario
3 Funcionamiento del aparato
3.1 Control del aparato
A B C D
BOTÓN FUNCIÓN
(A) : 1. Botón de nivel
(B) : 2. Botón de nivel
(C) : Botón del nivel 3
(D) : Luz Encendida /
Apagada
Hace funcionar el aparato en la primera velocidad. Cuando se pulsa
este botón de nuevo para apagar el aparato, el nivel de velocidad
de la pantalla se apaga.
Hace funcionar el aparato en la segunda velocidad. Cuando se pulsa
este botón de nuevo para apagar el aparato, el nivel de velocidad
de la pantalla se apaga.
Hace funcionar el aparato en la tercera velocidad. Cuando se pulsa
este botón de nuevo para apagar el aparato, el nivel de velocidad
de la pantalla se apaga.
Puede iluminar el área de cocción pulsando este botón. Vuelva a
pulsar este botón para apagar la lámpara.
3.2 Funcionamiento eficiente y
ahorro de energía
Uso
• * Al utilizar su campana, ajuste la ve-
locidad de acuerdo a la cantidad de
vapores y olores existentes, para así
ahorrar energía.
• Utilice velocidades bajas (1-2) en
condiciones normales, y velocidades altas (3) para el olor y el vapor
intensos.
• * Las lámparas en la campana son
colocadas para iluminar la superficie
donde se cocina.
Al usarlas como luces de ambientación se desperdiciará energía innecesariamente y dará una luz insuficiente.
Campana de cocina / Manual de usuario
3.3 Instrucciones de funcionamiento
• * Su campana contiene un motor
con varias velocidades.
• Para un mejor rendimiento, reco-
mendamos utilizar velocidades
bajas en condiciones normales y
velocidades altas en casos de olores fuertes y vapor intenso.
• * Puede iniciar su campana pul-
sando el botón de la velocidad deseada. (A, B, C)
• Puede iluminar el área de cocción
presionando la lámpara (D).
23 / ES
3 Funcionamiento del aparato
3.4 Reemplazo de la lámpara
(Imagen 3)
Haga las conexiones eléctricas del
aparato. Su aparato utiliza una lámpara LED de 3W. Para cambiar las
lámparas, empuje el soporte desde
atrás hacia abajo, gírelo en sentido
contrario a las agujas del reloj y sáquelo hacia abajo. Haga lo anterior a
la inversa para instalar nuevas lámparas (Imagen 3).
Bombilla
Potencia de la bombilla (W)
Soporte / enchufe GZ 10
Voltaje de la bombilla
(V)
Tamaño (mm) 53 x 50
Código ILCOS DR/F3-220-240-
3
220 - 240
GZ10-50-53
3.5 Funcionamiento con conexión al conducto
• El vapor se extrae a
través del conducto de
humo, que está sujeto
a la cabeza de conexión en la campana.
• El diámetro del conducto de humos
debe ser el mismo que el del anillo
de conexión. En los entornos horizontales, el tubo tiene que tener
una ligera inclinación hacia arriba
(alrededor de 10º) para que el aire
pueda salir fácilmente de la habitación.
3.6 Funcionamiento sin conexión
al conducto
• El aire se filtra a través
del filtro de carbón y circula en la habitación. El
filtro de carbón se uti-
liza cuando es imposible utilizar un conducto para humos
en casa.
• Si el funcionamiento es sin con-
ducto, quite las tapas dentro del
adaptador del conducto.
• Retire el filtro de aceite. Para instalar
el filtro de carbón, colóquelo en las
pestañas centrándolo en la pieza de
plástico a ambos lados del cuerpo
del ventilador. Apriételo girando a la
derecha o a la izquierda.
• Reemplace el filtro de aceite de alu-
minio.
24 / ES
Campana de cocina / Manual de usuario
4 Limpieza y mantenimiento
Antes de la limpieza y el
mantenimiento, desenchufe el
C
producto o apague el interruptor.
4.1 Limpieza de los filtros de
aceite de aluminio
El filtro de aceite de aluminio se utiliza
para retener las partículas de aceite
en el aire. Los filtros de aluminio pueden cambiar de color después de
ser limpiados repetidamente. Esto es
normal, y no debe reemplazar sus filtros.
C
A
También puede lavar los filtros
de aceite de aluminio en la
lavadora.
PRECAUCIÓN
En caso de uso normal, limpie
su filtro de aceite de aluminio
una vez al mes.
(Imagen 4)
• Empuje el cierre del filtro de aceite
de aluminio hacia adelante.
• Luego tire ligeramente hacia abajo
y sáquelo (imagen 4). De lo contrario, puede deformar el filtro. Lave y
enjuague los filtros de aceite de aluminio con detergente líquido y sustituya los filtros de aceite de aluminio
realizando los pasos especificados
anteriormente en orden inverso.
Estos filtros de aceite de aluminio se
utilizan para retener las partículas de
aceite en el aire.
Campana de cocina / Manual de usuario
25 / ES
4 Limpieza y mantenimiento
4.2 Sustitución de los filtros de
carbón
(Imagen 5)
El aparato que usted ha comprado es apropiado para su uso con filtros de carbón.
• Retire los filtros de aceite de aluminio (Imagen 4).
• Coloque la parte inferior del filtro de carbón
en el alojamiento del motor (Imagen 5).
• Pulse en la pestaña del filtro de carbón y
empújelo hacia adelante, y asegúrese de
que las pestañas del filtro de carbón estén
enganchadas y bloqueadas. (Imagen 5).
• Coloque los filtros de aceite de aluminio.
A
A
A
26 / ES
PRECAUCIÓN
El filtro de carbón nunca
será lavado.
PRECAUCIÓN
Reemplace los filtros de
carbón una vez cada 3
meses.
PRECAUCIÓN
Puede obtener el filtro de
carbón en los servicios
técnicos autorizados.
Campana de cocina / Manual de usuario
5 Instalación del aparato
¡ADVERTENCIA!
Antes de comenzar la ins
A
A
Para la instalación de la campana,
por favor contacte con el servicio técnico autorizado más cercano.
Es responsabilidad del cliente proveer
la ubicación e instalación eléctrica
apropiadas para la campana.
talación, lea la información
de seguridad en el manual
de usuario.
¡ADVERTENCIA!
Si no se instalan los tor
nillos y estabilizadores de
acuerdo con estas instruc
ciones, puede producirse
una descarga eléctrica.
-
-
-
5.1 Posición del aparato
(Imagen 6)
• La distancia entre la cocina y la
campana extractora debe ser tenida en cuenta antes del montaje.
Esta distancia debe ser de 65 cm
(Imagen 6).
• La distancia debe medirse desde la
superficie de la rejilla para las cocinas de gas,
• y desde la superficie del vidrio para
las cocinas eléctricas.
Campana de cocina / Manual de usuario
27 / ES
5 Instalación del aparato
5.2 Accesorios de instalación
Davlumbaz
Kullanma kılavuzu
BDT6050I
BDT9050I
TR
www.beko.com
14
15 16 17 18
1. Producto
2. Conducto interno
3. Conducto exterior
4. Adaptador de Conducto de Chimenea de
Ø150/120mm
5. Placa de conexión del conducto
6. Manual de Usuario
7. Patrón de ensamblaje
8. 6x Placas de suspensión
9. 6x clavijas de plástico de Ø6mm
10. 3x taquetes de plástico de Ø10mm
11. 3x tornillos de montaje para pared de
5.5x60
12. 2x M5x35 Tornillo de conexión de la pla-
ca de suspensión
13. 6x 3.9x22 Tornillo de la placa de cone-
xión del conducto
14. 2x 3.5x9.5 tornillos de la placa de cone-
xión de la chimenea
15. 2x 3,5X9,5 tornillos ciegos
16. Adaptador plástico (de cuadrado a re-
dondo)
17. Válvula anti-retorno
18. Deflector de aire
19. Adaptador plástico (desviador de aire)
19
La información necesaria para elegir un lugar
adecuado para la instalación de la campana
se da a continuación.
5.3 Montaje en la pared
• La pared debe ser plana, recta y tener una
capacidad de carga suficiente.
• La profundidad de los agujeros de
perforación deben coincidir con la longitud
de los pernos.
• Los tornillos y tacos proporcionados son
adecuados para paredes de ladrillo. Para
otros materiales de construcción (por
ejemplo, paneles de yeso, placas, hormigón
poroso), se deben utilizar apropiadas clavijas
y tuercas de fijación.
(Imagen 7)
28 / ES
Campana de cocina / Manual de usuario
5 Instalación del aparato
PRECAUCIÓN
Antes de perforar, asegúrese
A
Dibuje una línea perpendicular desde techo
hasta al borde inferior de la campana de cocina ().
Fije el esquema de montaje a la pared. Para
los puntos A y B, tome como referencia las
dimensiones máximas de la campana, taladre
en os puntos A y B que ha marcado con una
broca de Ø6mm y, a continuación, inserte los
tacos de plástico de Ø6mm. Instale la placa
de conexión del conducto en la pared con 2
unidades de tornillos de 3,9x22 (Imagen 8).
Para instalar el cuerpo de la campana, taladre
los puntos C,D,E especificados en la plantilla
de instalación con una broca de Ø10mm e
inserte los tacos de plástico de Ø10mm en
estos puntos (Imagen 8).
de que no existan tuberías de
alimentación, gas o agua cerca
de las locaciones de perforación.
(Imagen 9)
Sostenga la campana extractora por su cuerpo y colóquela sobre los tornillos de montaje
en la pared y apriete los tornillos (Imagen 9).
Fije la campana extractora con un tornillo de
5,5x60 a la pared a través del orificio de montaje en el interior del aparato (Imagen 9).
Instale 2 tornillos de montaje de 5,5x60 en los
puntos C y D con un espacio de 5 mm entre la
cabeza del tornillo y la pared (Imagen 8).
1
2
(Imagen 8)
Instale dos placas de suspensión en el cuerpo de la campana con tornillos de montaje
M5x35 (Imagen 8).
Campana de cocina / Manual de usuario
5.4 Conexión al conducto
Si va a utilizar el adaptador de plástico para
conductos de humos de 120/150 mm de diámetro, conecte un extremo del tubo a este
adaptador, si no lo va a utilizar, a la salida directa del producto. Conecte el otro extremo
del tubo al conducto de humos. Compruebe
que estas dos conexiones están lo suficientemente firmes para que no se aflojen cuando el aparato funcione a plena potencia.
Compruebe si las tapas del interior del conducto funcionan cuando se aprietan
con las abrazaderas. Conecte la conexión del
conducto fuera del adaptador (Imagen 11/a).
Si el conducto de conexión está colocado en
el interior del adaptador, no se producirá la
succión de aire ya que la tapa de salida de
humos que impide el retorno del aire permanecerá cerrada (Imagen 11 / b). La longitud de
la conexión de la tubería, así como el número
de codos deben ser de lo mínimo posible.
A : Tubo de salida de humos
29 / ES
5 Instalación del aparato
B : Tapas de no retorno
C: Adaptador de escape de plástico
Las válvulas están cerradas y el aparato no
funciona, lo que evita que el posible olor exterior y el polvo entren en el interior.
(Imagen 10)
(a) (b)
Ok Not Ok
(Imagen 11)
5.5 Instalación de la campana
en el conducto
Lleve a cabo la conexión eléctrica de su campana antes de empezar con la instalación del
conducto de humos. Deslice las placas del
conducto alrededor del cuerpo.
Instale la placa del conducto en la placa de
sujeción del conducto que está fijada a la
pared por sus bordes exteriores superiores
(Imagen 13).
(Imagen 12)
30 / ES
(Imagen 13)
1. Conducto interno
2. 2 tornillos de 2x 3.5x9.5
3. Placa de conexión del conducto
Campana de cocina / Manual de usuario
 Loading...