

Page 1

4200 SA
Oven
4700 TAA
4710 TBA
English version of the 285.4305.10
booklet (12.11.2004)
Page 2

This product,
is produced in modern facilities which
are respectful to environment,without
giving harm to the nature
Page 3

Dear Customer,
It is our ultimate desire that you achieve the best performance from our product,
which has been passed through meticulous quality control checks and is manufactured
in modern facilities.
To this effect, we recommend that you read the entire guide carefully before
operating the product and keep it as a reference.
веко
www.beko.com.tr
<Ф> ее
This product has 10 years life span.
It means that said period is time interval to stock its spare
parts to keep this product functional.
Page 4

Contents
Technical specifications
Page 2
I
Process that you must do
I
before calling services
Page 23
Safety precaution and important items pgg0 3 ^
Superior properties of product,
practical and useful informations
Superior features
Introducing the control panel
Using of oven part
Operating the grill.................................................11
Operating the timer..........................................12-16
Transport...............................................................17
Maintenance and cleaning
Lamp changing.....................................................19
Oven installing................................................20_22
....................................................
.............................................
______
..................................
___________
Page 4
Page 18
6-10
Important do's and dont's
4
5
Page 24
Page 5
Technical specifications
{Classic model) (Mullifunction)
4200 SA 4700TBA/4700TAA
Outer width
Outer deoth
Outer heiaht
Inner width
Inner deoth
.Inner heiaht
Dimensions of installation sening
Width
Deoth
Heioht
Oven volume
SuoDlvvoltaoe
Grill cutout
Turbo heatino element outout
Oven outout
Ventilation motor (If available)
Lamp (If available)
Cooking (In models with timer) Elecirical dijilal ptogrammable timer
594 mm 594 mm
550 mm 550 mm
595 mm 595 mm
450mm 445 mm
428 mm 410 mm
337 mm 332 mm
600 mm 600 mm
560 mm 560 mm
500 mm 600 mm
65 It. 61 It.
220 V ~ 50 Hz 220 V~ 50 Hz
1100/2300 W 1100/2300 W
1800W
2400 W 2400 W
15 W(H type) 15 W (H type)
15 W/25W 15/25 W
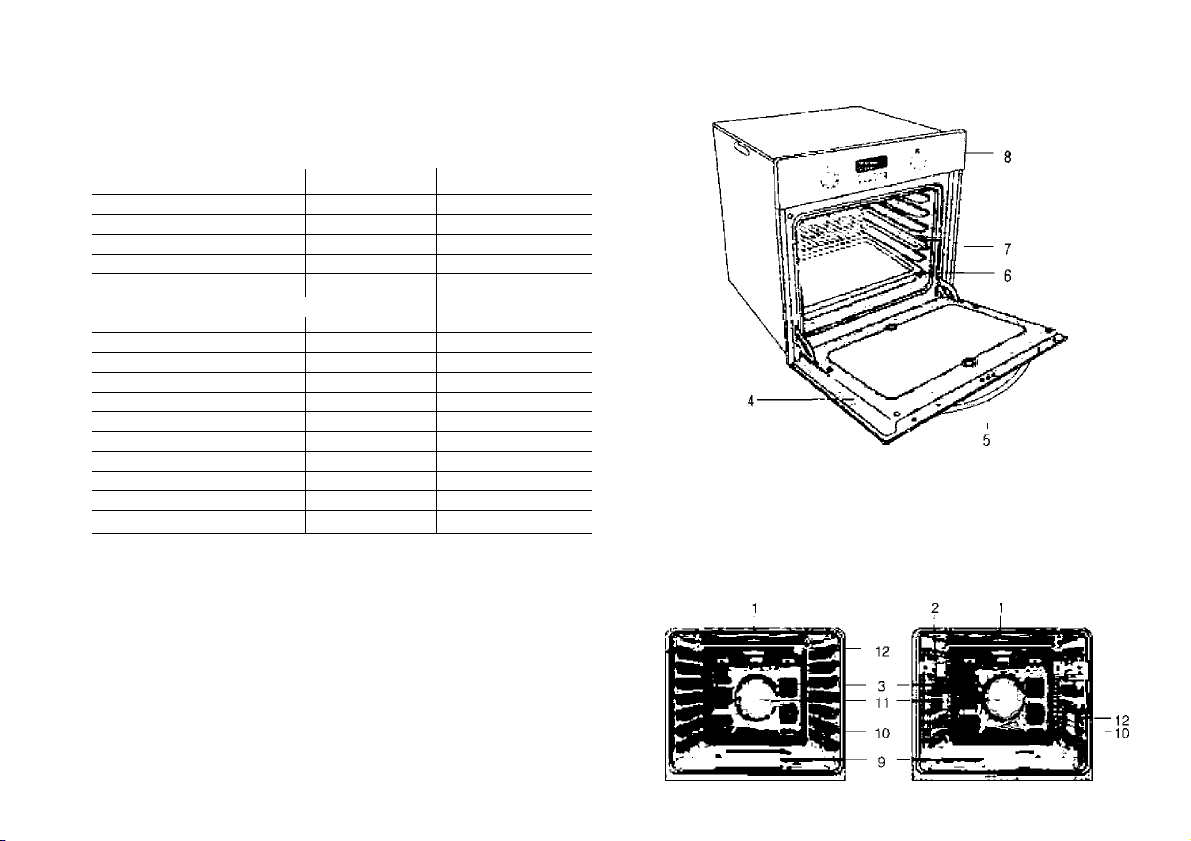
1. Upper heating element
2. Shelf positions 8. Control panel
3. Turbo heater (behind steel plate) 9. Bottom heater (behind steel plate)
4. Frontdoor 10. Air exit holes
5. Handle 11 Turbo motor (behind steel plate)
6. Tray 12. Lamp
7. Grill shelf
The rdates and values about this product are
obtained in laboratory test conditions therefore
these values can be changed according to the
Page 6

Safety precautions and important items
* The current value of the fuse in your
home shall be suitable to the current
drawn by your cooker.
* Before your appliance is connected to
the mains electricity supply, check to
ensure that the voltage and the frequency
shown in the rating label corresponds with
your power supply.
* Before applying to authorized service,
have the electrical wiring of your home
ready for connection.
* If the current value is less than 16
Amperes please have 16 A fuse with
electrician.
* The ground cable should always be
performed by the manufacturer or its
authorized service agent or a similarly
qualified person. Our company shall not
held responsible for any damage coused
by the utilisation of the oven without
ground cabling.
* While locating your oven; do not
squeeze the supply cord under the oven
body or inside the oven door, because the
cable isolation can be damaged.
* If the supply cord is damaged, it must
be replaced by the manufacturer or its
service agent or a similarly qualified person
in order to avoid a hazard.
*
* In models with the timer:
Always adjust the timer during the first
operation or after any interruptions of the
electric supply. Otherwise, your oven will
not operate.
* Do not attempt to move the appliance
by pulling the door and/or handles.
* While the front door is open do not put
any heavy object on it, and do not allow
children to sit on it.
* Accessible parts of the appliance will
become very hot whilst the appliance is in
use and until the appliance has cooled.
Children should be kept away to avoid
burns and scalds.
* The packaging materials can cause
danger for the children.
* Do not forget to remove the packaging
material near the tray and wire grill, and
the polysthrene sticked to the front door
glass.
* Whilst the appliance is in use; avoid
touching heating elements inside the oven
as the accessible parts of the appliance
will become very hot.
* The appliance is not intended for use by
young children or infirm persons without
supervision.
* The cooling fan will continue for a while
after switching the oven off.
* Always switch off the appliance from
the mains when the appliance is not in
use before cleaning or in the unlikely
event of any probable product failure.
* Ensure the appliance is switched off
before replacing the lamp, to avoid the
possibility of electric shock.
* Immediately switch off the appliance
from the mains if a crack is detected on
the ceramiic glass surface, in available
models.
* In models with Grill;
*Always use oven gloves when removing
the grill rack and dishes from inside the
oven when in use.
*lf, whilst cooking, steam produced
comes into contact with cool surfaces on
the outside of the appliance, it will
condense and produce water droplets.This
is quite normal and is not a fault. Wipe it
with a dry cloth.
Page 7

The superior features of your oven
1-
Í i i 1 M
I i { I
Conventional oven:
□ In this position you can
perform by operating the
lower and upper heating
elements.
* The lower and upper
heating elements ensures
even cooking of both sides of
your food.
* You can sterilize your food
(in presen/ed position) in your
oven (refer to on how to
sterilize/to make canned
food).
In this postion use 1 tray
for cooking.
C D
In this position you can
grill.
Fan assisted oven:
S Fan-assisted oven position
Your oven facilitates multi
functional utilization through its
bottom heating element, top
heating element and turbo fan.
This system ensures that your food
is cooked in the best possible
manner by using the functions of
your oven in a most efficient
manner.
(S In this position you can cook by
operating the bottom resistance and
turbo fan according to the
characteristics of the meal you cook,
S You can use this position to fry
to top of your meal better.
In these positions cook will one
tray.
@ Turbo oven:
In this position, you can perform the functions
listed below by operating the turbo-heating
element and turbo-fan.
* In timer equipped models; timer and heater
are connected serially. Therefore, to run heater,
your timer must be adjusted (please refer timer
guide).
* For food that is cooked at the same
temperature but has different cooking times,
you should set the oven program according to
food which has shortest cooking period Set the
additional duration for the remaining foods after
taking out the food that has first been cooked.
* Energy conservation can be achieved with your
oven by cooking two or three different foods at
the same time, without mixing their odours.
* Pierce the dough to prevent the space
between the trays from becoming blocked
through swelling while cooking pastries in the
turbo position using three trays.
Page 8
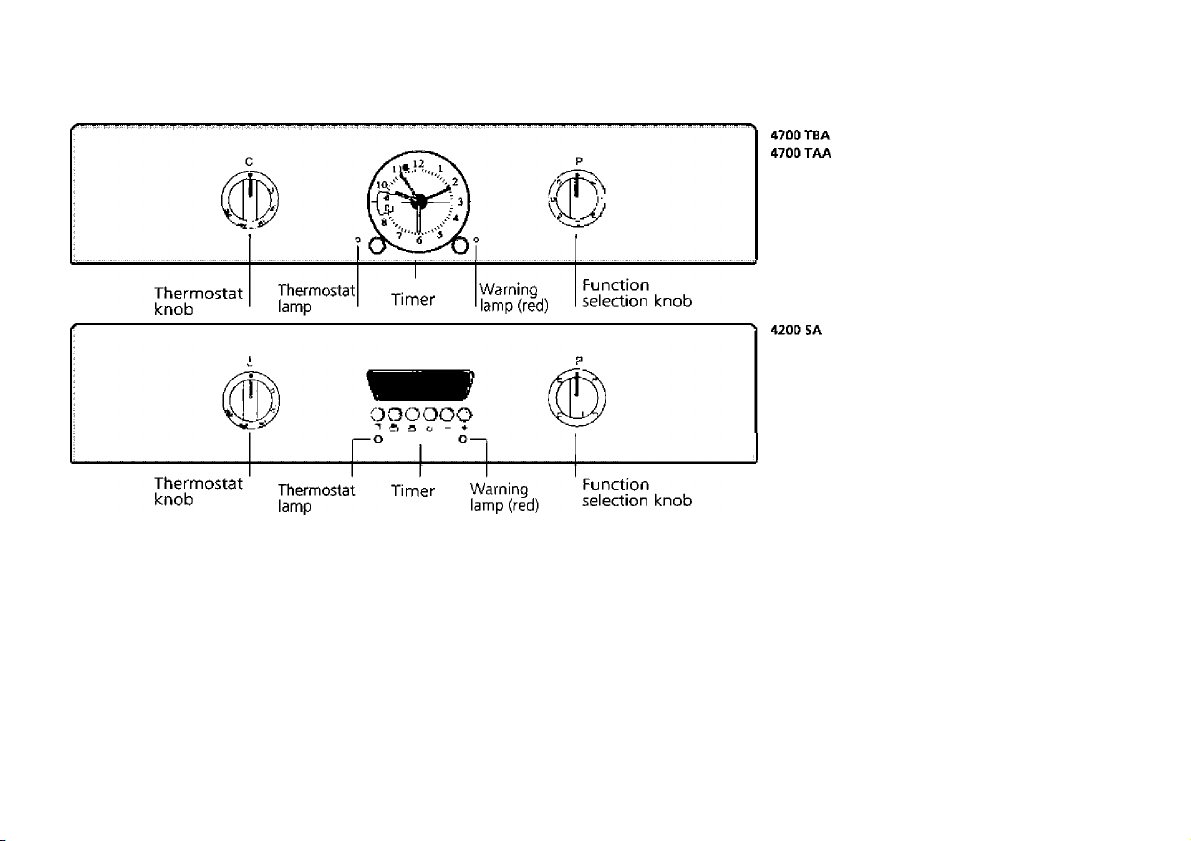
Introduction of control panel
Warning lamp (red)
Indicates hob operation.
Thermostat lamp (yellow): If oven inner temperature exceeds your setted
temperature, thermostat cuts off your appliance circuit and turn off lamp.
Page 9

Operating the oven
Oven heating control knob
This knob is used together with the
"function selection" knob. Select the
desired stage with the "function
selection" knob. Then rotate the "oven
heating control" knob clockwise. The
lamp and the heating elements in
conjuction with the stage you have
selected, or the fan will come on line.
The temperature in the oven shall be
sensed by the thermostat. The
thermostat switches off the heating
element and the thermostat light when
the set temperature level is reached
inside the oven. When the temperature
falls below thermostat comes back on
line and the thermostat light
illuminates. This way, the set
temperature level is maintained
throughout the cooking period.
Function selection knob
This knob allows you to select
functions and carry out checks. The
functions and their stages are
explained below. In order to operate
the stages, you need to bring the
"function selection" knob together
with the "oven heating control" knob
to the desired temperature degree and
adjust the timer if there is. If your
cooker has timer; refer to the
description of timer usage.
Using the oven's timer; If your oven has
a timer; You can do
full automatic, semi automatic and manual
cooking.
You should adjust the electronic timer prior
to using oven.
The electrical current to the heatings
elements flows thought the electronic
timer. The timer must be set in order for
the heating elements to go into operation.
In automatic cooking; do not leave spoilable
foods in the oven up to cooking start time.
* The kinds of food you want to cook.
Thermostat positions. Shelf positions
and recommended cooking times are
given at the cooking table.
* Bring the thermostat knob to the
position you want and function knob
to the " [^" position.
* Preheat the oven for 10 minutes with
oven door closed.
* Locate the meal you want to cook
into the oven after preheating.
* After cooking, bring the knobs to
the "0" position.
06
The stages of the static oven
function selection knob
Top and bottom heaters
are on.
Bottom heater is on.
□
Top heater is on.
□
Means only the grill heater
is on.
□
You must bring to the
heating control knob to the
maximum temperature.
Page 10

Cooking table
SHELF
POSITIONS
Foods
Stiort bread (Serves 8) 24-26 cm bread mould
Cake in mould (Serves 5) 18-22 cm cake mould
Cookie (Serves 121 Cookino Sheet
Flaky Dastrv (Sirves 12|
Brioche Cooking sheet
Pastry (Serves i)
Yeasled dough (Serves 181
Biscuits (Serves 10)
Cake (Serves 20)
MlHeteullle pastry (Serves 8) Big tray
Lasagne (Senres 8)
Pizza (Serves 8)
Roast beef (Serves 8) Roasting dish
Lamb shoulder (Serves 8) Roasting dish
Roasted chicken Roasting dish
Roasted turkey (5.5 kg) Big tray
Fish Roasting dish
COOKING PAN
Cooking Sheet
1 1 Top and
^ bottom
2-3
2-3
2-3
2-3 180-190
Z-3
Big tray Z-3
Big tray 2-3 200-220
Cooking sheet
Big tray
2-3
2-3
Z-3
Lasagne dish
Big tray
2-3
Z-3
2-3
2-3
2-3
2-3
_______
*Fof roasted meats, the thermostat starts with the highest level and decreases
to 150°C after 15 minutes.
THERMOSTAT
POSITION
Top and
“ bottom
170-180
170-130
170-190
160-180
190-200
170-180
170-180
200-210
170-180
200-220
250(15minl*
250(15min)*
250(15min)*
220 (25min)*
200
COOKING
TIME (min)
Topand
bottom
25-35
25-35
25-35
25-35
25-35
40-50
35-45
20-30
25-35
25-35
40-50
30-35
110-120
70-90
60-70
180-240
15-25
-
Note: The values on the cooking table are the
results we got in our laboratory.
The cooking table may be changed according to
the quantity of products. You can find different
tastes suitable for your harmony according to your
cooking and using habits.
* If you want use the oven tray and want to make
a cooking in another pot. prefer the right cooking
adjusment because of your experiences.
* Don't use the pots that have heat perfecting or
bad conduction and glass pots for making cooking
pastry. The oven tray is the convenient off all.
* To use mold makes a better result for cooking
cakes
* The cooking time may be changed according to
the quantity of products.
* When putting the trays into the oven, be careful
to put the trays on a level with others.
* Before cooking, make a first heating for 10
minutes, then put your food into oven.
* 5 minutes prior to the finishing time you can
close the system for providing energy savings with
non- opening the door.
After closing your oven; the vantllate goes on to
work for a little to cool the electrical heaters on
your oven.
07
Page 11

Operating the oven
Multi-function ovens
The stages of the multi- function oven
function selection knob
Oven heating control knob
This knob is used together with the "function selection" knob.
Select the desired stage with the "function selection" knob.
Then rotate the "oven heating control" knob clockwise. The
lamp and the heating elements in conjuction with the stage
you have selected, or the fan will come on line. The
temperature in the oven shall be sensed by the thermostat.
The thermostat switches off the heating element and the
thermostat light when the set temperature level is reached
inside the oven. When the temperature falls below thermostat
comes back on line and the thermostat light illuminates. This
way, the set temperature level is maintained throughout the
cooking period.
Function selection knob
This knob allows you to select functions and carry out checks.
The functions and their stages are explained below. In order
to operate the stages, you need to bring the "function
selection" knobtogether with the "oven heating control" knob
to the desired temperature degree and adjust the timer if there
is. If your cooker has timer; refer to the description of timer
*
usage.
* The kinds of food you want to cook, Thermostat positions,
Shelf positions and recommended cooking times are given
at the cooking table.
* Bring the knobs to the position you want.
* Preheat the oven for 10 minutes with oven door closed.
* Locate the meal you want to cook into the oven after
preheating.
* After cooking, bring the knobs to the "0” position.
08
Fan and oven
lamp are on.
%
Fan and turbo heater are on.
Fan and bottom heater are on.
A
Top and bottom heaters are on.
Fan, top and bottom heaters
A
are on.
Fan and top heater are on.
A
Means only the grill heater is on.
You must bring to the heating control
knob to the maximum temperature.
6. shelf -
5. shelf -
4.shelf —
3. shelf -
|—2. shelf -
1. shelf
Page 12

Cooking table
SHELF POSITIONS
Foods
COOKING PAN
Fan with
ring
heater
Short bread (Serves 8) 24-26 cm bread mould 3
Cake in mould (Serves 5) 18-22 cm cake mould 3
Cookie (Serves 12)
Cooking sheet
4
Flaky pastry (Serves 12) Cooking sheet 4
Brioche Cooking sheet 4
Pastry (Serves 8) Big tray 4
Yeasted dough (Serves 18) Big tray 4
Biscuits (Serves 10)
Cooking sheet
4
Cake (Serves 20) Big tray 4
Milleteuille pastry (Serves 8) Big tray 4
Lasagne (Serves 8) Lasagne dish 4
Pizza (Serves 8) Big tray 4
Roast beef (Serves 8) Roasting dish 4
Lamb shoulder (Serves 8) Roasting dish 4
Roasted chicken
Roasting dish 4
Roasted turkey (5,5 kg) Big tray 4
Fish Roasting dish 4
*For roasted meats, the thermostat starts with the highest level and
decreases to 150°C after 15 minutes.
• The values listed in the table are the results obtained from laboratory testing.
• You may find different flavours of the food according to your own cooking
and usage practices.
• If you wish, you can add the time it takes to pre-heat the oven to the values
listed in the table.
□
Top and
bottom
2-3
2-3
2-3
2-3
2-3
2-3
2-3
2-3
2-3
2-3
2-3
2-3
2-3
2-3
2-3
2-3
2-3
THERMOSTAT
POSITION
Fan with Top
andbotbsm
3 170-180 15-25
3 170-180
3 170-190 20-30
3 180-190 20-30
3
160-180
3 m/ :180-190
n/m : 190-200
3 ffl/ : 190-200 25-35
n/m :200-220
3 170-180
3 170-180 20-30
3 200-210 20-30
3 170-180
3 200-220 20-30
3 250(15min)* 90-120
3 250(15min)* 55-80
250 (15min)*
3
3 220 (25min)* 170-220
3 200 15-20
Shelf position (In fan with
ring heater model)
For 3 trays : 2 - 4 - 6
For 2 trays : 4 - 6
For 1 trays : 4
COOKING TIME (min)
Fan with
ring
heater
Top and
bottom
25-35
20-30
25-35
25-35
25-35
20-30
35-45
25-35
40-50
35-45
15-25
20-30
25-35
25-35
35-45
40-50
30-35
110-120
70-90
55-65
60-70
180-240
15-25
Q Top and bottom heater
2] Fan with Top and bottom heater
□
Fan with Tqi aid
bottoni
20-25
20-25
20-25
20-25
20-25
30-40
25-35
18-22
20-25
20-25
30-40
25-30
100-110
60-75
50-60
150-210
15-20
Fan with ring heater
(IF AVAILABLE)
09
Page 13

Note: The values on the cooking table are the results we got in our laboratory.
The cooking table may be changed according to the quantity of products.
You can find different tastes suitable for your harmony according to your
cooking and using habits.
* If you want use the oven tray and want to make a cooking in another pot,
prefer the right cooking adjusment because of your experiences.
* Don't use the pots that have heat perfecting or bad conduction and glass
pots for making cooking pastry. The oven tray is the convenient off all.
* To use mold makes a better result for cooking cakes
* The cooking time may be changed according to the quantity of products.
* When putting the trays into the oven, be careful to put the trays on a level
with others.
* Before cooking, make a first heating for 10 minutes, then put your food
into oven.
* 5 minutes prior to the finishing time you can close the system for providing
energy savings with non- opening the door.
After closing your oven; the vantilate goes on to work for a littJe to cool the
electrical heaters on your oven.
The accessories on product (according to different models)
* Grill; For grilling or putting saucepan when using another pot in oven.
* Oven tray (grand); For cooking pastries.
* Grill in tray; For grilling
* Deep tray; For cooking the watery foods, recommending
* Glass tray; For cooking the watery foods, recommending
Warning about glass tray
* After cooking, don't put the glass tray that you out of the oven on wet and
cold surface. Wait for it's cooling on a dry cloth.
* Don't put the glass tray, that you take out of the refrigerator, into the hot
oven.
* Don't cut the metarial in glass tray with knife.
* Don't dean the trays of the oven with metarials such as hard brush, dish fiber
or knife. During cleaning, don't use metarials with sharp edge.
* Do the cleanings of glass surface with special glass cleaning materials.
Sterilizing (canned)
6. shelf -
5. shelf —
4. shelf
3. shelf
-2. shelf
1. shelf
For this process firstly;
Put the tray to first shelf. Put 1/2 liter water at approximately
SOX into tray. Pay attention to the jars for being not contected
each other. Close the lid of your oven. Brings the ovens
"function sellector" knob to " □" position Then;
To sterilize fruits;
Turn "Oven heating remote-control device" knob between
150-200 X ( approximately 180 X). After 45 minutes, bring
"function selectior" knob to "0" positon. Take out of the
oven after 30 minutes.
To sterilize vegetables;
Turn "Oven heating remote-control device" knob between
100-1 SOX. After 80-90 minutes, bring "function selector"
knob to "0" positon. Take out of the oven after 30 minutes.
Page 14

Operating the grill
» Preheat the grill at □ (grill setting) for
approximately 5 minutes. For this period
the heat control knob shall be at the max
setting and the door must be dosed.
The indicator light will illuminate to
show that the grill is switched on.
Apply oil on the grill shelf to prevent
meat from sticking on the bars.
Put a tray on one of the bottom shelves
in order to collect oil and for easy cleaning
put some water in it.
Use 4 or 5. shelf position for grilling.
Do not allow children to sit or
stand on the oven door when the
door is open.
Using the Knob Heat Shield
housing into Oven Door (for
suitable models)
* WARNING! Do not grill when the front
door is closed. Otherwise, oven parts may
be damaged. After preheating, keep the
front door half-open during grilling.
In order to prevent the knobs of the control
panel from heating up, center the knob
shield plate between the front cover and
the oven housing without leaving any gap.
Shell positions
*■ Accessible part may become
hot when the grill is in use.
Don'allow children to be dose.
If tray and thread grill are given with oven; use these when making grill.
Shell po^Hion
Cooking
dufofion imin '
Front door
1 1
Lamb
Lambe hops
Beef
Veal chops
Mutton chop
Depending on the thickness
4-5
4-5
4-5
4-5
12-15
12-15
15-25 HI
15-25 [1|
Page 15

Operating the timer
(If your cooker has a timer)
Setting the electronic timer
You should adjust the electronic timer prior to using the oven.
Otherwise your oven will not operate.
Your oven's electronic timer is operated similar to a normal timer.
Your oven's electronic timer will be reset if the electrical power
is cutoff. The electronic timer will run slow if the frequency of
your supply power is not appropriate (This malfunction is not due
to your timer itself. In such cases, you must re-adjust your timer).
88.98
oooooo
a' G a - +
”0" ; Programming button for warnings
The following functions are available on
your programmable timer.
1. You can adjust cooking durations between 00.00 - 24.00
hours.
2. You can use it as a chiming alarm between 00.00 - 24.00
hours.
3. You can run a cooking program for fully-automatic, semi
automatic and non-programmed (manual) cooking. (The heating
elements inside the oven are tied into the electronic timer and
are programable.
^ : Cooking period adjustment button
S : Cooking terminating time adjustment button
; Manual adjustment button (non-programmed
cooking)
— + : Time adjustment buttons
12
Page 16

Please note
* The timer controls the oven heating element
only and the current time of day must be set
before the oven will function.
* If the timer has been set to an automatic
or semi automatic programme, the daily time
cannot be readjusted, the semi or auto
programme, must be cancelled. See "How
to cancel automatic
programme".
How to set the current time
of day
The clock display uses a 24 hour configuration
8:30 pm = 20:30
* Press and hold " 0 tZT'* buttons at the
same time.
* Press " + " button to increase or to
decrease, the time.
* Adjust using the " + " or" -" buttons to
set the current time. If "Auto" flashes.
See "How to cancel automatic
programme".
* Release the buttons, the clock will now
start.
oooooo
Tr e o o - +
Manual cooking (or to
cancel a programme)
* Press" S " button, press the
button, until 0:00 is displayed.
* Press the button.
The " a u t o " and " S " sign will
disappear.
* Set the oven knob to the required
cooking temperature and function selection
knob to the desired position.
* The oven will switch on. The Amber oven
indicator will light.
* At the end of cooking, switch off by
resetting the oven thermostat knob to the
(off) mark.
Note:
The timer will not switch off the oven. To
switch off the oven turn the oven
thermostat and selection knob to the " •“
(off) mark.
13
Page 17

Semi-automatic programming
This mode allows a manual start time but an automatic switch off
time, which is very useful to prevent the over cooking of food.
* Press" Sr" button. Press the " + " (or buttons, to set the
cooking time duration (Auto and" S" will be displayed) in minutes.
* Set the oven thermostat knob to the required temperature and
function selection knob to the desired position.
* The oven will switch on and cooking will commence.
* The programmer will switch the oven off at the end of the preset
cooking time. "Auto" will flash and the timer alarm will bleep.
To turn off the alarm press the "S" button.
* Set the oven thermostat knob to the (off) mark.
* Press button to cancel "Auto".
Automatic programming
The programmer will switch the oven on and off at the required
times.
Ensure the oven thermostat is in "•"'(off) position, and the correct
time has been set.
* Press the "'ll)" button to cancel any program stored. (Auto and
"S" symbol will not be displayed)
* Press the "•©" button and press " + " (or buttons, to set
the stop time required. ( ^ and auto will be displayed)
* Press the button and press button to set the cooking
time (duration) required.
* Set the oven knob to the required cooking temperature and place
your food in the oven.
* The oven will switch on at the required time, cook the food and
switch off at the predetermined time.
* At the end of cooking the alarm will bleep and "Auto” will
flash. To turn off the alarm press the "■&"button.
oooooo
o - +
14
Page 18

Press " " button to cancel “Auto".
* Set the oven thermostat and function selection
knob to the (off) mark.
Note: Make sure you follow food manufacturer's
instructions.
* Press the " CZr " button to view the remaining
cooking time during cooking.
rlilll
Timer alarm
The timer alarm can be adjusted to bleep between
0 and 23 hours 59 minutes, i.e. as a minute minder
to remind you to switch off a hob heating zone.
* Press the " "¿J" " button, press the or
buttons to set the desired alarm time.
* The timer alarm will bleep at the end of the
time period.
* To turn off the alarm press the " mr" button.
How to cancel automatic
programme
* Press " o " button, press button until
the clock display shows 0.00
TIMER
drop
* Press "\l!y " button, the programme has now
been cancelled.
* The current time can then be reset.
gooooo
Ü ^ ff} yj — +
(If Available)
Activating the Demo mode/Key lock
The Demo mode is conditionally applicable as key lock.
If it is activated, the relays remain open all the time.
Thus timer can be operated as usual but the connected
appliance or appliance module remains unaffected. This
means that your child can select the cook program but
the program will not be activated and thus the connected
appliance or appliance module will not be switched on.
To activate the demo mode/key lock:
1. Make sure that the clock is in manual mode and cancel
any active programs.
2. Hold the " ^'2" “ button and the " q " button
down simultaneously for approx. 8 seconds. The display
will read "ON".
3. Press the " + " button.
The display reads "O FF" and the"?" symbol appears.
After approx. 5 seconds the time reappears next to the "
? " symbol. The key lock is now activated.
To deactivate the demo mode/key lock:
1. Make sure that the clock is in manual mode and cancel
any active programs.
2. Hold the "^2” “ button and the 'tij " button
down simultaneously for approx. 8 seconds. The display
will read "OFF".
3. Press the " + " button.
The display reads "ON" and the " ?" symbol disappears.
After approx. 5 seconds the time reappears on the display.
The key lock is now deactivated.
15
Page 19

Using the mechanical timer
Cooking Time : Shaft ® Disk ©
■Minute minder (Yellow) C
Minute hand (Gold) A
-Start of cooking (orange)F
1: To set minute minder (Time of day pull)
2: To set cooking time
(start of cooking pull)
Clock : Shaft (1) Hands ® & (D
To set the time of day pull and then turn the shaft ® clockwise.
Set the hands ® & d) in the right position of the time of day.
Minute minder: Shaft 0 Hands (5)
Mechanical bell after a maximum duration of 55 minutes
To set the minute minder turn the shaft ® clockwise and
anticlockwise and put the hand © in front of the selected
duration.
>- At the end of the timing, the bell rings and stops
automatically after aronud 3 minutes. The bell can bastopped
manually by turning the shaft © to put the hand © on the
position STOP .
Immediate start of cooking and automatic stop of
cooking.
Maximum duration: 180 minutes (3 hours).
>■ To set the cooking time, turn the shaft (D clockwise
and put the graduation of the disk (D in front of the ®
index © of the dial.
5^ The end of cooking is indicated by a bell which
stops automatically after 3 minutes. The disk @
indicates "O” (off position). This bell can be stopped
manually by turning the shaft © in order to put the
“0” of the disk in front of the index
Cooking Start Time : Shaft @ Hand©
Cooking completely automatic with delayed start
and automatic stop of cooking.
Maximum delayed start; 12 hours.
X* Before setting the cooking start time, ensure that
the “0" of the disk © is positioned in front of the
index© of the dial.
5^ To set the cooking start time, pull and turn the shaft
©in both directions (clockwise and anticlockwise)
and put the hand © in front of the cooking start time.
When this operation is over set the cooking time as
above mentioned.
16
Page 20

Future transportation
* Transporting the oven;
Store the oven's original box. Transport the oven in its
original carton. Follow the guidance marks that are printed
on the carton.
To prevent the wire grill and tray inside the oven from
damaging the oven door, place a strip of cardboard or
paper 1 to 1.5 cm in thickness onto the inside of the oven
door that lines up with the position of the trays. Tape the
oven door to the side walls.
* If you do not have the original carton;
Take the necessary precautions in order to prevent the
exterior panels, and the glass surfaces of the oven from
being damaged.
Pack the oven in bubble wrap or thick cardboard and tape
it securely in order to prevent damage during transportation.
The oven must be transported upright. Do not place other
items on the top of the cooker.
17
Page 21

Maintenance and cleaning
Turn off the mains switch before cleaning.
* Before switching on again ensure that all controls are in the OFF
position.
* Never clean the cooker surface by using materials such as hurd
brushes, steel pads or knives, which can easily scratch the
enamelled and stainless steel surfaces.
Control panel
Wipe over the control panel with a damp cloth and polish with a
dry cloth. Do not use oven cleaners or aerosols, scouring pads or
abrasive powder for cleaning the plastic knobs as damage will
occur, Do not attempt to remove any of the control knobs from
the panel as this may cause damage and is a safety hazard.
* Special cleaners that are commercially avaible may be used after
carefully reading the warning labels written on them. Do not use
cleaning agents containing acid or chlorine. Cleaning can be
accomplished using a soft piece of cloth wetted with soapy water
or with commercially avaible special surface cleaners and a soft
piece of cloth. Especially use liquid paste or cream type cleaners.
Warning!
Never clean the inside of the oven and trays with hard
brushes, steel pads or knives.
Do not use cleaning agents containing acid or chlorine on
stainless steel surfaces and the handle. Cleaning can be
accomplished using a soft piece of cloth wetted with soapy
water or with commercially available special surface cleaners
and a soft piece of doth.
18
Oven interior
Before switching on again ensure that all controls are in the OFF
position. Take out all trays and the grill out of the oven. Clean
out the interior with a piece of moist, soapy cloth. Then, clean
it once more with a wet piece ot cloth and let it to dry.
Do not use dry powder agents for cleaning.
Special cleaners that are commercially available may be used
after carefully reading the warning that are written on the labels.
* Catalytic-enamelled models;
The oven interior of this
model is coated with catalytic enamel since the catalytic enamel
cleans itsellf, you do not have to perform an extra cleaning after
the cooking operation.
If your oven obtains steel rack; To
clean the steel rack, unscrew the 4
screws. After cleaning operation,
assemble the steel rack to the oven
body again.
__ __ __ _ _ _ _ _ _ _ _ _ _ _ _ _ _ _ _ _ _ _
9
Do not use these
steel
wool
Cleaning
powders
abrasive
sponges
materials for
cleaning
Page 22

Lowering the heating element
Warning!
Make sure that the heating element is
sufficiently cool before you start cleaning.
Warning!
Never switch on the heating element or
place any wright on it when the heating
element is in the lowered position.
1. Unlock the heating elementby turning the
screw at the selling of the oven cavity.
2. After cleaning, move the heating element
upward and screw it to the ceiling of the
oven cavity.
Replacing the oven lamp:
1. Unplug the power cable.
2. Then, remove theprotective
glass cover of the lamp inside
your oven by turning it
counterclockwise.
3. Then, remove the bulb by
turning it
counter-clockwise.
4. After installing the correct
bulb obtained from an Authorized
Service, reinstall the protective glass
of the lamp.
For the square-shaped lamp models:
There are 2 square-shaped lamps
at right and left side of the oven
inside. Both lamps are on and
off at the same time.
oven lamp
Replacing the Oven Lamp
Disconnect the appliance
from the supply Take out
screws on the side shelve.
Take out Lens of the oven
lamp by means of the flat
screwdriwer. Replace defective lamp with
the new one.
Reinstall lens and side shelf. Lamp type
is 220-230V, 1 5/25W E14,T300°C
19
Page 23

Oven-Mounting and Warnings
Things to Pay Special Attention to Regarding the Electrical
Connection
- Have the device's electricity connected by a certified electrician.
- This device belongs to the primary protection class and must be
operated only via a grounded electrical connection.
- The device must be installed in such a way as to prevent contact
with the electrical connections.
- If, together with the product, a main cord is not provided, or if a
main cord is provided without a plug: a circuit breaker must be
used with the product such that a 3 mm gap stands between all
contacts capable of severing the electricity among all of the poles
on the product.
- During product installation, ensure that no more than one of its
side surfaces, if necessary, stands close to a high wall or cupboard.
In wall ovens that come with the pyrolitic cleaning function, a
minimum distance of 30 mm must be left between the oven's front
panel and furniture or wall of the building.
- For the safe and reliable operation of the device, it is recommended
that the back wall of the compartment into which it is installed be
open.
- The consituent materials of the installation cavity must be able to
withstand a temperature of 100°C. This is especially applicable to
and important for wooden materials, coverings that adhere to
edges, plastic surfaces, applied adhesives, paints and polishes.
Furniture in the device's imimediate vicinity must be able to with
stand a temperature of at least 70°C.
Matters to Pay Special Attention to Regarding the Oven's
Installation Cavity!
Prior to installing the device, the cutting of furniture and countertops
or renovation activities need to have been comipleted. Sawdust and
debris on the surfaces of furniture near which the product is to be
installed must be cleaned. Otherwise the device's cord and electrical
connection could become damaged.
- For the furniture cavity dimensions and the placement of the
device, see the diagram.
- If a drawer is to be located underneath the device, a separator
panel must be placed between the device and the drawer.
- Because the device is installed flush with the back wall, the
electrical socket, except for the device's mounting area, must be
located in an easily accessible place.
- For integrated ovens, the electrical connections and installation of
the stove control buttons must take into account that the stove
control buttons will be on the front panel of the oven.
- Ensure that the furniture cabinet of the kitchen countertop has
been stabilized/immobilized.
- For the oven's proper ventilation, there must be a distance of up
to 35 mm between intervening furniture surfaces and the back
wall.
Matters to Pay Special Attention to Regarding the
Positioning of the Oven
- By pushing the device, insert it fully into the furniture
compartment.
Attention! During insertion, ensure that the electrical cable is not
broken or pinched.
- For air circulation, some empty space must remain between the
walls and the compartment into which the device is installed. For
this reason, prior to stabilizing/immobilizing the device, try to center
it within the cabinet.
- After positioning the device, stabilize/lmmobilize it with screws as
shown in the diagram.
- The space between the upper surface and the device must not be
blocked/occupied by any object.
When removing the oven from the furniture cavity,
- Disconnect the device's electricity.
-Unscrew the stabilization/immobilization screws.
- Remove the device by slowly lifting and pulling out.
20
Page 24

Page 25

Positioning of the Oven
un eacn siae ot me
- instai lalion cavity, position
1
íT-
a piece of the same depth
as the cabinet or at ieast
4 cm wide.
■3;5 cm
Mounting
<sr
22
Page 26

Process that you must do before calling service
Before calling service, please do the controls below
If the oven is not heating;
Your product's plug can be not connected
to grounded socket. Fuse can be off. In the
models with clock, clock can be not set up.
Is temperature device mode with oven
heating remote-control device knob?
Is the fuse of socket that the oven's
connected or main fuse off?
If your oven is not working;
In multi -system oven, is function selector
knob set up to necessary functions?
if internai illumination lamp is off;
Is there electricity? Can the lamp be out of order?
If its out of order, change it by looking guide.
Cooking (if topand bottom part is not cooking
equal);
Control the temperature value, time of cooking
and shelf positions according to using guide.
If there is stiil probiem in the product; please
call authorized service.
23
Page 27

Important do's and don'ts
Don'ts
* Don't leave children unsupervised where
the cooker is installed and in use as all
surfaces will get hot.
* Don't allow children to sit or stand on
the oven door when open in its down
position or allow any person to sit or stand
on part of the appliance.
* Don't use large preserving pans or fish
kettles across two hotplates as this will
damage the hob.
* Don't store items above the cooker that
children may attempt to reach.
* Don't use water to extinguish oil or fat
fires.
* Don't use the cooker as space heater,
dryer.
* Don't heat up unopened food containers
as pressure can build up causing the
container to burst.
* Don't place flammable or plastic items
on or near the hob, and never place wet
cloths etc. on the hob to dry.
* Don't use biological washing powder or
harsh abrasives or chemical cleaners for
cleaning the oven inner panels.
* Don't leave a hotplate on for long
periods when not covered by a pan.
Spillage should be dealt with as soon as it
occurs, taking due care as the hob surface
may be hot. Any spillage left on the
surface after cooking should be cleaned
off before the hob is switched on again to
prevent baking on.
* Don't store flammable materials, aerosol
etc. In adjacent cabinets.
* Don't cover ventilation slots in any way.
* Don't use the handles to hang towels,
dishcloths etc.
* Don't use round-bottomed (traditional)
woks. Use flat-bottomed types.
* Don't place dishes, pans, trays directly
onto the oven compartment base.
* Don't cover oven shelves with aluminium
foil as the air circulation in the oven will
be disrupted.
* Don't line the grill pan with aluminium
foil.
* Don't attempt to grill with the door
closed.
* Don't use the grill to warm plates.
Do's
* Have your appliance installed by a
qualified engineer or a technician.
* Make sure you understand the controls
prior to using your appliance.
*Ensure that no flammable materials are
adjacent to the appliance as the sides of
the appliance become hot during
24
operation.
* Keep children away from the cooker at
all times when in use as surfaces will get
extremely hot.
* Always turn off the electricity supply at
the wall switch before cleaning.
* Check all controls on the appliance are
switched off after cooking.
* Keep all ventilation slots clear of
obstructions.
* Remember that the oven and the utensil
will be very hot when in use.
* Note that times and temperatures in this
book are for guidance only.
* Ensure meat and poultry is thoroughly
defrosted before cooking.
* Take care when removing utensils from
the grill as they may be hot.
* Take care when opening the door. Let
steam and hot air escape before removing
the food.
* Use quality oven gloves for removing
hot food utensils from the oven/grill.
* Select the correct shelf position before
turning the oven or grill on.
* Clean your cooker regularly, ideally after
each use.
* Allow the appliance to cool before
cleaning.
* Always refer servicing to a qualified
appliance service engineer.
 Loading...