

Page 1

Encastrable oven
Instruction manual
4401 4701 E CIM302000TX
English version of the 285.6157.31
manual- 07.08.07
Page 2

GB
Dear Customer!
We would like to take this opportunity to thank you for deciding to purchase one
of our products. The appliance you have purchased fulfils the highest demands and
is easy to use. Nonetheless, you should take the time to read these operating
instructions. This way, you will become familiar with your appliance and can use it
optimally and without disturbance. Please take note of the safety information. We
wish you happy cooking with your appliance.
- Keep these operating instructions with your equipment. In case of selling
or giving it to another person, be sure that the operating instructions
accompany it. Thus the new user will be informed of its operating system
and the related notices. These notices have been recorded for your
security and others as well.
This product, is produced in modern
environment,without giving harm to
facilities which are respectful to
the nature I
Page 3

Contents
Technical specifications ^
Safety precaution and 4
important items
General safety
Important for child 5
Installation for your oven
Electrical connection
Installation
______________
................................
......
.....................
....................................
6
Superior properties of
product, practical and useful 10
informations
Superior features.
_________________
Introducing the control panel
and using of oven
Introducing the control panel
Using of oven part
Operating the grill
Operating the timer.......................18
.................
........
........................
.........................
12
12
13
17
I Process that you must do 23
I
before calling services
4
6
7
_________
Maintenance and cleaning 21
Cleaning the oven....................... 21
Lamp changing ............................22
Transport
......................................
23
@>
Page 4
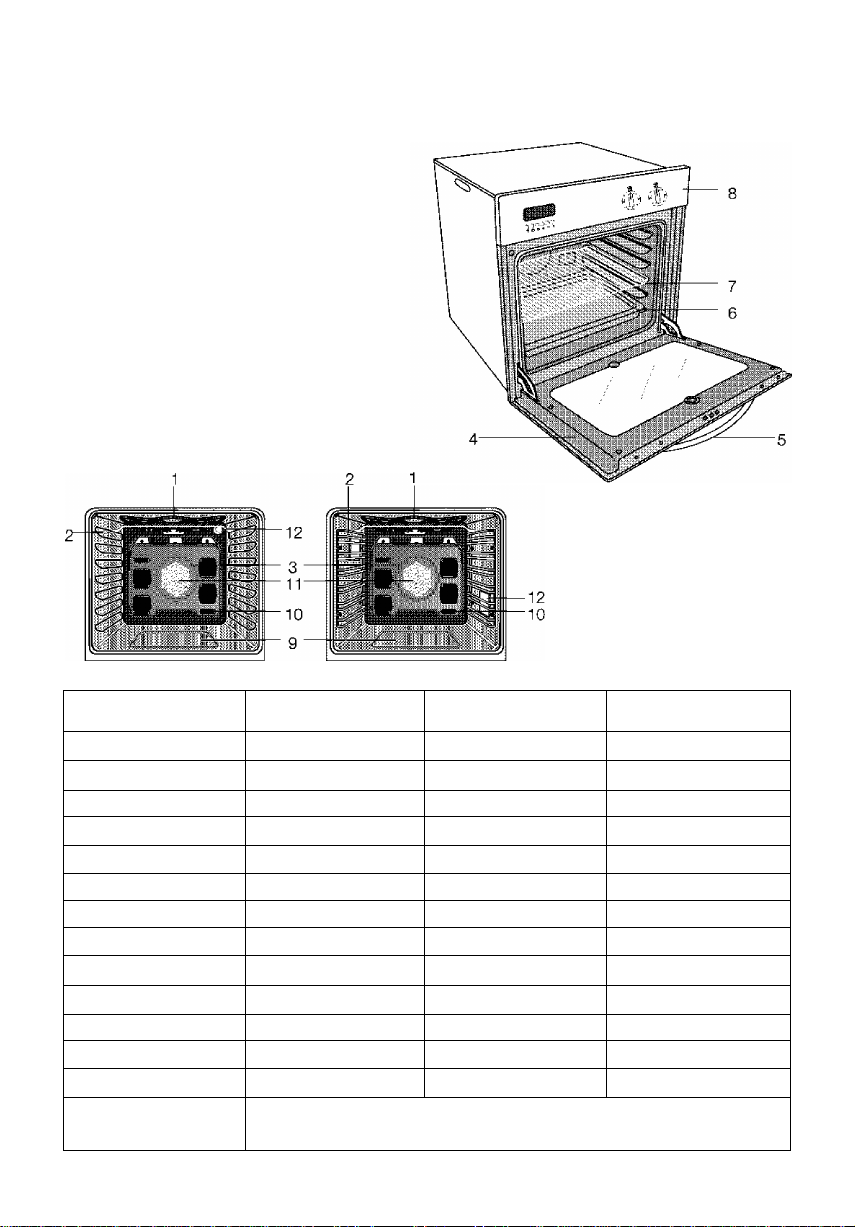
Technical specifications
1. upper heating element
2. Shelf positions
3. Ring heater (behind steel plate)
4. Front door
5. Handle
6. Tray
7. Grill shelf
8. Control panel
9. Bottom heater (behind steel plate)
10. Air exit holes
11. Fan motor (behind steel plate)
12. Lamp
Outer width
Outer depth
Outer height
Installing dimensionE
Width
Depth
Height
Oven output
Grill output
Ring heater
Fan motor
Supply voltage
Lamp
Cooking
4401 4701 E CIM 302000 TX
594 mm 594 mm 594 mm
550 mm 550 mm 550 mm
595 mm 595 mm 595 mm
600 mm 600 mm 600 mm
560 mm 560 mm 560 mm
600 mm 600 mm 600 mm
2500 W 2500 W 2400 W
1100/2300 W
-
1100/2300 W
1800W 1800W
1100/2300 W
+ -1 - -1 -
220-230 V ~ 50 Hz 220-230 V ~ 50 Hz 220-230 V ~ 50 Hz
15/25 W
15/25 W
15/25 W
In models with timer, programmed or non programmed with
eletrical timer
3 dB)
Page 5

Safety precautions and important items
This appliance is not intended for use
by persons {including children) with
reduced pyhsical, sensory or mental
capabilities, or lack of experience and
knowledge, unless they have been given
supervision or instruction concerning
use of appliance by a person responsible
for their safety.
Children should be supervised to ensure
that they do not play with the appliance.
Before plugging your equipment, be
sure that the tension and the frequence
given on the indicator plate correspond
to your electricity installation.
* Before applying to authorized service,
have the electrical wiring of your home
ready for connection.
* If the current value is less than 16
Amperes please have 16 A fuse with
electrician.
* The ground cable should always be
performed by the manufacturer or its
authorized service agent or a similarly
qualified person. Our company shall not
held responsible for any damage coused
by the utilisation of the oven without ground
cabling.
* While locating your oven; do not squeeze
the supply cord under the oven body or
inside the oven door, because the cable
isolation can be damaged.
* If the supply cord is damaged, it must be
replaced by the manufacturer or its service
agent or a similarly qualified person in order
to avoid a hazard.
Don’t change the qualifications of this
equipment. It would represent a danger
for you.
^ Verify the general appearance of your
equipment by identifying possible damages
during the transportation.
* In models with the timer:
Always adjust the timer during the first
operation or after any interruptions of the
electric supply. Otherwise, your oven will
not operate.
* Do not attempt to move the appliance by
pulling the door and/or handles.
* Do not forget to remove the packaging
material near the tray and wire grill, and the
polysthrene sticked to the front door glass.
* Whilst the appliance is in use; avoid
touching heating elements inside the oven
as the accessible parts of the appliance
will become very hot.
* The cooling fan will continue for a
while after switching the oven off.
* Always switch off the appliance from the
mains when the appliance is not in use
before cleaning or in the unlikely event of
any probable product failure.
* Ensure the appliance is switched off
before replacing the lamp, to avoid the
possibility of electric shock.
* In models with Grill;
^Always use oven gloves when removing
the grill rack and dishes from inside the
oven when in use.
*lf, whilst cooking, steam produced comes
into contact with cool surfaces on the
outside of the appliance, it will condense
and produce water droplets.This is quite
normal and is not a fault. Wipe it with a dry
cloth.
4 I <|n)
Page 6

Preparation and burning off
Important for asthmatic sufferers
The protective coatings need to be burnt
off before the first use of your appliance.
Fumes \will be emitted but this is quite
normal.
Ensure the room is very well aired
during the burn-off-process. Avoid
direct inhalation of the fumes
generated during this process.
' Do not connect the
[cooker to the electricity
I
supply until all packing and
transit protectors have been rennoved.
The packaging materials can cause
danger for children.
While the front door is open do not
put a heavy object on it, and allow
children to sit on it.
The exterior surface of the oven may
heat up during grilling. Therefore, keep
your children well away from the oven.
Some technical properties can
be changed without informing
before, in order to improve the
product quality.
Some figures inside the instruction
manual may be schematical, and may
not be suitable to your product.
The values which are expressed both on
the prints of the product, or within the
documents distributed together with the
product are the values that are found
after some tests within the laboratory
conditions according to the related
standarts. These values may change
according to the environment conditions
as well as the usage situations of the
product.
Page 7
Installation and preparation
Electrical connection
^ Before your appliance is connected
to the main electricity supply, check
to ensure that the voltage and the
frequency shown in the data plate
correspond with your power supply.
You can find the rating plate under
the front door. When you open the
door, you can see data plate left
bottom side of the cavity entrance.
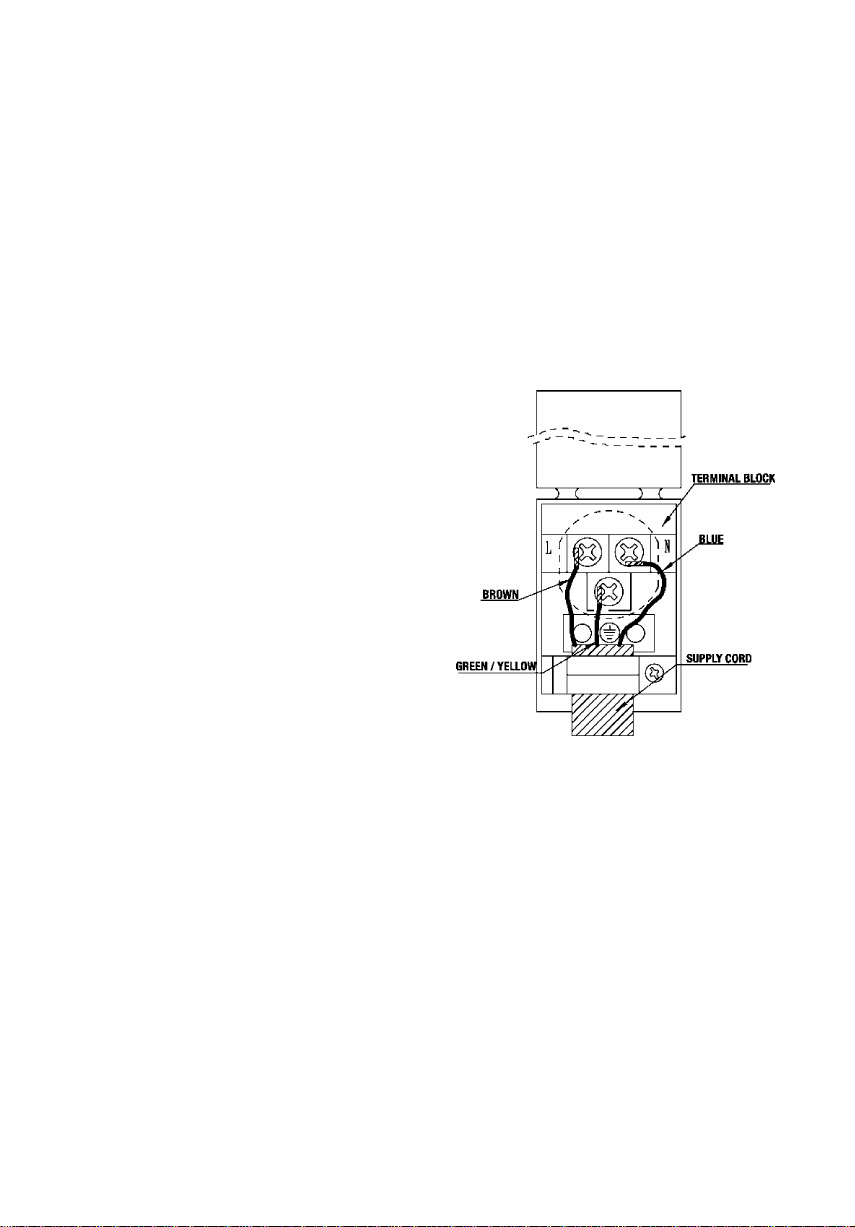
Warning!
This appliance must be earthed!
^ A cable without a plug is provided
together with your oven (H05 VV-F
3G 1.5)
Take care to connect as below:
* Brown cable = L (Live)
* Blue cable ^ N (Neutral)
* Green / Yellow cable - E (Earth)
Our company shall not be held
responsible for any damage caused
by utilization of the oven without
proper grounding.
Before applying to Authorized
Service, have the electrical wiring of
your home ready for connection.
* This product must only be installed
by a qualified electrician eg. local
electricity company to a suitable
double pole control unit with a
minimum contact clearance of 3 mm
in all poles which should be adjacent
to (but not above) the cooker in
accordance with lEE regulation,
Failure to observe this instruction may
result in operational problems and
invalidation of the product warranty.
If the appliance is connected by a
plug, this plug must easily be
accessible after installation (but not
above the hob).
The cable length should be 2 m.
max for isolation safety.
I.Open terminal cover with screwdriwer
2.0pen cable clamp
3. Change the cable according to this
schema.
Take care to connect as below:
Brown cable = L (Live)
Blue cable = N (Neutral)
GreenA^ellow cable = E (Earth
4. Fix the cable clamp
5. Close terminal cover
6 (|й)
Page 8
Positioning of the Oven
Page 9

Positioning of the Oven
Page 10

Oven-Mounting and Warnings
Things to Pay Special Attention to
Regarding the Electrical Connection
- Have the device’s electricity connected
by a certified electrician.
- This device belongs to the primary
protection class and must be operated
only via a grounded electrical
connection.
- The device must be installed in such a
way as to prevent contact with the
electrical connections.
- If, together with the product, a main
cord is not provided, or if a main cord is
provided without a plug: a circuit breaker
must be used with the product such that
a 3 mm gap stands between all contacts
capable of severing the electricity among
all of the poles on the product.
- During product installation, ensure that
no more than one of its side surfaces, if
necessary, stands close to a high wall or
cupboard. In wall ovens that come with
the pyrolitic cleaning function, a minimum
distance of 30 mm must be left between
the oven’s front panel and furniture or
wall of the building.
- The consituent materials of the
installation cavity must be able to
withstand a temperature of 100 °C. This
is especially applicable to and important
for wooden materials, coverings that
adhere to edges, plastic surfaces,
applied adhesives, paints and polishes.
Furniture in the device’s immediate
vicinity must be able to withstand a
temperature of at least 70 °C.
Matters to Pay Special Attention to
Regarding the Oven’s Installation
Cavity!
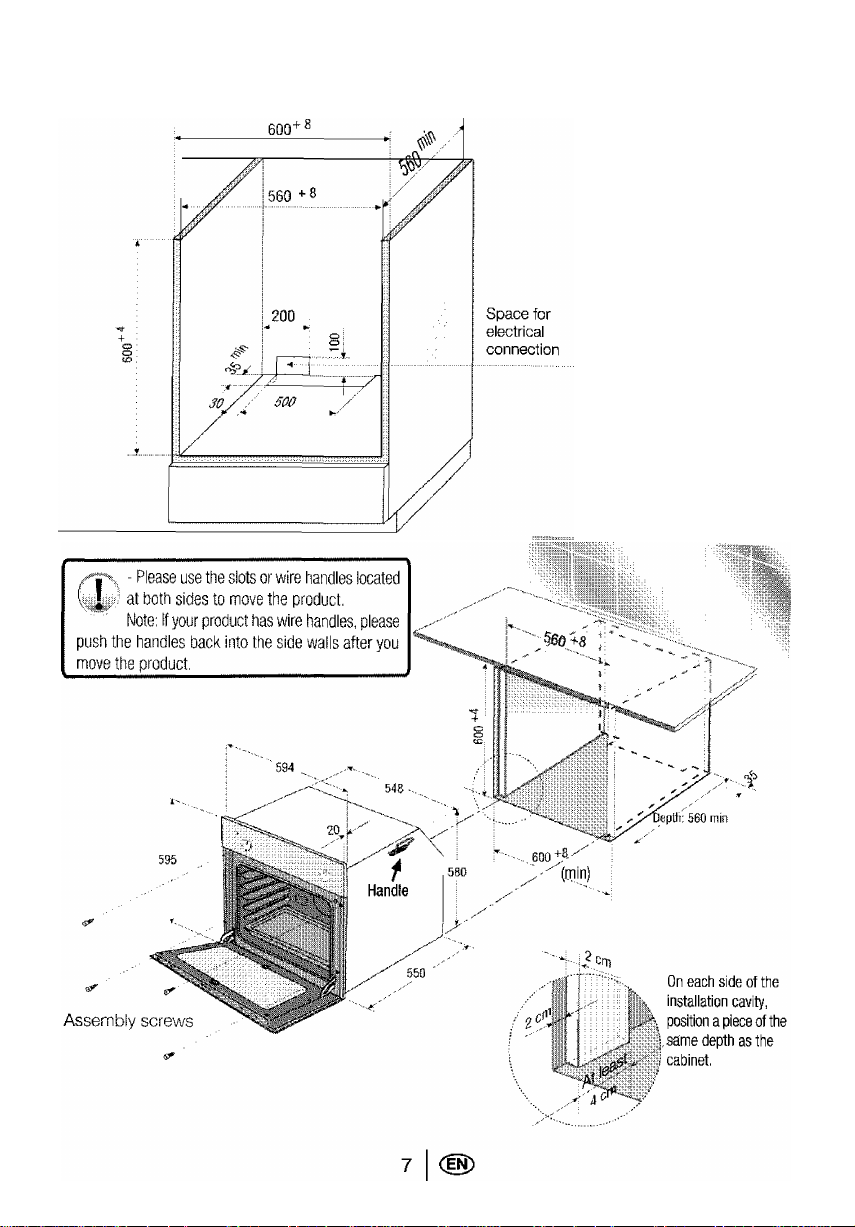
- For the furniture cavity dimensions and
the placement of the device, see the
diagram.
- If a drawer is to be located underneath
the device, a separator panel must be
placed between the device and the
drawer.
- Because the device is installed flush
with the back wall, the electrical socket,
except for the device’s mounting area,
must be located in an easily accessible
place.
Matters to Pay Special Attention to
Regarding the Positioning of the Oven
- By pushing the device, insert it fully into
the furniture compartment.
Attention! During insertion, ensure that
the eleotrical cable is not broken or
pinched.
- For air ciroulation, some empty space
must remain between the walls and the
compartment into which the device is
installed. For this reason, prior to
stabilizing/immobilizing the device, try to
center it within the cabinet.
- After positioning the devioe,
stabilize/immobilize it with screws as
shown in the diagram.
- The space between the upper surface
and the device must not be
blocked/occupied by any object.
When removing the oven from the
furniture cavity,
- Disconnect the device’s electricity.
-Unscrew the stabilization/immobilization
screws.
- Remove the device by slowly lifting and
pulling out.
9
Page 11

The superior features of your oven
1-
I I f I I I
Conventional oven:
□ In this position you can perform
by operating the lower and upper
heating elements.
* The lower and upper heating
elements ensures even cooking of
both sides of your food.
* You can sterilize your food (in
preserved position) in your oven
{refer to on how to sterilize/to make
canned food).
In this postion use 1 tray for
cooking.
□ In this position you can grill.
2-
I I i I I»
Fan assisted oven:
El Fan-assisted oven position
Your oven facilitates multi-functional
utilization through its bottom heating
element, top heating element and turbo
fan.
This system ensures that your food is
cooked in the best possible manner by
using the functions of your oven in a most
efficient manner.
S In this position you can cook by
operating the bottom resistance and
turbo fan according to the characteristics
of the meal you cook.
In these positions cook will one tray.
ID You can use this position to fry to top
of your meal better.
Ш defrost
[Ж] You can use this position to fry
to top of your meal better.
Q You can use this position to fry
to bottom of your meal better.
10 dS)
Page 12

3-
(H Turbo oven:
In this position, you oan perform the
functions listed below by operating the
turbo-heating element and turbo-fan.
* In timer equipped models; timer and
heater are connected serially. Therefore,
to run heater, your timer must be
adjusted (please refer timer guide).
* For food that is cooked at the same
temperature but has different cooking
times, you should set the oven program
according to food which has shortest
cooking period Set the additional
duration for the remaining foods after
taking out the food that has first been
cooked.
* Energy conservation can be achieved
with your oven by cooking two or three
different foods at the same time, without
mixing their odours.
* Pierce the dough to prevent the space
between the trays from becoming
blocked through swelling while cooking
pastries in the turbo position using three
trays.
D 3D function:
In this position, bottom resistance, top
resistance, turbo resistance and turbo
fan operate. It is used as alternative for
turbo oven when we want to cook the
bottom and the top better without
mixing the smells to each other.
5-
Booster mode is just for preheating.
Don't use this mode for cooking proposes.
11 (|n)
Page 13

Introduction of control panel
Warning lamp (red)
Warning lamp (red)
Indicates oven operation.
Thermostat lamp (yellow): If oven
inner temperature exceeds your setted
temperature, thermostat cuts off your
appliance circuit and turn off lamp.
Minute minder knob
There is an alarm clock that can set up cooking
time up to 100 minutes. It's operated by setting
with a knob and turning in the direction of clock
needle {towards right). At the end of the time
we set up “Chinn” sound is heard and electrical
current becomes over automatically. If operating
the oven more than 100 minutes is necessary
or if you want to set up the time yourself, turn
the knob to manuel position In this
condition, clock does not cut off the electrical
circuit To shut off the oven, reset the clock or
bring the selector knob to “0” position.
12 I @
Page 14

Operating the oven part
Oven heating controi knob
This knob is used together with the
"function seiection" knob. Select the
desired stage with the "function seiection"
knob. Then rotate the "oven heating
control" knob clockwise. The lamp and
the heating elements in conjuction with
the stage you have selected, or the fan will
come on line. The temperature in the oven
shall be sensed by the thermostat. The
thermostat switches off the heating
element and the thermostat light when the
set temperature level is reached inside the
oven. When the temperature falls below
thermostat comes back on line and the
thermostat light illuminates. This way, the
set temperature level is maintained
throughout the cooking period.
Function selection knob
This knob allows you to select functions
and carry out checks. The functions and
their stages are explained below. In order
to operate the stages, you need to bring
the "function selection" knob together with
the"oven heating control" knob to the
desired temperature degree and adjust
the timer if there is. If your cooker has
timer; refer to the description of timer
usage.
3 D function (if available)
Circular heating element and fan runs with
top and bottom heating elements. By
using this function you can cook 3 trays
of food simultaneously with best quality.
Booster function (if available)
1. Adjust the "heating control
knob" to the desired oven temperature.
2. Turn the "function selection knob" to
the booster stage.
3. Your ovens immediately start to operate
and thermostat light will be ON.
4. When the oven reaches to selected
temperature the thermostat light will go OFF.
5. After thermostat light goes off reset the
"function selection knob" to desired oven
cooking mode.
Don't forget that the Booster mode is
just for preheating. Don't use this mode
for cooking proposes.
* The kinds of food you want to cook,
Thermostat positions. Shelf positions and
recommended cooking times are given at
the cooking table.
* Bring the knobs to the position you
want.
* Preheat the oven for 10 minutes with
oven door closed.
* Locate the meal you want to cook into
the oven after preheating.
* After cooking, bring the knobs to the “0”
position.
13
dS)
Page 15

The stage of function selection knob 4701 E
Fan and oven lamp are on.
Ring heater with fan
Fan and bottom heater are on.
A
Top and bottom heaters are on.
Fan, top and bottom heaters
are on.
Fan and top heater are on.
A
Means only the grill heater is on.
You must bring to the heating
control knob to the maximum
temperature.
4401
^ I Fan, top and bottom heaters
are on.
CIM 302000 TX
Defrost
A
Top and Bottom Heater
Top and Bottom Heater with fan
A
Ring heater with fan
Bottom Heater
□
Grill 1 with fan
Grill 2
Top and bottom heaters are on.
Bottom Heater
□
Grill 1 with fan
Grill 2
Booster function
3/
In models with Telescopic shelf
(sliding rack)
In level 1, the oven is equipped with a
telescoping rail. This makes it easier to
push foods into the oven and remove
them. Use the large baking sheet for this
purpose. The metal pins on the rail must
catch in the
insets on the
front edge of
the baking
sheet.
14 @
Page 16

Cooking table
Foods
Short bread
Cake in mould 18-22 cm cake mould 3 3
Cookie Cooking sheet 4 4
Flaky pastry
Brioche
Pastry Big tray
Yeasted dough Big tray 4 4
Biscuits Cooking sheet 4 4
cn
Cake
Milleteuille pastry Big tray 4 4
Lasagne Lasagne dish 4 4
Pizza Big tray 4 4
Roast beef Roasting dish 4 4
Lamb shoulder
Roasted chicken
Roasted turkey (5,5 kg) Big tray 4 4
Fish Roasting dish 4 4
*For roasted meats, the thermostat starts with the highest level and
decreases to 150°C after 15 minutes.
• The values listed in the table are the results obtained from laboratory testing.
• You may find different flavours of the food according to your own cooking
and usage practices.
• If you wish, you can add the time it takes to pre-heat the oven to the values
listed in the table.
COOKING PAN
Fan with
ring
heater
24-26 cm bread mould 3 3
Cooking sheet 4 4
Cooking sheet 4 4
4
Big tray
Roasting dish
Roasting dish
4
4 4
4 4
SHELF POSITIONS
□
Top and
3 D
bottom
2-3
2-3
2-3
2-3
2-3
4
2-3
2-3
2-3
4
2-3
2-3
2-3
2-3
2-3
2-3
2-3
2-3
2-3
s
Fan with Top
and bottom
THERMOSTAT
POSITION
COOKING TIME (min)
Fan with
ring
heater
3 170-180 15-25 15-25
3 170-180 20-30 20-30
3 170-190 20-30 20-30
3 180-190 20-30 20-30
3 160-180 20-30 20-30
3 ®/[l :180-190
n/m :190-200
3 ^/(1:190-200
35-45 35-45
25-35 25-35
n/E :200-220
3 170-180
15-25 15-25
3 170-180 20-30 20-30
3 200-210 20-30 20-30
3 170-180 35-45 35-45
3 200-220 20-30 20-30
3 250 (15min)* 90-120 90-120
3 250 (15min)*
65-80 65-80
3 250 (15min)* 55-65 55-65
3 220 (25min)* 170-220 170-220
3 200 15-20 15-20
Shelf position (In fan with
ring heater model+ 3D
model)
For 3 trays
For 2 trays
For 1 trays
2-4-6
4-6
4
^ Fan with ring heater + top and
□
Top and
3 D
Fan with ring heater
Top and bottom heater
Fan with Top and bottom heater
Pizza function
bottom heater
(IF AVAILABLE)
bottom
25-35
25-35
25-35
25-35
25-35
40-50
35-45
20-30
25-35
25-35
40-50
30-35
110-120
70-90
60-70
180-240
15-25
m
Fan with Top md
20-25
20-25
20-25
20-25
20-25
30-40
25-35
18-22
20-25
20-25
30-40
25-30
100-110
60-75
50-60
150-210
15-20
Page 17

Note: The values on the cooking table are the
results we got in our laboratory.
The cooking table may be changed according
to the quantity of products. You can find different
tastes suitable for your harmony according to
your cooking and using habits.
* If you want use the oven tray and want to
make a cooking in another pot, prefer the right
cooking adjusment because of your
experiences.
* Don’t use the pots that have heat perfecting
or bad conduction and glass pots for making
cooking pastry. The oven tray is the convenient
off all.
* To use mold makes a better result for cooking
cakes
* The cooking time may be changed according
to the quantity of products.
* When putting the trays into the oven, be careful
to put the trays on a level with others.
* Before cooking, make a first heating for 10
minutes , then put your food into oven.
* 5 minutes prior to the finishing time you can
close the system for providing energy sa^ngs
with non- opening the door.
After closing your oven; the vantilate goes on to
work for a little to cool the electrical heaters on
your oven.
The accessories on product (according to
different models)
* Grill; For grilling or putting saucepan when
using another pot in oven.
* Oven tray (grand); For cooking pastries.
* Grill in tray; For grilling
* Deep tray; For cooking the watery foods,
recommending
* Glass tray; For cooking the watery foods,
recommending
to the jars for being not confected each
other. Close the lid of your oven. Brings the
ovens "function sellector" knob to " □"
To sterilize fruits;
Turn "Oven heating remote-control device"
selectior" knob to "0" positon. Take out of
the oven after 30 minutes.
To sterilize vegetables;
Turn "Oven heating remote-control device"
Warning about glass tray
* After cooking, don't put the glass tray that
you out of the oven on wet and cold surface.
Wait for it's cooling on a dry cloth.
* Don't put the glass tray, that you take out of
the refrigerator, into the hot oven.
* Don’t cut the metarial in glass tray with knife.
* Don't clean the trays of the oven with
metarials such as hard brush, dish fiber or knife.
During cleaning, don't use metarials with sharp
edge.
* Do the cleanings of glass surface with special
glass cleaning materials.
Sterilizing (canned)
For this process firstly;
Put the tray to first shelf. Put 1/2 liter water
at approximately 80°C into tray.Pay attention
position Then;
knob between 150-200 °C (approximately
180 °C). After 45 minutes, bring "function
knob between 100-150°C. After 80-90
minutes, bring "function selector" knob to
"0" positon. Take out of the oven after 30
minutes.
16 I
Page 18

Grill Function
Attention
• Always keep the oven door
closed when grilling.
^ Preheat the grill at □ (grill setting) for
approximately 5 minutes. For this period
the heat control knob shall be at the max
setting and the door must be closed.
The indicator light will illuminate to
show that the grill is switched on.
«•“ we adviced, If tray and thread grill are
given with oven; use these when making
grill.
Apply oil on the grill shelf to prevent
meat from sticking on the bars.
If you use big grill shelf; put a tray on
one of the bottom shelves in order to
collect oil and for easy cleaning put some
water in it.
Use 4 or 5. shelf position for grilling.
Do not allow children to sit or stand
on the oven door when the door is
open.
m QJ
Lamb
Lambc hops
Shelf position
Cooking
djratior (min.)
4-5 12-15
4-5 12-15
Beef
Veal chops
Mutton chop
4-5 15-25 (1)
4-5 15-25 (1)
(1) Depending on the thickness
6. raf
5. raf
4. raf
3. raf
2. raf
1. raf
If tray and thread grill are given with
oven; use these when making grill.
• Ensure the food is correctly positioned
under the grill element.
• Food which requires browning only
should either be placed under the hot grill
in the grill pan, or on the floor of the grill
compartment, according to the depth of
the dish. The grill pan wire grid may be
removed.
• Do not line the grill pan with aluminium
foil as the increase in heat is a fire hazard.
• Plates and dishes placed on the floor of
the grill compartment will be heated when
the main oven is in use.
17
Accessible part may become
hot when the grill is in use.
Don'allow children to be close.
Page 19

Operating the clock/programmer
You should adjust the electronic timer prior
to using the oven. Otherwise your oven will
not operate.
The electrical current for the heating
elements flows through the electronic
timer. The timer must be set in order for
the heating elements to come into
operation.
OOOOGICI
o' S S vif — +
: Programming button for warnings
Mn
: Cooking period adjustment button
t::!
: Cooking terminating time adjustment
button
: Manual adjustment button
- +
Your oven's electronic timer operates similar
to a normal timer. Your oven's electronic
timer will be reset if the electricity is cut-off.
The electronic timer will run slowly if the
frequency of your supply power is less than
50 Hz. (This malfunction is not due to your
timer. In such cases, you must readjust your
timer).
(non-programmed cooking)
: Time adjustment buttons
The timer of your oven ;
1. You can adjust cooking durations between
00.00 - 24.00 hours.
2. You may also use it as a chiming alarm
between 00.00 - 24.00 hours.
3. You can run fully-automatic, semi-automatic
and non-programmed (manual) a cooking
programmes. (The heating elements inside the
oven are connected to the electronic timer and
are programmable.)
The following functions are available on your
programmable timer;
* Automatic, semi automatic or manual modes,
* Current time clock display in 24h format,
* Timer alarm that can be used as a minute
minder.
Please note
* The timer controls the oven-heating element
only and the current time of day must be set
before the oven will function.
* If the timer has been set to an automatic or
semi automatic programme, the daily time
cannot be readjusted, the semi or auto
programme, must be cancelled to do so. See
"How to cancel automatic programme".
How to set the current time of day
The clock display uses a 24 hour configuration;
so 8:30 pm = 20:30.
* Press and hold "o s buttons at the same
time.
* Press"+" button to increase orto decrease
the time.
* Adjust using the "+" orbutton to set the
current time. If "Auto" flashes, see "How to
cancel automatic programme".
* Release the buttons, the clock will now start.
18 |@)
Page 20

0 or cr
- +
Manual cooking
(Or to cancel a programme)
* Press S button, press the button until
0:00 is displayed.
* Press the '!1V button.
The "Auto" and S sign will disappear.
* Set the oven knob to the required cooking
temperature and the function selection knob
to the desired position.
* The oven will switch on. The Amber oven
indicator will light.
* At the end of cooking process, switch off
by resetting the oven thermostat knob to the
(off) mark.
Note: The timer will not switch off the oven.
To switch the oven off, turn the oven
thermostat and selection knob to the (off)
mark.
Semi-automatic programming
This mode allows a manual start time but an
automatic switch off time, which is very useful
to prevent the food from over cooking.
* Press S button. Press the "+" (or
button, to set the cooking period ("Auto"and
S will be displayed) in minutes.
* Set the oven thermostat knob to the required
temperature and the function selection knob
to the desired position.
* The oven will switch on and cooking will
commence.
* The programmer will switch the oven off at
the end of the preset cooking time. "Auto"
will flash and the timer alarm will bleep. To
turn off the alarm press the S button.
* Set the oven thermostat knob to the
(off) mark.
* Press v!lV button to cancel "Auto".
19 @
Automatic programming
The programmer will switch the oven on and
off at the required times.
Ensure the oven thermostat is in (off)
position, and the correct time has been set.
* Press the button to cancel any program
stored. (Auto and & symbol will not be displayed)
* Press the S button and press "+" (or "-")
button to set the stop time required. ( S and
"Auto" will be displayed)
* Press the S button and press button to
set the required cooking period.
* Set the oven knob to the required cooking
temperature and place your food in the oven.
* The oven will switch on at the required time,
cook the food and switch off at the
predetermined time.
* At the end of cooking process the alarm will
bleep and "Auto" will flash. To turn off the
alarm press the S button.
Pressvt) button to cancel "Auto".
* Set the oven thermostat and function selection
knob to the "I" (off) mark.
Note; Make sure you follow the food
manufacturer's instructions.
* Press the S button to view the remaining
cooking time during cooking.
Timer alarm
The timer alarm can be adjusted to bleep
between 0 and 23 hours 59 minutes, i.e. as a
minute minder to remind you to switch off a
hob heating zone.
* Press the "o'button, press the "+" or"-" buttons
to set the desired alarm time.
* The timer alarm will when the set time elapsed.
* To turn off the alarm press the S button.
How to cancel an automatic programme
* Press S button, press button until the
clock display reads 0:00.
* Press ^ button, the programme has now been
cancelled.
* The current time can then be reset.
Page 21

If the clock does not switch into
manual mode or the oven does not
start:
Auto-program in the clock memory may
be reset. Hold button “S” pressed and
press “ +” increase the cooking time a
little bit and then set the cooking time to
zero by pressing Then, the oven can
be started by pressing the manual key
For models equipped with a key lock:
The Demo mode is conditionally applicable as
key lock. If it is activated, the relays remain open
all the time. Thus, the timer can be operated
as usual but the connected appliance or
appliance module remains unaffected. This
means that your child can select a cooking
program but the program will not be activated
and thus the connected appliance or appliance
module will not be switched on.
To activate the demo mode/key
lock:
1. Make sure that the clock is in manual mode
and cancel any active programs.
2. Hold the " o" " button and the "S " button
down simultaneously for approx. 8 seconds.
The display will read "On".
3. Press the "+" button.
The display reads "OFF" and the "?" symbol
appears.
After approx. 5 seconds the time reappears next
to the "? " symbol. The key lock is not activated.
To deactivate the demo mode/key
lock:
1. Make sure that the clock is in manual mode
and cancel any active programs.
2. Hold the "'a " button and the "S " button
down simultaneously for approx. 8 seconds.
The display will read "OFF".
3. Press the "+" button.
The display reads "ON" and the " f" symbol
disappears.
After approx. 5 seconds the time reappears on
the display.
The key lock is now deactivated.
20 (|n)
Page 22

Maintenance and cleaning
Turn off the main switch off
before cleaning.
Before switching on again ensure that all
controls are in the OFF position.
Wipe over the control panel and knobs, with
a damp cloth and polish with a dry cloth. Do
not use oven cleaners or aerosols, scouring
pads or abrasive powder for cleaning the
plastic knobs as damage will occur. Do not
attempt to remove any of the control knobs
from the panel as this may cause damage
and is a safety hazard.
Oven interior
Remove all trays and the grill from the oven.
Clean the interior with a piece of moist, soapy
cloth. Then, clean it once more with a wet
piece of cloth and let it dry.
Do not use dry powder agents for cleaning.
‘•‘We recommended immediate cleaning of
acidic substances such as oil, lemon etc..
•- Use a damp cloth to clean the interior and
exterior. Never use any sharp instruments,
abrasive household cleaner, or detergents
for cleaning. For hard stains use suitable
washing liquid.
«•Cleaning can be accomplished using a soft
piece of cloth wetted with soapy water or
with commercially available special surface
cleaners and a soft piece of cloth. Especially
use liquid paste or cream type cleaners.
Warning!
Never clean the inside of the oven and
trays with hard brushes, steel pads or
knives.
*
*Commercially avaible special cleaners
may be used after carefully reading of
the warning labels written on them. Do
not use cleaning agents containing acid
or chlorine.
^ Catalytic-enamelled models (if
available);
The oven interior of this model is coated with
catalytic enamel. Since the catalytic enamel is
self-cleaning, you do not have to perform an
extra cleaning after the cooking operation.
If your oven
contains a steel
rack; To clean the steel
rack, unscrew the 4
screws. After cleaning,
assemble the steel rack
back to the oven body
again.
Steel Cleaning
wool powders abrasive
y
sponges
Do not use the
above materials to clean ceramic
glass and stainless steel surfaces.
Color change is not due to the change in the
material properties, but rather it stems from
insufficient cleaning of burnt residue that
accumulates on surfaces, abrasion on the
glass surface which is caused by pots and
pans along with the use of improper cleaning
agents.
21 @)
Page 23

Lowering the heating element
Warning!
Make sure that the heating element is
sufficiently cool before you start cleaning.
1. Unlock the heating element by
loosening the screw at the seiling of the
oven cavity.
Warning!
Never switch on the heating element or
place any weight on it when the heating
element is in the lowered position.
2. After cleaning, move the heating
element upwards and screw it back to the
ceiling of the oven cavity.
Replacing the oven lamp (In models with lamp):
1. Unplug the power cable.
2. Then, remove the protective glass cover
of the lamp inside your oven by turning it
counter clockwise.
3. Then, remove the bulb by turning it
counter clockwise.
4. After installing the correct bulb obtained
from an Authorized Service, reinstall the
protective glass of the lamp.
For the square-shaped lamp models:
There are 2 square-shaped lamps at right
and left
side of
the oven
inside.
Both
lamps ar(
on and
off at the same time
Replacing the Oven Lamp
Disconnect the appliance from the supply
Take out screws on the side shelve
Take out Lens of the oven lamp by means
of the flat screwdriwer
Replace defective lamp with the new one.
Reinstall lens and side sheelf. Lamp type
is 220-230V, 15/25W E14,T300°C
22 <|5)
Page 24

Future transportation
Transporting the oven;
store the original box of your oven.
Transport the oven in its original carton.
Follow the guidance marks printed on
the carton.
To prevent the wire grill and tray inside
the oven from damaging the oven door,
place a strip of cardboard or paper of 1
to 1.5 cm onto the inside of the oven
door that lines up with the position of
the trays. Tape the oven door to the
sidewalls.
If you do not have the original
carton;
Take the necessary precautions in order
to prevent the exterior panels, and the
glass surfaces of the oven from being
damaged.
Pack the oven in bubble wrap or thick
cardboard and tape it securely in order
to prevent damage during transportation.
The oven must be transported in an
upright position. Do not place other items
on the top of the cooker.
Process that you must do before calling service
Before calling service, please do
the controls below
If the oven is not heating;
Your product’s plug can be not
connected to grounded socket.
Fuse can be off. In the models with
clock, clock can be not set up.
If internal illumination lamp is
off;
Is there electricity? Can the lamp
be out of order? If its out of order,
change it by looking guide.
If your oven is not working;
In multi -system oven, is function
selector knob set up to necessary
functions?
Is temperature device mode with
oven heating remote-control device
knob?
Is the fuse of socket that the oven’s
connected or main fuse off?
23 C|n)
(Q>
Cooking (if topand bottom part
is not cooking equal);
Control the temperature value,
time of cooking and shelf
positions according to using
guide.
If there is still problem in the
product; piease cail authorized
service.
 Loading...