

Beko 32WLA530HID User Manual

INTEGRATED DIGITAL HD READY COLOUR TELEVISIONS
32WLA530HID
Operating Instructions
HD
ready
Certification mark^
digital[5j
Approved product


List of contents
Important Information
Special features
.................................................................
.......................................................
Safety instructions.............................................................6
Getting started
Aerial connection.....................................................................................7
Switching on............................................................................................7
Battery fitting...........................................................................................7
Control unit
Remote control........................................................................................9
...................................................................
........................................................................
Using the TV.....................................................................10
Tuning the TV........................................................................................11
Automatic tuning (Digital and Analog)
Manual tuning........................................................................................12
Electronic program guide (Digital)......................................................13
Program organising.........................................................................14-15
...............................................
11
TV setup............................................................................16
Sound menu...........................................................................................16
Picture setup..........................................................................................17
Features Menu................................................................................18-19
Digital TV menu......................................................................................20
4
5
7
8
Using teletext..............................................................21-22
Connecting external equipment
................................
23-27
Help and service tips.......................................................28
Technical specifications table
Main Uk Transmitter Stations
........................................
.........................................
29
30
Guarantee....................................................................31 -32
Important Information
LCD display panels are manufactured using an extremely high level of precision technology, however
sometimes some parts of the screen may be missing picture elements or have luminous spots. This is
not a sign of a malfunction.
Cleaning the screen and the cabinet...
After turning off the power, clean the screen and the cabinet with a soft, dry cloth. We recommend that
you do not use any proprietary polishes or solvents on the screen or cabinet as this may cause damage.
Dispasal...
The cold cathode fluorescent lamp in the LCD panel contains a small amount of mercury, when the set
reaches the end of its useful life please dispose of it in accordance with Local Government Regulations
or at a recycling centre.
Connection of Mains Cable
Always use the mains cable supplied. First of all insert the mains cable into the input panel of the CTV,
and only there after in to mains supply socket.
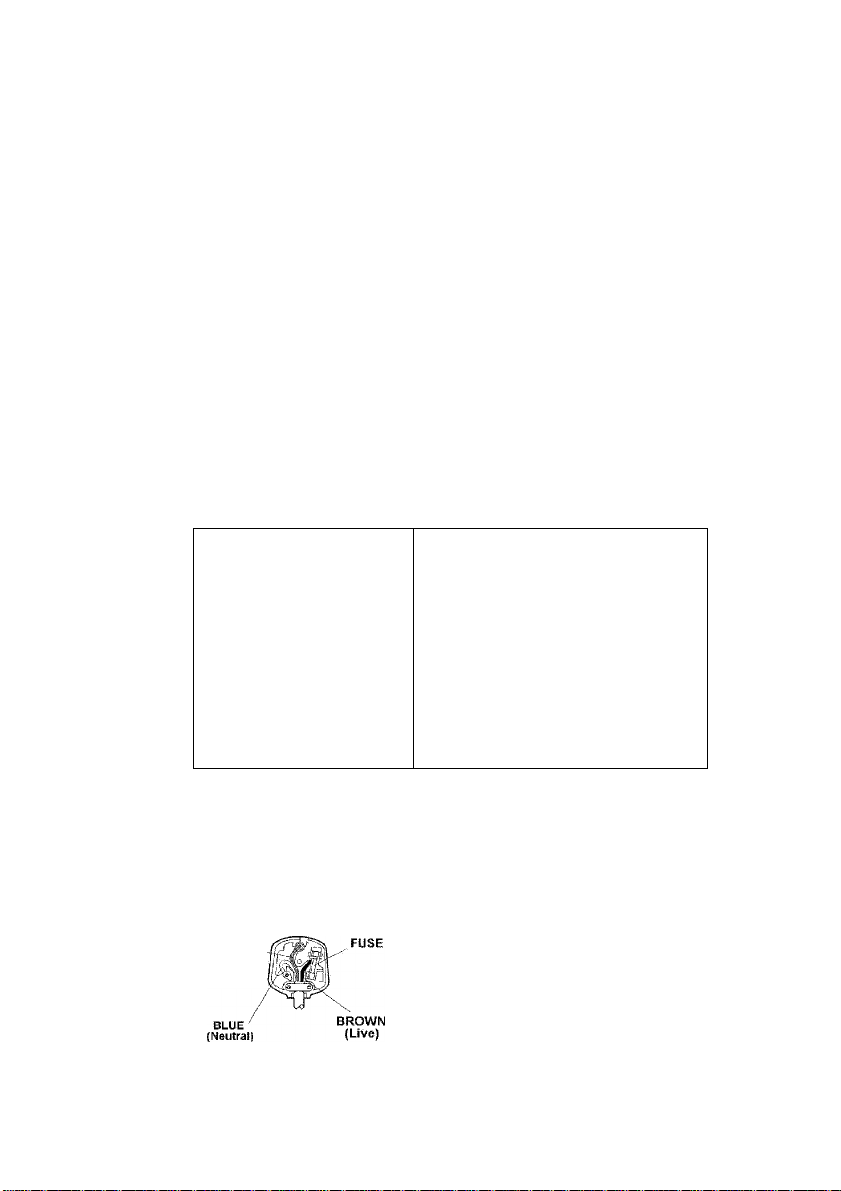
ELECTRICAL CONNECTIONS
For your own safely read the following instructions carefully before attempting to connect this unit to
the mains supply.
IMPORTANT appliance may not correspond with the coloured
The wires in the mains lead are markings identifying the terminals in your plug, proceed
coloured in accordance with the as follows;
foiiowing code; The wire which is coloured blue or black must be
Blue - Neutral connected to the terminal which is marked with the letter
Brown - Live N or coloured Black.
As the colours in the mains lead of this The wire which is coloured brown or red must be
BLUE / ^OWN
(Neutral) (Live)
connected to the terminal which is marked with the letter
L or coloured Red.
No connection is to be made to the Earth terminal of the
plug.
If a 13 Amp (BS1363) Plug is used, fit an ASTA
approved 3, 5, or 13 Amp fuse as required.
If your product is fitted with a moulded plug Vi/hich
requires replacement ptease cut off and dispose of
safely, then rewire as shown above.
IMPORTANT
The wires in the mains lead are coloured
irt accordance with the following code;
Blue - Neutral
Brown - Live
Yetlow/Green -• Earth
As the colours in the mains lead of this
GREEN
&
YELLOW
(Earth)
appliance may not correspond with the coloured
markings identifying the terminals in your plug,
proceed as follows;
The wire which is coloured green and yellow must
be connected to the terminal which is marked with
the letter E, or by the earth symbol, or coloured
green or green and yellow.
The wire which is coloured blue or black must be
connected to the terminal which is marked with the
letter N or coloured Black.
The wire which is coloured brown or red must be
connected to the terminal which is marked with the
letter L or coloured Red.
If a 13 Amp (BS1363) Plug is used, fit an ASTA
approved 3, 5. or 13 Amp fuse as required,
if your product is fitted with a moulded plug which
requires replacement please cut off and dispose of
safely, then rewire as shown above.
Caution: -Under no circumstances should the discarded plug be inserted into a mains socket. To
prevent shock hazard carefully dispose of the discarded plug into your dustbin, do not leave the plug
lying around where children might see it.
-4-

Television
Thank you for buying this television which is designed to give you many years of satisfactory service.
You may already be familiar with using a television but do please take time to read these instructions.
They are designed to familiarise you with the unit's many new features and to ensure you get the very
best out of your purchase.
Special Features
32" TFT-LCD WXGA Panel
HD Ready
Available for Cable Channels (A decoder may be required)
2x1 0 W Stereo sound
250-Page Teletext Feature
PIP (Picture in Picture) Feature
Wide angle perspective
2 SCART sockets, AV out Socket
HDMI input
S-VHS and Phono inputs for S-Video connection
PC connection
Cl Slot
Minimum energy consumption
AVL - Automatic Volume Limiting
ATS - Automatic Tuning System
Programmed on/off Timer
Graphic equalizer
Colour Transfer sharpness feature (CTI)
Black-White Transfer sharpness feature (LTI) and picture sharpness
Compound Filter (Digital Comb Filter) Feature for clear images
On screen viewing of all control commands, program numbers and additional features
Manual Fine Tuning
100 Analog Channel Memory
Infrared Remote Control
Panel Lock
Ability to watch NTSC video playback through SCART input
Easy handling through an advanced menu system. Abiltiy to choose from 23 languages.
1000 Digital Channel Memory
Adjustable 4 favorite list
8-Day EPG (Electronic Program Guide)
Integrated Digital Receiver
MHEG - 5
DVB Subtitling
OAD (Over Air Download)
of hop'll Lioensing; LLiJ.
qnci Hyh-De^itiit on Mul nvrdra t nr
STAND
REMOVAL
• Cover a table with a soft towel (or other protection to prevent damage to the TV or table)
• Carefully lay the TV front down on the table.
• Position the TV stand so that it hangs over the edge of the table.
• Remove the 5 screws that hold the stand.
• Remove the stand.
• Attach any new brackets before lifting the TV backup.
Note: Keep removed stand and screws safely for future use.
-5-
Safety is Important
Your safety and the safety of others is important. Please, therefore, ensure you read the Safety
instructions before you operate this television.
Safety instructions
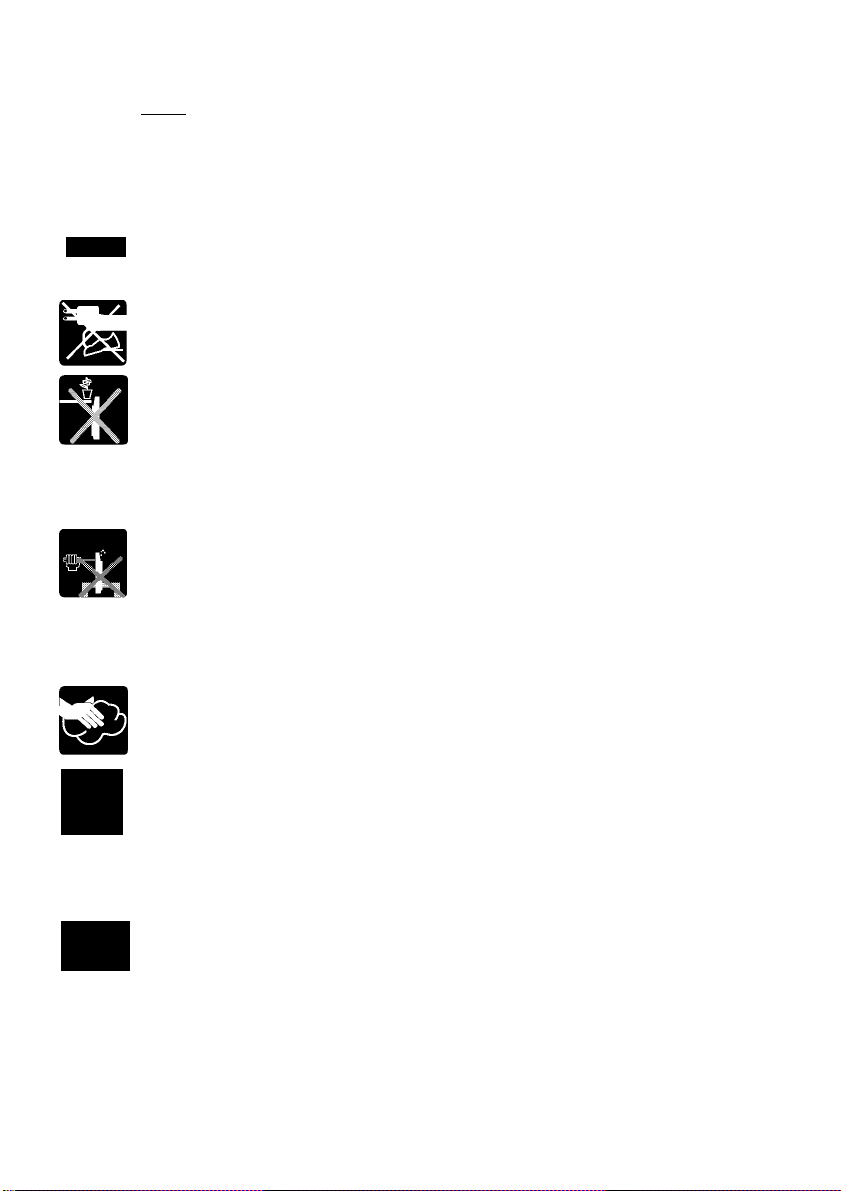
^ Read all the safety instructions before first use of your TV.
Position the television so that direct light does not fall on the screen. Excessive light
will cause a washed out effect.
• Position the power supply lead and other leads so that they are not likely to be walked
on or pinched by things placed on or against them.
• Do not place objects filled with liquid such as a vase or flower pot near or on the
television.
• Do not expose the TV to dripping or splashing of liquids.
• Do not place naked flame sources such as lighted candles on or next to the TV set.
• Make sure that no naked flame sources, such as lighted candles, are placed on top
of the appliance.
• Do not place the television near heat sources such as radiators, ovens, stoves, etc.
Do not push, hit or screw into the screen of your product.
• The heat built up in the set escapes through ventilation holes, so do not cover the set
by drapes, clothes etc. that may block air circulation. Do not place the television on
carpet or soft furnishings. Leave a minimum of 10cm gap araund all sides of the TV
unif.
• Never lei,children push anything intq the holes or slots on the case.
• Clean the TV Screen using a slightly damp cloth or chamois leather. Never use abrasive
cleaning agents like liquid or aerosol cleaners.
• Remove the mains plug from the socket outlet while cleaning.
K
230
• Never apply pressure on the screen when cleaning.
• Never put your screen on hard objects. Your TFT screen may be damaged.
• If you wish to place the television on a shelf or in a wall unit always ensure there is a
minimum air gap of 10 cm around the top, sides and rear of the television, to assist
ventilation.
• Your TV set is designed to operate with mains voltages 230V AC; 50Hz. Do not connect
your TV set to power sources other than the mains supply.
• If you don't use the television for a long period, please remove the mains plug from wall
socket outlet.
•To fully disconnect the TV, the mains plug is used as a disconnecting device and therefore
shall be readily operable.

Getting started
Remove your Television carefully from the box.
You may wish to store the packaging for future
In the box
Inside the carton box you should have:
• Accessories box
• Power cord
• Remote control
• Batteries
• Instruction Book
Note: Scarf, VGA, PHONO and HDMI
Leads are not supplied.
Read these instructions before use.
Aerial connection
To connect an aerial, plug the aerial lead
into the aerial socket on the rear of the
TV.
1. The availability of Freeview digital terrestrial
services in your home depends on your local
transmitter and the configuration of your existing
reception equipment.
2. You should have already checked your postcode
to see if you are in a Freeview coverage area.
If not please contact Freeview immediately:
Call 08708 809980
Text your postcode to 83331
Visit www.freeview.co.uk
3. If you are in a Freeview coverage area but
are unable to receive all available channels for
your location, it is recommendded you have a
site survey by a professional aerial installer to
ensure aerial alignment and line of site' to the
transmitter are optimised. If you do not know of
a local aerial installer, please call the
Confederation of Aerial Industries (
on 0208 902 8998 who will be able to
recommend one.
www.cai.org.uk)
Please note
If you live in a poor reception area or use an
indoor aerial you may experience loss or
corruption of teletext transmissions.
Switching on and First Use
1. Connect the mains lead to the socket at the
back panel of the LCD TV.
2. Connect the mains plug to a suitable mains
socket.
Note 1: Your TV will go to stand-by mode
in five minutes if there is no broadcast signal.
Note 2: Your TV is equiped to operate from the
control buttons on the cabinet. In case your R/C is
broken or the batteries are exhausted.
Pleose Note
When not in use disconnect the mains plug from
the mains supply.
3. Press the Power button on the cabinet
of the TV. The standby indicator will
illuminate.
4. Press a numeric button or the Program
Up / Program Down button on the
remote handset or Program Up /
Program Down on the cabinet of the
TV to switch the TV on. The picture will
appear after a few seconds.
Pleose Note
Do not leave the television in standby unattended
or overnight.
Switching the TV on for the first time
To install your TV, please read the sections
"TV controls" and "Tuning the television".
The botteries
Remove the back cover to reveal the battery
compartment and make sure you insert the
batteries the right way round.
Suitable battery types for this remote are
UM4, lEC R03 or AAA 1.5V.
Do not throw your old batteries into a fire,
dispose of them in a designated disposal area.
Do not combine a used, old battery with a new
one or mix battery types.
The performance of the remote control will
deteriorate beyond a distance of 8 metres or
outside an angle of 30 degrees from the centre
of the TV.
You con use on outdoor or indoor aerial.
However, if you use an indoor aerial the quality
of the reception may be reduced and adjustment
of the aerial may be required when changing
programs.
r
-7-
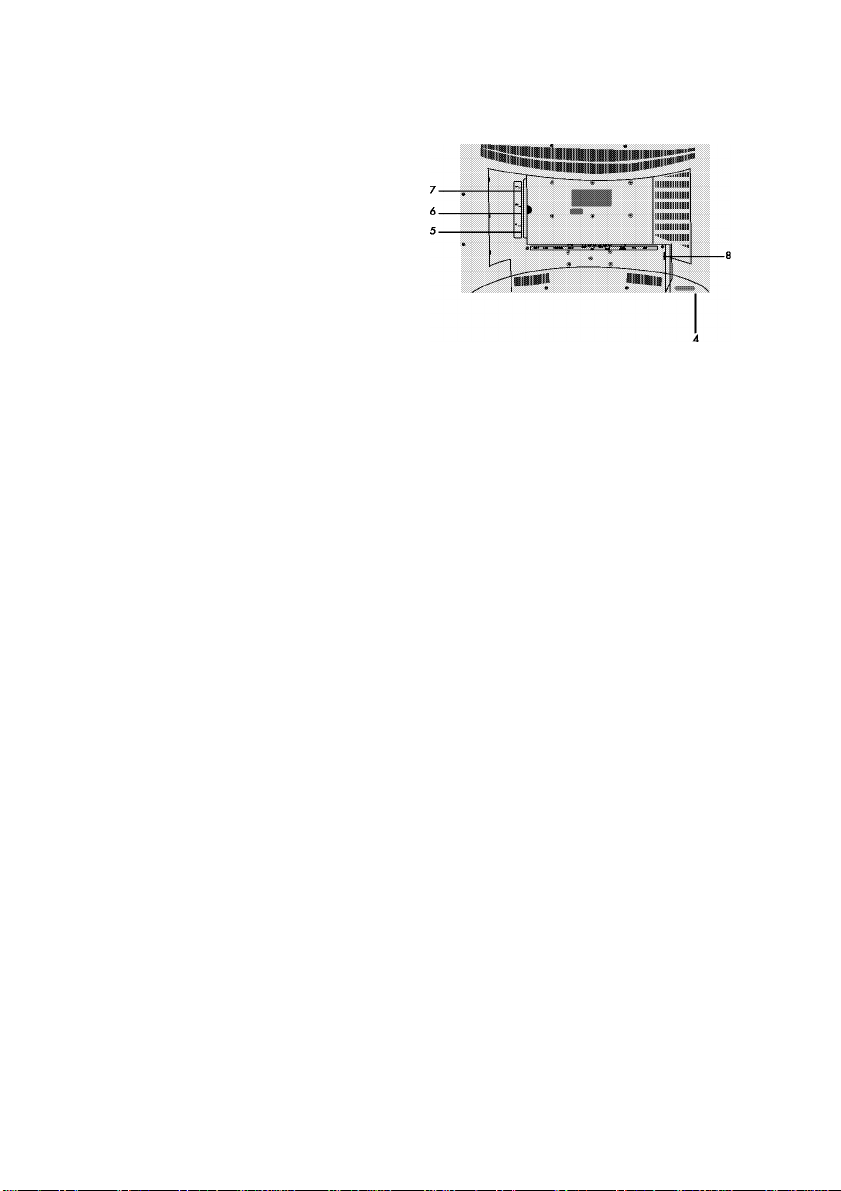
Control Unit
r ^ ill
[o] ••■■■ © (i) © © © © © © ® «
rw.r ...nxw^^rrn Video L R Video L R *, PC-IN
SPDIF S-VHS SUBWOOFER ANT IN
20 21 22 23 24 25
1. Stand-by 15. Program up
2. Power on /off 16. SPDIF
3. Remote control 17. S-VHS (S-Video in source menu)
4. Headphone jack 18. Subwoofer Output
5. Cl Input 19. Aerial input
6. Scart2 20. AV IN input PHONO connector (Select AV in source menu)
7. Scart 1 21. AV IN or S-Video Phono Connector (L) (Select AV in source menu)
8. Power Input 22. AV IN or S-Video Phono Connector (R) (Select AV in source menu)
9. Speaker 23. Video output PHONO connector (See page 1 8 - Scart2 Output)
10. Source Select 24. Audio PHONO output (L) (See page 18 - Scart2 Output)
1 1. Menu button 25. Audio PHONO output (R) (See page 18 - Scart2 Output)
12. Volume down 26. PC sound input
13. Volume up 27. VGA (PC input)
14. Program down 28. HDMI
Please note
• Do not use Video PHONO and S-Video connections at the same time, otherwise they will each effect
the performance of the other.
• RGB inputs from scarts will give you better picture quality than PHONO or S-VHS inputs when connecting
to an external device.
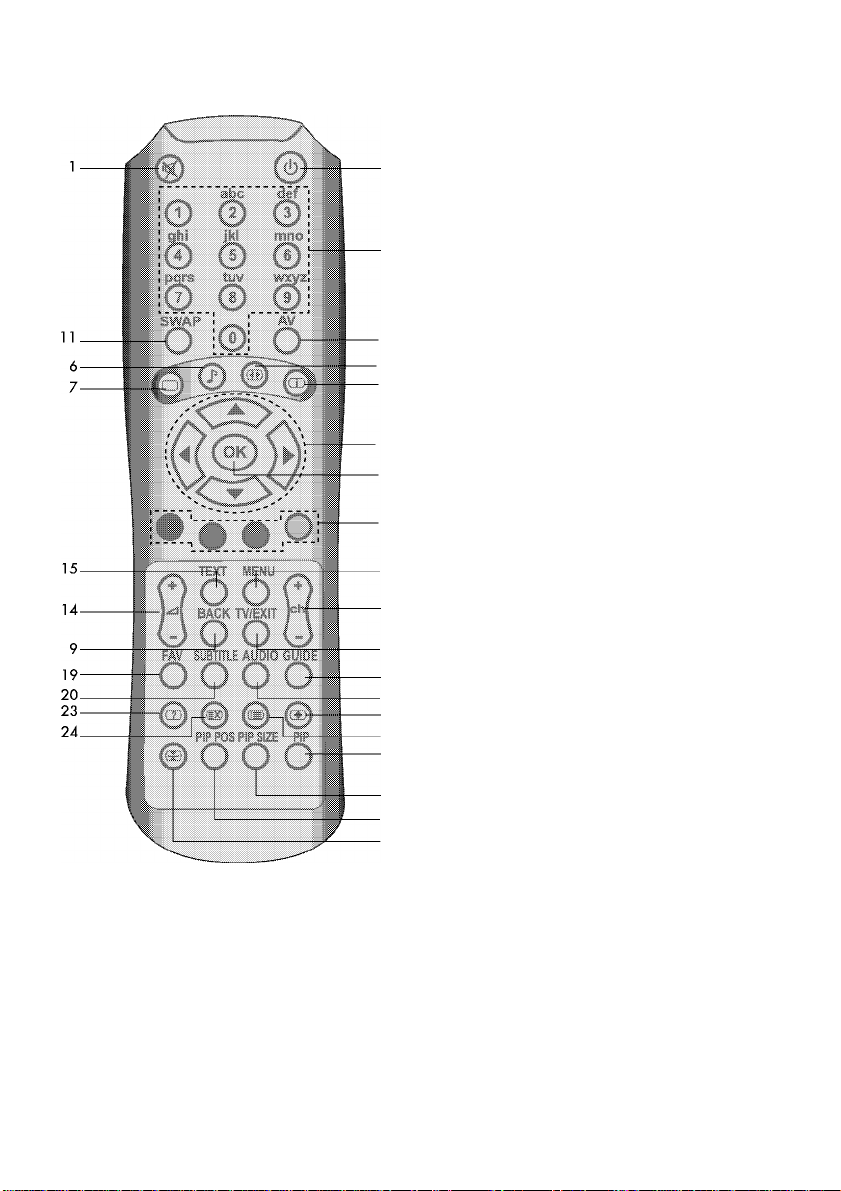
Remote control
1. Mutes the sound (®).
2. Puts TV into and out of standby mode f
3. Used for any numeric input.
4. Navigation in menus.Functions in
interactive applications.
Change teletext pages.
5. Program position up and down W).
6. Selects pre-defined sound modes or
customer-own one ^).
7. Selects pre-defined picture modes or
customer-own one ( ).
-10
-8
-17
-4
-12
-13
8. Selects preset picture modes or
customer setting ((ll)).
9. Functions as ExitXCancel key in
interactive applications.
10. Displays all possbie sources ATV,
DTV, AVI, ..., HDMI, etc.
11 .Swaps between current program and
previous one.
12.Select in menus and interactive
applications ((^ ^).
13.Functions in teletext and interactive
applications.
14.Increase and decrease volume level
15.0n\0ff analog teletext or digital
interactive appicaitons. When in
teletext mode, mix key is used for
mixing teletext and analog video.
16.Displays menu.
1/.Displays info banner in digital mode
Moves lo index page in teletext mode ({^
18. Exit OSD or interactive applications.
Move from any souce to TV.
19. Displays favorite lists.
16
20. Displays subtitles.
21 .Selects possible audio available
Selects dual l-ll for analog.
22. Displays Electonic Program Guide
18
22
21
26
25
30
29
28
27
(EPG) in digital mode.
23. Reveals concealed text in teletext
page
24.Selects a page while watching TV (Q
25. AII0WS access to subpages within a
teletext page |3)-
26. Doubles the size of teletext
characters
27. Hold a desired page ' _
28. Displays PIP position menu for
PIP position.
29. Resizes PIP window.
30. Activates PIP menu for PIP operations.
-9-

Using the TV
Turning on for the first time and Tuning
TV controls
Temporary On-Off (STAND-BY)
Press the red (@) stand-by button
(temporary on-off function) located on
the upper right hand side of your remote
control, or on the front panel of your
television. When it is switched on the
unit will go into stand-by.
To switch your television back on, either
buttons or one of the (H) buttons.
Caution!
if you ore not going to use your television
for o long period of time, moke sure to
switch it oft from the main power button.
When you first switch it on, the Language menu
appears.
l.Select the menu language by pressing
( )or( ).
2. Select Country with ( ) or (• '• '•) and then select
the country where you are located with (v) or (v).
S.Select autoprogram with (\ ■, ) or and
press to start the search.
• The automatic station search starts. This may last
• After the search, the station list appears.
SOURCE Menu: Pres the AV key of the remote
control. The SOURCE menu which is shown below
appears on the screen. From this menu switching
to the "Analogue TV" "Digital TV" "PC" is possible.
You may select the modes "Scart 1" "Scart 2" "SVideo" "AV" "HDMI" "YPbr".
press the sam^button, any of the number
'Qi
a minute or longer, depending on the number
of television stations received.
You can delete any stations which have been
saved more than once.
Digital TV
Scarf 1
Scart 2
S-Video
AV
PC
HDMI
YPbPr
Programme selection
Press the (§) buttons on your remote
control, or use numeric buttons in
order to switch to the desired channel
on your television. In order to select a
program whose number is greater than
9, you can use the numeric buttons,
inputting the desired numbers as
required.Tor example, to select program
12, press the numeric buttons 1 and 2
one after another.
□
□
Mute
To temporarily mute the sound of your
television, press the (@) button, whereby
the (@) on screen display will appear
on screen as an indication or the
application.
When you press the same button again,
the sound will return. In the mute position, when
you press the (ft) key, the sound is turned down
but the Mute position is not aborted, if you
press the (¿) button the volume will increase
and automatically switch out of the mute function.
Return to Selected Button Program
(SWAP)
lf you wish to return to the previous
program that you were watching then
you have the ability to return with a
single function, by pressing the ('o')
I
Regardless of whether your are at AV, or any
other program, by using the SWAP function allows
you to swap between the program you were
watching and the last selected program. If you
hit the same button again, you will return to the
program or AV you were watching before.
button.
PR 01 ^ mtm PR 11 ^
PR 01
-10-
Control Menu
Press the (O) button. You will see the
MENU with all the headings of the
different controls on screen. The
I
select between the different Sub-rnenu titles. Enter
a Sub-menu by pressing the or Up/down
(', ?",-■) or ■•) button.
to exit the application at any given stage, simply
press the MENU or TV button. Pressing menu
while in a Sub-menu returns you to the previous
menu.
Up/Down buttons ( ) or ( ' '•) enable you to
«SHU
The setup menu is accessed via the menu
button. The setup sub-menu is selected by
means of the up-down button. The Setup
menu is accessed using the (Cj^) button
or the ) button. The button
or the (;•) button is pressed to enter the
Autotuning process. The ATS menu appears
on the screen. The country selection is done
via the (\5) or (|y) buttons. The
outoprogrom title is selected by means of
the (CS?) or (<3D>) buttons, it is confirmed
via the (C“$) or (0) or buttons.
A V^arning appears on the screen; the
search is started via the (*.^'^) button or it
p is cancelled using the (o) button.
1/
Tuning the television
You can either tune the programs automatically
or manually storing them in your television.
Please Note
In the case that your television does not receive
any broadcast signals for 5 minutes it will
automatically go to stand-by. The 5 minute
countdown OSD will be displayed on screen.
Automatic tuning and storing of the television program chann^s with ATS (DIGITAL and ANALOGUE).
Select digital or analog TV in the source menu
by pressing the AV button on your remote control.
The ATS (Automatic Tuning System) on your
television enables the automatic finding and
sorting of channels.
Sorting is done according to the selected
country channels, which broadcast Teletext and
channel names; followed by all channels with
Teletexts without channel names and then by
channels without Teletext, to be concluded by
foreign channels broadcasting Teletext with
channel names.
1/
U
Manual Tuning
Program Management
Counrtv
Autoprogram
SETUP
[>
[>
ATS
<! UK l>
-1 1-
 Loading...