

Page 1

COLOUR TELEVISIONS
20” L5C LCD TV
Operating Instructions
Page 2

List of contents
Important Information..............................................4
Special features ........................................................5
Safety instructions ....................................................6
Getting started .........................................................7
Aerial connection.................................................................7
Switching on .......................................................................7
Battery fitting .......................................................................7
Control unit ..............................................................8
Side and rear panel .............................................................8
Remote control.....................................................................9
Using the TV ...........................................................10
Tuning the TV ....................................................................11
Automatic tuning................................................................11
Manual tuning ...................................................................12
Program organising............................................................14
TV setup .................................................................15
Sound menu ......................................................................15
Sound Features ..................................................................16
Picture menu......................................................................17
Features Menu ..............................................................17-18
Using teletext ....................................................19-20
Connecting external equipment .........................21-25
PC use ....................................................................26
Help and service tips ..............................................27
Technical specifications table ..................................28
Main UK transmitter stations ..................................29
Guarantee.........................................................30-31
-3-
Page 3

Important Information
LCD display panels are manufactured using an extremely high level of precision technology,
however sometimes some parts of the screen may be missing picture elements or have luminous
spots. This is not a sign of a malfunction.
Cleaning the screen and the cabinet...
After turning off the power, clean the screen and the cabinet with a soft, dry cloth. We recommend
that you do not use any proprietary polishes or solvents on the screen or cabinet as this may cause
damage.
Disposal...
The cold cathode fluorescent lamp in the LCD panel contains a small amount of mercury, when the
set reaches the end of its useful life please dispose of it in accordance with Local Government
Regulations or at a recycling centre.
Connection of Mains Cable
Always use the mains cable supplied. First of all insert the mains cable into the input panel of the CTV, and only
thereafter in to mains supply socket.
ELECTRICAL CONNECTIONS
For your own safety read the following instructions carefully before attempting to connect this unit to the mains
supply.
For your convenience a mains lead and plug with a fuse has been supplied. For your safety please observe the
following information.
The moulded incorporates a 5A fuse. Should the fuse need to be replaced an ASTA approved BS 1362 fuse of
the same rating must be used. Do not forget to refit the fuse cover. In the event of losing the fuse cover the plug
must not be used until a replacement fuse cover which must be the same colour as that visible on the pin face of
the plug has been fitted. Fuse covers are available from any good electrical store.
If the fitted moulded plug is not suitable for your socket, then the plug should be cut off and an appropriate plug
fitted.
IMPORTANT! FITTING A DIFFERENT PLUG.
If the mains plug is cut off from the mains cable rewire the replacement plug in accordance with these instructions.
IMPORTANT
The wires in this mains lead are coloured in accordance with the following code:
Blue - Neutral
Brown - Live
Yellow
Green-Earth
As the colours in the mains lead may not correspond with the coloured markings identifying the terminals
in your plug proceed as follows:
The wire coloured BLUE must be connected to the terminal marked with the letter N or coloured
BLACK.
The wire coloured BROWN must be connected to the terminal marked with the letter L or coloured
RED.
The wire coloured green or GREEN/YELLOW must be connected to the terminal marked with letter E or
The television receiver must be protected by a 5A fuse if a fused plug is fitted. For any other plug fit a 5A fuse
at the distribution board.
.
GREEN
GREEN/YELLOW
5 A FUSE
Caution: - Under no circumstances should the discarded plug be inserted into a mains socket. To prevent shock hazard carefully
dispose of the discarded plug into your dustbin, do not leave the plug lying around where children might see it.
-4-
Page 4

Television
Thank you for buying this television which is designed to give you many years of satisfactory service.
you may already be familiar with using a television but do please take time to read these instructions.
They are designed to familiarise you with the unit’s many new features and to ensure you get the
very best out of your purchase.
Special Features of the Television
• 20’’ TFT-LCD VGA Panel
• Available for Cable Channels (A decoder may be required)
• 2x3 W Stereo sound
• Teletext/Fastext
• Wide angle perspective
• 2 SCART socket, AV Socket, S-VHS Socket and external sound system connection
• Minimum energy consumption
• AVL – Automatic Volume Limiting
• ATS – Automatic Tuning System
• Intelligent program switch
• Programmed power on
• Programmed power off
• Graphic equalizer
• On screen viewing of all control commands, program numbers and additional features
• Manual Fine Tuning
• 100 Program memory
• Infrared Remote Control
• Child Lock
• VGA/PC input (Model Dependant)
• Headphone socket
• Cover a table with a soft towel (or other protection to prevent damage to the T.V. table).
STAND
REMOVAL
• Carefully lay the T.V. front down on the table.
• Position the T.V. table stand so that it hangs over the edge of the table.
• Remove the 2 screws that hold the blanking plate.
• Remove the 4 screws that hold the stand.
• Remove the stand and refit the blanking plate.
• Attach any new brackets before lifting T.V. back up.
Note: Keep removed stand and screws safely for future use.
-5-
Page 5

or cabinet.into
15V
15
Page 6

Getting started
Remove your Television carefully from the box.
You may wish to store the packaging for future
use.
In the box
Inside the carton box you should have:
• Accessories box
• Mains lead
• Adapter
• Remote control
• Batteries
• Instruction book
Read these instructions before use.
Note: Scart, VGA and Phono leads are not
supplied.
Aerial connection
To connect an aerial, plug the aerial lead into
the aerial socket on the rear of the TV.
Please Note: When not in use disconnect the
from the mains power supply.
plug
4.
Press the
the TV. The standby indicator will
illuminate.
5.
Press a Numeric button or the
or ( ) button on the remote handset
or
(PR+), (PR-) or (MENU) button
on the side panel to switch the TV
on.
The standby indicator remains on.
The picture will appear after a few
seconds.
Press the
to standby. The standby indicator will
brighten.
Please Note: Do not leave the television in
standby unattended or overnight.
( ) button on the side of
( )
( ) button to switch the TV
You can use an outdoor or indoor aerial.
However, if you use an indoor aerial the quality
of the reception may be reduced and adjustment
of the aerial may be required when changing
programs.
Please note: If you live in a poor reception
area or use an indoor aerial you may experience
loss or corruption of teletext transmissions and
nicam sound.
Switching on and First Use
Connect the mains lead to the adapter.
1.
Connect the input socket of the adapter to
2.
the socket at the back panel of the LCD TV.
Connect the adapter to a suitable mains
3.
socket.
Switching the TV on for the first time
To install your TV, please read the sections
“TV controls” and “ Tuning the television”.
The batteries
Remove the back cover to reveal the battery
compartment and make sure you insert the batteries
the right way round.
Suitable battery types for this remote are
UM-4, IEC R03 or AAA 1.5V.
Do not throw your old batteries into a fire, dispose
of them in a designated disposal area.
Do not combine a used, old battery with a new
one or mix battery types.
The performance of the remote control will
deteriorate beyond a distance of 8 metres or
outside an angle of 30 degrees from the centre
of the TV.
Note 1: Your TV will move to stand-by mode
in five minutes when there is no broadcast signal.
Note 2: Your TV is equiped to operate with
side panel buttons, “MENU”, “PR+”, “PR-”, “VL+”,
“VL–” in case your R/C is broken or the batteries
are exhausted.
-7-
Page 7
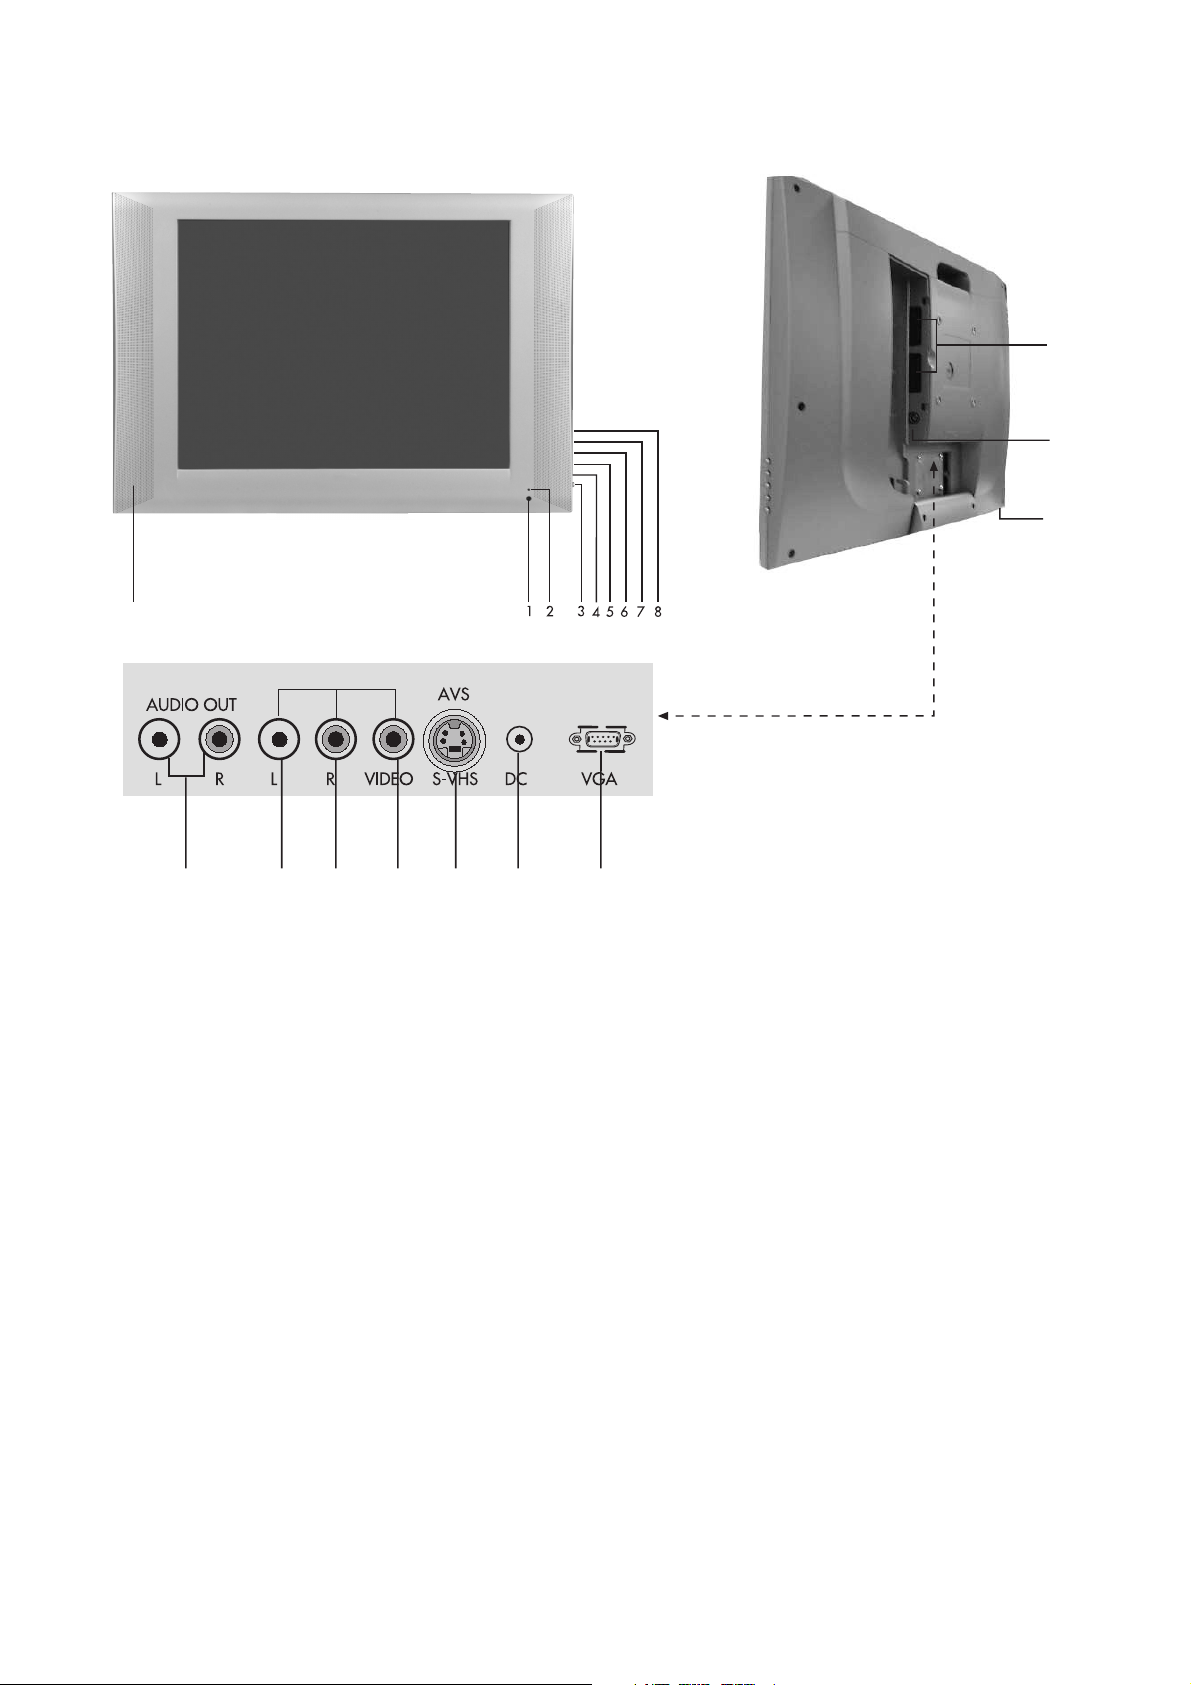
Control Unit
9
AV3
17
15
14
1011 12 1316 18 19
1.
Remote control sensor
Stand-by Led
2.
Power on / off
3.
Volume down
4.
Volume up
5.
Menu button
6.
Program down
7.
Program up
8.
Speaker
9.
10.
Please note
• Do not use Video Phono and S-Video connections at the same time, otherwise they will effect
the picture.
• RGB inputs from scart will give you better picture quality.
• Remove cover to access scart and aerial sockets.
Audio phono (R)
11.
Audio phono (L)
12.
Video input phono connector
13.
S-VHS
14.
Headphone socket
15.
Aerial input
16.
Audio Phono Output (L,R)
17.
2 Scart
18.
DC Power supply input
19.
VGA (PC Input)
-8-
Page 8

Remote control
1. Picture Format ( )
1
2
3
4
5
6
7
8
10
2. Mute of volume (MUTE) (
)
3. Numeric buttons
123
456
789
AV
0
SWAP
17
18
4. Audio/Video (AV) (
5. PC mode transition (
6. Teletext / MIX / TV (
)
)
)
7. Up movement (Menu -Teletext) (
8. Left movement (Menu) (
9. Volume UP (
)
10. Volume DOWN (
)
)
)
11. Red Fastext
PC TV
TXT/MIX
OK
9
VOL+
VOL-
MENU
PR+
PR-
19
20
21
22
23
24
25
12. Green Fastext
13. Index Teletext (P100) (
14. Question/Answer (REVEAL) (
15. UPDATE Teletext (
16. SUB PAGE Teletext (
17. STAND-BY (
)
)
)
)
)
18. Return to Selected Program (SWAP) (
19. TV mode selection (
20. Menu (
)
)
)
11
12
13
14
15
16
26
27
‹
?
X
28
29
30
31
21. OK (
22. Right (Menu) (
23. Down (Menu/Teletext) (
24. Program up (P+) (
25. Program down (P-) (
26. Blue Fastext
)
)
)
)
)
27. Yellow Fastext
28. STOP Teletext (
29. Teletext enlarge (DOUBLE) (
30. Equalizer selection (
31. Picture control (
)
)
)
)
Page 9

Using the TV
STAND-BY
Switch on the television By pressing the
main ON/OFF button
by light will glow. To switch the television
to standby press the red
located on the upper right hand side of
your remote control.The sound and
picture will go off and the power
indicator will brighten. To switch back
on, either press the same button, any of
the number buttons or one of the
buttons.
Caution!
If you are not going to use your television
for a long period of time, make sure to
switch it off from the main power button.
( ). The stand-
( ) button
( )/( )
Programme selection
Press the ( )/( ) buttons on your remote
control, or by selecting a numeric button
in order to get the desired channel on
your television. In order to select a
program whose number is greater than
9, you can use the numeric buttons,
pressing in the desired numbers as
required. For example, to select program
12, press the numeric buttons 1 and 2
one after another.
Volume
Press the Volume+ or Volume- button on
the TV or the
remote control. A sound level bar will
appear on the screen.
( ) or ( ) button on the
MUTE
To mute the sound, press the ( ) button.
Press the same button again, the sound
will return. During mute, press the
button the volume will decrease and if
you press the
increase. The mute function will be
cancelled.
( ) button the volume will
( )
Return to Selected Button Program
(SWAP)
To return to the previous program press
( ) button.
the
-10-
Page 10
AV
Your television has 2 SCART sockets.
The AV function is used when you are connecting
an external source to your TV via the SCART
sockets or PHONO sockets. Every time you press
the
( ) button, your default settings will change
according to the socket connection below.
1. AV1 when using SCART socket 1
(with RGB support)
2. AV2 when using the RCA socket
“when TV has only 1 scart” AV2 when
using SCART socket 2 “when TV has 2
scart sockets”
3. AVS when using S-Video socket “when TV
has only 1 scart” AV3 when using RCA socket
“when TV has 2 scart sockets”
4. AVS when using S-Video socket “when TV
has 2 scart sockets” You can return to TV mode
by pressing AV button again.
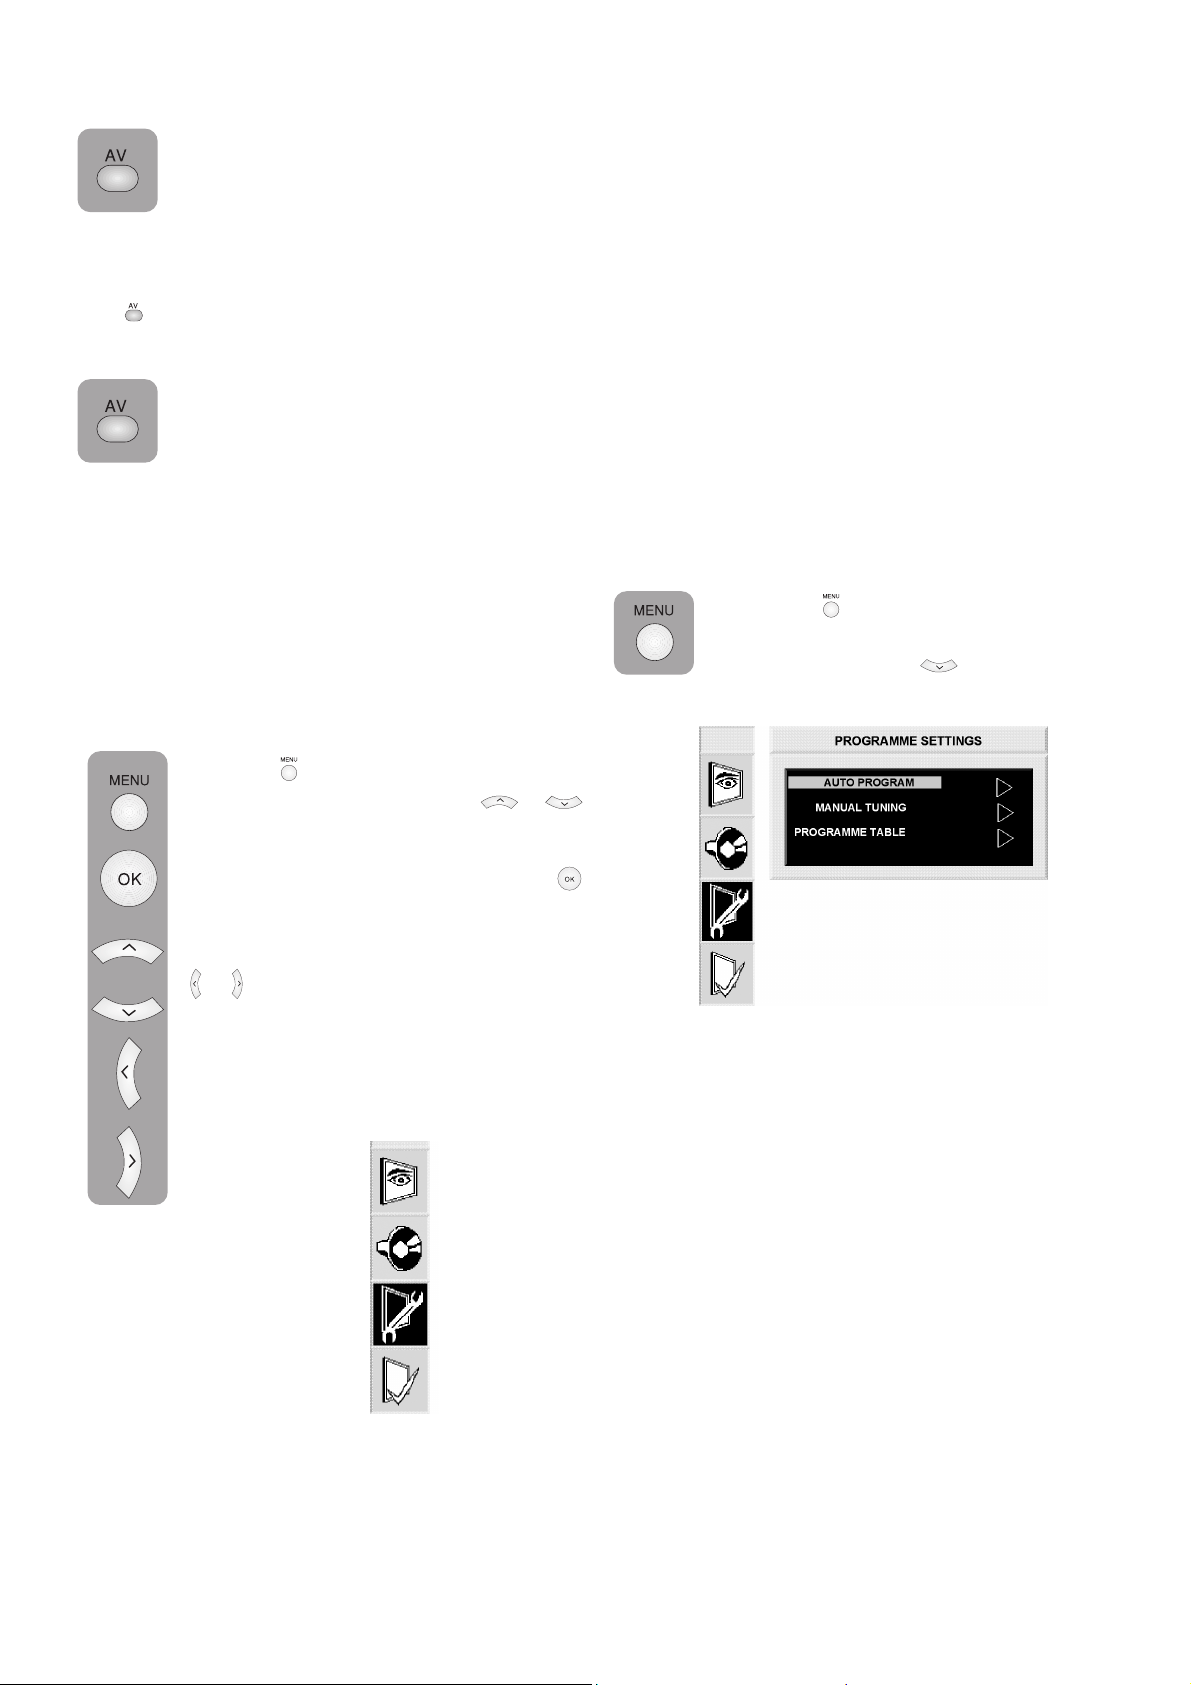
Control Menu
Tuning and storing the programs on
your television
You can either tune the programs automatically
or manually storing them in your television. As
a result of your television’s Automatic Tuning
System (ATS), the programs found are
automatically stored.
Please note: If your television does not receive
a signal for 5 minutes, then it will automatically
switch to the stand-by mode.
This will be indicated on screen during the last
minute before switching to the stand-by mode.
Automatic tuning and storing of the
television program channels
(AUTOPROGRAM)
Press the
control, the MAIN MENU will appear
use down button
SET-UP.
( ) button on your remote
( ) to highlight
Press the
appear. The Up-Down buttons
enable you to move between the different
control menu functions where you can
indicate your choice by pressing the
button.
Press the left or right movement buttons
( ) button the MAIN MENU will
( )/( )
( )
( )/( ) to adjust.
Press MENU button to return to MAIN
MENU.
Picture
Sound
Set-Up
Features
-11-
Page 11

Press the right movement button ( ) and
highlight the AUTO PROGRAM option,
press the
selection the “COUNTRY SELECTION”
menu will appear on screen. Using the
direction buttons on your remote control,
highlight and select U.K. option and
press the
setup menu will appear on screen and after
pressing the
channels will be tuned and stored in sequence. At
this point an AUTO PROGRAM function bar will
be displayed.
Manual tuning and storing of the
television programs: If you already
know the Channel number:
(See page 29)
( ) button. The AUTO PROGRAM
( ) button once more, the program
After the application is complete, the
PROGRAMME TABLE will then appear on
screen. To stop the process at any given
time, press the
numbers that have been stored are reflected
in the PROGRAMME TABLE, giving you
the ability to assign any program number
to the channel of your choice.
Press the ( ) button on your remote
control and using the ( ) button select
the SETUP MENU. Press
u
sing the ( ) button highlight the
manual tuning bar in blue
( ) button. Following this
( ) button. The program
( ) button then
press the
( ) button, or the right movement ( )
button you will have access to this menu.
Select “MANUAL TUNING” highlight the
CHANNEL bar, selecting the programs by pressing
( ) for the “S” band in locating cable channels
and the “C” band for those channels received by
an aerial. Using the number buttons of your remote
control, you can apply the channel numbers
accordingly. If the program found on screen is
acceptable in quality, then in order to store it use
the upward movement button
the PROGRAMME NO.
Enter the number that you wish to assign
to the channel by using the number
buttons on your remote control. By using
the right-left movement buttons
you also have the option to choose the
number.
With the downward movement button
( ) to highlight
( )/( )
( ) highlight the STORE option and
then press the
the “STORED” displayed.
The program will be stored to the number
of your choice and you can also store
the other channels in the same way. To
exit the MANUAL TUNING menu, press
( ) button.
the
( ) button you will see
-12-
Page 12

Manual Tuning and Storing of the
Television Programs
If you do not know the Channel
number:
Fine Tuning
If the channel found, needs additional fine tuning
then use the down button
TUNING menu, highlight the FINE TUNING
option.
( ) in the MANUAL
In the MANUAL TUNING menu, highlight
the SEARCH option and search the
channel numbers using the
When the program viewed on screen is
required select the PROGRAMME NO
line. Using the numeric buttons, input the
program number. You can also choose
the program number by using the leftright movement buttons
down movement button
the STORE option and press the
button, you will see “STORED” displayed
on screen. The channel will be stored
according to the program number of
your choice. In order to store other
channels, simply repeat the above
process. To exit the MANUAL TUNING
menu, press the
( ) button.
( )/( ) buttons.
( )/( ) Using the
( ) highlight
( )
Use the left-right movement
on your remote control you will have the
ability to get the exact quality of tuning
required. Under normal circumstances,
you will not need to use the Fine Tuning
function. The AFC values of your television
will automatically adjust and lock
themselves to the channel.
To exit the Channel tuning menu, press the
button.
( )/( ) buttons
( )
-13-
Page 13

Program Table Deleting a program that has been
Switching the locations of the program
channels that have already been stored:
Your television has the capability of
switching and changing the stored
numbers of the programmed channels
manually or automatically. Press the
button of your remote control, upon which
you will go into the Program in the Setup
menu press the
PROGRAM TABLE.
Using the up-down or left-right movement
buttons
programs you wish to exchange with
others, press the “Green” button. The first
channel program number indicated can be moved
to the second channel program number, which
in turn moves the initial channel program number
that has been indicated.
( )/( ), ( )/( ) indicate the
( ) button, to select the
( )
To name the programs
‹n the PROGRAM TABLE you can name
any or all of the programs with names that
have a maximum of 5 characters. Using
the up-down or right-left buttons
( )/( ), ( )/( ) choose the program
that you would like to name and then press
the “Yellow” button. Using the up-down
button number or sign that you want. To move
onto the second character of the name, use
the right-left movement
with the up-down movement buttons
( )/( ) assign the program the letter,
number or sign of your choice. Once you
have completed all the characters, press
the “Yellow” to store. To write names for
any of the other programs, simply repeat
the above procedure. To exit at any given
stage, simply press the
( )/( ) you can choose the
( )/( ) and again
( ) button.
stored:
In the PROGRAM TABLE choose the
program that is to be deleted, using the
up-down or right-left
buttons.
Press the “Blue” button. The program
indicated is then deleted and all
remaining programs are moved to the
prior number.
Skipping a program that has been
stored:
If you do not wish to come across certain
programs while going up and down
channels using the
the PROGRAM TABLE choose the
program that is to be skipped using the
up-down, left-right buttons
( )/( ).
The program that is to be skipped will
be indicated in red. You have the option
of applying this on more than one
program. In order to see the program
numbers that are skipped, press the
number of the concealed program
directly.
In order to cancel the program skipping
mode, press the “Red” button again, the
program number will turn white and the
skipping mode will be cancelled.
( )/( ), ( )/( )
( )/( ) buttons, in
( )/( ),
-14-
Page 14

Setting up the Sound Menu
You can control the sound settings of
your television by using the
buttons on your remote control or the
buttons directly on your television.
To set up other features of the sound
menu, press the
control. Select the SOUND menu bar in
blue, press the
SOUND menu will appear on screen.
Using the up-down movement buttons
( ) button on your remote
( ) button and the
( )/( ) you can choose the features
that you require.
( ) and ( )
Sound type
Your television has the ability to receive NICAM
Stereo transmission. If the program you are
viewing is available in stereo, then this will be
indicated with STEREO on screen display.
Spatial
To give further “depth” to the sound of the program
you are watching, select “Spatial” using right
movement button
( ) in Sound Mode.
Balance
In order to balance the level of sound
between the right and left speaker of the
television, use the down movement button
( ) to highlight the BALANCE mode
in white and by using the right left buttons
( )/( ), you can adjust the balance.
-15-
Page 15

Equalizer
Highlight “EQUALIZER” in the SOUND
MENU, press the
equalizer setting function on screen. Using
the up-down movement
buttons you choose between a series of
preset settings for different types of sound
output such as Music, Sports, Cinema
and Speech. Also you have the Personal
1 and Personal 2 option settings which
can be adjusted in accordance to your
preferences. Highlight the Personal
preferences, press
the right-left movement
choose from the 120Hz / 500 Hz /
1,5KHz / 5KHz / 10 KHz frequencies
and with the up-down movement
buttons, adjust the levels according to your
preferences. To store the frequency levels, press
the
( ) button and then your preferences will be
stored in the memory of your television.
To exit at any given stage, press the
( ) button bringing the
( )/( )
( ). Then by using
( )/( ) buttons
( )/( )
( ) button.
When you plug in the headset and press the
MUTE button sound is transferred into the headset.
The audio setting of the headset can be adjusted
using the “VOL+” and “VOL-“ buttons.
You can choose the equalizer modes directly
from the
( ) button of your remote control.
-16-
Page 16

Picture Set up
Press the MENU button on your remote control,
you can enter the PICTURE menu. Using the updown movement
indicate your choice in feature and with the
right–left movement
the levels as necessary.
The picture brightness, contrast, color and
sharpness levels can all be adjusted according
to your desire.
Furthermore, non-adjustable default settings in
the memory categorized as Weak – Strong Natural can also be used by press the
on your remote control directly gaining access
without having to enter the picture menu.
The changes you make in the picture
settings will be automatically stored being
your Personal settings. To exit at any
given stage, press the
TINT: When a NTSC video is connected
to the SCART, you can adjust the TINT
picture mode of your screen. If you do
not connect this type of video, then the
TINT option of the PICTURE menu can
be adjusted however the picture mode
will not be affected or changed.
( )/( ) buttons you can
( )/( ) buttons you can adjust
( ) button
( ) button.
SPECIAL FEATURES
Press the ( ) button on your remote
control, the MAIN MENU will appear
on screen. Highlight the SPECIAL
FEATURES option in blue, press the
button to enter into this menu.
( )
Child Lock:
The Child Lock option enables you to
switch off access to a certain program
and prevent it from being watched. You
have the option of cancelling this function
at any given time. In order to enable
the Child Lock function, go into the
“SPECIAL FEATURES” menu after selecting the
program of your choice.
Using the down movement
the Child Lock option and turn it ON or OFF as
needed. Using right/left movement buttons
Press the
“LOCKED“ on screen display.
( ) button to exit the menu and see the
( ) button, highlight
( )/( ).
To cancel the Child Lock option, the mode can
be switched OFF from the SPECIAL FEATURES
menu in the process described above.
-17-
Page 17

Language
In the FEATURES MENU highlight the
LANGUAGE mode in white press the
button, to access to the LANGUAGE
menu.
movement
( )/( ), ( )/( ) buttons,
indicate the language of your choice,
once again press the
( ) button.
All the function modes of your television
will be displayed in the language that
you have indicated. To exit the application
at any stage, press the
( ) button. Only
the O.S.D. language will change. Not
teletext or TV sound language.
English
Deutsch
Francais
Dutch
Italiano
Espanol
Portuguesa
E
hnika
K
Pycc
Dansk
Swenska
Norsk
Türkçe
Suomi
Polski
Magyar
Cesky
Româneşte
Slovensky
TIME
In the FEATURES MENU use the numeric buttons
to enter the time. The time that is stored here will
be used as the basis in all activities based within
the TIMER mode.
Please Note: The time will be reset when you
turn off your television, but will adjust itself to the
time of any channel with Teletext once you switch
on your television again, getting the necessary
information from the transmission.
SLEEP TIMER Mode
In the FEATURES MENU highlight the TIMER
option and press
TIMER menu on screen. With this function, you
will have the ability to automatically turn your
television on or off at the time of your choice, or
enable your television to shift from one channel
to another at a time of your choice.
( ), which will bring the SLEEP
( )
PROGRAMME NO
You can insert the program number of
the channel that your television will
automatically switch on, or shift to using
the right-left movement
( )/( ) buttons.
TIME SELECT ON
Highlight the time select ON mode and
press the
( ) button, use the numeric
buttons to insert the time that you want
your television to switch on. If television
is in Stand-By mode at this time, then it will
automatically switch on, if it is already on then
it will switch to the channel program indicated.
In this way you can preset the time of the program
you wish to follow and have your television switch
to them at their starting time automatically.
TIME SELECT OFF
Highlight the time select OFF mode and
press the
( ) button, use the numeric
buttons to insert the time that you want
your television to switch off. During the
last minute before your television is
programmed to switch off to stand-by,
the on screen display indicating that there
is one minute remaining will appear. In the event
that you wish to exit stage, press the
( ) button.
Please note: If you turn your television off from
the main power supply switch then the sleep timer
modes selected will cancelled.
Picture Format
By pressing the ( ) button on your remote
control, you have the ability to change
the picture format of the screen. If you
leave the screen format function on AUTO
then the program that you are viewing will be
shown in either 4:3 or 16:9 format depending
on the transmission broadcast.
A black band may be present top and bottom of
the picture dependant on the broadcast this is
not a fault.
-18-
Page 18

Using Teletext
Teletext is an information system that displays
text on your TV screen. Using the teletext control
buttons you can view pages of information that
are listed in the teletext index.
Please Note: No on screen display is available
in text mode. The contrast, brightness and colour
cannot be changed but the volume control is still
available.
To enter Text mode
Please Note: Make sure the TV channel you
are watching transmits teletext. If not NO TEXT
sign will be shown on the screen.
Press the
appear, normally the index page.
( ) button. The text page will
To exit Text mode
Press the ( ) button. The will screen
will return to the channel you were
watching.
To select a page of text
TV/text mix
To view a TV programme whilst in text
mode, press the
will be superimposed over the TV
programme.
Press the
the text page.
( ) button again to return to
( ) button. The text
Page search whilst watching TV
In Text mode press the ( ) button. The
TV will return to TV mode with the text
page number in the top left hand corner
of the screen.
Enter the page number you want using
the Numeric buttons.
The top line of the text page will appear
whilst the text searches for your page.
When the page is found the number
will remain in the top left hand corner
of the screen.
Press the
selected page of text.
( ) button to view your
Find the number of the page in the index
and enter it using the Numeric buttons.
The number of the page will appear in
the top left hand corner of the screen.
The page counter will search for your
page. When it finds it, the page will be
displayed.
To move to the next page of text press
the
( ) button.
To move to the previous page press the
( ) button.
To return to the index page press the
( ) button.
Double height text
If you have difficulty reading the
text on the TV you can double the height
of the text.
Press the
page will be displayed in double height
text.
Press the
half of the page will be displayed in
double height text.
Press the
the full page in normal text.
( ) button. The top half of the
( ) button again. The bottom
( ) button again to return to
-19-
Page 19

Page Stop
To reveal information
If the page of text you have selected
contains sub pages, these sub pages
will automatically be displayed in order
with a delay to allow you to read the
page.
To stop the move to the next sub page
press the
in the top left hand corner.
To continue moving through the sub
pages press the
( ) button. STOP will appear
( ) button again.
To select a sub page
If the page of text you are viewing
contains sub pages, the number of the
sub page you are on and the total
number of sub pages is displayed on
the right of the screen i.e. 1/7.
To select a sub page press the
button. Press the green button to select
next sub-page or press the red button
to select the previous sub-page.
( )
Press the ( ) button to reveal concealed
information (quiz answers etc.).
Press the
the information again.
( ) button again to conceal
Clock
Press the ( ) button, whilst watching a
TV program, to display the time.
Fast text
At the bottom of the teletext screen is a row of
subject headings in red, green yellow and blue.
The remote control has a row of coloured buttons
corresponding to the row of coloured subjects
on the screen.
Pressing one of the coloured buttons will take
you directly to the page corresponding to the
subject heading.
Enter the number of the sub page, using
the Numeric buttons in the format S0001
for sub page 1.
The teletext will search for the sub page.
This may take some time. To return to
the TV whilst the teletext is searching
press the
When the page number is found it will
appear in the top left hand corner of
the screen.
Press the
text page.
( ) button.
( ) button again to view the
-20-
Page 20

Connecting external
equipment
You can connect a wide range of audio and
video equipment to your TV.
Connecting a video recorder
Via SCART
Make sure the TV and video recorder are both
switched off.
Plug one end of the SCART lead (not supplied)
into the back of the video recorder and the other
end into one of the SCART sockets on the back
of the TV.
Switch on the video recorder and the TV.
Press the
control to select AV1 or AV2 to
correspond with the SCART socket
you are using on the back of the TV.
Please note: You can connect RGB external
equipment via Scart. It is necessary to you use
a full Scart cable for this purpose.
( ) button on the remote
Via Phono lead (not supplied)
Make sure the TV and video recorder are both
switched off.
Plug one end of the PHONO lead into the video
and audio out sockets on the back of the video
recorder and plug the other end into the video
and audio in sockets of the TV.
If the sound is mono, use the Audio Input L. and
in the SOUND menu select the MONO feature.
Select the video output of the external device
by using its menu, and set to RGB.
-21-
Page 21

Via aerial socket
Make sure the TV and video recorder are both
switched off.
Via Phono lead and S-Video
socket
You can also connect it through the
S-Video socket of the TV.
Unplug the aerial lead form the TV and plug it
into the aerial socket on the video
recorder.
Plug a coaxial plug into the RF out socket on the
rear of the video recorder and plug the other
end into the aerial socket on the TV.
Switch on the video recorder and the TV. If your
video recorder has a test signal, switch it on.
(Refer to the video recorder user guide). Or play
a prerecorded tape.
See ‘Tuning the TV’ and carry out the tuning
procedure for the video recorder test signal.
Select a programme number 0.
Plug the S-Video plug into the S-Video socket
and the audio leads into the audio sockets.
AV3
AV3
-22-
Page 22

Connecting a DVD player
Via SCART
Make sure the TV and DVD player are both
switched off.
Plug one end of the SCART lead (not supplied)
into the back of the DVD player and the other
end into the SCART socket on the back of the
TV.
Switch on the DVD and the TV.
Via Phono lead
Make sure the TV and DVD player are both
switched off.
Plug one end of the PHONO lead into the video
and audio out sockets on the back of the DVD
player and plug the other end into the video and
audio in sockets of the TV.
Via Phono lead and S-Video
socket
You can also connect it through the
S-Video socket of the TV.
Plug the S-Video plug into the S-Video socket
and the audio leads into the audio sockets.
AV3
AV3
-23-
Page 23

Connecting a decoder
Via SCART
Make sure the TV and decoder are both switched
off.
Plug one end of the SCART lead (not supplied)
into the back of the decoder and the other end
into the SCART on the back of the TV.
Switch on the decoder and the TV.
Press the
control to select AV1.
( ) button on the remote
Via Phono lead
Make sure the TV and decoder are both switched
off.
Note: For Decoder connection Via phono lead
your Decoder device must have the tuner built
in.
Plug one end of the phono lead into the video
and audio out sockets on the back of the decoder
and plug the other end into the video and audio
in sockets on the TV.
AV3
-24-
Page 24

Connecting TV with video and satellite/digital
receiver
Connecting TV with camcorder
DC VGA
AVS
AV3
L R VIDEOL R S-VHS
AUDIO OUT
Connecting TV games and computer
DC VGA
AVS
AV3
L R VIDEOL R S-VHS
-25-
AUDIO OUT
Page 25

Start Up
As your LCD-TV unit also enables VGA
applications, it can also be used as a PC monitor.
Transition to the PC mode
In order for the LCD-TV to switch to the monitor
(PC) mode, you can use the PC button on your
remote control. In order to switch from the monitor
mode back to the TV mode, use the TV button
on your remote control.
NOTE 1: When the unit is switched to the
monitor mode, the sound from of the AVS(S-VHS)
entry can be heard from the speakers. When
switched to this mode, the VOL+/VOL- and MUTE
buttons will be functional.
NOTE 2: When the unit is in monitor mode, the
Stand-by button is functional. When the unit is
switched back on from the stand-by function, it
will open in the TV mode.
PC Mode MENU structure
When you press the (
remote control while the unit is in the
PC mode, the features available in the
PC mode will appear on screen as the
PC MENU. In order to make the
necessary adjustments in this menu, you
can use the right-left, up-down movement
( )/( ), ( )/( ) buttons on your
remote control.
PHASE: ADC’s phase setting
H.POSITION: Horizontal position setting
V.POSITION: Vertical position setting
AUTOMATIC CONFIGURATION: The
most suitable geometric settings in
accordance to the entry mode is configured by
this function. For this application, highlight the
AUTOMATIC CONFIGURATION option and
press the OK button.
) button on your
Warning Messages:
1. NO SIGNAL: There is no VGA connection.
Under these circumstances the on screen display
will be “NO SIGNAL”. The message will be on
screen for 15 seconds and if a suitable VGA
attachment is not made to the indicated area,
then the unit will switch itself to the POWER
SAVING mode in order to protect the unit panel.
2. OUT OF RANGE: If the resolution application
is not one of the graphic entry modes, then the
on screen display will be “OUT OF RANGE”.
The message will remain on screen until the
necessary graphic entry mode is applied.
Important Cautions:
1. When a VGA mode is displayed for the first
time, an AUTOMATIC CONFIGURATION
application may be necessary.
2. According to the VGA power Saving
standards, when there is no signal, for 15 seconds
an on screen display of “NO SIGNAL” is shown
after which the unit switches itself off in a 30Watt
power saving mode
If you switch to the monitor model after adjusting
the TIMER function available under the Special
Features menu, the timer function and program
switch will no longer function, however the
automatic shut-down application will continue
to function.
-26-
Page 26

Help and service tips
The TV does not work
Make sure it is plugged into the mains supply
and switched on.
Poor picture
• Is the aerial plugged in.
• If you are using a set top aerial is it properly
aligned for the best signal.
• Make sure the aerial is not to close to neon
lights, loudspeakers etc.
• Try changing the direction of the outdoor
aerial. High buildings and mountains can
cause ghost pictures or double images.
• The picture quality may be reduced by
connecting two external sources at once.
Disconnect one of the sources.
• Adjust the fine tuning.
No picture (TV)
• Is the aerial plugged in properly.
• Is the aerial lead damaged.
• Are all the plugs in the aerial lead fitted
correctly.
• Have you pressed the correct buttons on the
remote control.
No picture (PC)
• Is the VGA lead connected correctly.
• Is the PC switched on.
No sound
• Is the sound muted. Press the Mute
button.
• Is the volume turned down.
• Are there headphones connected.
Sound coming from only one
speaker
• Is the balance set to one side. See the sound
menu.
• If you have external speakers, has one
of them become disconnected.
No response to the remote control
• Try changing the batteries.
• Is there an obstruction between the
remote control and the sensor on the
TV.
If nothing works
If you have tried the above solutions and none
seem to work, try switching the unit off and on
again.
If this does not work contact your supplier or TV
repair technician. Never attempt to repair a
defective TV yourself.
Small picture (TV)
• A black band may be present top and bottom
of the picture dependant on the broadcast
this is not a foult.
Symptoms
No picture, no sound
Poor sound, picture OK
Poor Picture, sound OK
Weak picture
Blurred picture
Double image
Lines in picture
Distorted picture
Weak reception on some channels
Horizontal bars
Picture rolls vertically
Poor colour
No colour
Remote control not working
TV does not accept any command
Teletext rolling up/down
Try a different channel, if OK, probably station trouble
Solutions
Check aerial connections on back of set
Re orientate aerial
Check if on/off switch is “on”
Check aerial broken wires
Adjust brightness control
Adjust fine tuning control
Probably local interference, such as an appliance
Adjust contrast control
Check if station is broadcasting colour
Adjust colour control
Check batteries in the remote control handset.
Switch the TV set OFF and ON from mains
-27-
Page 27

20.1” 4:3
active matrix TFT
2x3 W
Receiving broadcast system
15V-4 A
Environmental note
This product has been made from high-quality parts and materials which can be re-used and recycled.
Therefore, do not throw the product away with normal household waste at the end of its life. Take it to a
collection point for devices. This is indicated by this symbol on the product, in the operating manual and
on the packaging.
Please find out about collection points operated by your local authority.
Help protect the environment by recycling used products.
-28-
Page 28

MAIN UK TRANSMITTER STATIONS
UHF CHANNELS STATIONS CT D
Regional Main Stations BBCI BBC2 ITV CH4 CH5 Map Bluebell Hill 40 46 43 65 29
North West Crystal Palace 26 33 23 30 37 28
Caldbeck 30 34 28 32 56 12 Dover 50 56 66 53 30
Winter Hill 55 62 59 65 48 15 Heathfield 49 52 64 67 31
Douglas (‹OM) 68 66 48 56 56 45 Oxford 57 63 60 53 49 27
North East
Belmont 22 28 25 32 56 17 Sandy Heath 31 27 24 21 39 25
Emley Moor 44 51 47 41 37 16 Sudbury 51 44 41 47 35 26
North East Tacolneston 62 55 59 65 52 24
Bilsdale West Moor 33 26 29 23 35 14 Scotland
Chatton 39 45 49 42 11 Angus 57 63 60 53 37 6
Pontop Pike 58 64 61 54 56/68 13 Black Hill 40 46 43 50 37 8
Midlands (West) Craigkelly 31 27 24 21 48 7
Ridge Hill 22 28 25 32 35 23 Darvel 33 26 23 29 35 9
Sutton Coldfield 46 40 43 50 37 22 Durris 22 28 25 32 67 5
The Wreckin 26 33 23 29 25 20 Eitshal (Lewis) 33 26 23 29 49
Midlands (East) Keeylang Hill 40 46 43 50 1
Waltham 58 64 61 54 35 21 Knock More 33 26 23 29 4
South West Rosemarkie 39 45 49 42 3
Beacon Hill 57 63 60 53 37 Rumster Forest 31 27 24 21 2
Caradon Hill 22 28 25 32 38 Selkirk 55 62 59 65 52 10
Huntshaw Cross 55 62 59 65 67 40 Wales
Redruth 51 44 41 47 37 39 Blaenplwyf 31 27 24 21 56 44
Stockland Hill 33 26 23 29 36 Carmel 57 63 60 53 42
Channel Islands LIanddona 57 63 60 53 19
Fremont Point 51 44 41 47 Moel-y-Parc 52 45 49 42 18
West Presely 46 40 43 50 37 43
Mendip 58 64 61 54 37 35 Wenvoe 44 51 41 47 41
South N.IRELAND
Hannington 39 45 42 66 35 34 Brougher Mountain 22 28 25 32 37 47
Midhurst 61 55 58 68 32 Divis 31 27 24 21 31 46
Rowbridge 31 24 27 21 33 Limavady 55 62 59 65 48
BBCI BBC2 ITV CH4 CH5 Map
-29-
Page 29

-30-
Page 30

-31-
Page 31

M8Q.801
 Loading...