

Beko 20LB330 User Manual

COLOUR TELEVISIONS
20” L5C LCD TV
Operating Instructions

List of contents
Important Information..............................................4
Special features ........................................................5
Safety instructions ....................................................6
Getting started .........................................................7
Aerial connection.................................................................7
Switching on .......................................................................7
Battery fitting .......................................................................7
Control unit ..............................................................8
Side and rear panel .............................................................8
Remote control.....................................................................9
Using the TV ...........................................................10
Tuning the TV ....................................................................11
Automatic tuning................................................................11
Manual tuning ...................................................................12
Program organising............................................................14
TV setup .................................................................15
Sound menu ......................................................................15
Sound Features ..................................................................16
Picture menu......................................................................17
Features Menu ..............................................................17-18
Using teletext ....................................................19-20
Connecting external equipment .........................21-25
PC use ....................................................................26
Help and service tips ..............................................27
Technical specifications table ..................................28
Main UK transmitter stations ..................................29
Guarantee.........................................................30-31
-3-

Important Information
LCD display panels are manufactured using an extremely high level of precision technology,
however sometimes some parts of the screen may be missing picture elements or have luminous
spots. This is not a sign of a malfunction.
Cleaning the screen and the cabinet...
After turning off the power, clean the screen and the cabinet with a soft, dry cloth. We recommend
that you do not use any proprietary polishes or solvents on the screen or cabinet as this may cause
damage.
Disposal...
The cold cathode fluorescent lamp in the LCD panel contains a small amount of mercury, when the
set reaches the end of its useful life please dispose of it in accordance with Local Government
Regulations or at a recycling centre.
Connection of Mains Cable
Always use the mains cable supplied. First of all insert the mains cable into the input panel of the CTV, and only
thereafter in to mains supply socket.
ELECTRICAL CONNECTIONS
For your own safety read the following instructions carefully before attempting to connect this unit to the mains
supply.
For your convenience a mains lead and plug with a fuse has been supplied. For your safety please observe the
following information.
The moulded incorporates a 5A fuse. Should the fuse need to be replaced an ASTA approved BS 1362 fuse of
the same rating must be used. Do not forget to refit the fuse cover. In the event of losing the fuse cover the plug
must not be used until a replacement fuse cover which must be the same colour as that visible on the pin face of
the plug has been fitted. Fuse covers are available from any good electrical store.
If the fitted moulded plug is not suitable for your socket, then the plug should be cut off and an appropriate plug
fitted.
IMPORTANT! FITTING A DIFFERENT PLUG.
If the mains plug is cut off from the mains cable rewire the replacement plug in accordance with these instructions.
IMPORTANT
The wires in this mains lead are coloured in accordance with the following code:
Blue - Neutral
Brown - Live
Yellow
Green-Earth
As the colours in the mains lead may not correspond with the coloured markings identifying the terminals
in your plug proceed as follows:
The wire coloured BLUE must be connected to the terminal marked with the letter N or coloured
BLACK.
The wire coloured BROWN must be connected to the terminal marked with the letter L or coloured
RED.
The wire coloured green or GREEN/YELLOW must be connected to the terminal marked with letter E or
The television receiver must be protected by a 5A fuse if a fused plug is fitted. For any other plug fit a 5A fuse
at the distribution board.
.
GREEN
GREEN/YELLOW
5 A FUSE
Caution: - Under no circumstances should the discarded plug be inserted into a mains socket. To prevent shock hazard carefully
dispose of the discarded plug into your dustbin, do not leave the plug lying around where children might see it.
-4-

Television
Thank you for buying this television which is designed to give you many years of satisfactory service.
you may already be familiar with using a television but do please take time to read these instructions.
They are designed to familiarise you with the unit’s many new features and to ensure you get the
very best out of your purchase.
Special Features of the Television
• 20’’ TFT-LCD VGA Panel
• Available for Cable Channels (A decoder may be required)
• 2x3 W Stereo sound
• Teletext/Fastext
• Wide angle perspective
• 2 SCART socket, AV Socket, S-VHS Socket and external sound system connection
• Minimum energy consumption
• AVL – Automatic Volume Limiting
• ATS – Automatic Tuning System
• Intelligent program switch
• Programmed power on
• Programmed power off
• Graphic equalizer
• On screen viewing of all control commands, program numbers and additional features
• Manual Fine Tuning
• 100 Program memory
• Infrared Remote Control
• Child Lock
• VGA/PC input (Model Dependant)
• Headphone socket
• Cover a table with a soft towel (or other protection to prevent damage to the T.V. table).
STAND
REMOVAL
• Carefully lay the T.V. front down on the table.
• Position the T.V. table stand so that it hangs over the edge of the table.
• Remove the 2 screws that hold the blanking plate.
• Remove the 4 screws that hold the stand.
• Remove the stand and refit the blanking plate.
• Attach any new brackets before lifting T.V. back up.
Note: Keep removed stand and screws safely for future use.
-5-

or cabinet.into
15V
15

Getting started
Remove your Television carefully from the box.
You may wish to store the packaging for future
use.
In the box
Inside the carton box you should have:
• Accessories box
• Mains lead
• Adapter
• Remote control
• Batteries
• Instruction book
Read these instructions before use.
Note: Scart, VGA and Phono leads are not
supplied.
Aerial connection
To connect an aerial, plug the aerial lead into
the aerial socket on the rear of the TV.
Please Note: When not in use disconnect the
from the mains power supply.
plug
4.
Press the
the TV. The standby indicator will
illuminate.
5.
Press a Numeric button or the
or ( ) button on the remote handset
or
(PR+), (PR-) or (MENU) button
on the side panel to switch the TV
on.
The standby indicator remains on.
The picture will appear after a few
seconds.
Press the
to standby. The standby indicator will
brighten.
Please Note: Do not leave the television in
standby unattended or overnight.
( ) button on the side of
( )
( ) button to switch the TV
You can use an outdoor or indoor aerial.
However, if you use an indoor aerial the quality
of the reception may be reduced and adjustment
of the aerial may be required when changing
programs.
Please note: If you live in a poor reception
area or use an indoor aerial you may experience
loss or corruption of teletext transmissions and
nicam sound.
Switching on and First Use
Connect the mains lead to the adapter.
1.
Connect the input socket of the adapter to
2.
the socket at the back panel of the LCD TV.
Connect the adapter to a suitable mains
3.
socket.
Switching the TV on for the first time
To install your TV, please read the sections
“TV controls” and “ Tuning the television”.
The batteries
Remove the back cover to reveal the battery
compartment and make sure you insert the batteries
the right way round.
Suitable battery types for this remote are
UM-4, IEC R03 or AAA 1.5V.
Do not throw your old batteries into a fire, dispose
of them in a designated disposal area.
Do not combine a used, old battery with a new
one or mix battery types.
The performance of the remote control will
deteriorate beyond a distance of 8 metres or
outside an angle of 30 degrees from the centre
of the TV.
Note 1: Your TV will move to stand-by mode
in five minutes when there is no broadcast signal.
Note 2: Your TV is equiped to operate with
side panel buttons, “MENU”, “PR+”, “PR-”, “VL+”,
“VL–” in case your R/C is broken or the batteries
are exhausted.
-7-
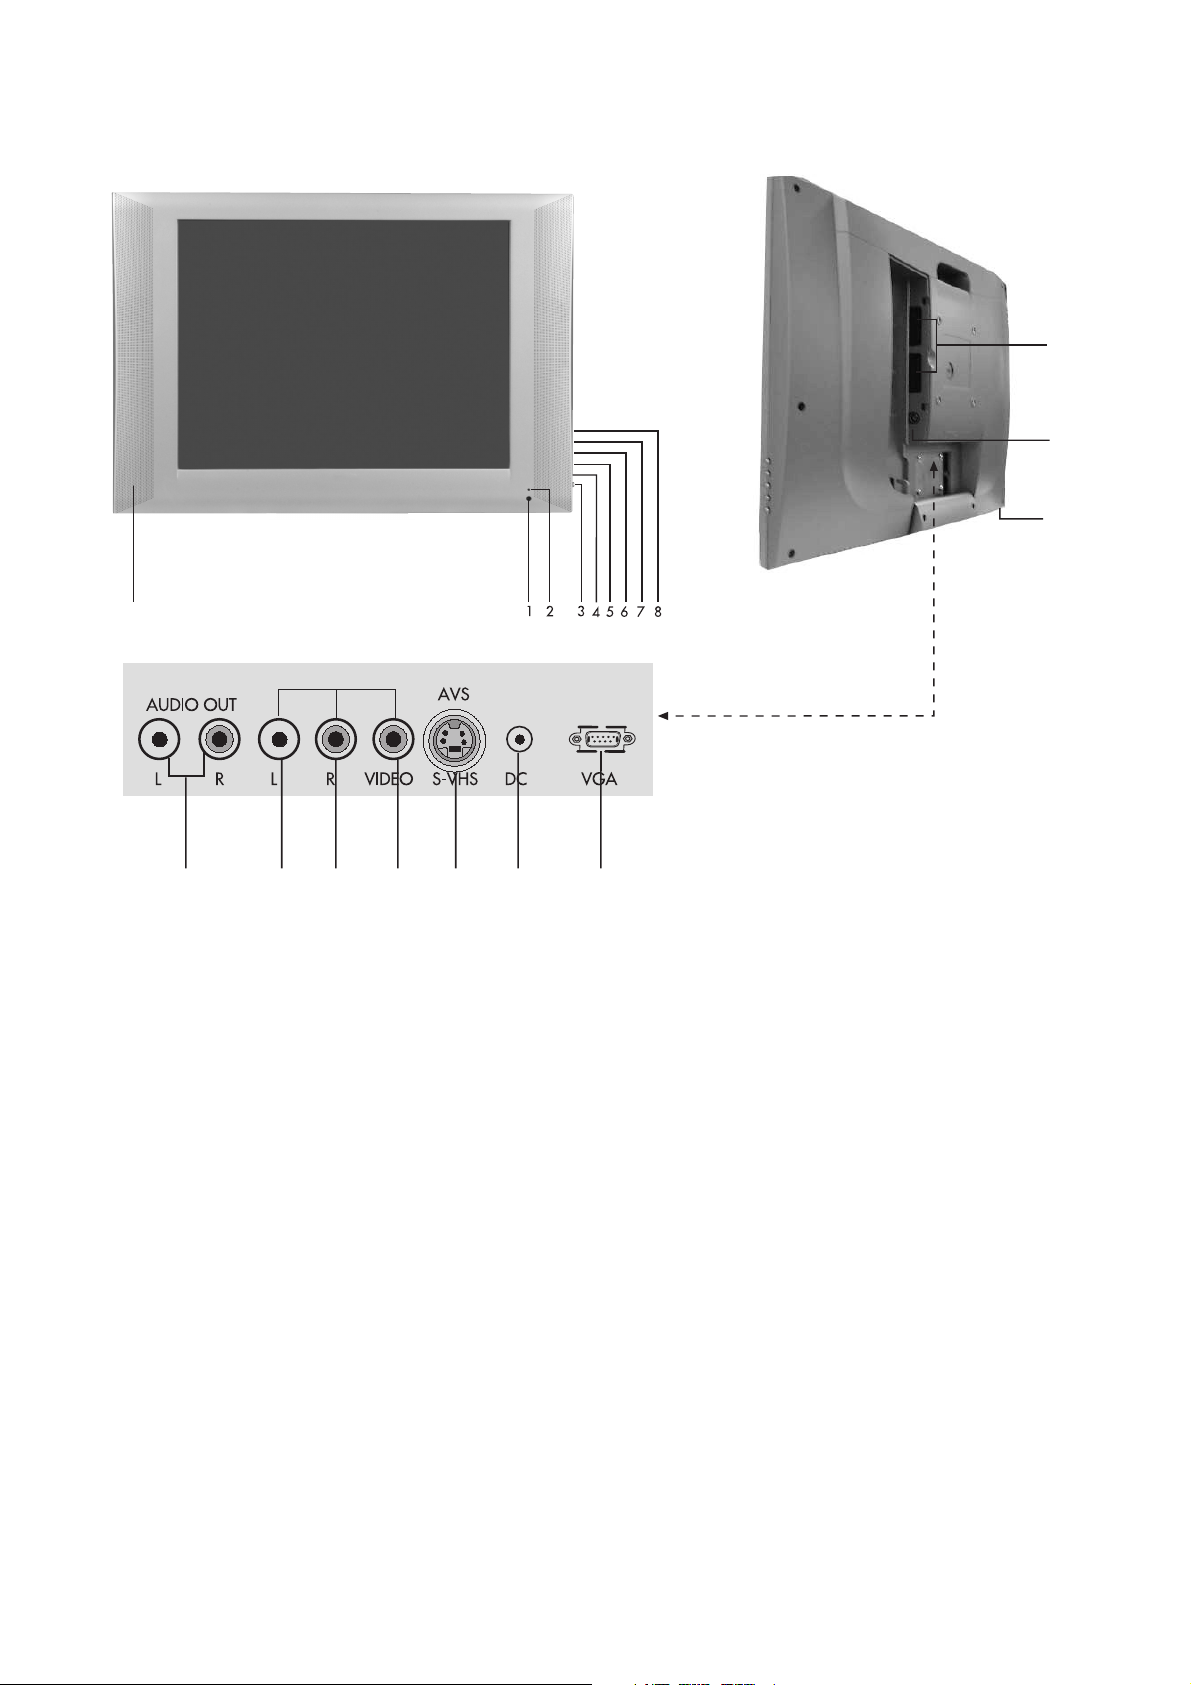
Control Unit
9
AV3
17
15
14
1011 12 1316 18 19
1.
Remote control sensor
Stand-by Led
2.
Power on / off
3.
Volume down
4.
Volume up
5.
Menu button
6.
Program down
7.
Program up
8.
Speaker
9.
10.
Please note
• Do not use Video Phono and S-Video connections at the same time, otherwise they will effect
the picture.
• RGB inputs from scart will give you better picture quality.
• Remove cover to access scart and aerial sockets.
Audio phono (R)
11.
Audio phono (L)
12.
Video input phono connector
13.
S-VHS
14.
Headphone socket
15.
Aerial input
16.
Audio Phono Output (L,R)
17.
2 Scart
18.
DC Power supply input
19.
VGA (PC Input)
-8-

Remote control
1. Picture Format ( )
1
2
3
4
5
6
7
8
10
2. Mute of volume (MUTE) (
)
3. Numeric buttons
123
456
789
AV
0
SWAP
17
18
4. Audio/Video (AV) (
5. PC mode transition (
6. Teletext / MIX / TV (
)
)
)
7. Up movement (Menu -Teletext) (
8. Left movement (Menu) (
9. Volume UP (
)
10. Volume DOWN (
)
)
)
11. Red Fastext
PC TV
TXT/MIX
OK
9
VOL+
VOL-
MENU
PR+
PR-
19
20
21
22
23
24
25
12. Green Fastext
13. Index Teletext (P100) (
14. Question/Answer (REVEAL) (
15. UPDATE Teletext (
16. SUB PAGE Teletext (
17. STAND-BY (
)
)
)
)
)
18. Return to Selected Program (SWAP) (
19. TV mode selection (
20. Menu (
)
)
)
11
12
13
14
15
16
26
27
‹
?
X
28
29
30
31
21. OK (
22. Right (Menu) (
23. Down (Menu/Teletext) (
24. Program up (P+) (
25. Program down (P-) (
26. Blue Fastext
)
)
)
)
)
27. Yellow Fastext
28. STOP Teletext (
29. Teletext enlarge (DOUBLE) (
30. Equalizer selection (
31. Picture control (
)
)
)
)

Using the TV
STAND-BY
Switch on the television By pressing the
main ON/OFF button
by light will glow. To switch the television
to standby press the red
located on the upper right hand side of
your remote control.The sound and
picture will go off and the power
indicator will brighten. To switch back
on, either press the same button, any of
the number buttons or one of the
buttons.
Caution!
If you are not going to use your television
for a long period of time, make sure to
switch it off from the main power button.
( ). The stand-
( ) button
( )/( )
Programme selection
Press the ( )/( ) buttons on your remote
control, or by selecting a numeric button
in order to get the desired channel on
your television. In order to select a
program whose number is greater than
9, you can use the numeric buttons,
pressing in the desired numbers as
required. For example, to select program
12, press the numeric buttons 1 and 2
one after another.
Volume
Press the Volume+ or Volume- button on
the TV or the
remote control. A sound level bar will
appear on the screen.
( ) or ( ) button on the
MUTE
To mute the sound, press the ( ) button.
Press the same button again, the sound
will return. During mute, press the
button the volume will decrease and if
you press the
increase. The mute function will be
cancelled.
( ) button the volume will
( )
Return to Selected Button Program
(SWAP)
To return to the previous program press
( ) button.
the
-10-
AV
Your television has 2 SCART sockets.
The AV function is used when you are connecting
an external source to your TV via the SCART
sockets or PHONO sockets. Every time you press
the
( ) button, your default settings will change
according to the socket connection below.
1. AV1 when using SCART socket 1
(with RGB support)
2. AV2 when using the RCA socket
“when TV has only 1 scart” AV2 when
using SCART socket 2 “when TV has 2
scart sockets”
3. AVS when using S-Video socket “when TV
has only 1 scart” AV3 when using RCA socket
“when TV has 2 scart sockets”
4. AVS when using S-Video socket “when TV
has 2 scart sockets” You can return to TV mode
by pressing AV button again.
Control Menu
Tuning and storing the programs on
your television
You can either tune the programs automatically
or manually storing them in your television. As
a result of your television’s Automatic Tuning
System (ATS), the programs found are
automatically stored.
Please note: If your television does not receive
a signal for 5 minutes, then it will automatically
switch to the stand-by mode.
This will be indicated on screen during the last
minute before switching to the stand-by mode.
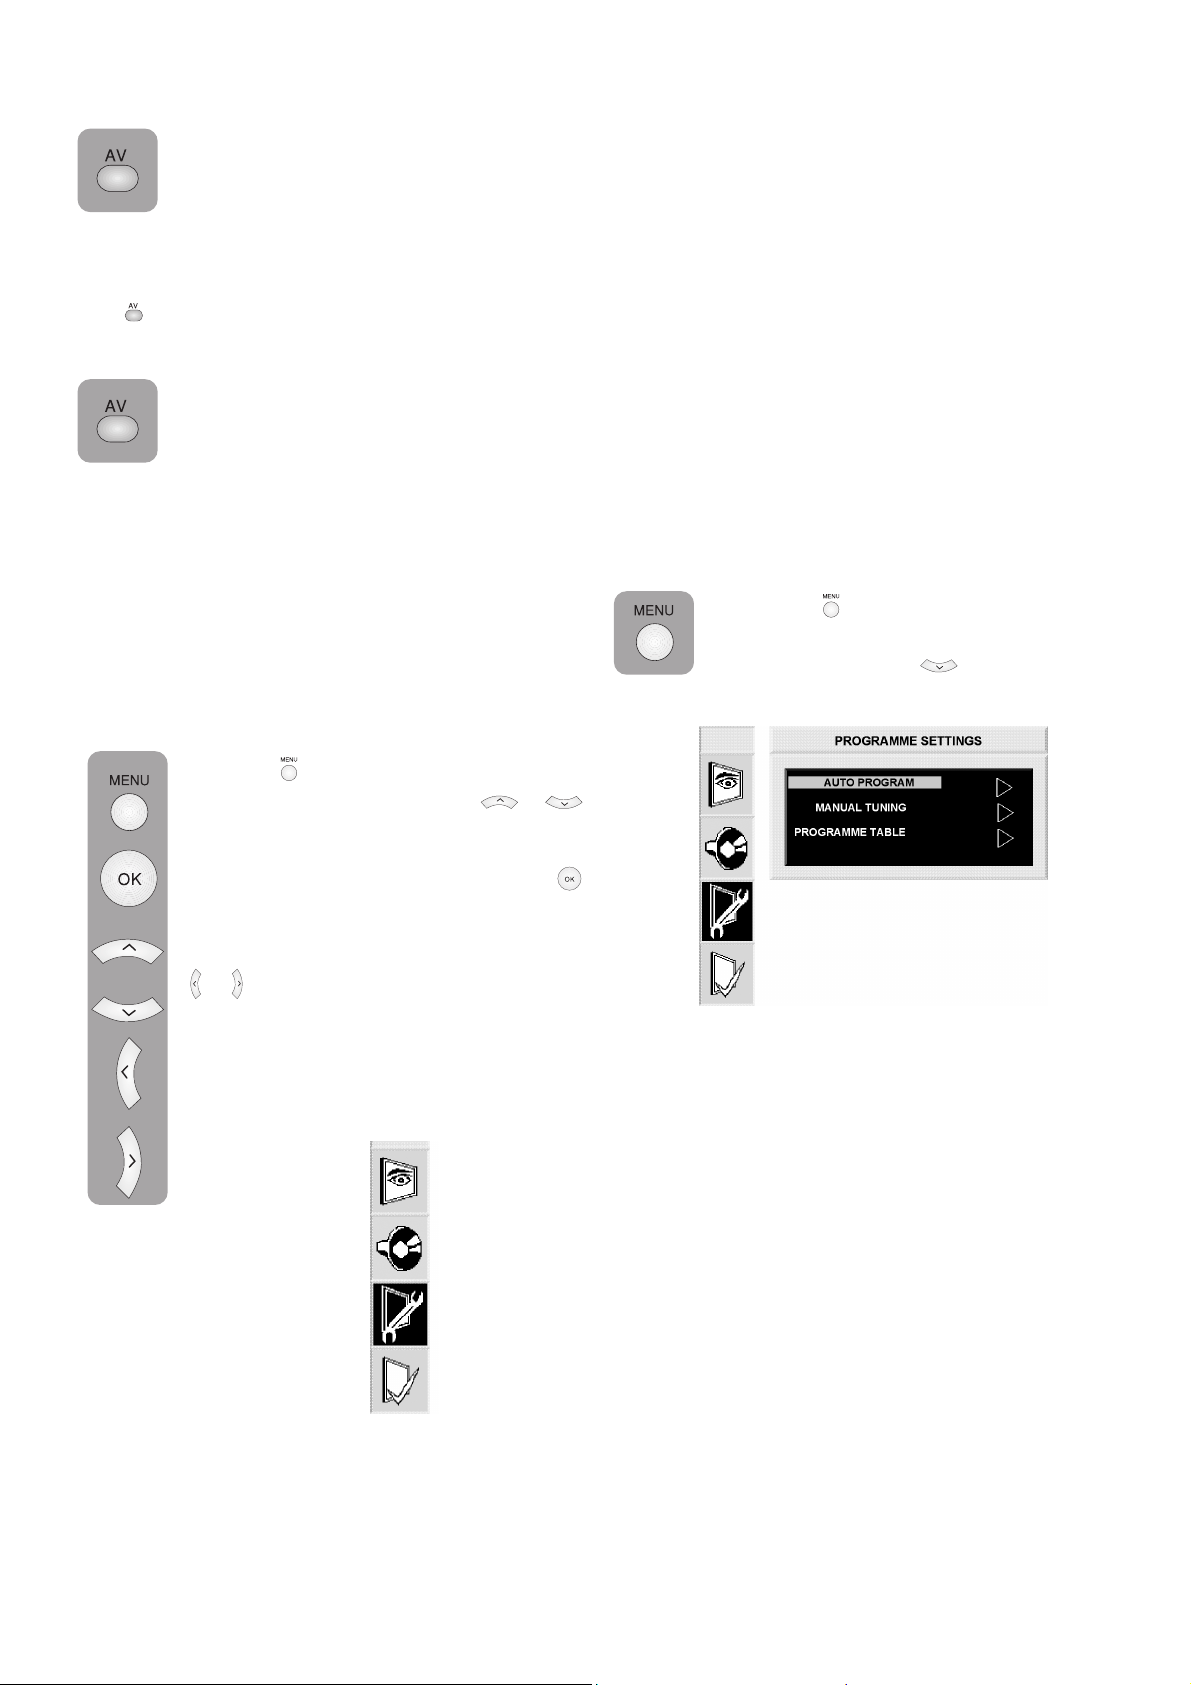
Automatic tuning and storing of the
television program channels
(AUTOPROGRAM)
Press the
control, the MAIN MENU will appear
use down button
SET-UP.
( ) button on your remote
( ) to highlight
Press the
appear. The Up-Down buttons
enable you to move between the different
control menu functions where you can
indicate your choice by pressing the
button.
Press the left or right movement buttons
( ) button the MAIN MENU will
( )/( )
( )
( )/( ) to adjust.
Press MENU button to return to MAIN
MENU.
Picture
Sound
Set-Up
Features
-11-
 Loading...