

Page 1
ONSEL
Behringer Airplay Guitar ULG10
High-Performance 2.4 GHz Guitar Wireless System with
Ultra-Low Latency and Rechargeable Battery
Quick Start Guide
Important Safety Instructions
WARNING: To reduce the risk of electric shock do not perform any servicing other than that contained in the operation instructions. Repairs have to be
performed by qualified service personnel.
1. Read these instructions.
2. Keep these instructions.
3. Heed all warnings.
4. Follow all instructions.
5. Do not use t his apparatus near w ater.
6. Clean only wi th dry cloth.
7. Do not exp ose a power pack to re o r excessive tempera ture.
Expos ure to the re or temper ature above 100°C (212°F)
may cause explosion.
8. Do not expo se this produc t to bright sunshine f or a long time.
9. Do not d isassemble thi s apparatus. Take it to a quali ed service
person when service or repair is required. Incorrect reassembly
may result in a r isk of re or injur y to persons.
10. Please store this product in a clean and dry environment.
11. Charge it once a month (minimum).
Features
1
⁄4" TS
BATTERY CHARGE/
CHANNEL LEDS
CHANNEL SELECT
ON/OFF
12. Use o f a power supply or char ger not recommende d or sold by
the manuf acturer may resu lt in a risk of re or injur y to persons.
13. Do not u se this apparatu s in excess of its out put rating.
Overloa d outputs above ra ting may result in a ris k of re or
injury to persons.
14. Do not us e this apparatus i f it is damaged or modi ed.
Damaged or m odied batter ies may exhibit unp redictable
behavior r esulting in re, ex plosion or risk of inj ury.
15. Have servicing perfor med by a qualied repair person using
only ident ical replacement p arts. This wil l ensure that the
safety of the product is maintained.
16. Switch o this apparatus wh en not in use.
17. WARNING! Choking an d Swallowing Hazard . Keep the
produc t safely out of rea ch of children and pe ts. The small size
and the internal battery present a choking and swallowing
hazard. Failure to follow instructions may lead to permanent
injury o r death.
18. WARNING! To prevent possible hearing damage, do not
listen at hi gh volume levels for lo ng periods
19. Correc t disposal of this product: This symbol
indicate s that this produc t must not be dispo sed of
with hous ehold waste, accor ding to the WEEE
Direc tive (2012/19/EU) and your nat ional law. This
produc t should be taken to a col lection center l icensed for the
recyc ling of waste elec trical and elec tronic equipm ent (EEE). The
mishandli ng of this type of wa ste could have a possib le negative
impact on the environment and human health due to potentially
hazardo us substances th at are generally ass ociated with EEE. At
the same ti me, your cooperati on in the correc t disposal of this
produc t will contribut e to the ecient use of n atural resource s. For
more info rmation about wh ere you can take your wa ste equipment
for rec ycling, please cont act your local c ity oce, or your
household waste collection service.
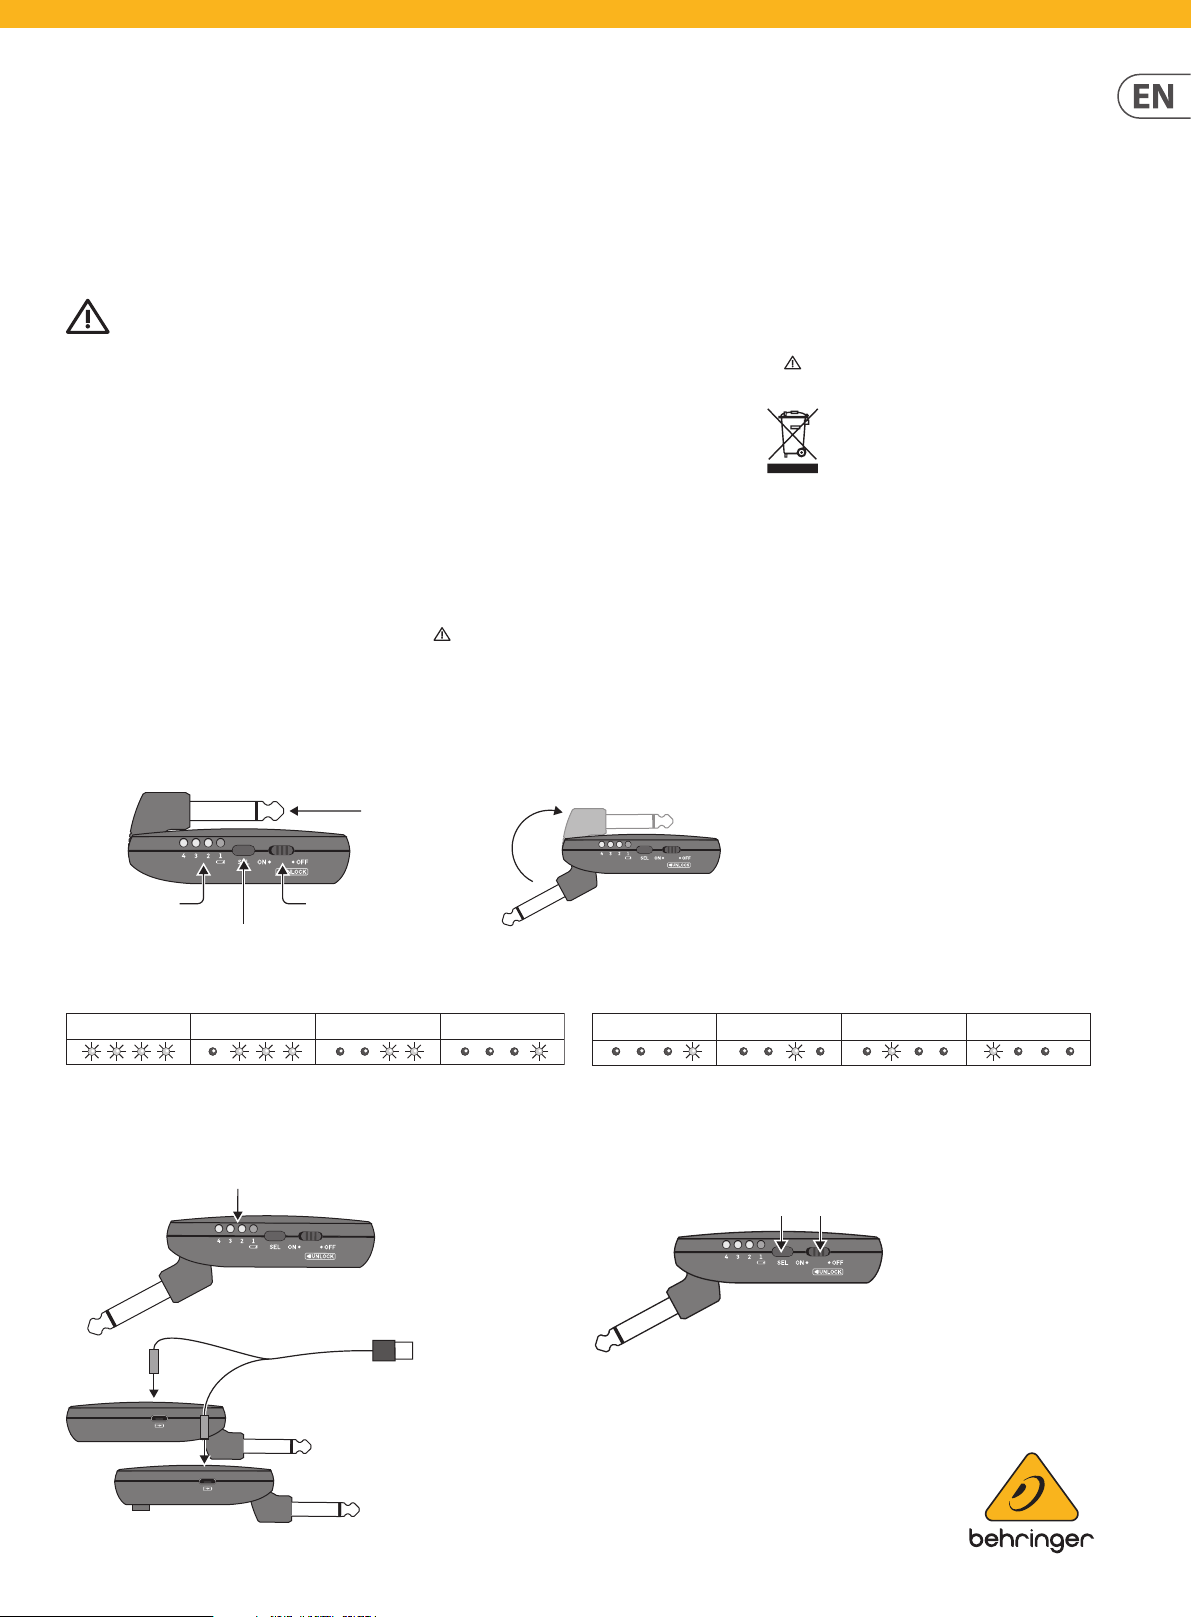
Charging the Battery
100% Charged Approx 75% Approx 50% Low Battery
1. The Bat tery Level LEDs will ash twice when eac h unit is turned ON.
2. Fully charg e each unit before u sing them for the r st time.
3. If the level i s low, attach the suppl ied dual cords to a comp uter USB output.
4. CAUTION: Do not leave the units unattended while they are charging.
Micro USB
USB
Selecting the Channel
Channel 1 Channel 2 Channel 3 Channel 4
1. Channel 1 is au tomatically sel ected each time t he units are turn ed on.
2. Note: Use cha nnel 1 unless you are pi cking up interf erence. Each unit mu st be
on the same c hannel, or they will no t operate.
3. If requir ed, press SEL on each un it to change to a dier ent channel. All 4 LEDs
will ash t wice and show the chan nel LED.
4. If the unit s are on dierent cha nnels, then the 4 LEDs o n the receiver will s tart to ash repea tedly
after a f ew seconds, until yo u select the cor rect channel.
5. The trans mitter signals c an be received by sever al receivers se t to the same channel.
For examp le, the signal can be fe d to 2 ampliers simu ltaneously to
generate a stereo sound image.
6. To switch o the t ransmitter and r eceiver, rst turn o y our
power ampli er, and then set both on/o s witches to the
OFF position.
Page 2
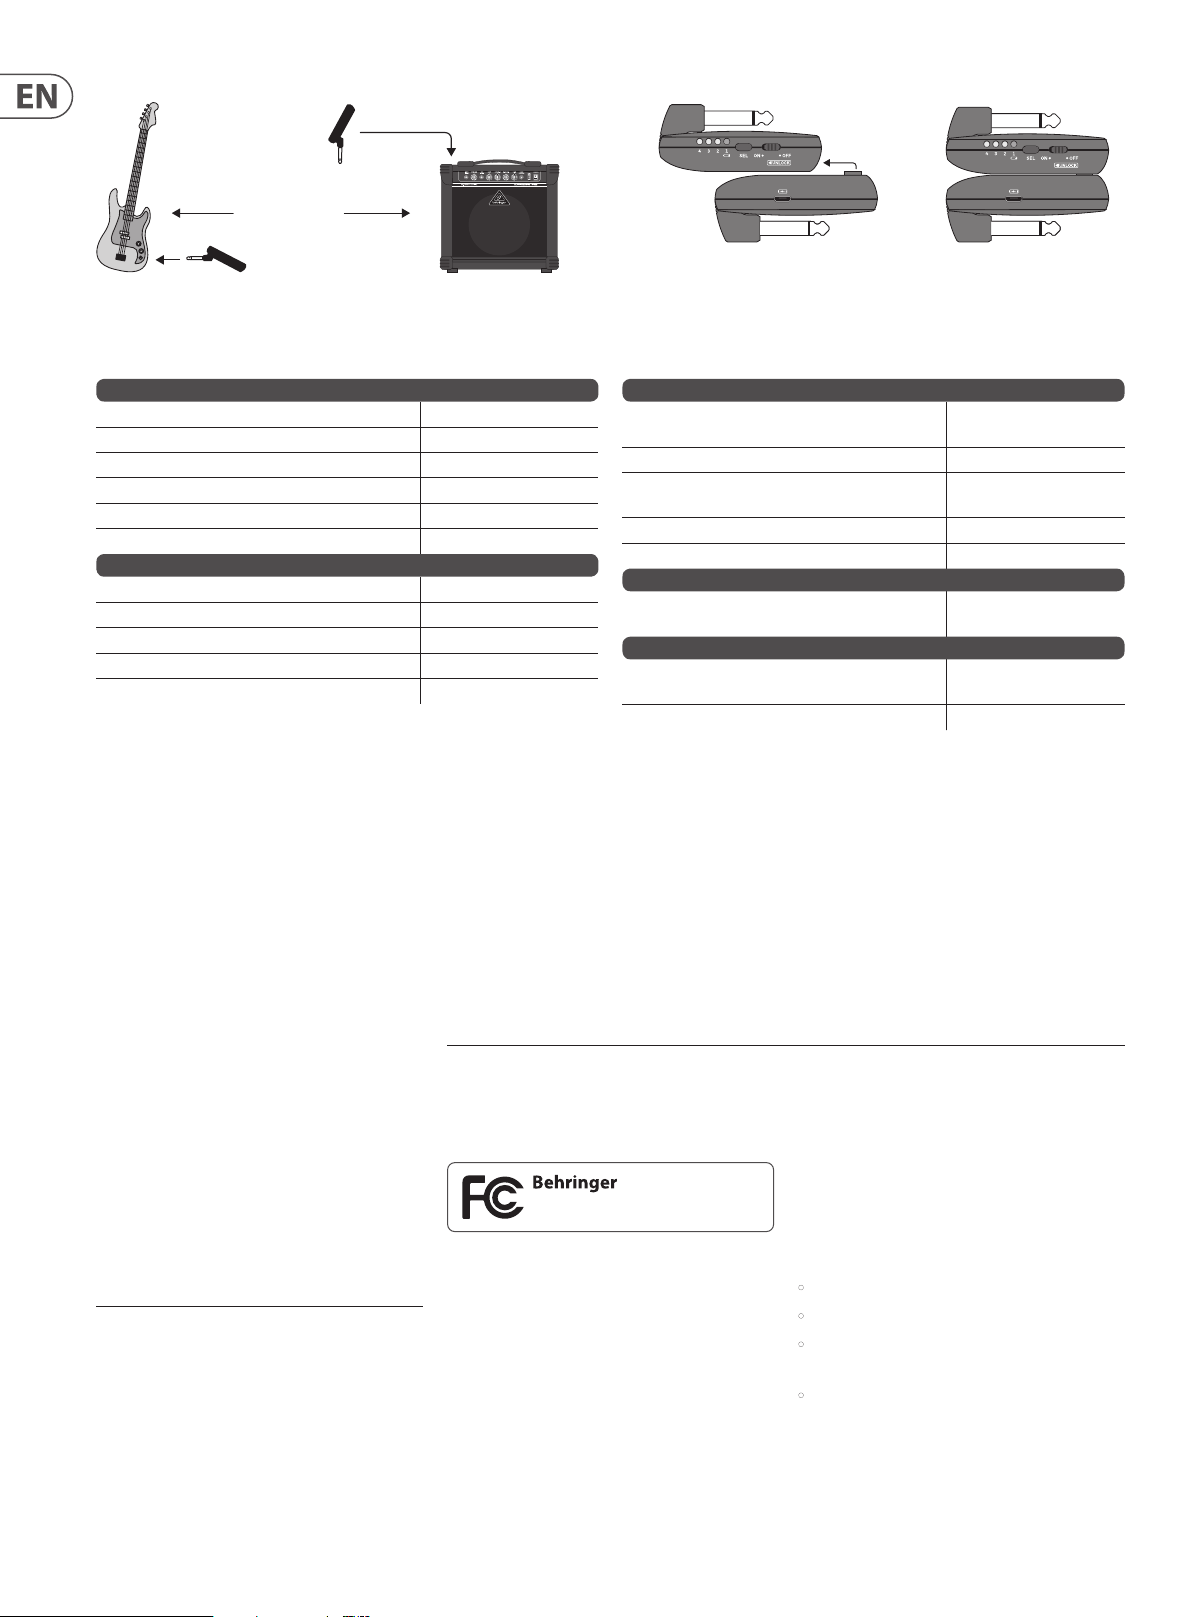
Typical Installation Clipping Units together
Instrument input
RECEIVER
MAXIMUM 30 M
E-Bass TRANSMITTER
BEHRINGER ULTRABASS BT108
Specications
Units can be clipped together
for tranportation and storage
RF Connection
Frequency 2.4 GHz
RF output power 20 dBm maximum
Number of channels 4
Channel selection SEL button on each unit
Channel indicator 4 LEDs
Range 30 meters max imum
Audio
Frequency range 20 Hz to 16 kHz
Latency ~ 5ms
Digital signal parameters 24 bit/ 48 kHz
Transmitter audio input ¼" TS
Receiver audio output ¼" TS
LEGAL DISCLAIMER
Music Tribe accepts no liability for any loss which
may be suered by any person who relies either
wholly or in part upon any description, photograph,
or statement contained herein. Technical specications,
appearances and other information are subject to
change without notice. All trademarks are the property
of their respective owners. Midas, Klark Teknik,
Other important information
1. Regis ter online. Please re gister your new Mus ic Tribe equi pment right af ter you purchase it by v isiting behring er.com. Registering yo ur
purchas e using our simple onli ne form helps us to pr ocess your repair c laims more quickl y and e ciently. Also, read t he terms and
conditions of our warranty, if applicable.
2. Malfunc tion. Should your M usic Tribe Authorize d Reseller not be loc ated in your vicini ty, you may contact th e Music Tribe Authorize d
Fulller fo r your country lis ted under “Suppo rt” at behri nger.com. Should your cou ntry not be liste d, please check if yo ur problem can
be dealt wi th by our “Online Suppo rt” which may a lso be found under “S upport” at b ehringer.com. Altern atively, please submi t an
online warranty claim at behringer.com BEFORE returning the product.
Lab Gruppen, Lake, Tannoy, Turbosound, TC Electronic,
TC Helicon, Behringer, Bugera, Auratone and Coolaudio
are trademarks or registered trademarks of Music Tribe
Global Brands Ltd. © Music Tribe Global Brands Ltd.
2019 All rights reserved.
FEDERAL COMMUNICATIONS
COMMISSION COMPLIANCE
INFORMATION
LIMITED WARRANTY
For the applicable warranty terms and conditions
and additional information regarding Music Tribe’s
Limited Warranty, please see complete details online at
musictribe.com/warranty.
Zhongshan Eurotec Electronics Limited
No. 10 Wanmei Road, South China Modern Chinese
Medicine Park, Nanlang Town, 528451, Zhongshan City,
Guangdong Province, China
Responsible Party Name: Music Tribe
Address: 5270 Procyon Street,
Phone Number: +1 702 800 8290
FCC ID: QWHULG10
AIRPLAY GUITAR ULG10
complies w ith the FCC rules as men tioned in the
following paragraph:
This equi pment has been test ed and found to compl y with
the limit s for a Class B digita l device, pursuant to p art
Power Supply
Typ e
Operating time per battery charge Up to 6 hours
Charging method
Charge status indicators 4 LEDs
Power switch On/O slide switch
Environmental
Operating temperature range
Physic al (set)
Dimensions (H x W x D)
Weight 0.045 kg (0.02 lbs) x2
AIRPLAY GUITAR ULG10
Commercial NV Inc.
Las Vegas, NV 8 9118,
USA.
Internal rechargeable
750 mAh Lithium Bat tery
Duo-pin USB charging
cable supplied
5°C – 40°C
(41°F – 104°F)
40 x 72 x 32 mm x2
(0.13 x 0.24 x 0.10") x2
15 of the FCC Rules. T hese limits are de signed to provide
reasonable protection against harmful interference in a
residential installation. This equipment generates, uses and
can radiate radio frequency energy and, if not installed and
used in acco rdance with the ins tructions, ma y cause harmful
interference to radio communications. However, there is
no guarantee that interference will not occur in a particular
installation. If this equipment does cause harmful interference
to radio or te levision recepti on, which can be dete rmined by
turning t he equipment o and o n, the user is encoura ged to
try to cor rect the inter ference by one or mo re of the following
measures:
• Reorient or relocate the receiving antenna.
• Increase the separation between the equipment and receiver.
• Conn ect the equipm ent into an outlet on a c ircuit dierent
from tha t to which the receive r is connected.
• Cons ult the dealer or an ex perienced radio/ TV technici an
for help.
Important information:
Changes or modications to the equipment not expressly
approved b y Music Tribe can void the us er’s authority t o use the
equipment.
 Loading...