

Page 1
Quick Start Guide
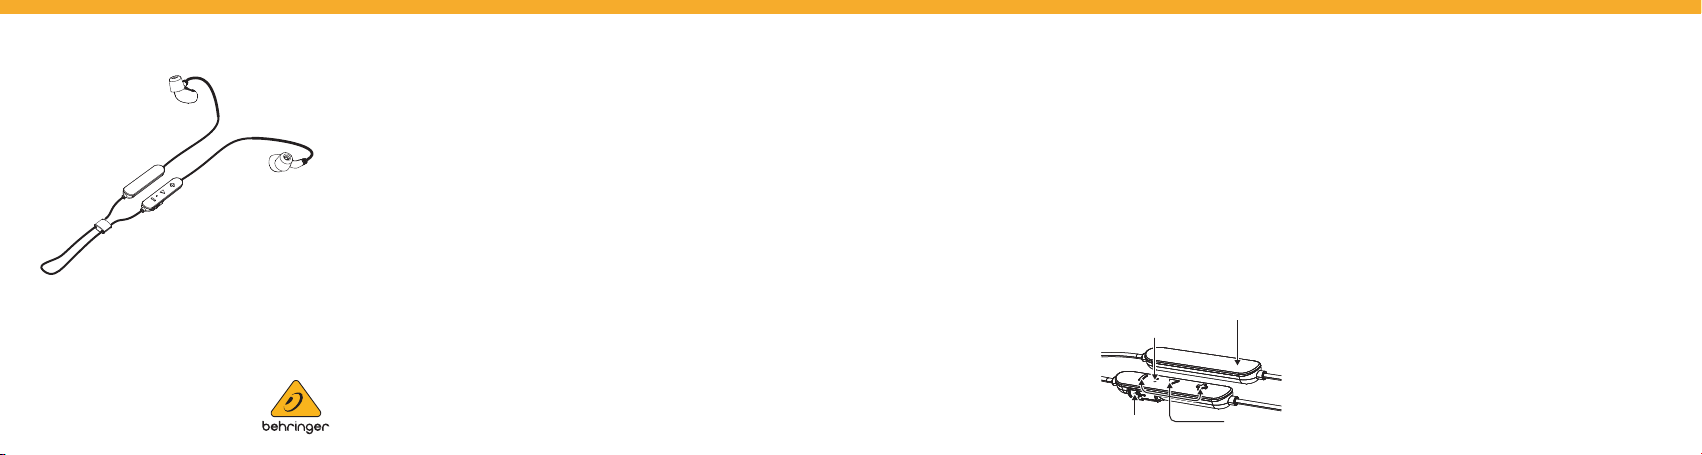
Battery pod
USB charging port
Charging/Bluetooth LED
Control buttons
SD251-BT
Studio Monitoring Earphones with
Bluetooth* Connectivity
V 1.0
LEGAL DISCLAIMER
Music Trib e accepts n o liabilit y for any lo ss which may b e suere d by any perso n
who reli es either w holly or in p art upon a ny descri ption, ph otograph , or statem ent
contained herein. Technical specications, appearances and other information
are subj ect to cha nge witho ut notice. A ll tradema rks are th e proper ty of thei r
respective owners. Midas, Klark Teknik, Lab Gruppen, Lake, Tannoy, Turbosound,
TC Electronic, TC Helicon, Behringer, Bugera, Oberheim, Auratone and Coolaudio
are trademarks or registered trademarks of Music Tribe Global Brands Ltd. © Music
Tribe Glo bal Brand s Ltd. 2021 All rig hts rese rved.
LIMITED WARRANTY
For the applicable warranty terms and conditions and additional information
regarding Music Tribe’s Limited Warranty, please see complete details online at
musictribe.com/warranty.
! Important Safety Information
1. Read these instructions.
2. Keep these instructions.
3. Heed all warnings.
4. Follow all instructions.
5. Do not use th is appara tus
near water.
6. Clean only w ith dry c loth.
7. Do n ot throw thi s produc t in the
re, to avoi d explosi on.
8. Do not exp ose this pro duct to
bright s unshine fo r a long time.
9. Do not dis assembl e or modif y
this product.
10. Please s tore this pr oduct in a
clean and dry environment.
Accessories List
11. Ch arge it once a m onth
(minimum).
12. Do not l eave unatt ended
while charging.
13. WARNING! Choking and
Swallow ing Hazard . Keep the
produc t safely o ut of reach o f
childr en and pets . The small
size pre sents a cho king and
swallowing hazard. Failure to
follow i nstruc tions may le ad to
permanent damage or death.
14. WARNING! To prevent p ossible
hearin g damage, do no t listen
at high vo lume levels f or long
periods.
• SD251- BT earphon es x 1 pair
• Zipper case
• Sili cone sleev es in 3 sizes
• USB ch arging ca ble
• Cleaning tool
• This quick start guide
Features
• Professional studio-grade
monitoring earphones
• Dynamic micro-dri ver provides
wide fr equency r esponse (2 0
Hz - 20 kHz) de livering f ull bass
and detailed highs
• Blu etooth* 5.0 te chnology f or
exceptional sound quality with
up to 33 ft (10 m) of wi reless
freedom
• Bui lt-in CVC 8.0 i solates th e
user's voice from surrounding
clutt er for clear p hone
conversation
• Sound-isolating design blocks
outside noise for detailed
musical experience
Controls
and microphone
• Secure, over-the-ear cable
design e nsures in -ear stab ility
and comfort
• 360 -degre e rotatin g
gold-plated MMCX lock-snap
connector for exibility and
versatile connectivity options
• Bluetooth communication
cable for seamless phone calls
and eo rtless mu sic contro ls
• Up to 7-h ours of bat tery lif e -
USB charg ing cable i ncluded
• Zip per case in cluded to en joy
your music on-the-go
• Inc ludes foa m and silicon e
ear-plu gs in 3 sizes to e nsure
a perf ect t
Getting Started
Charging
• Bef ore use, pl ease read th is
quick start guide carefully and
keep it in a s afe place.
• Plea se fully ch arge the ear buds
before use.
• Do no t leave unat tended
while charging.
• Plea se regula rly charge t he
earbud s if you do not us e them
for a long t ime (more tha n
3 months).
WARNING: Avoid the following
• Rep lacement of a b atter y that
can defeat a safeguard.
• Dis posal of a ba ttery in to re
or a hot oven , or mechani cally
crushi ng or cutt ing of a bat tery,
that can r esult in an e xplosion .
• Leav ing a batte ry in an
extremely high temperature
surrounding environment
that can r esult in an e xplosion
or the leakage of ammable
liquid or gas.
• Plea se use the su pplied ch arger
cable only.
• There is built-in easy voice
prompt f or low bat tery that
infor ms the user to r echarge
the devi ce.
• A bat tery sub jected to
extremely low air pressure
that may re sult in an ex plosion
or the
• leakage of ammable liquid
or gas.
Page 2
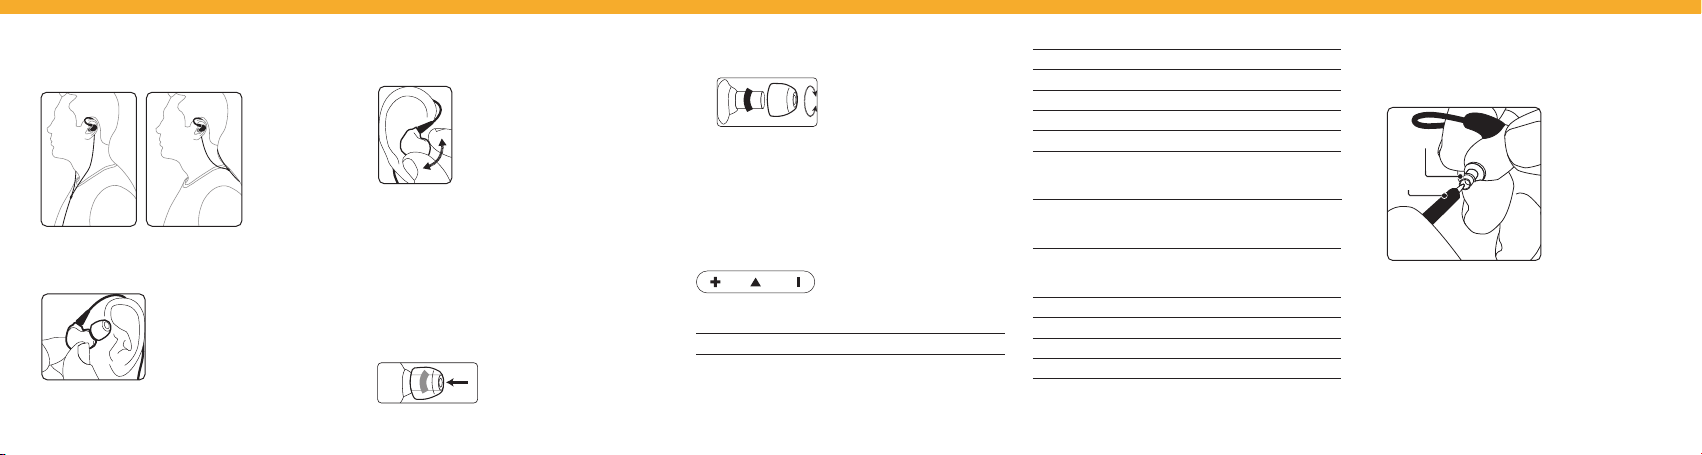
Wearing, inserting and removing the earphones
Nozzle
Nozzle
Tool
1. These ea rphones s hould be wor n with the c ables rout ed over the ea r.
Then, th e cables ca n be run to your m onitori ng system e ither in fr ont or
behind , s imilar to thi s illustr ation:
2. Insert e ach earph one so makes a t ight seal in t he ear canal . A good seal wi th
the ear ca nal is neces sary fo r optimum so und qualit y, especia lly for bas s
frequencies.
3. If you noti ce a loss of bas s frequen cies, gent ly push the e arphone de eper
into the e ar canal to pr oduce a bet ter seal. If t his adjust ment does n ot
improve t he bass res ponse, you c an also swi tch to a dier ent sleeve .
WARNING: Avoid pushi ng the earp hone in beyo nd the ear can al.
4. To remove the ea rphones , rmly hol d each earph one’s outer c ase betw een
your ng er and thumb a nd twist g ently.
Choosing, installing and changing sleeves
SD Serie s earphon es come wit h a selecti on of soft s leeves in th ree sizes,
from sm all to large
WARNING: Always mak e sure to prote ct your ea rs by muting o r lowering y our
monito ring sys tem’s volume do wn all the way b efore ins erting th e earphon es.
1. Choose a n earphon e sleeve wit h the best t a nd the bes t seal to isol ate your
earphone mix from outside sounds.
2. Slide the sl eeve onto ea ch earpho ne’s sound noz zle. Appl y light pres sure,
and if nec essary r otate the sl eeve as you go u ntil secu re.
3. Make sure th e sleeve com pletely co vers the noz zle and the ared barb.
4. Try inser ting the ea rphone int o your ear can al to test th e t.
5. If the t is to o loose or ti ght, twis t and pull to re move the sle eve from th e
nozzle a nd replace w ith a sleeve i n the next a ppropri ate size.
NOTE: If the ba rb or nozzl e is expose d beneath t he sleeve, th e sleeve is no t
insta lled prope rly. Sleeve s that do not t s ecurely o ver the nozz le and barb
should be replaced.
Bluetooth pairing
You will hea r voice promp t for pairi ng after p ower on. Plea se refer to f unctio n
map table for other functions.
Blueto oth func tions for B luetooth -enable d earphon es can be acce ssed fro m the
contro ller pod emb edded in th e earphon e cable:
Power ON / OFF
Power On Press ce nter key for 3 s econds
Power O Press cente r key for 3 sec onds
Music Controls
Play the Trac k Press ce nter key once
Pause th e Track Press ce nter key once
Volume Up by 7 % Pr ess "+" ke y
Volume Dow n by 7% Press "-" ke y
Nex t Trac k Long Pre ss "+" key
Previous Track Long Pre ss "-" key
Mic Control
Mic mute / u nmute Long pre ss center key
Voice Assist Control
Activ ate Voice Ass ist Pre ss center key t hree time s
LED Indication
Mode LED color/activity
Charging Red
Fully cha rged Red ligh t will turn o
Pairing mode Red and Blue lights ashing alternately
Bluetooth connected Blue
Cleaning
1. If you not ice proble ms with sou nd qualit y not relate d to the t insi de
the ear ca nal, remove t he sleeve an d check the e arphone no zzle for
obstructions.
2. If the noz zle is blocke d, use the in cluded cle aning tool t o clear the b lock.
3. Replace th e sleeve ont o the nozzl e, and re-in sert the e arphones i nto
your ear to t est the sou nd.
Maintenance tips
• Keep the earphones and sleeves clean and dry.
• To clea n, remove the s leeves fr om the earp hone nozzl e, gently ri nse
in warm wa ter and allow t o air dry. Sle eves shoul d be complet ely
dry before
• Ins pect slee ves for dama ge and repla ce as neces sary.
• Avoid exposing the sleeves to extreme temperatures.
• Rep lace sleeve s that do not t p roperly.
Page 3

Specications
Driver 6.8 mm
Impedance 2 2 Ω
Frequency responsew 20 Hz to 20 kHz
Sound pressure level (SPL) 93 dB @1kHz (105 dB peak )
Rated po wer 3 mW
Bluetooth* Version 5.0
Frequency range 2402 MHz ~ 2480 M Hz
Channel number 79
Max output power 5 d Bm
Bluetooth range Up to 10 m (33 ft) in li ne of sight
CODEC support apt X, AAC, SBC
Call support CVC 8.0
Mic sensitivity -42 dB (±3 dB) @ 1 k Hz, 0 dB = 1 V/Pa
Battery type Rechargeable lithium battery
Workin g time Up to 7 hrs
Standby time Up to 150 hrs
Charging time 1 hr v ia USB 5 V / 500 mA
Cable Shielded, detachable
Connector MMCX connector, detachable
Cable length 25 cm (10")
*The Blue tooth® wor d mark and log os are owne d by the Bluet ooth SIG, Inc .,
and any us e of such mark s by Music Trib e is under lic ense.
Other important information
Register online. Please register your new Music Tribe equipment right after
you purchase it by visiting behringer.com. Registering your purchase using
our simp le online fo rm helps us to p rocess yo ur repair cl aims more qu ickly and
ecien tly. Also, rea d the terms an d conditi ons of our war ranty, if ap plicable .
Malfunction. Shoul d your Music Tri be Authori zed Resel ler not be loc ated
in your vi cinity, you m ay contac t the Music Trib e Authori zed Fullle r for your
country listed under “Support” at behringer.com. Should your country not be
listed , please che ck if your pr oblem can b e dealt wit h by our “Onlin e Suppor t”
which ma y also be foun d under “Sup port ” at behring er.com. Alter nativel y,
please submit an online warranty claim at behringer.com BEFORE returning
the product.
FEDERAL COMMUNICATIONS COMMISSION
COMPLIANCE INFORMATION
SD251- BT
Responsible Party Name: Music Trib e Commerc ial NV Inc.
Address: 5270 Proc yon Street ,
Phone Number: +1 702 800 829 0
SD251-BT
This equ ipment has b een teste d and found t o comply wit h the limit s for a
Class B di gital devi ce, pursua nt to part 15 of t he FCC Rules. T hese limi ts are
designed to provide reasonable protection against harmful interference in
a reside ntial inst allation . This equi pment gene rates, use s and can rad iate
radio f requenc y energy an d, if not inst alled and us ed in accor dance with
the instructions, may cause harmful interference to radio communications.
However, th ere is no guar antee that i nterfer ence will no t occur in a pa rticula r
installation. If this equipment does cause harmful interference to radio or
television reception, which can be determined by turning the equipment o and
on, the us er is encour aged to tr y to correc t the inter ference by o ne or more of
the following measures:
Las Vegas NV 89118, United States
• Reorient or relocate the receiving antenna.
• Increase the separation between the equipment and receiver.
• Connec t the equi pment into a n outlet on a ci rcuit di erent fro m that to
which th e receiver i s connect ed
• Consult the dealer or an experienced radio/TV technician for help.
This dev ice compli es with Par t 15 of the FCC rule s. Operat ion is subje ct to the
following two conditions:
(1) this devic e may not caus e harmful i nterfer ence, and
(2) this device must accept any interference received, including interference
that may cause undesired operation.n.
Important information:
Change s or modic ations to th e equipme nt not expr essly appr oved by Music
Tribe can void the user’s authority to use the equipment.
 Loading...