

Page 1
User Manual
ULTRADRIVE PRO DCX2496/
ULTRADRIVE DCX2496LE
Ultra-High Precision Digital 24-Bit/96 kHz
Loudspeaker Management System
Page 2
2 ULTRADRIVE PRO DCX2496/ULTRADRIVE DCX2496LE User Manual 3 ULTRADRIVE PRO DCX2496/ULTRADRIVE DCX2496LE User Manual
Thank you
Thank you very much for expressing your con dence in BEHRINGER products by
purchasing the ULTRADRIVE PRO DCX2496/ULTRADRIVE DCX2496LE—our highquality digital loudspeaker management system designed speci cally for both
live and studio applications.
Table of Contents
Thank you ....................................................................... 2
Important Safety Instructions ...................................... 3
Legal Disclaimer .............................................................3
Limited warranty ............................................................ 3
1. Introduction ...............................................................4
2. Control Elements .......................................................4
3. Quick Start .................................................................. 6
4. Menu Structure and Editing ..................................... 7
5. Audio Connections ..................................................17
6. Applications ............................................................. 17
7. Sp ec i cations ........................................................... 30
9. Block Diagram .......................................................... 32
10. Menu Structure ......................................................33
Important Safety
Instructions
LEGAL DISCLAIMER
LIMITED WARRANTY
Terminals marked with this symbol carry
electrical current of su cient magnitude
to constitute risk of electric shock.
Use only high-quality professional speaker cables with
¼" TS or twist-locking plugs pre-installed. Allother
installation or modi cation should be performed only
by quali edpersonnel.
This symbol, wherever it appears,
alertsyou to the presence of uninsulated
dangerous voltage inside the
enclosure-voltage that may be su cient to constitute a
risk ofshock.
This symbol, wherever it appears,
alertsyou to important operating and
maintenance instructions in the
accompanying literature. Please read the manual.
Caution
To reduce the risk of electric shock, donot
remove the top cover (or the rear section).
No user serviceable parts inside. Refer servicing to
quali ed personnel.
Caution
To reduce the risk of re or electric shock,
do not expose this appliance to rain and
moisture. The apparatus shall not be exposed to dripping
or splashing liquids and no objects lled with liquids,
suchas vases, shall be placed on the apparatus.
Caution
These service instructions are for use
by quali ed service personnel only.
Toreduce the risk of electric shock do not perform any
servicing other than that contained in the operation
instructions. Repairs have to be performed by quali ed
servicepersonnel.
1. Read these instructions.
2. Keep these instructions.
3. Heed all warnings.
4. Follow all instructions.
5. Do not use this apparatus near water.
6. Clean only with dry cloth.
7. Do not block any ventilation openings. Install in
accordance with the manufacturer’s instructions.
8. Do not install near any heat sources such as
radiators, heat registers, stoves, or other apparatus
(including ampli ers) that produce heat.
9. Do not defeat the safety purpose of the polarized
or grounding-type plug. A polarized plug has two blades
with one wider than the other. A grounding-type plug
has two blades and a third grounding prong. The wide
blade or the third prong are provided for your safety. Ifthe
provided plug does not t into your outlet, consult an
electrician for replacement of the obsolete outlet.
10. Protect the power cord from being walked on or
pinched particularly at plugs, convenience receptacles,
and the point where they exit from the apparatus.
11. Use only attachments/accessories speci ed by
themanufacturer.
12. Use only with the
cart, stand, tripod, bracket,
or table speci ed by the
manufacturer, orsold with
the apparatus. When a cart
is used, use caution when
moving the cart/apparatus
combination to avoid
injury from tip-over.
13. Unplug this apparatus during lightning storms or
when unused for long periods of time.
14. Refer all servicing to quali ed service personnel.
Servicing is required when the apparatus has been
damaged in any way, such as power supply cord or plug
is damaged, liquid has been spilled or objects have fallen
into the apparatus, the apparatus has been exposed
to rain or moisture, does not operate normally, or has
beendropped.
15. The apparatus shall be connected to a MAINS socket
outlet with a protective earthing connection.
16. Where the MAINS plug or an appliance coupler is
used as the disconnect device, the disconnect device shall
remain readily operable.
17. Correct disposal of this
product: This symbol indicates
that this product must not be
disposed of with household
waste, according to the WEEE
Directive (2012/19/EU) and
your national law. This product
should be taken to a collection center licensed for the
recycling of waste electrical and electronic equipment
(EEE). The mishandling of this type of waste could have
a possible negative impact on the environment and
human health due to potentially hazardous substances
that are generally associated with EEE. At the same time,
your cooperation in the correct disposal of this product
will contribute to the e cient use of natural resources.
For more information about where you can take your
waste equipment for recycling, please contact your local
city o ce, or your household waste collection service.
18. Do not install in a con ned space, such as a book
case or similar unit.
19. Do not place naked ame sources, such as lighted
candles, on the apparatus.
20. Please keep the environmental aspects of battery
disposal in mind. Batteries must be disposed-of at a
battery collection point.
21. Use this apparatus in tropical and/or
moderate climates.
MUSIC Group accepts no liability for any loss
which may be su ered by any person who relies
either wholly or in part upon any description,
photograph, or statement contained herein.
Technical speci cations, appearances and other
information are subject to change without notice.
All trademarks are the property of their respective
owners. MIDAS, KLARK TEKNIK, LAB GRUPPEN, LAKE,
TANNOY, TURBOSOUND, TC ELECTRONIC, TC HELICON,
BEHRINGER, BUGERA and DDA are trademarks
or registered trademarks of MUSIC Group IP Ltd.
© MUSIC Group IP Ltd. 2016 All rights reserved.
For the applicable warranty terms and conditions
and additional information regarding MUSIC Group’s
Limited Warranty, please see complete details online at
music-group.com/warranty.
Page 3
4 ULTRADRIVE PRO DCX2496/ULTRADRIVE DCX2496LE User Manual 5 ULTRADRIVE PRO DCX2496/ULTRADRIVE DCX2496LE User Manual
1. Introduction
To operate a loudspeaker system that consists of several speakers for the various
frequency bands requires di erent input signals for the individual loudspeakers.
This requires a frequency crossover network that divides the input signal into
several frequency bands. For this purpose, the ULTRADRIVE provides up to
sixoutputs.
Multi-way speaker systems are used in many applications—including stereo
systems, cinemas, discotheques and concert halls. Due to the high quality
demands made by today’s consumers, they can even be found in “simple”
products such as TV sets. Why?
A single loudspeaker cannot reproduce the entire audible frequency spectrum
with the same high quality. If it is connected to a crossover network and
only has to reproduce a limited frequenc y band, the quality will improve
considerably in terms of frequency response and dispersion pattern. This also
reduces intermodulation distortion in the treble range (due to the diaphragm
displacement produced by bass frequencies).
◊ ◊ This manual first describes the terminology used, so that
you understand the unit and its functions. Please read the
manual carefully and keep it for future reference.
1.1 Before you get started
1.1.1 Shipment
The ULTRADRIVE was carefully packed in the factory to guarantee safe transport.
Nevertheless, we recommend that you carefully examine the packaging
and its contents for any signs of physical damage, which may have occurred
during transit.
◊ ◊ If the unit is damaged, please do NOT return it to us, but notify your
dealer and the shipping company im mediately, otherwise claims for
damage or replacement may not be granted.
1.1.2 Initial operation
Be sure that there is enough space around the unit for cooling purposes and,
to avoid over-heating, please do not place the DCX2496 on high-temperature
devices such as radiators or power amps.
◊ ◊ Blown fuses must only be replaced by fuses of the same type
and rating!
The console is connected to the mains via the supplied cable. It meets the
required safety standards.
◊ ◊ Please make sure that all units have a proper ground connection.
For your own safety, never remove or disable the ground conductor
from the unit or the AC power cord.
1.2 The user’s manual
The user’s manual is designed to give you both an overview of the controls,
as well as detailed information on how to use them. You nd a detailed
short-description of the most important functions in chapter 3.
2. Control Elements
(1) The DCX2496(LE) feature s 6-segment LED displays (plus CLIP and MUTELED)
for precise level adjustment of input signals A- B or A-C.
(2) If the input stage is overdriven, the CLIP LED will indicate that the signal
isdistorting.
(3) The b ottom LED (#8) is the MUTE LED (red), which illuminates when the re spective
input is muted.
(4) The se are the input channel but tons, which allow you to activ ate speci c fu nctions
from the sel ected menus (e.g. MUTE). Additionally, you can use t hese buttons to call
up the IN A/B/C menu s.
(5) The DISPLAY shows all the menus available for preset editing.
(6) Use these buttons to call up the DCX2496(LE)'s menus (e.g. SETUP, RECALL, etc.).
The only exception is the COMPARE button, which allows you to compare the edits
made with the previously sele cted presets. When COMPARE is active, no value
changes can be entered.
(7) The PAG E buttons sele ct single pages from onemenu.
(8) Individual parameters can be selected with the PAR AM buttons.
(9) The dat a wheel allows you to edit the selectedparameters.
(10) With the OK and CANCEL buttons you can either con rm or cancel any
settings made.
(11) Output s 1-6 each have a 5-segment LED display (plus MUTE, CLIP and LIMIT LED)
showing the respective output levels.
(12) Like the input stages, the output stages should not be overdriven, i.e. the CLIP LED
should notilluminate.
(13) The LIMIT LED illuminates when the limiter for the corres p onding output has been
activated and is operating.
(14) The bottom LED indicator (#8) is the MUTE LED, which illuminate s as soon as the
corresponding output is muted.
(15) Output channel buttons, with which you can enter the out puts 1-6 or mute or
reactivate individual outputs in MUTE mode.
(16) Use the POWER switch to put your DCX 2496(LE) into operation. The POWER switch
should always be in the “O ” position when you are about to connect your unit to
the mains.
(17) This is the FUSE HOLDER of your DCX2496(LE). Blown fuses must be replaced by a
fuse of the s ame type and rating.
(18) The mains connec tion is an IEC receptacle. Anappropriate power cord isincluded.
(19) The 9-pin R S-232 interface allow s you to connect your DCX2496 to a comput er.
This enables you to s ave and load les, up date the DCX2496 operating sof tware,
or remotely contr ol one or several ULTRADRIVE PRO units f rom a PC. Free editor
soft ware can be downloaded at behrin ger.com.
(20) When you have daisy-chaine d several ULTRADRIVEPRO via the LINK connector s (see
(21)), please press the TERM switc h on the rst a nd last unit of the chain, to avoid
data re ections and transmissi on errors.
(21) Use the LINK connec tors A and B (RS-485 n etwork interface) anda comm ercially
available netwo rk cable to daisy-chain several ULTRADRIVEPRO s.
(22) Balanced XLR output connector s for output channels 1-6. Connect your power
amps here.
(23) Balanced XLR input connector s A-B / A-C are used for connecting input signals.
DCX2496:
Input A can also be used for digital AES/EBU input signals. Input C can be used
for line signals or for connecting a measuring microphone. If AUTO ALIGN has
been enabled in the SETUP menu, input C will be set for mic levels automatic ally.
Additionally, phantom power for the measuring microphone will be switched on.
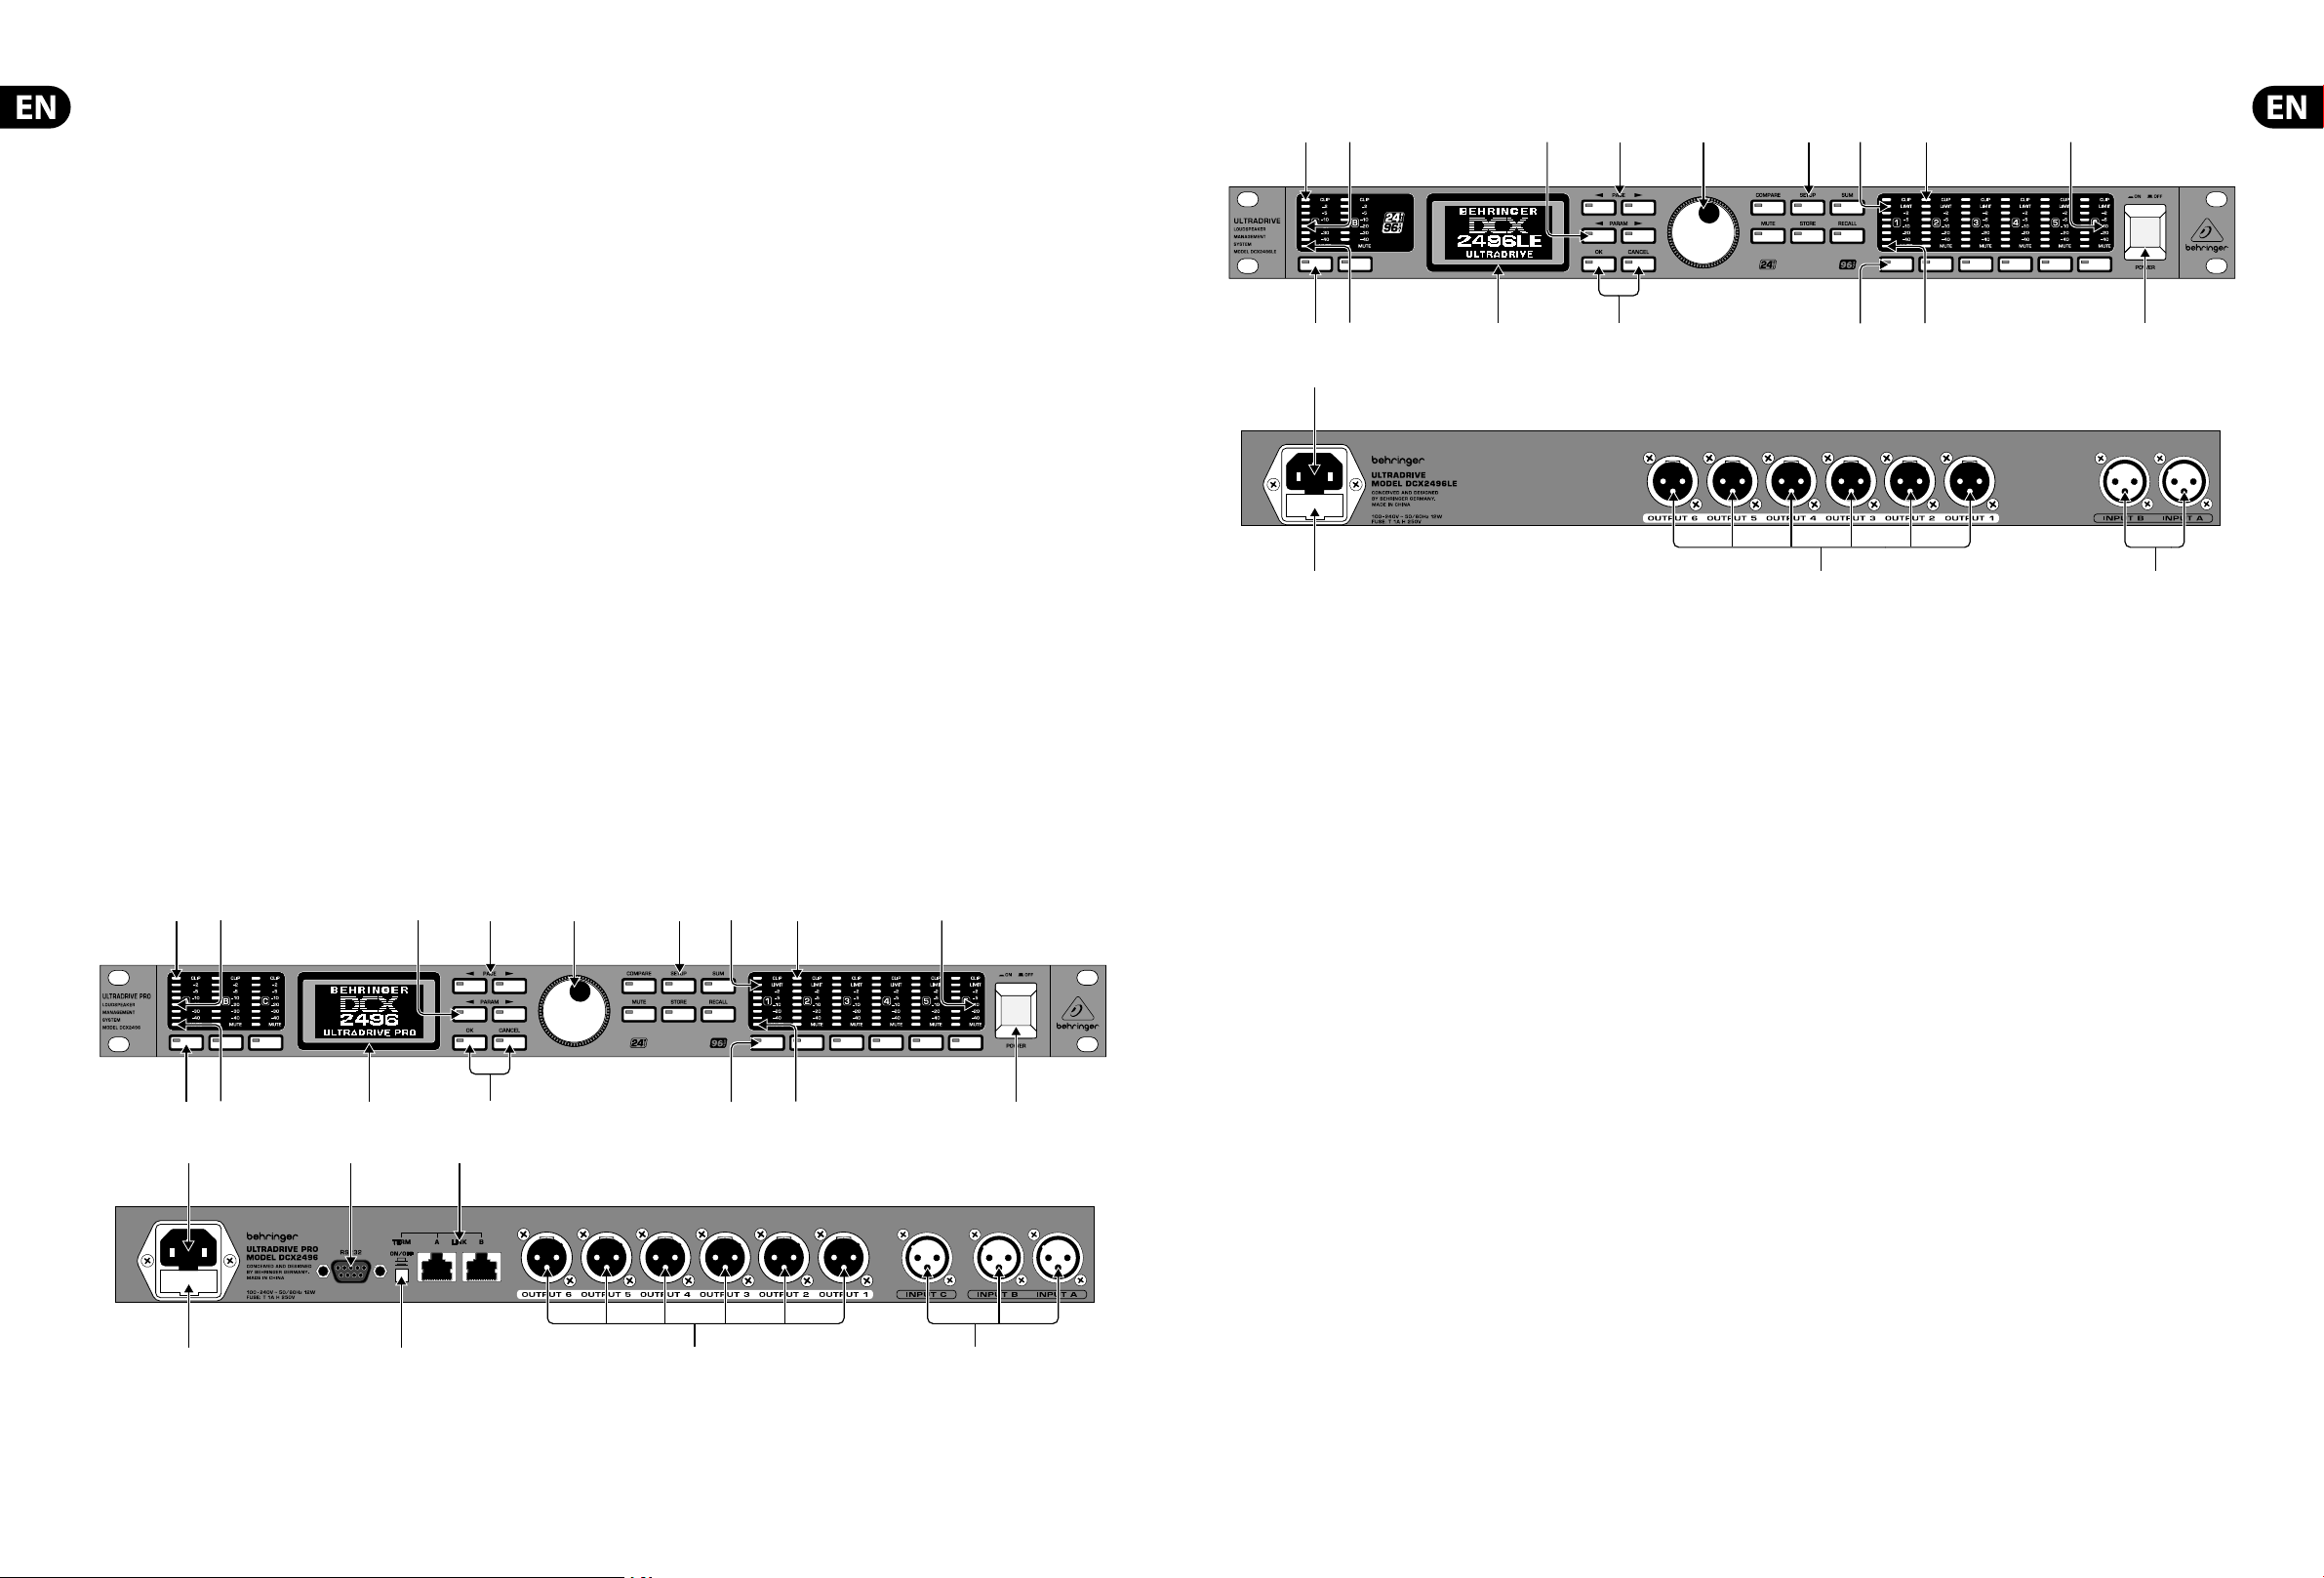
DCX2496
DCX2496LE
(1) (7) (6) (12)(9)(8) (13) (11)(2)
(4) (3) (5) (10)
(18)
(17)
(22)
(15)
(14)
(16)
(23)
(1) (7) (6) (12)(9)(8) (13) (11)(2)
(4) (3) (5) (10)
(19)(18)
(20)(17)
(21)
(22)
(15)
(14)
(23)
(16)
Page 4
6 ULTRADRIVE PRO DCX2496/ULTRADRIVE DCX2496LE User Manual 7 ULTRADRIVE PRO DCX2496/ULTRADRIVE DCX2496LE User Manual
3. Quick Start
This chapter is for those who cannot wait to use their new DCX2496(LE) in a
practical application. You will nd a description of how you can explore your
DCX2496(LE) and its versatile and intuitive features below. This chapter is just a
starting point for future excursions. So, please read the entire user’s manual to
take full advantage of all your DCX2496(LE)'s features andfunctions.
3.1 Selecting an Output Con guration
Press the SETUP button to call up the SETUP menu.
On the rst menu page, selectan output con guration (OUTCONFI GURATION) to
determine which outputs are used for which frequency ranges. One mono and
three stereo con gurations areavailable.
The mono con guration allows you to split the input signal into six di erent
frequency ranges. The stereo con gurations allow a maximum of three di erent
frequency ranges per stereo side. The abbreviations L, Mand H stand for Low,
Mid and HighSpeaker.
3.2 Setting Crossover Frequencies
In order to assign dedicated frequency bands to the output channels, you have
to de ne the crossover frequencies (X-Over) for each of them. The crossover
frequencies determine the upper and lower limits of a frequency band,
whichallows you to clearly separate the outputs from each other in terms
offrequency.
Press the corresponding OUT button (1-6) and select menu page 2/8 using the
PAGE buttons. With the parameters FREQ and TYPE you can de ne the slope of
the crossover frequenc y and also select a lter type. When the parameter X-OVER
ADJUST MODE is set to “LINK”, any changes to the crossover frequency will also
shift the neighboring frequency ranges.
3.3 Muting Input/Output Channels (Mute)
Press the MUTE button to enter the MUTE menu. Here you can mute the inputs
and outputs of the DCX2496(LE). On this page you can mute or activate individual
channels by pressing the channel buttons (IN A-B / A-C and OUT 1-6), or all
inputs/outputs by pressing the PARAM and OK or CANCEL buttons. Thus, you can
monitor each frequency band, either individually or together with a neighboring
band, to allow perfect editing of the isolated frequency range. To quit the MUTE
menu press MUTE a secondtime.
3.4 Storing Presets
Use the STORE button to save your presets.
3.5 Recalling Presets
Press the RECALL button to load presets from the internal memory. Select the
preset you wish to recall, then press ENTER. We included some typical presets
that you can use as a basis for your own applications.
3.6 Restoring the Factory Presets
If you wish to restore the ULTRADRIVE’s factory presets, press and hold both PAGE
buttons on the front panel switching on the unit. The DCX2496(LE) prompts you
to con rm (OK) or CANCEL. Press OK to erase the internal memory and restore the
factorypresets.
4. Menu Structure and Editing
This chapter describes all functions, operating steps and parameter pages in full
detail. While working with your DCX2496(LE), please keep the user’s manual on
hand, and use it as a reference in case of problems.
4.1 General operating structure and
displaypresentation
When you switch on your ULTRADRIVE, the display shows a graphic with the
current routing of the unit, i.e. how inputs and outputs are linked to each other.
Use the buttons to the left of the output LED displays (SETUP, MUTE etc.) to enter
the various menus. Most of them include several pages, which you can select
with the PAGE buttons. The PARAM button selects individual parameters from
one page, the data wheel edits them. Con rm new settings with OK, or cancel
your selection with CANCEL. This operating structure is the same for all menus so
it will not be repeated in each section of the manual.
The menu name is shown at the top-lef t of the display. Next to this, andseparated
by an arrow, is the name of the current page (e.g. SETUP ➠ IN/OUT). Thepage
number of the corresponding menu is shown on the right-hand side
(e.g. 1/6 = page 1 of 6).
The bottom line also shows the menu name (e.g. SETUP). For buttons IN A-C and
OUT 1-6 (below the input/output LED displays), the menus for the corresponding
inputs/outputs are listed (IN A, OUT 3 etc.). In addition, the output display also
indicates the name of the output (e.g. SUBWOOFER, RIGHT MID etc.).
4.2 SETUP menu
Use the SETUP menu to make basic adjustments necessary for the operation of
your ULTRADRIVE. Press the SETUP button to display the rst page of thismenu.
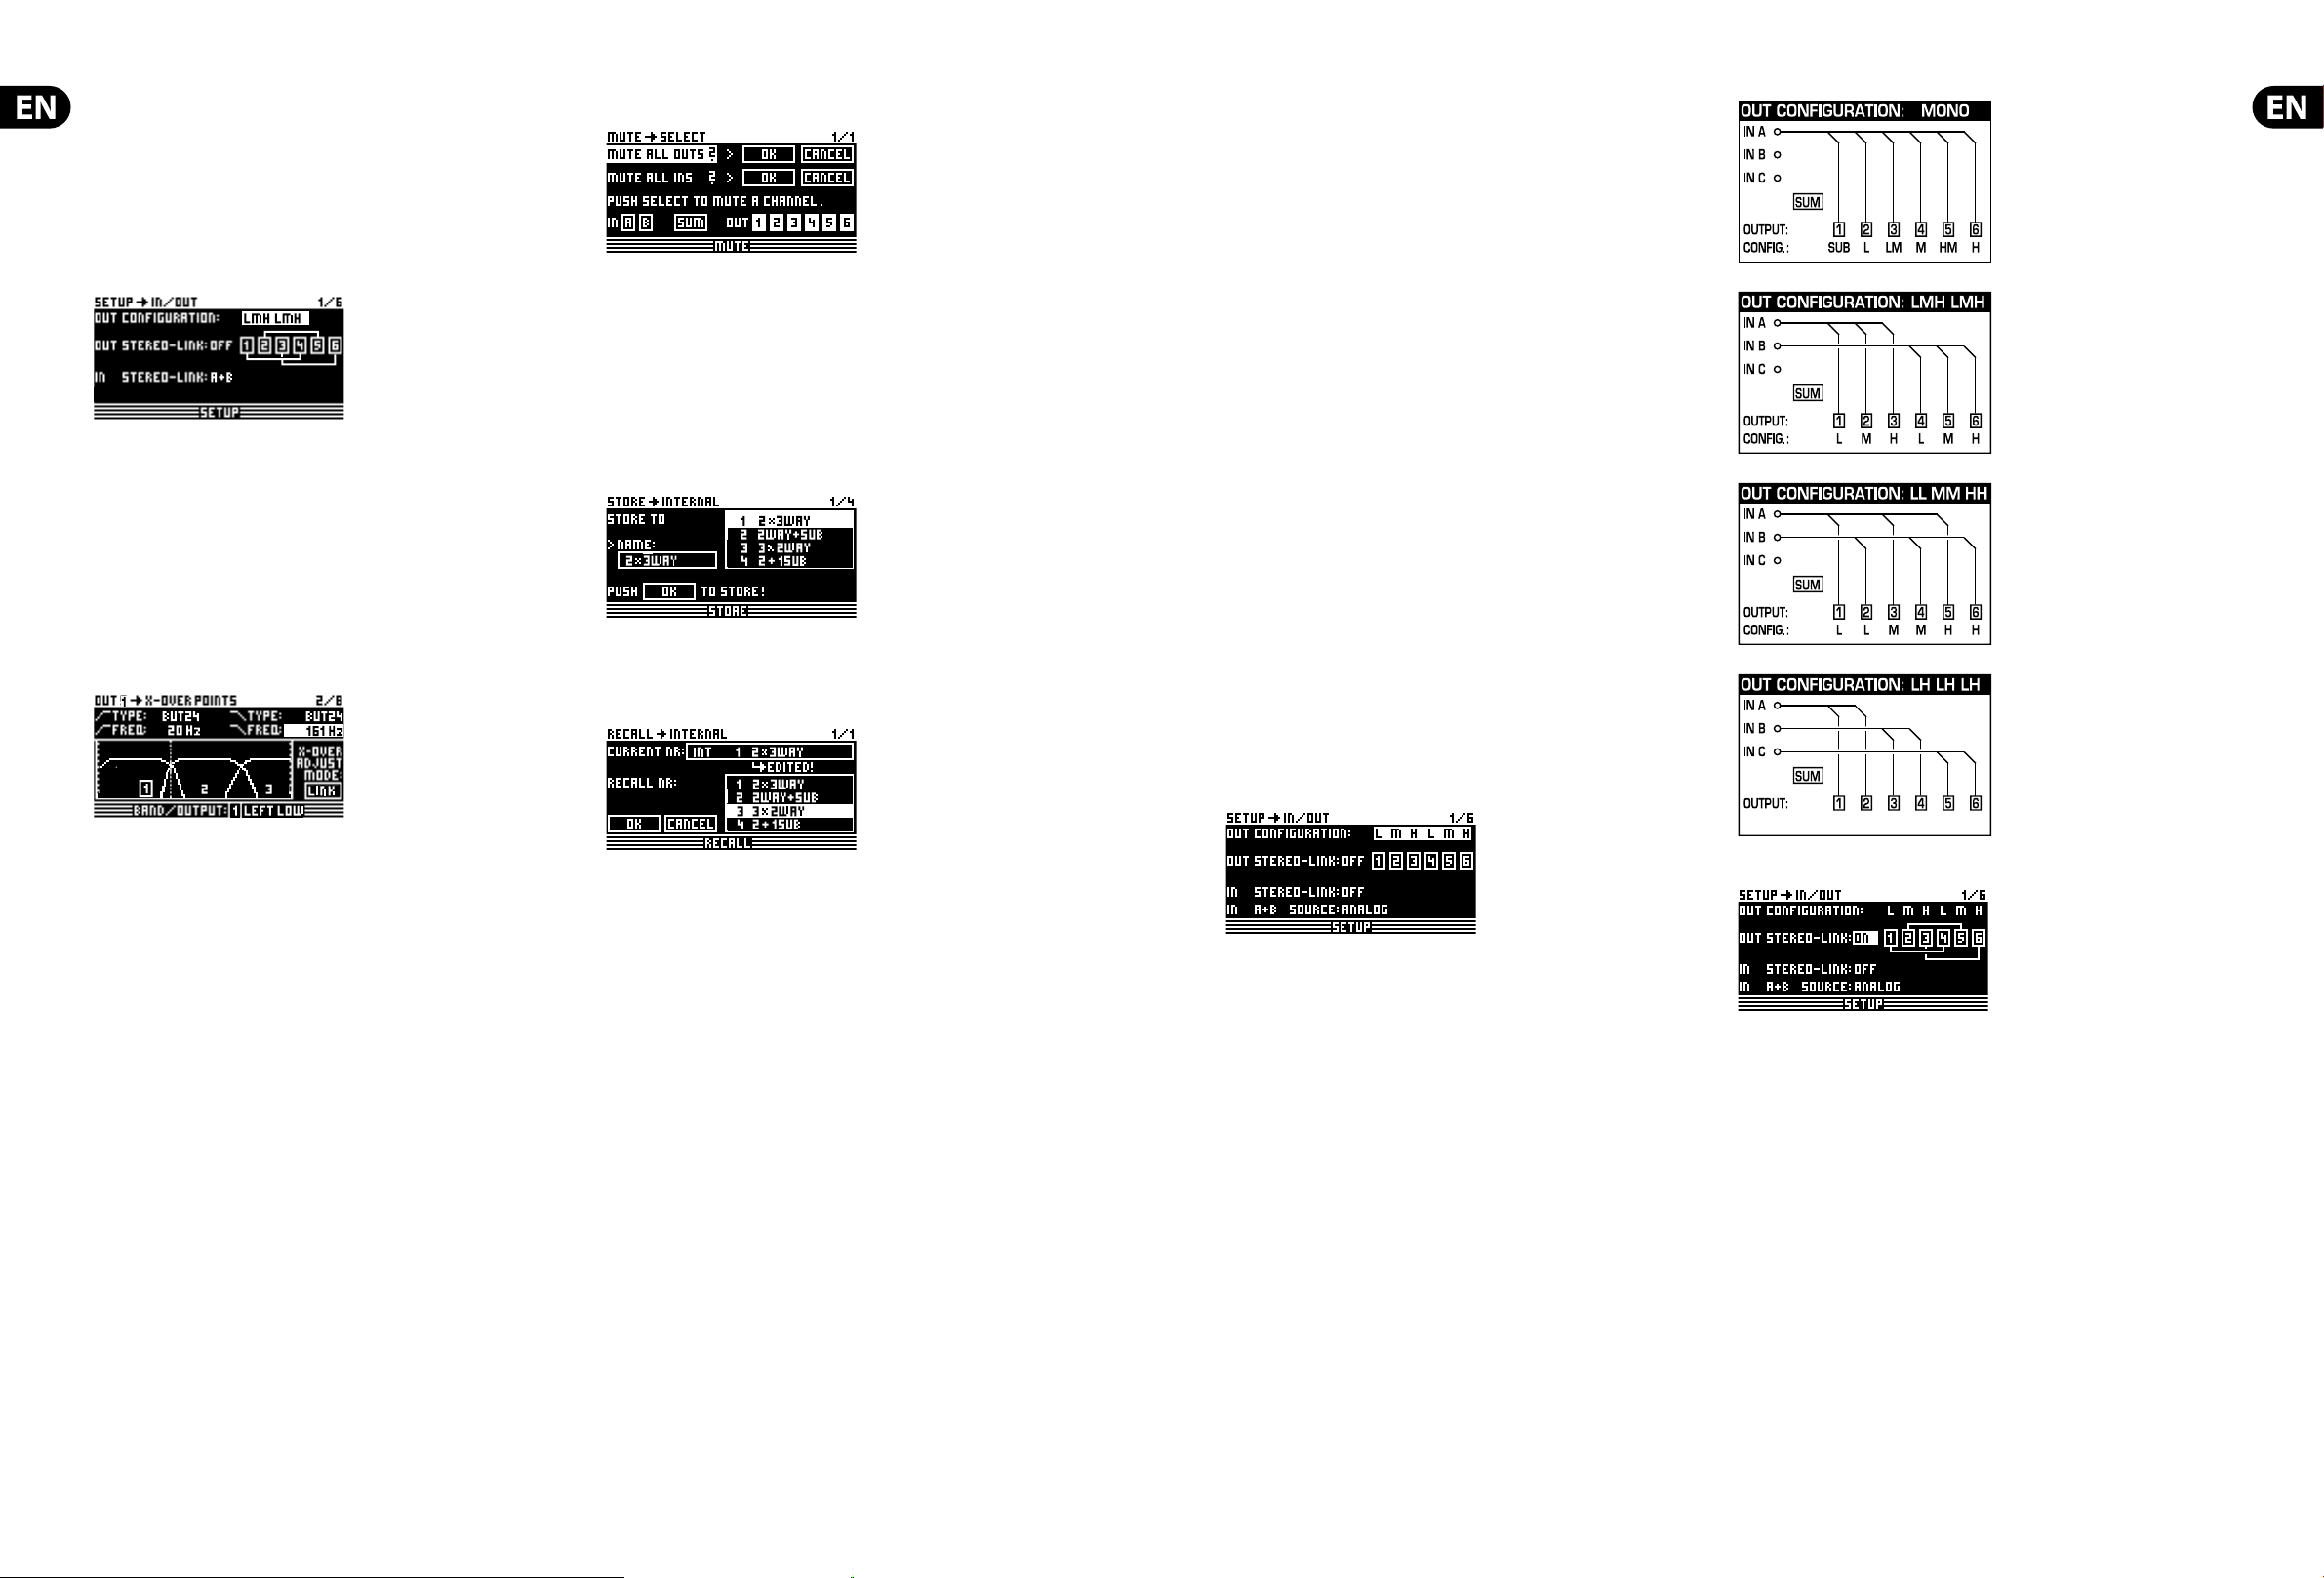
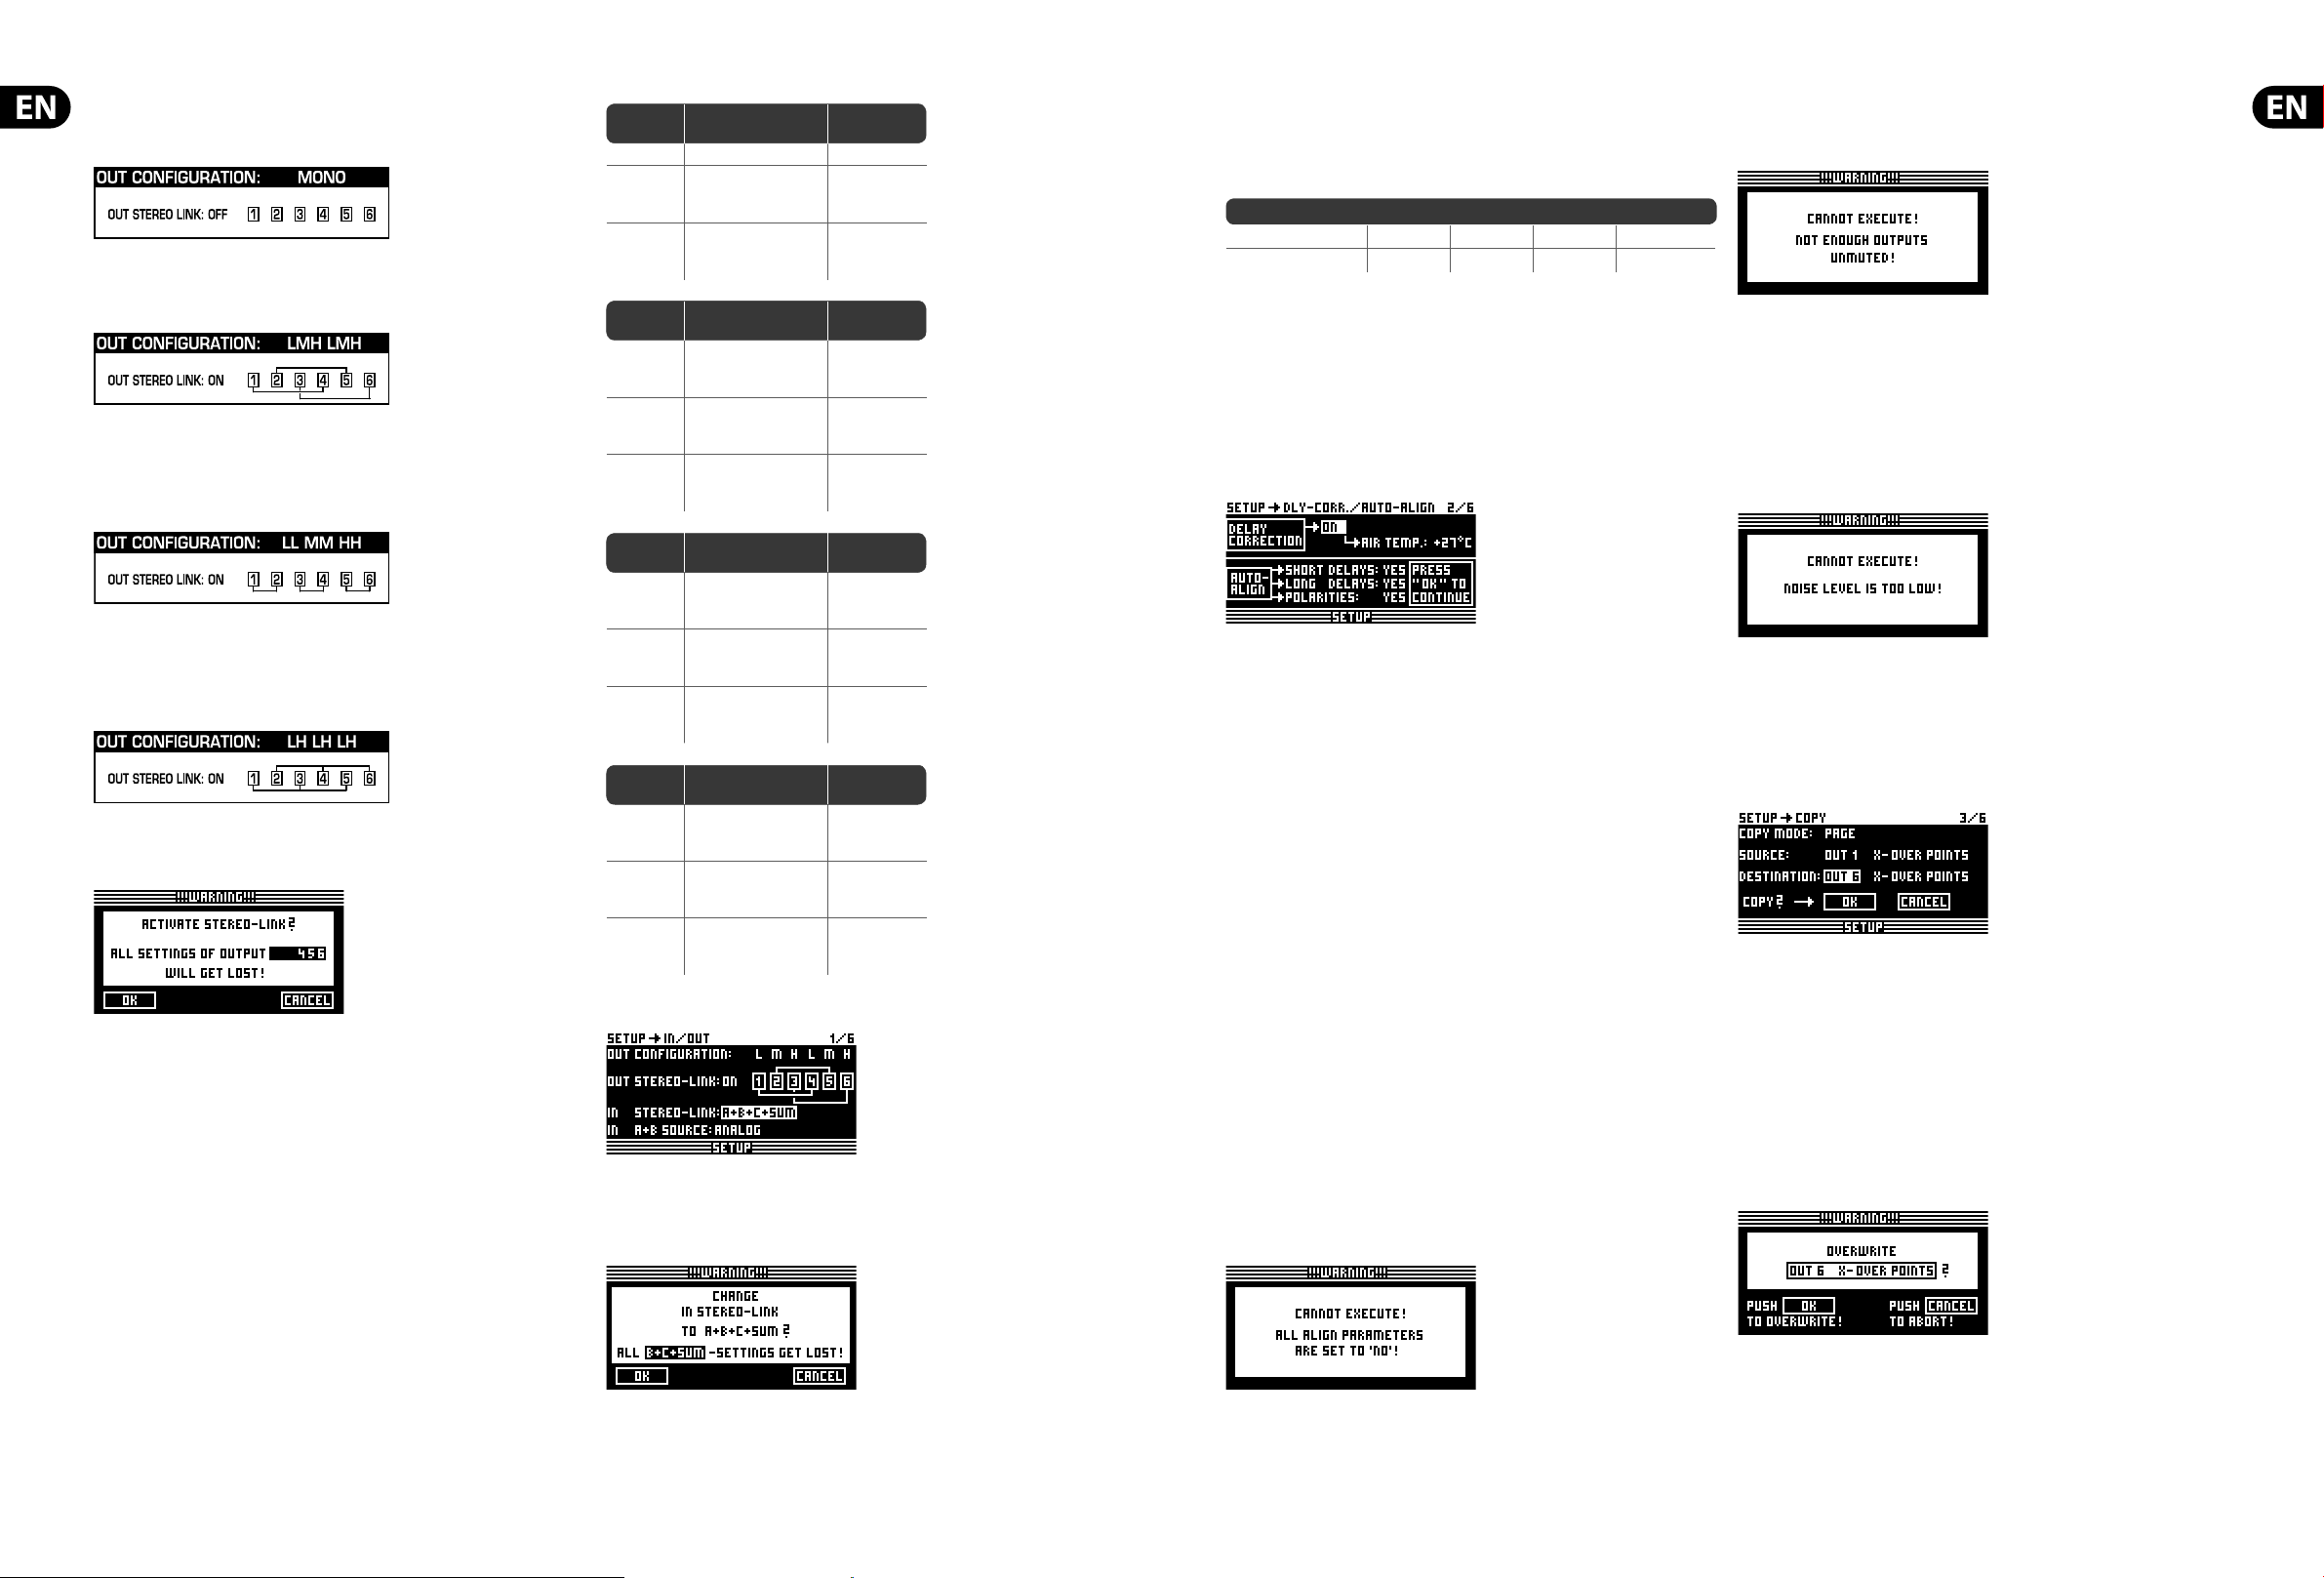
4.2.1 IN/OUT
Fig. 4.1: Setup ➠ In/Out
The parameter OUT CONFIGURATION selects the general operating mode;
in MONO mode input A is the preset signal source for all outputs. In STEREO mode,
three con gurations are available. Please use inputs A and B in these modes.
Thedisplay shows the OUT channels (L = LOW, M = MID and H = HIGH).
The stereo 3-way con guration LMHLMH has input A routed to outputs 1, 2
and 3, and input B routed to outputs 4, 5 and 6. The stereo 3-way con guration
LLMMHH routes input A to outputs 1, 3 and 5, and input B to outputs 2, 4 and 6.
The 2-way con guration LHLHLH uses all three inputs; here, A can be routed to
outputs 1 and 2, B to outputs 3 and 4, and C to outputs 5 and 6. This application is
used for 3 x 2-way speaker systems or triple bi-amping (see chapter 6.3).
Fig. 4.2: Output con guration
Fig. 4.3: Setup ➠ In/Out
With the OUT STEREOLINK function you can determine whether processing
with EQs, limiter, etc. is e ective on the linked outputs, or whether the settings
for each output can be made independently. When this function is enabled (ON),
linking several outputs to each other, the display will show small connecting lines
between the individual outputs.
Page 5
8 ULTRADRIVE PRO DCX2496/ULTRADRIVE DCX2496LE User Manual 9 ULTRADRIVE PRO DCX2496/ULTRADRIVE DCX2496LE User Manual
The following link options (output con gurations) are available:
1. MONO (no stereo links)
Fig. 4.4: Output con guration MONO
2. L(1) M(2) H(3) L(4) M(5) H(6)
Fig. 4.5: Output con guration LMHLMH
Link: L(1) > L(4) / M(2) > M(5) / H(3) > H(6)
3. L(1) L(2) M(3) M(4) H(5) H(6)
Fig. 4.6: Output con guration LLMMHH
Link: L(1) > L(2) / M(3) > M(4) / H(5) > H(6)
4. L(1) H(2) L(3) H (4) L(5) H(6)
Fig. 4.7: Output con guration LHLHLH
Link: L(1) > L(3) > L(5) / H(2) > H(4) > H(6)
Fig. 4.8: Set up ➠ In/Out
When Out Stereo Link is enabled, the unit warns you that all settings for the
linked outputs will be lost, because they will be overwritten with the values of
the output to be selected.
Any further changes to the parameters of a speci c output will be transferred
directly to the linked output. However, any edits made to a LONG DELAY value
(see chapters 4.2.2 and 4.5.5) will not be transferred to the other output.
Thisparameter can be adjusted speci cally for each output. SHORT DELAY
settings (see chapters 4.2.2 and 4.5.5) will be transferred as long as OUT Stereo
Link is on.
◊ ◊ In the MONO configuration, the Out Stereo Link function cannot
be activated.
OUT
Con guration
MONO 123456 LINK-Activation
OUT Stereo L ink OFF not availa ble
SHORT Del ay
Link (Chassis)
1 ➟ 2 ➟ 3 ➟ 4 ➟ 5 ➟ 6
Sb ➟ L ➟ LM ➟ M ➟ HM ➟ H
activ ated by enablin g
“OUT STEREO-LINK”
on SETUP-page 1/6
LONG Delay Li nk
(Loudspeakers)
1 ➟ 2 ➟ 3 ➟ 4 ➟ 5 ➟ 6
Sb ➟ L ➟ LM ➟ M ➟ HM ➟ H
activ ated by
enablin g “LINK” on
OUT-page 8/8
OUT
Con guration
LMH LMH 123 456 LINK-Acti vation
OUT Stereo L ink
1 ➟ 4 2 ➟ 5 3 ➟ 6
L ➟ L M ➟ M H ➟ H
activ ated by enablin g
”OUT STEREO -LINK“
on SETUP-page 1/6
SHORT Del ay
Link (Chassis)
1 ➟ 4 2 ➟ 5 3 ➟ 6
L ➟ L M ➟ M H ➟ H
activ ated by enablin g
”OUT STEREO -LINK“
on SETUP-page 1/6
LONG Delay Li nk
(Loudspeakers)
1 ➟ 2 ➟ 3 4 ➟ 5 ➟ 6
L ➟ M ➟ H L ➟ M ➟ H
activ ated by
enablin g ”LINK“ on
OUT-page 8/8
OUT
Con guration
LL MM HH 12 34 56 LINK-Acti vation
OUT Stereo L ink
1 ➟ 2 3 ➟ 4 5 ➟ 6
L ➟ L M ➟ M H ➟ H
activ ated by enablin g
”OUT STEREO -LINK“
on SETUP-page 1/6
SHORT Del ay
Link (Chassis)
1 ➟ 2 3 ➟ 4 5 ➟ 6
L ➟ L M ➟ M H ➟ H
activ ated by enablin g
”OUT STEREO -LINK“
on SETUP-page 1/6
LONG Delay Li nk
(Loudspeakers)
1 ➟ 2 ➟ 3 4 5 ➟ 6
L ➟ L M ➟ M H ➟ H
activ ated by
enablin g ”LINK“ on
OUT-page 8/8
OUT
Con guration
LH LH LH 12 34 56 LINK-Activation
OUT Stereo L ink
1 ➟ 3 ➟ 5 2 ➟ 4 ➟ 6
L ➟ L ➟ L H ➟ H ➟ H
activ ated by enablin g
”OUT STEREO -LINK“
on SETUP-page 1/6
SHORT Del ay
Link (Chassis)
1 ➟ 3 ➟ 5 2 ➟ 4 ➟ 6
L ➟ L ➟ L H ➟ H ➟ H
activ ated by enablin g
”OUT STEREO -LINK“
on SETUP-page 1/6
LONG Delay Li nk
(Loudspeakers)
1 ➟ 2 3 ➟ 4 5 ➟ 6
L ➟ H ➟ L H ➟ L ➟ H
activ ated by
enablin g ”LINK“ on
OUT-page 8/8
Tab. 4.1: Survey of al l OUT LINK con gurations
Fig. 4.9: Setup ➠ In/Ou t
The inputs can also be linked using the parameter INSTEREO LINK. Thus, all
settings of one input can be transferred to another input, or to all inputs.
Fig. 4.10: Setup ➠ In/Out
When this function is On, the display provides a warning note that shows both
the new link to be activated and the name of the inputs that will be overwritten
(black eld). Use the data wheel to edit the link to be activated (black eld).
Thevalues of input A will be transferred to the following inputs.
Possible setting
Newlink OFF A + B A + B + C A + B + C + SUM
Overwritten settings (empty) B B+C B+C+SUM
Tab. 4.2: In Stereo Link
When you edit a setting of any input, while a link is activated, all edits are
directly transferred to the linked inputs. In the case of the IN STEREO LINK
function, this also includes the DELAY values (see chapter 4.3.2).
Use the parameter IN A + B SOURCE to select the type of input signals:
ANALOGor AES/EBU (digital: via input A only).
4.2.2 DLY-CORR./AUTO-ALIGN
Fig. 4.11: Setup ➠ Dly-Corr./Auto-Align
As the speed of sound depends on the air temperature, the parameter
DELAY CORRECTION on this SETUP page can be used to adjust the DCX2496(LE)
to the ambient temperature, ensuring proper delay characteristics at all times.
Theavailable value range is from -20°C to 50°C (-4°F to 122°F) and will be taken
into account only as long as DELAY CORRECTION is ON.
With the AUTO ALIGN function you can delay the output signal automatically
by a certain amount, so as to eliminate phase cancellations caused by speaker
alignment. For example, when the diaphragms of several speakers are not
in the same phase it leads to cancellations due to arrival time di erences.
Identicalsignals are radiated from di erent positions, so that wave
crests coincide with wave troughs. If only one of these signals is delayed,
thismisalignment can becompensated.
If the arival time di erences are smaller, a short signal delay will be enough
to eliminate them (SHORT DELAY). However, if the speaker cabinets are placed
several meters away from each other, not only can phase cancellations occur
but so can audible run-time di erences. To remove these, you’ll have to use
considerably higher delay values (LONG DELAY). The LONG DELAY calculation,
however, works only with a minimum distance of four meters.
If, for example, a speaker is connected with incorrect polarity, AUTO ALIGN will
detect and—if POLARITIES is on—correc t this error automatically.
Use the parameters SHORT DELAY, LONG DELAY and POLARITIES for the
automatic correction of output signals. As soon as at least one parameter is set to
YES, pressing OK will take you to another sub-menu. If not (all parameters set to
NO), you will be warned that the process cannot be executed.
Fig. 4.12: Setup ➠ Dly-Corr./Auto-Align
In the AUTO-ALIGN sub-menu you can mute or open all outputs. Be sure that at
least two outputs are open (UNMUTE OUTPUTS TO ALIGN), otherwise no delay
values can be calculated, and a warning message will be displayed.
Fig. 4.13: Setup ➠ Dly-Corr./Auto-Align
If at least two or more outputs have been opened and OK has been pressed,
the cursor will jump to ADJUST NOISE LEVEL and you can hear some test noise.
Usethe data wheel to adjust the test noise. The level will be read at the outputs.
Press OK to trigger the measuring process. The DCX2496(LE) calculates the runtime di erences, phase shift and polarity. The OUTs are automatically adjusted to
the optimum delay values calculated. This process cannot be executed if the test
noise level is too low.
Fig. 4.14: Setup ➠ Dly-Corr./Auto-Align
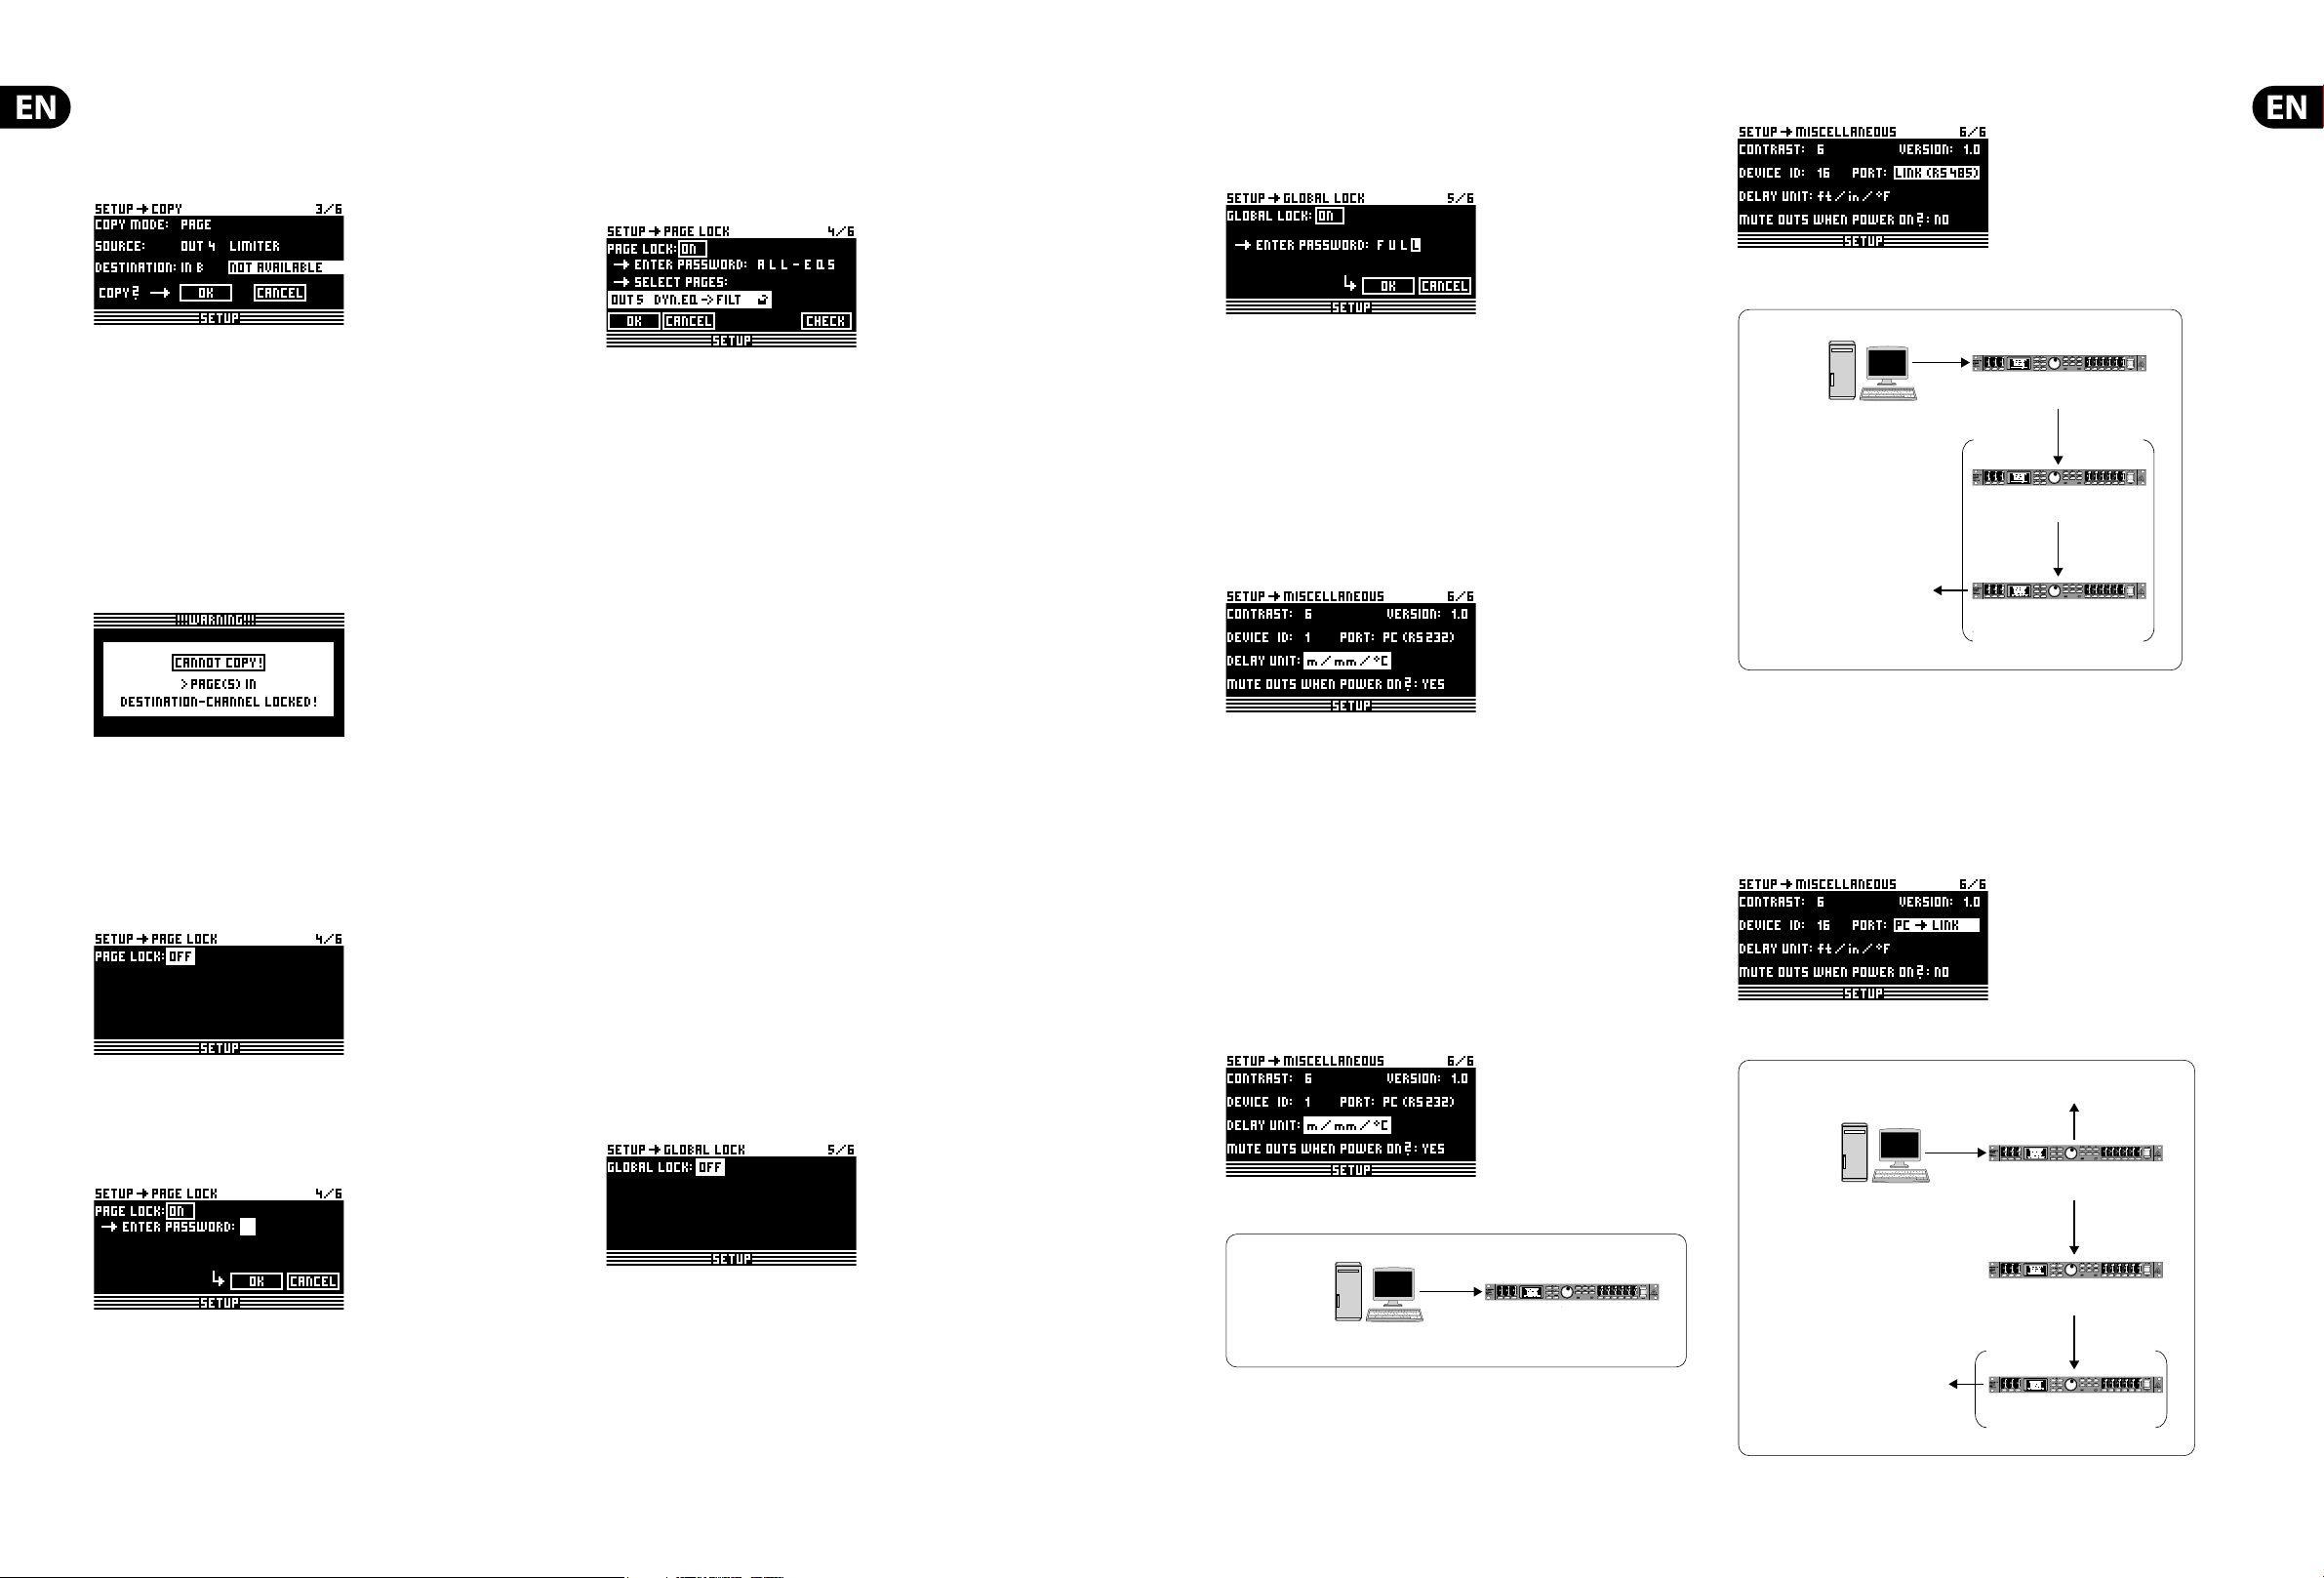
4.2.3 COPY
Use the COPY function to copy parameter settings to other pages. For example,
you can transfer the EQ or gain settings from one channel to another, which saves
you a lot of time.
Fig. 4.15: Setup ➠ Copy
The parameter COPY MODE determines whether only single pages (PAGE) or the
complete channel settings (WHOLE CHANNEL) will be copied. Select PAGE mode
with the PARAM button and then select the source channel SOURCE plus the
SOURCE PAGE to be transferred to another channel. If you select just one page,
the channel to be overwritten (DESTINATION PAGE) will appear automatically
under the parameter DESTINATION. Please enter the channel to which the data
should be copied to (DESTINATION CHANNEL).
Both the source and destination Channel can be selected using the data wheel or
by pressing the corresponding channel button (IN A-C, OUT 1-6 and SUM).
Fig. 4.16: Setup ➠ Copy
Page 6
10 ULTRADRIVE PRO DCX2496/ULTRADRIVE DCX2496LE User Manual 11 ULTRADRIVE PRO DCX2496/ULTRADRIVE DCX2496LE User Manual
Press OK or CANCEL to subsequently copy further pages in the same way.
◊ ◊ Only similar pages with identical parameters can be copied. If you
select a SOURCE PAGE that is not available in the DESTINATION CHANNEL,
the display will read NOT AVAILABLE under DESTINATION PAGE.
Fig. 4.17: Setup ➠ Copy
If you set COPY MODE to WHOLE CHANNEL, you can copy the complete channel
settings to another channel. Use SOURCE to select the channel to be copied
(SOURCE-CHANNEL), then de ne the channel to be overwritten (DESTINATION).
Theprocess is the same as in PAGE mode.
So-called “cross copying” (copying of di erent channels, for example output 1to
input A), allows the copying of only those pages that can be transferred 1:1 to
another channel. Any other pages will not be overwritten.
Previously locked pages (see chapter 4.2.4) cannot be overwritten.
Acorresponding message is displayed.
Fig. 4.18: Setup ➠ Copy
4.2.4 PAGE LOCK
In this menu you can lock individual parameter pages, preventing them from
being edited without rst entering a password. This is useful for P.A. rental
companies, for example, who want to make sure that certain “harmful” pages
with necessary xed settings cannot be accessed by the user.
Fig. 4.19: Setup ➠ Page Lock
In the PAGE LOCK menu you can either lock single pages or all pages. In this case,
you need a password to edit the pages. The parameter PAGE LOCK is set to OFF
by default. As long as it is not ON, you can skip this page and move on to the next.
Fig. 4.20: Set up ➠ Page Lock
To lock a parameter page you must activate the PAGE LOCK function (ON).
Theunit will prompt you to enter a password. Use the data wheel to enter a
password with a maximum of 8 characters, and con rm your selection with OK.
◊ ◊ CAUTION: Please make a note of your password. It is impossible to
unlock parameter pages without the correct password!
Fig. 4.21: Setup ➠ Page Lock
Now, the parameter SELECT PAGES is displayed, enabling you to select all the
pages to be locked. Use the IN/OUT/SUM/SETUP buttons to call up a menu,
thedata wheel to select the page of your choice and the OK button to activate
the PAGE LOCK function.
The data wheel also allows you to scroll through a list of all pages, from which
you can select the ones you wish to lock. This is the only way to call up
the ALL PAGES function that lets you lock all pages in one operation.
Tounlock all pages at once, select ALL PAGES and press CANCEL. As before,
the selected pages must be con rmed and locked with OK. Locked pages are
displayed with a closed lock symbol. If a page is unlocked, the lock symbol is
open. Use the CANCEL button to unlock a previously locked page.
◊ ◊ The OK and CANCEL func tions cannot be selected in the display with the
cursor. They can only be activated with the corresponding buttons on
the front panel.
Use the CHECK function for an overview of all locked pages. The locked pages
from the list now appearing can be selected with the data wheel. This function is
located at the bottom right of the display and must be selected with the cursor.
When you call up a locked page, you will at rst notice no di erence.
Only when you tr y to edit a parameter, will the display prompt you to
enter your password. Entering the correct password and con rming it
with OK will take you back to the page, now ready for editing.
To activate PAGE LOCK again, go to the PAGE LOCK page (4/6) and enter your
password again. Now, all settings are available, i.e. you can activate or deactivate
PAGE LOCK completely by selecting the line “PAGE LOCK: ON” with the cursor and
setting this parameter to ON or OFF with the data wheel.
4.2.5 GLOBAL LOCK
This function allows you to lock all parameter pages if you want to make sure
that nobody can edit your set tings while you‘re away during a break in a live
performance, for example.
Fig. 4.22: Se tup ➠ Global Lock
On this SETUP page you can activate the GLOBAL LOCK function (ON),
entera password, then con rm with OK. Now, if you try to edit any parameter,
thedisplay will prompt you to enter your password. The process follows
the same logic as the PAGE LOCK routine.
Fig. 4.23: Set up ➠ Global Lock
◊ ◊ Activating PAGE LOCK and/or GLOBAL LOCK auto matically locks all STORE
and RECALL pages.
CAUTION: If you have locked individual pages with PAGE LOCK and deactivated
the GLOBAL LOCK function with the correct password, you can not yet make
any changes to the corresponding page. You must rst unlock this page in the
PAGE LOCK menu. When using the GLOBAL LOCK feature, we recommend that
you unlock all pages in the PAGE LOCK menu (UNLOCK ALL).
4.2.6 MISCELLANEOUS
Fig. 4.24: Setup ➠ Miscellaneous
On this page, the current version of your DCX2496 operating software is
shown in the top right corner of the display (e.g. VERSION: 1.0). This is just a
message and cannot be selected. Additionally, this menu provides ve user
settings. Firstly,you can adapt the CONTRAST of the display to ambient
conditions. Secondly,you can assign a DEVICE ID to your DCX2496, allowing
you to daisy-chain several units via the rear panel RS-485 network interface
(LINK A and B). The rst unit is connected to a PC either via one of the LINK
interfaces (RS-485) orvia the RS-232 interface.
Note - The DCX2496LE does not have RS-232 or RS-485 connectors.
The PORT parameter provides three di erent modes for the PC remote control:
1. PC (RS-232)
Fig. 4.25: Set up ➠ Miscellaneous
Fig. 4.26: PC (RS -232) mode
Use this setting if you want to connect only one DCX2496 to your computer via
the RS-232 interface. It is impossible to daisy-chain several units in this mode.
2. LINK (RS-485)
Fig. 4.27: Setu p ➠ Miscellaneous
Fig. 4.28: LINK (R S-485) mode
Please use this mode when several ULTRADRIVE PROs are linked to each other via
the network interfaces LINK A and B and the rst unit in the chain is connected
to a computer via the RS-485 interface. The last unit in the chain must have a
termination (TERM switch on rear panel = ON). The RS-232 interface is not used
in this con guration.
3. PC -> LINK
Fig. 4.29: Se tup ➠ Miscellaneous
Fig. 4.30: PC -> LINK mode
LINK
(RS-485) =
PC
TERM-Switch: ON
RS-485
DEVICE ID: 1
PORT: LINK (RS-485)
RS-485
DEVICE ID: 2
PORT: LINK (RS-485)
RS-485
DEVICE ID: 3
PORT: LINK (RS-485)
DCX2496
DCX2496
DCX2496
DCX2496
PC (RS-232) =
PC
RS-232
DEVICE ID: 1
PORT: PC (RS-232)
TERM-Switch: ON
PC -> LINK =
TERM-Switch: ON
RS-232
DEVICE ID: 1
PC
PORT: PC -> LINK
RS-232
DEVICE ID: 2
PORT: LINK (RS-485)
RS-232
DEVICE ID: 3
PORT: LINK (RS-485)
DCX2496
DCX2496
DCX2496
Page 7

12 ULTRADRIVE PRO DCX2496/ULTRADRIVE DCX2496LE User Manual 13 ULTRADRIVE PRO DCX2496/ULTRADRIVE DCX2496LE User Manual
Please use this mode on the rst unit when several ULTRADRIVE PROs are linked
to each other via LINK A and B, and the rst unit in the chain is connected to a
computer via the RS-232 interface. In this con guration, the last AND the rst
unit in the chain must have their TERM switch ON, since both are integrated into
the system via only one LINK interface.
◊ ◊ General rule: Whenever one device within a chain has been connected
to the system via only one LINK interface, its TERM switch must be
pressed (ON) to avoid data reflections and hence transmission errors.
In PC (RS-232) mode this switch is not needed because the LINK
interfaces are not used.
The parameter DELAY UNIT determines the units of both measurement and
temperature used for the delay settings in the corresponding menus. You can
choose between m / mm / C° and ft / in / F°. When you change from meters/
millimeters to feet/inch, the temperature will be changed automatically from
°Celsius to °Fahrenheit. These settings cannot be made independently of
eachother.
The MUTE OUTS WHEN POWER ON function is used to protect connected
equipment such as power amps and loudspeakers. When it is on (YES),
alloutputs of the ULTRADRIVE PRO are muted during power-up. To restore the
output con guration of your presets, you will have to activate the respective
outputs individually or call up the preset again using RECALL (see chapter
4.7). UsingRECALL to switch from one preset to another automatically mutes
all outputs, as soon as a preset has a di erent output con guration.
However, if the output con gurations are the same, the muted outputs of the
new preset will beloaded.
When MUTE OUTS WHEN POWER ON is disabled (NO), the last output
con guration used will be recalled during power-up.
4.3 IN A/B/C menu
On these pages you can de ne the EQ, delay and similar values for the individual
input signals, and hence optimize the overall sound. Note that the DCX2496LE
does not have an INPUT C jack on the rear panel, or an IN C button on the
front panel.
4.3.1 GAIN
Press one of the buttons IN A, IN B or IN C to enter the INPUT menu of the
corresponding input. On the rst page, you can adjust the input gain for the
signal (GA IN). The setting range is from -15 to +15 dB.
Fig. 4.31: In A ➠ Gain
Below this parameter you can see a graphic representation of the current IN-OUT
con guration (OUTPUT CONFIG). Additionally, the display shows whether or not
the input is used for the SUM signal (see chapter 4.4). This is just a message.
Youcannot edit anything here! OUT con gurations are shown on the
SETUP page 1/6. The input source selection for SUM and for the various OUTs is
determined on page 1 in the corresponding menus (SUM, OUT).
4.3.2 DELAY/NAME
Fig. 4.32: In A ➠ Delay/Name
You can delay either the IN A, B or C signal to compensate for arrival time
di erences—resulting from o set stereo signals or so-called “delay lines”
(“delay towers”). Activate the function with DELAY (ON) and select the delay
time of your choice with DISTANCE/TIME. The values DISTANCE and TIME are
linked to each other, i.e. both values are edited simultaneously when you turn
the data wheel. IN A (B/C) NAME allows you to enter a name with a maximum of
8characters for the input signal selected.
4.3.3 EQ
Fig.4 .33: In A ➠ EQ
On this page you can process the sound of the input signals with the help of
various equalizer settings.
The EQ parameter determines whether this function is generally ON or OFF. Inthe
adjacent NR eld you can select the number of EQs. There are various lters
available, which can be used and edited. Their number depends on the current
processor capacity, which is shown as a percentage next to the number of the
lter. The free capacity of the processor is directly dependent upon the number
and type of the lter selected (e.g. >FREE: 33%).
Use TYPE to de ne the lter type you wish to use. You can choose from low-pass
(LP), high-pass (HP) and band-pass (BP) lters. Description:
The low-pass lter raises (positive gain) or lowers (negative gain) the level
of the frequency band below the adjusted frequency. The high-pass lter
raises (positive gain) or lowers (negative gain) the level of the frequency
band above the adjusted frequency. Use TYPE to set a slope of 6 or 12 dB/oct.
for the high-pass or low-pass lter, or to determine the quality (Q) of the
band-pass lter.
The band-pass lter raises or lowers the level of the frequency range around
the adjusted frequency. The quality parameter Q determines the width of the
resulting bell-shaped lter curve.
The FREQ parameter controls the cuto frequency, at which the lter starts
working. In the case of the low-pass and high-pass lters, the cuto frequency
is the point, at which low and/or high frequencies are processed. The entire
frequency spectrum ranges from 20 Hz to 20 kHz.
Use the GAIN parameter to de ne the degree of boost/cut applied to a speci c
frequency band. The setting range is from -15 to +15 dB.
◊ ◊ When you set GAIN to 0 dB, the corresponding filter is inoperative!
This means that you cannot selec t a new type. Only when this
values is higher or lower than 0 dB, will the filter be activated,
and you can select a new filter type. Please note that two or more
filters are used for one frequency range when LINK is active.
Consequently, the processor performance will decrease.
With the Q parameter you can set both the quality of the band-bass lter and
the amount of interaction with adjacent frequency ranges around the center
frequency. The higher this value, the lesser the in uence on neighboring
frequencies. This func tion is available only for the band-pass lters; its range is
adjustible from 0.1 to 10.
The number of lters available depend on the processing power (>FREE)
available. Filters can be allocated to either the inputs or outputs in any
proportion. The more lters are activated, the lower the processing power and
vice versa.
4.3.4 DYNAMIC EQ (FILTER)
As the DYNAMIC EQ is a highly complex module, its parameters are allocated to
two pages—the FILTER and the DYNAMICS parameters pages.
The DYNAMIC EQ in uences a speci c frequency range of the signal, depending
on the volume level. It can either boost or cut this frequency range, depending
on the gain setting made by the user. If the gain control is set to lower the
respective frequency range in level, and if a preset THRESHOLD is exceeded, the
EQ modi es the sound by reducing the gain of the frequency range. The amount
of gain reduction applied is de ned by the RATIO value. When the signal drops
below threshold again, the frequency range is “smoothed out” again, i.e. the
DYNAMIC EQ stops processing the signal.
When you de ne a certain boost with the GAIN control, the gain of the
frequency range is raised depending on the volume level. When the level of
the selected frequency range drops below a preset THRESHOLD, the range is
boosted by a certain amount (RATIO). As soon as the threshold is exceeded again,
the DYNAMIC EQ stops processing the signal.
Fig. 4.34: In A ➠ Dy namic EQ (➠ Filter)
The complete DYNAMIC EQ (FILTER) page corresponds to the EQ page in
terms of operation and to the parameters in terms of number and type.
Exception: Onlyone lter is selectable.
4.3.5 DYNAMIC EQ DYNAMICS
On this page you can edit both the threshold and the operating mode of the
compressor and/or expander (volume-dependent sound processing).
Fig. 4.35: In A ➠ Dynami c EQ (➠ Dynamics)
The THRESHOLD parameter de nes a threshold, activating the lter function
once that threshold is exceeded. If the lter has been set to reduce the gain
on the DYNAMIC EQ (FILTER) page (GAIN < 0), this frequency range will be cut,
assoon as it exceeds the threshold.
However, if the lter has been set to raise the gain (GAIN > 0), the frequency
range is boosted, as soon as its level drops below the threshold. The threshold
setting range is from -60 to 0 dB.
Next, you can use the RATIO parameter to de ne the amount of gain
boost/cut. RATIO adjusts the level balance between the input and output
signals. Available settings range from 1.1 : 1 (minimum boost/cut) to ∞ :
1 (maximum boost/cut).
ATTACK de nes how fast the DYNAMIC EQ reacts to signals exceeding or falling
below THRESHOLD, and can be set from
1 to 200 milliseconds.
RELEASE controls the recovery time needed by the EQ to stop processing the
signal, once it has exceeded or fallen below THRESHOLD (depends on the GAIN
setting). Available RELEASE times are from 20 to 4,000 milliseconds.
Settings
TYPE BP
FREQ 1.00 kHz
GAIN
+15 dB > contin uous line
0 dB > broken lin e
-15 dB > dotted line
Q 0.1
THRESHOLD -40 dB
RATIO ∞ : 1
Tab. 4.3: Band-pass s ettings with e xtreme values (re sults in g. 4.36)
Fig. 4.36: Filte r curves with gain a bove/below thres hold
4.4 SUM menu
In addition to its inputs A-C, the ULTRADRIVE PRO DCX2496 provides an internal
source signal that can be composed of these three input signals. This SUM signal
can be edited at any time, much like any other input signal, so that you have
a maximum of four separate source signals available. The DCX2496LE only has
INPUTS A and B.
4.4.1 INPUT/GAIN
Fig. 4.37: Sum ➠ Input/Gain
In this menu, the parameter IN SELECT allows you to de ne a combination of
two inputs forming the SUM signal. Available options are: IN A + IN B, IN A +
IN C and IN B + IN C. Of course, you can also use just one input signal as your
SUM signal (IN A, IN B or IN C), by doubling one of the inputs. It is impossible,
however, to form a SUM signal composed of all input signals!
If no additional source signal is required, set IN SELECT to OFF. The current SUM
con guration is shown graphically below this parameter.
In the top left corner of the display you can use SUM INPUT Gains to adjust
the input signal of the inputs A-C. The signal controlled here is taken directly
from post-input converters—not post-EQ or post-Dynamics. Therefore, it is not
necessary to re-adjust the input gain. The SUM INPUT GAINS setting range is from
-15 to +15 dB.
0
dBu
Positive gain >
gain boost
after dropping
below threshold
-40
dBu
Negative gain >
gain reduction
after exceeding
threshold
-40 dBu
Threshold
0
dBu
Page 8

14 ULTRADRIVE PRO DCX2496/ULTRADRIVE DCX2496LE User Manual 15 ULTRADRIVE PRO DCX2496/ULTRADRIVE DCX2496LE User Manual
With the OUT GAIN parameter you can control the internal output level of
the sum signal. This signal is also taken pre-EQ, pre-Dynamics, etc. and is then
routed to output channels 1-6. The gain setting also ranges from -15 to +15 dB.
Thus,you can use one parameter to quickly adjust all inputs together in their
adjusted balance at the same time.
The following SUM pages are 100% identical to the IN A/B/C pages 2/5 to
5/5 (see chapters 4.3.2 to 4.3.5)!
4.5 OUT 1-6 menu
Press one of the OUT 1-6 buttons to enter the OUTPUT menu of the respective
output. Here, you can set the IN-OUT con guration, X-OVER POINT or, as with the
input signals, the EQ and DYNAMIC EQ parameters.
4.5.1 GENERAL
Fig. 4.38: Out 5 ➠ General
On the rst page of this menu, the parameter INPUT SOURCE allows you to
choose the input signal feeding the selected output. Available options are the
inputs A-C and the additional SUM signal. If a STEREO-LINK con guration has
been previously selected in the SETUP menu (see chapter 4.2.1. IN/OUT), inputA
will automatically be routed to the LEFT CHANNEL outputs, and input B to the
RIGHT CHANNEL outputs. However, these preset con gurations can be edited
asdesired.
The OUT 16 GAIN parameter controls the volume level of the respective
output channel (also pre-EQ, pre-DYNAMIC EQ, etc.). The setting range is from
-15 to +15dB. Just as the inputs, the output levels should be set properly to
avoiddistortion.
The third parameter, OUT 16NAME can be used to assign speci c names to the
outputs. In contrast to the DCX2496 inputs, you cannot enter single characters
here, but you may choose from a list of preset names (e.g. LEFT LOW-MID,
RIGHTHI-MID, SUBWOOFER etc.). Depending on the output con guration
(e.g.LMHLMH) and the output selected, the system assigns a default name.
Thisname can be changed at any time by using the data wheel to select a
di erent name from thelist.
Output-
con guration
OUT 1 OUT 2 OUT 3 OUT 4 OUT 5 OUT 6
LMHL MH Left Lowe Left Mi d Left Hi Right L ow Right Mid Right Hi
LLMMHH Left Low Right Low Left Mi d Right Mid Left Hi Right Hi
L HL HLH Left Low L eft Hi Ce nter Low Center Hi Right Low Right Hi
MONO Sub-woofer Low Low-Mid Mid Hi-Mid Hi
Tab. 4.4: Default out put names, dependi ng on output con guratio n
4.5.2 XOVER POINTS
On this page, you can de ne the cuto frequencies and lter curves for the
individual outputs, which are displayed graphically for one stereo side and over
the entire frequency range. Use the OUT buttons 1-6 to select the output to be
processed. A frame around the selected OUT number highlights your selection.
Fig. 4.39: Ou t 5 ➠ X-Over Poin ts
Use the TYPE parameter in the top left corner of the display to de ne the type
of curve at the lower (left) slope. To de ne the upper (right) slope, use the TYPE
parameter in the top right corner of the display. Both parameters are marked by
a curve symbol.
You can choose from three di erent types of lters:
1. Butterworth (with a slope of either 6, 12, 18, 24 or 48 dB/oct)
2. Bessel (with a slope of either 12 or 24 dB/oct.)
3. Linkwitz-Riley (with a slope of either 12, 24 or 48 dB/oct.)
◊ ◊ With higher slopes, the number of filters goes down (see EQ page 3/6,
display >FREE<). For each 12 dB increase in slope, you will lose 1-2 EQs.
The FREQ parameter in the top left corner of the display selects the lower (left)
cuto frequency for one output. With the same parameter on the right-hand
side you can determine the upper (right) cuto frequency. These parameters,
too, aremarked by a curve symbol.
The XOVER ADJUST MODE, when set to “FREE”, allows you to enter all TYPE
and FREQ values, independent of one another. When set to “LINK”, you can couple
the X-Over lters of adjacent outputs. Though your entries are retained, theywill
be proportionally shif ted with each parameter change. When you shift the
upper cuto frequency of OUT 1 in the LMHLMH con guration for test purposes,
thelower cuto frequency of OUT 2 will be shifted as well.
The following pages 3/8 to 5/8 (EQ, DYNAMIC EQ (FILTER) and DYNAMIC EQ
(DYNAMICS)) are 100% identical to the IN pages 3/5 to 5/5!
4.5.3 LIMITER
To protect your power ampli ers and loudspeakers, the ULTRADRIVE PRO
DCX2496 features a limiter for each of the six outputs. Use this device to suppress
harmful level peaks.
Fig. 4.40: Out 5 ➠ Limiter
Use the LIMITER parameter to switch this function ON or OFF. The corresponding
THRESHOLD parameter determines (similarly to the DYNAMIC EQ) the LIMITER
threshold (-24 to 0 dB). RELEASE controls the recovery time that elapses
between the point when the signal drops below THRESHOLD and the deactivation
of the LIMITER function (20 to 4,000 ms).
4.5.4 POLARITY/PHASE
Any phase errors at the outputs (cancellation of speci c frequency ranges) may
be corrected here.
Fig. 4.41: Out 5 ➠ Polarit y/Phase
The POLARITY parameter determines whether the phase of an output signal
is INVERTED or not (NORMAL)—just as if you had inverted the polarity of your
speakers. Use the PHASE parameter to adjust the precise phase position at the
upper X-OVER frequenc y of the currently selected output. This ne adjustment
is necessary when two output signals are not perfectly displayed by 0° or 180°
with regard to each other.
4.5.5 DELAY
Fig. 4.42: Out 5 ➠ Delay
The DLY parameter in the top left corner of the display switches the DELAY
function ON or OFF. With the LINK function you can couple several output
DELAYS, so that you only have to adjust one DELAY for a whole stack of speakers.
However, this applies to LONG DELAY values only. SHORT DELAY values
can be adjusted separately and independently of the LINK function, and can
be linked to each other in the SETUP menu (page 1/6), using the parameter
OUT STEREOLINK.
The parameters SHORT and LONG allow you to de ne the DELAY values of
your choice. The setting range for the SHORT Delay is from 0 to 4,000 mm
(= 0.00 to 11.64 ms) and the LONG Delay can be adjusted from 0.00 to 200.00 m
(= 0.00 to 582.24ms).
With the LINK function activated, all LONG DELAY changes at one output are
transferred to the corresponding output (L > M > H of one stereo side)—
irrespective of the selected output con guration (e.g. LMHLMH).
◊ ◊ If the LINK function is activated for one output, it will be switched on
for ALL other outputs as well.
When you have set all DELAY values for the outputs and then activated the LINK
function for one of them, the LONG DELAY values are NOT transferred to the
linked outputs. This happens only when you edit any parameters that change the
values of the linked outputs proportionally. The current DELAY values are still not
copied, but rather the linked output values follow the changes.
The output links are shown graphically, with the currently selected OUT channel
displayed as an inverted loudspeaker, in the top right-hand corner of the display.
Below are the DELAY times shown on a timeline.
4.6 MUTE menu
Fig. 4.43: Mute ➠ Select
On this page, you can mute individual or all input/output channels.
Use the parameters MUTE ALL OUTS and MUTE ALL INS to disable (OK)
or de-mute (CANCEL) the inputs/outputs of the DCX2496 in one go. To mute
or de-mute individual channels, please use the respective input/output
buttons (e.g. OUT 2, IN A, SUM, etc.). The lower part of the display only shows
the status of the channel and does not allow for any selection.
MUTE settings of any type can be made exclusively on this page. As soon as an
input/output has been muted, the bot tom red LED above the corresponding
input/output button lights up.
Press MUTE again or select another menu to quit the MUTE menu. Pressing the
IN or OUT buttons has no e ect.
4.7 RECALL menu
In the upper display line, the parameter CURRENT NR indicates the current
preset. If the preset has been edited but not yet stored, an arrow plus “EDITED”
appears below this line. Now, if you try to load a new preset, the unit warns you
that the current preset has not been saved yet. If you continue to load a new
preset, all settings will be lost.
Fig. 4.44: Rec all ➠ Internal
If you wish to store the current preset before loading a new one, cancel RECALL
and change to the STORE menu (see chapter 4.8).
The parameter RECALL NR allows you to selec t the number of the preset. Use the
data wheel to select a preset (1-60). Con rm your selection with OK to return to
the previously selected menu (before entering RECALL).
◊ ◊ “Empty” presets (without a name) cannot be RECALLED.
Page 9

16 ULTRADRIVE PRO DCX2496/ULTRADRIVE DCX2496LE User Manual 17 ULTRADRIVE PRO DCX2496/ULTRADRIVE DCX2496LE User Manual
4.8 STORE menu
Use this menu to store previously created presets in the internal memory.
◊ ◊ If you need more memory capacity you can store your presets
externally on a PC (data dump via RS-232 or LINK RS-485 interface).
4.8.1 INTERNAL MEMORY
Fig. 4.45: Store ➠ Internal
The window on the right-hand side lists the presets already stored in the internal
memory. You can allocate a memory location to the preset, give it a NAME
and overwrite an existing con guration or select an unused memory location.
If you want to overwrite an existing preset, thencon rm your command with
OK. The display will prompt you to con rm once again. Press OK to con rm,
or CANCEL to quit.
Fig. 4.46: Store ➠ Inter nal
If the preset to be overwritten was previously locked in the PRESET LOCK menu
(see chapter 4.8.4), the process cannot be completed; a corresponding message
is displayed.
Fig. 4.47: Store ➠ Internal
If you save to an unused preset location, the store command will be executed
directly, i.e. without further prompts.
◊ ◊ Please note that you have to assign a name to each preset.
Presets without a proper name cannot be saved.
AUTO-STORE
Your DCX2496 features an AUTO-STORE function. This means that
all settings are saved automatically, once every few seconds, to a
temporary, non-volatile memory. For example, if there is a power
failure while you’re editing, at least the last few edits (before the
last auto-store operation) are available directly from the auto-store
memory. This function cannot be disabled.
4.8.2 DELETE/FORMAT
Fig. 4.48: Store ➠ Delete/ Format
On the next menu page you can erase presets from the internal memory.
Similar to the previous page, then, in the right-hand window, mark the
preset to be deleted. When you press OK, the display prompts you to con rm
your selection.
Fig. 4.49: Store ➠ Delete/Format
Press OK to delete the preset. Locked presets cannot be deleted.
4.8.3 COPY
On the third page of the STORE menu you can copy presets from one
location to another.
Fig. 4.50: Stor e ➠ Copy
Select the SOURCE PRESET and the DESTINATION PRESET. The display indicates
both the number, name and status (LOCKED/UNLOCKED) of the preset.
Fig. 4.51: Store ➠ Copy
◊ ◊ Locked DESTINATION PRESETS cannot be overwritten. In this case,
the display informs you that the process cannot be completed.
Since SOURCE PRESETS will not get lost during the copying process,
it does not matter whether they are locked or not.
When all settings have been made and con rmed with OK, the DESTINATION
PRESET is directly overwritten and the display indicates the name of the new
preset. Locked SOURCE PRESETS are stored as unlocked presets. To lock them,
goto the next page of the STORE menu (PRESET-LOCK). You can also unlock
locked DESTINATION PRESETS there.
4.8.4 PRESETLOCK
Fig. 4.52: Store ➠ Pres et-Lock
The last page of the STORE menu allows you to LOCK or UNLOCK your presets.
The right-hand window displays the preset. Use ALL PRESETS to selec t all presets.
Press OK to lock the preset, or CANCEL to unlock it.
Here, you can unlock a DESTINATION PRESET you wish to overwrite, or lock
recently copied presets.
5. Audio Connections
The BEHRINGER ULTRADRIVE PRO DCX2496 has standard electronically balanced
inputs and outputs. The circuit design has an automatic hum suppression with
balanced signals and is able to operate, without problem, even at highest
levels. Externally-induced mains hum etc. is thus e ciently suppressed.
Theservo-function, also automatic, recognizes the connection of unbalanced
pin assignments and changes the nominal level internally so that there is no
di erence in level between the input and output signals (6dB correction).
◊ ◊ Please ensure that only qualified persons install and operate the
device. During installation and operation the user must have sufficient
contact to earth. Electrostatic discharges might affect the operation of
the unit.
Fig. 5.1: XLR connectio ns
6. Applications
On the following pages we present the most useful applications for your
ULTRADRIVE PRO, using a few practical examples. For each example there is
an appropriate preset available, which you can use as a starting point for your
own set-ups.
Please note that these presets provide only basic outline settings that must
be adapted to meet your speci c requirements in terms of loudspeaker,
ampli erand room acoustics!
The application examples are arranged in three groups:
1. Classic setups (chapters 6.1 – 6.6)
2. Special applications: zoning / delay lines / surround
(chapters 6.7 – 6.9)
3. Large-scale applications requiring two DCX (chapters 6.10 – 6.12)
Balanced use with XLR connectors
12
3
input
1 = ground/shield
2 = hot (+ve)
3 = cold (-ve)
1
2
3
output
For unbalanced use, pin 1 and pin 3
have to be bridged
Page 10

18 ULTRADRIVE PRO DCX2496/ULTRADRIVE DCX2496LE User Manual 19 ULTRADRIVE PRO DCX2496/ULTRADRIVE DCX2496LE User Manual
6.1 Stereo tri-amp operation
Fig. 6.1: Stereo 3-way ope ration
Stereo Tri-Amp operation is one of the most popular applications. The stereo input signals (In A+B) are split up into three frequency bands per stereo side and then
reproduced using the 6 outputs. This ensures the best possible use of your 3-way sound reinforcement system, since the individual drivers reproduce only those
frequency ranges for which they are ideally suited. Intermodulation distortion is thus e ectively minimized.
6.2 Stereo bi-amp operation plus monosubwoofer
Fig. 6.2: Ster eo 2-way operation plu s subwoofer
Each driver (speaker diaphragm) of the two 2-way speaker cabinets is controlled separately to ensure optimum reproduction of treble and mid-range frequencies.
The bass is reproduced by a mono subwoofer, which is driven by a power amp in mono-bridged mode. The sub-woofer receives its signal from the DCX’s “SUM” input,
which is limited to bass frequencies and is the sum of mix signals In A+B. The unused input C and output 6 could be used for a mono delay line, forexample.
In A
Out 1 2 3 4 5 6
In B
EUROPOWER EP2000
Stereo power amplier
Left
Stereo output
Right
XENYX X2222USB Mixing Console
High (3)
High (6)
Mid (2)
XENYX X2222USB Mixing console
High
Left (2)
HighRight (4)
Right
Stereo output
Left
In A
Outputs: (6 is not used)12 345
In B
Mid (5)
Low (1)
Low (4) Loudspeaker left Loudspeaker right
Left (1)
EUROLIVE B1800X PRO
Mono subwoofer
Right (3) Mid
Mid
SUM (A + B) signal (5)
EUROPOWER EP2000
Stereo power amplier
Low
Mono bass (amplier mono bridged)
Page 11

20 ULTRADRIVE PRO DCX2496/ULTRADRIVE DCX2496LE User Manual 21 ULTRADRIVE PRO DCX2496/ULTRADRIVE DCX2496LE User Manual
6.3 3x bi-amp operation (LCR/Triple Bi-Amping)
Fig 6.3: 3x2-way ope ration [LCR/Triple Bi -Amping]
Three 2-way speakers driven from three inputs. Such a setup is used for stage monitors or in cinemas, where, in most cases, the two stereo cabinets (completely to the
left and right) are used to play back music and e ects, whilethe center cabinet reproduces voices. Hence the name L-C-R, which stands for “Left-Center-Right”.
Note that this scenario will not work for the DCX2496LE as it does not have an INPUT C jack.
6.4 Stereo operation plus mono subwoofer
Fig. 6.4: Stereo o peration plus mon o subwoofer
A full-range stereo signal is sent to two active speaker cabinets for stereo reproduction. There is no need for a dedicated frequency separation because the crossover
and ampli er in the active speaker are perfectly adapted to each other. However, to achieve more power in the bass, low frequencies are cut o in the active cabinets
and routed to a subwoofer. The power amp is set to mono-bridged mode and the SUM signal derived from In A+B is sent to the subwoofer. Outputs 4 to 6 can be used
as mono or stereo delay lines.
XENYX X2222USB Mixing console
Left
channel
In B In C
23456
Low High
Low
High
In A
Outputs: 1
EUROPOWER EP2000
Stereo power amplier
Right
Stereo output
Left
In A
XENYX X2222USB Mixing console
RightCenter
Low
High
B815NEO
Left active
loudspeaker
High (1)
EUROLIVE B1800X PRO
B815NEO
Right active
loudspeaker
Outputs: 1 2 3 (4, 5 and 6 not used)
In B
High (2) High (4)
Low (1)
Left
EUROLIVE B1520 PRO
Low (3)
Mid
(Center)
Low (5)
High (6)
Right
Passive mono subwoofer
SUM (A + B) signal
EUROPOWER EP2000
Stereo power amplier (mono bridged)
Output 4 usable as additional mono delay line output.
Output 5 + 6 usable as additional stereo delay line output.
Low (3)
Page 12

22 ULTRADRIVE PRO DCX2496/ULTRADRIVE DCX2496LE User Manual 23 ULTRADRIVE PRO DCX2496/ULTRADRIVE DCX2496LE User Manual
6.5 Stereo operation plus 2 subwoofers
Fig. 6.5: Stere o operation plus 2 wo ofer cabinets
Only two frequency ranges (Low and High) are used on each stereo side. Thetwo passive speaker cabinets for the higher frequencies are limited towards the bass end
and are ne-tuned in their sound with the DCX’s internal equalizer. The stereo bass signal is rst sent to the active woofer, which also provides the passive woofer
cabinet with su cient power for the right-hand low-frequency channel. The unused outputs 5 and 6 can be used as mono delay lines.
6.6 Stereo bi-amp operation plus subwoofer and additional monitor
Fig. 6.6: Stere o 2-way operation plu s subwoofer and add itional monitor
Inputs A+B carry the stereo signal optimized for the two 2-way speakers. Thewoofer signal is derived from the sum signal of A+B, limited in its frequency range and
routed to the active sub-woofer. A separate signal from the mixing console (aux/subgroup) for a separate speaker can be processed via In C. In our example, this is a
full-range stage monitor with its own ampli er able to play back a dedicated monitor mix for the singer, drummer or other performers.
This scenario does not apply to the DCX2496LE.
In A
Out 1 2 3 4 (5 and 6 not used)
In B
EUROPOWER EP2000
Stereo power amplier
Left
Stereo output
Right
XENYX X2222USB Mixing console
EUROLIVE
B1220 PRO
Left passive
loudspeaker
High (2)
Right passive
loudspeaker
High (4)
EUROLIVE B1800X PRO
Monitor output
Right
Left
Stereo sub master
XENYX X2222USB Mixing console
High (2)
High (4)
Left Right
Mid (3)
Mid (1)
Low (5) SUM (A + B) signal
In A
In B In C
Outputs: 1 2 3 4 5 6
Output 5 + 6 usable as additional mono delay line outputs.
Low (3)
Low (1)
Left active subwoofer Right passive subwoofer
In C signal
EUROLIVE F1220A
Active mono subwoofer
Full Range mono monitor
Page 13

24 ULTRADRIVE PRO DCX2496/ULTRADRIVE DCX2496LE User Manual 25 ULTRADRIVE PRO DCX2496/ULTRADRIVE DCX2496LE User Manual
6.7 Mono 6-zone distribution mode
Fig. 6.7: Mono 6 -way “Zoning” (sig nal distribut ion mode)
In this special-purpose application, the ULTRADRIVE PRO is not used as a frequency crossover but rather as a signal distributor, for dedicated EQing plus individual
delays and separate volume settings for each output. The monophonic mix signal is split up and sent to six equal outputs. It can be used for a variety of applications
requiring the transmission of music or speech over large distances or to several rooms or rooms consisting of several compartments. Examples are large discotheques,
multi-room clubs/pubs/bars, shopping malls, restaurants, hotels, lobbies, trade show and conference halls, railway stations, churches/cathedrals and even at home
where you can use the DXC2496 to play back music in every room.
6.8 Stereo 3-zone delay line
Fig. 6.8: Triple s tereo delay line
In this application, the ULTRADRIVE PRO is not used as a crossover network. Instead, it produces stereo delay lines, i.e. stereo speaker cabinets delayed in time with
regard to each other. All pairs of cabinets are supplied with the same full-range stereo input signal A+B. Then, these pairs can be placed at regular distances away
from the stage, as is often the case at big open-air concerts. Thefarther away the original signal (usually the music played on stage) is, themore audible the delay
between speaker signal (close to the listener) and original signal (far away) becomes. The DCX2496 allows you to make up for the resulting echoes by adding speci c
delay times to the speaker signals. This allows the audience to feel as if they were “part of it” even though they may be far away from the stage—and this without any
annoying echoes.
Outputs: 1
(Sub) (Mid)(Low
(Low)
XENYX X2222USB Mixing console
Mono master
output
In A
23456
Mid)
EUROPOWER EP2000
Stereo power amplier
Identical full range mono output signals
(High mid)
(High)
Main
amplication
All loudspeakers: full range
Left (1) Right (2)
EUROLIVE B1520 PRO
Left (3) Right (4)
Right
Stereo master
Left
XENYX X2222USB Mixing console
(Low)
Delay line 1
(High)
(Low)
Delay line 2
(High)
Right
Stereo sub master
Left
EUROPOWER EP2000
Stereo power amplier
In A
Outputs: 1 2 3 4 5 6
In A
(1)
Left
EUROLIVE B1520 PRO
(2) (3) (4) (5) (6)
Right Left Right Left Right
Left (5) Right (6)
(Low)
Delay line 3
(High)
Page 14

26 ULTRADRIVE PRO DCX2496/ULTRADRIVE DCX2496LE User Manual 27 ULTRADRIVE PRO DCX2496/ULTRADRIVE DCX2496LE User Manual
6.9 3.0 Channel surround
Fig. 6.9: Surr ound 3.0
With this 3-channel con guration your audience experiences a live surround sound that comes close to the popular “Dolby Surround” sound format. The2-way front
speakers carry the main stereo signal from inputs A+B. Aseparate mono surround signal is supplied via In C, which is reproduced by two rear (or side) full-range
speakers. The surround signal can be a delayed signal derived from the stereo sum signal, it can be processed with reverb or any other e ect, or it can even provide a
separate sound. Using this con guration, yoursurround music performances, slide shows, silent-movies or video shows will be a real experience—the sound of ocean
waves lapping onto the shore or space ships ying through outer space—all embedded into “atmo” sounds oating around the room.
This scenario does not apply to the DCX2496LE.
6.10 Stereo 4-way bridged system plus 2 monitors
Fig. 6.10: 4-way mono -bridged oper ation plus 2 monito rs (per stereo sid e)
This application uses one ULTRADRIVE PRO for each stereo side. When both units are coupled to each other via the LINK jacks, and one of them is additionally
connected to a notebook/PC, you can use the computer to remotely control both devices with our free CrossOverRemote Software.
In this example, each DCX2496 is supplied with one side of the main stereo signal (In A). Two additional mono signals are routed from the console to inputs B and
C. Two power amps each are used for the 4-way paths of each P.A. stack, while the third power amp drives two full-range stage monitors. This allows for building a
stereo 4-way system that gives the musicians four on-stage monitors that can be “accessed” individually.
This scenario does not apply to the DCX2496LE.
Out 5/6 identic
In A
In B In C In C Signal
Outputs: 1 2 3 4 5 6
Left
Stereo sub master
Right
Mono surround channel
EUROPOWER EP2000
Stereo power amplier
2x mono surround
XENYX X2222USB Mixing console
Low Full range (mono)
High
Surround rear
Left (5)
Right (6)
XENYX X2222USB Mixing console
Stereo master
left channel
Mono out 1
Mono
out 2
(Sub)
RS-232
In A
6 5 4 3 2 1 Outputs Outputs: 1 2 3 4 5 6
EUROPOWER EP2000
Stereo power amplier
In B In C In A In B In C
loudspeaker tpwers
(In A signal)
High (4)
High mid (3) High mid (3)
LINK
(RS-485)
4-way
Mono out 4
Mono out 3
Stereo master
right channel
High (4)
Stereo high frequencies
Stereo low frequencies
High
High
Surround front
Low Left (1)
Low
EUROLIVE B1220 PRO
Left (2)
Right (4)
Right (3)
In C signal (6)
Full range
mono monitors
Mid (2) Mid (2)
Low (1) Low (1)
Left Right
In B signal (5)
EUROLIVE F1220A
In B signal (5)
In C signal (6)
Full range
mono monitors
Page 15

28 ULTRADRIVE PRO DCX2496/ULTRADRIVE DCX2496LE User Manual 29 ULTRADRIVE PRO DCX2496/ULTRADRIVE DCX2496LE User Manual
6.11 5-way mono operation plus 1 additional mono signal
Fig. 6.11: 5-way mono operatio n plus 1 additional m ono signal (per ster eo side)
Again, two ULTRADRIVE PROs can be remotely controlled from a notebook/PC by using our free CrossOverRemote Software.
This set-up is similar to the one described in chapter 6.10. Here, however, even ve frequency-optimized ways per stereo side are transmitted. The subwoofer has a separate
mono-bridged power amp, just like the sixth channel, whichcan be used independently and is controlled from the separate B input. In our example, one of these mono
channels is used for an individual subwoofer, while the the mono channel of the second ULTRADRIVE PRO drives a full-range stagemonitor.
6.12 5.1 Surround operation
Fig. 6.12: Surround 5.1
(To be continued on next page...)
XENYX X2222USB Mixing console
Mono out 1
Stereo master
left channel
RS-232
In A In B In A In B
1 2 3 4 5 6 Outputs Outputs: 6 5 4 3 2 1
EUROPOWER EP2000
Stereo power amplier
High (6) High (6)
High mid (5) High mid (5)
Mid (4) Mid (4)
LINK
(RS-485)
4-way
loudspeaker towers
(In A Signal)
Mono out 2
Stereo master
right channel
Surround processor/decoder
Front
Front
left
In A
RS-232
In A
Outputs: 1
Screen/curtain
Front left Front center Front right
2 3 4 5 6 Outputs: 6 not used 5 4 3 2 1
High
(2)
Front
center
right
In B
In C
Front left
Front center
Front right
In B In C In A In B In C
XENYX X2222USB Mixing console
High
(4)
or
LINK
RS-485
High
(6)
Rear
Rear
right
left
In A
Front subbass
Rear right
Rear left
In B
Front
subbass
In C
Low mid (3) Low mid (3)
Low (2) Low (2)
In B signal (1) In B signal (1)
Left Right
EUROLIVE F1220A
Full range mono monitor
EUROLIVE B1800X PRO
Mono subwoofer
Low
(1)
Front subbass (LFE) connected in a row
Rear left Rear right
Low
(3)
High (2)
Low (1)
Low
(5)
High (4)
Low (3)
Page 16

30 ULTRADRIVE PRO DCX2496/ULTRADRIVE DCX2496LE User Manual 31 ULTRADRIVE PRO DCX2496/ULTRADRIVE DCX2496LE User Manual
With two DCX2496 units you can even realize today’s most popular surround format:
5.1. In addition to the speaker cabinets and power amps (or active speakers as in
the simpli ed illustration shown here), all you need is a surround decoder to play
back pre-produced 5.1 material such as DVDs, or a mixing console with six outputs
(e.g. stereo out plus four subgroups). In the latter case, you can create highly
sophisticated surround mixes even without a special surround sound decoder.
The preset “5.1 FRONT” has been optimized for the L-C-R front speakers
with 2speaker ways each (see also chapter 5.3). The three signals required
“Front-Left, Front-Center, Front-Right” are routed via the three inputs (A, B, C)
tothe rst DCX2496.
On the second DCX2496, the preset “5.1 REAR” should be used as a starting
point. It supplies the two rear surround speakers (also 2-way systems) plus the
monophonic sub-bass channel (“LFE” = “Low Frequency Enhanced”) with the
input signals “Rear-Left, Rear-Right and Sub-bass”, using connectors In A, B, C.
The sixth output of the second ULTRADRIVEPRO is not used in this application,
but is left available for additional e ects or as a mono delay line.
This scenario does not apply to the DCX2496LE.
7. Speci cations
Analog Inputs (A, B, C)
Type electronically balanced
Connector XLR
Max. input level +22 dBu
Input impedance approx. 35 kΩ @ 1 kHz
Crosstalk -72 dB @ 0 dBu
Digital Input (A) - DCX2496
Connector XLR
Format S/PDIF or AES/EBU
Input level 0.3 to 10 Vpp
Input impedance approx. 110 Ω
Sampling frequency 32 to 96 kHz
Special feature Sample Rate Converter
Microp hone Input (C) - DCX2496
Type electronically balanced
Connector XLR
Max. input level -23 dBu
Input impedance approx. 670 Ω @ 1 kHz
Phantom supply +15 V
Analog Outputs (1, 2, 3, 4, 5, 6)
Type electronically balanced
Connector XLR
Max. output level +22 dBu
Output impedance approx. 100 Ω @ 1 kHz
Crosstalk -100 dB @ 10 dBu
System Data
Sampling frequency 96 kHz
Signal delay < 1 ms Analog input to analog output
Frequency response 10 Hz to 45 kHz (-3 dB) typ.
Dynamic range 112 dB
THD+N Ratio 0,007% @ 0 dBu
0,004% @ 10 dBu
Converters
A/D Converter CS5381
Resolution 24-Bit Delta-Sigma
Oversampling 64x
Dynamic range 120 dB typ.
D/A Converter AK4393
Resolution 24-Bit Delta-Sigma
Oversampling 64x
Dynamic range 120 dB typ.
Serial Interface (DCX2496)
RS-232
Type 9-pin sub-D connector
Transmission type 115200 bauds, 8 data bits,
1 stop bit, no parity
RS-485 (2x)
Type RJ-45 connector
Transmission type 38400 bauds, 8 data bits,
1 stop bit, no parity
Power Supply
Mains Voltage
USA/Canada 120 V~, 60 Hz
Europe/U.K./Australia 230 V~, 50 Hz
Japan 100 V~, 50 - 60 Hz
General export model 100 - 240 V~, 50 - 60 Hz
Power consumption approx. 12 W
Fuse 100 to 240 V~: T 1 A H
Mains connector Standard IEC receptacle
Dimensions/Weight
Dimensions (H x D x W) 45 x 483 x 208 mm
(1.75 x 19 x 8.1")
Weight approx. 2 kg (4.4 lbs)
Shipping Weight approx. 3.2 kg (7 lbs)
Page 17

32 ULTRADRIVE PRO DCX2496/ULTRADRIVE DCX2496LE User Manual 33 ULTRADRIVE PRO DCX2496/ULTRADRIVE DCX2496LE User Manual
9. Block Diagram
*The DCX 2496LE doe s not have an INPUT C jack.
10. Menu Structure
Page 18

34 ULTRADRIVE PRO DCX2496/ULTRADRIVE DCX2496LE User Manual 35 ULTRADRIVE PRO DCX2496/ULTRADRIVE DCX2496LE User Manual
FEDERAL COMMUNICATIONS
COMMISSION COMPLIANCE
INFORMATION
Responsible Part y Name: MUSIC Group Services NV Inc.
Address: 5270 Procyon Street
Las Vegas, NV 89118
USA
Phone Number: +1 702 800 8290
ULTRADRIVE PRO DCX2496/ULTRADRIVE DCX2496LE
complies with the FCC rules as mentioned in the followingparagraph:
This equipment has been tested and found to comply with the limits for a ClassB
digital device, pursuant to part 15 of the FCC Rules. These limits are designed
to provide reasonable protection against harmful interference in a residential
installation. This equipment generates, uses and can radiate radio frequency
energy and, if not installed and used in accordance with the instructions, may cause
harmful interference to radio communications. However, there is no guarantee that
interference will not occur in a particular installation. If this equipment does cause
harmful interference to radio or television reception, which can be determined
by turning the equipment o and on, the user is encouraged to try to correct the
interference by one or more of the followingmeasures:
• • Reorient or relocate the receiving antenna.
• • Increase the separation between the equipment and receiver.
• • Connect the equipment into an outlet on a circuit di erent from that to which the
receiver is connected.
• • Consult the dealer or an experienced radio/TV technician forhelp.
This device complies with Part 15 of the FCC rules. Operation is subject to the
following two conditions:
(1) this device may not cause harmful interference, and
(2) this device must accept any interference received, including interference that may
cause undesired operation.
Important information:
Changes or modi cations to the equipment not expressly approved by MUSIC Group
can void the user’s authority to use the equipment.
ULTRADRIVE PRO DCX2496/
ULTRADRIVE DCX2496LE
Page 19

Dedicate Your Life to Music
 Loading...