

Page 1

Table of Contents
Safety instructions . . . . . . . . . . . . . 40
Information regarding
general road safety. . . . . . . . . . . . . 41
Arrangement of controls . . . . . . . . 42
Anti-theft device. . . . . . . . . . . . . . . 44
Entering the code number . . . . . . . . . . . 44
General operation . . . . . . . . . . . . . 45
Welcome . . . . . . . . . . . . . . . . . . . . . . . . 45
Switching on the unit. . . . . . . . . . . . . . . 45
Setting display . . . . . . . . . . . . . . . . . . . . 46
DVD mode . . . . . . . . . . . . . . . . . . . 47
Using the DVD player. . . . . . . . . . . . . . 47
Notes on DVDs . . . . . . . . . . . . . . . . . . 47
Loading DVDs . . . . . . . . . . . . . . . . . . 48
Ejecting DVDs . . . . . . . . . . . . . . . . . . 48
Starting DVD playback. . . . . . . . . . . . 49
Pause function. . . . . . . . . . . . . . . . . . . 49
Stopping DVD playback . . . . . . . . . . . 49
Scrolling through chapters/scenes. . . . 49
Fast forward / reverse . . . . . . . . . . . . . 49
Slow motion . . . . . . . . . . . . . . . . . . . . 50
Selecting individual titles
on the DVD directly . . . . . . . . . . . . . . 50
Selecting chapters or scenes
on the DVD directly . . . . . . . . . . . . . . 50
Status line . . . . . . . . . . . . . . . . . . . . . . . 51
DVD menu. . . . . . . . . . . . . . . . . . . . . . . 51
Opening the DVD menu . . . . . . . . . . . 51
Selecting menu items from
the DVD menu . . . . . . . . . . . . . . . . . . 51
CD mode . . . . . . . . . . . . . . . . . . . . . 52
Listening to audio CDs . . . . . . . . . . . . . 52
Notes on CD-R and CD-RWs . . . . . . . 52
Notes on copy-protected CDs . . . . . . . 52
Notes on compact discs (CD) . . . . . . . 52
Loading audio CDs . . . . . . . . . . . . . . . 53
Ejecting audio CD. . . . . . . . . . . . . . . . 53
Starting audio CD playback . . . . . . . . 54
Pause function . . . . . . . . . . . . . . . . . . . 54
Stopping CD playback . . . . . . . . . . . . 54
Track skip forwards/backwards . . . . . 54
Fast forward / reverse . . . . . . . . . . . . . 54
Listening to MP3 CDs . . . . . . . . . . . . . . 55
General notes on MP3. . . . . . . . . . . . . 55
Creating an MP3 storage medium. . . . 55
Notes on playing MP3 CDs. . . . . . . . . 55
Loading MP3 CDs. . . . . . . . . . . . . . . . 55
External sources . . . . . . . . . . . . . . . 57
Video games . . . . . . . . . . . . . . . . . . . . . 57
Connecting and playing
video games. . . . . . . . . . . . . . . . . . . . . 57
Connecting and playing
S-video games . . . . . . . . . . . . . . . . . . . 57
Other video sources . . . . . . . . . . . . . . . . 57
Connecting and playing other video
sources. . . . . . . . . . . . . . . . . . . . . . . . . 57
User settings . . . . . . . . . . . . . . . . . . 58
Opening / quitting User Settings menu . 58
Screen settings . . . . . . . . . . . . . . . . . . . . 59
Setting the volume. . . . . . . . . . . . . . . . 59
Adjusting brightness . . . . . . . . . . . . . . 60
Adjusting colour . . . . . . . . . . . . . . . . 60
Adjusting contrast . . . . . . . . . . . . . . . 61
Setting backlighting. . . . . . . . . . . . . . 61
Setting Day/Night mode . . . . . . . . . . 62
Setting menu language . . . . . . . . . . . 62
Other settings . . . . . . . . . . . . . . . . . . . . 63
Language selection . . . . . . . . . . . . . . 63
Setting subtitles . . . . . . . . . . . . . . . . . 64
Setting viewing angle . . . . . . . . . . . . 64
Setting format/zoom . . . . . . . . . . . . . 65
Setting FM modulator . . . . . . . . . . . . 65
Setting Default Settings. . . . . . . . . . . 66
Remote control . . . . . . . . . . . . . . . . 67
Battery replacement . . . . . . . . . . . . . . . 67
Headphones . . . . . . . . . . . . . . . . . . 68
Using headphones . . . . . . . . . . . . . . . . 68
Switching on headphones . . . . . . . . . 68
Switching off headphones . . . . . . . . . 68
Setting the volume. . . . . . . . . . . . . . . 69
Battery replacement . . . . . . . . . . . . . . . 69
Keyword directory . . . . . . . . . . . . . 71
Index . . . . . . . . . . . . . . . . . . . . . . . . 72
Technical data . . . . . . . . . . . . . . . . 74
NOTICE . . . . . . . . . . . . . . . . . . . . . .75
39
Page 2

Safety instructions
G
The Rear Seat Entertainment System has been developed exclusively for use by the passengers in the rear seats of your
vehicle. Use by the driver while driving is not permitted. The driver should never try to view the screen of the Rear Seat
Entertainment System while driving.
Operation of the unit is permitted only if traffic conditions are suitable and you are absolutely sure that you, your
passengers or other motorists are not endangered, obstructed or inconvenienced.
The unit may only be used for its intended purpose. If you are not using the Rear Seat Entertainment System with the
headphones but with the vehicle speakers, the volume must be set so that noises outside the vehicle are still audible.
In case of a malfunction (e.g. smoke or noticeable odours) immediately turn off the unit.
Due to the variety of functions and the corresponding high processing capacity of the microprocessor, the unit will warm
up greatly during operation. The installed components are equipped to handle these temperatures.
For safety reasons, the unit must only be opened by a trained technician. Please refer to your dealer for repair.
40
Page 3

Information regarding general road safety
This entertainment unit is intended and approved for installation and operation in passenger cars, commercial vehicles
and buses (vehicle classes M, N and O) whose electric system has a rated voltage of 12V.
Installation and maintenance should only be carried out by specialists. Faulty installation or maintenance can result in
the malfunctioning of the motor vehicle’s electronic systems. The vehicle manufacturer’s safety instructions must be
observed.
The vehicle’s electronics must only be worked on by an authorised service garage. We assume no liability for any
impairment of the vehicle’s electronics.
The method of attachment used must ensure that the device will remain properly attached, should the vehicle be involved
in a crash.
The power supply must be properly fused.
Using mobile phones without an external antenna in the proximity of the unit may cause picture and sound interference.
41
Page 4
Arrangement of controls
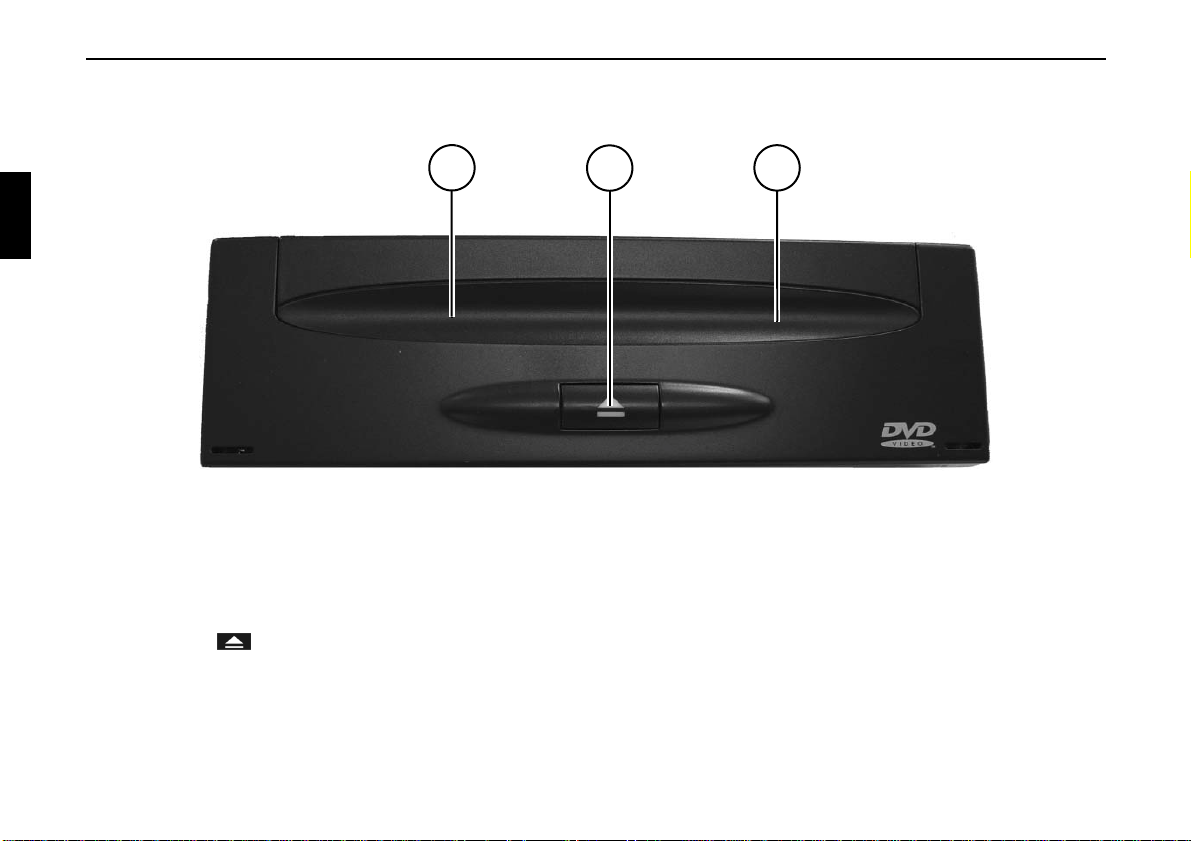
Arrangement of controls
1Cover
2 Eject button
3DVD slot
1
2
3
42
Page 5
1
2
3
4
5
6
7
8
9
10
11
12
13
14
15
16
17
18
19
20
21
22
23
24
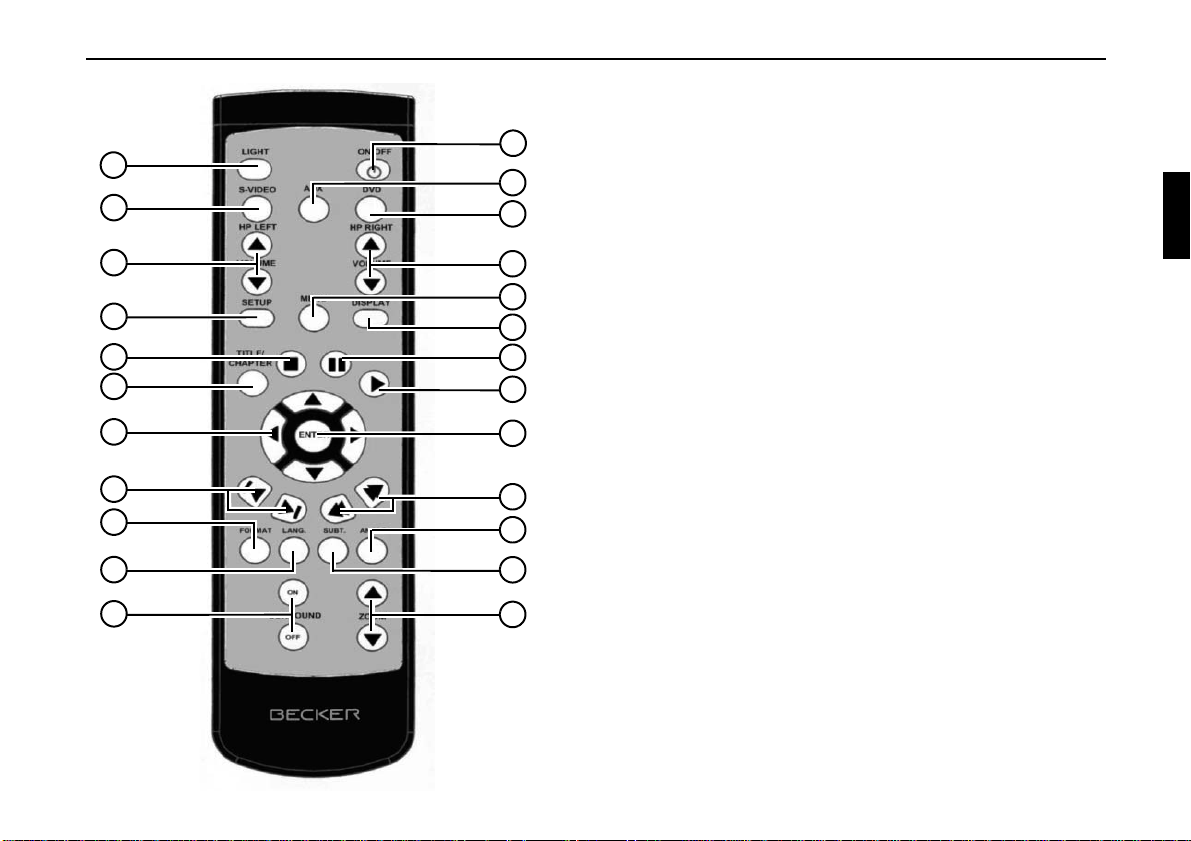
Arrangement of controls
1 /,*+7 button
2 69,'(2 function button
3 Volume buttons for left headphones
4 6(783 button
5 6723 button
6 7,7/(&+$37(5 button
Button for directly selecting chapters or scenes
7 Arrow buttons
8 Chapter or scene skip buttons
9 )250$7 button
10 /$1* button
Button for setting the audio language
11 6855281' buttons
12 212)) button
13 $8; function button
14 '9' function button
15 Volume buttons for right headphones
16 0(18 button
17 ',63/$< button
18 3$86( button
19 67$57 button
20 (17(5 button
21 Buttons for fast forward/reverse
22 $1*/( button
Button for setting the camera angle
23 68%7 button
Button for setting subtitles
24 =220 buttons
43
Page 6

Anti-theft device
Anti-theft device
Entering the code number
If the Rear Seat Entertainment System is
disconnected from the electrical supply
source, the anti-theft device prevents it
from being reconnected. After switching
on at the 212)) button on the remote
control, the following prompt
displayed.
The four-digit code must be entered
using the arrow buttons on the remote
control. The unit automatically enters
the serial number.
Example:
Code number 1372 (the code number
can be found on the enclosed CODE
CARD).
is
X Enter the individual digits using arrow
buttons and on the remote
control.
X Press the (17(5 button on the
remote control to confirm the digit
entered.
When all the digits have been entered
correctly, the unit switches on
automatically.
Note
It is important to store the CODE
CARD in a safe place outside the
vehicle to prevent unauthorised use.
The window stickers provided should
be attached to the windscreen/windows
inside your vehicle.
If an incorrect code number is entered,
the prompt :URQJ 6HFXULW\&RGH
WU\DJDLQ will be displayed.
If an incorrect code number is entered
three times in a row, the unit will display
„3OHDVH ZDLW“, and the unit will be
blocked for approximately 60 minutes.
A further incorrect entry blocks the unit
for another 60 minutes.
Attention:
The unit and the vehicle ignition must
remain switched on during the
60-minute waiting period. If the
ignition does not remain switched on,
the waiting period will begin again.
44
Page 7

General operation
Welcome
A Rear Seat Entertainment System has
been installed in your vehicle. This Rear
Seat Entertainment System consists of
the following components:
• the rear screen unit with video, AUX
and S-video ports as well as
headphone jacks
• the DVD player
• the headphones.
The various components cannot be
switched on and off individually.
The Rear Seat Entertainment System is
usually operated with the engine running
or with the ignition on.
Note:
If the ignition is switched off while the
unit is being operated, the message
“3RZHU RII LQ VHF“ appears on
the screen. At the end of these
15 seconds, the unit is switched off.
If within this period the 212))
button on the remote control is pressed,
operation of the unit can be extended by
15 minutes.
The unit can also be switched on, with
the ignition off, via the 212)) button
on the remote control. However, to
prevent the vehicle battery from
becoming discharged, the unit switches
off again automatically after 15 minutes.
General operation
Switching on the unit
X Press the 212)) button on the
remote control.
X Fold down the screen of the Rear Seat
Entertainment System.
X
1
2
4
5
3
1 Connection for left headphones
2 Connection for video game console
3 Audio connection for video game
console
4 Connection for S-video game console
5 Connection for right headphones
45
Page 8

General operation
Setting display
To obtain an optimum view from your
seat, it is possible to adjust the screen
within the adjustment range.
46
Page 9

DVD mode
Using the DVD player
The DVD player of the Rear Seat
Entertainment System can play standard
DVD videos corresponding to the NTSC
or PAL standards. The relevant
specifications can be found on the DVD
sleeve or on the DVD itself.
There are also DVD videos available on
the market that do not correspond to
these standards. These DVDs may cause
picture, sound or playback problems.
Note:
This DVD player is designed for use
with DVD videos, video CDs 2.0, audio
CDs and MP3 CDs. Laser discs,
unusually shaped or unusually bevelled
CDs or DVDs cannot be played.
Notes on DVDs
In order to ensure optimum DVD
playback, please note the following
points:
• Handle DVDs with care.
• Avoid scratching, leaving fingerprints
and dust on the DVDs
• Do not stick anything on the DVDs
and do not write on them.
• Clean DVDs occasionally with a
commercially available cleaning
cloth. Always wipe in a straight line
from the inside outwards, never in a
circular motion.
• After use, replace the DVDs into the
sleeve.
• Protect the DVDs from heat and direct
sunlight.
DVD mode
Note:
The regional code for your country was
set for the DVD player at the factory.
You will not be able to change this
regional code.
The DVD player is thus not suitable for
playing DVDs with other regional
codes.
47
Page 10

DVD mode
1 2 3
G
1Cover
2 Eject button
3DVD slot
Loading DVDs
X Open the cover by pressing the
button.
X Insert the DVD video.
The message “'LVF/RDGLQJ” appears
on the screen and the DVD player pulls
in the DVD.
X Close the cover.
For safety reasons, the cover may not be
left open while driving.
Note
DVD videos can be single-sided or
double-sided.
A single-sided DVD has a printed and a
non-printed side. The side you want to
play (non-printed side) must face
downwards when loading.
A double-sided DVD has two nonprinted sides. When loading the DVD,
the side that you want to play must also
face downwards. There is usually a
mark on the inside edge of the DVD to
indicate which side is which.
Ejecting DVDs
X Open the cover by pressing and
holding the button.
The DVD is ejected and the message
“1R'LVF” appears on the screen.
X Remove the DVD from the slot.
If you do not remove the DVD, the DVD
player will automatically retract it after
10 seconds.
X Close the cover.
G
For safety reasons, the cover may not be
left open while driving.
48
Page 11
DVD mode
Starting DVD playback
X Open the cover by pressing the
button.
X Push the DVD into the slot.
The DVD player pulls in the DVD and
starts playing it.
If a DVD has already been inserted into
the slot, playback is started with the
button on the remote control.
Pause function
X During DVD playback, press the
button on the remote control.
DVD play switches to pause. The
picture freezes.
In the status line that then appears, the
function mode, the current status, the
current title, the current chapter and the
remaining playing time of the film are
displayed (See “Status line” on
page 51).
X Press the button on the remote
control.
The DVD continues playing and the
status line disappears after a few
seconds.
Stopping DVD playback
X Press the button on the remote
control.
DVD playback is stopped.
After pressing the button on the
remote control, playback starts at the
point where it was previously stopped.
Scrolling through chapters/ scenes
X Depending on the desired scrolling
direction, press the or button
on the remote control.
button = The DVD player skips to
the next chapter or to the next scene.
button = The DVD player skips to
the previous chapter or to the previous
scene.
Fast forward / reverse
X During DVD playback, press the
or button on the remote control.
Fast forward / reverse is started and the
status line is displayed.
By repeatedly pressing the or
button, the fast forward/reverse
speed increases. It is possible to choose
between 4 times, 8 times, 15 times and
30 times the playback speed.
Fast forward/reverse operation stops as
soon as the button is pressed.
49
Page 12

DVD mode
Slow motion
X During DVD playback, press the
button on the remote control.
In the “Pause” state, press the
button.
Playback in slow motion is started.
By repeatedly pressing the button,
the slow motion speed increases. It is
possible to choose between 1/16 times,
1/8 times, 1/4 times and 1/2 times the
playback speed.
Slow motion operation stops as soon as
the button is pressed.
Selecting individual titles on
the DVD directly
If the DVD is subdivided into a number
of films, the films can be selected
directly. However, selection of the film
is only possible when playback has
stopped.
X Press the 7,7/(&+$37(5 button
on the remote control.
X Select the desired title number using
arrow buttons and on the remote
control.
X Press the (17(5 button on the
remote control.
Playback of the selected film begins.
Selecting chapters or scenes on the DVD directly
If the film is subdivided into chapters or
scenes, these can also be selected
directly. Chapters are selected during
playback or when the picture has been
frozen by the pause function.
X Press the 7,7/(&+$37(5 button
on the remote control.
X Select the desired chapter using arrow
buttons and on the remote
control.
X Press the (17(5 button on the
remote control.
Playback of the selected chapter begins.
50
Page 13

DVD mode
Function
mode
Status
Title
Chapter
Remaining
time
Status line
X During DVD playback, press the
',63/$< button on the remote
control.
Appearing now at the bottom edge of the
screen is the status line, which displays
the function mode, the title and chapter
details as well as the remaining playing
time of the film.
The status line is hidden again by
pressing the ',63/$< button again.
DVD menu
The DVD menu is the menu stored on
the DVD itself. It will differ depending
on the DVD and permits various actions
and settings such as, for example, the
direct selection of individual chapters.
Opening the DVD menu
X Press the 0(18 button on the remote
control.
The top level of the DVD menu will be
displayed.
Example of a DVD menu:
Selecting menu items from the DVD menu
X Select a menu item using arrow
buttons , , and on the
remote control.
X Press the (17(5 button on the
remote control.
This confirms the selection.
A DVD menu may include a number of
submenu items which can also be
selected using the arrow buttons and
confirmed with the (17(5 button.
51
Page 14

CD mode
CD mode
Listening to audio CDs
Notes on CD-R and CD-RWs
You can play CD-Rs (writeable CDs) on
this unit, but please comply with legal
restrictions. These restrictions may vary
from one country to another.
Depending upon the recording device
used to record the CD-R and / or the
CD-R itself, it may not be possible to
play some CD-Rs on this unit.
CD-Rs must be manufactured according
to the ”Orange Book” standard (not
applicable for MP3 CDs).
CD-RWs (rewritable CDs) cannot be
played on this unit.
Notes on copy-protected CDs
In some cases, problems may arise when
attempting to play copy-protected CDs,
such as long reading times or a total
inability to perform playback.
Note
Do not use 8 mm diameter CDs,
not even with a CD adapter.
Notes on compact discs (CD)
In order to ensure optimum CD
playback, please note the following
items:
• Handle CDs with care.
• Avoid scratching, leaving fingerprints
and dust on the CDs.
• Do not stick anything on the CDs and
do not write on them.
• Clean CDs occasionally with a
commercially available cleaning
cloth. Always wipe in a straight line
from the inside outwards, never in a
circular motion.
• After use, replace the CDs into the
sleeve.
• Protect the CDs from heat and direct
sunlight.
52
Page 15

CD mode
G
Loading audio CDs
X Open the cover by pressing the
button.
X Insert the audio CD into the slot with
the printed side upwards.
X Close the cover.
For safety reasons, the cover may not be
left open while driving.
The DVD player pulls in and loads the
audio CD. The message 'LVF/RDGLQJ
appears on the screen. After loading, the
unit automatically starts to play the
audio CD.
A list of tracks on the CD is then given
on the screen. The song being played is
highlighted. The track length is also
displayed.
Note
If the corresponding information for the
tracks included on the CD is not
available, only
Track 1
Track 2
etc. appears on the screen.
Ejecting audio CD
X Open the cover by pressing and
holding the button.
The audio CD is ejected and 1R'LVF
appears on the screen.
X Remove the audio CD from the slot.
If you do not remove the CD, the DVD
player will automatically retract it after
10 seconds.
X Close the cover.
G
For safety reasons, the cover may not be
left open while driving.
53
Page 16

CD mode
Starting audio CD playback
X Open the cover by pressing the
button.
X Push the CD into the slot.
The DVD player pulls in the CD and
starts playing it.
If a CD has already been inserted into
the slot, playback is started with the
on the remote control.
Pause function
X Press the button on the remote
control.
CD playback switches to pause.
Playback is interrupted.
X Press the button on the remote
control.
The CD continues playing.
Stopping CD playback
X Press the button on the remote
control.
CD playback is stopped.
After pressing the button again,
playback starts at the point where it was
previously stopped.
Track skip forwards/ backwards
X Depending on the desired track skip
direction, press the or button
on the remote control.
button = The DVD player skips to
the beginning of the next track.
button = The DVD player first skips
to the beginning of the current track and
in the next step to the beginning of the
previous track.
Fast forward / reverse
X During CD playback, press the or
button on the remote control.
The speed of fast forward/reverse is
8 times the playback speed.
Fast forward/reverse operation stops as
soon as the button is pressed.
54
Page 17

CD mode
Listening to MP3 CDs
General notes on MP3
The music that can be played when your
unit is in MP3 mode is generally
copyright-protected under applicable
international and national laws. In
several countries, the reproduction of
copyrighted material is not permitted,
even if only for personal use, without the
express prior consent of the copyright
holder. Please check the current
copyright laws for your country and
comply with them. These restrictions
naturally do not apply to your own
compositions and recordings, or for
recordings for which authorisation has
been obtained from the copyright
holder.
Creating an MP3 storage medium
• The maximum number of directories
per medium is limited to 255.
• Fixed and variable bit rates of 8 -
320 kbit/s and scan rates of 8-48 kHz
are supported.
• We recommend a bit rate of at least
160 kbit/s for compressing MP3 files.
It should be noted that with MP3 files
having a variable bit rate, the display
of the elapsed playing time may
deviate from real time.
• For further information about creating
MP3 files, please consult your dealer
or check on the Internet.
Notes on playing MP3 CDs
The individual directories can be
selected by pressing arrow buttons
and .
Loading MP3 CDs
X Open the cover by pressing the
button.
X Insert the MP3 CD into the slot with
the printed side upwards.
X Close the cover.
G
For safety reasons, the cover may not be
left open while driving.
55
Page 18

CD mode
The DVD player pulls in and loads the
MP3 CD. The message 'LVF/RDGLQJ
appears on the screen.
After loading, the unit automatically
starts to play the MP3 CD.
During playback, the name of the open
directory as well as the tracks in the
directory are displayed on the screen.
MP3 CDs are operated essentially in the
same way as audio CDs. Please read the
following:
• “Ejecting audio CD” on page 53
• “Starting audio CD playback” on
page 54,
• “Pause function” on page 54,
• “Fast forward / reverse” on page 54
and
• “Stopping CD playback” on page 54.
Selection of individual directories is
possible using the buttons and on
the remote control. The tracks in the
directories can be selected using buttons
and . In both cases the
selection must be confirmed with
(17(5.
56
Page 19

External sources
Video games
External sources, video games for
example, can also be connected to your
Rear Seat Entertainment System.
Connecting and playing video games
X Insert the game console cable into the
9LGHR connection underneath the
screen.
X Press the $8; button on the remote
control.
This selects the AUX operating mode.
Note:
With the AUX operating mode
selected, the buttons on the remote
control for operating the DVD player
are not available.
Some video games consoles have an
S-video connection permitting a higher
resolution.
Connecting and playing
S-video games
X Insert the S-video game console cable
into the connection with the same
name underneath the screen.
X Press the 69,'(2 button on the
remote control.
This selects the S-video operating mode.
Note:
With the S-video operating mode
selected, the buttons on the remote
control for operating the DVD player
are not available.
External sources
Other video sources
A video camera or a digital camera can
also be connected to your Rear Seat
Entertainment System.
Connecting and playing other
video sources
X Insert the cable of the device you want
to connect into the 9LGHR connection
underneath the screen.
X Press the $8; button on the remote
control.
This selects the AUX operating mode.
Note:
With the AUX operating mode
selected, the buttons on the remote
control for operating the DVD player
are not available.
57
Page 20

User settings
User settings
Opening / quitting User Settings menu
By calling up the user settings, it is
possible to adapt the settings below to
your personal requirements.
The arrangement of the user settings
options may vary, depending on the
function mode.
X In the DVD function mode, press the
6(783 button on the remote control.
The following menu appears on the
display:
Example:
If the unit’s function mode is set to CD,
MP3, AUX or S-video, only the
following options are available:
Press the (17(5 button on the remote
control to go to the particular submenus.
Press the 6(783 button to return to the
top menu level of the user settings.
If no entry has been made within a few
seconds, the menu closes automatically.
If some user settings options are not
supported by the DVD inserted, these
are depicted in grey letters.
58
Navigation within the user settings
menu is possible using arrow buttons
and on the remote control.
Page 21

User settings
Screen settings
Collected together under the menu item
6HWWLQJV are several functions with
which basic screen settings can be made.
X Highlight the menu item 6HWWLQJV us-
ing arrow button on the remote
control.
X Press the (17(5 button on the
remote control.
The submenu is opened.
X Select the desired function using
arrow button .
Setting the volume
With this function, the volume of the
two unit headphones can be set.
X In any function mode, press the
6(783 button on the remote control.
X Highlight the menu item 6HWWLQJV us-
ing arrow button on the
remote control.
X Press the (17(5 button on the
remote control.
X Highlight the function 9ROXPHULJKW
or 9ROXPH OHIW using arrow button
on the remote control.
The current value is displayed on the
screen.
X Select the desired volume using arrow
buttons and .
The selected volume is set.
59
Page 22

User settings
Adjusting brightness
With this function, the screen brightness
can be set to a value of your choice.
X In any function mode, press the
6(783 button on the remote control.
X Highlight the menu item 6HWWLQJV us-
ing arrow button on the
remote control.
X Press the (17(5 button on the
remote control.
X Highlight the menu item %ULJKWQHVV
using arrow button on the remote
control.
The current value is displayed on the
screen.
X Select the desired value using arrow
buttons and .
The selected brightness is set.
Adjusting colour
With this function you can set the colour
intensity of the screen.
X In any function mode, press the
6(783 button on the remote control.
X Highlight the menu item 6HWWLQJV
using arrow button on the
remote control.
X Press the (17(5 button on the
remote control.
X Highlight the menu item &RORU using
arrow button on the remote
control.
The current value is displayed on the
screen.
X Select the desired value using arrow
buttons and .
The selected colour value is set.
60
Page 23

User settings
Adjusting contrast
With this function you can set the screen
contrast.
X In any function mode, press the
6(783 button on the remote control.
X Highlight the menu item 6HWWLQJV us-
ing arrow button on the remote
control.
X Press the (17(5 button on the
remote control.
X Highlight the menu item &RQWUDVW
using arrow button on the remote
control.
The current value is displayed on the
screen.
X Select the desired value using arrow
buttons and .
The selected colour contrast is set.
Setting backlighting
With this function you can set the
backlighting of the screen.
X In any function mode, press the
6(783 button on the remote control.
X Highlight the menu item 6HWWLQJV us-
ing arrow button on the remote
control.
X Press the (17(5 button on the
remote control.
X Highlight the menu item %DFNOLJKW
using arrow button on the remote
control.
The current value is displayed on the
screen.
X Select the desired value using arrow
buttons and .
The selected value is set.
61
Page 24

User settings
Setting Day/Night mode
The Rear Seat Entertainment System is
able to measure the brightness in the
vehicle and adapt the backlighting of the
screen using the measurement results.
This option can be activated and
deactivated here.
X In any function mode, press the
6(783 button on the remote control.
X Highlight the menu item 6HWWLQJV us-
ing arrow button on the remote
control.
X Press the (17(5 button on the
remote control.
X Highlight the menu item 'D\1LJKW
using arrow button on the remote
control.
The options $XWR and 2II are available.
X Select the desired value using arrow
buttons and .
The setting is adopted.
Setting menu language
The Rear Seat Entertainment System
menu is currently available in five
languages. These are:
•German
•French
•Italian
•Spanish
• English.
X In any function mode, press the
6(783 button on the remote control.
X Highlight the menu item 6HWWLQJV
using arrow button on the remote
control.
X Press the (17(5 button on the
remote control.
X Highlight the menu item 0HQX
/DQJXDJH using arrow button
on the remote control.
The current language is displayed.
X Select the desired menu language
using arrow buttons and .
X Press the (17(5 button on the
remote control to confirm your
selection.
The selected menu language is set.
62
Page 25

User settings
Other settings
Language selection
In this function, it is possible to choose
the language in which the inserted DVD
is to be played.
A list of the available languages appears
on the screen. This list depends on the
particular DVD inserted. Example:
The current language is highlighted.
If the particular language is available in
several sound formats, the sound format
can also be selected from this menu
item.
Note
This function is only available if the
inserted DVD also supports multiple
languages and sound formats.
X In the DVD function mode, press the
6(783 button on the remote control.
X Highlight the menu item $XGLR/DQ
JXDJH using arrow button on the
remote control.
X Press the (17(5 button on the
remote control to confirm the
selection.
X Select the desired language using
arrow buttons and on the
remote control.
X Press the (17(5 button on the
remote control to confirm the
selection.
X Select the desired sound format for the
selected language using arrow buttons
and on the remote control.
X Press the (17(5 button on the
remote control to confirm the
selection.
The language and the sound format are
set.
Tip
This function can also be called up from
a DVD menu, if available, or using the
/$1* button on the remote control.
Note
The “DTS“ sound format cannot be
played by your Rear Seat Entertainment
System. It is therefore greyed out in the
list and cannot be selected.
If this sound format is selected via the
DVD menu of the inserted DVD, the
film will be played but there will be no
sound.
63
Page 26

User settings
Setting subtitles
In this function, it is possible to choose
whether subtitles should be displayed
during DVD playback, and the subtitle
language.
A list of the available subtitle languages
appears on the screen. Example:
The currently selected option is
highlighted.
Note
This function is only available if the
inserted DVD supports subtitles.
X In the DVD function mode, press the
6(783 button on the remote control.
X Highlight the menu item 6XEWLWOH
using arrow button on the remote
control.
X Press the (17(5 button on the
remote control to confirm the
selection.
X Select the desired option using arrow
buttons and on the remote
control.
X Press the (17(5 button on the
remote control to confirm the
selection.
The option is set.
Tip
This function can also be called up from
a DVD menu, if available, or using the
68%7 button on the remote control.
Setting viewing angle
Different camera perspectives are
provided on some DVD videos, and it is
possible to choose from these.
Note
This function is only available if the
inserted DVD supports different
camera perspectives.
X In the DVD function mode, press the
6(783 button on the remote control.
X Highlight the menu item $QJOH using
arrow button on the remote
control.
X Press the (17(5 button on the
remote control to confirm the
selection.
X Select the desired viewing angle using
arrow buttons and on the
remote control.
X Press the (17(5 button on the
remote control to confirm the
selection.
The viewing angle is set.
64
Page 27

User settings
Tip
This function can also be called up from
a DVD menu, if available, or using the
$1*/( button on the remote control.
Setting format/zoom
This function is appropriate for films in
wide screen format. This enables you to
hide the black bars at the top and bottom
edges of the picture or to reduce their
height.
X In any DVD function mode, press the
6(783 button on the remote control.
X Highlight the option )RUPDW=RRP
or )RUPDW using arrow button on
the remote control.
X Press the (17(5 button on the
remote control to confirm the
selection.
The currently selected format is
highlighted in the list.
X Select the desired format using arrow
buttons and on the remote
control.
X Select the desired zoom factor using
arrow buttons and on the remote
control.
X Press the (17(5 button on the
remote control to confirm your
selection.
The selected picture format and the
desired zoom factor are set.
Tip
It is also possible to call up this function
using the )RUPDW button on the remote
control.
Setting FM modulator
Note
The menu item is used for setting an
optional accessory device. At the time
of going to press this accessory unit was
not yet available.
It is possible to transmit audio
information from the Rear Seat
Entertainment System to your car radio
via an FM modulator.
X In the DVD function mode, press the
6(783 button on the remote control.
X Highlight the option )00RGXODWRU
using arrow button on the remote
control.
X Press the (17(5 button on the
remote control to confirm the
selection.
65
Page 28

User settings
Setting Default Settings
With this function, the unit can be reset
to the factory settings. All the settings
that you have made are reset to the
factory default settings.
X Press 6(783 on the remote control
for more than five seconds.
The unit is reset to the default settings.
The currently selected option is
highlighted.
X Select the desired option using arrow
button .
X Where appropriate, select the desired
transmission frequency using arrow
buttons and on the remote
control.
X Press the (17(5 button on the
remote control to confirm your
selection.
The selected option is set.
66
Tip
It is also possible to call up this function
using the menu item 'HIDXOW6HWWLQJV
in the 6(783 menu.
Page 29

Remote control
Battery replacement
The remote control includes two type
R03 1.5V batteries.
X Remove the cover of the battery
compartment on the back of the
remote control.
X Remove the dead batteries.
X Insert the new batteries.
Observe the polarity markings on the
batteries.
X Replace the cover on the battery
compartment.
G
Keep batteries away from children.
Consult a doctor immediately if a child
swallows a battery.
Do not dismantle or short-circuit
batteries. Do not throw them onto fires.
Dispose of discharged batteries in an
environmentally safe manner.
Remote control
Tip
Use only batteries of type R03 1.5 volt.
Rechargeable batteries are not suitable.
Remove all used batteries when
changing the batteries. Do not use new
batteries with old ones or batteries of a
different type. Leaking batteries can
damage the remote control.
If the remote control is not used for long
periods of time, the batteries should be
removed from the battery compartment.
67
Page 30

Headphones
Headphones
Using headphones
The AIR 1-AS cordless infrared (IR)
headphones provide undistorted audio
pleasure from audio signals in the rear
area of the vehicle, the signals being
transmitted from an infrared transmitter
in the screen control unit.
Depending on the system, optimum
audio transmission quality is only
ensured with direct and unobstructed
“intervisibility“ between the transmitter
and the headphones. If intervisibility is
interrupted or the distance between the
transmitter and the headphones is too
great, then interference may occur.
Switching on headphones
X Press the 212)) button on the
right-hand side of the headphones.
The headphones switch on and the LED
starts to illuminate.
Volume control
ON / OFF switch
Switching off headphones
X Press the 212)) button on the
right-hand side of the headphones.
The headphones switch off and the LED
extinguishes.
Note
If no signal is received by the
headphones for a period of several
minutes, they switch off automatically
to extend the life of the batteries.
68
Page 31

Headphones
Volume control
Setting the volume
X Turn the wheel on the right-hand side
of your headphones upwards to
increase the volume or downwards to
reduce the volume.
Battery replacement
X Turn the ear piece of the left head-
phone shell about 5° anticlockwise.
This unlocks the ear piece lock and the
ear piece can be removed.
The headphones contain two type R03
1.5V batteries.
X Open the battery cover using a
screwdriver or a coin.
X Remove the discharged batteries using
the ribbon.
X Insert the new batteries.
Observe the polarity markings on the
batteries.
X Close the battery covers.
X Fasten the ear piece. Place it on the
headphones appropriately and turn it
clockwise until the lock locks again.
G
Keep batteries away from children.
Consult a doctor immediately if a child
swallows a battery.
Do not dismantle or short-circuit
batteries. Do not throw them onto fires.
69
Page 32

Headphones
Tip
Use only batteries of type R03 1.5 volt,
which are suitable fur use and storage at
50 °C, e. g. Duracell or Energizer.
Remove all used batteries when
changing the batteries. Do not use new
batteries with old ones or batteries of a
different type. Leaking batteries can
damage the headphones.
If the headphones are not used for long
periods of time, the batteries should be
removed from the battery compartment.
Dispose of discharged batteries in an
environmentally safe manner.
70
Page 33

Keyword directory
AUX
(Auxiliary)
Connection for external audio signals.
Keyword directory
PAL
(Phase Alternation Line)
German standard for colour television.
Code number
A secret number that must be entered to
activate the unit.
DVD
(Digital Versatile Disc)
Digital storage medium for storing large
data volumes, e.g. films.
MP3
Special process for compressing audio
data (e.g. music).
NTSC
(National Television Standards
Committee)
The NTSC signal is a composite signal
that has been adopted from the television
and video industry in the USA and
Japan.
Regional code
Because of the regional codes, DVD
videos can only be played on DVD
equipment with the same code as the
>DVD. The Rear Seat Entertainment
System is set to the relevant national
code at the factory.
71
Page 34

Index
Index
$
Audio CD
AUX
%
Battery replacement
&
CD-R
CD-RW
Chapter selection line
Code number
Compact Disc (CD)
Connecting and playing
Copy-protected CDs
..........................................52
Ejecting
Fast forward / reverse
Loading
Pause function
Starting playback
Stopping playback
Track skip forwards/backwards
.......................................53
..................54
.......................................53
.............................54
.........................54
.......................54
..................................................71
Headphones
Remote control
.................................69
............................67
.................................................52
.............................................52
.......................51
.............................. 44, 71
..........................52
Other video sources
S-video game
Video game
.................................57
.....................57
...............................57
.........................52
..54
'
Double-sided DVD
DVD
........................................... 48, 71
Direct selection of chapters
or scenes
Direct selection of
individual titles
Double-sided
Ejecting
Fast forward / reverse
Loading
Pause function
Scrolling through chapters/
scenes
Single-sided
Starting playback
Stopping playback
DVD menu
DVD playback
Starting
Stopping
DVD player
(
Ejecting
Audio CD
DVD
MP3 CD
.......................................48
.......................................48
..........................................49
........................................51
........................................49
............................................48
...........................48
......................................50
............................50
...............................48
..................49
.............................49
.................................48
.........................49
.......................49
......................................49
................................ 45, 47
....................................53
......................................56
)
Fast forward / reverse
Audio CD
DVD
MP3 CD
+
Headphones
Battery replacement
Setting the volume
Switching off
Switching on
/
Loading
Audio CD
DVD
MP3 CD
0
MP3
...................................................71
MP3 CD
Ejecting
Fast forward / reverse
Loading
Pause function
....................................54
............................................49
......................................56
................................ 45, 68
....................69
......................69
...............................68
...............................68
....................................53
............................................48
......................................55
............................................55
.......................................56
..................56
.......................................55
.............................56
72
Page 35

Index
Starting playback
Stopping playback
1
Notes
Compact Disc (CD)
Copy-protected CD
DVD
............................................47
MP3 CD
NTSC
2
Optimum DVD playback
Other settings
Format/zoom
Language selection
Subtitles
Viewing angle
Other video sources
3
PAL
...................................................71
Pause function
Audio CD
DVD
MP3 CD
Picture problems
......................................55
................................................71
.......................................64
............................................49
......................................56
.........................56
.......................56
.....................52
.....................52
..................47
....................................63
...............................65
......................63
.............................64
..........................57
....................................54
...............................47
Playback problems
5
Regional code
Remote control
Battery replacement
6
Screen settings
Backlighting
Brightness
Colour
Contrast
Day/Night mode
Menu language
Volume
Screen unit
Setting display
Single-sided DVD
Slow motion
Sound format
Sound problems
Starting playback
Audio CD
DVD
MP3 CD
Stopping playback
Audio CD
............................ 47, 71
..................................67
..................................59
................................61
....................................60
..........................................60
.......................................61
........................................59
........................................45
..................................46
......................................50
....................................63
................................47
....................................54
............................................49
......................................56
....................................54
............................47
....................67
..........................62
............................62
.............................48
............................................49
DVD
MP3 CD
Switching on
Headphones
Unit
Switching on the unit
8
User settings
9
Video games
Volume
......................................56
.................................68
..............................................45
......................................58
.....................................57
...................................... 59, 69
........................45
73
Page 36

Technical data
Technical data
DVD player
• Installation angle:
horizontal up to 45° upward and 10°
downward
vertical up to +-15°
• Output:
Headphones 2 x 2 x 100 mW
• Output resistance:
S-video input (Video_Y) 75 Ohm
S-video input (Video_C) 75 Ohm
Headphones 32 Ohm
• Input resistance:
Video input (AUX) 75 Ohm
Audio input 4700 Ohm
• Total amplitude
with synchronisation:
video input (AUX) 1 V
S-video input (Video_Y) 1 V
• Video amplitudes for white picture:
S-video input (Video_Y) 700 mV
FBAS-video input 700 mV
• Amplitude:
audio input 1.0 V
• Line cross section:
min. 0.75 mm²
• Supply voltage:
12 V
pp
pp
pp
pp
RMS
• Total current consumption:
Standby mode: < 1.6mA
Play mode: < 2.1A
• Operating temperature:
-20 to +65 °C
• Playable CDs and DVDs:The only
CDs that can be used are those that
comply with DIN EN 60908. The use
of 8 cm CDs with an adapter is not
recommended
• Playable media:
Media Standard
CD-DA, CD-text Red Book
CD-ROM,
CD-ROM XA
CD-R Orange Book
CD-Extra Blue Book
DVD-ROM DVD-Book:
DVD-R DVD-Book:
DVD-RW DVD-Book:
Yellow Book
DVD-ROM
(Part1 ver.1.02)
DVD-R for General
(Part1 ver.2.0)
DVD-RW
(Part1 ver.1.1)
Screen unit
• Viewing angle
horizontal +-65 °
vertical up to 65° upward and up to
40° downward
• Operating temperature:
-30 to +65 °C
Headphones
• Range:
at least 7 m
• Frequency response:
20 Hz - 18 kHz
• Battery life with
Duracell batteries:
at least 35 hours
• Operating temperature:
-20 to +50 °C
74
Page 37

127,&(
4
Dear Customer,
In conformance with current EC guidelines, any person may operate this unit.
This unit conforms to the current valid European or harmonised national standards. This
designation is your guarantee that the unit conforms to the applicable specifications
regarding electromagnetic compatibility. This means that interference with other electrical/
electronic devices caused by the unit, or interference with this unit caused by other
electrical/electronic devices is largely prevented.
• The EC - type-approval mark (e1) issued by the Federal Office
for Transport (KBA) in accordance with European Directive 95/
54/EC governing the - EMC - of motor vehicles authorises
installation and operation of the unit in motor vehicles
(classes M, N and O).
e
1
02359
• With regard to the following European standards, the EMC
requirements that apply specifically to this unit have been met:
- EN 55013
- EN 55020
75
Page 38

76
 Loading...