

Becker Transit 6SL EU Plus, Transit 6S EU, Ready 6L EU Plus, Professional 6SL EU, Active 6S EU Plus Instruction Manual
...Page 1

OPERATING GUIDE
Page 2

>>> CONTENTS
Contents
Contents 2
24-month warranty 6
Warranty 6
Safety instructions 7
The Navigation device 9
Operating manual contents 9
Use of the product 9
Navigation 9
Images* 9
Telephone (selected models) 10
Unpacking the Navigation device 10
Checking the contents 10
Overview of functions 11
Complaints 13
Handling the packaging 13
Description of the device 13
The basic unit 13
Cable for power supply from cigarette
lighter 14
Intelligent charger cable (Smart)
for power supply via cigarette
lighter (depending on the model) 14
Battery 15
USB connection cable 15
Unit bracket 15
Accessories 15
Mains power supply unit 15
Overview of the scope of Delivery 16
Overview of the navigation device 17
General operation 19
Maintenance and care 19
Battery quality declaration 20
Display quality declaration 20
Start-up 20
Power supply 20
Using the battery 21
Connection for the cigarette lighter 21
Connection to the mains outlet 22
Connecting to power supply 22
TMC antenna (depending on the
model) 22
GPS antenna 22
Unit antenna 22
Cable for vehicle integration
(depending on model, optional) 23
Cable for rear view camera
(depending on the model, optional) 23
Memory card 23
Inserting the memory card 24
Ejecting the memory card 24
Unit bracket 24
Fitting the unit bracket 24
On the windscreen 25
Adjusting the unit holder’s position 26
Attaching the Navigation device 26
Removing the Navigation device 26
Devices with magnetic holders 26
Switching the Navigation
device on/off 26
Switching on 27
Switching off 27
Basic information about the touch
screen 28
Operation 28
Calibration (model dependent) 28
Basic information about the menus 29
The main menu 29
Entries made with the entry menu 30
Entering characters 30
Accepting proposals 30
Scrolling through the lists 31
Special characters and accent
marks 31
Other character sets 32
Entering numbers 32
Switching between upper and
lower case: 32
Deleting characters 33
Inserting spaces 33
The back button 33
Content Manager 33
Installing the Content Manager 34
Starting the Content Manager 34
Transferring pictures 36
Faults 36
Download manager
(model dependent) 36
Map Update 37
Speed camera detector update 38
Resuming downloads 38
Installing updates 39
2
Page 3

CONTENTS >>>
Transferring pictures 39
Faults 39
Navigation Mode 40
What is navigation? 40
Selecting Navigation 41
Home address 41
Smart Guess 42
Last destinations list 42
The destination list 42
Icons used 43
Operating the last destinations list 43
Start with existing destination 43
Scrolling through stored
destinations 43
Displaying or editing a destination 43
Personal destinations 44
Contacts 44
Selecting a destination from Personal
destinations 44
Editing Personal destinations 45
Selecting a destination from Contacts 45
The New destination menu 46
Layout of the New destination menu 47
Enter address 47
Select Point of Interest 47
Travel Guide (model dependent) 47
Select on map 47
Enter geo-coordinates 47
Route planning 47
Entering the address 47
Selecting a country 48
Selecting an address and starting
route guidance 48
Entering address by speech
(selected models) 53
Speech Dialogue System
(selected models) 54
Explanation of symbols 54
Objective 54
Route 55
More... 55
Live POI Search (model dependent) 55
Points of interest 55
Point of interest in the vicinity 56
Point of interest near to an address 57
Point of interest near to destination 58
POI on route 58
Entering a point of interest directly 58
Calling special destination phone
number
(depending on the model) 59
Additional point of interest
information 59
Travel Guide (model dependent) 59
Selecting a destination from the map 60
Coordinate entry 61
Route planning 61
Simulation of the route 63
Creating a new route 63
Editing a route 64
Optimising a route 65
Navigation settings 65
The Map view button 66
Auto zoom 67
Select POI categories 68
Selecting Info box data fields 68
3D city view 69
The Route overview button 70
The Guidance info button 70
The Route options button 72
Selecting the vehicle profile
(depending on model) 72
Truck and mobile home functions
(depending on model) 73
Setting truck profiles 74
Selecting vehicle category
and name 76
Selecting the route type 76
Time-dependent route guidance 77
Avoiding particular types of road 77
The TMC or Traffic button
(model dependent) 77
The Traffic Button (model dependent) 78
The Voice guidance button 78
Setting the Voice 79
Setting the Volume 80
The Warnings button 80
Setting Driver alerts 81
Setting environmental zones
(depending on model) 82
Truck warnings
(depending on model) 82
Setting Speed info 83
The Blocked roads button 84
The Vehicle data button 85
3
Page 4

>>> CONTENTS
The Format button 86
The Time button 86
The Reset button 86
Traffic announcements using TMC
(depending on the model) 87
Live Traffic – Traffic Announcements
via Data Connection
(model dependent) 87
Displaying traffic messages
on the map 88
Using TMC or Live-Traffic 88
Reading a message 89
Taking announcements into
consideration when calculating routes 90
Automatic recalculation 90
Manual recalculation 90
The map display 91
Calling up the map display 91
Structure of the map display 91
Map display without route guidance 91
Map display with route guidance 91
The Information box 92
Split screen with route guidance 93
Route guidance with arrow display 94
Lane Assistant Pro 3D
(model dependent) 94
Map display with Junction view 94
Tunnel view 95
Using the map display 95
Repeating the last announcement 95
Changing the announcement volume 96
Map zooming 96
Moving the map 97
Map orientation 97
The Route overview 98
SituationScan 99
The detour assistant 99
The Park Assistant 99
The departure assistant 99
Map display options 100
Displaying the whole route 100
Move route (model-dependent) 101
Selecting alternative routes 102
Change route options 103
Canceling route guidance 103
Entering/deleting a stopover 103
Blocking route temporarily 104
Setting day/night display 105
Displaying current position
(Where am I?) 105
Entering the destination 106
Skipping a destination 107
Supplementary functions for trucks and
mobile homes (selected models only) 108
Feedback after route calculation 108
Zooming in on the map 108
Warnings with planned route 108
Warnings without planned route 109
Show route 109
Other additional functions
(only selected models) 110
Display height profile 110
Telephone mode 111
Calling up the telephone mode
(only selected models) 111
Telephone menu (only selected
models) 112
Dialing a number 112
Phonebook 113
Call list 114
Icons used 115
Scrolling through the call list 115
Dialing an available number 115
Displaying or editing entries 115
Lists loaded from cell phone 116
Connecting Bluetooth® telephones 116
Calling up a device list 116
Automatic connection 117
Searching for cell phones 118
Connect new devices 118
Connecting a mobile phone 119
Disconnecting a connected
telephone 119
Telephone calls 119
Establishing a call 119
Accepting a call 120
Ending a call 120
During a call 121
Bluetooth settings
(model dependent) 122
Bluetooth: on/off 122
Telephone settings 122
Automatic connection 122
4
Page 5

CONTENTS >>>
Automatic call acceptance 122
Telephone volume 123
Updating the phonebook 123
Bluetooth® name 123
Data settings / Bluetooth Tethering
(model dependent) 124
Audio Out settings
(model dependent) 124
Tools 125
Travel Guide (model dependent) 125
Rear View camera 125
Displaying Rear view camera
(depending on the model) 125
Image viewer* 125
The image viewer menu 126
Selecting an image 126
Enlarging the image 127
Rotating the picture 127
Displaying image information 127
Slide show 128
Settings 128
Where am I? 128
Traffic forecast
(depending on model) 128
Country information 129
Blocking a section of the road
permanently 130
Trip computer
(depending on model) 131
Settings 133
Selecting system settings 133
The system settings menu 133
Operation 133
Selection options 133
Closing the settings menu 133
The individual menu items 134
Battery 134
Automatic on/off 135
Day/night display 136
Brightness 136
Design by day 136
Design by night 137
Setting the colour 137
Language 138
Keyboard layout 138
Sounds 138
Rear view camera
(depending on the model) 138
Screen animations 139
Driver profiles (depending on model) 139
Renaming driver profile 140
Deleting driver profile 140
Driver profile Pro
(model dependent) 141
Service information 141
Factory settings 142
Calibration (model dependent) 142
Wi-Fi® settings (model dependent) 143
Technical terminology 144
index 146
Model overview and technical s
pecifications 149
NOTICE 151
EU Declaration of Conformity 151
Disposal of the unit 152
Disposal of the battery 153
Duty to supply information according to
battery legislation (BattV) 153
Removing the battery 153
The information and data contained in
these documents are subject to change
without prior notice.
No part of these documents may be
duplicated or transmitted for any
purpose whatsoever without express
written permission of United Navigation
GmbH. All technical information,
drawings etc. are subject to copyright
law.
© Copyright 2015, United Navigation GmbH
All rights reserved.
The Bluetooth® word mark is a
registered trademark owned by
Bluetooth SIG, Inc. and any use of such
marks by United Navigation GmbH is
under license.
Wi-Fi® is a registered trademark of the
Wi-Fi Alliance.
5
Page 6

>>> WARRANTY
Warranty
24-month warranty
The company United Navigation GmbH,
Zeppelinstraße 41, 73760 Ostfildern,
Germany, provides a world-wide,
24-month warranty (battery: 6 months)
for BECKER units, beginning on the day
of delivery to the final customer (buyer).
Within the framework of the warranty,
functional defects will be eliminated
free-of-charge, provided that these can
be shown to be the result of material or
manufacturing faults and this shall be effected either by elimination of the fault or
by provision of a new unit, at the discretion of the manufacturer. Warranty
claims must be registered by the buyer
immediately after defects are discovered
and must be accompanied by the initial
buyer’s purchase contract.
The warranty expires after 24 months
(battery: 6 months); neither warranty
claims nor fulfilment shall effect an extension of the warranty period.
Faults resulting from improper handling,
incorrect installation of the unit, improper
noise suppression of the vehicle, static
charge or mechanical damage are excluded from the warranty.
The warranty is invalidated in the case of
repairs or tampering on the part of the
buyer or unauthorised third parties.
Repairs may only be performed by persons and service centres expressly authorised by the manufacturer or by the
manufacturer himself.
This warranty does not affect or
restrict the legal warranty rights of
the buyer.
6
Page 7

SAFETY INSTRUCTIONS >>>
Safety instructions
¤ Safety instructions
• Use of the device is only permitted if the traffic conditions are suitable and you are absolutely sure that its use presents
no risk, distraction or inconvenience to you, your passengers or other road users.
Traffic laws and regulations will apply in each and every case. Destinations may only be entered when the vehicle is
stationary.
• The navigation system is merely an aid, data/information may in select cases be incorrect. The driver must decide in each
situation by him- or herself if he or she will follow the directions. No liability will be assumed for incorrect directions
provided by the navigation system. Imprecise or incorrect directions may be provided due to changing traffic patterns or
deviations in data. Therefore, you must always observe the actual road signs and traffic regulations. In particular, the
navigation system must not be used as an orientation aid at times of poor visibility.
• The device must only be used for its intended purpose. The volume of the navigation system should be adjusted so that
noises external to the vehicle are still well audible.
• Turn the unit off immediately if a defect occurs (e.g. emission of smoke or odors).
• For reasons of safety and security, the device must only be opened by a professional. In case of needed repair please
consult your dealer.
• Navigation devices from Becker could contain magnets. Do not bring them near magnetic data carriers (notebooks) or
cards (EC cards, credit cards etc.). These could get damaged or be rendered unusable if brought into contact. Magnets can
impair the function of cardiac pacemakers! Persons with cardiac pacemakers should not carry the device to close to their
bodies.
7
Page 8

>>> SAFETY INSTRUCTIONS
• It is forbidden to exceed the supply voltages (Volts) specified for the mains adapter, the motor vehicle charging adapter
and the product. In case of non-observance, the product or the charger may be damaged, or the battery may explode.
• Do not open the product or the battery under any circumstances. No modifications of the product are permitted, any such
modification leads to the loss of the operating permission.
• Only use original BECKER accessories. This way it is ensured that all relevant provisions will be met and that health risks
and damages to the product are avoided. Dispose of the used product or the battery according to the legal regulations in
effect.
• Improper use excludes all warranties! The safety instructions are also valid for any original BECKER accessories.
• Allowed temperature range: -20 °C – 60 °C storage / 0 °C – 45 °C operation
8
Page 9

The Navigation device
Operating manual contents
Use of the product
THE NAVIGATION DEVICE >>>
Navigation
This operating manual contains the
description of your Becker navigation
equipment.
This manual contains descriptions for
different model versions in a single
document. Therefore, some of the
functions described here might not be
available for your equipment under
certain circumstances.
All pictures are similar.
This product is a high performance PND
(Personal Navigation Device) for use in
vehicles. Protect the product and the
accessories from moisture and dirt.
The use of the GPS = Global Positioning
system eliminates the tedious process
of looking in street maps.
The receiver antenna integrated into the
product allows constant access to the
navigation services outside buildings.
Within buildings, it is currently not
possible to access any navigation
functions. When using in vehicles, it
might not possible to receive sufficent
GPS data depending on the installation
position of the Navigation device.
Images*
The Navigation device has a Picture
Viewer with a lot of image display
functions.
*depending on model, must be activated via the Content Manager
9
Page 10

>>> THE NAVIGATION DEVICE
Telephone (selected models)
Your Navigation device is equipped with
Bluetooth® wireless technology. Via
Bluetooth®, you may connect to a cell
phone equipped with Bluetooth®
wireless technology.
Your Navigation device can then be used
as a very comfortable hands-free unit.
You also have the option to read out the
address book or phonebook of the cell
phone and to read any received short
messages.
Unpacking the Navigation device
Note:
Your Navigation device is delivered in a
stable packaging. If the packaging or its
contents show the signs of serious
damages, you must not continue to
unpack the product. In such case, please
contact your dealer.
Checking the contents
Before you start using the Navigation
device, the scope and condition of the
contents must be thoroughly checked
(see also page 16).
> Unpack the contents carefully and
check them thoroughly.
10
Page 11

Overview of functions
:standard
- :not available
:optional
THE NAVIGATION DEVICE >>>
Navigation system
active.6s CE / EU
BE H00
BE B95 / BBF96
ready.6l EU plus
BE H10
active.6s EU plus
active.6sl EU plus
BE H40
BE H50
professional.6sl EU
BE H02
transit.6s EU
BE H50
transit.6sl EU plus
TMC
Becker OneShot Pro Voice control – – – – –
Free speed camera detector for 1 year (download product)
––––
–
Lifelong speed camera detector (download product) – –––––
Lifelong live speed camera detector – – –
Driver warnings – – – –
Bluetooth hands-free – –
On-board computer -
Environmental zones
Truck & Camper Navigation Pro – – – – –
Display height profile – – – –
BECKER RouteMove –
ADAC Camping Guide
MARCO POLO Travel Guide
Lane assistant Pro 3D
Connection for reversing camera – – – – –
WLAN interface – – –
Live Traffic (Bluetooth and/or WLAN Tethering) – –
Live POI Search (Bluetooth and/or
WLAN Tethering)
– –
Becker Connect / Download Manager – – –
Track recording – – – –
EU Truck Driving Ban Calendar –––––
Power saving mode –
11
Page 12

>>> THE NAVIGATION DEVICE
:standard
Navigation system
- :not available
: optional
BE 2B00
BE 3B00
active.5s EU
BE 2B30
active.7s EU
BE 3B30
BE 2B10
active.5sl EU
BE 3B10
BE 2B40
active.7sl EU
BE 3B40
BE 3B40
transit.7sl EU
TMC
Becker OneShot Pro Voice control – – – – –
Free speed camera detector for 1 year (download product)
–––
Lifelong speed camera detector (download product) – –
Lifelong live speed camera detector –––––
Driver warnings ––––
Bluetooth hands-free –––––
On-board computer
Environmental zones
Truck & Camper Navigation Pro – – – –
Display height profile – – – –
BECKER RouteMove
ADAC Camping Guide
MARCO POLO Travel Guide
Lane assistant Pro 3D
Connection for reversing camera –––––
WLAN interface – –
Live Traffic (Bluetooth and/or
WLAN Tethering)
Live POI Search (Bluetooth and/or
WLAN Tethering)
––
––
Becker Connect / Download Manager – –
Track recording ––––
EU Truck Driving Ban Calendar – – – –
Power saving mode –––––
12
Page 13

THE NAVIGATION DEVICE >>>
Complaints
In case of complaints, please consult
your dealer. The equipment may be sent
directly to United Navigation in its
original packaging.
Handling the packaging
Keep the original packaging in a dry
place, at least for the warranty period.
Note:
The disposal must be performed in a
professional manner, according to the
country-specific regulations. The
packaging must not be combusted.
Depending on the country of delivery, it
might be possible to return the
packaging to the dealer.
Description of the device
The navigation device consists of the
basic unit and the accessories included in
the scope of delivery.
For descriptions of the individual parts,
see:
• "Overview of the scope of Delivery" on
page 16
Note:
The basic unit and accessories must not
be opened or modified in any way.
The basic unit
The basic unit consists of the complete
electronic unit:
• Integrated antenna
• a TMC receiver for receiving traffic
messages (depending on the model),
•Touchscreen
• an integrated loudspeaker
• a microphone (dependingon the
model).
On the side of the unit, there are also
various connections and ports.
You will find more details of the unit
under:
• "Model overview and technical
specifications" on page 149
13
Page 14
>>> THE NAVIGATION DEVICE
Cable for power supply from cigarette lighter
This cable allows the unit to be connected up to the car's cigarette lighter.
The power supply must satisfy the
following requirements:
• DC current 12/24 volts
1 amps
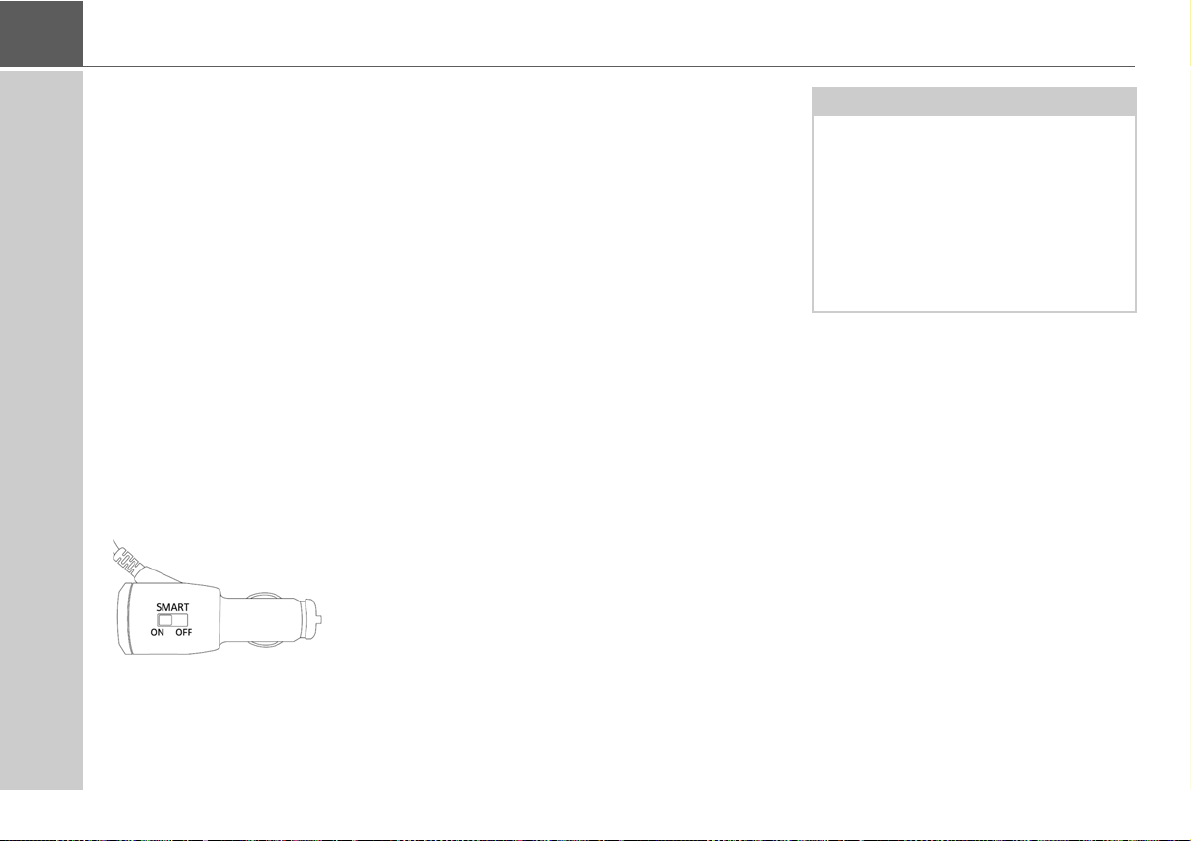
Intelligent charger cable (Smart) for power supply via cigarette lighter (depending on the model)
This cable allows the unit to be connected up to the car's cigarette lighter.
The power supply must satisfy the following requirements:
• DC current 12/24 volts
1.3 amps
The cable detects whether the engine is
running or switched off and switches the
power supply to your navigation system
on or off accordingly.
The function is switched on when the
switch is on the
The function is switched off when the
switch is on the
This cable also allows the function
"Automatic on/off", described on
page 135, without switched cigarette
lighters:
• For cars with unswitched cigarette
lighters.
• Charger cable detects whether the engine is running or not and switches the
power supply to the navigation system
on or off accordingly.
If the function is switched off, the
navigation system is always supplied
with power when there is voltage on the
cigarette lighter.
position On.
position Off.
Note:
The function can be switched off on
vehicles with switched vehicle voltage
sockets. It does not work on vehicles
with 24V vehicle voltage.
On vehicles with an automatic start/
stop feature, your navigation device
might always be switched off when the
engine is stopped.
This cable allows the function "Automatic
on/off", described page 135, to also be
used for vehicles without switched cigarette lighters.
14
Page 15

THE NAVIGATION DEVICE >>>
Battery
When depleted, the integrated
rechargeable battery can be recharged
by connecting the Navigation device to
the power supply.
For this purpose, connect the unit via a
car power adapter to a 12/24 V socket in
a vehicle or via the optional mains power
supply unit to the 230 V mains.
Note:
You can charge the Navigation device
via the car charger cable included in the
scope of delivery or via the optionally
available mains power supply unit.
When the Navigation device is
connected to a PC, it is supplied with
power via the PC and does not consume
battery power.
USB connection cable
With the USB connection cable provided,
it is possible to connect the Navigation
device to a standard PC with a USB
interface. The integrated flash memory
of the navigation device and a micro SD
card that may eventually be inserted can
then be addressed by the PC like a
removable storage device.
Note:
Switch the navigation device completely
off, see "Devices with magnetic holders"
on page 26, before connecting the navigation device to the computer.
Unit bracket
The Navigation device can be mounted in
the vehicle using the unit bracket.
Accessories
Mains power supply unit
This power supply allows connection of
the Navigation device to a mains outlet.
15
Page 16
>>> OVERVIEW OF THE SCOPE OF DELIVERY
1
2
3
4
3
5
2
4
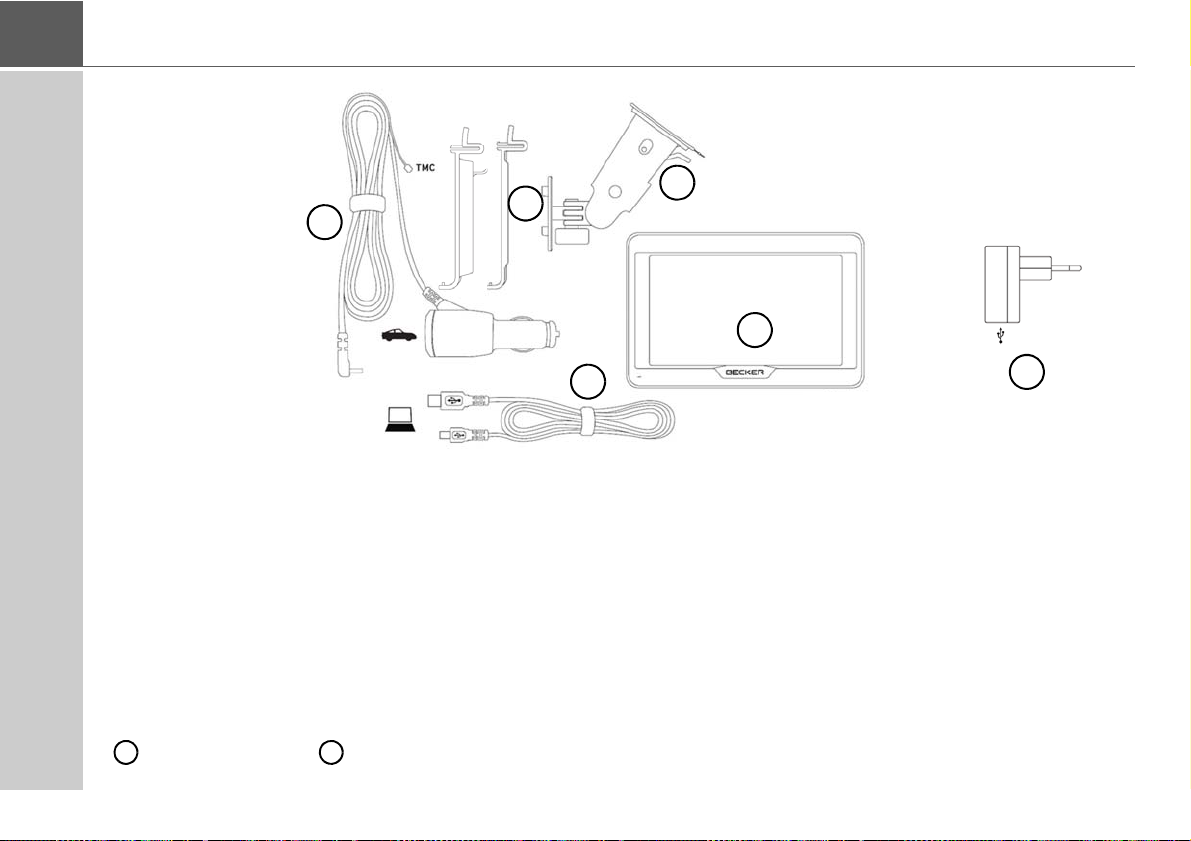
Overview of the scope of Delivery
Scope of delivery
1 Basic device – PND (Personal Navigation Device)
2 USB connection cable
3 Unit holder with carrier plate (the design depending on the
model)
4 Cable for power supply via the vehicle cigarette lighter
(12/24 Volt) with integrated TMC-antenna (depending
on the model)
5 Micro USB mains charger (selected models)
In the case of devices with magnetic holders, the carrier plate
and car adapter cable form one unit.
16
Page 17
OVERVIEW OF THE NAVIGATION DEVICE >>>
1
2
3
4
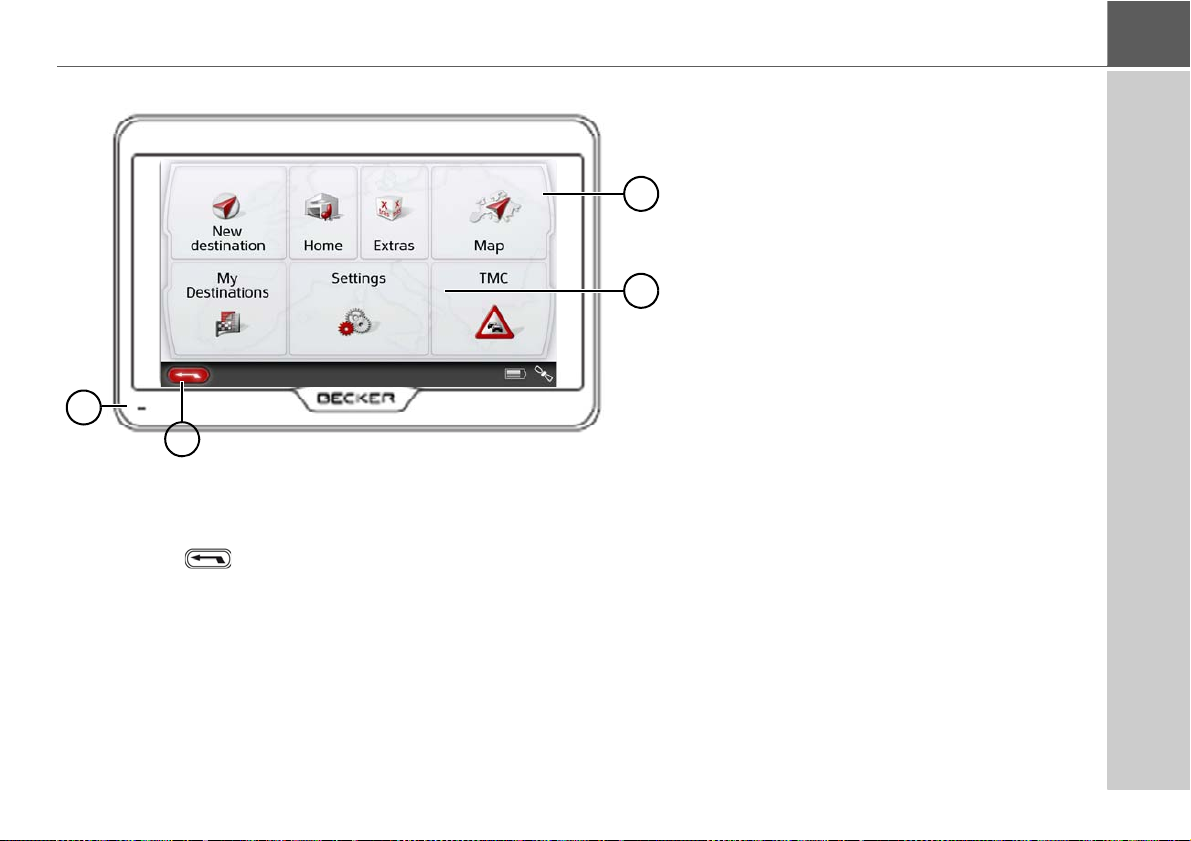
Overview of the navigation device
Front of unit with controls and displays
1 Back button
Model dependent: either on the left bottom side of the
screen or in the left top corner of the housing.
Press = Back function in most applications
Press and hold = Open the main menu
2 Touch screen showing the main menu selected
3 Touch screen key
Press = activates the corresponding key command
4 Microphone (depending on the model, sometimes in the
right top corner, too))
17
Page 18
>>> OVERVIEW OF THE NAVIGATION DEVICE
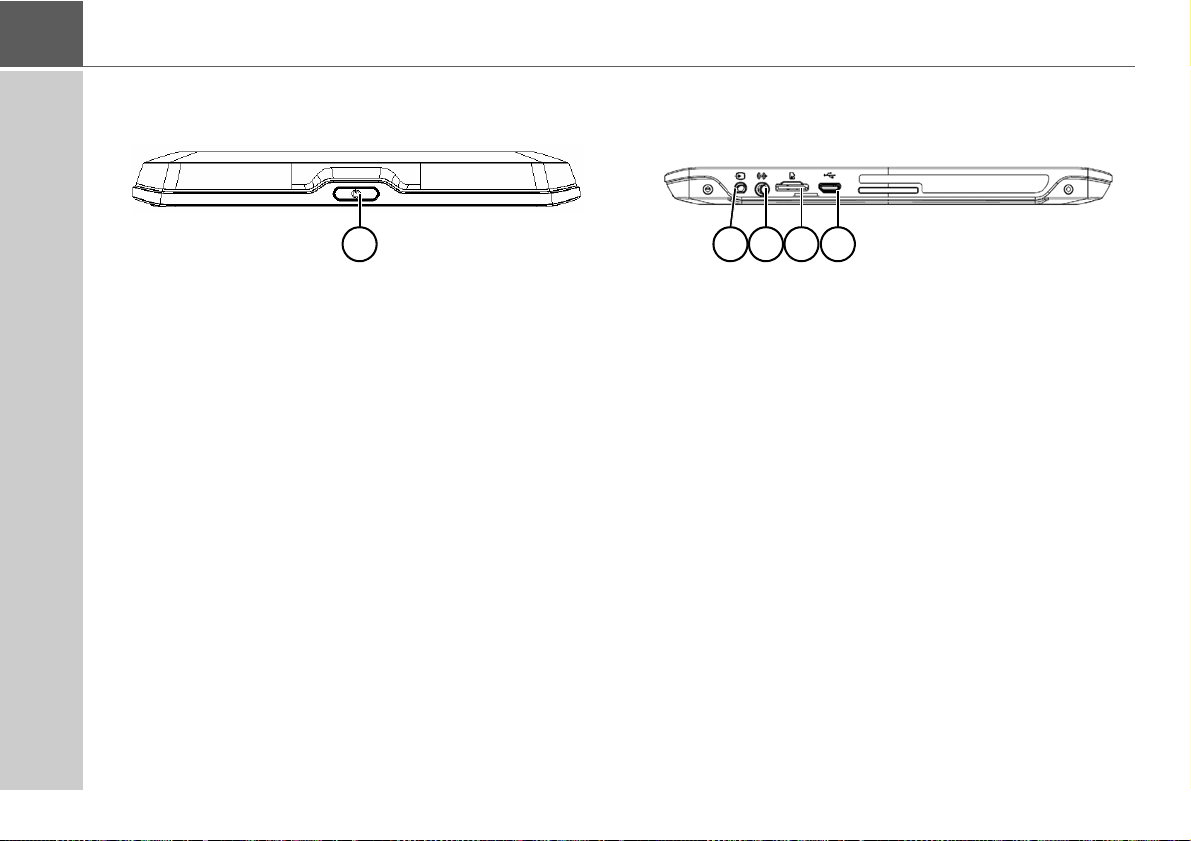
1 2 345
Model dependent, the arrangement of the connections can differ on the bottom side of the device.
1 ON/OFF switch
(model dependent)
Underside of the unit
2 Slot for Micro SD card
3 Mini USB connection / connection for power supply
4 Connection for reversing camera
5 Connection for vehicle integration
18
Page 19

General operation
Maintenance and care
The unit is maintenance-free.
For proper care, a commercially
available cleansing fluid for electrical
devices may be applied using a soft
damp cloth.
¤ Danger!
Danger to life by electrocution.
Always switch off the unit and
disconnect the mains power supply
unit before cleaning the unit, supplied
components, or accessories.
Note:
Do not use any aggressive or abrasive
substances or cloths which may
damage the surface.
A micro-fibre cloth is particularly
suitable for the display.
The unit must not be exposed to water.
Your mobile navigation system was
designed and manufactured with great
care and should be treated with equal
care. You will enjoy your mobile navigati on s yst em f or a lon g ti me t o co me i f you
observe the recommendations listed in
the following:
• Protect your mobile navigation unit
and the accessories from water and
moisture. If your unit has been
exposed to moisture, switch it off
immediately and disconnect the power
supply. Allow to dry at room
temperature.
• Do not operate your mobile navigation
system in a dusty or dirty environment
and do not store it in such an
environment.
• Do not store your mobile navigation
system in hot environments. High
temperatures can shorten the service
life of electronic components in your
unit, damage the rechargeable
batteries and cause certain plastics to
warp or melt.
GENERAL OPERATION >>>
• Do not store your mobile navigation
system in cold environments. During
operation, when the unit warms up to
operating temperature, moisture may
form internally, causing damage to
electronic components.
• Do not drop your mobile navigation
system unit, protect it from shocks and
do not shake it. Improper handling can
damage components within the unit.
• Never use corrosive or aggressive
chemicals, cleaning solutions or
aggressive detergents for cleaning.
All the above information applies equally
to the mobile navigation system, the
rechargeable battery, the mains charging and car power adapters as well as all
accessories. Should one of these parts
not work properly, please contact your
authorised dealer.
19
Page 20

>>> GENERAL OPERATION
Battery quality declaration
The capacity of the rechargeable battery
in your mobile navigation system
decreases with every charging/
discharging cycle. Improper storage at
excessively high or low temperatures
may also cause a gradual deterioration
of capacity. Consequently, the operating
time may be substantially reduced even
in the case of a fully charged battery.
Display quality declaration
In some cases, for technical reasons, a
few discoloured dots (pixels) may be
visible on the display. Some pixels may
also appear brighter or darker. However,
such instances do not represent a
product flaw.
Start-up
Once the Navigation device has been
unpacked and checked for damage, the
unit can be started up. The individual
start-up steps are:
• connect to power supply.
•switching on the unit.
• ensuring antenna reception (if
navigation is desired)
Power supply
Note:
You can charge the Navigation device
via the car charger cable included in the
scope of delivery or via the optionally
available mains power supply unit.
When the Navigation device is connected to a PC, it is supplied with power via
the PC and does not consume battery
power.
20
Page 21
GENERAL OPERATION >>>
Using the battery
The internal power supply is via the
integrated rechargeable battery. The
rechargeable battery is maintenancefree and does not require any particular
care.
You are alerted by a warning message
when the battery should be recharged.
After the alert, the device can still be
used for approximately 10 minutes
before switching off automatically.
Note:
Note that if the battery is completely
discharged, it may take up to a minute
before the device can be switched on
again.
Note:
In the event of a defective battery,
please contact your authorised dealer.
Please do not attempt to remove the
battery yourself.
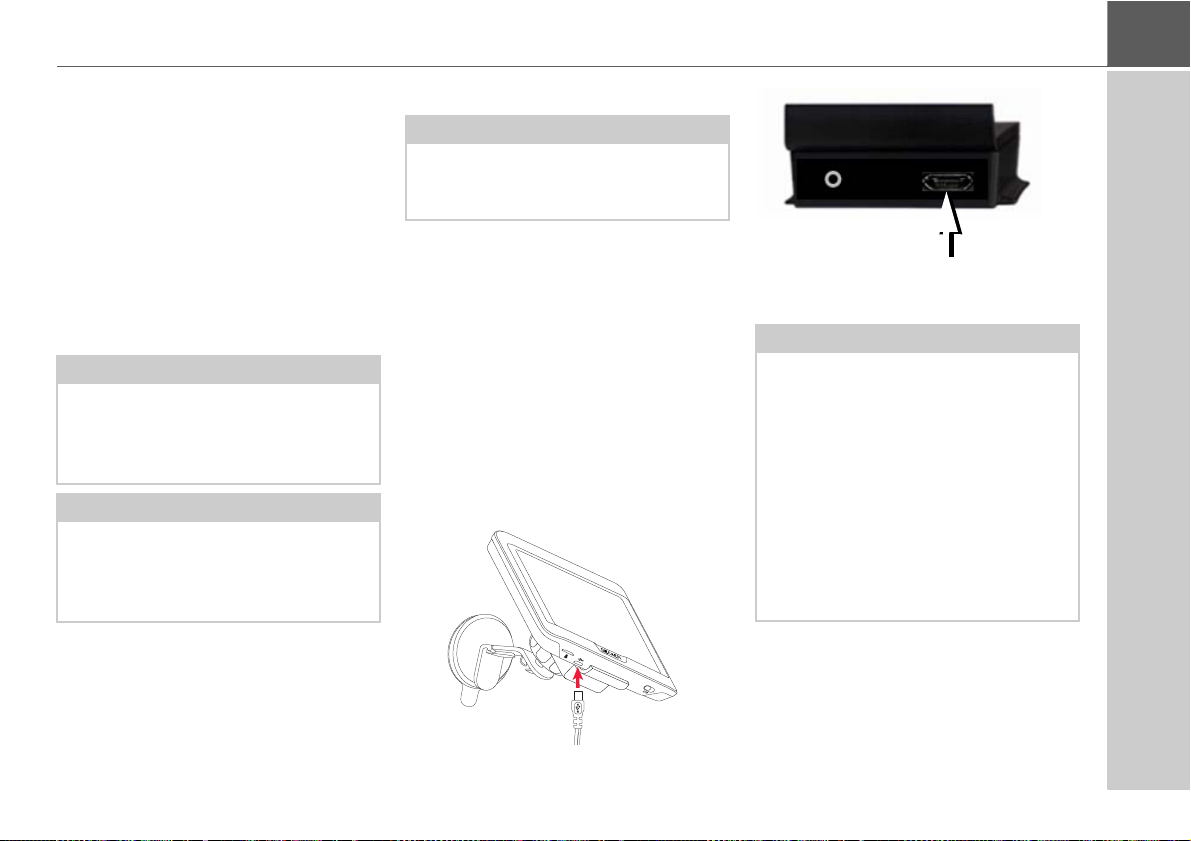
Connection for the cigarette lighter
Note:
If the cigarette lighter has recently been
used and is still hot, wait until the lighter
socket has cooled down.
Connect the power supply via the vehicle
battery and the cable provided for the
cigarette lighter as follows:
> Grasp the connector of the connection
cable and insert it gently without force
into the connector socket of the
navigation device up to the stop, or in
the case of a device with an active
cradle, on the underside of the
supporting plate. (Model dependent,
this step is not required on navigation
devices with magnetic holders)
> Insert the adapter into the cigarette
lighter.
Note:
When the engine is switched off, the
power supply slowly discharges the
vehicle battery via the cigarette lighter!
Do not therefore operate the Navigation
device for long periods with the engine
switched off.
To receive TMC messages (depending
on the model), the power supply must
be connected to the supporting plate in
the case of a device with an active
cradle.
21
Page 22

>>> GENERAL OPERATION
Connection to the mains outlet
¤ Danger!
Make sure that your hands are not wet
and that the power supply unit is dry.
Only connect the power supply unit to
a permissible mains power supply.
Connecting to power supply
Connection to the public mains grid is
achieved using the optionally available
mains power supply unit. Please
proceed as follows to connect to the
mains:
> Hold the connector and push it all the
way into the connecting socket in the
Navigation device without using
excessive force.
> Insert the plug of the power supply unit
into the socket.
Note:
Remove the power supply unit when
not using the Navigation device for
longer periods of time.
TMC antenna (depending on the model)
The supplied TMC antenna is integrated
into the cable for power supply.
The TMC antenna runs in parallel with
the the cigarette lighter cable in the
delivered condition.
If the TMC reception is poor, you must
remove the cable of the TMC antenna
from the cable for the cigarette lighter.
Note:
The TMC antenna must be installed in
such a way that it does not distract you
while driving.
GPS antenna
Unit antenna
The GPS antenna is integrated into the
housing.
Note:
The integrated GPS antenna is not
suitable for use in vehicles with antiglare windows (metalised thermoglass or metal foil, indicated by the
window label - SIGLA SOL, SIGLA
CHROM, SIGLA, KOOL-OF, SUNGATE,
etc.) and vehicles with fine-meshed
heating wires in the windows.
22
Page 23
GENERAL OPERATION >>>
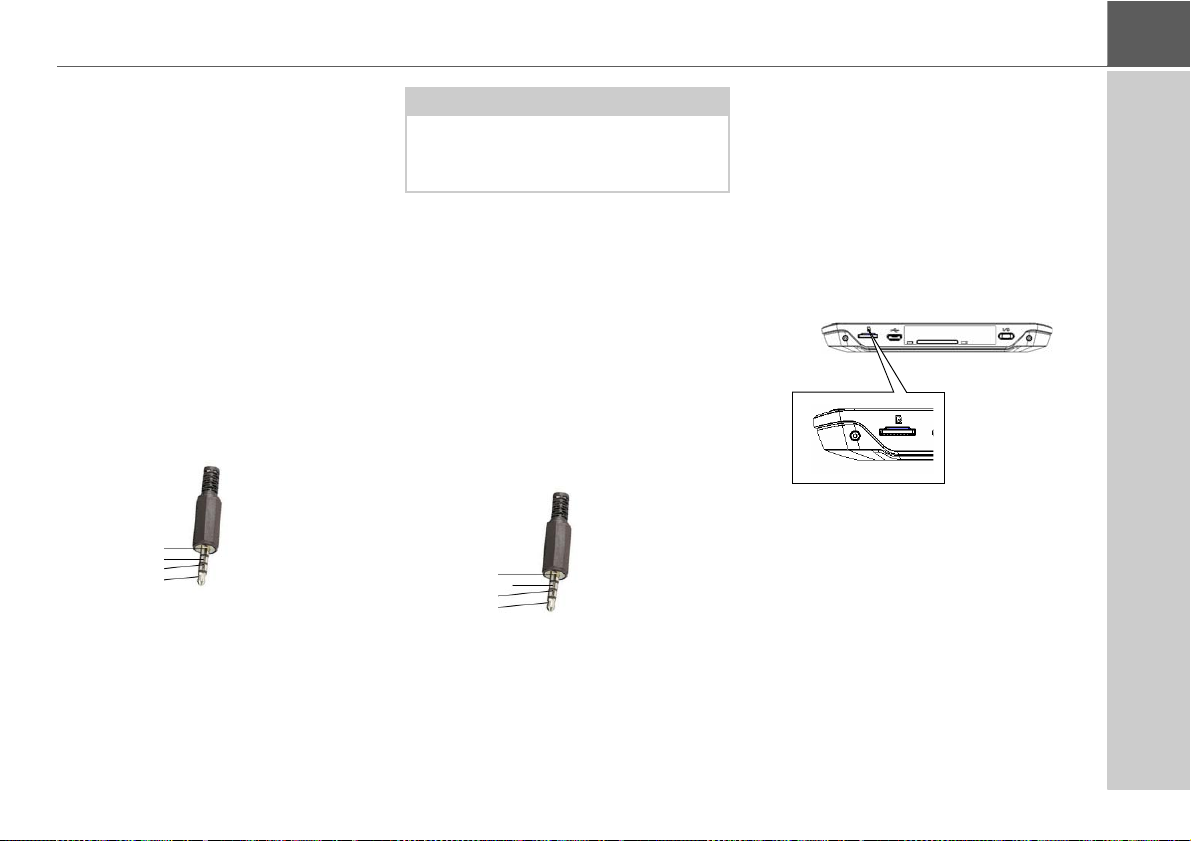
GND
Video
Audio-R
Audio-L
Cable for vehicle integration
(depending on model, optional)
With a 4-pin 3.5mm jack cable you can
integrate your Navigation device
seamlessly into your vehicle.
• connect your Navigation device to the
phone mute function of your audio
system. If the cable is connected
correctly, your audio system will mute
the car radio during navigation
announcements.
• connect your Navigation device to your
audio system for output of the audio
signal.
Telephone Mute:
> Plug the cable into the designated 3.5
socket on the underside of the device.
GND
Audio-R
Audio-L
Note:
Once the cable is connected, the
loudspeaker of the basic device is
switched off.
Cable for rear view camera (depending on the model, optional)
You can connect your rear view camera
to your navigation device using a 4-pin
2.5mm AV cable. Insert the cable into the
socket provided on the back of the basic
unit, also see page 18.
You can make the necessary settings in
the chapter “Rear View camera” on
page 125.
Memory card
Your Navigation device has a slot for a
micro SD memory card.
As the map data is stored in an internal
memory on the Navigation device, the
slot for a micro SD memory card is used
for updates and for viewing images.
The memory card can also be used for
supplementing the map data.
The card slot is located on the bottom
side of the device. The card slot is
equipped with a spring-actuated locking
and ejector mechanism.
23
Page 24

>>> GENERAL OPERATION
Inserting the memory card
> Remove the memory card from its
packaging without touching or soiling
the contact bar.
> Hold the memory card so that the
contact strip is facing towards the rear
of the unit.
> Guide the memory card into the card
slot.
> Exert a little pressure and slide the
memory card into the card slot until it
snaps in.
Ejecting the memory card
The card slot ejects the card so that you
can pull it out with two fingers.
> Use your finger to gently press the
memory card against the spring force
into the card slot and then release it.
The card is ejected.
> Remove the memory card and place it
in the packaging while ensuring not to
touch contact bar.
Unit bracket
The Navigation device can be attached
directly to the windscreen with the unit
holder.
Note:
The Navigation device and unit bracket
must not be exposed to long periods of
direct sunlight. Temperatures inside the
vehicle of +70 °C and higher may
damage parts of the bracket.
Fitting the unit bracket
Note:
Fasten the unit holder such that your
field of vision is not impaired when the
Navigation device is installed and
ensure that the unit is outside the
deployment area of the airbag.
Ensure that the electrical connection
cable does not hamper you from
accessing the vehicle's controls.
Clean the attachment surface on the
windscreen to ensure that it is clean and
free of grease. Do not use greasy or
soapy cleaning agents.
24
Page 25
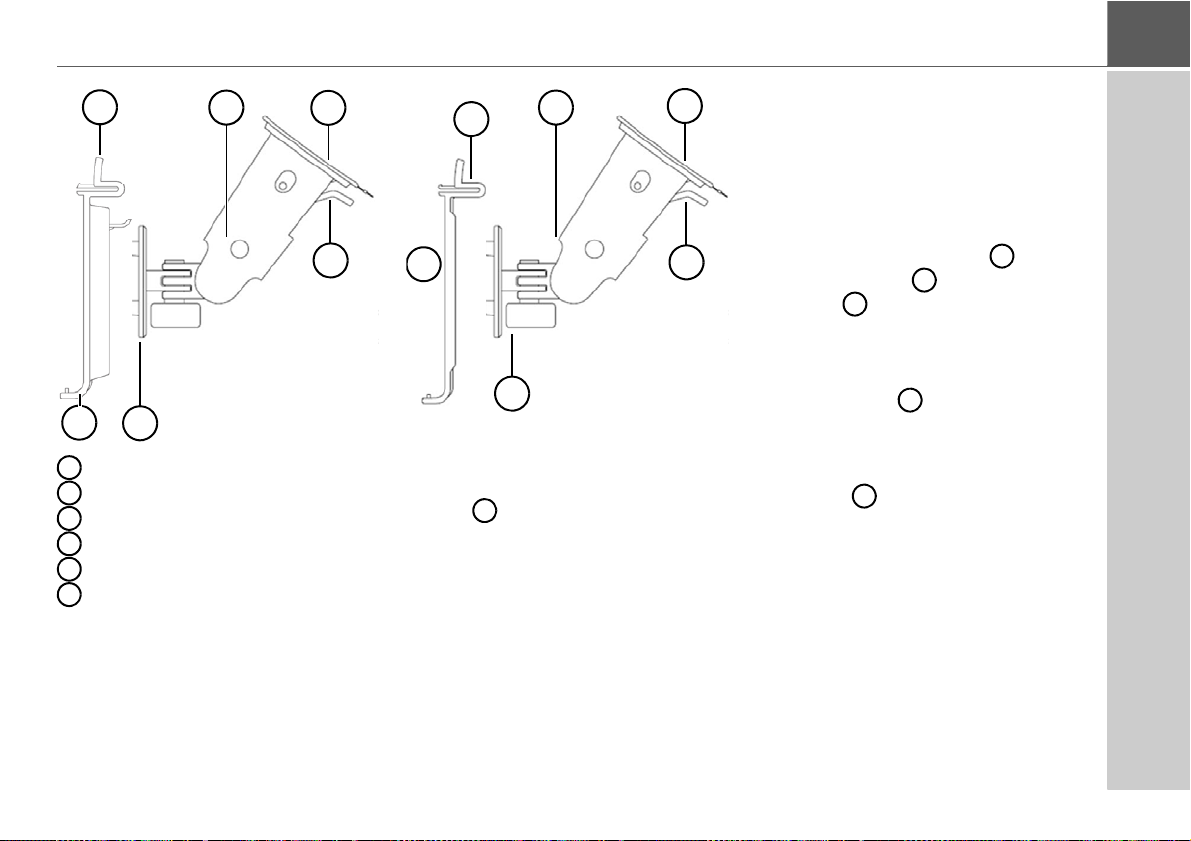
Suction surface
2
7
4
3
1
6
12346
7
4
1
6
3
2
7
74213
3
Base
Lever
Fastening screw
Carrier plate
Release button
GENERAL OPERATION >>>
On the windscreen
The unit holder can be attached directly
to the windscreen using the suction
mechanism.
> Press the carrier plate onto the four
retaining lugs of the unit holder.
> Select a suitable spot to attach.
>
Loosen the fastening screw slightly.
> Press the base with its suction
surface against the windscreen.
Turn the unit holder such that the
carrier plate is positioned roughly in
the desired viewing direction.
> Press the lever down.
The holder has attached itself firmly to
Similar to figure, on devices with
magnetic holders no unlocking button is
present .
the windscreen. It can now be adjusted
with precision. In order to remove it,
operate the lever again.
25
Page 26
>>> GENERAL OPERATION
456
64566767622
Adjusting the unit holder’s position
> Loosen the fastening screws and
until the carrier plate can be
moved without using excessive force.
> Move the carrier plate to the
required position and hold it in this
position.
> Tighten the fastening screws and
sufficiently so that the Navigation
device is held securely in place when
the vehicle is in motion.
Attaching the Navigation device
> Position the Navigation device with the
attachment point on the bottom of the
housing, onto the carrier plate .
> Without using excessive force, press
the Navigation device onto the carrier
plate . The Navigation device locks
into place.
Removing the Navigation device
Press the button on the top of the
carrier plate . This unlocks the
Navigation device which can be removed
from the carrier plate.
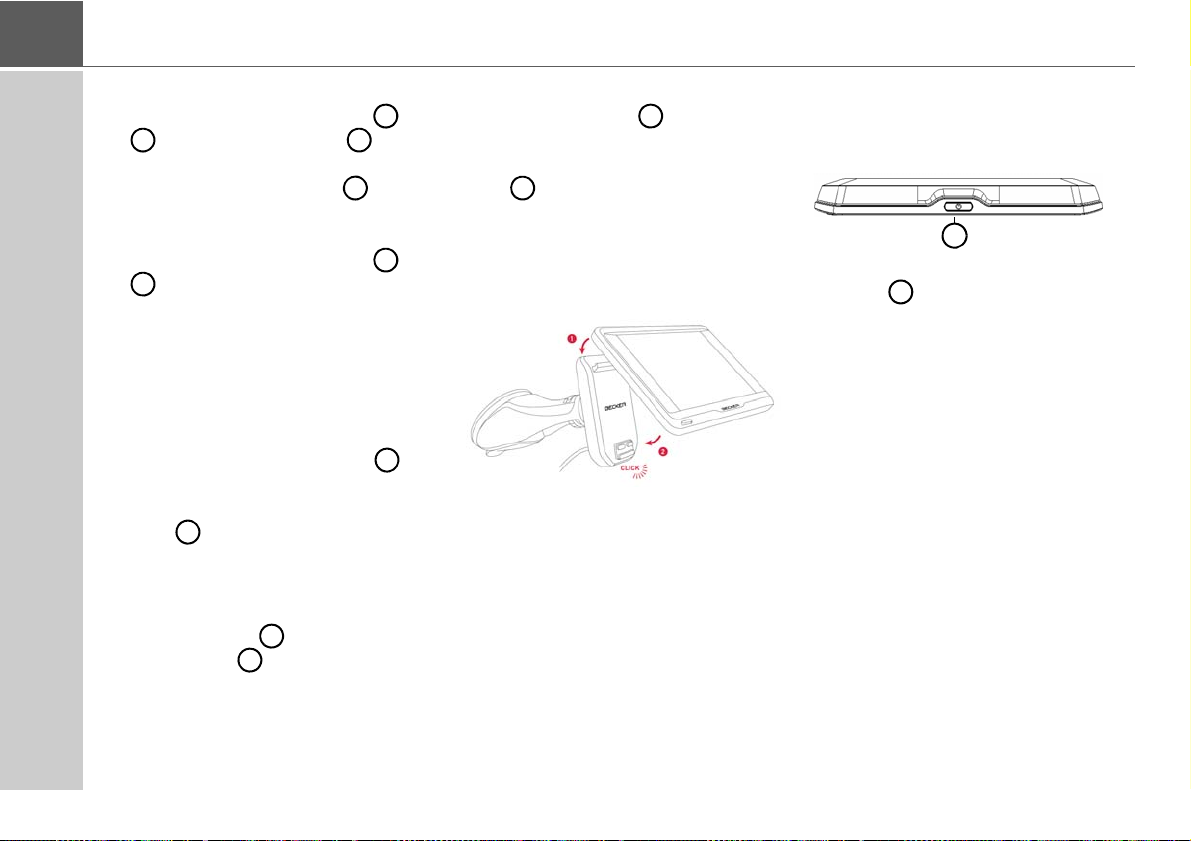
Devices with magnetic holders
The unlocking button is not present.
First place the navigation device with the
upper mounting point onto the carrier
plate and fold down the navigation
device. The magnet holds the navigation
device securely on the carrier plate. To
remove the navigation device, first take it
off from the carrier plate at the bottom.
Switching the Navigation device on/off
With the button you can switch the
device off, on or to the sleep mode.
26
Page 27
GENERAL OPERATION >>>
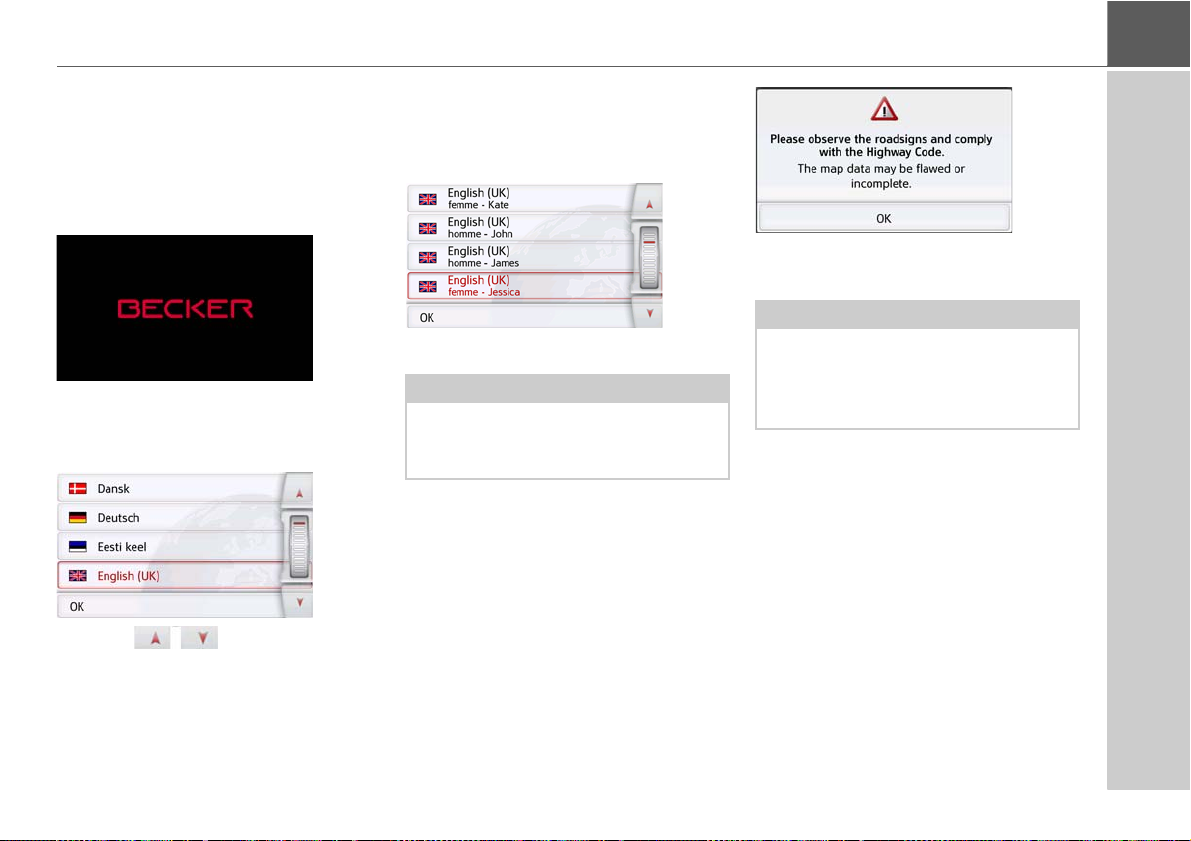
Switching on
> Press the button on the top of the
Navigation device.
The unit is switched on. The
manufacturer's logo appears on the
touchscreen.
When the Navigation device is started for
the first time, the language selection is
displayed automatically.
Using the buttons or the scroll
wheel, it is possible to scroll through the
list in the direction of the relevant arrow.
> Press the button for the required
language.
> The selection is confirmed by pressing
OK.
> Then select the desired voice.
Note: for models with TTS
Voices with a (TTS) tag support the textto-speech function (e.g. announcing
roads and reading out text messages).
A short example announcement is given.
> Confirm your selection by pressing the
OK button.
The following prompt appears shortly
afterwards:
> If you agree to the request contained in
this prompt, press the
Note:
Use of the Navigation device is only
permitted in accordance with the
national road traffic regulations
applicable at the time.
OK button.
Switching off
You can switch the unit off at any time.
> Press the button on the top of the
Navigation device.
The Navigation device switches to sleep
mode.
> Press the switch on the top of the
navigation device for longer than
3seconds to finally switch it off.
27
Page 28

>>> GENERAL OPERATION
Note:
We recommend that you place the
Navigation device in sleep mode in the
event of short interruptions to operation
(of up to a week).
This significantly reduces the switch-on
time and the Navigation device finds the
satellites required for navigation much
faster.
If route guidance was active when sleep
mode is activated, it is automatically
resumed if the Navigation device is
switched back on again within approx.
4hours.
If the device cannot be switched off
anymore or no longer works reliably, it
is possible to switch off the device
completely by pressing the button on
the top for longer than 7 seconds.
Basic information about the touch screen
The Navigation device is fitted with a
touch screen.
Note:
To ensure that the display's surface is
not damaged, you may only touch it with
your fingers or a blunt, non-smearing
object.
Operation
When you touch a button on the touch
screen, the button in question is briefly
shown outlined in red to confirm the
selection.
If you touch a button that is not active at
the moment, a short signal tone sounds.
Calibration (model dependent)
A calibration can only be carried out on
devices with resistive display, devices
with capacitive display do not have to be
calibrated.
If the touch screen responds
inaccurately, a calibration must be
carried out.
The calibration function is started from
the menu (see also page 142).
28
Page 29

GENERAL OPERATION >>>
2
1
1
2
2
1
1
211
Basic information about the menus
During operations, you are assisted by
various menus and entry windows.
The main menu
The top menu level is the main menu.
The individual applications are started
from the main menu. The main menu
differs in terms of content and graphical
representation; an example graphic is
only shown here.
You will find information about the individual applications in the corresponding
main chapters.
In addition to the individual applications,
the main menu also contains further
information and operating options.
You can tell whether a telephone is
already connected by the symbol on the
Phone button.
Telephone connected
Telephone not connected
The satellite symbol in the main menu or
status line (model-dependent) shows
you whether there is currently GPS
reception or not.
GPS reception
No GPS reception
If route guidance is already active, the
current destination address and a button
for cancelling route guidance will be
displayed between the two rows of
buttons.
Press the button to cancel route
guidance to the displayed destination
directly in the main menu.
29
Page 30
>>> GENERAL OPERATION
Entries made with the entry menu
Some applications require entries to be
made via the entry menu. The entry
menu is operated in a similar way to a
keypad.
The keyboard layout can be switched
between ABC and QWERTZ, see page
“Keyboard layout” on page 138
The character entered on the keypad is
displayed in the top line of the entry
menu. The central area is used to enter
characters. Help functions are provided
in the right line. Descriptions of how to
operate the menu are provided below.
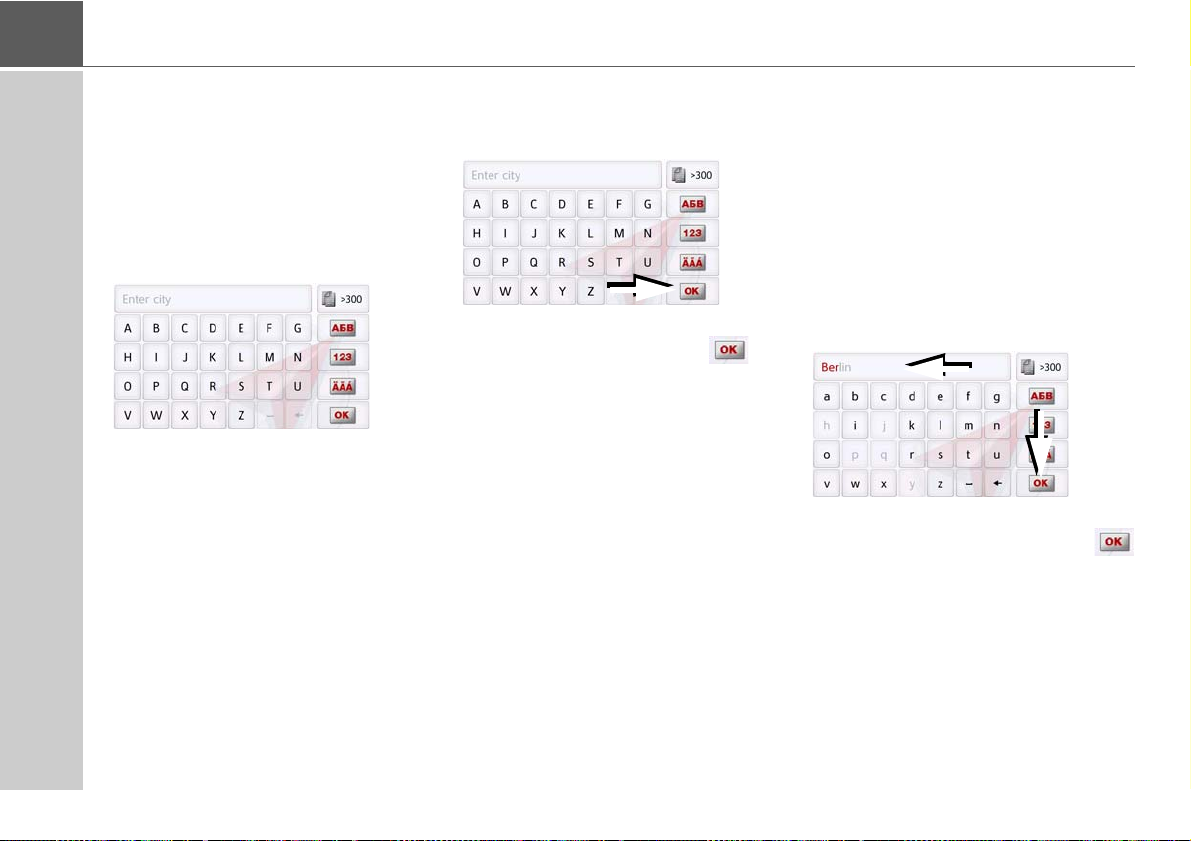
Entering characters
Characters are entered by pressing the
keys in the central area.
Once the entry is complete, the process
is concluded by pressing the key
and the entry passed on to the
Navigation device for processing.
When a navigation destination is
entered, the Navigation device compares
the data with the stored data.
Only those letters that are still possible
area vailable for selection.
Characters that cannot be selected are
displayed greyed out.
Accepting proposals
During entry, the Navigation device
makes proposals in the uppermost line.
The proposals take into account your
usage habits. For example, if you enter
the city of Hamburg often, then after you
enter the letter "H" the proposal
"Hamburg" is automatically displayed.
If no preferences are known for the letter
entered, then cities/locations suitable for
the entry are displayed as proposals.
> To accept the proposal, you may press
either the input field or the
button.
30
Page 31

GENERAL OPERATION >>>
Scrolling through the lists
If you have already entered some of the
letters of the selection you want, you can
use the selection list to display all the
destinations containing the combination
of letters in question.
> To call up the selection list, press
the key.
Note:
The quantity of selection options is displayed in the form of the number on the
button. When there are more than 300
options, the precise number is not displayed.
In the list, all the entries corresponding
to the letters already entered are displayed. The letters entered are coloured
red in the case of the individual entries.
The selection list appears.
> Press the arrow keys on
the right hand side of the screen to
scroll through the list.
> Press the destination you want.
The destination is adopted and the
selection list is closed.
Special characters and accent marks
Special characters and accent marks do
not have to be used when entering the
names of towns and streets. The
Navigation device will change entries
from AE, OE and UE if necessary.
> If, for example, you are looking for the
location "Würzburg", then simply press
"WUERZBURG" or "WURZBURG".
Special characters can be useful when
naming destinations and routes.
> In order to switch to the special
characters keyboard, press the button
marked with an arrow.
The special characters keyboard is
displayed.
> Enter the desired special character.
After you enter a character, the Navigation device automatically switches to the
normal input menu.
To exit the special character keypad
without an entry, press the button
marked with the arrow.
31
Page 32

>>> GENERAL OPERATION
Other character sets
Different character sets can be selected
for the keyboard of the Navigation
device.
> Press the button marked with an
arrow repeatedly until the desired
character set is selected.
Entering numbers
Switch to the numbers keyboard in order
to enter figures.
> Press the button.
The numbers keyboard is displayed.
> In order to return again to the
keyboard for entering letters, press
the button marked with an arrow.
Switching between upper and lower case:
During free text entry, it is possible to
switch between upper/lower case and
the automatic function.
> Press repeatedly on the button in the
top right-hand corner of the display
until the desired method of entry is
activated.
The inscription on the button symbolises
the method of entry.
• The button represents
automatic mode. This means that, on
entry, the first letter is automatically in
upper case and subsequently changes
automatically to lower case.
• The button represents the entry
of upper case letters.
• The button represents the entry
of lower case letters.
32
Page 33

GENERAL OPERATION >>>
Deleting characters
To delete the last character, use the back
key.
> To delete the character to the left of the
cursor, press the key.
Inserting spaces
If you have an entry with two words, e.g.
for names of towns, the words should be
separated by a space.
> To enter a space, press the key.
The back button
The button is located on the
bottom left of the device.
It has various functions:
• Depending on the menu context, if
pressed briefly, you will be returned to
the previous entry level.
• The main menu is displayed by
pressing and holding the button.
• Depending on the model, the Back
button is either integrated on the
screen or positioned on the edge of the
screen as a button.
Content Manager
The Content Manager is a PC-based
application containing a number of
important functions to help you manage
the content on your Navigation device.
With the Content Manager you can:
• back up the content saved on the
Navigation device to your PC and
restore it later to your Navigation
device,
• download current content from the
Internet and install it on the Navigation
device.
To use the Content Manager, you will
need the USB cable provided as well as a
computer that meets the following
minimum requirements:
Minimum
Operating system Windows
Processor 300 MHz clock
frequency
Main memory 256 MB
Free storage space 2 GB
33
Page 34

>>> GENERAL OPERATION
Installing the Content Manager
You can install the Content Manager on
your computer with the following steps:
> Switch the navigation device com-
pletely off, see “Devices with magnetic
holders” on page 26.
> Connect the USB interface of the de-
vice directly to a USB port of the computer using the USB cable supplied.
> Switch on the navigation device.
>
If the application does not start
automatically, please start the file
"ContentManager" manually in the folder
"ContentManagerStarter.exe".
> Select a language from the list and
then click on
> Read the welcome page and click on
Next to continue.
> Select the installation folder. A default
installation folder is already specified.
To select another folder, either type in
the path name or click on
define another folder.
OK.
Browse and
> Click on
procedure. Click on
Install to start the copying
Details to see the
details during copying.
The Content Manager is automatically
started immediately after installation.
Remove the check mark from the box if
you do not want this.
This completes the installation procedure.
> Click on
Finish to exit the installation
program.
Starting the Content Manager
Execute the following actions to start the
Content Manager:
> Switch the navigation device com-
pletely off, see “Devices with magnetic
holders” on page 26.
> Connect the USB interface of the de-
vice directly to a USB port of the computer using the USB cable supplied.
Switch on the Navigation device.
Note:
When you connect the Becker
Navigation device to the PC for the first
time, the PC installs all the necessary
drivers and then displays the message
"Your unit is now ready to use".
After a short time, the Navigation device
is displayed as a removable storage
medium on the computer.
34
Page 35

GENERAL OPERATION >>>
> Click on Start > All Programs on the
computer.
> Select
> Click on
Becker.
Content Manager.
When the Content Manager is started,
the program executes a number of steps
before you can start to manage your
navigation software content.
Each time the program is called, a
connection is established to the Internet
to check whether a new version of the
ContentManager is available. If a new
software version is found, the Content
Manager gives you the option of
installing it. We recommend that you
always agree to the upgrade, if one is
available. If a new software version is
found, you have the following options:
•Click on
Yes to accept the new
software version. The new version is
downloaded and installed before you
can start the Content Manager.
•Click on
No to start the Content
Manager with the version already
installed.
• If the new version is a critical update,
the
Exit button will be shown instead
of the
No button. You must install the
new version, otherwise you have to
exit the application.
If you have not yet made a backup of the
navigation unit, the Content Manager will
ask you each time it starts whether you
would like to make a complete or partial
backup copy.
Note:
We recommend that you always create
the backup. Otherwise you will not be
able to restore the content in the event
of loss of data.
*depending on model, must be activated via the Content Manager
35
Page 36

>>> GENERAL OPERATION
Transferring pictures
Pictures* can be saved on a separate
micro SD memory card (not included in
the standard delivery) or in the internal
memory of the navigation device in the
"Media" folder.
Files can be transferred via a card reader
or a USB connection.
Note:
Switch off the navigation device completely, see “Devices with magnetic
holders” on page 26, before connecting
the navigation device to the computer.
We recommend that you give files and
directories self-explanatory names so
that it is simpler to find these again, if
needed.
Faults
Malfunctions in the operating system or
in the unit are displayed accordingly. If
the desired function cannot be
performed after that, you should restart
the navigation device by pressing the
button on the top for longer than
7seconds.
If the messages reappear or the unit
doesnot function correctly for any other
reason, please contact your local dealer.
You can also try to find a solution to
your problem in the FAQ in the Support
area on the Becker homepage
(www.mybecker.com).
Note:
Never attempt to open the unit yourself.
Please contact your authorised dealer if
you are unable to remedy the fault.
Download manager (model dependent)
The integrated Download manager
allows you to easily perform updates
such as the lifelong map updates,
lifelong speed camera warning updates
as well as updates of the learning
navigation directly on the device, without
connecting to the PC at all. As soon as
contents for your device are available,
you will receive notification on your
device automatically if the Wi-Fi®
Internet connection is active. No matter
where you are – a Wi-Fi® Internet
connection at home or a mobile
smartphone connected via Tethering is
sufficient and you can download the
updates immediately and without any
time-consuming delays. You can also
download updates later, of course, by
pressing the button in the main
menu or in the Tools. Please note that
the navigation menu is not available
while downloading updates.
36
Page 37

GENERAL OPERATION >>>
Note:
A Wi-Fi® Internet connection via a local
or mobile hotspot is a prerequisite for
use. The data transmission may result
in additional costs (home Internet flat
rate or a mobile contract with data flat
rate is recommended). The activation of
Wi-Fi® is described in the chapter
entitled Wi-Fi® Settings on page 143.
The prerequisite for using lifelong map
updates is the one-time online
activation in the Becker Content
Manager within 30 days after using your
device for the first time.
The speed camera detector must first
be purchased in the BECKER Online
Shop with the enclosed voucher code.
More information at
www.shop.mobilenavigation.mybecker
.com. Operating the speed camera
warning, or carrying it with you so that it
is ready to be operated, is a regulatory
offence in Germany and is therefore
prohibited.
Additionally, it may constitute a violation
of the law in other countries too. Before
starting your journey, please find out
about the regulations that are currently
valid in the countries in which you are
travelling. United Navigation GmbH
accepts no liability for the legality of the
installation or use.
The prerequisite for using the learning
navigation is to first agree to updates of
the learning navigation via the Becker
Content Manager. Automatic data
transmission will only take place upon
your explicit consent.
If you select the button in the main
menu or in the Tools, you will be taken to
the initial menu of the Download
Manager:
Note:
Your navigation device should be connected to a power supply via the enclosed USB power supply or the vehicle
adaptor cable in order to prevent damage that an empty battery can cause
during the map update.
Map Update
With the
which new maps you want to download.
The system is also capable of only
updating individual country maps. For
best possible system speed and troublefree cross-national routing, however, we
recommend a complete update of all
available countries for your device.
In this view, you can also see the volume
of data generated during the download.
Please note that considerably large
amounts of data can be generated,
especially when downloading map
updates, which could exceed the free
volume included in mobile telephone
contracts. Therefore, we recommend
using home Internet access that
generally has no download volume
restriction.
button you can select
37
Page 38

>>> GENERAL OPERATION
If you select a button on the left (map or
self-learning navigation), a description of
the download will be displayed. With the
button on the right, next to the map description, you can start the download. If
more than one file is available, you can
choose individual maps or all maps at
once.
Once you have made your choice, you
can start downloading by selecting the
Download button. The download is started and you are informed about the progress during the download. The duration
of the download depends on the speed of
the Internet access and Wi-Fi® network
connection.
You can use the button to pause an
individually ongoing download at any
time.
You can use the button to restart an
individually paused download.
The button provides you with additional options:
• Cancel all ongoing downloads
• Pause all ongoing downloads
• Resume all paused downloads
After downloading all the updates, you
still have to install the downloads. You
can do this either by selecting the Install
button or by selecting the button in
the Download Manager.
Note:
During an active download, you cannot
install the updates that have already
been downloaded. Either wait until all
data has been downloaded or pause any
downloads that are required less urgently. Do not disconnect the navigation
device from the connected power supply during the installation!
Speed camera detector update
With the button in the Download
Manager menu you can download the
new speed camera detector updates. If
no new data is available yet, you will be
informed about this via a popup window.
Resuming downloads
With the button in the Download
Manager menu you can resume paused
downloads. The function is only
selectable if downloads were paused
previously.
38
Page 39

GENERAL OPERATION >>>
Installing updates
With the button in the Download
Manager menu you still have to install
the downloaded updates before you can
use them. The button is only selectable if
completely downloaded files are available for installation.
The updates will also be installed after
the next restart of the device. If you only
switch the device to sleeping mode, the
downloaded updates will not be installed
until you have switched off the device
completely
Transferring pictures
Images*, music* and videos* can be
stored on a separate Micro SD memory
card (not included in the scope of
delivery) or in the internal memory of the
Navigation device in the "Media" folder.
Files can be transferred via a card reader
or a USB connection.
Note:
Switch off the navigation device completely, see “Devices with magnetic
holders” on page 26, before connecting
the navigation device to the computer.
We recommend that you give files and
directories self-explanatory names so
that it is simpler to find these again, if
needed.
Faults
Malfunctions in the operating system or
in the unit are displayed accordingly. If
the function you want cannot then be
executed, you should restart the
Navigation device using the On/Off
switch. In the case of devices without I/O
switches, you can restart the device by
pressing the button on the top for longer
than 7 seconds.
If the messages reappear or the unit
doesnot function correctly for any other
reason, please contact your local dealer.
You can also try to find a solution to
your problem in the FAQ in the Support
area on the Becker homepage
(wwww.becker-navigation.de).
Note:
Never attempt to open the unit yourself.
Please contact your authorised dealer if
you are unable to remedy the fault.
39
Page 40

>>> NAVIGATION MODE
Navigation Mode
What is navigation?
The term "navigation" (lat. navigare = to
travel by sea) is generally understood to
mean the determination of a vehicle’s
location, the determination of its
direction and its distance from the
desired destination and the required
route to get there. Stars, prominent
landmarks, compasses and satellites
etc. are used as navigation tools.
With the Navigation device, the location
is determined by the GPS receiver. The
Global Positioning System (GPS) was
developed during the 1970s by the US
military as a weapons guiding system.
GPS is based on a total of 32 satellites
which orbit the Earth and transmit
signals. A GPS receiver receives these
signals and calculates its distance to the
individual satellites based on the signal
travel times, and then determines your
current geographical position.
Signals from at least three satellites are
required to determine your position;
your height above sea level can be
calculated if signals are received from
four or more satellites.
The Navigation device determines the
direction and distance from the
destination using a navigation computer
and a digital street map held in its
internal memory.
For safety reasons, route guidance is
given predominantly in spoken form.
This is supported by a direction indicator
and a map display on the touch screen.
¤ Safety instructions
• Road traffic regulations always take
priority. The navigation system is
merely an aid, data/information may
in select cases be incorrect. The driver
must decide in each situation by himor herself if he or she will follow the
directions.
No liability will be assumed for
incorrect directions provided by the
navigation system.
• When first put into use it can take up
to 30 minutes to fix the position.
• Observation of traffic signs and local
traffic regulations must always take
priority.
• Traffic guidance is restricted to
passenger vehicles. Special driving
recommendations and regulations
for other vehicles (e.g. commercial
vehicles) are not included.
• Destinations may only be entered
when the vehicle is stationary.
40
Page 41

NAVIGATION MODE >>>
Selecting Navigation
Navigation mode is called up from the
main menu. New destinations can be
entered in the menu "
Destinations that have already been
visited or saved can be selected in the
menu
My destinations.
> In the main menu, press the button
destinations
.
Note:
If an address is displayed in the lower
edge of the main menu, this means that
route guidance has already been started
to the displayed address.
New destination".
My
Home address
When you press the
Home button you
will be asked to enter an address if no
home address has yet been entered.
> Press the
Yes to enter the address.
You can then enter a destination as
described under "The New destination
menu" on page 46.
Note:
The menu items
Set current position
and Select from last destinations (fast
access mode) can also be used to select
a destination.
If you have already entered your home
address, you can start route guidance to
your home address in the first line.
A home address once entered can be
modified later.
In the "
the
> Press the
My destinations" menu, next to
Home option press the button.
Change button to enter a
new home address.
The menu for selecting the destination
appears.
41
Page 42

>>> NAVIGATION MODE
Here you can set the new home address
for example using an intelligent text
entry field.
Smart Guess
The two addresses that can be selected
with the button, is a selection of the
addresses last visited. Depending on the
time of day and your current position, the
two most likely destinations are
displayed and can be selected directly.
Last destinations list
The last destinations visited and saved
destinations are displayed in the Last
destinations list and can be selected
directly. The menu for entering
destinations can also be called up using
the fast access function.
The destination list
The destination list displays, line by line,
all destinations available for fast dialling.
Each line of the destination list is divided
into two fields. Each list field is designed
as a button. The destination is shown on
the right-hand button and the properties
of the destination are displayed using the
left icon.
Note:
Up to 200 of the most recent destinations are automatically stored in the
destination list. If the storage capacity is
reached, the oldest destination in the list
is automatically deleted to make room
for each new destination. However, important destinations may be protected.
If you select your home address and it
has not yet been defined, you will be requested to enter the address.
42
Page 43

NAVIGATION MODE >>>
Icons used
The following icons are used in the
destination list:
Icon Meaning
This destination is a standard
destination with no special
features.
This destination is protected.
If the destination memory is
full, this destination will not
automatically be deleted.
This can be performed
manually, if required.
In the case of a protected
entry, you can also
determine the position using
the fast access function.
Operating the last destinations list
Start with existing destination
The existing destinations are listed in the
destinations list.
> Press the button for the desired
destination to start route calculation.
The calculation begins.
When the calculation is complete, the
map appears and the route guidance
begins.
Scrolling through stored destinations
Using the buttons or the scroll
wheel, it is possible to scroll through the
list.
Displaying or editing a destination
Any destination stored in fast access
mode can be displayed and edited.
> Press the button to the left of the
desired destination.
> A selection menu appears.
Option Meaning
Show details The data for the destina-
tion are displayed. From
this screen you can display the destination on
the map, display the
route or start the route
guidance.
Name entry The destination can be
renamed. If the destination is given a name it is
automatically protected.
Protect entry The destination is pro-
tected from automatic
deletion. This function is
only available for unprotected destinations.
43
Page 44

>>> NAVIGATION MODE
Option Meaning
Remove
protection
The protection is removed from the destination. This function is
only available for protected destinations.
Move up The destination is
moved forwards by one
position. If the destination is moved it is automatically protected.
Move down The destination is
moved back by one position. If the destination
is moved it is automatically protected.
Delete entry The destination is delet-
ed from the fast access
mode.
Delete all
entries
All destinations (except
for the protected destinations and your home
address) are deleted
from the list.
Personal destinations
Using the
you can call up Google
Personal destinations button
™ points of
interest that have been imported into the
Navigation device and start route
guidance to one.
• See "Selecting a destination from
Personal destinations" on page 44.
Contacts
Using the
up Microsoft
Contacts button you can call
®
Outlook® contacts that
have been imported into the Navigation
device and start route guidance to the
address listed in the contact.
• See "Selecting a destination from
Contacts" on page 45.
Selecting a destination from Personal destinations
You can call up Google™ points of interest that have been imported into the
Navigation device and start route guidance to one.
Note:
To display custom Google
interest, the Google
be stored in the Navigator\con-
tent\userdata\mydest directory of the
Navigation device.
> In the main menu, press the button
destinations
> Press the
.
Personal destinations
button.
™ points of
™ KML files must
My
44
Page 45

NAVIGATION MODE >>>
A list of the available destinations will be
displayed.
Using the buttons or the scroll
wheel, it is possible to scroll through the
list.
Note:
If the list contains numerous entries, it
may be a good idea to search for the
desired destination by selecting
entry
and using the input menu.
Search
A maximum of 1000 destinations can be
imported.
Newly imported destinations are filed at
the start of the list.
> Select the desired destination.
Route guidance to the selected
destination will be initiated.
Editing Personal destinations
> In the list of your own destinations,
press the button in front of the
destination that you wish to edit.
Select
Delete entry if you wish to delete
the destination from the list. Select
Delete all entries if you wish to delete the
entire list.
Select
Show details if you wish to display
details about the destination.
Press the
Start button to begin route
guidance to the destination straight
away.
You can also display your chosen
destination on the map (
in fast access mode (
route to the destination (
On map), store it
Save), display the
Show route) or
call the number if a telephone is
connected and a phone number is
available by pressing the button with the
symbol.
Selecting a destination from Contacts
You can call up Microsoft® Outlook
contacts that have been imported into
the Navigation device and start route
guidance to one.
Note:
The Microsoft
imported via the Content Manager.
> In the main menu, press the button
destinations
> Press the
An input menu appears if there are more
than 10 contacts. If there are fewer than
®
Outlook® contacts are
.
Contacts button.
My
®
45
Page 46

>>> NAVIGATION MODE
2
1
1
2
10 entries, a list of contacts is displayed
straight away.
> In the input menu, select the first
letters of the entry you are looking for.
> Press the button when the name
you want is displayed in the top line.
If there are 5 or fewer entries available
with the letter combination entered, a list
containing these entries will
automatically be displayed.
Note:
You may also first have a list displayed
that corresponds to the letter
combination entered. For this purpose,
press the button in the input
menu.
> Select the desired entry in the list.
Press the
Start button to begin route
guidance to the address displayed for
this contact straight away.
You can also display the address shown
for the contact on the map (
store itin fast access mode (
On map),
Save),
display the route to the destination
(
Show route) or call the number
displayed if a phone number is provided
(button with the symbol).
If there are a number of addresses
provided for the chosen contact, you can
select one of them after pressing the
button .
If there are a number of phone numbers
provided for the chosen contact, you can
select one of them after pressing the
button .
The New destination menu
> In the main menu, press the button
New destination.
The menu for new destinations appears.
46
Page 47

NAVIGATION MODE >>>
Layout of the New destination menu
Enter address
The various steps from selecting an
address to starting route guidance can
be carried out using the
button.
• See "Entering the address" on page 47.
Select Point of Interest
Points of interest such as airports and
ferryports, restaurants, hotels, petrol
stations or public buildings can be
selected and route guidance started
using the
Select Point of Interest button.
• See "Points of interest" on page 55.
Travel Guide (model dependent)
With the travel guide, you can select, for
example, MARCO POLO Top-Highlights
or MARCO POLO Insider Tips and start
the guide destination there. See "Travel
Guide (model dependent)" on page 59.
Enter address
Select on map
With the button
Select on map, you can
select a destination directly on the map
and start route guidance.
• See "Selecting a destination from the
map" on page 60.
Enter geo-coordinates
The geographic coordinates for a
destination can be entered and route
guidance started via the
coordinates
button.
Enter geo-
• See "Coordinate entry" on page 61.
Route planning
A route with several waypoints can be
planned using the
Route planning
button.
• See "Route planning" on page 61.
Entering the address
The Enter address button in the
destination input menu opens the menu
for entering addresses.
> In the destination input menu, press
the
Enter address button.
The menu for entering addresses
appears.
Note:
By pressing the
right) you can delete all entered data
apart from the country.
Clear form button (top
47
Page 48

>>> NAVIGATION MODE
Selecting a country
You can select a country from those
available using the button for the country
of destination. A country is adopted
automatically in the address input menu
after selection. If a country of destination
has already been entered it will remain
until you select a different country.
> Press the button containing the
country of destination to access the
country selection list.
The selection list appears.
> Press the button for the desired
country.
Note:
If required, press the arrow keys
or use the scroll wheel on
the right of the screen to scroll through
all available countries of destination.
The symbol indicates the countries
for which an address can be entered
using speech. (depending on the model)
Selecting an address and starting route guidance
You can enter the exact destination
address in the address input menu.
The following settings can be made in
the address input menu:
•Town
• Zip code (or postal code)
• Street and house number
• Junctions as an orientation aid
It is also possible to:
• search for a point of interest near to
the address entered (
can be entered as described under
"Point of interest near to an address"
on page 57.
• save the destination in fast access
mode,
• show the route on the map. For details
please see page 100.
• start the route guidance straight away.
POI search). This
48
Page 49

NAVIGATION MODE >>>
Selecting a town
The destination can be entered by either
using the name or ZIP code.
When you enter the letters of a place, the
navigation device displays suggestions
(See "Accepting proposals" on page 30).
If you do not want to accept the proposal,
just enter the other letters of the location
you want.
The Navigation device excludes all
impossible letter combinations and ZIP
codes and activates only letter fields or
numerical fields that lead to an existing
location or ZIP code.
> Select the option of entering the town
or postcode.
> Enter the letters of the destination
town or the numbers of the postcode
consecutively.
Note:
If two words need to be entered you
must separate them with the character
.
When sufficient letters have been
entered it will automatically switch to a
list from which you can select the town.
However, you can switch to the list
before this by pressing the button.
Note:
If you have entered a postcode, the
name of the town will be hidden in the
input menu to start with. If you then
enter the street name, the name of the
town will then also be displayed.
Using the town list
Once a few letters of the desired town
have been entered you can display a list
of all the towns with the relevant letter
combinations or this list will be displayed
automatically.
> Press the button on the right of
the screen to call up the list.
Using the buttons or the scroll
wheel, it is possible to scroll through the
list.
> Press the button for the required town.
49
Page 50

>>> NAVIGATION MODE
Selecting the street
In the
Street menu field the street and
house number can be entered separately using a letter and number field.
The Navigation device excludes all
impossible letter combinations and
activates only those letters that could
give an existing street name.
A house number can only be chosen
once the street has been selected and if
house numbers are included in the data.
> Enter the letters of the destination
street consecutively.
When sufficient letters have been
entered it will automatically switch to a
list from which you can select the street.
However, you can switch to the list
before this by pressing the button.
Using the street list
Once a few letters of the desired street
have been entered you can display a list
of all the streets with the relevant letter
combinations or this list will be displayed
automatically.
> Press the button on the right of
the screen to call up the street list.
You can scroll through the displayed list
using the buttons.
> Press the button for the desired street.
Selecting the Intersection
After entering the destination town and
street, you can enter a junction so as to
further limit the choice.
Note:
Instead of entering a junction, you can
also enter a house number. However, it
is not possible to enter both at the same
time.
> Press the
The input menu for the name of the
junction will appear.
> Enter the name of the junction.
Once a few letters of the desired street
have been entered a list will automatically be displayed.
> Press the button for the desired street.
Intersection button.
50
Page 51

NAVIGATION MODE >>>
Selecting a house number
After entering the destination town and
street, you can enter a house number so
as to further limit the choice.
Note:
Instead of entering the house number,
you can also enter a junction. However,
it is not possible to enter both at the
same time.
> Press the
No. button.
The input menu for the house number
will appear.
> Enter the house number and then
press the button.
Displaying the route
Once the address has been entered, the
address input menu allows the route to
the destination to be displayed on the
map.
> Press the
Show route button to display
the route on the map.
The route is calculated.
You can start the route guidance directly
from this screen using the
Start button.
The other options on this screen are
described under "Displaying the whole
route" on page 100.
Storing a destination
In the address input menu, the
Save
button opens a menu where a name can
be entered for the specified destination.
If the desired name has been entered
and has been pressed to accept it,
the destination is transferred to fast
access mode and protected.
Starting navigation
The
Start button starts the route
guidance.
All data entered thus far is processed
when calculating the route.
> Press
Start to start the route guidance.
The route is calculated. The map will
then be displayed and the route guidance
will begin.
51
Page 52

>>> NAVIGATION MODE
Note:
The symbols above the progress bar
refer to restrictions that you may have
activated (e.g. unpaved roads, toll
roads).
If the route guidance is already running
you will be asked whether the new
destination should replace the old
destination or if the new destination
should be regarded as a waypoint.
> Select between
as new destination
destination
Add as stopover, Add
or Replace old
.
If the route guidance is already running
and a waypoint has already been entered
you will be asked whether the new
destination should replace the old
destination or the waypoint.
> Select
Replace stopover or Replace
old destination
.
Note:
If there is no GPS signal when the route
is calculated, the following will be
displayed:
When a GPS signal is available, the route
calculation will start automatically.
When the
Last position button is
pressed, the last known position is used
and the route calculated from this
position.
52
Page 53

NAVIGATION MODE >>>
Entering address by speech (selected models)
You can start the spoken address entry
from the address entry menu by pressing the button.
Notes:
• Only one address can be entered
using the voice entry function. Lists
for more precise selection cannot be
operated using speech.
• The destination country cannot be
entered using speech.
• The symbol in the list of countries
indicates the countries for which
address entry using speech is
possible.
If entry using speech is not possible,
the button will be displayed
greyed out.
• An address and the street number
mus t b e s pok en i n t he lan gu age of the
destination country.
After pressing the button, a menu
that shows you how to say an address
will be displayed.
You can say the address as soon as you
see the lines next to the stylised face.
Notes:
• If a number of languages are spoken
in the destination country (as is the
case in Switzerland, for example), you
can set another language by pressing
the
Change language button.
• You can say the complete address or
just a part of it.
Possible entries include:
- street number - street - town
- street - town
- town
> Say the address.
If your entry is unique, after a short time
the menu for entering addresses will be
displayed with your entry filled in.
If the address displayed does not match
the address you said, you can make
appropriate changes.
If the address is correct, you can start
route guidance, display the route or store
the address as described on page 51.
53
Page 54

>>> NAVIGATION MODE
If your entry was not unique or the
Navigation device was not able to
uniquely assign your entry, you will be
shown appropriate lists. You can then
select the address you want from these
lists.
Depending on your entry, lists with town
names, lists with street names or
combined lists with town and street
names can be displayed.
Note:
Voice entry can be restarted at any time
in the lists by pressing the button.
The following example shows a list in
which a town can be selected.
Entries identified with the symbol
open up a further list when they are
selected. This can be necessary if, for
example, the same town name occurs a
number of times in the set country.
Once you have selected the town or
street you want in the lists, the menu for
entering addresses is displayed after a
short time with your entry filled in.
You can then start route guidance,
display the route or store the address as
described on page 51.
Speech Dialogue System (selected models)
The Speech Dialogue System is an extension of the spoken address entry. As
well as entering addresses directly, selected device functions can be operated
via speech dialogue. This function is
available in the following languages:
German, English, Italian, Spanish and
French.
Explanation of symbols
The following symbols are displayed on
the left-hand side of the screen:
Please speak
Please listen
Please click
(to start voice control)
Objective
You can enter the following destinations
via speech entry:
• Address
•Point of Interest
• Last destinations
•Home
To enter an address, see page 61.
If you have not yet entered a destination,
54
Page 55

NAVIGATION MODE >>>
or you have not set a home address (because this is the first time you have used
the device), these fields are greyed out.
Points of interest are divided into different categories. Route guidance is also
activated in the screenshot above, so the
device asks if the petrol station should be
located on the route or near the destination.
Route
When you enter a destination, the following options are available:
•Show route
• Delete route
•Block road
If there is not currently a route activated,
this field is greyed out.
More...
When you click on More..., you can
choose between three menu items.
Under
Where Am I?, you can determine
the current GPS position.
If you select
en information about the country you are
currently in.
Help gives you useful information about
speech entry. For example, it lists all
phrases which can be used as soon as
the speech dialogue is started. As well as
these global commands, you will also
find help for entering addresses or for
points of interest.
Country info, you will be giv-
Live POI Search (model dependent)
With the Live POI Search your Becker
navigation device establishes a connection to our live Server. You have access
to millions of addresses in Europe.
You can choose between:
• A Live POI Search in the vicinity,
• A Live POI Search near to an address
• A Live POI Search near to a destination
Subsequent operation is similar to how it
is described in the chapter entitled Points
of interest on page 55, except that no
categories can be selected.
Points of interest
Points of interest (POI) are included in the
map and can be displayed there. Points
of interest include airports and ferry
ports, restaurants, hotels, petrol
stations, public buildings. You can use
points of interests as navigation
destinations.
55
Page 56

>>> NAVIGATION MODE
Note:
You can only select points of interest in
the area in question if the GPS reception
is adequate for determining a position.
Otherwise, the last position stored will
be used.
You can extend the places of interest
stored on the device by installing
additional POIs in KML format on your
device via the Content Manager.
> In the main menu, press the button
New destination.
> Press the
Select Point of Interest
button.
You can choose between:
• a point of interest in the vicinity,
• a point of interest near to an address,
• a p oint of interest near to a destination,
• a point of interest along the route or
• entering a point of interest directly.
Point of interest in the vicinity
> Press the
POI nearby button.
Press the arrow keys or use
the scroll wheel to scroll through the list
displayed.
> Select one of the available categories.
Note:
You can also press the
All categories
button. An input menu will then open
and you can enter the name of a point of
interest directly and confirm it.
For some categories, e.g. petrol stations,
a further selection menu is displayed in
which you can narrow down the choice
further, e.g. by brand.
56
Page 57

NAVIGATION MODE >>>
If you have selected the category, any
points of interest belonging to the
relevant category and available within
the area in question will now be
displayed.
The name, distance as the crow flies and
the address is displayed for each entry.
> Select the desired point of interest.
You will now receive additional
information about your chosen
destination.
> Press the
Start button to begin route
guidance to the point of interest
directly.
In addition, the selected point of interest
can be:
• displayed on the map (
• saved in fast access mode (
On map),
Save),
• used for displaying a route to the POI
(
Show route),
• if a telephone is connected and a
phone number is available by pressing
the button with the symbol.
(depending on the model)
Point of interest near to an address
> Press
POI near location.
> Select the desired country.
> In the
City or Code field, enter the town
where you wish to search for a point of
interest.
Note:
If you have already entered an address,
this address will appear by default.
> Press the
Select category button.
The available Points of interest
categories for the city entered will be
displayed.
> Select the desired point of interest as
described under "Point of interest in
the vicinity" on page 56.
57
Page 58

>>> NAVIGATION MODE
> Press the Start button to begin route
guidance to the point of interest
directly.
However, you can also store your
chosenpoint of interest in fast access
mode (
Save) or display the route to the
point of interest (
Show route).
Note:
Your can also press the
Interest
button. An input menu will then
Select Point of
open and you can enter the name of a
point of interest directly and confirm it.
By pressing of the button next to
the selected POI, you can display the
additionally available information for the
destination.
Point of interest near to destination
> Press the
POI near destination button.
The categories available near to the
destination are displayed.
> Select the desired point of interest as
described under "Point of interest in
the vicinity" on page 56.
POI on route
> Press the
POI on route button
The available Point of Interest categories
available on the whole route will be
displayed.
> Select the desired point of interest on
the route as described under "Point of
interest in the vicinity" on page 56.
Entering a point of interest directly
> Press the
POI search by name button.
> Enter the desired point of interest or
part of the name.
> Press the button.
The Navigation device displays in a list all
the points of interest corresponding to
the name entered.
> Select the desired destination in the
list.
You will now receive additional information about your chosen destination.
58
Page 59

NAVIGATION MODE >>>
> Press the Start to begin route guidance
to the point of interest straight away.
However, you can also display your
chosen point of interest on the map (
map
), store it in fast access mode (Save)
or display the route to the point of
interest (
Calling special destination phone number (depending on the model)
You can dial directly phone numbers
specified in the information on a point of
interest
The prerequisite here is that a cell phone
is connected via Bluetooth® wireless
technology with the Navigation device.
> Press the button with the symbol
The call will be initiated.
Show route).
shown at the bottom of the point of
interest information screen.
On
Additional point of interest information
Any additional information that is
provided for a point of interest can also
be displayed.
To display the additional information,
press the
bottom of the point of interest
information screen.
You can scroll through the displayed text
using the arrow buttons or the scroll
wheel.
More button shown at the
Travel Guide (model dependent)
The Travel Guide acts in a similar fashion
to the "Enter point of interest" function
(see also page 47).
The Travel Guide for Berlin is already
pre-installed. All travel guides are
available in 5 languages (D, E, I, S, F).
Other languages are represented in
English. Additional cities can be
purchased from the ContentManager
(see also page 33).
59
Page 60

>>> NAVIGATION MODE
Selecting a destination from the map
You may also select a destination directly
from the displayed map.
> Press the
The map display appears.
Note:
You may need to make the area larger
using the zoom buttons and in
order to find the desired point. You can
also move the map to the desired point.
Select on map button.
> Press the desired point lightly on the
surface of the screen.
A flashing red cross will be displayed at
this point.
Note:
By pressing the
GPS Position you can
display your current position again.
> Press the
Select button.
Where available, the address of your
chosen point is displayed.
> Press the
Start button to begin route
guidance to the destination straight
away.
You can also search for points of interest
in the vicinity of your chosen point using
the POI nearby button.
However, you can also store your
chosen point in fast access mode (
Save)
or display the route to the point of
interest (
Show route).
You can select a new destination by
touching the map even during the route
guidance in progress, in order to insert a
stopover or to replace the old
destination. When touching the display, a
compass appears with arrows to adjust
the horizontal display and the vertical
display angle of the map. This function is
described on page 97.
60
Page 61

NAVIGATION MODE >>>
1
2
3
2
1
3
Coordinate entry
You can also enter your destination using
geographic coordinates.
> In the main menu, press the button
New destination.
> Press
> Using select the value you wish to
> Using the two buttons indicated by
Enter geo-coordinates.
change.
select the direction required for the
geographic longitude and latitude
(east/west or north/south).
> Then enter the desired values using
the buttons to .
The entry field at the beginning may be
displayed greyed out. Delete any entries
in the field with the backspace button, in
order to use the entry field. You can enter
coordinates in three different ways.
The following formats can be used:
• Degrees Minutes Seconds.Decimal
seconds e.g. 42°52’46.801“
• Degrees Minutes.Decimal minutes
e.g. 48° 53.56667'
• Decimal degrees e.g. 48.89277778
Notes:
• The coordinates entered must
correspond to WGS84 (World
Geodetic System 1984).
• If you press button your current
geographic position will be entered
into the fields.
> Press the button.
Where possible, an address matching
the coordinates will be displayed. You
can view the destination on the map,
store it, display the route to the
destination or start the route guidance
straight away.
Route planning
The route planning menu allows you to
create and select individual routes. To do
this, enter the individual destination
points for the desired route. It is then
possible to travel to these points
consecutively without having to enter
any further information. You can also
optimise the destination points entered
and in so doing change their order.
> In the main menu, press the button
New destination.
> Press the
In the route menu you can create a new
route by pressing the
button. Previously stored routes are
shown in a list below this.
Route planning button.
Create new route
61
Page 62

>>> NAVIGATION MODE
Note:
If no routes have yet been stored, the
route menu is empty.
Scrolling through stored routes
> Press the arrow keys or
use the scroll wheel on the right of the
screen to scroll through the stored
routes.
Editing stored routes
You can add additional stages to a stored
route, change the name of the route or
delete it.
> Press the button in front of the
route you wish to edit.
By pressing
Add stage you can now add
a stage to the route.
After pressing
Rename route you can
give the route a new name.
Pressing
Delete route will allow you to
delete the route from the stored routes.
Selecting and starting a route
> Press a route to select it.
The route is loaded and displayed in the
stage menu.
> Press the top button.
Note:
You can also select a leg of the route.
The route is started as of this leg.
> Select the start point or your current
position as the start point for route
guidance.
Note:
If a start point is selected, this is only
used to view a route.
The individual stages are calculated.
A map of the stages will then be
displayed.
> Press the
Start button to start
guidance for this route.
You can call up the route options using
the
Options button.
62
Page 63

NAVIGATION MODE >>>
Simulation of the route
There is a play button on the left
under the map, used to start a simulation
of the route.
If you touch the display after starting, a
control bar is displayed at the top with
control buttons for the simulation. You
can pause the simulation with the
button, and continue it with the
button. The button allows you to
fast forward the simulation by a 16x
speed. You can move from route section
to route section with the and
buttons.
If there is no further action, the control
bar disappears after a few seconds.
Creating a new route
> Drücken Sie in der Routenplanung die
Taste
Create new route.
You can now enter an intermediate destination as described under "The New
destination menu" on page 46 (
dress
, Select from last destinations, Se-
lect Point of Interest
tacts, Personal destinations
map
or Enter geo-coordinates). You also
, Travel Guide, Con-
Enter ad-
, Select on
have the option of quickly selecting a
destination using the
destinations
button.
> In the input menu, press the
Select from last
OK button
to accept the relevant intermediate
destination.
Notice (depending on model):
Here you can define a loading time.
This, in turn, has an impact on the calculations of the arrival time for the subsequent destinations of the route.
> Enter the loading time in hours and
minutes using the buttons.
If you do not want to set any loading
time, press the
No loading time button.
63
Page 64

>>> NAVIGATION MODE
> Press Add stage to enter further
intermediate destinations as described
above.
> When you have entered all intermedi-
ate destinations, press the
Done
button.
> Give the route a name of your choice.
The stage menu for the new route will be
displayed.
Editing a route
> Select the route you wish to edit.
> Press the button in front of the
stage you wish to edit.
The edit menu will be displayed. The
following options are available:
Option Meaning
Show details The data relating to the
intermediate destination
is displayed. From this
screen, you can display
the intermediate
destination on the map.
Entering
loading time
You can define the expected loading time.
This is necessary in order to display the most
accurate expected arrival time possible.
Move up The stage is moved for-
wards by one position.
Option Meaning
Move down The stage is moved
backwards by one
position.
Delete stage The stage is deleted
from the route.
Replace
stage
You can replace the
selected stage with
another intermediate
destination.
64
Page 65

NAVIGATION MODE >>>
Optimising a route
If you have entered several destinations
for a route, you can use the Navigation
device to optimise the order of the
destinations for the journey distance.
The route stored is retained even after
optimization, however.
Call up the map display for the stages of
the route.
> Press
The route is optimised and recalculated.
Optimise.
Navigation settings
The navigation settings contain all the
settings that are relevant to the
navigation functions.
Note:
All your settings must be confirmed by
pressing the button. Only in a few
cases it is possible to confirm selections
in the menu using the
Yes button.
> In the main menu, press the
button.
> Press the
Navigation settings button.
OK button or the
This will take you to the navigation
settings menu.
Configuration
Various pages containing functions are
available in the menu:
You can go to the next or previous page
of the settings by pressing the
and buttons or the scroll wheel.
The optimised route is displayed.
65
Page 66

>>> NAVIGATION MODE
1 2 3
5
4
45123
The Map view button
You can select whether the map is to be
displayed in 3D or 2D mode, in a split
screen with 3D or 2D display or in arrow
mode.
You can also select whether or not 3D
buildings available in towns should be
displayed in 3D mode.
Further setting options are available to
you in the extended settings.
> Press the
settings menu.
The
Map view settings window appears.
Map view button in the
> Press the button or to select
whether to use 2D or 3D mode.
> Press the button to select the
entire map.
> Press the button for a split screen.
> Press the button for arrow mode.
To call up the extended settings, press
the
Advanced button.
66
Page 67

NAVIGATION MODE >>>
The following setting options are
available in the extended settings:
•
Auto zoom
You can select how the map changes
when approaching an action point or at
different speed.
•
Select POI categories
You can select which symbols are
displayed for points of interest on the
map.
•
Infobox data fields
In this menu you can define the data to
be displayed in the Info box in the top
left corner of the map view. You can
select between Speed, Speed limit,
Time and Height.
•
3D City models
You can select whether or not 3D
buildings available in towns should be
displayed in 3D mode or not .
This option is only available with the
3D view active.
•
Street names 2D/Street names 3D
You can select whether the street
names should be displayed ( ) or not
( ) in 3D or 2D mode.
•
2D heading up
You can select whether the map
should always be orientated to the
direction of travel ( ) or to the north
( ) in 2D mode. This option is only
available with the 2D view active.
Auto zoom
> Press the
Auto zoom button in the
extended settings.
Pressing the
Auto zoom button switches
the zoom function on ( ) or off ( ).
When the zoom function is switched on,
you can select whether the autozoom
action should be weak, medium or
strong.
67
Page 68

>>> NAVIGATION MODE
Select POI categories
You can select which POI symbols are to
be displayed on the map.
> Press the
in the extended settings.
Select POI categories button
Selecting
Show all POIs displays all
points of interest on the map.
Selecting
Show no POIs displays no
points of interest on the map.
Selecting
then pressing the
User defined selection and
Select POIs button
allows you to determine for yourself in
the menu which then appears whether
each individual points of interest
category is displayed or not.
68
> You can then switch the display of
entire categories on ( ) or off ( ).
After pressing the button beside a
category you can switch subcategories in
further menus on or off.
> Confirm all your settings by pressing
the button.
Selecting Info box data fields
In this menu you can define the data to be
displayed in the Info box in the top left
corner of the map view.
> Press the Info box data fields button.
The Info box data field selection window
appears.
Touch the first field to select one of the
possible options.
An options list appears on the right side
over the window.
For the selected route (category With
Route) you can choose from the display
options Remove, remaining time, arrival
time, speed, speed limit, time, altitude
and traffic delays on the entire route
(selected models).
Page 69

Under these options, you can select
displays for the travel without a selected
route. Here you can only select between
Speed, Speed limit, Time and Height.
3D city view
With this option, you can select whether
or not 3D buildings available in towns
should be displayed in 3D mode or not.
In the Advanced menu, press the 3D city
view button to turn the function on or off.
NAVIGATION MODE >>>
> Confirm your setting in the Advanced
menu by pressing the button.
Note:
This setting is only available in the 3D
view.
69
Page 70

>>> NAVIGATION MODE
The Route overview button
With the options in this setup menu you
can select the Points of Interest to be
displayed and whether TMC reports are
displayed in the map view when pressing
the Route overview button.
> Activate the option All Destinations.
The Route Overview displays the Points
of Interest selected in the POI Categories
menu. The display is recalculated every
two minutes.
> Activate the option TMC On Route.
The Route Overview in the map view
displays TMC announcements.
> Press the Select POI Categories button.
The Select POI Categories window is
opened. Three point of interest categories can be selected.
If you touch the preset option of one of
the POI Categories (POI 1, 2 and 3), a
selection list with 20 POI types appears.
The Guidance info button
In the Guidance info settings window
you can select which additional
information you would like displayed
during route guidance.
> Press the
settings menu.
The
appears.
The following settings are available:
Setting Meaning
Lane info When this function is
Guidance info button in the
Guidance info settings window
enabled, a small arrow
indicates which lane
you should move into
in the case of multilane roads.
70
Page 71

NAVIGATION MODE >>>
Setting Meaning
Signposts When this function is
activated, you receive
additional important
information at traffic
junctions about the
sign you should follow.
Detour
Assistant
If this function is activated, the Assistant will
help you to avoid traffic
jams or traffic disruptions. The responsiveness can be adjusted
with 3 sensitivity settings.
Parking
Assistant
If this function is activated, the Assistant will
help you to choose a
car park at the destination.
ExitAssistant If this function is acti-
vated, the Assistant will
help you if you leave
the motorway unexpectedly.
Setting Meaning
Country info When this function is
enabled, you will
automatically receive
generally applicable
traffic information for
the relevant country
when you cross a
national border (e.g.
speed limits).
Lane Assistant
Pro 3D
If this function is activated, you will see an
animated, realistic representation of your
lane at many junctions
if available.
Junction
view
If this function is
activated, you will see
realistic views of the
current lane situation, if
available, at many
motorway
intersections.
Setting Meaning
Tunnel View
If this function is
activated, you will see a
three-dimensional
tunnel view when
entering a longer
tunnel.
Note:
This information can only be displayed if
it is contained in the map material.
> Press the relevant button to switch the
required function on or off .
> Confirm your selection by pressing
the button.
71
Page 72

>>> NAVIGATION MODE
1
2
3
4 5 6 7 8
5
6
7
8
1
2
34567
8
The Route options button
You can edit your driving profile in the
Route options settings window. The
settings made here have an effect on the
route selection and on the calculation of
the estimated journey times.
> In the settings menu, press the
options
The
button.
Route options settings window
appears.
Route
Selecting the vehicle profile (depending on model)
This setting influences the calculation of
the expected time of arrival and blocks
e.g. motorways for the bicycle setting.
> Select the mode of travel or the
required vehicle profile after pressing
the
Vehicle button.
The different profiles are displayed and
you can select the desired profile by
pressing the appropriate button.
Saved profile truck with trailer
Saved bus profile
Saved mobile home profile
General truck profile
Car profile
Motorcycle profile
Bicycle profile
Pedestrian profile
After selecting the desired profile, it is
displayed.
You can now change the selected profile,
as described under "Truck and mobile
home functions (depending on model)"
on page 73 (only for selected models).
72
> Press the settings button
or button.
Page 73

NAVIGATION MODE >>>
The window for selecting the maximum
speed is displayed.
Select a speed and exit the speed menu
with the back button .
> Exit the vehicle selection menu, too,
with the back button .
The selected vehicle type is now
displayed.
The required profile is displayed once
selected.
Truck and mobile home functions (depending on model)
You can select or set the vehicle profile.
For the truck profiles (depending on the
model), you can define or select dimensions, weight, number of axles etc.
Once the appropriate profile is set, a
route is calculated on the basis of these
settings.
See also the chapter on supplementary
functions for trucks and mobile homes
on page 108.
¤Danger of accident!
The information in the map material
could be incorrect on account of sudden
changes (e.g. construction sites)!
The traffic situation and the signposts
on site have priority over the information given by the navigation system.
Notes:
In the map display, roads are displayed
with a light red contour if no specific information for trucks is available. You
must therefore be particularly careful
here.
With the GPS navigation activated
the symbol displays that there is no
specific truck information available before the current road or the road to
which the next driving manoeuvre is
leading.
> Call up the option menu for the map
screen.
> Press the
Route options button (de-
pending on model).
> Press the
Vehicle button
Different menus are now displayed depending on the vehicle profile previously
set.
> Confirm the profile currently set by se-
lecting
OK or select Change profile to
change the profile.
73
Page 74

>>> NAVIGATION MODE
1
2
3
4
5
7
6
1234455
6
7
You have different operation options in
the car or truck profile menus displayed.
You do not have any further setting options for all other profiles.
For the car profile:
Setting truck profiles
Notes:
This function is only available with models with optimized route navigation for
trucks, busses and mobile homes.
> Select one of the saved truck profiles
or the general truck profile.
With the three saved truck profiles you
have the option to customize the truck
symbol and name
The window is displayed for selecting the maximum speed
Setting size
> In the profile settings, press the button
for setting the size.
For the general truck profile or saved
truck profiles (depending on the model):
You can now set the selected profile:
With this button you can set the size
of the truck.
With this button you can set whether
the truck has a trailer and how many
axles there are.
With this button you can set the
Here you can set the profile settings directly by pressing the buttons in the
right-hand area as described on the following pages.
74
maximum permissible weight as
well as the actual weight.
With this button you can set the hazardous materials class of the truck.
Use this button to select tunnel restrictions. ADR tunnel categories B to
E are available for selection.
> Press the button next to the dimension
to be entered.
An entry menu will appear.
> Enter the desired dimension.
> Confirm the entry in the entry menu by
pressing .
Once you have made all the required settings, confirm your settings by selecting
.
Page 75

NAVIGATION MODE >>>
1
1
Setting trailer and axles
> In the profile settings, press the button
for the trailer and axle settings.
> Use the button to select whether
there is a trailer ( ) or not ( ).
> Select the total number of axles.
> Confirm your settings by selecting
.
Setting weight
> In the profile settings, press the button
for setting the weight.
> Press the button next to the weight to
be entered.
An entry menu will appear.
> Enter the desired weight.
> Confirm the entry in the entry menu by
pressing .
Once you have made all the required settings, confirm your settings by selecting
.
Setting hazardous materials class
> In the profile settings, press the button
for setting the hazardous materials
class.
> Select the required hazardous materi-
als class.
Set tunnel category (ADR)
> In the profile settings, press the button
for setting the tunnel categories .
> Select the required tunnel category.
If you do not select any of the available
restrictions (B to E), all tunnels will be
used for your route.
Once you have made all the required
settings, confirm your settings by
selecting .
75
Page 76

>>> NAVIGATION MODE
2
1
1
2
Selecting vehicle category and name
Once you have changed one of the truck
profiles, you have the option to enter the
displayed truck symbol and name.
> Press the button to enter another
name.
The entry menu will appear.
> Enter the desired name.
> Confirm the entry in the entry menu by
pressing .
The name is changed.
> Press the button to change the
displayed symbol.
> Select the desired symbol. The new ve-
hicle category is displayed in the profile.
Selecting the route type
> After pressing the
Route type button,
select one of the following options.
Option Meaning
Fast route With this option, the
fastest route in terms of
travel time is calculated.
Economical
route
With this option, the
most economical route
in terms of travel time
and mileage is
calculated taking into
consideration further
parameters such as
gradients, for example.
Short route With this option, the
shortest route in terms
of mileage is calculated.
Easy route With this option, a route
with as few manoeuvres
as possible is calculated.
This may result in larger
detours.
76
Page 77

NAVIGATION MODE >>>
Time-dependent route guidance
If this function is switched on ( ),
information (statistical information) on
the possible speed on certain segments
at certain times of the day is also taken
into account in the route calculation,
provided this is available. This provides a
more accurately calculated arrival time
and may even result in a different route
being selected.
Avoiding particular types of road
After pressing the button
Avoid you can
exclude various types of road (e.g.
motorways, ferries and toll roads), from
the route calculation.
You can set one of the following options
for each of these road types.
Option Meaning
Permitted With this option, the
road type in question is
included in calculating
the route.
Prohibited With this option, the
road type in question is
not included in
calculating the route.
> Confirm your selection in the
options
window ny pressing the OK
Route
button.
The TMC or Traffic button (model dependent)
The use of TMC is described below, Live
Traffic behaves similarly here. You can
configure settings for the reception of
traffic announcements in the
settings window.
> Press
The
TMC in the settings menu.
TMC settings window appears.
TMC
77
Page 78

>>> NAVIGATION MODE
Setting Meaning
Rerouting This button allows you
to choose whether the
route change should be
made
Never,
Automatically or
Manually. (See "Taking
announcements into
consideration when
calculating routes" on
page 90.) The setting
Never is equivalent to
switching off the TMC
function.
> Confirm your settings by pressing
the button.
An automatic search procedure presets
the transmitter with the best reception.
The currently received TMC-transmitter
appears on the display.
The TMC announcements can be spoken
by the voice, if the navigation settings in
the
Voice guidance menu the Announce
TMC events
option is activated.
The Traffic Button (model dependent)
When the navigation device has access
to the server, the heading
other icon are displayed instead of TMC.
The traffic announcements will always
then be retrieved updated from the server. The settings are the same as described in the chapter entitled TMC.
Notice:
The data transmission via your mobile
phone may involve additional costs depending on the mobile phone contract.
Please find out from your mobile phone
provider before activating. If a connection to the server is not possible, e.g. because no mobile phone network is
available for a longer period of time,
then the system switches over automatically to TMC until a connection to
the server is possible again.
Traffic and an-
The Voice guidance button
In the Voice guidance settings window
you can make settings relating to the
voice guidance of the Navigation device.
> Press the
settings menu.
The
appears.
The following setting options are then
available:
•
Voice
You can select the voice that will make
the navigation announcements for the
language that has been set.
Voice guidance button in the
Voice guidance settings window
78
Page 79

NAVIGATION MODE >>>
• Volume
You can select the standard volume for
voice announcements for each start of
the Navigation device, or switch off
voice announcements completely.
•
Interior noise level
With the Interior noise level button,
you can adjust the speed-dependent
volume control. To do this, select the
interior volume level suitable for your
vehicle.
With the
Dynamic setting (selected
models), the interior noise is measured with the aid of the integrated microphone, the volume is then
continually adjusted depending on the
noise level.
Notice:
If the announcements of you navigation
device are too loud at high speed, you
should select a quieter interior noise. If
the announcements are too quiet, you
should select a louder interior noise.
•
Announce streets
Using the Announce streets button
you can switch the announcement of
the names of streets into which you
are to turn on ( ) or off ( ).
•
Announce time of arrival
Using the Announce time of arrival
button you can switch the automatic
announcement of the expected arrival
times on ( ) or off ( ).
Note:
The
Announce streets and Announce
time of arrival
functions are only
supported by speakers with the TTS
function.
Setting the Voice
In the
Voice settings window you can set
the voice that will make the navigation
announcements for the language that
has been set.
> In the
window, press the
The
Voice settings window appears.
Voice guidance settings
Voice button.
> Select the desired voice.
Note:
Voices with a (TTS) tag support the textto-speech function (e.g. announcing
roads and reading out text messages).
A short example announcement is given.
> Confirm your selection by pressing
the button.
79
Page 80

>>> NAVIGATION MODE
Setting the Volume
With the
Volume settings window, you
can set the standard volume for voice
announcements for each start of the
Navigation device, or switch off voice
announcements completely. Depending
on the situation, this setting can be fitted
into the map display.
> In the
window, press the
The
Volume settings window appears.
Voice guidance settings
Volume button.
> Select the desired volume with
the and buttons or the
scroll wheel.
> The voice output can be switched off
completely or turned back on by
pressing the Mute button.
> Confirm your settings by pressing
the button.
The Warnings button
In the Warnings settings window you can
select which warnings are to be
displayed by the Navigation device or
which warning sounds are to be output.
> In the settings menu, press the
Warnings button.
The
Warnings settings window appears.
The following setting options are then
available:
•
Driver alerts (depending on the
model)
You can have signs displayed, for
example for dangerous curves or
steep gradients, provided this
information is stored in the map data.
•
Speed info
You can select whether speed limits
are displayed in parallel to the
navigation.
You can also receive an audible
warning about exceeding the speed
limit.
•
Speed camera detector
(model-dependent)
You can be alerted against stationary
and mobile speed checks.
Models that include speed camera
detector alerts against stationary
speed checks are a download product
that first have to be downloaded and
then activated under the "speed
camera detector" menu item. To do
this, follow the instructions on the
flyer enclosed in the packaging. As an
active subscriber, you perform regular
updates of the speed camera data
either in your customer account of the
80
Page 81

NAVIGATION MODE >>>
Becker Online Shop (http://
shop.mobilenavigation.mybecker.com;
Follow the instructions in the "My
downloads" area), or perform updates
of the speed camera data for models
with Becker Connect directly via the
integrated Download Manager.
In the case of models that include
speed camera detector alerts against
mobile speed checks (Live speed
camera detector), you just need to activate this function under the "Speed
camera detector" menu item. Updates
of speed camera data are performed
in real-time via an active connection to
your Internet-enabled mobile phone
with WLAN-/Bluetooth Tethering and
mobile contract.
Note:
Operating the speed camera warning,
or carrying it with you so that it is ready
to be operated, is a regulatory offence in
Germany and is therefore prohibited.
Additionally, it may constitute a violation
of the law in other countries too.
Before starting your journey, please find
out about the regulations that are
currently valid in the countries in which
you are travelling. United Navigation
GmbH accepts no liability for the legality
of the installation or use.
•
Environmental zones (depending on
model)
You can let yourself be warned about
environmental zones.
•
Truck Navigation (depending on model)
You can let yourself be warned about
loading and vehicle-specific restrictions
(e.g. height, weight, restrictions for hazardous materials).
Setting Driver alerts
If this information is saved in the map
material and is supported by your
navigation device, you can display
information signs, e.g. for dangerous
bends or descending gradients. In
addition, you can define whether the
display of the sign is also to be
accompanied by a warning sound.
> In the
press the
The
Warnings settings window,
Driver alerts button.
Driver alerts settings window
appears.
The available driver alerts are divided into
4 categories. The four categories can be
enabled or disabled individually.
The warning sound can be set individually for each of the four categories by
pressing the symbol with the bell (
warning sound switched on).
81
Page 82

>>> NAVIGATION MODE
The following signs are available in the
individual categories:
•
Curve warnings
This category includes warning signs
that relate to sharp curves.
•
Traffic regulations
This category includes other traffic
regulations, such as no passing zones.
•
General warnings
This category includes all other
warning signs, such as steep
gradients, falling rocks.
•
Informatory road signs
This category contains the available
information signs.
> Confirm your settings by pressing the
button.
Setting environmental zones (depending on model)
You can let yourself be warned about environmental zones provided that this information is saved in the card material
and is supported by your navigation system. This function can be activated or
deactivated . By pressing the symbol
with the bell, you can set the audible
warning signal ( audible warning
signal activated).
> Confirm your settings by pressing the
button.
Truck warnings (depending on model)
You can let yourself be warned about
environmental zones provided that this
information is saved in the card material
and is supported by your navigation
system. The function can be adjusted
separately for journeys with and without
active navigation. The function can be
activated or deactivated
respectively. By pressing the symbol
with the bell, you can set the audible
warning signal ( audible warning
signal activated).
> Confirm your settings by pressing the
button.
82
Page 83

NAVIGATION MODE >>>
Setting Speed info
The
Speed info settings window allows
to select whether speed limits are
displayed in parallel to the navigation.
You can also receive an audible warning
about exceeding the speed limit.
Note:
This information can only be displayed if
it is contained in the map material.
¤ Risk of accident!
The information in the map material
may be incorrect as a result of shortterm changes (road works, for
example).
The traffic situation and the local road
signs take precedence over the
navigation system information.
> In the
press the
The
Warnings settings window,
Speed info button.
Speed info settings window
appears.
The following settings are available.
Setting Meaning
Show signs Select whether speed
limits are never
displayed, always
displayed or only
displayed if the limit is
exceeded. Furthermore,
you can select whether
the sign should blink
when exceeding the
speed limit, by selecting
Always or If speed limit
is exceeded
In city Select the amount over
.
the speed limit at which
you would like to receive
an acoustic warning
within built-up areas.
Setting Meaning
Out of city Select the amount over
the speed limit at which
you would like to receive
an acoustic warning
within built-up areas.
Alert
An audible signal is to
sound when exceeding
speed limits.
Voice
output
A speaker’s voice warns
you of exceeding the
speed limit.
> Confirm your selection by pressing the
button.
83
Page 84

>>> NAVIGATION MODE
1 1
1 1
2 2
2
2
1
2
The Blocked roads button
In the Blocked roads settings window
you can unblock previously permanently
blocked roads (See "Blocking a section of
the road permanently" on page 130) or
modify the block (time and days of week
of block).
> In the settings menu, press the
Blocked roads button.
A window is displayed containing the
roads that have previously been blocked.
Note:
To delete all blocked roads from the list,
press the
followed by the
that then appears.
Delete all blockings button
Yes button in the display
> Select the blocked road you want.
The road is currently blocked for all days
of the week, for the whole day . You
can now set whether or not the road
should be blocked for each day of the
week.
> Press the buttons with the days
on which the road should not be
blocked .
> Press the clock symbol under one of
the days and limit the block of this day
to the required time of the day.
You can now set whether or not the road
should be blocked for each day of the
week.
> Confirm your settings by pressing the
back button .
or
> Press the button under one of the
days and set up to two times when the
road should be blocked.
> Using the buttons set the first
period when the road is to be blocked
on this day.
> Using the buttons set the second
period when the road is to be blocked
on this day if necessary.
84
Page 85

NAVIGATION MODE >>>
Note:
Press the
Block 24 h, button to set a
block for an entire day.
Press the
Use setting for... button to
also use the block on other days.
> Confirm your settings by pressing the
back button .
The Vehicle data button
This menu allows the calculation of an
economic route by using the fuel
consumption of the vehicle.
> Press the
The Vehicle data window is displayed.
The following settings can be made:
> Press the
erage fuel consumption of the vehicle
within cities. The input menu for numbers appears. Any existing inputs can
be deleted with the arrow buttons. Enter the fuel consumption value with
the number keys. The value can be given to one decimal point. Confirm your
entry by pressing the
Vehicle data button.
Urban button to enter the av-
OK button.
> Press the
Extra-urban button to enter
the average fuel consumption of the
vehicle outside cities. This can be
entered as described for the In city
value.
> Press the
Type of engine button to set
your engine type. The display changes
by pressing the button repeatedly. You
can select Petrol, Diesel and Hybrid as
the engine type.
> Press on the
Fuel economy button to
change to the consumption unit. Pressing this button repeatedly will change
the display. You can choose from the
consumption units l/100 km, MPG (UK)
and MPG (US).
85
Page 86

>>> NAVIGATION MODE
The Format button
In the Format settings window you can
set the measurement units to be used
for times and distances.
> In the settings menu, press the
button.
The
Format settings window appears.
> Press the
Time button to switch be-
tween the 12 hour clock and the
24 hour clock.
> Press the
Distance button to switch
between kilometres and miles.
> Confirm your settings by pressing the
button.
Format
The Time button
You can select the time zone relevant for
your location in the
window. This setting is important for the
correct calculation of the estimated time
of arrival.
> Press
The
Using the
Time in the settings menu.
Time settings window appears.
Time zone you can set whether
the time zone should be set automatically by the Navigation device or not (
auto time zone
zone
off ).
on or Use auto time
If the automatic function is switched off,
you can select the desired time zone by
pressing the button below
zone
.
Time settings
Use
Use auto time
The Reset button
You can reset the navigation settings to
their factory settings.
The settings will then be reset. The fast
access mode data, stored routes,
blocked routes, voice and home address
are retained.
> Press the
> Press the
The navigation settings are reset to their
factory settings.
Reset button.
Yes button.
86
Page 87

NAVIGATION MODE >>>
Traffic announcements using TMC (depending on the model)
Your Navigation device can receive
traffic announcements (TMC messages)
from radio stations. The power supply
with the integrated TMC antenna must
be connected to the carrier plate for this
function.
Note:
TMC is not available in all countries.
Traffic announcements are transmitted
by radio stations via the TMC (Traffic
Message Channel) in addition to the
radio programme and are received and
analysed by the navigation system.
Receiving traffic announcements is free
of charge.
Note:
As the traffic announcements are
transmitted by radio stations, we cannot
assume responsibility for the
completeness or accuracy of the
announcements.
Austria: The location and event code
was made available by ASFINAG and
BMVIT.
The Navigation device constantly checks
whether there are any relevant
announcements for the route that has
been set. All traffic problems that have
been received are shown on the map.
If the continuous checks determine that
a traffic announcement is relevant to
route guidance, the unit can
automatically recalculate a new route to
the destination (See "The TMC or Traffic
button (model dependent)" on page 77).
Live Traffic – Traffic Announcements via Data Connection
(model dependent)
Your navigation device can receive traffic
announcements from a server via a data
connection. These announcements are
more up-to-date than data received via
TMC and are also available more quickly.
There must also be an appropriate data
connection. Subsequent use of the traffic
announcements is the same as described below for TMC.
If a connection to the server is not possible, the system then tries to switch over
to TMC traffic announcements (model
dependent). As soon as TMC is displayed,
there is no connection to the Life Traffic
server.
A data connection can be established
via an integrated WLAN/WiFi® and/or
Bluetooth® interface, depending on the
navigation device model. Please refer
the relevant chapters in this manual.
87
Page 88

>>> NAVIGATION MODE
Notice:
The data transmission via your mobile
phone may involve additional costs depending on the mobile phone contract.
Please find out from your mobile phone
provider before activating. If a connection to the server is not possible, e.g. because no mobile phone network is
available for a longer period of time,
then the system switches over automatically to TMC until a connection to
the server is possible again.
With this button you can
specify the time a traffic
congestion bypass will save
before it should be displayed.
Values between 3 minutes
and 30 minutes of timesaving are available.
Displaying traffic messages on the map
The latest traffic messages are
represented graphically on the traffic
overview map. Sections of the route
where there are traffic problems are
highlighted blue. Arrows indicating the
traffic direction which is affected by the
traffic problem continue to be displayed.
In addition to the coloured mark, a
warning sign is displayed on the stretch
of road affected.
In the case of devices with Live Traffic –
traffic messages, movement data in
coloured gradations are represented in
addition to traffic congestions. Green,
yellow, orange and red are used here,
whereby green signifies a free flow of
traffic and red indicates that serious
delays are to be expected.
Using TMC or Live-Traffic
The use of TMC is described below, Live
Traffic behaves similarly here. When the
Navigation device has been attached to
the carrier plate (power supply with the
integrated TMC antenna connected), your
Navigation device will receive up-to-date
traffic announcements. It is then possible
to calculate dynamic routes (traffic jam
diversion).
You can also view traffic announcements
directly.
Settings for TMC can be made as
described under "The TMC or Traffic
button (model dependent)" on page 77.
> In the main menu, press the
button.
The map overview appears.
88
Page 89

NAVIGATION MODE >>>
1
2
3
4
12345
The message list appears when you
press
TMC List view.
You can scroll through the list using the
arrow keys or the scroll
wheel on the right-hand edge of the
screen.
The following is displayed for each traffic
announcement:
The type of problem and the street
number (motorway, A-road or
district road)
The distance as the crow flies from
the current position, and the length
and duration of the problem if
applicable
The part of the route with the travel
direction
If a TMC message lies on your route,
the message is indicated by the sign
.
Traffic announcements received via
Premium-TMC are indicated by the
symbol.
A red twisted arrow next to the
traffic report warns for traffic
jams that need to be avoided. If the
arrow is crossed out in grey and red
, the route does not go around
the traffic jam.
Reading a message
> Press on the desired message in the
list. The message display appears on
the top of the screen, while a map is
displayed below it with the related
route section. Press on the message
again to display more information on
the traffic obstruction. By pressing it
again, the extra information disappears.
The message display appears.
> Press the arrow buttons to
scroll in the messages.
> Press the button to return to the
message list.
89
Page 90

>>> NAVIGATION MODE
Taking announcements into consideration when calculating routes
Your Navigation device can take traffic
announcements into consideration when
calculating a route. You have the option
of setting this function to automatic,
manual or never in the menu in the
navigation settings with the TMC option
(see "The TMC or Traffic button
(model dependent)" on page 77).
Automatic recalculation
If the traffic on your route is obstructed,
the Navigation device checks whether an
expedient detour of the obstruction is
possible. If an expedient detour is
possible, then an alternative route is
calculated and you are guided via the
alternative route.
Manual recalculation
If a traffic announcement affects your
route, a window with detailed information on the traffic announcement appears.
If, after displaying the traffic message,
the navigation system detects that a
sensible alternative route is possible, the
following display appears.
Note:
This display may also appear if, for
example, a previously obstructed route
is now free again.
The display provides you with an
overview of the alternative route
calculated.
The red route or route marked blue for
an obstruction shows the previous route.
The route marked yellow displays the
alternative route calculated.
In the right section of the display, you can
see how much the route changes and
how much time you will likely save if you
use the alternative route.
> Now either press the
the alternative route or press the
Reject button to continue using the
existing route.
OK button to use
90
Page 91

NAVIGATION MODE >>>
1
2
5
4
6 3
7
1234567
1
3
7
6
2
8
4
10
5
9
14
13
12
11
123
The map display
The map display is used primarily for
route guidance. However, you can also
use the map display without route
guidance to show your current position
and, for example, to receive warnings
about exceeding the speed limit.
Calling up the map display
The map display is called up
automatically when you start route
guidance.
Without route guidance, you can call up
the map display from the main menu.
The map display will then appear and, if
GPS reception is available, will show
your current position.
If route guidance is already active, the
map will be displayed with route
guidance.
Structure of the map display
The structure depends on the settings
made in "Map display options" on
page 100 or in "The Map view button" on
page 66 and whether route guidance is
active or not.
Map display without route guidance
Speed limit on the road currently
being driven on (display not
available for all roads), signs for the
driver alerts will also be displayed
Zoom buttons
Power level/telephone status
(depending on the model)
Button for calling up the options
Vehicle position
Current road
Information box (if displayed)
showing vehicle speed and altitude
above sea level
Map display with route guidance
If the navigation is not active, almost the
whole area of the touch screen will be
taken up by the map.
Speed limit of the street currently
being driven on (display is not
available for all streets)
Driver alerts (depending on the
model)
Zoom buttons
91
Page 92

>>> NAVIGATION MODE
45678
910111213
14
2
1
1
2
Power level/telephone status
(depending on the model)
Button for calling up the options
Traffic lane recommendation (only
appears on some multi-lane roads;
green arrows = recommended
lanes)
Note:
If you follow the lane recommendation,
the next driving maneuver is possible
without changing lanes.
Vehicle position
Current street or street to which the
next driving maneuver leads
Distance to the next driving maneuver
Next driving maneuver
Calls up volume settings
Button for
SituationScan
Button for Route overview (only with
the selected route active. If TMC
announcements are activated on the
route, a traffic jam warning sign
appears on the button.)
Information box
Your current position is displayed on the
map via the position icon.
The Information box
During route guidance you can have
information displayed in the Info box.
If you press the Info box again, more or
less fields are displayed. At least one
field and a maximum of three fields can
be displayed. The information displayed
depends on the settings that are selected
in the
Navigation settings in the map
view menu > Advanced > Info box data
fields
. The following can be selected:
• With selected route : Remaining
distance to destination, remaining
travel time, time of arrival at
destination, speed, speed limit, time,
position altitude above sea level and
traffic delays on the entire route
(selected models)
• Without selected route : Speed,
Speed limit, Time and Positionheight
92
Page 93

NAVIGATION MODE >>>
1
14
11
4
5
3
6
8
7
10
13
2
12
15
9
1234567
8
910111213
14
15
Information is also displayed in the
bottom left corner in the preview area.
The next manoeuvre is displayed as an
arrow, with a distance indication
underneath it. If two driving manoeuvres
are to be performed in succession within
a short time, another smaller arrow
indicating the second driving manoeuvre
is displayed above the first arrow.
You can adjust the volume of the
navigation announcements by pressing
the button with the speaker symbol in
the preview area (See "Changing the
announcement volume" on page 96).
Split screen with route guidance
Note:
If you follow the lane recommendation,
the next driving maneuver is possible
without changing lanes.
Next driving maneuver
Current street or street to which the
next driving maneuver leads
Distance to the next driving
Speed limit on the road currently being driven on (display not available
for all roads), signs for the driver
alerts will also be displayed
Driver alerts (depending on the
model)
Zoom buttons
Vehicle position
Power level/telephone status
(depending on the model)
Button for calling up the options
maneuver
Bar display to illustrate the distance
to the next driving maneuver
Button for
SituationScan
Calls up volume settings
Information box
Button for Route overview (only with
the selected route active. If TMC
announcements are activated on the
route, a traffic jam warning sign
appears on the button.)
Traffic lane recommendation (only
appears on some multi-lane roads;
green arrows = recommended
lanes)
93
Page 94

>>> NAVIGATION MODE
1
11
10
12
4
2
5
6
7
8
9
13
3
123456789
101112
13
Route guidance with arrow display
Traffic lane recommendation (only
appears on some multi-lane roads;
green arrows = recommended
lanes)
Note:
If you follow the lane recommendation,
the next driving maneuver is possible
without changing lanes.
Vehicle speed and altitude above sea
level
Information box
Button for
SituationScan
Power level/telephonestatus (depending on the model)
Button for calling up the options
Button for Route overview (only with
the selected route active. If TMC
announcements are activated on the
route, a traffic jam warning sign
appears on the button.)
Driver alerts (depending on the
model)
Speed limit of the street currently
being driven on (display is not
available for all streets)
Next driving maneuver
Current street or street to which the
next driving maneuver leads
Distance to the next driving
maneuver
Calls up volume settings
Lane Assistant Pro 3D (model dependent)
You can display an animated realistic
representation of the lane at many junctions. To do this, switch on the function
Lane Assistant Pro 3D as described un-
der "The Guidance info button" on
page 70. At selected complex junctions
you will be shown exactly which lane you
have to change to. You can leave the
Lane Assistant Pro 3D again by touching
the display.
Map display with Junction view
You can display a detailed and realistic
view of the lane situation at many
motorway junctions.
To do this, switch on the
Junction view
function as described under "The
Guidance info button" on page 70.
If you are then directed through a motorway junction by the Navigation device,
you will see a corresponding display.
> Follow the lanes indicated with the
arrows.
94
Page 95

NAVIGATION MODE >>>
Tunnel view
When your enter a longer tunnel, a three
dimensional tunnel view appears. If
there is no maneuvres performed in the
next 1000m in the tunnel, the lane of the
current road section is displayed. An
overview of the tunnel is displayed in the
bottom on the right. When you touch the
display, the tunnel view disappears. If
any maneuvres are performed in the
tunnel, or if the next maneuvre is
performed outside the tunnel, a tunnel
view is displayed in full image mode with
the coming maneuvre.
Note:
The tunnel view and the intersection
view can be deactivated by touching the
display. The map view is displayed
again. If you would like to deactivate the
tunnel view permanently, de-select the
"Tunnel view" option in the "Settings >
Navigation settings > Route guidance"
menu.
Note:
The tunnel view provides a schematic
view of the route layout of the tunnel.
The whole tunnel layout, the first route
section and the vehicle position are
displayed. Since there is no GPS signal
during the travel through the tunnel, the
displayed position is only calculated.
Using the map display
Repeating the last announcement
During route guidance, the system
announces important information, e.g.
the next driving manoeuvre. The last
announcement can be repeated with
updated information.
> Press the speaker symbol in the
preview area while route guidance is
active.
The last announcement is be repeated
with updated information. The volume is
also displayed. If the preview area is
reduced and no speaker symbol is
displayed, the announcement can be
spoken again if you press the preview
area.
95
Page 96

>>> NAVIGATION MODE
Changing the announcement volume
The volume of announcements can be
adjusted.
> Press the speaker symbol in the
preview area while route guidance is
active. On the top edge of the image,
the Mute button is displayed with a
speaker symbol. A bar diagram and
the and buttons are
displayed on the right.
The bar diagram represents the volume.
> Press or or pull your finger
over the scroll strip to increase or
decrease the volume.
> Press
Mute in order to mute the
announcements.
An x now appears next to the speaker
symbol . With pressing the
button, you can make the volume control
elements disappear.
> Press again the speaker symbol in the
preview area to mute the voice again.
¤ Warning!
Always adjust the volume so that you
can still hear any ambient noise while
driving.
The bar display disappears again
automatically after a short while if no
button is pressed.
Map zooming
The map can be zoomed into in steps by
using the zoom buttons.
> Press the button. The zoom
buttons are displayed.
> Press zoom in to "zoom in on the
map" and therefore to get closer to the
details displayed.
> Press zoom out to "zoom out from
the map” and therefore to obtain a
larger overview.
> Press the button to switch back to
the set zoom step after a change.
Note:
The zoom steps are altered in quick
succession by pressing and holding the
or button.
If you change the zoom step, a button
with two red lenses are displayed.
> Press the button to restore the
originally set zoom step.
96
Page 97

NAVIGATION MODE >>>
Moving the map
You can move the map to any point.
> To do this, press the map briefly.
> Then press any point on the map and
move it in the required direction.
The map is then moved accordingly.
Note:
By pressing the
display your current position again.
You can also select a point as a destination as described under "Selecting a destination from the map" on page 60.
GPS Position you can
Map orientation
When a route is activated, the map view
can be oriented in different ways.
If you have selected a 2D view in the
Navigation settings in the map view (see
page 64), this pertains to the compass
direction only.
> Press the 2D map view on the display
a little longer.
Apart from the pulsating point, a
compass and two arrow buttons pointing
to the left and right appear on the top
edge of the screen.
> Press the and buttons to
rotate the map towards the desired
compass direction.
You can orient the map for example in
the direction of travel.
If you have selected a 3D display for the
map view, the vertical display angle can
be adjusted, too.
> Press the 3D map view on the display
a little longer.
Apart from the pulsating point, a compass and two arrow buttons and
pointing to the left and right appear on
the top edge of the screen, and on the left
edge of the screen, two arrow buttons
pointing up and down are displayed.
> Press the button.
97
Page 98

>>> NAVIGATION MODE
The viewing angle will be lower and the
horizon is moved back after a while into
the image.
> Press the button.
The viewing angle will be steeper. If the
angle is exactly 90°, you are viewing the
map in the 2D view from the top.
The Route overview
With the Route overview, you can have
Points of Interest (POIs) and, if the TMC
on route option is activated in the
Navigation settings > Route overview
menu, TMC events displayed on the
selected route.
> Press the button.
A list of POIs and traffic events are
displayed. In the top edge of the screen,
four single buttons are displayed for TMC
announcements on the route and the
three selected POI Categories are also
displayed. Apart from the symbols, the
number of TMC announcements and
POIs are displayed.
> Press one or more buttons to display
TMC events or POIs.
A list of POIs and, if applicable, TMC
events is displayed with the expected
arrival time and distance from the
current vehicle position.
> Press the desired Point of Interest or
TMC event.
Information such as the address and the
telephone number of the POIs or the type
of traffic obstruction are displayed. From
this view, all actions already described in
the chapter Points of Interest on page 52
can be accessed, such as displaying POIs
on the map, inserting or storing
stopovers on routes.
The red line in the middle of the screen
represents your route. If this line ends
with two points, then the list continues
and you can scroll through the complete
list by moving your finger.
At cross-border destinations, the border
crossing is displayed with the appropriate national flag. If you select the petrol
station button, a petrol station is displayed before and after the border if
available.
98
Page 99

NAVIGATION MODE >>>
Note:
If there is a traffic jam announcement
on the route, the TMC symbol
appears on the button. If there are
no traffic jams reported on the route,
the POI symbol is displayed
instead.
SituationScan
If this function is activated in the
Navigation settings in the Route
guidance menu, three assistants support
the driver during the travel with useful
information and help in case of
unexpected traffic situations.
The detour assistant
This function reacts to the reduction of
the speed. If there are no POIs such as
resting places or filling stations in the
vicinity, the assistant assumes that the
driver is in a traffic jam. If the symbol
is displayed in colour and begins to blink,
the assistant suggests a detour.
> Press the symbol.
A message is displayed with the
question "You are probably standing in a
traffic jam. Would you like to avoid the
jam using a detour?". Now you can have
the suggested detours displayed and
select or reject them.
If the vehicle is not on a motorway, the
detour assistant calculates possible
alternative routes before the next
crossing in case of strong stop-and-go
traffic to get you there faster. If the
assistant can calculate an alternative
route before the vehicle passes the
crossing, the symbol is blinking. The
alternative routes can be displayed and
selected similar to the identically named
function described on page 84.
The Park Assistant
This assistant will be activated when you
are near the destination or passed by the
destination. In the case when the driver is
looking for a parking place, the
symbol is activated as soon as it is
possible to park in the given point of
interest. Up to eight parking possibilities
may be displayed, where the route to
there and the footpath from the parking
lot to the destination are governing for
the selection.
> Touch a parking possibility on the map
to select it.
You can then have the route leading
there displayed and the route guidance
started. You can have the device lead you
to the destination in pedestrian mode at
the arrival at the parking place.
The departure assistant
This assistant reacts when you leave the
suggested route, and asks your
intentions with a list of options.
Depending on whether you are looking
for a resting place or a parking place, or
would like to avoid a visual traffic
obstruction, a tunnel or a toll road, the
assistant displays the appropriate POIs in
the vicinity or calculates a detour that
supports the driver in avoiding the given
route section. If the assistant has
calculated a detour, the symbol is
activated and blinking.
99
Page 100

>>> NAVIGATION MODE
Map display options
In the map display options, you can
change the settings for route guidance,
the map display and the route.
On the map display, press the button on
the bottom right.
This opens the options menu for the map
display.
You can go to the next or previous page
of the options by pressing the and
buttons or by using the scroll
wheel.
Note:
The scope of the displayed functions
depends on whether route guidance or
a route with several destinations is
active.
The options menu is exited either by
selecting a function or by pressing the
button.
Displaying the whole route
(Only available when route guidance is
active.)
You can have the whole route to the
destination displayed on the map.
Additionally, you can have a complete
route description displayed. As a further
option, you can display and, if needed,
select the different routes that can be set
in the Route options.
> Call up the options menu for the map
display.
> Press the
The complete route is displayed.
Show route button.
100
 Loading...