

Page 1

OPTION
OPTIONAL EXTRA
ZUBEHÖR ALS OPTION
IN OPTIE
ACCESSORI
ACCESORIOS
ACESSÓRIOS
NOTICE D’UTILISATION
INSTRUCTIONS FOR USE
GEBRAUCHSANWEISUNG
GEBRUIKSAANWIJZING
ISTRUZIONI D’USO
MANUAL DE INSTRUCCIONES
MANUAL DE INSTRUÇÕES
GR O+
0-13KG
Page 2

compatibilités - compatibility
compatibilità - compatibilidad - compatibilidade
passend für - combineerbaar
2
Page 3
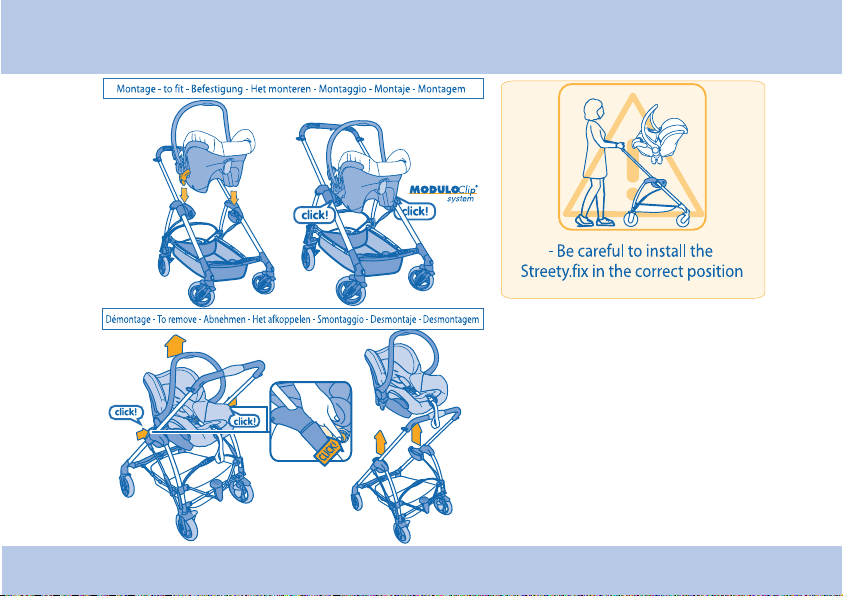
montage et démontage du babycoque - assembling and dismantling the baby seat
montage und demontage der schale - monteren en afkoppelen van de babyschelp
montaggio e smontaggio del seggiolino auto - montaje y desmontaje del portabebé
montagem e desmontagem da babycoque
3
Page 4
déhoussage - removal of cover
abnehmen des bezugs - bekleding afnemen
sfoderabilità - desenfundado - tirar a forra
1
4
2
3
1
2
3
4
5
4
Page 5
COMPARTIMENT DE RANGEMENT DU MODE D’EMPLOI
STORAGE COMPARTMENT FOR INSTRUCTION MANUAL
AUFBEWAHRUNGSFACH FÜR DIE GEBRAUCHSANWEISUNG
OPBERGVAKJE VOOR GEBRUIKSAANWIJZING
SCOMPARTO PER IL MANUALE D’ISTRUZIONI
COMPARTIMENTO PARA GUARDAR EL MANUAL DE INSTRUCCIONES
COMPARTIMENTO PARA GUARDAR O MANUAL DE INSTRUÇÕES
1
2
OPTION
OPTIONAL EXTRA
ZUBEHÖR ALS OPTION
IN OPTIE
ACCESSORI
ACCESORIOS
ACESSORIOS
STREETY.BASE
NOTICE D'UTILISATION
INSTRUCTIONS FOR USE
GEBRAUCHSANWEISUNG
GEBRUIKSAANWIJZING
ISTRUZIONI D’USO
MANUAL DE INSTRUCCIONES
MANUAL DE INSTRUÇÕES
Baby coque
STREETY.FIX
GR O+
0-13KG
5
Page 6
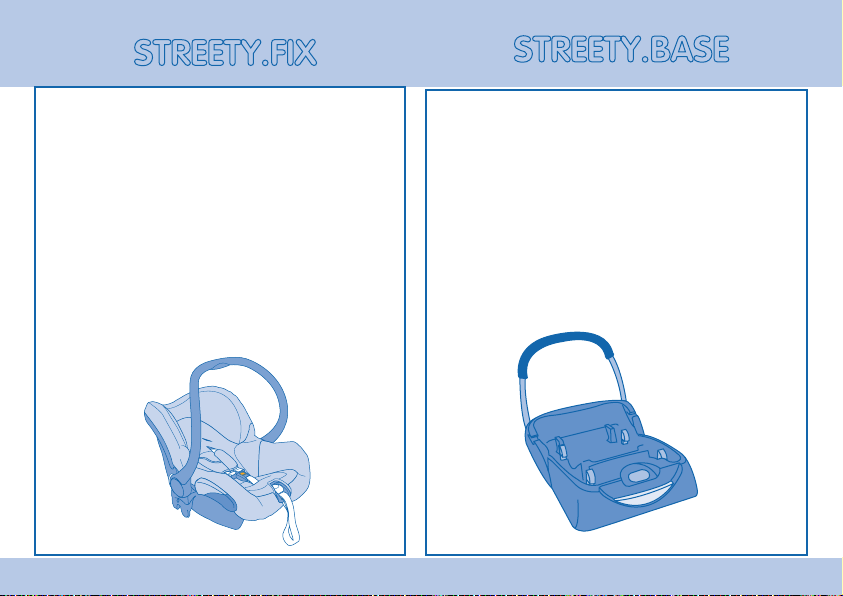
STREETY.FIX
STREETY.BASE
FR - Mode d’emploi du Streety.fix p. 7 - 18
Garantie p. 22
GB - Instructions for Streety.fix p. 7 - 18
Guarantee p. 23
DE - Gebrauchsanweisung Streety.fix S. 24 - 32
Garantie S. 36
NL - Gebruiksaanwijzing Streety.fix Blz. 38 - 50
Garantie Blz. 54
IT - Istruzioni d’uso dello Streety.fix p. 38 - 50
Garanzia p. 55
ES - Instrucciones de uso de la Streety.fix,
pág. 55 - 67
Garantía p. 71
PO - Manual de instruções Streety.fix p. 55 - 67
Garantia, p. 72
FR - Mode d’emploi du Streety.base p. 19 - 21
GB - Instructions for Streety.base p. 19 - 21
DE - Gebrauchsanweisung Streety.base
S. 33 - 35
NL – Gebruiksaanwijzing Streety.base
Blz. 51 – 53
IT - Istruzioni d’uso della Streety.base p. 51 – 53
ES - Instrucciones de uso de la Streety.base, pág.
68 - 70
PO - Manual de instruções Streety.base
p. 68 - 70
OPTION
OPTIONAL EXTRA
ZUBEHÖR ALS OPTION
IN OPTIE
ACCESSORI
ACCESORIOS
ACESSÓRIOS
6
Page 7
RECOMMANDATIONS POUR L’UTILISATION DU
STREETY.FIX ET STREETY.BASE
INSTRUCTIONS FOR USE OF STREETY.FIX AND
STREETY.BASE
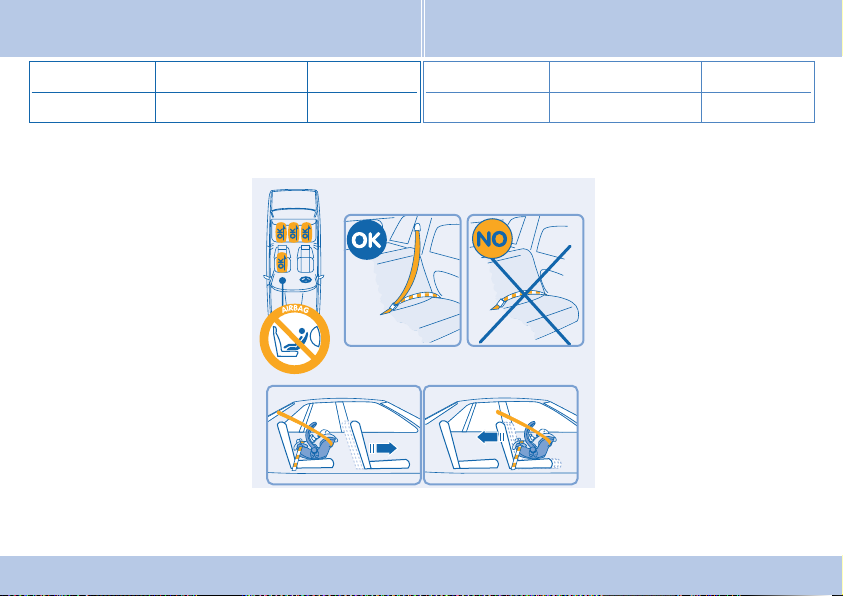
Sens
Places
Groupe O+
Dos à la route Avants et Arrières 0 à 13 kg
• Le siège peut être utilisé aux places avant
(selon la législation en vigueur) ou aux
places arrière. Les sièges rabattables
doivent toujours être verrouillés. Ce
dispositif est seulement utilisable sur
les véhicules approuvés équipés de
ceintures de sécurité 3 points / statiques /
à enrouleur, homologuées, conformément
au règlement CEE N°16 / ONU ou d’une
norme équivalente.
• NE PAS installer de siège pour enfant
tourné vers l’arrière sur un siège avant
équipé d’un coussin gonflable. RISQUE
DE MORT OU DE BLESSURE GRAVE.
• Régler la position des sièges du véhicule
pour ne pas entraver l’installation et
l’efficacité du dispositif de retenue pour
enfants:
- Avancer le siège passager avant pour une
installation à l’arrière du véhicule.
- Reculer le siège passager avant pour une
installation à l’avant du véhicule et ainsi
profiter au maximum de la longueur de la
ceinture avant du véhicule.
• Veillez à ce que les pieds de votre dispositif
de retenue pour enfants soient bien posés
sur le siège du véhicule.
Direction
Position
Rear-facing Front and rear seats 0 to 13 kg
• The seat can be used in the front (if allowed
by current legislation) or on the rear seats.
Folding seats must always be locked in
place. This device must be used only on
approved vehicles fitted with 3 point seat
belts/static/retractable, approved to ECE/
UN regulation or equivalent standard.
• DO NOT install the child safety seat
facing the rear on a front seat fitted
with an airbag. DANGER OF DEATH OR
SERIOUS INJURY.
• Adjust the position of the vehicle’s seats
so as not to interfere with the correct fitting
and effectiveness of the child safety seat:
- Push the front passenger seat forward to
install the child safety seat in the rear of
the vehicle.
- Push the front passenger seat backwards
when installing in the front of the vehicle
to use the length of the front seat belt to
maximum advantage
• Ensure that the base of the child safety
seat is solidly placed on the seat of the
vehicle.
7
FR - GB
Group O+
Page 8

IMPORTANT
WARNING
• Nous vous conseillons de lire attentivement cette notice et de manipuler votre
produit avant de l’utiliser.
• Conserver toujours la notice pour une utilisation ultérieure, une poche de
rangement a été prévue à cet effet sur le dispositif de retenue pour enfants.
• Ne jamais laisser votre enfant sans surveillance.
• Ce dispositif de retenue pour enfants est efficace uniquement lors du respect
des instructions d’utilisation.
• Pour votre sécurité et celle de votre enfant, installez toujours ce dernier dans
le dispositif de retenue pour enfants quel que soit le trajet que vous avez à
effectuer.
• Même minimes, les chocs subits par un véhicule peuvent transformer l’enfant
en un véritable projectile.
• Attachez toujours le dispositif de retenue pour enfants même lorsque l’enfant
n’y est pas installé.
• Modèle approuvé pour le groupe 0+ c’est à dire pour un enfant d’un poids
inférieur à 13 Kg (jusqu’à 12 mois environ).
• Le dispositif de retenue pour enfants (groupe 0+) doit être utilisé dos à la route.
• La responsabilité du fabricant ne saurait être engagée, que dans le cadre de
l’attribution du Règlement Européen (R44). Cette homologation n’exclut pas la
prudence et le respect du code de la route.
• Ne modifiez jamais la construction ou les matériaux du siège et de la ceinture
sans avoir consulté le fabricant.
• Ne placez jamais d’objets lourds sur la tablette arrière, afin d’éviter les
projections en cas d’accident.
• L’utilisateur doit toujours veiller à ce que les bagages et autres objets
susceptibles de causer des blessures à l’occupant du siège en cas de choc
soient solidement arrimés.
• La température à l’intérieur d’un véhicule peut être très élevée, notamment
après une longue exposition au soleil. Il est fortement recommandé, dans ces
conditions, de recouvrir le siège auto d’un tissu ou autre qui empêchera les
fixations du harnais, et plus particulièrement les pièces métalliques, de chauffer
et de brûler l’enfant.
• Le siège doit impérativement être remplacé après un accident.
• Vérifiez toujours si une partie du siège ou du harnais n’est pas coincée sous un
siège ou dans la porte du véhicule.
FR - GB
• We advise you to read these instructions carefully and to ensure you are
familiar with the product before using it.
• Always retain the instructions for future use, a storage pocket for this has been
provided on the child’s safety seat.
• Never leave your child unattended.
• This child safety seat is effective only if the fitting instructions are followed.
• For your own safety and that of your child, always place your child in the
safety seat no matter how short the journey you are making.
• Even a slight accident can turn your child into a projectile.
• Always keep the child safety seat fitted even when the child is not being
carried.
• Model approved for the 0+ group, i.e. for a child weighing less than 13 kg (up
to about 12 months of age).
• The child restraint system (0+ group) must be used with the back facing
forwards.
• The manufacturer’s liability extends only to what is contained in European
Regulation (R44). This approval does not preclude due care and observation
of the highway code.
• Never change the construction or materials of the seat or belt without
consulting the manufacturer.
• Never place heavy objects on the rear parcel shelf to avoid them being flung
forward in case of an accident.
• The user must always ensure that luggage and other objects which could
injure the occupant of the seat in case of an accident are firmly fastened down.
• The temperature inside a vehicle can be very high, especially after it has stood
in the sun for a long time. In such conditions, you are strongly advised to
cover the child’s seat with a cloth or other suitable item to prevent the harness
fastenings, in particular the metal parts, from becoming hot and burning the
child.
• A new seat MUST be fitted after an accident.
• Always check that no part of the safety seat or harness is trapped under a
seat or in the door of the vehicle.
• Do not use the child safety seat without its cover. Do not replace the seat
cover with one not recommended by the manufacturer because the cover is
an integral part of the restraint.
8
Page 9

IMPORTANT
WARNING
• Ne pas utiliser le dispositif de retenue pour enfants sans la housse. Ne pas
remplacer la housse du siège par une autre housse que celle recommandée
par le constructeur, car elle intervient directement dans le comportement du
dispositif de retenue.
• Les produits Bébé Confort ont été conçus et testés avec soin pour la sécurité et
le confort de votre bébé. N’utilisez que des accessoires vendus ou approuvés
par Dorel France. L’utilisation d’autres accessoires peut s’avérer dangereuse.
• Après avoir installé votre enfant, assurez-vous que la ceinture soit correctement
tendue en tirant sur la sangle. Assurez-vous également que la sangle ne se
vrille pas.
Entretien
• Avant démontage, veillez à bien noter la manière dont les différentes parties
sont montées sur le siège afin de tout remonter correctement.
• Pour une entière satisfaction, le produit dépend d’un entretien régulier.
Confection :
• Avant nettoyage consulter l’étiquette de composition du textile cousue sur
la confection, vous y retrouverez les symboles de lavage propre à l’élément
à laver.
Coque :
• Nettoyer la coque à l’aide d’un chiffon humide.
Pictogrammes de lavage :
Lavage en machine 30°
Lavage à la main
seulement
Ne pas utiliser de Javel (Chlore)
Pas de séchage en tambour
Pas de repassage
Aucun nettoyage à
sec
.
• Bébé Confort products have been carefully designed and tested to ensure
the complete safety and comfort of your baby. Use only accessories sold or
approved by Dorel France. The use of other accessories may be dangerous.
• After having put your baby in the seat, ensure that the belt is correctly
tensioned by pulling the strap. Also ensure that the strap is not twisted.
Care
• Before removal, ensure you have carefully noted the way which the various
parts are attached to the seat so as to facilitate reassembly.
•
To give perfect satisfaction, the product must be cared for regularly.
Fabric:
• Before cleaning check the label sewn into the fabric, you will find the wash
symbols indicating the method of washing each item.
Washing symbols :
Machine wash 30 °
Hand wash only
Do not use bleach
(Chlorine)
Shell:
• Clean the shell using a damp cloth.
9
Do not tumble dry
Do not iron
Do not dry clean
FR - GB
Page 10
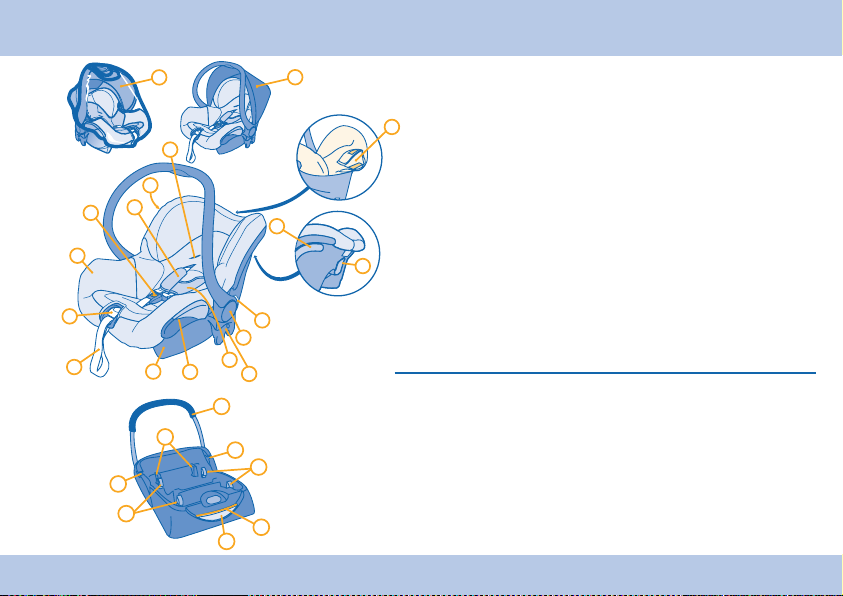
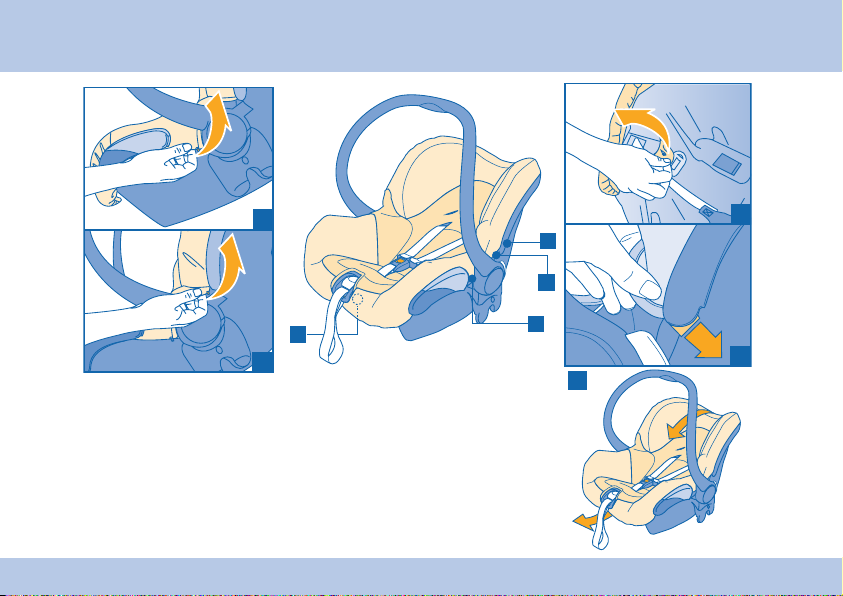
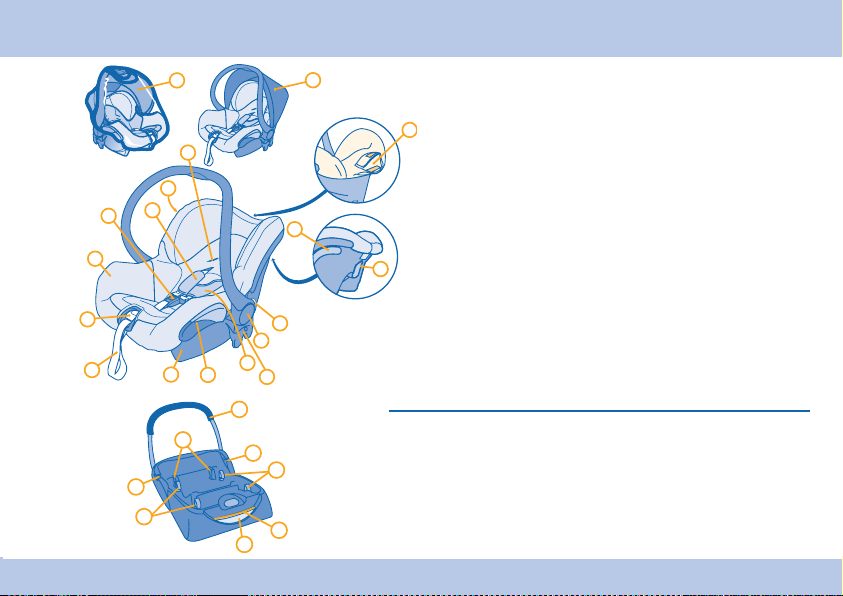
DESCRIPTION
8
14
9
10
OPTION
2
5
FR - GB
18
6
5
7
1
2
11
13
1
3
17
3
12
15
2
16
2
5
4
1. Coque
2. Poignée
3. Instructions et autocollant pour «Airbag».
4. Mode d’emploi (entre la coque et le polystyrène)
4
5. Autocollant de mise en garde
6. Encoches pour le réglage en hauteur des bretelles
7. Bretelles
8. Fermoir du harnais
9. Bouton de réglage harnais
11. Protections d’épaules
10. Sangle pour régler d’une seule main les bretelles
12. Crochet arrière pour le passage de la partie épaule
de la ceinture 3 points
13. Crochet pour le passage de la partie abdominale
de la ceinture 3 points
14. Housse amovible
15. Bouton de commande pour le réglage de la poignée de transport
16. Modulo Clip® System (pour fixation sur châssis Bébé Confort)
17. Canopy
18. Habillage-pluie. Vendue en accessoire
1 - Barre anti-rebond
2 - Passages ceinture
3 - Bouton de déverrouillage
4 - Indicateur de fixation de la coque du Streety.fix
5 - Crochets de fixation
10
Page 11
DESCRIPTION
8
14
9
10
OPTIONAL EXTRA
2
18
6
5
7
1
2
5
11
13
1
3
17
3
15
2
16
2
5
4
1. Shell
2. Carrying handle
3. Instructions and airbag sticker
4. Instruction manual (Between the shell and the polystyrene)
4
5. Warning sticker
6. Slots for adjusting the shoulder belts
7. Shoulder belts
8. Buckle of the harness belt
9. Quick-adjuster button
10. Belt for adjusting the shoulder belt with one hand
11. Shoulders pads
12. Belt hook at the rear for shoulder belt of the 3-point seat belt
13. Belt hook for the lap belt of the 3-point seat belt
14. Removable cover
12
15. Push-button for adjusting the carrying handle
16. Modulo Clip® System (For fastening on the Bébé Confort frame)
17. Sunshade
18. Raincover. Sold as an accessory
1 - Anti-rebound bar
2 - Belt guides
3 - Unlocking button
4 - Fixing indicator for the Streety.Fix shell
5 - Fixing hooks
11
FR - GB
Page 12
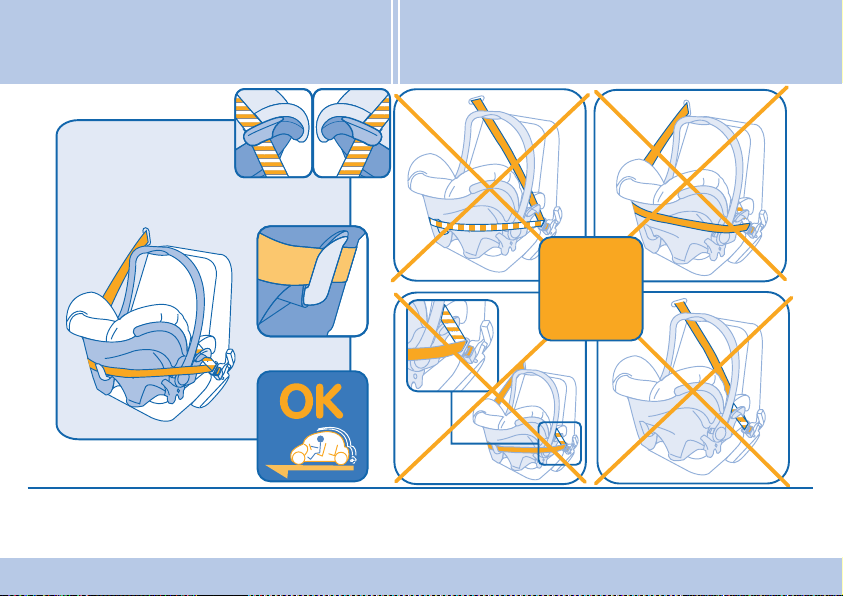
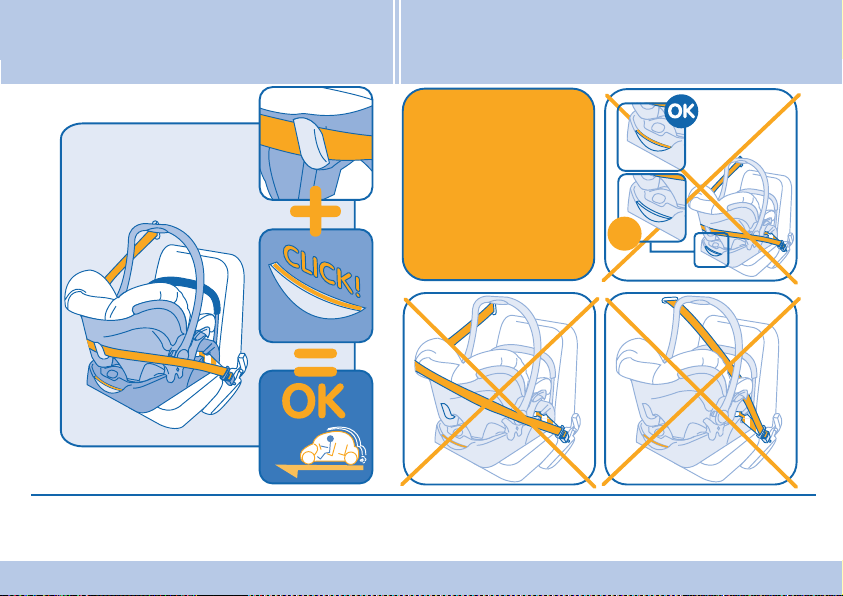
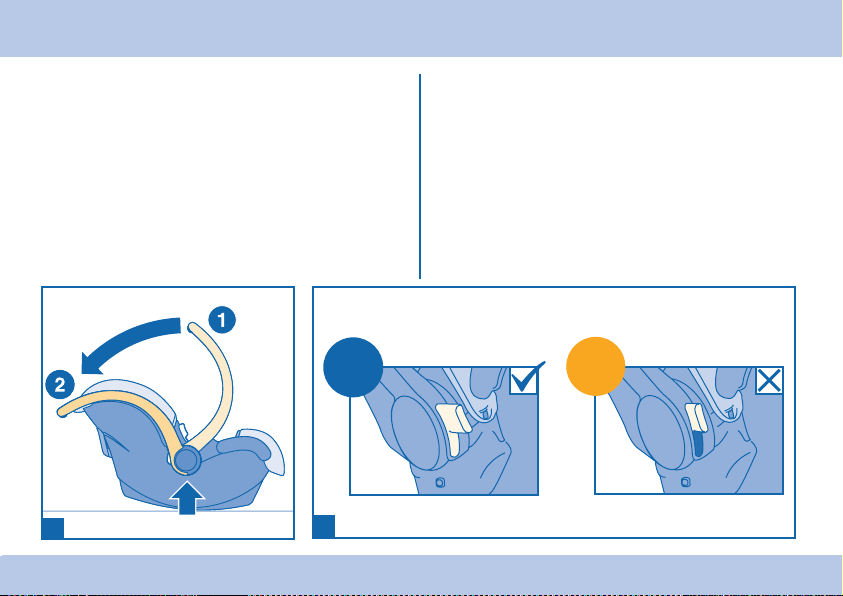
INSTALLATION CORRECTE DU STREETY.FIX SEUL
CORRECT INSTALLATION OF STREETY.FIX ONLY
MAUVAISES INSTALLATIONS DU STREETY.FIX SEUL
INCORRECT INSTALLATIONS OF STREETY.FIX ONLY
OK
+
NO
=
ATTENTION : Il est conseillé à l’usager de se mettre en rapport avec le distributeur ou le fabricant du système de retenue pour enfants, s’il a un doute sur
WARNING : if in any doubt about the correct installation or use of the system, the user is advised to contact the distributor or the manufacturer of the child
FR
l’installation correcte du système.
restraining device system.
12
Page 13
INSTALLATION CORRECTE DU STREETY.FIX AVEC
STREETY.BASE - CORRECT INSTALLATION OF
STREETY.FIX WITH STREETY.BASE
MAUVAISES INSTALLATIONS DU STREETY.FIX AVEC
STREETY.BASE - INCORRECT INSTALLATIONS OF STREETY.
FIX WITH STREETY.BASE
OK
ATTENTION : Il est conseillé à l’usager de se mettre en rapport avec le distributeur ou le fabricant du système de retenue pour enfants, s’il a un doute sur
WARNING: if in any doubt about the correct installation or use of the system, the user is advised to contact the distributor or the manufacturer of the child
l’installation correcte du système.
restraining device system.
NO
13
NO
GB
Page 14
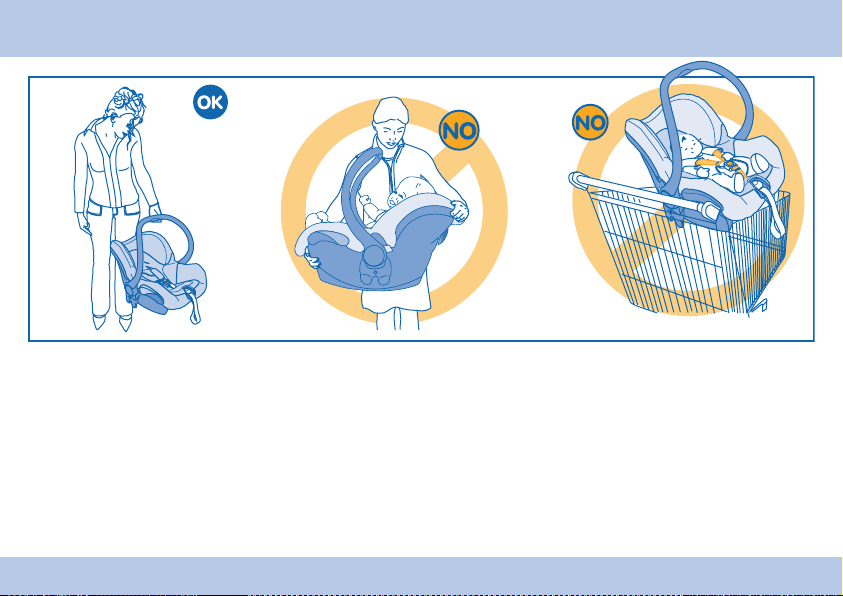
IMPORTANT WARNING
AVERTISSEMENT : Il est dangereux d’utiliser ce siège sur une surface en
hauteur.
AVERTISSEMENT : Pour éviter tout risque de chute, votre enfant doit toujours
être attaché.
IMPORTANT : avant de porter le siège vérifiez que la poignée de transport
est correctement verrouillée.
IMPORTANT : pour la sécurité de votre enfant, il est fortement déconseillé
d’installer le Streety.Fix sur un chariot de supermarché.
FR - GB
14
WARNING: It is dangerous to use or place this seat on a raised surface.
WARNING:To avoid any risk of a fall, your child should always be fastened
into the seat.
IMPORTANT: Before carrying the seat, check that the carrying handle is
locked in place.
IMPORTANT: For your child’s safety, you are strongly advised not to place the
Streety.Fix on a supermarket trolley.
Page 15
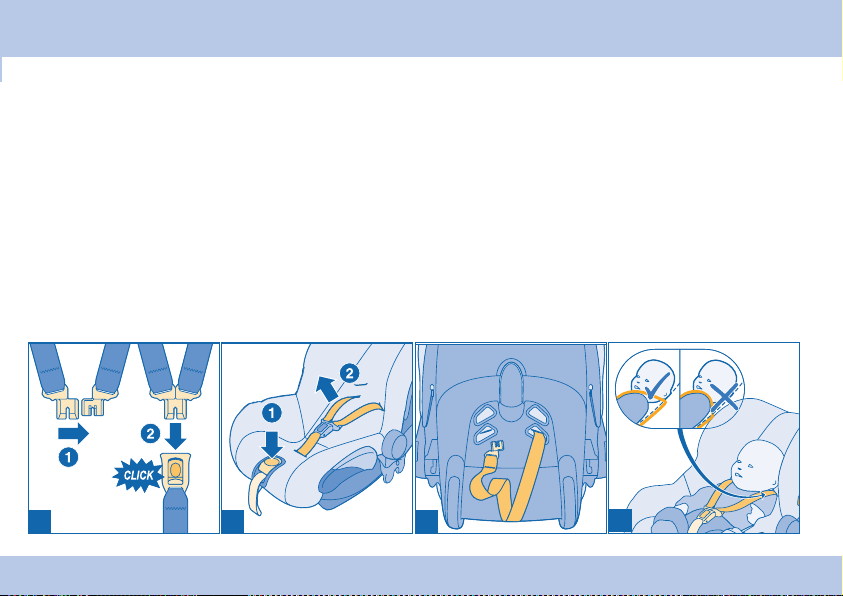
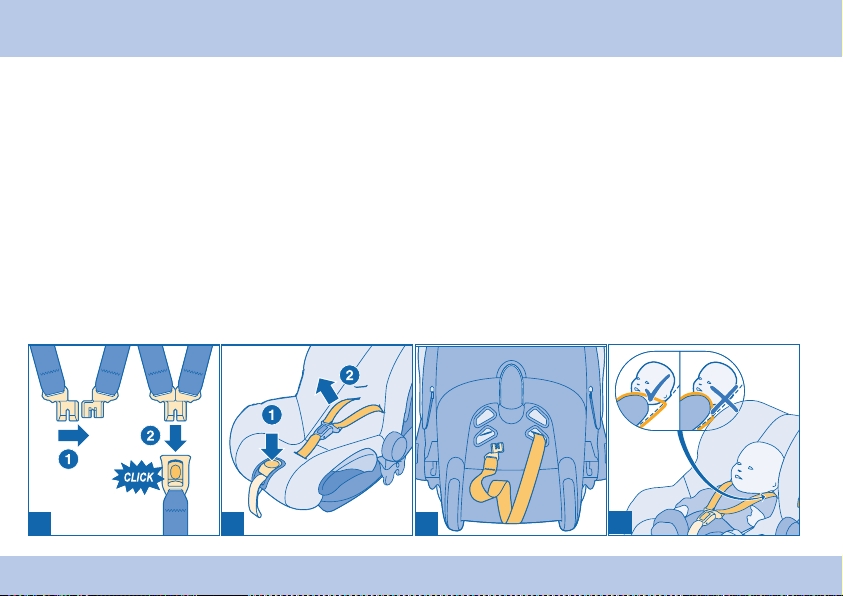
ATTACHER LE BÉBÉ
• Ouvrez le fermoir du harnais (en appuyant sur le bouton rouge).
• Veillez à ce que le bébé ait une bonne position dans le siège, le dos
bien calé. La forme ergonomique de la coque empêchera le bébé
de glisser.
• Veillez à ce que les bretelles reposent bien à plat sur les épaules
du bébé (D).
• Assemblez les embouts en plastique des deux bretelles (A).
• Introduisez les embouts dans le fermoir: un fort clic indiquera leur
verrouillage (A).
• Ajustez le serrage du harnais en tirant sur la sangle centrale à l’avant
de la coque afin que l’enfant soit parfaitement attaché (système du
harnais).
a b c
Réglage de la ceinture du harnais.
• Les sangles du harnais (système de bretelles) doivent être bien
ajustées au corps de votre bébé (D).
• Les bretelles du harnais doivent passer à travers les fentes les plus
proches des épaules de l’enfant (D).
Réglage des bretelles du harnais
• Faites passer les bretelles à travers les fentes de la housse et de
la coque (C).
• Vérifiez que les bretelles passent bien à travers les fentes prévues à
cet effet de la coque et de la housse (C).
Réglage de la ceinture du harnais (système de ceinture)
Pour desserrer:
• Appuyez sur le bouton de commande à l’avant de la coque (B).
• Tirez en même temps des deux bretelles vers vous (B).
Pour resserrer:
• Tirez la sangle centrale à l’avant de la coque jusqu’à ce que la ceinture
soit suffisamment serrée.
• La sangle centrale peut être fixée aux crochets sur l’avant de la coque.
d
15
FR
Page 16
SECURING THE BABY
• Open the belt buckle (press the red button).
• Ensure the baby is placed correctly in the seat, its back firmly
against the back of the seat. The ergonomic shape of the shell
ensures the baby does not slump in the seat.
• The shoulder belts must fit correctly over the shoulders of the baby (D).
• Slide both plastic tongue sections together (A).
• Insert both tongue sections in the buckle, you will hear a loud click
locking them in position (A).
• Pull the adjuster belt at the front of the shell tight, so that the child is
firmly secured with the harness belt (the belt system).
a b c
GB
Adjusting the harness belt.
• The harness belt (belt system) must be adjusted to suit your child’s
body (D).
• The harness shoulder belts must be threaded through the slots
nearest to the shoulders of the child (C).
Adjust the harness shoulder belts as follows.
• Pull the shoulder belts through the slots in the cover and the shell (D).
• Thread the shoulder belts through the correct slots in the shell
and cover (C).
Alter the adjuster belt (belt system) as follows:
To loosen:
• Press the adjuster button at the front of the shell (B).
• Pull both harness shoulder belts simultaneously towards you (B).
To tighten:
• Pull the adjuster belt at the front of the shell tight until the harness belt
lies firmly against the child.
• The end of the adjuster belt can be fastened on to the hooks at the
front of the shell.
d
16
Page 17

UTILISATION DU BABYCOQUE STREETY.FIX EN VOITURE SANS EMBASE
5
5
5
Respectez soigneusement les conseils ci-dessous concernant
l’installation dans une voiture.
• Ne placez jamais un siège auto pour enfants à l’avant si le véhicule
est équipé d’un airbag. Ceci peut être très dangereux. Cette
recommandation n’est pas applicable aux «airbags» latéraux.
• Lors de l’installation dans la voiture, veillez à bien différencier la
partie abdominale de la partie épaule de la ceinture de sécurité du
véhicule.
• Placez toujours le siège auto dos à la route (le dos de l’enfant dans
le sens de la marche du véhicule) et réglez la poignée de transport
en position verticale (E).
• Si la ceinture de sécurité est réglable, réglez-la en position basse.
e
f g h i
• Reculez le siège avant au maximum.
UTILISATION DU BABYCOQUE STREETY.FIX SANS EMBASE
• Passez la partie abdominale de la ceinture 3 points à l’avant à travers
les crochets marqués en bleu puis à travers les crochets destinés à la
ceinture abdominale puis bouclez la ceinture (F).
• Faites passer la partie épaule de la ceinture autour du siège
auto et fixez-la dans le crochet marqué en bleu vif à l’arrière (G).
Veillez à ce que la partie épaule se trouve bien prise derrière le
crochet bleu et bloquée par celui-ci (H). Serrez bien la ceinture en
veillant à ce qu’elle soit bien à plat.
• Vérifiez de nouveau que la ceinture passe bien à travers et par-dessus
les endroits repérés en bleu vif (I).
Votre Babycoque STREETY est maintenant correctement installé.
5
17
FR
Page 18

USING THE CAR SAFETY SEAT IN THE CAR WITHOUT BASE
5
5
5
Please pay attention to the following when installing the car safety seat
in the car.
• Do not use a child safety seat if the vehicle is equipped with a front
airbag. This can be dangerous. This does not apply to so-called side
airbags.
• Note the difference between the lap belt and the shoulder belt when
installing the seat in the car.
• Always place the seat in a rearward facing position on the passenger
seat or back seat, the carrying handle must be placed in an upright
position (E).
• If the passenger seat belt is adjustable in height, place it in the lowest
position.
• Ensure that the front seat is in the rearmost position.
e
f g
GB
USING THE CAR SAFETY SEAT IN THE CAR WITHOUT BASE
• Guide the lap belt of the 3-point seat belt through the blue marked belt
hooks on the front and through the lap belt hooks. Fasten the seat belt
into the buckle (F).
• Place the car shoulder belt around the back of the seat and hook it into
the bright blue marked belt hook at the rear (G). Ensure that the car
shoulder belt is behind the blue belt hook and blocked by the retaining
hook (H). Pull the belt tight. Ensure the belt is not twisted.
• Double check that the seat belt is threaded correctly through and
underneath the three points marked bright blue (I).
The car safety seat is now correctly installed.
5
h
i
18
Page 19
RÉGLAGE DE LA POIGNÉE DE TRANSPORT ADJUSTING THE CARRYING HANDLE
5
• La poignée peut être réglée sur 2 positions (J).
• Appuyez simultanément sur les deux boutons de part et d’autre de la
poignée et déplacez celle-ci en avant ou en arrière.
• Les boutons reprennent automatiquement leur position dès que la
poignée est correctement placée (J).
1 Position transport manuel / position voiture
2 Position couchée / position bascule
Il est impératif que la poignée soit verrouillée (voir schéma K
ci-dessous) avant portage du produit avec la poignée.
OK
j
k
The carrying handle has 2 positions (J).
• Press the two buttons on either side of the carrying handle
simultaneously and move the carrying handle forwards or backwards
as required.
• The buttons will pop out automatically when the carrying handle is in
the correct position (J).
1 Carrying position/car position,
2 Sleeping position/rocking position
Make sure the handle is securely locked in place (see picture K below)
before trying to carry the product by the handle.
NO
19
FR - GB
Page 20
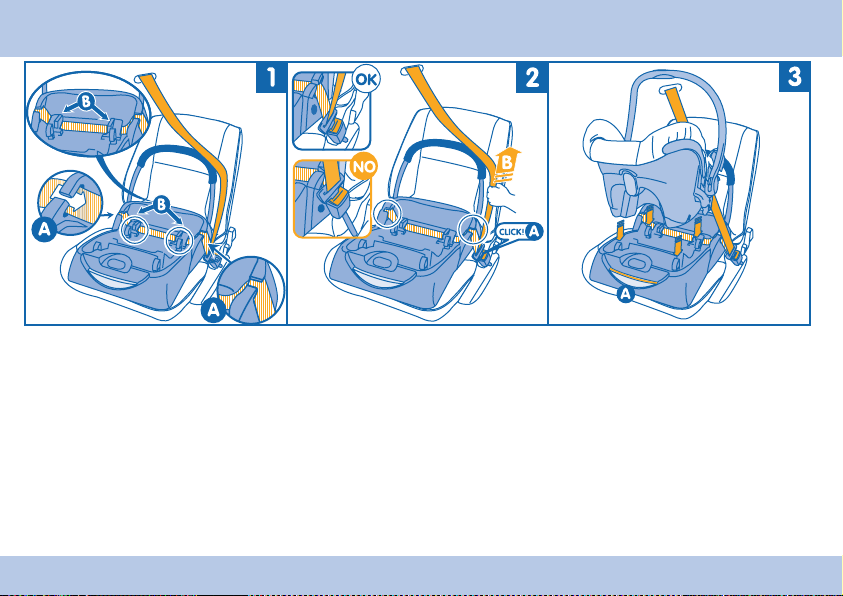
INSTALLATION AVEC L’EMBASE - INSTALLATION WITH THE BASE
1 - Posez l’embase dos à la route, barre anti-rebond
contre le dossier du siège du véhicule. Passez la
ceinture ventrale dans les guides-sangle. (A et B).
ATTENTION : Lors du passage de la sangle ventrale
dans les guides-sangle, veillez toujours à ce qu’elle
ne se vrille pas.
1 - Install the base facing backwards, with the anti-
rebound bar against the back of the car seat. Insert
the lap belt into the belt guides. (A and B).
CAUTION: Whilst inserting the lap belt into the
guides, take care that it does not become twisted.
FR - GB
2 - Bouclez la ceinture (A).
Puis tendez la ceinture ventrale au maximum (B).
2 - Fasten the belt (A).
Then tighten the lap belt as much as possible (B).
20
3 - Avant d’installer votre Streety.fix, vérifier que le
liseret orange sur la poignée est bien visible (A). En
cas de doute, contacter le distributeur.
Vérifier qu’aucun objet ne gène le verrouillage du
Streety.fix sur l’embase.Clippez le Streety.fix, dos à
la route, sur l’embase.
3 - Before installing your Streety.fix, check that the
orange strip on the handle is clearly visible (A). If in
doubt, contact the distributor.
Check that there are no objects hindering the locking
of the Streety.fix to its base. Clip the Streety.fix onto
its base in a rearward facing position.
Page 21
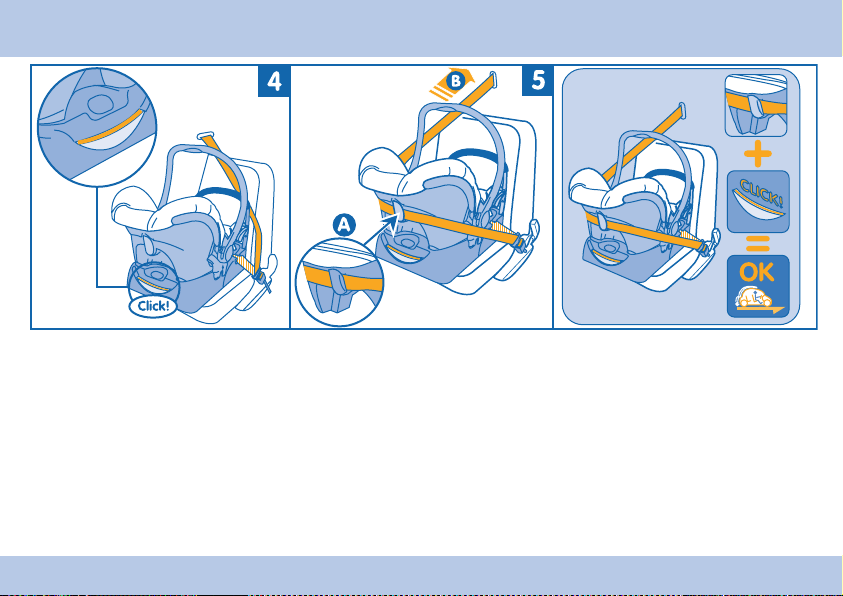
INSTALLATION AVEC L’EMBASE - INSTALLATION WITH THE BASE
4 - Appuyer fermement sur le Streety.fix afin qu’il
se verrouille dans l’embase.
ATTENTION : Votre siège est correctement fixé si
vous entendez un “click” et que l’indicateur sur le
bouton (liseret orange) est visible.
4 - Press firmly on the Streety.fix so that it locks
into its base.
IMPORTANT: Your seat is correctly mounted if
you hear a “click” and the indicator on the button
(orange strip) is visible.
5 - Faites passer la ceinture d’épaule dans le guidesangle arrière de la coque (A), et tendez-la (B).
5 - Insert the shoulder belt into the belt guide on the
back of the structure (A), then into the belt guide on
the side of the seat (B), and tighten.
21
ATTENTION : vous avez terminé l’installation de
votre Streety.fix sur le Streety.base.
Vérifier que la ceinture soit bien passée dans les
guides-sangle, et que le liseret orange apparaisse sur
le bouton situé à l’avant de l’embase.
IMPORTANT: you have now finished installing your
Streety.fix on the Streety.base.
Check that the belt is properly inserted in the belt
guides, and that the orange strip is visible on the
button located on the front of the base.
FR - GB
Page 22
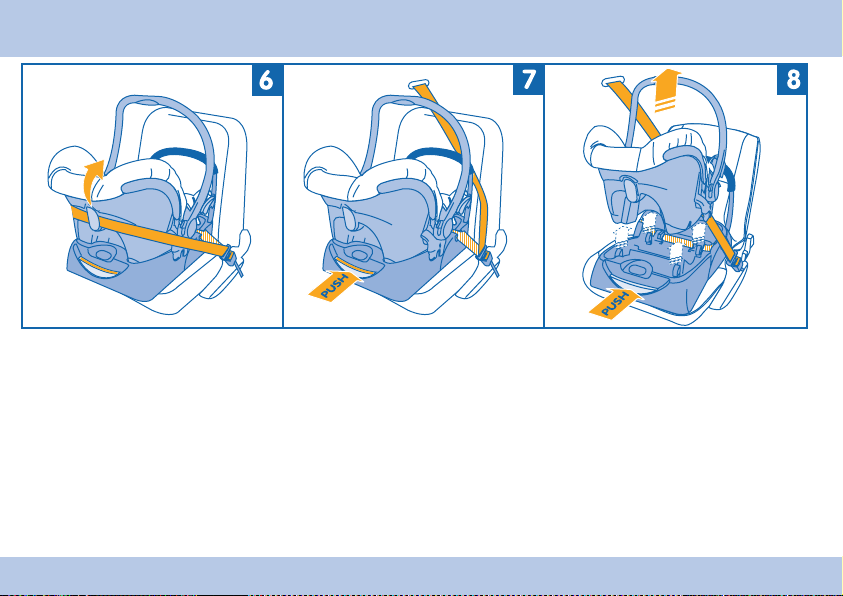
COMMENT RETIRER LE BABYCOQUE STREETY.FIX DE L’EMBASE
HOW TO REMOVE THE CAR SAFETY SEAT STREETY.FIX FROM THE BASE
6 - Défaire la ceinture diagonale seulement (de la
coque) et la relacher contre la banquette.
6 - Unfasten only the diagonal belt ( from the shell)
and let it retract against the seat of the car.
FR - GB
7 - Appuyer sur le bouton de l’embase pour
déverrouiller le Streety.fix.
7 - Press the button on the base to unlock the
Streety.fix.
22
8 - Maintenir le bouton enfoncé et retirer la coque.
8 - Hold the button pressed in and remove the shell.
Page 23
CERTIFICAT DE GARANTIE
Cher client,
Nous vous remercions de la confiance que vous nous accordez en choisissant l’un de nos produits. Nous espérons qu’il
vous donne entière satisfaction. Votre produit a été fabriqué selon les différentes normes de qualité qui lui sont applicables
et a été soumis à de nombreux contrôles aux différentes étapes de sa fabrication. Si malgré tous nos efforts une anomalie
intervenait pendant la période de validité de la garantie, nous nous engageons à respecter les conditions de garantie.
CERTIFICAT DE GARANTIE : Nous vous garantissons que ce produit est conforme aux exigences de sécurité telles que
définies par la réglementation en vigueur, et qu’il ne présente aucun défaut de conception et fabrication au moment de son
achat par le revendeur. Si après votre achat, durant une période de 24 mois, ce produit présentait un défaut dans le cas
d’une utilisation normale telle que définie dans la notice d’emploi, nous nous engageons à vous le réparer ou à vous le
changer (pour plus d’informations sur les modalités d’applications de notre garantie, veuillez consulter votre revendeur ou
notre site web), hors les cas d’exclusion suivants :
. utilisation et destination autres que celles prévues dans la notice d’utilisation,
. installation non conforme à la notice,
. réparation effectuée par une personne ou un revendeur non agréé,
. défaut de présentation d’une preuve d’achat,
. manque d’entretien de votre produit,
. remplacement de toutes pièces d’usure (roues, parties en frottement ...) en utilisation normale.
A partir de quand ?
A compter de la date d’acquisition du produit.
Pour combien de temps ?
24 mois consécutifs et non transmissibles, seul le premier acheteur en est l’unique bénéficiaire.
Que devez-vous faire ?
A l’achat de votre produit, vous devez impérativement garder votre ticket de caisse où figure la date d’achat.
En cas de défaut, le produit devra être rapporté dans le magasin d’achat.
Tout produit adressé directement au fabricant ne pourra bénéficier de la garantie.
Cette garantie est conforme à la Directive Européenne n° 1999/44/CE du 25 Mai 1999
23
FR
Page 24

GUARANTEE CERTIFICATE
Dear Customer,
Thank you for the confidence you have shown in us by choosing one of our products. We hope it will meet all your
expectations. This certificate indicates that this product has been manufactured according to the quality standards
applicable and that it has been subjected to numerous checks during the various manufacturing stages. Should an anomaly
occur during the warranty period, we will respect the conditions stipulated in the guarantee.
GUARANTEE CERTIFICATE: Guarantee: We guarantee that this product complies with the security regulations currently
in effect, and that it is free from defects in material and craftsmanship at the time it is purchased by the retailer.
If this product fails within 24 months of the original purchase and under normal use as defined in the user’s manual,
we will repair or replace the product (for more information regarding our warranty policy, ask your retailer
or consult our website), except in the following cases:
. use and purpose other than those indicated in the instructions for use,
. installation not in accordance with the instructions,
. repair carried out by a non-approved person or retailer,
. proof of purchase not presented,
. product not maintained,
. replacement of any parts subject to wear (wheels, areas which rub, etc.) during normal use.
From when?
From the date the product is purchased.
For how long?
For 24 consecutive months, non-transferable; only the first purchaser benefits from this.
What do you have to do?
After you purchase your product, you must keep the sales receipt showing the date of purchase. If a problem should arise,
the product must be taken back to the retailer from whom it was bought. Any product sent directly to the manufacturer will not be
covered by the guarantee.
This guarantee conforms with European Directive No. 1999/44/EC dated 25 May 1999.
GB
24
Page 25

BEDIENUNGSANLEITUNG FÜR STREETY.FIX UND STREETY.BASE
Einbaurichtung
Gegen die Fahrtrichtung
• Der Sitz kann auf den Vordersitzen (je nach gültiger Gesetzgebung) oder
auf der Rückbank verwendet werden. Herunterklappbare Sitze müssen
immer entsprechend befestigt / eingerastet sein. Dieses Rückhaltesystem
darf nur in zugelassenen Fahrzeugen, die mit zugelassenen 3-PunktSicherheitsgurten, mit oder ohne Aufrollautomatik, die der EU-Verordnung
Nr.16 / UNO oder einer gleichwertigen Norm entsprechen, verwendet
werden.
• Installieren Sie den Kindersitz NICHT rückwärtsgerichtet auf einem Sitz, der
mit einem Airbag ausgestattet ist.
LEBENS- BZW. VERLETZUNGSGEFAHR.
• Stellen Sie die Position der Fahrzeugsitze so ein, dass diese den Einbau des
Kinderrückhaltesystems bzw. dessen Effizienz nicht beeinträchtigen:
- Schieben Sie den Beifahrersitz nach vorne um den Einbau auf der
Rückbank zu erleichtern.
- Schieben Sie den Beifahrersitz nach hinten um den Einbau auf dem
Vordersitz zu erleichtern und von der maximalen Länge des vorderen
Fahrzeuggurts profitieren zu können.
• Achten Sie darauf, dass die Unterseite Ihres Kinderrückhaltesystems gut auf
dem Fahrzeugsitz aufliegt.
Vorne und hinten
Plätze
25
Gruppe O+
0 bis 13 kg
DE
Page 26

WICHTIG
WICHTIG
• Wir raten Ihnen, diese Gebrauchsanweisung aufmerksam durchzulesen und
Ihr Produkt vor dem Gebrauch probemässig handzuhaben.
• Bewahren Sie diese Gebrauchsanweisung für eine spätere Verwendung
sorgfältig auf, zu diesem Zweck ist das Aufbewahrungsfach an der Babyschale
vorgesehen.
• Lassen Sie Ihr Kind nie unbeaufsichtigt.
• Dieses Kinderrückhaltesystem ist nur dann effizient, wenn die
Gebrauchsanweisungen berücksichtigt werden.
• Für Ihre eigene Sicherheit und die Ihres Kindes setzen Sie es immer in das
Rückhaltesystem und schnallen Sie es an, auch bei nur kurzen Fahrten.
• Bereits bei einem Aufprall mit geringer Geschwindigkeit kann Ihr Kind durch
das Auto geschleudert werden.
• Befestigen Sie das Kinderrückhaltesystem auch wenn kein Kind darin sitzt.
• Für Gruppe 0+ zugelassenes Modell, d.h. für ein Kind mit einem Gewicht unter
13 kg (bis ca. 12 Monaten).
• Das Kinderrückhaltesystem (Gruppe 0+) muss rückwärtsgerichtet (Rücken in
Fahrtrichtung) eingebaut werden.
• Die Verantwortung wird vom Hersteller einzig im Rahmen der Einführung der
Europäischen Verordnung (R44) übernommen. Diese Genehmigung schließt
weder Vorsicht noch das Einhalten der Straßenverkehrsverordnung aus.
• Ändern Sie nie die Bauweise oder das Material des Sitzes oder des Gurtes
ohne vorher den Hersteller befragt zu haben.
• Legen Sie keine schweren Gegenstände auf die Hutablage um zu vermeiden,
dass diese bei einem Unfall nach vorne geschleudert werden.
• Achten Sie darauf, dass Gepäckstücke und sonstige Gegenstände, welche
die Insassen bei einem Unfall verletzen könnten, sicher verstaut sind.
• Die Temperatur im Fahrzeuginneren kann besonders nach längerer
Sonneneinstrahlung sehr hoch sein. Unter diesen Umständen ist es vorteilhaft,
den Kindersitz mit einem Tuch oder ähnlichem Material abzudecken, um zu
verhindern, dass sich die Befestigungen des Gurtsystems, im besonderen
die metallischen Bestandteile, erhitzen und das Kind dadurch Verbrennungen
erleidet.
• Der Kindersitz muss nach einem Unfall unbedingt ersetzt werden.
• Überprüfen Sie stets, dass kein Teil des Sitzes oder des Gurtes unter dem Sitz
oder in der Fahrzeugtür eingeklemmt ist.
DE
• Verwenden Sie das Rückhaltesystem nicht ohne den Sitzbezug. Ersetzen Sie
den Bezug nie durch ein vom Hersteller nicht empfohlenes Fabrikat, denn er ist
ein wichtiger Bestandteil des Rückhaltesystems.
• Die Produkte von Bébé Confort wurden für die Sicherheit und den Komfort Ihres
Babys sorgfältig entworfen und geprüft. Benutzen Sie ausschließlich Zubehör,
welches von Ampafrance verkauft oder genehmigt ist. Die Verwendung von
Fremdzubehör kann gefährlich sein.
• Vergewissern Sie sich, nachdem Sie Ihr Kind in die Babyschale gesetzt haben,
dass der Gurt korrekt gespannt ist. Vergewissern Sie sich außerdem, dass der
Gurt nicht verdreht ist.
Pflege
• Bevor Sie den Bezug abnehmen merken Sie sich genau wie die verschiedenen
Teile befestigt sind, damit Sie diese danach wieder korrekt anbringen können.
• Damit Sie lange Freude an diesem Produkt haben, muss dieses regelmäßig
gepflegt werden.
Bezug
• Beachten Sie das unter dem Bezug aufgenähte Etikett mit der Zusammensetzung
des Stoffes vor dem Reinigen. Darauf befinden sich ebenfalls die
Waschsymbole.
Pflegehinweise (Piktogramme)
30 º Waschmaschinenfest
Nur Handwäsche
Nicht bleichen
(Chlor)
Schale :
• Reinigen Sie die Schale mit einem feuchten Lappen.
Nicht schleudern
Nicht bügeln
Ke in e
Trockenreinigung
26
Page 27

SITZBESCHREIBUNG
18
6
5
7
8
14
9
10
1
ZUBEHÖR ALS OPTION
2
2
5
17
3
15
2
11
13
16
1
2
5
4
3
1. Schale
2. Tragebügel
3. Anweisung und Airbagaufkleber
4. Gebrauchsanweisung (zwischen Schale und Styropor)
4
5. Warnhinweis
6. Schlitze zum Verstellen der Schultergurte
7. Schultergurte
8. Schloss des Hosenträgergurtes
9. Bedienungstaste des Schnellverstellers
10. Zentraler Gurt zum Verstellen der Schultergurte mit einer Hand
11. Gurstschuzpolster
12. Hintere Gurtklemme für den Schultergurt
des Dreipunkt-Sicherheitsgurts
13. Gurtklemme für den Beckengurt des Dreipunkt-Sicherheitsgurtes
12
14. Stoffbezug
15. Drucktaste zum Verstellen des Tragebügels
16. Modulo Clip® System (zur Befestigung der Babyschale
auf Bébé Confort Gestellen des Sortiments Avenue)
17. Sonnendach
18. Regenschutz. Separat als Zubehör erhältlich
1 - Anti-Abprall-Bügel
2 - Gurtführungen
3 - Entriegelungsknopf
4 - Anzeige der Fixierung des Streety.fix
5 - Befestigungshäkchen
27
DE
Page 28

RICHTIGER EINBAU DES STREETY.FIX OHNE
STREETY.BASE
FALSCHER EINBAU DES STREETY.FIX OHNE STREETY.
BASE
DE
OK
+
NO
=
ACHTUNG: Bei Fragen bezüglich der Montage des Kinderrückhaltesystems wenden Sie sich bitte an Ihren Fachhändler.
28
Page 29

RICHTIGER EINBAU DES STREETY.FIX MIT DER
STREETY.BASE
FALSCHER EINBAU DES STREETY.FIX MIT STREETY.
BASE
OK
WICHTIG : Bei Fragen bezüglich der Montage der Streety.base wenden Sie sich bitte an Ihren Fachhändler.
NO
29
NO
DE
Page 30

ACHTUNG
ACHTUNG : Es ist gefährlich diesen Autositz erhöht aufgestellt zu verwenden.
ACHTUNG : Um jegliches Sturzrisiko zu vermeiden, muss das Kind immer angeschnallt sein.
ACHTUNG : Prüfen Sie vor dem Tragen der Babyschale, dass der Transportgriff korrekt verriegelt ist.
ACHTUNG :: Aus Sicherheitsgründen wird nicht empfohlen Streety.fix auf einen Supermarktwagen zu stellen.
DE
30
Page 31

ANSCHNALLEN DES BABYS
• Öffnen Sie das Gurtschloss (die rote Taste drücken).
• Legen Sie das Baby vorsichtig in den Babycoque STREETY
Bébé Confort; der Rücken des Babys muss vollständig an der
Rückenlehne anliegen. Durch die ergonomische Form der Schale ist
ein Herausrutschen nach unten ausgeschlossen.
• Achten Sie darauf, dass die Schultergurte glatt über die Schultern des
Babys verlaufen (D).
• Fügen Sie zunächst die Endstücke beider Schultergurte zusammen
(A).
• Schieben Sie dann die Endstücke in das Schloss, bis sie mit einem
deutlichen Klicken einrasten (A).
• Ziehen Sie den zentralen Gurt an der Vorderseite der Schale an,
damit das Gurtsystem straff sitzt.
a b c
Verstellen des Hosenträgergurt
• Der Hosenträgergurtes (Gurtsystem) muss dem Körper des Babys
angepasst werden (D).
• Die Hosenträger-Schultergurte müssen durch die Schlitze geführt
werden, die den Schultern des Kindes am nächsten sind (C).
Verstellen der Höhe der Hosenträger-Schultergurte
• Ziehen Sie die Schultergurte durch die Schlitze von Bezug und
Schale (C).
• Führen Sie die Schultergurte durch die richtigen Schlitze in Schale
und Bezug (C).
Verstellen des Hosenträgergurt
Lockern :
• Drücken Sie die Verstelltaste vorn in der Schale (B).
• Ziehen Sie gleichzeitig die beiden Hosenträger-Schultergurte an der
Vorderseite zu sich (B).
Fester:
• Straffen Sie den zentralen Gurt an der Vorderseite der Schale, bis der
Hosenträger-Gurt fest anliegt.
• Die Schlaufe des zentralen Gurtes kann an der Vorderseite der
Schale in den Klemmen befestigt werden.
d
31
DE
Page 32

BENUTZUNG DES BABY COQUE STREETY.FIX IM AUTO OHNE BASE
5
5
5
Beachten Sie Nachfolgendes bei der Befestigung im Auto:
• Benutzen Sie Ihren Kinderautositz nicht auf einem Sitz, der mit
Frontairbag ausgestattet ist. Es kann zu gefährlichen Verletzungen
kommen. Dies gilt jedoch nicht bei Seitenairbag.
• Beachten Sie den Unterschied zwischen dem Beckengurt und dem
Schultergurt bei der Befestigung im Wagen.
• Stellen Sie den Sitz immer entgegen der Fahrtrichtung auf den
Sitzplatz (mit dem Rücken des Kindes in Fahrtrichtung des Wagens).
Der Tragebügel muss aufrecht stehen (E).
• Stellen Sie den Autogurt, sofern dieser verstellbar ist, in die niedrigste
Position ein.
• Achten Sie darauf, dass sich der Vordersitz in der hintersten Position
befindet.
e
f g
DE
BENUTZUNG DES BABY COQUE STREETY.FIX OHNE BASE
• Führen Sie den Beckengurt des Dreipunkt-Sicherheitsgurtes durch
die blau markierte Gurtklemme an der Vorderseite und durch die
Beckengurtklemmen und stecken Sie den Schlossriegel in das
Schloss (F).
• Führen Sie den Schultergurt um den Sitz herum und haken Sie ihn
in die ebenfalls hellblau markierte Gurtklemme an der Rückseite
(G). Achten Sie darauf, dass der Autoschultergurt hinter der blauen
Gurtklemme liegt und durch den Widerhaken blockiert wird (H).
Straffen Sie den Gurt. Sorgen Sie dafür, dass der Gurt überall glatt
anliegt.
• Überprüfen Sie nochmals, ob der Sicherheitsgurt korrekt durch und
über die drei hellblau markierten Punkte verläuft (I). Der Babycoque
STREETY Bébé Confort ist nun sicher befestigt.
5
h i
32
Page 33

VERSTELLEN DES TRAGBÜGELS
5
• Der Tragebügel ist in 2 Positionen verstellbar (J).
• Drücken Sie die zwei Tasten an beiden Seiten des Tragebügels gleichzeitig und bewegen Sie den Tragebügel nach vorne oder hinten in die
gewünschte Richtung.
• Die Tasten springen von selbst wieder heraus, wenn die gewünschte Position erreicht ist (J).
1 Trageposition/Autoposition
2 Schlafposition / Schaukelposition
Der Handgriff muss unbedingt verriegelt sein (siehe Skizze K unten), bevor das Produkt mit dem Handgriff verwendet wird.
OK
j
k
33
NO
DE
Page 34

MONTAGE MIT DER STREETY.BASE
1 - Die Streety Base gegen die Fahrtrichtung mit
dem Metallbügel gegen die Rückenlehne des Autos
installieren. Führen Sie bitte den Beckengurt in die
Gurtführungen ein (A und B).
VORSICHT : Bei der Einführung des Beckengurtes
in die Gurtführungen prüfen Sie bitte immer, dass
die Gurte nicht verdreht sind.
DE
2 - Schliessen Sie die Gurte (A). Straffen Sie den
Beckengurt (B).
34
3 - Bevor Sie Ihren Streety fix montieren,
vergewissern Sie sich bitte, dass der orange Knopf
auf dem Griff gut sichtbar ist. Bei Fragen wenden
Sie sich bitte an Ihren Fachhändler. Stellen Sie
sicher, dass die Verriegelung für den Streety fix
auf der Streety.base nicht verdeckt ist. Befestigen
Sie den Streety fix entgegen der Fahrtrichtung auf
der Base.
Page 35

MONTAGE MIT DER STREETY.BASE
4 - Drücken Sie kräftig auf den Streety fix bis die
Verriegelung mit der Base einrastet.
ACHTUNG : Der Sitz ist korrekt installiert, wenn er
mit einem hörbaren Klick einrastet und die orange
Farbanzeige auf dem Knopf sichtbar ist.
5 - Führen Sie den Schultergurt in die Gurtführungen
auf der Rückseite (A) und an der Seite der Schale
(B) ein. Straffen Sie den Gurt.
35
ACHTUNG : Die Montage des Streety fix auf der
Base ist jetzt fertig.
Prüfen Sie bitte, ob der Gurt richtig durch die
Gurtführungen läuft und die orange Farbanzeige auf
der Vorderseite der Base erscheint.
DE
Page 36

ABNAHME DES STREETY.FIX VON DER BASE
6 - Den Gurt nur diagonal zur Schale lösen und zur
Rückbank führen.
DE
7 - Drücken Sie kräftig auf den Knopf der Basis um
den Streety.fix zu lösen.
36
8 - Halten Sie den Knopf gedrückt und entfernen
Sie die Schale.
Page 37

GARANTIE-ZERTIFIKAT
Sehr geehrte/r Kundin/e,
Wir danken für das von Ihnen gewährte Vertrauen, indem Sie eines unserer Produkte gewählt haben. Wir hoffen,
dass Sie dieses vollständig zufrieden stellen wird. Dieses Produkt wurde gemäß verschiedener, dafür in Anwendung
kommender Qualitätsnormen produziert und wurde während der verschiedenen Produktionsschritte zahlreichen Kontrollen
unterworfen. Sollte trotz unserer Anstrengungen ein Fehler innerhalb der Garantiezeit auftreten, verpflichten wir uns, die
Garantiekonditionen einzuhalten.
GARANTIE-ZERTIFIKAT : Garantieschein: Wir garantieren, dass dieses Produkt den gegenwärtig gültigen
Sicherheitsregelungen entspricht und dass es zum Zeitpunkt des Kaufs beim Fachhändler keine Konzeptions-
und Fabrikationsfehler aufwei‚t. Wenn innerhalb von 24 Monaten nach Ihrem Kauf bei normalem Gebrauch
nach Gebrauchsanweisung ein Defekt auftritt, verpflichten wir uns, das Produkt zu reparieren oder auszutauschen
(für mehr Information bzgl. unserer Garantiemodalitäten konsultieren Sie Ihren Fachhändler oder unsere Webseite),
ausgenommen die folgenden Fälle:
. andere Verwendung oder Bestimmung als die in der Gebrauchsanweisung aufgeführten,
. Montage, die nicht der Gebrauchsanweisung entspricht,
. Reparatur, die durch eine nicht befugte Person oder einen nicht berechtigten Händler durchgeführt wurde,
. wenn kein Kaufbeleg (Kassazettel) vorgelegt werden kann,
. wenn das Produkt nicht entsprechend gewartet und gepflegt wurde,
. Tauschen aller sich abnützenden Teile (Räder, reibende Teile …) bei normalem Gebrauch.
Ab wann ?
Ab Kaufdatum des Produktes.
Wie lange ?
24 aufeinander folgende und nicht übertragbare Monate, ausschließlich der Erstkäufer ist der alleinige Nutznießer.
Was müssen Sie tun ?
Nach Kauf des Produktes, den Kaufbeleg (mit lesbarem Kaufdatum) sorgfältig aufbewahren.
Beim Auftauchen eines Problems muss das Produkt zum entsprechenden Fachhändler, bei dem der Artikel gekauft wurde,
zurückgebracht werden. Für jedes Produkt, welches direkt an den Hersteller eingeschickt wird, ist die Garantie nicht gültig.
Diese Garantie entspricht der Europäischen Richtlinie Nr. 1999/44/CE vom 25.Mai 1999.
37
DE
Page 38

ADVIEZEN VOOR HET GEBRUIK VAN
STREETY.FIX EN STREETY.BASE
Richting
Geplaatst « tegen de
rijrichting in ».
• De autostoel kan geplaatst worden op
de voorzetel (indien de wet dit toelaat) of
de achterbank van de auto. Autozetels
met neerklapbare rugleuning dienen altijd
goed vergrendeld te zijn. De autostoel mag
uitsluitend gebruikt worden in auto’s voorzien
van originele, door de wet goedgekeurde
3-punts gordels met oprolsysteem. De
3-punts gordels dienen te
voldoen aan de reglementen van de CEE
N°16/ONU normen of gelijkwaardige normen.
• Plaats nooit een autostoel “tegen de
rijrichting in” op de voorzetel van de auto
indien uw auto over een AIRBAG beschikt.
DOODSGEVAAR EN/OF KANS OP ZWARE
VERWONDINGEN.
• Stel de autozetel waarop u de autostoel
gaat plaatsen zodanig af dat de installatie
niet belemmerd wordt.
- Voor een plaatsing op de achterbank van
de auto dient de passagierszetel geheel
naar voor geschoven te worden.
- Voor een plaatsing op de passagierszetel
dient de passagierszetel geheel naar achter
geschoven te worden. In deze positie
kan men optimaal gebruikmaken van de
gehele gordellengte, waardoor de autostoel
eenvoudiger te bevestigen is.
• Controleer of de onderkant van de
autostoel goed op de passagiersstoel of
achterbank geplaatst is.
Plaatsen
Zitplaatsen voor en achter
NL - IT
Groep O+
0 tot 13 kg
RACCOMANDAZIONI PER L’UTILIZZO DELLO
STREETY.FIX E DELLA STREETY.BASE
Direzione
In senso inverso di
marcia
Sedile
Anteriore e posteriore
• Il seggiolino può essere posizionato sul
sedile anteriore (secondo la legislazione in
vigore) o posteriore. I sedili ribaltabili
devono essere sempre ben fissati. Questo
dispositivo è utilizzabile esclusivamente su
veicoli autorizzati , dotati di cinture
di sicurezza a 3 punti / statiche / con
avvolgitore, omologate, in conformità
al regolamento CEE N° 16 / ONU o
normativa
equivalente.
• NON installare il seggiolino in senso
inverso di marcia su un sedile anteriore
dotato di airbag. RISCHIO DI MORTE O
DI FERITE GRAVI.
• Regolare la posizione dei sedili
dell’autoveicolo per non interferire con
l’installazione del dispositivo di ritenuta
per bambini :
- Far avanzare il sedile anteriore lato
passeggero per installare il seggiolino sul
sedile posteriore.
- Spingere all’indietro il sedile anteriore lato
passeggero prima di installarvi il seggiolino
auto, per sfruttare al massimo la lunghezza
della cintura di sicurezza.
• Verificare il corretto posizionamento
della base del dispositivo di ritenuta per
bambini sul sedile dell’autoveicolo.
38
Gruppo O+
da 0 a 13 kg
Page 39

OPGELET
IMPORTANTE
• Wij adviseren u deze gebruiksaanwijzing aandachtig te lezen voordat u de
autostoel in gebruik neemt.
• Bewaar nauwkeurig de gebruiksaanwijzing als naslagwerk. Deze autostoel
beschikt over een speciaal vakje voor het opbergen van de gebruiksaanwijzing.
• Laat nooit uw kind zonder toezicht.
• Deze autostoel is uitsluitend doeltreffend indien de gebruiksinstructies correct
opgevolgd worden.
• Voor uw veiligheid en die van uw kind dient u in elke omstandigheid uw kind in
de autostoel te plaatsen, ongeacht de lengte van het traject.
• Zelfs kleine botsingen met uw auto kunnen uw kind omvormen tot een echt
projectiel!
• Bevestig altijd de autostoel zelfs indien de autostoel leeg vervoerd wordt.
• Goedgekeurd model voor groep 0+ (Groep 0+; geschikt voor een kind met een
lichaamsgewicht minder dan 13kg./ Tot een leeftijd van ongeveer 12 maanden).
• De autostoel voor kinderen (groep 0+) moet in het voertuig geplaatst worden in
de positie «tegen de rij-richting in.
• De fabrikant kan alleen verantwoordelijk gesteld worden in het kader van de
toepassing van de Europese reglementering (R44). Deze bekrachtiging sluit
onvoorzichtigheid en respect van de verkeersregels uit.
• Wijzig nooit de constructie of het materiaal van de autostoel en de gordel
zonder daarover Bébé Confort te hebben geconsulteerd.
• Plaats nooit zware of losse voorwerpen op de hoedenplank, deze kunnen
geprojecteerd worden in geval van een ongeval.
• De gebruiker wordt geacht zijn bagage goed en veilig te plaatsen, zodat het
geen letsel kan veroorzaken aan het kind in geval van schokken, remmen of
een ongeval.
• De temperatuur in de auto kan hoog oplopen wanneer de auto lang in de
zon heeft gestaan. Bébé Confort adviseert u in dat geval de autostoel af te
dekken met een doek of deken zodat de bekleding, gordels en ijzeren gespen
niet oververhit kunnen raken. Oververhitting van deze onderdelen kunnen
brandwonden bij het kind veroorzaken.
• De autostoel moet onmiddellijk vervangen worden na een ongeval.
• Controleer steeds of er geen delen van de autostoel of gordels gekneld onder
de autostoel zitten.
• Vi consigliamo di leggere attentamente le istruzioni e di maneggiare il vostro
prodotto prima dell’utilizzo.
• Conservare il presente manuale d’istruzioni per un eventuale utilizzo futuro.
Sul seggiolino auto è presente una tasca che ha lo scopo di contenere il
manuale.
• Non lasciare mai il bambino senza sorveglianza.
• Questo dispositivo di ritenuta per bambini è efficace solo se vengono rispettate
le istruzioni per l’utilizzo.
• Per la vostra sicurezza e quella del vostro bambino, installare sempre
quest’ultimo nel dispositivo di ritenuta per bambini, per qualsiasi tipo di tragitto.
• Anche se minimi, gli urti subiti da un autoveicolo possono trasformare il
bambino in un vero e proprio proiettile.
• Agganciare sempre il dispositivo di ritenuta per bambini alla cintura di
sicurezza dell’auto, anche quando il bimbo non vi è installato.
• Modello approvato per il gruppo 0+, ovvero per un bambino di peso inferiore
ai 13 kg.
• Il dispositivo di ritenuta per bambini (gruppo 0+) deve essere installato in senso
inverso di marcia.
• Il produttore è responsabile solo nell’ambito dell’applicazione della Normativa
Europea (R44). Questa omologazione non esclude la prudenza ed il rispetto
del codice della strada.
• Non modificare mai la costruzione o i materiali del seggiolino auto e della
cintura senza aver consultato il produttore.
• Non collocare mai oggetti pesanti sul ripiano posteriore, per evitare proiezioni
in caso di incidente.
• Fissare saldamente i bagagli o altri oggetti che, in caso d’impatto, potrebbero
provocare ferite all’occupante del seggiolino.
• La temperatura interna di un autoveicolo può diventare elevata, soprattutto
dopo una lunga esposizione al sole. Si consiglia vivamente, in condizioni simili,
di ricoprire il seggiolino con un tessuto o altro, per impedire il surriscaldamento
delle parti di fissaggio delle cinture, in modo particolare quelle in metallo, che
possono provocare scottature al bambino.
• Sostituire assolutamente il seggiolino auto dopo un incidente.
• Verificare sempre che le parti del seggiolino e delle cinture non rimangano
incastrate sotto il sedile o nella portiera dell’autoveicolo.
39
NL - IT
Page 40

OPGELET
•
Gebruik nooit de autostoel zonder bekleding. Men mag uitsluitend
de originele Bébé Confort bekleding speciaal voor uw type autostoel
gebruiken.
• Bébé Confort producten zijn met zorg ontworpen en getest voor de
veiligheid en het comfort van uw baby. Gebruik uitsluitend accessoires
welke goedgekeurd en verkocht worden door Bébé Confort. Het gebruik
van andere accessoires kunnen gevaar opleveren.
• Nadat uw kind in de autostoel geplaatst is dient u te controleren of de gordel
goed aangespannen is door aan de gordel te trekken. Controleer tevens of
de gordel niet gedraaid zit.
Onderhoud
• Voordat u de bekleding gaat afnemen dient u de bevestigingsmanier van
alle delen aandachtig te bestuderen om daarna alle onderdelen weer
correct terug te kunnen bevestigen.
• Om optimaal van uw product te kunnen genieten is het van groot belang
uw autostoel regelmatig te onderhouden. (voorkom dat vuil zich definitief in
de bekleding vasthecht)
Bekleding :
• Raadpleeg het wasetiket voordat u de bekleding gaat reinigen. (het
wasetiket is aan de bekleding gestikt) Op het wasetiket treft u de
onderhoudssymbolen.
Wasvoorschriften :
(30°) Machinewasbaar tot 30°
Uitsluitend handwas
G eb ruik geen
c h lo or ho u de nd e
p r o d u c t e n
Plastic buitenschelp :
• Reinigen met een vochtige doek.
(bleekwater)
Niet in de droogtrommel
drogen
Niet strijken
Niet chemisch reinigen
NL - IT
IMPORTANTE
• Non utilizzare il dispositivo di ritenuta per bambini senza il rivestimento.
Non sostituire il rivestimento del seggiolino con un altro che non sia
quello consigliato dal costruttore, perché esso interviene direttamente sul
funzionamento del dispositivo di ritenuta.
• I prodotti Bébé Confort sono stati ideati e testati con cura, per la sicurezza
e il comfort del vostro bambino. Utilizzare esclusivamente accessori
venduti o approvati da Dorel France. L’utilizzo di altri accessori può
rivelarsi pericoloso.
• Dopo aver installato il bambino all’interno del seggiolino, verificare la
corretta tensione delle cinture e controllare che le cinture non siano
attorcigliate.
Lavaggio
• Prima dello smontaggio, verificare con attenzione il modo in cui le diverse
parti sono montate, per rimontare il tutto correttamente.
• Per ottimizzare l’utilizzo del seggiolino, pulire il prodotto regolarmente.
Rivestimento :
• Prima del lavaggio, consultare l’etichetta di composizione del tessuto
cucita sulla confezione, per verificare i simboli di lavaggio.
Simboli per il lavaggio :
Lavaggio in lavatrice a 30°
Lavaggio a mano
asciugatrice
Non stirare
Non lavare a secco
Non candeggiare
Non asciugare in
Scocca :
• Pulire la scocca con un panno umido.
40
Page 41

OMSCHRIJVING
IN OPTIE
18
6
5
7
8
14
9
10
1
2
2
5
11
13
1
3
17
3
15
2
16
2
5
4
1. Kuip
2. Draagbeugel
3. Instructie- en airbagsticker
4
4. Opbergvak voor de gebruiksaanwijzing
5. Waarschuwingssticker
6. Sleuven voor het verstellen van de schoudergordels
7. Schouderriemen van het harnas
8. Slot van harnasgordel
9. Bedienings-knop snelversteller
10. Centrale riem om het harnas in een handeling op te spannen
11. Schouderbeschermers
12. Gordelhaak achter, voor bevestiging van de 3-puntsautogordel
13. Gordelhaak voor, voor bevestiging van de buikgordel van de
12
3-puntsautogordel
14. Uitneembare bekleding
15. Drukknop voor het verstellen van de draagbeugel
16. Modulo Clip® Systeem (voor bevestiging op het onderstel)
17. Zonnekapje
18. Regenbekleding. Verkocht als accessoire
1 - Veiligheidsbeugel
2 - Gordelsleuven
3 - Ontgrendelknop
4 - Bevestigings indicator van de Streety.fix schelp
5 - Bevestigingshaken
41
NL
Page 42

DESCRIZIONE
8
14
9
10
ACCESSORI
IT
18
6
5
7
1
2
2
5
11
13
1
3
17
3
15
2
16
2
5
4
1. Scocca
2. Maniglione per il trasporto
3. Istruzioni e adesivo airbag
4. Istruzioni per l’uso (tra la scocca e il polistirene)
4
5. Adesivo con avvertenze
6. Fessure per la regolazione in altezza delle cinture di sicurezza del
seggiolino
7. Cinture di sicurezza del seggiolino
8. Fibbia delle cinture di sicurezza del seggiolino
9. Pulsante per allentare le cinture di sicurezza
10. Cinghia per regolare le cinture di sicurezza con una sola mano
11. Protezioni per cinture
12. Gancio posteriore per il passaggio della parte diagonale della cintura
12
di sicurezza a 3 punti dell’auto
13. Gancio per il passaggio della parte addominale della cintura di
sicurezza a 3 punti dell’auto
14. Rivestimento amovibile
15. Pulsante per la regolazione del maniglione per il trasporto
16. Modulo Clip® System (per l’aggancio al telaio Bébé Confort)
17. Pagodina
18. Parapioggia. Venduto come accessorio
1 - Barra anti-ribaltamento
2 - Punti di passaggio della cintura
3 - Pulsante di sblocco
4 - Indicatore di fissaggio del seggiolino Streety.fix
5 - Ganci di fissaggio
42
Page 43

CORRECTE PLAATSING VAN STREETY.FIX ZONDER
BASIS - INSTALLAZIONE CORRETTA DELLO STREETY.
FIX SENZA BASE
FOUTIEVE PLAATSING VAN STREETY.FIX ZONDER BASIS -
INSTALLAZIONE NON CORRETTA DELLO STREETY.FIX
SENZA BASE
OK
+
NO
=
ATTENTIE : Bij twijfel betreft de correcte plaatsing van de autostoel in het voertuig, dient men contact op te nemen met de winkelier of fabrikant.
ATTENZIONE : in caso di dubbi sulla corretta installazione del sistema, si consiglia di contattare il distributore o il produttore del dispositivo di ritenuta per bambini.
43
NL - IT
Page 44

CORRECTE PLAATSING VAN STREETY.FIX MET
STREETY.BASE - INSTALLAZIONE CORRETTA DELLO
STREETY.FIX CON LA STREETY.BASE
FOUTIEVE PLAATSING VAN STREETY.FIX MET STREETY.
BASE INSTALLAZIONE NON CORRETTA DELLO STREETY.FIX
CON LA STREETY.BASE
OK
ATTENTIE : Bij twijfel betreft de correcte plaatsing van de autostoel in het voertuig, dient men contact op te nemen met de winkelier of fabrikant.
ATTENZIONE : in caso di dubbi sulla corretta installazione del sistema, si consiglia di contattare il distributore o il produttore del dispositivo di ritenuta per bambini.
NL - IT
NO
NO
44
Page 45

OPGELET
IMPORTANTE
WAARSCHUWING : Het is gevaarlijk deze babyschelp/autostoel te gebruiken op
een verhoging of verhoogd oppervlak.
WAARSCHUWING : Om valpartijen te voorkomen dient u ALTIJD en in ELKE
omstandigheid het harnas te sluiten en aan te spannen.
BELANGRIJK : voordat u de babyschelp gaat dragen dient u te controleren of
de draagbeugel correct vergrendeld is.
BELANGRIJK : Voor de veiligheid van uw kind raden wij sterk af babyschelp
STREETY op een winkelwagentje te plaatsen.
45
ATTENZIONE : è pericoloso posizionare il seggiolino su una superficie rialzata.
ATTENZIONE : per evitare qualsiasi rischio di caduta, il bambino deve essere
sempre agganciato alle cinture.
ATTENZIONE : prima di trasportare il seggiolino, verificare che il maniglione di
trasporto sia correttamente bloccato.
ATTENZIONE : per la sicurezza del vostro bambino, sconsigliamo vivamente di
installare il seggiolino Streety.fix sul carrello del supermercato.
NL- IT
Page 46

VASTMAKEN VAN DE BABY
• Harnasslot openen (door op de rode knop te drukken).
• Zorg ervoor dat de baby goed in de babyschelp ligt, de rug goed
aangesloten.
Door de ergonomische vorm van de babyschelp is onderuitzakken
uitgesloten.
• Let op dat de schouderriemen van het harnas glad aanliggen over de
schouders van
de baby (D).
• De kunststof slottongen van beide schouderriemen eerst
samenvoegen (A).
• Steek de slottongen in het harnasslot, zodat deze met een harde klik
vergrendeld worden (A).
• Span het harnas op door aan de centrale riem aan de voorzijde van
de babyschelp te trekken zodat het harnas goed aangespannen op
het kind zit.
a b c
NL
Harnas gordel in hoogte verstellen.
• Het harnas (de gordel voor baby) dient aan het lichaam van uw baby
aangepast te worden (B).
• De schouderriemen van het harnas moeten door de sleuven gevoerd
worden welke zich het dichtst bij de schouders van het kind bevinden
(C). Verstel de hoogte van de harnasschouderriemen als volgt
• Trek de schouderriemen door de sleuven in de bekleding en door de
kuip van de babyschelp (C).
• Voer de schouderriemen door de juiste sleuven van de kuip en door
de bekleding.
Het verstellen van het harnas (gordelsysteem) gaat als volgt;
Losser:
• Druk op de verstelknop voorin de babyschelp (B).
• Trek tegelijkertijd de beide harnasschouderriemen aan de voorzijde
naar u toe (B).
Strakker:
• Trek aan de centrale riem aan de voorzijde van de babyschelp tot het
harnas strak aanligt.
• De lus van de centrale riem kan aan de voorzijde van de babyschelp
in de haakjes worden vastgemaakt.
d
46
Page 47

COME ALLACCIARE LE CINTURE DEL SEGGIOLINO AUTO
• Aprire la fibbia delle cinture (premendo il pulsante rosso).
• Assicurarsi che il bambino sia seduto comodamente, con la schiena
ben appoggiata allo schienale. La forma ergonomica della scocca
impedisce al bambino di scivolare.
• Verificare che le cinture del seggiolino siano ben tese sopra le spalle
del bambino (D).
• Unire le linguette in plastica di entrambe le cinture (A).
• Inserire le linguette nella fibbia fino a che non si ode uno scatto (A).
• Tirare la cinghia situata sulla parte anteriore della scocca per fare
aderire le cinture al corpo del bambino (sistema delle cinture di
sicurezza).
Regolazione delle cinture di sicurezza
• Le cinture di sicurezza devono essere ben posizionate attorno al
corpo del bambino (D).
• Le cinture di sicurezza per le spalle devono passare attraverso le
fessure più vicine alle spalle del bambino (C).
Regolazione delle cinture per le spalle
• Far passare le cinture per le spalle attraverso le fessure del
rivestimento e della scocca (C).
• Verificare che le cinture per le spalle passino correttamente attraverso
le apposite fessure della scocca e del rivestimento (C).
Regolazione del sistema delle cinture di sicurezza
Per allentare le cinture:
• Premere il pulsante di regolazione situato sulla parte anteriore del
seggiolino (B).
• Tirare contemporaneamente entrambe le cinture per le spalle verso
di sé (B).
Per tendere le cinture:
• Tirare la cinghia situata sulla parte anteriore del seggiolino, fino a che
le cinture non sono ben tese.
• La cinghia può essere fissata agli appositi ganci situati sulla parte
anteriore del seggiolino.
a b c
47
d
IT
Page 48

GEBRUIK VAN DE BABYSCHELP IN DE AUTO
5
5
5
Let op: het hiernavolgende informatie is uiterst belangrijk bij gebruik
in de auto:
• Gebruik nooit een babyschelp op een plaats waar een frontale-airbag
geïnstalleerd is, dit is levensgevaarlijk. Deze waarschuwing is niet van
toepassing op de zogenaamde side-airbags.
• Let bij installatie in het voertuig op het verschil tussen de buikgordelriem
en de diagonale autogordelriem.
• Bevestig de babyschelp altijd in de positie “tegen de rijrichting in” op
de passagierszetel in het voertuig. De draagbeugel dient altijd rechtop
te staan (E).
• Indien de autogordel in hoogte verstelbaar is dient deze altijd op de
laagste stand te staan.
• Zorg dat de voorste passagierzetel altijd zo ver mogelijk naar achter
geschoven is.
e
f g
NL
GEBRUIK VAN DE BABYSCHELP ZONDER BASIS
• Voer de buikgordel van de 3-punt autogordel door de blauwe
gordelhaken aan de voorzijde en door de heupgordelhaken, sluit de
autogordel (F).
• Plaats de diagonale autogordelriem rondom de babyschelp en haak
deze in de
blauwe gordelhaak aan de achterzijde van de babyschelp (G). Let
op dat de diagonale autogordelriem achter de blauwe gordelhaak
ligt en geblokkeerd wordt door de weerhaak (H).Trek de autogordel
strak aan.
Zorg ervoor dat de gordel nergens gedraaid is.
• Controleer nogmaals of de autogordel correct door en over de drie
blauw gemarkeerde punten loopt (I). De Bébé Confort babyschelp is
nu correct geïnstalleerd.
5
h
i
48
Page 49

USO DEL SEGGIOLINO AUTO STREETY.FIX NELL’AUTOMOBILE SENZA BASE
5
5
5
Durante l’installazione del seggiolino nell’automobile, attenersi alle
istruzioni riportate di seguito:
• Non utilizzare il seggiolino auto sul sedile anteriore se l’autoveicolo
è dotato di airbag frontale, perché può essere pericoloso. Questa
raccomandazione non è valida per gli airbag laterali.
• Durante l’installazione del seggiolino nella vettura, fare attenzione
a ben differenziare la parte addominale e la parte diagonale della
cintura di sicurezza dell’auto.
• Posizionare sempre il seggiolino in senso inverso di marcia (la
schiena del bambino orientata nel senso di marcia del veicolo) e
regolare il maniglione per il trasporto in posizione verticale (E).
• Se la cintura di sicurezza è regolabile in altezza, sistemarla nella
posizione inferiore.
• Assicurarsi che il sedile anteriore si trovi nella posizione più arretrata.
e
f g h i
USO DEL SEGGIOLINO AUTO STREETY.FIX SENZA BASE
• Fare passare la parte addominale della cintura di sicurezza a 3 punti
d’attacco dell’auto sulla parte anteriore del seggiolino attraverso i
ganci marcati in azzurro e attraverso i ganci destinati alla cintura
addominale, poi inserire la fibbia nella chiusura (F).
• Fare passare la parte diagonale della cintura di sicurezza dell’auto
intorno al seggiolino e fissarla al gancio azzurro situato sul retro della
scocca (G). Verificare che la cintura dell’auto passi correttamente
attraverso il gancio azzurro e che sia bloccata contro di esso (H).
Tendere bene la cintura, assicurandosi che non sia attorcigliata.
• Verificare di nuovo che la cintura dell’auto passi correttamente
attraverso e sopra i punti marcati in azzurro (I).
Ora il seggiolino auto STREETY è installato correttamente.
5
49
IT
Page 50

VERSTELLEN VAN DE DRAAGBEUGEL REGOLAZIONE DEL MANIGLIONE
5
De draagbeugel heeft 2 standen (J)
• Druk de twee knoppen aan weerszijden van de draagbeugel
gelijktijdig
in en beweeg de draagbeugel voor of achteruit in de gewenste
richting.
De knoppen springen automatisch vast als de gewenste stand bereikt
is (J)
1 Draagstand/autostand
2 Slaapstand/schommelstand
De draagbeugel MOET vergrendeld zijn (zie schema K hieronder)
voordat u het product met de draagbeugel gaat dragen».
OK
j
NL - IT
k
Il maniglione per il trasporto può essere regolato in 2 posizioni (J).
• Premere contemporaneamente i due pulsanti situati su entrambi i
lati del maniglione e spostare quest’ultimo in avanti o indietro, nella
posizione desiderata.
• I pulsanti si risollevano automaticamente, una volta sistemato il
maniglione nella posizione desiderata (J).
1 Posizione per il trasporto/per l’automobile
2 Posizione di riposo/dondolo
E’ necessario che il maniglione sia bloccato (vedere lo schema K qui
sotto) prima di trasportare il seggiolino auto utilizzando il maniglione
stesso.
NO
50
Page 51

PLAATSING IN HET VOERTUIG MET BASIS
INSTALLAZIONE CON LA BASE
1 - Plaats de basis «tegen de rijrichting in» op
de zitplaats van het voertuig. De metalen
veiligheidsbeugel dient tegen de rugleuning van de
zitplaats geplaatst te worden. Haal de buikgordel door
de gordelsleuven (A en B). ATTENTIE : controleer
dat de buikgordel glad door de gordelsleuven loopt,
de gordel mag niet gedraaid zijn.
1 - Posizionare la base in senso inverso di marcia,
con la barra anti-ribaltamento contro lo schienale del
sedile dell’autoveicolo. Far passare la parte
addominale della cintura di sicurezza dell’auto
attraverso le guide (A e B). ATTENZIONE : verificare
che la cintura non si attorcigli, durante il
passaggio attraverso le apposite guide.
2 – Sluit de autogordel (A).
Span de buikgordelriem zo strak mogelijk op (B).
2 - Agganciare la cintura di sicurezza del sedile
(A).
Poi tendere al massimo la parte addominale della
cintura (B).
51
3 - Voordat autostoel Streety.fix op de basis geplaatst
wordt dient men te controleren of de oranje indicator op
de voorkant van de basis duidelijk zichtbaar is (A).
In geval van twijfel adviseren wij u contact op te nemen
met uw babyspeciaalzaak.Controleer dat geen enkel
voorwerp of object de vergrendeling tussen autostoel
Streety.fix en de basis belemmerd. Plaats autostoel
Streety.fix op de basis, altijd in de positie “tegen de
rijrichting in”.
3 - Prima di installare lo Streety.fix, verificare che la
striscia arancione sul pulsante posto sulla base sia ben
visibile (A). In caso di dubbi, contattare il distributore.
Controllare che nessun oggetto ostacoli l’aggancio dello
Streety.fix alla base. Agganciare lo Streety.fix, rivolto in
senso inverso di marcia, alla base.
NL - IT
Page 52

PLAATSING IN HET VOERTUIG MET BASIS
INSTALLAZIONE CON LA BASE
4 - Druk stevig op autostoel Streety.fix zodat de
autostoel in de basis vergrendeld wordt.
ATTENTIE : De autostoel is correct geplaatst indien
u
“klik” hoort en de oranje indicator van de basis
duidelijk zichtbaar is.
4 - Esercitare pressione sullo Streety.fix per
agganciarlo alla base.
ATTENZIONE : il seggiolino è agganciato
correttamente se si ode un “click” e se l’indicatore
sul
pulsante (striscia arancione) è visibile.
NL - IT
5 – Haal de diagonale autogordel door de
gordelsleuf op de achterkant van de babyschelp
(A), span de autogordel strak op (B).
5 - Far passare la parte diagonale della cintura
attraverso la guida sul retro della scocca (A), e
tenderla con cura (B).
52
ATTENTIE : de plaatsing van Streety.fix op de
basis is nu voltooid.
Controleer of de autogordel correct en glad door de
gordelsleuven loopt, controleer of de oranje indicator
op de knop aan de voorkant van de basis duidelijk
zichtbaar is.
ATTENZIONE : l’installazione dello Streety.fix sulla
Streety.base è terminata.
Verificare che la cintura passi correttamente
attraverso le apposite guide e che la striscia
arancione sul pulsante della base sia visibile.
Page 53

STREETY.FIX VAN DE STREETY.BASE AFNEMEN
COME RIMUOVERE LO STREETY.FIX DALLA STREETY.BASE
6 - Maak uitsluitend de diagonale autogordel vrij
van de babyschelp, plaats de diagonale autogordel
tegen de rugleuning van de achterbank.
6 - Rimuovere solamente la parte diagonale della
cintura (dal seggiolino) e appoggiarla al sedile.
7 - Druk op de knop van de basis om de Streety.
fix te ontgrendelen.
7 - Premere il pulsante sulla base per sganciare lo
Streety.fix.
53
8 - Houdt de knop ingedrukt terwijl u de babyschelp
van de basis afneemt.
8 - Mantenere la pressione sul pulsante e rimuovere
il seggiolino.
NL - IT
Page 54

GARANTIE BEWIJS
Geachte klant,
Wij danken u voor het vertrouwen dat u in ons stelt bij het kiezen van een van onze producten en hopen dat ze u volledig tevreden
zullen stellen. Dit product is vervaardigt volgens diverse kwaliteitsnormen die van toepassing zijn voor dit product. Tevens
is het product onderworpen aan diverse controles tijdens de verschillende fabricage etappes. Indien er, ondanks al onze
inspanningen, gedurende de garantieperiode een afwijking/onregelmatigheid zich voordoet, verplichten wij ons ertoe de
garantievoorwaarden te respecteren.
GARANTIEBEWIJS : Garantiebewijs: Wij garanderen u dat dit product voldoet aan de veiligheidsvoorwaarden zoals
omschreven in het reglement van kracht, dat het product geen enkele fout of fabricagefout vertoont op het moment van
aankoop door de detailhandelaar. Indien er zich na aankoop van het product, gedurende de garantieperiode van 24
maanden, het product een fout vertoont, bij normaal gebruik zoals omschreven in de gebruiksaanwijzing, verplichten
wij ons ertoe het product te repareren of te vervangen (voor bijkomende informatie betreft de toepassing van de
garantievoorwaarden adviseren wij contact op te nemen met uw detailhandelaar of onze website te raadplegen) De
volgende gevallen zijn uitgesloten voor garantie:
- bij gebruik en doel anders dan voorzien in de gebruiksaanwijzing,
- bij een plaatsing welke niet overeenkomstig is met de gebruiksaanwijzing,
- herstellingen uitgevoerd door een niet erkend persoon of door een niet officieel erkende verkoper,
- indien het aankoopbewijs niet getoond kan worden,
- indien het product slecht onderhouden is,
- vervanging van onderdelen die bij een normaal gebruik aan slijtage onderhevig zijn (wielen, draaiende en bewegende delen..…
.enz..)
Vanaf wanneer ?
Vanaf de aankoopdatum van het product.
Voor welke periode ?
24 opeenvolgende niet overdraagbare maanden. De eerste aankoper is de enige begunstigde van deze garantie.
Wat moet u doen ?
Bij aankoop van het product dient het aankoopbewijs zorgvuldig bewaard te worden. De aankoopdatum moet duidelijk zichtbaar
zijn op het aankoopbewijs. Indien het product een gebrek vertoont dient het teruggebracht te worden bij de detailhandelaar waar
het product aangekocht is. Producten die rechtstreeks naar de fabrikant teruggezonden worden komen niet in aanmerking voor
garantie.
Deze garantie is overeenkomstig met de Europese richtlijnen N° 1999/44/CE van 25 mei 1999.
NL
54
Page 55

CERTIFICATO DI GARANZIA
Gentile Cliente,
Grazie per aver scelto uno dei nostri prodotti. Speriamo che ne sia completamente soddisfatto. Questo certificato indica
che il suo prodotto è stato costruito secondo normative di qualità specifiche e che è stato sottoposto a numerosi controlli
nelle diverse fasi di lavorazione. Se, nonostante tutti i nostri sforzi, dovesse riscontrare un’anomalia durante il periodo
di validità della garanzia, ci impegneremo a rispettare le condizioni del presente certificato.
CERTIFICATO DI GARANZIA : Vi garantiamo che questo prodotto è conforme alle norme di sicurezza definite dalla
regolamentazione in vigore e che non presenta alcun difetto di ideazione e di fabbricazione al momento dell’acquisto
presso il rivenditore. Se dopo l’acquisto, entro un periodo di 24 mesi, questo prodotto dovesse presentare un difetto
durante il normale utilizzo definito dalle avvertenze d’uso, ci impegniamo a ripararlo o a sostituirlo (per maggiori
informazioni sulle condizioni d’applicazione della nostra garanzia, consultate il vostro rivenditore oppure il nostro sito
internet). La sostituzione e la riparazione sono escluse nei seguenti casi:
. utilizzo e destinazione diversi da quelli previsti nelle istruzioni d’uso,
. installazione non conforme alle istruzioni,
. riparazione effettuata da persona o rivenditore non autorizzato,
. mancanza dello scontrino d’acquisto,
. mancanza di manutenzione del prodotto,
. sostituzione di parti sottoposte ad usura (ruote, parti sottoposte ad attrito ...) durante il normale utilizzo.
Qual è la decorrenza ?
La data d’acquisto del prodotto.
Per quanto tempo ?
24 mesi consecutivi e non trasferibili ad altra persona: l’unico beneficiario è colui che ha effettuato l’acquisto.
Cosa si deve fare ?
Dopo l’acquisto, dovete conservare lo scontrino riportante la data d’acquisto del prodotto. Nel caso si verifichi un problema,
il prodotto deve essere restituito al rivenditore presso cui è stato effettuato l’acquisto. I prodotti inviati direttamente al produttore
non godranno di alcuna garanzia.
Garanzia conforme alla Direttiva Europea n° 1999/44/CE del 25 Maggio 1999.
55
IT
Page 56

RECOMENDACIONES PARA USAR LA
STREETY.FIX Y LA STREETY.BASE
Instalación
De espaldas a la marcha Traseras y delanteras
• La silla de auto se puede instalar en
los asientos delanteros ( conforme la
legislación vigente) o traseros. Los
asientos abatibles deben estar siempre
bien bloqueados. Este dispositivo sólo
puede ser utilizado en automóviles que
estén equipados con cinturones de
seguridad de 3 puntos / estáticos / con
enrolladores, homologados conforme al
reglamento R 16 de la CEE / ONU o
norma equivalente.
• Esta silla de auto no debe utilizarse en
el asiento delantero (acompañante) de
automóviles equipados con Airbag para
pasajero. ALTO RIESGO DE MUERTE O
DE LESIONES GRAVES.
• Modificar la posición de los asientos del
automóvil para facilitar la instalación y
optimizar la eficacia del Dispositivo de
Retención Infantil.
- Para instalar el dispositivo en el asiento
trasero del automóvil, adelantar el asiento
delantero del acompañante.
- Para instalarlo en el asiento delantero del
automóvil, y aprovechar al máximo la
longitud del cinturón delantero, desplazar
hacia atrás el asiento delantero del
pasajero.
• Asegúrese de que la base del Dispositivo
de Retención Infantil está correctamente
fijada al asiento del automóvil.
Plazas
ES - PT
Grupo O+
0 a 13 kg
RECOMENDAÇÕES NA UTILIZAÇÃO DA
STREETY.FIX E STREETY.BASE
Sentido
De costas para a estrada
Lugares
À frente e atrás 0 aos 13 kg
• A cadeira-auto pode ser utilizada no
banco da frente (segundo a legislação em
vigor) ou no banco traseiro. Os bancos
rebatíveis devem estar sempre fechados.
Este dispositivo deve ser utilizado somente
em automóveis equipados com cintos
de segurança de 3 pontos, devidamente
homologados conforme o regulamentado
pela CEE Nº16/ONU ou alguma outra
norma equivalente.
• Nunca instale a cadeira-auto no banco da
frente, de costas para a estrada, com o
airbag ligado. RISCO DE MORTE OU DE
FERIMENTOS GRAVES.
• Regule a posição dos bancos do automóvel
para evitar uma instalação defeituosa ou a
redução da eficácia do dispositivo de
retenção:
- Chegue para a frente o banco do passageiro
da frente, de forma a efectuar a instalação
no banco traseiro do automóvel.
- Chegue para trás o banco do passageiro
da frente, de forma a efectuar a instalação
na frente do automóvel e assim usufruir
ao máximo de toda a extensão da frente
do automóvel.
• Certifique-se que a base do dispositivo
de retenção está bem colocada sobre a
cadeira-auto.
56
Grupo O+
Page 57

IMPORTANTE
IMPORTANTE
• Se aconseja leer atentamente este manual antes de empezar a manipular
el producto.
• Conserve estas instrucciones para posteriores consultas. El Dispositivo de
Retención Infantil dispone de un bolsillo para guardarlas dentro.
• No deje nunca al bebé sin la vigilancia de un adulto.
• Este Dispositivo de Retención Infantil es eficaz siempre y cuando se respeten
las instrucciones de uso.
• Para su seguridad y la de su bebé, instálelo siempre en su portabebés, incluso
en los trayectos más cortos.
• Cualquier choque, por leve que sea, puede convertir al bebé en un verdadero
proyectil si no viaja correctamente asegurado con el arnés.
• Fije siempre el Dispositivo de Retención Infantil al asiento del automóvil,
incluso cuando el bebé no esté instalado en ella.
• Modelo aprobado como Grupo 0+, es decir, para bebés de menos de 13 kg
(hasta 12 meses aprox.)
• La silla de seguridad auto (grupo 0+) debe utilizarse de espaldas
a la marcha.
• La responsabilidad del fabricante se limitará a lo dispuesto en el Reglamento
Europeo (R44). El uso de este producto homologado no excluye la prudencia
y el respeto de las normas de circulación.
• No manipule nunca los materiales o el propio diseño de la silla y del cinturón
sin haber consultado previamente al fabricante.
• Se recomienda no dejar ningún objeto en la bandeja trasera, para evitar
cualquier riesgo de proyección en caso de accidente.
• Los objetos en el interior del automóvil deberán ir correctamente sujetos, para
evitar que lesionen al bebé en caso de impacto o frenazo brusco.
• La temperatura interior del automóvil puede llegar a ser muy alta, especialmente
tras una larga exposición al sol. En estas condiciones, se recomienda cubrir la
silla de auto con una funda o tela para impedir que las fijaciones del arnés y,
particularmente, las piezas metálicas, se calienten y quemen al bebé.
• Tras un accidente, la silla de auto debe ser reemplazada por otra nueva.
• Verifique siempre que el arnés o cualquier otra parte de la silla no han
quedado atrapados por la puerta o asientos abatibles del automóvil.
• Aconselhamos que leia atentamente este manual e experimente o seu
produto antes de o utilizar
• Conserve este manual para futuras consultas. Para o efeito, foi colocada uma
pequena bolsa no dispositivo de retenção para crianças.
• Nunca deixe o seu filho sem vigilância.
• Este dispositivo de retenção é eficaz quando respeitadas, integralmente, as
instruções de utilização.
• Para a sua segurança e a do seu filho, utilize sempre o cinto qualquer que
seja o trajecto a efectuar.
• Os choques de automóvel, por mais leves que sejam, podem transformar o
seu filho num verdadeiro projectil.
• Coloque o dispositivo de retenção para crianças antes de instalar o seu filho.
• Modelo aprovado para o grupo 0+, ou seja, para bebés com peso inferior a
13 Kg (até aos 12 meses aproximadamente).
• O dispositivo de retenção para bebés (grupo 0+) deve ser utilizado de costas
para a estrada.
• A responsabilidade do fabricante não será atribuída, excepto no que consta
no Regulamento Europeu (R44). Esta homologação não exclui a prudência e
o respeito pelo código da estrada.
• Nunca modifique a construção ou os materiais da cadeira-auto, bem como o
cinto, sem antes consultar o fabricante.
• Não coloque objectos pesados no tablier traseiro para evitar projecções em
caso de acidente.
• Deve ter cuidado, para que a bagagem ou outros objectos susceptíveis de
causar ferimentos ao ocupante da cadeira, em caso de choque, estejam
devidamente arrumados.
• A temperatura interior do automóvel pode ser elevada, em particular após
um longo período de exposição ao sol. Nestes casos, é recomendado a
cobertura da cadeira-auto com um tecido que protegerá as peças de fixação
do arnês, e em particular as peças metálicas impedindo que o seu filho se
queime ou se magoe.
• A cadeira deve ser sempre substituída após um acidente.
• Verifique sempre se uma parte da cadeira ou do arnês não está presa no
banco ou na porta do automóvel.
57
.
ES - PT
Page 58

IMPORTANTE IMPORTANTE
• No utilizar el Dispositivo de Retención Infantil sin la vestidura. No reemplazar
la vestidura original de la silla por otra que no sea recomendada por el
fabricante, ya que participa activamente en la eficacia del dispositivo de
retención.
• Los productos Bebé Confort han sido creados y testados para ofrecer la
máxima seguridad y confort a su bebé. Utilizar únicamente accesorios
homologados por el fabricante. La utilización de otros accesorios puede
ser peligrosa.
• Después de haber instalado al bebé, comprobar la tensión del arnés y
ajustarla si fuera necesario tirando de la cinta de regulación del arnés.
Comprobar también que el arnés no esté retorcido o enrollado.
Mantenimiento
• Antes de desinstalar la silla, memorizar cómo están montadas las distintas
partes, para poder volver a montarlas correctamente.
• Para optimizar la duración y eficacia del producto, debe limpiarlo
regularmente.
Confección:
• Antes de lavarla, consultar la etiqueta de composición textil cosida a
la vestidura donde se encuentran las instrucciones para una limpieza
adecuada.
Pictogramas de lavado :
Lavar a máquina 30°
Sólo lavado a mano
No utilizar lejía
Carcasa:
• Limpiar la carcasa con un trapo húmedo.
No utilizar secadora
No planchar
No limpiar en seco
ES - PT
• Não utilize o dispositivo de retenção sem forra. Não substitua a forra da
cadeira por outra que não seja recomendada pelo construtor, uma vez que
ela intervém directamente no desempenho do dispositivo de retenção.
• Os produtos Bébé Confort foram concebidos e testados com cuidado, para
segurança e conforto do seu filho. Utilize somente acessórios vendidos
ou aprovados pelo fabricante. A utilização de outros acessórios pode ser
perigosa.
• Depois de ter instalado o seu filho, assegure-se que o cinto está
correctamente colocado, tomando atenção para que este não fique
enrolado.
Lavagem
• Antes de desmontar, verifique o modo como as diferentes partes estão
montadas na cadeira, para depois montar tudo correctamente.
• Para total satisfação, o produto necessita de lavagens regulares.
Confecção:
• Antes de lavar, consulte a etiqueta da composição têxtil, cosida na
confecção, onde poderá encontrar os símbolos de lavagem do produto.
Símbolos de lavagem :
Lavagem na máquina 30º
Lavagem à mão
unicamente
Não utilizar lixívia
Coque:
• Limpe a coque com a ajuda de um pano humido.
Não secar no tambor
Não passar a ferro
Não lavar a seco
58
Page 59

DESCRIPCIÓN
8
14
9
10
ACCESORIOS
18
6
5
7
1
2
2
5
11
13
1
3
17
3
15
2
16
2
5
4
1. Carcasa
2. Asa de transporte
3. Instrucciones y etiqueta del airbag
4. Modo de empleo (entre la carcasa y el poliestireno)
4
5. Etiqueta de advertencia
6. Ranuras para el ajuste del arnés
7. Arnés
8. Cierre de arnés
9. Pinza de ajuste rápido del arnés
10. Correa para el ajuste del arnés con una sóla mano
11. Protegearneses
12. Guía para tramo diagonal del cinturón de 3 puntos de anclaje
13. Guía para el tramo abdominal del cinturón de 3 puntos de anclaje
12
14. Vestidura extraíble
15. Pulsador para ajustar la posición del asa de transporte
16. Modulo Clip® System (para la fijación en los chasis Bébé Confort)
17. Toldo
18. Burbuja. Vendida como accesorio
1 - Barra parachoques
2 - Puntos de pasaje para el cinturón de seguridad
3 - Botón de desbloqueo
4 - Indicador de fijación de la carcasa de la Streety.Fix
5 - Ganchos de fijación
59
ES
Page 60

DESCRIÇÃO
8
14
9
10
ACESSORIOS
PT
18
6
5
7
1
2
2
5
11
13
1
3
17
3
15
2
16
2
5
4
1. Assento
2. Alça de transporte
3. Autocolante de instruções e do airbag
4
4. Manual de instruções (entre a coque e o esferovite)
5. Autocolante de aviso
6. Ranhuras para o ajuste do cinto dos ombros
7. Cinto dos ombros
8. Fecho da armação do cinto
9. Botão de desengate do ajuste rápido
10. Correia de ajuste rápido, do cinto dos ombros
11. Protecções de ombros
12. Gancho posterior para o cinto dos ombros,
12
do cinto de segurança de 3 pontos de fixação
13. Gancho dos cintos inferiores do cinto de segurança
de 3 pontos de fixação
14. Capa amovível
15. Botão de pressão para ajuste da alça de transporte
16. Sistema Modulo Clip (para fixação sobre os chassis Bébé Confort)
17. Pára-sol
18. Capota de chuva. Vendido como acessório
1 - Barra anti-salto
2 - Passagens do cinto
3 - Botão de desbloqueio
4 - Indicador de fixação da cadeira Streety.fix
5 - Ganchos de fixação
60
Page 61

INSTALACIÓN CORRECTA DE LA STREETY.FIX
SOLA
INSTALAÇÃO CORRECTA DA Streety.fix
SOZINHA
INSTALACIONES INCORRECTAS DE LA STREETY.FIX SOLA
INSTALAÇÕES ERRADAS DA Streety.fix SOZINHA
OK
+
NO
=
ATENCIÓN : En caso de duda sobre la instalación del Dispositivo de Retención Infantil, se aconseja ponerse en contacto con su tienda especializada o con el
ATENÇÃO: em caso de dúvida sobre a instalação do sistema de retenção, aconselhamos que contacte o lojista ou fabricante.
fabricante.
61
ES - PT
Page 62

INSTALACIÓN CORRECTA DE LA STREETY.FIX CON
LA STREETY.BASE - INSTALAÇÃO CORRECTA DA
STREETY.FIX COM A STREETY.BASE
INSTALACIONES INCORRECTAS DE LA STREETY.FIX CON
LA STREETY.BASE - INSTALAÇÕES ERRADAS DA STREETY.
FIX COM A STREETY.BASE
OK
ATENCIÓN : En caso de duda sobre la instalación del Dispositivo de Retención Infantil, se aconseja ponerse en contacto con su tienda especializada o con
ATENÇÃO: em caso de dúvida sobre a instalação do sistema de retenção, aconselhamos que contacte o lojista ou fabricante.
ES - PT
NO
NO
el fabricante.
62
Page 63

IMPORTANTE IMPORTANTE
ADVERTENCIA : no colocar la silla sobre una superficie elevada.
ADVERTENCIA : para prevenir caídas, el bebé debe ir siempre sujeto con los
arneses.
IMPORTANTE : antes de desplazar la silla, verificar que el asa de transporte
esté correctamente bloqueada.
IMPORTANTE : para la seguridad del bebé, no se recomienda instalar el
Streety.fix en un carrito de supermercado.
ADVERTÊNCIA : é perigoso utilizar esta cadeira sobre uma superfície alta.
ADVERTÊNCIA: Para evitar quedas o seu filho deve estar sempre bem preso
com o arnês.
IMPORTANTE : Importante: antes de utilizar a cadeira, verifique se a pega de
transporte está correctamente bloqueada.
IMPORTANTE: para segurança do seu filho, é fortemente desaconselhado
que instale a Streety.fix num carrinho de supermercado.
63
ES - PT
Page 64

SUJETAR AL BEBÉ
• Abra el cierre del arnés (oprima el botón rojo).
• Coloque al bebé en la silla de auto STREETY Bébé Confort, con la
espalda del bebé completamente apoyada en el respaldo. La forma
ergonómica de la carcasa impide que el bebé se deslice hacia abajo.
• Compruebe que el arnés quede ajustado sobre los hombros del bebé (D).
• Junte primero las lengüetas de los tirantes del arnés (A).
• Introduzca las lengüetas en el cierre hasta hacer clic (A).
• Tire suavemente de la cinta que cuelga de la parte delantera del
carcasa para tensar el arnés y adaptarlo al volumen del bebé.
a b c
PT
Ajuste de la altura del arnés de sujeción.
• El cinturón de arnés debe adaptarse correctamente al cuerpo
del bebé (D).
• Para ello, el arnés debe pasar por las ranuras más cercanas
a los hombros (C).
Para cambiar la altura del arnés proceda como sigue.
• Extraiga los tirantes hasta sacarlos completamente de las ranuras (C).
• Pase las lengüetas de los tirantes por las ranuras adecuadas
de la carcasa y de la vestidura (C).
Ajuste del arnés de sujeción.
Más suelto:
• Pulse el botón de ajuste en la parte delantera de la carcasa (B).
• Tire simultáneamente de ambos tirantes hacia Vd (B).
Más apretado:
• Tire suavemente de la cinta que cuelga de la parte delantera hasta
que quede bien ajustado.
• El tramo sobrante de cinta puede sujetarse en los ganchos de la parte
delantera de la carcasa.
d
64
Page 65

COMO PRENDER O BEBÉ
• Abra o fecho do cinto (carregar no botão vermelho).
• Coloque o bebé com cuidado na cadeira Babycoque STREETY
Bébé Confort, com as costas bem assentes ao encosto lombar.
O assento possui forma ergonómica que não permite o deslizamento
do bebé na cadeira.
• É da máxima importância que os cintos dos ombros estejam planos e
bem justos aos ombros do bebé (D).
• Junte primeiramente as placa dos cintos dos ombros (A).
• A seguir introduza as placa dos cintos dos ombros, que se fixam com
um forte estalido (A).
• Puxe pelas correias do ajuste central da armação, na parte frontal da
cadeira, de modo que a criança fique firmemente presa pela armação
(sistema do cinto de segurança).
a b c
Ajustar a armação do cinto.
• A armação (sistema do cinto de segurança) deve ser ajustada ao
corpo do bebé (B).
• As fitas dos cintos dos ombros devem passar pelas ranhuras mais
próximas possíveis aos ombros da criança (C).
Ajuste a armação dos cintos dos ombros da forma seguinte.
• Introduza o cinto dos ombros pelas ranhuras da capa e do
assento(C).
• O cinto dos ombros deve passar pelas ranhuras correctas do assento
e da capa.
Para ajustar a armação (sistema do cinto de segurança)
Com alguma folga:
• Carregue no botão de desengate na parte frontal do assento (B).
• Puxe as duas partes dos cintos dos ombros na sua direcção (B).
Apertado:
• Puxe pela correia central, na parte frontal da cadeira, até que a
armação do cinto esteja suficientemente apertada.
• A laçada da correia central pode ser fixa no gancho situado na parte
frontal da cadeira.
d
65
ES - PT
Page 66

INSTALACIÓN EN EL AUTOMÓVIL SIN BASE
5
5
5
Para la instalación de la silla en el automóvil, siga estas instrucciones:
• No instale ninguna silla de seguridad en asientos equipados con
airbag frontal. Podría ser peligroso. Esto no es aplicable en caso de
airbag lateral.
• Al instalar la silla de seguridad en el automóvil, ponga especial
atención en no confundir los distintos recorridos de los dos tramos
del cinturón.
• Coloque la silla en el asiento delantero o trasero, siempre de espaldas
al sentido de la marcha. El asa debe estar en posición vertical (E).
• Si tiene posibilidad de regular la altura del cinturón del automóvil,
déjelo en su posición más baja.
• Desplace el asiento delantero a la última posición, lo más atrás
posible.
INSTALACIÓN DE LA SILLA STREETY.FIX SIN BASE
e
f g h i
ES - PT
• Pase el tramo abdominal del cinturón de 3 puntos de anclaje por
los ganchos marcados de azul en la parte frontal y por sus guías
correspondientes, e introduzca la lengüeta en el cierre (F).
• Pase el tramo diagonal del cinturón alrededor de la sillita y por la guía
de pasaje azul que hay detrás del respaldo (G). Asegúrese de que
queda bloqueado por el dispositivo de sujeción (H). Tense el cinturón
y compruebe que no esté torcido.
• Compruebe de nuevo que el cinturón pasa de forma adecuada por las
tres guías de color azul (I). La silla de auto STREETY Bébé Confort
está ahora instalada correctamente.
5
66
Page 67

UTILIZAÇÃO DA STREETY.FIX SEM A BASE
5
5
5
Babycoque STREETY Bébé Confort no carro
Ao instalar a cadeira no carro, tenha atenção aos seguintes pontos:
• Não utilize esta cadeira de segurança em veículos equipados com
Airbag no assento da frente. A sua utilização dessa forma pode ser
muito perigosa para o seu filho! Esta especificação não é aplicável
aos chamados Airbags laterais.
• Ao efectuar a instalação do cinto de segurança no carro, deve ter em
conta os diferentes modos de instalação, de um cinto de segurança
de 2 pontos de fixação e do cinto de segurança de 3 pontos de
fixação.
• Coloque a cadeira sempre no sentido contrário ao banco
(com as costas da criança no sentido da direcção do carro), e com a
alça de transporte na posição vertical (E).
• Ajuste a altura do cinto de segurança, se for o caso, na posição mais
baixa possível.
• Coloque sempre o banco da frente na posição mais afastada possível.
e
f g h i
UTILIZAÇÃO DA STREETY.FIX SEM A BASE
• Passe a faixa sub-abdominal do cinto de segurança através dos
ganchos marcados a azul, na parte da frente. De seguida, prenda
o cinto (F).
• Passe o cinto diagonal sobre a cadeira e prenda-o no gancho azul
escuro, na parte de trás da cadeira (G). Tenha atenção de que o
cinto diagonal passa correctamente atrás do gancho azul e esteja
firmemente preso pelo gancho de fixação (H). Puxe o cinto de modo a
ficar bem apertado, não devendo ficar torcido em parte alguma.
• Certifique-se de que o cinto do carro passa de forma correcta pelos
três pontos marcados em azul escuro (I). Apenas desse modo a
cadeira Babycoque STREETY Bébé Confort estará correctamente
instalada.
5
67
PT
Page 68

AJUSTE DEL ASA DE TRANSPORTE AJUSTAR A ALÇA DE TRANSPORTE
5
El asa tiene 2 posiciones (J).
• Oprima simultáneamente los dos botones a ambos lados del asa
y muévala hacia delante o hacia atrás en el sentido deseado. Los
botones saltarán automáticamente cuando se haya alcanzado la
posición correcta (J).
1 Posición de transporte/automóvil
2 Posición reclinada/balancín
Es indispensable que el asa esté bloqueada (ver el dibujo K de abajo)
antes de transportar el producto con ella.
A alça de transporte possui 2 posições (J).
• Carregue nos botões nas partes laterais da alça e movimente-a
na posição desejada, para trás ou para a frente. Quando a
posição correcta for ajustada, os botões de ajuste saltam para cima
automaticamente fixando-a na posição escolhida (J).
1 Posição de transporte/de uso no carro
2 Posição deitada/de balanço
É imperativo que o punho seja bloqueado (ver esquema K mais abaixo)
antes do transporte do produto pelo punho.
j
ES - PT
OK
k
NO
68
Page 69

INSTALACIÓN CON LA BASE - INSTALAÇÃO COM A BASE
1 - Colocar la base de espaldas a la marcha, con la
barra de sujeción contra el respaldo del asiento del
automóvil. Pasar el cinturón abdominal por las guías
(A) y (B) de la base.
ATENCIÓN : Comprobar que el cinturón ventral no
está retorcido en ningún punto del recorrido.
1 - Pouse a base na posição de costas para a
estrada com a barra anti-salto contra o encosto do
banco do automóvel. Passar o cinto abdominal nos
guias-cinto (A e B).
ATENÇÃO : quando passar o cinto abdominal nas
guias, verifique sempre se não está torcido.
2 - Anclar el cinturón en su cierre (A)
Tensar el cinturón ventral al máximo (B).
2 - Prender o cinto (A).
A seguir, esticar o cinto abdominal ao máximo (B).
69
3 - Antes de instalar la Streety.fix, verificar que el
borde naranja del botón está visible (A). En caso de
duda, contactar con su tienda especializada.
Comprobar que ningún objeto dificulta la fijación
de la Streety.fix a la base. Anclar la Streety.fix a la
base en posición de espaldas a la marcha.
3 - Antes de instalar a Streety.fix, verifique se a
marca cor de laranja no botão está bem visível
(A). Se tiver alguma dúvida, contacte o distribuidor.
Verifique se algum objecto impede o bloqueio da
Streety.fix na base. Encaixe a Streety.fix, de costas
para a estrada, na base .
ES - PT
Page 70

INSTALACIÓN CON LA BASE - INSTALAÇÃO COM A BASE
4 - Presionar con firmeza la Streety.fix contra la
base, para que queden perfectamente ancladas.
ATENCIÓN : Al anclar la Streety.fix a la base,
deberá oírse un clic, y el borde naranja del botón
quedará visible.
4 - Carregar firmemente na Streety.fix de modo a
ficar bem presa na base.
Atenção: a cadeira está correctamente fixa se ouvir
um clique e se a marca cor de laranja do botão
estiver bem visível.
ES - PT
5 - Pasar el cinturón diagonal del automóvil por la
guía-pasaje de la parte trasera de la carcasa (A).
Seguidamente, pasarlo por el pasaje lateral de la
silla (B) y tensarlo.
5 - Passar o cinto do ombro no guia-cinto atrás
da cadeira (A) e depois no guia-cinto do lado da
cadeira (B), e esticá-lo.
70
ATENCIÓN : la Streety.fix ya está anclada a la
Streety.base. Comprobar que el cinturón pase por
todos los puntos de pasaje y que el borde naranja del
botón está visible en la parte frontal de la base.
ATENÇÃO : terminou a instalação da Streety.
fix na Streety.base. Verificar se o cinto passa
correctamente nas guias e se a marca de laranja no
botão situado na frente da base está bem visível.
Page 71

COMO RETIRAR LA STREETY.FIX DE LA BASE
COMO RETIRAR A STREETY.FIX DA BASE
6 - Retirar el cinturón diagonal del pasaje trasero
de la carcasa. El cinturón quedará apoyado en el
respaldo del asiento del automóvil.
6 - Desapertar só o cinto diagonal (da cadeira) e
largá-lo.
7 - Presionar el botón de la base para liberar la
Streety.fix.
7 - Carregue no botão da base para desbloquear
a Streety.fix.
71
8 - Mantener presionado el botón y retirar la
carcasa.
8 - Manter o botão para baixo e retirar a cadeira.
ES - PT
Page 72

CERTIFICADO DE GARANTÍA
Distinguido Cliente,
Ante todo, queremos agradecerle la confianza que nos ha demostrado al escoger nuestros productos. Estamos seguros
de que serán de su total satisfacción. Este documento certifica que este producto ha sido fabricado según las normas
de calidad que le son aplicables y que ha sido sometido a numerosos controles en las distintas etapas de su fabricación.
Si a pesar de nuestros esfuerzos, se da una anomalía durante el periodo de validez de la garantía, nos comprometemos
a respectar las condiciones de la garantía.
LAS SIGUIENTES CONDICIONES: Certificado de garantía: Nosotros le garantizamos que este producto es conforme
a las exigencias de seguridad tal cual están definidas por la reglamentación en vigor, y que no presenta ningún defecto
de concepción y fabricación en el momento de su compra en su comercio. Si después de la compra, durante un periodo
de 24 meses este producto presenta un defecto en el caso de una utilización normal definida en el manual de
instrucciones, nosotros nos comprometemos a reparar o a cambiar el producto (para más información sobre las
modalidades de aplicación de nuestra garantía, contacte con su comercio o diríjase a nuestra web) excepto en los casos
de exclusión siguientes:
• Uso y finalidad distintos a los previstos en el manual de utilización.
• Instalación no conforme al manual.
• Reparación efectuada por personal no acreditado.
• No adjuntar el certificado de garantía debidamente cumplimentado según se indica en el apartado ¿Qué hacer?
• No presentar el tiquet o factura de compra.
• Mantenimiento inadecuado del producto.
• Cambio de piezas por deterioro (ruedas, partes en zonas de fricción...) en un uso normal.
¿A partir de cuándo?
A partir de la fecha de compra del producto.
¿Durante cuánto tiempo?
Durante 24 meses consecutivos y no transmisibles. El único beneficiario es el primer comprador.
¿Qué hacer?
En el momento de la compra del producto, debe rellenar el certificado de garantía, sellarlo por el vendedor y conservarlo junto
al ticket de compra. Si surgiera algún problema, el producto deberá ser devuelto a un vendedor o DISTRIBUIDOR Bébé Confort,
acompañado del correspondiente certificado de garantía debidamente cumplimentado como o se ha indicado anteriormente.
Cualquier producto remitido directamente al fabricante no podrá beneficiarse de dicha garantía.
Esta garantía es conforme a la Directiva Europea nº 1999/44/CE del 25 de Mayo de 1999
ES
72
Page 73

CERTIFICADO DE GARANTIA
Estimado Cliente,
Agradecemos a confiança depositada em nós ao optar pelos nossos produtos. Esperamos que seja da sua inteira satisfação.
Este certificado indica que o seu produto foi fabricado segundo as diferentes normas de qualidade que lhe são aplicáveis e que
foi submetido a numerosas verificações durante as diferentes etapas do seu fabrico. Se apesar de todos os nossos esforços
verificar uma anomalia durante o período de validade deste certificado, comprometemo-nos a respeitar as condições da garantia.
CERTIFICADO DE GARANTIA : Garantimos que este produto está conforme as exigências de segurança definidas
pela regulamentação em vigor e que não apresenta nenhum defeito de concepção e fabrico no momento da sua compra
pelo revendedor. Se após a compra pelo clienteb e durante um período de 24 meses, este produto apresentar algum
defeito, ainda que utilizado conforme definido no manual de instruções, comprometemo-nos a repará-lo ou trocá-lo (para
mais informações sobre as modalidades de aplicação da nossa garantia, queira consultar o revendedor ou o nosso site
Internet), exceptuando nos casos seguintes:
• Utilização e destino diferentes dos previstos no manual de utilização
• Instalação não conforme o manual
• Reparação efectuada por uma pessoa ou um revendedor não autorizado
• Não devolução ao fabricante do certificado de garantia correctamente preenchido pelo proprietário ou pelo revendedor em caso
de intervenção
• Falta de apresentação de uma prova de compra
• Falta de manutenção do produto
• Substituição de todas as peças de uso (rodas, partes em desgaste…) em utilização normal.
A partir de quando?
A contar da data de aquisição do produto.
Por quanto tempo?
24 meses consecutivos e não transmissíveis. O primeiro comprador é o único beneficiário.
O que deve fazer?
Guardar o talão de compra logo após a aquisição do produto. Se surgir algum problema, o produto deverá ser restituído junto
do revendedor autorizado e acompanhado do certificado de garantia devidamente preenchido. Qualquer produto endereçado
directamente ao fabricante não poderá beneficiar da garantia.
Esta garantia está conforme a Directiva Europeia nº 1999/44/CE de 25 de Maio de 1999.
73
PT
Page 74

Page 75

Page 76

www.bebeconfort.com
DOREL FRANCE S.A.
Z.I. - 9 bd du Poitou
BP 905
49309 Cholet Cedex
FRANCE
DOREL BELGIUM
BITM Brussels International Trade Mart
Atomiumsquare 1, BP 177
1020 Brussels
BELGIQUE / BELGIE
DOREL (U.K). LTD
Hertsmere House,
Shenley Road,
Borehamwood
Hertfordshire WD6 1TE
UNITED KINGDOM
DOREL GERMANY
Augustinusstraße 11 b
D-50226 Frechen-Königsdorf
DEUTSCHLAND
DOREL NETHERLANDS
Postbus 6071
5700 ET HELMOND
NEDERLAND
DOREL ITALIA S.P.A.
a Socio Unico
Via Verdi, 14
24060 Telgate (Bergamo)
ITALIA
DOREL HISPANIA, S.A.
C/Pare Rodés n°26
Torre A 4°
Edificio Del Llac Center
08208 Sabadell (Barcelona)
ESPAÑA
DOREL PORTUGAL
Parque Industrial da Varziela
Rua nº 1 - Arvore
4480-109 Vila do Conde
PORTUGAL
DOREL JUVENILE
SWITZERLAND S.A.
Chemin de la Colice 4
1023 CRISSIER
SWITZERLAND / SUISSE
..0527754
 Loading...