

Page 1

POWER UNITS
& Gardening Attachments
OWNERS
USE & CARE
MANUAL
CODE NUMBER 90103079 EDITION 11.17
M O D E L S
710
722
732
718
HARVESTER
PROFESSIONAL
948
852
853
PROFESSIONAL
PROFESSIONAL
NEW HANDLEBARS
GARDENER
HARVESTER
PROFESSIONAL
Page 2

Dear Customer,
A
Thank you for your purchase. Get set to enjoy the benefits your wise
selection of a BCS unit has earned for you. We believe that no other
make machine that can handle so many lawn and garden tasks with
such fine results – and with so little effort on your part.
Your BCS unit has precision gearing for lasting, trouble-free service.
There are no drive belts to stretch and break.
Our network of BCS distributors and servicing dealers stands ready to
supply tour needs for attachments, accessories, parts and service.
With a yearly check-up, your dealer can help you keep your BCS
equipment to shape. Meanwhile, be sure to follow the operating and
maintenance tips in this owner’s manual for satisfied performance of
your machine.
BCS America
MODELS IN THIS EDITION
BCS America maintains a dynamic updating policy. If notifies the field of the serial number of the
first unit off the line after a change.
This edition covers the models and model options
listed in the specifications on page 16.
ccordingly, be sure to record the BCS unit serial
number printed between two stars on the transmission, and the engine model and serial numbers from the engine name plate.
GRAPHIC SYMBOL
IT FLAGS YOUR ATTENTION TO DANGER WARNINGS IN THE MANUAL.
WHEN PLACED OVER A PICTURE OR AN ITEM IN THE PICTURE, THIS SYMBOL SAYS
“NO !” DO NOT DO, OR USE OR PERMIT WHATEVER IS SHOWN.
THIS SYMBOL IS LIKE A FLAG.
READ ALL SAFETY RULES AND OPERATING AND MAINTENANCE
INSTRUCTIONS IN THIS MANUAL BEFORE USING ANY POWER UNIT,
ATTACHMENT, OR ACCESSORY.
WARNING
2
Page 3

CONTENTS
SECTION ONE
RULES FOR SAFE OPERATION
OF UNIT AND ATTACHMENTS
SECTION TWO
SCHEME CONFIGURATIONS
SECTION THREE
USE AND CARE OF ATTACHMENTS
GENERAL PRECAUTIONS AND INSTRUCTIONS
REAR-TINE TILLER PRECAUTIONS
ROTARY MOWER PRECAUTIONS
CUTTER BAR MOWER PRECAUTIONS
SNOW THROWER PRECAUTIONS
POWER SPRAYER PRECAUTIONS
CHIPPER/SHREDDER PRECAUTIONS
POWER SWEPPER PRECAUTIONS
MODELS DESIGNED FOR FRONT-MOUNTED ATTACHMENTS
MODELS DESIGNED FOR REAR-MOUNTED ATTACHMENTS
SPECIFICATIONS
MODEL 852, 853
MODELS 710
MODELS 718, 722, 732
MODEL 948
UNPACKING
ASSEMBLING THE UNIT
LUBRICATION FILTER AND FUEL
ENGINE CRANKCASE LUBRICATION
GEARBOX LUBRICATION
ENGINE AIR CLEANER
GASOLINE ENGINE FUEL
STARTING AND STOPPING
SETTING CONTROLS FOR COLD STARTING
CRANKING TO START
STOPPING
DIFFERENTIAL AND TWO-WHEEL DRIVE
WHEEL BRAKES
SHUT-DOWN (STORAGE)
TAKING CONTROL OF THE MACHINE
GEAR AND P.T.O. ENGAGEMENT
MAKING A CONVERSION FRONT-TO-REAR, OR REAR-TO-FRONT
OPERATING IN CONVERTED MODE
MAINTENANCE PROGRAM
LUBRICATION OF ATTACHMENTS
COUPLING ATTACHMENT TO P.T.O.
USE AND CARE OF REAR-TINE TILLER
PREPARING NEW TILLER
WIDTH OF TILTH
TILLING DEPTH ADJUSTMENT
GARDENING SUGGESTIONS
TRANSPORT SULKY FOR REAR-TINE TILLER
USE AND CARE OF CUTTER BAR MOWER ATTACHMENT
GENERAL CUTTER BAR MOWER INFORMATION
RECOMMENDED OPERATION
MOWER BAR MAINTENANCE
USE AND CARE OF 2-BLADE ROTARY MOWER
THE UNITS CONVERTED FOR MOWER USE
ASSEMBLY, CONNECTION AND LEVELING OF THE 2-BLADE MOWER
LUBRICATION
ROTARY MOWER OPERATION
INSPECTION AND MAINTENANCE
USE AND CARE OF SNOW THROWERS
GENERAL INFORMATION
SNOW THROWER OPERATION
USE AND CARE OF CHIPPER / SHREDDER
CHIPPER / SHREDDER MAINTENANCE
USE AND CARE OF POWER SWEEPER
OPERATION
MAINTENANCE AND STORAGE
USE AND CARE OF DOZER BLADE
Page 5
“ 8
“ 9
“ 10
“ 10
“ 11
“ 12
“ 13
“ 15
“ 15
“ 16
“ 17
“ 18
“ 19
“ 20
“ 21
“ 21
“ 25
“ 25
“ 25
“ 26
“ 27
“ 28
“ 29
“ 30
“ 30
“ 30
“ 30
“ 31
“ 31
“ 31
“ 32
“ 33
“ 35
“ 36
“ 36
“ 37
“ 37
“ 37
“ 37
“ 38
“ 38
“ 39
“ 39
“ 39
“ 39
“ 41
“ 41
“ 41
“ 42
“ 42
“ 43
“ 44
“ 44
“ 44
“ 45
“ 45
“ 46
“ 46
“ 46
“ 47
3
Page 4
RECORD OF SERIAL NUMBERS .
BCS UNIT SERIAL NUMBER * __________ *
(Located between stars on transmission)
BRIGGS & STRATTON
ENGINE SERIAL NUMBER __________
(Stamped on crankcase about two inches from
name plate on side of engine)
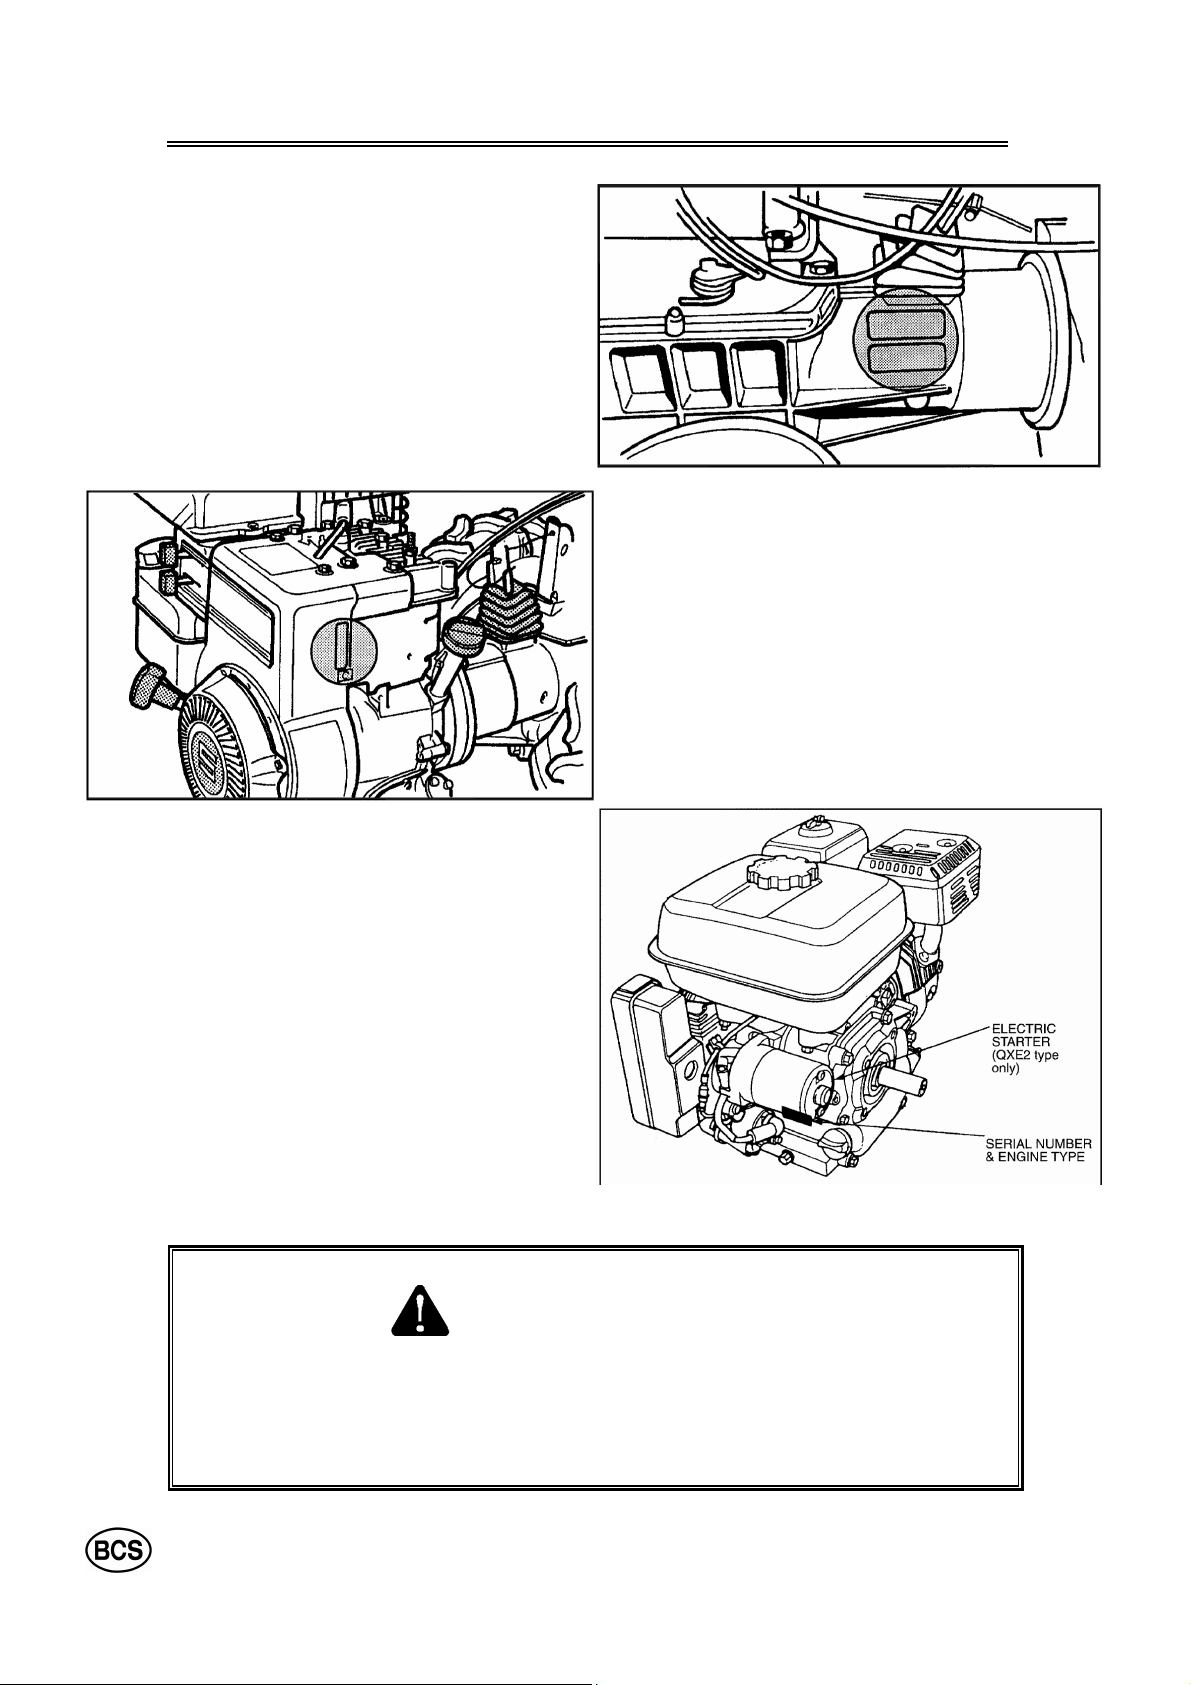
HONDA ENGINE SERIAL NUMBER:
TYPE _____________
SERIAL NO. ____________
KOHLER ENGINE SERIAL NUMBER ____________________ (Located on engine crankcase)
READ ALL SAFETY RULES AND OPERATING AND MAINTENANCE
INSTRUCTIONS IN THIS MANUAL BEFORE USING ANY POWER UNIT,
ATTACHMENT, OR ACCESSORY.
WARNING
4
Page 5
SECTION
INSTRUCTIONS FOR SAFE OPERATION OF
BCS POWER UNITS AND ATTACHMENTS
General precautions and instructions are followed by specific precautions
for each combination of attachment and power unit in the owner’s manual.
GENERAL PRECAUTIONS AND
INSTRUCTIONS .
TRAINING
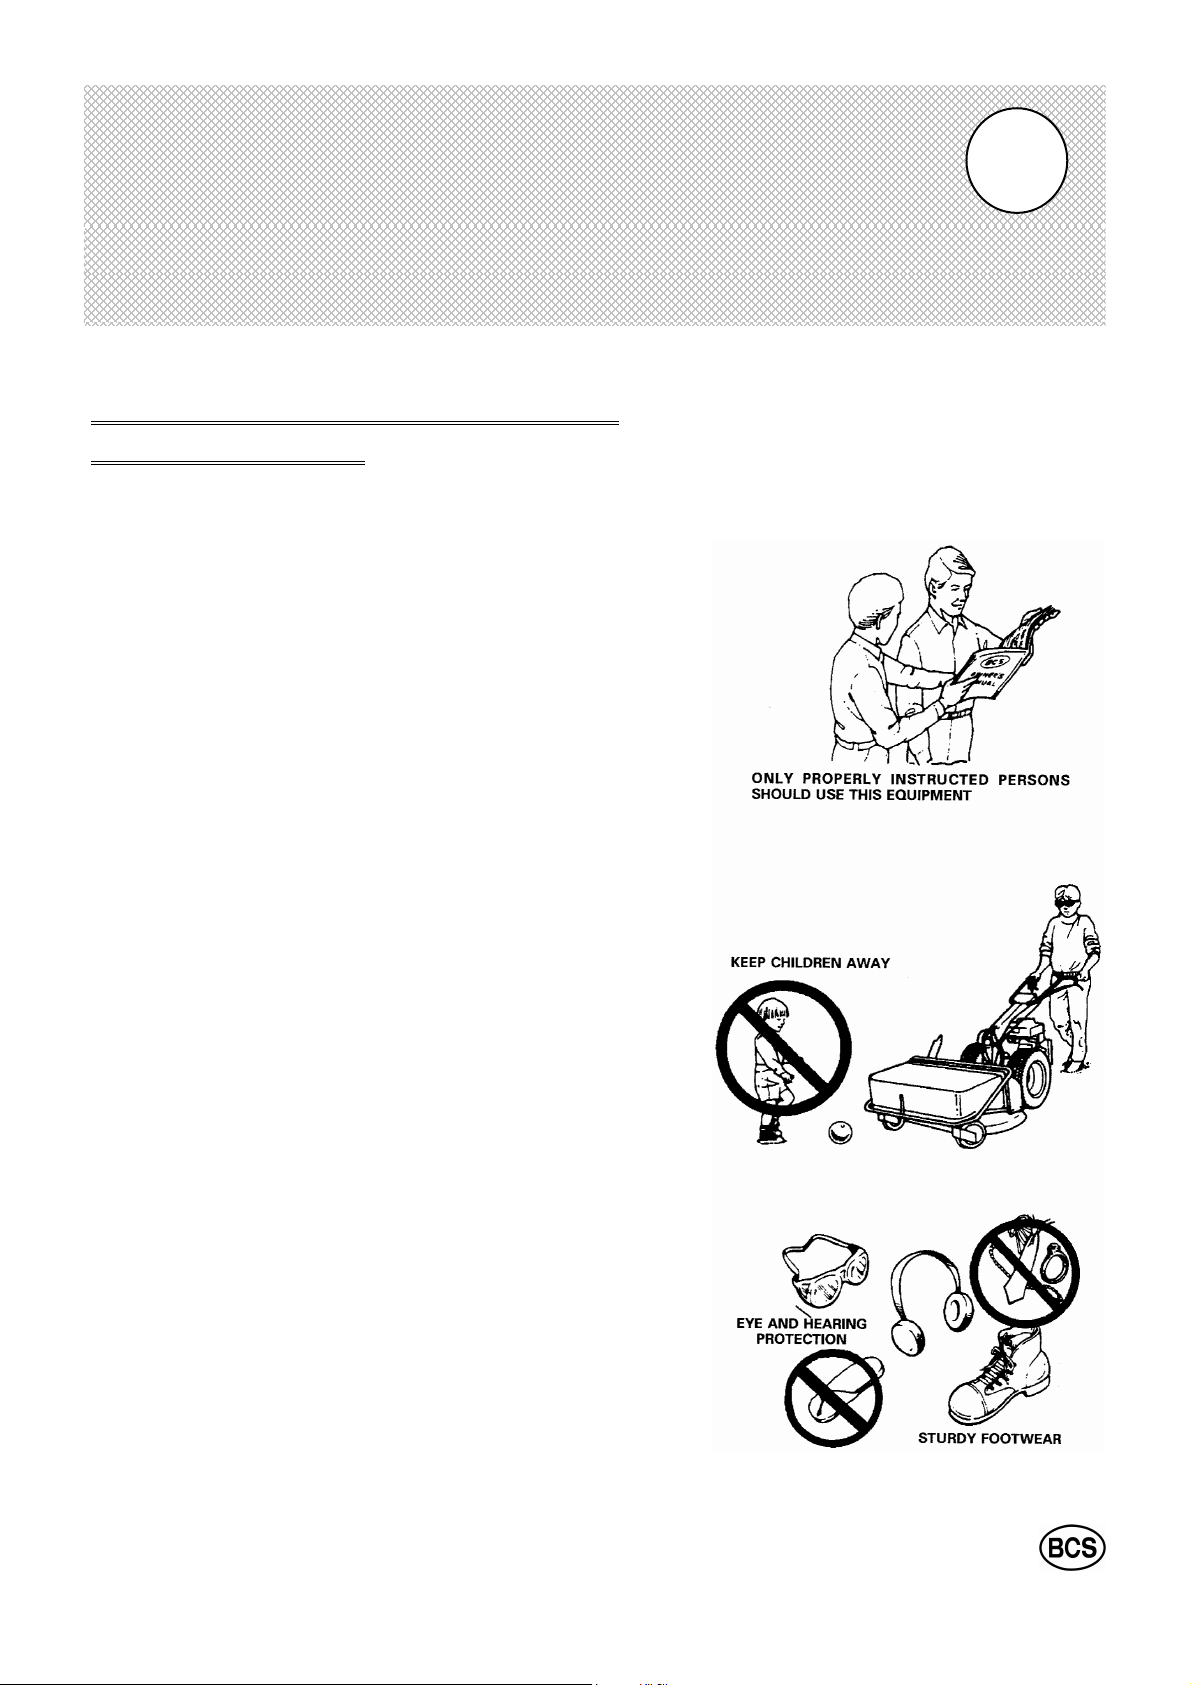
READ THIS OWNER'S MANUAL PRIOR TO OPERATING THE
POWER UNITS AND ATTACHMENTS.
BCS power units and attachments are designed for operation by properly instructed adults only. Make certain that any person operating
this equipment has read this manual.
DO NOT LET CHILDREN OPERATE THE POWER UNIT.
KEEP THE OPERATING AREA CLEAR OF PEOPLE AND ANIMALS. BE CAREFUL THAT CHILDREN DO NOT COME NEAR.
During storage, and whenever the power unit is unattended, disengage the PTO (power take-off) and render the engine unstartable by
disconnecting the spark plug wire from spark plug.
1
PREPARATION
Wear appropriately protective clothing and safety protection articles
for the climate and type of attachment you are to operate.
1. For all walk-behind applications, wear sturdy non-slip boots or safety toe shoes. See recommendations listed for use of a particular
attachment. Do not wear open-toed sandals or go barefoot when
operating these machines.
2. Wear snug-fitting protective clothing which allows freedom of mo-
vement without being loose-fitting. Ties, scarf and jewels which
could be caught in the machinery should not be worn.
3. Wear hearing protection.
4. Wear eye protection when operating a snow-thrower, power spra-
yer, chipper / shredder or mower attachment.
Overexposure to sunlight can be damaging to your eyes and skin.
5.
When working in strong sunlight, protect your eyes with sun glasses and either keep your body covered or apply a sun screen
lotion.
Do not operate on terrain where you cannot maintain good footing or
where the machine could overturn or slide into you. When walking
behind the unit, walk slowly. DO NOT RUN!
5
Page 6
2 1
Thoroughly inspect the area where you are going to mow or
thatch the lawn, sweep walks or drives or throw snow. Remove toys, stones, bones, wires, glass, newspapers and other
objects which could be caught up and thrown by the machine.
Take the following precautions for the safe handling and storage of fuel:
1.
Keep fuel supplies in approved type, properly labelled fuel
containers.
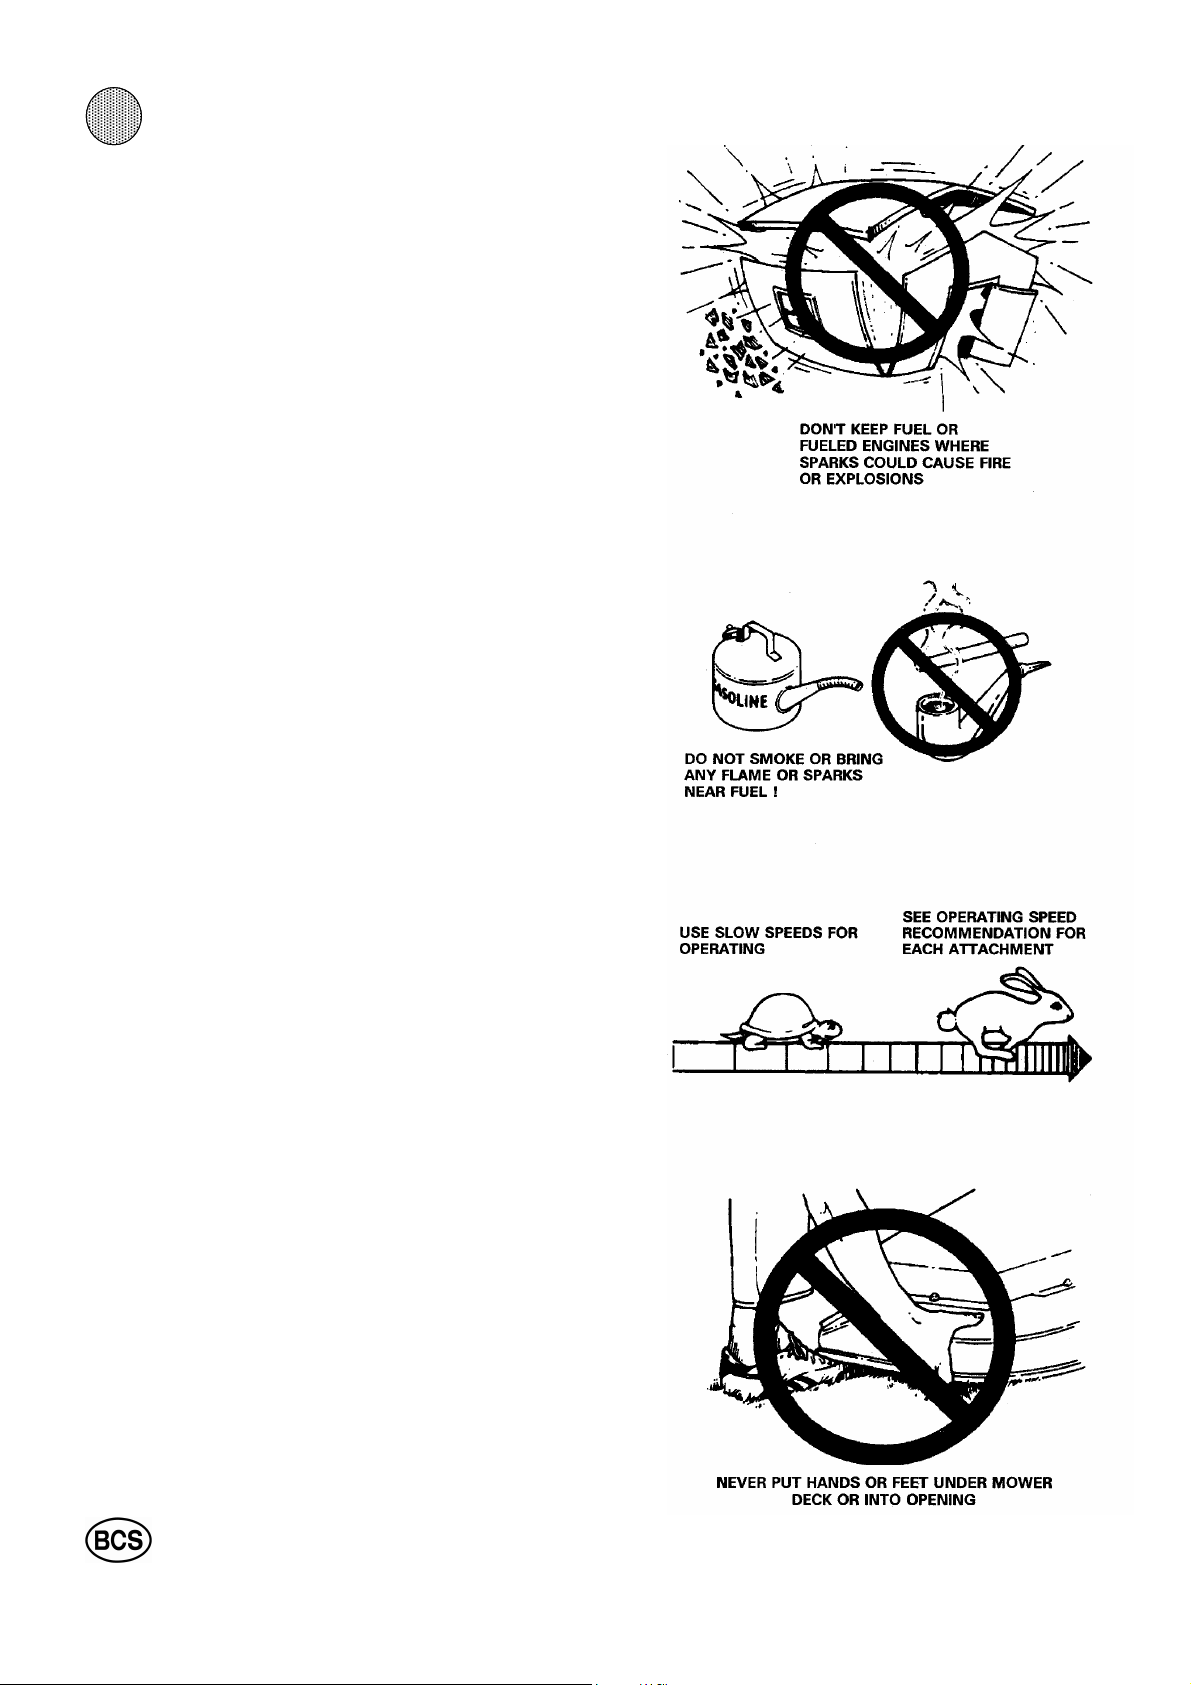
2.
Do not store fuels or fuelled units in closed (unventilated)
areas or in garages or shops connected to human living quarters. Do not store units or fuel where there are flames or sources of sparks such as electrical appliances and switches.
3. Obey all local regulations for the storage and handling of
fuel.
4. Do not smoke when fuelling, or fuel where the fumes could
be ignited by fire or sparks.
5. Do all fuelling outdoors over non-flammable surfaces. If fuel
is spilled on the unit, wipe the unit dry and properly dispose of
the wiping rag. ALWAYS MOVE THE UNIT AT LEAST 10
FEET (3 m.) AWAY from the fuelling spot and fuel supplies before starting the engine.
6. Always remove the engine fuel cap very slowly to equalize
tank pressure and avoid spurting of fuel. Keep your face and
eyes away from the tank while loosening the fuel cap.
7. Do not fuel a running or hot engine. Do not loosen the fuel
cap until the engine has stopped.
Then wait several minutes for the engine to cool before pouring fuel. Before starting the engine, put all control levers in
neutral (N) position. All "N" positions on the gear selector are
neutral. Also be sure to disengage the PTO (power take-off) to
the attachment. Never make blade height or any other adjustment to the power unit or any attachment while the engine is
running.
OPERATION
Operate only when there is good visibility. Do not operate at
dusk or at night. Do not operate when it is foggy or hazy.
Never change the engine governor setting or overspeed the
engine. Use the throttle and gear settings recommended for
particular attachments and applications in this owner's manual.
Do not put hands and feet under the mower deck or into the
discharge openings of a rotary mower.
Do not put fingers or any other part of the body into the intake
or discharge openings of any mower, snow-thrower or chipper/
shredder unless you have disconnected the spark plug wire so
engine cannot be started accidentally.
Keep the machine clean-out holes closed. Stay out of the discharge stream of a mower, chipper/shredder, power sweeper
or power sprayer.
Always stop operation of a rotary mower, a cutter bar mower,
snow thrower or a tiller before crossing paved or gravel roadways.
6
Page 7
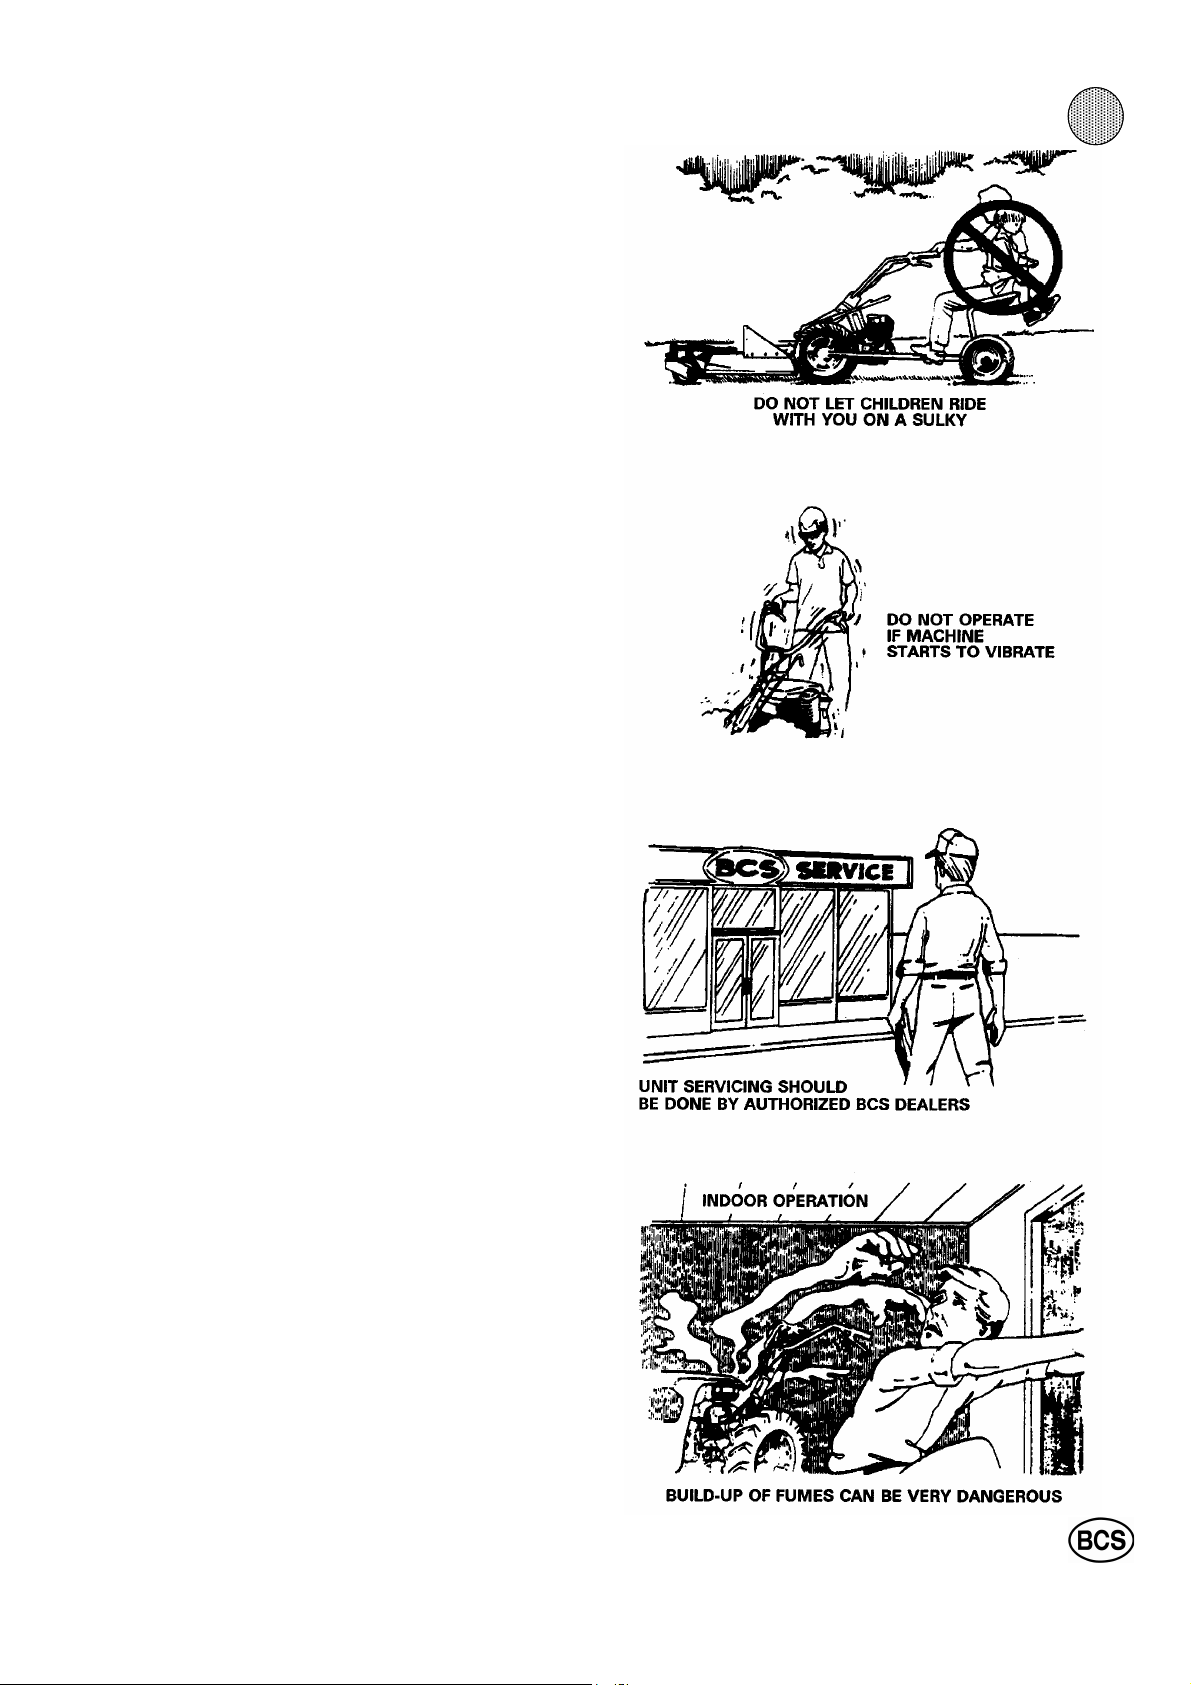
Never ride the tractor or an attachment. Ride only on riding accessories designed for the purpose. Do not take
children on a sulky with you.
1. Use transport sulkies only for transport to and from
the operating area and never for operation.
2. Use utility wagons only for hauling and limit the pay-
load to the rated capacity of the wagon.
3. A mowing sulky is exclusively for operation of a rota-
ry mower and must not be used with any other attachment.
4. Never use ride-on attachments on the highway or
any city street.
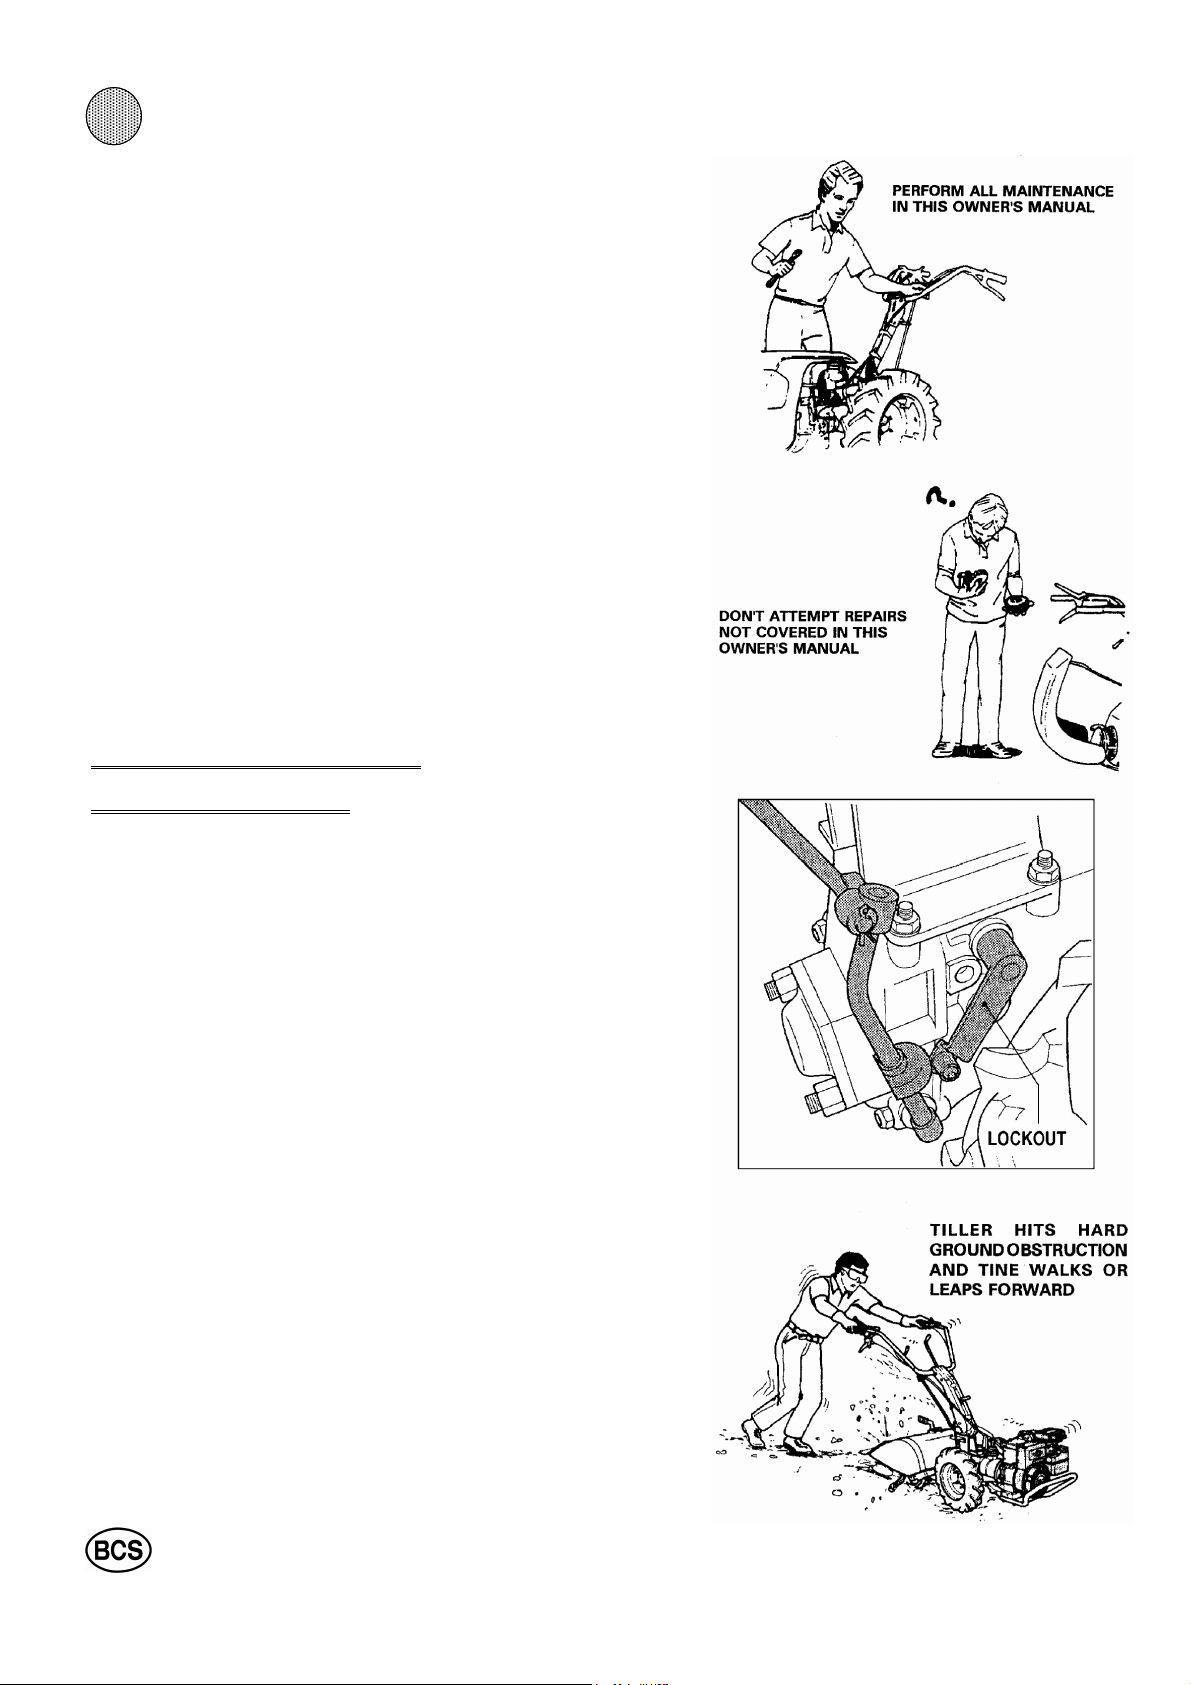
Do not disconnect or otherwise defeat the purpose of
the lockout devices.
The high-speed lockout prevents using too fast a gear
for backing up a front-mounted attachment.
The PTO/REVERSE lockout permits backing up a rearmounted attachment only when the PTO is disengaged.
Read Section Two for explanation of the lockout devices.
Do not use the highest numbered gear on the gear selector when walking behind the machine.
On all units in this manual, the highest gear produces
much faster than walking speed and is only to be used
for transport in conjunction with a transport sulky.
Don't make adjustments or repairs to the machine when
the engine is running.
Put all controls in neutral, wait until reciprocating or rotating parts of the attachment have stopped and disconnect the spark plug wire:
1. Before leaving the unit where unauthorized persons
may start it accidentally.
2. When a foreign object has been struck or taken into
the attachment. Proper operation should be restored before further use.
3. Before cleaning out a clogged attachment such as a
rotary mower, cutter bar mower, snow-thrower, chipper/
shredder or power sweeper.
4. If the machine suddenly starts to vibrate or run erra-
tically. The entire machine should be inspected by an
authorized BCS servicing dealer before further use.
All safety guards, plates, lockouts, deflectors and shields
must be in proper position.
Do not operate if any safety devices or fastening parts
are missing from the unit.
Do not run the engine indoors where deadly poisonous
carbon monoxide fumes can collect.
If the engine is to be started inside a garage or barn,
open the doors and windows wide so the fumes can
escape.
7
21
Page 8
2 1
MAINTENANCE AND STORAGE
Keep engine, tractor and all attachments in safe working condition. Clean the unit and accessories at regular intervals, also
check for damaged or missing parts.
Check the tightness of all fasteners. Perform the items of maintenance recommended in this owner’s manual. Do not attempt any
disassembly and repairs for which instructions have not been
furnished.
Certain engine adjustments, and interval servicing of the engine,
tractor, clutch and transmission, and gearboxes of attachments
should be done only by a BCS-trained service-man at an authorized BCS servicing dealer or distributor.
Do not store the machine with fuel in the system. Disconnect the
fuel line at the carburettor inlet, and drain the fuel into a fuel
container. Then reconnect the fuel line. Start and run the engine
until it stops from lack of fuel.
When storing the machine, use the spring latch (illustrated on page 29) to latch the clutch lever in the depressed
(disengaged) position. This prevents the clutch cone from
sticking to the lining during storage.
Store the machine in a well-ventilated place, protected from
dampness and the weather.
REAR-TINE TILLER
PRECAUTIONS .
All the models have PTO / reverse lockout devices to prevent
tine rotation while the Tiller is being backed up. These devices
are shown and their operation described on page 28. Before
operating the Tiller, always check that the lockout device is
properly assembled on the machine. Do not remove the high
speed lockout or render it inoperable.
Don’t put hands or feet near or under the tiller housing. Keep
away from the rotating tines. The tines of the BCS tiller rotate
at high speeds independent of the tractor gear speed settings.
Inspect the area to be tilled. Pick up rocks and other objects of
a size which may jam or otherwise interfere with tiller operation. Till only when there is good light.
Use caution to avoid slipping and falling. Wear footwear which
will improve footing on slippery surfaces. Do not over-load the
machine by attempting to till too deeply or in fast forward. See
tiller operation instructions in Section 3.
On new (previously untilled) or hard, rocky ground, use lowest
gear and throttle settings, and set the tiller tines for minimum
soil penetration. Be alert for the possibility the machine may
leap forward if the tines contact an underground obstruction. If
this occurs, let go of the tiller handles to stop the engine.
Do not use makeshift accessories in conjunction with the tractor and the tiller. Use only wheels, counterweights, shaft extensions, connectors, and tine combinations recommended for
each tractor and tiller attachment by BCS.
The highest number gear selection is only for transport of
the unit and tiller attachment in conjunction with a transport sulky.
8
Page 9
Don't operate the tiller in high gear. Don't use high transport
speeds on slippery surfaces. When using a transport sulky, look
behind and use care when backing.
DO NOT MOW WITH
GRASS DEFLECTORS OPEN
21
ROTARY MOWER PRECAUTIONS
IMPORTANT NOTICE
Do not deactivate the PTO Reverse Lockout on any of the
convertible models. The new design lock-outs on thee models automatically disengage during a conversion for frontmount attachments.
Clear the area to be mowed of all objects (wires, rocks, toys,
etc.) which might be picked up and thrown by the mower.
Disengage the PTO and put the transmission into neutral (gear
selector position "N") before cranking to start the engine and also
whenever leaving the operator zone behind the handlebar or dismounting from a sulky. Stay alert for holes, rocks, roots in the terrain and other hidden hazards. Keep away from drop-offs. Use
wheel extensions for added stability of a walk-behind mower.
When walking behind, be especially cautions when changing direction on slopes.
When operating from a riding sulky, reduce speed and use extreme caution on slopes and in sharp turns to prevent tipping and
loss of control.
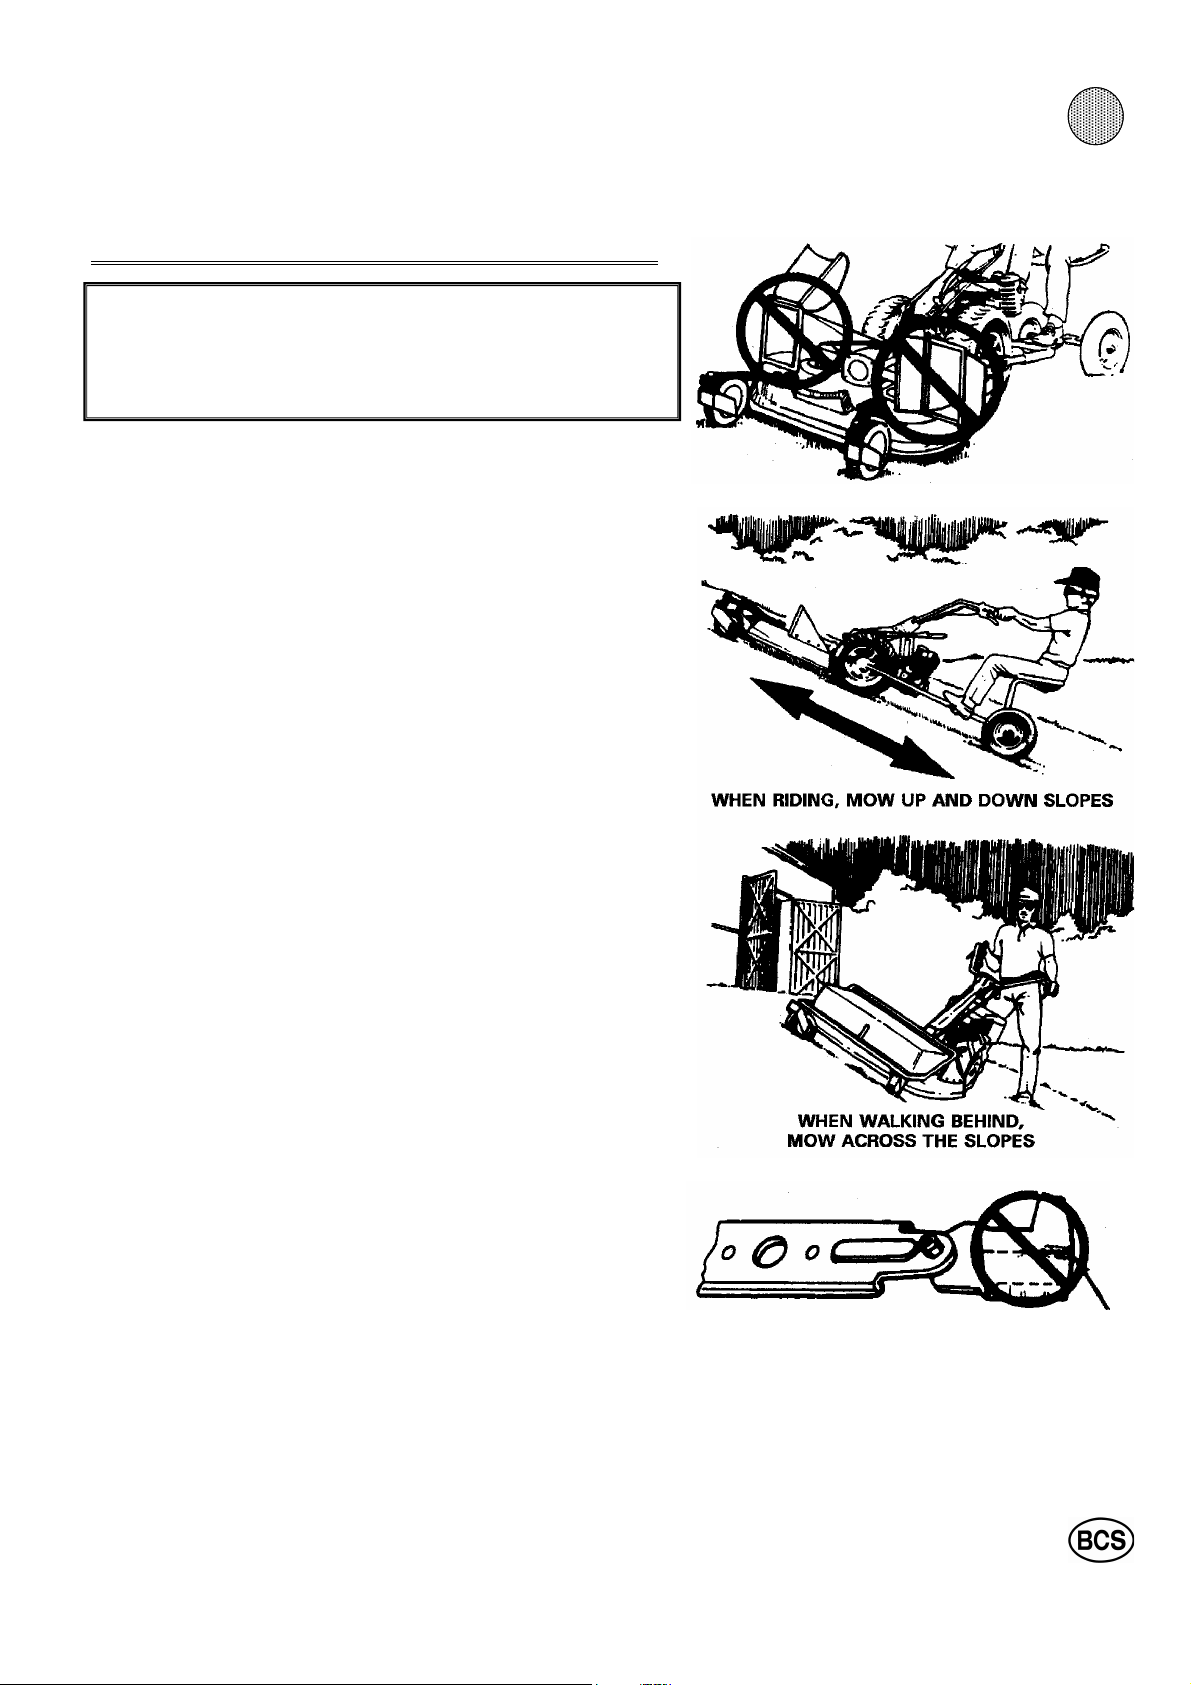
MOW SLOPES AS FOLLOWS:
1. When riding, mow up and down, never across the slopes.
2. When walking behind, mow across the slopes, never up and
down.
3. Do not mow excessively steep slopes.
Be careful not to discharge grass in direction of roadways, houses, vehicles and people. Inspect grass bags frequently for wear
and deterioration. Replace grass bags which are not in good condition.
When the 2-blade mower is used without the grass bag, the
grass deflector must be in the down position covering one discharge chute, and the door on the other chute must be closed to
prevent open discharge from the chutes.
When mounting the grass bag on the deck to collect the cuttings,
open the door and raise the deflector for discharge from the volutes into the bag.
Before removing the grass bag for emptying, disengage the PTO,
shut off the engine and wait until the mower blades have stopped.
Never put hands in any openings of the mower or grass bag
when the engine is running. If necessary to clear out the discharge chute with your hands, always first disconnect the spark
plug wire.
Keep the mower blades in good condition. Inspect, sharpen and
maintain blades as recommended for mower attachments in Section 3. Replace bent, badly worn blades, because pieces breaking off can become projectiles. After sharpening, blades should
be balanced.
CRACKS
9
Page 10
2 1
IMPORTANT NOTICE
Do not deactivate the PTO Reverse Lockout on any of
the convertible models. The new design lockouts on
these models automatically disengage during a conversion for front-mount attachments.
CUTTER BAR MOWER
PRECAUTIONS
Cutter Bar Mower attachments are intended for walk behind operation only. Do not use a riding sulky.
Mow only at a slow rate of speed. See page 39 for recommended throttle and gear combinations for cutter
bar mowing. Do not use (transport) gear # 4 on 852 for
any purpose other than using a transport sulky for transport. Transport speed of these models far exceeds the
walking speed of an operator.
The models 718, 722, 732 and 948 converted for cutter
bar operation have high gear position blocked by a high
speed lockout.
Do not remove or otherwise defeat the purpose of
the high speed lockout device.
Disengage the PTO when backing the machine.
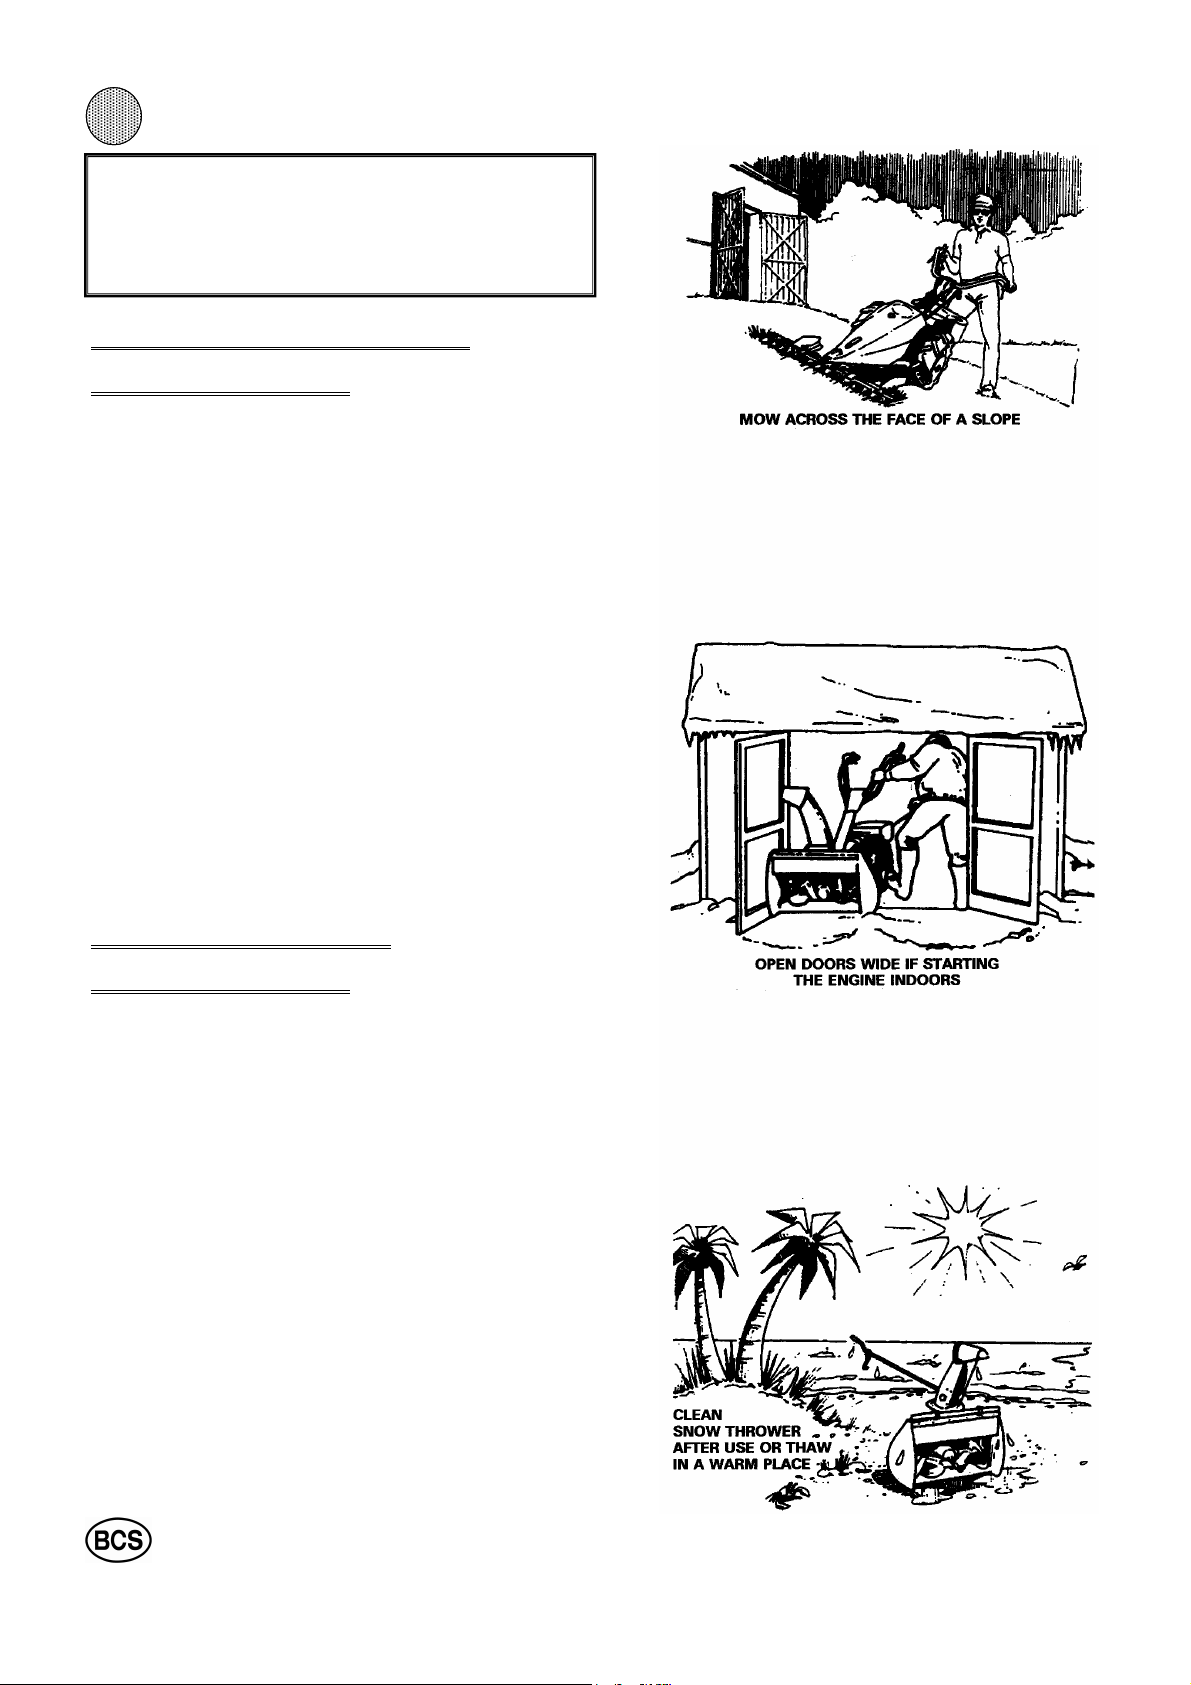
Cutter bar mowers are designed for mowing over terrain
which is too rugged or steep for use of rotary mowers.
Use care when mowing hilly terrain. Always mow across
the face of a slope, never up and down. Use wheel
extenders for added stability. Do not mow excessively
steep slopes. Go slowly and carefully on all turns.
SNOW THROWER
PRECAUTIONS
Wear protective trim fitting winter clothing with no scarf
or draw strings which could be caught in the machinery.
Wear boots or shoes designed to improve tour footing
on slippery surfaces. Wear proper eye protection. When
necessary to start the engine indoors and drive the machine out of the building, keep the doors and windows
wide open. Exhaust fumes can be dangerous.
Never put your hands into the discharge opening or impeller/collector when the engine is running. Always disengage the PTO, shut off the engine and wait until all
moving parts have stopped before doing the following:
1. Cleaning or deicing the impeller/collector and discharge chute (if possible, detach snow-thrower and
thaw in a warm, dry place).
2. After striking a foreign object, thoroughly inspect for
damage. Make repairs before further operation.
Never use the snow-thrower near glass enclosures,
automobiles, window wells, drop-offs, etc., without adjusting the discharge angle away from them.
Keep children, pets and observers away.
10
Page 11
21
POWER SPRAYER
PRECAUTIONS
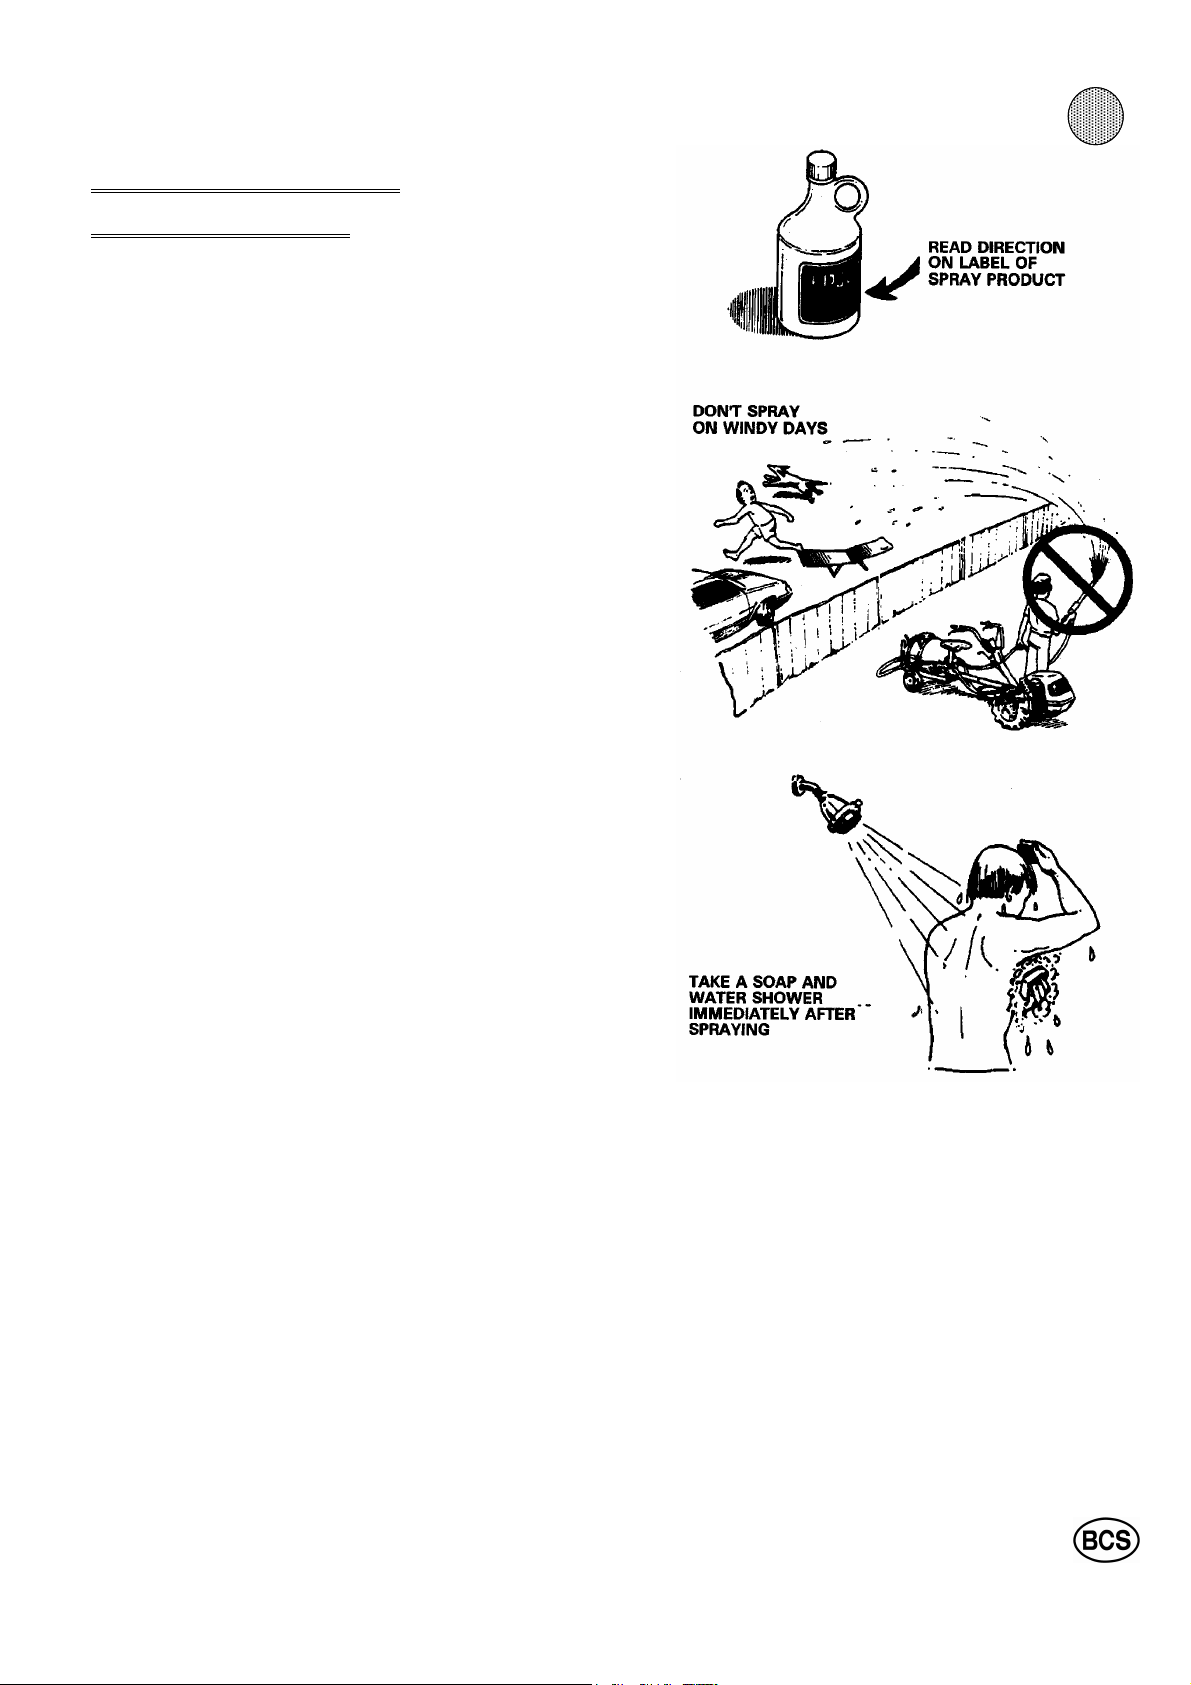
Always read and follow the information and instructions for
the application of herbicides, fungicides, insecticides and
fertilizer obtained from the labels of such products or from
the manufacturer.
In addition, advice on chemicals approved for use in your
area can be obtained from your local county agent. Be
sure you know the proper application rate for any chemical
you wish to spray.
Inspect the sprayer before each use. The sprayer develops high pressure so be sure all pressure lines and connections are in good condition.
Choose windless days for the spraying of any chemical
considered hazardous. Do not spray where drift could contaminate people, animals or property.
When applying any substance dangerous if breathed in or
absorbed through skin, wear adequate protection. This
should include rubber gloves and boots, goggles, respirator masks, caps and clothing to cover as much as possible of the body. Cotton articles are suggested for their
washable as well as high absorbency. After the spraying of
any hazardous substance, remove clothing articles for
laundering and immediately take a thorough soap-andwater shower before residues have time to enter your body.
Before spraying, always prepare for proper wash-down of
equipment.
Never allow passengers to ride the sprayer.
The pressure at the discharge nozzle is as high as 300 psi.
The spray can penetrate the skin and cause severe blood
poisoning. Do not put hands into the discharge stream. Do
not direct spray at people or animals.
Unless the manufacturer of the chemicals claims that certain products can be combined for application, spray only
one chemical at a time. Flush the sprayer tank before
changing sprays.
Always hose down the equipment and flush the sprayer
tank after each use. Select an area where the run-off will
not contaminate ground water. Do not dump into ditches
and storm sewers.
11
Page 12
A
2 1
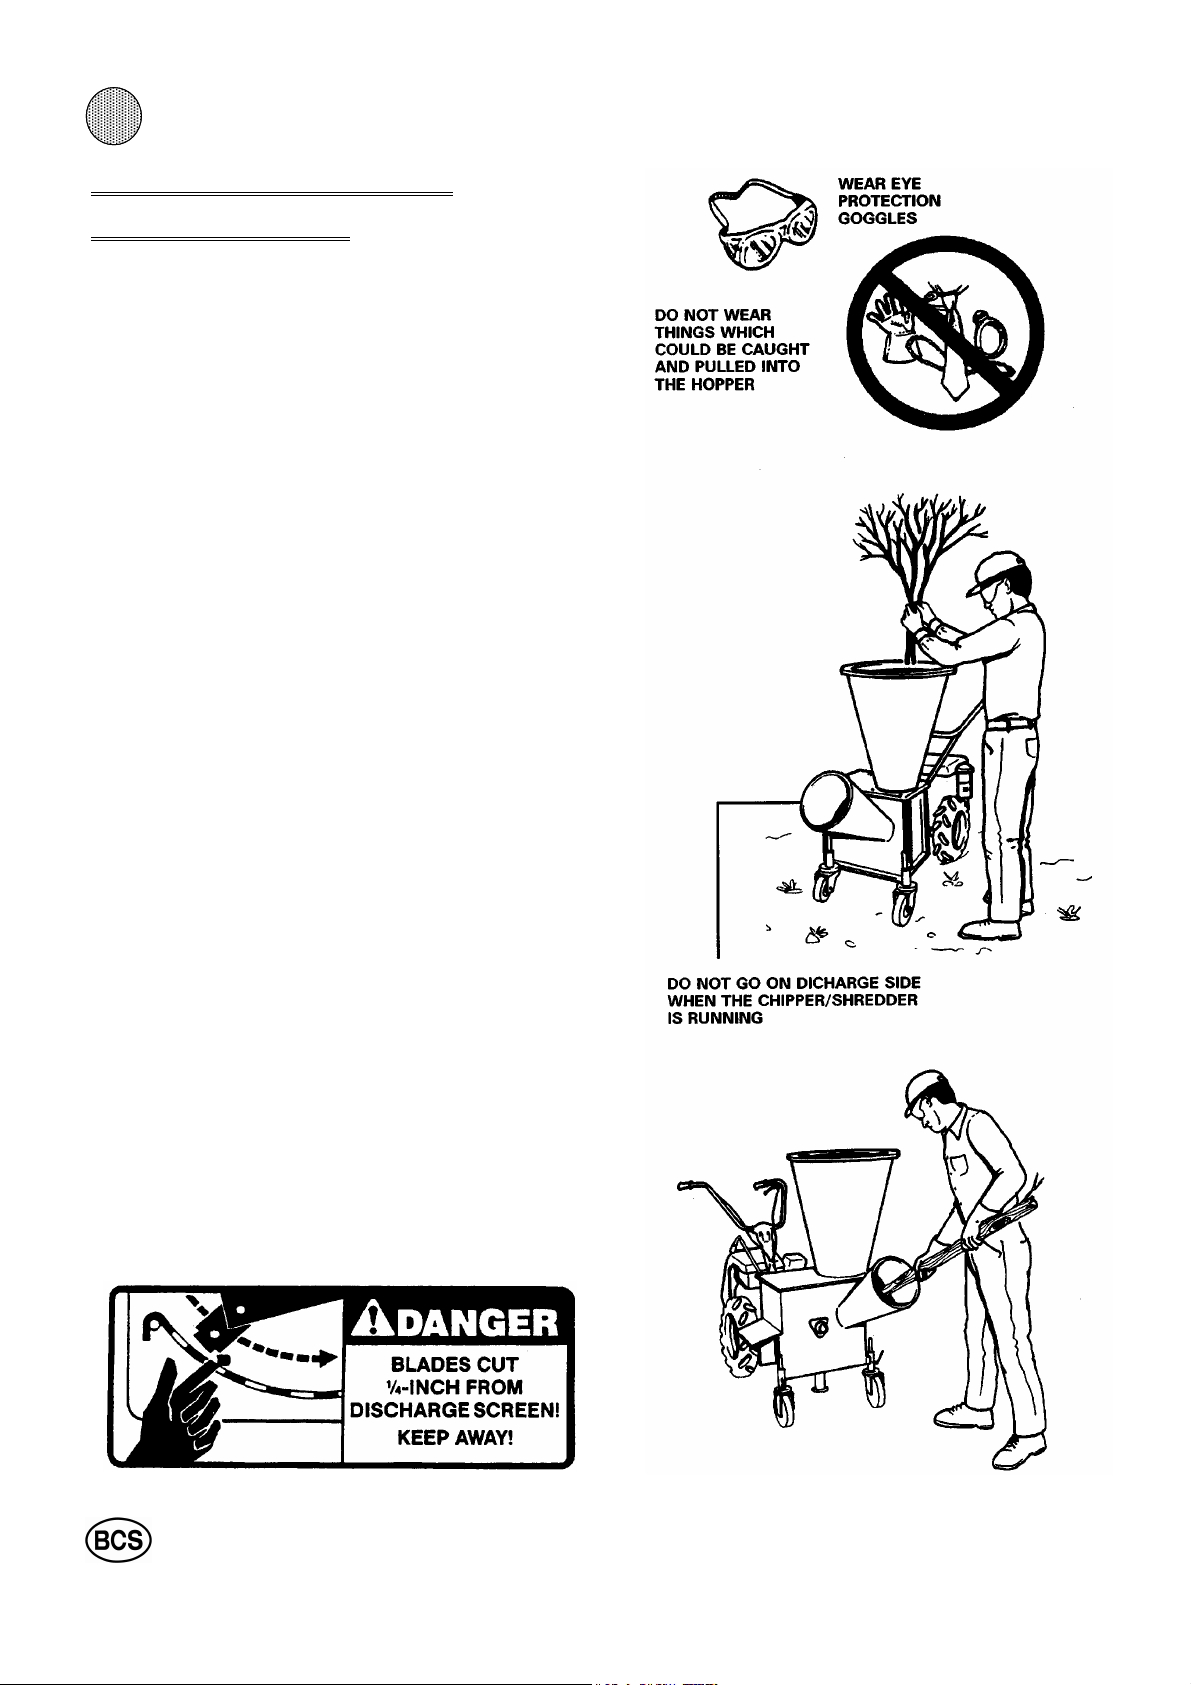
CHIPPER/SHREDDER
PRECAUTIONS
Read all instructions in this owner's manual, plus detailed instructions in the Chipper/Shredder owner's manual.
Material may be thrown out of the intake or discharge
openings at high velocity. Wear safety eye protection
goggles stamped "Z87" (for ANSI Standard Z87). Also
wear a hat.
Wear trim-fitting articles of clothing with no dangling ties
laces, chains, etc. Remove rings, bracelets and wrist
watches before operating the Chipper/Shredder. Gloves
may be worn when feeding the Chipper but remove
gloves before feeding material into the Shredder hopper.
Set up the machine on soft, firm ground which provides
support and acts as a shock absorber. But, do not set
up on hard paved or gravel surfaces which provide no
cushion.
Before starting the engine, always look to be sure the
Chipper/Shredder is empty.
Do not go on the discharge side when the Chipper/
Shredder is running. Do not look into the Shredder hopper or place your head over it when feeding material. Do
not feed the chipper chute from directly in front but always stand to the side.
Do not reach into the chipper chute to push through
short pieces. Push short ends through with another long
branch.
Put only materials which can be shredded into the hopper.Be careful not to include cloth, string plastics, grass,
rubber, rocks or paving, bricks, large wood chunks, metal or long branches or vines. These things cannot be
shredded and can cause violet ejection of materials
from the Chipper/Shredder.
Do not allow processed material to pile up in the discharge area. A blockage of the discharge can result in
kickback of material through the feed opening.
lways disengage the PTO before transporting the unit
and attachment. Never leave the machine unattended
without putting the controls in neutral and disconnecting
the spark plug wire to prevent unauthorized operations.
12
Page 13
A
21
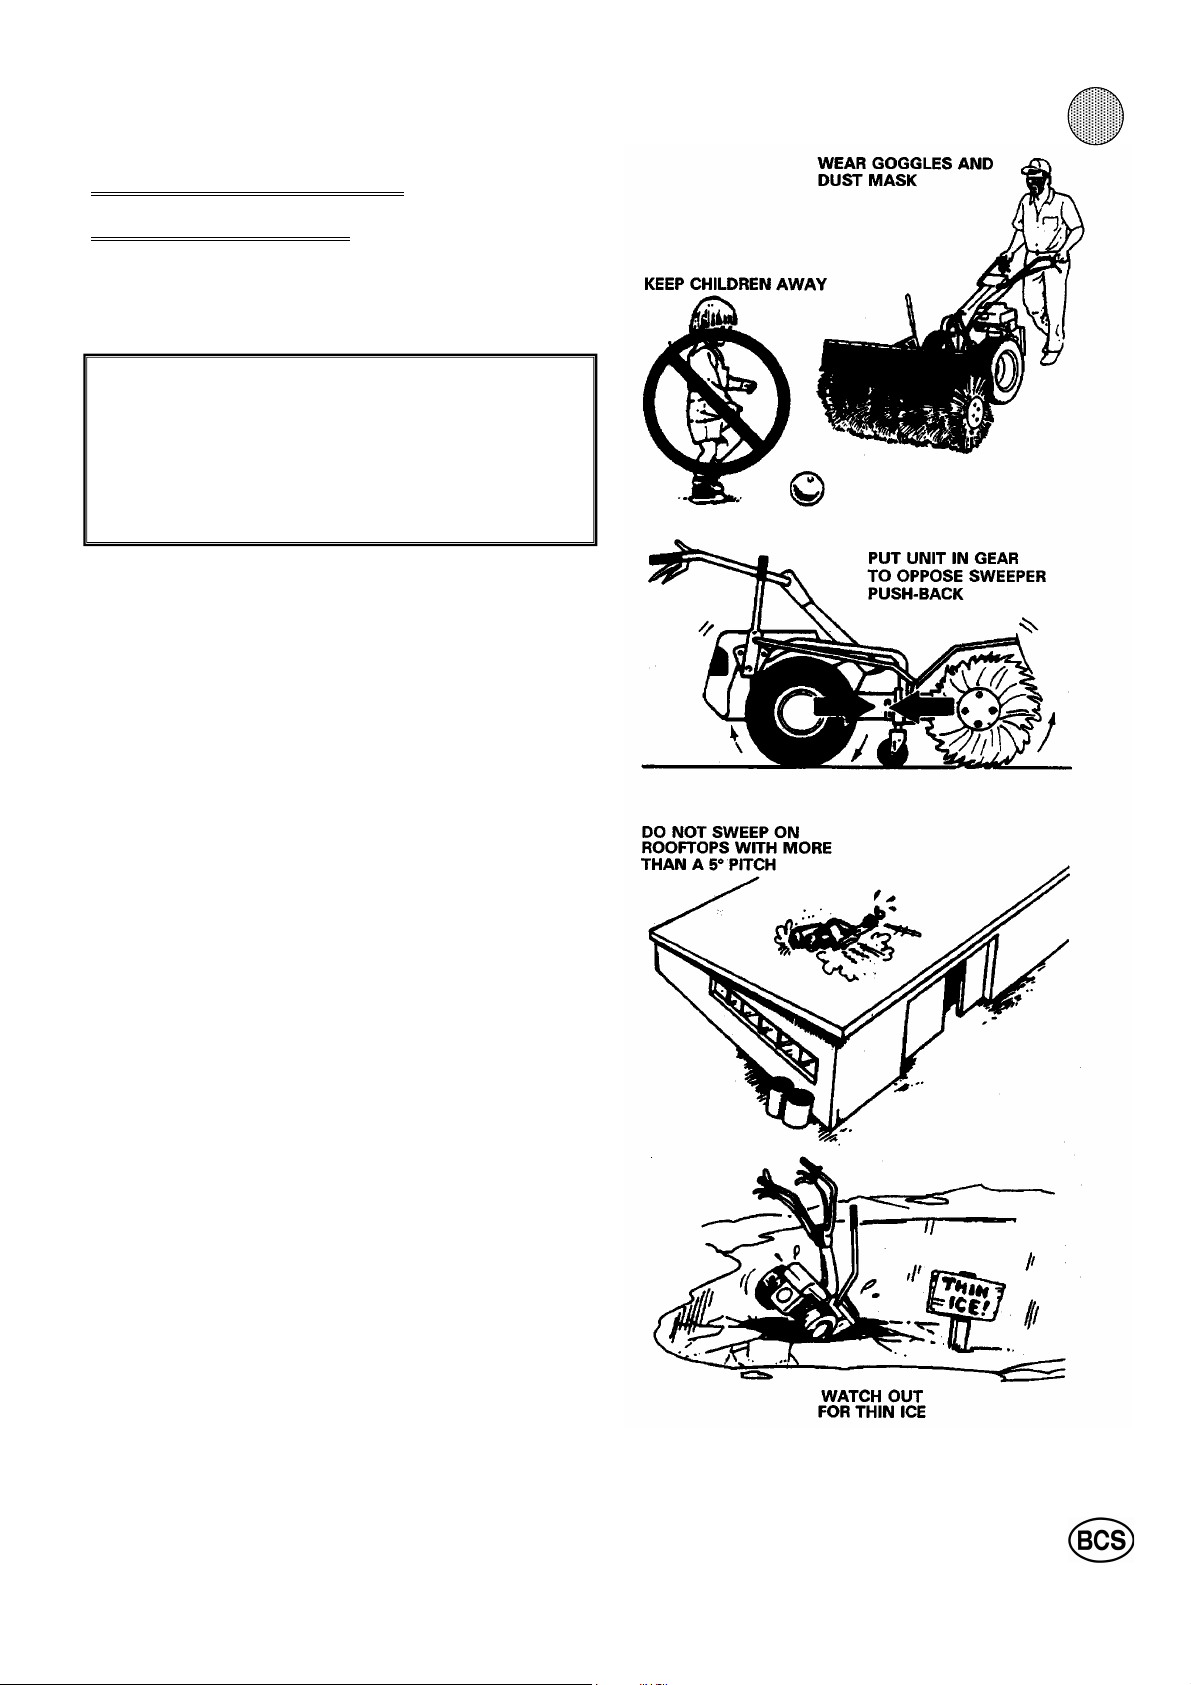
POWER SWEEPER
PRECAUTIONS
Follow "General Precautions and Instructions" in Section One of this manual, and all instructions in the Power Sweeper Attachment owner's manual (part number
101.00915) for the safe use of the Power Sweeper.
IMPORTANT NOTICE
Deactivation of the PTO Reverse Lockout (see WARNING in Sweeper owner's manual) is not to be done
on the tractor models in this updated owner's manual.
New design lockouts automatically disengage during
the conversion of these models for the Sweeper or any
other front-mounted attachment.
Do not put hands, feet or any other part of your body
near the sweeper brush or any other rotating part.
Keep the work area clear of people and pets. Do not let
children come near. Be extremely careful on gravel or
paved surfaces to direct the discharge away from people and passing vehicles.
Wear a dust mask or respirator for protection when
sweeping dusty surfaces.
Wear eye protection goggles stamped "Z87" (for ANSI
Standard Z87).
Before transport or storage of the unit adjust the casters
of the sweeper so the bristles do not touch the ground.
Thoroughly inspect the surface to be swept and remove
objects which could be thrown by the sweeper or cause
it to run off course. Remove wires, glass objects, doormats, boards, toys and other obstructions.
lways put the unit in gear before engaging the PTO to
power the sweeper. If the sweeper bristles engage the
ground when the unit is in neutral, the sweeper will drive
back the unit.
On irregular terrain with hillocks, prepare to let go of the
controls to stop all motion if the brush suddenly drives
the unit backward.
Do not use the sweeper on any surface where you
cannot keep tour footing or the unit could overturn. Walk
behind the unit. Disengage the PTO when going up or
down a slope. Work across the slope when sweeping or
thatching.
If using the sweeper on rooftops, set up barricades so
you will not come too close to the edges. Be sure the
surface is dry and does not pitch more than 5 degrees
(1/2" per foot).
Do not drive the sweeper onto frozen lakes or ponds
unless the ice is thick and strong enough to support the
combined weight of you, the sweeper and the unit.
13
Page 14
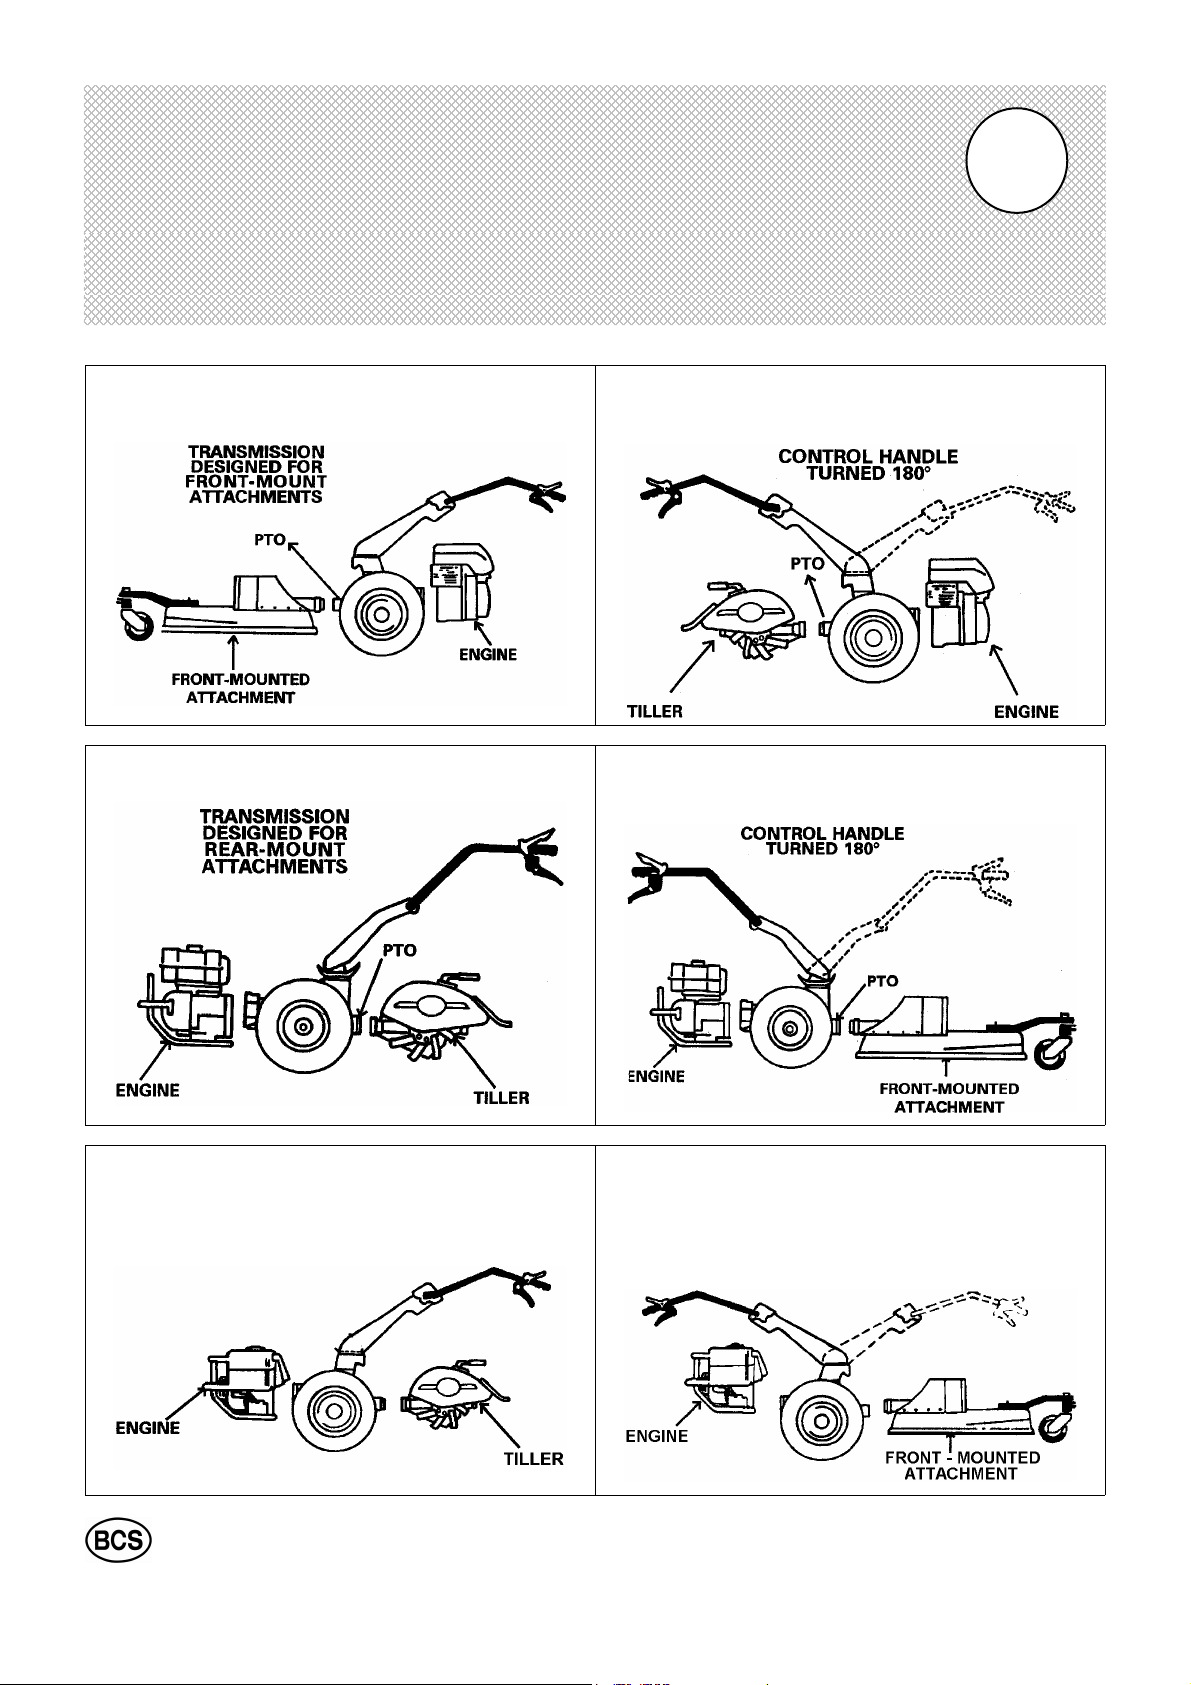
SECTION
SCHEME CONFIGURATIONS
2
MODEL 852 / 853
FRONT-MOUNT MODE
MODELS 710/718/722/732
REAR-MOUNT MODE
NATURAL CONFIGURATION CONVERSE-MODE CONFIGURATION
MODEL 852 / 853
CONVERSION FOR REAR-MOUNT ATTACHMENT
MODELS 710/718/722/732
CONVERSION FOR FRONT-MOUNT ATTACHMENT
MODEL 948
REAR-MOUNT MODE
TRASMISSION DESIGNED FOR
REAR-MOUNT ATTACHMENTS
MODEL 948
CONVERSION FOR FRONT-MOUNT ATTACHMENT
CONTROL HANDLE
TURNED 180°
14
Page 15

MODELS DESIGNED FOR
FRONT-MOUNTED ATTACHMENTS
Models of the 800 series are convertible model designed primarily as pusher for front-mount attachments,
they have the PTO (power take-off) coupling up front,
and the engine and control column at the rear.
852 has 4 speeds forward and 3 speeds reverse as pusher, 3 speeds forward and 3 speeds reverse as tractor.
853 has 3 speeds forward and 3 speeds reverse as
pusher, but in rear-mount attachments (tractor) has 4
speeds forward and 3 speeds reverse.
Swinging the handlebars around to place them over the
PTO coupling at the rear of the unit converts them for
rear-mount attachments (tractor).
The transmission changes drive wheel rotation to drive
the unit forward in either front-mount or rear-mount
mode.
Selecting one of three available gear positions on the
gear selector, and engaging the red reverser lever on
the right handlebar backs up the unit in either frontmount or rear-mount mode.
The high speed lockout blocks selection of gear position #4 for backing up the units.
MODELS DESIGNED FOR
REAR-MOUNTED ATTACHMENTS
All models of the 700 series and 948 are designed for
rear-mount tillers, and all models are convertible for
front-mount attachments.
In the rear-mount mode, the PTO (power take-off) flange and the control column are at the rear and the engine is up front.
Models 710, 718, 722 and 732 have three speeds
forward, two reverse.
Model 948 has four speeds forward, three reverse.
Swinging the control column around from the PTO end
of the unit to the engine end converts it for front-mount
attachments.
A safety high speed/reverse lockout device on the control column blocks the high forward speeds on 710,
718, 722, 732 and 948 which are too fast for use in
backing the unit.
All models have a new type transmission that drives the
unit forward when placed in gear-even when converted
for front-mount attachments. In either front-drive or reardrive mode, selecting any gear except the high speed
(that the lockout blocks) and moving the red reverser
lever on the right handlebar backs up the unit. Gear #3
(#4 for 948) is too fast for backing up the unit.
2
15
Page 16

SPECIFICATIONS
ENGINE AND POWER UNIT
MODEL 852 853 710 718 722 732 948
Design Type
Convertible
Engine
Make
Type
Pusher
To Tractor
HONDA
GX390 carb.
or KOHLER
KD440
Pusher
To Tractor
HONDA
GX390 carb.
or KOHLER
KD440
Tractor
To pusher
Subaru SP170
Subaru EX27
Kohler CH270
Tractor
To pusher
HONDA
GX200 carb.
Tractor
To pusher
HONDA
GX240 carb.
Tractor
To pusher
HONDA
GX340 carb.
Subaru EX27
Kohler CH395
Tractor
To pusher
HONDA
GX390 carb.
Type of air filter
HONDA dry cartridge
KOHLER oil bath
Dry cartridge
Prefilter Standard Standard
Transmission
Precision steel gears Precision steel gears
Differential Yes No No No Yes Yes
Gears:
Forward
Reverse
Speed (mph)
1st
nd
2
rd
3
th
4
1st Reverse
nd
Reverse
2
rd
Reverse
3
Power take-off
PTO rpm/
Engine rpm
Attaching
Method
Wheels & Tires
Size
Tread
Track width
4
3*
Tract.
3
3*
Push.
0.8
1.6
2.7
8.3
0.8
1.7
2.8
990 / 3600
2 threaded
studs w / nuts
5.0 x 10”
Tractor
20”
Push.
3
3*
0.8
1.6
2.7
8.3
0.8
1.7
2.8
Tract.
4
3*
Push.
2
2*
0.7
1.6
7.0
-
0.7
1.6
-
Tract.
3
2*
Push.
2
2*
0.7
1.6
7.0
-
0.7
1.6
-
Tract.
3
2*
Push.
2
2*
Tract.
3
2*
0.7
1.6
7.0
-
0.7
1.6
-
(independent – PTO rpm controlled by throttle setting on all models)
990 / 3600
2 threaded
studs w / nuts
5.0 x 10”
Tractor
20”
990 / 3600
2 threaded
studs w / nuts
4.00 x 8”
Tractor
17”
990 / 3600
2 threaded
studs w / nuts
4.00 x 8”
Tractor
17”
990 / 3600
2 threaded
studs w / nuts
4.00 x 8”
Tractor
17”
Push.
Tract.
2
2*
0.7
1.6
7.5
-
0.7
1.7
-
990 / 3600
2 threaded
studs w / nuts
4.0 x 10”
Tractor
19”
3
2*
Push.
3
3*
0.6
1.4
2.1
6.5
0.6
1.5
2.2
990 / 3600
3 threaded
studs w / nuts
6.5 / 80 x 12”
Tractor
26”
Weight (lbs.) 230 230 130 130 140 160 330
Dimensions (in.)
Height
Width
Lenght
47”
27”
47”
47”
27”
47”
40”
25”
63”
40”
25”
63”
40”
25”
63”
40”
25”
63”
34” - 43”
27”
78”
Tract.
4
3*
Extra tires 5.00-12 5.00-12 - - - - -
Capacities (L)
Transmission
Crankcase
Running time
2.00
1.10
2 Hrs.
2.00
1.10
2 Hrs.
1.90
0.60
2 1/2 Hrs.
1.90
0.60
2 1/2 Hrs.
1.90
1.10
2 1/2 Hrs.
1.90
1.10
2 1/2 Hrs.
2.20
1.10
2 Hrs.
@3000 rpm**
NOTE: * Has “Reverser” control to change direction of travel.
May be adapted by mode of mounting wheels, or with optional accessories.
Power unit with standard wheels and tires.
** at ¾ load.
16
Page 17

MODELS 852 / 853
RIGHT BRAKE
LEVER
RED
REVERSER
LEVER
GEAR ROD
THROTTLE
LEVER
P.T.O.
CONTROL
ROD
DIFFERENTIAL
LEVER
TRANSPORT SULKY /
UTILITY TRAILER HITCH
P.T.O.
CONTROL COLUMN INDEXING LEVER
ENGINE
HANDLEBAR
HEIGHT
ADJUSTMENT
LEVER
RED
ENGINE
STOP
LEVER
These “pusher” models, designed and geared to drive mowers and
other front-mounted attachments, may be converted into a tractor by
swinging the control handles around as illustrated on page 32.
Of the very latest design, they have both high speed and PTO / reverse
safety lockout devices that function when needed, and require no disassembly or deactivation.
A differential lever on the right handlebar has two-wheel drive and differential drive settings.
In differential drive, applying just one wheel brake aids in turning to that
side.
Whether in the front-drive or rear-drive mode, the unit will drive forward
when placed in any gear on the gear selector.
With the reverser lever pulled and left against the handlebar, and gear
position #1, #2 or #3 selected, the unit will back up.
Too fast to use when backing the unit, gear position #4 is blocked by
the high speed lockout. 852 model has the fourth speed in pusher
mode; 853 has the fourth speed in tractor mode.
CLUTCH LEVER
LEFT
BRAKE
LEVER
LEVER
LATCH
17
Page 18

2
MODEL 710
THROTTLE LEVER
P.T.O. CONTROL ROD
CONTROL COLUMN
INDEXING LEVER
RED ENGINE STOP
LEVER
CLUTCH LEVER
ENGINE
The model 710 is the smallest tractor of the BCS product line. It has 3 forward speeds and 2 reverse, without
differential.
The drive is controlled using only one control rod located on the left side of the handlebar.
On these models there is also a PTO / reverse lockout
device that prevents shifting into reverse with the tiller
engaged.
The lockout disengages automatically when a front attachment is installed on the unit.
When a front attachment is installed on the unit, what
was the reverse gear in the tilling mode is now the forward gear.
When a front mount attachment is on the unit, the
third gear (transport gear) is blocked out.
LEVER LATCH
GEAR SHIFT ROD
CABLE GUIDES
18
Page 19

CONTROL COLUMN
INDEXING LEVER
2
MODELS 718
MC 732
FORWARD / REVERSE
PTO CONTROL ROD
ENGINE
THROTTLE LEVER
DIFFERENTIAL
722
732
RED ENGINE
STOP LEVER
BLACK CLUTCH
LEVER
GEAR SHIFT ROD
The models 718 / 722 / 732 have three forward speeds
and two reverse.
The drive gears are available through a rod on the left
side of the handlebar.
Forward and reverse are controlled with the red lever
on the right top of the handlebar.
On each of these models, a PTO/ reverse lockout device prevents shifting into reverse with the tiller engaged.
But the lockout disengages automatically during operation with a front mount attachment on the unit.
When a front mount attachment is on the unit, the third
gear (transport gear) is blocked out.
NOTE:
The differential is only on model 732.
19
Page 20

2
RIGHT BRAKE
LEVER
THROTTLE
LEVER
MODEL 948
GEAR ROD
RED
REVERSER
LEVER
DIFFERENTIAL
LEVER
This is the largest tractor in the BCS product line.
It has a differential drive transmission and two wheel brakes,
four forward gears and three reverse gears. The drive is controlled using only one control rod located on the left side of the
handlebar.
The PTO is controlled using one control rod located on the
right side of the handlebar.
With the tiller attachment on this model there is also a PTO/
reverse lockout device that prevent shifting into reverse with
the tiller tines engaged. This lockout automatically disengages
when a front-mount attachment is in-stalled.
This allows you to drive in forward or reverse with the PTO engaged.
When a front mount attachments installed, what was the reverse gears in the tilling mode are now the forward gears in the
front attachment mode.
In the front attachment mode there is a high speed lock-out
that blocks out the high speed gears that were used in the
tilling mode.
CONTROL COLUMN INDEXING LEVER
P.T.O.
CONTROL
ROD
HANDLEBAR
HEIGHT
ADJUSTMENT
LEVER
RED
ENGINE
STOP
LEVER
CLUTCH LEVER
LEFT
BRAKE
LEVER
LEVER
LATCH
20
Page 21

G
21
UNPACKIN
IMPORTANT
Use extreme care to avoid crimping or severely bending
the control cables while unpacking and assembling the
unit.
WARNING
Take care to avoid being cut by the staples or nails
when opening the carton.
Open the top and lay out the sides of the carton. Remove the parts and tools to be used in assembling the unit.
The fasteners required for assembly have been placed
at locations where they are to be used.
ASSEMBLING THE
UNIT
1. INSTALL THE WHEELS:
a) Except for one or two special sizes, most wheel and
tire combinations can be mounted for either a wide
or narrow track.
For all applications except tilling and plowing, the recommended mounting is wide track for stability.
The "Vees" of tractor tread tires should point in the
direction of forwards rotation.
On convertible models, which can be used with both
front-mount and rear-mount attachments, mount the
wheels for the attachment that will be used the most.
It is not necessary to remount the wheels when changing attachments.
b) For wide track, mount the wheels with the tire valves
towards the outside.
For a narrower track, mount the wheels with the valves toward the inside.
2. ADJUST THE PRESSURE TO 15 POUNDS.
21
Page 22

3. MODELS 852, 853 AND 948
These models come with the control column and handlebar preassembled, but mounted in a compact position on
the unit.
22
Page 23

2
NOTE
............................................................................................................................................................................................................................................................................................................................................................................
............................................................................................................................................................................................................................................................................................................................................................................
............................................................................................................................................................................................................................................................................................................................................................................
............................................................................................................................................................................................................................................................................................................................................................................
............................................................................................................................................................................................................................................................................................................................................................................
............................................................................................................................................................................................................................................................................................................................................................................
............................................................................................................................................................................................................................................................................................................................................................................
............................................................................................................................................................................................................................................................................................................................................................................
............................................................................................................................................................................................................................................................................................................................................................................
............................................................................................................................................................................................................................................................................................................................................................................
............................................................................................................................................................................................................................................................................................................................................................................
............................................................................................................................................................................................................................................................................................................................................................................
............................................................................................................................................................................................................................................................................................................................................................................
............................................................................................................................................................................................................................................................................................................................................................................
............................................................................................................................................................................................................................................................................................................................................................................
............................................................................................................................................................................................................................................................................................................................................................................
............................................................................................................................................................................................................................................................................................................................................................................
............................................................................................................................................................................................................................................................................................................................................................................
............................................................................................................................................................................................................................................................................................................................................................................
............................................................................................................................................................................................................................................................................................................................................................................
............................................................................................................................................................................................................................................................................................................................................................................
............................................................................................................................................................................................................................................................................................................................................................................
............................................................................................................................................................................................................................................................................................................................................................................
............................................................................................................................................................................................................................................................................................................................................................................
............................................................................................................................................................................................................................................................................................................................................................................
............................................................................................................................................................................................................................................................................................................................................................................
............................................................................................................................................................................................................................................................................................................................................................................
............................................................................................................................................................................................................................................................................................................................................................................
23
Page 24

2 2
4. TRANSMISSION
For shipping purposes, the transmission (gear case)
filler hole is sealed with a plastic plug and the dipstick
is in the owner's kit.
Remove the plug. Before installing the dipstick, it is
important to oil the O-ring with a light engine oil.
Then install the dipstick on the hole (see drawing).
Check the level of gear oil at this time (see "Gearbox
Lubrication" on page 25).
5. ENGINE PRE-SERVICE
BRIGGS AND STRATTON ENGINES
Remove and discard the thimble-shaped, clear plastic
cover from the oil breather tube located to the left of
the carburettor.
Remove the crankcase oil filler plug (or dipstick) and
check that the oil is at proper level (see "Engine
crankcase lubrication" on page 25 and its specific use
and care manual).
HONDA AND KOHLER ENGINES
Check the oil fill cap/dipstick at the left of engine. If oil
level is below full mark, see "Engine crankcase lubrication" on page 25.
No other pre-service is required. For Honda engine
operating and service instructions see "Honda engine
owner's manual 31ZH7622".
ELECTRIC SYSTEM BATTERY
The battery is a 12 Volt 14 : 16 AH
(dimensions: mm 160x90x161 - ref. YB16;
or mm 190x127x160 ref. UR1).
Push the unit to an open ventilated spot.
Wear safety goggles and gloves when filling the cells
with the electrolyte solution.
Follow instructions supplied with the battery for filling
with electrolyte, maintaining fluid level in the cells and
charging and recharging.
DANGER
The battery electrolyte is a strong acid.
The acid or the fumes from it can cause severe burns.
The battery constantly emits hydrogen gas which can
be exploded by flame or sparks. Avoid contact with the
battery acid.
Always fill the battery in a well ventilated place and do
not bring flame or sparks of any kind near the battery.
If acid contacts your body, flood the area immediately
with soap and water.
24
Page 25

LUBRICATION,
FILTERS AND FUEL
NOTE
Engine manufacturers recommend the types and
weights of oil for seasonal use in their engine. Always consult the engine instruction manual for their
recommendations.
22
BRIGGS & STRATTON ENGINE
ENGINE CRANKCASE
LUBRICATION
The oils selected for use should be high quality, high
detergent products of API service classification "SF".
The oil usually recommended for warm weather use a
straight SAE 30 weight.
A multi-viscosity type oil such as SAE 10W-40 can also
be used in warm weather.
When the air temperature falls below 32 degrees F (0°
C) switch to 10W-40 or 10W-30 weight oil. For extremely cold (sub-zero Celsius) temperatures, it may be necessary to use SAE 5W-30 or 5W-20 weight oils.
Always check the oil level every day of use.
Change the oil after the first five hours of engine operation and at least once a season thereafter.
Put the unit on a level surface when checking oil level. If
the engine has a dipstick, maintain the oil level between
the high and low marks on the stick. If no dipstick, keep
the oil level no lower than half an inch (12.7 mm) below
the top thread of the filler hole.
For all the engines check the oil level such as indicated on the owner's manual. Add oil if the oil level
is at the half of the dipstick.
KOHLER AND HONDA ENGINE
When changing oil, always run the engine to get the oil
warm. Then shut down, remove the drain plug and drain
the dirty oil into a container for proper disposal. Do not
pollute the environment with waste oil.
GEARBOX LUBRICATION
The gearbox requires maintenance of the oil level with
SAE 80/90 or SAE 90 EP (extreme pressure) gear oil.
The gearbox filler cap (see drawing on page 24) has a
dipstick with marker rings denoting full and low levels.
NOTE
When checked on a brand new machine, the oil level will be at the full mark on the dipstick. When it
drops near the low mark add oil, but do not fill above the full mark. Do not operate if level is not up to
the low mark.
1. Twist and pull up the filler cap to check the dipstick.
Checking every 50 operating hours is recommended.
2. Put the dipstick back into the filler hole and twist the
stick around so the flat side is toward the centre of
the transmission gearbox.
25
Page 26

2 2
ENGINE AIR CLEANER
The dry element filters used on B&S, Honda and Kohler
engines are shown in different drawings. Optional
commercial type pre-cleaner elements are available to
fit these air cleaners.
Pre-cleaners are recommended particularly when using
a Power Sweeper, Dozer Blade or Tiller, in dry and dusty conditions.
Open the air cleaner and check the air filter at regular
intervals. Under very dusty conditions, check often and
change filters when necessary. A clogged filter raises
the engine temperature.
Dry element filters can be cleaned by tapping gently
against a flat surface but it is far better to replace a dirty
filter than try to clean it. The pre-cleaners, however, can
be cleaned with soap and water or mineral spirits, but
must be dried thoroughly, then oiled before use.
Soak the cleaned and dried pre-cleaner in clean engine
oil. Then squeeze out the oil before installing the precleaner.
KOHLER CH270
KOHLER CH395
26
Page 27

GASOLINE ENGINE FUEL
The 4-cycle will run on either leaded or unleaded gasoline.
Gasoline of 87 to 93 octane is recommended.
1. Remove the fuel cap, fill fuel tank, and re-install the
cap securely.
2. Push the tractor at least 10 feet from fuelling area
and wipe off any spillage before starting the engine.
3. Open the fuel line valve at the tank outlet, so fuel can
flow by gravity to the carburettor.
DANGER
Gasoline is explosive ! Read page 5 of safety “Rules”,
before filling the fuel tank and starting the engine.
Use approved type, properly labelled fuel containers.
Do not smoke or bring fuel near any sparks or open
flame.
Do all fuelling outdoors, never in a garage or shop
connected to living quarters. Do not refuel when the
engine is running or still hot.
22
27
Page 28

STARTING AND STOPPING
Including PTO Engagement and Control Unit
710
Backing with the PTO engaged is dangerous. So all
convertible units have a PTO / REVERSE LOCKOUT to prevent simultaneous engagement of PTO
and REVERSE.
You must be sure that the PTO lockout bar is aligned with the donut-shaped stop on the PTO lever
when the unit is in the rear-mount mode (see drawing).
DO NOT REMOVE OR MOVE THIS LOCK-OUT
BAR ASIDE FOR PTO ENGAGEMENT DURING
BACKING OF THE TILLER.
WARNING
WARNING
Be sure to shift into NEUTRAL (N) position on the
gear selector, and disengage the PTO before starting the engine.
If started in gear, the unit will move along.
If started with the PTO engaged, a Tiller, or a Power Sweeper may run out of control.
Inadvertent operation of any attachment can be
dangerous.
28
Page 29

SETTING CONTROLS FOR
22
COLD STARTING
1. DISENGAGE THE PTO
IMPORTANT
MODELS IN REAR-MOUNT MODE:
Pull back on the PTO shift rod to disengage the
PTO.
MODELS IN FRONT-MOUNT MODE:
Push down the PTO shift rod to disengage the PTO.
2. SHIFT INTO NEUTRAL
On the gear speed selector, all positions marked "N" are
neutral.
3. OPEN THE THROTTLE
Advance the throttle lever on the right handlebar to between half and full throttle position.
4. OPEN THE FUEL VALVE
If valve has a handle, open position is handle in line with
the fuel line. If valve has a round control knob, turn the
knob counter-clockwise (to the left).
5. CLOSE THE CHOKE
Closed choke position on the carburettor is the upward
or lateral position of the choke lever. Downward is "open
choke", the position used after engine is running and
warm.
6. LATCH BOTH CLUTCH AND STOP SWITCH LE-
VERS FOR ENGINE STARTING
The clutch is the black lever and the stop switch is the
red lever on the left handlebar. The red lever has to be
held depressed during operation or it will shut off the
engine. For starting, squeeze both levers against the
handlebar with one hand and prop them in this position
by setting the wire spring latch (see drawing).
WARNING
The RED engine stop switch lever is designed to stop
the engine in the event the operator loses control of
the moving machine. It is necessary to latch the stop
lever during starting, and to lock it in the run position
when it is necessary for the operator to attend a
stationary attachment such as the Chipper/Shredder.
Pin holes are provided in the lever and handlebar for
this purpose.
For use of a moving attachment, DO NOT LOCK,
TAPE DOWN, or otherwise defeat the purpose of the
stop switch lever.
NOTE
Squeezing the clutch lever dislodges the wire spring
latch, letting you take over control of the clutch. If you let
go of the handlebar, the engine will be switched to a
stop.
29
Page 30

2
CRANKING TO START
RECOIL START ONLY: Read warning about starter rope. Grasp the starter grip with one hand only.
Place your foot against the side of the tire tread to
steady the machine. Pull the grip gently until the starter
engages THEN PULL RAPIDLY to crank engine. Open
the choke when the engine starts.
WARNING
NEVER WRAP THE STARTER ROPE AROUND
YOUR HAND OR WRIST, OR USE TWO HANDS TO
PULL THE STARTER GRIP. You want the grip to
slim from your grasp if the engine kicks during
cranking.
ELECTRIC START ONLY: Turn the ignition key to
START to crank the engine. Key will return to the RUN
position when you let go. When engine starts, open the
choke.
ENGINE WARM-UP PERIOD: let the engine warm up
for a few moments without any load (in neutral N and
PTO disengaged) to give the oil time to reach the parts
of the engine in need of lubrication.
RESTARTING WARM ENGINE: When the engine has
run and is still warm,it requires no choking to start. In
fact, cranking a warm engine at closed choke may flood
it.
DIFFERENTIAL AND TWO-WHEEL DRIVE
A feature of models 948,852,853, 732 the differential
drive directs the driving to one wheel, allowing the other
to free-wheel. Differential drive facilitates making tight
turns with the unit.
When two-wheel drive is needed for traction, lock in the
differential lever on the right handlebar.
When placed in differential drive, models 948, 852 and
853 can be turned by squeezing the left or right brake lever.
WHEEL BRAKES
Models 852,853 and 948 have two-wheel brakes, with
brake levers on handlebar.
For parking pull completely both levers. However, the
machine may also be placed in gear to keep it from rolling when the engine is shut off.
A brake kit is available for other models.
STOPPING
Any time you let go of the left handlebar, the red stop
lever on top will activate the ignition stop switch to stop
the engine. On an electric start, turn off the switch to
prevent current drain when the unit is not in use. In case
the stop switch becomes open (disconnected) you can
make an emergency stop on the engine either by closing the carburetor choke or by doing the instructions
obtained from the engine owner’s manual.
30
Page 31

IMPORTANT
Directions such as right and left are always called
out as you would see them when operating with the
unit in the mode for which it was designed.
However when the handlebars of a convertible unit
are swung 180 degrees from designated position,
the right lever on the right handlebar will still brake
the right wheel.
But the right wheel will be on the left side.
SHUT-DOWN (STORAGE)
(See instructions on page 8)
TAKING CONTROL OF THE
MACHINE
1. When the engine is running, grasp the left handle-
bar. Hold the stop switch depressed and squeeze
the clutch lever to dislodge the spring latch. Now
both clutch and stop levers will be under your control.
2. Do not let up the stop switch lever or it will stop the
engine. When ready for action, shift into the desired
gear and release the clutch lever. Instructions for
operation of unconverted units are given immediately below, and those for converted units are on page
33.
NOTE
Transmission to the axle and wheels is independent
of transmission through the PTO to an attachment.
The advantage of this BCS design is that the most
efficient operating rpm of the attachment can be selected by the throttle setting, and the desired machine movement chosen independently through a combination of throttle setting and gear selection.
GEAR AND PTO
ENGAGEMENT
(For converted units, skip to page 33)
1. Start the engine and take over control of the unit.
Keep the throttle at moderate speed setting.
Hold the clutch lever (left handlebar) depressed
2.
while shifting, and engaging the PTO lever, and until
you are ready to drive.
3. Shift into the lowest forward speed position on the
gear speed selector. If the gears will not engage, release (slip) the clutch just a bit unit the gears mesh.
4. Smoothly release the clutch lever and the machine
will move forward. If you wish to stop momentarily
without killing the engine or shifting into neutral, depress the clutch lever fully.
5.
USING RED REVERSER FOR BACKING.
Disengage the clutch
Position 1, 2 and 3 (852 / 853 / 948) on the gear selector will be available for backing and 4 will be locked
out. On the models 710, 718, 722 and 732 are available position 1 and 2; position 3 is locked out.
Select speed, and depress the red reverser lever
on right handlebar before engaging the clutch
when going back to forward drive disengage the
clutch.
31
Page 32

MAKING A CONVERSION
FRONT-TO-REAR,
OR REAR-TO-FRONT
Mod. 852 – 853
PUSHER TO TRACTOR
Mod. 710
TRACTOR TO PUSHER
LOCATING OF CONTROL COLUMN INDEXING LEVERS
Mod. 718 – 722 – 732 – 948
TRACTOR TO PUSHER
NOTE
Put on the new attachment (or leave the other in
place) to keep unit from rotating during positioning of the control column.
1. Shift into the lowest forward gear position. This
will provide clearance for turning the handlebars
to the other end of the unit.
2. Detach the PTO and gear selector shift rods from
their supports and let them hang down.
3. Locate the control column indexing rod or lever
(according to model; see drawings.) Use it to free
the column from the support in preparation to
swing it around.
Mod. 710
Mod. 718 - 722 - 732 - 852 - 853 - 948
32
Page 33

4. Be careful not to stress or sharply bend the control cables while indexing the control column.
Turn column 180 degrees as follows:
a) models 710,718,722,732 and 948: convert from
tractor to pusher by pulling rod or lever and turning
the control column 180 degrees counter-clockwise
(to go back to tractor mode, turn clockwise).
b) models 852 and 853: convert from pusher to trac-
tor by pulling the lever on right handlebar and turning column 180 degrees clockwise (to go back to
pusher mode, turn counterclockwise).
5. Put the shift rods back in their brackets on the control
column. Check the position of the control cables and
see that they are neither bunched up nor pulled taut.
2
OPERATING IN CONVERTED
MODE, ALL MODELS
1. TRACTOR MODE:
Push the PTO shift rod forward to engage the PTO,
pull it back for the disengagement.
2. PUSHER MODE:
Pull the PTO shift rod back to engage the PTO, push
it forward for the disengagement.
3. SHIFTING THE GEARS:
Shift into desired gear according to model.
33
Page 34

a) Models 852 and 948: in the converted mode, three of
the four gear positions on the gear selector can be
used for travel in either forward or reverse direction.
The fourth gear is blocked because it is too fast to
use for backing the unit: select desired gear and engage clutch to move forward. To back up, disengage
clutch, engage the red reverser lever on the right
handlebar and engage clutch.
Models 853 and 948 have the fourth gear in tractor
mode.
b) Models 710, 718,722 and 732: two of the three gear
positions can be used, in the converted mode, in
either direction. The third is blocked because it is too
fast to use in backing the unit.
3. Engage the PTO and the clutch to put the unit to
work.
710 / 718 / 722 / 732
710
34
Page 35

SEASONALLY:
MAINTENANCE PROGRAM
1. Refer to the maintenance instructions and illustra-
tions in the "Use and Maintenance" manual furnished
for your model engine.
Change oil, filters, etc., and clean the cylinder fins
and crankcase breather as instructed in the engine
manual.
2. DAILY CLEAN-UP:
When the machine is very dirty you may hose down
everything except the engine immediately after use.
But to avoid cracking the engine, you must let it cool
before hosing it down. You may, however, idle the
engine until it is warm enough to evaporate the wash
water from around the spark plug.
3. AFTER FIRST 10 OPERATING HOURS
(and afterwards as recommended):
a) tighten nuts and bolts:
b) check tire pressure;
c) originally, the position of A lever is normal.
As clutch wears out the same lever could have a
wider opening being so uneasy to use, this means
that it is necessary to adjust the cable, setting lever A on its original position acting on adjustment
device B and on counter-nut C;
d) check the gear oil level of each attachment.
Re-check rotary mowers every 50 hours and the
other attachments every 100 hours.
4. OCCASIONALLY AS NEEDED
Clean any dirt and old grease from the PTO connections of all equipment and pack with clean bearing
grease.
5.
a) lubricate the control cables with a light oil;
b) models with engine hood: lubricate the hinge with
a light oil. Do not use mineral oil.
c) clean parts thoroughly and apply grease to the
control column indexing rod or lever, column fork,
column support or pivot post (according to model).
22
35
Page 36

SECTION
USE AND CARE OF ATTACHMENTS
3
LUBRICATION OF
ATTACHMENTS
1. TILLERS, ROTARY MOWERS, SNOW THROWERS
AND POWER SWEEPERS:
Remove the pipe plug on top of the attachment gear
housing. If the oil level is more than 2 inches (50
mm) below the filler hole, fill to the top with SAE 80/
90 or SAE 90EP (extreme pressure) gear oil. Maintain at the nearly full level.
2. MOWER BARS:
These require no gear oil but need frequent greasing
with a lithium based (general purpose) grease pumped through two "zerk" type fittings on the housing.
3. ALL ATTACHMENTS:
Remove dirty grease and lubricate the PTO coupling
of the attachment with bearing grease whenever
greasing the unit PTO. For other points of lubrication,
see the particular attachment.
COUPLING ATTACHMENT
TO PTO
A. DIRECT COUPLING:
1. Remove the lock nuts and washers from the
tractor PTO studs.
2. Align the tractor PTO with the connecting flange
of the attachment. Always bring the tractor to the
attachment. If necessary use props to level the
attachment.
3. Slide the PTO studs into the attachment flange
and secure with the washers and lock nuts.
When the PTO flange of the attachment is coupled to
the unit PTO flange and the PTO is engaged, the splined shaft slides out to engage the splined (grooved)
shaft of the attachment.
Then the shafts rotate as a single member until the PTO
shift lever is used to retract the drive shaft.
Although the attachment may be coupled directly to the
unit PTO, there is a quick hitch that can shorten the time
for coupling and uncoupling attachments. There are also PTO extensions in lengths of 3" and 6" which can be
coupled between the PTO and attachment for better balance with certain attachment and engine combinations.
B. QUICK HITCH:
1. The hitch consists of two parts held together by
a captive T-handled pin. Pull and turn pin sideways to separate the parts.
2. Remove the two nuts from the tractor PTO studs
and the two bolts and nuts from the quick hitch.
3. Attach the female part, pin-side-up, to the tractor
PTO. Attach the male part, hole-side-up, to the
attachment connecting flange. Install and tighten
the four nuts.
4. Fit the attachment part into the PTO part. Twist
the pin so it drops down into locking position, securing the two parts together.
5. To uncouple, pull the pin.
36
Page 37

3
USE AND CARE OF REAR-TINE TILLER ATTACHMENT
PREPARING NEW TILLER
SINGLE ROW ATTACHMENT FOR 710, 718, 722, 732
(or converted 852):
Available sizes are 18", 20", 26" and 30".
1. Open the carton and stand the tiller on end so you can
see the underside. Fasteners required for assembly are
included. The bolts in the assembly drawing are labelled (M8 or M10) for the metric diameters and length is
given in millimetres.
If a sulky or utility cart is to be hitched to the tractor, assemble the depth gauge bar in a position 180 degrees
from that in the drawing.
2. Use the self-locking nut to fasten the depth gauge to
the gear housing. Install the flange nut at the stabilizer
bar bottom connection.
3. The depth gauge and stabilizer bar protrude through
the top of the tiller housing. The bar is bolted to the brackets. The gauge is pinned with the clevis pin and "hairpin". Tighten all nuts.
WIDTH OF TILTH
IMPORTANT
When changing sets of tines, it is important to keep
the tines in place on one side for use as a model while
changing tines on the other.
Do not mount the tines backwards on the flange.
SINGLE ROW ATTACHMENT FOR MODEL 948:
This comes preassembled for a 32" tilling width. The
width can be increased to 40" or decreased to 27" by
adding or removing flanges of tines, and by changing
the tines to bend inward or outward (see drawing).
TILLING DEPTH ADJUSTMENT
The procedure is the opposite of what many people first
would believe. For the deepest soil penetration, you raise the depth controlling "knife" by pinning the bar in the
bottom hole (see drawing).
37
Page 38

A
2 3
GARDENING SUGGESTIONS
1. When breaking new ground or preparing hard, rocky
soil, till at a maximum depth at the lowest gear setting
and at a fast throttle setting.
In soft soil you can probably start right off tilling at
1. Remove the hairpin and the clevis pin from the bracket and bar.
Raise or lower the bar handle to align the holes in
2.
the bar and brackets. Pin the bar at desired setting,
or as recommended in step 3.
3. In hard ground, as when tilling a patch of ground for
the first time, pin the depth adjustment rod through
the top hole for a shallow cut.
fter a pass or two to break up the hard top crust,
stop the engine and pin the depth adjustment bar
through the lower position hole.
Pinning the bar through the bottom holes raises the
depth-gauging "knife" for maximum tilling depth.
maximum depth and finest tilth are achieved in the lowest gear speeds.
2. You can avoid trampling over and tamping the freshtilled rows by walking to one side of the tiller.
Swing the handlebar to the side and adjust it to a comfortable height. After a bit of practice with the tiller, you
can work out a pattern where your footprints will be erased with each new pass.
TRANSPORT SULKY FOR REARTINE TILLER
The Transport Sulky is exclusively for riding the machine to and from the working site. As warned in Section
One, you must never operate the Tiller from a sulky or
wagon of any type. A curved coupling is needed to attach the Transport Sulky to most models.
38
Page 39

USE AND CARE OF CUTTER BAR
3
MOWER ATTACHMENTS
SICKLE BAR DESIGNED FOR CUTTING FIELD AND CEREAL GRASSES-HASLONG, POINTED TOOTH COMB.
DOES NOT RECUT (MULCH).
.
GENERAL CUTTER BAR MOWER
INFORMATION
1. ALL THE TRACTORS must be converted to the front-
mount mode.
2. The SICKLE BAR and MULCHER BAR are the two original types of BCS mower bars.
The COMBINATION BAR combines features and abilities of both. Although construction of the bars is very similar, there are differences to be encountered in adjustment and maintenance.
RECOMMENDED OPERATION
WARNING
Never operate the mower bar from a mowing sulky.
1. It is unnecessary to run the engine at wide open throttle
for satisfactory performance.
Cutter bar mowers give excellent results when operated
at medium throttle settings and there is less wear and
tear on the reciprocating parts.
If necessary to increase ground speed, select a higher
gear rather than advance the throttle.
2. The short teeth of the Mulching Bar can cut wet grass
without clogging.
COMBINATION BAR COMBINES SOME OF THE ABILITIES OF THE SICKLE BAR AND MULCHING BAR
IN ONE ATTACHMENT.
Both the Mulching and Combination Bars are designed
for re-cutting (mulching) mown grass. For brush cutting
and also when operating in extremely rugged terrain,
go slowly and deliberately with either type attachment.
3. The Sickle Bar is designed specifically for cutting
grass. It cannot re-cut mown grass and is not suitable for cutting brush.
MOWER BAR MAINTENANCE
1. Wash down and re-oil the sliding parts after each
use.
2. Every four operating hours pump a lithium base
grease into the blade control mechanism through
the two grease fitting on the central housing (no
gear oil is required for this attachment).
3. The cutting teeth should be removed and sharpened
with a grinder. For blade removal, remove the two
bolts and the blade coupling. Then slide out the blade.
39
Page 40

2 3
4. The tension between the blade and the tooth is set
by adjusting the blade holders (described below).
NOTE
The tension must be snug enough for clean cut-
ting action, but should not freeze or bind the blade
against the tooth comb.
b) Blade holder adjustment for all sickle cutter bars
Loosen the lock nut A (5c). Adjust the tension screw
B until the blade slides freely between the tooth and
blade holder without excessive slack.
When the adjustment produces the best motion without binding, tighten the lock nut A.
Two types of blade holders are available:
COMBO CUTTER BAR (fig.5a)
SICKLE CUTTER BAR (fig.5c)
a) Blade holder adjustment for COMBO cutter bar
Loosen the upper lock nut A (5a). Adjust the tension
screw B until the blade slides freely between the
tooth and blade holder without excessive slack.
When the adjustment produces the best motion without binding, tighten the upper lock nut A.
6. REPLACEMENT PARTS:
See your dealer for parts.
Replacement teeth, and also complete, riveted mower blade assemblies are available.
40
Page 41

USE AND CARE OF 2-BLADE
3
ROTARY MOWER .
THE UNITS CONVERTED FOR
MOWER USE
For conversion and operation of your unit the front-drive
mode see pages 33 and 34.
ASSEMBLY, CONNECTION AND
LEVELING OF THE 2-BLADE
MOWER
The attachment is packaged with the grass catcher in
place on the deck but the following must be done in preparation for use:
1.
Lift the catcher at the rear and tilt it forward.
Note that the catcher assembly is pinned at the front
on both sides and may be removed if not needed to
catch the grass.
2.
Remove bolts, washers and nuts from the discharge
volute bracket. Use them to attach the curved discharge deflector to the bracket (see drawing).
3. The discharge volute on the opposite side from the
one in step 2 has a flat door hinged down the side.
No assembly is needed.
DANGER
Open discharge from the volutes without the catcher in place can be very dangerous.
Make sure door is closed and deflector is in the
down position when moving without the grass
catcher.
4. POSITIONING OF THE DISCHARGE DEFLECTOR
AND DOOR:
a) For mowing without the grass catcher the dis-
charge deflector MUST be in the down position,
covering the opening so the clippings will not be
thrown out. The door MUST be in closed position
across the other opening for the same reason.
41
Page 42

2 3
The oil level should be checked each 50 operating
hours thereafter.
b) When putting the grass catcher into position on
the deck, open up both volutes to discharge into
the catcher compartment; swing open the door
and lift the curved deflector upward out of the way.
5. Put the unit on a level surface.
Remove the nuts from the PTO studs and mount the
mower to the PTO.
6. The mower deck should be level for even mowing
height. The wheel mounting brackets have three holes. If levelling is required, remove the wheel retaining hairpins and remount the wheels in a higher
or lower hole as required.
ROTARY MOWER OPERATION
WARNING
Read and obey all safety rules applicable to the unit
and the rotary mower in Section One. Do not remove
or defeat the purpose of the discharge deflector on the
mower, or leave the discharge door open when not
using the grass catcher.
Do not remove or destroy the operation of the high
speed lockout device on the unit, or operate or leave
the machine running with the RED STOP LEVER latched in the down position. Do not operate with the mower at the rear of the unit.
When operating from a sulky, always MOW UP AND
DOWN (never across) a slope and make wide turns to
guard against tipping.
When walking behind the mower, GO ACROSS (never
up and down) the slopes while mowing.
1. OPERATION FROM A RIDING SULKY:
Only models with wheel brakes should be operated
from a riding sulky.
An optional wheel brake kit may be installed if your
unit does not have factory-installed brakes.
LUBRICATION
Before operating, remove the pipe plug at the top of the
transmission housing. Check that the gear oil is within
2" of the top of the housing. If low, fill with SAE 80/90 or
SAE 90EP gear oil to the top of the filler hole.
WARNING
Remember that a converted unit will pull to the left
when the right brake lever is depressed and to the
right when the left brake lever is depressed.
Forgetting this could result in loss of control especially on a unit in differential drive, or the model
where the right and left brake levers are used in
making turns.
42
Page 43

Like all cutting tools, the mower must be kept in good
condition to perform well.
1.
Clean the underside of the deck often enough to prevent heavy caking of dirt and grass on the surfaces.
Inspect the condition of the mower blade assemblies
each time.
2. The left and right mower blade assemblies consist of
fluked cutter blades mounted on both ends of blade
holders by M10x30 mm lock nuts, special "super"
lock washer and self-locking nuts.
The mounting imparts a flail-like action to the cutters.
The left side blade assembly rotates counter clockwise (ccw) and the right side assembly clockwise (cw).
2. CUTTING HEIGHT ADJUSTMENT:
The cutting height is set by raising or lowering the
mower blades under the deck. The deck stays at the
same height above ground level. To adjust the cutting height pull up the knobbed, spring-loaded pin in
the height adjustment bracket on the deck and pin it
into the desired hole of the five holes in the top of the
transmission housing (see drawing).
The hole nearest the PTO connection gives the shortest cutting height.
3. The cutting height range is 2" to 4".
To avoid shock to the grass it is recommended that
only about 1/3 of the grass height, or a maximum of
2 inches, be removed at each cutting. For example,
reduce a 6 inches growth to 4 inches on the first
mowing, then reduce it to desired height later on with
a second cutting.
4. Mowing wet lawns is not recommended because of
poor results and also because it increases the potential for mildew and other grass diseases.
5. It is a good idea to vary the mowing pattern with
each mowing. This will help to eliminate matting and
give a more even overall appearance than when the
mowing pattern is unvaried.
INSPECTION AND
MAINTENANCE
WARNING:
If a hard object is stuck, shut down the engine immediately (see page 7) and inspect for a damaged
blade. Do not try to straighten and remount a bent
cutter because any impact, severe enough to bend
it, may have put tiny cracks in the hardened steel.
These could enlarge unit the cutter shatters during
operation.
Do not substitute ordinary fasteners for those
called out in step 2.
3. An extra set of cutter blades was packaged with the
mower. Put these on the blade holders when the
other set has been removed for grinding (cutting edges cannot be field).
Grind the bottom edges of the cutters.
4. After grinding and remounting the cutters, check the
balance of each blade assembly. If one end is heavy,
remove the cutter from that end and grind it to improve blade balance. An out-of-balance condition causes excessive vibration.
5. The cutters gradually will wear thin at the bend of the
flukes. Keep a watch for this. If you see cracks in this
area, discard cutters before further wear occurs.
Cracked pieces can break off, becoming high velocity missiles.
WARNING
23
43
Page 44

3
USE AND CARE OF SNOW THROWERS
GENERAL INFORMATION
All sizes of the Snow Throwers are similar in construction and operation.
Optional accessories include snow grips and wheel
weights for added traction.
SNOW THROWER OPERATION
1. Read all precautions in Section One pertaining to the
safe operation of the machine and snow thrower attachment.
2. Only the lowest speed should be used for backing
when the footing is slippery.
3. If necessary to start the engine in a barn or shed
keep the doors wide open.
4. If necessary to back up be sure of your footing and
be sure the way behind you is unobstructed.
WARNING
Do not try to clear slopes so steep that you could lose
control, or the machine could slide into you or an obstruction.
The snow-thrower has an impeller retard system designed to brake the impeller to a stop within three seconds after PTO disengagement or engine shutdown.
Even so, never put hands and fingers inside the discharge chute or the impeller (collector) area unless
the engine has been rendered unstartable, as explained in Section One at page 8.
5. Always shut off the engine, wait until all movement
stops and disconnect the spark plug wire before
deicing the discharge chute or the impeller.
The wooden stick on the side of the Snow Thrower is
for deicing. You also can let the machine thaw if a
warm place is available.
6. Always be sure to direct the discharge chute away
from living quarters, vehicles and people. Work in a
pattern which will pile the snow where desired and
which requires the fewest passes with the machine.
With the wrong procedure you could be throwing
snow over and over without clearing the area. Don't
forget that the wind has an influence on how you
should proceed.
44
Page 45

A
A
USE AND CARE OF CHIPPER / SHREDDER
3
Be sure to read the Manufacturer Chipper/Shredder
Owner's Manual which comes with the attachment and
also obey the safety messages printed on the unit and
the Chipper / Shredder attachment. This unit reduces
thick branches to chips and pulverizes lawn and garden
waste for mulching or adding to your compost pile.
Careless or improper use can be very dangerous.
Wear safety goggles of the type specified by ANSI Sa-
fety Standard Z87. Also wear a hat.
Work gloves may be worn when feeding the Chipper but
not when feeding the Shredder because they can pull
your hands into the hopper if snagged by the material.
Remove jewels or clothing articles which could be
drawn into the machine.
Set up on firm ground but not on gravel, concrete, brick
or other surfaces which provide no cushion.
DANGER
Do not start engine when there is material in the
Shredder. Shut off engine and disconnect the spark
plug wire before cleaning a jammed hopper, changing
screens or performing any maintenance or service.
fter latching the clutch and stop switch and starting the
engine, leave the unit in neutral.
Disengage the clutch lever while pinning down the stop
switch lever (see drawing).
Engage the PTO when ready to operate.
Be careful what you put into the Shredder hopper. The
machine can shred most organic materials. However,
objects of certain shape, size or texture may cause trouble even if organic.
The Shredder cannot handle thick branches or large
chunks of wood.
Neither Shredder nor Chipper can handle cloth, string,
glass, rubber, metal, rocks or paving or long vines.
Soggy soil, green garden wastes and wet grass clippings can be processed through the Shredder by mixing
dry leaves and wood chips with the wet stuff.
For wet processing, the standard curved screen with the
"Swiss cheese" holes should be replaced with the set of
five rods and tubes supplied with the attachment.
DANGER
Do not use the Chipper/Shredder with an unscreened discharge.
The discharge must be covered either with the
rods and tubes or the standard screen.
IMPORTANT
lways disengage the PTO lever before stopping the
engine. If the PTO remains in engagement during engine shutdown, the rotating Chipper/Shredder shaft may
motorize and restart the engine.
After shutdown, always check the paint splash across
the drive shaft (near Chipper chute) to be sure all movement has stopped.
CHIPPER/SHREDDER
MAINTENANCE
1. Clean out the hopper before each use.
2. Clean the exterior at regular intervals and apply a
light oil or wax to prevent rust.
3. Shaft bearings are the sealed, self-lubricating type
requiring no further lubrication.
4. Check all fasteners frequently and tighten loose
parts. Replace missing or worn parts. See the illustrated parts list in your Chipper/Shredder owner's
manual for parts information.
45
Page 46

3
USE AND CARE OF POWER SWEEPER 80 – 100 cm
OPERATION
Move to the work site and adjust the casters for proper
brush height; brush should touch flat, paved, surfaces;
should barely clear the turf when re-moving lawn thatch.
If adjusted too low, or when it runs into a hillock, the
brush will drive the unit back towards the operator.
Always put the unit into gear before engaging the PTO.
If the Sweeper is engaged first and the brush is in contact with the ground, it will drive back the unit.
Be sure to read and follow the detailed instructions in
Power Sweeper Operator's Manual that came with the
attachment. Also follow the instructions for safe use of
power units and the Power Sweeper attachment in Section One of this manual.
Your unit should have an 7 horsepower or larger engine
to power the Sweeper. Installation of a pre-cleaner element in the engine air cleaner is recommended.
Safety equipment must include eye protection goggles
of the type stamped "Z87" (for ANSI Safety Standard
Z87).
A dust mask or respirator should be worn when sweeping surface where dust is raised.
Keep children, pets and bystanders away from the machine and keep well clear or the rotating parts.
NOTICE
In your Power Sweeper owner's manual, the instructions to deactivate the PTO lockout device for front
operating attachment applies to earlier units than
those of your model year.
On your unit, PTO lockout deactivation is not only
unnecessary, but also must not be done. On your
unit, the lockout is effective only when needed. In
the front-drive mode, the lockout is inactive.
Be prepared to let go of the controls to stop all motion if
the unit is driven backwards or you lose control.
Disengage the PTO and walk behind the unit when
going up or down slopes. Work across the slope when
sweeping. Do not work on terrain where you cannot
keep your footing or control of the unit. It could overturn
or slide into you. For rooftop sweeping, be sure the surface is dry and does not pitch more than 5 degrees (1/2"
per foot). Set up warning barriers so you will know when
you come near the edges of the roof.
MAINTENANCE AND STORAGE
Grease the PTO shaft coupling, the U-joint and the
quick hitch at the same time as you repack the unit PTO
coupling with grease.
Also maintain the level of gear oil in the Sweeper transmission per instructions on page 36.
Clean the Power Sweeper prior to storage and apply
auto wax of other rust preventative to the exterior surfaces. Store in a dry, well-ventilated place.
All parts of the Power Sweeper are available from your
BCS dealer or distributor.
See the illustrated parts list in the power Sweeper
owner's manual for parts identification.
46
Page 47

USE AND CARE OF DOZER BLADE
The Dozer Blade can be used either in front or behind
the unit. It also can be set to doze material straight
ahead or to either side.
The choice of best mounting position and best angle
can be made after experimentation with the dozer blade
and will vary with the condition of the soil, snow or whatever material is to be moved or spread.
Consider installation of wheel weights when maximum
traction is needed. Instruction for assembly and use come with the Dozer Blade.
The models have an integral mounting bracket.
Fit the dozer blade tongue over the hitch (or special
bracket) on the unit, and drop the hitch pin through the
holes.
Drop the angle pin through the tongue hole into one of
the slots in the angle bracket.
Now tighten the PTO stud nuts.
47
Page 48

SAVE THIS MANUAL
FOR REFERENCE
48
Page 49

Accessories for Power Units & Attachments
MAIN ATTACHMENTS
For more information on the large variety
of BCS attachments such as the different
size Tillers, Sickle Bars, Snow Throwers,
Heavy Duty Mowers and other attachments, please contact your nearest BCS
dealer.
QUICK HITCH FOR
ATTACHMENTS
When two or more attachments are purchased, BCS offers a Quick Hitch accessory. The Quick Hitch will allow the attachments to be installed and removed from
the tractor quickly and easily without the
need for any tools. The Quick Hitch includes one bushing, to be installed on the
tractor, and two tangs, to be installed on
two attachments.
Part.# 922.90825
TANG FOR QUICK HITCH
Each Quick Hitch accessory comes with
two tangs to be installed on two attachments. If more than two attachments are
purchased individual tangs can be purchased for each additional attachment.
Part.# 922.90826
PTO EXTENSIONS
Available in 3” and 6” lengths needed for
certain applications with a Rotary Mower
or Cutter Bar Mower Attachment on diesel engine power units.
Part.# 922.90829 (three inch)
PTO ADAPTOR
Converts the standard BCS PTO shaft to
the American standard 1-3/8”, 6-spline size
Part.# 922.90828
WHEELS AND TIRES
Many sizes and types are available to
suit your needs. Ask your BCS servicing
dealer for complete information.
STEEL CAGE WHEELS
For additional traction in loose or wet
soils.
17” size - # 922.57779
(for 710,718,722,732)
23 ½” size - # 922.49993 (for 948)
BRAKE
Available in kit form.
Part.# 922.90833 (for 710,718,722)
Part.# 922.59505 (for 732)
WHEEL SPACERS
Placed on wheel axles, these 2.5” spacers increase track width by 5”.
Part.# 922.43685
WHEEL WEIGHTS
Available in various weights for different
wheel sizes, weights mount into the
wheels for increased traction and / or
deeper plowing or tilling.
Part.# 922.43686 for 4.00-8/3.50-8
(kg.11)
Part.# 922.48715 for 4.00-10 & 5.00-10
(kg.15)
Part.# 922.48720 for 6.50/80-12” (kg.34)
UTILITY TRAILER
Use with 948 and 853 power units. Hauls
up to 875 pounds of firewood, trash,
shrubs, etc. has a separate footbrake for
operating safety. Not for road use. A curved coupling is used for attachment to the
unit hitch.
Trailer # 921.48701
Curved coupling # 922.59512
MOWING SULKY
Converts your walking BCS Rotary Mower
Attachment to a riding mower.
For 852, 853 and 948 power units.
Part.# 921.49300
TRANSPORT SULKY
For 852, 853 and 948 power units for
transport of machine and operator to the
work site. Not for work applications or
road use. A curved coupling is used for
attachment to the unit hitch.
Sulky # 921.48675
Curved coupling # 922.47720 (852, 853)
Curved coupling # 922.59512 (948)
TILLER TINES
The standard tines supplied with the attachment have been proved over many
years to be ideally suited for most soil
types.
TRANSPORT WHEEL
Providing fast, easy manuevering, this
rubber-tired wheel is mounted on the tiller
by an easy-to-remove or install “presto”
pin.
Part.# 922.42465
HILLER / FURROWER
Two tools in one, Furrower has removable
hiller wings so it can be used separately.
Easily attaches to the Tiller hood by a
“presto” pin.
Part.# 921.47860
SINGLE BOTTOM PLOW
Will plow a furrow from 6” to 10”. Size
5.00-12 or 6.5/80-12 tires and wheel
weights are recommended for plowing.
Part.# 921.90799 (for 718, 722, 732, 852,
853)
Part.# 921.49992 (for 948)
SWIVEL PLOW
Reversible plow allows gardener to return
down next plow row. 6.5/80-12 tires and
wheel weights are recommended.
Part.# 921.90797
CUTTER BAR BLADE GUARD
To be installed on Cutter Bar Mower when
not in use Protects operator. See servicing
dealer for part number.
DOZER/SCRAPER BLADE (40”)
Can be pushed or pulled. Easily converts
by “presto” pin. Angles are adjustable.
Part.# 921.90735
49
Page 50

MAINTENANCE RECORD
DATE DESCRIPTION OF WORK DONE WORK DONE BY
Page 51

WARNING:
state of California to cause cancer, birth defects or other reproductive harm.
the Engine Exhaust from this product contains chemicals known to the
BCS America LLC
8111 N.E. Columbia Blvd
PORTLAND, OREGON 97218
Tel.: 503-2521249 / 800-5431040
Fax: 503-2528360
http://www.bcs-america.com
 Loading...