

Page 1
38WA
POWER CONVERSION EQUIPMENT
Compact manual
Language English
Translation
Document No. 5.06014.02
Part No. 397361
Status 24.05.2011
LISTED
E 5.06014.02
b maXX®
BM4400,
BM4600,
BM4700
Read the manual before starting any work!
Page 2

Title Compact manual
Product b maXX® BM4400, BM4600, BM4700
Version 5.06014.02
Article number 397361
Status 24.05.2011
Copyright These instructions may be copied by the owner in any
quantity but only for internal use. For other purposes these
operating instructions and extracts thereof must not be
copied or reproduced.
Use and disclosure of infor mation contained in these instructions are not permitted.
Designations and c ompany marks contained in these instructions may b e bran d name s, t he use of wh ich b y thir d
parties for their own purposes may violate the rights of the
holders.
Obligatory These instructions are part of the equipment/machine.
These instructions must be ava ilable to th e ope rator at all
times and must be in a legible condition. If the equipment/
machine is sol d or moved to a differen t location these in
structions must be pas sed on by the owner tog ether with
the equipment/machine.
After any sale of the equipme nt/machine thi s original and
all copies must be handed over to the buyer. After disposal
or any other end of use this original and all copies must be
destroyed.
-
When the present instructions are handed over, corresponding sets of instructions of a previous version are automatically inv alidated. Please notice that s pecifications/
data/information are current values according to the
printing date. These statements are not legally binding
according to the measu rement, computation and calcula
tions.
Baumüller Nürnberg GmbH reserves the right, in developing its products fur ther, to cha nge the technical specifica tions and the handli ng of the products co ncerned without
prior notice.
No liability can be accepted concerning the correctness of
the instructions unl ess otherwis e specified in the General
Conditions of Sale and Delivery.
Manufacturer Baumüller Nürnberg GmbH
Ostendstr. 80 - 90
D-90482 Nürnberg
Germany
Tel. +49 9 11 54 32 - 0 Fax: +49 9 11 54 32 - 1 30
www.baumueller.de
-
Page 3

Table of contents
1 Introduction . . . . . . . . . . . . . . . . . . . . . . . . . . . . . . . . . . . . . . . . . . . . . . . . . . . . . . . . . . . . . . 5
1.1 Copyright and trade mark . . . . . . . . . . . . . . . . . . . . . . . . . . . . . . . . . . . . . . . . . . . . . . . 5
2 Fundamental safety instructions . . . . . . . . . . . . . . . . . . . . . . . . . . . . . . . . . . . . . . . . . . . . . 7
2.1 Legal information . . . . . . . . . . . . . . . . . . . . . . . . . . . . . . . . . . . . . . . . . . . . . . . . . . . . . . 7
3 Description of the devices . . . . . . . . . . . . . . . . . . . . . . . . . . . . . . . . . . . . . . . . . . . . . . . . . . 9
3.1 Marking of the device - type key . . . . . . . . . . . . . . . . . . . . . . . . . . . . . . . . . . . . . . . . . . 9
4 Mounting. . . . . . . . . . . . . . . . . . . . . . . . . . . . . . . . . . . . . . . . . . . . . . . . . . . . . . . . . . . . . . . . 13
5 Installation . . . . . . . . . . . . . . . . . . . . . . . . . . . . . . . . . . . . . . . . . . . . . . . . . . . . . . . . . . . . . . 19
5.1 Connection diagram. . . . . . . . . . . . . . . . . . . . . . . . . . . . . . . . . . . . . . . . . . . . . . . . . . . 20
5.2 Connection diagrams. . . . . . . . . . . . . . . . . . . . . . . . . . . . . . . . . . . . . . . . . . . . . . . . . . 23
6 Commissioning . . . . . . . . . . . . . . . . . . . . . . . . . . . . . . . . . . . . . . . . . . . . . . . . . . . . . . . . . . 33
6.1 Requirements to the executing personnel . . . . . . . . . . . . . . . . . . . . . . . . . . . . . . . . . . 33
6.2 Preconditions. . . . . . . . . . . . . . . . . . . . . . . . . . . . . . . . . . . . . . . . . . . . . . . . . . . . . . . . 34
6.3 Preparations . . . . . . . . . . . . . . . . . . . . . . . . . . . . . . . . . . . . . . . . . . . . . . . . . . . . . . . . 34
6.4 Survey . . . . . . . . . . . . . . . . . . . . . . . . . . . . . . . . . . . . . . . . . . . . . . . . . . . . . . . . . . . . . 42
6.5 Executing commissioning . . . . . . . . . . . . . . . . . . . . . . . . . . . . . . . . . . . . . . . . . . . . . . 43
7 Operation . . . . . . . . . . . . . . . . . . . . . . . . . . . . . . . . . . . . . . . . . . . . . . . . . . . . . . . . . . . . . . . 59
7.1 Enable signals . . . . . . . . . . . . . . . . . . . . . . . . . . . . . . . . . . . . . . . . . . . . . . . . . . . . . . . 59
7.2 Switch-on frequency . . . . . . . . . . . . . . . . . . . . . . . . . . . . . . . . . . . . . . . . . . . . . . . . . . 59
7.3 Display elements - LED . . . . . . . . . . . . . . . . . . . . . . . . . . . . . . . . . . . . . . . . . . . . . . . . 60
7.3.1 Operating condition (H1, H2). . . . . . . . . . . . . . . . . . . . . . . . . . . . . . . . . . . . . . . . . . . 60
7.3.2 Current limit (H3). . . . . . . . . . . . . . . . . . . . . . . . . . . . . . . . . . . . . . . . . . . . . . . . . . . . 61
7.3.3 Error (H4) . . . . . . . . . . . . . . . . . . . . . . . . . . . . . . . . . . . . . . . . . . . . . . . . . . . . . . . . . 61
7.3.4 Display. . . . . . . . . . . . . . . . . . . . . . . . . . . . . . . . . . . . . . . . . . . . . . . . . . . . . . . . . . . . 61
8 Error detection and troubleshooting . . . . . . . . . . . . . . . . . . . . . . . . . . . . . . . . . . . . . . . . . 63
8.1 Error detection . . . . . . . . . . . . . . . . . . . . . . . . . . . . . . . . . . . . . . . . . . . . . . . . . . . . . . . 63
8.2 Troubleshooting. . . . . . . . . . . . . . . . . . . . . . . . . . . . . . . . . . . . . . . . . . . . . . . . . . . . . . 63
8.2.1 Reset errors. . . . . . . . . . . . . . . . . . . . . . . . . . . . . . . . . . . . . . . . . . . . . . . . . . . . . . . . 64
8.2.2 Error parameters - error messages (error list) - error reactions . . . . . . . . . . . . . . . . 64
8.2.3 Parameter description – warnings (warning bit list). . . . . . . . . . . . . . . . . . . . . . . . . . 87
Table of figures . . . . . . . . . . . . . . . . . . . . . . . . . . . . . . . . . . . . . . . . . . . . . . . . . . . . . . . . . . . . . 89
Index . . . . . . . . . . . . . . . . . . . . . . . . . . . . . . . . . . . . . . . . . . . . . . . . . . . . . . . . . . . . . . . . . . . . . . 91
Revision survey . . . . . . . . . . . . . . . . . . . . . . . . . . . . . . . . . . . . . . . . . . . . . . . . . . . . . . . . . . . . . 93
Compact manual b maXX® BM4400, BM4600, BM4700
Document no.: 5.06014.02
3
of 94
Page 4

Table of co ntents
4
of 94
Compact manual b maXX® BM4400, BM4600, BM4700
Document no.: 5.06014.02 Baumüller Nürnberg GmbH
Page 5

1
1INTRODUCTION
This short instruction serves as an assistance for the mounting of the devices of the series
b
maXX® BM4400, BM4600, BM4700 with the type designation BM44XX - XXX -
XX2XX[Ryy] in a switching cabinet.
Please, take all info rmation for system confi guration with b maXX® BM4400, BM4600,
BM4700 from the manual b
This short instruction does not replace the safety instruction nor the manual, but it rather
requires knowledge o f the safe ty instruc tion (do cument no. 5 .04021) a nd of the m anual
b
maXX® BM4400, BM4600, BM4700 (document no. 5.04043) from the user.
In the packing the Safety Instructions are enclosed. The manual is to be found on the enclosed documentation DVD in the packing.
Documents also can be found in the internet under www.baumueller.de in the area Downloads.
maXX® BM4400, BM4600, BM4700.
1.1 Copyright and trade mark
b maXX
HIPERFACE
®
®
is a registered trade mark of Baumüller Nürnberg GmbH
is a registered trade mark of SICK/Stegmann
Compact manual b maXX® BM4400, BM4600, BM4700
Document no.: 5.06014.02
5
of 94
Page 6

1.1
Copyright and trade mark
6
of 94
Compact manual b maXX® BM4400, BM4600, BM4700
Document no.: 5.06014.02 Baumüller Nürnberg GmbH
Page 7
2.1 Legal information
This manual is addressed to technical qualified personnel, who is specifically skilled and
who is thoroughly familiar with all warnings and maintenance procedures.
The user is responsibl e for the ex ec uti on of se rvi ce and co mmi ss i oning ac co rd in g to t he
safety notes of the prevailing standards and other relevant national and local instructions
concerning conductor dimensioning and protection, grounding, disconnector, overcurrent
protection and so on.
For damages, which re sult from the mountin g or from the conne ction, the one is li able,
who has carried out the mounting or the installation.
2
2FUNDAMENTAL SAFETY
INSTRUCTIONS
WARNING
The following may occur, if you disregard these safety notes:
m serious personal injury
m death
All persons, who work with this device, must know and regard the safety notes and the safety
instructions in this manual.
Apart from this, any and all per sons who wo rk on this de vice must addi tional ly know and regard to all regulations and instructions, that are valid at the location.
WARNING
The following may occur, if you disregard these safety notes:
m serious personal injury m death
The danger is: electricity.
Knowledge of manual and of safety instructions.
Compact manual b maXX® BM4400, BM4600, BM4700
Document no.: 5.06014.02
7
of 94
Page 8

2.1
Legal information
8
of 94
Compact manual b maXX® BM4400, BM4600, BM4700
Document no.: 5.06014.02 Baumüller Nürnberg GmbH
Page 9
3DESCRIPTION OF THE DEVICES
3.1 Marking of the device - type key
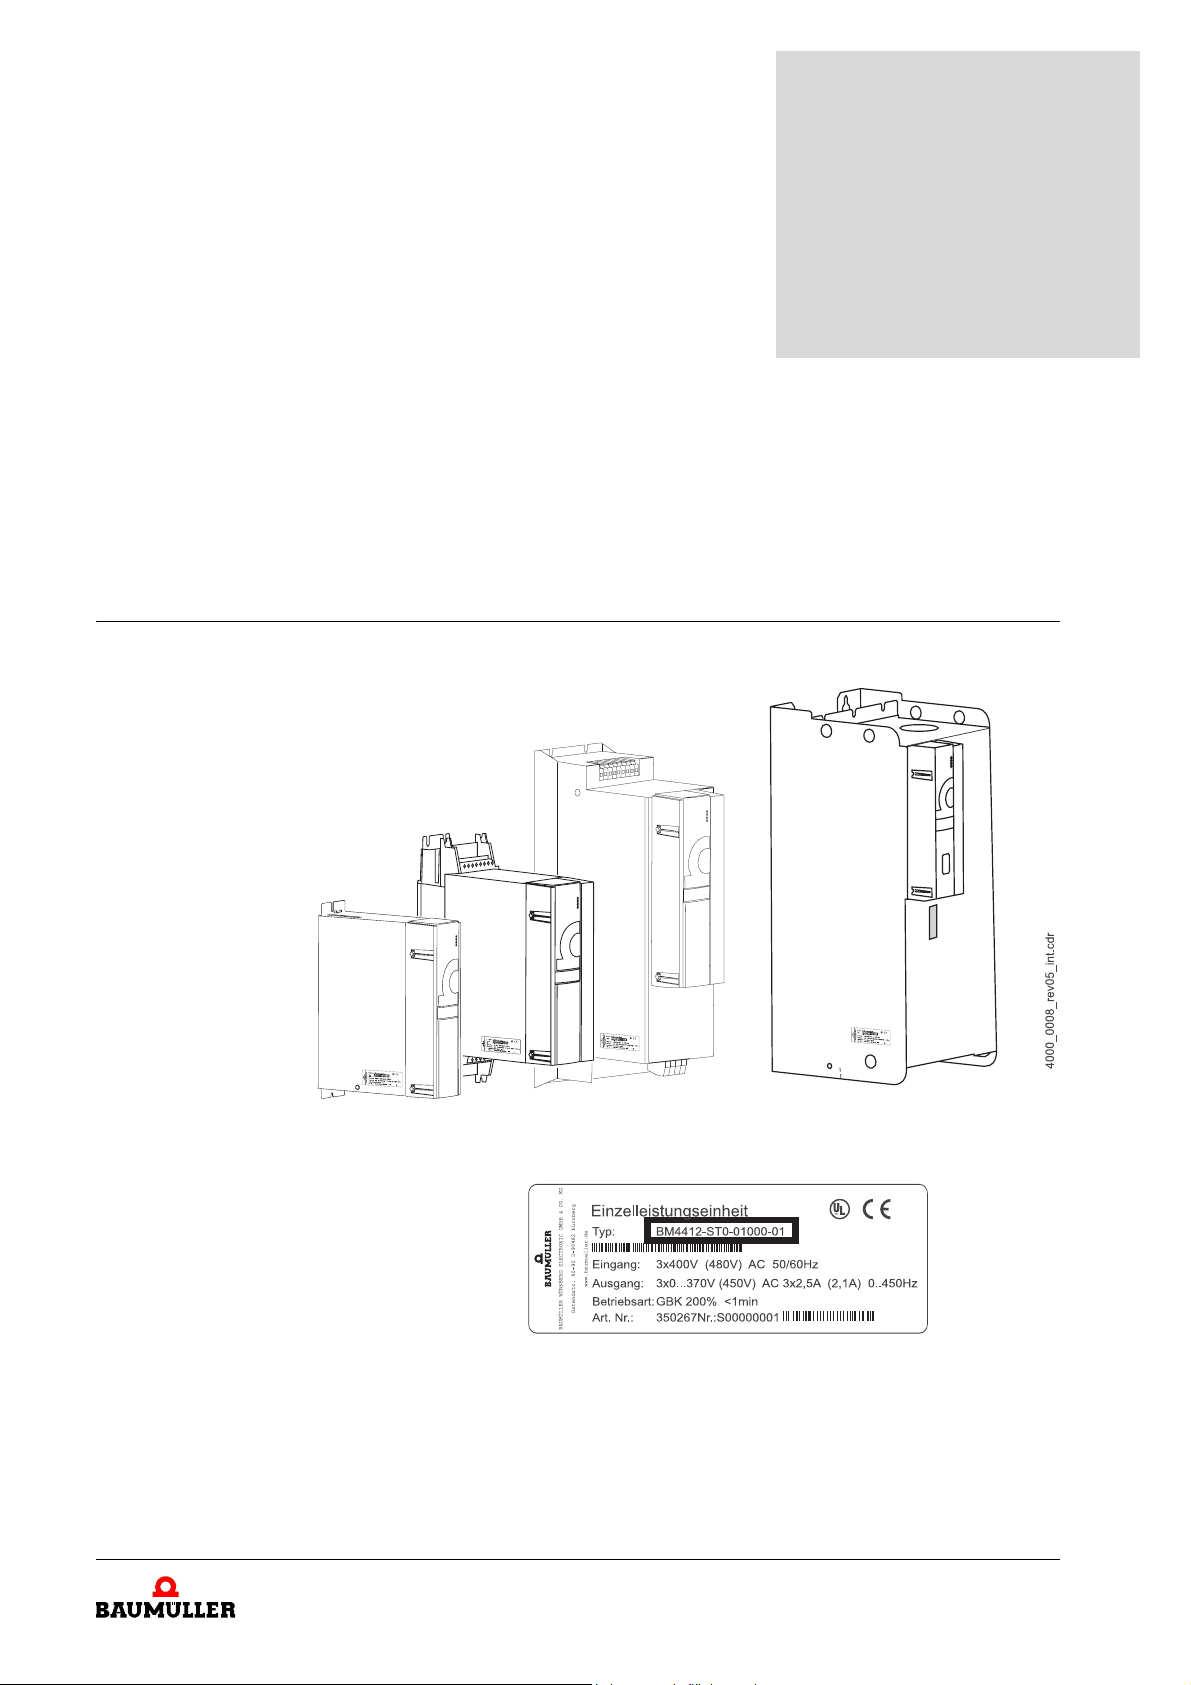
On the type plate (label) you will find, besides others, the type key of the device.
3
Figure 1: Position of type key label
Compact manual b maXX® BM4400, BM4600, BM4700
Document no.: 5.06014.02
9
of 94
Page 10

3.1
Marking of the device - type key
The type key has the form: BM4XXX - XX X - XXXX X [Ryy ] - XX. Dir ect ly beh in d the typ e
key is the desi gn c ode ( -XXX X - X - XX X - X XX ). The des ig n c od e co n tai ns in form a tio n,
which only is important to Baumüller Nürnberg GmbH.
That’s why in the following table only the type key is explained.
BM4XXX - XXX - XXXXX[Ryy] - [XXX] - XX Device generation
BM4XXX - XXX - XXXXX[Ryy] - [XXX] - XX Type
4: Vector controller with and without encoder feedback (closed loop / open loop)
5: for M-controller oder V-controller developed devices,
see manual 5.05022
6: Vector controller like 4, but optimzed for max. peak current
7: Vector controller like 4, but optimzed for max. nominal current
BM4XXX - XXX - XXXXX[Ryy] - [XXX] - XX Size of cabinet
1 to 7 (from cabinet size 1 there are two different wide versions)
BM4XXX - XXX - XXXXX[Ryy] - [XXX] - XX Current grading (output rated current)
0 to 6 (current value is dependent on the cabinet size), see appendix D
BM4XXX - XXX - XXXXX[Ryy] - [XXX] - XX Cooling type
S: air-cooled with air supply and with air outlet in the control cabinet
A: air-cooled with air supply and with air outlet outside the control cabinet
Z: water-cooled with water cooler in the control cabinet
F: water-cooled with water cooler outside the control cabinet
C: (cold plate) cooling via mounting wall of the control cabinet
BM4XXX - XXX - XXXXX[Ryy] - [XXX] - XX Mains type
T: TN- or TT-mains
I: IT-mains and ’grounded delta’
BM4XXX - XXX - XXXXX[Ryy] - [XXX] - XX Safety relay
0: no module
1: Module with one relay and high power current contacts
2: Module with two relays and high power current contacts
3: Module with one relay and low current contacts
4: Module with two relays and low current contacts
5: Module with one relay and all current contacts
6: Module with two relays and all current contacts
BM4XXX - XXX - XXXXX[Ryy] - [ XXX] - XX Hardware type/power unit type
0: Rectifier and inverter with chopper resistor transistor UDC = 540 V
1: Rectifier and inverter with chopper resistor transistor
U
2: Power module (only output sided inverter). Operation as power module,
UDC = 540 V
3: Rectifier and inverter with chopper resistor transistor UDC = 540 V
short packaging for BM465X, BM466X, BM475X und BM476X
=230 V ± 10 %, UDC =310 V
Mains
BM4XXX - XXX - XXXXX[Ryy] - [XXX] - XX Hardware type/controller unit versions
1: Module in slots A to H pluggable
2: Modules in slots A to M pluggable
BM4XXX - XXX - XXXXX[Ryy] - [XXX] - XX Hardware type (internal information via Baumüller Nürnberg
GmbH.
0XX: Controller without 7-segment display (RS 485 interface)
1XX: Controller without 7-segment display (RS 485 interface)
2XX :Controller with 7-segment display (RS 485 interface)
3XX :Controller with 7-segment display (Ethernet interface))
10
of 94
Compact manual b maXX® BM4400, BM4600, BM4700
Document no.: 5.06014.02 Baumüller Nürnberg GmbH
Page 11

Description of the devices
BM4XXX - XXX - XXXXX[Ryy] - XX Optional chopper resistor
R16: Chopper resistor with 16 Ω
R10: Chopper resistor with 10 Ω
R05: Chopper resistor with 5 Ω
R03: Chopper resistor with 3 Ω
BM4XXX - XXX - XXXX X[Ryy] - XX State of software controller (firmware)
01: Series version 1.x
03: Series version 3.x
NOTE
This type key is only for the basi c device without the pl ug-in modules . Every plug- in module
(except the controller) has its own type key.
3
Compact manual b maXX® BM4400, BM4600, BM4700
Document no.: 5.06014.02
11
of 94
Page 12

3.1
Marking of the device - type key
12
of 94
Compact manual b maXX® BM4400, BM4600, BM4700
Document no.: 5.06014.02 Baumüller Nürnberg GmbH
Page 13

4
4MOUNTING
The installation instr uctions, dimensions and drillin g plans of the individual device ve rsions for the configuration are to be taken from the manual.
Compact manual b maXX® BM4400, BM4600, BM4700
Document no.: 5.06014.02
13
of 94
Page 14
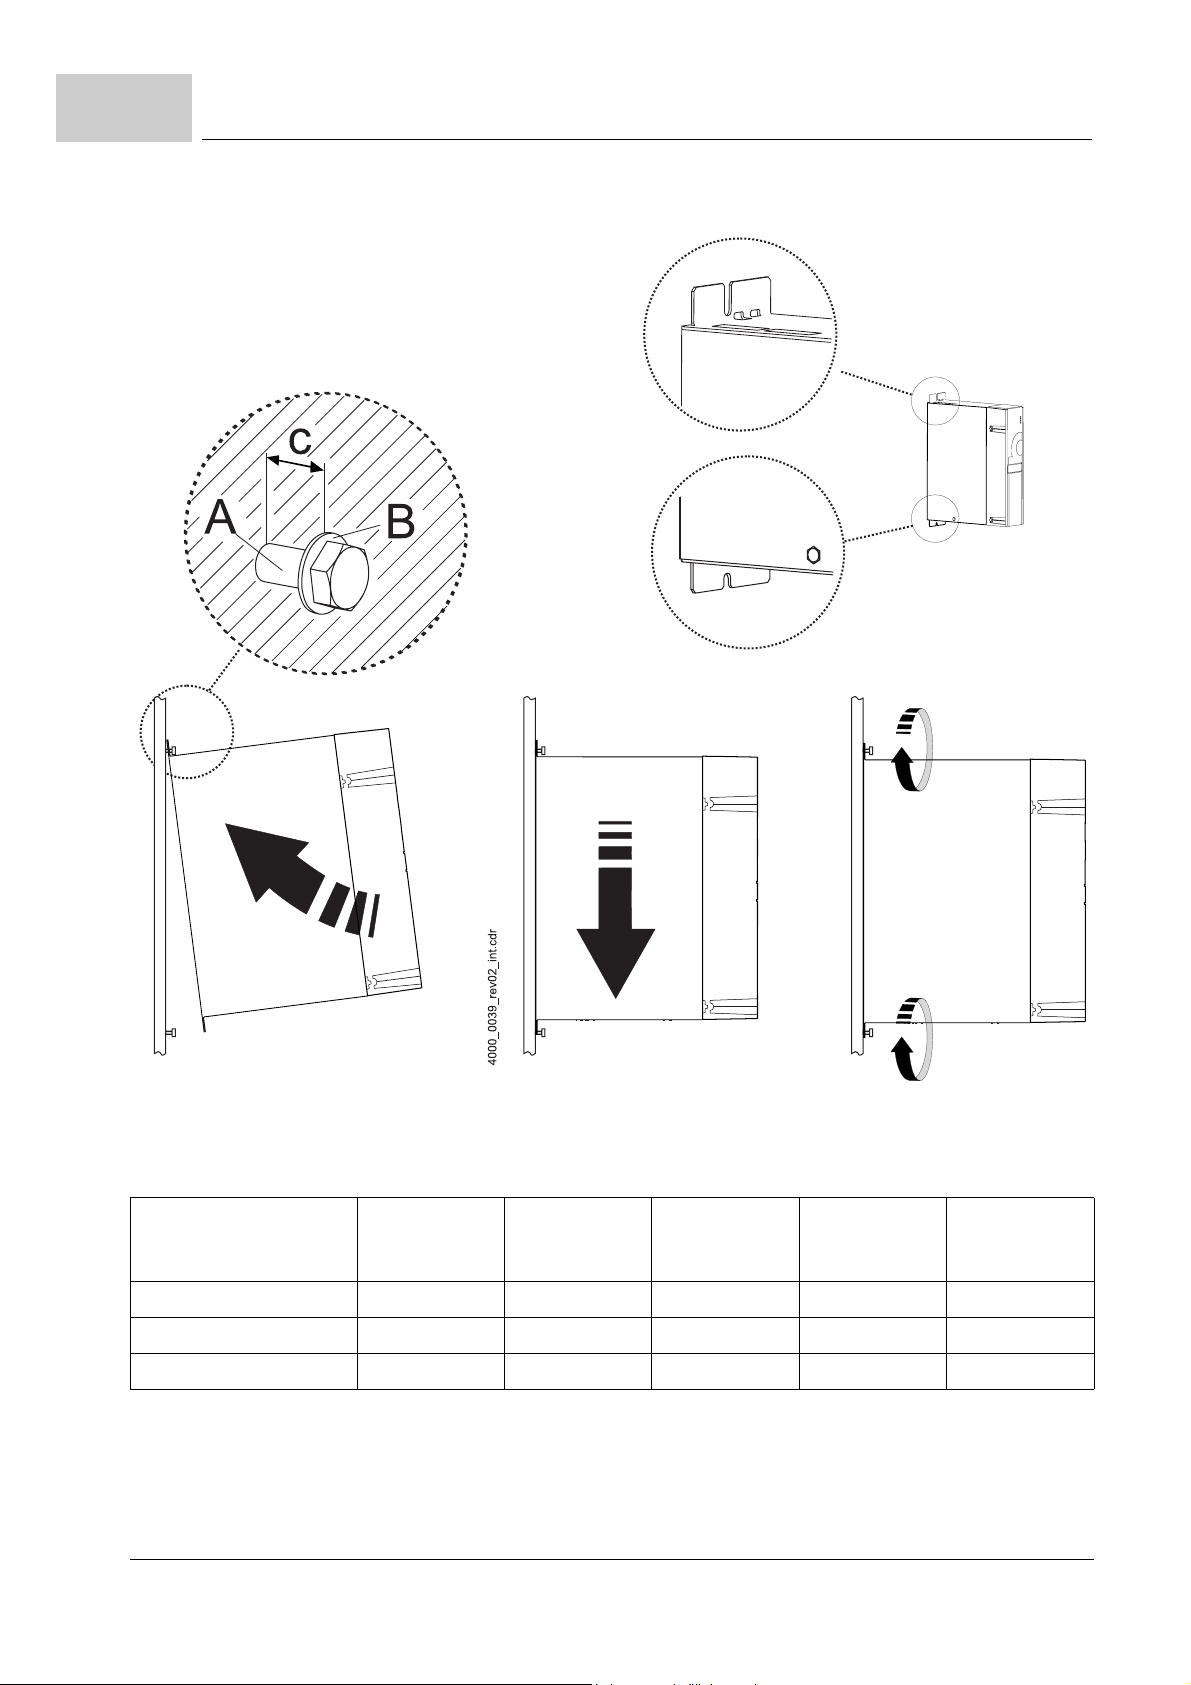
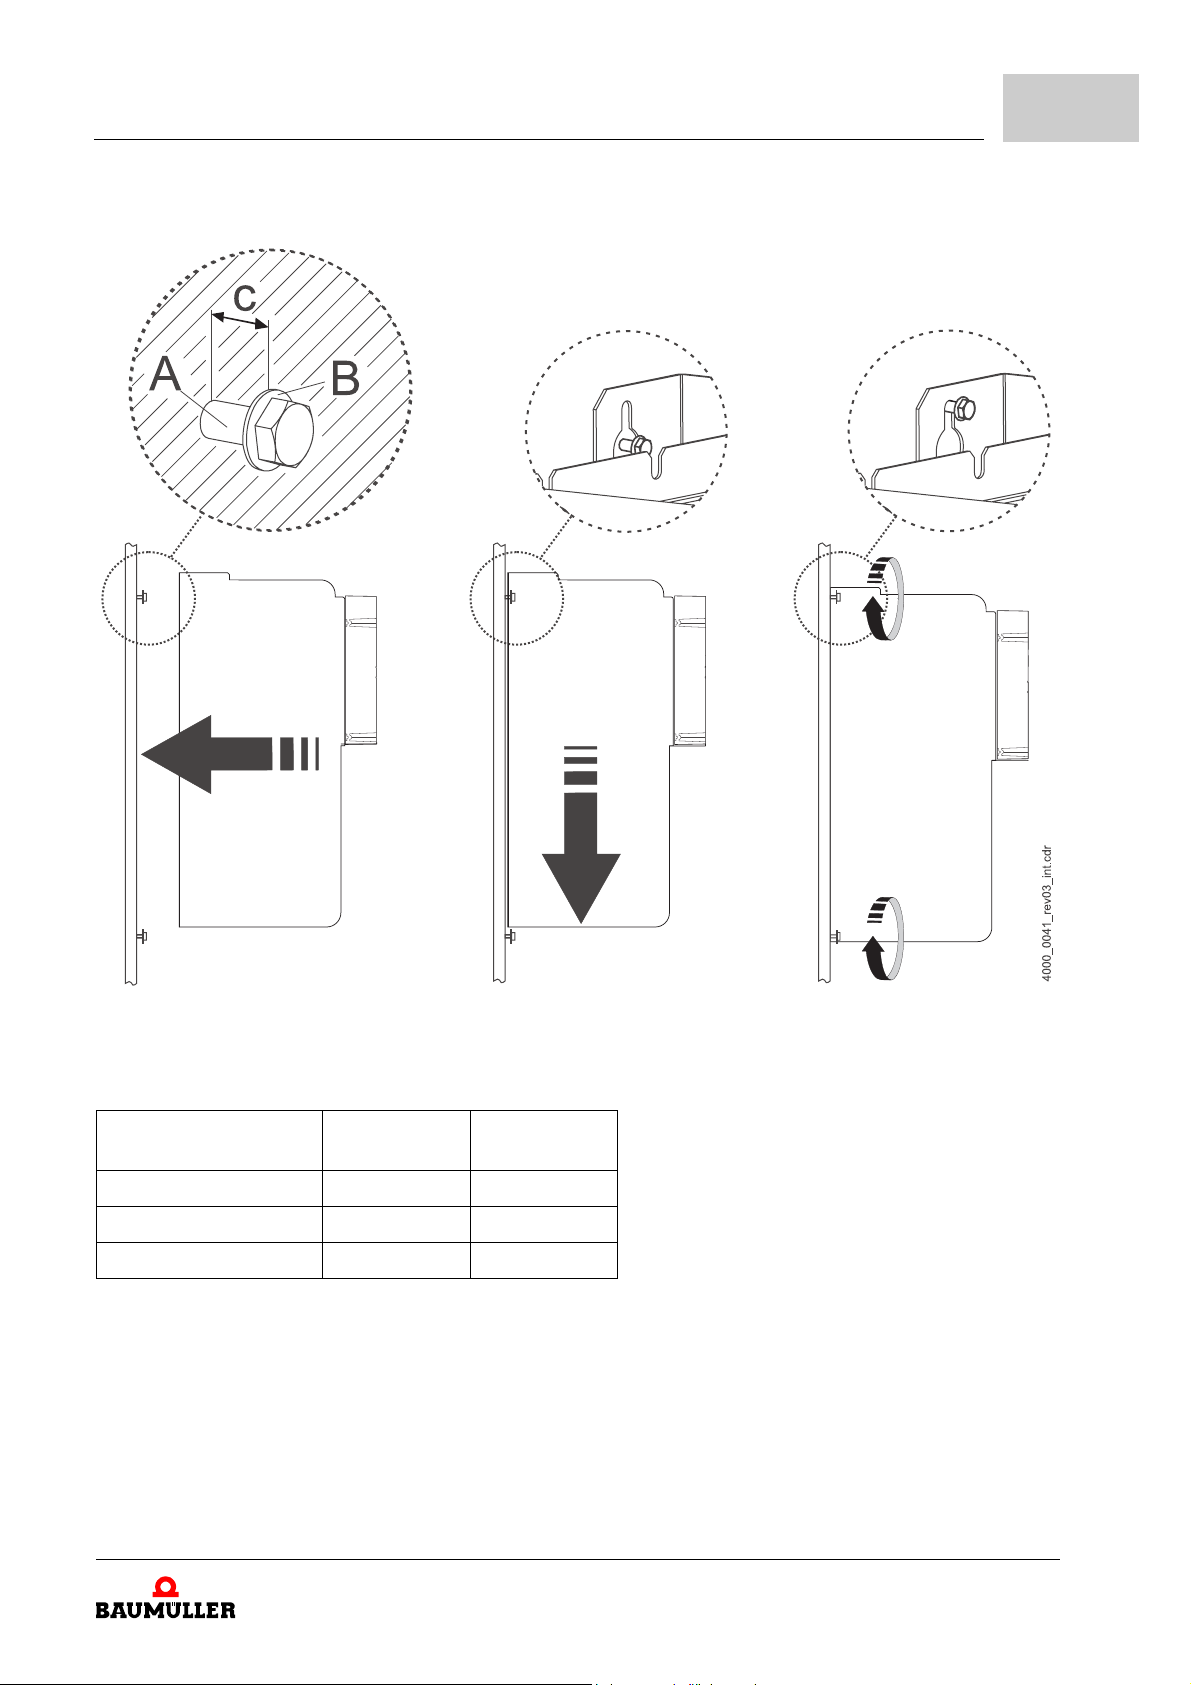
Figure 2: Mounting instruction BM441X, BM442X-S, BM443X-S/Z, BM463X-S/Z, BM444X-S/Z, BM464X-S/Z
Device BM441X-XXX
-XO
BM441X-XXX
-X2
BM442X-S BM443X-S/Z
BM463X-S/Z
BM444X-S/Z
BM464X-S/Z
-X1
A - screws 2 x M5 4 x M5 4 x M5 4 x M5 4 x M5
B - washers 2 x (5.3 x 10) 4 x (5.3 x 10) 4 x (5.3 x 10) 4 x (5.3 x 10) 4 x (5.3 x 15)
C - mount spacing c = 5 mm c = 5 mm c = 5 mm c = 5 mm c = 5 mm
14
of 94
Compact manual b maXX® BM4400, BM4600, BM4700
Document no.: 5.06014.02 Baumüller Nürnberg GmbH
Page 15
Mounting
4
Figure 3: Mounting instruction BM445X-S/Z, BM465X-S/Z, BM446X-S/Z and BM466X-S/Z
Device BM445X-S/Z
BM465X-S/Z
A - screws 4 x M8 4 x M8
B - washers 4 x (8.4 x 17) 4 x (8.4 x 17)
C - mount spacing c = 7 mm c = 7 mm
BM446X-S/Z
BM466X-S/Z
Compact manual b maXX® BM4400, BM4600, BM4700
Document no.: 5.06014.02
15
of 94
Page 16
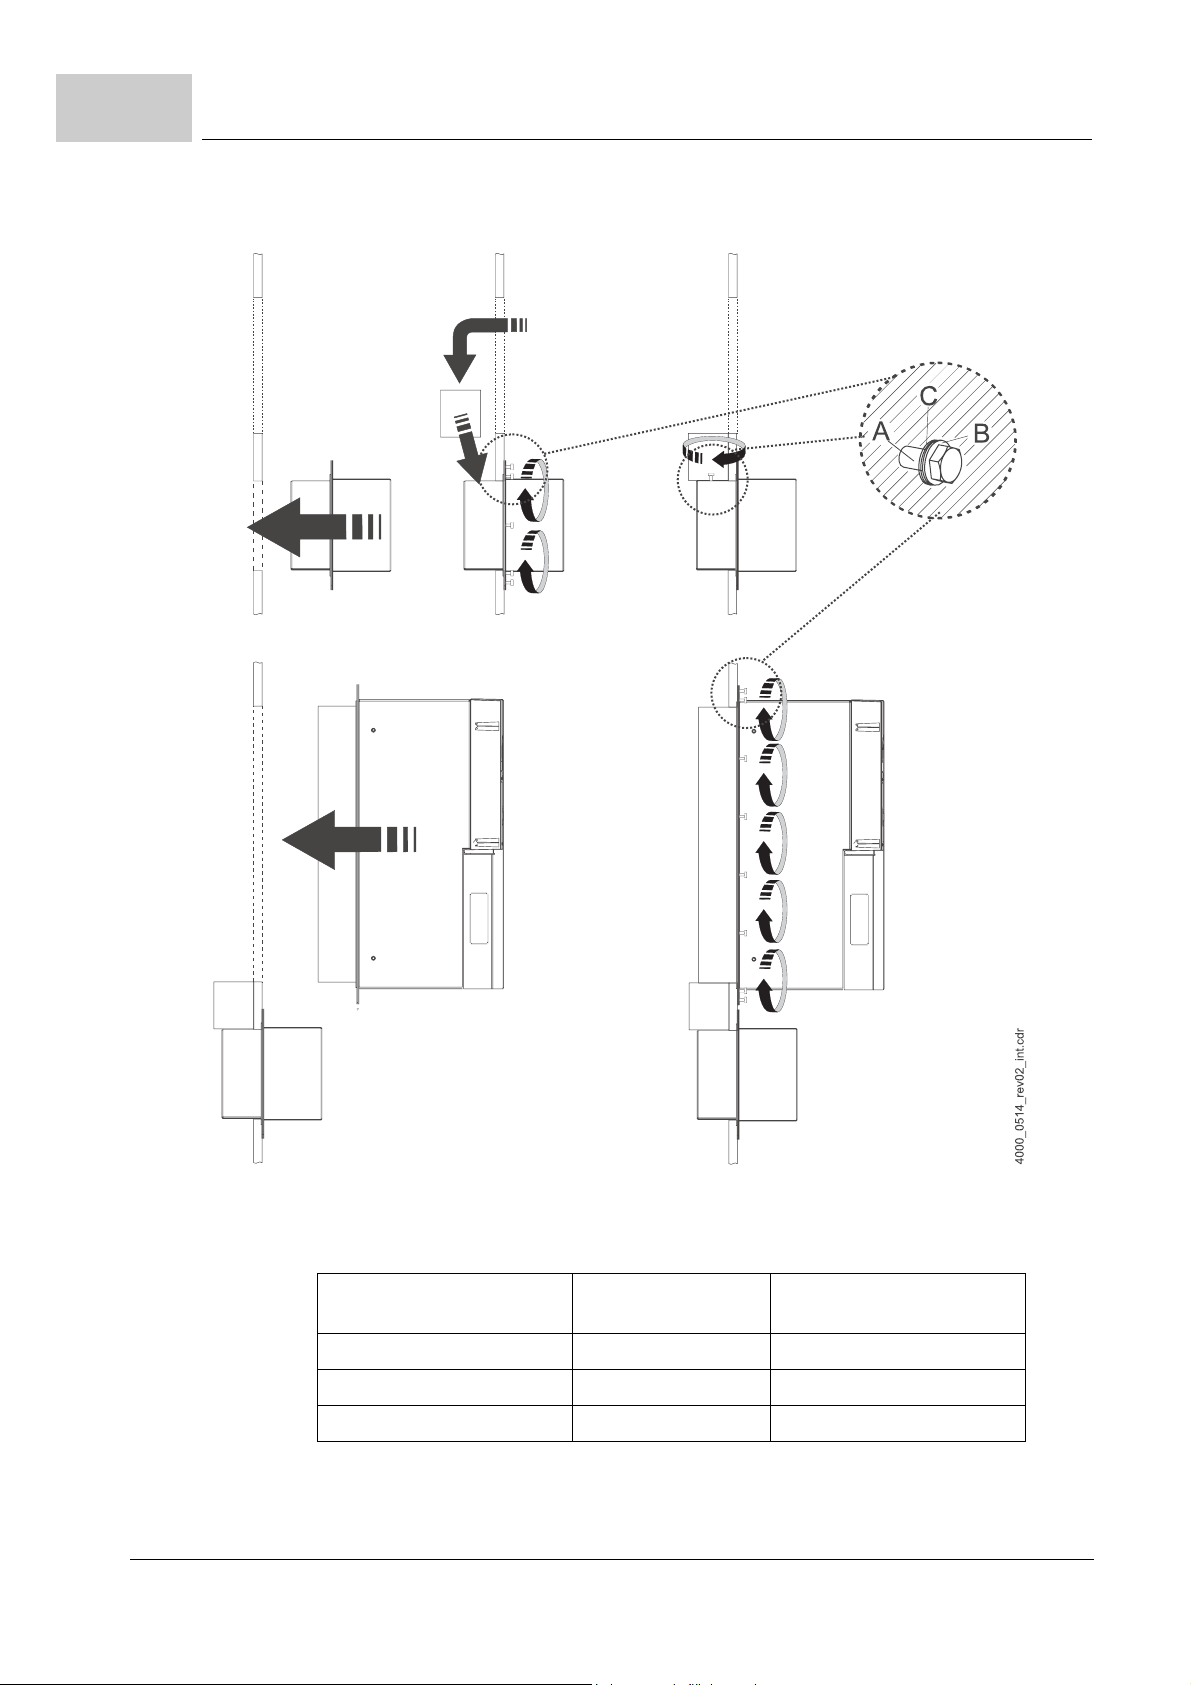
Figure 4: Mounting instruction BM447X-A/F and BM477X-FXX-3XXXX
Device BM447X-S/A BM447X-F
A - screws 38 x M6 22 x M6
B - conical spring washers 38 x DIN6796-6-FST 22 x DIN6796-6-FST
C - washers 38 x (6.4 x 12.5) 22 x (6.4 x 12.5)
BM477X-FXX-3XXXX
16
of 94
Compact manual b maXX® BM4400, BM4600, BM4700
Document no.: 5.06014.02 Baumüller Nürnberg GmbH
Page 17
Mounting
4
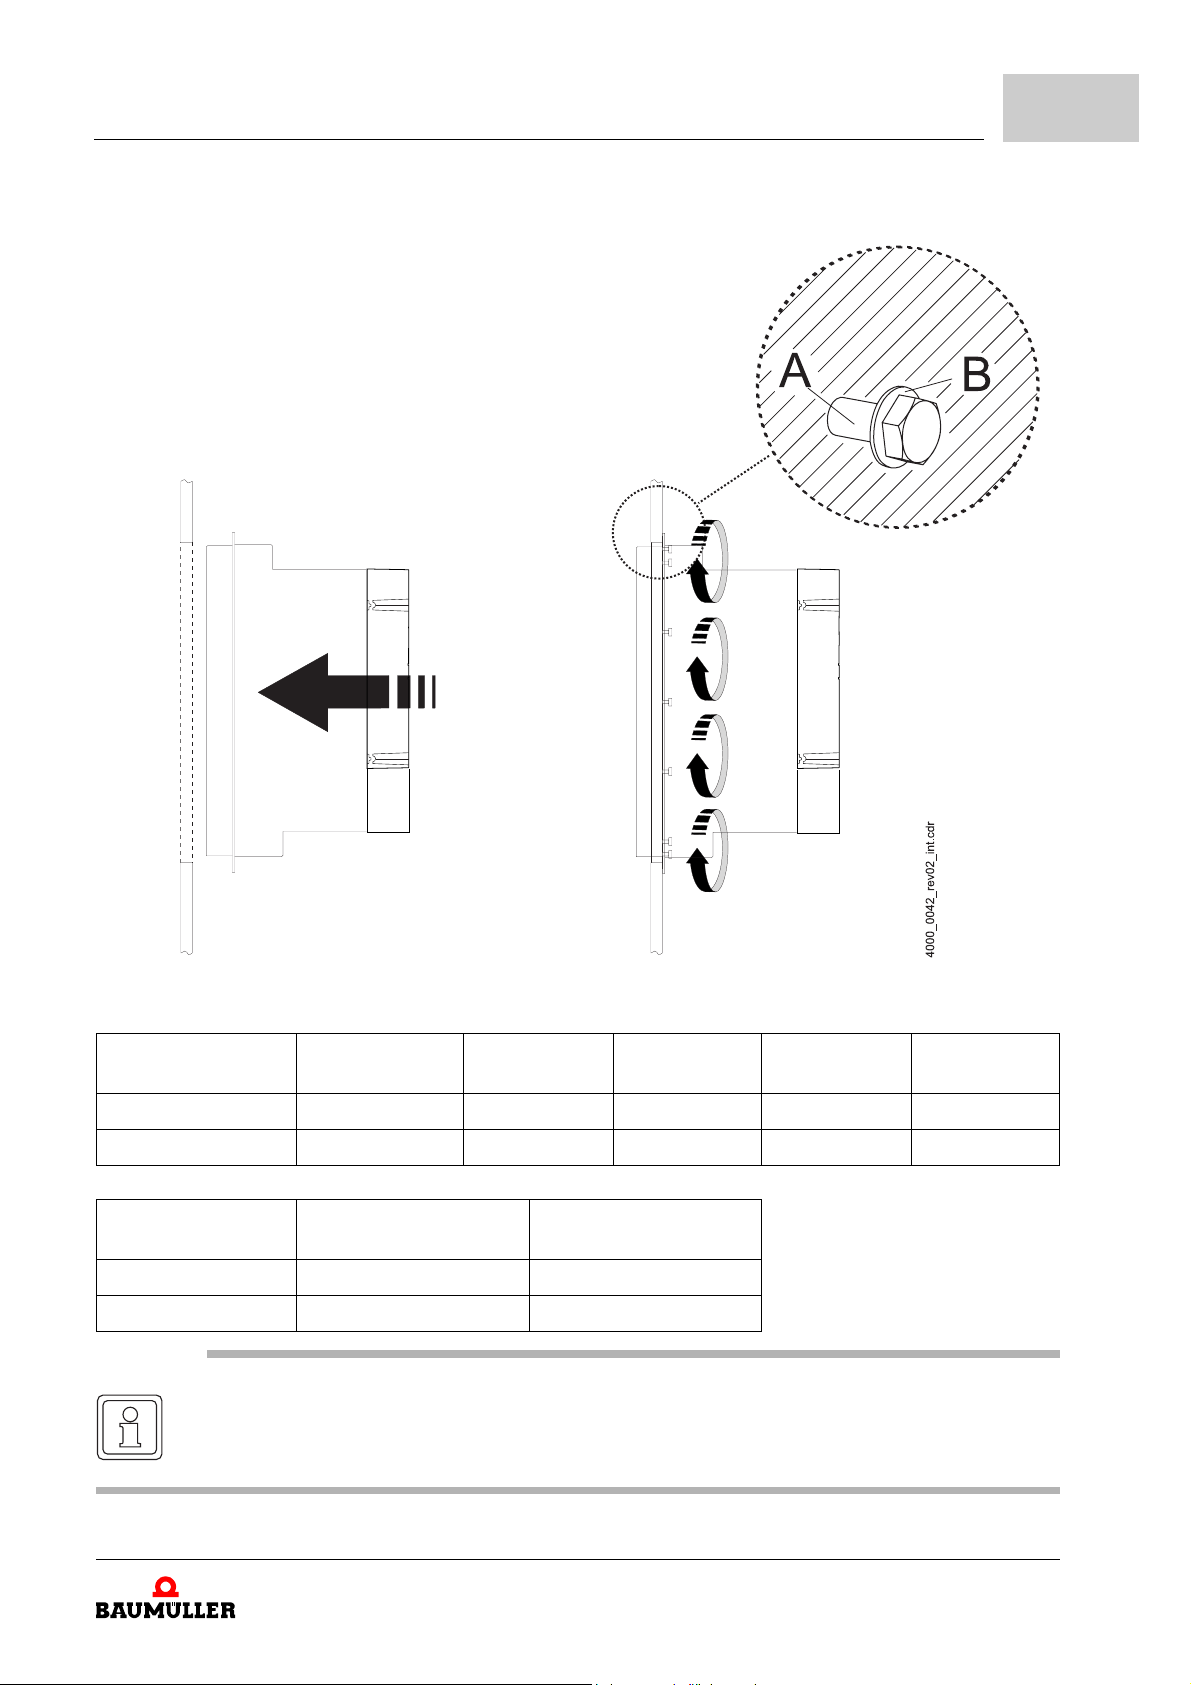
Figure 5: Mounting instruction ’miscellaneous’
Device BM454X-A/F/Z/C BM443X-A/F/C
BM463X-A/F
A - screws 4 x M5 14 x M4 16 x M5 16 x M8 20 x M8
B - washers 4 x (5.3 x 10) 14 x (4.3 x 9) 16 x (5.3 x 15) 16 x (8.4 x 17) 20 x (8.4 x 17)
Device BM465X-FXX-3XXXX
BM475X-FXX-3XXXX
A - screws 18x M6 18 x M8
B - washers 18 x (6,4x17) 18 x (8,4x21)
NOTE
At the types BM4XXX-F and BM4XXX-Z, which have got water cooling, do not forget to connect the cooling circuit to the heat sink on the reverse side of the devices.
BM466X-FXX-3XXXX
BM476X-FXX-3XXXX
BM444X-A/F
BM464X-A/F
BM445X-A/F
BM465X-A/F
BM446X-A/F
BM466X-A/F
Compact manual b maXX® BM4400, BM4600, BM4700
Document no.: 5.06014.02
17
of 94
Page 18

18
of 94
Compact manual b maXX® BM4400, BM4600, BM4700
Document no.: 5.06014.02 Baumüller Nürnberg GmbH
Page 19

5
5INSTALLATION
The important data for the dimensioning of the electric connections are to be found in the
manual.
Compact manual b maXX® BM4400, BM4600, BM4700
Document no.: 5.06014.02
19
of 94
Page 20
5.1
Connection diagram
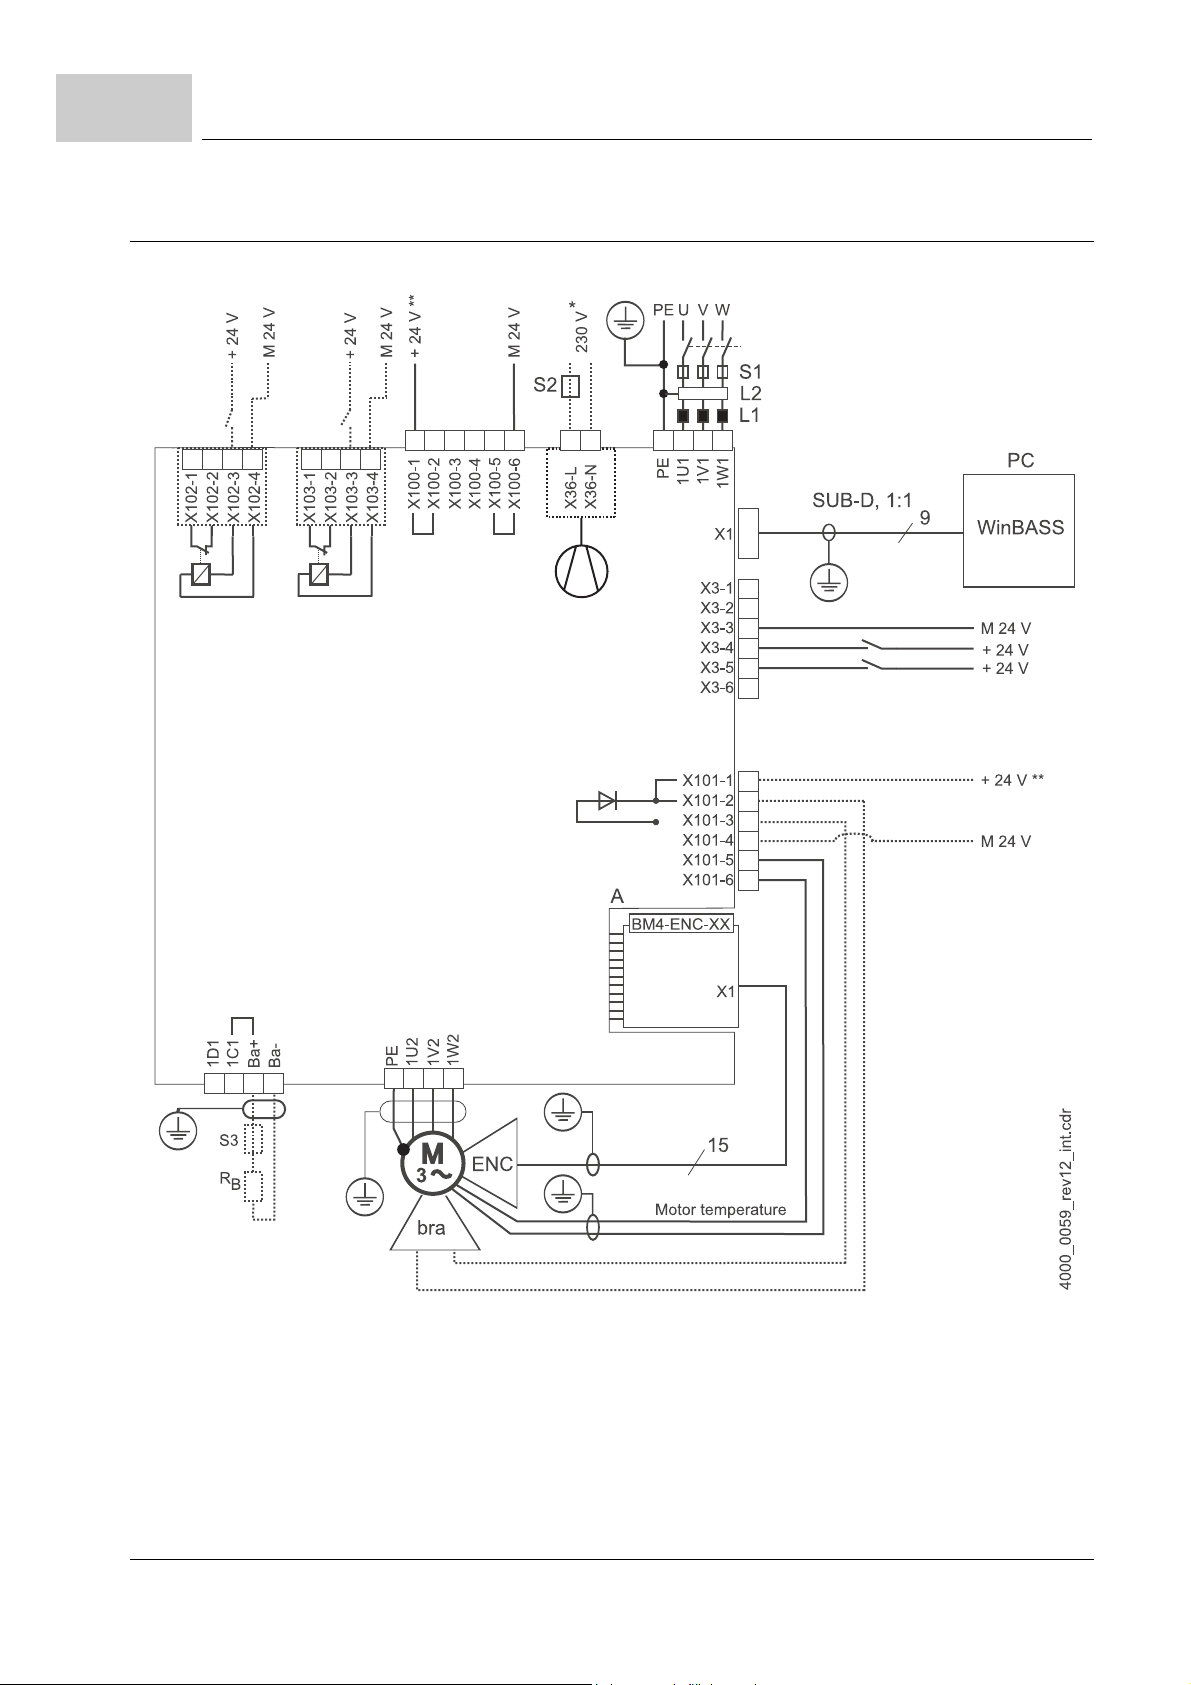
5.1 Connection diagram
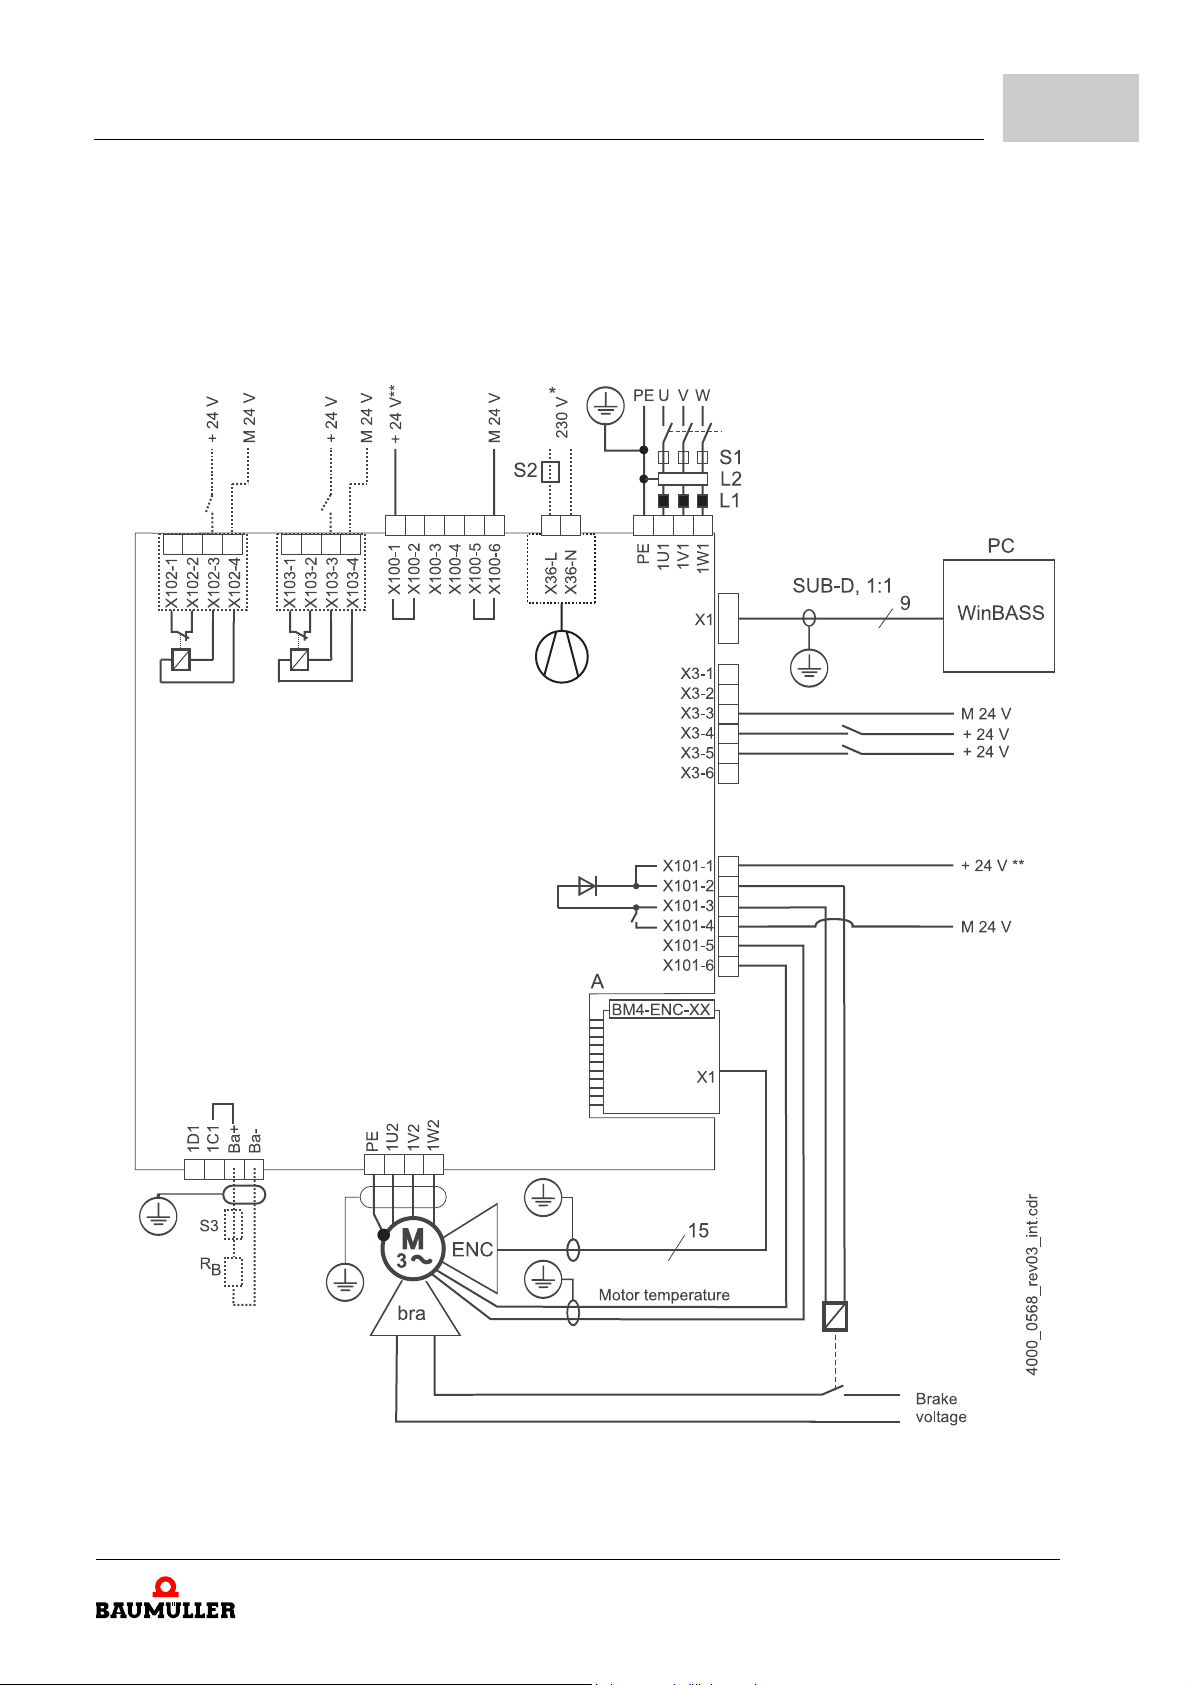
Figure 6: Connection diagram with a directly controlled motor brake
20
of 94
Compact manual b maXX® BM4400, BM4600, BM4700
Document no.: 5.06014.02 Baumüller Nürnberg GmbH
Page 21
Installation
Additional relay i s n ec essar y onl y if the voltage of the brake is ≠24V, if the current of the
brake is greater than t he switch ing capacity of X101 or i f you consi der UL508C and t he
current of the brake is greater 4 A.
Perhaps consider a limited operating voltage range of the brak e because of the interna l
voltage drop to max. 2.6 V.
5
Figure 7: Connection diagram with motor brake controlled via an additional relay.
Compact manual b maXX® BM4400, BM4600, BM4700
Document no.: 5.06014.02
21
of 94
Page 22

5.1
Connection diagram
* is only valid for BM444X, BM445X and BM446X accordingly the cooling versions S and A.
for BM447X cooling type -A:
Figure 8: Connection fan BM447X-A
** The power supply at X100 or X101 must be fused external. At the selection of the fuse you
must consider the cross-section of the connecting cable and the maximum allowable load
capacity.
In case you consider UL 508 C, you must limit the power supply to 100 W or fuse it with a UL-
listed 4 A fuse.
Ba- ... 1D1 Connections for chopper resistor and DC link, see ZFigure 9– on page 23 and the following.
R
B
PE....1W1 Mains connection, see ZFigure 9– on page 23 ff.
S1 Fuses (circuit cable + device)
S2 Fuse (fan) *)
L1 Mains choke (not necessary for BM441X and BM442X except BM4426)
L2 Mains filter
X1 Serial interface (RS 232), see ZFigure 18– on page 32.
X3 Connections for ready-for-use, quickstop, pulse enable, see ZFigure 18– on page 32.
X36 Connections for fan (only BM444X-S/-A, BM445X-S/-A, BM446X-S/-A, BM447X-A)
X100 Connections for 24 power supply, further information see ZFigure 18– on page 32 (SELV/
X101 Connections for brake, motor temperature, see ZFigure 9– on page 23 and the following
X102 Connections of the safety relay, see ZFigure 9– on page 23 and the following (SELV/PELV)
X103 Connections of the optional, second safety relay (only BM443X - BM447X)
A:X1 Encoder module, see manual 5.01042 (SELV/PELV)
Chopper resistor
PELV)
(SELV/PELV)
ENC Encoder
BRE Brake
PE....1W2 Connections for motor, see ZFigure 9– on page 23 ff.
22
of 94
Compact manual b maXX® BM4400, BM4600, BM4700
Document no.: 5.06014.02 Baumüller Nürnberg GmbH
Page 23
5.2 Connection diagrams
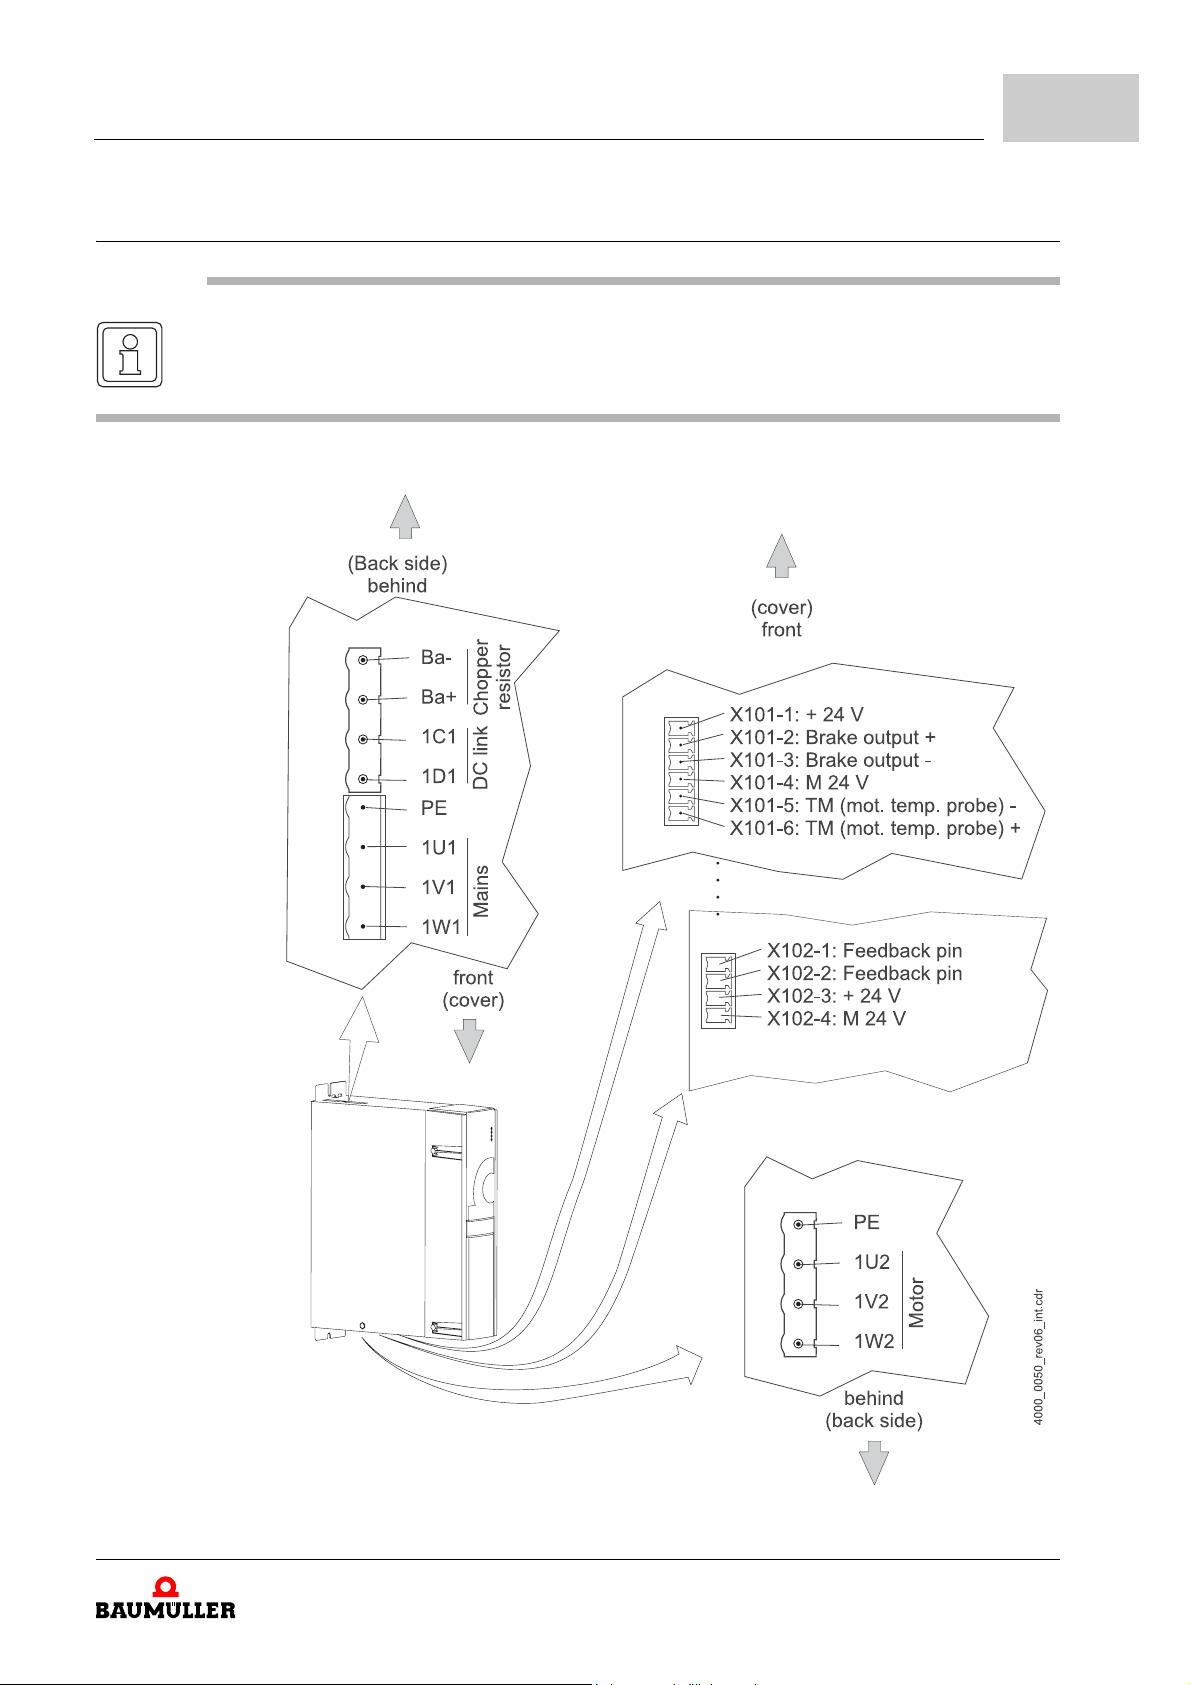
NOTE
When having a s wi tc hed-o ff s afe ty re lay , it is no t po ss ib le at BM 441X and BM442X to use a
chopper resistor.
The electrical connectio ns for devic es BM4412 and BM4413 are shown in the following
figure:
Installation
5
Figure 9: Electrical connections for mains, motor, upon others for BM4412 and BM4413
Compact manual b maXX® BM4400, BM4600, BM4700
Document no.: 5.06014.02
23
of 94
Page 24
5.2
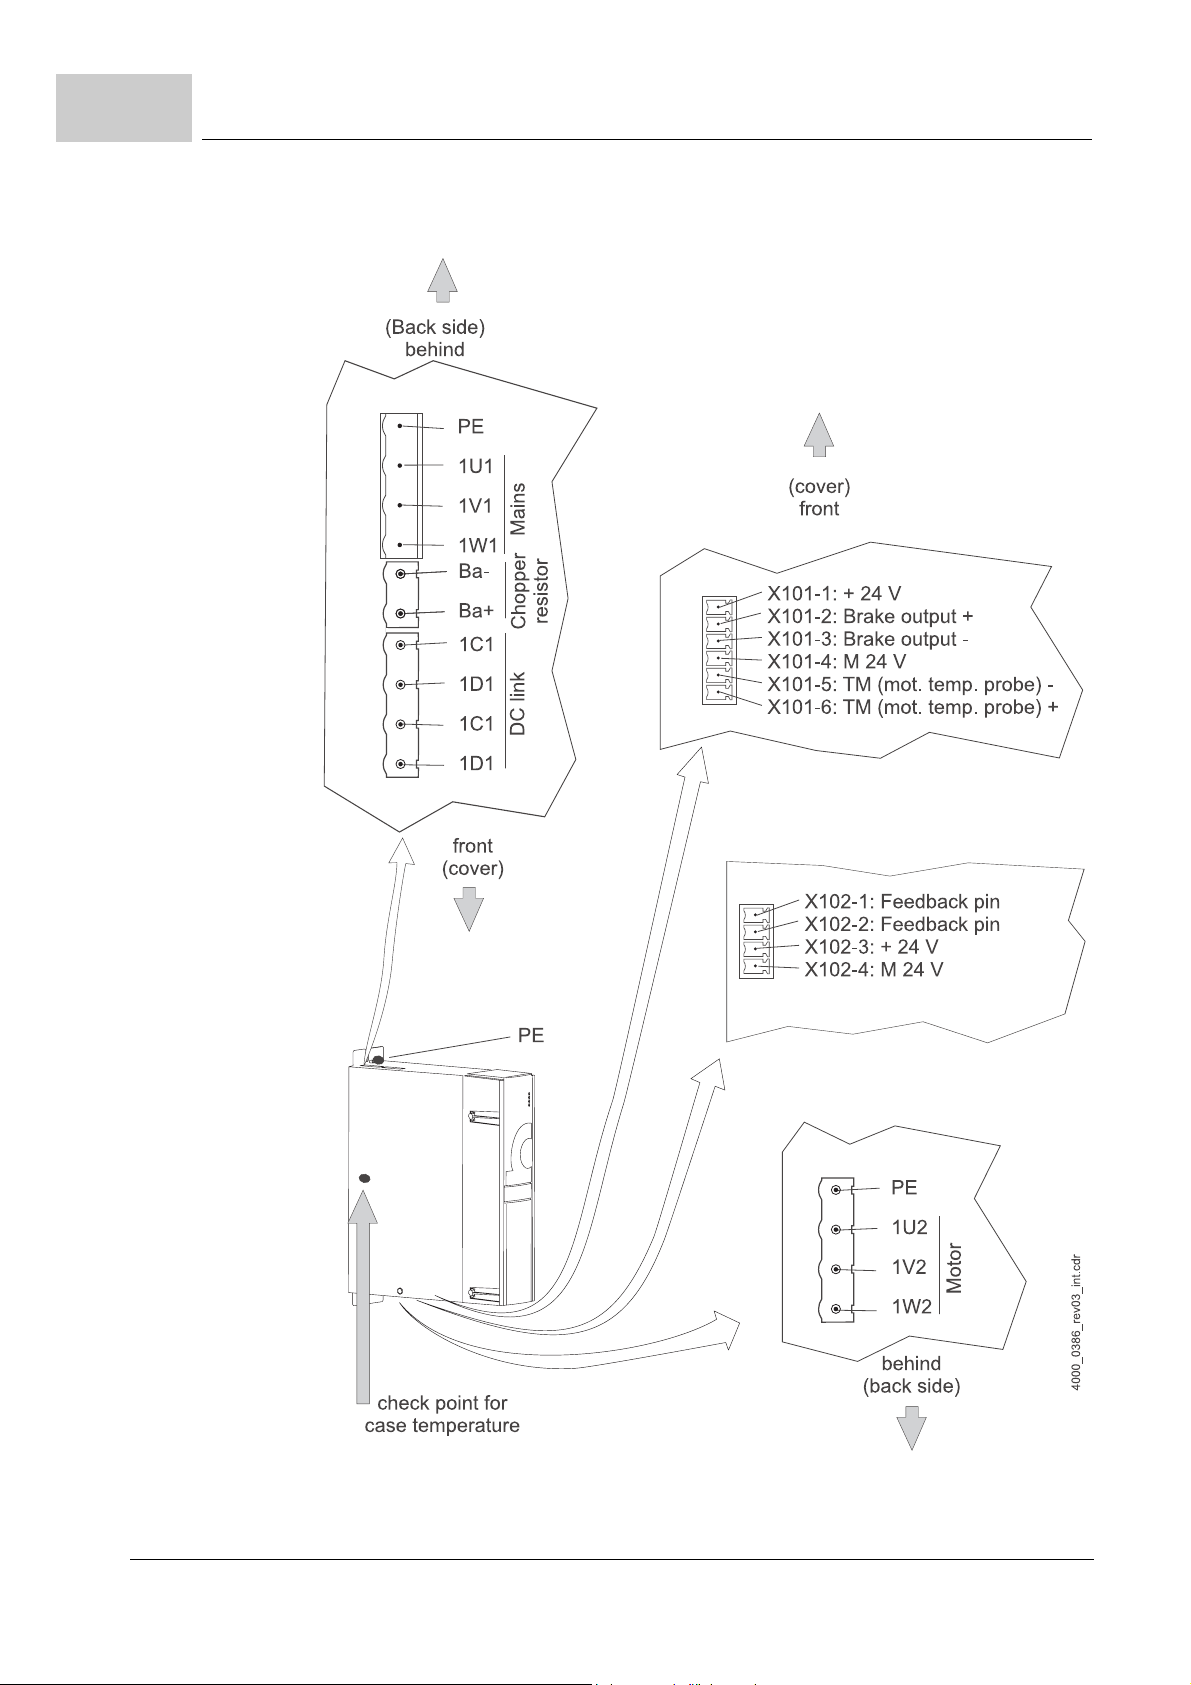
Connection diagrams
The electrical connections for device BM4414 are shown in the following figure:
24
of 94
Figure 10: Electrical connections for mains, motor, upon others for BM4414
Compact manual b maXX® BM4400, BM4600, BM4700
Document no.: 5.06014.02 Baumüller Nürnberg GmbH
Page 25

Installation
The electrical connections for device BM442X are shown in the following figure:
5
Figure 11: Electrical connections for mains, motor, upon others for BM442X
Compact manual b maXX® BM4400, BM4600, BM4700
Document no.: 5.06014.02
25
of 94
Page 26
5.2
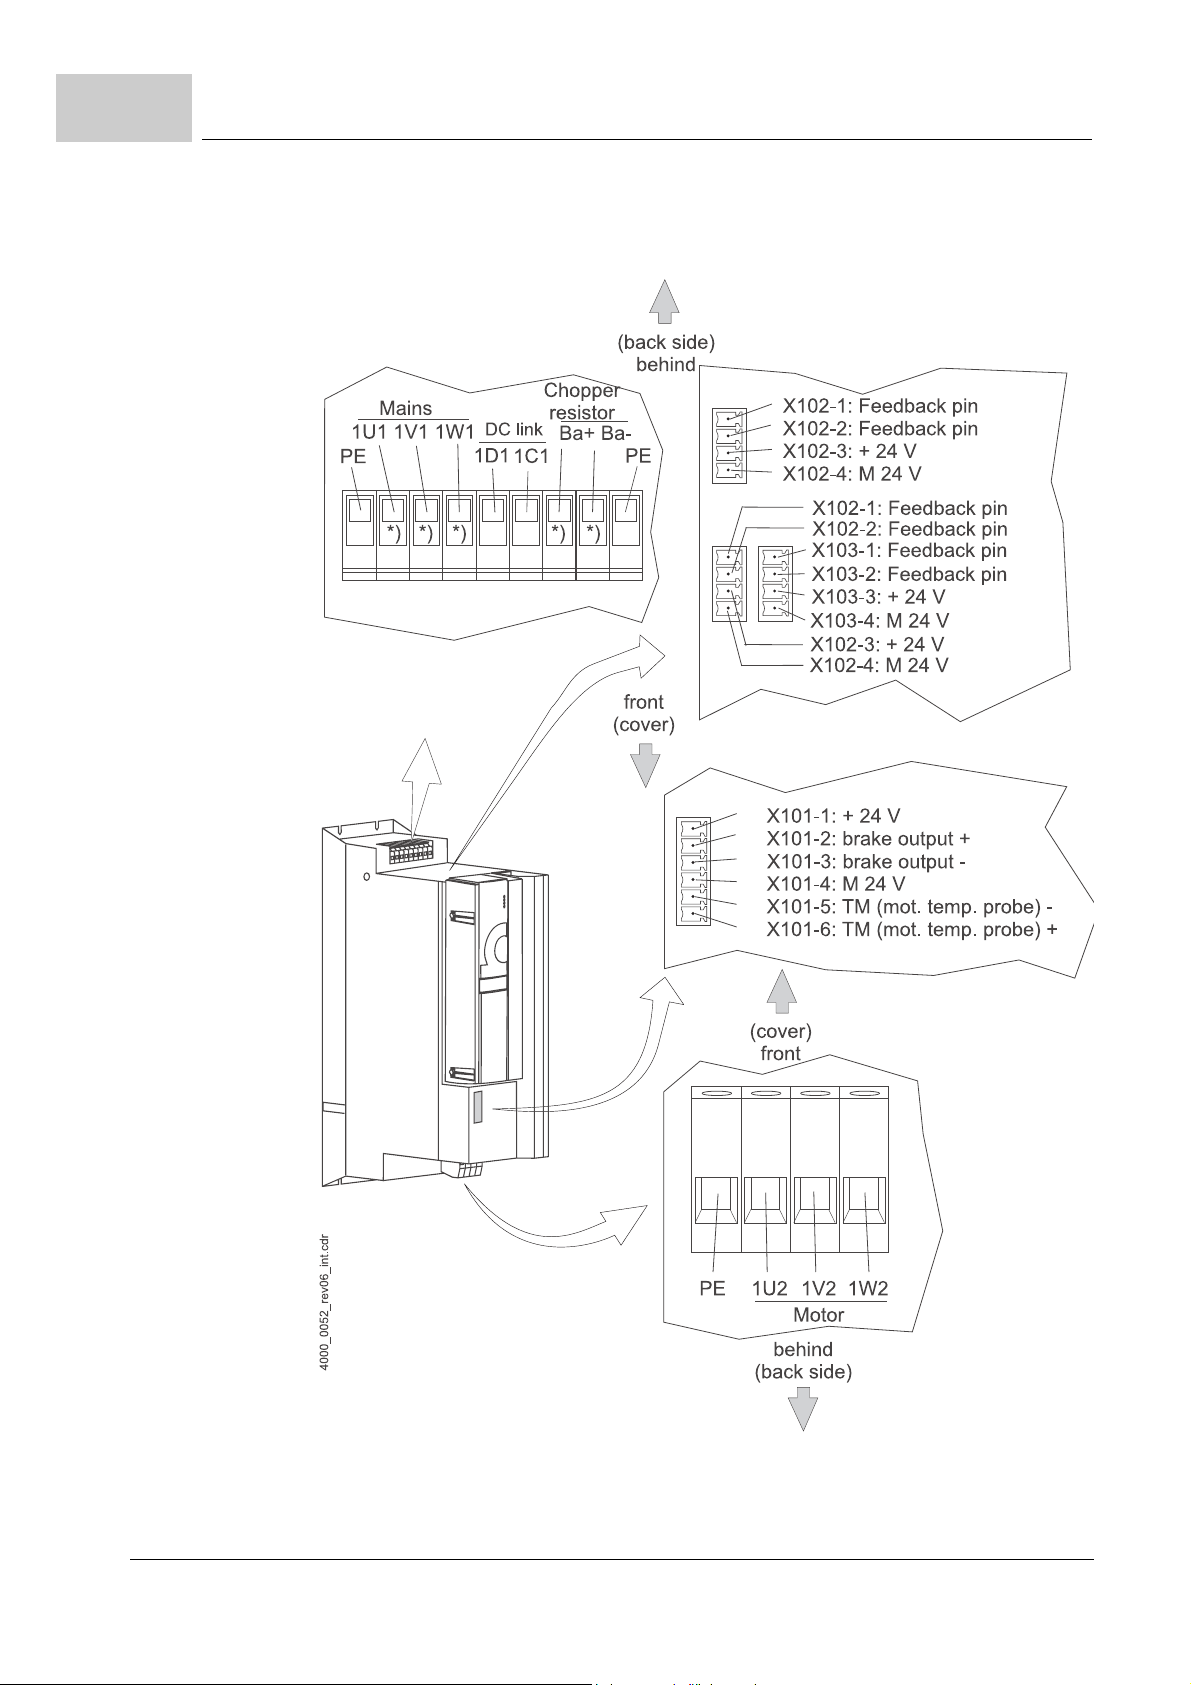
Connection diagrams
The electrical conne ctions for device BM443X and BM463X are shown in the following
figure:
26
of 94
Figure 12: Electrical connections for mains, motor, upon others for BM443X and BM463X
Compact manual b maXX® BM4400, BM4600, BM4700
Document no.: 5.06014.02 Baumüller Nürnberg GmbH
Page 27
Installation
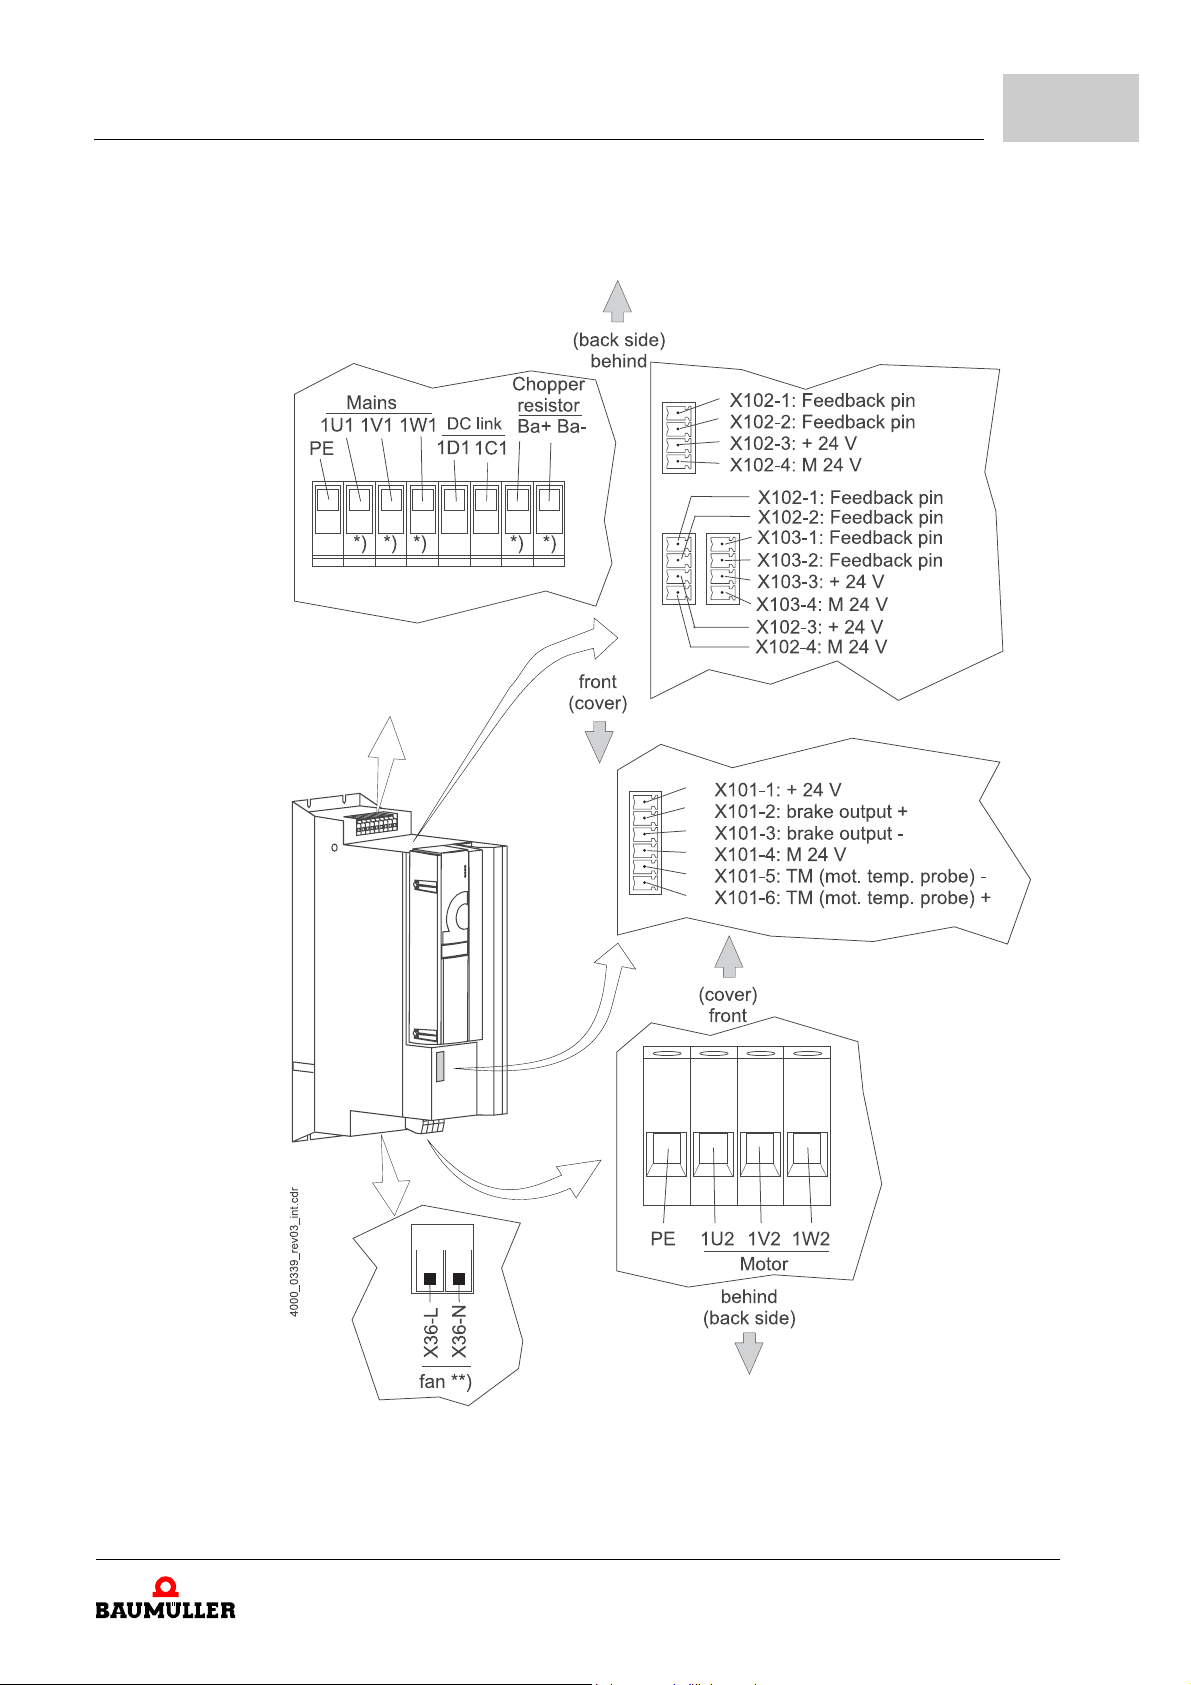
The electrical con nections f or dev ice BM444X and BM 464X are shown in the following
figure:
5
Figure 13: Electrical connections for mains, motor, upon others for BM444X and BM464X
*) only BM444X-S/-A
Compact manual b maXX® BM4400, BM4600, BM4700
Document no.: 5.06014.02
27
of 94
Page 28
5.2
Connection diagrams
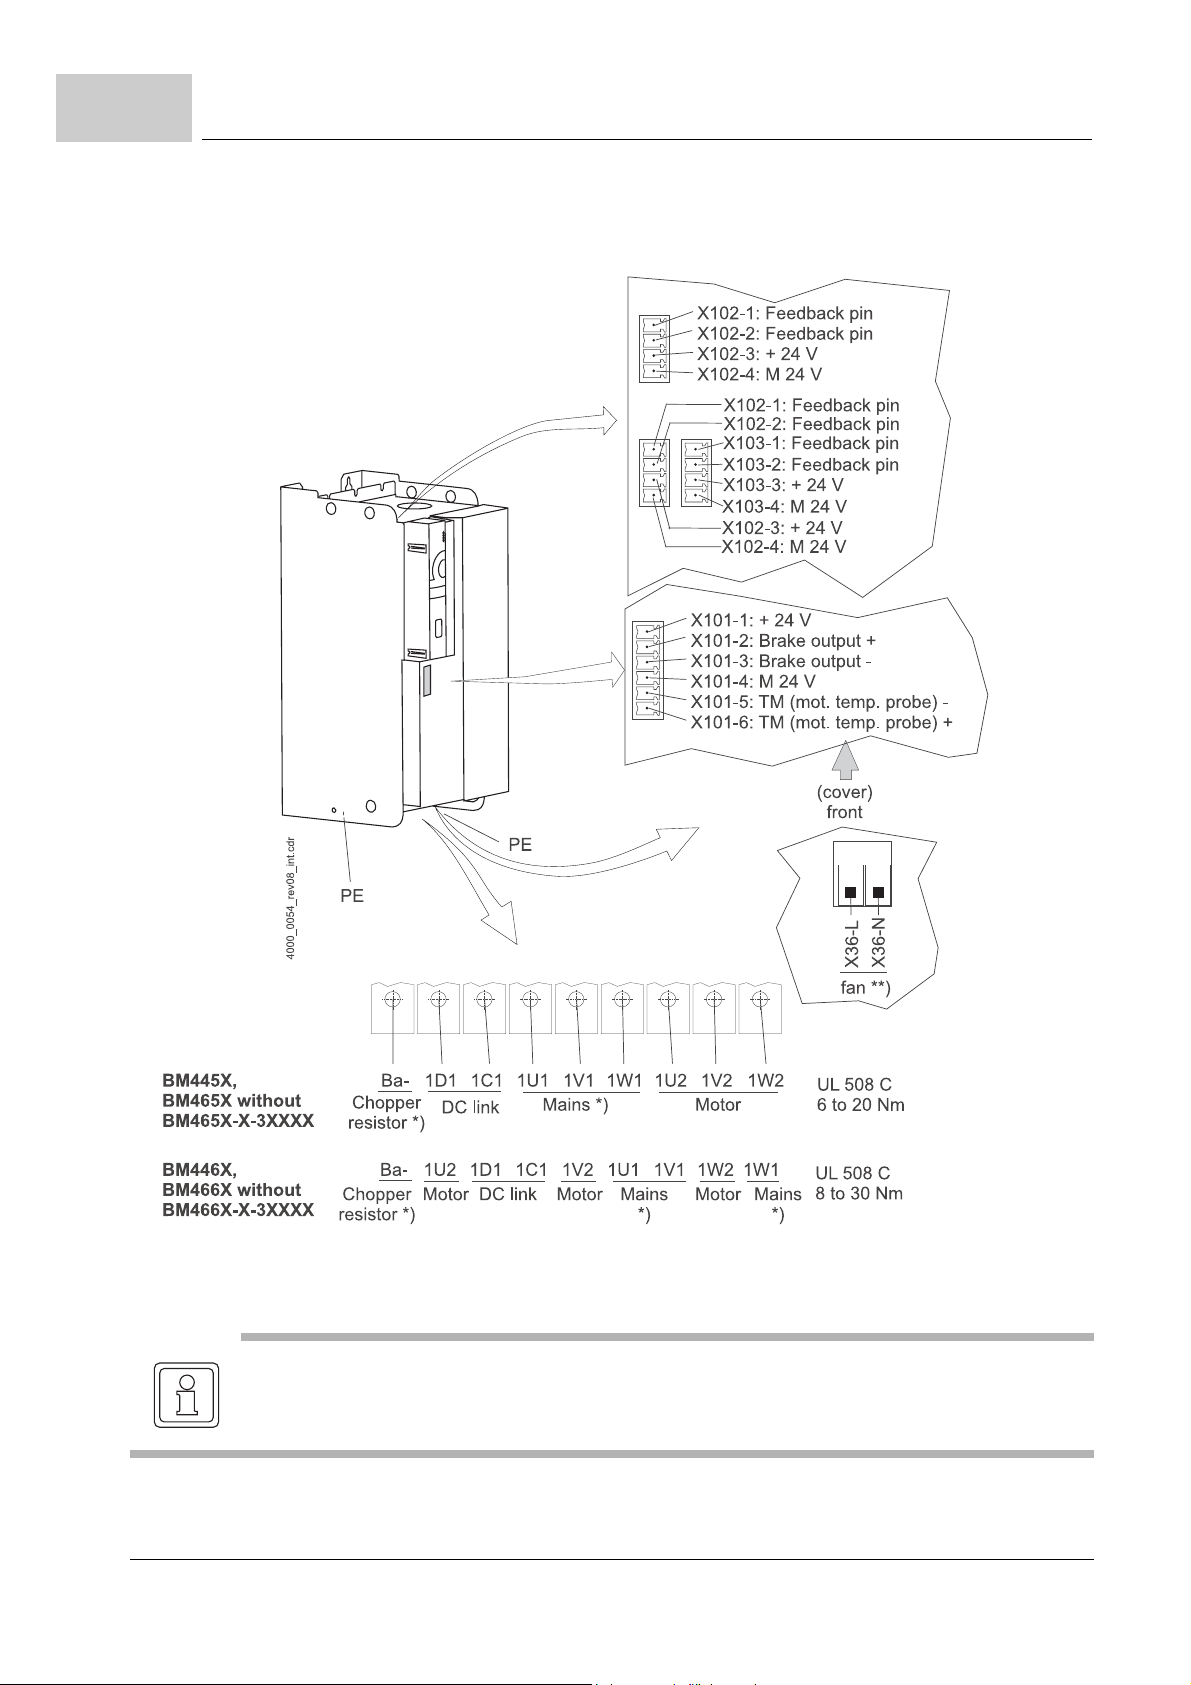
The electrical connections for the devices BM445X, BM465X, BM446X and BM466X are
shown in the following figure:
Figure 14: Electrical connections for mains, motor, upon others for BM445X, BM465X,BM446X and BM466X
28
of 94
*) only BM445X-S/-A and BM446X-S/-A
NOTE
The chopper resistor is connected at the devices BM445X and BM446X between Ba- and 1C1.
Also see ZFigure 6– on page 20.
Compact manual b maXX® BM4400, BM4600, BM4700
Document no.: 5.06014.02 Baumüller Nürnberg GmbH
Page 29
Installation
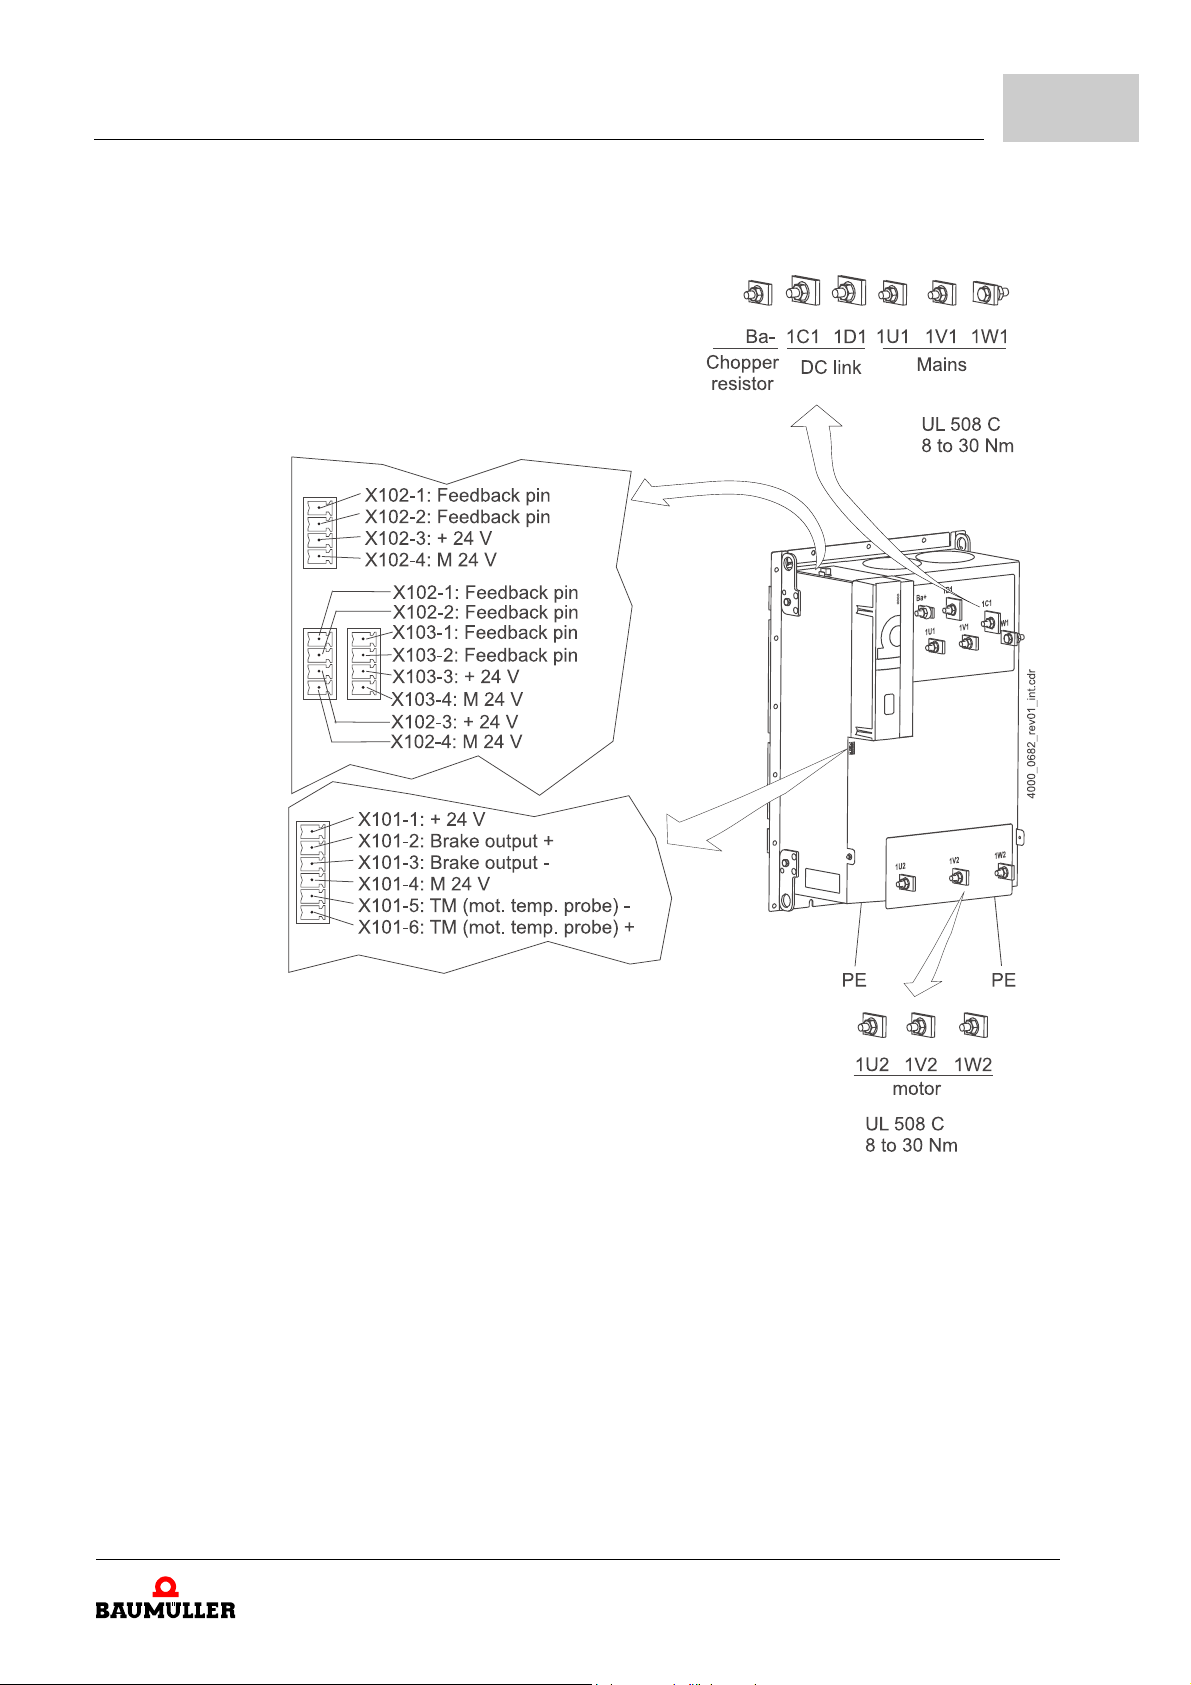
The electrical connections for the device BM466X and BM476X are shown in the following figure:
5
Figure 15: Electrical connections for mains, motor, upon others for BM466X and BM476X
Compact manual b maXX® BM4400, BM4600, BM4700
Document no.: 5.06014.02
29
of 94
Page 30

5.2
Connection diagrams
The electrical connections for the device BM4755 are shown in the following figure:
30
of 94
Figure 16: Electrical connections for mains, motor, upon others for BM4755
Compact manual b maXX® BM4400, BM4600, BM4700
Document no.: 5.06014.02 Baumüller Nürnberg GmbH
Page 31
Installation
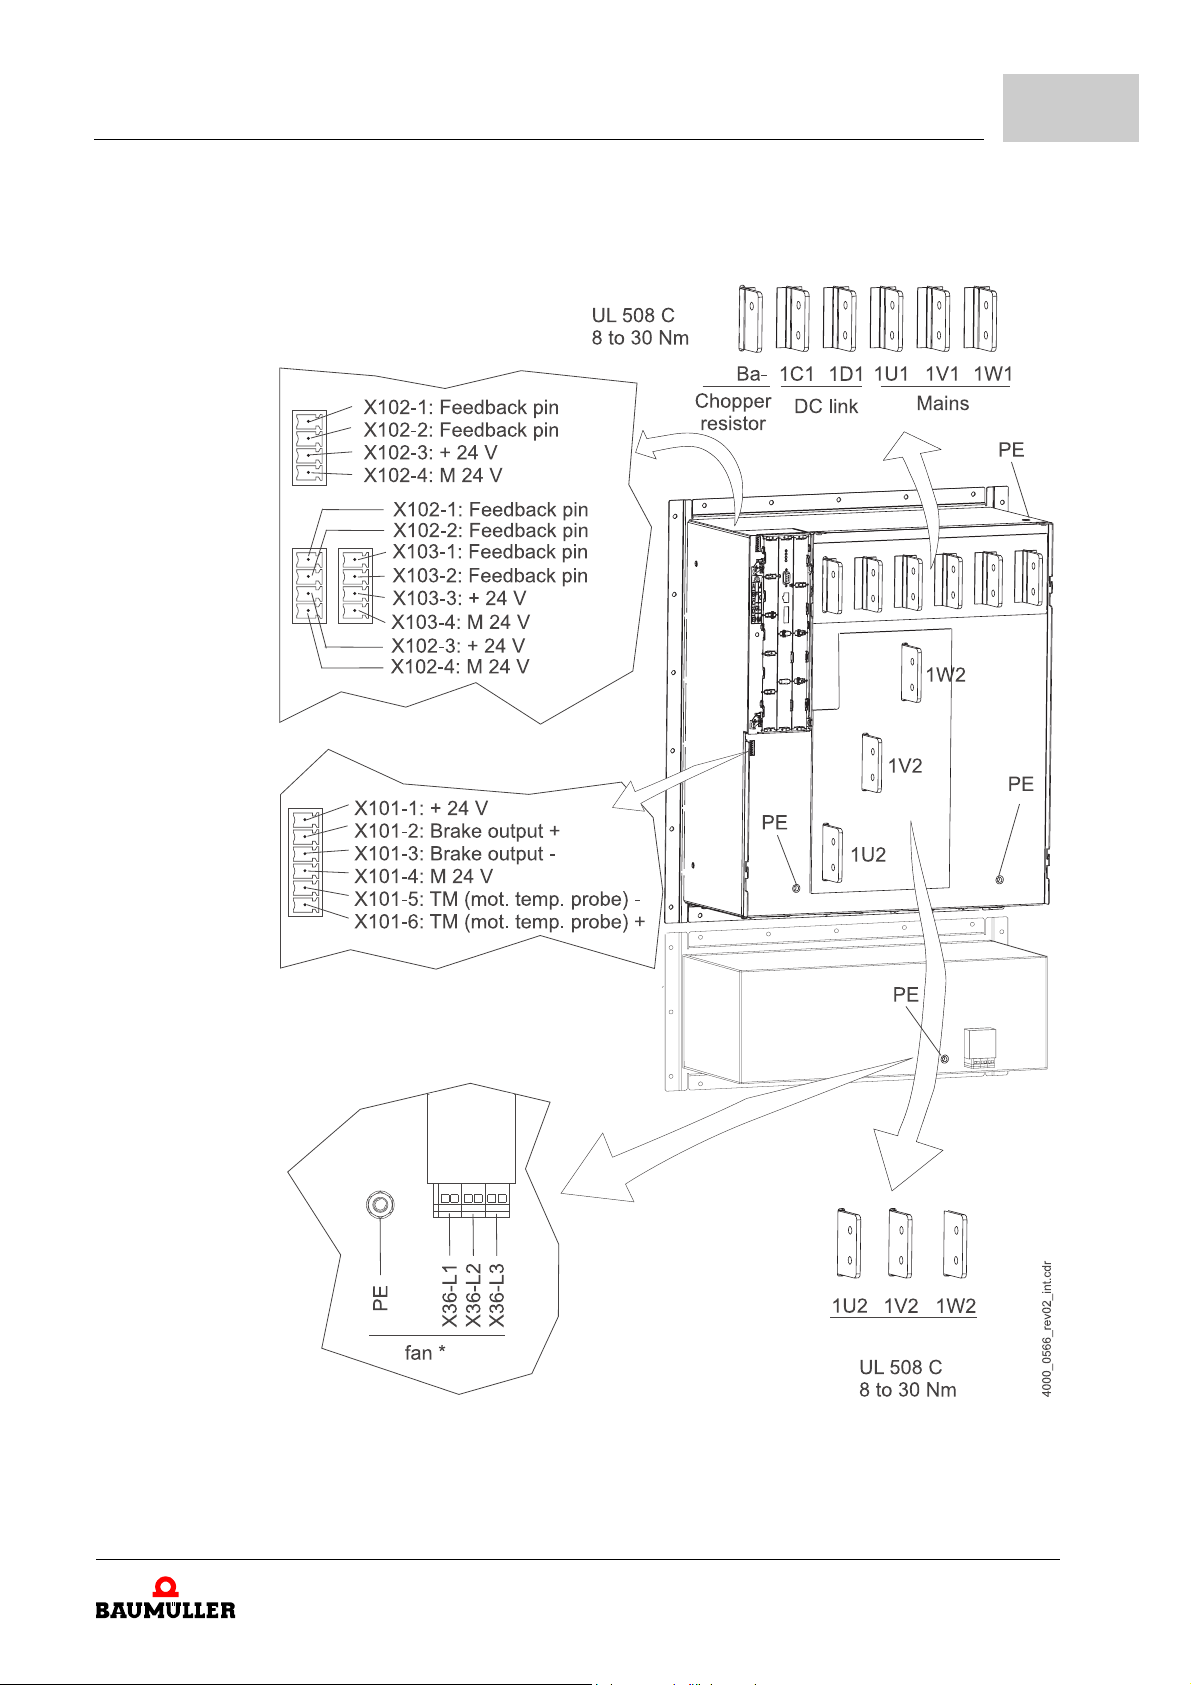
The electrical connections for the device BM447X and BM4773 are shown in the following figure:
5
Figure 17: Electrical connections for mains, motor, upon others for BM447X and BM4773
*)only BM447X-/-A
Compact manual b maXX® BM4400, BM4600, BM4700
Document no.: 5.06014.02
31
of 94
Page 32
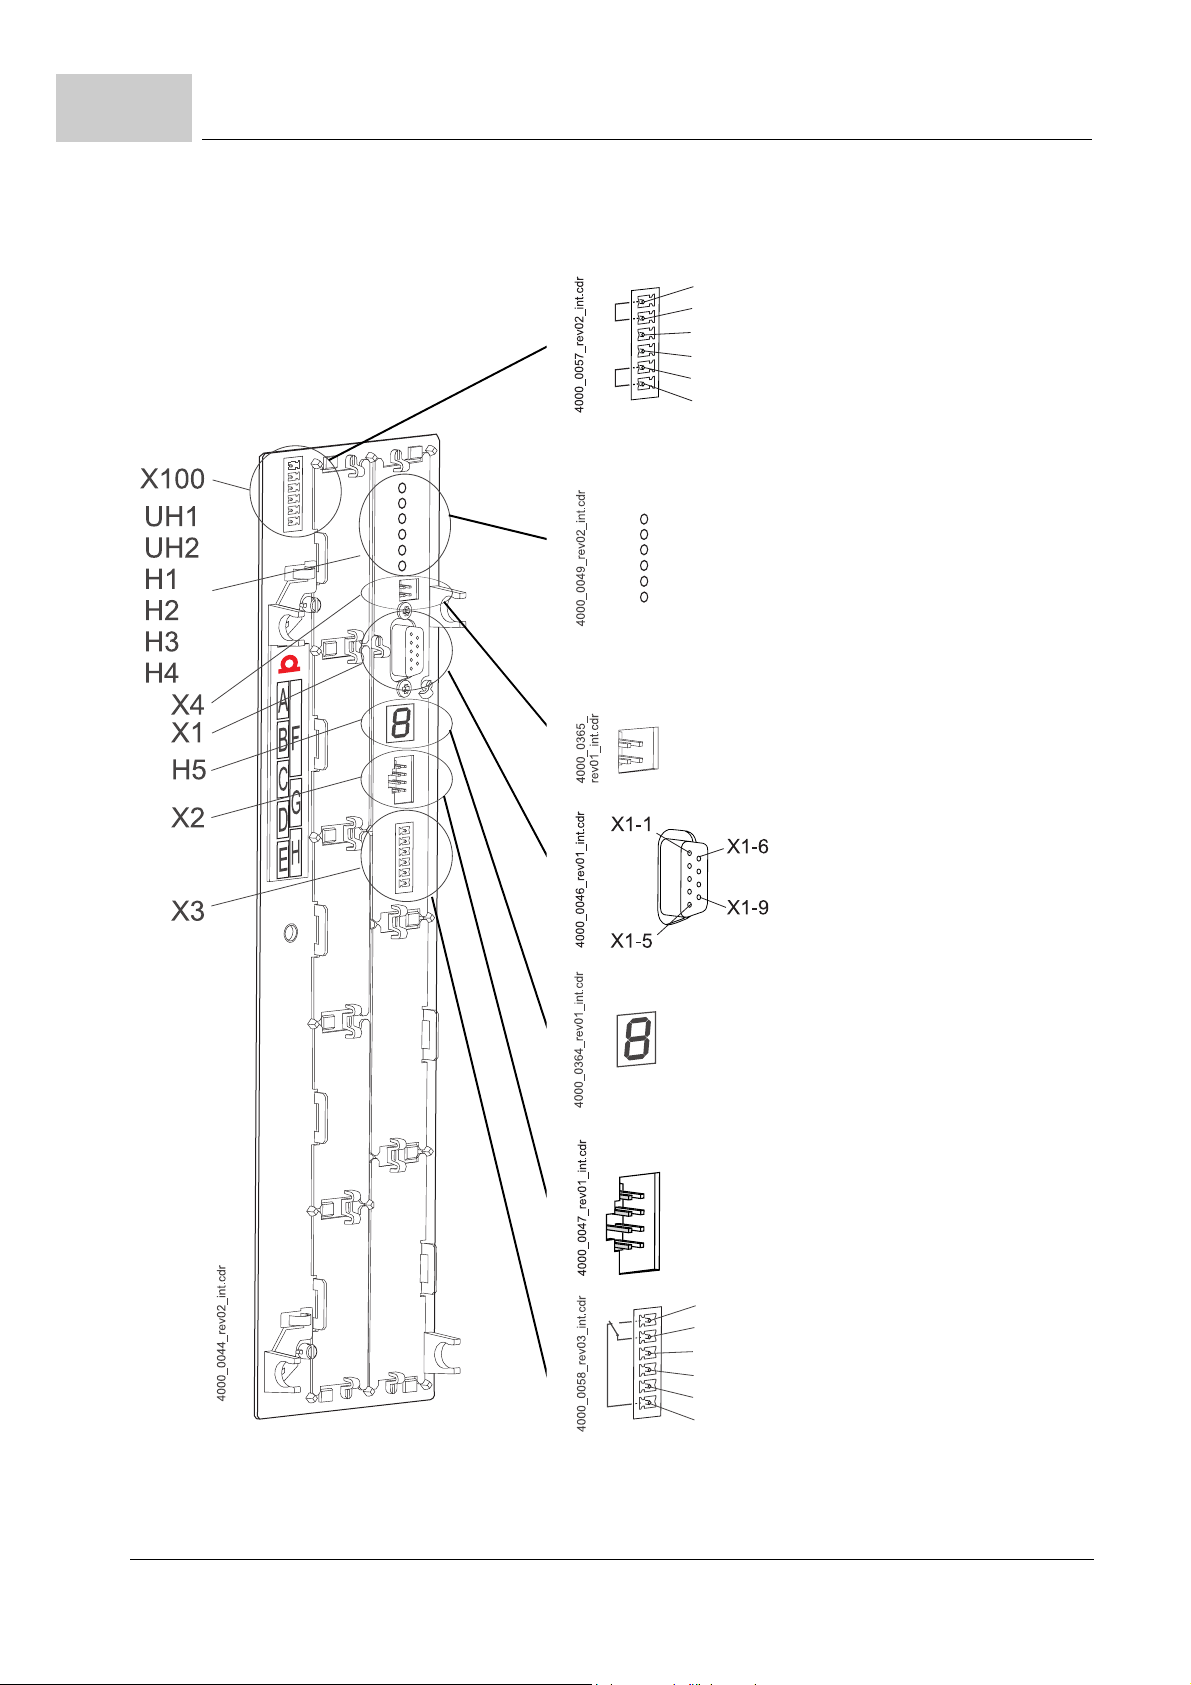
5.2
X100-1: +24V (SELV/PELV)
UH1:green: Programmable LED
X3-1: BB on (NO) (SELV/PELV)
Connection diagrams
X100-2: +24V (SELV/PELV)
X100-3: Mains on (bus) (SELV/PELV)
X100-4: Chopper resistor (SELV/PELV)
X100-5:
X100-6: M24V (SELV/PELV)
UH2:green: Programmable LED
H1: green: Torque direction1
H2: green: Enable
H3: red: Current limit reached
H4: red: Error
M24 V (SELV/PELV)
yellow: Programmable LED
yellow: Programmable LED
yellow: Torque direction2
yellow: Power ON
X4: reserved
1: reserved
2: TxD RS232
3: RxD RS232
4: DTR, DSR
5: Grounding
H5 Display
7 segment display
Standard operation: Display drive status
Error condition: Display error number
X2:
Connection for
Baumüller memory module PSI
6: DTR, DSR
7: RTS
8: CTS
9: reserved
32
of 94
Figure 18: Connection X100 and connections of the controller unit
Compact manual b maXX® BM4400, BM4600, BM4700
Document no.: 5.06014.02 Baumüller Nürnberg GmbH
X3-2: BB on (middle selector switch)
X3-3: Reference potential for 4 and 5
X3-4: Quickstop (SELV/PELV)
X3-5: Pulse enable (SELV/PELV)
X3-6: BB on (NC) (SELV/PELV)
Page 33

In this chapter we describe an exemplary commi ssioning of a bmaXX® device with a
Baumüller motor DS 56-M with s ine-cosine encoder. Carry out the commissionin g, to
make sure that the delivered devices are in an accordingly condition. This commissioning
is not for the complete installation of the device for your application.
6.1 Requirements to the executing personnel
The personnel, who is assigned for commissioning, must have enough knowledge about:
m Safety technology
m PC-operation (windows),
especially in the program WinBASS II (up to FW 3.09) or ProDrive (from FW 3.07).
m Connection and operating method of the device b maXX® 4400.
6
6COMMISSIONING
Compact manual b maXX® BM4400, BM4600, BM4700
Document no.: 5.06014.02
33
of 94
Page 34

6.2
Preconditions
6.2 Preconditions
The commissioning i s an exemplary checking of the fu nctionality of the device. When
commissioning, your assure yourself if the device is ready for operation.
Commissioning
with Baumüllermotors
Commissioning of
motors of other
manufacturers
The, furthermore described, exemplary commissioning is specified to Baumüller motors.
In order to reduce your scope of work, you are provided with a motor database, within the
operating software WinBASS II, which provides the most va lues automatically (reads
out), so that you can concentrate on the checking of the values.
If you, however, choos e another configuration (e. g. another encoder), you must enter
more values yourself, because the reading of the data isn’t completely available anymore.
Motors of other manufacturers we have not included into the motor data base. In this case
you must feed all values yourself. However, it is possible to include these motors into the
motor database.
6.3 Preparations
Precondition for the commissioning is that mounting and installation are correctly executed.
1 Assure, that mounting is correctly exec uted and espec ially that all sa fety instructi ons
.
NOTE
Figures referring to th e next wor king steps a re to be foun d in the manu al of the bas ic unit b
maXX4400.
were referred to (see mounting in manual of b maXX
®
4400).
2 Assure, that the installation is correctly executed, and that especially all safety instruc-
tions were referred to.
3 WinBASS II must be installed onto the PC/laptop. The controll er firmware versions,
which are supported by WinBASS II / ProDriv e are to be fo und in WinBASS II / Pro
Drive-Online-Help in the men u ’U se r indic ati ons /s upp orted b maXX devi ce s’ .
.
NOTE
The controller firmw are versions, which are sup ported by WinBASS II / ProDriv e are to be
found in the
WinBASS II / ProDrive Online Help in the menu ’User indications/Supported b maXX® devices’, or on the WinBASS II / ProDrive CD in the readme file under ’User indications/Supported
b maXX
®
devices’.
At commissioning you ca n among other things e nte r m oto r- a nd e nc ode r d ata in the op erating software or wrong values can be co rrecte d. In order, to carry out com miss ioning
efficiently, it is advantageous, if you have all data when starting with commissioning. Data
for Baumüller motors can be found within the operating software in form of a ’motor data
base’.
4 Assure, that you have all necessary data.
-
-
34
of 94
Compact manual b maXX® BM4400, BM4600, BM4700
Document no.: 5.06014.02 Baumüller Nürnberg GmbH
Page 35

Commissioning
6
Motor data
(type plate)
Motor data
(data sheet)
This data is, e. g. on the type plate of the motor, which you use when commissioning.
Name Value, e. g. is required for input par a m e ter list/paramete r s
Motor type, -designation DS 56-M Parameter list/configuration motor
Rated voltage U
Rated current I
Rated speed n
N
N
N
330 V Parameter list/configuration motor
4.0 A Parameter list/configuration motor
3000 RPM Parameter list/configuration motor
P0050 Motor type key
P0053 Motor nominal voltage
P0053 Motor nominal current
P0057 Motor nominal speed
In this example we are u sing the motor data base , the values from the chart t hen only
serve as a purpose of control.
This data is to be found on the data sheet of the motor, which you use when you are commissioning.
Name Value, e. g. is used to enter parameter list/parameters
Limit current I
Number of pole pairs 3 Parameter list/configuration motor
Max. Speed n
Pole position, if specified
1)
You can also let the notch position be determined by WinBASS II / ProDrive (see ZFind notch position– on
page 54).
peak
max.
1)
14.3 A Parameter list/configuration motor
P0069 Motor peak current
P0065 Motor number of pole pairs
6000 P aram eter list/configuration motor
P0072 Motor maximum speed mechanical
240° Parameter list/configuration motor
P0082 Motor notch position
Encoder data
(data sheet)
This data you will find on th e data sh eet of the encod er, which you use during co mmissioning.
Name Value, e. g. is used to enter parameter list/parameters
Encoder type Sincos-encoder
Stegmann SRS
50/60
PPR count 1024 Parameter list/configuration encoder/
Encoder type Resolver PPR count 1 Parameter list/configuration encoder/
at sine-cosine encoders with HIPERFACE®interface
the encoder type is automatically entered via the
HIPERFACE
BM_u_Enc1PulsesPerRev
BM_u_Enc1PulsesPerRev
®
interface
5 Assure, that the motor fulfills the following conditions:
m equipped with a suitable encoder, in our example: Resolver or SinCos encoder
SRS50
m connected to b maXX® 4400
m Ready-to-operate
6 Make sure, that switching elements for pulse enable and quickstop clearance are con-
nected to b maXX4 400 (e. g. in a switchbo ard) and are operating. Assure, that the
switches are in off-position (inactive).
7 A ssu re, tha t all saf ety de vice s a re conn ected l ine- and mo tor sid ed and a re r eady- to-
operate.
Compact manual b maXX® BM4400, BM4600, BM4700
Document no.: 5.06014.02
35
of 94
Page 36

6.3
Preparations
8 Assure, that the encoder for motor control (resolver or sine-cosine encoder) is connect-
9 If necessary, assure, that the safety relay is plugged in and is connected according to
10Assure, that PC/laptop is connected with a serial cable (RS232/9-pin sub-d connector)
NOTE
The company Baumüller Nürnberg GmbH recommends the usage of optically decoupled
transmitters (e.g. from the company Ratioplast part no. 901SV232C6095 and
part no. 901SV232T6095)
You can get an o ptically decoupled i nterface cabl e as an ac cessories na med programm ing
cable.
ed with the encoder cable to the encoder module BM4-ENC-01 or BM4-ENC-02 in slot
A.
the instructions.
to the plug connection X1 of the controller.Start WinBASS II / ProDrive.
36
of 94
Compact manual b maXX® BM4400, BM4600, BM4700
Document no.: 5.06014.02 Baumüller Nürnberg GmbH
Page 37

Commissioning
11After starting the ProDrive Startpage appears. Usually you can proceed as follows.
6
Figure 19: ProDrive: Start window
12On the Startpage select ’Select device’. The window ’Select device’ appears (see
ZFigure 21– on page 39)
13Select the s erial inter face unde r ( 1), wher e the P C is c onnec ted with the b maXX de-
vice.
14Then select the type of device, b maXX4400 drive under (2).
15Then press ’test’ (3). If an online connection with the b maXX device is generated, then
an according ses sion ( 4) is shown. The shown versi on and the v ersion of the devic e
have to match. If you press ’Connect’ (see
don’t match the error message ’version conflict’ will appear. This conflict can be solved
by the offered XML data update.
NOTE
In case there is no session for the present controller firmware version you need an update for
the WinBASS II / ProDrive program.
Compact manual b maXX® BM4400, BM4600, BM4700
ZFigure 22– on page 40) and the versions
Document no.: 5.06014.02
of 94
37
Page 38

6.3
Preparations
Figure 20: ProDrive: version conflict
NOTE
In case there is a PLC in th e b maXX® device a communication with WinBASS II / ProDrive to the controller only can be established, if a project is existing in the PLC!
38
of 94
Compact manual b maXX® BM4400, BM4600, BM4700
Document no.: 5.06014.02 Baumüller Nürnberg GmbH
Page 39

Commissioning
(2)
(1)
(4)
(3)
6
(5)
Figure 21: ProDrive: Select device
16With a click on ’Ok’ (5) the graphically user interface is started.
Further notes and explanations are to be found in the online help of the program. This
online help is initiated with F1 or under ?/help subjects or on the following starting window with ’help’.
Compact manual b maXX® BM4400, BM4600, BM4700
Document no.: 5.06014.02
39
of 94
Page 40

6.3
Preparations
17Wait until the following display mask appears and there, click on the ’project tree’ but-
ton.
40
of 94
Figure 22: ProDrive: Startpage
18Click in the ProDrive Navigation on ’power unit’.
Figure 23: ProDrive: Navigation
Compact manual b maXX® BM4400, BM4600, BM4700
Document no.: 5.06014.02 Baumüller Nürnberg GmbH
Page 41

Commissioning
6
Compact manual b maXX® BM4400, BM4600, BM4700
Document no.: 5.06014.02
41
of 94
Page 42

6.4
Survey
6.4 Survey
The following surve y shows commissioning schematicall y. The individual steps of the
commissioning you will find described in detail in
43.
NOTE
If your device h as not go t a sa fety relay, pass ov er the step s 5, 6 , 13 and 14 of the starting
sequence (see
ZFigure 24–).
ZExecuting commissioning– from page
42
of 94
Figure 24: Starting sequence
Compact manual b maXX® BM4400, BM4600, BM4700
Document no.: 5.06014.02 Baumüller Nürnberg GmbH
Page 43

6.5 Executing commissioning
Start with the commissioning, after you have completed the preparations.
1 Effectuate the power supply to the b maXX
(supply voltage + control voltage).
Hereupon the device starts up an d sh ows its operat ional readiness by fla shi ng of the
orange-colored LED H-2 (Power ON).
m LED H-2 must light up orange, thi s means P ower ON, the devi ce is ready -to-oper-
ate.
m LED H-2 may not light up green: The green shining LED H-2 signified ’operation en-
abled’! The motor is power supplied and can rotate! Immediately cancel this with the
switch element pulse enable or quickstop enable!
m LED H-3; the red luminous LED means current limit reached. Reduce the load of the
motor. Continue the parameteriza tion .
m LED H-4; a red flashing LED signifies a state of error. Later the error is removed with
the help of the op er ating pr ogram WinBASS II / Pr oDriv e. Con tin ue the parameter
ization.
2Now plug on the (RS232-)cable c onnector from the PC/la ptop to the co ntroller at the
bmaXX
The communication between the pro cessor and th e b maXX® runs through the connection cable.
3 Start WinBASS II (up to FW 3.09) or ProDrive (from FW 3.07), as far as it isn’t running
yet.
®
.
Commissioning
®
6
-
NOTE
In case you get an e rror message referring a plug-in module , then please first che ck if the
plug-in module is accurately cabled and if need be, is supplied with voltage.
Compact manual b maXX® BM4400, BM4600, BM4700
Document no.: 5.06014.02
43
of 94
Page 44

6.5
Executing commissioning
Warnings/
reset errors
4 Then click on ’drive management’
Figure 25: ProDrive: Navigation
5 Activate the voltage supply for the safety relay (in case a safety relay exists).
44
of 94
Compact manual b maXX® BM4400, BM4600, BM4700
Document no.: 5.06014.02 Baumüller Nürnberg GmbH
Page 45

Commissioning
6 „ Acknowledge“ existing warnings/error s in the w indow „Dev ice manage ment“ (if n ec-
essary press the button „Acknowledge messages“ several times).
6
Figure 26: ProDrive: Drive Manager
NOTE
Because of the ma nifold comb ination pos sibilities of motors and encoders we will on ly give
one example. Enter the given data of motor and encoder!
Compact manual b maXX® BM4400, BM4600, BM4700
Document no.: 5.06014.02
of 94
45
Page 46

6.5
Executing commissioning
7 Click on ’power unit’.
Figure 27: ProDrive: Navigation
8 The current, which is necessar y fo r yo u r ap pl i ca tio n is en t er ed in ’M a xim u m current of
the drive’, the maxim um is the limit current of the motor (acco rding to data sheet):
2.5
A in order to operate the motor and the power unit.
46
of 94
Figure 28: ProDrive: Power unit
Compact manual b maXX® BM4400, BM4600, BM4700
Document no.: 5.06014.02 Baumüller Nürnberg GmbH
Page 47

Commissioning
6
Parameterize encoder
Now parameters still have to be entered for the encoder.
9 Go back to the ProDrive Navigation .
10Click on the tab ’Startpage’
On the Startpage you can see, at which slot the encoder module is plugged in (resolver BM4-ENC-01 or sine-cosine - BM4-ENC-02).
Figure 29: ProDrive: Startpage
11Check, if the plug-in modules were detected correctly.
CAUTION
The following may occur, if you disregard these safety notes:
m Property damage
The danger is: errors in the hardware identification. The device in which the b maXX®4400
is installed, can be damaged or ca n work defective, if a module or mo re modules were no t
recognized or were recognized wrong.
Cancel commissioning, if at least one plug-in module was not or was wrong recognized. Contact Baumüller Nürnber g GmbH.
12Go back to the ProDrive Navigation.
13Double-click on ’encoder’.
Compact manual b maXX® BM4400, BM4600, BM4700
Document no.: 5.06014.02
of 94
47
Page 48

6.5
Executing commissioning
14Click on ’encoder1’ if your encoder module is in slot A.
Click on ’encoder2’ if your encoder module is in slot B.
The window ’encoder1-configuration’ opens.
(1)
(2)
48
of 94
Figure 30: ProDrive: Encoder 1 configuration
15When using a resolver or sine-cosine encoder without HIPERFACE®-interface. With a
sine-cosine encoder with HIPER FACE-inte rfac e the data is automat ically transf erred
over the HIPERFACE-interface - do not change data.
m (1) Resolver: PPR count = 1, sine-cosine without HIPERFACE® e.g. PPR count = 1024
m (2) Resolver: rotations = 1, sine-cosine without HIPERFACE® e.g.
rotations = 1
m both encoders: activation (activate encoder)
Enter overspeed limit manually in block ’speed threshold’.
Compact manual b maXX® BM4400, BM4600, BM4700
Document no.: 5.06014.02 Baumüller Nürnberg GmbH
Page 49

Commissioning
16Change to the ProDrive Navigation and there click on ’motor’.
Figure 31: ProDrive: Navigation
6
Use motor database
17Click in the motor window on the button ’Motor database’.
Figure 32: ProDrive: Motor database
18The following window appears
Figure 33: ProDrive: Selection of the motor
19In this window you enter with:
m the motor nominal voltage : „540 V“
m the motor type: ’DS 56-S’
m the nominal speed: ’6000 rev/min’
m the maximum speed is automatically taken over from the value for basic speed.
Compact manual b maXX® BM4400, BM4600, BM4700
Document no.: 5.06014.02
49
of 94
Page 50

6.5
Executing commissioning
NOTE
The values for the nominal speed and the maximum speed are the same at synchronous motors and therefore, at choice of nominal speed, are taken over into the maximum speed.
At asynchronous motors you must select both values separately. Software for asynchronous
motors: in preparation.
20Activate butto n k.
With this all data is taken from the motor database over in the accordant parameters and
display fields of WinBASS II / ProDrive.
21Check all values of the motor with the motor data sheets (this is only a purpose of con-
trol, if you use the motor datab ase of Baumülle r). When you ar e using a motor of an
other manufacturer, you must do this anyway).
NOTE
When you use a m otor of an other manu facturer, you c an also ta ke his da ta into the motor
database.
Motor data
change
Normally, you will find no deviations between the motor data sheet and the automatically
from the motor database taken values.
In case, you want to change values, you have got to do the following:
22Click on the tab ’startpage’. On the start page you enter next to ’enable service opera-
tion’: Service’ and close this input with enter’.
Now you are able to change the so -far write-protected da ta in the screen menu. If you
would like to re-establish the write-protection, then enter with ’off’ instead of service’.
23Click on the ProDrive Navigation of ’motor’.
50
of 94
Compact manual b maXX® BM4400, BM4600, BM4700
Document no.: 5.06014.02 Baumüller Nürnberg GmbH
Page 51

Commissioning
Check motor data 24In the motor window and in the sub-window synchronous motor or asynchronous motor
all important motor data or motor parameters are displayed.
Check all data.
6
Figure 34: ProDrive: Motor
Use parameter list If you are not using the Baumüller motor database, you can enter al l motor paramet ers
also with help of the ’parameter list’.
25Click on the tab parameter list.
Compact manual b maXX® BM4400, BM4600, BM4700
Document no.: 5.06014.02
51
of 94
Page 52

6.5
Executing commissioning
26In the parameter list click on ’configuration motor’.
Figure 35: ProDrive: Parameter list
The following motor parameters must be described:
m Maximum speed mech. (P0072 motor maximum speed mechanical)
m Number of pole pairs (P0065 Motor number of pole pairs)
m Rotating field (P0087 Motor rotating field)
Now save the entered data.
27Click in the icon bar on the icon ’Data set management’.
Figure 36: ProDrive: Data set management
52
of 94
Compact manual b maXX® BM4400, BM4600, BM4700
Document no.: 5.06014.02 Baumüller Nürnberg GmbH
Page 53

Commissioning
28Click in the data set management on the button ’save all’.
6
Figure 37: ProDrive: Data set management
29Wait until next to ’data set status’ is shown: ’o.k.’
Thus the data set is saved in the EEPROM.
30Turn off the voltage supply for the safety relay (if existing).
31Disconnect the device from the mains- and the control voltage.
32Turn on the power supply for the safety relay (if a safety relay is existing)
33Effectuate the power supply to the b maXX
(supply voltage + control voltage).
By switching on and off you can check, if your settings lead to warnings or errors.
®
Compact manual b maXX® BM4400, BM4600, BM4700
Document no.: 5.06014.02
53
of 94
Page 54

6.5
Executing commissioning
Find notch position
Now the notch position of the motor still has to be found.
34Go to the ProDrive Navigation and double-click on ’operating mode’, then click on ’find
notch position’.
35Click on the icon ’drive manager dialogue’.
Figure 38: ProDrive: Drive manager dialogue
Additionally the window ’drive manager dialogue’ appears.
(4)
(1)
(2)
(6)
(3)
Figure 39: ProDrive: Find notch position: Drive manager
36Select method 0 for ’mode’ (1).
37Select ’find notch position’ in the scroll list (2).
WARNING
The following may occur, if you disregard these safety notes:
m serious personal injury m death
The danger is: mechanical effects. With a non-free-rotating motor the motor and parts, which
are connected to the motor can be damaged/d estroyed.
Assure, that the motor can rotate freely during commissioning.
38Activate the pulse enable and the quickstop clearance.
39Click on ’start’ (3).
40Wait until the text appears in this field (4): ’notch position was found’.
41Then click on „Off“ (5).
(5)
54
of 94
Compact manual b maXX® BM4400, BM4600, BM4700
Document no.: 5.06014.02 Baumüller Nürnberg GmbH
Page 55

Commissioning
42Check if the measured value meets the expected value (6)
(at Baumüller motors: resolver: 330°, sine-cosine 240° ± 5°).
43Inactivate the pulse enable and quickstop clearance.
With this activity all parameterization workings for an exemplary commissioning are com-
pleted. You can now convince yourself from the proper functions, by letting the motor rotate shortly.
6
First rotating of
the motor.
44Go back to the ProDrive Navigation.
45Double-click on: ’setpoint generators’.
46Click on: ’ramp function generator’.
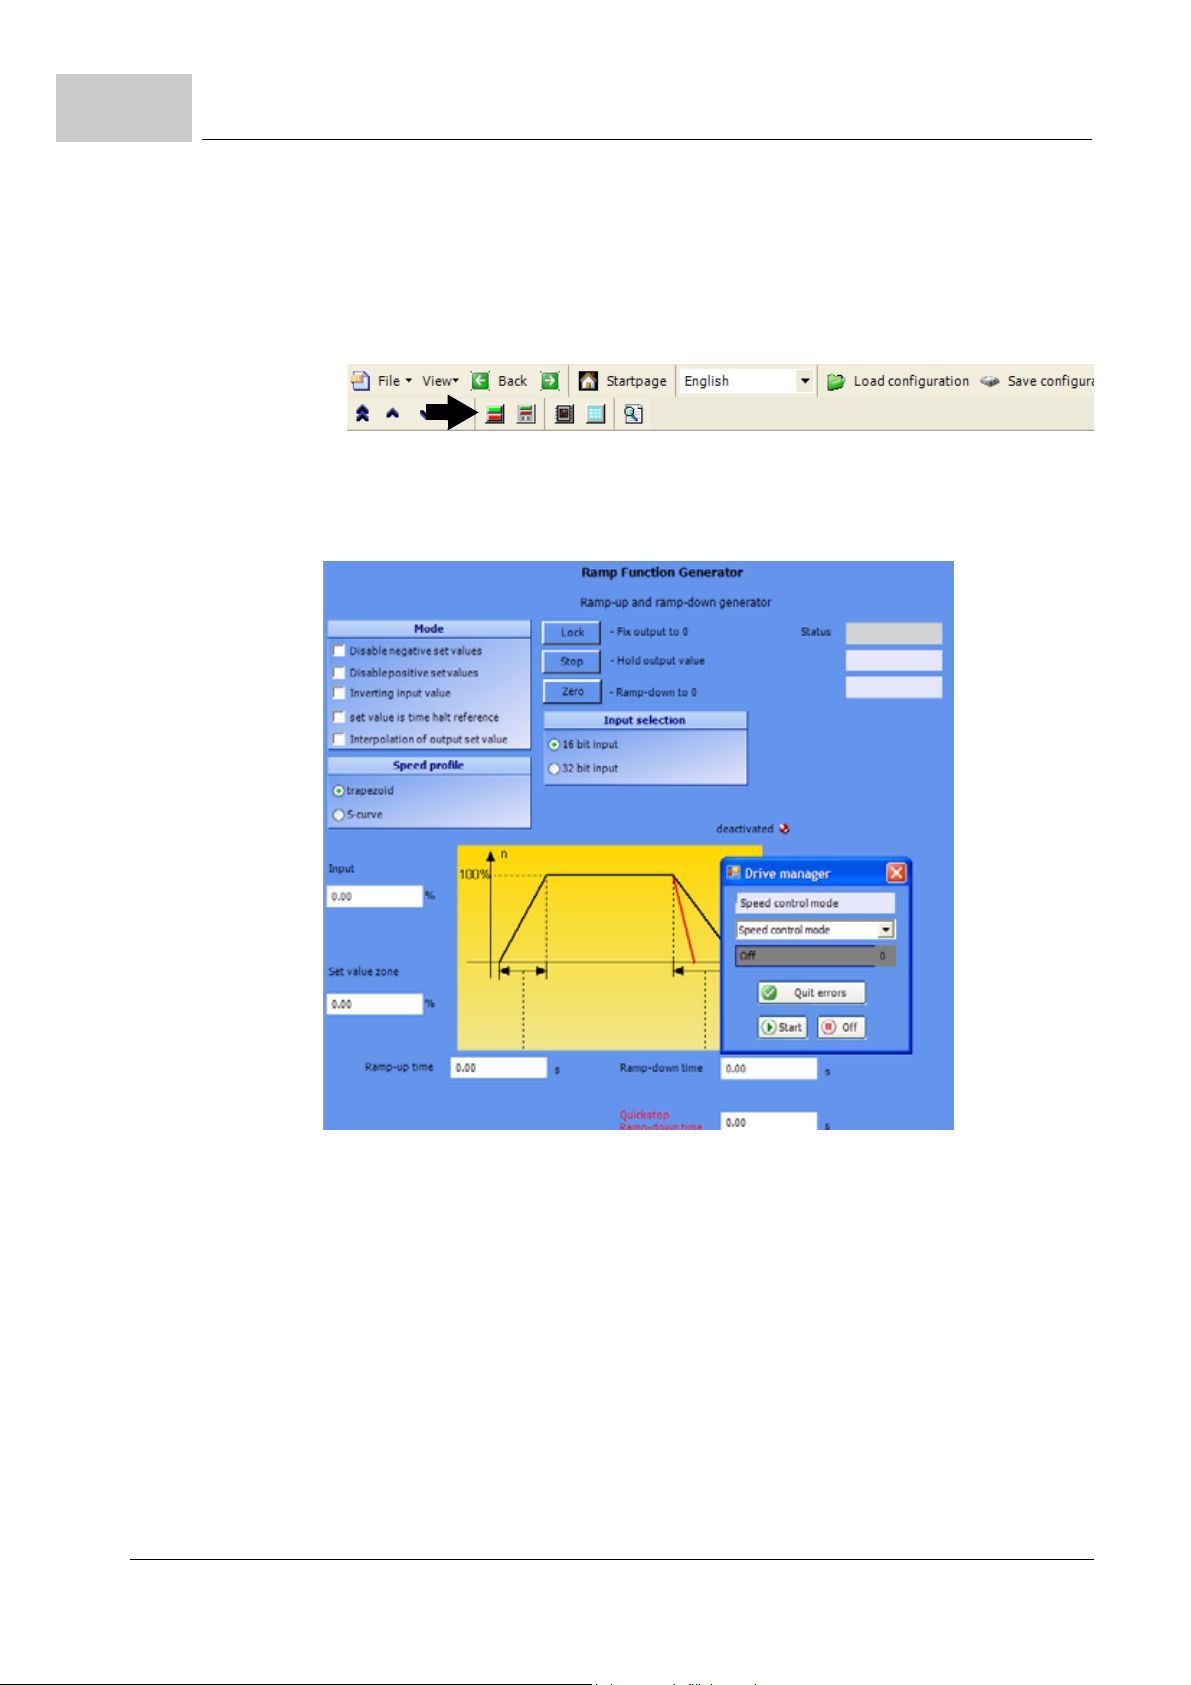
(1)
Figure 40: ProDrive: Ramp function generator
Compact manual b maXX® BM4400, BM4600, BM4700
Document no.: 5.06014.02
55
of 94
Page 56
6.5
Executing commissioning
47Enter the values into the following entry fields:
m (Ramp function generator) input (1)
h Enter with value ’10’.
48In case y ou have shut the window ’drive ma nager dialogue’: cl ick on the icon ’ Drive
management’.
Figure 41: ProDrive: Drive manager dialogue
Additionally the window ’drive manager dialogue’ appears.
(1)
(2)
(3)
Figure 42: ProDrive: Ramp function generator - Drive manager
49Select in the drive manag er dialogue in the s croll list (1) the o perating mode ’s peed
control’.
50Activate the pulse enable and the quickstop clearance.
51Click on the drive manager dialogue menu on the button ’start’ (2)
Now the motor should rotate with 10% of the maximum speed.
52Click in the drive manager menu on the button ’off’ (3)
Now the motor will stop.
53Inactivate the pulse enable and quickstop clearance.
56
of 94
Compact manual b maXX® BM4400, BM4600, BM4700
Document no.: 5.06014.02 Baumüller Nürnberg GmbH
Page 57

Commissioning
6
Data set
save
This data set now should be saved.
54Click in the icon bar on the icon ’data set management’.
Figure 43: ProDrive: Data set management - icon bar
55Click in the data set management on the button ’save all’.
Drive
switch off
Figure 44: ProDrive: Data set management
56Wait until next to ’data set status’ is shown: ’o.k.’
Thus the data set is saved in the EEPROM.
To complete commissioning we switch off the drive.
57Turn off the voltage supply for the safety relay (if existing).
58Separate over the ac co rd ant swit chi ng e lem ent s the device from th e ma in s- an d c on-
trol voltage.
Thus the commissioning is successfully completed.
Compact manual b maXX® BM4400, BM4600, BM4700
Document no.: 5.06014.02
57
of 94
Page 58

6.5
Executing commissioning
58
of 94
Compact manual b maXX® BM4400, BM4600, BM4700
Document no.: 5.06014.02 Baumüller Nürnberg GmbH
Page 59

7
7OPERATION
In this chapter we descri be, h ow the dev ic e work s durin g ope ra tio n and how y ou h andl e
the device during operation.
7.1 Enable signals
These signals must have a signal level of 24 V (DC) and must be connected to the terminals X3-4 and X3-5 (ZFigure 18– on page 32).
Pulse enable During operation the signal ’pulse enable’ must constantly be created, so that the device
supplies power. Addi tio nal ly the puls e e nabl e ha s to be do ne by the con tr oll er
nals are AND-linked, so the failure of one of these signals results in impulse inhibit of the
power unit.
. Both sig-
Quickstop Allow the signal ’quickstop’ only then, if you must stop the installation/device as quick as
possible.
During operation the sig nal ’quickst op’ must con stantly be appli ed, that the dev ice sup-
plies power.
7.2 Switch-on frequency
The device may not be switched on and off as often as you like. Between two switch-onsequences there should be a certain time period, in order to protect the devices/fuses.
NOTE
h refer to the specified waiting time, if you switch on the supply voltage for the device again,
after you have switched off the device.
Imperative for the devices BM441X and BM442X is:
between two switch-on-sequences at least one minute must have passed, before you switch
on the device again. In case you switch off the device beforehand, the durability of the device
will be shortened.
Imperative for the devices BM443X, BM444X, BM445X, BM446X and BM447Xis:
No waiting time has to be complied with.
Compact manual b maXX® BM4400, BM4600, BM4700
Document no.: 5.06014.02
59
of 94
Page 60

7.3
Display elements - LED
7.3 Display elements - LED
BM44XX - XXX - XX0 XX and BM44XX - XXX - XX1XX:
On the front side of the device there are 4 LEDs. The 4 LEDs (H1 to H4) show information
about the operating status and are also displayed in WinBASS II / ProDrive.
BM44XX - XXX - XX2XX:
On the front side of the device th ere are six LE Ds. Both upp er LEDs (UH1 and UH2: 2)
are freely programmable. The four lower LEDs (H1 to H4) show information abut the op
erating status and are also displayed in WinBASS II / ProDrive.
ZFigure 18– on page 32 shows the position of the display elements.
7.3.1 Operating condition (H1, H2)
Both of the upper LEDs (H1 and H2) indicate, how the device is working at the time.
green: the motor rotates, torque direction 1.
orange: the motor rotates, torque direction 2.
-
NOTE
The LED H1 cannot be taken as rotationa l dir ecti on in dic ato r . It only show s the torqu e dir ec tions.
green: Pulse enable. The motor is power supplied by the power unit.
orange: Power ON, the device is ready-to-operate. In case the LED lights up
orange colored during operation, maybe the pulse enable is missing or
the quickstop was activated.
flashing in turn green/orange:
Pulses for field generation at asynchronous machines enabled.
No release for torque generation.
green with a short orange-colored flashing or
orange with a short green flashing:
Saving procedure active in the EEPROM,
if possible do not switch off device in this phase.
60
of 94
Compact manual b maXX® BM4400, BM4600, BM4700
Document no.: 5.06014.02 Baumüller Nürnberg GmbH
Page 61

7.3.2 Current limit (H3)
r-
e
n-
r-
The third LED (H-3) indicates whether the current limit has been reached.
7.3.3 Error (H4)
Operation
red: adjusted current limit of the controller has been reached.
h Application is adapted or ’no reaction’.
LED doesn’t light up: the internal monitoring have not found an error.
Red, continuously: Error.
7
7.3.4 Display
h Remove the err or wit h he lp of th e op er ating program WinBASS II / ProD ri ve . Fu
ther information is to be found in ZError detection and troubleshooting– from pag
63.
red, flashing: Warning.
h Warnings you are able to see in the drive manager of the operating program Wi
BASS II / ProDrive. W arnings d o not affec t operation of the devi ce. Furth er info
The 7-segment-displ ay in normal operation s hows the operat ion sta tus. In case of error
the error number is shown.
Display Status Meaning
0 Not ready-to-start Initialization phase, pulses inhibited.
1 Inhibit start Pulses inhibited, initialization completed error-free.
2 Ready-to-start Pulses inhibited
3 Switched on Pulses for field generation at asynchronous machines enabled,
no torque generation yet.
4 Operation enabled Pulses enabled, drive function enabled
5 Inhibit operation active Pulses enabled, braking procedure active
6 Shutdown active Pulses enabled, braking procedure active
7 Quickstop active Pulses enabled, braking procedure active
E Error reaction active Pulses enabled, braking procedure active
F Error Pulses inhibited, error status
In the display the error number is shown.
The single drive statuses are specified in chapter device management in parameter manual 5.03039.
Compact manual b maXX® BM4400, BM4600, BM4700
Document no.: 5.06014.02
61
of 94
Page 62

7.3
S
E
o
Display elements - LED
In the status error the error numbers are shown in the display. Only the errors are shown,
which enable an error rea ction in th e drive or have enabled one. Er rors withou t reactio n
and also warnings are not displayed.
First of all the display of error no. star ts in showing for about 1.5 s „F“. Then, three digits
of the error code ar e di spl ay ed . The individual dig its a re di s pla ye d for about 0.8 s, i nte r
rupted by a short break . If there are further error s, they are displayed according to the
same principle. The procedure recurs, as soon as all errors have been displayed.
Example: Error 125 and 91 are existing:
tart End Time
rror
utput
-
If the mains voltage and the 24-volt supply is applied to the device after the electric installation has been complete d, then, at least the LEDs s hould flash and the 7-segment di splay should show a status.
of 94
62
Compact manual b maXX® BM4400, BM4600, BM4700
Document no.: 5.06014.02 Baumüller Nürnberg GmbH
Page 63

8.1 Error detection
In the following we will in form you abou t the different errors and the conseq uential error mes sages. The errors can either be of mechanical or of electrical causes. The devices of the series
b maXX
side of the cabinet. Additionally the error number is displayed via the 7-segment display on the
front side of the cabinet. By the error number the error message can be determined with the help
of the error list in this doc ument ation. F urthe rmore the error me ssag e is displ ayed i n the oper
ating software WinBASS II / ProDrive:
®
4400 signal an error statu s via the lighti ng up of the lowes t red LED H4 on th e front
8
8ERROR DETECTION AND TROUBLE-
SHOOTING
-
h Start the operating program WinBASS II (up to FW 3.09) or ProDrive (from FW 3.07), if it isn’t
running yet.
The error message signaled with ’error’ is to be found in WinBASS II / ProDrive:
h Open a list in the project tree by clicking on the + in front of ’management’.
h Select from this list ’Device management’.
NOTE
If you are not able to start the moto r, although the red LED H 4 isn’t lig hting up and al though
the LED H2 is lighting up green, chec k the parameterization of the b maXX
parameter list in WinBASS II / ProDrive.
Error possibilities are e. g.: torque limit = 0 has been set or notch position is not correct (also
see parameter manual b maXX
If no LEDs are lighting up on the front side of the device, check the 24V supply.
8.2 Troubleshooting
The error messages are bas ed on the tr oub le sho oti ng in the b maX X® devices, which also are
termed as error lists. If an error appears, the according definite error message is displayed with
in a short time in WinBASS II / ProDriv e in the menu „driv e man age r’, whos e mea ni ng yo u can
look up in the error list.
®
4400).
®
4400 with the
-
Compact manual b maXX® BM4400, BM4600, BM4700
Document no.: 5.06014.02
63
of 94
Page 64

8.2
Troubleshooting
8.2.1 Reset err ors
If the red error LED is lighting up, the re is at leas t on e erro r. You c an r eact upo n thi s, by
’Quit’ the error in WinBASS II / ProDrive, that means, that you inform the device, that you
have noted the error, that you have remo ved it or that you want to pass over it. Due to
error reset all error messages are reset. An individual error reset is not possible. The ac
ceptance causes a r ese tti ng of t he e rr o r, in case the reset was po ss ib le du e to th e er ror
situation.
-
8.2.2 Error parameters - error messages (error list) - error reactions
In the following you will find all error messages. An (error) message is shown in
WinBASS
II in the window ’drive manager’. In the list field ’messages’ you will find the (abbreviated) error names, at HIPE RFACE® errors also the device part, the error number
(not at errors accordin g to HIPERFACE
®
specification) and , separated by a colon, the
meaning of this error, e.g. ’MotorError 96: Short-circuit temperature sensor’. At HIPER
FACE® errors e.g. ’Encoder 1 communication: Parity error’.
Error processor P0201
Error no. Meaning Reaction Troubleshooting
0 reserved
1 Watchdog-Error IS Execute a restart of b maXX® 4400
2 Incorrect or unexpected interrupt has
occurred
3 NMI interrupt/bus error IS Execute a restart of b maXX® 4400
4 to 15 reserved
not assigned = 0
IS Execute a restart of b maXX® 4400
-
64
of 94
Compact manual b maXX® BM4400, BM4600, BM4700
Document no.: 5.06014.02 Baumüller Nürnberg GmbH
Page 65

Error detection and troubleshooting
Error operating system P0202
Error no. Meaning Reaction Troubleshooting
16 Err ors while booting IS Execute a restart of b maXX® 4400
17 Software error: IS Execute a restart of b maXX® 4400
18 Time slot configuration IS Execute a restart of b maXX® 4400
19 Time slot - time error IS Execute a restart of b maXX® 4400;
Change configuration of the time slice operation system
20 1 = No free memory IS Execut e a restart of b maXX® 4400
21 Invalid error code IS Execute a restart of b maXX® 4400
22 Invalid warning code IS Execute a restart of b maXX® 4400
23 False FPGA version IS Contact Baumüller
8
24 Two position controller: error while writ-
ing to target parameter
25 Checksum error flash system data IS The system data in the controller flash is invalid
26 Power unit is not supported IS Use an appropriate power unit or contact
27 to 31 reserved
Not assigned = 0
IS Ensure that the target parameter is writeable in
these operating conditions and the value to
write is in the valid value margin.
and was replaced by default values. These
default values are written to the flash by switch
ing off and on.
Baumüller
Error Proprog communicationP203
Error no. Meaning Reaction Troubleshooting
32 Timeout protocol adjustable Execute a restart of b maXX® 4400
33 Prot ocol struct ure adjustable Execute a restart of b maXX® 4400
34 Wrong module type adjustable Contact Baumüller
35 Too many data in the telegram adjustable Contact Baumüller
-
36 Not enough data in telegram adjustable Contact Baumüller
37 Invalid operand adjustable Contact Baumüller
38 Invalid memory type adjustable Test RAM
39 Invalid operand address adjustable Enter a valid address
Compact manual b maXX® BM4400, BM4600, BM4700
Document no.: 5.06014.02
65
of 94
Page 66

8.2
Troubleshooting
Error no. Meaning Reaction Troubleshooting
40 Value less than the minimum value adjustable Check data set and adjust
41 Value greater than the maximum value adjustable Check data set and adjust
42 Parameter is write-protected adjustable Check data set and adjust
43 Parameters in this operation status not
writable
44 Invalid parameter value adjustable Enter with a valid value
45 Communication error
WinBASS controller
46 to 47 reserved
not assigned = 0
adjustable Check operating condition and parameteriza-
tion
adjustable Establish connection again or set parameter
P0290 to 0.
Error in function or option modules P0204
Error no. Meaning Reaction Troubleshooting
48 Error in
Function module A
49 Error in
Function module B
50 Error in
Function module C
51 Error in
Function module D
Level 3
error
Level 3
error
Level 3
error
Level 3
error
see ZError Function module A to E P0240 to
P0244– on page 82 (= 3. level)
see ZError Function module A to E P0240 to
P0244– on page 82 (= 3. level)
see ZError Function module A to E P0240 to
P0244– on page 82 (= 3. level)
see ZError Function module A to E P0240 to
P0244– on page 82 (= 3. level)
66
of 94
52 Error in
Function module E
53 Error in
Option module G
54 Error in
Option module H
55 Error in
Option module J
56 Error in
Option module K
57 Error in
Option module L
58 Error in
Option module M
Level 3
error
Level 3
error
Level 3
error
Level 3
error
Level 3
error
Level 3
error
Level 3
error
see ZError Function module A to E P0240 to
P0244– on page 82 (= 3. level)
see ZError option module G to M P0245 to
P0250– on page 83 (= 3. level)
see ZError option module G to M P0245 to
P0250– on page 83 (= 3. level)
see ZError option module G to M P0245 to
P0250– on page 83 (= 3. level)
see ZError option module G to M P0245 to
P0250– on page 83 (= 3. level)
see ZError option module G to M P0245 to
P0250– on page 83 (= 3. level)
see ZError option module G to M P0245 to
P0250– on page 83 (= 3. level)
Compact manual b maXX® BM4400, BM4600, BM4700
Document no.: 5.06014.02 Baumüller Nürnberg GmbH
Page 67

Error detection and troubleshooting
Error no. Meaning Reaction Troubleshooting
8
59 Timeout when waiting for the RST sig-
nal of the slaves
60 CRC error in
SPI transmission module f controller
61 CRC error in
SPI transmission
Controller f module
62 to 63 reserved
not assigned = 0
IS Execute a restart
adjustable Error indicates that there are high EMC interfer-
adjustable Error indicates high EMC interferences; please
ences; please reduce these.
Contact Baumüller.
reduce these.
Contact Baumüller.
Error power Supply P0205
Error no. Meaning Reaction Troubleshooting
64 Mains failure adjustable Restore the connection to the power supply
65 Phase failure IS Check if all phases are correctly connected and
66 Mains undervoltage IS Assur e the compliance with the mains specifi-
voltage-carrying
cations (see techn. data)
67 Mains overvoltage IS Assur e the compliance with the mains specifi-
68 Underv oltage 24V IS Assure the compliance with the mains specifi-
68 to 79 reserved
not assigned = 0
79 Mains monitor collected errors Adjustable See P0236
cations (see techn. data)
cations (see techn. data)
Error power unit P0206
Error no. Meaning Reaction Troubleshooting
80 Communication error after HIPER-
FACE ® specification
81 Heatsink temperature IS Let the device cool down and/or reduce the
82 U DC link overvoltage IS Reduce the DC link voltage
83 O vercurrent IS Reduce the load and check the current control-
IS see ZError power unit - serial interface
P0233– on page 77
(= 3. level)
load
ler settings as well as the cabling and the motor
Compact manual b maXX® BM4400, BM4600, BM4700
Document no.: 5.06014.02
67
of 94
Page 68

8.2
Troubleshooting
Error no. Meaning Reaction Troubleshooting
84 Ground current IS Check the installation of the device (from
85 Device internal overtemperature IS Make sure of a sufficient ventilation in the
86 Cable break temperature sensor IS Pass on the device for repair
87 Safety relay off (or defect) IS Check the safety relay, exchange it for a new
b
maXX 443x) and check the motor for ground
fault
device
88 Bridge short-circuit IS Carry out a restart. At recurring error messages
89 Power unit not ready-to-operate IS Complete the operational readiness to the
90 Phase failure IS Check if all phases are correctly connected and
91 Mains failure IS Restore the mains supply
92 Mains undervoltage IS Assure the compliance with the mains specifi-
93 Mains overvoltage IS Assure the compliance with the mains specifi-
94 Undervoltage U DC link IS Check the power connections
95 reserved
not assigned = 0
renew the controller cartridge
power unit
voltage-carrying
cation (see technical data)
cation (see technical data)
68
of 94
Compact manual b maXX® BM4400, BM4600, BM4700
Document no.: 5.06014.02 Baumüller Nürnberg GmbH
Page 69

Error detection and troubleshooting
Error motor P0207
Error no. Meaning Reaction Troubleshooting
8
96 Shor t-circuit temperature sensor
(Tm <= -30 °C)
97 Temperature sensor - motor not con-
nected
(Tm > +300 °C)
98 Mot or overte mper ature IS Rem o ve motor over tem perat ure by cooling
99 Error I2t > 100% IS Leave drive in inhibited status until I2t-actual
100 Power unit maximal current > motor
maximal current
101 reserved
Not assigned = 0
102 Collective error finding notch position IS see ZError finding notch position P0237– on
103 to 111 reserved
Not assigned = 0
adjustable Remove the short-circuit in the temperature
adjustable Remove open circuit in the temperature sensor
adjustable Set power unit maximal current P1241 lower
sensor
circuit
down and/or reducing the load
value decreases under 100%
than motor maximal current P0069
page 133
(= 3. level)
Compact manual b maXX® BM4400, BM4600, BM4700
Document no.: 5.06014.02
69
of 94
Page 70

8.2
Troubleshooting
Error Encoder1 P0208
Error no. Meaning Reaction Troubleshooting
112 Communication error
(HIPERFACE®-Specification)
113 reserved
114 Error at overwriting of
encoder position information
115 Cable break encoder 1 IS Rem ove the cable break in the encoder cable
116 Overspeed encoder 1 IS Check the allowable rotational speed for
117 Amplitude limit exceeded IS Use another encoder
118 Encoder type unknown IS Check if the correct encoder is connected or
119 Invalid data field for motor data IS Use another encoder
120 Inco rrect motor data IS Use another encoder
121 Saving error of motor data IS Use another encoder
122 Motor data write-protected.
(is not valid for BM motors)
IS see encode r 1 (HIPERFACE® P0234
(= 3rd level)
IS Execute the command again. If the error occurs
again, contact Baumüller Nürnberg GmbH.
of encoder 1 or check the assignment of the
encoder cable
encoder 1
use another encoder
IS Use another encoder
123 Field angle error IS Check the shielding of the encoder cable
124 Encoder without temperature measur-
ing
125 Memory capacity in the encoder for
electronic type plate too small
126 to 127 reserv ed
not assigned = 0
adjustable Use an encoder module with temperature mea-
suring
adjustable Use another encoder with a greater memory
70
of 94
Compact manual b maXX® BM4400, BM4600, BM4700
Document no.: 5.06014.02 Baumüller Nürnberg GmbH
Page 71

Error detection and troubleshooting
Error encoder 2 P0209
Error no. Meaning Reaction Troubleshooting
8
128 Communication error
(HIPERFACE®-Specification)
129 reserved
130 Error at overwriting of
Encoder position information
131 Cable break encoder 2 IS Remove the cable break in the encoder cable
132 Overspeed encoder 2 IS Check the allowable rotational speed for
133 Amplitude limit exceeded IS Use another encoder
134 Encoder type unknown IS Check if the correct encoder is connected or
135 Invalid data field for motor data IS Use another encoder
136 Incorrect mot or data IS Use another encoder
137 Saving error of motor data IS Use another encoder
138 Motor data write-protected.
(is not valid for BM motors)
IS see encoder 2 (HIPERFACE®) P0235
(= 3rd level)
IS Execute the command again. If the error occurs
again, contact Baumüller Nürnberg GmbH.
of encoder 1 or check the assignment of the
encoder cable
encoder 2
use another encoder
IS Use another encoder
139 Field angle error IS Check the shielding of the encoder cable
140 Encoder without temperature measur-
ing
141 Memory capacity in the encoder for
electronic type plate too small
142 to 143 reserved
not assigned = 0
adjustable Use an encoder module with temperature mea-
suring
adjustable Use another encoder with a greater memory
Compact manual b maXX® BM4400, BM4600, BM4700
Document no.: 5.06014.02
71
of 94
Page 72

8.2
Troubleshooting
Error encoder manager P0210
Error no. Meaning Reaction Troubleshooting
144 Absolute position of encoder 1
unknown
145 Absolute position of encoder 2
unknown
146 Encoder module 1 is missing IS Check, if the right encoder is connected to
147 Encoder module 2 is missing IS Check, if the right encoder is connected to
148 Encoder module for measured value
storage is missing
149 At resolver no measured value storage
possible
150 Triggering not possible, because no
incremental encoder
151 Digital I/o-module is missing IS Install the digital I/O-Module
152 Incremental encoder emulation module
is necessary and is missing
153 Encoder module 1 is necessary for
incremental encoder emulation and is
missing
IS Use another encoder
IS Use another encoder
module position A
module position B
IS Install the encoder module
IS Use a SinCos- or incremental encoder
IS Use for this option an incremental
incremental encoder
IS Install the incremental encoder-
emulation module
IS Install the encoder module to slot A
154 Encoder module 2 is necessary for
incremental encoder emulation and is
missing
155 Initialization error of the incremental
encoder-emulation module
156 Incremental encoder-emulation module
(HW) signals error
157 Error incremental encoder emulation
module
158 SSI encoder emulation module is miss-
ing
159 Error in setpoint source encoder 1 or 2 IS See encoder error message
IS Install encoder module to slot B
IS Restart system
IS Restart system, if error message recur change
the module
IS Use for this option an incremental encoder
IS Install the SSI-encoder-emulation module
72
of 94
Compact manual b maXX® BM4400, BM4600, BM4700
Document no.: 5.06014.02 Baumüller Nürnberg GmbH
Page 73

Error detection and troubleshooting
Error drive manager P0211
Error no. Meaning Reaction Troubleshooting
8
160 Timeout communication adjustable Remove the timeout of the
161 Timeout BACI adjustable Remove the timeout of the BACI communica-
162 Timeout cyclic communication adjustable Remove the timeout of the
163 Timeout required data adjustable Remove the timeout of the required data com-
164 Field bus error adjustable Check the field bus communication
165 Controller not synchronous to external
signal
166 Error at brake control IS Check the wiring and the function of the brake
167 No release of holding brake when start-
ing the drive
168 No closing of holding brake at stopping
of drive
169 Error holding brake status (cyclic moni-
toring)
adjustable set the Sync-Offset and / or
IS Check the holding brake
adjustable Check the holding brake
adjustable Check the holding brake
Proprog communication
tion option module
cyclic communication:
munication
Sync-tolerance
170 Error holding brake lining adjustable Check the holding brake
171 Initialize holding brake error IS Check, if there is a DIO module, if it is in the
172 Error holding brake: holding torque not
reached
173 to 175 reserved
not assigned = 0
IS Ensure that the torque limits are not set too
correct position and if it is correctly parameter
ized (also see P0883)
small
|P1402| < Min (|P1036|, |P1037|, |P1038|)
-
Compact manual b maXX® BM4400, BM4600, BM4700
Document no.: 5.06014.02
73
of 94
Page 74

8.2
Troubleshooting
Error data record manager P02 12
Error no. Meaning Reaction Troubleshooting
176 EEPROM copy error adjustable Copy the data set once more
177 Write timeout EEPROM adjustable The data in the EEPROM are invalid, please
178 Checksum error EEPROM IS EEPROM faulty or described faulty
179 No boot data set IS The data in the EEPROM are invalid, please
180 Incompatible s o ftw are IS The data in the EEPROM are invalid, please
181 There is no data set adjustable The data in the EEPROM are invalid, please
182 Checksum error im PSI module adjustable PSI EEPROM faulty or described faulty
183 PSI is reset adjustable Please save all data records
184 PSI data invalid adjustable The data in the PSI are invalid, please save all
185 Autotuning tables invalid. adjustable Restart autotuning
186 A/D correction table invalid adjustable Replace the controller cartridge
187 EEPROM is reset IS The data in the EEPROM are invalid, please
safe all data records
safe all data records
safe all data records
safe all data records
data records
safe all data records
188 to 191 reserv ed
not assigned = 0
74
of 94
Compact manual b maXX® BM4400, BM4600, BM4700
Document no.: 5.06014.02 Baumüller Nürnberg GmbH
Page 75

Error detection and troubleshooting
Error position controller P0213
Error no. Meaning Reaction Troubleshooting
192 Position deviation dynamic adjustable Rem ove the dynamical position deviation error
193 Position deviation static adjustable Remove the statical position deviation error
8
194 Encoder 1 is used for position control,
but is inactive.
This error is also shown, if the faulty
positioning is in one of the inactive data
records.
195 Encoder 2 is used for position control,
but is inactive.
This error is also shown, if the faulty
positioning is in one of the inactive data
records.
196 Software limit switch 1 exceeded adjustable Check the target position with the by the limit
197 Software limit switch 2 exceeded adjustable Check the target position with the by the limit
198 Hardware limit switch 1 exceeded adjustable Chec k the target position with the by the limit
199 Hardware limit switch 2 exceeded adjustable Chec k the target position with the by the limit
200 Homing necessary and not yet exe-
cuted
201 Setpoint in mode
Set-of-setpoints didn’t arrive in time
IS Activate encoder 1
IS Activate encoder 2
switch enabled travelling range
switch enabled travelling range
switch enabled travelling range
switch enabled travelling range
adjustable Execute homing
adjustable Assure, that positioning data and handshake
take place in time
(also see parameter manual)
202 Target position v Modulo position Adjustable Minimize target position or
203 Spindle positioning:
Error while initialization of the trigger
204 Spindle positioning:
Timeout at trigger signal
205 Error occured while executing homing Adjustable Check the function of the reference switch and
206 to 207 not assigned = 0
Adjustable Used encoder without triggersignal (zero pulse)
Adjustable Check encoder for zero pulse; check encoder
adjust Modulo position P1239
or incorrect adjustment in P1425 spindle posi
tioning mode
connector; check zero pulse signal by means of
the toggle bit (encoder 1/2 status bit 8)
the hardware limit switch; adjust the encoder
input selection where necessary; select only
supported homing methods
Compact manual b maXX® BM4400, BM4600, BM4700
Document no.: 5.06014.02
-
75
of 94
Page 76

8.2
Troubleshooting
Error speed controller P0214
Error no. Meaning Reaction Troubleshooting
208 Drive blocked IS Remove the blockade of the drive
209 Encoder 1 is parameterized as encoder
for the motor control, but the evaluation
is not activated. This error is also
shown, if the faulty positioning is in one
of the inactive data records.
210 Encoder 2 is parameterized as encoder
for the motor control, but the evaluation
is not activated. This error is also
shown, if the faulty positioning is in one
of the inactive data records.
211 Overspeed
Open loop
212 to 223 not assigned = 0
IS You have got to either activate the encoder in
the encoder 1 (mode P0150) or you set the
encoder 2 as encoder for the position control
(parameter P1030)
IS You have got to either activate the encoder in
the encoder 2 (mode P0160) or you set the
encoder 1 as encoder for the position control
(parameter P1030)
IS Check parameterization and reduce speed
Error free control section P0215
Error no. Meaning Reaction Troubleshooting
224 to 234 Not assigned = 0 adjustable
235 Torque coupling: General error in the
master
adjustable
236 Torque coupling: Operating mode in
the slave is not speed control
237 C onfiguration error reaction return
motion is invalid
238 Return motion destination was not rea-
ched
239 Application error
(enabled by P0302 bit 1)
IS
IS
adjustable
adjustable
Error CANsync P0216
Error no. Meaning Reaction Troubleshooting
240 to 245 not assigned = 0 no reaction Check the parameterization of the
DC-parameters, see parameter manual
246 Invalid DIP switch settings according
to setting
247 to 255 not assigned = 0
Correct the wrong setting of the
DIP switch on the module
76
of 94
Compact manual b maXX® BM4400, BM4600, BM4700
Document no.: 5.06014.02 Baumüller Nürnberg GmbH
Page 77

Error detection and troubleshooting
3. Level Error power unit - serial interface P0233
(communication error to the power unit)
Error code Meaning Troubleshooting
6 Data overflow Error indicates high EMC problems; please reduce
7 Bit frame error Error indicates high EMC problems; please reduce
8 Invalid command state Contact Baumüller
these.
Contact Baumüller
these.
Contact Baumüller
8
9 Parity error Restart of b maXX
10 Checksum error Error indicates high EMC problems; please reduce
11 Unknown error code Error indicates high EMC problems; please reduce
12 Data number error Error indicates high EMC problems; please reduce
13 Invalid argument Error indicates high EMC problems; please reduce
14 Data field is write protected Error indicates high EMC problems; please reduce
15 Invalid access code Error indicates high EMC problems; please reduce
16 Data field is not changeable in its size Error indicates high EMC problems; please reduce
these.
Contact Baumüller
these.
Contact Baumüller
these.
Contact Baumüller
these.
Contact Baumüller
these.
Contact Baumüller
these.
Contact Baumüller
these.
Contact Baumüller
®
17 Word address outside of data field Error indicates high EMC problems; please reduce
18 Data field is nonexistent Error indicates high EMC problems; please reduce
these.
Contact Baumüller
these.
Contact Baumüller
Compact manual b maXX® BM4400, BM4600, BM4700
Document no.: 5.06014.02
77
of 94
Page 78

8.2
Troubleshooting
Error code Meaning Troubleshooting
36 Wrong data checksum Error indicates high EMC problems; please reduce
37 No response Error indicates high EMC problems; please reduce
these.
Contact Baumüller
these.
Contact Baumüller
66 Inv alid respo nse Restart of b maXX
®
2 encoders can be connected to a b ma XX® 4400 at most. Accordingly maximum errors
can appear in function module 1 and function module 2. The term ’encoder 1’ or ’encoder
2’ in the column ’device part’ stands for one of the five currently existing encoder module
types.
Error encoder 1 - serial interface P0234
Error encoder 2 - serial interface P0235
(communication error after HIPERFACE® specification in the encoder 1 /encoder 2)
Error code M eaning Troubleshooting
1 Analog signals outside specification Check the encoder cable and if the encoder has been
connected correctly.
2 Error in internal angle offset Check the encoder cable and if the encoder has been
3 Data field partitioning table destroyed Check the encoder cable and if the encoder has been
connected correctly.
connected correctly.
78
of 94
4 Analog limit values not available Check the encoder cable and if the encoder has been
connected correctly.
5 Internal I2C-bus not operative Check the encoder cable and if the encoder has been
connected correctly.
6 Internal checksum error Check the encoder cable and if the encoder has been
connected correctly.
7 Internal watchdog error - encoder reset Check the encoder cable and if the encoder has been
connected correctly.
8 Overflow of the counter Check the encoder cable and if the encoder has been
connected correctly.
9 Parity error Check the encoder cable and if the encoder has been
connected correctly.
10 Check sum error Check the encoder cable and if the encoder has been
connected correctly.
11 Unknown error code Check the encoder cable and if the encoder has been
connected correctly.
Compact manual b maXX® BM4400, BM4600, BM4700
Document no.: 5.06014.02 Baumüller Nürnberg GmbH
Page 79

Error detection and troubleshooting
Error code Meaning Troubleshooting
12 Data number error Check the encoder cable and if the encoder has been
connected correctly.
8
13 Invalid argument Check the encoder cable and if the encoder has been
14 Data field is write protected Check the encoder cable and if the encoder has been
15 Invalid access code Check the encoder cable and if the encoder has been
16 Data field is not changeable in its size Check the encoder cable and if the encoder has been
17 Word address outside of data field Check the encoder cable and if the encoder has been
18 Data field is nonexistent Check the encoder cable and if the encoder has been
19 to 27 reserved
28 Absolute monitoring of the analog signals Check the encoder cable and if the encoder has been
29 Transmission current critical Check the encoder cable and if the encoder has been
30 En coder tem perat ure critical Check the motor temperature
connected correctly.
connected correctly.
connected correctly.
connected correctly.
connected correctly.
connected correctly.
connected correctly.
connected correctly.
31 Rotational speed too high - no formation of
positioning possible
32 Po sition singleturn unreliable Internal encoder error
33 Multiturn position error Internal encoder error
34 Multiturn position error Internal encoder error
35 Multiturn position error Internal encoder error
36 Invalid power unit data checksum Check the encoder cable and if the encoder has been
37 No response from encoder Check the encoder cable and if the encoder has been
38 En coder address unknown Check the encoder cable and if the encoder has been
39 Er ror reading the absolute angle position Check the encoder cable and if the encoder has been
Check the encoder cable and if the encoder has been
connected correctly.
Contact Baumüller
Contact Baumüller
Contact Baumüller
Contact Baumüller
connected correctly.
connected correctly.
connected correctly.
connected correctly.
Compact manual b maXX® BM4400, BM4600, BM4700
Document no.: 5.06014.02
79
of 94
Page 80

8.2
Troubleshooting
Error code Meaning Troubleshooting
40 Invalid checksum of received data Check the encoder cable and if the encoder has been
connected correctly.
41 Unknown encoder type Check the encoder cable and if the encoder has been
42 to 63 reserved
64 No response of HIPERFACE® encoder Check the encoder cable and if the encoder has been
65 No response from EnDat encoder Check the encoder cable and if the encoder has been
66 Useless response to encoder comm and Check the encoder cable and if the encoder has been
67 Type of encoder is not applicable Use an other type of encoder
68 to 79 reserved
80 CRC has determined an error Check the encoder cable and if the encoder has been
81 Invalid command Check the encoder cable and if the encoder has been
82 Error in response telegram Check the encoder cable and if the encoder has been
connected correctly.
connected correctly.
connected correctly.
connected correctly.
connected correctly.
connected correctly.
connected correctly.
83 Alarm bit is set Restart the system
84 Mem ory is occupied Check the encoder cable and if the encoder has been
85 Inco rrect data checksum Check the encoder cable and if the encoder has been
86 Motor data length and/or data version of
encoder and controller firmware are not
identical
87 No EnDat interface Check the encoder cable and if the encoder has been
88 Exceeding of transmission format which is
able to be evaluated
89 Ex ceeding of the evaluable
measuring step length
90 Signal period length < measuring step
length
91 EnDat 2.2: Error during initialization the
master module
connected correctly.
connected correctly.
Check the encoder cable and if the encoder has been
connected correctly.
connected correctly.
Use another
length measuring system type
Use another
length measuring system type
Use another
length measuring system type
80
of 94
Compact manual b maXX® BM4400, BM4600, BM4700
Document no.: 5.06014.02 Baumüller Nürnberg GmbH
Page 81

Error detection and troubleshooting
Error code Meaning Troubleshooting
92 EnDat 2.2: Timeout during measuring the
signal propagation time
8
93 En Dat 2.2: Error - propagation time com-
94 En Dat 2.2:Type of encoder does not sup-
95 EnDat 2.2: No RM-Bit is set, encoder abso-
96 Er ror lighting Connect encode r
97 Er ror signal amplitude Connect encoder
98 Er ror position value Connect encoder
99 Er ror overv o ltage Exchange the encoder module
100 Error undervoltage Exchange the encoder module
101 Error overcurrent Exchange the encoder module
102 Error battery Connect encoder
103 to 111 reserved
112 Position error detected during multiple
pensation is switched off
port EnDat2.2 (introduction set, power supply, clock frequency)
lute position is not referenced
request
113 Error triggered by additional info 1 Fehler durch Zusatzinfo 1 ausgelöst
114 Error triggered by additional info 2 Fehler durch Zusatzinfo 2 ausgelöst
115 Error triggered by additional info 3 Fehler durch Zusatzinfo 3 ausgelöst
116 Error triggered by additional info 4 Fehler durch Zusatzinfo 4 ausgelöst
117 Error triggered by additional info 5 Fehler durch Zusatzinfo 5 ausgelöst
118 Error triggered by additional info 6 Fehler durch Zusatzinfo 6 ausgelöst
119 Error triggered by additional info 7 Fehler durch Zusatzinfo 7 ausgelöst
Compact manual b maXX® BM4400, BM4600, BM4700
Document no.: 5.06014.02
81
of 94
Page 82

8.2
Troubleshooting
Error Function module A to E P0240 to P0244
Level 3 error
no.
0 Reserved error
1 Module not detected adjustable Check if the correct module is located at the correct slot
2 Module not permitted at this
position
3 24 V missing or output short-
circuited
4 Wrong target parameter value
by digital input
5 Direct PLC -I/O access for this
module not permitted
6 Reserved error
7 Module not allowed in control-
ler
8 to 15 Reserved error
Meaning Reaction Troubleshooting
adjustable Check if the correct module is located at the correct slot
adjustable Check the wiring of the digital outputs
adjustable Check the parametrization of the input channel
adjustable Do not select the module
IS Remove the module
82
of 94
Compact manual b maXX® BM4400, BM4600, BM4700
Document no.: 5.06014.02 Baumüller Nürnberg GmbH
Page 83

Error detection and troubleshooting
Error option module G to M P0245 to P0250
Sub-error no. Meaning Reaction Troubleshooting
8
4096 Wrong parameter no. at setpoint
parameter 1
4097 Wrong parameter no. at setpoint
parameter 2
4098 Wrong parameter no. at setpoint
parameter 3
4099 Wrong parameter no. at setpoint
parameter 4
4100 Wrong parameter no. at setpoint
parameter 5
4101 Wrong parameter no. at setpoint
parameter 6
4102 Wrong parameter no. at setpoint
parameter 7
4103 Wrong parameter no. at setpoint
parameter 8
4104 Wrong parameter no. at setpoint
parameter 9
4105 Wrong parameter no. at setpoint
parameter 10
adjustable Check the according setpoint parameter
adjustable Check the according setpoint parameter
adjustable Check the according setpoint parameter
adjustable Check the according setpoint parameter
adjustable Check the according setpoint parameter
adjustable Check the according setpoint parameter
adjustable Check the according setpoint parameter
adjustable Check the according setpoint parameter
adjustable Check the according setpoint parameter
adjustable Check the according setpoint parameter
4106 Wrong parameter no. at setpoint
parameter 11
4107 Wrong parameter no. at setpoint
parameter 12
4108 Wrong parameter no. at setpoint
parameter 13
4109 Wrong parameter no. at setpoint
parameter 14
4110 Wrong parameter no. at setpoint
parameter 15
4111 Wrong parameter no. at setpoint
parameter 16
4112 Wrong parameter no. at actual value
parameter 1
4113 Wrong parameter no. at actual value
parameter 2
adjustable Check the according setpoint parameter
adjustable Check the according setpoint parameter
adjustable Check the according setpoint parameter
adjustable Check the according setpoint parameter
adjustable Check the according setpoint parameter
adjustable Check the according setpoint parameter
adjustable Check the according actual value parameter
adjustable Check the according actual value parameter
Compact manual b maXX® BM4400, BM4600, BM4700
Document no.: 5.06014.02
83
of 94
Page 84

8.2
Troubleshooting
Sub-error no. Meaning Reaction Troubleshooting
4114 Wrong parameter no. at actual value
parameter 3
4115 Wrong parameter no. at actual value
parameter 4
4116 Wrong parameter no. at actual value
parameter 5
4117 Wrong parameter no. at actual value
parameter 6
4118 Wrong parameter no. at actual value
parameter 7
4119 Wrong parameter no. at actual value
parameter 8
4120 Wrong parameter no. at actual value
parameter 9
4121 Wrong parameter no. at actual value
parameter 10
4122 Wrong parameter no. at actual value
parameter 11
4123 Wrong parameter no. at actual value
parameter 12
adjustable Check the according actual value parameter
adjustable Check the according actual value parameter
adjustable Check the according actual value parameter
adjustable Check the according actual value parameter
adjustable Check the according actual value parameter
adjustable Check the according actual value parameter
adjustable Check the according actual value parameter
adjustable Check the according actual value parameter
adjustable Check the according actual value parameter
adjustable Check the according actual value parameter
4124 Wrong parameter no. at actual value
parameter 13
4125 Wrong parameter no. at actual value
parameter 14
4126 Wrong parameter no. at actual value
parameter 15
4127 Wrong parameter no. at actual value
parameter 16
4128 Invalid value at
setpoint parameter no. 1
4129 Invalid value at
setpoint parameter no. 2
4130 Invalid value at
setpoint parameter no. 3
4131 Invalid value at
setpoint parameter no. 4
4132 Invalid value at
setpoint parameter no. 5
adjustable Check the according actual value parameter
adjustable Check the according actual value parameter
adjustable Check the according actual value parameter
adjustable Check the according actual value parameter
adjustable Make sure that you have got correct values
within the permitted value range.
adjustable Make sure that you have got correct values
within the permitted value range.
adjustable Make sure that you have got correct values
within the permitted value range.
adjustable Make sure that you have got correct values
within the permitted value range.
adjustable Make sure that you have got correct values
within the permitted value range.
84
of 94
Compact manual b maXX® BM4400, BM4600, BM4700
Document no.: 5.06014.02 Baumüller Nürnberg GmbH
Page 85

Error detection and troubleshooting
Sub-error no. Meaning Reaction Troubleshooting
8
4133 Invalid value at
setpoint parameter no. 6
4134 Invalid value at
setpoint parameter no. 7
4135 Invalid value at
setpoint parameter no. 8
4136 Invalid value at
setpoint parameter no. 9
4137 Invalid value at
setpoint parameter no. 10
4138 Invalid value at
setpoint parameter no. 11
4139 Invalid value at
setpoint parameter no. 12
4140 Invalid value at
setpoint parameter no. 13
4141 Invalid value at
setpoint parameter no. 14
4142 Invalid value at
setpoint parameter no. 15
adjustable Make sure that you have got correct values
within the permitted value range.
adjustable Make sure that you have got correct values
within the permitted value range.
adjustable Make sure that you have got correct values
within the permitted value range.
adjustable Make sure that you have got correct values
within the permitted value range.
adjustable Make sure that you have got correct values
within the permitted value range.
adjustable Make sure that you have got correct values
within the permitted value range.
adjustable Make sure that you have got correct values
within the permitted value range.
adjustable Make sure that you have got correct values
within the permitted value range.
adjustable Make sure that you have got correct values
within the permitted value range.
adjustable Make sure that you have got correct values
within the permitted value range.
4143 Invalid value at
setpoint parameter no. 16
4144 Invalid value for
Setpoint period
4145 Invalid value for
Actual value period
4146 False value for
Cycle offset setpoints
4147 False value for
Cycle offset actual values
4148 BACI timeout at
cyclic data
4149 BACI timeout at
Service data
4150 Check results in faulty checksum IS E xecute a restart by switching on and off
4151 ramp-up Timeout when waiting for the
slave type or when waiting for the
resetting of config-pending-flag
4152 Invalid data transfer structure type adjustable Contact Baum üller
adjustable Make sure that you have got correct values
within the permitted value range.
adjustable Make sure that you have got correct values
within the permitted value range.
adjustable Make sure that you have got correct values
within the permitted value range.
adjustable Make sure that you have got correct values
within the permitted value range.
adjustable Make sure that you have got correct values
within the permitted value range.
adjustable Check the communication rate with the
adjusted timeout P0839
adjustable
adjustable Execute a restart by switching on and off
Compact manual b maXX® BM4400, BM4600, BM4700
Document no.: 5.06014.02
85
of 94
Page 86

8.2
Troubleshooting
Sub-error no. Meaning Reaction Troubleshooting
4153 Internal error: Wrong BACI status adjustable Contact Baumüller
4154 Access conflicts with slave at cyclic
Communication:
4155 Error cyclic Communication: Parameter
value wrong
4156 Error cyclic Communication: Alive-
counter conflict
4157 Cmd interface: Channel number wrong
(0 or > 6)
4158 Cmd interface: The channel which was
indicated does not exist
4159 Cmd interface: Internal error - wrong
pointer
4160 Cmd interface: Internal error - wrong
status
4161 Cmd interface: Wrong package number adjustable Contact Baumüller
4162 Cmd interface: Wrong command num-
ber
4163 Cmd interface: Wrong status when
handling the package
adjustable Contact Baumüller
adjustable Contact Baumüller
adjustable Check the value of the transmitted parameter
adjustable Check if the option module and the controller
are synchronous.
adjustable Contact Baumüller
adjustable Contact Baumüller
adjustable Contact Baumüller
adjustable Contact Baumüller
adjustable Contact Baumüller
4164 Cmd interface: Timeout at command
processing
4165 Cmd interface: Wrong package length adjustable Contact Baumüller
4166 Cmd interface: Descriptor not available adjustable Contact Baumüller
4167 Cmd interface: Wrong package type adjustable Contact Baumüller
4168 Cmd interface: Checksum error adjustable Contact Baumüller
4169 Module identification: PCI-error when
reading
4170 Module identification: PCI-error when
writing
4171 Module identification: general reading
error
4172 Module identification: general error at
writing
4173 Internal error adjustable Contact Baumüller
adjustable Contact Baumüller
adjustable Check the reliability performance of the option
module
adjustable Check the reliability performance of the option
module
adjustable Check the reliability performance of the option
module
adjustable Check the reliability performance of the option
module
86
of 94
Compact manual b maXX® BM4400, BM4600, BM4700
Document no.: 5.06014.02 Baumüller Nürnberg GmbH
Page 87

Error detection and troubleshooting
Sub-error no. Meaning Reaction Troubleshooting
8
4174 Configuration cyclic services: Parame-
ters are not cyclic writable
4175 Configuration cyclic services: Invalid
parameter number
4176 Wrong option module error code adjustable Contact Baumüller
4177 to 8191 reserved
8192 Error CANopen timeout on CAN bus adjustable Error node guarding
adjustable Select another parameter
adjustable Select another parameter
8.2.3 Parameter description – warnings (warning bit list)
Warning power supply P0261
Warning no. Meaning Troubleshooting
0 reserved warning
1 Undervoltage 24V Assure the compliance with the specification
Further information is to be found in programming manual CANopen Slave for b maXX®
controller
2 Mains undervoltage Assure the compliance with the mains specification
3 Mains overvoltage Assure the compliance with the mains specification
4 Mains failure Restore the mains supply
5 Phase failure Check if all phases are correctly connected and volt-
6 to 15 reserved warning
age-carrying
Compact manual b maXX® BM4400, BM4600, BM4700
Document no.: 5.06014.02
87
of 94
Page 88

8.2
Troubleshooting
Warnings power unit P0262
Warning no. Meaning Troubleshooting
16 Inside temperature of device Establish the specified environmental conditions,
17 Heatsink temperature Reduce the power output, check the fans of the device
18 Timeout at DC link charging Check the mains phase sequence (clockwise phase
19 not assigned = 0
20 Safety relay not controlled Check the cabling of the safety relay
21 to 22 reserved warning
23 Difference of voltage
Mains DC link > 40 V
24 Ixt-threshold 1 is exceeded Take steps, so that the Ixt actual value doesn’t exceed
25 to 31 reserved warning
assure correct ventilation conditions
sequence) and avoid taking energie from the DC link
during charging
Check the power connections
100 %
Warnings motor P0263
Warning no. Meaning Troubleshooting
32 Temperature threshold 1 exceeded Reduce the power output of the motor
33 Temperature threshold 2 exceeded Reduce the power output of the motor
34 I²t threshold exceeded Reduce the power output of the motor
35 to 47 reserved warning
88
of 94
Compact manual b maXX® BM4400, BM4600, BM4700
Document no.: 5.06014.02 Baumüller Nürnberg GmbH
Page 89

Table of figures
Table of figures
Position of type key label ............................................................................................................. 9
Mounting instruction BM441X, BM442X-S, BM443X-S/Z, BM463X-S/Z, BM444X-S/Z, BM464X-S/Z
14
Mounting instruction BM445X-S/Z, BM465X-S/Z, BM446X-S/Z and BM466X-S/Z.................... 15
Mounting instruction BM447X-A/F and BM477X-FXX-3XXXX................................................... 16
Mounting instruction ’miscellaneous’.......................................................................................... 17
Connection diagram with a directly controlled motor brake ....................................................... 20
Connection diagram with motor brake controlled via an additional relay................................... 21
Connection fan BM447X-A......................................................................................................... 22
Electrical connections for mains, motor, upon others for BM4412 and BM4413 ....................... 23
Electrical connections for mains, motor, upon others for BM4414............................................. 24
Electrical connections for mains, motor, upon others for BM442X ............................................ 25
Electrical connections for mains, motor, upon others for BM443X and BM463X....................... 26
Electrical connections for mains, motor, upon others for BM444X and BM464X
*) only BM444X-S/-A................................................... ....... ...................................... ....... ........... 27
Electrical connections for mains, motor, upon others for BM445X, BM465X,BM446X and BM466X
*) only BM445X-S/-A and BM446X-S/-A.................................................................................... 28
Electrical connections for mains, motor, upon others for BM466X and BM476X....................... 29
Electrical connections for mains, motor, upon others for BM4755............................................. 30
Electrical connections for mains, motor, upon others for BM447X and BM4773
*)only BM447X-/-A ..................................................................................................................... 31
Connection X100 and connections of the controller unit............................................................ 32
ProDrive: Start window... ...... ....... ....................................... ...... ....... ...... ...... ....... ...... ....... ..... ...... 37
ProDrive: version conflict ............................... ....................................... ...... ....... ...... ....... ..... ...... 38
ProDrive: Select device........ ....... ...... ....... ...... ....... ...... ....... ...... ....... ...... ..................................... 39
ProDrive: Startpage.. ...... ...... ....... ...... ....... ...... ....... ...................................... ....... ...... ....... ........... 40
ProDrive: Navigation ................................................... ....... ...... ....... ...... ...... ....... ...... ....... ........... 40
Starting sequence .......... ...... ....... ...... ....... ...... ....... ...... ....... ...... ....... ...... ..................................... 42
ProDrive: Navigation ................................................... ....... ...... ....... ...... ...... ....... ...... ....... ........... 44
ProDrive: Drive Manager...... ....... ...... ....... ...... ....... ...... ....... ...... ....... ...... ..................................... 45
ProDrive: Navigation ................................................... ....... ...... ....... ...... ...... ....... ...... ....... ........... 46
ProDrive: Power unit ................... ...... ....... ...... ....... ...... ....... ...... ....... ........................................... 46
ProDrive: Startpage.. ...... ...... ....... ...... ....... ...... ....... ...................................... ....... ...... ....... ........... 47
ProDrive: Encoder 1 configuration ............................................................................................. 48
ProDrive: Navigation ................................................... ....... ...... ....... ...... ...... ....... ...... ....... ........... 49
ProDrive: Motor database ........... ...... ....... ....................................... ...... ...... ....... ...... ....... ...... ..... 49
ProDrive: Selection of the motor................................................................................................ 49
ProDrive: Motor.............................................. ....... ...... ....... ...... ....... ...... ...... ............................... 51
ProDrive: Parameter list........................................................................ ...... ....... ...... ....... ........... 52
ProDrive: Data set management....... ....... ...... ....... ...... ....... ...................................... ....... ...... ..... 52
ProDrive: Data set management....... ....... ...... ....... ...... ....... ...................................... ....... ...... ..... 53
ProDrive: Drive manager dialogue............................................................................................. 54
ProDrive: Find notch position: Drive manager ........................................................................... 54
ProDrive: Ramp function generator............................................................................................ 55
ProDrive: Drive manager dialogue............................................................................................. 56
ProDrive: Ramp function generator - Drive manager................................................................. 56
ProDrive: Data set management - icon bar................................................................................ 57
ProDrive: Data set management....... ....... ...... ....... ...... ....... ...................................... ....... ...... ..... 57
Compact manual b maXX® BM4400, BM4600, BM4700
Document no.: 5.06014.02
89
of 94
Page 90

Table of figures
90
of 94
Compact manual b maXX® BM4400, BM4600, BM4700
Document no.: 5.06014.02 Baumüller Nürnberg GmbH
Page 91

Index
C
Commissioning 33
Connection diagrams 23
Connection torque 28
Connection X100 32
Connections of the controller part 32
Cooling type 10
Current grading 10
Current limit reached 61
D
Device description 9
Device generation 10
Device management 63
Display elements 60
E
Electrical connections 23, 24
Enable signals 59
Encoder data (data sheet) 35
Error 61
Error detection 63
Error list 64
Error messages 64
Error parameters 64
Error rea c tions 64
Executing commissioning 43
F
Find notch position 54
FunktionsModul 82
H
Hardware type 10
HIPERFACE 77
I
Installation 19
Introduction 5
L
LED 60
LED H-2 43
LED H2 63
LED H-3 43
LED H-4 43
LED H4 63
Legal information 7
M
Mains type 10
Marking 9
Memory module PSI 32
Motor control 36
Motor data (data sheet) 35
Motor data (type plate) 35
Motor type 35
Mounting 13
N
Notch position 35
Number of pole pairs 35
O
Operating program 61
Operating status 60
Operation 59
Option module 83
P
Parameter list 63
Parameterization 63
PPR count 35
Preconditions 34
Preparations 34
Pulse enable 35, 59, 60
Q
Quickstop 59
R
Reset errors 64
RS232 36
RS232-cable connector 43
S
Safety instructions 7
Safety relay 10, 22, 68, 88
Screws 14
Signal level 59
Size of cabinet 10
Starting sequence 42
State of software 11
Switching elements 35
Switch-on frequency 59
T
Torque direction 1 60
Torque direction 2 60
Troubleshooting 63
Type 10
Type key 9
plug-in card 11
W
Warnings 87
Washers 14
WinBASS II 43, 63
Compact manual b maXX® BM4400, BM4600, BM4700
Document no.: 5.06014.02
91
of 94
Page 92

Index
92
of 94
Compact manual b maXX® BM4400, BM4600, BM4700
Document no.: 5.06014.02 Baumüller Nürnberg GmbH
Page 93

Revision survey
Revision survey
Version Date of
issue
5.06014.01 15.05.2006 First edition
5.06014.02 24.05.2011 ProDrive added. BM4600 und BM4700 integrated.
Changings
Compact manual b maXX® BM4400, BM4600, BM4700
Document no.: 5.06014.02
93
of 94
Page 94

Notes:
94
of 94
Compact manual b maXX® BM4400, BM4600, BM4700
Document no.: 5.06014.02 Baumüller Nürnberg GmbH
Page 95

Page 96

Baumüller Nürnberg GmbH Ostendstraße 80-90 90482 Nürnberg T: +49(0)911-5432-0 F: +49(0)911-5432-130
All information given in this manual is customer information, subject to change without notice. We reserve the right to futher develop and actualize
our products continuously using our permanent revision service. Please notice, that specifications/data/information are current values according to the printing date.
These statements are not legally binding according to the measurement, computation and calculations. Before you make any information given in this manual to the basis
of your own calculations and/or applications, please make sure that you have the latest edition of the information in hand.
No liability can be accepted concerning the correctness of the information.
www.baumueller.de
 Loading...