

Page 1

HOME CINEMA
CINEVERSUM 60/70
INSTALLATION MANUAL
22042004 R5976763/00
Page 2

Barco nv Home Cinema
aan 5, B-8520 Kuurne
Noordl
Phone: +32 56.36.89.69
Fax: +32 56.36.83.54
salesassistantht.bci@barco.com
E-mail:
Visit us at the web: www.homecinema.barco.com
Printed in Taiwan
Page 3
Changes
Barco provides this manual ’as is’ without warranty of any kind, either expressed or implied, including but not limited to the implied warranties or merchantability and fitness for a particular purpose. Barco may make improvements and/or changes to the product(s) and/or the
program(s) described in this publication at any time without notice.
This publication could contain technical inaccuracies or typographical errors. Changes are periodically made to the information in this
publication; these changes are incorporated in new editions of this publication.
Copyright ©
All rights reserved. No part of this document may be copied, reproduced or translated. It shall not otherwise be recorded, transmitted or
stored in a retrieval system without the prior written consent of Barco.
Federal Communications Commission (FCC Statement)
This equipment has been tested and found to comply with the limits for a class B digital device, pursuant to Part 15 of the FCC r
These limits are designed to provide reasonable protection against harmful interference when the equipment is operated in a residential
environment. This equipment generates, uses, and can radiate radio frequency energy and, if not installed and used in accordance with the
instruction manual, may cause harmful interference to radio communications. Operation of this
cause harmful interference in which case the user is encouraged to try to correct the interference by one or more of the following measures.
Introduction to the user :
If this equipment does cause interference to radio or television reception, the user may try to correct the interference by one or more of the
following measures :
• Re-orientation of the receiving antenna for the radio or television.
• Relocate the equipment with respect to the receiver.
• Plug the equipment into a different outlet so that the equipment and receiver are on different branch circuits.
• Fasten cables connectors to the equipment by mounting screws.
The use of shielded cables is required to comply within the limits of Part 15 of FCC rules and EN55022.
equipment in a residential area is likely to
ules.
Guarantee and Compensation
Barco provides a guarantee relating to perfect manufacturing as part of the legally stipulated terms of guarantee. On receipt, the purchaser
must immediately inspect all delivered goods for damage incurred during tr
must be informed immediately in writing of any complaints.
The period of guarantee begins on the date of transfer of risks, in the case of special systems and software on the date of commissioning,
at latest 30 days after the transfer of risks. In the event of justified notice of compliant, Barco can repair the fault or provide a replacement
at its own discretion within an appropriate period. If this measure proves to be impossible or unsuccessful, the purchaser can demand a
reduction in the purchase price or cancellation of the contract. All other claims, in particular those relating to compensation for direct or
indirect damage, and also damage attributed to the operation of software as well as to other services provided by Barco, being a component
of the system or independent service, will be deemed invalid provided the damage is not proven to be attributed to the absence of properties
guaranteed in writing or due to the intent or gross negligence or part of Barco.
If the purchaser or a third party carries out modifications or repairs on goods delivered by Barco, or if the goods are handled incorrectly,
in particular if the systems are commissioned operated in
agreed upon in the contract, all guarantee claims of the purchaser will be rendered invalid. Not included in the guarantee coverage are
system failures which are attributed to programs or special electronic circuitry provided by the purchaser, e.g. interfaces. Normal wear as
well as normal maintenance are not subject to the
The environmental conditions as well as the servicing and maintenance regulations specified in the this manual must be complied with by
the customer.
correctly or if, after the transfer of risks, the goods are subject to influences not
guarantee provided by Barco either.
ansport, as well as for material and manufacturing faults Barco
Trademarks
Brand and product names mentioned in this manual may be trademarks, registered trademarks or copyrights of their respective holders.
All brand and product names mentioned in th
the products or their manufactures.
is manual serve as comments or examples and are not to be understood as advertising for
Page 4

Page 5

Table of contents
TABLE OF CONTENTS
1. Packaging and Dimensions ....................................................................................... 3
1.1 Boxcontent............................................................................................................................ 3
1.2 Projector Packaging................................................................................................................... 3
1.3 Dimensions............................................................................................................................ 4
2. Installation Guidelines.............................................................................................. 7
2.1 SafetyWarnings....................................................................................................................... 7
2.2 General ................................................................................................................................ 7
2.3 Projector Configuration andPosition................................................................................................. 8
2.4 SafetyArea aroundprojector ........................................................................................................10
2.5 Cleaning the lens. . ...................................................................................................................10
2.6 Vertical lens shift ..................................................................................................................... 11
2.7 BatteryInsertionin the Remote Control.............................................................................................12
2.8 Ceiling Mount assembly. . ............................................................................................................13
3. Connections.........................................................................................................15
3.1 Removing the Connector cover. . ....................................................................................................15
3.2 PowerConnection.................................................................................................................... 15
3.3 Input facilities . . . . .. ...................................................................................................................16
3.4 S-Video input .. . . . ....................................................................................................................17
3.5 Composite Video input ...............................................................................................................18
3.6 5-Cableinput.........................................................................................................................18
3.7 Component Input . ....................................................................................................................20
3.8 Digital Visual Interface (DVI) input. .. ................................................................................................21
3.9 Computer input (RGB analog) .. . .................................................................................................... 22
3.10 RS232-422 IN connection ........................................................................................................... 22
3.11 Trigger outputs . . . . ...................................................................................................................23
4. Getting Started......................................................................................................25
4.1 Terminology overview ................................................................................................................25
4.2 Switching on..........................................................................................................................27
4.3 Lampruntime......................................................................................................................... 27
4.4 Switching from operational mode to standby. .. .....................................................................................28
4.5 Switching off the projector ...........................................................................................................28
4.6 Temperature error DMD..............................................................................................................28
4.7 Using the RCU .......................................................................................................................28
4.8 Projector Address .................................................................................................................... 29
4.9 Controlling the projector..............................................................................................................29
5. Getting used to the menu structure.............................................................................31
5.1 How to start up the menus...........................................................................................................31
5.2 How to use the menus ............................................................................................................... 31
5.3 How to makeanadjustment ......................................................................................................... 32
5.4 Access Control viaa password...................................................................................................... 32
6. Source Selection ...................................................................................................33
6.1 Selecting a source ................................................................................................................... 33
7. ImageSettings menu ..............................................................................................35
7.1 Image settingsmenuoverview ...................................................................................................... 35
7.2 Startingthe Image settings menu ................................................................................................... 35
7.3 Brightness ............................................................................................................................36
7.4 Contrast............................................................................................................................... 36
7.5 Saturation.............................................................................................................................36
7.6 Tint (hue) . . ...........................................................................................................................37
7.7 Sharpness .. .......................................................................................................................... 38
7.8 Gamma ...............................................................................................................................38
7.9 Color Temperature ...................................................................................................................39
7.9.1 Predefined Color Temperature ................................................................................................ 39
7.9.2 Custom Color Balance ........................................................................................................40
7.9.3 Color standard . . ...............................................................................................................40
7.10 White peak ........................................................................................................................... 42
8. Advanced Settings.................................................................................................43
8.1 Advanced settings menu overview..................................................................................................43
8.2 Start up the Advanced settings ...................................................................................................... 43
8.3 AspectRatio..........................................................................................................................44
8.4 Image Position .......................................................................................................................46
8.4.1 Horizontal shift.................................................................................................................46
8.4.2 Horizontal size................................................................................................................. 47
8.4.3 Vertical shift....................................................................................................................48
8.4.4 Vertical size ....................................................................................................................49
8.5 Blanking ..............................................................................................................................50
R5976763 CINEVERSUM 60/70 22042004
1
Page 6

Table of contents
8.6 Input Balance. . . .. . ...................................................................................................................51
8.6.1 Introduction to Input Balance . .................................................................................................52
8.6.2 Adjusting the Input Balance for RGB signals .................................................................................53
8.6.3 Input balance for YUV signals. ................................................................................................54
8.6.4 Returning to the factory defaults ..............................................................................................55
9. Installation menu...................................................................................................57
9.1 Installation menu overview........................................................................................................... 57
9.2 Start up the Installation menu........................................................................................................ 57
9.3 Input Slots . . ..........................................................................................................................58
9.3.1 5 RCA input selection (RGB/component input) . . ............................................................................. 58
9.3.2 Reset a single input ...........................................................................................................59
9.3.3 Reset all inputs . ...............................................................................................................59
9.4 File service ...........................................................................................................................60
9.4.1 Auto search ....................................................................................................................60
9.4.2 Film mode......................................................................................................................60
9.4.3 Color Space....................................................................................................................61
9.5 Internal pattern ....................................................................................................................... 62
9.6 When no signal . .. . ................................................................................................................... 63
9.7 Source transition .....................................................................................................................63
9.8 OnScreen Display Configuration....................................................................................................64
9.8.1 Menu position..................................................................................................................64
9.8.2 Barscale status................................................................................................................65
9.8.3 Barscale position.............................................................................................................. 65
9.8.4 Messagestatus................................................................................................................66
9.9 Language support . ...................................................................................................................66
9.10 Vertical keystone.....................................................................................................................67
9.11 Horizontal keystone..................................................................................................................68
9.12 Global keystone......................................................................................................................69
9.13 Orientation............................................................................................................................69
10.Service menus ......................................................................................................71
10.1 Service menu overview.............................................................................................................. 71
10.2 Start up the Servicemenu........................................................................................................... 71
10.3 Identification screen .. ................................................................................................................72
10.4 Password.............................................................................................................................72
10.4.1 Enable-disable password. . ....................................................................................................72
10.4.2 Modify password...............................................................................................................73
10.5 IR address............................................................................................................................74
10.6 RS232 address .. . ....................................................................................................................74
10.7 Serial communication................................................................................................................74
10.7.1 Baudrate setup ................................................................................................................74
10.7.2 Serial communication interface selection.....................................................................................75
10.8 Thermal Diagnosis ...................................................................................................................76
10.9 I2C Diagnosis .. . . . ...................................................................................................................76
A. Specifications.......................................................................................................77
A.1 Specifications for CineVERSUM 60 .................................................................................................77
A.2 Specifications for CineVERSUM 70 .................................................................................................78
B. Maintenance .........................................................................................................81
B.1 Error reporting via the LEDs . . . . . ....................................................................................................81
Glossary .................................................................................................................83
Index......................................................................................................................85
2 R5976763 CINEVERSUM 60/70 22042004
Page 7
1. PACKAGING AND DIMENSIONS
Overview
• Box content
• Projector Packaging
• Dimensions
1.1 Box content
CEE7
European power plug to connect the power cord to the wall outlet.
ANSI 73.11
American power plug to connect the power cord to the wall outlet.
Content
• 1 CineVERSUM 60 or CineVERSUM 70 projector
• 1 remote control unit RCU + 2 batteries.
• 2 power cables with outlet plug type CEE7 and ANSI 73.11.
• 1 spanner to shift the lens
• 1 owners manual European languages (English, French, German, Italian, Spanish)
• 1 owners manual Asian languages (Chinese, Japanese)
• 1 installation manual
• 1 safety manual multilingual
1. Packaging and Dimensions
1.2 Projector Packaging
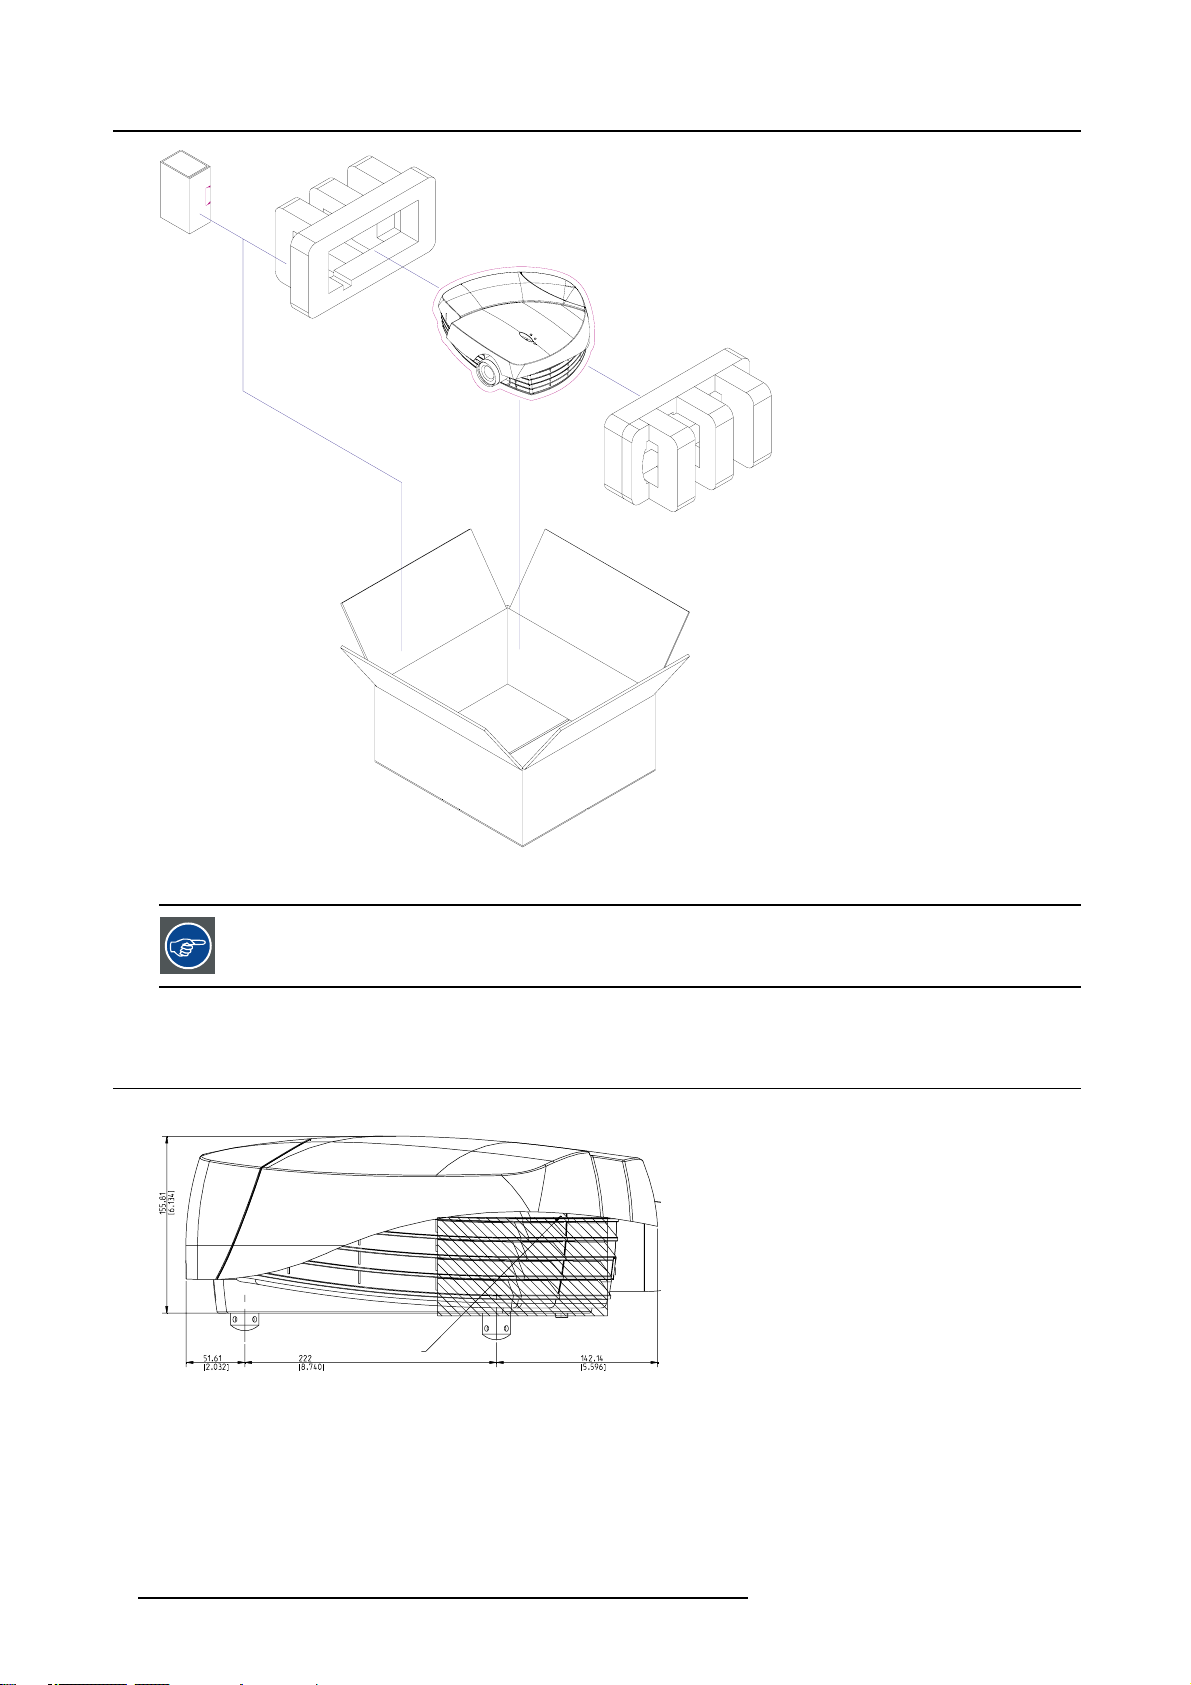
Way of Packaging
The projector is packed in a carton box. To provide protection during transportation, the projector is surrounded with foam. The
package is secured with banding and fastening clips.
To unpack
1. Pull off the adhesive tape or cut the adhesive tape but take care not to insert the knife too deep otherwise the projector can be
damaged.
2. Take the projector out of its shipping carton, remove the foam rubber and place it on a table. (image 1-1)
R5976763 CINEVERSUM 60/70 22042004
3
Page 8
1. Packaging and Dimensions
Image 1-1
Projector packaging
Save the original shipping carton and packing ma
projector. For maximum protection, repack your projector as it was originally packed at the factory.
1.3 Dimensions
Left side view
Image 1-2
Left side view
A Air outlet
terial, they will be necessary if you ever have to ship your
A
4
R5976763 CINEVERSUM 60/70 22042004
Page 9
Right side view
A
1. Packaging and Dimensions
A
Image 1-3
Right side view
A Air inlet
B Adjustable feet
Front view
Image 1-4
Front view
A Air outlet
B
R5976763 CINEVERSUM 60/70 22042004
5
Page 10

1. Packaging and Dimensions
Bottom view
C
A
Image 1-5
Bottom view
A Vertical lens shift bolt
B M8 bolt for security chain when ceiling mounted
C Air inlet
B
6
R5976763 CINEVERSUM 60/70 22042004
Page 11
2. Installation Guidelines
2. INSTALLATION GUIDELINES
Overview
• Safety Warnings
• General
• Projector Configuration and Position
• Safety Area around projector
• Cleaning the lens
• Vertical lens shift
• Battery Insertion in the Remote Control
• Ceiling Mount assembly
Before installing the projector, read first the safety instructions in the safety manual delivered with the projector and also the safety pages in this manual.
2.1 Safety Warnings
Mercury Vapor Warnings
Keep the following warnings in mind when using the projector. The lamp used in the projector contains mercury. In case of a lamp
rupture, explosion there will be a mercury vapor emission. In order to minimize the potential risk of inhaling mercury vapors:
• Ensure the projector is installed only in ventilated rooms.
• Replace the lamp module before the end of its operational life.
• Promptly ventilate the room after a lamp rupture, explosion has occurred, evacuate the room (particularly in case of a pregnant
woman).
• Seek medical attention if unusual health conditions occur after a lamp rupture, explosion, such as headache, fatigue, shortness
of breath, chest-tightening coughing or nausea.
2.2 General
Ambient Temperature Conditions.
Careful consideration of things such as image size, ambient light level, projector placement and type of screen to use are critical to
the optimum use of the projection system.
Max. ambient temperature : 40°C or 104 °F
Min. ambient temperature : 10 °C or 50 °F
The projector will not operate if ambient air temperature falls outside this range (10°C- 40°C or 50°F-104°F).
Storage temperature: -35°C to +65°C (-31°F to 149°F)
Humidity Conditions
Storage: 0 to 98 % RH Non-condensing
Operation: 0 to 95 % RH Non-condensing
Environment
Do not install the projection system in a site near heat sources
excessive dust or humidity. Be aware that room heat rises to the ceiling; check that temperature near the installation site is not
excessive.
Environment condition check
A projector must always be mounted in a manner which ensures the free flow of clean air into the projectors ventilation inlets. For
installations in environments where the projector is subject to airborne contaminants such as that produced by smoke machines or
similar (these deposit a thin layer of greasy residue upon the projectors internal optics and imaging electronic surfaces, degrading
performance), then it is highly advisable and desirable to have this contamination removed prior to it reaching the projectors clean
air supply. Devices or structures to extract or shield contaminated air well away from the projector are a prerequisite, if this is not a
feasible solution then measures to relocate the projector to a clean air environment should be considered.
such as radiators or air ducts, or in a place subject to direct sunlight,
R5976763 CINEVERSUM 60/70 22042004
7
Page 12
2. Installation Guidelines
Only ever use the manufacturer’s recommended cleaning kit which has been specifically designed for cleaning optical parts, never
use industrial strength cleaners on the projector’s optics as these will degrade optical coatings and damage sensitive optoelectronics
components. Failure to take suitable precautions to protect the projector from the effects of persistent and prolonged air contaminants will culminate in extensive and irreversible ingrained optical damage. At this stage cleaning of the internal optical units will
be non-effective and impracticable. Damage of this nature is under no circumstances covered under the manufacturer’s warranty
and may deem the warranty null and void. In such a case the client shall be held solely responsible for all costs incurred during any
repair. It is the clients responsibility to ensure at all times that the projector is protected from the harmful effects of hostile airborne
particles in the environment of the projector. The manufacturer reserves the right to refuse repair if a projector has been subject to
wantful neglect, abandon or improper use.
Special Care for Laser Beams
Special care should be used when DLP projectors are used in the same room as performant laser equipment. Direct or indirect hitting
of a laser beam on to the lens can severely damage the Digital MicroMirror Devices™ in which case there is a loss of warranty
Which screen type ?
There are two major categories of screens used for projection equipment. Those used for front projected images and those for rear
projection applications.
Screens are rated by how much light they reflect (or transmit in the case of rear projection systems) given a determined amount
of light projected toward them. The ‘GAIN’ of a screen is the term used. Front and rear screens are both rated in terms of gain.
The gain of screens range from a white matte screen with a gain of 1 (x1) to a brushed aluminized screen with a gain of 10 (x10)
or more. The choice between higher and lower gain screens is largely a matter of personal preference and another consideration
called the Viewing angle. In considering the type of screen to choose, determine where the viewers will be located and go for the
highest gain screen possible. A high gain screen will provide a brighter picture but reduce the viewing angle. For more information
about screens, contact your local screen supplier.
What image size? How big should the image be?
The projector is designed for an optimum screen width of :
• For CineVERSUM 60 : min 1.30 m (52”) to max 1.78 m (70”)
• For CineVERSUM 70 : min 1.55 m (61") to max 1.98 m (78”)
(depending on the ambient light conditions), with an aspec
Depending on the used lens, the minimum and maximum diagonal screen sizes are :
For CineVERSUM 70
R9010080
R9010081
For CineVERSUM 60
R9002460
R9002461
Short throw lens (1.4 - 1.8) Min : 0.80 m (32”) Max. 6.35 m (250”)
Long throw lens (1.8 - 2.4) Min : Wide : 1 m (40”)
Short throw l
Long throw lens (2.25 – 3) Min : Wide : 0.8 m (32”)
ens (1.7 - 2.25)
t ratio of 16 to 9.
Min : Tele : 0.76 m(30”)
Min: 1m(39”) Max. 5 m (200”
Min : Tele : 0.60 m(24”)
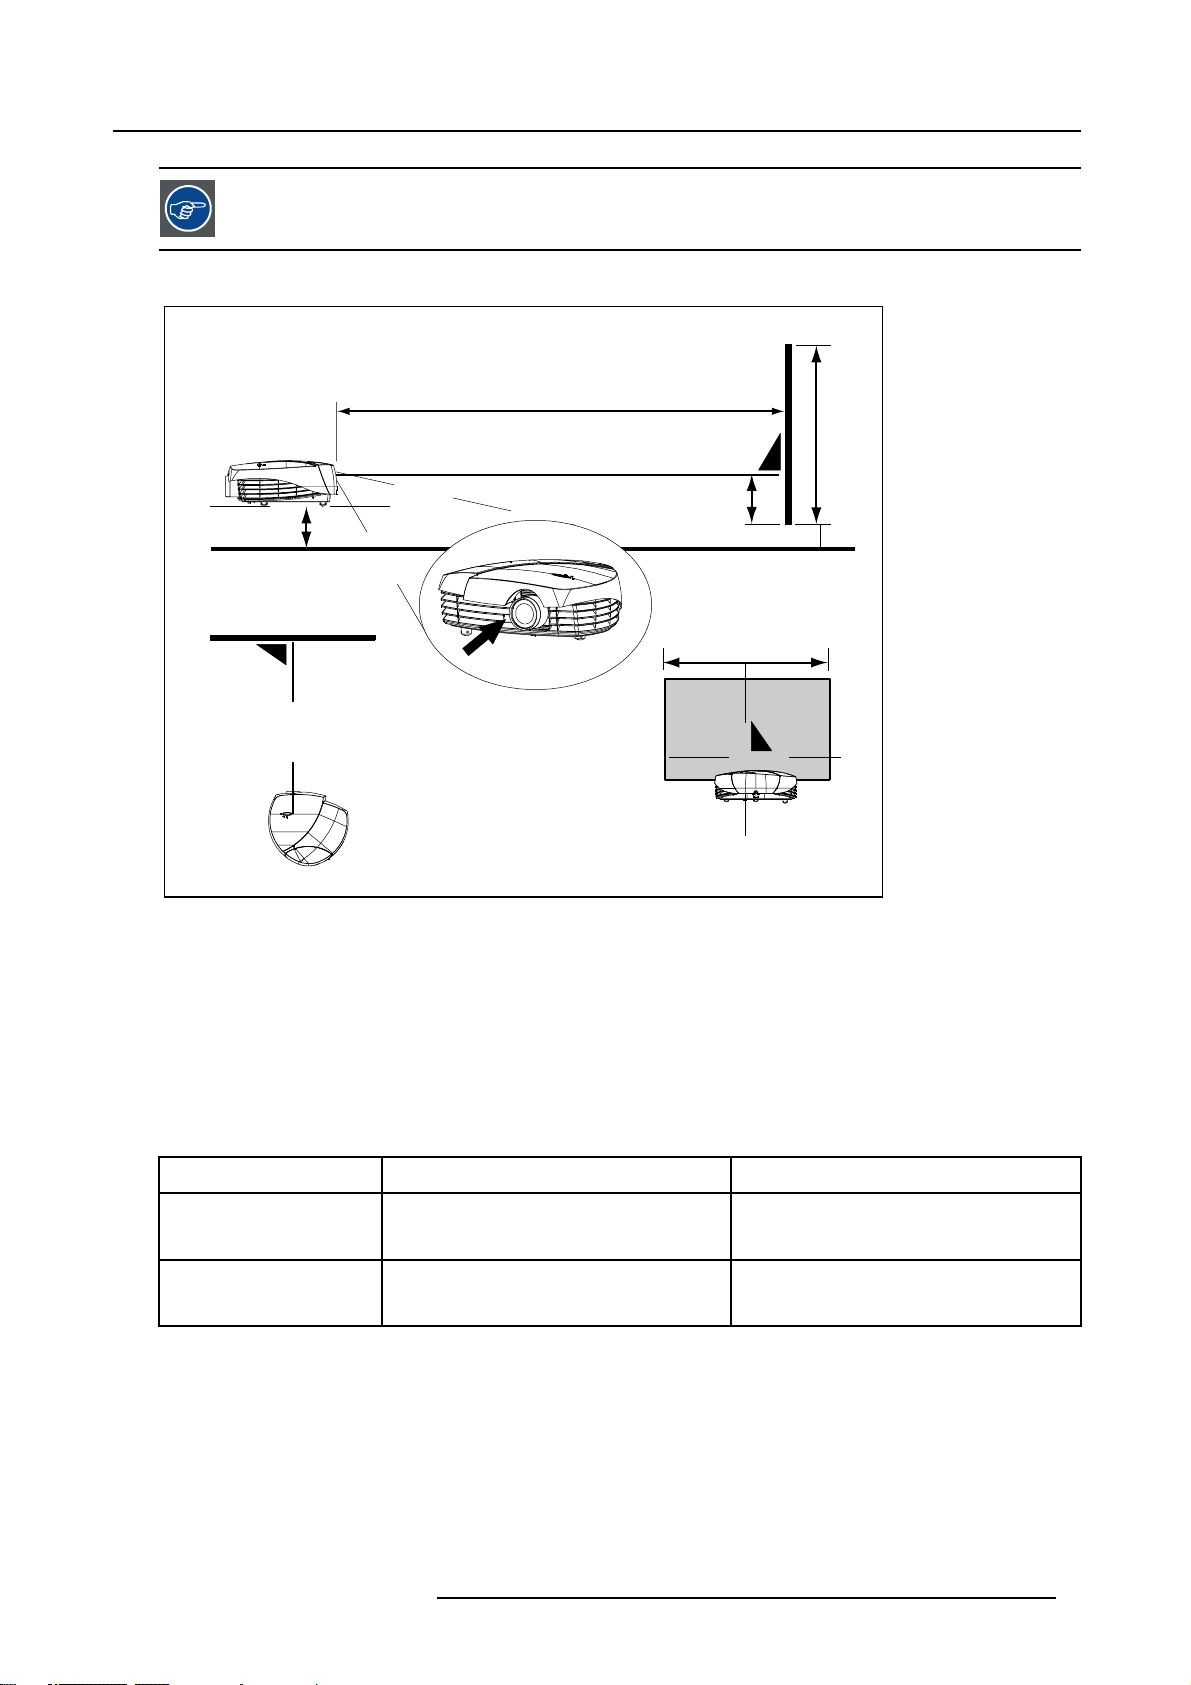
2.3 Projector Configuration and Position
Which configuration can be used?
The projector can be installed to project images in four different configurations:
• Front/table
• Rear/table
• Front/ceiling
• Rear/ceiling
Max : Wide : 7.60 m (300”)
Max : Tele : 5.60 m (222”)
)
Max : Wide : 6.0 m (240”)
Max : Tele : 4.50 m (178”)
Positioning the projector
• The projector should be installed perpendicular with the screen on a distance PD and water leveled in both directions. The
mounting positions in the following image is shown for a nominal lens position.
• Position the screen so that it is not in direct sunlight or room light. Light falling directly onto the screen washes out the colors,
making viewing difficult . Close the curtains and dim the lights when setting up the screen in a sunny or bright room.
• The projector lens should be centered horizontally in the middle of the screen.
8
R5976763 CINEVERSUM 60/70 22042004
Page 13
2. Installation Guidelines
Try to avoid an inclination of the projector (forwards, backwards, to the left or to the right) as this will result in
a keystone deformation of the image. This deformation can be corrected with the keystone function but with
a loss of resolution as result.
The drawing is given for a table mounted projector. The same is valid for a ceiling mounted projector.
PD
V1
C
CD
SH
B
V2
PD
Image 2-1
Table mounted configuration
V1 Side view
V2 Top view
V3 Back view
PD Distance projector - screen
CD Distance bottom side projector - floor
SH Screen height
B Distance bottom side screen - floor
C Distance bottom side projector - perpendicular light axes
SW Screen width
For CineVERSUM 70:
Lens
PD
V3
SW
CD
1.4 - 1.8
1.8 - 2.4
With C = 0.25 x SH
R5976763 CINEVERSUM 60/70 22042004
Wide : PD = 1.4 x SW
Te le : P D = 1. 8 x SW
Wide : PD = 1.8 x SW
Te le : P D = 2. 8 x SW
CD=B+C-5.9cm
CD=B+C-5.9cm
9
Page 14
2. Installation Guidelines
For CineVERSUM 60:
Lens
1.7 - 2.25
2.25 - 3
With C = 0.23 x SH
PD
Wide : PD = 1.7 x SW
Tele : PD = 2.25 x SW
Wide : PD = 2.25 x SW
Te le : P D = 3 x S W
CD
CD=B+C-5.9cm
CD=B+C-5.9cm
2.4 Safety Area around projector
Safety area
Make sure the projector is located so that the air inlets and outlets for the cooling system are not obstructed. Leave at least 50 cm
between the projector and an object next t
o the projector.
A
B
Image 2-2
Do not place inflammable materials within the safety area.
2.5 Cleaning the lens
To minimize the possibility of damaging the optical coating or scratching exposed lens surface, we have developed recommendations for cleaning the lens. FIRST, we recommend you try to remove any material from
thelensbyblo
Necessary tools
To ra ys e eTMcloth, order number : R379058.
Howtocleanthelens?
Proceed as follow :
1. Always wipe lenses with a CLEAN Toraysee
2. Always wipe lenses in a single direction.
Warning: Do not wipe back and forwards across the lens surface as this tends to grind dirt into the coating.
3. Do not leave cleaning cloth in either an open room or lab coat pocket, as doing so can contaminate the cloth.
4. If smears occur when cleaning lenses, replace the cloth. Smears are the first indication of a dirty cloth.
wing it off with clean, dry deionized air. DO NOT use any liquid to clean the lenses.
TM
cloth.
Do not use fabric softener when washing the cleaning cloth or softener sheets when drying the cloth.
Do not use liquid cleaners on the cloth as doing so will contaminate the cloth.
10 R5976763 CINEVERSUM 60/70 22042004
Page 15
2. Installation Guidelines
Other lenses can also be cleaned safely with this TorayseeTMcloth.
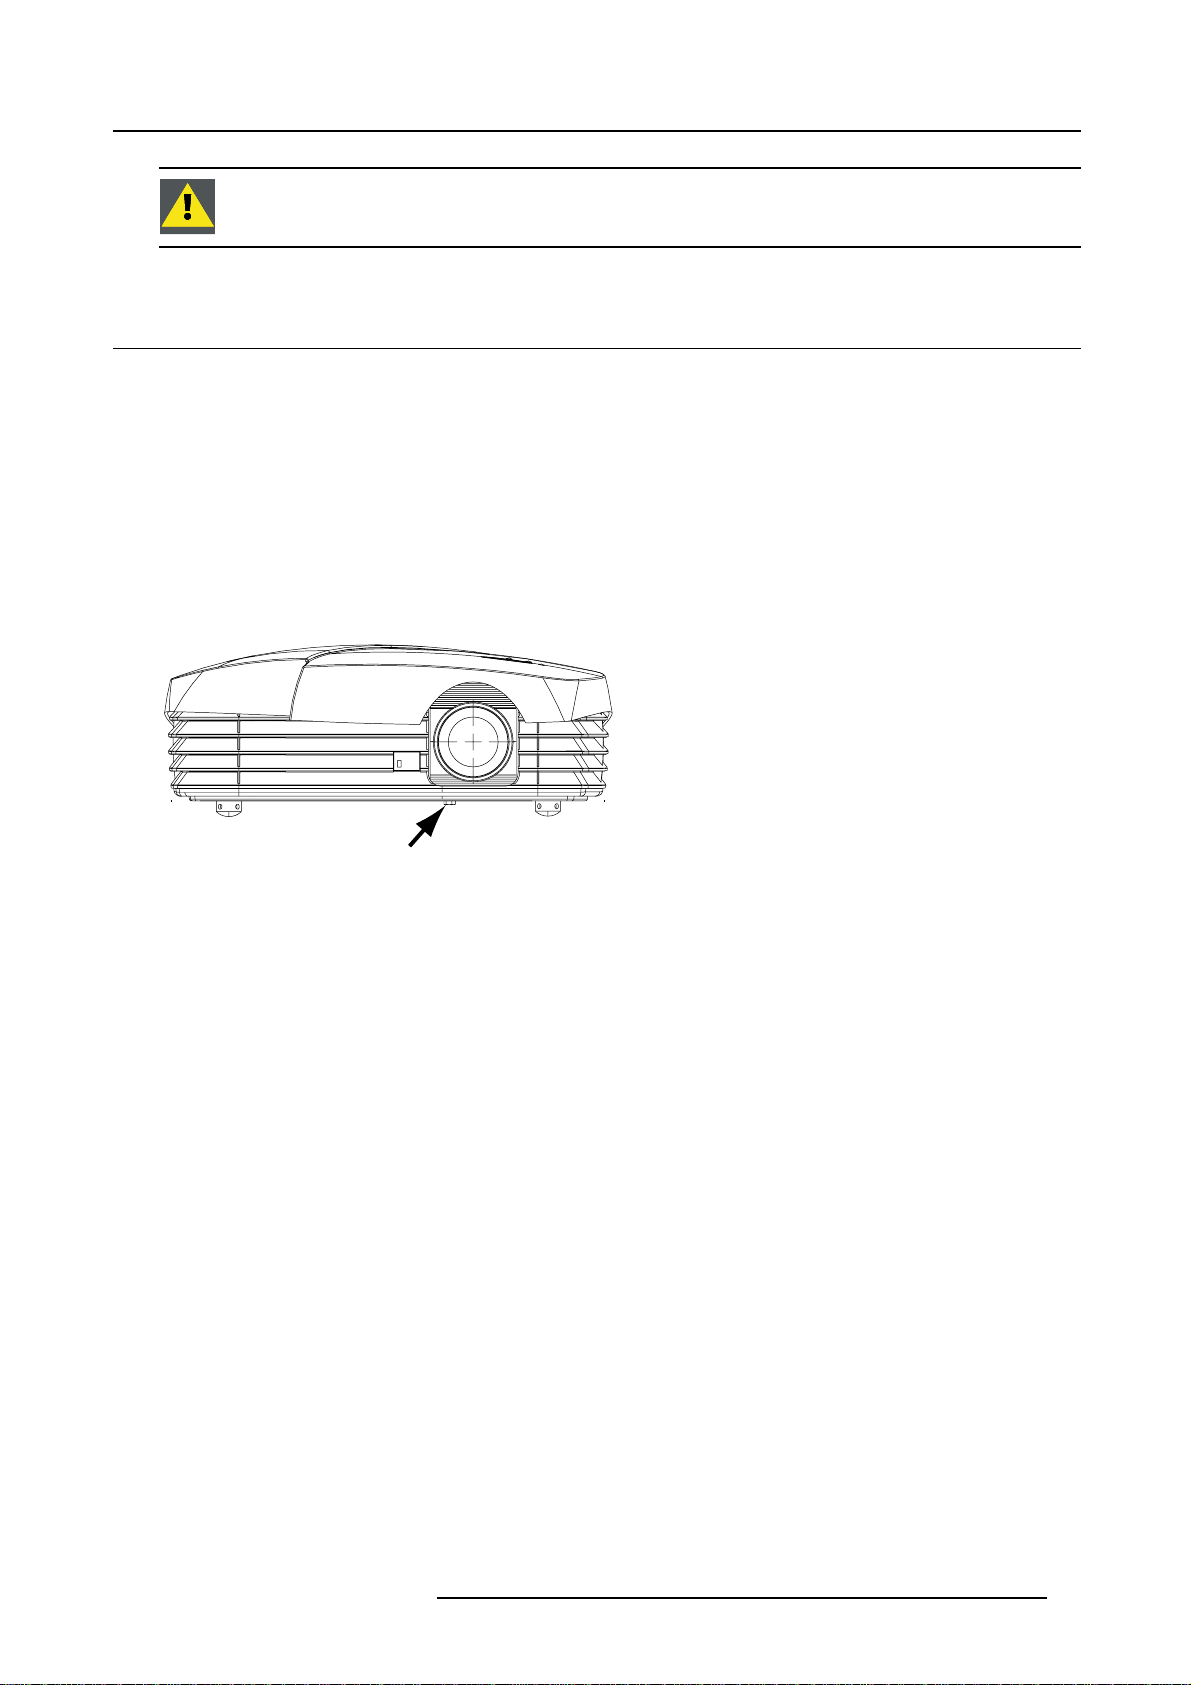
2.6 Vertical lens shift
What can be done ?
The image can be shifted in a vertical way to position the image correctly on the screen.
Necessary tools
Spanner delivered in the package
How to shift the lens ?
1. Turn the lens shift bolt on the bottom side of the projector, just below the lens, until the desired image position is obtained.
(image 2-3)
When table mounted, turning to the left (clockwise) will shift the image upwards. Turning to the right (
the image downwards.
counter clockwise), will shift
Image 2-3
Vertical lens shift bolt
A Lens shift bolt
A
R5976763 CINEVERSUM 60/70 22042004
11
Page 16
2. Installation Guidelines
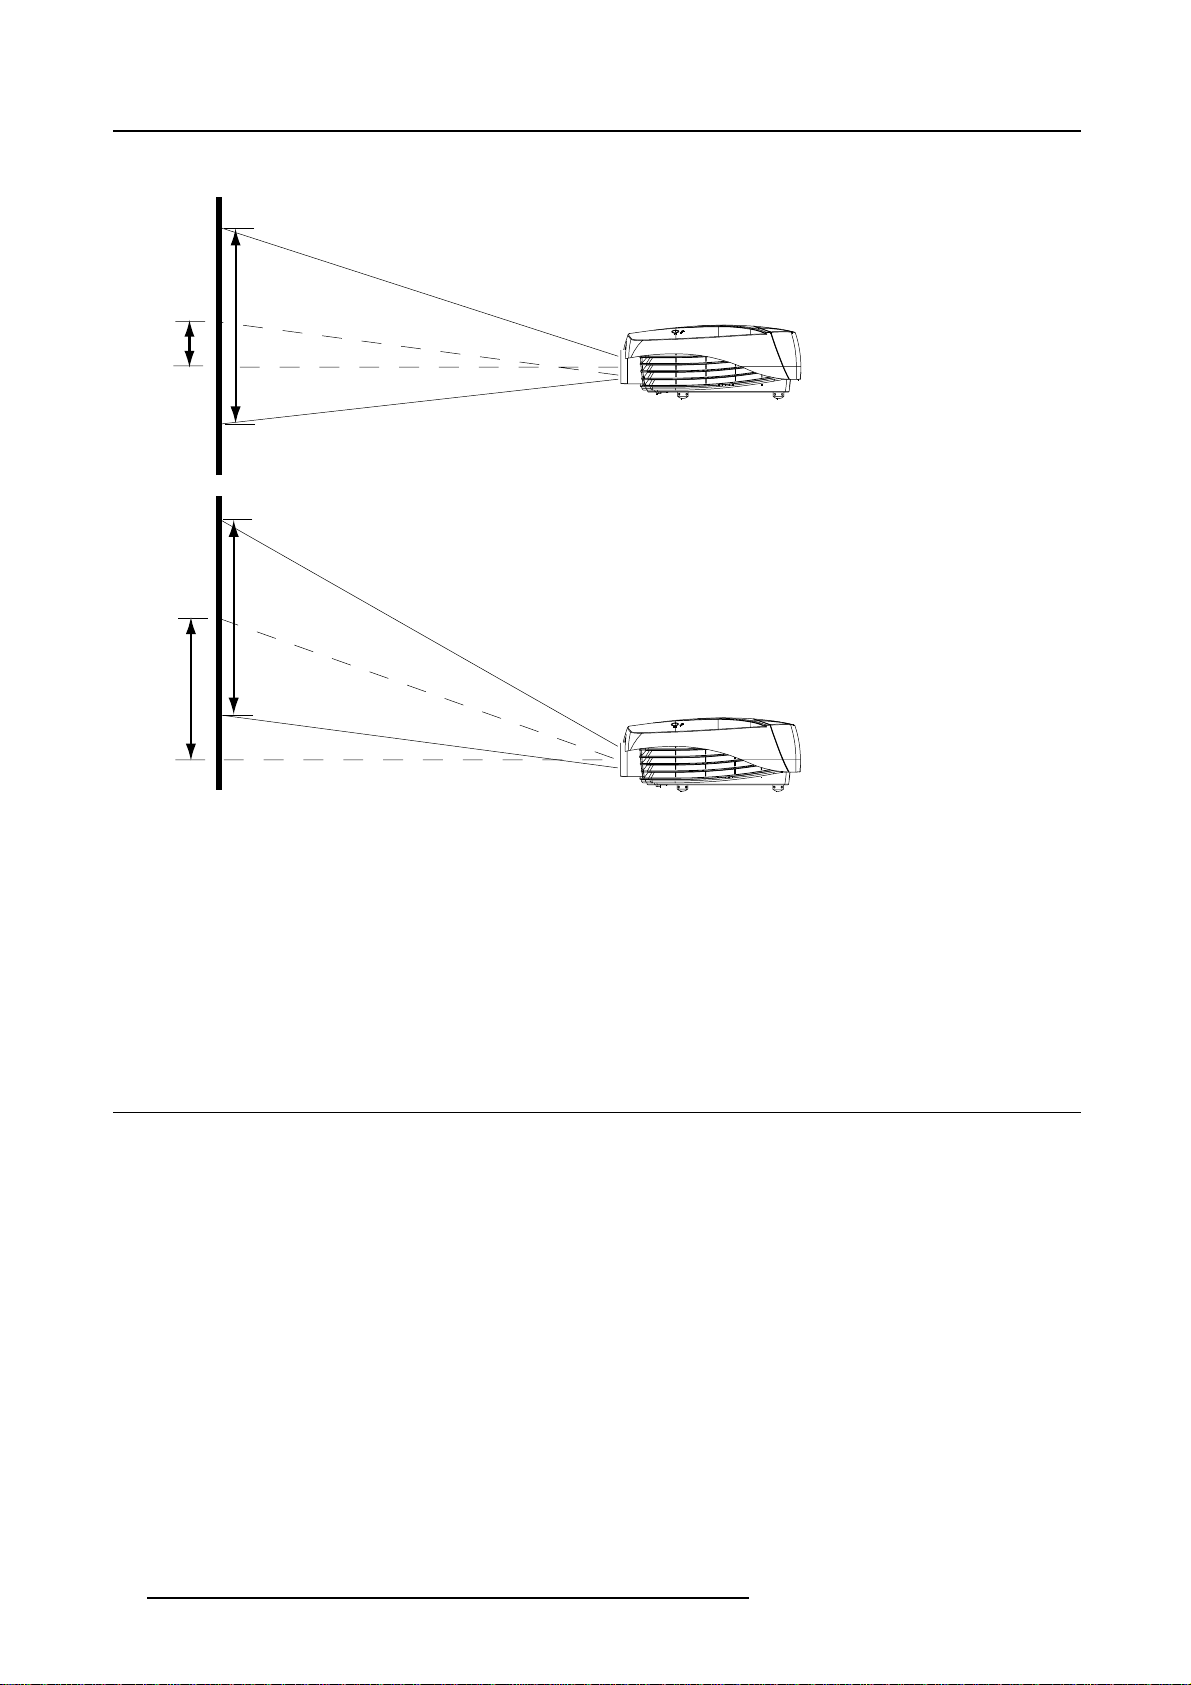
Vertical lens shift ranges
SH
A
SH
B
Image 2-4
Vertical lens shift
The distance between the middle of the projected image and the perpendicular line from the projector.
For CineVERSUM 60 :
• A = 0.275 x SH
•B=0.86xSH
For CineVERSUM 70 :
•A=0.24xSH
• B = 0.625 x SH
2.7 Battery Insertion in the Remote Control
Where to find the batteries
The batteries are not placed in the remote cont
time.
How to install the batteries
1. Push the cover tab (A) with the fingernail a little backwards and pull upwards the cover top (B). (image 2-5)
2. Slide the cover forwards to remove. (image 2-6)
3. Push the battery body towards the spring and lift it up to remove. (image 2-7)
4. Insert two AA size batteries, making sure t
5. Insert the lower tab of the battery cover in the gap at the bottom of the remote control, and press the cover until it clicks in place
(image 2-6).
rol to avoid remote control operation in its package, resulting in a shorter battery life
he polarities match the + and – marks inside the battery compartment (image 2-7).
12
R5976763 CINEVERSUM 60/70 22042004
Page 17
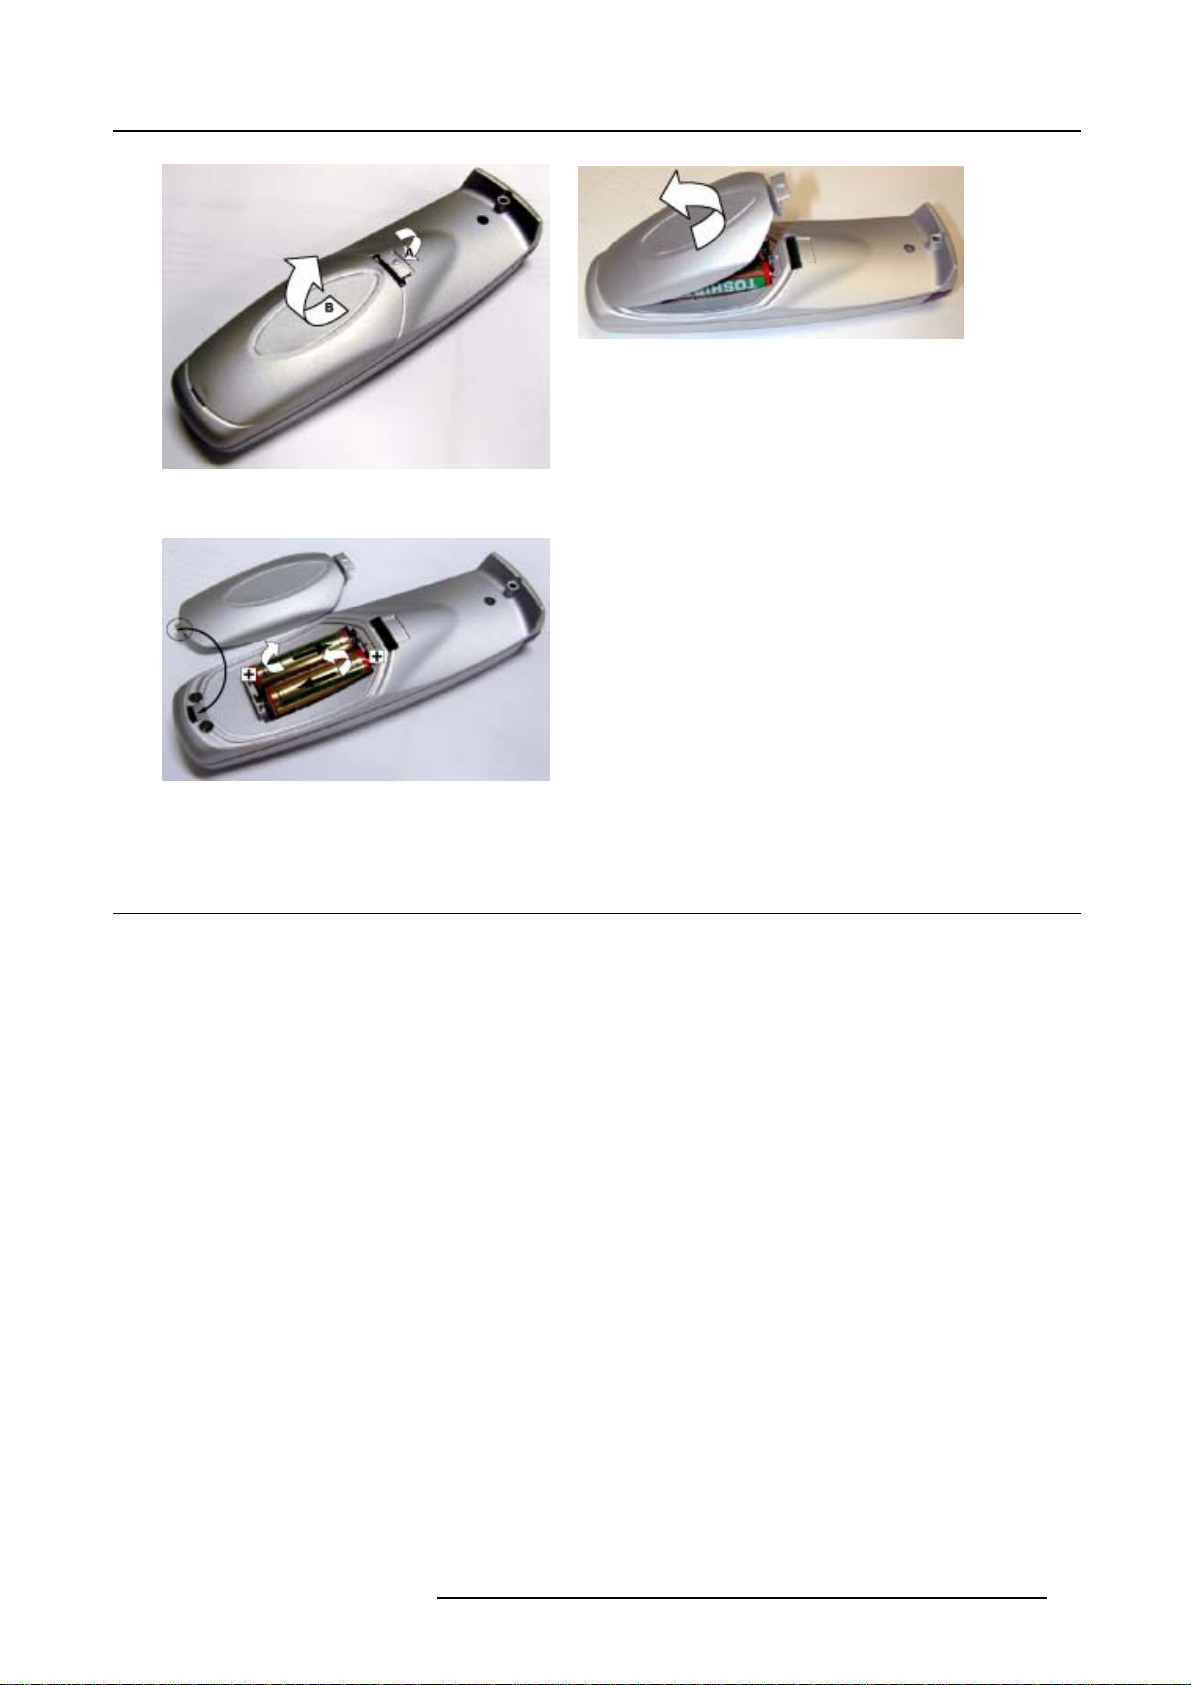
Image 2-5
Battery cover unlock
Image 2-6
Battery cover removal
2. Installation Guidelines
Image 2-7
Battery removal
2.8 Ceiling Mount assembly
Overview
eiling mount is available to mount the projector to the ceiling. Always use this ceiling mount.
Ac
Order number : R9852060
For a more detailed description on how to mount the ceiling mount, consult the ceiling mount installation manual (R5976750) which
can be found in the box of the ceiling mount assembly or separately ordered by Barco.
R5976763 CINEVERSUM 60/70 22042004
13
Page 18

2. Installation Guidelines
14 R5976763 CINEVERSUM 60/70 22042004
Page 19
3. CONNECTIONS
Overview
• Removing the Connector cover
• Power Connection
• Input facilities
• S-Video input
• Composite Video input
• 5-Cable input
• Component Input
• Digital Visual Interface (DVI) input
• Computer input (RGB analog)
• RS232-422 IN connection
• Trigger outputs
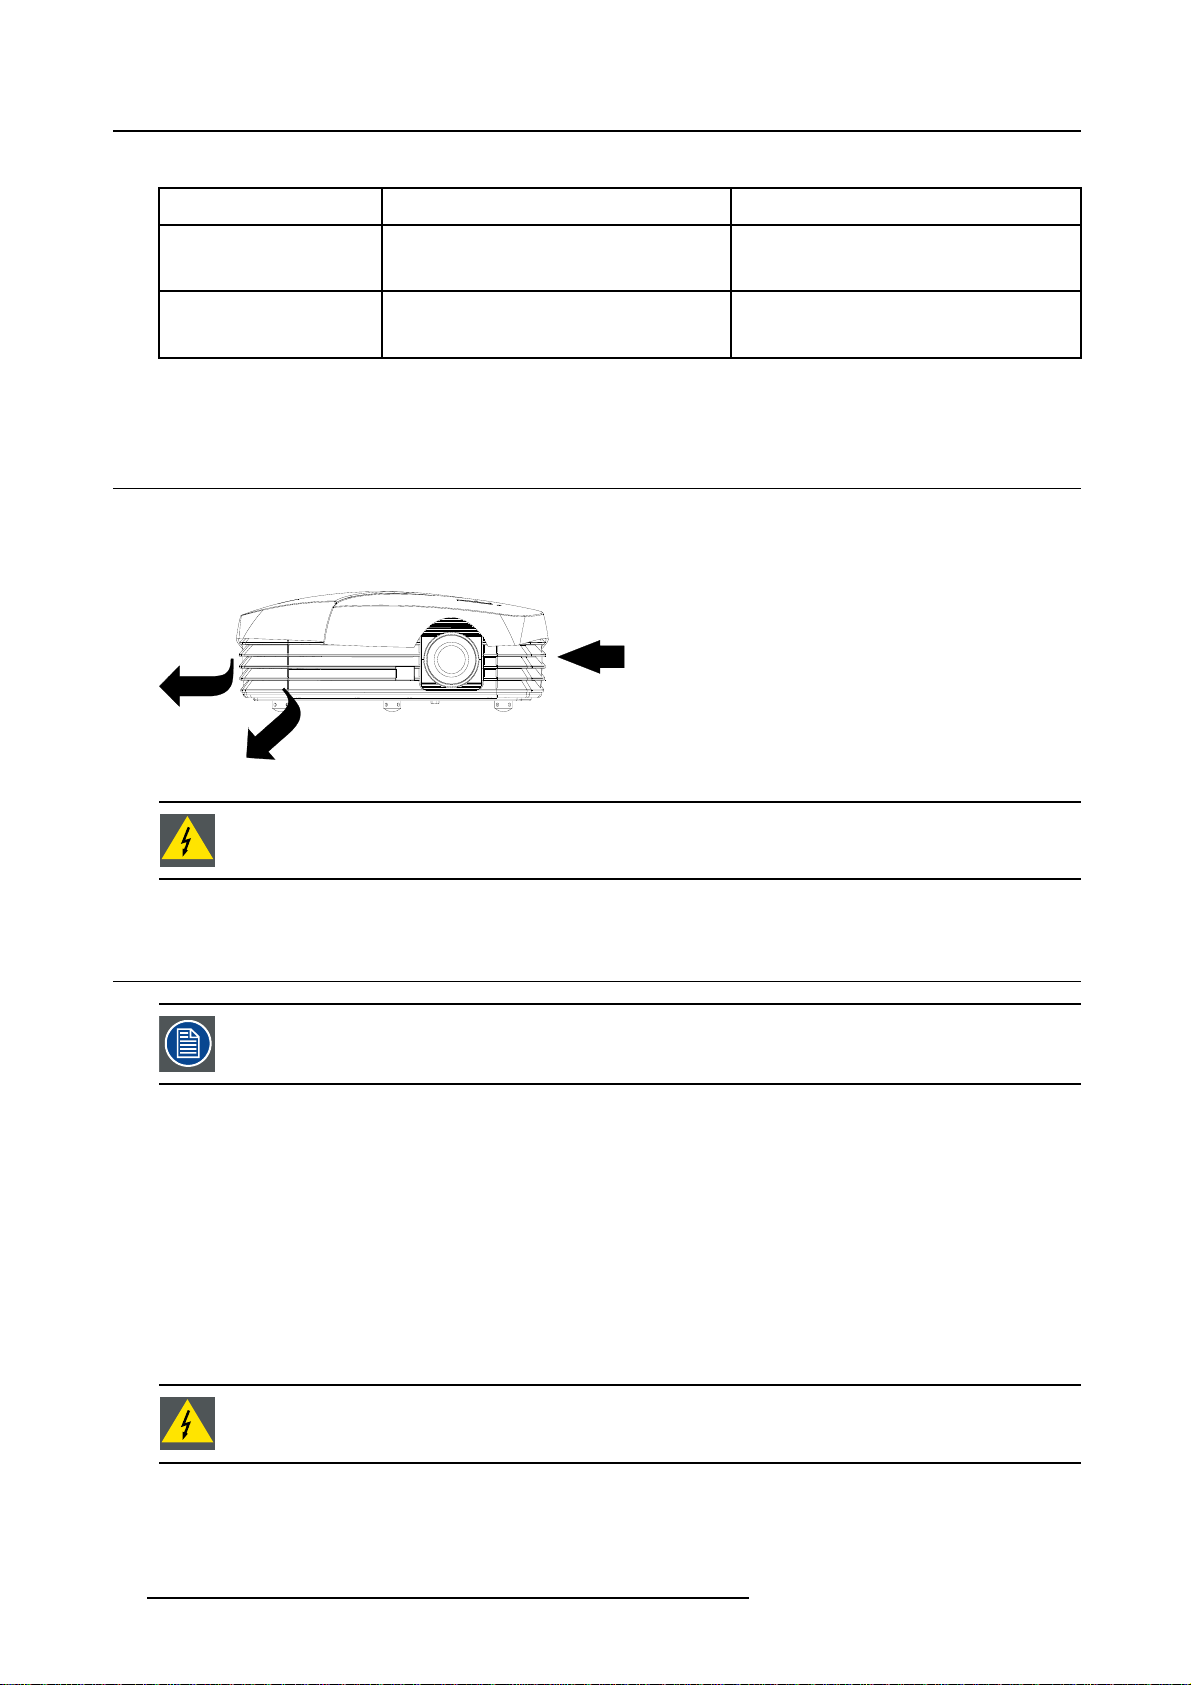
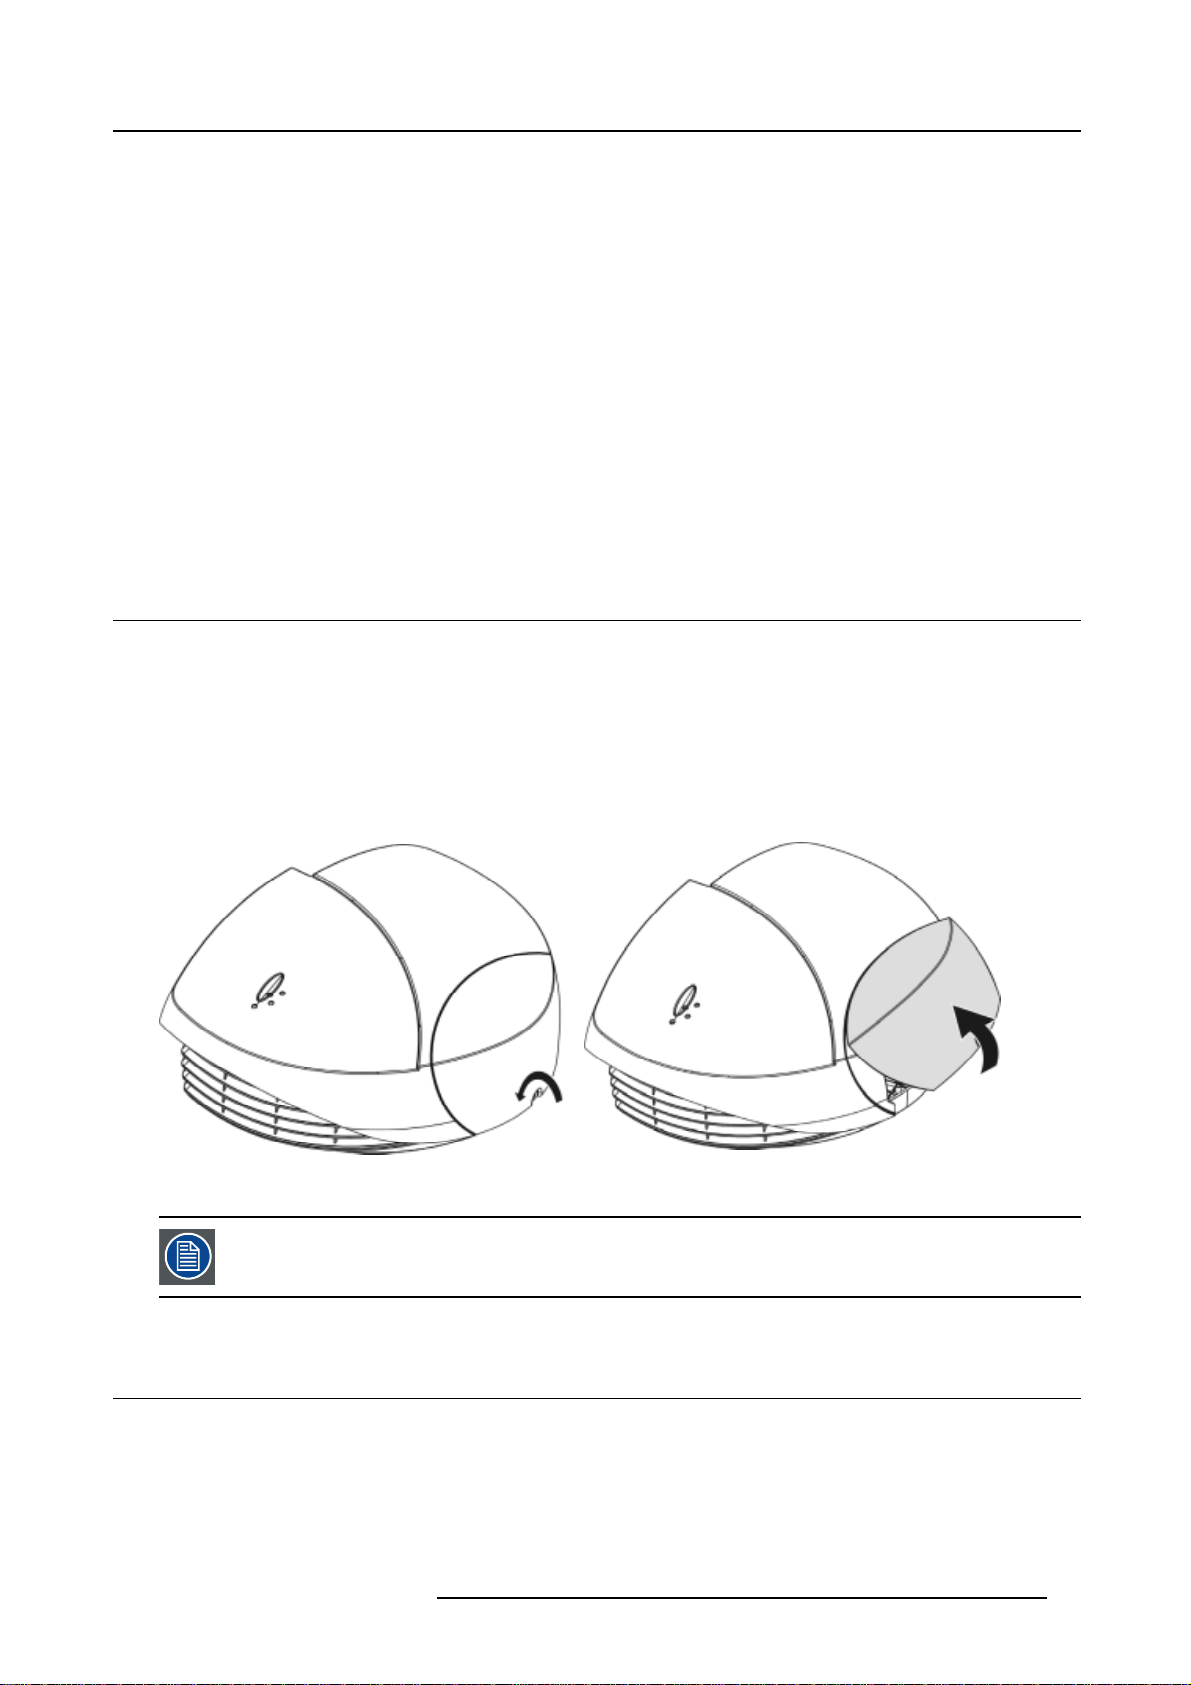
3.1 Removing the Connector cover
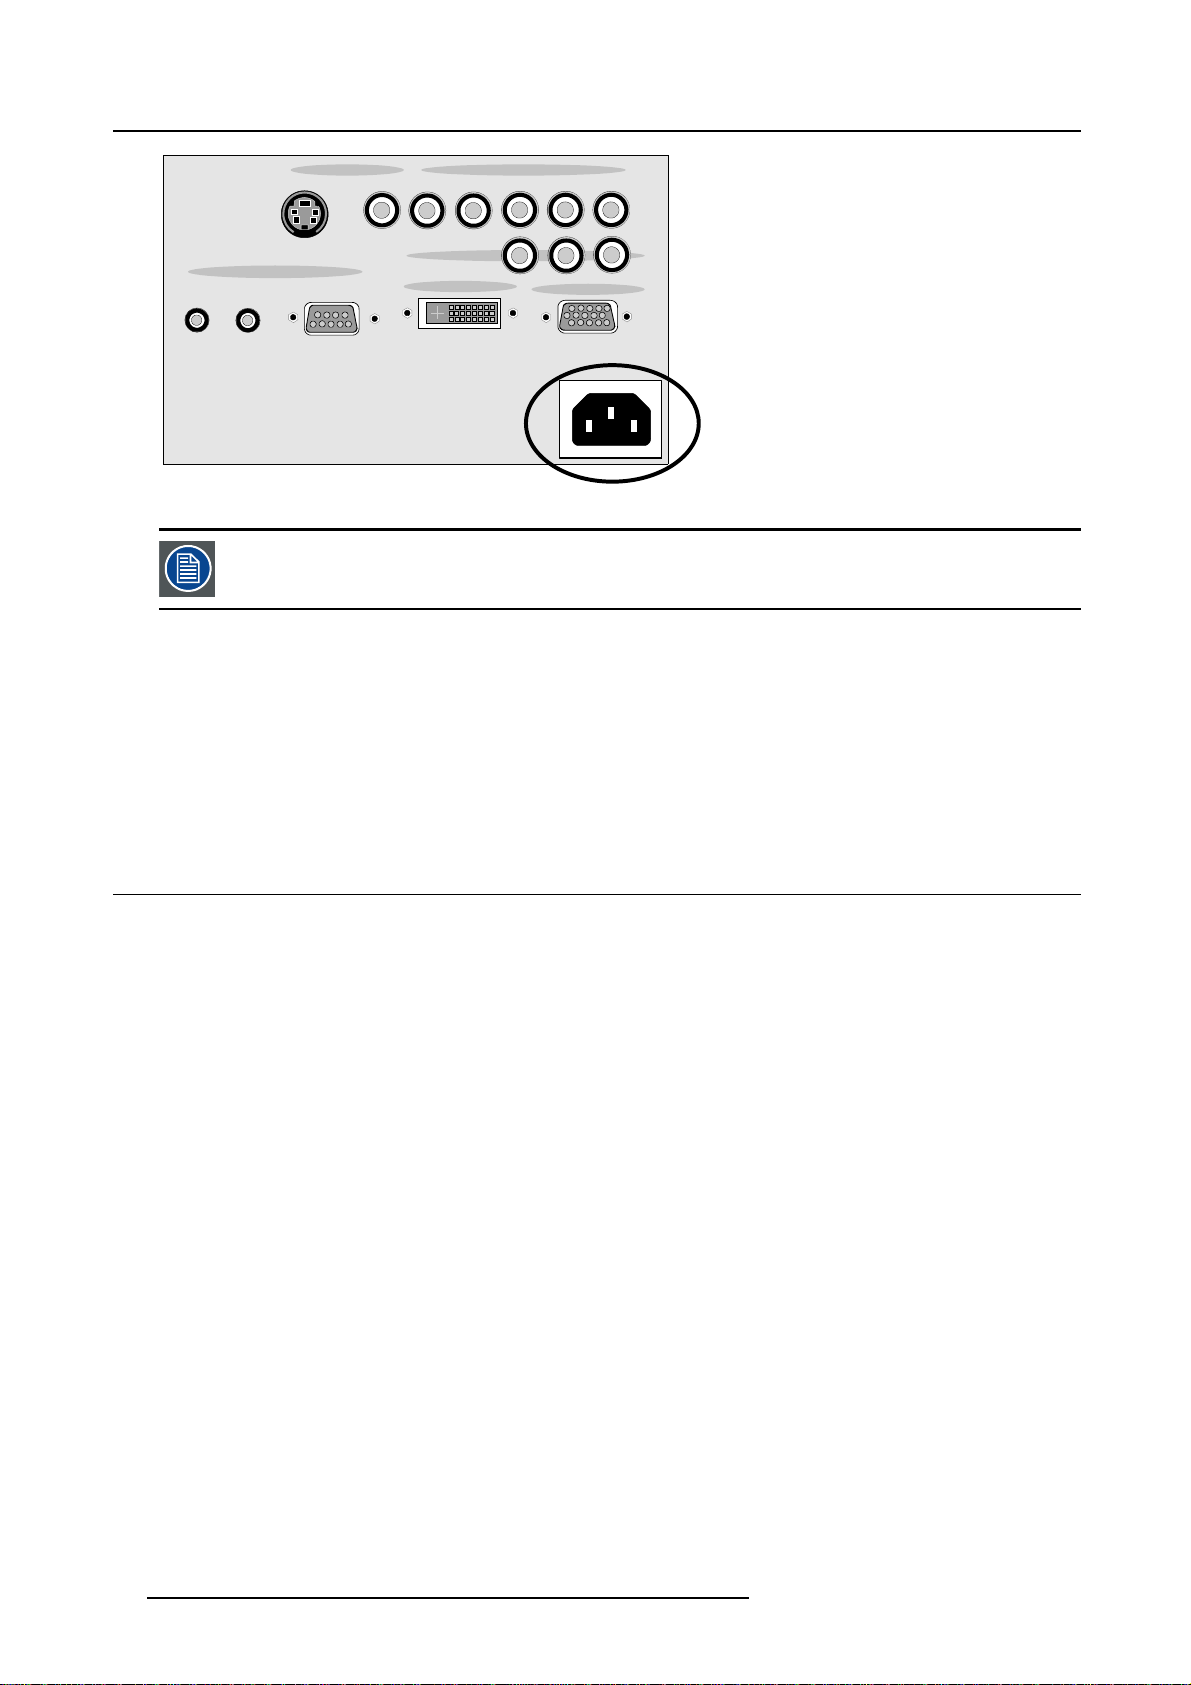
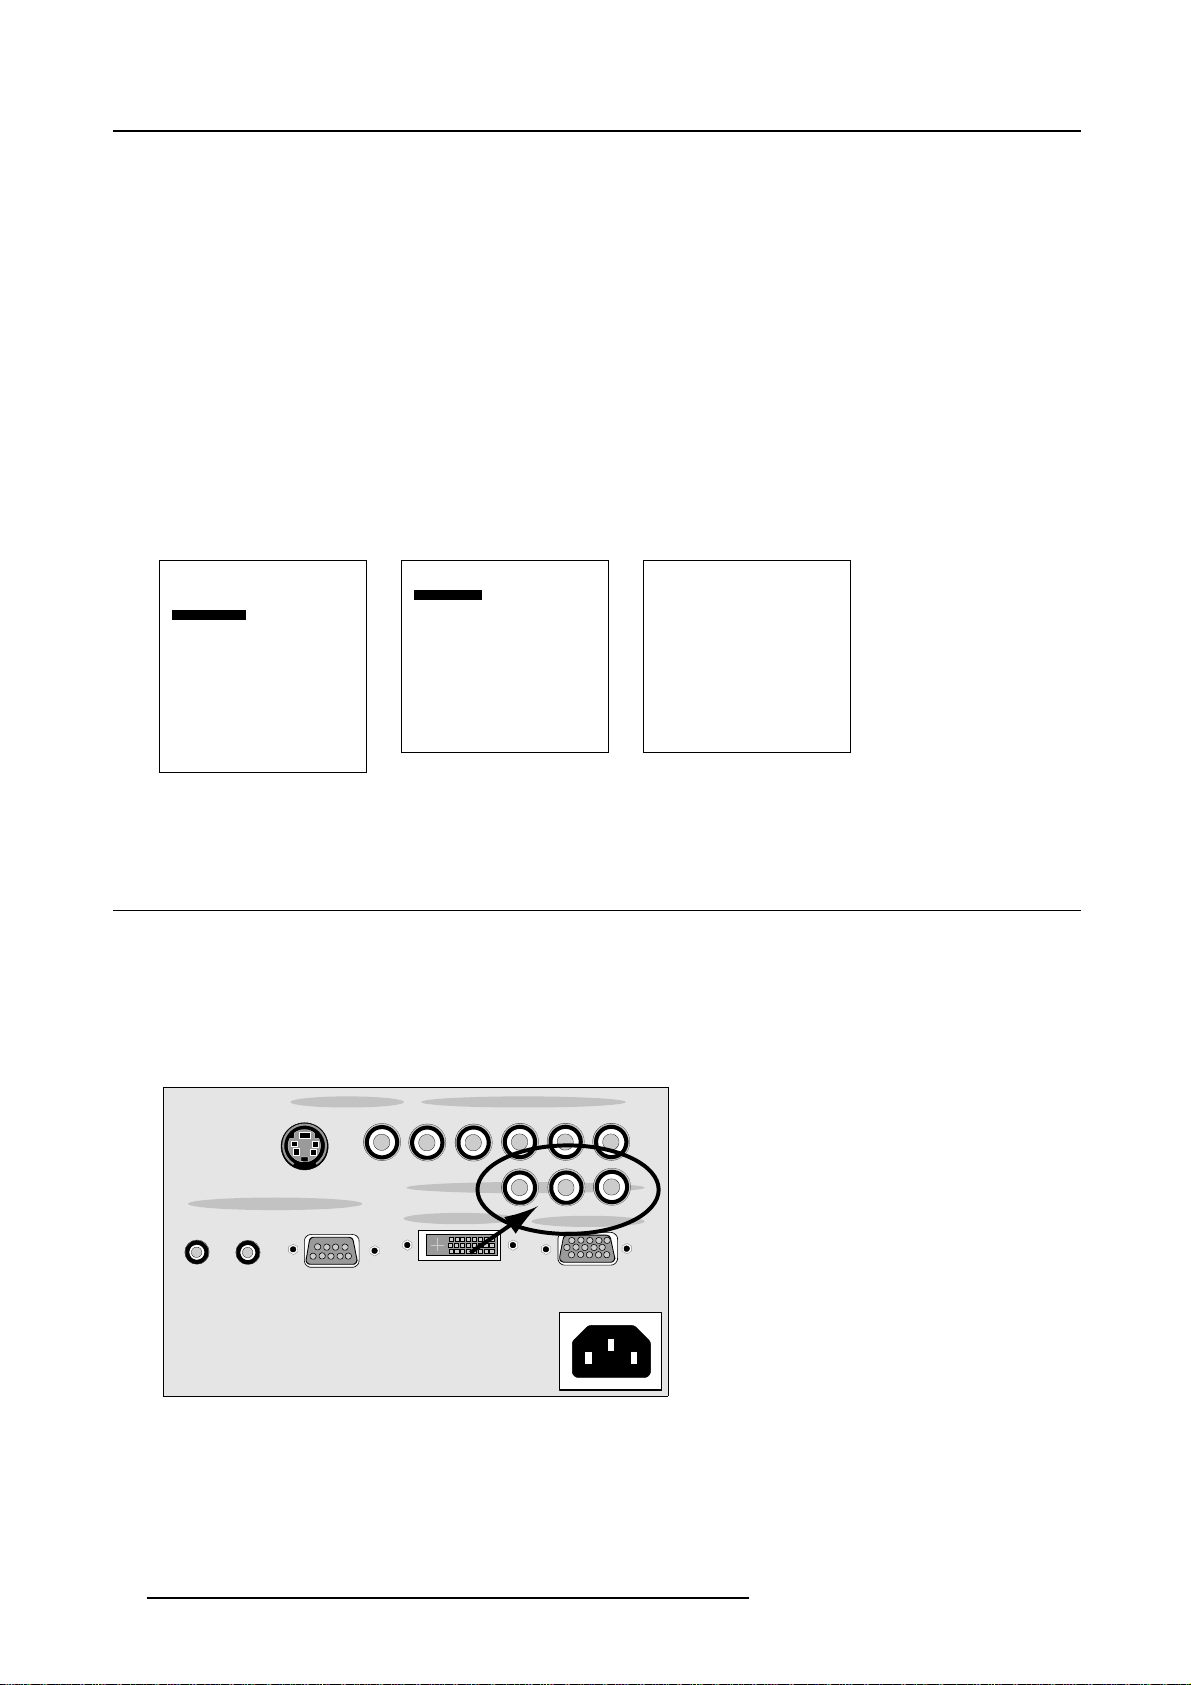
What is behind this cover ?
The power connector and all inputs are situated behind this cover.
3. Connections
How to remove the cover ?
1. Loosen the locking screw. (image 3-1)
2. Left up at the bottom and pull on the cover to loose.
The cover makes a loud ’snap’ when removed. This is normal and does not damage the cover.
Image 3-1
Removing the input cover
When all connections are done, close the cover again and fix the locking screw.
3.2 Power Connection
AC Power (mains) cord connection
Use the supplied power cord to connect your projector to the wall outlet.
Plug the female power connector into the male connector at the back of the projector.
Plug the male connector into wall outlet.
R5976763 CINEVERSUM 60/70 22042004
15
Page 20
3. Connections
ASPECT
RATIO
12V TRIGGER
Image 3-2
S-VIDEO VIDEO V
CONTROL
SCREEN
RS232/RS422
VIDEO INPUT RGB/COMPONENT INPUT
IN
H
COMPONENT
DVI INPUT
B/Pb
R/Pr
Pr Pb Y
VGA INPUT
G/Y
The power input is auto-ranging from 90 to 240 VAC.
About the power cord
Mainslead(ACPowercord)withCEE7plugupto16A
The colors of the mains lead are colored in accordance with the following code:
• Green-and-yellow: Earth (safety earth)
• Blue: Neutral
•Brown:Line
3.3 Input facilities
Overview
•S-Video
• Video
• 5 cable input on RCA
-RGBS
-RGBHV
- Component video (Pr/Y/Pb)
• Component input on 3 RCA
•DVIinput
• VGA input (=analog RGB)
• Communication connections
- RS232/RS422
- Aspect ratio
16
R5976763 CINEVERSUM 60/70 22042004
Page 21
3.4 S-Video input
Input location
3. Connections
VIDEO INPUT RGB/COMPONENT INPUT
S-VIDEO VIDEO V
COMPONENT
DVI INPUT
ASPECT
SCREEN
RATIO
12V TRIGGER
Image 3-3
S-Video location
CONTROL
RS232/RS422
IN
Pin configuration 4 pin connector
2
4
3
1
Image 3-4
For S-Video
R/Pr
H
Pr Pb Y
B/Pb
VGA INPUT
G/Y
pin 1 : earth (ground) luminance
pin 2 : earth (ground) chrominance
pin 3 : luminance signal (Y) 1Vpp ±3dB
pin 4 : chrominance signal (C) 300mVpp
Chrominance
The color com
ponent of a video signal that includes information about tint and saturation.
Luminance
The component of a video signal that includes information about its brightness.
Which signal can be connected ?
Standard S-Video (S-VHS) with separate Y (luma) and C (chroma) signals.
How to select the S-Video input ?
1. Press 4 on the
Note: Another way of selecting S-Video is entering the Main menu and selecting SVideo.
RCU.
R5976763 CINEVERSUM 60/70 22042004
17
Page 22
3. Connections
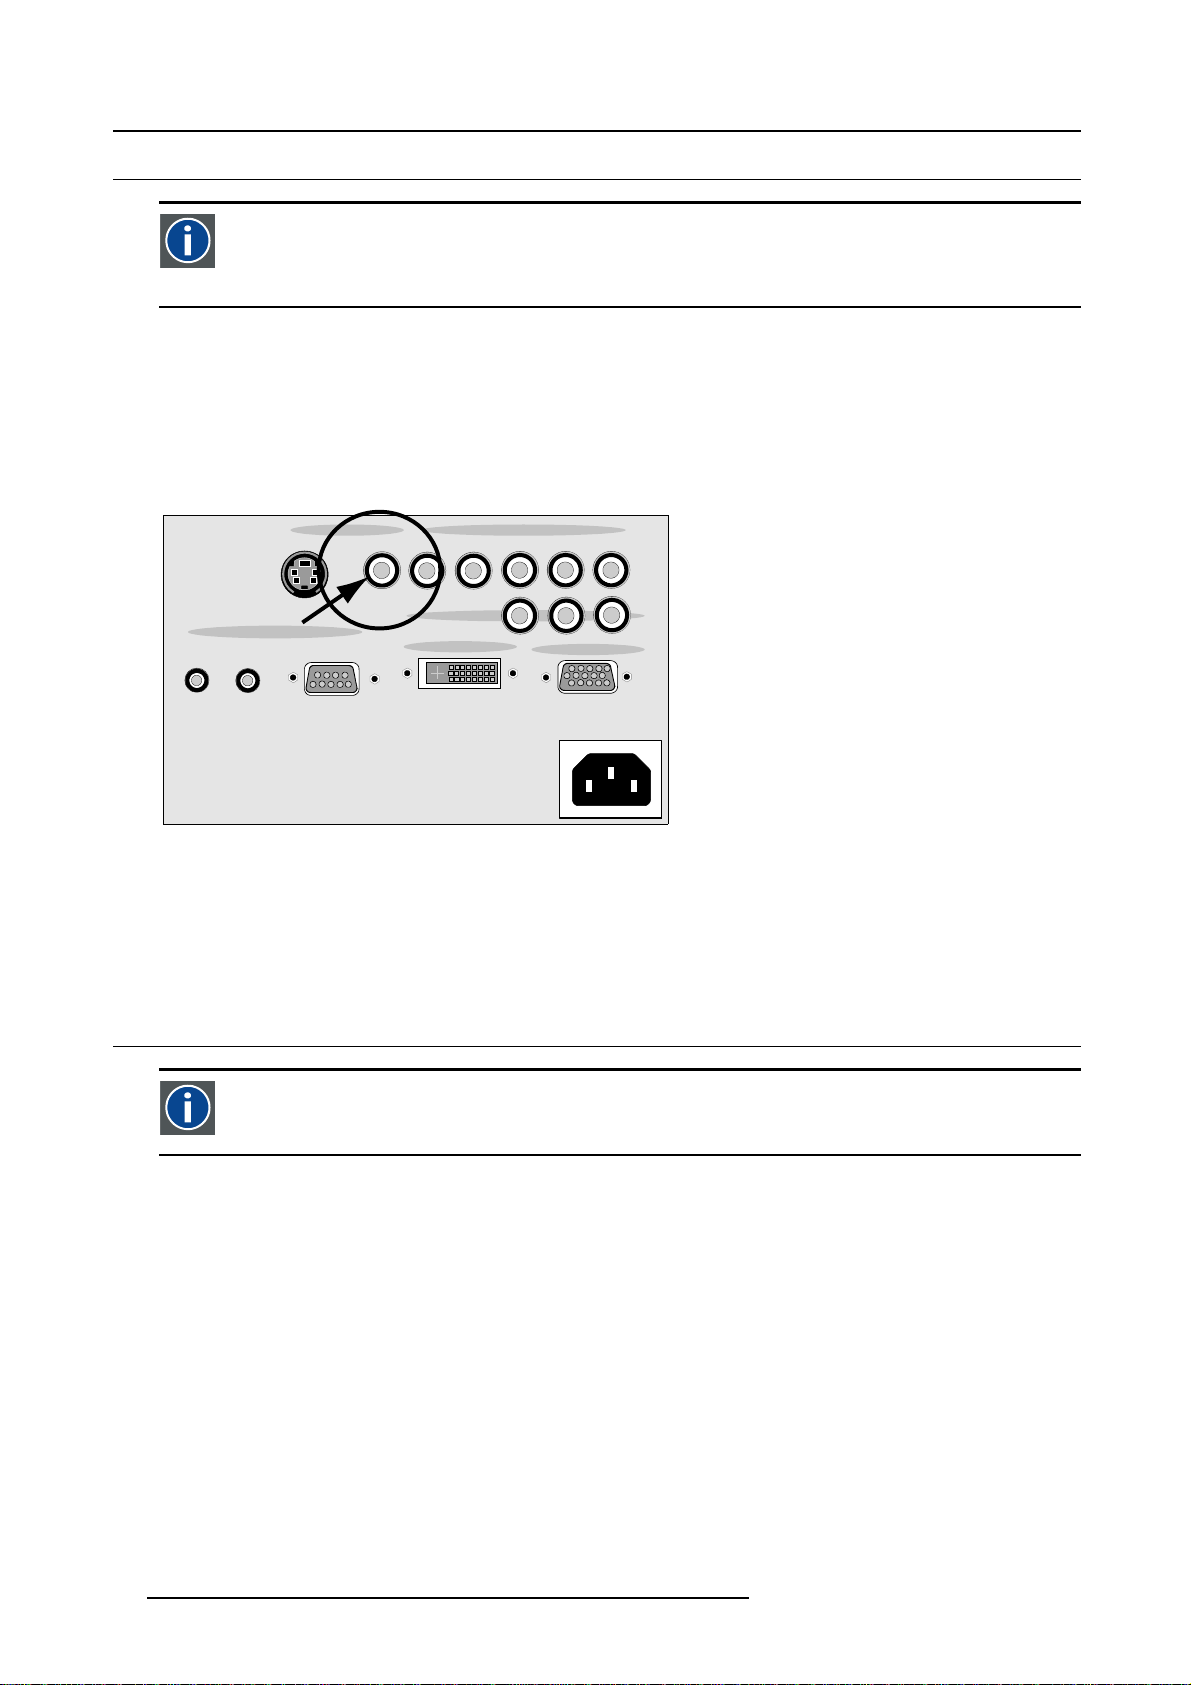
3.5 Composite Video input
Composite Video
Luminance and chrominance are combined along with the timing reference "sync" information using one of the coding standards--NTSC, PAL or SECAM--to make composite video. Most televisions and VCRs have composite video
connectors, which are usually colored yellow.
Input specifications and location
The composite video input is made of 1 RCA input terminal. Connect composite video signals from a VCR, OFF air signal decoder,
etc..
1.0Vpp ±3dB
75 Ω terminated
No loop through
VIDEO INPUT RGB/COMPONENT INPUT
S-VIDEO VIDEO V
ASPECT
RATIO
12V TRIGGER
Image 3-5
Video input indication
CONTROL
SCREEN
RS232/RS422
IN
COMPONENT
DVI INPUT
How to select a composite video input ?
1. Press 5 on the RCU.
Note: Another way of selecting Video is entering the Main menu and selecting Video.
3.6 5-Cable input
Component video
A video system containing three separate color component signals, either red/green/blue (RGB) or chroma/color difference (YCbCr, YPbPr, YUV), in analog or digital form.
R/Pr
H
Pr Pb Y
B/Pb
VGA INPUT
G/Y
Input specifications and location
The 5-cable input section is made of 5 RCA input terminals.
0.7Vpp ± 3dB
75 Ω terminated
18
R5976763 CINEVERSUM 60/70 22042004
Page 23
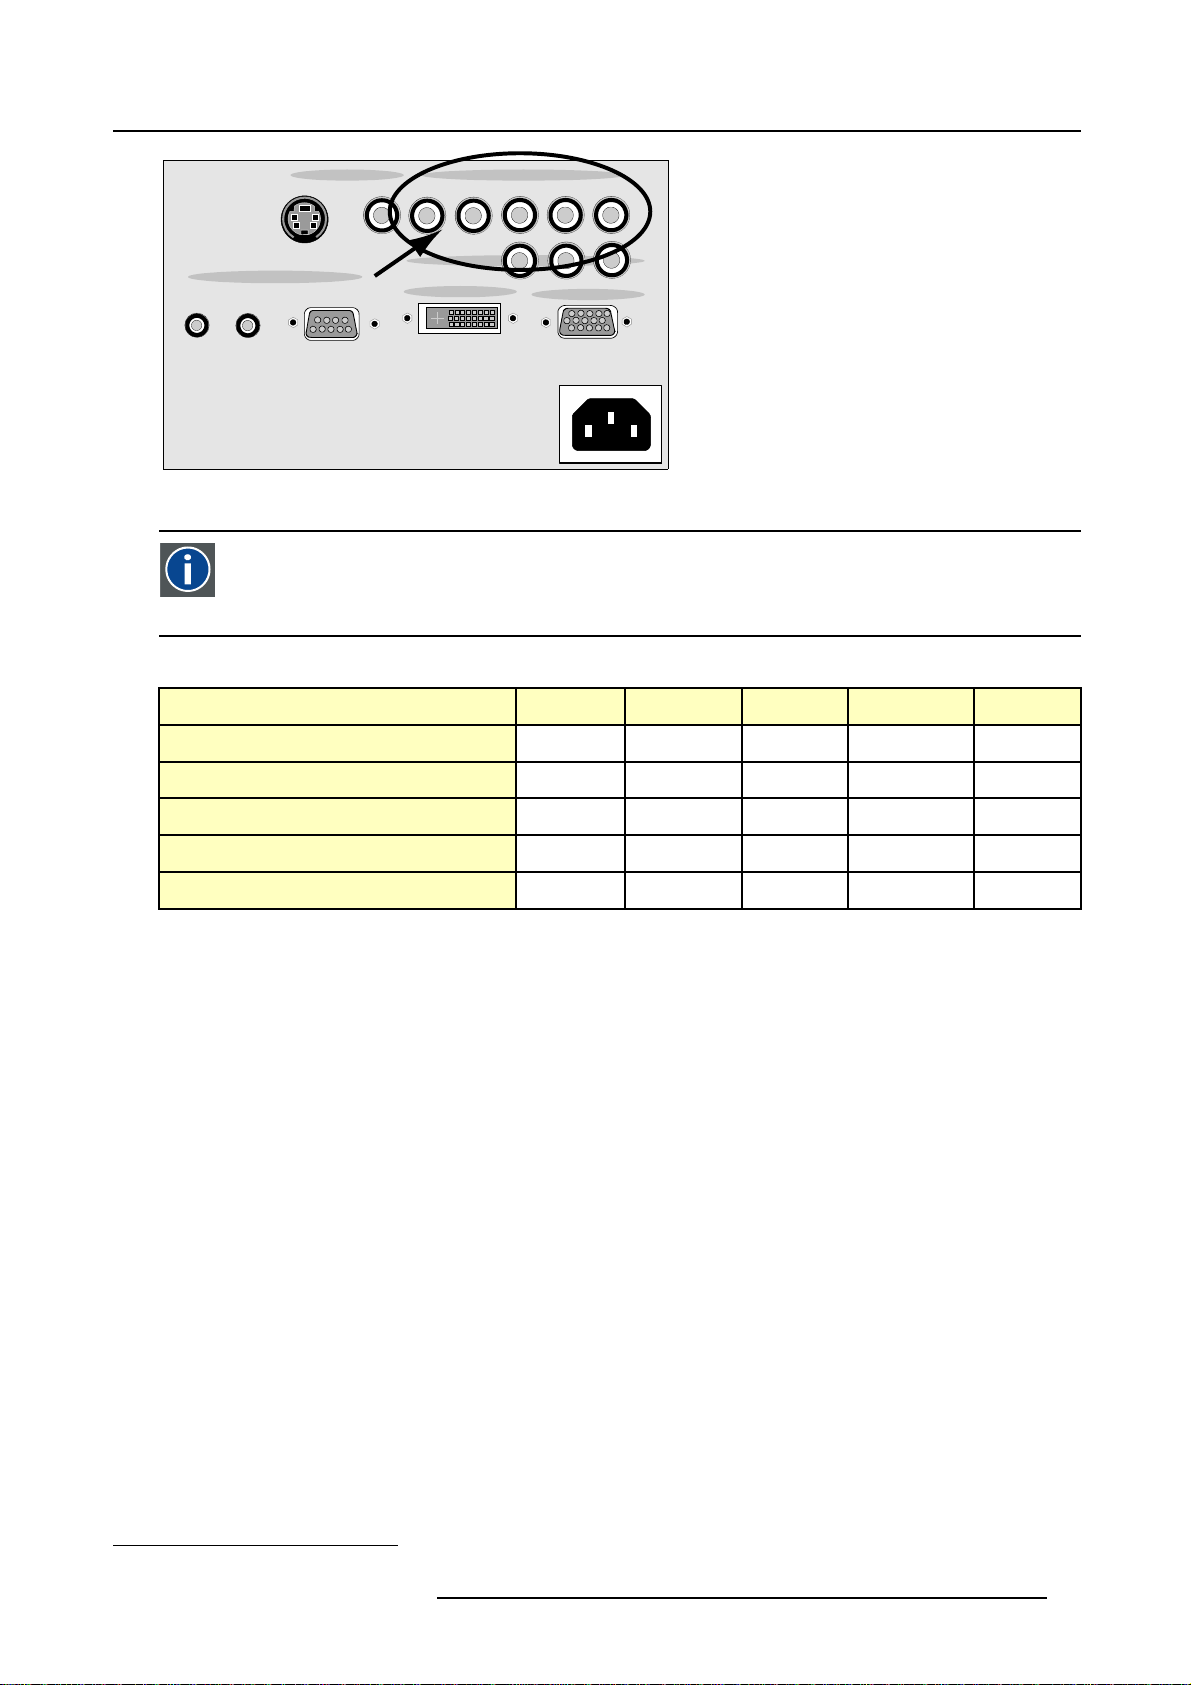
3. Connections
ASPECT
RATIO
12V TRIGGER
Image 3-6
5-cable input
S-VIDEO VIDEO V
CONTROL
SCREEN
RS232/RS422
VIDEO INPUT RGB/COMPONENT INPUT
IN
H
COMPONENT
DVI INPUT
Component Video
In Component Video the term component describes a number of elements that are needed to make up the video picture, these components are PR/Y/PB. A composite video signal on the other hand contains all the information needed
for the color picture in a single channel of information
Which signals can be connected ?
Signals/Input RCA
1
RGBHV
RGsB
1
RGBS
Component
RGB+Video (SCART)
B/Pb
R/Pr
Pr Pb Y
G/Y
VGA INPUT
V H R B
V H R B
- -
CS
- -
R B
R B
PR PB Y
Video R B
G
G
G
s
G
s
G
How to select a source on the 5-cable input ?
1. Press 2 on the RCU.
Note: Another way of selecting the 5-cable input is entering the Main menu and selecting RGB/component.
1. Sync signals are TTL level
R5976763 CINEVERSUM 60/70 22042004 19
Page 24
3. Connections
How to configure the 5-cable input ?
1. Press ADJ or ENTER to open the Main menu. (menu 3-1)
2. Push the cursor key ↑ or ↓ to select Installation and press ENTER.
The installation menu will be displayed. (menu 3-2)
3. Push the cursor key ↑ or ↓ to select Input slots and press ENTER.
The input slots menu will be displayed. (menu 3-3)
4. Select 5 RCA and toggle ENTER to switch between YUV, RGB and SCART.
Select RGB for the following source types:
-RGBHV
-RGBS
-RGsB
Select YUV for the following source types:
- Component sources
Select SCART for the following source types:
- RGB+Video
Image settings
Advanced settings
Installation
Service
1. PC
2. RGB/Component
3. DVI
4. SVideo
* 5. Video
6. Component
Shutdown
Back
Menu 3-1
Main Menu
Menu 3-2
Installation
Input slots
File service
Internal pattern
When no signal
Source transition
OSD configuration
Language
V-Keystone
H-Keystone
Global keystone
Orientations
Back
3.7 Component Input
Input specifications and locations
The component input section is made of 3 RCA input terminals.
Input signals : Pr, Pb, Ys
0.7Vpp ± 3dB
75 Ω terminated
VIDEO INPUT RGB/COMPONENT INPUT
S-VIDEO VIDEO V
H
R/Pr
B/Pb
G/Y
Input slots
5 RCA
YUV
Reset single slot
PC
RGB/Component
DVI
SVideo
Video
Component
Reset all slots
All input slots
Back
Menu 3-3
CONTROL
ASPECT
SCREEN
RATIO
12V TRIGGER
Image 3-7
Component input
RS232/RS422
IN
How to select the component input ?
1. Press 6 on the RCU.
Note: Another way of select ing the component input is entering the Main menu and selecting C
20
COMPONENT
DVI INPUT
Pr Pb Y
VGA INPUT
omponent.
R5976763 CINEVERSUM 60/70 22042004
Page 25
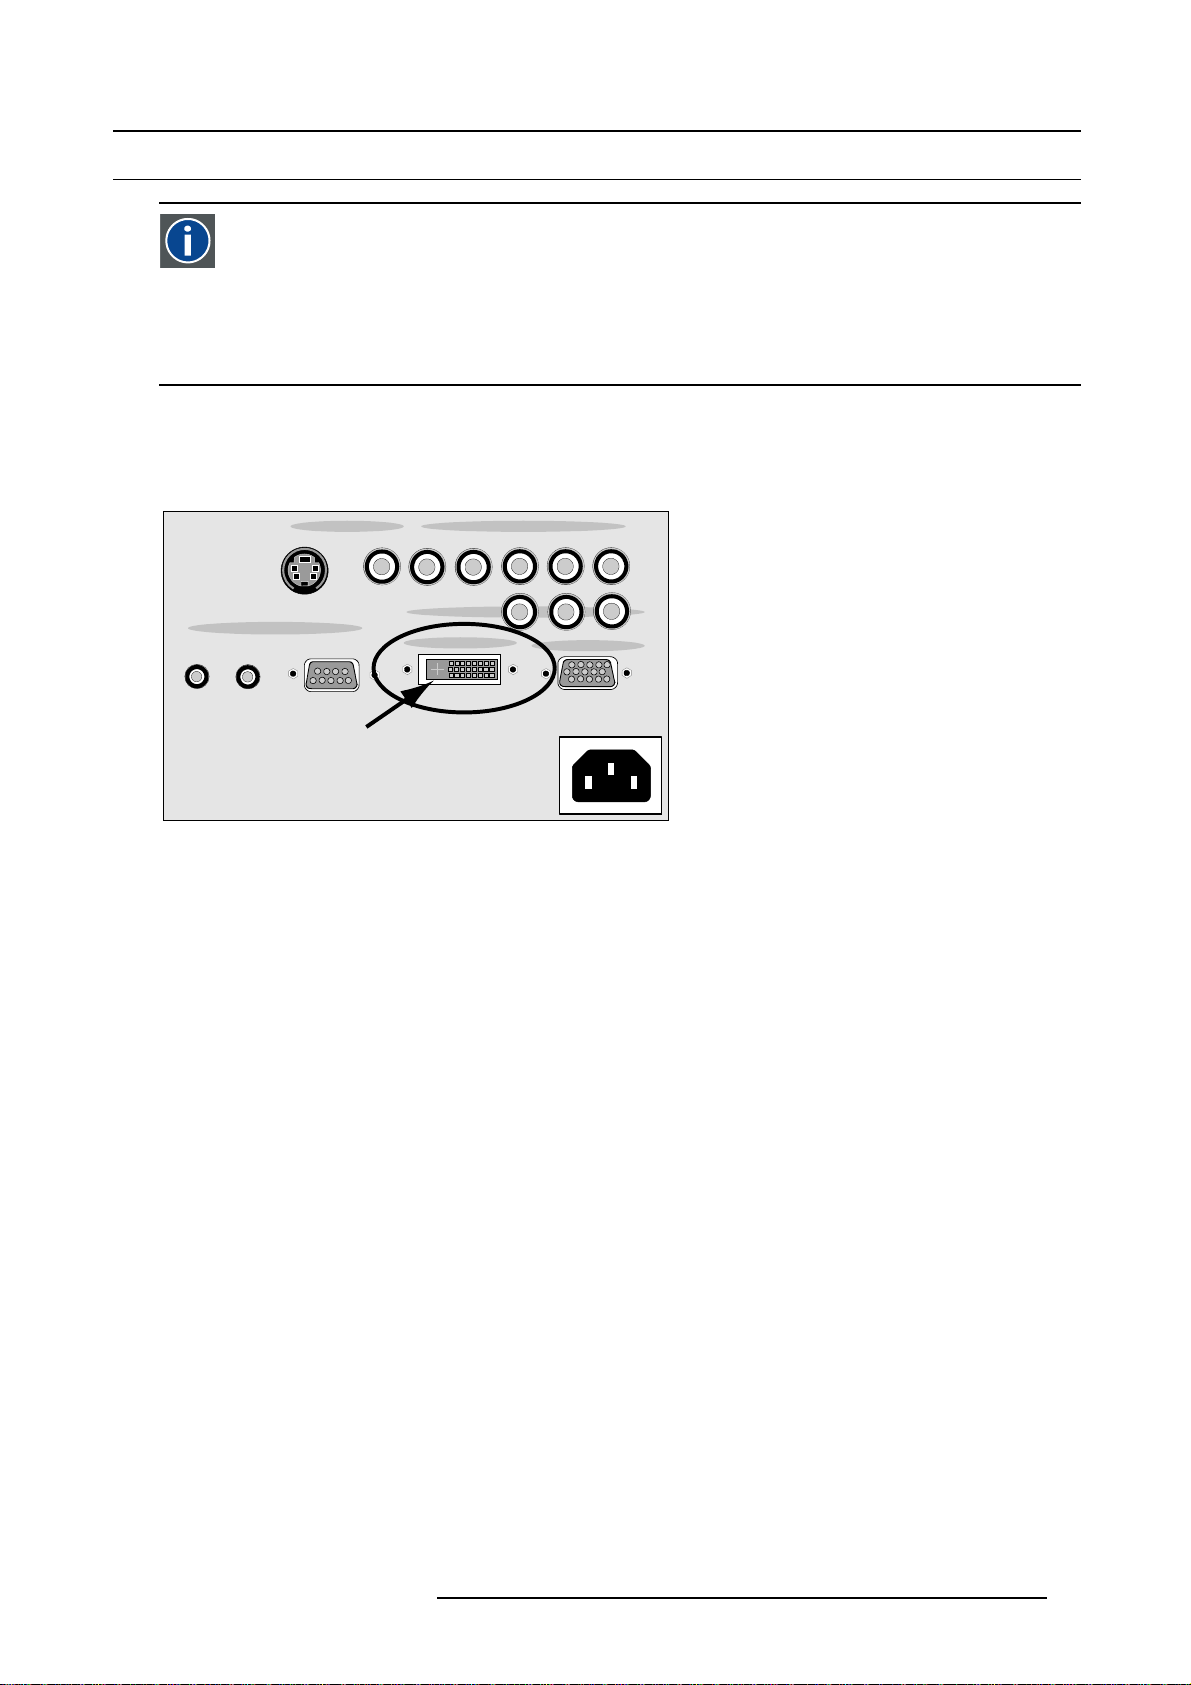
3.8 Digital Visual Interface (DVI) input
DVI
Digital Visual Interface is a display interface developed in response to the proliferation of digital flat panel displays.
The digital video connectivity standard that was developed by DDWG (Digital Display Work Group). This connection
standard offers two different connectors: one with 24 pins that handles digital video signals only, and one with 29 pins
that handles both digital and analog video. This standard uses TMDS (Transition Minimized Differential Signal) from
Silicon Image and DDC (Display Data Channel) from VESA (Video Electronics Standards Association).
DVI can be single or dual link.
Input specifications
Single link DVI
Differential input voltage: 200 mV - 800 mV
3. Connections
ASPECT
RATIO
12V TRIGGER
Image 3-8
DVI input
S-VIDEO VIDEO V
CONTROL
SCREEN
RS232/RS422
VIDEO INPUT RGB/COMPONENT INPUT
IN
H
Pr Pb Y
COMPONENT
DVI INPUT
Pin assignment for the DVI connector.
Pin 1
Pin 2
Pin 3
Pin 4
Pin 5
TMDS DATA2-
TMDS DATA2+
TMDS DATA2/4 Shield
TMDS DATA4-
TMDS DATA4+
R/Pr
B/Pb
VGA INPUT
G/Y
Pin 13
TMDS DATA3+
Pin14 +5Power
Pin 15
Ground (for +5V)
Pin 16 Hot Plug Detect
Pin 17
TMDS DATA0-
Pin 6
Pin 7
DDC Clock
DDC Data
Pin 8 Not connected Pin 20
Pin 9
Pin 10
Pin 11
Pin 12
TMDS DATA1-
TMDS DATA1+
TMDS DATA1/3 Shield
TMDS DATA3-
How to select the DVI Input ?
1. Press 3 on the RCU
Note: Another way of selecting the DVI input is entering the Main menu and selecting DVI.
R5976763 CINEVERSUM 60/70 22042004
Pin 18
Pin 19
Pin 21
Pin 22
Pin 23
Pin 24
TMDS DATA0+
TMDS DATA0/5 Shield
TMDS DATA5-
TMDS DATA5+
TMDS Clock Shield
TMDS Clock+
TMDS Clock-
21
Page 26

3. Connections
3.9 Computer input (RGB analog)
Input specification and location
TTL sync input : U
RGB input = 0.7 V
min
pp
=2.0V
±3dB
ASPECT
RATIO
12V TRIGGER
Image 3-9
Computer input
S-VIDEO VIDEO V
CONTROL
SCREEN
RS232/RS422
VIDEO INPUT RGB/COMPONENT INPUT
IN
H
COMPONENT
DVI INPUT
B/Pb
R/Pr
Pr Pb Y
VGA INPUT
G/Y
What can be connected ?
•RGBHV
•RG
B
S
CompositesynconlypossibleonGreen
How to select a computer input ?
1. Press 1 on the RCU
Note: Another way of s electing the Computer (VGA) input is entering the Main menu and selecting PC.
3.10 RS232-422 IN connection
What can be connected to the RS232 IN connection ?
The RS232 IN connection allows the projector to communicate with a computer e.g. IBM PC or Apple Macintosh.
ASPECT
RATIO
12V TRIGGER
Image 3-10
RS232/RS422 input
CONTROL
SCREEN
VIDEO INPUT RGB/COMPONENT INPUT
S-VIDEO VIDEO V
RS232/RS422
IN
H
COMPONENT
DVI INPUT
22 R5976763 CINEVERSUM 60/70 22042004
B/Pb
R/Pr
Pr Pb Y
VGA INPUT
G/Y
Page 27
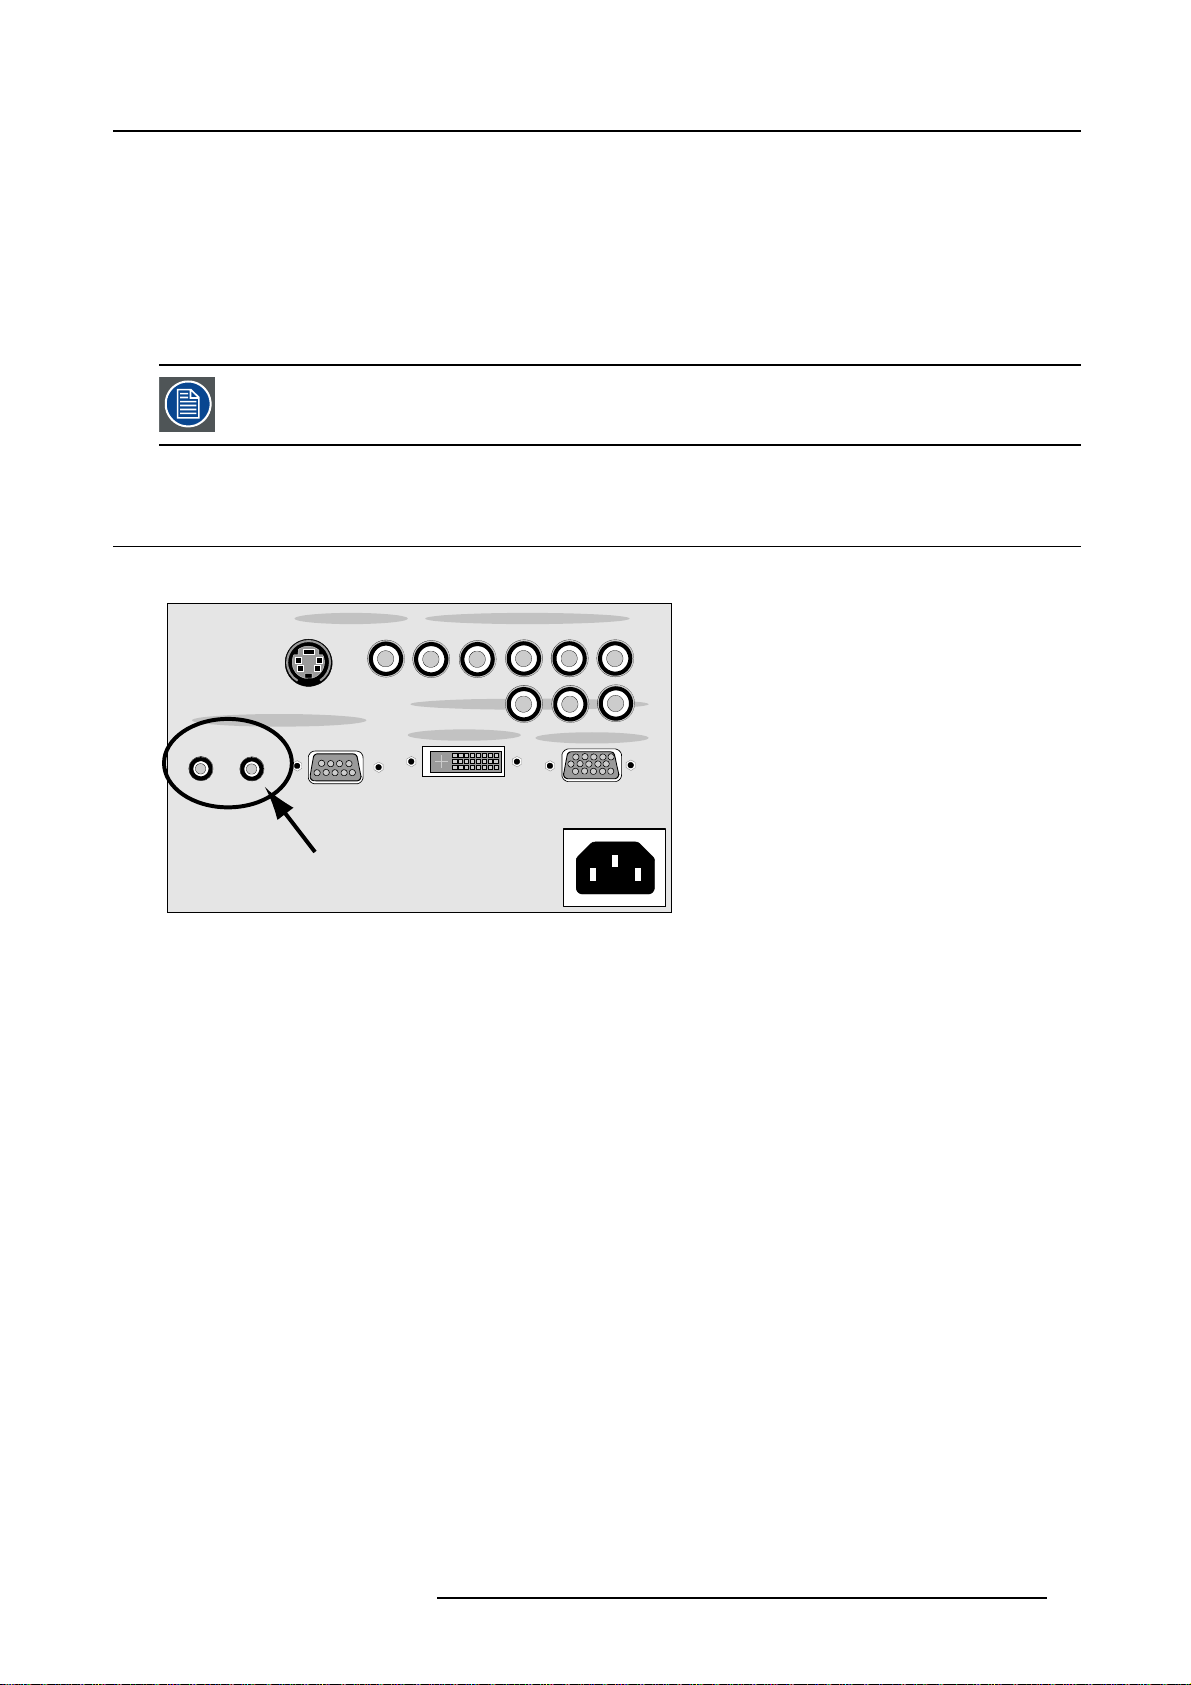
Applications of the RS232/RS422 connection
Remote control:
• easy adjustment of projector via IBM PC (or compatible) or MAC connection.
• address range : 0 and 1.
• allow storage of multiple projector configurations and set ups.
• wide range of control possibilities.
Data communication: sending data to the projector or copying the data from the projector to the computer.
To set up the baud rate of the projector, see "Baudrate setup", page 74.
3.11 Trigger outputs
Location
3. Connections
ASPECT
RATIO
12V TRIGGER
Image 3-11
Trigger outputs
S-VIDEO VIDEO V
CONTROL
SCREEN
RS232/RS422
VIDEO INPUT RGB/COMPONENT INPUT
IN
H
COMPONENT
DVI INPUT
B/Pb
R/Pr
Pr Pb Y
VGA INPUT
G/Y
Aspect ratio
When the internal projector aspect ratio is switched to 4 by 3 or 5 by 4 a 12 V DC voltage will set on the Aspect Ratio output. In all
other cases the is no voltage available on that output.
This 12 V voltage can be used to trigger e.g. the curtains ne
xt to the screen when switching from wide image to a small image.
Screen
When the projector is in operational mode, a 12 V DC voltage is set on the Screen output. When the projector is in standby, there
is no voltage at the output.
This 12 V voltage can be used to trigger e.g. a motor which rolls out the screen when starting up the projector.
R5976763 CINEVERSUM 60/70 22042004
23
Page 28

3. Connections
24 R5976763 CINEVERSUM 60/70 22042004
Page 29

4. GETTING STARTED
Overview
• Terminology overview
• Switching on
• Lamp runtime
• Switching from operational mode to standby
• Switching off the projector
• Temperature error DMD
•UsingtheRCU
• Projector Address
• Controlling the projector
4.1 Terminology overview
On projector
The controls are situated on the top cover of the projector.
4. Getting Started
1
2
3
4
Image 4-1
Ref.
1
2 IR reception indication Lights up when a valid IR signal is captured.
3
4 Main power switch When pressed, the projector starts in stand by mode.
Function Description
Infra red receiver Infra red reception diode for IR signals coming from the Remote control
(RCU
Stand by led
• projector in operational mode: Lights up continuously
• projector in standby mode: LED, 0.5 sec on, 2 sec off.
• projector in cooling down mode: LED, 1 sec on, 1 sec off.
R5976763 CINEVERSUM 60/70 22042004 25
Page 30

4. Getting Started
On Remote control
1
2
F3
F2
F1
F4
F5
3
4
5
6
7
15
ADJ
PAUSE
?
9
SDI
7
DVI
5
VIDEO S-VIDEO
3
RGB
1
TREBLE
Bass
0
SB-PC
8
6
4
EXIT
14
13
12
ENTER
TEXT
*
11
10
9
PHASE
Sharpness
TINT
COLOR
PC
2
BRIGHTN
CONTR
Balance
VOL
8
Image 4-2
Remote control
No. Key name Description
1
RC operating indication lights up when a button on the remote control is pressed. (This is a visual indicator to
check the operation of the remote control)
2 Function keys not yet implemented
3 ADJ Adjust key, to enter or exit the menus.
4 Address key
(recessed key), to enter the address of the projector (between 0 and 9). Press the recessed
address key with a pencil, followed by pressing one digit button between 0 and 9.
5
PAU SE to stop projection for a short time, press ’PAUSE’. The image disappears but full power is
retained for immediate restarting.
6
STBY standby button, to start projector when the power switch is switched on and to switch off the
projector without switching off the power switch.
Attention : Switching to Standby. When the projector is running and you want to
go to standby, press the standby key for 2 seconds.
7
Digit buttons direct input selection.
8 Picture controls use these buttons to obtain the desired picture analog level.
26 R5976763 CINEVERSUM 60/70 22042004
Page 31

No. Key name Description
9
* Aspect ratio button. Opens the selection menu for the aspect ratio.
4. Getting Started
10 FREEZE
11 TEXT to des-activate or activate the on screen slide bars.
12 ENTER
13
Cursor keys Cursor Keys on RCU : to make item selections in a menu box or to adjust a function when a
14 EXIT
15 Audio controls not implemented
press to freeze the projected image.
to confirm an adjustment or selection in a menu..
Entering the adjustment mode is also possible.
slide bar is vissible.
to leave the selected menu box or item (go upwards to previous menu).
4.2 Switching on
Howtoswitchon
1. Press the main power switch on the projector
The projector goes to stand by mode. The stand by LED blinks.
Start image projection
1. Press Standby key once on the RCU.
Note: It may take about 60 seconds before image projection, i.e. no projection until the completion of several operations (soft-
ware initialization,...).
The projector scans the inputs and displays the first found active source.
2. To switch to the desired source, press the corresponding digit on the RCU.
4.3 Lamp runtime
Lamp runtime indication while running
When the total runtime of the lamp is 1400 hours or more, a warning message will be displayed : “Lamp Runtime : 1400 hours”.
When the total runtime of the lamp is 1500 hours or more, a second message will be displayed : “Lamp Runtime limit reached :
1500 hours”.
This warning message will be repeated at next start up. Press EXIT to remove this message.
Contact a qualified service technician to replace the lamp.
The total life time of the lamp for a safe operation is 1500 hours. Do not use it longer as the lamp could explode.
The lamp runtime reset as well as the lamp replacement can only be done by a Barco authorized technician.
R5976763 CINEVERSUM 60/70 22042004 27
Page 32

4. Getting Started
4.4 Switching from operational mode to standby
Howtoswitchtostandby
1. Press the standby button on the remote control for 2 seconds.
A message : “Power down appears”.
Projector goes into standby. Standby LED blinks. After a while, the fans stop blowing and the projector switch off automatically.
4.5 Switching off the projector
Howtoswitchtooff
1. Press the standby button on the remote control for 2 seconds.
A message : Power down appears.
Projector goes into standby. Standby LED blinks. After a while, the fans stop blowing and the projector sw
2. Press the main power switch on the projector.
4.6 Temperature error DMD
Overview
When the temperature of the DMD is too low or too high, the projector will switch automatic
flashes 8 times and an automatic shutdown is activated.
itch off automatically.
ally to standby. The LED on the projector
4.7 Using the RCU
Pointing to reflective screen
Point the front of the RCU to the reflective screen surface.
A
C
B
Image 4-3
Via reflective screen
Direct pointing to the IR sensors
Point the RCU to any of the remote sensors, lo
up to 9 meters from the projector and within a 45 degree angle with respect to the sensors.
cated on the front, top and the rear of the projector. The remote control can be used
28
R5976763 CINEVERSUM 60/70 22042004
Page 33

4. Getting Started
45
45
F
3
F
4
F
2
F
5
F
1
I
T
X
E
J
D
A
T
E
R
N
E
T
X
T
E
E
S
U
A
P
+
-
?
S
E
H
A
P
+
-
0
9
P
N
R
A
S
H
-
7
8
T
T
I
N
-
6
5
R
L
O
O
C
-
4
3
N
T
H
R
I
G
B
-
1
2
R
T
N
O
C
+
-
+
-
E
N
C
L
A
A
B
E
L
B
E
T
R
+
-
+
-
L
V
O
S
S
A
B
Image 4-4
Direct using of the RCU
+
+
+
+
-
T
R
E
B
L
E
-
B
A
S
S
+
F
1
F
2
A
D
J
F
3
F
4
F
5
P
A
U
S
E
E
X
I
T
?
9
0
7
8
E
T
N
E
T
X
E
T
R
5
6
-
P
H
A
S
3
4
E
-
+
S
H
A
-
1
R
2
P
N
+
T
I
N
T
-
+
C
O
L
O
-
R
+
+
B
R
I
G
-
H
T
N
+
C
O
N
T
R
-
+
B
A
L
A
-
N
C
+
E
+
Backlighting
When a button is pressed on the RCU, backlight is activated automatically. That allows the user to operate the remote control in a
dark room. Backlight is turned off automatically a few seconds after the last button is pressed.
4.8 Projector Address
Projector address
Address installed in the projector to be individually controlled.
Overview
The projector address can be set to any value between 0 and 9.
Why a projector address ?
As more than one projector or device which is remote controlled can be installed in a room, the separate projector or device should
be separately addressable with an RCU.
When the projector and another device have the same address, during controlling, interference is possible. To avoid that, set the
projector address on a not used address in the room.
How to set the projector address ?
1. Press The Address key (recessed key) with a pencil.
The projector displays a message box to announce that you can enter an address between 0 and 9.
2. Enter the address by pressing a digit key between 0 and 9.
The projector address and the address of the RCU will be changed to the new entered address.
3. Press EXIT to return to operational mode.
4.9 Controlling the projector
Input Selection
Key in the corresponding input with the digit keys on the RCU. The selected source will be displayed.
When an source is displayed and more source
•press↑ key to display the previous source.
•press↓ key to display the next source.
When no previous or next source, the projector returns to the actual source (only when Auto search is on).
R5976763 CINEVERSUM 60/70 22042004
s are connected and switched on:
29
Page 34

4. Getting Started
The following key numbers are valid :
1. PC source
2. RGB/Component source (5 RCA input)
3. DVI
4. S-Video
5. Video
6. Component (3 RCA)
Picture Controls
When an image control is pressed, a text box with a bar scale and function name of the control, e.g. ’brightness...’ appears on
the screen (only if Barscale status is Yes). The length of the bar scale and the value of the numeric indication indicate the current
memorized setting for this source. The bar scale changes as the arrows on the RCU are pressed or the + or - buttons on the local
keypad.
The picture settings are saved in the image file.
Brightness
Contrast Use the + button for a higher contrast.
Color Use the + button for richer colors.
Tint (Hue) Tint is only active for Video and S-Video when usinga60Hzsource(likeNTSC4.43orNTSC3.58).
Sharpness Use the + button for a sharper picture.
Freeze
Use the + button for a higher brightness.
Use the - button for a lower brightness.
Use the - button for lower contrast.
Use the - button for lighter colors.
Use the + button
Use the - button.
Use the - button for a softer picture.
Press Freeze to freeze the displayed image.
The Pause Key
When the Pause key is pressed, the image projection is stopped, the image is removed from the screen.
To restart the image projection:
•PressPAUSE key
30
R5976763 CINEVERSUM 60/70 22042004
Page 35

5. Getting used to the menu structure
5. GETTING USED TO THE MENU STRUCTURE
Overview
• How to start up the menus
• How to use the menus
• How to make an adjustment
• Access Control via a password
5.1 How to start up the menus
Box like menu structure
The menu structure is built up with boxes which allow easy access to different parameters for setting up the projector.
A menu box item can generate at its turn a menu box or it can generate an adjustment box such as a slide bar.
How to activate the menu structure
1. Press ADJ or ENTER on the RCU.
The Main menu box will be displayed. (menu 5-1)
Main Menu
Image settings
Advanced settings
Installation
Service
1. PC
2. RGB/Component
3. DVI
4. SVideo
* 5. Video
6. Component
Shutdown
Back
Menu 5-1
5.2 How to use the menus
How to select an item
1. Use the ↑ or ↓ keys to highlight the desired item. (menu 5-2)
2. Press ENTER to select.
If the selected item has sub menus, this sub menu will open.
If the selected item is an adjustment or selection, the adjustment or selection will be executed.
3. Use the EXIT key to close an adjustment or to return to the previous menu.
Note: The menu will be closed automatically when there is no action on the menu detected about 5 seconds.
4. Use ADJ to quit the menu structure completely from anywhere in the menu tree.
Main Menu
Image settings
Advanced settings
Installation
Service
1. PC
2. RGB/Component
3. DVI
4. SVideo
* 5. Video
6. Component
Shutdown
Back
Menu 5-2
R5976763 CINEVERSUM 60/70 22042004 31
Page 36

5. Getting used to the menu structure
When no action is taken within a few seconds while a menu box or slide bar is displayed, the projector quits
the menu structure or slide bar (adjustment).
The menus inserted in this manual are always full menus: all the items are visible.
Greyed out menu items are not available for the current selected source or current software version.
5.3 How to make an adjustment
How to perform ?
1. Use the arrow keys to adjust the selected control.
The following keys are mostly combined:
-The↑ and → key perform an adjustment in the positive direction (or to the right, or upwards).
-The↓ and ← key perform an adjustment in the negative direction (or to the left, or downwards).
5.4 Access Control via a password
Password protection
Some items (Advanced settings, installation and service) in the Main menu
user against misalignment of the projector. Only the daily necessary items are available for non experienced users.
This password protection can be enabled or disabled in the service menu. Once the password protection is set, this password will
be necessary to disable it again.
The customer is allowed to create his own password.
How to get access ?
1. Select a item which is password protected.
The Enter password box appears with the first position highlighted.
2. Use the ↑ or ↓ keys to select first character.
The characters can be alphanumeric (from 0 to 9 and from a to z).
3. Press ENTER to accept.
The second character will be highlighted.
4. Select the second character and press ENTER to accept.
5. Select the third character and press ENTER to continue in the adjustment mode.
can be password protected. This password protects the
32
R5976763 CINEVERSUM 60/70 22042004
Page 37

6. SOURCE SELECTION
Overview
• Selecting a source
6.1 Selecting a source
How to select
1. Press ADJ or ENTER to start up the Main menu. (menu 6-1)
An asterisk (*) is displayed before the actual selected source.
2. Push the cursor key ↑ or ↓ to highlight the desired source, e.g. 4. SVideo.
3. Press ENTER to select.
When the source is available, it will be selected. A dialog box appears with the message “Calibrating input ...”
Main Menu
Image settings
Advanced settings
Installation
Service
1. PC
2. RGB/Component
3. DVI
4. SVideo
* 5. Video
6. Component
Shutdown
Back
6. Source Selection
Menu 6-1
R5976763 CINEVERSUM 60/70 22042004 33
Page 38

6. Source Selection
34 R5976763 CINEVERSUM 60/70 22042004
Page 39

7. IMAGE SETTINGS MENU
Overview
• Image settings menu overview
• Starting the Image settings menu
• Brightness
• Contrast
• Saturation
• Tint (hue)
• Sharpness
• Gamma
• Color Temperature
• White peak
7.1 Image settings menu overview
Overview
• Brightness
• Contrast
• Saturation
•Tint
• Sharpness
• Gamma
• Color Temperature
- Predefined color temperatures
- Custom color balance
- Color standard
• White peak
7. Image Settings menu
7.2 Starting the Image settings menu
How to start up ?
1. Press ADJ or ENTER to start up menus. (menu 7-1)
2. Push the cursor key ↑ or ↓ to highlight Image settings.
3. Press ENTER to select.
The Image settings menu will be displayed. (menu 7-2)
Image settings
Advanced settings
Installation
Service
1. PC
2. RGB/Component
3. DVI
4. SVideo
* 5. Video
6. Component
Shutdown
Back
Menu 7-1
Main Menu
Menu 7-2
Image settings
Brightness
Contrast
Saturation
Tint
Sharpness
Gamma
Color temperature
White peak Off
Back
R5976763 CINEVERSUM 60/70 22042004 35
Page 40

7. Image Settings menu
7.3 Brightness
About brightness
The brightness function is used to adjust the overall light output.
How to change the brightness ?
1. Push the cursor key ↑ or ↓ to highlight Brightness. (menu 7-3)
2. Press ENTER to select.
A slider box appears.
3. Use the cursor keys to adjust the brightness setting.
↑ or → key for higher brightness (higher values).
↓ or ← key for lower brightness (lower values).
Image settings
Brightness
Contrast
Saturation
Tint
Sharpness
Gamma
Color temperature
White peak Off
Back
Menu 7-3
7.4 Contrast
About contrast
The contrast function is used to adjust the contrast between the light and dark areas of the displayed image. A correct ’contrast’
setting is important for good image reproduction.
How to change the contrast ?
1. Push the cursor key ↑ or ↓ to highlight Contrast. (menu 7-4)
2. Press ENTER to select.
A slider box appears.
3. Use the cursor keys to adjust the contrast setting.
↑ or → key for higher contrast (higher values).
↓ or ← key for lower contrast (lower values).
Image settings
Brightness
Contrast
Saturation
Tint
Sharpness
Gamma
Color temperature
White peak Off
Back
Menu 7-4
7.5 Saturation
About saturation
The saturation function is used to adjust the color saturation levels for Video, S-Video and component input signals.
36 R5976763 CINEVERSUM 60/70 22042004
Page 41

How to change the saturation ?
1. Push the cursor key ↑ or ↓ to highlight Saturation . (menu 7-5)
2. Press ENTER to select.
A slider box appears.
3. Use the cursor keys to adjust the saturation setting.
↑ or → key for richer colors (higher values).
↓ or ← key for lighter colors (lower values).
Image settings
Brightness
Contrast
Saturation
Tint
Sharpness
Gamma
Color temperature
White peak Off
Back
Menu 7-5
7.6 Tint (hue)
7. Image Settings menu
About tint
The tint function is used to adjust color hue to obtain true color reproduction and is only active for 60 Hz sources like NTSC signals.
For PAL and SECAM sources, the tint is greyed out.
NTSC
National television system committee. The organization that developed the analog television standard currently in use
in the U.S., Canada, and Japan. Now generally used to refer to that standard. The NTSC standard combines blue,
red, and green signals modulated as an AM signal with an FM signal for audio.
PAL
Phase alternate line. The television broadcast standard throughout Europe (except in France and Eastern Europe,
where SECAM is the standard). This standard broadcasts 625 lines of resolution, nearly 20 percent more than the
U.S. standard, NTSC, of 525.
SECAM
Sequential couleur avec mémoire. The television broadcast standard in France, the Middle East, and most of Eastern
Europe, SECAM provides for sequential color transmission and storage in the receiver. The signals used to transmit
the color are not transmitted simultaneously but sequentially line for line. SECAM processes 625 lines, a maximum
of 833 pixels per line and 50 Hz picture frequency. SECAM is used as a transmission standard and not a production
standard (PAL is typically used).
R5976763 CINEVERSUM 60/70 22042004 37
Page 42

7. Image Settings menu
How to change the tint ?
1. Push the cursor key ↑ or ↓ to highlight Tint. (menu 7-6)
2. Press ENTER to select.
A slider box appears.
3. Use the cursor keys to adjust the tint setting.
↑ or → key for higher tint (higher values).
↓ or ← key for lower tint (lower values).
Image settings
Brightness
Contrast
Saturation
Tint
Sharpness
Gamma
Color temperature
White peak Off
Back
Menu 7-6
7.7 Sharpness
About Sharpness
The sharpness function is used to adjust the image sharpness of a video, S-Video and interlaced component input signal.
How to change the sharpness ?
1. Push the cursor key ↑ or ↓ to highlight Sharpne ss. (menu 7-7)
2. Press ENTER to select.
A slider box appears.
3. Use the cursor keys to adjust the brightness setting.
↑ or → key for higher brightness (higher values).
↓ or ← key for lower brightness (lower values).
Image settings
Brightness
Contrast
Saturation
Tint
Sharpness
Gamma
Color temperature
White peak Off
Back
Menu 7-7
7.8 Gamma
About Gamma
Gamma is an image quality enhancement function that offers a richer image by brightening (darkening) the already darker portions
of the image without altering the brightness of the brighter portions (contrast feeling enhanced).
38
R5976763 CINEVERSUM 60/70 22042004
Page 43

How to change the Gamma ?
1. Push the cursor key ↑ or ↓ to highlight Gamma. (menu 7-8)
2. Press ENTER to select.
The gamma selection menu appears. (menu 7-9)
Theactualactivegammavalueisindicatedbyanasterisk(*).
The default value is 2.2.
3. Push the cursor key ↑ or ↓ to highlight the desired gamma value.
4. Press ENTER to select.
The new selected gamma value becomes active.
7. Image Settings menu
Image settings
Brightness
Contrast
Saturation
Tint
Sharpness
Gamma
Color temperature
White peak Off
Back
Menu 7-8
1.0
1.3
1.6
1.9
* 2.2
2.5
2.8
3.1
Back
Menu 7-9
Gamma
7.9 Color Temperature
Color temperature
Color temperature is measured in degrees Kelvin. If a TV has a color temperature of 8,000 degrees Kelvin, that means
the whites have the same shade as a piece of pure carbon heated to that temperature. Low color temperatures have
a shift towards red; high color temperatures have a shift towards blue.
What can be done ?
The color temperature can be selected according to the type of source:
There are 5 different preset color temperatures:
• Display white
• Computer : 9300 K
• Video : 6500 K
• Film : 5400 K
• Broadcast : 3200 K
These calibrated presets can be selected and will provide optimum color tracking, the projector allows however the setting of a
personal color temperature, this is done in Custom balance.
Next to the color temperature, the color standard can be set up.
7.9.1 Predefined Color Temperature
Display white will provide maximum projector light output.
R5976763 CINEVERSUM 60/70 22042004 39
Page 44

7. Image Settings menu
How to select a preset color temperature ?
1. Push the cursor key ↑ or ↓ to highlight Color temperature. (menu 7-10)
The color temperature menu will appear. (menu 7-11)
An asterisk (*) indicates the actual selected color temperature.
2. Push the cursor key ↑ or ↓ to highlight the desired color temperature.
3. Press ENTER to select.
The selected color temperature of the image is adapted
Image settings
Brightness
Contrast
Saturation
Tint
Sharpness
Gamma
Color temperature
White peak Off
Back
Menu 7-10
Color temperature
Display white
Computer 9300K
* Video 6500K
Film 5400K
Broadcast 3200K
Custom balance
Color temp. type: EBU
Back
Menu 7-11
7.9.2 Custom Color Balance
How to select and adjust the custom color balance ?
1. Push the cursor key ↑ or ↓ to highlight Color temperature. (menu 7-12)
The color temperature menu will appear. (menu 7-13)
An asterisk (*) indicates the actual selected color temperature.
2. Push the cursor key ↑ or ↓ to highlight Custom balance.
The Custom balance menu will be displayed. (menu 7-14)
The color temperature of the image will change to the actual stored custom balance.
3. Push the cursor key ↑ or ↓ to highlight x-white.
4. Press ENTER to select.
A bar scale will be displayed.
5. Press the ↑ or ↓ to change the x-white value.
Adjust until the desired value is almost reached. Release the button and wait a few seconds. The color of the image will be
adapted. Fine tune with the ↑ or ↓ keys until the correct value is reached.
6. Press EXIT to return to the Custom balance menu.
7. Repeat from step 3 by highlighting y-white and adjust in the same way.
Image settings
Brightness
Contrast
Saturation
Tint
Sharpness
Gamma
Color temperature
White peak Off
Back
Menu 7-12
Color temperature
Display white
Computer 9300K
* Video 6500K
Film 5400K
Broadcast 3200K
Custom balance
Color temp. type: EBU
Back
Menu 7-13
x-white
y-white
Back
Menu 7-14
Custom balance
7.9.3 Color standard
Color reproduction
The reproduced colors are all situated within a specific color triangle (gamut) based on the basic colors red, green and
pending on the used standard, the triangle can be slightly different so that the reproduced colors are slightly different.
40
R5976763 CINEVERSUM 60/70 22042004
blue. De-
Page 45

7. Image Settings menu
Image 7-1
Color gamut
The projector contains 2 international standards, EBU and ANSI, and its own color triangle (gamut) determined by the lamp and all
optical components of the projector. Colors outside this triangle c
annot be displayed.
EBU
European Broadcasting Union. An organization of European broa
nical statements and recommendations for the 625/50 line television system.
ANSI
American National Standards Institute
Selecting the color standard
1. Push the cursor key ↑ or ↓ to highlight Color temperature. (menu 7-15)
The color temperature menu will appear. (menu 7-16)
An asterisk (*) indicates the actual selected color temperature.
2. Push the cursor key ↑ or ↓ to highlight Color Temp. type.
3. Press ENTER to toggle between EBU, ANSI or PROJ.
EBU
ANSI American color standard. Use this standard for NTSC video images.
PROJ
Image settings
Brightness
Contrast
Saturation
Tint
Sharpness
Gamma
Color temperat
White peak Off
Back
European color standard. Use this standard for PAL and SECAM video images.
Internal projector color system.
Color temperature
Display white
Computer 9300K
* Video 6500K
Film 5400K
Broadcast 3200K
ure
Custom balance
Color temp. typ
Back
e: EBU
dcasters that, among other activities, produces tech-
Menu 7-15
Menu 7-16
R5976763 CINEVERSUM 60/70 22042004 41
Page 46

7. Image Settings menu
7.10 White peak
About white peak
In video centric applications true color reproduction is generally a priority over brightness. To achieve this a typical design will not
utilize a white segment of the color wheel. This has the side effect of reducing the amount of light allowed through the color wheel,
which reduces the overall brightness. To compensate for this a technique can applied called Spoke Light Capture (SLR). The spokes
are defined to be the time between colors. The DMD is normally kept in the “off” state during this time preventing any light from
getting to the screen. If the light is passed trough the spokes, the average over time across them is made up of a mixture of the two
adjacent colors. This will result in a secondary color. If these spokes are taken three at a time, over time they will sum up to white
light. This “virtual white segment” is the basic principal of SLR and can yield a substantial boost to system brightness.
White peak “off” is the best solution for video images while white peak “on” can be used with success for data images.
How to select ?
1. Push the cursor key ↑ or ↓ to highlight Color temperature. (menu 7-17)
2. Press ENTER to toggle between ON and OFF.
On White parts in the image are boosted. Use this for data images.
Off No boosting of white parts. Use this for video images.
3. Press EXIT to return.
Image settings
Brightness
Contrast
Saturation
Tint
Sharpness
Gamma
Color temperature
White peak Off
Back
Menu 7-17
42 R5976763 CINEVERSUM 60/70 22042004
Page 47

8. ADVANCED SETTINGS
Overview
• Advanced settings menu overview
• Start up the Advanced settings
• Aspect Ratio
• Image Position
•Blanking
• Input Balance
8.1 Advanced settings menu overview
Overview
• Aspect ratio
-16:9
-4:3
-5:4
-2.35
-1.88
-1.78
- Letterbox
•Position
- Horizontal shift
- Horizontal size
- Vertical shift
-Verticalsize
• PiP configuration
•Blanking
• Input Balance
8. Advanced Settings
8.2 Start up the Advanced settings
How to start up ?
1. Press ADJ or ENTER to start up menus. (menu 8-1)
2. Push the cursor key ↑ or ↓ to highlight Advanced settings.
3. Press ENTER to select.
The Advanced settings menu will be displayed. (menu 8-2)
Main Menu
Image settings
Advanced settings
Installation
Service
1. PC
2. RGB/Component
3. DVI
4. SVideo
* 5. Video
6. Component
Shutdown
Back
Menu 8-1
R5976763 CINEVERSUM 60/70 22042004 43
Advanced settings
Aspect Ratio
Position
PiP Configuration
Blanking
Input Balance
Back
Menu 8-2
Page 48

8. Advanced Settings
8.3 Aspect Ratio
Aspect ratio
horizontal & vertical dimension in which the window will be displayed, e.g. 4 by 3 or 16 by 9.
What can be done ?
The aspect ratio setting forces the projector to project an image using a defined aspect ratio.
Aspect ratio Description
16:9
4:3
5:4
2.35
1.88
1.78
Letterbox
Some examples:
The first column shows the aspect ratios for a standard television signal with 4:3 image information. The only correct aspect ratio is
4:3. In all other cases the image is transformed.
The second column shows the aspect ratios for a standard television signal with 16:9 image information. The only correct aspect
ratio is “Letterbox”. In all other cases the image is transformed.
Wide screen television format / anamorphic format
Standard television format
Workstation format
Panavision or Cinemascope format
Cinema format
Wide screen television format / anamorphic format
To display standard television format with 16:9 image information. The letter format of the signal is force
into the native panel resolution.
d
44
R5976763 CINEVERSUM 60/70 22042004
Page 49

8. Advanced Settings
Image 8-1
Different views for some typical input signals
(1) Standard television signal with 4:3 image information
(2) Standard television signal with 16:9 image information
When displaying DVD images stored as 4:3 anamorphic, select aspect ratio Letterbox.
When displaying DVD images stored as 16:9, select aspect ratio 16:9.
R5976763 CINEVERSUM 60/70 22042004
45
Page 50

8. Advanced Settings
How to change the aspect ratio ?
1. Push the cursor key ↑ or ↓ to highlight Aspect Ratio. (menu 8-3)
2. Press ENTER to select.
The Aspect ratio menu will be displayed. (menu 8-4)
An asterisk (*) shows the actual selected aspect ratio.
3. Push the cursor key ↑ or ↓ to highlight the desired aspect ratio.
4. Press ENTER to select.
The image changes accordingly.
Advanced settings
Aspect Ratio
Position
PiP Configuration
Blanking
Input Balance
Back
Menu 8-3
Menu 8-4
* 16:9
4:3
5:4
2.35
1.88
1.78
Letterbox
Back
Aspect ratio
8.4 Image Position
Overview
• Horizontal shift
• Horizontal size
• Vertical shift
• Vertical size
When used ?
The controls can be used to exactly match the image on the screen after that all mechanical alignments are correctly done.
8.4.1 Horizontal shift
What can be done ?
The image can be shifted in a horizontal direction.
Image 8-2
Horizontal shift
A Shift to the left
B Shift to the right
46
R5976763 CINEVERSUM 60/70 22042004
Page 51

How to shift the image ?
1. Push the cursor key ↑ or ↓ to highlight Position. (menu 8-5)
2. Press ENTER to select.
The Position menu will be displayed. (menu 8-6)
3. Push the cursor key ↑ or ↓ to highlight Horizontal shift.
A slide bar will be displayed.
4. Use the cursor keys to shift the image horizontally.
When shifting to the left, the value will be negative.
When shifting to the right, the value will be positive.
The adjustment range can vary from - 255 to + 255. 0 is the nominal position.
8. Advanced Settings
Advanced settings
Aspect Ratio
Position
PiP Configuration
Blanking
Input Balance
Back
Menu 8-5
Horizontal shift
Horizontal size
Vertical shift
Vertical size
Back
Menu 8-6
Position
8.4.2 Horizontal size
What can be done ?
The size of the image can be adjusted in horizontal direction. The left side of the image is fixed and only right side can be moved
until the exact size is reached.
Image 8-3
Horizontal size
R5976763 CINEVERSUM 60/70 22042004 47
Page 52

8. Advanced Settings
Howtosizetheimage?
1. Push the cursor key ↑ or ↓ to highlight Position. (menu 8-7)
2. Press ENTER to select.
The Position menu will be displayed. (menu 8-8)
3. Push the cursor key ↑ or ↓ to highlight Horizontal size.
A slide bar will be displayed.
4. Use the cursor keys to resize the image horizontally.
When the value is negative the image becomes smaller.
When the value is positive the image becomes wider.
The adjustment range can vary from - 255 to + 255. 0 is the nominal position.
Advanced settings
Aspect Ratio
Position
PiP Configuration
Blanking
Input Balance
Back
Menu 8-7
8.4.3 Vertical shift
What can be done ?
The image can be shifted in a vertical direction.
Horizontal shift
Horizontal size
Vertical shift
Vertical size
Back
Menu 8-8
Position
Image 8-4
Vert ical shif t
C Shift upwards
D Shift downwards
48
R5976763 CINEVERSUM 60/70 22042004
Page 53

How to shift the image ?
1. Push the cursor key ↑ or ↓ to highlight Position. (menu 8-9)
2. Press ENTER to select.
The Position menu will be displayed. (menu 8-10)
3. Push the cursor key ↑ or ↓ to highlight Vertical shift.
A slide bar will be displayed.
4. Use the cursor keys to shift the image vertically.
When shifting downwards, the value will be negative.
When shifting upwards, the value will be positive.
The adjustment range can vary from - 255 to + 255. 0 is the nominal position.
8. Advanced Settings
Advanced settings
Aspect Ratio
Position
PiP Configuration
Blanking
Input Balance
Back
Menu 8-9
Horizontal shift
Horizontal size
Vertical shift
Vertical size
Back
Menu 8-10
Position
8.4.4 Vertical size
What can be done ?
The size of the image can be adjusted in vertical direction. The upper side of the image is fixed and only bottom side can be moved
until the exact size is reached.
Image 8-5
Horizontal size
R5976763 CINEVERSUM 60/70 22042004 49
Page 54

8. Advanced Settings
Howtosizetheimage?
1. Push the cursor key ↑ or ↓ to highlight Position.(menu8-11)
2. Press ENTER to select.
The Position menu will be displayed. (menu 8-12)
3. Push the cursor key ↑ or ↓ to highlight Vertical size.
A slide bar will be displayed.
4. Use the cursor keys to resize the image vertically.
When the value is negative the image becomes less high.
When the value is positive the image becomes higher.
The adjustment range can vary from - 255 to + 255. 0 is the nominal position.
Advanced settings
Aspect Ratio
Position
PiP Configuration
Blanking
Input Balance
Back
Menu 8-11
Horizontal shift
Horizontal size
Vertical shift
Vertical size
Back
Menu 8-12
Position
8.5 Blanking
What can be done ?
Blanking adjustments affect only the edges of the projected image and are used to frame the projected image on to the scree
to hide or black out unwanted information (or noise). A ’0’ on the bar scale indicates no blanking.
Which blanking adjustments are available ?
• top blanking
• bottom blanking
• left blanking
• right blanking
nand
50
R5976763 CINEVERSUM 60/70 22042004
Page 55

Image 8-6
Blanking
A Top blanking
B Bottom blanking
C Left blanking
D Right blanking
8. Advanced Settings
Adjusting the blanking
1. Push the cursor key ↑ or ↓ to highlight Blanking. (menu 8-13)
2. Press ENTER to select.
The Blanking menu will be displayed. (menu 8-14)
3. Push the cursor key ↑ or ↓ to highlight the desired blanking
4. Press ENTER to start up the chosen blanking.
5. Use the cursor keys to adjust the blanking.
Advanced settings
Aspect Ratio
Position
PiP Configuration
Blanking
Input Balance
Back
Menu 8-13
Top
Bottom
Left
Right
Back
Menu 8-14
Blanking
8.6 Input Balance
Overview
• Introduction to Input Balance
• Adjusting the Input Balance for RGB signals
• Input balance for YUV signals
• Returning to the factory defaults
R5976763 CINEVERSUM 60/70 22042004
51
Page 56

8. Advanced Settings
e
8.6.1 Introduction to Input Balance
Introduction: Unbalanced color signals
When transporting signals, there is always a risk of deterioration of the information contained in the signals.
In case of information contained in the amplitude of the signals which is the case of data color signals (R, G, B),image 8-7 , we are
quite sure that the amplitude of these color signals is subject to alterations.
An example of alteration may be a DC component added to the signal, in the form of a DC offset repositioning the black level, since
this black level (“brightness”) will become crucial later on (clamping circuit) it will result in “black not being black”.
Another value that is subject to alteration is the amplitude of the signal, resulting in an altered “Gain” of the signal (“white level” or
contrast).
The alterations of the three color signals will happen independently i.e. the colors will end to be unbalanced, image 8-8
B
0.7V
Image 8-7
R
Image 8-8
G
R
∆
One can conclude here that a good color tracking can only be met by using three previously (input) balanced
color signals
B
G
∆
∆Β
Black lev
Analog Digital Conversion
The analog color signals must pass through an Analog/Digital conversion circuit prior to any digital processing in the PMP.
A typical ADC transforms the analog value into an 8 bit coded digital signal.
The graphic shows that when converting a signal containing a DC offset component the range of the converter is not optimally used.
ADC
Black leve
R
∆
Image 8-9
One can conclude here that a good data conversion can only be met by using three previously (input) balanced
color signals
255
i2 : video information
0
i1 : superfleous information
Black level
The objective of input balancing
The objective in input balancing is to “set” the same black level and the same white level for the three colors of a particular input
source.
52
R5976763 CINEVERSUM 60/70 22042004
Page 57

8. Advanced Settings
Black level setting : brightness
White level setting : contrast
The same absolute black and white level for the three colors allow the same reference for Brightness and contrast control of the
picture !
These two references also set the range in which the ADC will work for that particular source (this explains also why each input
balance setting is linked to a particular source and thus saved in the image file).
8.6.2 Adjusting the Input Balance for RGB signals
How can it be done ?
To balance the three color signals of a particular source there are conditions; in fact we must know the black and the white level of
the source i.e. :
1. The source in question must be able to generate a white signal, ideally a 100% white (background) full screen pattern
2. The source in question must be able to generate a black signal, ideally a 100% black (background) full screen pattern
A
Image 8-10
White balance : In the projector, we will set the contrast for each color until we get a 100% light output picture when projecting a
100% white image (image A)
Black balance : In the projector, we will set the brightness for eac
100% black image (image B).
The changeover from min to max is indicated by the apparition of bright spots also called “digital noise”
An alternative to a full screen White/black pattern is the standard gray scale pattern, the white bar will be used
for white balance and the black bar for black balance.
B
h color until we get a 0% light output picture when projecting a
Image 8-11
Black balance
1. Push the cursor key ↑ or ↓ to highlig
2. Press ENTER to select.
The Input balance menu will be displayed. (menu 8-16)
3. Push the cursor key ↑ or ↓ to highlight Black balance.
R5976763 CINEVERSUM 60/70 22042004
ht Input Balance. (menu 8-15)
53
Page 58

8. Advanced Settings
4. Press ENTER to select.
The black balance menu will be displayed. (menu 8-17)
5. Adjust the Brightness to a maximum value until there is just no green noise visible in the black areas.
6. Push the cursor key ↑ or ↓ to highlight Black level red.
7. Press ENTER to select.
8. Adjust with the cursor keys until there is no red noise visible in the black areas.
9. Repeat from step 6 but select Black level blue and adjust until no blue noise is visible in the black areas.
10.Set the brightness back to its normal value.
Advanced settings
Aspect Ratio
Position
PiP Configuration
Blanking
Input Balance
Back
Menu 8-15
Menu 8-16
Input balance
White balance
Black balance
Factory settings
Back
Black balance
Black level red
Black level blue
Back
Menu 8-17
White balance
1. Push the cursor key ↑ or ↓ to highlight Input Balance. (menu 8-18)
2. Press ENTER to select.
The Input balance menu will be displayed. (menu 8-19)
3. Push the cursor key ↑ or ↓ to highlight W hite balance.
4. Press ENTER to select.
The white balance menu will be displayed. (menu 8-20)
5. Select gain red and put it on its lowest value. Do the same for gain blue.
Adjust contrast to a maximum value until the green noise becomes visible in the white areas and return one step.
6. Select Gain red and adjust with the cursor keys until the red noise becomes visible in the white areas and return one step.
7. Select Blue red and adjust with the cursor keys until the blue noise becomes visible in the white areas and return one st
8. Put the contrast back on its normal value.
ep.
Advanced settings
Aspect Ratio
Position
PiP Configuration
Blanking
Input Balance
Back
Menu 8-18
Menu 8-19
Input balance
White balance
Black balance
Factory settings
Back
8.6.3 Input balance for YUV signals
How to adjust ?
1. Push the cursor key ↑ or ↓ to highlight Input Balance. (menu 8-21)
2. Press ENTER to select.
The Input balance menu will be displayed. (menu 8-22)
3. Decrease the brightness a lot.
4. Push the cursor key ↑ or ↓ to highlight Black balance.
54
Gain red
Gain blue
Back
Menu 8-20
White balance
R5976763 CINEVERSUM 60/70 22042004
Page 59

8. Advanced Settings
5. Press ENTER to select.
The black balance menu will be displayed. (menu 8-23)
6. Select Black level red and adjust the red balance with the cursor keys until the red noise becomes visible in the black areas.
7. Select now Black level blue and adjust the blue balance with the cursor keys until the blue noise becomes visible in black areas.
8. Increase the brightness until the black areas displays approximately 50% white noise.
9. Correct Red and Blue Black balance adjustment in such a way the blue and red noise are just visible and a small brightness
increase maintain a grey color.
Advanced settings
Aspect Ratio
Position
PiP Configuration
Blanking
Input Balance
Back
Menu 8-21
Menu 8-22
Input balance
White balance
Black balance
Factory settings
Back
Checking the white balance
There is no adjustment procedure for the white balance.
8.6.4 Returning to the factory defaults
Howtoreturn?
1. Push the cursor key ↑ or ↓ to highlight Factory settings. (menu 8-24)
2. Press ENTER to select.
The factory settings will be loaded.
Input balance
White balance
Black balance
Factory settings
Back
Black balance
Black level red
Black level blue
Back
Menu 8-23
Menu 8-24
R5976763 CINEVERSUM 60/70 22042004 55
Page 60

8. Advanced Settings
56 R5976763 CINEVERSUM 60/70 22042004
Page 61

9. INSTALLATION MENU
Overview
• Installation menu overview
• Start up the Installation menu
• Input Slots
•Fileservice
• Internal pattern
• When no signal
• Source transition
• On Screen Display Configuration
• Language support
• Vertical keystone
• Horizontal keystone
• Global keystone
• Orientation
9.1 Installation menu overview
9. Installation menu
Overview
• Input slots
•Fileservice
- Auto search
- Film mode
- Color space
• Internal patterns
• When no signal
• Source transition
• OSD configuration
• Language
• V-keystone
• H-keystone
• Global keystone
• Orientations
9.2 Start up the Installation menu
The installation menu can be password protected when the password protection is set to on.
R5976763 CINEVERSUM 60/70 22042004 57
Page 62

9. Installation menu
Start up
1. Press ADJ or ENTER to start up the Main menu. (menu 9-1)
2. Push the cursor key ↑ or ↓ to select Installation.
3. Press ENTER to select.
The Installation menu will be displayed. (menu 9-2)
Image settings
Advanced settings
Installation
Service
1. PC
2. RGB/Component
3. DVI
4. SVideo
* 5. Video
6. Component
Shutdown
Back
Menu 9-1
Main Menu
Menu 9-2
Installation
Input slots
File service
Internal pattern
When no signal
Source transition
OSD configuration
Language
V-Keystone
H-Keystone
Global keystone
Orientations
Back
9.3 Input Slots
Overview
• 5 RCA input selection (RGB/component input)
• Reset a single input
• Reset all inputs
9.3.1 5 RCA input selection (RGB/component input)
What can be done ?
The 5 RCA input can accept RGB signals as well as Component signals. Therefor, this input must be configured for the correct
signal input.
How to configure ?
1. Push the cursor key ↑ or ↓ to highlight Input slots. (menu 9-3)
2. Press ENTER to select.
The input slots menu will be displayed. (menu 9-4)
3. Push the cursor key ↑ or ↓ to highlight the 5 RCA selection.
4. Press ENTER to toggle between RGB, YUV or SCART.
RGB Input is configured to accept RGB signals.
YUV
SCART Input is configured to accept RGB signals with Video as sync on the Hs input.
Input slots
File service
Internal pattern
When no signal
Source transition
OSD configuration
Language
V-Keystone
H-Keystone
Global keystone
Orientations
Back
Menu 9-3
Input is configured to accept component signals
Installation
Menu 9-4
Input slots
5 RCA
YUV
Reset single slot
PC
RGB/Component
DVI
SVideo
Video
Component
Reset all slots
All input slots
Back
58 R5976763 CINEVERSUM 60/70 22042004
Page 63

9. Installation menu
9.3.2 Reset a single input
What can be done ?
Via Image settings and Advanced settings the image can be modified as desired. But when some misalignments are discovered,
it sometimes not so easy to return to the standard settings. Therefore, with a Reset a single input,itispossibletoreturntosource
factory defaults.
How to reset a single input ?
1. Push the cursor key ↑ or ↓ to highlight Input slots. (menu 9-5)
2. Press ENTER to select.
The input slots menu will be displayed. (menu 9-6)
3. Push the cursor key ↑ or ↓ to highlight the input slot which must be reset. (e.g. Video)
4. Press ENTER to select.
The specific reset menu will be displayed. (menu 9-7)
5. Push the cursor key ↑ or ↓ to select the corresponding source type. (e.g. PAL source).
6. Press ENTER to reset.
If the selected source corresponds with the input signal, the projector will load the source default.
If the selected source does not correspond, nothing will happen.
Installation
Input slots
File service
Internal pattern
When no signal
Source transition
OSD configuration
Language
V-Keystone
H-Keystone
Global keystone
Orientations
Back
Menu 9-5
Menu 9-6
Input slots
5 RCA
YUV
Reset single slot
PC
RGB/Component
DVI
SVideo
Video
Component
Reset all slots
All input slots
Back
The reset be executed without confirmation warning.
9.3.3 Reset all inputs
What can be done ?
All settings of all inputs can be reset to the default values.
How to reset all inputs ?
1. Push the cursor key ↑ or ↓ to highlight Input slots. (menu 9-8)
2. Press ENTER to select.
The input slots menu will be displayed. (menu 9-9)
3. Push the cursor key ↑ or ↓ to highlight All input slots.
All input will be reset to the default values.
Video slots defaults
Reset PAL
Reset SECAM
Reset NTSC
Reset PAL non intl
Reset NTSC non intl
Back
Menu 9-7
Installation
Input slots
File service
Internal pattern
When no signal
Source transition
OSD configuration
Language
V-Keystone
H-Keystone
Global keystone
Orientations
Back
Menu 9-8
Menu 9-9
Input slots
5 RCA
YUV
Reset single slot
PC
RGB/Component
DVI
SVideo
Video
Component
Reset all slots
All input s
Back
lots
R5976763 CINEVERSUM 60/70 22042004 59
Page 64

9. Installation menu
The reset be executed without confirmation warning.
9.4 File service
Overview
• Auto search
• Film mode
• Color Space
9.4.1 Auto search
What can be done ?
When a not active input is selected, the projector can scan automatically the inputs and display the first active source. When auto
search is off, the projector stays on the selected source and waits until a signal is available.
During the scanning the projector follows priority :
1. PC
2. DVI
3. Video
4. S-Video
5. 5 RCA
6. 3 RCA
How to set up ?
1. Push the cursor key ↑ or ↓ to highlight File service. (menu 9-10)
2. Press ENTER to select.
The File service menu will be displayed. (menu 9-11)
3. Push the cursor key ↑ or ↓ to highlight Auto search.
4. Press ENTER to toggle between ON and OFF.
ON Projector scans for an active source
Projector stays on the selected input
OFF
Installation
Input slots
File service
Internal pattern
When no signal
Source transition
OSD configuration
Language
V-Keystone
H-Keystone
Global keystone
Orientations
Back
Menu 9-10
Menu 9-11
File service
Auto search ON
Film mode ON
Color space
Back
9.4.2 Film mode
What can be done ?
Some sources like common DVD material are derived from cinema 24 Hz sources (2/2 or 3/2 pull down method).
The film mode detection insures that these converted signals are shown without artefacts.
60
R5976763 CINEVERSUM 60/70 22042004
Page 65

9. Installation menu
This function may cause undesired effects on standard sources, therefore it can be disabled (OFF) at any time
2:2 pull-down
The process of transferring 24-frames/sec film format into video by repeating each frame (used for PAL DVD’s) as two
video fields. ( AD )
3:2 pull-down
Method used to map the 24 fps of film onto the 30 fps (60 fields) or 25 fps (50 fields), so that one film frame occupies
three video fields, the next two, etc. It means the two fields of every other video frame come from different film frames
making operations such as rotoscoping impossible, and requiring care in editing. Some sophisticated equipment can
unravel the 3:2 sequence to allow frame-by-frame treatment and subsequently re-compose 3:2. The 3:2 sequence
repeats every five video frames and four film frames, the latter identified as A-D. Only film frame A is fully on a video
frame and so exists at one time code only, making it the editable point of the video sequence.
Artefacts
Undesirable elements or defects in a video picture. These may occur naturally in the video process and must be
eliminated in order to achieve a high-quality picture. Most common in analog are cross co
Most common in digital are macroblocks, which resemble pixelation of the video image.
lor and cross luminance.
Enabling/disabling the film mode detection
1. Push the cursor key ↑ or ↓ to highlight File service. (menu 9-12)
2. Press ENTER to select.
The File service menu will be displayed. (menu 9-13)
3. Press ENTER to toggle between ON and OFF.
Film mode is enabled.
ON
Film mode is disabled.
OFF
Installation
Input slots
File service
Internal pattern
When no signal
Source transition
OSD configuration
Language
V-Keystone
H-Keystone
Global keystone
Orientations
Back
Menu 9-12
Menu 9-13
File service
Auto search ON
Film mode ON
Color space
Back
9.4.3 Color Space
Color Space
The color range between specified references. Typically references are quoted in television: RGB, Y, R-Y, B-Y, YIQ,
YUV and Hue Saturation and Luminance (HSL). In print, Cyan, Magenta, Yellow and Black (CMYK) are used. Moving
pictures between these is possible but requires careful attention to the accuracy of process
ing involved. Operating
across the media--print, film and TV, as well as between computers and TV equipment--will require conversions in
color space.
About color space
Color space selection is only active for progressive component video signals on the 5-cable (5 RCA) or the Component (3 RCA)
input.
It is possible to change the values of the color matrix with predefined values so that the result color changes.
R5976763 CINEVERSUM 60/70 22042004
61
Page 66

9. Installation menu
Progressive scan
A video scanning system that displays all lines of a frame in one pass.
Color space
1. Push the cursor key ↑ or ↓ to highlight File service. (menu 9-14)
2. Press ENTER to select.
The File service menu will be displayed. (menu 9-15)
3. Push the cursor key ↑ or ↓ to highlight Color space.
4. Press ENTER to toggle between YCbCr, YPbPr or SMPTE240.
Installation
Input slots
File service
Internal pattern
When no signal
Source transition
OSD configuration
Language
V-Keystone
H-Keystone
Global keystone
Orientations
Back
Menu 9-14
Menu 9-15
File service
Auto search ON
Film mode ON
Color space
Back
9.5 Internal pattern
What can be done ?
To check to alignment of the projector, different internal patterns are built-in. Once a pattern is selected and displayed, a second
pattern of the same type can be displayed by pressing ENTER.
How to display an internal pattern ?
1. Push the cursor key ↑ or ↓ to highlight Internal pattern. (menu 9-16)
2. Press ENTER to select.
The Internal pattern selection menu will be displayed. (menu 9-17)
3. Push the cursor key ↑ or ↓ to highlight the desired pattern.
4. Press ENTER to select.
The selected pattern will be displayed.
5. Press ENTER to scroll through the different patterns available for that type. When the last one is displayed and ENTER is
pressed, the internal pattern selection box appears.
A new pattern can be selected in the same ways as the previous one or EXIT canbepressedandtheprojectorreturnstolast
displayed source.
Installation
Input slots
File service
Internal pattern
When no signal
Source transition
OSD configuration
Language
V-Keystone
H-Keystone
Global keystone
Orientations
Back
Menu 9-16
Internal pattern
Background
Outline
Hatch
Colorbars
Graybars
Multiburst
Checkerboard
Purity
Curtain mode
Page Character
Back
Menu 9-17
The curtain mode displays the system uncorrected colors (red, green, blue and white). This pattern can be
used to measure the x-y color coordinates of the system (can be used to optimize the projector after lamp
replacement). The displayed color is unaffected by the chosen color temperature.
62 R5976763 CINEVERSUM 60/70 22042004
Page 67

9. Installation menu
9.6 When no signal
What can be done ?
When the projector does not detect an input source, it can be set up to switch automatically to stand by after a certain time which
can be set up during installation.
’When no signal’ set up.
1. Push the cursor key ↑ or ↓ to highlight When no signal. (menu 9-18)
2. Press ENTER to select.
The When no signal menu appears. (menu 9-19)
3. Push the cursor key ↑ or ↓ to highlight Shutdown.
4. Press ENTER to toggle between ON and OFF.
ON The projector shuts down after a certain delay. The delay menu item becomes active and can be set up.
OFF
The projector remains active and waits until an input signal is back.
5. Is Shutdown set to ON?
If yes, Push the cursor key ↑ or ↓ to highlight Delay (min).
The Modify delay window opens. (menu 9-20)
6. Use the ↑ or ↓ key to enter a new value.
The delay can be between 1 and 10 minutes.
Installation
Input slots
File service
Internal pattern
When no signal
Source transition
OSD configuration
Language
V-Keystone
H-Keystone
Global keystone
Orientations
Back
Menu 9-18
Menu 9-19
When no signal
Shutdown : ON
Delay (min) : 1
Back
Modify delay
Enter new value :
1
Back
Menu 9-20
9.7 Source transition
What can be done ?
While switching from one source to another, the time between (transition time) can be filled up with a typical background color.
Available colors:
•Black
• Green
•Blue
R5976763 CINEVERSUM 60/70 22042004
63
Page 68

9. Installation menu
How to set up a source transition ?
1. Push the cursor key ↑ or ↓ to highlight Source transition. (menu 9-21)
2. Press ENTER to select.
The Source transition menu will be displayed. (menu 9-22)
An asterisk (*) indicates the actual set up.
3. Push the cursor key ↑ or ↓ to highlight the desired transition.
4. Press ENTER to select.
The asterisk jumps to the selected item.
Installation
Input slots
File service
Internal pattern
When no signal
Source transition
OSD configuration
Language
V-Keystone
H-Keystone
Global keystone
Orientations
Back
Menu 9-21
* None
Black screen
Green screen
Blue screen
Back
Menu 9-22
Source transition
9.8 On Screen Display Configuration
OSD
On screen display
Overview
• Menu position
• Bar scale status
• Bar scale position
• Message status
9.8.1 Menu position
What can be done ?
When a menu is called, it can be displayed in nine different places of the active image.
How to position the menu ?
1. Push the cursor key ↑ or ↓ to highlight OSD configuration. (menu 9-23)
2. Press ENTER to select.
The OSD configuration menu will be displayed. (menu 9-24)
3. Push the cursor key ↑ or ↓ to highlight V just below Menu position.
4. Press ENTER to toggle between Top, Bottom and Center.
Toggle until the desired vertical position is obtained.
64
R5976763 CINEVERSUM 60/70 22042004
Page 69

5. Push the cursor key ↑ or ↓ to highlight H below Menu position.
6. Press ENTER to toggle between Left, Center and Right.
Toggle until the desired horizontal position is obtained.
9. Installation menu
Installation
Input slots
File service
Internal pattern
When no signal
Source transition
OSD configuration
Language
V-Keystone
H-Keystone
Global keystone
Orientations
Back
Menu 9-23
OSD configuration
Menu position
V Top
H Left
Barscale status Yes
Barscale position
V Top
H Right
Message status Yes
Back
Menu 9-24
9.8.2 Bar scale status
What can be done ?
The bar scale which appears during some image adjustment such as brightness control, etc. can be disabled. The adjustment can
still be done but no bar scale appears on the screen. E.g., this is sometimes handy when adjusting an image setting during a film.
Enabling/disabling the bar scale
1. Push the cursor key ↑ or ↓ to highlight OSD configuration. (menu 9-25)
2. Press ENTER to select.
The OSD configuration menu will be displayed. (menu 9-26)
3. Press ENTER to toggle between Yes and No.
Yes The bar scale will be displayed each time an image adjustment is called.
No No bar scale will be displayed during an image adjustment.
Installation
Input slots
File service
Internal pattern
When no signal
Source transition
OSD configuration
Language
V-Keystone
H-Keystone
Global keystone
Orientations
Back
Menu 9-25
OSD configuration
Menu position
V Top
H Left
Barscale status Yes
Barscale position
V Top
H Right
Message status Yes
Back
Menu 9-26
9.8.3 Bar scale position
What can be done ?
When a function with bar scale adjustment is called, this bar scale can be displayed on nine different places of the active image.
How to position the menu ?
1. Push the cursor key ↑ or ↓ to highlight OSD configuration. (menu 9-27)
2. Press ENTER to select.
The OSD configuration menu will be displayed. (menu 9-28)
3. Push the cursor key ↑ or ↓ to highlight V just below Barscale position.
4. Press ENTER to toggle between Top, Bottom and Center.
Toggle until the desired vertical position is obtained.
R5976763 CINEVERSUM 60/70 22042004
65
Page 70

9. Installation menu
5. Push the cursor key ↑ or ↓ to highlight H below Barscale position.
6. Press ENTER to toggle between Left, Center and Right.
Toggle until the desired horizontal position is obtained.
Installation
Input slots
File service
Internal pattern
When no signal
Source transition
OSD configuration
Language
V-Keystone
H-Keystone
Global keystone
Orientations
Back
Menu 9-27
OSD configuration
Menu position
V Top
H Left
Barscale status Yes
Barscale position
V Top
H Right
Message status Yes
Back
Menu 9-28
9.8.4 Message status
What can be done ?
Messages generated by the projector to inform the user about e.g. shutdown, etc. can be disabled.
Enabling/disabling messages
1. Push the cursor key ↑ or ↓ to highlight OSD configuration. (menu 9-29)
2. Press ENTER to select.
The OSD configuration menu will be displayed. (menu 9-30)
3. Press ENTER to toggle between Yes and No.
Yes The messages, when generate by the projector will be displayed.
No No messages will be displayed.
Installation
Input slots
File service
Internal pattern
When no signal
Source transition
OSD configuration
Language
V-Keystone
H-Keystone
Global keystone
Orientations
Back
Menu 9-29
OSD configuration
Menu position
V Top
H Left
Barscale status Yes
Barscale position
V Top
H Right
Message status Yes
Back
Menu 9-30
9.9 Language support
What is possible ?
The language of the OSD can be changed to some predefined languages.
The following languages are available:
• English
•German
• French
• Chinese
66
R5976763 CINEVERSUM 60/70 22042004
Page 71

How to change the language ?
1. Push the cursor key ↑ or ↓ to highlight OSD configuration. (menu 9-31)
2. Press ENTER to select.
The Language selection menu will be displayed. (menu 9-32)
3. Push the cursor key ↑ or ↓ to highlight the desired language.
4. Press ENTER to select.
The OSD language changes to the selected language.
9. Installation menu
Installation
Input slots
File service
Internal pattern
When no signal
Source transition
OSD configuration
Language
V-Keystone
H-Keystone
Global keystone
Orientations
Back
Menu 9-31
* English
Back
Menu 9-32
Deutsch
Français
Chinese
Language
9.10 Vertical keystone
What can be done ?
The Vertical Keystone adjustment is used to align the image geometry, this can be necessary when projecting under a non standard
angle.
Image 9-1
Vertical keystone correction
A Vertical keystone top
B Vertical keystone bottom
Depending on the Global keystone setting, the vertical keystone adjustment is source specific or is global for
all sources.
Avoid using the vertical keystone function as this result in a loss of resolution. The reason for this keystone
is the inclination of the projector. Check first if it is possible to correct that physically.
R5976763 CINEVERSUM 60/70 22042004 67
Page 72

9. Installation menu
How to adjust the Vertical keystone ?
1. Push the cursor key ↑ or ↓ to highlight V-Keystone. (menu 9-33)
2. Press ENTER to select.
A bar scale will be displayed.
3. Push the cursor key ↑ or ↓ to adjust the vertical keystone.
Adjust until the left and right vertical lines are straight.
Installation
Input slots
File service
Internal pattern
When no signal
Source transition
OSD configuration
Language
V-Keystone
H-Keystone
Global keystone
Orientations
Back
Menu 9-33
9.11 Horizontal keystone
What can be done ?
The Horizontal Keystone adjustment is used to align the image geometry, this can be necessary when projecting under a non standard angle.
Image 9-2
Horizontal keystone adjustment
A Right keystone
B Left keystone
Depending on the Global keystone setting, the horizontal keystone adjustment is source specific or is global
for all sources.
Avoid using the horizontal keystone function as this result in a loss of resolution. The reason for this keystone
is the inclination of the projector. Check first if it is possible to corr
ect that physically.
68 R5976763 CINEVERSUM 60/70 22042004
Page 73

How to adjust the Horizontal keystone ?
1. Push the cursor key ↑ or ↓ to highlight H-Keystone. (menu 9-34)
2. Press ENTER to select.
A bar scale will be displayed.
3. Push the cursor key ↑ or ↓ to adjust the horizontal keystone.
Adjust until the top and bottom horizontal lines are straight.
Installation
Input slots
File service
Internal pattern
When no signal
Source transition
OSD configuration
Language
V-Keystone
H-Keystone
Global keystone
Orientations
Back
Menu 9-34
9.12 Global keystone
9. Installation menu
What can be done ?
When global keystone is set to Yes, the actual vertical and horizontal keystone settings will be applied to all sources.
When global keystone is set to No, the actual vertical and horizontal keystone settings will be applied only to the actual source.
How to set up ?
1. Push the cursor key ↑ or ↓ to highlight Global keystone. (menu 9-35)
2. Press ENTER to select.
The global keystone menu will be displayed. (menu 9-36)
An asterisk (*) indicates the actual setting.
3. Push the cursor key ↑ or ↓ to highlight the desired global keystone setting.
Yes Keystone adjustment is global.
No
Keystone adjustment is only for the active source.
4. Press ENTER to select.
Installation
Input slots
File service
Internal pattern
When no signal
Source transition
OSD configuration
Language
V-Keystone
H-Keystone
Global keystone
Orientations
Back
Yes
*No
Back
Global keystone
Menu 9-35
Menu 9-36
9.13 Orientation
Projector orientation
Depending on how the projector is oriented, the projector’s internal settings have to be adapted.
R5976763 CINEVERSUM 60/70 22042004
69
Page 74

9. Installation menu
How to set up ?
1. Push the cursor key ↑ or ↓ to highlight Orientation. (menu 9-37)
2. Press ENTER to select.
The orientation menu will be displayed. (menu 9-38)
3. Press ENTER to toggle the orientation.
Possible orientations :
- Front/table : used when the projector is placed in front of the screen on a table.
- Front/ceiling : used when the projector is placed in front of the screen but mounted on the ceiling.
- Rear/table : used when the projector is placed behind the screen on a table.
- Rear/ceiling : used when the projector is placed behind the screen but mounted on the ceiling.
Installation
Input slots
File service
Internal pattern
When no signal
Source transition
OSD configuration
Language
V-Keystone
H-Keystone
Global keystone
Orientations
Back
Menu 9-37
Orientations
Orientations : Front/Table
Back
Menu 9-38
70 R5976763 CINEVERSUM 60/70 22042004
Page 75

10. SERVICE MENUS
Overview
• Service menu overview
• Start up the Service menu
• Identification screen
• Password
• IR address
• RS232 address
• Serial communication
• Thermal Diagnosis
• I2C Diagnosis
10.1 Service menu overview
Overview
• Identification
• Password
• IR address : 000
• RS232 address : 000
• Serial communication
• Thermal diagnosis
• I2C diagnosis
10. Service menus
10.2 Start up the Service menu
The service menu can be password protected when the password protection is set to on.
How to start up ?
1. Press ADJ or ENTER to start up the main menu. (menu 10-1)
2. Push the cursor key ↑ or ↓ to highlight Service.
3. Press ENTER to select.
The Service menu will be displayed. (menu 10-2)
Image settings
Advanced settings
Installation
Service
1. PC
2. RGB/Component
3. DVI
4. SVideo
* 5. Video
6. Component
Shutdown
Back
Menu 10-1
Main Menu
Identification
Password
IR address : 000
RS232 address : 000
Serial communication
Thermal diagnosis
I2C diagnosis
Back
Menu 10-2
Service
R5976763 CINEVERSUM 60/70 22042004 71
Page 76

10. Service menus
10.3 Identification screen
What can be seen on the identification screen?
The identification screen shows the general information of the projector.
The following items will be displayed:
• Type of projector: CineVERSUM 70
• IR address = address used for the remote control
• RS address = address used with RS232/422 serial communication
• Software version
• Baud rate: transfer speed for communication through RS232/RS422 with an external device or computer. The baud rate of the
projector must be the same as the baud rate of the connected computer or external device.
• Projector Serial number: indicates the fabrication number of the projector. This number can be useful when calling for technical
assistance.
• Lamp Run Time: gives the total run time since the first start up of this lamp.
• Manufacturing date
How to display the identification window ?
1. Push the cursor key ↑ or ↓ to highlight Identification. (menu 10-3)
2. Press ENTER to select.
The Identification window appears. (menu 10-4)
Service
Identification
Password
IR address : 000
RS232 address : 000
Serial communication
Thermal diagnosis
I2C diagnosis
Back
Menu 10-3
Menu 10-4
Identification
CineVERSUM 70
IR address : 000
RS address : 000
Soft. version : 07A00F22Z
Baudrate PC : 19200
Serial number : 6002316
Lamp runtime : 28h
Manuf. Date : Apr. 14 2004
Back
10.4 Password
Overview
• Enable-disable password
• Modify password
10.4.1 Enable-disable password
Why password ?
With a password it is possible to protect all settings in Advanced Settings, Installation and Service
When the password is enabled, only person who knows the password can get in.
.
72
R5976763 CINEVERSUM 60/70 22042004
Page 77

Enable/disable password
1. Push the cursor key ↑ or ↓ to highlight Password. (menu 10-5)
2. Press ENTER to select.
The password menu will be displayed. (menu 10-6)
3. Push the cursor key ↑ or ↓ to highlight Use password.
4. Press ENTER to toggle between Yes or No.
Yes Password is enabled
No Password is disabled. Free access to all menus.
10. Service menus
Service
Identification
Password
IR address : 000
RS232 address : 000
Serial communication
Thermal diagnosis
I2C diagnosis
Back
Menu 10-5
Use password : Yes
Modify password
Back
Menu 10-6
Password
10.4.2 Modify password
How to modify
1. Push the cursor key ↑ or ↓ to highlight Password. (menu 10-7)
2. Press ENTER to select.
The password menu will be displayed. (menu 10-8)
3. Push the cursor key ↑ or ↓ to highlight Mo dify password.
4. Press ENTER to select.
The password modification menu will be displayed. (menu 10-9)
The first digit will be highlighted.
5. Push the cursor key ↑ or ↓ to change the value.
An alphanumeric value can be entered. The following characters can be browsed:
digital scroll list : 0123456789
ASCII scroll list : abcdefghijklmnopqrstuvwxyz
6. Press ENTER to accept this first character.
The second character will be highlighted.
7. Enter in the same way.
8. Press ENTER to accept this second character.
The third character will be highlighted.
R5976763 CINEVERSUM 60/70 22042004
73
Page 78

10. Service menus
9. Enter in the same way.
10.Press ENTER to accept this third character.
The new password is entered.
It becomes valid after a reboot of the projector. Switch off the projector and switch on again.
Service
Identification
Password
IR address : 000
RS232 address : 000
Serial communication
Thermal diagnosis
I2C diagnosis
Back
Menu 10-7
Use password : Yes
Modify password
Back
Menu 10-8
Password
10.5 IR address
Overview
An overview of the IR address is given.
To change the IR address, see "Projector Address", page 29.
10.6 RS232 address
How to change ?
1. Push the cursor key ↑ or ↓ to highlight RS232 address. (menu 10-10)
2. Press ENTER to toggle between 000 and 001.
Modify password
Enter new value :
0
Menu 10-9
Service
Identification
Password
IR address : 000
RS232 address : 000
Serial communication
Thermal diagnosis
I2C diagnosis
Back
Menu 10-10
10.7 Serial communication
Overview
• Baudrate setup
• Serial communication interface selection
10.7.1 Baudrate setup
About Baudrate
The baudrate is the communications speed used for communication between the projector and the external computer. The baudrate
setting of the projector must be the same as those of the computer.
74
R5976763 CINEVERSUM 60/70 22042004
Page 79

How to setup
1. Push the cursor key ↑ or ↓ to highlight Serial Communication. (menu 10-11)
2. Press ENTER to select.
The Serial communication menu will be displayed. (menu 10-12)
3. Push the cursor key ↑ or ↓ to highlight Baudrate PC.
4. Press ENTER to toggle between the different possible baudrates.
The following baudrates are available :
- 1200
- 4800
- 9600
- 19200
10. Service menus
Service
Identification
Password
IR address : 000
RS232 address : 000
Serial communication
Thermal diagnosis
I2C diagnosis
Back
Menu 10-11
Serial communication
Baudrate PC : 19200
Interface : RS232
Back
Menu 10-12
10.7.2 Serial communication interface selection
About interface selection
The serial port of the projector can accept serial communication via the RS232 protocol or via the RS422 protocol. The protocol
type must be setup.
RS232
An Electronic Industries Association (EIA) serial digital interface standard specifying the characteristics of the communication path between two devices using either DB-9 or DB-25 connectors. This standard is used for relatively
short-range communications and does not specify balanced control lines. RS-232 is a serial control standard with a
set number of conductors, data rate, word length and type of connector to be used. The standard specifies component
connection standards with regard to computer interface. It is also called RS-232-C, which is the third version of the
RS-232 standard, and is functionally identical to the CCITT V.24 standard. Logical ’0’ is > + 3V, Logical ’1’ is < - 3V.
The range between -3V and +3V is a the transition zone.
RS422
An EIA serial digital interface standard that specifies the electrical characteristics of balanced (differential) voltage,
digital interface circuits. This standard is usable over longer distances than RS-232. This signal gov
erns the asynchronous transmission of computer data at speeds of up to 920,000 bits per second. It is also used as the serial port
standard for Macintosh computers. When the difference between the 2 lines is < - 0.2V that equals with a logical ’0’.
When the difference is > +0.2V that equals to a logical ’1’..
R5976763 CINEVERSUM 60/70 22042004 75
Page 80

10. Service menus
How to set up ?
1. Push the cursor key ↑ or ↓ to highlight Serial Communication. (menu 10-13)
2. Press ENTER to select.
The Serial communication menu will be displayed. (menu 10-14)
3. Press ENTER to toggle between RS232 and RS422.
Service
Identification
Password
IR address : 000
RS232 address : 000
Serial communication
Thermal diagnosis
I2C diagnosis
Back
Menu 10-13
Serial communication
Baudrate PC : 19200
Interface : RS232
Back
Menu 10-14
10.8 Thermal Diagnosis
About thermal diagnosis
This menu gives an overview of the fan speeds and if they work normal.
It gives also the internal ambient temperature and the temperature of the DMD.
How to get an overview ?
1. Push the cursor key ↑ or ↓ to highlight Thermal diagnosis. (menu 10-15)
2. Press ENTER to select.
The Thermal diagnosis menu will be displayed. (menu 10-16)
Service
Identification
Password
IR address : 000
RS232 address : 000
Serial communication
Thermal diagnosis
I2C diagnosis
Back
Thermal diagnosis
Fan 1 1687 RPM
Fan 2 1028 RPM
Fan 3 1687 RPM
Fan 4 Normal
Fan 5 Normal
Fan 6 Normal
T_amb 39°C
T_DMD 45°C
Back
Menu 10-15
Menu 10-16
10.9 I2C Diagnosis
How to display ?
1. Push the cursor key ↑ or ↓ to highlight I2C diagnosis. (menu 10-17)
2. Press ENTER to select.
The I2C diagnosis menu will be displayed. (menu 10-18)
Service
Identification
Password
IR address : 000
RS232 address : 000
Serial communication
Thermal diagnosis
I2C diagnosis
Back
Menu 10-17
Menu 10-18
76 R5976763 CINEVERSUM 60/70 22042004
I2C diagnosis
DDP1010 0x34 – + +
Thermal 0x5A + + +
Thermal 0x58 + + +
ADC 0x9A + + +
Deiter 0x64 + + +
VDC 0x42 + + +
Back
Page 81

A. SPECIFICATIONS
A.1 Specifications for CineVERSUM 60
Overview
A. Specifications
Optimium screen diagonal
Optimium screen width
Tech nology single chip DLP™
DLP resolution 1024 x 576
Single cable digital link
Chip format
Chip Type
Lamp
Lamp Arc Length 1,3 mm
Lifetime > 1500 hours (on average)
Light Output typical 900 ANSI lumens
Contrast Ratio (full On/Off) > 2000 : 1
Brightness uniformity > 90%
Color Temperature
Lenses
60" to 80"
132 to 177cm
No
16:9 true widescreen
ED2
250 W UHP
8500 K
1.70 - 2.25 : 1 (Standard)
2.25 - 3.0 : 1 (Long throw)
Lens Zoom and Focus Manual
Lens Shift
Vertical Shift 50 to 160 % off Axis
Horizontal Shift No (on Axis)
Maximum screen size (diagonal) Standard lens: 200" Optional lens: 240" (wide) 178" (tele)
Color Wheel 6 segment (RGBRGB)
CineVersum Master
Inputs
Control 1 RS232 (D-sub9 connector)
12V Trigger
Acoustic Noise <30dBA
Main Voltage Range
Manual
Not mandatory
1 Composite Video (RCA connector)
1S-Video(4pinminiDIN)
1 Component Video (3 x RCA connectors)
1 RGBHV or Component (5 x RCA connectors)
1 RGBHV (D15 VGA connector )
1 DVI input (HDCP)
2 (power/masking)
90-230V AC/ 50-60 Hz
Weight
R5976763 CINEVERSUM 60/70 22042004 77
6kg(13.2lbs)
Page 82

A. Specifications
Width
Height
Depth
Article Number
Color Refresh 5x (NTSC) / 6x (PAL)
449 mm / 17.7"
156 mm / 6.2"
420 mm / 16.6"
R9002460 CineVERSUM 60 standard throw
R9002461 CineVERSUM 60 long throw
A.2 Specifications for CineVERSUM 70
Overview
Optimium screen diagonal
Optimium screen width
Tech nology single chip DLP™
DLP resolution 1280 x 720
Single cable digital link
Lenses
70" to 90"
155 to 200cm
No
1.80 - 2.40 : 1 (Standard)
1.40 - 1.80 : 1 (Short throw)
Article Number
Chip format
Chip Type
Lamp
Lamp Arc Length 1,3 mm
Lifetime > 1500 hours (on average)
Light Output Typical 1000 ANSI lumens
Contrast Ratio
Brightness uniformity > 90%
Color Temperature
Lens Zoom and Focus Manual
Lens Shift
Vertical Shift 50% to 120% off Axis
Horizontal Shift No (on Axis)
Maximum screen size (diagonal) Standard lens: 300" (wide) 220" (tele) Short th
R9010080 CineVERSUM 70 standard
R9010081 CineVERSUM 70 short throw
16:9 true widescreen
HD2+
250 W UHP
> 2700 : 1
8500 K
Manual
row: 250"
Color Wheel 6 segment (RGBRGB)
Color Refresh 5x (NTSC) / 6x (PAL)
78 R5976763 CINEVERSUM 60/70 22042004
Page 83

A. Specifications
Inputs
Control RS232 Control
12V Trigger
Acoustic Noise <30dBA
Main Voltage Range
Width
Height
Depth
Weight
CineVersum Master
1 Composite Video (RCA connector)
1S-Video(4pinminiDIN)
1 Component Video (3 x RCA connectors)
1 RGBHV or Component (5 x RCA connectors)
1 RGBHV (D15 VGA connector )
1 DVI/HDCP input
2 (power/masking)
90-230V AC / 50-60 Hz
449 mm / 17.7"
156 mm / 6.2"
420 mm / 16.6"
7.9 kg (17.4 lbs)
Not mandatory
R5976763 CINEVERSUM 60/70 22042004 79
Page 84

A. Specifications
80 R5976763 CINEVERSUM 60/70 22042004
Page 85

B. MAINTENANCE
B.1 Error reporting via the LEDs
Legend of the used code
Blue : LED is on with blue color
Green: LEDisonwithgreencolor
– : LED is out
No blinking : LED is out for a longer time
Over temperature
Blinking sequence of standby LED:
Blue–Blue–Blue–Noblinking–Green–Noblinking
The sequence repeats.
Lamp error
Blinking sequence of standby LED:
Blue–Blue–Blue–Blue–Blue–Noblinking–Green–Noblinking
The sequence repeats.
B. Maintenance
Fan error
Fan1:Blue–Blue–Blue–Blue–Blue–Blue–Noblinking–Green–Noblinking
Fan2: Blue–Blue–Blue–Blue–Blue–Blue–Noblinking–Green–Green–Noblinking
Fan3: Blue–Blue–Blue–Blue–Blue–Blue–Noblinking–Green–Green–Green–Noblinking
Fan4: Blue–Blue–Blue–Blue–Blue–Blue–Noblinking–Green–Green–Green–Green–Noblinking
Fan4: Blue–Blue–Blue–Blue–Blue–Blue–Noblinking–Green–Green–Green–Green–Green–Noblinking
DMD error
Blue – Blue – Blue – no blinking – Green – Green – Green – No blinking
R5976763 CINEVERSUM 60/70 22042004
81
Page 86

B. Maintenance
82 R5976763 CINEVERSUM 60/70 22042004
Page 87

GLOSSARY
2:2 pull-down
The process of transferring 24-frames/sec film format into video by repeating each frame (used for PAL DVD’s) as two video fields.
(AD)
3:2 pull-down
Method used to map the 24 fps of film onto the 30 fps (60 fields) or 25 fps (50 fields), so that one film frame occupies three video
fields, the next two, etc. It means the two fields of every other video frame come from different film frames making operations
such as rotoscoping impossible, and requiring care in editing. Some sophisticated equipment can unravel the 3:2 sequence to
allow frame-by-frame treatment and subsequently re-compose 3:2. The 3:2 sequence repeats every five video frames and four film
frames, the latter identified as A-D. Only film frame A is fully on a video frame and so exists at one time code only, making it the
editable point of the video sequence.
ANSI
American National Standards Institute
ANSI 73.11
American power plug to connect the power cord to the wall outlet.
Artefacts
Undesirable elements or defects in a video picture. These may occur naturally in the video process and must be eliminated in
order to achieve a high-quality picture. Most common in analog are cross color and cross luminance. Most common in digital are
macroblocks, which resemble pixelation of the video image.
Glossary
Aspect ratio
horizontal & vertical dimension in which the window will be displayed, e.g. 4 by 3 or 16 by 9.
CEE7
European power plug to connect the power cord to the wall outlet.
Chrominance
The color component of a video signal that includes information about tint and saturation.
Color Space
The color range between specified references. Typically references are quoted in television: RGB, Y, R-Y, B-Y, YIQ, YUV and Hue
Saturation and Luminance (HSL). In print, Cyan, Magenta, Yellow and Black (CMYK) are used. Moving pictures between these is
possible but requires careful attention to the accuracy of processing involved. Operating across the media--print, film and TV, as
well as between computers and TV equipment--will require conversions in color space.
Color temperature
Color temperature is measured in degrees Kelvin. If a TV has a color temperature of 8,000 degrees Kelvin, that means the whites
have the same shade as a piece of pure carbon heated to that temperature. Low color temperatures have a shift towards red; high
color temperatures have a shift towards blue.
Component video
A video system containing three separate color component signals, either red/green/blue (RGB) or chroma/color difference (YCbCr,
YPbPr, YUV), in analog or digital form.
Component Video
In Component Video the term component describes a number of elements that are needed to make up the video picture, these
components are PR/Y/PB. A composite video signal on the other hand contains all the information needed for the color picture in a
single channel of information
Composite Video
Luminance and chrominance are combined along with the timing reference "sync" information using one of the coding standards-NTSC, PAL or SECAM--to make composite video. Most televisions and VCRs have composite video connectors, which are usually
colored yellow.
R5976763 CINEVERSUM 60/70 22042004
83
Page 88

Glossary
DVI
Digital Visual Interface is a display interface developed in response to the proliferation of digital flat panel displays.
The digital video connectivity standard that was developed by DDWG (Digital Display Work Group). This connection standard offers
two different connectors: one with 24 pins that handles digital video signals only, and one with 29 pins that handles both digital
and analog video. This standard uses TMDS (Transition Minimized Differential Signal) from Silicon Image and DDC (Display Data
Channel) from VESA (Video Electronics Standards Association).
DVI can be single or dual link.
EBU
European Broadcasting Union. An organization of European broadcasters that, among other activities, produces technical statements and recommendations for the 625/50 line television system.
Gamma
The transfer characteristics of most cameras and displays are nonlinear. For a display, a small change in amplitude when the signal
level is small produces a change in the display brightness level, but the same change in amplitude at a high level will not produce
the same magnitude of brightness change. This nonlinearity is known as gamma.
Luminance
The component of a video signal that includes information about its brightness.
NTSC
National television system committee. The organization that developed the analog television standard currently in use in the U.S.,
Canada, and Japan. Now generally used to refer to that standard. The NTSC standard combines blue, red, and green signals
modulated as an AM signal with an FM signal for audio.
OSD
On screen display
PAL
Phase alternate line. The television broadcast standard throughout Europe (except in France and Eastern Europe, where SECAM
is the standard). This standard broadcasts 625 lines of resolution, nearly 20 percent more than the U.S. standard, NTSC, of 525.
Progressive scan
A video scanning system that displays all lines of a frame in one pass.
Projector address
Address installed in the projector to be individually controlled.
RS232
An Electronic Industries Association (EIA) serial digital interface standard specifying the characteristics of the communication path
between two devices using either DB-9 or DB-25 connectors. This standard is used for relatively short-range communications and
does not specify balanced control lines. RS-232 is a serial control standard with a set number of conductors, data rate, word length
and type of connector to be used. The standard specifies component connection standards with regard to computer interface. It is
also called RS-232-C, which is the third version of the RS-232 standard, and is functionally identical to the CCITT V.24 standard.
Logical ’0’ is > + 3V, Logical ’1’ is < - 3V. The range between -3V and +3V is a the transition zone.
RS422
An EIA serial digital interface standard that specifies the electrical characteristics of balanced (differential) voltage, digital interface
circuits. This standard is usable over longer distances than RS-232. This signal governs the asynchronous transmission of computer
data at speeds of up to 920,000 bits per second. It is also used as the serial port standard for Macintosh computers. When the
difference between the 2 lines is < - 0.2V that equals with a logical ’0’. When the difference is > +0.2V that equals to a logical ’1’..
SECAM
Sequential couleur avec mémoire. The television broadcast standard in France, the Middle East, and most of Eastern Europe,
SECAM provides for sequential color transmission and storage in the receiver. The signals used to transmit the color are not transmitted simultaneously but sequentially line for line. SECAM processes 625 lines, a maximum of 833 pixels per line and 50 Hz picture
frequency. SECAM is used as a transmission standard and not a production standard (PAL is typically used).
84
R5976763 CINEVERSUM 60/70 22042004
Page 89

INDEX
Index
Numerics/Symbols
5-cable input 18
A
Advanced setting 50
Blanking 50
Advanced settings 43–44, 46–49
Aspect ratio 44
Image position 46
Position 46–49
Horizontal shift 46
Horizontal size 47
Vertical shift 48
Vertical size 49
Start up 43
Aspect ratio 44
Auto search 60
B
Bar scale position 65
Bar scale status 65
Baudrate setup 74
Blanking 50
Box content 3
Brightness 36
Selection via menu 36
C
Ceiling mount 13
Color space 61
Color temperature 39–40
Color standard 40
Custom color balance 40
Predefined 39
Component input 20
Composite video input 18
Computer input 22
Conections 21
DVI input 21
Connections 15–18, 20, 22–23
5-Cable input 18
Communications 22
RS232 IN 22
RS422 IN 22
Component input 18, 20
Composite video 18
Computer input 22
Connector cover 15
Removal 15
Input facilities 16
Power connection 15
RGB analog 22
RGBHV input 18
S-Video 17
Trigger outputs 23
VGA input 22
Video 18
Contrast 36
Selection via menu 36
Controlling the projector 29
D
Dimensions 3–4
DVI 21
Pin configuration 21
DVI input 21
E
Error reporting 81
F
File service 60–61
Auto search 60
Color space 61
Film mode 60
Film mode 60
G
Gamma 38
Getting started 25, 27–29
Controlling the projector 29
Lamp runtime 27
Projector address 29
Switching off 28
Switching on 27
Switching to standby 28
Temperature error DMD 28
Terminology overview 25
Using the RCU 28
Global keystone 69
H
Horizontal keystone 68
Hue 37
Selection via menu 37
Humidity conditions 7
I
I2C diagnosis 76
Image settings 35–39, 42
Brightness 36
Color temperature 39
Predefined 39
Contrast 36
Gamma 38
Hue 37
Overview 35
Saturation 36
Sharpness 38
Start up 35
Tint 37
White peak 42
Input balance 52–55
Factory defaults 55
Introduction 52
RGB signals 53
YUV signals 54
Input Balance 51
Installation 57–69
File service 60–61
Auto search 60
Color space 61
Film mode 60
Global keystone 69
Horizontal keystone 68
Input slots 58–59
5 RCA input 58
Reset all inputs 59
Single input 59
Internal pattern 62
Language 66
Orientation 69
OSD configuration 64–66
Bar scale position 65
R5976763 CINEVERSUM 60/70 22042004
85
Page 90

Index
Bar scale status 65
Menu position 64
Message status 66
Overview 57
Source transition 63
Start up 57
Vertical keystone 67
When no signal 63
Installation guidelines 7–8, 13
Ceiling mount 13
General 7
Projector configuration 8
Projector position 8
Installation Guidelines 7–8, 10
Ambient Temperature 7
Condition Check 7
Environment 7
Humidity conditions 7
Laser Beams 8
Safety area 10
Screen Type 8
Interface selection 75
Internal pattern 62
K
Keystone 67–69
Global 69
Horizontal 68
Vertical 67
L
Lamp runtime 27
Language 66
Change 66
Selection 66
Lens 10–11
Cleaning 10
Vertical lens shift 11
Lens shift 11
M
Maintenance 81
Error reporting 81
Menu position 64
Menu structure 31–32
Access control 32
Getting used with 31
How start up 31
How to make adjustment 32
How to use 31
Password control 32
Message status 66
O
Orientation 69
OSD configuration 64–66
Bar scale position 65
Bar scale status 65
Menu position 64
Message status 66
P
Packaging 3
Box content 3
Projector 3
Password 72–73
Disable 72
Enable 72
Modify 73
Power connection 15
Projector address 29
Projector configuration 8
Projector position 8
R
Remote control 12
Battery insertion 12
RGB analog input 22
RGBHV input 18
RS232 22
Connection 22
RS422 22
Connection 22
S
S-Video 17
Pin configuration 17
S-Video input 17
Safety Warnings 7
Saturation 36
Selection via menu 36
Serial communication 74–75
Baudrate setup 74
Interface selection 75
Service 71–76
I2C diagnosis 76
Identification 72
IR address 74
Overview 71
Password 72–73
Disable 72
Enable 72
Modify 73
RS232 address 74
Serial communication 74–75
Baudrate setup 74
Interface selection 75
Start up 71
Thermal diagnosis 76
Sharpness 38
Selection via menu 38
Source selection 33
How to select 33
Via menu structure 33
Source transition 63
Specifications 77–78
CineVERSUM 60 77
CineVERSUM 70 78
Switching off 28
Switching on 27
Switching to standby 28
T
Temperature 7
Ambient 7
Thermal diagnosis 76
Tint 37
Selection via menu 37
Trigger outputs 23
V
Vertical keystone 67
VGA input 22
Video input 18
W
When no signal 63
86
R5976763 CINEVERSUM 60/70 22042004
Page 91

Revision Sheet
To :
Barco nv Home Cinema/Documentation
Noordlaan 5, B-8520 Kuurne
Phone: +32 56.36.89.69, Fax: +32 56.36.83.54
E-mail: antoon.dejaegher@barco.com, Web: www.homecinema.barco.com
From:
Date:
Please correct the following points in this documentation (R5976763/00):
page
wrong
correct
R5976763 CINEVERSUM 60/70 22042004
 Loading...