

Page 1
Solis Maestro Grinder
Operating Instructions
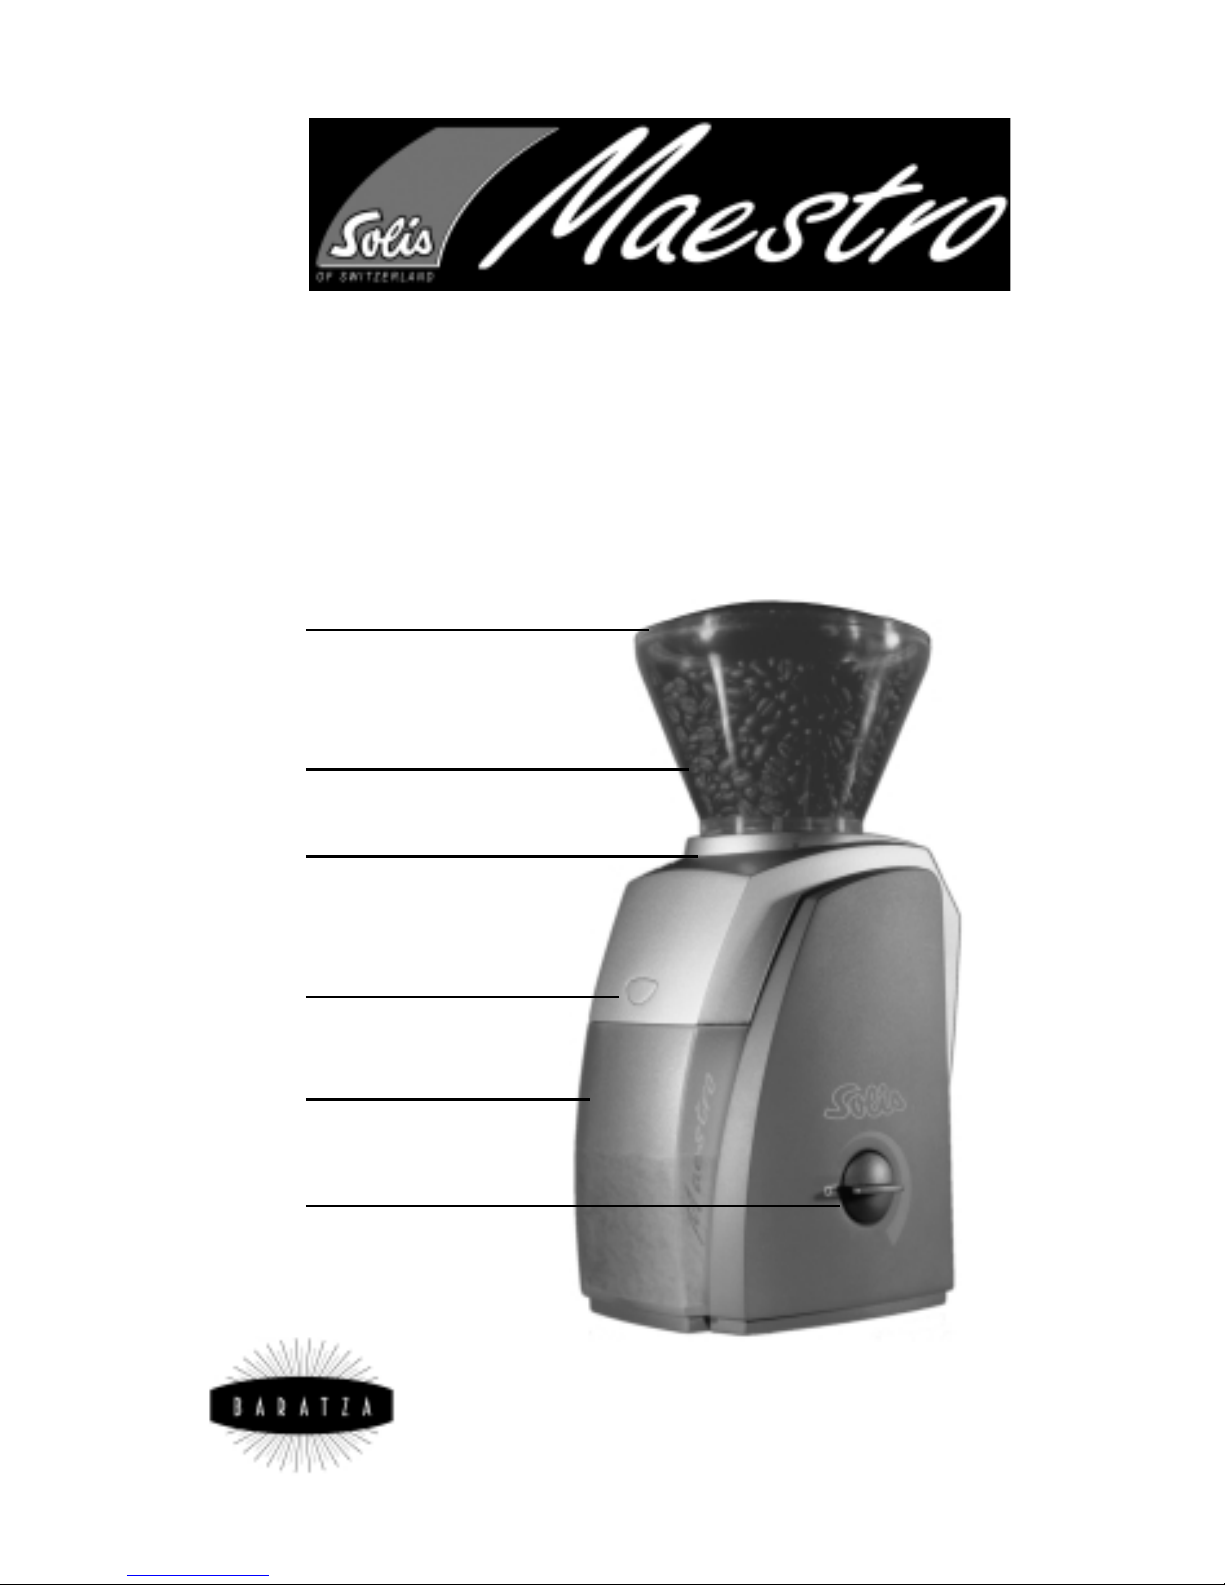
Lid
Bean Hopper
Grind Control
Microswitch
Ground Coffee Bin
Time/Quantity
Page 2

IMPORTANT SAFEGUARDS - CAUTION
When using electrical appliances, basic safety precautions must be followed, including the following:
1. Be sure you read and understand all instructions, safeguards, and
warnings before operating your grinder.
2. Always turn appliance OFF before plugging in or removing power cord
from wall outlet.
3. This machine is not for commercial use. It was designed to process normal
household quantities only. It is not suitable for continuous operation.
4. Do not let the cord hang over the edge of the table or counter or touch
hot surfaces.
5. Do not leave your grinder unattended while turned ON.
6. Do not use outdoors.
7. Children should not use this machine. Keep your grinder out of reach
of children.
8. Use your Baratza Solis Maestro Grinder only on alternating current
(AC). Be certain the machine is connected only to a power source with
the voltage that is specified on the rating plate located on the underside of the appliance (120 volts).
9. Disassemble your grinder only as directed in the Cleaning section of this
manual. If you cannot remedy a malfunction call Baratza at 877-701-2020
to arrange for repair. Do not remove screws and do not attempt internal
repairs.
10. Do not use appliance for anything other than its intended use.
SAVE THESE INSTRUCTIONS - WARNINGS
To avoid electric shock:
•Keep your grinder out of reach of children.
•Do not immerse the appliance, plug, or cord in water or any other liquid.
•Do not run water or any other liquid over the machine body.
•Do not operate your grinder with a damaged cord or plug or if the appli-
ance malfunctions.
•Shut off and unplug machine from the electrical outlet when not in use
and before cleaning. To unplug, grasp plug and remove from the outlet—never pull on cord.
•Use only 120 volt current.
•Do not use attachments or parts not included or approved for use with
this machine as they may cause fire, electric shock or other injury.
To otherwise avoid injury:
•Do not place grinder on or near a hot gas or electric burner, or in a heat-
ed oven. Keep appliance from direct contact with steam.
•Do not use your grinder if it has been dropped or damaged.
•Moving parts can cut and crush. Never operate the grinder with the bean
hopper removed. Keep hands away from the grinding burrs while the
machine is in use.
•Always unplug the grinder before cleaning.
Page 3

SHORT CORD INSTRUCTIONS
A short power supply cord is provided to reduce your risk of tripping over
or otherwise becoming entangled with a longer cord. Longer extension
cords are available and may be utilized if care if exercised in their use. If an
extension cord is used:
•The marked electrical rating of the extension cord should be at least as
great as the electrical rating of the appliance (120 volts).
•The longer cord should be arranged so that it will not drape
over the counter or table-top, where it may be pulled on by
children or accidentally tripped over.
Operating Instructions
Initial Operation
Place the Maestro Grinder on a level surface. Unreel the required length of
cord and insert the plug into the outlet. Remove the lid from the hopper by
lifting it off. Place the desired quantity of coffee beans into the hopper up to
a maximum of 8 oz. Replace the lid.
Setting the Grind Control
Note: If the grinder has been filled with coffee beans, the grinding
control must only be operated when the motor is running.
Slowly rotate the bean hopper clockwise or counterclockwise to the desired
setting. With use, you will find the most suitable settings for your own taste.
The following symbols can be used as a guide for adjusting the grind.
Adjust the degree of grind from:
Smallest (far left) Turkish ultra-fine*
Espresso fine
Drip medium
Largest (far right) French Press coarse
*This setting is too fine for espresso, may clog porta-filter.
Quantity Control
The Maestro grinder is equipped with a time control
knob for ease of repeatable grinding time and coffee
quantity. Use it to set the coffee grinder to the desired
grinding time and quantity. The grinder switches off
automatically once the preset time has elapsed. If you
want to interrupt grinding before the preset time has
elapsed, simply turn the rotary knob back to the left
until the grinder switches off.
The quantity of ground coffee you need to make your coffee depends on the
type of bean, coarseness of the grind, and personal taste. With use, you
will find the most suitable settings for your own taste.
Page 4

Front-mounted Microswitch
Push in button and hold to grind. The machine
will grind as long as you depress the button.
The grinder shuts off when you release the button.
Ground Coffee Bin
Coffee can be ground into
the coffee bin or directly
into coffee filters or
espresso porta-filters.
Cleaning
Check and clean periodically (depending on bean
type). Switch grinder off and remove the plug
from the power supply. Remove any remaining
beans in the bean container. Remove the hopper
by twisting it in a counterclockwise direction as
far as it will turn. Lift the bean hopper from the
housing. The grinding ring burr can then be lifted
out of the machine. A soft-bristle brush is ideal
for cleaning the grinding
ring burr. Re-assemble
the machine by performing
the above operation in
reverse order. Housing
and transparent parts
can be cleaned easily
using a damp cloth.
Do not immerse the
grinder in water.
Warranty and Service (US only)
Warranty: One-year parts and labor on materials and workmanship.
For any repairs or spare parts contact
Baratza LLC
3923-120th Ave. S.E.
Bellevue, WA. 98006
877-701-2020
e-mail: service@baratza.com
© 2001 Baratza
 Loading...