


S SERIES
USER MANUAL
Rugged Portable Solutions

ENERGY STAR® is a government program that offers businesses and consumers
energy-efficient solutions, making it easy to save money while protecting the
environment for future generations.
Please reference ENERGY STAR® related information from www.energystar.gov.
BAP Precision LTD. has determined that this product meets the ENERGY STAR®
guidelines for energy efficiency.
An ENERGY STAR® qualified computer uses 70 % less electricity than computers
without enabled power management features.
Earning the
Earning the E
Earning the Earning the
When every home office is powered by equipment that has earned the ENERGY
STAR®, the change will keep over 289 billion pounds of greenhouse gases out
of the air.
If left inactive, ENERGY STAR® qualified computers enter a low-power mode
and may use 15 watts or less. New chip technologies make power management
features more reliable, dependable, and user-friendly than even just a few years
ago.
Spending a large portion of time in low-power mode not only saves energy,
but helps equipment run cooler and last longer.
Businesses that use ENERGY STAR® enabled office equipment may realize
additional savings on air conditioning and maintenance.
ENERGY
NERGY S
EE
NERGY NERGY
STAR
SS
TAR
TARTAR
®®®®

Over its lifetime, ENERGY STAR® qualified equipment in a single home office
(e.g., computer, monitor, printer, and fax) can save enough electricity to light
an entire home for more than 4 years.
Power management (“sleep settings”) on computers and monitors can result
in much savings annually.
Remember, saving energy prevents pollution
Remember, saving energy prevents pollution
Remember, saving energy prevents pollutionRemember, saving energy prevents pollution
Because most computer equipment is left on 24 hours a day, power management
features are important for saving energy and are an easy way to reduce air pollution.
By using less energy, these products help lower consumers’ utility bills, and prevent
greenhouse gas emissions.

Table of Contents
Table of Contents
Table of ContentsTable of Contents
Chapter 1
Chapter 1 GGGGetting Started
Chapter 1Chapter 1
etting Started ................................
etting Startedetting Started
Identifying Hardware Components ..................................... 1-1
Front Components ..................................................... 1-1
Back Components ..................................................... 1-4
Bottom Components ................................................... 1-5
Connecting to AC Power and Charging the Battery.......... 1-6
Performing the Initial Startup ....................................... 1-6
Synchronizing with Your Computer .................................... 1-7
Installing ActiveSync or WMDC .................................... 1-8
Using Options .............................................................. 1-9
Using an SD Card .................................................... 1-9
................................................................
................................................................
................................................................
................................................................
..............................................
................................................................
.............. 1111----1111
............................
Chapter
Chapter 2222 BBBBasic Skills
ChapterChapter
asic Skills ................................
asic Skillsasic Skills
Power Saving and Turning Off ........................................ 2-1
Backlight Off ............................................................ 2-1
Entering the Suspend Mode ........................................ 2-1
Turning Off ..............................................................2-2
Navigating on the Screen ...............................................2-2
Stylus .....................................................................2-2
Today Screen ..............................................................2-3
Landscape View ........................................................2-3
Navigation Bar and Toolbar ............................................2-3
................................................................
................................................................
................................................................
................................................................
....................................................
................................................................
.................... 2222----1111
........................................
i

Programs ....................................................................2-4
Notifications .................................................................2-4
Entering Information .......................................................2-5
Entering Text Using the Input Panel .............................2-5
Writing on the Screen ...............................................2-6
Drawing on the Screen ..............................................2-6
Recording a Message ................................................2-7
Using My Text .........................................................2-8
Securing Your Device ....................................................2-8
Locking the Keypad ...................................................2-8
Locking Your Device ..................................................2-8
Chapter
Chapter 3333 UUUUsing the Phone (Select Models Only)
ChapterChapter
sing the Phone (Select Models Only) ................................
sing the Phone (Select Models Only)sing the Phone (Select Models Only)
About Your Phone ........................................................ 3-1
Switching On or Off the Phone ...................................3-2
Starting Microsoft Phone .............................................3-2
Phone Status Icons ...................................................3-3
Making a Call .............................................................3-4
Dialing a Call ..........................................................3-4
Making a Call from the Onscreen List ..........................3-4
Making a Call from Contacts .......................................3-5
Making a Call from the Call History List .......................3-5
Making a Call from Speed Dial ...................................3-6
Responding to a Call ....................................................3-6
Answering a Call ......................................................3-7
Rejecting a Call .......................................................3-7
Ending a Call ..........................................................3-7
Operations during a Call ................................................3-7
Adjusting the Phone Volume........................................3-7
Using the Mute Function ............................................3-8
.............................................................
................................................................
............................. 3333----1111
..........................................................
ii

Using the Speakerphone .............................................3-8
Managing More Than One Call ....................................3-8
Taking a Note during a Call ..................................... 3-10
Using Call History ...................................................... 3-10
Viewing Call History ................................................ 3-10
Adding an Entry to Contacts Using Call History ............. 3-11
Using Speed Dial ........................................................ 3-11
Creating a Speed Dial Entry ...................................... 3-11
Editing or Deleting a Speed Dial Entry ....................... 3-12
Customizing Your Phone .............................................. 3-13
Changing Phone Settings .......................................... 3-13
Changing Security Settings ........................................ 3-13
Changing Services Settings ....................................... 3-14
Changing Network Settings ........................................ 3-14
Additional Phone Operations .......................................... 3-15
Using Text Messages ............................................... 3-15
Setting up an Internet Connection .............................. 3-15
Checking Your Voice Mail ......................................... 3-15
Making an Emergency Call ....................................... 3-15
Dialing an International Call ...................................... 3-16
Chapter
Chapter 4444 MMMManaging Your Device
ChapterChapter
anaging Your Device ................................
anaging Your Deviceanaging Your Device
Managing Power ........................................................... 4-1
Low Battery Signals and Actions .................................. 4-1
Power-Saving Tips ....................................................4-2
Customizing Your Device ................................................4-3
Settings – Personal ...................................................4-3
Settings – System.....................................................4-4
Settings – Connections ...............................................4-5
Searching and Organizing Information ................................4-6
................................................................
................................................................
..............................................................
................................................................
.............................. 4444----1111
............................................................
iii

Chapter
Chapter 5555 MMMMicrosoft Pocket Outlook
ChapterChapter
icrosoft Pocket Outlook ................................
icrosoft Pocket Outlookicrosoft Pocket Outlook
Calendar: Scheduling Appointments and Meetings ................ 5-1
Creating an Appointment .............................................5-2
Using the Calendar Summary Screen ............................5-2
Contacts: Tracking Friends and Colleagues ........................5-3
Creating a Contact ....................................................5-3
Using the Contacts Summary Screen ............................5-4
Tasks: Keeping a To Do List .........................................5-4
Creating a Task .......................................................5-4
Using the Tasks Summary Screen ................................5-5
Notes: Capturing Thoughts and Ideas ...............................5-5
Creating a Note .......................................................5-5
Messaging: Sending and Receiving Messages .....................5-6
About Accounts.........................................................5-6
Reading E-mail Messages ..........................................5-7
Composing and Sending an E-mail ..............................5-7
Reading Text Messages (Select Models Only) ...............5-8
Composing and Sending a Text Message (Select
Models Only) .......................................................5-9
................................................................
................................................................
.......................................................
................................................................
....................... 5555----1111
..............................................
Chapter
Chapter 6666 MMMMore Programs
ChapterChapter
iv
ore Programs ................................
ore Programsore Programs
ActiveSync................................................................... 6-1
Synchronizing Data ....................................................6-2
Synchronizing Directly with Exchange Server ...................6-2
Office Mobile ...............................................................6-4
Creating a Document/Workbook/Note ............................6-4
Opening a Document/Workbook/Note/Presentation ...........6-4
Internet Explorer ...........................................................6-5
Windows Live and Messenger .........................................6-6
Setting up Windows Live ............................................6-6
................................................................
................................................................
................................................................
................................................................
............................................
................................................................
............ 6666----1111
........................

Signing in to Messenger .............................................6-6
Windows Media ............................................................6-7
Pictures & Videos ........................................................6-7
Viewing Pictures and Videos .......................................6-8
Camera ......................................................................6-8
Taking Pictures .........................................................6-8
Recording Video Clips .............................................. 6-10
Internet Sharing (Select Models Only) ........................... 6-12
Remote Desktop Mobile ............................................... 6-13
Chapter
Chapter 7777 GGGGetting Connected
ChapterChapter
etting Connected ................................
etting Connectedetting Connected
Types of Connections .................................................... 7-1
Using Cellular Connection (Select Models Only) ................7-2
Setting up a Cellular (GPRS) Connection ....................7-2
Setting up a Dial-up Connection ..................................7-3
Using Wireless Network .................................................7-4
Switching On or Off the Wi-Fi Radio ...........................7-4
Connecting to a Wireless Network ................................7-4
Using the Bluetooth Function ..........................................7-5
Switching On or Off the Bluetooth Radio .......................7-6
Sending Files via the Bluetooth Function .......................7-7
Creating a Bluetooth Partnership ..................................7-7
................................................................
................................................................
................................................................
................................................................
......................................
................................................................
...... 7777----1111
............
Chapter
Chapter 8888 Appendix
ChapterChapter
Appendix ................................
AppendixAppendix
FCC warning ............................................................... 7-1
................................................................
................................................................
................................................................
................................................................
...........................................................
................................................................
........................... 7777----1111
......................................................
v
Chapter 1
Chapter 1
Chapter 1Chapter 1
Getting Started
Getting Started
Getting StartedGetting Started
This chapter introduces you to the external components of your device and guides
you through the process of setting up your device for use.
Identifying Hardware Components
Identifying Hardware Components
Identifying Hardware ComponentsIdentifying Hardware Components
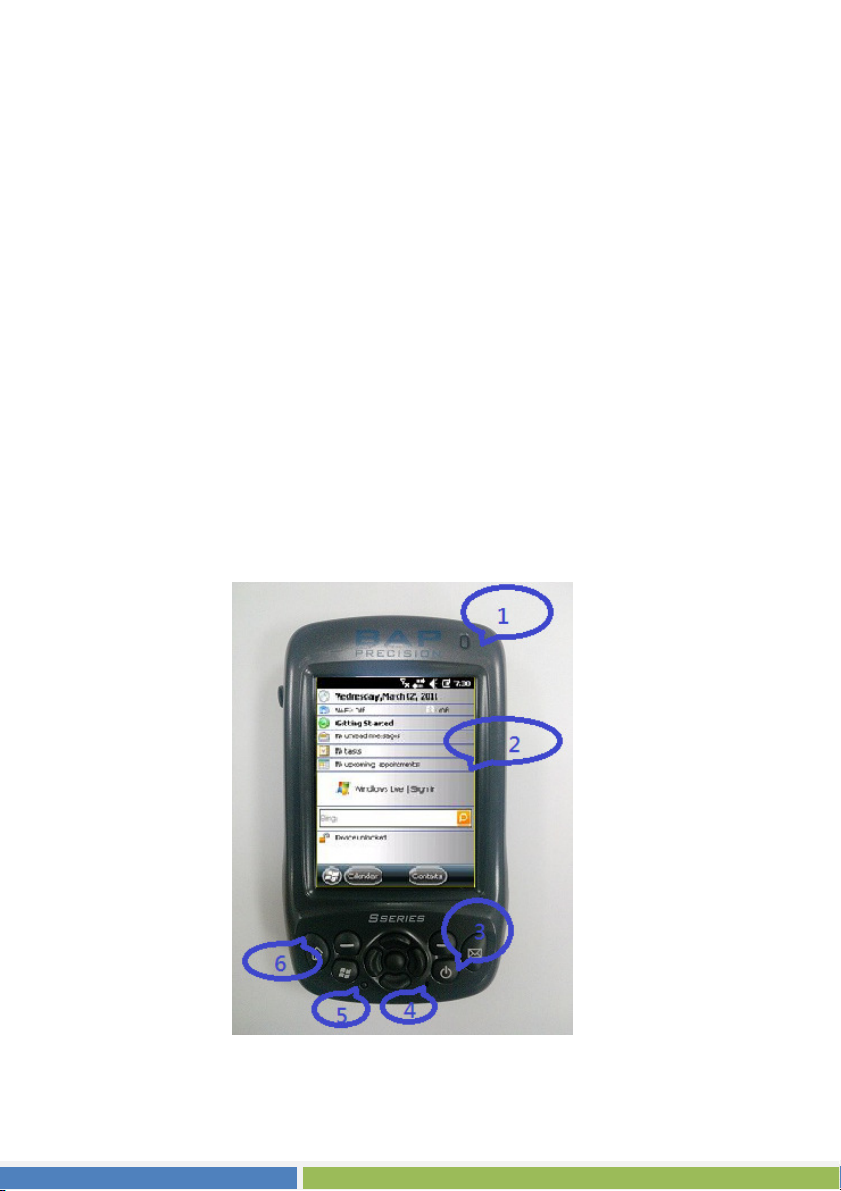
Front
Front
Front Front
Getting Started
1-1

with
Ref
Ref
RefRef
Component
Component Description
ComponentComponent
Description
DescriptionDescription
LED Indicator
Touch Screen
Power Button
Microphone
blinking green shows charging
steady green shows battery full
blinking red shows battery low
steady red shows battery fault
alternately showing green and amber -> battery charging
Windows notify
alternately showing red and amber -> battery low with
Windows notify
alternately showing amber and green -> battery full with
Windows notify
alternately showing amber and red -> battery fault with
Windows notify
Displays the output of your device and responds to your
tapping.
Turns on or off your device.
Records voices.
1-2
Reset
Keypad
Getting Started
Serves as the mouthpiece during a call (select models only).
Reset the device
See the next section for details

Performs the command shown on the bottom left or right
Keypad
Keypad
KeypadKeypad
Ref
Ref
RefRef
Component
Component Descript
ComponentComponent
Left/Right Soft
Left/Right Soft
Left/Right Soft Left/Right Soft
Key
Key
KeyKey
corner of the screen.
Description
DescriptDescript
ion
ionion
Home
Home
HomeHome
Message
Message
MessageMessage
Start Menu
Start Menu
Start MenuStart Menu
Power Button
Navigation
Navigation
NavigationNavigation
Button
Button
ButtonButton
Bring you to “Today” screen.
Composing and Sending Messages
Open the Start menu.
Turns your Pocket PC on or off.
Moves up, down, left or right by pressing the buttons
respectively. Select the item by pressing the center button.
Getting Started
1-3
on the touch screen
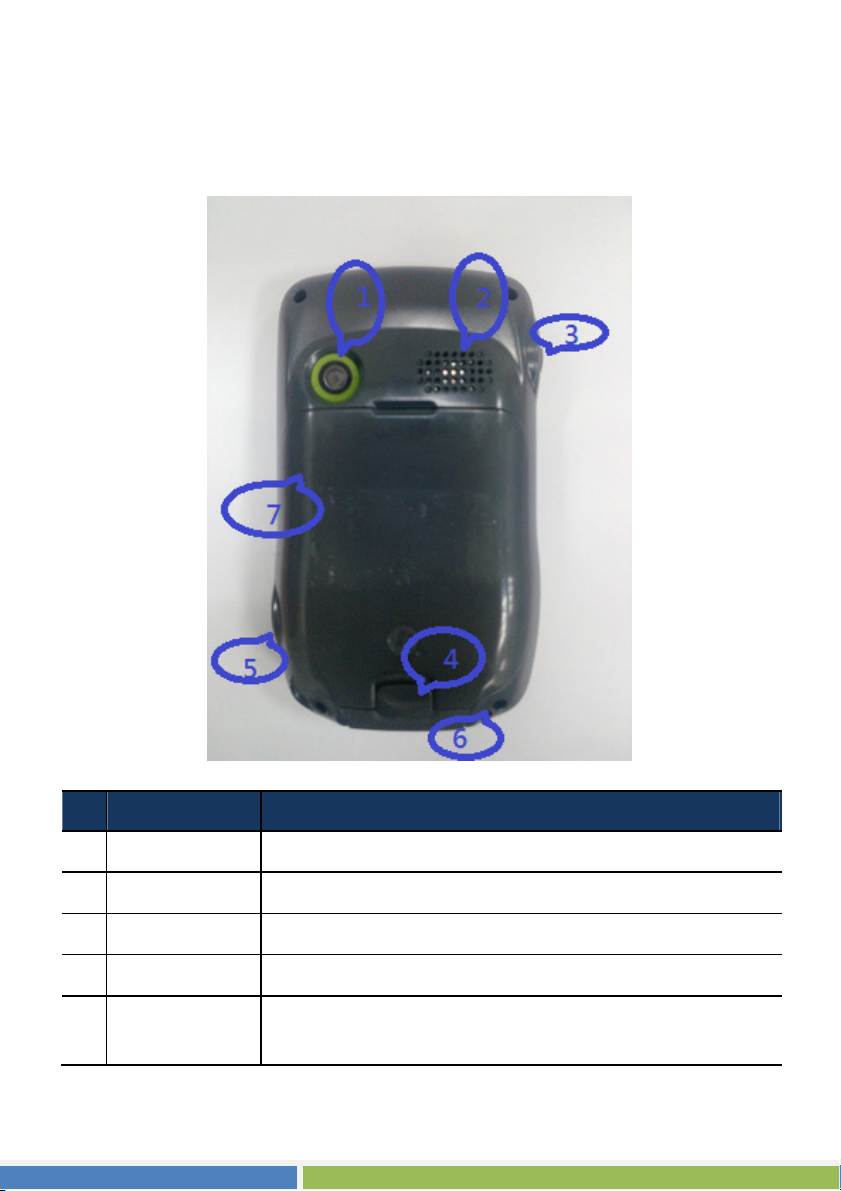
Back
Back /Sides
Back Back
/Sides
/Sides/Sides
Ref
Ref
RefRef
1-4
Component
Component Description
ComponentComponent
Camera
Camera
CameraCamera
Speaker
Speaker
SpeakerSpeaker
Battery Cover
Battery Cover
Battery CoverBattery Cover
Release button
Release button
Release buttonRelease button
Stylus
Stylus
StylusStylus
Getting Started
Description
DescriptionDescription
Takes still pictures or records video clips.
Plays music, sounds and voices.
Battery Inside.
To open the battery cover
Serves as the input device by tapping
to make selections and enter information.

This connector (under rubber dust cover) allows use of an
Lanyard hole
Lanyard hole
Lanyard holeLanyard hole
Camera button
Camera button
Camera buttonCamera button
External GPS
External GPS
External GPS External GPS
Antenna
Antenna
AntennaAntenna
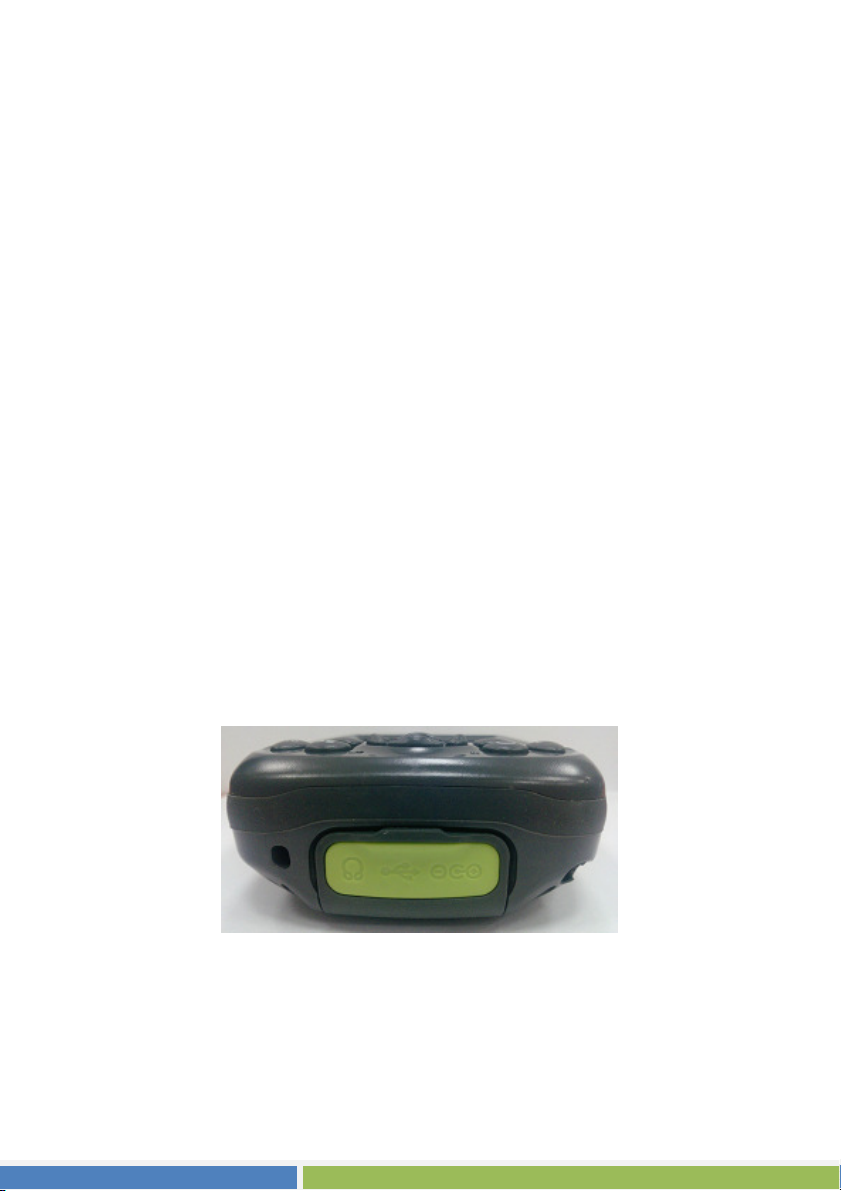
Bottom
Bottom Components
BottomBottom
Components
ComponentsComponents
Hand string attaches to this hole.
Press to take a photo
optional external antenna which may be positioned on top
of the car for better signal reception in areas with poor
reception.
Ref
Ref
RefRef
Component
Component Description
ComponentComponent
Headphone
Headphone
Headphone Headphone
Connector
Connector
ConnectorConnector
USB OTG
USB OTG (Host
USB OTGUSB OTG
Client) Connector
Client) Connector
Client) ConnectorClient) Connector
Power Connector
Power Connector
Power ConnectorPower Connector
(Host &&&&
(Host(Host
Connects to a pair of stereo headphones.
Connects to the USB cable.
Connects to the AC adapter for charging the battery.
Description
DescriptionDescription
Getting Started
1-5

Connecting to AC Power
Connecting to AC Power and Charging the Battery
Connecting to AC PowerConnecting to AC Power
Be sure to fully charge the battery before using your device for the first time.
1. Fit the converter plug to the AC charger.
2. Connect the DC jack end of the AC adapter to your device and the other
end to a wall outlet.
3. The LED indicator blinking green when charging is in progress.
Do not disconnect your Pocket PC from AC power until the battery is fully
charged. This will take a couple of hours.
CAUTION: For optimal performance of the lithium battery, take note of the
following:
Use the included AC adapter only.
There is no need to fully discharge the battery before charging. You can
charge the battery before it is discharged.
Do not charge the battery where the temperature is high (e.g. in direct
sunlight).
If you will not use the product for a long period of time, be sure to fully charge
the battery at least once every two weeks. Over discharge of the battery can
affect the charging performance.
Your device can also be charged when it is connected to a desktop computer
via the USB cable.
and Charging the Battery
and Charging the Batteryand Charging the Battery
Performing
Performing the
Performing Performing
When turning on your device for the very first time, you will be guided through a
setup process.
1. Make sure that your device is either connected to AC power or the battery has
power.
2. Press the power button to turn on your device.
1-6
Getting Started
the Initial Startup
Initial Startup
the the
Initial StartupInitial Startup

3. Follow the on-screen instructions to complete the setup wizard.
4. For models with the phone function only:
If a SIM card has been inserted and the mobile phone network operator (or
you) has set the PIN, you will be prompted to enter the PIN.
If a SIM card has not been inserted yet, a message of an invalid or missing
SIM card will appear on the screen. You can tap Cancel to continue the startup
procedure.
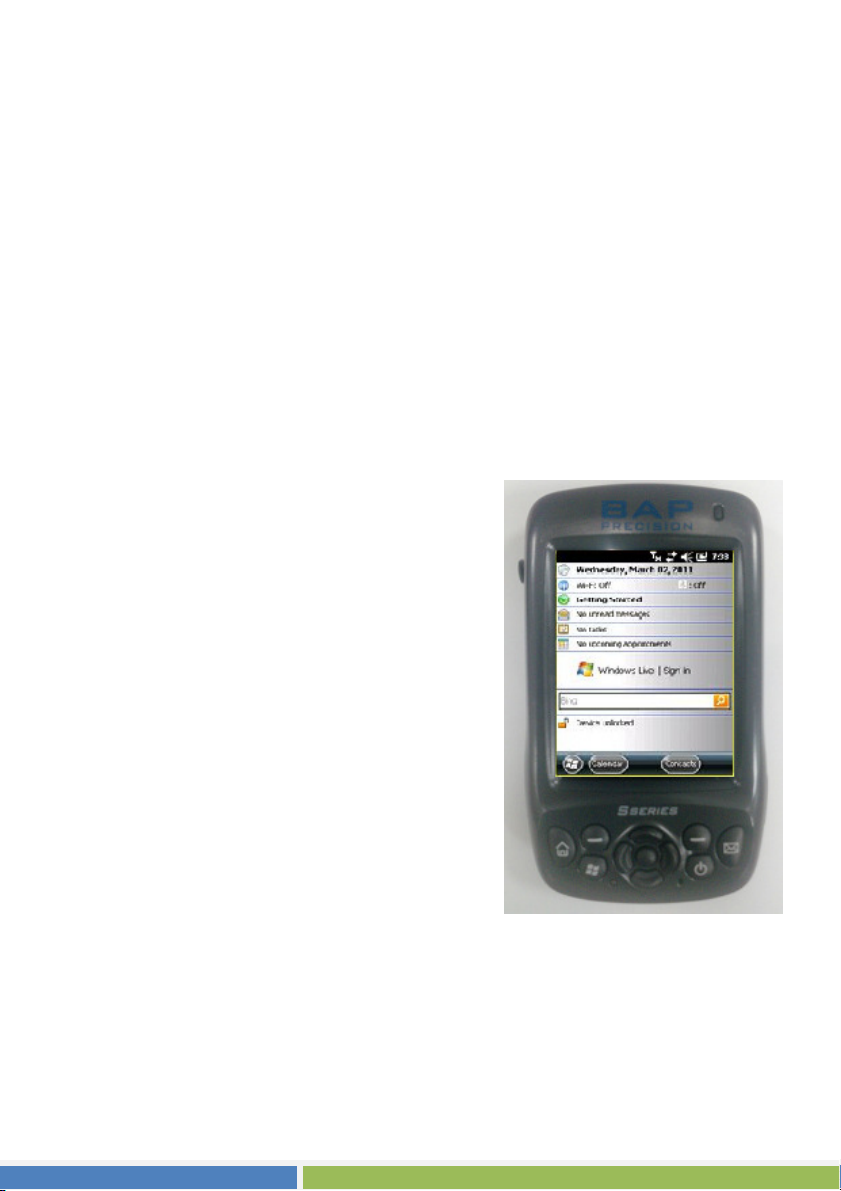
5. After the setup is completed, the Today screen appears. You can now use your
device.
Synchronizing with Your Computer
Synchronizing with Your Computer
Synchronizing with Your ComputerSynchronizing with Your Computer
ActiveSync and Windows Mobile Device Center (WMDC) provide an easy way to
synchronize data on a Windows-based computer with your device. ActiveSync works
on computers that have the Windows XP operating systems. WMDC works only on
computers that have Windows 7 or Windows Vista.
ActiveSync and WMDC act as gateways between your device and your computer
for transferring Outlook e-mail, appointments, contacts, and tasks, and media such
as pictures, music, and videos. You can also use the Explore feature in either program
to move files or programs from your computer to your device.
Getting Started
1-7
Installing
Installing ActiveSync or
Installing Installing
If you’re using Windows XP or earlier versions of Windows, install ActiveSync.
If you’re using Windows 7 or Windows Vista, download and install Windows Mobile
Device Center.
(Visit the Microsoft website to download the program and to obtain operating
instructions.)
NOTE:
Before installation, make sure that you have Microsoft Outlook installed on
your computer.
Connect your device to the computer AFTER ActiveSync or Windows Mobile
Device Center is installed.
ActiveSync connection problems may occur in some specific cases. They are
likely caused by interoperability with desktop firewall applications or
applications that manage network traffic. For troubleshooting information, visit
the Microsoft web site.
ActiveSync or WMDC
ActiveSync or ActiveSync or
WMDC
WMDCWMDC
After the software installation, connect your device to your computer with the USB
cable and you are ready to synchronize.
1-8
Getting Started

Using Options
Using Options
Using OptionsUsing Options
Using an
Using an micro
Using an Using an
Your device has a micro SD (micro Secure Digital) card slot where you can insert
a micro SD memory card.
NOTE:
Make sure that no foreign objects enter the slot.
Keep a micro SD card in a well-protected box to avoid dust and humidity
when you are not using it.
micro SD Card
micro micro
SD Card
SD CardSD Card
Getting Started
1-9

Chapter 2
Chapter 2
Chapter 2Chapter 2
Basic Skills
Basic Skills
Basic SkillsBasic Skills
This chapter familiarizes you with the basic operations of your Pocket PC such
as using the stylus, navigation buttons, Home screen, menus, and programs. You
will also know how to enter information and lock your Pocket PC.
Power Saving and Turning Off
Power Saving and Turning Off
Power Saving and Turning OffPower Saving and Turning Off
Backlight Off
Backlight Off
Backlight OffBacklight Off
The backlight of the screen dims out after a period of inactivity (default 30 seconds
while on battery power and 1 minute while on external power).
To restore the backlight, tap the screen or press a button. Note that where you
tap or what you press also causes the related task to be performed.
Entering the Suspend Mode
Entering the Suspend Mode
Entering the Suspend ModeEntering the Suspend Mode
Your device automatically suspends after a period of inactivity (default 3 minutes
while on battery power and 5 minutes while on external power).
To manually suspend the device, briefly press the power button.
To resume operation, press the power button. You will be back to where you left
off.
Basic Skills
2-1
Pull the stylus out of the slot and extend it for
Touch the screen once with the stylus to open
Hold the stylus on the screen and drag across
the screen to select text and images. Drag in
Tap and hold the stylus on an item to see
tions available for that item. On the
shortcut menu that appears, tap the action you
Turning Off
Turning Off
Turning OffTurning Off
If you are not using your device, press and hold the power button until the device
plays a 3 second countdown notification and turns off.
Navigating on the Screen
Navigating on the Screen
Navigating on the ScreenNavigating on the Screen
Stylus
Stylus
StylusStylus
Use the stylus to navigate and select objects on the screen.
ease of use. Store it in the slot when not in use.
Tap
Tap
TapTap
items and select options.
Drag
Drag
DragDrag
a list to select multiple items.
Tap and hold
Tap and hold
Tap and holdTap and hold
a list of ac
want to perform.
Navigation Button
Navigation Button
Navigation ButtonNavigation Button
You can also use the navigation button to navigate on the screen.
2-2
Basic Skills

for the first time
screen. The
screen can be easily accessed from any
screen to open the program
Home
Home Screen
HomeHome
When you switch on your device
each day, you will see the Home
Home
screen by tapping
The Home screen shows your upcoming
appointments, active tasks, information about
e-mail messages, and more. You can tap a
section on the Home
that is associated with that section.
Screen
ScreenScreen
and then Home.
Landscape View
Landscape View
Landscape ViewLandscape View
You can use your device in a landscape manner. To change the screen view, tap
Settings
Settings System
SettingsSettings
Navigation Bar and Toolbar
Navigation Bar and Toolbar
Navigation Bar and ToolbarNavigation Bar and Toolbar
The navigation bar is located at the top of the screen. It displays the active programs
and indicators for connectivity, volume, power, time, and others.
System Screen
SystemSystem
Screen General
ScreenScreen
General Landscape
GeneralGeneral
Landscape or Portrait
LandscapeLandscape
Portrait.
PortraitPortrait
Basic Skills
2-3
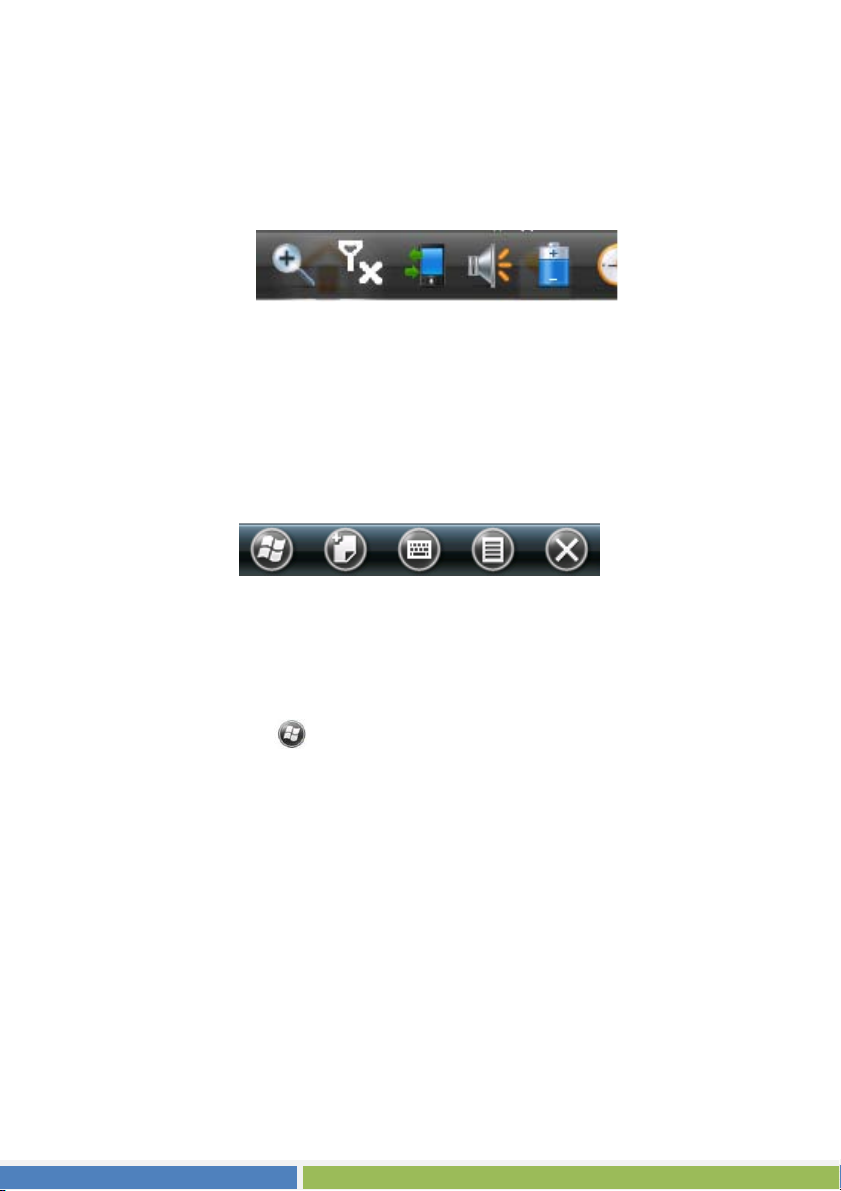
You can tap this bar to set up related items.
The navigation bar:
Use the toolbar at the bottom of the screen to perform tasks in the active
program. The toolbar includes buttons such as the input panel button and Menu
button.
An example of the toolbar:
PPPPrograms
rograms
rogramsrograms
You can switch from one program to another without closing any program.
To run a program, tap
Start menu. The Start menu contains all the program icons. You can drag the
screen up or down to see other program icons.
Notifications
Notifications
NotificationsNotifications
Your device reminds you in a variety of ways when you have something to do. For
example, if you have set up an appointment in Calendar, a task with a due date
in Tasks or an alarm in Clock, you will be notified in any of the following ways:
2-4
Basic Skills
at the left-bottom corner of the screen to open the

A message appears on the screen.
A sound, which you can specify, is played.
The notification indicator flashes in amber.
To choose reminder types and sounds for your device, tap
& Notifications.
Entering Information
Entering Information
Entering InformationEntering Information
You have several options for entering new information:
Use the Input panel to enter typed text, either by using the on-screen keyboard
or other input methods.
Write directly on the screen.
Draw pictures on the screen.
Speak into the microphone to record a message.
Entering Text Using the Input Panel
Entering Text Using the Input Panel
Entering Text Using the Input PanelEntering Text Using the Input Panel
Use the Input panel to enter information in any program on your device. You can
either type using the on-screen keyboard or write using a recognizer. In any case,
the characters appear as typed text on the screen.
Settings Sounds
To show or hide the Input panel, tap the . By default, the soft keyboard appears.
To change to a different input mode, tap and hold
menu.
and select from the popup
Basic Skills
2-5

When you use the Input panel, your device anticipates the word you are typing or
writing and displays it above the Input panel. When you tap the displayed word,
it is inserted into your text at the insertion point. The more you use your device,
the more words it learns to anticipate.
Recognizer
Recognizer
RecognizerRecognizer
With a recognizer, you can write letters using the stylus just as you would use a
pen on paper.
When you write a letter, it is converted to typed text that appears on the screen.
For specific instructions on using a recognizer, open a recognizer and then tap the
question mark next to the writing area.
Writing on the Screen
Writing on the Screen
Writing on the ScreenWriting on the Screen
In any program that accepts writing, such as the Notes program, you can use your
stylus to write directly on the screen. Write the way you do on paper. You can
edit and format what you have written and convert the information to text later.
To write on the screen, tap Draw
appears before the command.
Drawing
Drawing on the Screen
Drawing Drawing
You can draw on the screen in the same way that you write on the screen.
1. Tap
command.
2-6
Basic Skills
on the Screen
on the Screenon the Screen
Draw
Draw to enable drawing mode. A check (√) appears before the
DrawDraw
Draw to switch to drawing mode. A check (√)
DrawDraw

2. To create a drawing, cross three ruled lines on your first stroke. A drawing box
appears.
3. Subsequent strokes in or touching the drawing box become part of the drawing.
Drawings that do not cross three ruled lines will be treated as writing.
Recording a Message
Recording a Message
Recording a MessageRecording a Message
You can quickly capture thoughts, reminders and phone numbers by recording a
message. In the Notes program, you can either create a stand-alone recording or
include a recording in a written note. If you want to include the recording in a note,
open the note first. In the Messaging program, you can add a recording to an email
message.
To create a recording:
1. Tap
2. Tap View Recording Toolbar
3. Hold the device’s microphone near your mouth or other source of sound.
4. Tap the Record button on the Recording toolbar to start recording.
5. To stop recording, tap the Stop button on the Recording toolbar. The new
recording appears in the note list or as an embedded icon.
To play a recording, tap it in the list or tap its icon in the note.
Notes
Notes to switch to the program.
NotesNotes
View Recording Toolbar to show the Recording toolbar.
View Recording ToolbarView Recording Toolbar
Recording toolbar
Basic Skills
2-7

Using My Text
Using My Text
Using My TextUsing My Text
When using Messaging, use My Text to quickly insert preset or frequently used
messages into the text entry area. To insert a message, tap Menu
then tap a message.
Securing You
Securing Your Device
Securing YouSecuring You
Locking
Locking Your Device
Locking Locking
When not using your device, you can lock the device so that accidental touching
of the keypad or touchpad does not cause it to operate.
To lock the device: tap Device unlocked on the Today screen.
Your Device
Your DeviceYour Device
r Device
r Devicer Device
Menu My Text
MenuMenu
My Text and
My TextMy Text
To unlock the device: tap Unlock (or press the left soft key on the device) Unlock
(or press the * key on the device).
Securing
Securing YYYYour
SecuringSecuring
You can help keep your data more secure by requiring a password every time your
device is switched on.
1. Tap Settings Personal Lock.
2. Tap to select Prompt if device unused for, and in the box to the right select a
desired period of time.
3. Select the password type.
4. Enter the password you want to use to access your device when it is locked,
and then confirm the password.
2-8
Basic Skills
our DDDDevice
our our
evice with a Password
eviceevice
with a Password
with a Passwordwith a Password

Chapter 3
Chapter 3
Chapter 3Chapter 3
Using the Phone
Using the Phone (Select
Using the Phone Using the Phone
Models Only)
Models Only)
Models Only)Models Only)
This chapter tells you how to use the mobile phone function of your device.
About
About YYYYour
About About
Select models are equipped with the HSDPA (High-Speed Downlink Packet Access)
module. HSDPA is an enhanced 3G (third generation) mobile telephony
communications protocol. It can operate on 850/900/1800/1900/
2100MHz.
our PPPPhone
our our
hone
honehone
(Select
(Select (Select
To use the phone, you need to first set up an account with a mobile phone network
service. The functions available to you depend on the services offered by your mobile
phone network service provider and your type of subscription.
Your service provider will provide you with a SIM card. This card contains your mobile
phone account details and rights, contacts that can be stored and any additional
services to which you have subscribed. You must install a SIM card before you can
make or receive phone calls or use wireless data services.
Using the Phone
3-1

Wireless Manager section on the
vigation
to switch it from on to off or the
When the phone is switched on, you may be
Then, your device will search for the mobile
phone network service and show the name in
Wireless
Switching
Switching OOOOn
SwitchingSwitching
When the device is turned on, the phone is switched on by default. When needed
(for example, on an airplane), you can switch off the phone without turning off
your device.
n or
or Of
n n
oror
Off the
f the PPPPhone
OfOf
f the f the
hone
honehone
1. Tap the
Today screen.
- or -
Tap the connectivity indicator on the na
bar and tap Wireless Manager.
2. The Wireless Manager screen appears.
Tap Phone
other way around. Tap Done.
3.
requested to enter the PIN (Personal
Identification Number) code if it has been set.
the Wireless Manager section on the Today
screen.
When the phone is switched off, the
Manager section on the Today screen displays
Phone off.
Starting
Starting the
Starting Starting
Start the Phone program by any of the three
methods:
3-2
Using the Phone
the Phone
Phone Program
the the
PhonePhone
Program
ProgramProgram

Press the Send key on the device.
Tap Phone (left soft key) on the Today
screen.
Tap
NOTE: If the phone is currently off, you will be
asked to turn it on.
Whenever you start Phone, the Phone screen
displays the soft keypad. You can tap Hide Keypad
(left soft key).
You can use other programs during a call. To quickly switch back to Phone, press
the Send key on your device.
Phone
Phone SSSStatus
Phone Phone
Icons will be displayed on the navigation bar to indicate the status of the phone
functions. They are listed below.
Phone.
tatus IIIIcons
tatus tatus
cons
conscons
Icon
Icon
IconIcon
Phone off (airplane mode)
Signal strength
Call in progress
Missed call
Call on hold
GPRS available
GPRS in use
EDGE available
Meaning
Meaning
MeaningMeaning
Icon
Icon
IconIcon
Meaning
Meaning
MeaningMeaning
EDGE in use
WCDMA/UMTS available
WCDMA/UMTS in use
HSPA available
HSPA in use
New message
Missing SIM card
Using the Phone
3-3

the phone
Your device will automatically switch
, the program
searches Contacts, Call History, and Speed Dial
When
you see the name of the person to call listed,
Whenever you start the Phone program, the screen
Making
Making a
Making Making
There are several ways you can make a call.
Dialing a
Dialing a CCCCall
Dialing a Dialing a
a CCCCall
all
a a
allall
all
allall
1. When on the Today screen: Press the numeric
keys on your device to start entering
number.
to the Phone program.
While in the Phone program: Enter the phone
number using the physical or onscreen keypad.
2. As you enter the phone number
to find a matching name and/or number.
select it and the desired phone number.
Or, you can continue entering the complete phone number.
3. Press the Send key on your device to make the call.
NOTE:
If you enter a wrong number, use the Backspace key to erase individual
numbers one at a time.
If you are making an international call, tap and hold on the number key 0 until
the + sign appears. The + sign replaces the international prefix of the country
from where you are calling.
Making a Call from the Onscreen List
Making a Call from the Onscreen List
Making a Call from the Onscreen ListMaking a Call from the Onscreen List
3-4
Using the Phone

If the list contains the number you want to call,
and press
a person in
Tap the contact to call. Then tap the number
to call; or move to the number to call and
the contact to call, and
then tap the number to call in the shortcut
lists all recent calls, speed dials, and contacts.
you can conveniently select from the list
the Send key on your device.
NOTE: To view a different list on the Phone
screen, tap Menu View and select one of the
options.
Making a
Making a CCCCall from
Making a Making a
Microsoft Contacts displays your contact information stored both in your device’s
memory and on your SIM card. (See “Contacts: Tracking Friends and Colleagues”
in Chapter 5 for detailed information on the Contacts program.)
1. Start the Contacts program.
all from CCCContacts
all from all from
ontacts
ontactsontacts
2. Do one of the followings to call
the contact list:
then tap Call or press the Send key.
Tap and hold on
menu.
Making a
Making a CCCCall from the Call History
Making a Making a
The Call History list displays the calls you made, received or missed.
1. While in the Phone program, tap Call History.
all from the Call History LLLList
all from the Call History all from the Call History
ist
istist
Using the Phone
3-5

to see
ap and hold on the number to call and
call
in this
one program,
ress and hold the numeric key of the assigned
rings
es according to the options you have set
for the phone. The name and number of the caller
If have hidden the keypad, tap Keypad
the Call History key.
2. Do one of the followings to call a person in
the Call History list:
Select the number to call and then tap Call
or press the Send key on your device.
T
then tap Call in the shortcut menu.
Making a Call from Speed Dial
Making a Call from Speed Dial
Making a Call from Speed DialMaking a Call from Speed Dial
If you have created speed dial entries, you can
a person quickly. (See “Using Speed Dial”
chapter for information.)
When on the Today screen or in the Ph
p
speed dial number to make the call.
Responding to
Responding to a
Responding toResponding to
When an incoming call is received, your device
or vibrat
3-6
Using the Phone
a CCCCall
all
a a
allall

up window. If the name
of the caller is not in your contact list, only the
key
icon
are displayed on the pop-
caller’s phone number is displayed.
Answering a
Answering a CCCCall
Answering a Answering a
To answer an incoming call, press the Send
on your device or tap Answer (left soft key).
Rejecting a
Rejecting a CCCCall
Rejecting a Rejecting a
To reject an incoming call, press the End key on your device or tap Ignore (right
soft key).
Ending a
Ending a CCCCall
Ending a Ending a
To end a call, press the End key on your device or tap End on the screen.
all
allall
all
allall
all
allall
Operations during a Call
Operations during a Call
Operations during a CallOperations during a Call
Adjusting the
Adjusting the PPPPhone
Adjusting the Adjusting the
To adjust the volume during a call, tap the
on the navigation bar and select a volume level.
CAUTION: Never raise the sound volume level too
high when using earphones. An excessive sound
volume level could cause damage to your
hearing.
hone VVVVolume
hone hone
olume
olumeolume
Using the Phone
3-7

Using the Mute
Using the Mute Function
Using the Mute Using the Mute
During a call, you can mute your microphone so that the person with whom you
are speaking cannot hear you, but you can still hear him or her.
On the Phone keypad, tap Mute to switch on the mute function. The icon will
appear on the upper-right corner.
To switch off the mute function, tap Unmute.
Using
Using the
UsingUsing
You can switch on the speakerphone to use your device as a hands-free solution.
On the Phone keypad, tap Speaker On to switch on the speakerphone function. The
icon will appear on the navigation bar.
To switch off the speakerphone function, tap Speaker Off.
the SSSSpeakerphone
the the
Function
FunctionFunction
peakerphone
peakerphonepeakerphone
Managing
Managing MMMMore
Managing Managing
NOTE: You may need to register for the “call waiting” service with your mobile phone
network service and set your device accordingly. The exact number of people you
can talk at the same time depends on your mobile phone network service.
During a call, you can make or take a second call while putting the current call
on hold. Then, you can choose to swap between the two callers or set up a conference
call between all three parties.
Holding a
Holding a CCCCall to
Holding a Holding a
1. If there is another incoming call when you are talking on your device, a pop-up
window appears to notify you.
2. Tap Answer to place the first call on hold, and answer the second call.
3-8
Using the Phone
ore TTTThan
ore ore
all to TTTTake a
all to all to
han OOOOne
han han
ake a SSSSecond
ake a ake a
ne CCCCall
ne ne
econd CCCCal
econd econd
all
allall
alllll
alal

3. To end the second call and go back to the first, tap End.
Rejecting the
Rejecting the SSSSecond
Rejecting the Rejecting the
To reject the second call and keep your current call in progress, tap Ignore. Be
careful not to tap End; doing so will end the current call.
Placing a
Placing a CCCCall on
Placing a Placing a
1. During a call, tap Hold to place the first call on hold.
2. Dial a second number or the first few letters of the second contact’s name by
using the numeric keypad on your device. Then press the Send key to connect.
Wait for it to be picked up.
3. To end the second call and go back to the first, tap End.
Swapping between
Swapping between CCCCalls
Swapping between Swapping between
econd CCCCall
econd econd
all on HHHHold to
all on all on
old to MMMMake a
old to old to
alls
allsalls
all
allall
ake a SSSSecond
ake a ake a
econd CCCCall
econd econd
all
allall
When you have put a call on hold and made or taken another call as described
earlier, you can swap between the two calls by tapping Swap.
Setting up a
Setting up a CCCConference
Setting up a Setting up a
NOTE: You may need to consult your mobile phone network service for the
availability and subscription of the conference call function.
1. When you have put a call on hold and made or taken another call as described
earlier, you can set up conference calling by tapping Menu Conference.
2. To add additional people to your conference, tap Hold. Dial a second number
and press the Send key to connect. Wait for it to be picked up. Then tap Menu
Conference.
3. If you want to talk to one of the parties privately during the call, tap Menu
Private. Select a number, and tap Private.
onference CCCCall
onference onference
all
allall
Using the Phone
3-9

isplays all calls made to and from
isplays only calls that were
To include everyone in the call again, tap Menu Conference.
Taking a
Taking a NNNNote during a
Taking a Taking a
You can take a note during a call.
1. Tap Note.
2. Enter your note and tap ok.
To access a note you created during a call:
1. While in the Phone program, tap Call History.
2. The icon indicates that the phone call entry contains a note. Tap and hold
the name or number for that entry, and tap View Note in the shortcut menu.
NOTE: You can also tap Programs Notes, and access the note in the Calls
folder.
ote during a CCCCall
ote during a ote during a
all
allall
Using Call History
Using Call History
Using Call HistoryUsing Call History
Call History provides the time and duration of all incoming, outgoing, and missed
calls, and a summary of total calls. Call History also provides easy access to any
notes taken during a call.
To access Call History while in the Phone program, tap Call History.
Viewing Call History
Viewing Call History
Viewing Call HistoryViewing Call History
You can tap Menu Filter to change the Call History view (All Calls by default).
All Calls: D
your device in a chronological order.
Missed ( ): D
3-10
Using the Phone

isplays only calls made to
of a call, tap
not answered.
Outgoing ( ): Displays only calls made
from your device.
Incoming ( ): D
your device.
To see the time, date and duration
the item on the list to view details.
To clear all items on the list, tap Menu Delete
All Calls.
Adding an
Adding an EEEEntry to
Adding an Adding an
You can add a phone number in the Call History to Outlook Contacts or SIM Contact.
1. Tap and hold the entry you wish to transfer, and tap Save to Contacts in the
shortcut menu.
ntry to CCCContacts
ntry to ntry to
ontacts UUUUsing Call His
ontacts ontacts
sing Call History
sing Call Hissing Call His
tory
torytory
2. Tap <New Contact> and select a contact type.
3. Enter the contact’s name, and select the proper number type.
4. Tap Save to save the entry.
Using Speed Dial
Using Speed Dial
Using Speed DialUsing Speed Dial
You can create Speed Dials for frequently-called phone numbers so you can dial
a number with a single key press.
Creating a Speed Dial
Creating a Speed Dial EEEEntry
Creating a Speed Dial Creating a Speed Dial
Speed dials can only be created for numbers
ntry
ntryntry
Using the Phone
3-11

, accept the current name or change
if there
stored in Contacts.
1. While in the Phone program, tap Speed Dial.
2. Tap Menu New.
3. Tap the desired contact.
4. In Name
it if you want to.
5. In Number, select the phone number
is more than one number for the contact.
6. If Location, accept the current speed dial number or change the number if you
want to.
7. Tap ok to save the setting.
The new Speed Dial entry is now on the Speed Dial list. The letter on the
lower-right corner of the entry indicates the assigned phone number. For example,
“m” indicates the mobile phone number.
NOTE: The first Speed Dial location is reserved for your voice mail.
Editing
Editing or
EditingEditing
1. While in the Phone program, tap Speed Dial.
2. Tap the desired entry and tap Delete.
– or –
Tap and hold on the desired entry, and tap Delete in the shortcut menu.
3. Tap Yes.
3-12
Using the Phone
or DDDDeleting
eleting a Speed Dial
or or
eletingeleting
a Speed Dial EEEEntry
a Speed Dial a Speed Dial
ntry
ntryntry

e phone settings, such as the ring
type and ring tone to be used for incoming calls,
You might be prompted to enter the PIN2 code for
network service to check if your SIM card supports
Customi
Customizzzzing
CustomiCustomi
To access the Phone Settings, start the Phone program and tap Menu Options.
CCCChanging
hanging PPPPhone
hanging hanging
ing YYYYour
ing ing
hone SSSSettings
hone hone
our PPPPhone
our our
ettings
ettingsettings
hone
honehone
Tap the Phone tab.
You can customiz
and the keypad tone to be used when entering
phone numbers.
NOTE: To use custom .mp3, .wav, or .mid files as
ring tones for incoming calls, copy the files to the
\Application Data\Sounds folder on your device or
to the inserted storage card. Then, select the
sound from the Ring Tone list.
Changing
Changing SSSSecurity
Changing Changing
Tap the Security tab.
You can protect your phone from unauthorized use.
specific functions (such as the pre-paid card’s
charging counters). Consult your mobile phone
ecurity SSSSettings
ecurity ecurity
ettings
ettingsettings
PIN2-related functions and services.
NOTE: Emergency calls can be placed at any time
without requiring a PIN code.
Using the Phone
3-13

You can access and configure settings for the phone
mple, you may want
to block certain types of incoming and/or outgoing
calls, forward incoming calls to a different phone
incoming calls when you are already in a call, or
Services available to you depend on your mobile
To view your services settings, tap a service and
able wireless networks, determine
the order in which your phone accesses another
network if the current one is unavailable, and specify
whether you want to change networks manually or
automatically. The current network will remain active
t, lose your signal, or change your
Changing
Changing SSSServices
Changing Changing
ervices SSSSettings
ervices ervices
ettings
ettingsettings
Tap the Services tab.
services you subscribed to through your mobile
phone network service. For exa
number based on your situation, be notified of
let others know your identity when making calls.
phone network service and the type of your
subscription.
then tap Get Settings.
Changing
Changing NNNNetwork
Changing Changing
Tap the Network tab.
You can view avail
etwork SSSSettings
etwork etwork
ettings
ettingsettings
until you change i
SIM card.
3-14
Using the Phone

Additional
Additional PPPPhone
Additional Additional
Using Text Messages
Using Text Messages
Using Text MessagesUsing Text Messages
Text messages are automatically received when your phone is switched on. The Today
screen shows if there are new text messages. You can tap the section to open
the message list.
To send a text message, you can do one of the followings:
First select a phone number from a program such as Phone or Contacts. Then
select Send Text Message
Send Text Message from the shortcut menu or soft key.
Send Text MessageSend Text Message
First start the Messaging program. Then select the phone number.
See “Reading Text Messages” and “Composing and Sending a Text Message” in
Chapter 5 for more information.
hone OOOOperations
hone hone
perations
perationsperations
Setting up
Setting up an
Setting up Setting up
You can set up an Internet connection using the mobile network. See “Using Cellular
Connection (Select Models Only)” in Chapter 7 for information.
Checking
Checking YYYYour
Checking Checking
The first position in your speed dial list defaults as your voice mailbox. When you
insert your SIM card, your device automatically detects your voice mailbox number
and sets it to the first position in your speed dial list.
Making an
Making an EEEEmergency
Making an Making an
You can use your device to dial the international emergency number 112. This number
can normally be used to make an emergency call in any country with or without
a SIM card inserted, as long as you are within a mobile phone network.
an Internet
Internet CCCConnection
an an
Internet Internet
our VVVVoice
our our
mergency CCCCall
mergency mergency
oice MMMMail
oice oice
onnection
onnectiononnection
ail
ailail
all
allall
Using the Phone
3-15

Some mobile phone network services may require that a SIM card be inserted, and
in some cases that the PIN be entered.
There may be other emergency numbers available. Your mobile phone network service
may save additional local emergency numbers in the SIM card.
Dial
Dialing an
ing an IIIInternational
DialDial
ing an ing an
When you are manually dialing a number, tap and hold on the number key 0 until
the + sign appears. The + sign replaces the international prefix of the country from
where you are calling.
Enter the full phone number you want to dial including country code, area code (without
the leading area code zero) and local phone number.
nternational CCCCall
nternational nternational
all
allall
3-16
Using the Phone

Chapter 4
Chapter 4
Chapter 4Chapter 4
Managing
Managing Your Device
ManagingManaging
This chapter tells you how to effectively manage power, settings, data and programs
of your device.
Managing Power
Managing Power
Managing PowerManaging Power
A fully charged battery should provide power for up to 8 hours of use. The operating
time of a fully charged battery depends on how you are using the device. Some
functions, such as using multimedia or operating a SD/MMC card, may consume
the battery power considerably.
Your Device
Your DeviceYour Device
Low Battery Signals and Actions
Low Battery Signals and Actions
Low Battery Signals and ActionsLow Battery Signals and Actions
CAUTION: When you recharge the battery upon a warning of low power, you
should charge for at least 30 minutes. If you unplug the AC charger soon, you may
not have sufficient battery power for your operation.
You can monitor the battery power by tapping Settings
The remaining power is displayed on a status bar in the Power control panel.
When the battery is low, your device will pop up a warning message and a beep
will sound. You should save your data and recharge the battery immediately upon
a warning of low power; otherwise your device will turn off automatically. You need
to connect the device to external AC power for charging before you can use it again.
Settings System
Settings Settings
System Power
SystemSystem
Managing Your Device
Power.
PowerPower
4-1

Power
Power----Saving Tips
PowerPower
Follow these suggestions to maximize the battery’s operating time, particularly when
you are relying solely on the battery power for extended time periods.
Suspend frequently.
By default, the screen backlight will automatically dim out and the device will
also suspend when it has been idle for a period of time. You can shorten the
length of the idle time using
set up.
Press the power button to suspend your device when it is not in use, even
for a short time.
Turn off functions not needed or adjust settings.
Saving Tips
Saving TipsSaving Tips
Settings
Settings System
Settings Settings
System Power
SystemSystem
Power Advanced
Power Power
Advanced to
AdvancedAdvanced
Lower the volume.
Do not enable sounds or light flashing except for the most
necessary notifications. (Tap
Notifications
Notifications
NotificationsNotifications
to set up.)
Settings
Settings Personal
Settings Settings
Personal
PersonalPersonal
Sounds &
Sounds &
Sounds & Sounds &
Avoid power-consuming situations such as:
Using a modem or other peripheral
Playing sound or music
Recording
Using or monitoring wireless signals
4-2
Managing Your Device

(not supported by your
input methods and voice recording
nds, system volume
elect the information you want displayed on the Today screen
Cu
Customizing Your
stomizing Your DDDDevice
CuCu
stomizing Your stomizing Your
NOTE: Incorrect settings may cause your system to malfunction. Make sure that
you fully understand the function of a certain item before any adjustment.
You can customize the settings of the device to your own preferences. Tap
Se
Settings
ttings. Then tap the Personal
SeSe
ttingsttings
SSSSettings
ettings –––– Personal
ettings ettings
Item
Item Description
ItemItem
Personal
PersonalPersonal
Personal, System
PersonalPersonal
evice
eviceevice
System or Connections
SystemSystem
Connections tab.
ConnectionsConnections
Description
DescriptionDescription
Buttons
Input
Lock
Menus
Owner Information
Phone
Sounds &
Notifications
Today
To assign programs to hardware buttons
device) and set the repeat rate of the up/down control.
To set up items related to the
format.
To set a password for security. (See “Securing Your Device”
in Chapter 2 for more information.)
To customize what appears on the Start menu.
To enter your personal information.
To customize the phone function. (See “Customizing Your
Phone” in Chapter 3 for more information.)
To set the conditions and types of the sou
and ways of notifications.
To s
and to select a desired theme for the background.
Managing Your Device
4-3

and to define
uses for identifying itself to other
of other computers. This
and
feedback on using the Windows
if you want to encrypt files placed on storage cards.
nformation needed by technical support groups to diagnose a
he allocation between storage and program memory,
to view the memory on the storage card (if installed) and to
set the time for
SSSSettings
ettings –––– System
ettings ettings
Item
Item Description
ItemItem
System
SystemSystem
Description
DescriptionDescription
About
Backlight
Certificates
Clock & Alarms
Customer
Feedback
Encryption
Error Reporting
GPS
To show the hardware information of your device
the name that your device
computers.
To adjust the brightness level of the display and to set the
automatic turnoff for power saving purposes.
To establish your identity or the identity
helps prevent unauthorized users from accessing your device
information.
To change the time and date and to set alarms.
To set if you want to send your
Mobile software.
To set
The encrypted files will be readable only on this device.
To enable or disable error reporting. Error Reporting sends
i
program error for a device running Windows Mobile software.
To configure the GPS hardware settings and manage GPS.
Managed
Programs
Memory
Power
4-4
Managing Your Device
To manage the programs you installed.
To display t
manually stop a program if it becomes unstable or program
memory is low.
To show the remaining battery power and to
the device to turn off automatically.

the region of your location and the formats of the
feature for easier reading of text in
just the text size to see more content or increase the
isplay the information about the system performances and
.
You can also end or manage the running programs in Task
To connect your device with company resources. You will need
Regional Settings
Item
Item Description
ItemItem
Remove Programs
Screen
System
Information
Task Manager
Windows Update
To specify
number, currency, time and date.
Description
DescriptionDescription
To remove programs you added to the memory of your device.
To set the orientation of the screen to portrait or landscape.
To adjust the touch screen for accurate screen taps.
To enable the ClearType
programs that support ClearType.
To ad
readability in many programs.
To display the system information.
To d
the detailed information of the running programs on your device
Manager.
To set how you want your device to check for important updates.
SSSSettings
ettings –––– Connections
ettings ettings
Item
Item Description
ItemItem
Beam
Bluetooth
Connections
Domain Enroll
Connections
ConnectionsConnections
Description
DescriptionDescription
To receive information and files via Bluetooth technology.
To set up or change the Bluetooth connection.
To set up or change connection information.
the enrollment password provided by your system administrator.
Managing Your Device
4-5

To change the type of USB connection your device is using and
USB to PC
Item
Item Description
ItemItem
to enable advanced network functionality.
Description
DescriptionDescription
Wi-Fi
Wireless Manager
Searching and Organizing Information
Searching and Organizing Information
Searching and Organizing InformationSearching and Organizing Information
The Search feature on your device helps you quickly locate information.
To search a file, tap
select a data type and then tap Search
You can also use the File Explorer to find files on your device and to organize
these files into folders. Tap
NOTE: You can move files in File Explorer by tapping and holding the item you
want to move, tapping Cut or Copy on the shortcut menu, browsing to the new
location and then tapping Paste.
To search for wireless networks and configure the wireless
network module.
To change the Wi-Fi, Bluetooth, and Phone radio status.
Programs
Programs
ProgramsPrograms
Search to start the search.
Search Search
Search
Search. Enter the text you want to find,
SearchSearch
Pro
Programs
grams File Explorer
ProPro
grams grams
File Explorer.
File ExplorerFile Explorer
4-6
Managing Your Device

Chapter 5
Chapter 5
Chapter 5Chapter 5
Microsoft Pocket Outlook
Microsoft Pocket Outlook
Microsoft Pocket Outlook Microsoft Pocket Outlook
Microsoft Pocket Outlook includes Calendar, Contacts, Tasks, Notes, and Messaging.
You can use these programs individually or together. For example, e-mail addresses
stored in Contacts can be used to address e-mail messages in Messaging.
NOTE: For detailed information on using Microsoft programs, tap
Calendar: Scheduling
Calendar: Scheduling AAAAppointments
Calendar: Scheduling Calendar: Scheduling
and
and MMMMeetings
and and
Use Calendar to schedule appointments, including meetings and other events. You can
check your appointments in one of several views (Agenda, Day, Week, Month and
Year), and set Calendar to remind you of appointments with a sound or other methods.
Appointments for the day can be displayed on the Today screen.
Tap
NOTE: You can customize the Calendar display (for example, change the first day of
the week), by tapping Menu Tools Options.
eetings
eetingseetings
Calendar.
ppointments
ppointments ppointments
Help.
Microsoft Pocket Outlook
5-1

In Day or Week view, tap the desired date and
p first to select the
Enter other desired information. You will need
ou tap an appointment in Calendar, a summary
Creating an
Creating an AAAAppointment
Creating an Creating an
1.
time for the appointment.
2. Tap Menu New Appointment.
3. Using the Input panel, ta
field, and then enter a description and a
location.
4.
to hide the Input panel to see all available fields.
5. Tap ok to save and return to Calendar.
Using the Calendar
Using the Calendar SSSSummary
Using the Calendar Using the Calendar
ppointment
ppointmentppointment
ummary SSSScreen
ummary ummary
creen
creencreen
When y
screen is displayed. To change the appointment, tap
Menu Edit.
NOTE: If you receive a meeting request, you can tap
Reply to send an e-mail to the meeting host.
5-2
Microsoft Pocket Outlook

colleagues so that you can easily find the information
you are looking for, whether you are at home or on
n, contacts stored
also appear in the list (indicated
the phone function, you will be
Using the Input panel, enter a name and other
contact information. You will need to scroll down
Contacts: Tracking
Contacts: Tracking FFFFriends and
Contacts: Tracking Contacts: Tracking
CCCColleagues
olleagues
olleaguesolleagues
Contacts maintains a list of your friends and
the road.
riends and
riends and riends and
Tap
For models with the phone functio
in the SIM card
by the icon ).
Creating a
Creating a CCCContact
Creating a Creating a
1. In Contacts, tap New.
2. For models with
3.
NOTE: You can only set the contact’s name and
phone number for a SIM contact.
4. Tap ok to save and return to the contact list.
Contacts. The Contacts list appears.
ontact
ontactontact
asked to select Outlook contact or SIM contact
if the phone function is switched on.
to see all available fields.
Microsoft Pocket Outlook
5-3

n the contact list, a summary
You can enter a start date and due date or enter
other information by first tapping the field. If the Input
e it to see all
Using the Contacts
Using the Contacts SSSSummary
Using the Contacts Using the Contacts
When you tap a contact o
screen is displayed. To change the contact
information, tap Menu Edit.
NOTE: You can manage SIM contacts only when
the phone function is turned on (select models
only).
Tasks: Keeping a
Tasks: Keeping a TTTTo
Tasks: Keeping a Tasks: Keeping a
ummary SSSScreen
ummary ummary
o DDDDo
o LLLList
o o
o o
creen
creencreen
ist
istist
Use Tasks to keep track of what you have to do.
Tap
Creating a
Creating a TTTTask
Creating a Creating a
1. In Tasks, tap Menu New Task.
2. Using the Input panel, enter a description.
3.
4. Tap ok to save and return to the task list.
5-4
Programs Tasks.
ask
askask
panel is open, you will need to hid
available fields.
Microsoft Pocket Outlook

n the task list, a summary
ckly capture thoughts, reminders, ideas, drawings
. You can create a
drawing, typing,
Using the Tasks
Using the Tasks SSSSummary
Using the Tasks Using the Tasks
When you tap a task o
screen is displayed. To change the task, tap Edit.
Notes: Capturing
Notes: Capturing TTTThoughts and
Notes: Capturing Notes: Capturing
Qui
and phone numbers with Notes
written note or an audio recording. You can also
include a recording in a note.
ummary SSSScreen
ummary ummary
creen
creencreen
houghts and IIIIdeas
houghts and houghts and
deas
deasdeas
Tap
Creating a
Creating a NNNNote
Creating a Creating a
1. In Notes, tap New.
2. Create your note by writing,
3. Tap ok to save and return to the note list.
Programs Notes.
ote
oteote
or recording.
Microsoft Pocket Outlook
5-5

item
appears if your model comes with the phone
: This item appears if you have
directly with a Microsoft Exchange
You have to manually set
to provide the
messaging services that enable you to send and
Messaging: Sending and
Messaging: Sending and RRRReceiving
Messaging: Sending and Messaging: Sending and
MMMMessages
essages
essagesessages
You can work with e-mail and text messages (select models only) from Messaging.
eceiving
eceiving eceiving
Tap
About Accounts
About Accounts
About AccountsAbout Accounts
You can use multiple services to send and receive messages. For different ways
of accessing messages, there are different types of account:
Messaging. The account selection screen appears.
Text Messages (select models only): This
function.
Outlook E-mail
synchronized
Server account or with Microsoft Outlook on
your computer.
An Internet account
An Internet account:
An Internet accountAn Internet account
up such an account. This type of account
depends on a service provider or a mobile
operator (select models only)
receive e-mail over the Internet.
Setting up an
Setting up an Internet E
Setting up an Setting up an
You can set up only one Outlook account on your device. However, you can set
up multiple Internet e-mail accounts.
1. Tap
5-6
Microsoft Pocket Outlook
Internet E----mail
Internet EInternet E
Messaging.
mail AAAAccount
mail mail
ccount
ccountccount

on the account
2. Tap Setup E-mail on the account selection screen.
3. Follow the on-screen instructions to complete the setup.
During setup, you can enable Auto Setup to search for and enter the settings
of the e-mail account with which you want your device to synchronize. If Auto
Setup does not find the settings, you may have to ask your ISP, mobile operator,
or system administrator for the correct settings, and then enter them yourself.
Reading
Reading EEEE----mail
Reading Reading
When you connect to your email server or synchronize with your desktop computer
or server, by default, you will receive messages from the last three days only and
the first 2 KB of each new message, and not to sync file attachments. The original
messages remain on the server or your desktop computer.
To read E-mail messages:
mail Message
mail mail
Messagessss
MessageMessage
1. Tap
2. Tap the account you want to use
selection screen.
3. Messages you receive are displayed in the
message list. Tap an item to open it.
Composing and
Composing and SSSSending an
Composing and Composing and
1. Tap
2. Tap the account you want to use on the account selection screen.
3. Tap Menu New.
Messaging.
Messaging.
ending an EEEE----mail
ending an ending an
mail
mailmail
Microsoft Pocket Outlook
5-7

recipients, separating them with a semicolon. To
Enter your message and subject. To quickly add
, and
mail message,
, and tap the item you want
select the file you want to attach or record a
be attached
NOTE: You can also send an e-mail message by selecting a contact with an e-mail
address from another program such as Contacts or Phone. Then select Send
e-mail from the shortcut menu or soft key.
4. Enter the e-mail address of one or more
access addresses from Contacts, tap To.
5.
common messages, tap Menu My Text
tap a desired message.
6. To add an attachment to the Etap Menu Insert
to attach: Picture, Voice Note, or File. Then
voice note. Embedded objects cannot
to messages.
7. Tap Send.
NOTE: If you are working offline, e-mail messages are moved to the Outbox folder
and will be sent the next time you connect.
Reading Text Messages
Reading Text Messages (Select Models Only)
Reading Text MessagesReading Text Messages
Text messages are automatically received when your phone is switched on. The Today
screen shows if there are new text messages. You can tap the section to open
the message list.
To manually open the message list:
1. Tap
2. Select Text Messages on the account selection screen.
3. The message list appears. Select the item you want to read.
5-8
Microsoft Pocket Outlook
Messaging.
(Select Models Only)
(Select Models Only)(Select Models Only)

phone numbers from Contacts, tap
Composing and
Composing and SSSSending a
Composing and Composing and
Models Only)
Models Only)
Models Only)Models Only)
ending a Text
ending a ending a
Text MMMMessage
TextText
essage (Select
essageessage
(Select
(Select (Select
1. Tap
2. Select Text Messages on the account selection screen.
3. Tap Menu New.
NOTE: You can also send a text message by selecting a phone number from
another program such as Contacts or Phone. Then select Send Text Message
from the shortcut menu or soft key.
4. Enter the phone number of one or more
recipients, separating them with a semicolon.
To select
To.
5. Enter your message.
To quickly add common messages, tap Menu
My Text, and tap a desired message.
6. Tap Send.
Messaging.
Microsoft Pocket Outlook
5-9

Chapter 6
Chapter 6
Chapter 6Chapter 6
More Programs
More Programs
More ProgramsMore Programs
In addition to Microsoft Pocket Outlook, there are other programs built into your device.
This chapter tells you how to use these programs.
NOTE: For detailed information on using Microsoft programs, tap
ActiveSync
ActiveSync
ActiveSyncActiveSync
ActiveSync on your device works with ActiveSync on a Windows XP computer and
with Windows Mobile Device Center on a Windows Vista computer.
When you have established the connection between your device and your computer,
you can synchronize the information between the two with ActiveSync. Synchronization
compares the data on the two sides and updates both computers with the most recent
information. For example, you can:
Keep your Pocket Outlook Contacts, Calendar and Tasks databases up-to-date
by synchronizing your device with Microsoft Outlook data on your computer.
Synchronize e-mail messages in your device Outlook Inbox with e-mail messages
in Microsoft Outlook on your computer.
Synchronize Microsoft Word, Excel and PowerPoint files between your device and
computer. Your files are automatically converted to the correct format.
Help.
More Programs
6-1

You can select which information types are synchronized and control how much data
is synchronized. (See the ActiveSync or Windows Mobile Device Center help on
your computer.)
With ActiveSync, you can also:
Copy (rather than synchronize) files between your device and computer.
Add and remove programs on your device.
Pass through your computer to a network or the Internet.
Synch
Synchroni
SynchSynch
Once you have created a synchronization relationship and completed the first
synchronization, you can initiate synchronization from your device.
1. Connect your device to your computer.
ronizzzzing
ronironi
ing DDDData
ing ing
ata
ataata
2. On your device, tap
3. Tap Sync to begin synchronization.
NOTE: In addition to the USB cable, you can also synchronize by using Bluetooth.
(See the ActiveSync or Windows Mobile Device Center help on your computer.)
Synchroni
Synchronizzzzing
SynchroniSynchroni
You can increase your productivity when you are away from the office by setting
up an account to access e-mail, voice mail, calendar, and contact information from
a Microsoft Exchange Server.
Exchange Server, the Microsoft messaging and collaboration server, lets you send
and receive your work e-mail, calendar updates, voice mail, and contact information
while traveling.
6-2
More Programs
ing DDDDirectly with Exchange S
ing ing
Programs ActiveSync.
irectly with Exchange Server
irectly with Exchange Sirectly with Exchange S
erver
ervererver

To set up the account, you must obtain the name of the Exchange Server and the
server domain from the wireless service provider or system administrator. You must
also know your Exchange user name and password.
1. Make sure your device is not connected to your computer.
2. On your device, tap
Programs ActiveSync.
3. Tap Menu Add Server Source.
4. Follow the on-screen instructions to complete the setup.
5. Connect your device to the Internet for synchronization with Exchange Server.
NOTE:
If a message pops up asking you to accept security policies for
synchronization with Exchange Server, tap OK to proceed.
You may be prompted to set the password for device lock. You can set a
longer period of time (maximum of 24 hours) before your device prompts you
to enter the password again.
To disable the Direct Push feature, tap
Programs ActiveSync. Tap
Menu Options, uncheck the E-mail item and then tap ok to save the changes.
More Programs
6-3

Office
Office Mobile
OfficeOffice
Microsoft Office Mobile works with Microsoft Office on your computer to give you easy
access to copies of your documents.
Mobile
MobileMobile
Tap
Creating a
Creating a DDDDocument/
Creating a Creating a
NOTE: You cannot create or edit PowerPoint presentations on your device.
1. Tap
2. Enter the information.
3. When finished, tap ok and the document/workbook/note is automatically saved
Opening a
Opening a
Opening a Opening a
Office Mobile and select the program to use.
Excel Mobile
OneNote Mobile
PowerPoint Mobile
Word Mobile
ocument/WWWWorkbook/
ocument/ocument/
Office Mobile and select the program to use.
and named according to the first characters of text entered in the document.
orkbook/NNNNote
orkbook/orkbook/
ote
oteote
DDDDocument
ocument////WWWWorkbook/
ocumentocument
Whenever you switch to an Office Mobile program, you will see the file list. Tap
the desired file to open it. You can open only one document at a time; when you
open a second document, the first will be saved and closed automatically.
6-4
More Programs
orkbook/NNNNote/
orkbook/orkbook/
ote/PPPPresentation
ote/ote/
resentation
resentationresentation

. The Internet Explorer
ap the
n the
address bar that appears at the top of the screen,
eb address you want to visit and then
ap the arrow to choose from previously
IIIInterne
nternet Explorer
nternenterne
NOTE: When surfing the Internet, your device uses the default Internet connection
in Settings Connections Connections My ISP settings. If you want to surf the
Internet through Wi-Fi, connect to the wireless network before starting Internet
Explorer. (See Chapter 7 for information.)
Tap
Mobile home page appears.
Tap Favorites to display the Favorites list. T
page that you want to view.
To visit web pages not included in Favorites, i
enter the w
tap . Or, t
entered addresses.
t Explorer
t Explorert Explorer
Internet Explorer
More Programs
6-5

Windows Live
Windows Live and Messenger
Windows LiveWindows Live
Windows Live lets you wirelessly access many of the features of the Windows Live
Web site.
You can access your Windows Live Hotmail.
You can access your Windows Live Messenger and contacts.
You can merge your Messenger contacts with the contacts on your device. From
the device contact list, you can access the contacts’ Windows Live Spaces and
you can initiate an e-mail or an instant message to any contact.
The Windows Live Search bar can help you find local services, images, and
information on the Internet.
You can send a photo to your Windows Live Space.
NOTE:
You must have a Windows Live ID and password to use this service.
To use Windows Live, you must have an Internet connection.
and Messenger
and Messengerand Messenger
SSSSetting up
etting up Windows Live
etting up etting up
1. Tap
2. Tap Sign in to Windows Live.
3. Tap Accept to proceed.
4. Follow the on-screen instructions to complete the setup.
Signing in to Messenger
Signing in to Messenger
Signing in to MessengerSigning in to Messenger
Before you sign in to Messenger, you need to sign in to Windows Live first.
6-6
More Programs
Windows Live
Windows LiveWindows Live
Programs Windows Live.

1. Tap
2. Tap Sign in.
NOTE: To sign out from Messenger, tap Menu Sign out.
Windows Media
Windows Media
Windows MediaWindows Media
Use Microsoft Windows Media Player Mobile to play digital audio and video files that
are stored on your device or on a network, such as on a web site.
You can play files in either Windows Media or MP3 format (including files with the
extensions .asf, .wma, .wmv and .mp3).
Tap
Use Microsoft Windows Media Player on your computer to synchronize (if using
Windows Media Player 10) or copy (if using Windows Media Player 9) digital audio
and video files from your computer to your device.
Programs Messenger.
Programs Windows Media.
For more information, tap
computer.
Pictures & Videos
Pictures & Videos
Pictures & VideosPictures & Videos
With Pictures & Videos, you can:
View pictures and video clips.
Send pictures and videos to others.
Set a picture as the background on the Today screen.
Help, or see Windows Media Player Help on the
More Programs
6-7

To view pictures or video stored on a storage card,
By default, the program displays thumbnails of the
folder, within
Thumbnails of pictures and videos appear on the
screen. You can tap one of them to view in full
Play slide show.
Edit your pictures.
Viewing
Viewing PPPPictures and
Viewing Viewing
1.
insert the card.
ictures and VVVVideos
ictures and ictures and
ideos
ideosideos
2. Tap
pictures and videos in the My Pictures
the My Documents folder on your device.
3.
screen.
Camera
Camera
CameraCamera
The Camera program allows you to take pictures and record video clips.
Taking Pictures
Taking Pictures
Taking PicturesTaking Pictures
Programs Pictures & Videos.
1. To start the program, press the
Pictures & Videos Camera.
6-8
More Programs
key on your device or tap Programs

matches the
(60Hz or
The Camera screen appears. Below the display area are indicators of the current
status.
2. For camera controls such as brightness and zooming, tap Menu.
Menu Items
Menu Items
Menu ItemsMenu Items
Descriptions
Descriptions
DescriptionsDescriptions
Mode
Three choices:
1. Normal
2. Burst – Continuous shooting of 5 pictures
3. Timer – 5 second countdown before shooting
Brightness
Resolution
Seven brightness levels
Six choices from 160x120 to 2048x1536 (640x480 by
default)
Zoom
White
Balance
Flash
Full Screen
Options
Flicker
Available choices depend on the resolution.
Five choices from which you can select one that
current light source.
Flash on or off.
Full screen on or off.
Overall settings to the Camera program.
Set to the frequency of the local electrical system
50Hz) for flicker free shooting where electrical lights exist.
Night Mode
On or off. Set to On for shooting in low light situations.
NOTE: By default, the display area blanks out and shows the word “Standby” when
the camera has been idle for one minute. To resume, tap the screen.
More Programs
6-9

matches
3. Aim the camera lens at the subject. Press the
automatic focusing. A white frame appears. Wait until the color of the frame
turns green indicating the subject is in focus.
4. Press the
5. The result shows on the screen if the picture was taken in Normal or Timer
mode. At this time, you can tap Menu to perform a desired task to the current
picture. Tap Camera or ok to go back to the Camera screen.
6. The picture is saved to the predefined storage location (as long as you didn’t
delete it in the previous step).
Recording Video Clips
Recording Video Clips
Recording Video ClipsRecording Video Clips
1. To start the program, press the
Pictures & Videos Camera.
2. Tap Menu Video to switch to the video mode. Below the display area are
indicators of the current status.
3. For recording controls such as brightness and white balancing, tap Menu.
key fully to take the picture.
key on your device or tap Programs
key halfway down for
6-10
Menu Items
Menu Items Descriptions
Menu ItemsMenu Items
Brightness
Quality
White Balance
Full Screen
Options
More Programs
Seven brightness levels
352 x 288
Five choices from which you can select one that
the current light source.
Full screen on and off.
Overall settings to the Camera program.
Descriptions
DescriptionsDescriptions

NOTE: By default, the display area blanks out and shows the word “Standby” when
the camera has been idle for one minute. To resume, tap the screen.
4. Press the
key to start recording.
If needed, you can tap Pause to temporarily pause the recording and then tap
Resume to continue.
5. To stop, press the
key or tap Stop.
Or, the recording will automatically stop when the length reaches the pre-defined
maximum value (30 seconds by default).
6. The video clip is saved to the predefined storage location. To view the video
clip, tap Thumbnails.
More Programs
6-11

if using USB
as visible in the Bluetooth settings, tap
to connect to
omputer connects to the Internet
Internet Sharing
Internet Sharing (Select Models Only)
Internet SharingInternet Sharing
Using Internet Sharing, you can use your device as an external modem for the computer
via the USB or Bluetooth connection.
NOTE: The Internet Sharing function does not support Windows 98.
1. Make sure that your device is not connected to another device, and that you
have installed proper GPRS settings.
2. To use USB connection, connect your device to the computer with the USB cable.
To use the Bluetooth connection, you must first initiate and complete the Bluetooth
Personal Area Network (PAN) partnership on the computer. (For more
information, refer to Windows Help and Support.)
(Select Models Only)
(Select Models Only)(Select Models Only)
3. Tap
4. In PC Connection, select USB
connection.
Select Bluetooth PAN if using Bluetooth
connection. When prompted to make your
device
Yes.
5. In Network Connection, select your GPRS
setting (select models only).
6. Tap Connect for your device
the Internet.
Now your c
via your device.
7. To end the connection, tap Disconnect on your device.
6-12
More Programs
Programs Internet Sharing.

Remote Desktop Mobile
Remote Desktop Mobile
Remote Desktop MobileRemote Desktop Mobile
Using Remote Desktop Connection, you can log on to a Windows Terminal Server
and use all programs installed on this server.
NOTE: You can only access a remote computer on which the Terminal Services or
Remote Desktop program has been installed.
To connect to a remote computer:
1. Tap
2. Select the computer. Enter the user name, password, and domain.
3. Tap Connect.
Programs Remote Desktop Mobile.
More Programs
6-13

Chapter 7
Chapter 7
Chapter 7Chapter 7
Getting Connected
Getting Connected
Getting Connected Getting Connected
This chapter tells you how you can get your device connected through a variety of
ways.
Types of Connections
Types of Connections
Types of ConnectionsTypes of Connections
Your device can connect to the Internet, to your computer, and to other devices
and services.
Your device has two groups of connection settings: My ISP and My Work Network.
My ISP settings connect your device to the Internet, and My Work Network settings
connect to any private network, such as an intranet that you use at work.
The following types of connections are available on your device:
Cellular (GPRS) is a long-distance wireless data connection that is available
through some mobile service operators. (Select models only)
Dial-up lets you access the Internet or a corporate network by dialing a phone
number. (Select models only)
Wi-Fi lets you wirelessly connect your device to the Internet through access points
that can be up to 30 meters (about 100 feet) away.
Bluetooth lets you create a temporary wireless network that can link up to eight
devices that are within 10 meters (about 33 feet) of one another.
Getting Connected
7-1

USB is a wired connection between your device and a computer for synchronizing
data or surfing the Internet. (See “ActiveSync” in Chapter 6 for information.)
Using
Using CCCCellular
Using Using
Models Only)
Models Only)
Models Only)Models Only)
Models supporting mobile phone functions allow you to access the Internet using the
mobile network.
Set
Setting
ting up a
SetSet
tingting
NOTE: You must subscribe to GPRS service with your mobile operator.
In most cases, your cellular (GPRS) connection will be preconfigured by your cellular
service provider. You will not have to set up a GPRS connection or change your
GPRS settings.
ellular CCCConnection
ellularellular
up a CCCCellular (GPRS)
up a up a
ellular (GPRS) CCCConnection
ellular (GPRS) ellular (GPRS)
onnection (Select
onnectiononnection
(Select
(Select (Select
onnection
onnectiononnection
If you do have to set up a GPRS connection, you must obtain the settings from
your mobile operator before you start this procedure.
1. Tap Settings Connections Connections.
2. In either group, tap Add a new modem connection.
3. In the Enter a name for the connection field, enter a name for the connection.
4. In the Select a modem field, select Cellular Line (GPRS), and then tap Next.
5. Enter the access point name provided by your mobile operator, and then tap
Next.
6. Enter your user name and password, and then tap Finish.
7-2
Getting Connected

Set
Setting
ting up a
SetSet
tingting
NOTE: Depending on your wireless service provider, dial-up connections may not
be supported on your device.
With dial-up, your service provider gives you a phone number that you dial in order
to connect your device to the Internet.
1. Tap Settings Connections Connections.
2. In either group, tap Add a new modem connection.
3. In the Enter a name for the connection field, enter a name for the connection.
4. In the Select a modem field, select Cellular Line, and then tap Next.
5. Enter the phone number provided by your service provider, and then tap Next.
6. Enter your user name and password, and then tap Finish.
up a DDDDial
up a up a
ial----up
ialial
up CCCConnection
up up
onnection
onnectiononnection
Getting Connected
7-3

the connectivity indicator on the navigation
to
display the
previously connected to a wireless
network, your device will try to connect to the
n
If more than one network is detected, the screen
Select the network
Using
Using WWWWireless Network
Using Using
Your device has a built-in wireless network module. As long as you are in a wireless
LAN (WLAN) environment, you can connect to the network without physical cables.
Switching
Switching OOOOn
Switching Switching
By default, the Wi-Fi radio is switched off. To switch on or off the Wi-Fi radio:
1. Tap the Wireless Manager section on the Today screen.
- or -
Tap
bar and tap Wireless Manager.
2. In the Wireless Manager screen, tap Wi-Fi
change the Wi-Fi radio status.
ireless Network
ireless Networkireless Network
n or Off
or Off the Wi
n n
or Off or Off
the Wi----Fi
the Withe Wi
Fi RRRRadio
Fi Fi
adio
adioadio
When switched on, your device will
word Available if wireless networks are detected.
If you have
same network and display the name of the
network after the connection.
Connecting to
Connecting to a
Connecting toConnecting to
1. Switch on the Wi-Fi radio. (See “Switching O
or Off the Wi-Fi Radio” previously.)
2. Your device will detect available Wi-Fi networks.
will display a network list.
7-4
Getting Connected
a WWWWireless
ireless NNNNetwork
a a
ireless ireless
etwork
etworketwork

Select to connect to the Internet or the private
If the selected network requires a network key,
and
by switching
you want to connect to, and tap OK.
3.
network, and then tap Connect.
4.
enter the key and tap Connect.
The icon appears on the navigation bar
the RF indicator on your device flashes in
amber.
NOTE:
You can also search for a network to connect
by tapping Settings Connections
Wi-Fi Search for Networks.
Once you have connected to a network, the
shortcut is created in Settings. To change the
network settings, tap Settings
Connections Wi-Fi. Tap the desired network
and change the settings.
5. When you have finished using the wireless
network, end the Wi-Fi connection
off its radio.
NOTE: Leaving the radio on will consume more power.
Using
Using the Bluetooth
Using Using
NOTE: BAP does not guarantee the product’s compatibilities with the Bluetooth
headsets/devices from all manufacturers.
the Bluetooth FFFFunction
the Bluetooth the Bluetooth
unction
unctionunction
Getting Connected
7-5

Wireless Manager section on the
the connectivity indicator on the navigation
The RF indicator flashes in blue to indicate that
, switch
Your device incorporates the Bluetooth capability. Bluetooth technology is a short-range
wireless communications technology. Devices with Bluetooth capabilities can exchange
information over a distance of about 10 meters (30 feet) without requiring a physical
connection.
Switching
Switching OOOOn
Switching Switching
By default, the Bluetooth radio is switched off. To switch on or off the Bluetooth
radio:
1. Tap the
Today screen.
- or -
Tap
bar and tap Wireless Manager.
2. In the Wireless Manager screen, tap Bluetooth
to switch on or off the radio.
n or
or OOOOff the Bluetooth
n n
ff the Bluetooth Radio
oror
ff the Bluetoothff the Bluetooth
Radio
RadioRadio
the Bluetooth radio is on.
3. For other devices to detect your device, tap
Menu
Menu Bluetooth Settings
MenuMenu
this device visible to other devices
this device visible to other devices.
this device visible to other devicesthis device visible to other devices
4. When not using the Bluetooth function
off the Bluetooth radio.
NOTE: Leaving the radio on will consume more
power.
7-6
Getting Connected
Bluetooth Settings Mode
Bluetooth SettingsBluetooth Settings
Mode Make
ModeMode
Make
Make Make

”
From the program, tap and hold the item you
Calendar, a task in Tasks, a contact card in
searches for other devices with
Bluetooth capabilities within close range, and
to
Sending
Sending FFFFiles via the Bluetooth
Sending Sending
1. Switch on the Bluetooth radio. (See
“Switching On or Off the Bluetooth Radio
previously.)
2.
want to beam, such as an appointment in
Contacts, or a file in File Explorer.
3. Tap Beam [type of item] in the shortcut menu.
4. Your device
displays them in the list. Tap the device
which you want to send the item.
CAUTION: Files are saved automatically before they are beamed. If a Word
document or Excel workbook was created on a computer, unsupported content
and formatting may be lost when the files are saved.
iles via the Bluetooth FFFFunction
iles via the Bluetoothiles via the Bluetooth
unction
unctionunction
Creating a Bluetooth
Creating a Bluetooth PPPPartnership
Creating a Bluetooth Creating a Bluetooth
A partnership is a relationship that you create between your device and another device
with Bluetooth capabilities to help exchange information in a secure manner. Creating
a partnership involves entering the same Bluetooth passcode on both devices. Once
a partnership is created, your devices need only have the Bluetooth function switched
on to exchange information; they do not need to be visible.
1. Make sure that the two devices are switched on, visible, and within close range.
2. Tap Settings Connections Bluetooth Devices Add new
device.
Your device searches for other devices with
artnership
artnershipartnership
Getting Connected
7-7

Bluetooth capabilities, and displays them in the
, enter an alphanumeric passcode
list.
3. Tap the name of the other device, and tap Next.
4. In Passcode
between 1 and 16 characters, and tap Next.
5. Enter the same passcode on the other device.
6. Tap Done.
7-8
Getting Connected

Chapter 8
Chapter 8
Chapter 8Chapter 8
FCC Warning
This equipment has been tested and found to comply with the limits for a Class B digital
device, pursuant to Part 15 of the FCC Rules. These limits are designed to provide reasonable
protection against harmful interference in a residential installation. This equipment generates
uses and can radiate radio frequency energy and, if not installed and used in accordance
with the instructions, may cause harmful interference to radio communications. However,
there is no guarantee that interference will not occur in a particular installation. If this
equipment does cause harmful interference to radio or television reception, which can be
determined by turning the equipment off and on, the user is encouraged to try to correct
the interference by one or more of the following measures:
Reorient or relocate the receiving antenna.
Increase the separation between the equipment and receiver.
Connect the equipment into an outlet on a circuit different from that to which the receiver
is connected.
Consult the dealer or an experienced radio/TV technician for help.
Shielded cables and I/O cords must be used for this equipment to comply with relevant
FCC regulations.
You are cautioned that changes or modifications not expressly approved by the party responsible for
compliance could void your authority to operate the equipment. This transmitter must not be co-located or
operating in conjunction with any other antenna or transmitter.
This device complies with Part 15 of the FCC Rules. Operation is subject to the following two conditions: (1)
this device may not cause harmful interference and (2) this device must accept any interference received,
including interference that may cause undesired operation.
FCC warning
8-1

RF exposure warning
The equipment complies with FCC RF exposure limits set forth for an uncontrolled
environment.
The antenna(s) used for this transmitter must not be co-located or operating
in conjunction with any other antenna or transmitter.
RF exposure information (SAR)
This GPS Controller meets the government's requirements for exposure to radio
waves.
This GPS Controller is designed and manufactured not to exceed the emission
limits for exposure to radio frequency (RF) energy set by the Federal
Communications Commission of the U.S. Government.
The exposure standard for wireless GPS Controllers employs a unit of measurement
known as the Specific Absorption Rate, or SAR. The SAR limit set by the FCC
is 2.0 W/kg.
Tests for SAR are conducted using standard operating positions accepted by the
FCC with the GPS Controller transmitting at its highest certified power level in
all tested frequency bands. Although the SAR is determined at the highest certified
power level, the actual SAR level of the GPS Controller while operating can be
well below the maximum value. This is because the GPS Controller is designed
to operate at multiple power levels so as to use only the poser required to reach
the network. In general, the closer you are to a wireless base station antenna,
the lower the power output.
The highest SAR value for US model GPS Controllers as reported to the FCC
when tested for use at the body, as described in this user guide, is 1.280 W/kg.
 Loading...