

Page 1

BAP
S-Series
GPS Controller(GPS
Receiver)
Operator’s Manual
Getting Started 1-1
Page 2

Table of Contents
Chapter 1 Getting Started .............................................................................. 1-6
Identifying Hardware Components .................................................... 1-6
Front ............................................................................................ 1-6
Keypad ......................................................................................... 1-93
Back/Sides ..................................................................................... 1-4
Bottom......................................................................................... 1-10
Getting Your Device Ready for Use .................................................. 1-11
Installing the Battery and SIM Card ............................................. 1-11
Connecting to AC Power and Charging the Battery..................... 1-13
Performing the Initial Startup...................................................... 1-13
Synchronizing with Your Computer ................................................. 1-14
Installing ActiveSync or WMDC ................................................... 1-14
Using Options ................................................................................... 1-15
Using micro SD Card .................................................................... 1-15
Chapter 2 Basic Skills ..................................................................................... 2-1
Power Saving and Turning Off ............................................................ 2-1
Backlight Off .................................................................................. 2-1
Suspend Mode ............................................................................... 2-1
Turning Off .................................................................................... 2-1
Navigating on the Screen ................................................................... 2-2
Stylus ............................................................................................. 2-2
Navigation Button ......................................................................... 2-2
Home Screen ...................................................................................... 2-3
Landscape View ............................................................................. 2-3
Navigation Bar and Toolbar ............................................................... 2-4
Programs ............................................................................................ 2-4
Getting Started 1-2
Page 3

Notifications ....................................................................................... 2-4
Entering Information .......................................................................... 2-5
Entering Text Using the Input Panel .............................................. 2-5
Recognizer ..................................................................................... 2-6
Writing on the Screen.................................................................... 2-6
Drawing on the Screen .................................................................. 2-7
Recording a Message ..................................................................... 2-8
Securing Your Device .......................................................................... 2-9
Locking Your Device ................................................................... 2-109
Securing Your Device with a Password ........................................ 2-10
Chapter 3 Managing Your Device ................................................................... 3-1
Managing Power ................................................................................ 3-1
Low Battery Signals and Actions .................................................... 3-1
Power-Saving Tips.......................................................................... 3-1
Customizing Your Device .................................................................... 3-2
Searching and Organizing Information .............................................. 3-6
Chapter 4 Microsoft Pocket Outlook .............................................................. 4-1
Calendar: Scheduling Appointments and Meetings ........................... 4-1
Creating an Appointment .............................................................. 4-2
Using the Calendar Summary Screen ............................................ 4-4
Contacts: Tracking Friends and Colleagues ........................................ 4-4
Creating a Contact ......................................................................... 4-5
Using the Contacts Summary Screen ............................................. 4-5
Tasks: Keeping a To Do List ................................................................ 4-5
Creating a Task .............................................................................. 4-5
Using the Tasks Summary Screen .................................................. 4-7
Notes: Capturing Thoughts and Ideas ................................................ 4-7
Creating a Note ............................................................................. 4-8
Email: Sending and Receiving Email Messages .................................. 4-8
Synchronizing E-mail Messages ..................................................... 4-8
Connecting Directly to an E-mail Server ........................................ 4-8
Using the Message List .................................................................. 4-9
Getting Started 1-3
Page 4

Composing and Sending an E-mail ................................................ 4-9
Managing Email Messages and Folders ..................................... 4-910
Chapter 5 More Programs .............................................................................. 5-1
ActiveSync/WMDC ............................................................................. 5-1
Synchronizing Data ........................................................................ 5-2
Office Mobile ...................................................................................... 5-2
Creating an office file .................................................................... 5-3
Opening an office file .................................................................... 5-3
Internet Explorer ................................................................................ 5-4
Browsing the Internet ........................................................................ 5-4
Windows Live Messenger ................................................................... 5-5
Setting up Windows Live ............................................................... 5-6
Signing in to Messenger ................................................................ 5-6
Windows Media Player ...................................................................... 5-6
Pictures & Videos ............................................................................... 5-8
Viewing Pictures and Videos ......................................................... 5-8
Camera ............................................................................................ 5-10
Taking Pictures ............................................................................ 5-10
Recording Video Clips .................................................................. 5-11
Geotagging ................................................................................ 5-152
Remote Desktop Mobile .................................................................. 5-15
Chapter 6 Getting Connected ......................................................................... 6-1
Types of Connections ......................................................................... 6-1
Using Cellular Connection (Select Model Only).................................. 6-1
Setting up a Cellular (HSDPA) Connection ..................................... 6-1
Setting up a Dial-up Connection .................................................... 6-2
Using Wireless Network ..................................................................... 6-3
Switching On or Off the Wi-Fi Radio .............................................. 6-3
Connecting to a Wireless Network ................................................ 6-3
Using the Bluetooth Function ............................................................ 6-5
Switching On or Off the Bluetooth Radio ...................................... 6-5
Sending Files via the Bluetooth ..................................................... 6-6
Getting Started 1-4
Page 5

Receiving Files via the Bluetooth ................................................. 6-67
Creating a Bluetooth Partnership ................................................ 6-77
Chapter 7 Troubleshooting and Maintenance ............................................... 7-1
Resetting Your Device ........................................................................ 7-1
Restoring Factory Default State ......................................................... 7-2
Troubleshooting ................................................................................. 7-3
Caring for Your Device ........................................................................ 7-4
Safety Precautions ............................................................................. 7-5
About Charging .............................................................................. 7-5
About the Charger ......................................................................... 7-6
About the Battery .......................................................................... 7-6
Notices ........................................................................................... 7-6
Chapter 8 GeoAssist Software ....................................................................... 8-1
Starting GeoAssist ............................................................................. 8-1
GeoAssist Settings .............................................................................. 8-1
GPS Tab .......................................................................................... 8-1
Satellite Detail Tab ......................................................................... 8-3
Use Mode Tab ................................................................................ 8-4
Log Tab ........................................................................................... 8-6
About Tab ....................................................................................... 8-9
Chapter 9 Recommended Settings ................................................................ 9-1
GPS Settings and Best Practices ......................................................... 9-1
Handheld Settings and Best Practices ................................................ 9-1
Chapter 10 Warranty Information ................................................................ 10-1
Warranty Terms ................................................................................ 10-1
Getting Started 1-5
Page 6
Chapter 1
Getting Started
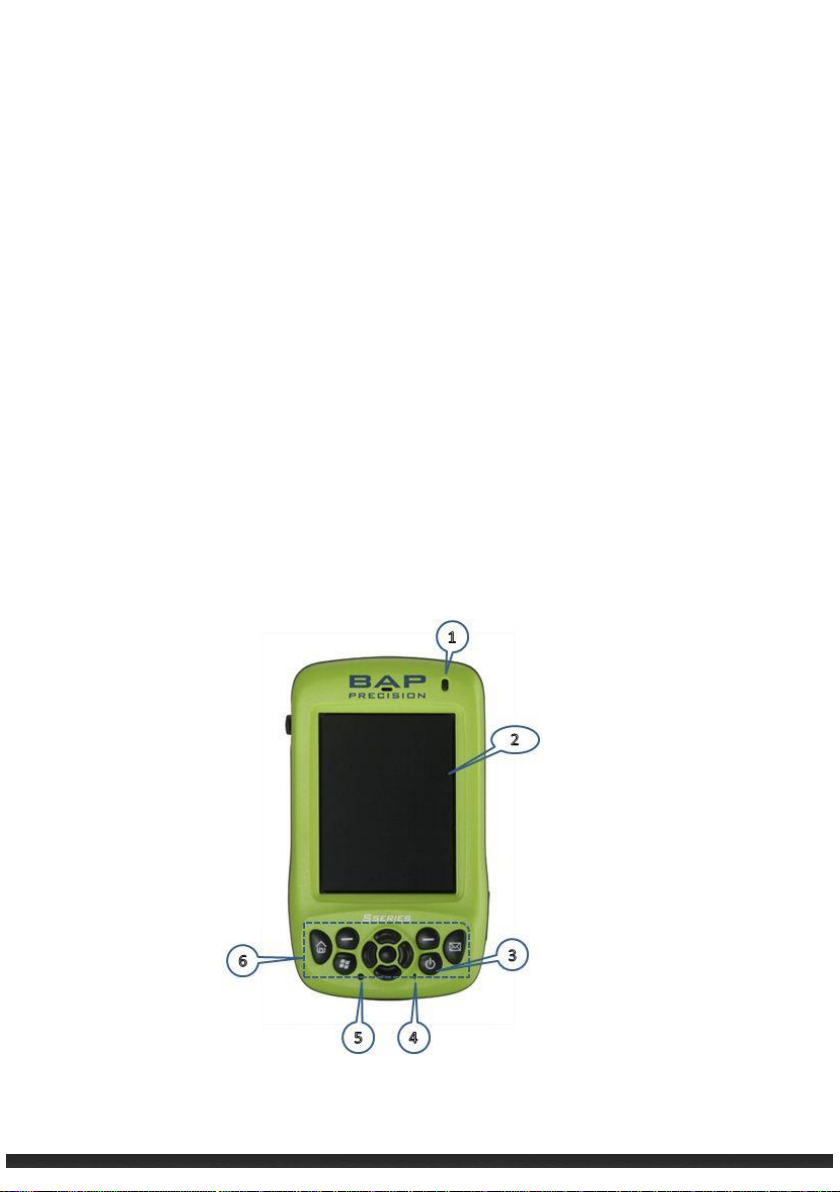
This chapter covers the hardware components of the device.
Identifying Hardware Components
Front
Getting Started 1-6
Page 7
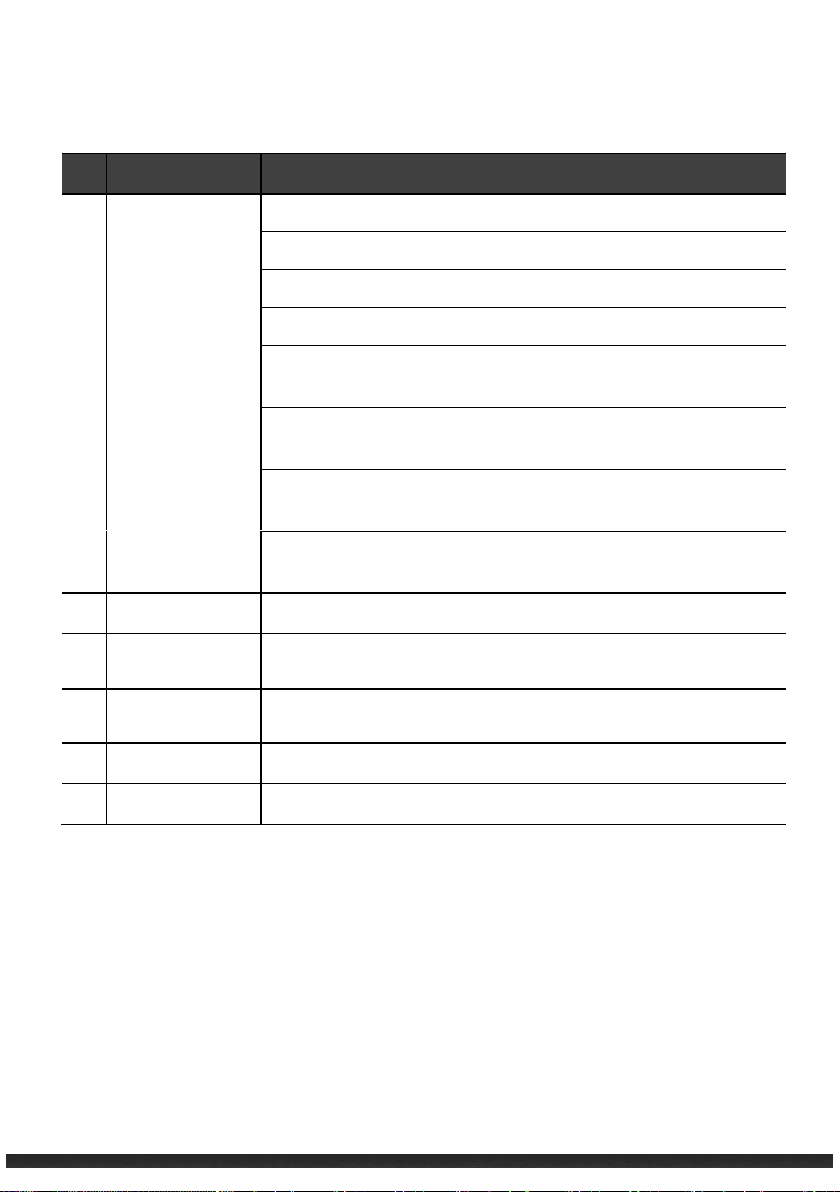
Ref
Component
Description
LED Indicator
Blinking Green displays charging battery
Solid Green displays full battery
Blinking Red displays low battery
Solid Red displays faulty battery
Alternating Green and Amber displays charging battery with
Windows notifications
Alternating Red and Amber displays low battery with Windows
notifications
Alternating Amber and Green displays full battery with
Windows notifications
Alternating Amber and Red displays faulty battery with
Windows notifications
Touch Screen
Video display that responds to finger taps and gestures
Power Button
Turns on or off your device.
Microphone
Voice recorder
Reset
Resets the device
Keypad
See “Keypad” section for details
Getting Started 1-7
Page 8
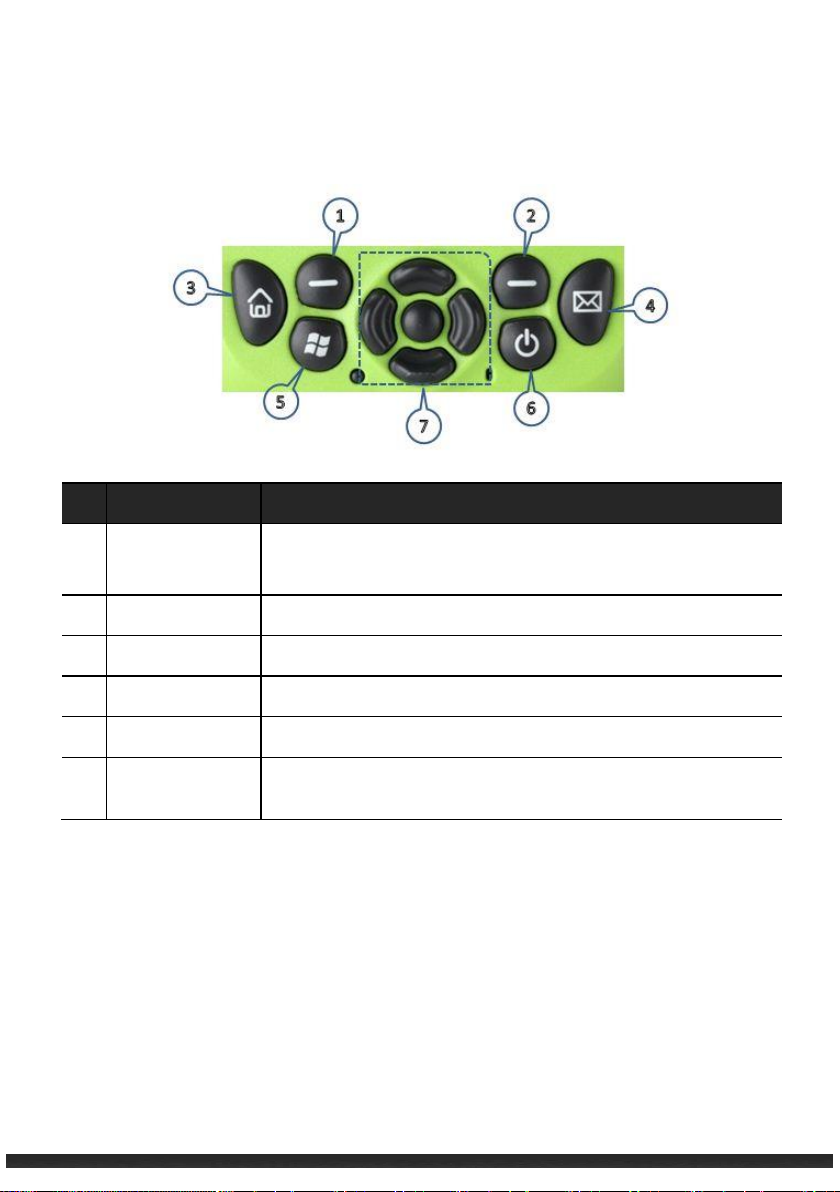
Ref
Component
Description
Left/Right Soft
Key
Selects screen commands.
Home
Returns to Home screen
Message
Composes and Sends messages
Start Menu
Opens Start Menu
Power Button
Turns device on and off
Navigation
Button
Navigates options in 4 directions. Center button selects
option.
Keypad
Getting Started 1-8
Page 9
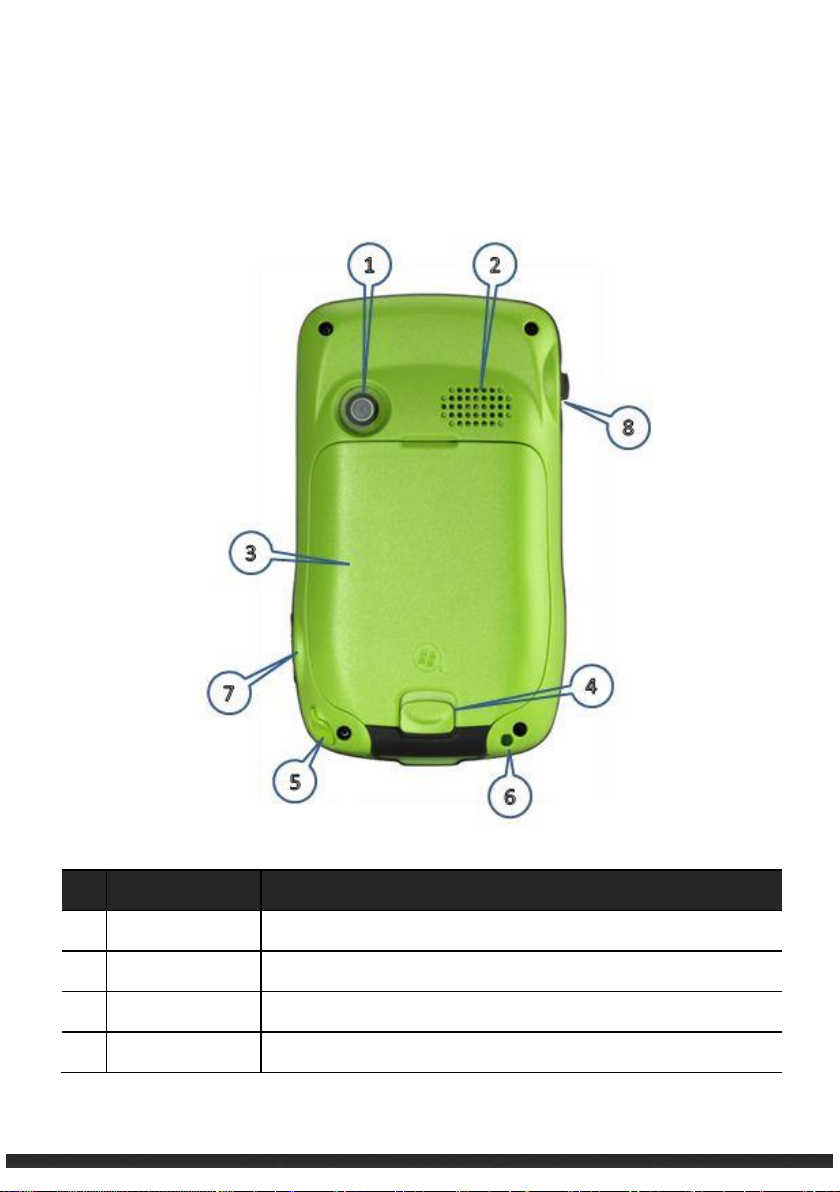
Ref
Component
Description
Camera
Takes pictures and records video
Speaker
Plays music, sounds and voices.
Battery Cover
Covers and protects battery
Release button
Detaches battery cover
Back /Sides
Getting Started 1-9
Page 10
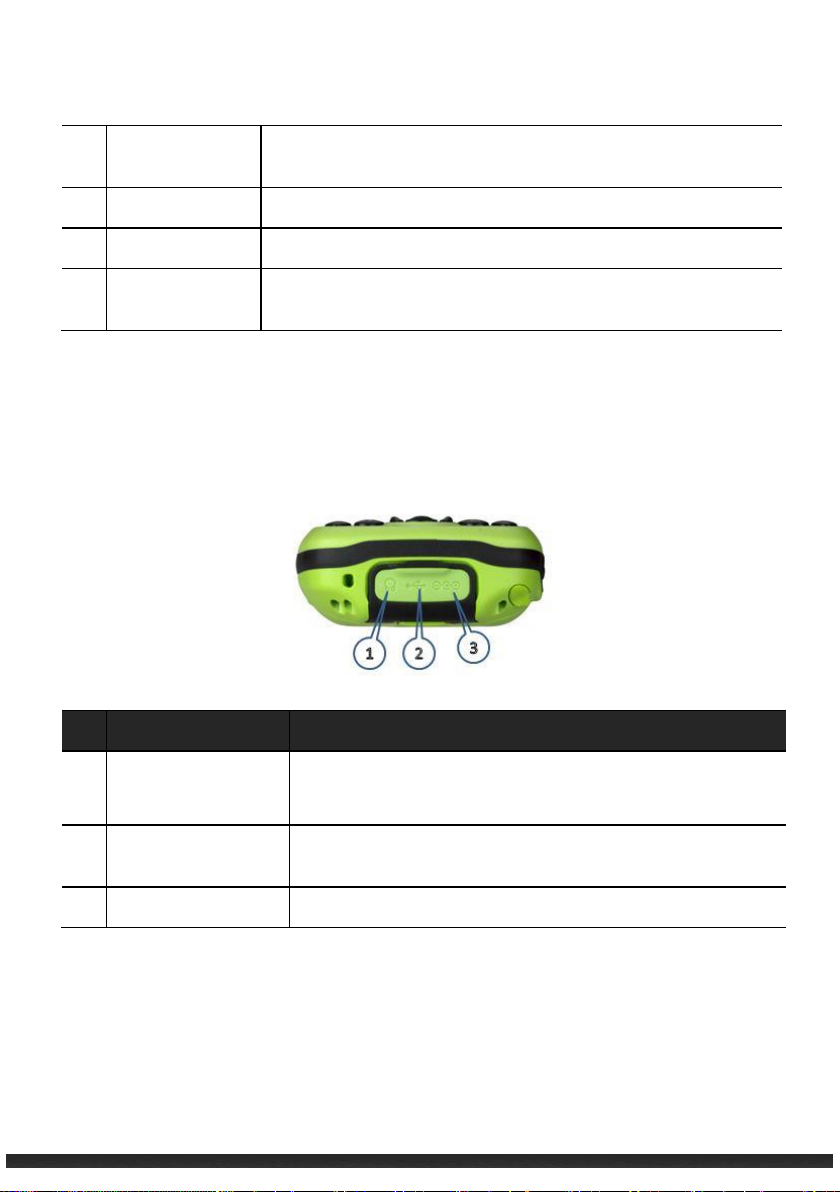
Stylus
Used to input information and select options on the touch
screen
Lanyard hole
Used to attach hand string
Camera button
Press to take a photo
External GPS
Antenna
Allows for use of optional external antenna. Antenna may be
placed on top of a vehicle/building to gain greater reception.
Ref
Component
Description
Headphone
Connector
Allows for stereo headphones connection
USB OTG (Host &
Client) Connector
Allows for USB connection
Power Connector
Allows for battery charging through an AC adapter
Bottom
Getting Started 1-10
Page 11
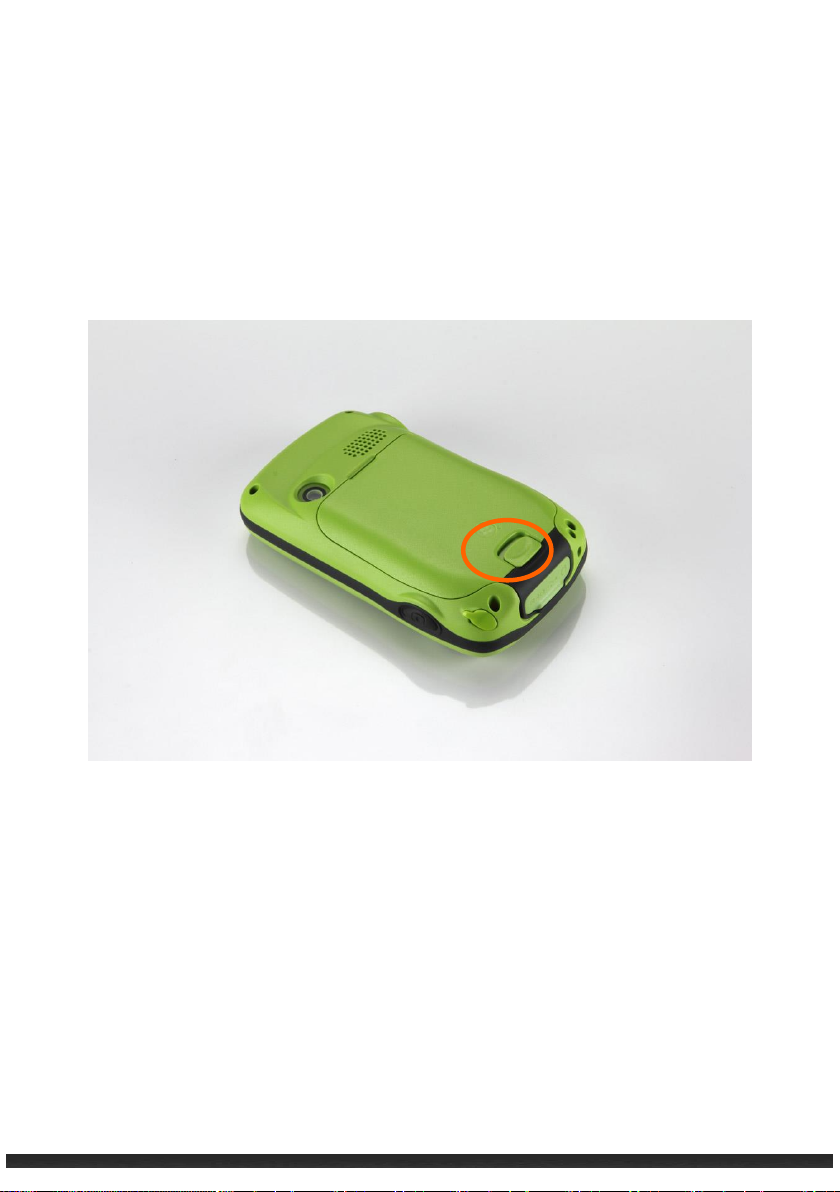
Getting Your Device Ready for Use
Installing the Battery and SIM Card (Select model only)
1. Detach the battery cover from the device.
Getting Started 1-11
Page 12
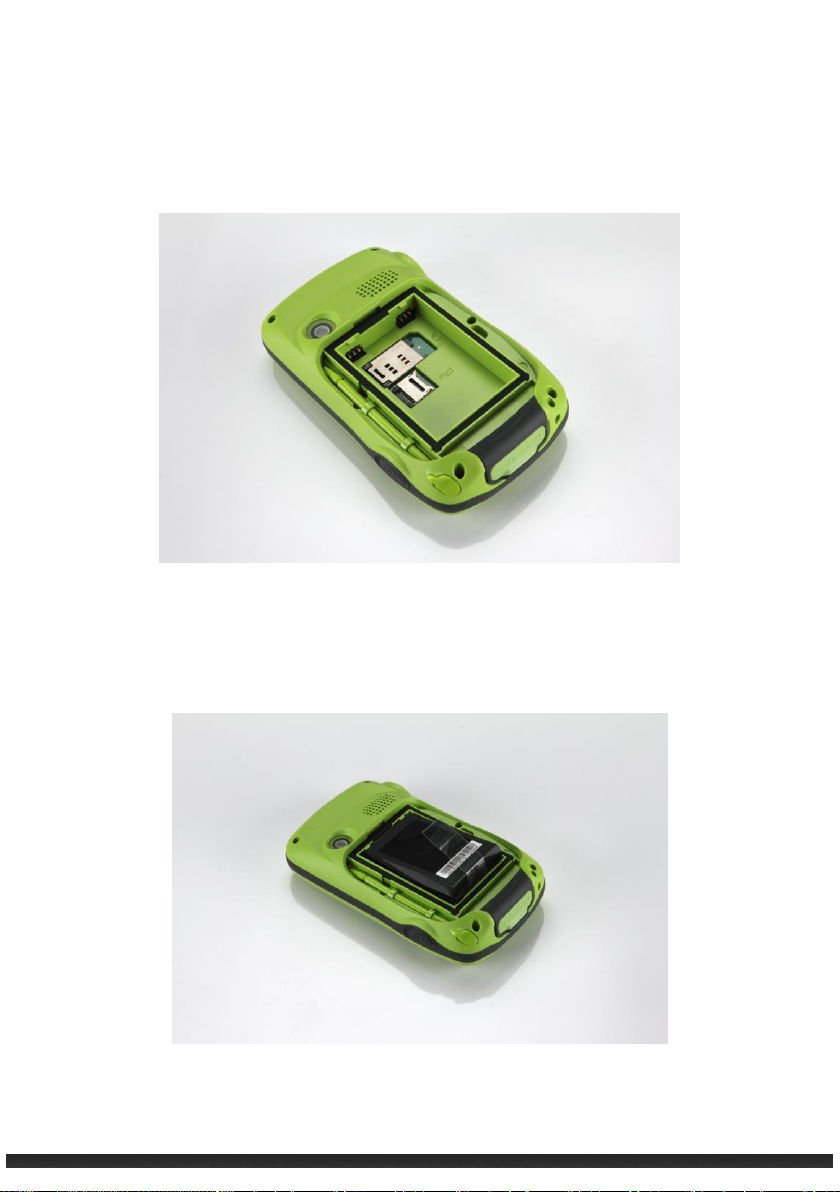
2. If your model has the 3.5G connection function, you need to install the SIM card
provided by your mobile operator and insert the card all the way into the slot then
push to lock.
NOTE:
To remove the SIM card, push to open then pull the card out of the slot.
3. To install the battery, attach the connector side of the battery to the unit then
push to engage the connector.
Getting Started 1-12
Page 13

4. Attach the battery cover to the device.
Connecting to AC Power and Charging the Battery
Note:
Charge the battery to full before using the device for the first time.
1. Connect the converter to the AC charger.
2. Connect the DC end of the AC adapter to your device and the other
end to an outlet.
3. The LED indicator will blink green when the battery is charging.
Do not disconnect your device from AC power until the battery is fully
charged. This may take a couple of hours.
Note:
For optimal lithium battery performance, adhere to the following:
Only use the included AC adapter.
The lithium battery does NOT need to be fully discharged before next charging.
Do NOT charge the battery in high temperatures (i.e. direct sunlight)
The battery MUST be fully charged at least once every two weeks even if the device
is not in use. Over-discharge of the battery creates negative battery performance.
The battery may also be charged if the device is connected via USB to a computer.
Performing the Initial Startup
When the device is turned on for the first time, an initial startup process will begin.
1. Connect the device to AC power or make sure the battery has a full charge.
2. Turn on the device by pressing the Power button.
3. Select the language you prefer to use.
4. Follow the Setup Wizard’s on screen instructions.
Getting Started 1-13
Page 14

5. Use the following steps for devices with 3.5G connection function: (Select model
only)
If a SIM card has been inserted and the 3.5G network operator (or you) has set the
PIN, you will be prompted to enter the PIN.
6. Once Setup is complete, the Home screen will appear. The device is ready for use.
Synchronizing with Your Computer
Your device can connect and synchronize data with a Windows-based computer
through ActiveSync and Windows Mobile Device Center (WMDC). ActiveSync is
compatible with Windows XP. WMDC is only compatible with Windows Vista or
Windows 7.
ActiveSync and WMDC act as gateways between your device and your computer. They
allow for transferring Outlook e-mail, appointments, contacts, and tasks, and media
such as pictures, music, and videos. Also, the Explore feature in either program can
move files or programs from your computer to your device.
Installing ActiveSync or WMDC
For Windows XP, download and install ActiveSync.
For Windows Vista or Windows 7, download and install Windows Mobile Device Center.
(Visit the Microsoft website to download the program and to obtain operating
instructions. http://www.microsoft.com)
NOTE:
Before installation, make sure Microsoft Outlook is installed on your computer.
Install ActiveSync or Windows Mobile Device Center BEFORE connecting your
device.
Getting Started 1-14
Page 15
ActiveSync connection problems may occur in some cases. Likely causes include
interoperability with firewall applications or network management applications.
For troubleshooting information, visit the Microsoft web site.
http://www.microsoft.com
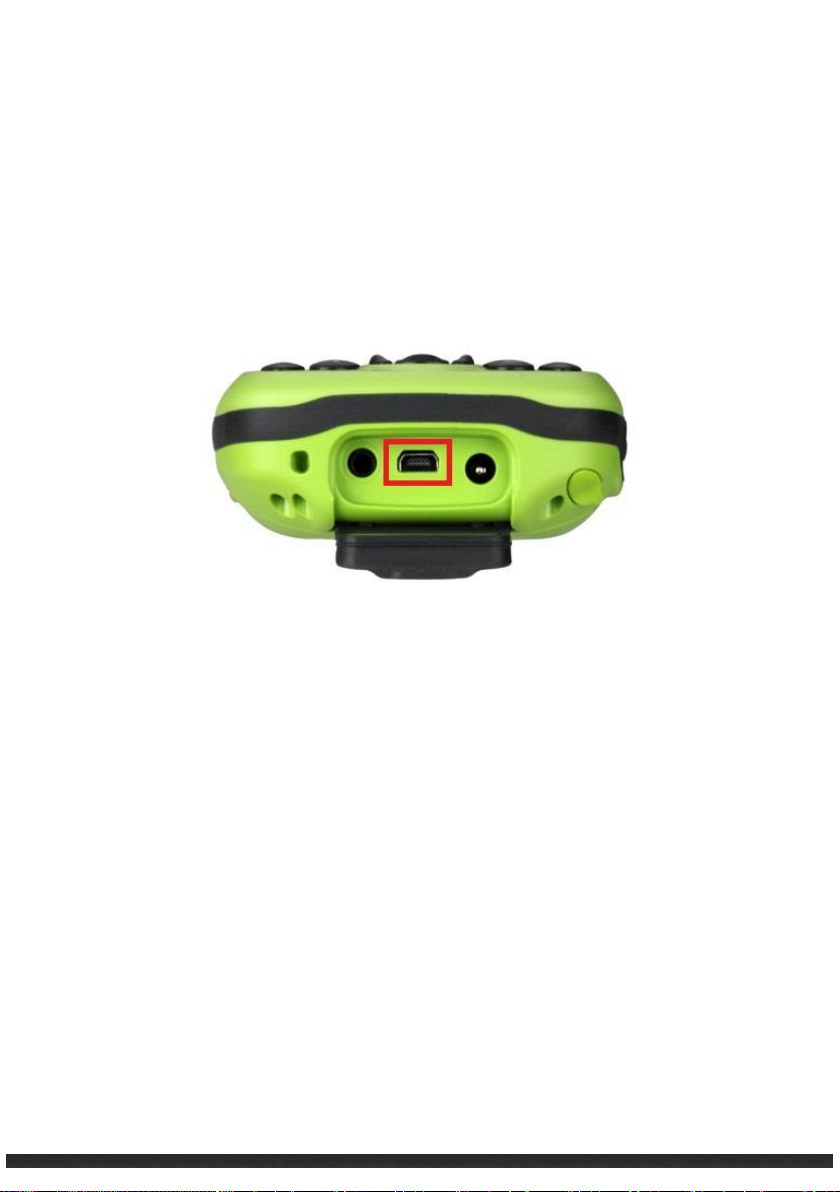
After software installation is complete, connect your device to your computer via the
USB cable. The device is ready to be synchronized.
Using Options
Using micro SD Card
The device supports micro Secure Digital (micro SD). Use the following steps to insert a
micro SD card:
1. Detach the battery cover from the device.
2. Remove the battery.
3. Insert the card into the slot.
Getting Started 1-15
Page 16
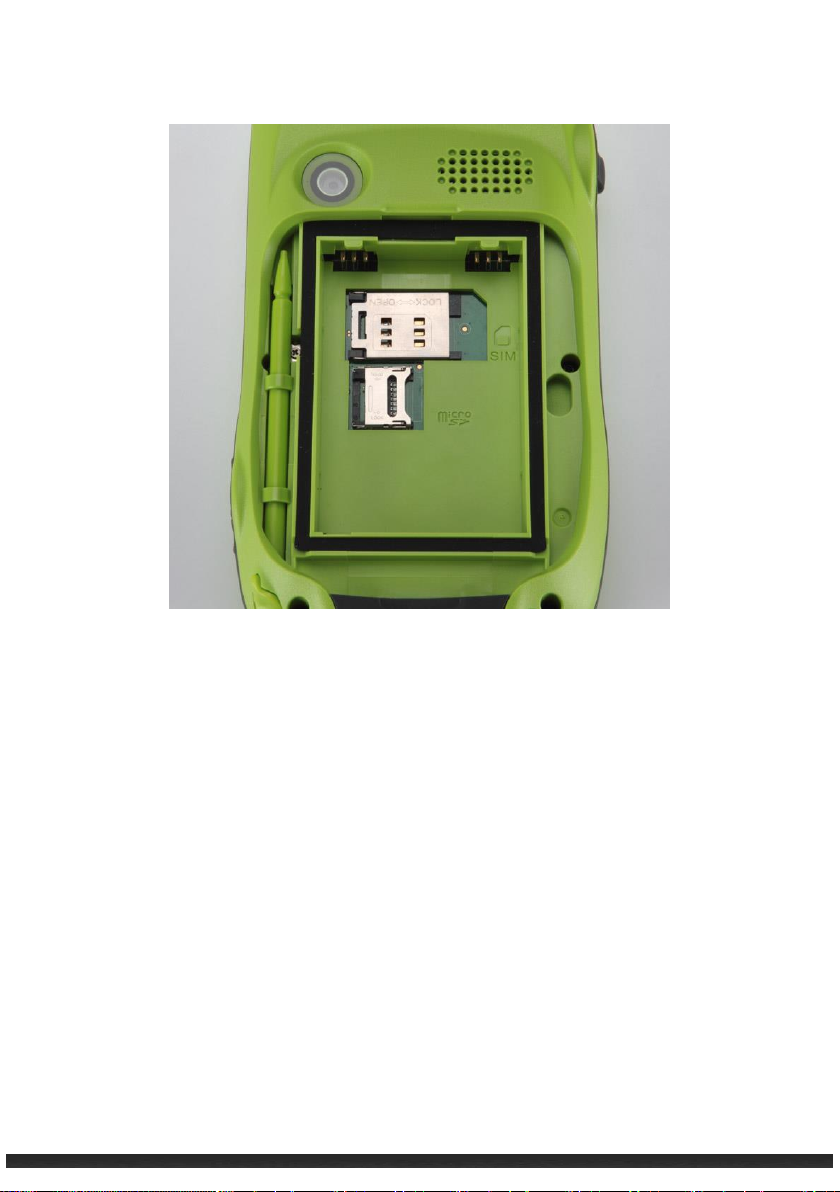
4. Install the battery before attach the battery cover to the device.
NOTE:
Keep slot free of debris.
Store micro SD card in a protected box to avoid heat, dust, and humidity.
Getting Started 1-16
Page 17

Chapter 2
Basic Skills
This chapter covers the basic operations of the device.
Power Saving and Turning Off
Backlight Off
The touch screen’s backlight dims after inactivity. By default, the touch screen will dim
after 30 seconds of inactivity on battery power. The touch screen will dim after 1
minute of inactivity while connected on AC power.
To restore the backlight, tap the touch screen or press any button.
Suspend Mode
The device sets itself into suspend mode after inactivity. By default, the device will set
itself into suspend mode after 3 minutes of inactivity on battery power. The device will
set itself into suspend mode after 5 minutes while connected on AC power.
To manually set the device into suspend mode, briefly press the power button.
To resume operation, press the power button.
Turning Off
To turn off the device, hold down the power button. The device will play a 3 second
countdown notification and turn off.
Basic Skills 2-1
Page 18
The stylus is stored in the side slot. Remove it for
use.
Tap
To open items and select options, touch the
screen once with the stylus.
Drag
To drag text and images across the screen,
tap, hold, and drag text or image. Lists and
multiple items can also be selected and
dragged.
Tap and hold
Tap and hold the stylus on an item to view a
shortcut menu of available options. From the
shortcut menu, select preferred option.
Navigating on the Screen
Stylus
Use the stylus to navigate the touch screen.
Navigation Button
The navigation button can also be used to navigate the screen.
Basic Skills 2-2
Page 19
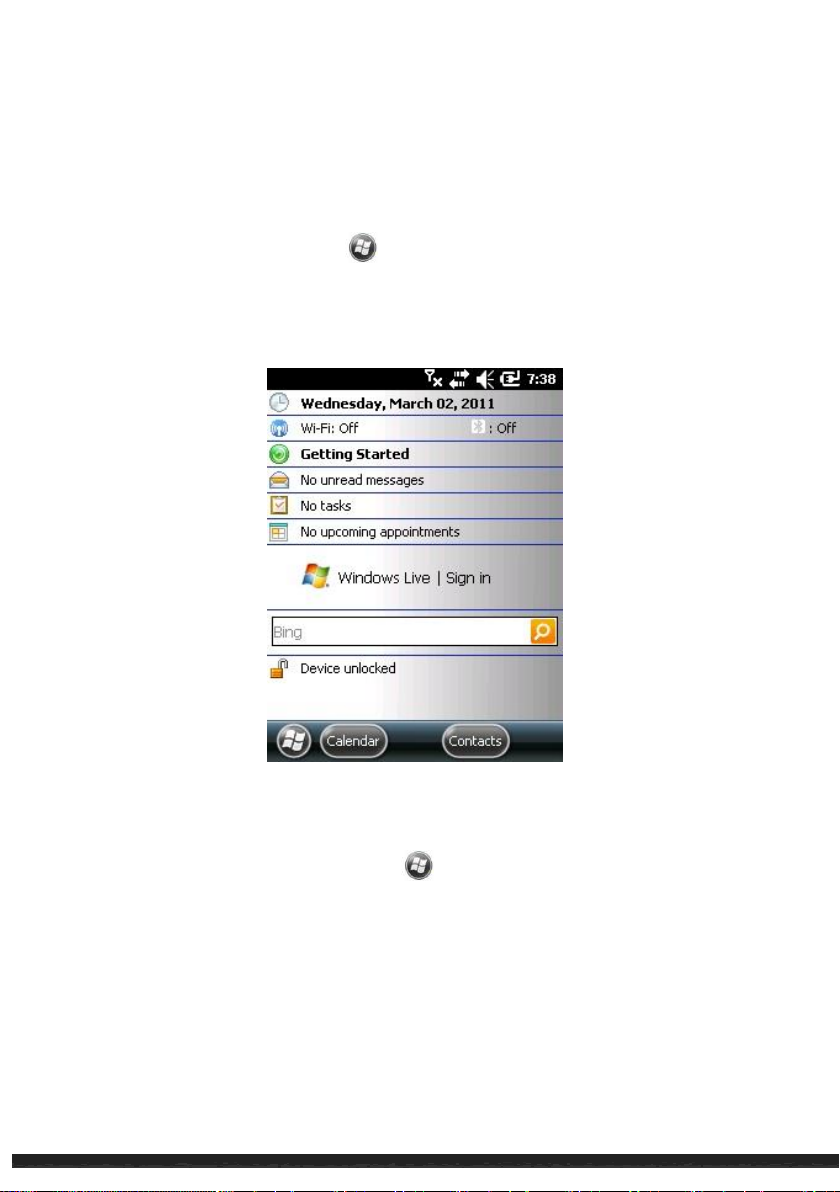
When the device is turned on, the default screen is the Home screen. The Home
screen can be accessed by tapping and then Home.
The Home screen displays upcoming appointments, active tasks, e-mail messages and
notifications, and more. If a section of the Home screen is tapped, the associated
program will open.
Home Screen
Landscape View
To view the device in landscape view, tap Settings System Screen
General Landscape or Portrait.
Basic Skills 2-3
Page 20
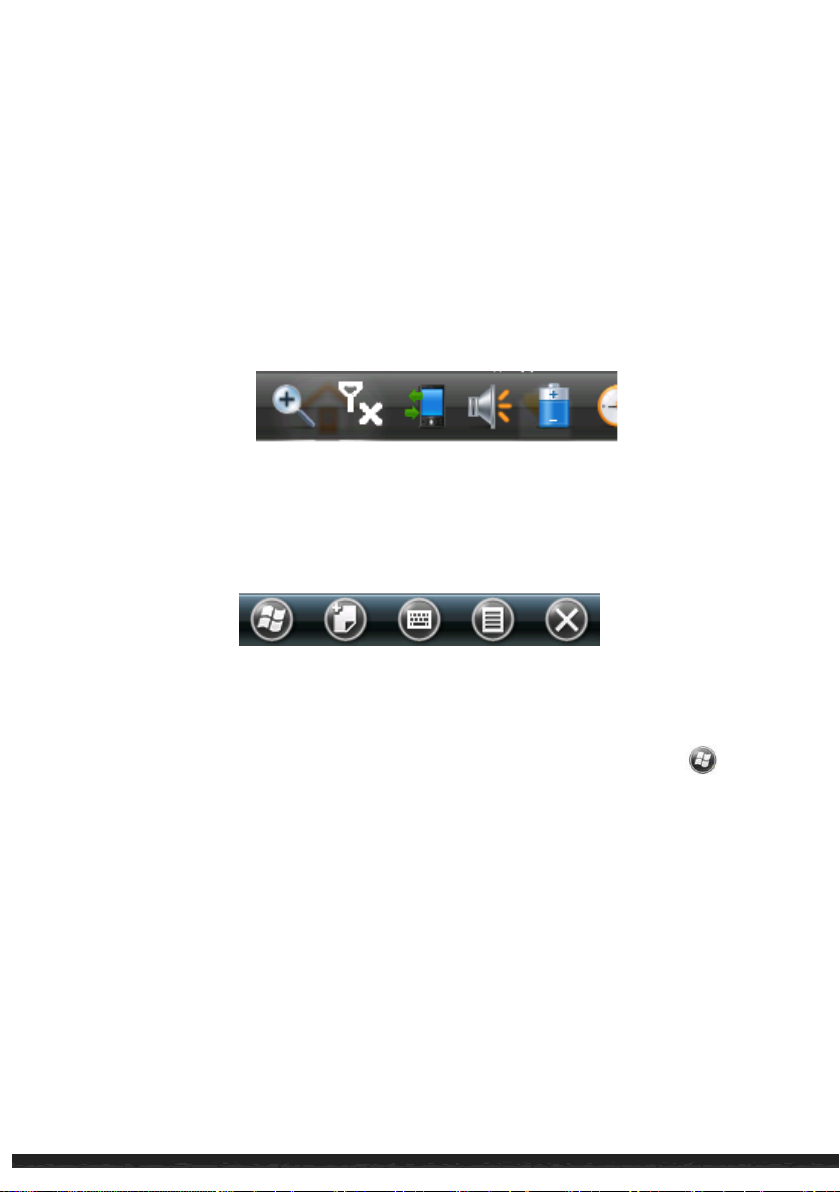
Navigation Bar and Toolbar
The navigation bar is located at the top of the screen. It displays active programs and
tools such as, volume, battery, time, connectivity, and more.
Tap the navigation bar to set up related items.
The navigation bar:
The toolbar is located at the bottom of the screen. The toolbar includes options such as
an input panel and the Menu button.
An example of the toolbar:
Programs
To switch from one program to another without closing other programs, tap
open the Start menu. All available programs can be accessed through the Start menu.
to
Notifications
The device has a variety of reminder notifications, such as Calendar appointments,
Tasks, alarm clock, etc. Notifications types include the following:
A screen message
A sound, which can be changed or specified.
Basic Skills 2-4
Page 21

The notification indicator flashes in amber.
To specify and choose reminder types and sounds, tap Settings Sounds
& Notifications.
Entering Information
There are several options for inputting new information. Options include the following:
Enter text in the Input panel. Text can be entered by using the on-screen keyboard
or other input methods.
Write directly on the screen.
Draw pictures, diagrams, charts, etc. on the screen.
Record a message using the microphone.
Entering Text Using the Input Panel
Information can be entered by using the Input panel. Text can be entered by using
the on-screen keyboard or by using the handwriting recognizer.
To show or hide the Input panel, tap the . The soft keyboard appears by default.
To change input modes, tap and hold and select preferred mode from the popup
menu.
When using the Input panel, the device auto-detects words that are being typed.
Tap on the displayed word to insert it. The device will learn to anticipate more words
through usage.
Basic Skills 2-5
Page 22
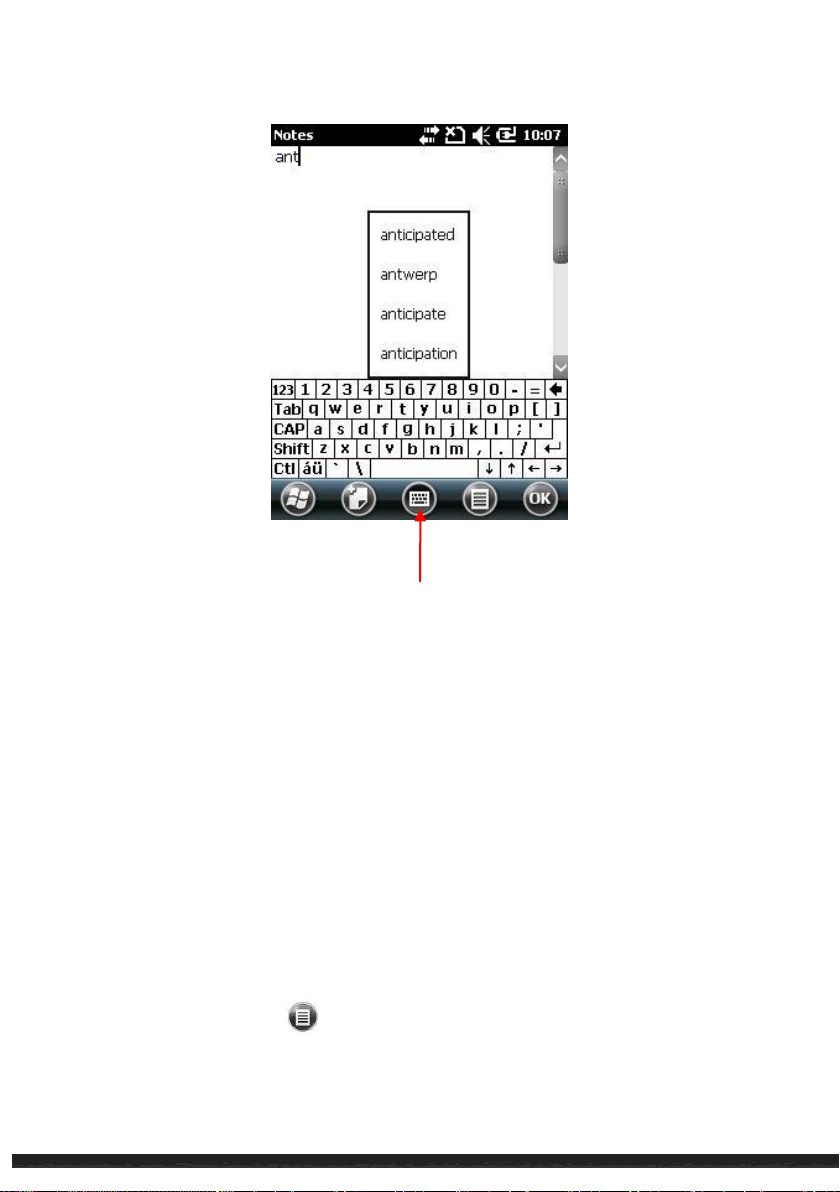
Input Panel
Recognizer
Texts can be entered using the stylus with the recognizer.
When a letter is written into the recognizer, it is converted into typed text onto the
screen. Specific instructions on using the recognizer can be accessed by tapping
the question mark located next to the writing area.
Writing on the Screen
In programs that accept writing, such as Notes, a stylus can be used to write onto
the screen. Writing can be edited and formatted into text later.
To write on the screen, tap Draw to switch to drawing mode.
Basic Skills 2-6
Page 23
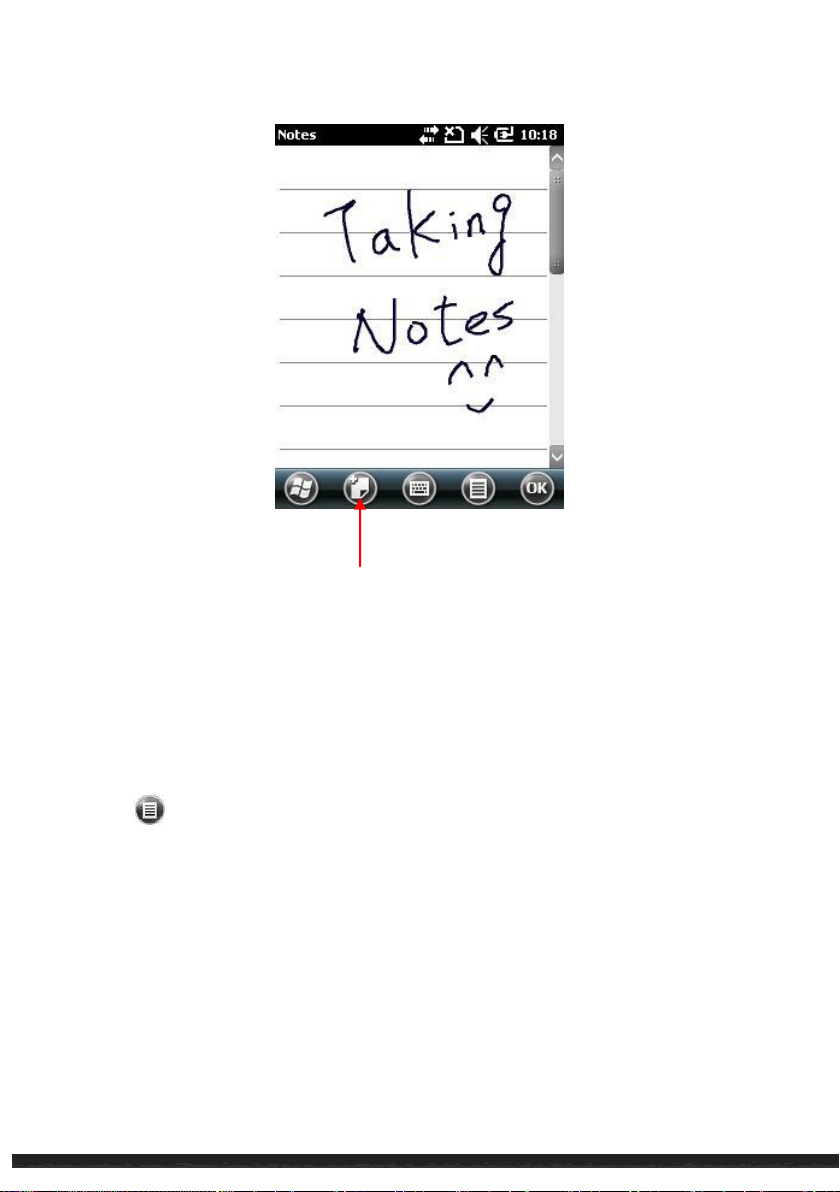
New note
Drawing on the Screen
Pictures, diagrams, charts, etc. can be drawn onto the screen in the same manner
as writing.
1. Tap Draw to enter drawing mode.
2. To draw, cross 3 ruled lines on the first stroke. A drawing box appears.
3. Subsequent strokes in or touching the drawing box become part of the drawing.
Drawings that do not cross three ruled lines will be treated as writing.
Basic Skills 2-7
Page 24
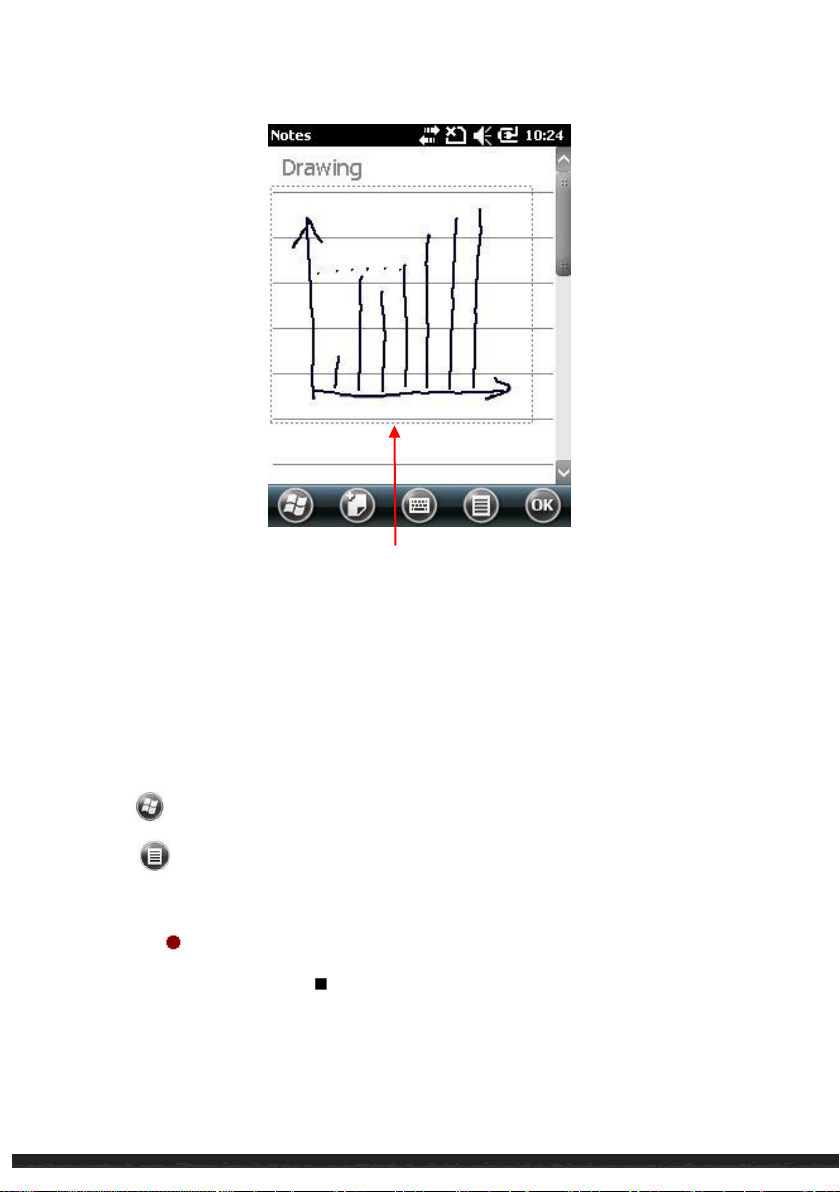
Drawing Box
Recording a Message
The device can record messages for reminders, phone numbers, thoughts, etc. In
the Notes program, a stand-alone recording can be created with the note.
To create a recording:
1. Tap
2. Tap View Recording Toolbar to view the Recording toolbar.
3. Place the device’s microphone near your mouth or the source of the sound.
4. Tap the Record button on the Recording toolbar to begin recording.
5. To stop recording, tap the Stop button on the Recording toolbar. The new
recording will appear in the note list or as an embedded icon.
To play a recording, select the recording in the list or tap its icon in the note.
Notes to open the program.
Basic Skills 2-8
Page 25
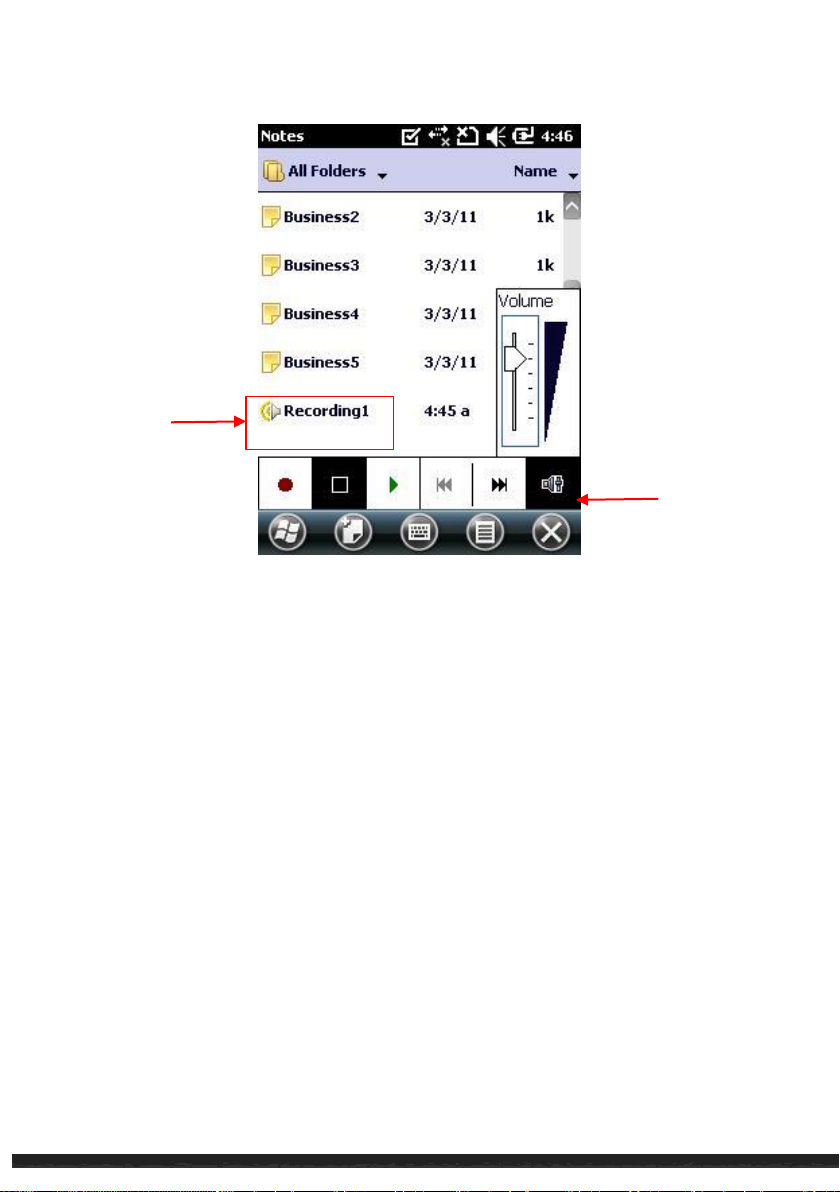
Recording file
Volume Control
Securing Your Device
Locking Your Device
The device can be locked when not in usage. Locking the device prevents accidental
operation of the touchpad or keypad.
To lock the device: tap Device unlocked on the Home screen.
To unlock the device: tap Unlock Unlock.
Basic Skills 2-9
Page 26
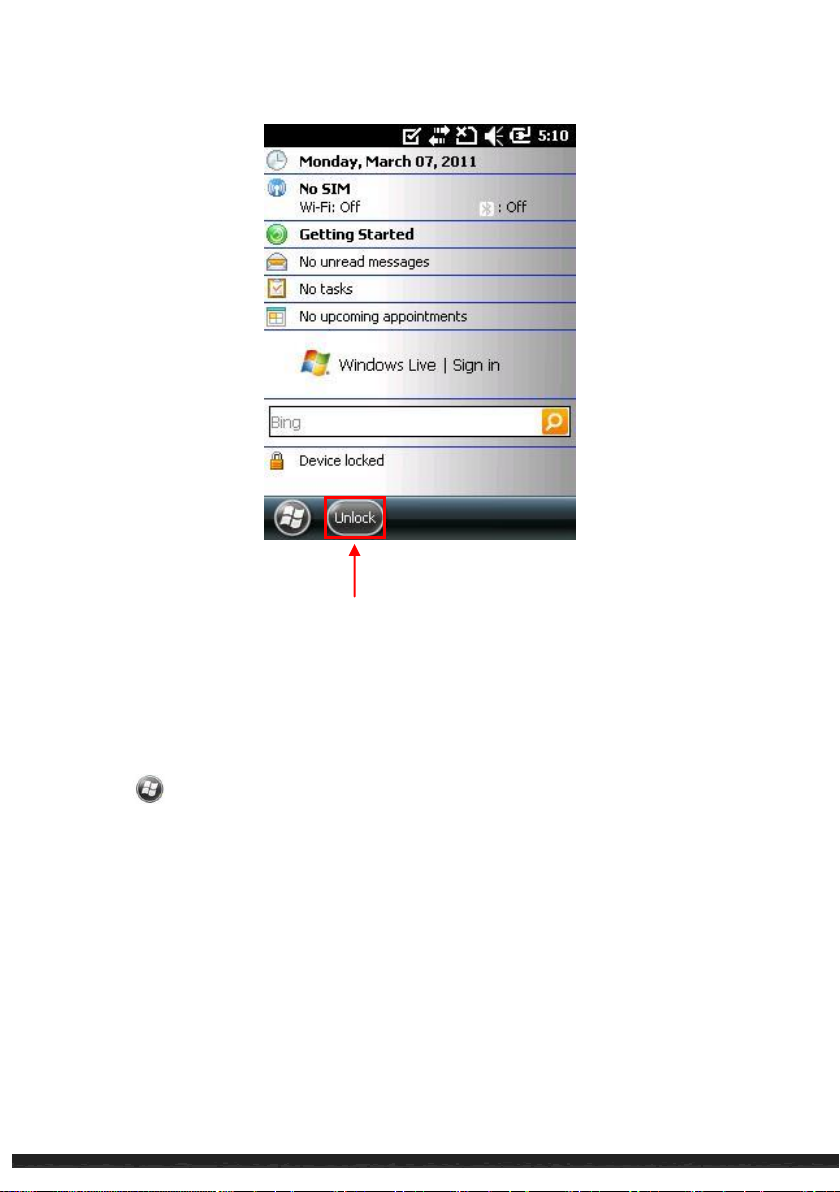
Unlock Device
Securing Your Device with a Password
To keep data secure, a password can be assigned to be inputted each time the device is
turned on.
1. Tap
2. Tap to select Prompt if phone unused for. In the box to the right, select a desired
period of time.
3. Select the password type.
4. Enter desired password. Confirm the password.
5. Tap ok to save the settings.
The next time the device is turned on, a password will be needed to login. The
Settings Lock.
Basic Skills 2-10
Page 27

password also needs to be entered on the computer for an ActiveSync connection.
NOTE:
If the password is forgotten, the memory must be cleared before accessing the devi
Basic Skills 2-11
Page 28

Page 29

Chapter 3
Managing Your Device
This chapter describes how to manage power, settings, data and programs.
Managing Power
A fully charged battery should supply power for approximately 8 hours. Operation time
will vary depending on usage of the device. Continuous multimedia operation or
micro-SD card operation will decrease the battery’s power supply.
Low Battery Signals and Actions
NOTE:
The battery should be charged for at least 30 minutes if the device displays a warning of
low power. Failure to do so may result in insufficient battery power for operation.
Battery power can be monitored by tapping Settings System Power. The
available remaining power is displayed on a status bar in the Power control panel.
When the battery is low, a warning message will pop up. As a precaution, all data
should be saved and the battery should be recharged immediately via AC power or USB
power. Failure to do so may result in data loss.
Power-Saving Tips
The following describes how to maximize the battery power and operation time.
Managing Your Device 3-1
Page 30

Items
Description
Bluetooth
To set up or change the Bluetooth connection.
Set the device in suspended mode when not in use.
By default, the screen backlight will automatically dim and the device will go into
suspended mode when it has been idle for a period of time. The idle time
required before the device goes into suspended mode can be adjusted by tapping
Settings System Power Advanced.
The device can also be set into suspended mode by pressing the power button.
Disable unneeded functions and features.
Decrease the volume.
Disable unused or unnecessary sounds and lights. Keep only the most
necessary notifications. These settings can be adjusted by tapping
Settings Sounds & Notifications.
Avoid power-consuming operations such as:
Using a modem or other peripheral
Multimedia playback and recording
Using or monitoring wireless network signals
Customizing Your Device
NOTE:
Incorrect settings may cause malfunction. Care should be taken when adjusting
settings.
You can customize the settings of the device to your own preferences. Tap
Settings. The items you can customize are described as follows:
Managing Your Device 3-2
Page 31

Clock & Alarms
To change the time, date, and alarms.
Home
To select the information, theme, and background to be displayed
on the Home screen.
Lock
To set a security password.
Sounds &
Notifications
To change the settings for the system’s sounds, volume, and
notifications.
Connections
Connections
To set up or change connection information.
Domain Enroll
To connect the device with company resources. An enrollment
password should be provided by the company’s system
administrator.
Beam mode
To enable to receive incoming files.
USB to PC
To adjust settings for the type of USB connection and to enable
advanced network functionality.
Wi-Fi
To configure the wireless network module.
Wireless Manager
To change the Wi-Fi and Bluetooth radio status.
Personal
Buttons
To assign hardware buttons to specific programs and to adjust
sensitivity levels of the buttons, i.e. repetition rate of scroll.
Owner Information
To enter personal information.
Managing Your Device 3-3
Page 32

System
About
To show the hardware information and to define the device name
for identifying itself to other computers.
Backlight
To adjust the brightness level and power saving options.
Certificates
To establish personal identification or the identification of other
computers. Establishing a personal identification of the device
and other computers prevents unauthorized users from accessing
the device and information on the device.
Customer Feedback
To send personal feedback to Microsoft regarding the Windows
Mobile software.
Encryption
To encrypt files on the storage card.
Error Reporting
To enable or disable error reporting to Windows Mobile technical
support group.
External GPS
To configure the GPS hardware settings.
Managed Programs
To show the installation history of managed programs.
Memory
To view the system memory or the memory of any installed
storage card and to manually stop a program if it becomes
unstable.
Managing Your Device 3-4
Page 33

Power
To show the remaining battery power and to set battery power
settings.
Regional Settings
To specify the region and the local number, currency, time, and
date.
Remove Programs
To remove programs.
Screen
To set the orientation of the screen to portrait or landscape.
To adjust the touch screen for accurate screen taps.
To adjust the text size.
System Information
To view system information.
Task Manager
To view or perform task management of programs.
Managing Your Device 3-5
Page 34

Searching and Organizing Information
The Search feature on the device helps quickly locate information.
To search for a file, tap
and tap Search to start the search.
File Explorer can also be used to find files on the device and to organize these files into
folders. Tap
NOTE:
Files can be moved in File Explorer by tapping and holding the item. Tap Cut or Copy on
the shortcut menu, browse to the new location, and then tap Paste.
File Explorer.
Search Phone. Enter the file name, select a data type,
Managing Your Device 3-6
Page 35

Chapter 4
Microsoft Pocket
Outlook
Microsoft Pocket Outlook includes Calendar, Contacts, Tasks, Notes, and Messaging.
These programs can be used individually or together.
NOTE:
For detailed information on using Microsoft programs, tap
Help.
Calendar: Scheduling Appointments
and Meetings
Use Calendar to schedule appointments, including meetings and other events.
Appointments can be viewed as Agenda, Day, Week, Month, or Year. Notifications can be
set as reminders for appointments. Appointments can also be displayed on the Home
screen.
Tap Calendar to access the program.
Microsoft Pocket Outlook 4-1
Page 36
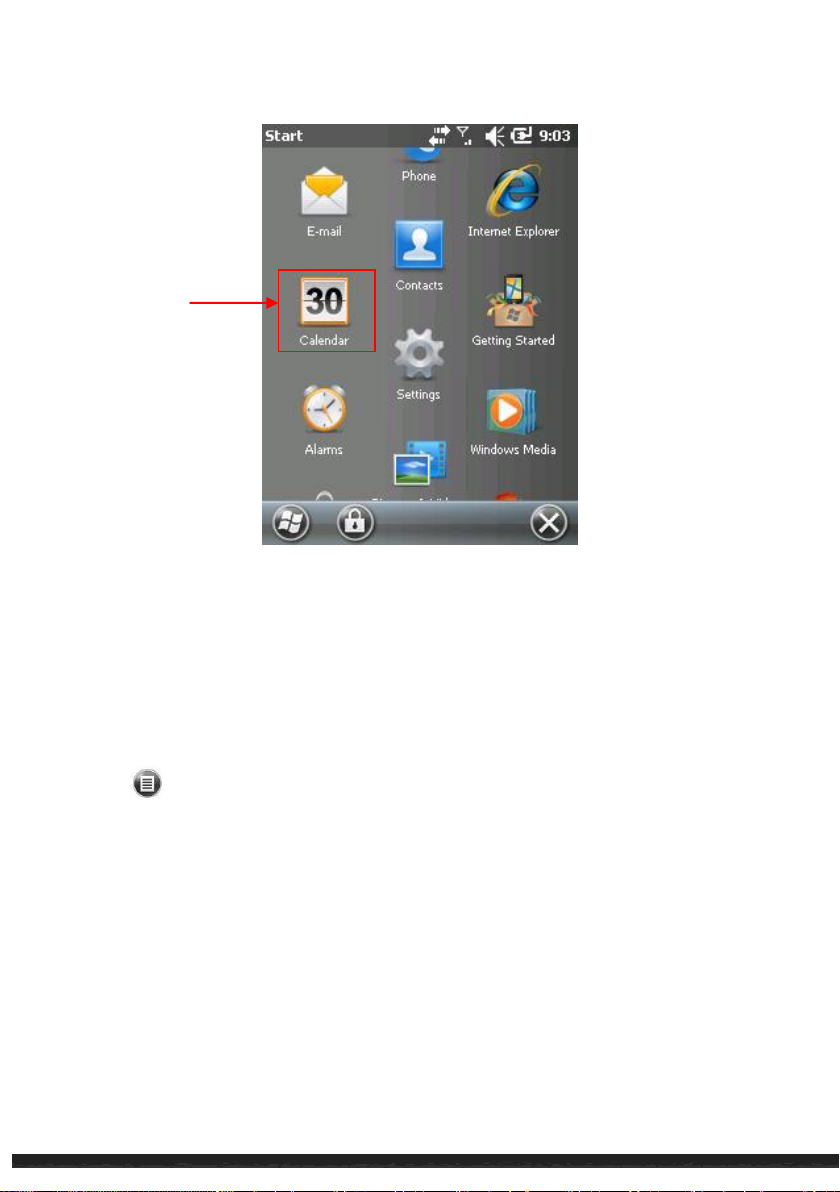
1. In Day or Week view, tap the desired date and time for the appointment.
2. Tap New Appointment.
3. Using the Input panel, tap first to select the field, and then enter a description
and a location.
4. If needed, tap the date and time to change them.
5. Enter other desired information. You will need to hide the Input panel to see all
available fields.
6. Tap ok to save and return to Calendar.
Tap to access
Creating an Appointment
Microsoft Pocket Outlook 4-2
Page 37
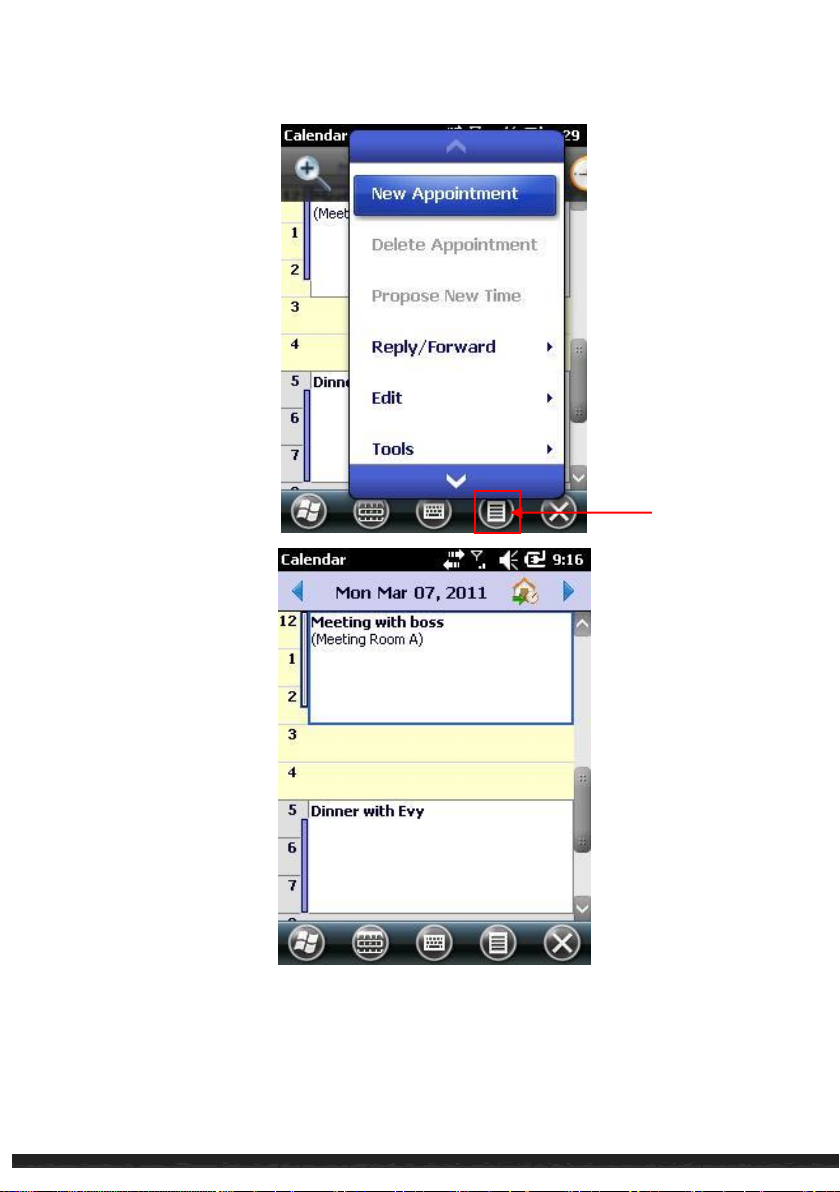
Tap to add new
appointment
Microsoft Pocket Outlook 4-3
Page 38
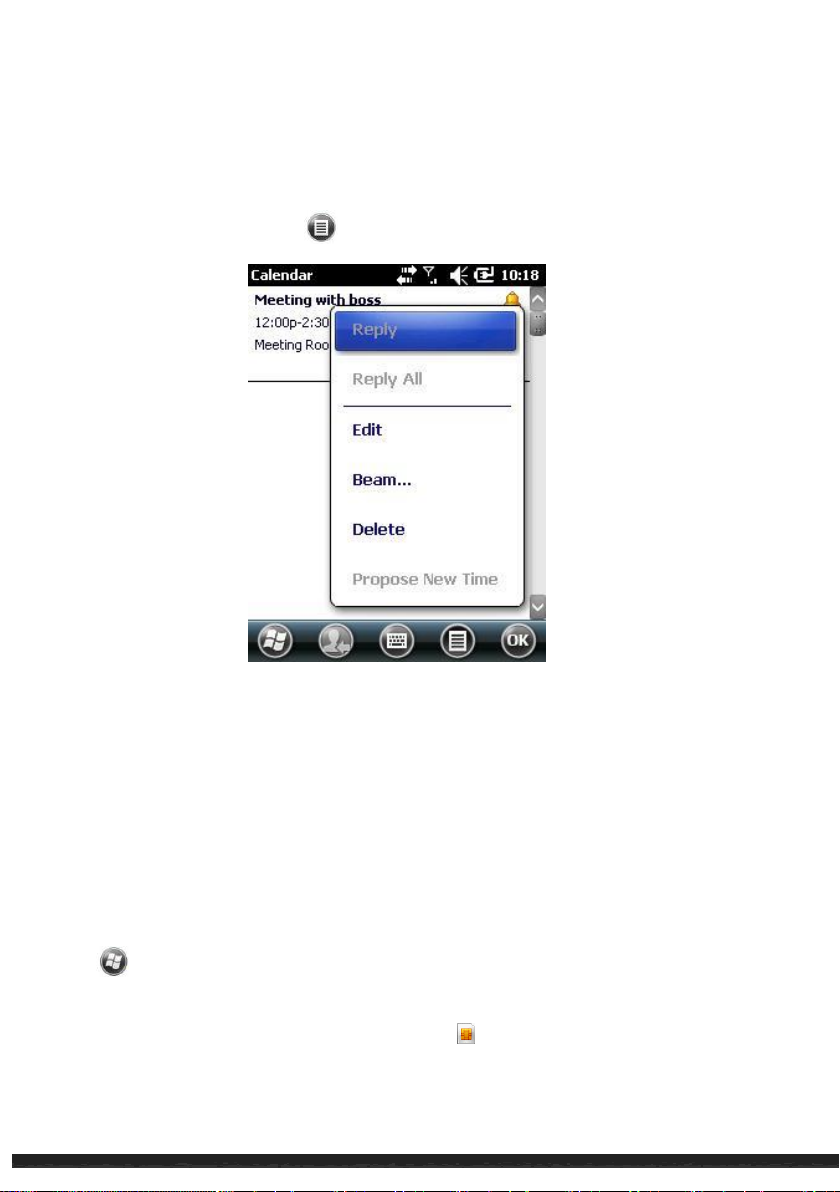
When you tap an appointment in Calendar, a summary screen is displayed. To
change the appointment, tap Edit.
Contacts maintains a list of friends and colleagues.
Tap
Contacts for access.
For model with the 3.5G connection function, contacts stored in the SIM card also
appear in the list. They are indicated by the icon .
Using the Calendar Summary Screen
Contacts: Tracking Friends and
Colleagues
Microsoft Pocket Outlook 4-4
Page 39

1. In Contacts, tap .
2. For model with the 3.5G connection function: Outlook or SIM contact will be
ask to be selected.
3. Using the Input panel, enter a contact’s information. Scroll to view all
available fields.
4. Tap ok to save and return to the contact list.
When a contact in the contact list is tapped, a summary screen is displayed. To
change the contact information, tap .
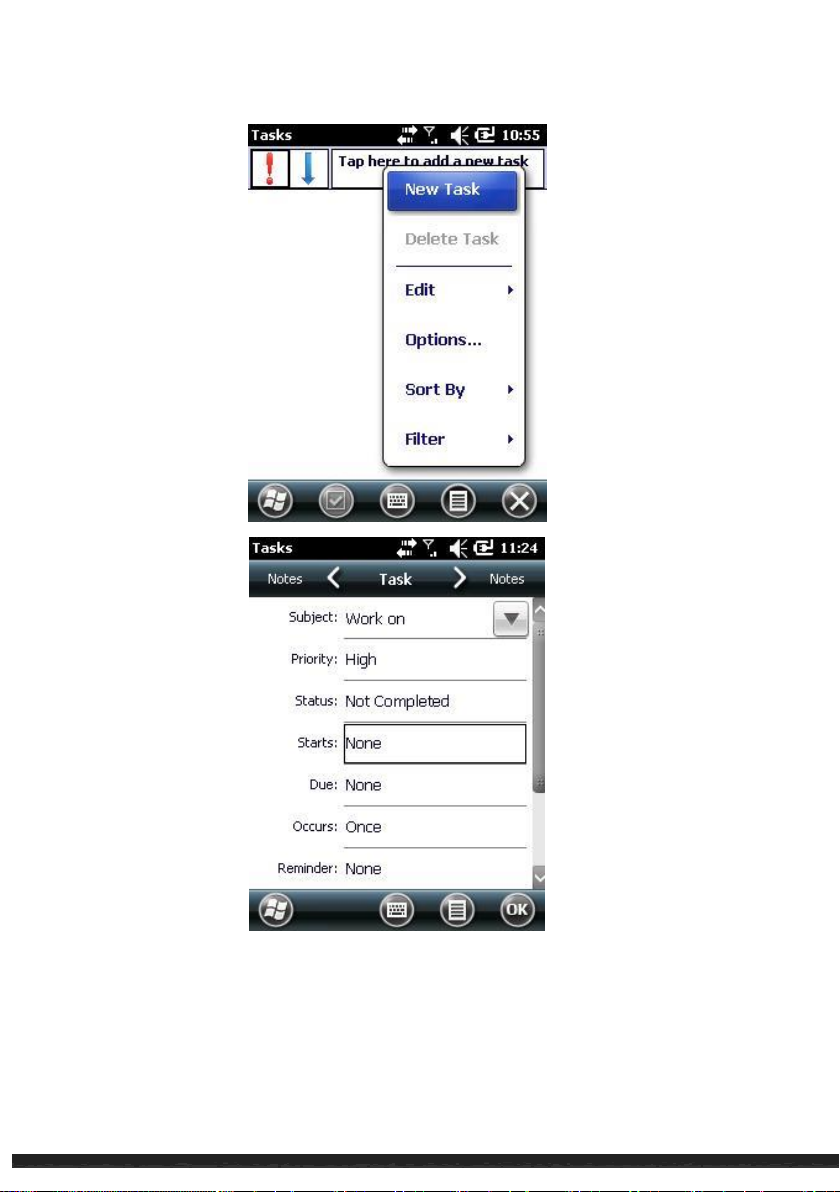
Use Tasks to create a To-Do list. Tap
Tasks to access the program.
1. In Tasks, tap New Task.
2. Using the Input panel, enter a description.
3. Enter a start date and due date, or enter other information by first tapping
the field. Hide the Input Panel to view all available fields.
4. Tap ok to save and return to the task list.
Creating a Contact
Using the Contacts Summary Screen
Tasks: Keeping a To Do List
Creating a Task
Microsoft Pocket Outlook 4-5
Page 40
Microsoft Pocket Outlook 4-6
Page 41
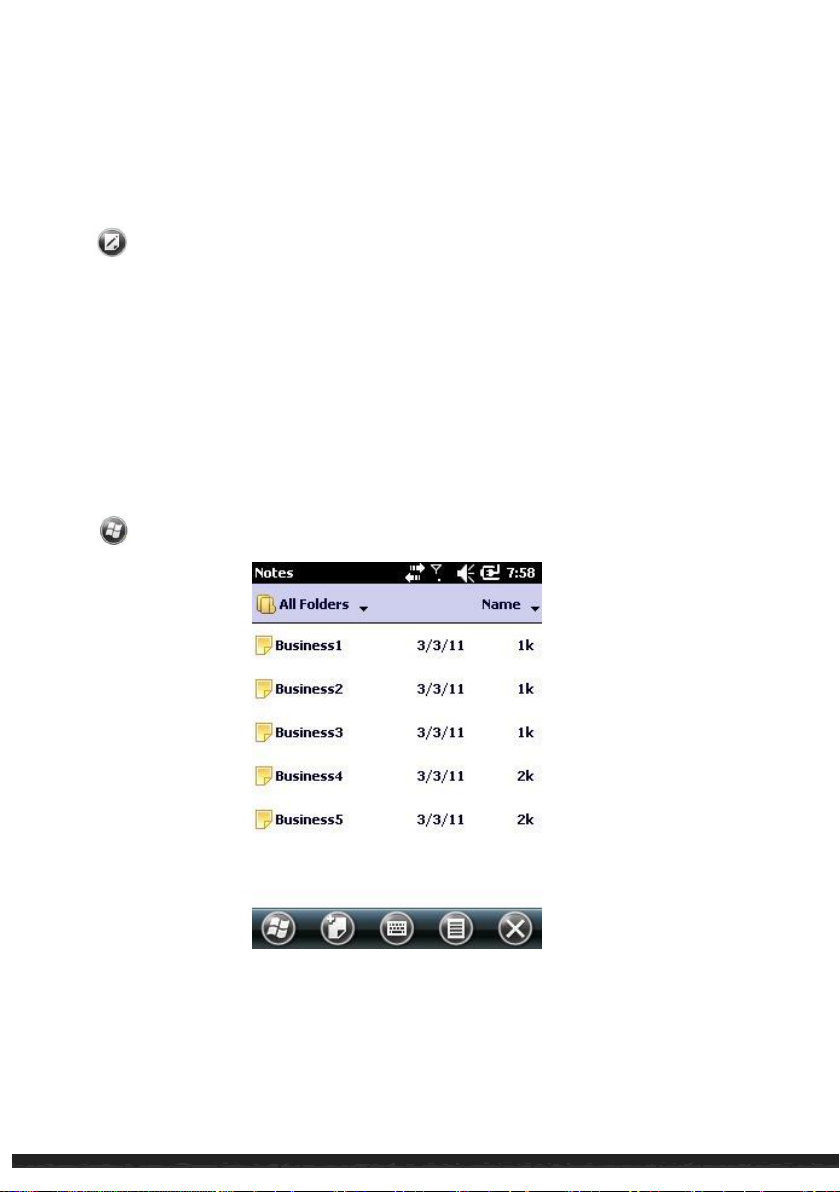
A summary of a task appears when it is tapped. To change the task,
tap .
Reminders, thoughts, idea, drawings, etc can be quickly jotted with Notes. A note
can be a written note, an audio recording, or a written note with an audio
recording.
Tap
Notes to open the program.
Using the Tasks Summary Screen
Notes: Capturing Thoughts and Ideas
Microsoft Pocket Outlook 4-7
Page 42

1. In Notes, tap .
2. Create a note by writing, drawing, typing, or recording.
3. Tap ok to save and return to the note list.
Creating a Note
Email: Sending and Receiving Email
Messages
The Email program can be used to send and receive email messages in two ways:
Sync the device with Microsoft Exchange or Outlook on a computer.
Connect directly to an email server through an Internet Service Provider (ISP) or a
network.
Tap
Email to access the program.
Synchronizing E-mail Messages
E-mail messages can be synchronized as part of the general synchronization process.
Enable Inbox synchronization in ActiveSync/Windows Mobile Device Center. For
information on enabling Inbox synchronization, see ActiveSync/Windows Mobile Device
Center Help on the desktop computer.
Connecting Directly to an E-mail Server
Email messages can be sent and received by connecting to a POP3 or IMAP4 email
server through an ISP or local area network. Multiple email services can be used to
receive messages. To use multiple email services, each email service needs to be set up
and named.
Microsoft Pocket Outlook 4-8
Page 43

Using the Message List
Received messages are displayed in the message list. Tap a message to open it.
By default, when the device is synchronized with a desktop computer or a server, only
messages from the previous three days and only the first 2kb will be synced with the
device. Attachments will not be synced with the device. The original messages will
remain on the desktop computer.
Messages can be marked so that the device will retrieve the messages in full during the
next synchronization or email server connection. To do so, tap and hold the desired
message to retrieve from the message list. On the shortcut menu, tap Download
Message. An icon will appear in the Inbox message list to display the message status.
Composing and Sending an E-mail
1. Select the account in E-mail..
2. In the message list, tap New.
3. In the To field, enter an email address of one or more recipients, separating them
with a semicolon. If the address is already in the contact list, tap To to select the
e-mail address.
4. Enter a message.
5. To check spelling, tap Spell Check.
6. To attach a file to the message, tap Insert and select the desired file.
7. Tap Send when complete. If working offline, the message is moved to the Outbox
folder and is sent the next time the device is connected to a server or to a desktop
computer. .
Messages in the Outbox folder will be delivered in one of two ways:
Microsoft Pocket Outlook 4-9
Page 44

The message is transferred to the Outbox folder in Exchange or Outlook upon
next synchronization.
The message is transferred to the email server upon connection.
Managing Email Messages and Folders
Each e-mail service account has its own folder hierarchy with five default folders: Inbox,
Outbox, Deleted Items, Drafts and Sent Items. The messages received and sent through
the mail service are stored in these folders. Additional folders can be created within
each hierarchy. To create folders, tap Tools Manage Folders.
The Deleted Items folder contains messages that have been deleted on the device. The
behavior of the Deleted and Sent Items folders depends on the chosen options.
Microsoft Pocket Outlook 4-10
Page 45

Chapter 5
More Programs
This chapter overviews other programs built into the device and how to use these
programs.
NOTE:
For detailed information on using Microsoft programs, tap
Help.
ActiveSync / WMDC
ActiveSync on the device works with ActiveSync on a Windows XP computer and with
Windows Mobile Device Center (WMDC) on a Windows Vista/Windows 7 computer.
When a connection is established between the device and a computer, information can
be synchronized on the device and the computer with ActiveSync or WMDC.
Synchronization compares the data on both the device and the computer and updates
both systems with the most recent information. For example:
Outlook Contacts, Calendar and Tasks databases on the device can be kept
up-to-date by synchronizing the device with Microsoft Outlook data on the
computer.
Synchronize email messages in the device Outlook Inbox with email messages in
Microsoft Outlook on the computer.
Synchronize Microsoft Word, Excel and PowerPoint files between the device and
the computer. Files are automatically converted to the correct format.
There are options to control which information types are synchronized and how much
data is synchronized.
More Programs 5-1
Page 46

ActiveSync can also:
Copy (not synchronize) files between the device and computer.
Add and remove programs on the device.
Pass through the computer to a network or the Internet.
Synchronizing Data
Once synchronization set is complete, date can be synchronized between the device
and the computer.
1. Connect the device to the computer.
2. On the device, tap
ActiveSync.
3. Tap Sync to begin synchronization.
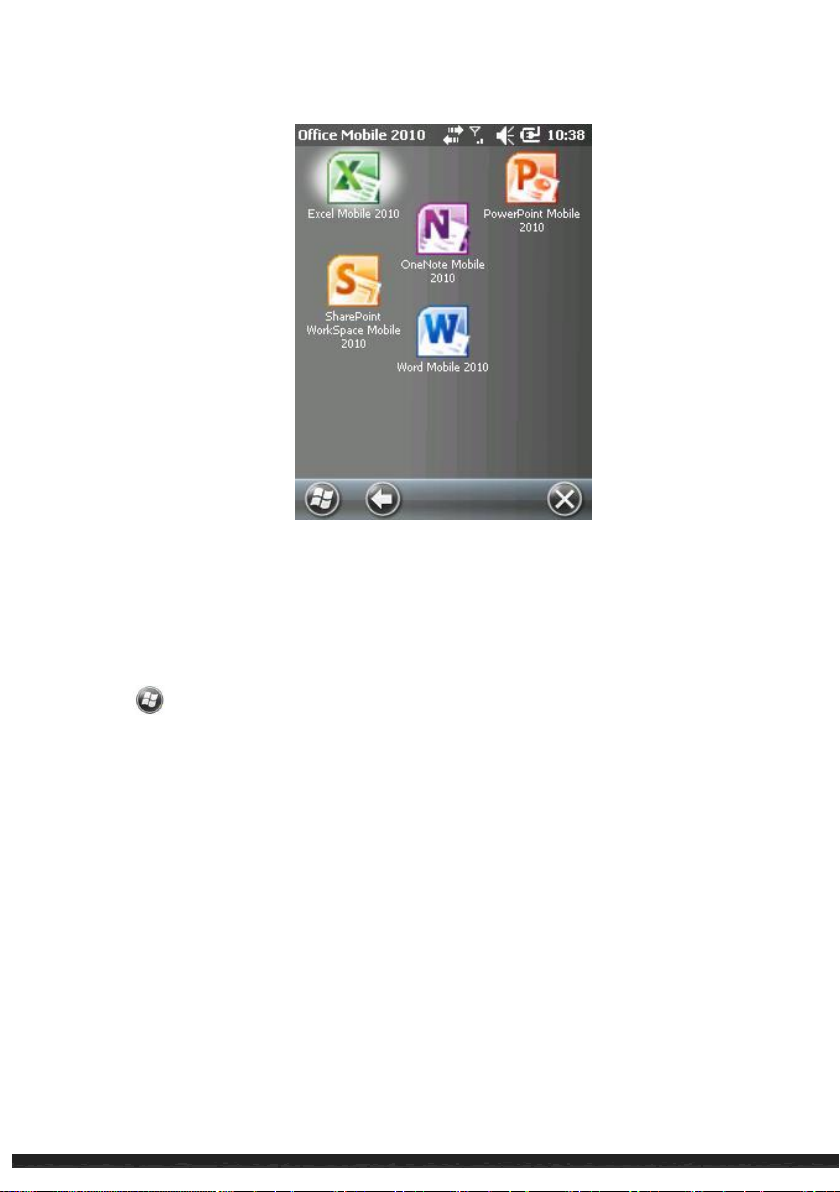
Office Mobile
Microsoft Office Mobile works with Microsoft Office on the computer to give easy access
to copies of office documentation.
Tap
Excel Mobile2010
OneNote Mobile2010
PowerPoint Mobile2010
SharePoint WorkSpace Mobile 2010
Word Mobile2010
Office Mobile2010 and select a program.
More Programs 5-2
Page 47
Creating an Office file
NOTE:
PowerPoint presentations on the device cannot be created or edited.
1. Tap
2. Enter the information.
3. After entering the information, tap OK. The file is automatically saved and named
according to the first characters of text entered in the file.
Office Mobile and select the program.
Opening an Office file
Upon opening an Office Mobile program, a file list will appear. Tap a file to open it. Only
one file may be opened at a time. If a second file is opened, the first file will be saved
and closed automatically.
More Programs 5-3
Page 48

Tap
Internet Explorer. The Internet Explorer Mobile home page appears.
Browsing the Internet
1. Tap Internet Explorer.
2. Tap the Favorites soft key to display the Favorites list.
3. Tap the desired page to view.
Internet Explorer
Internet Explorer can be used to view Web pages in the following ways:
Connect to an ISP or network and browse the Web. To do this, a connection
must first be created.
During synchronization with a computer, download links and mobile favorites
that are stored in the Mobile Favorites subfolder in Internet Explorer on the
computer.
While connected to an ISP or network, the device can download files and programs
from the Internet or an intranet.
More Programs 5-4
Page 49
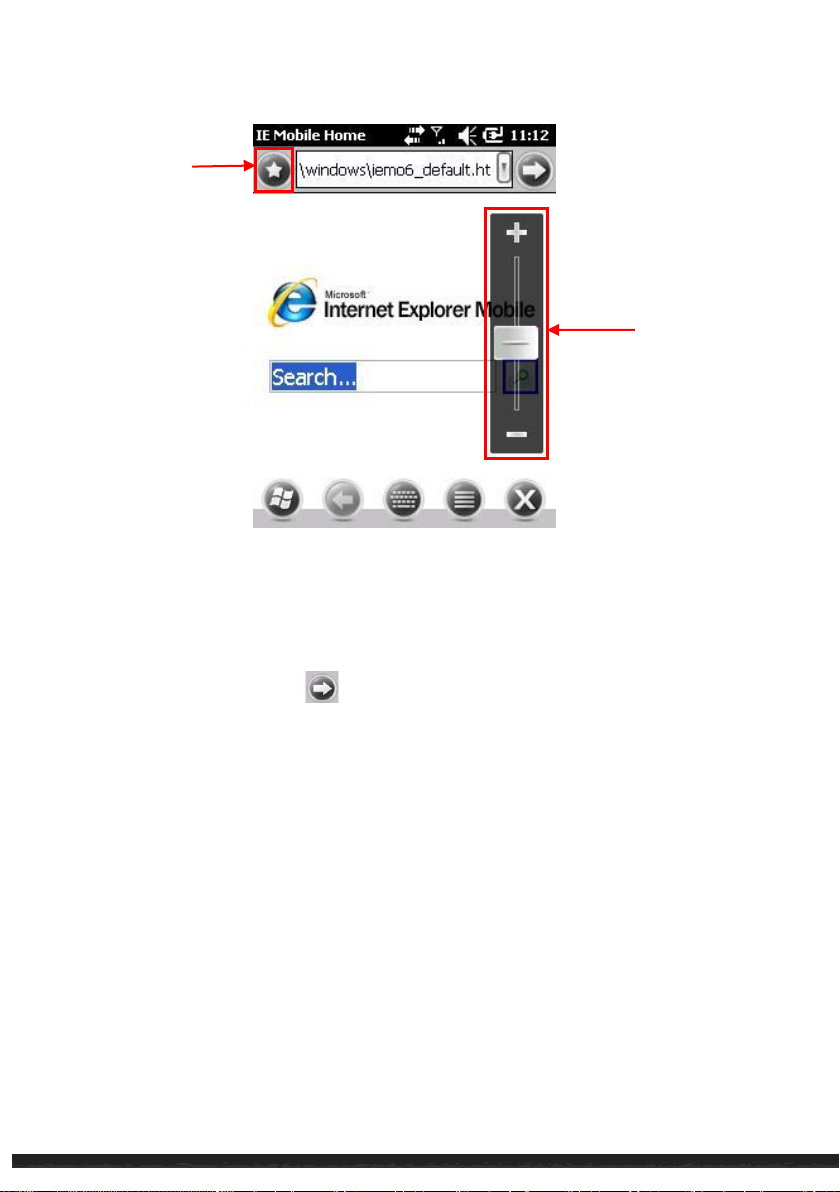
Favorites
Zoom in/out
Note:
To visit web pages not included in Favorites, enter a web address in the address bar at
the top of the screen and tap or, tap the arrow to choose from a previously
entered address.
Windows Live Messenger
Windows Live Messenger provides practically instant access to up-to-date MSN Hotmail
Inbox, Messenger Contacts list, and options for customizing the Messenger experience.
Features of Windows Live Messenger include:
MSN Hotmail
Read, write and send e-mail. Delete e-mail and manage Hotmail folders.
MSN Messenger
More Programs 5-5
Page 50

Before signing into Messenger, Windows Live must be signed into first.
1. Tap
Messenger to access the program.
2. Tap Sign in.
Send and receive instant messages. Check which contacts are online. Subscribe to
status updates for selected contacts.
Synchronize the Windows Live contacts, Hotmail inbox and MSN Messenger to the
device.
Windows Live requires an internet connection.
Windows live requires either an MSN Hotmail account, an MSN Messenger account, or
a Windows Passport account.
Setting up Windows Live
1. Tap
2. Tap Sign in to Windows Live.
3. Tap Accept.
4. Follow the on-screen instructions to complete the setup.
Windows Live to access the program.
Signing in to Messenger
Windows Media Player
Windows Media Player can be used to play digital audio or video stored on the device,
on a network, or on a web site.
Tap
Windows Media.
More Programs 5-6
Page 51
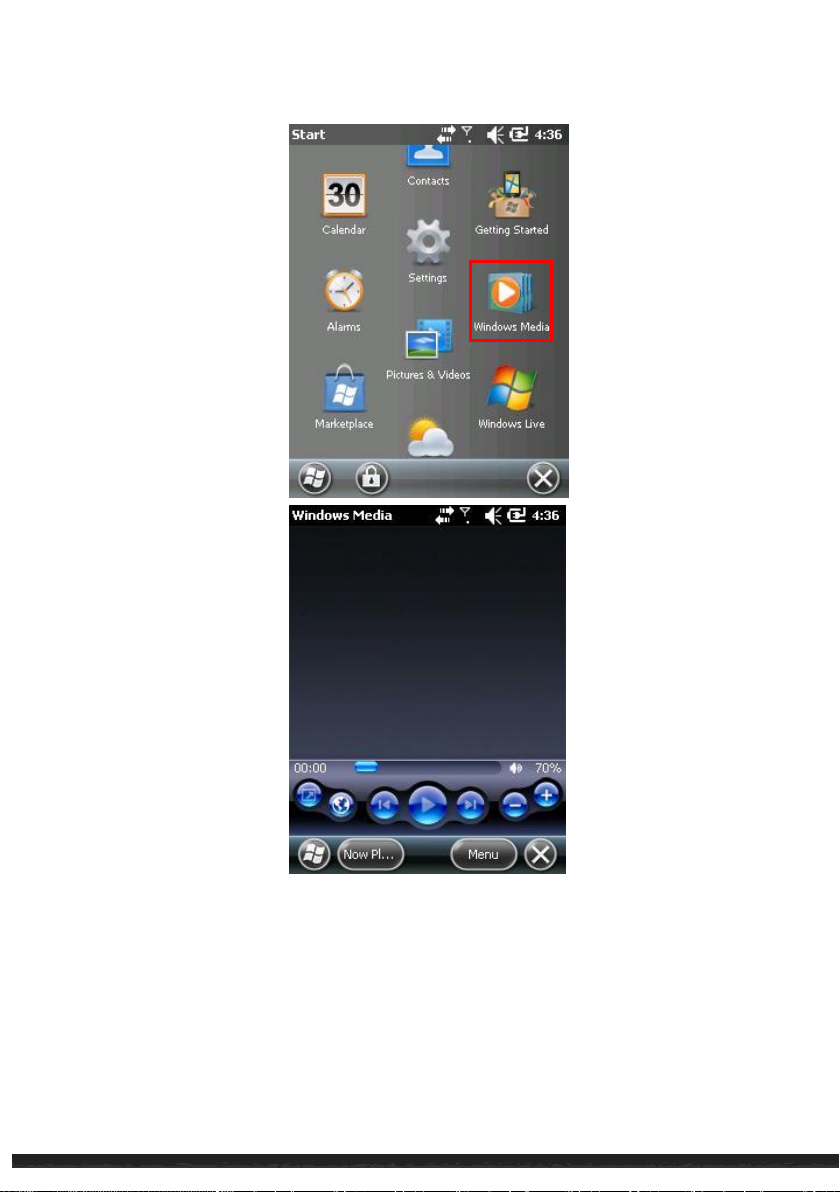
Supported formats are Windows Media or MP3 format (including files with the
extensions .asf, .wma, .wmv and .mp3).
Microsoft Windows Media Player on a desktop computer can be used to copy digital
audio and video files to the device.
More Programs 5-7
Page 52

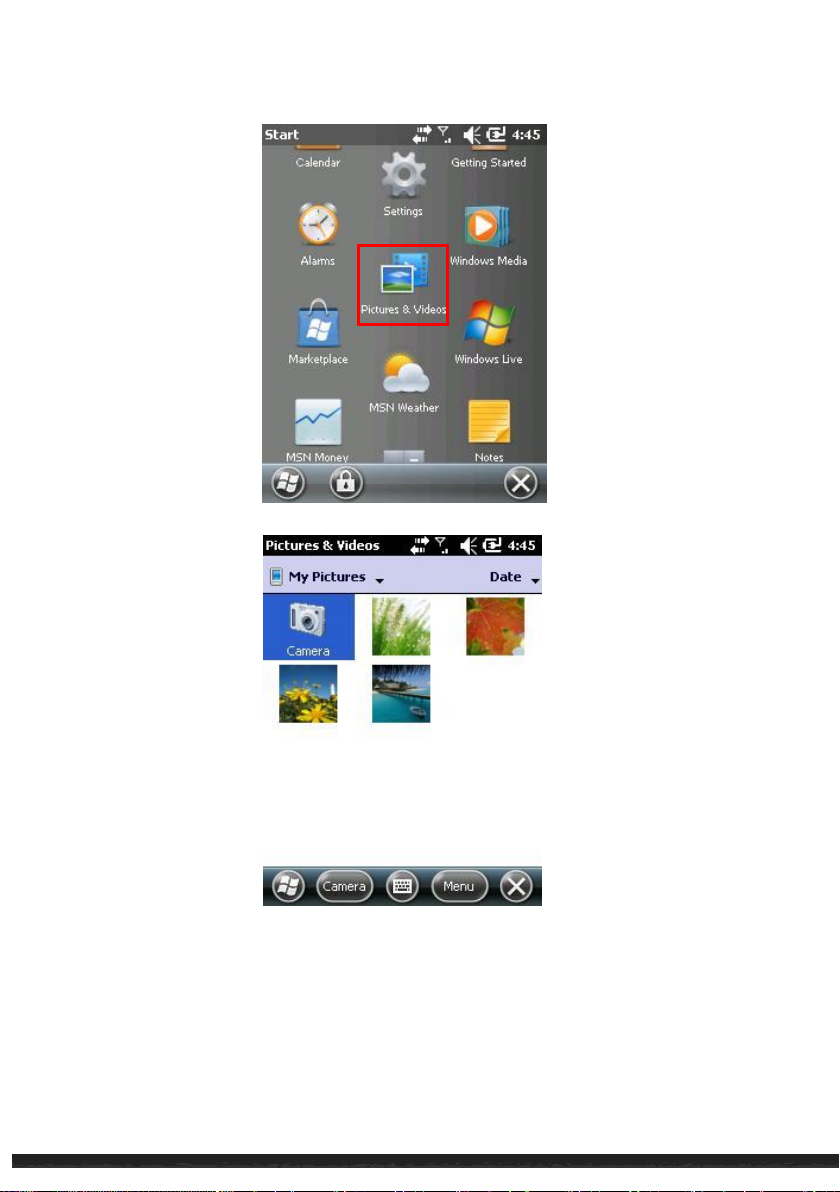
1. To view pictures or video stored on a storage card.
2. Tap
Pictures & Videos.
By default, the program displays thumbnails of the pictures and videos in the
My Pictures folder, within the My Documents folder on the device.
3. Thumbnails of pictures and videos appear on the screen. Tap one of them to
view in full screen.
Pictures & Videos
Features of Pictures & Videos include:
Viewing pictures and video clips.
Sending pictures and videos to others.
Setting a picture as the background on the Home screen.
Playing a slide show.
Editing pictures.
Viewing Pictures and Videos
More Programs 5-8
Page 53
More Programs 5-9
Page 54
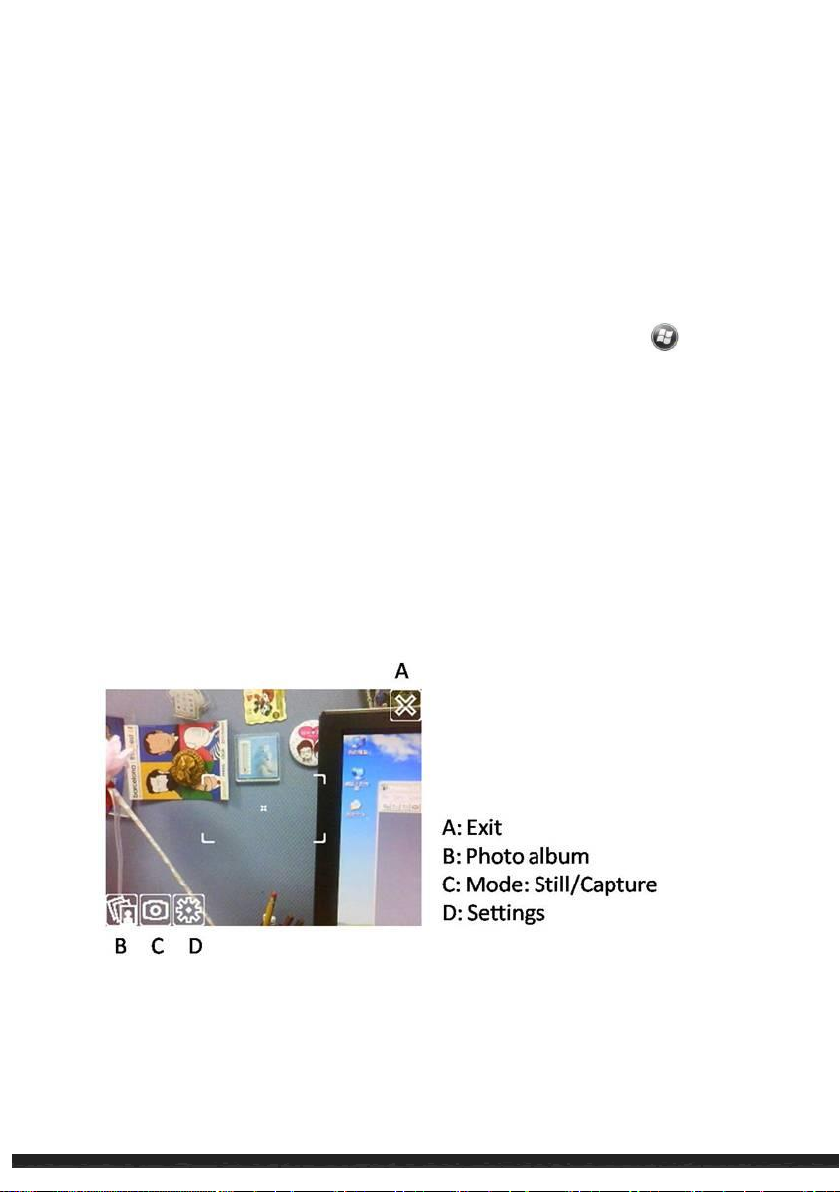
Camera
The Camera program can take photos and record video clips.
Taking Pictures
1. To start the program, press the camera button on the device or tap
& Videos Camera. The Camera screen will appear.
2. Aim the camera lens at the subject. Press the camera
focusing. A white frame will appear. Wait until the color of the frame to turn green
indicating that the subject is in focus.
3. Press the camera
4. The taken picture will be displayed on the screen. Tap the screen or press camera
button to go back to the camera screen.
5. If the picture is not chosen to be deleted after it was taken, the picture is saved to
the pre-selected storage location.
button fully to take the picture.
button halfway for automatic
Pictures
More Programs 5-10
Page 55
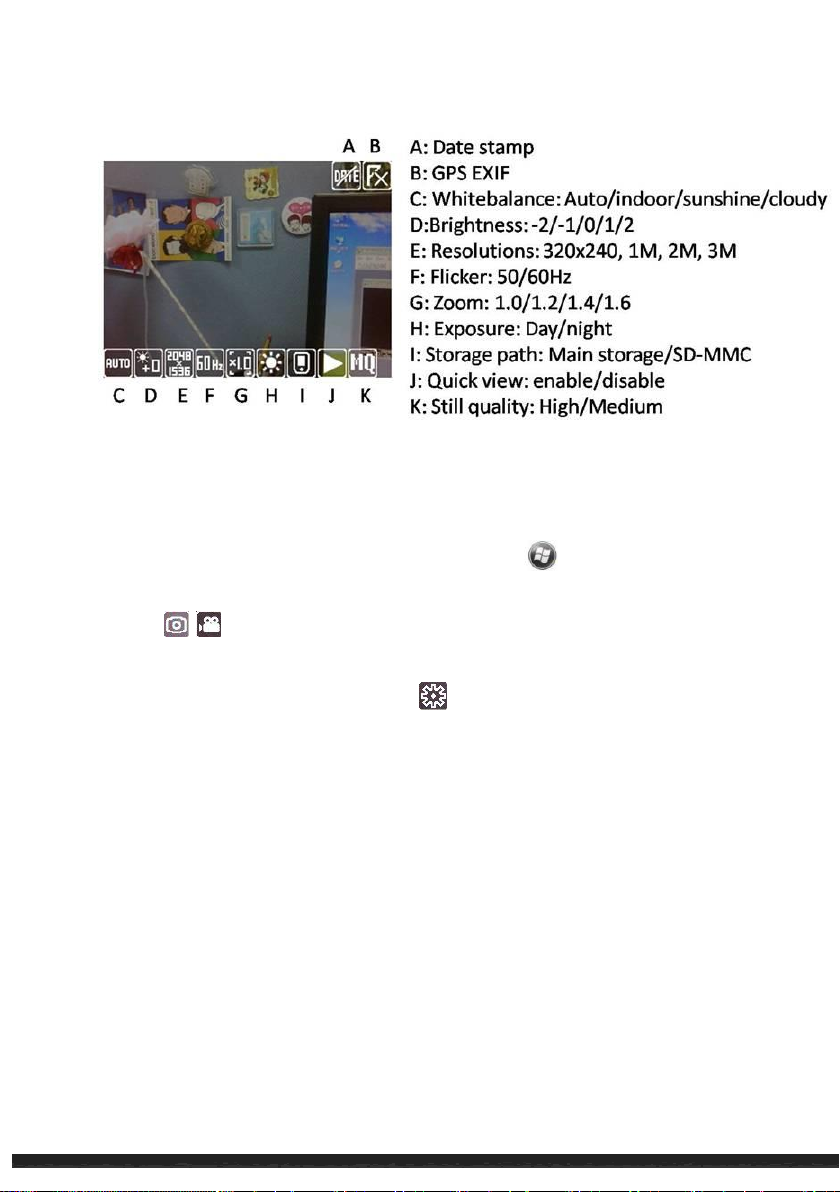
Recording Video Clips
1. To start the program, press the camera button or tap
Videos Camera.
2. Tap the / at left corner of the screen to switch between camera and video
modes.
3. For recording options and controls, tap .
4. Press the camera button to start recording.
5. To stop recording, press the camera button.
6. The video clip is saved to the pre-selected storage location. To view the video clip,
tap Thumbnails.
Programs Pictures &
More Programs 5-11
Page 56
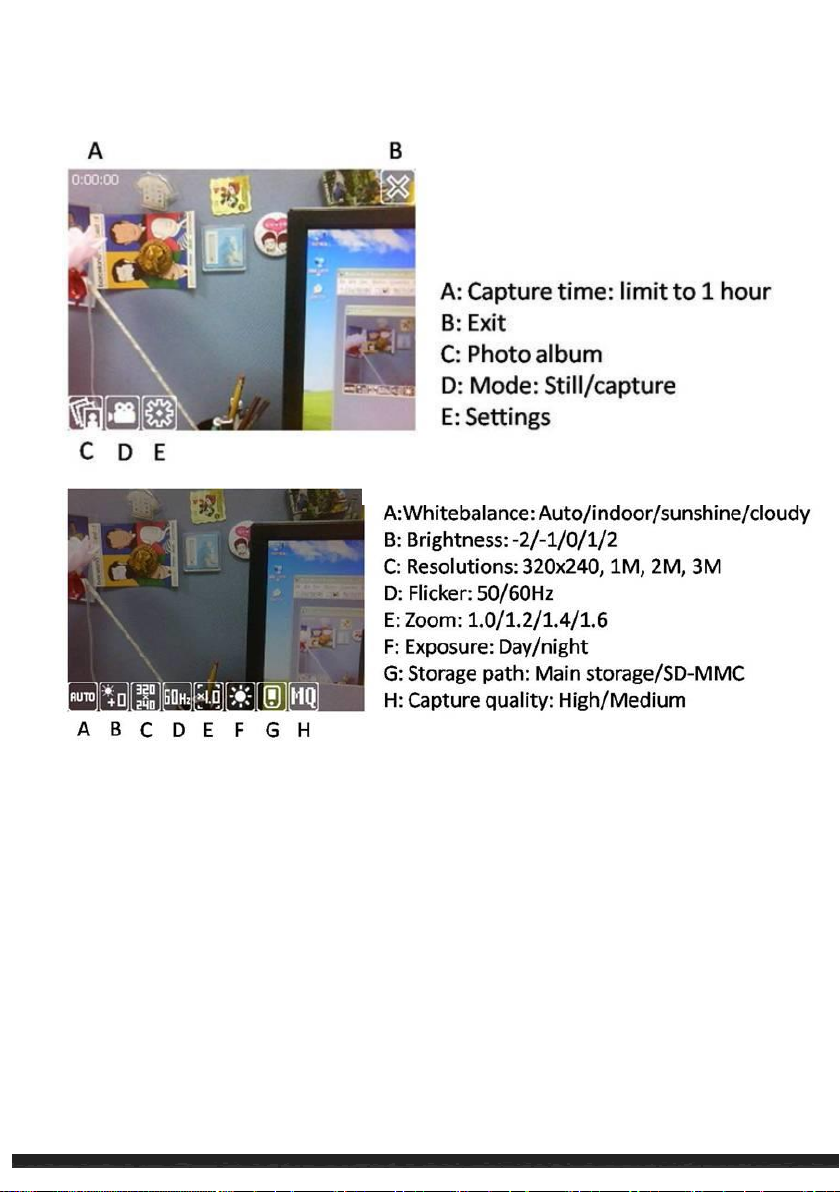
Geotagging
1. This picture here shows you the user interface of the Geo Camera. Tap the “Set
up” item on the bottom of the screen.
More Programs 5-12
Page 57
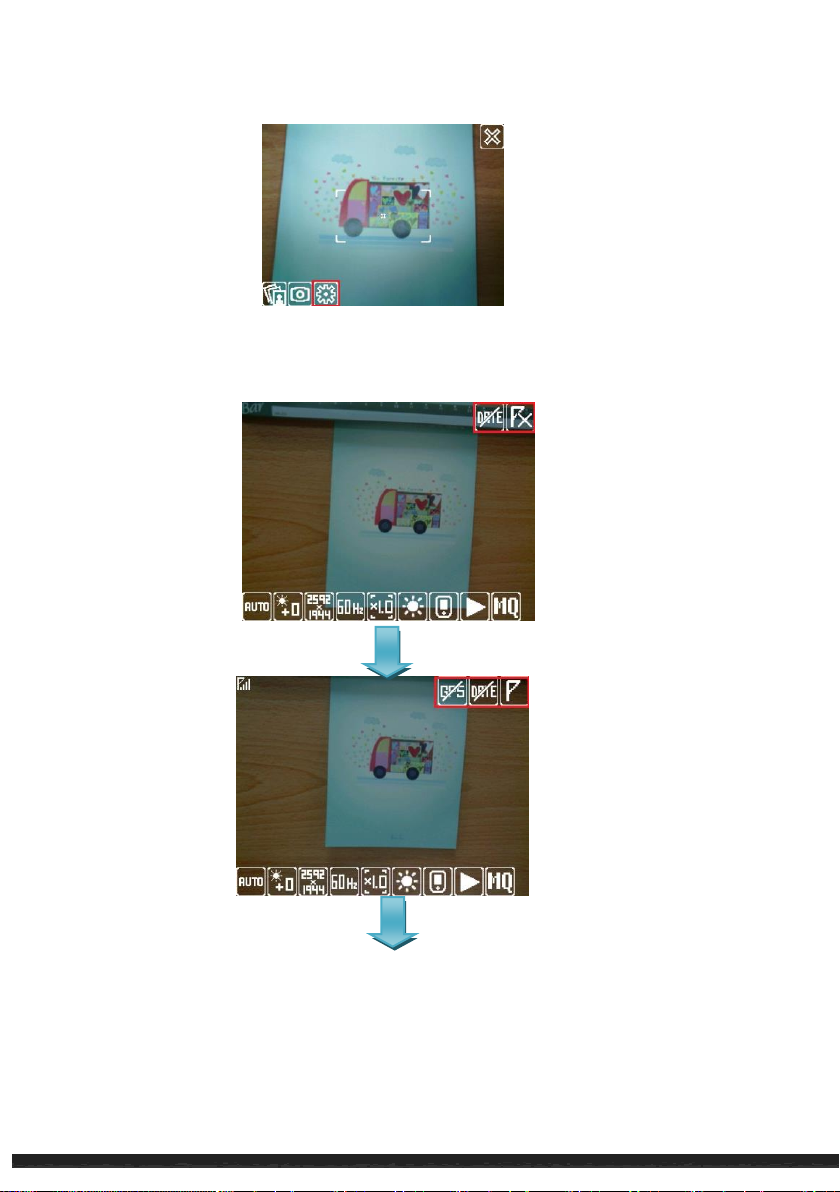
2. To Enable the coordinate and date marks by tapping the upper right icons. The
upper left icon (flag) shows the GPS position fix or not.
More Programs 5-13
Page 58
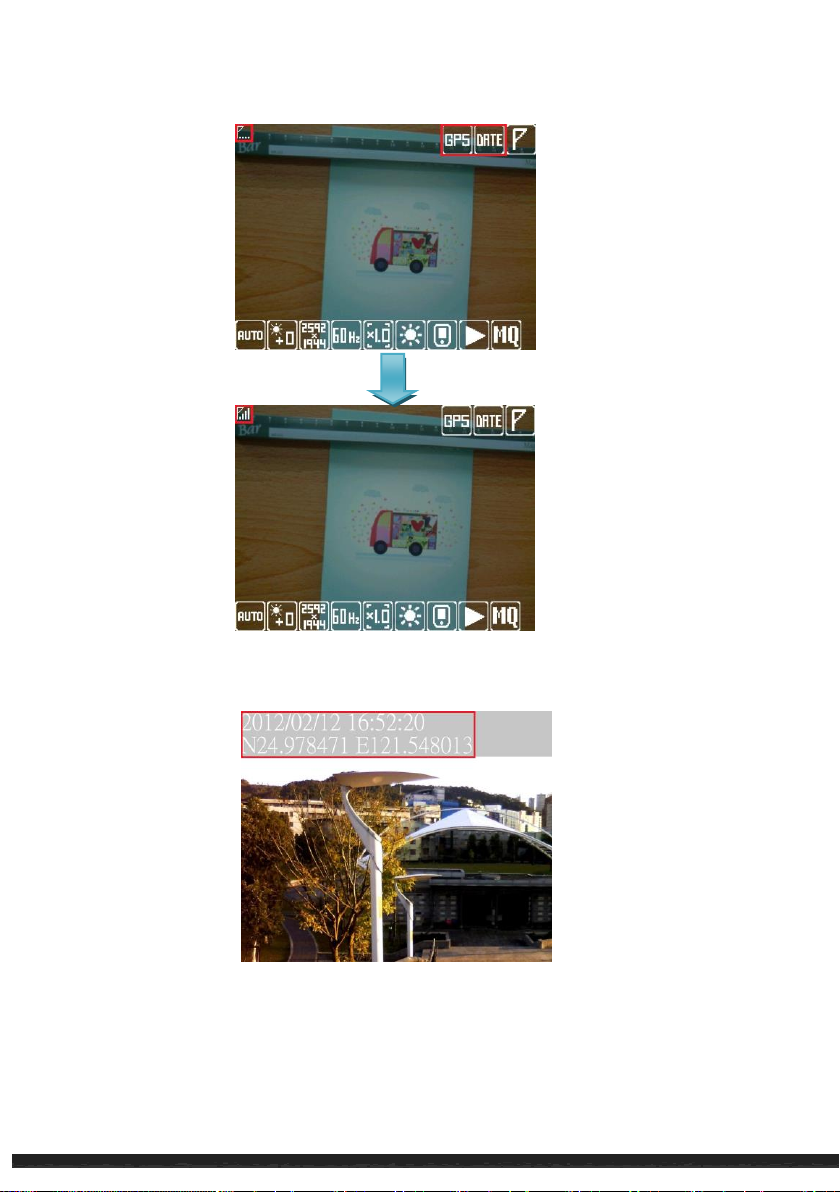
3. To check the coordinates from BAP S series unit, the coordinate and date
marks will show on the upper left corner of the photo.
More Programs 5-14
Page 59
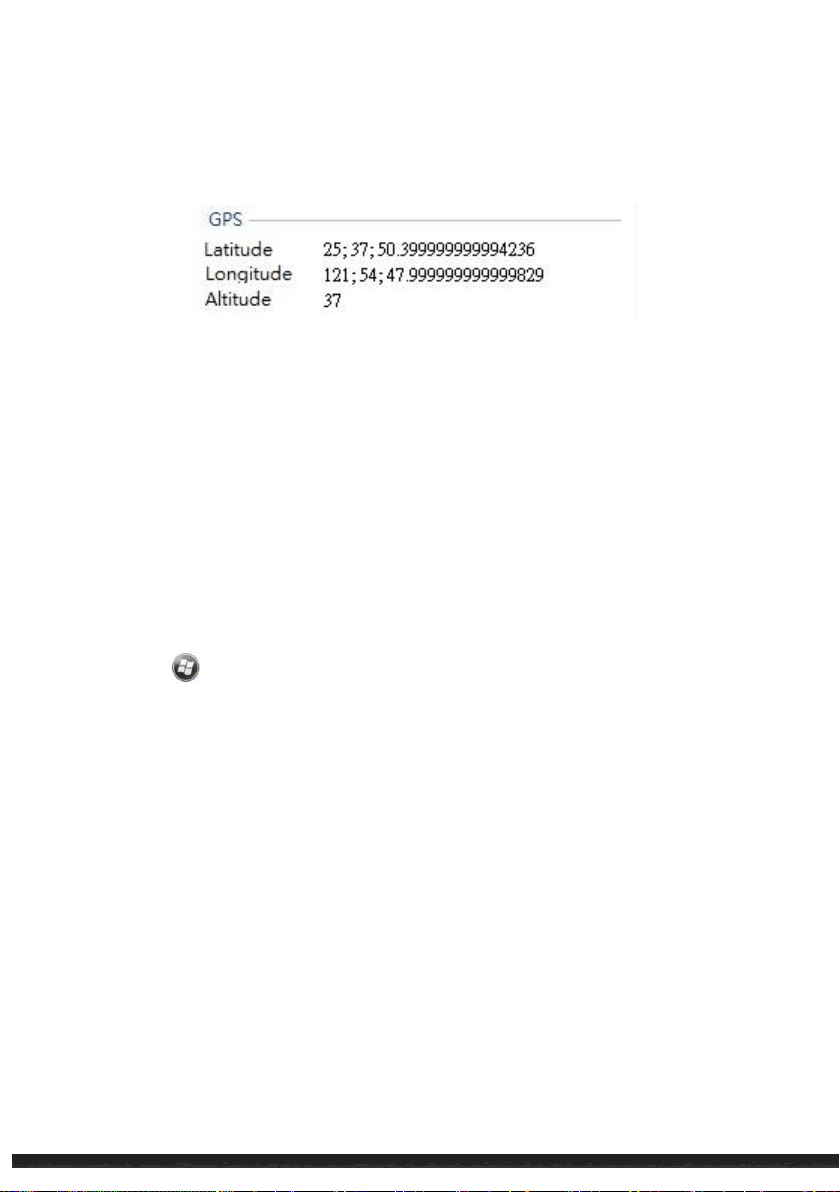
4. To check the coordinates from PC/NB, copy the file from BAP S series to PC/NB
and right click on the file. Select “Content” to check more information.
Remote Desktop Mobile
Remote Desktop allows the device to log onto a Windows Terminal Server and use the
programs installed on the server.
NOTE:
Access to a remote computer requires that the computer have Terminal Services or
Remote Desktop installed.
To connect to a remote computer:
1. Tap
2. Select the computer. Enter the user name, password, and domain.
3. Tap Connect.
Remote Desktop Mobile.
More Programs 5-15
Page 60

Page 61

Chapter 6
Getting Connected
This chapter describes the different types of connections the device can achieve.
Types of Connections
The device can connect to the Internet, a computer, and to other devices and services.
Using Cellular Connection (Select
Model Only)
Model with 3.5G connection function allow the device to access the Internet via the
mobile phone service network.
Setting up a Cellular (HSDPA) Connection
NOTE:
HSDPA service requires a subscription with a mobile phone service network operator.
In most cases, the cellular (HSDPA) connection will be preconfigured by the cellular
service provider and does not need to be set up or changed.
If the HSDPA connection requires manual set up, you must obtain the specific settings
from the cellular service provider and do the following:
1. Tap Settings Connections Connections.
Getting Connected 6-1
Page 62

2. In either group, tap Add a new modem connection.
3. In the Enter a name for the connection field, enter a name for the connection.
4. In the Select a modem field, select Cellular Line (HSDPA), and then tap Next.
5. Enter the access point name provided by the cellular service provider, and tap
Next.
6. Enter the username and password, and tap Finish.
Setting up a Dial-up Connection
NOTE:
Depending on the wireless service provider, dial-up connections may or may not be
supported.
With dial-up, the service provider gives a phone number that connects the device to the
Internet.
1. Tap Settings Connections Connections.
2. In either group, tap Add a new modem connection.
3. In the Enter a name for the connection field, enter a name for the connection.
4. In the Select a modem field, select Cellular Line, and then tap Next.
5. Enter the phone number provided by the service provider, and tap Next.
6. Enter the username and password, and tap Finish.
Getting Connected 6-2
Page 63

When the Wi-Fi radio is on, the Wi-Fi radio status on the Home screen will be
displayed as Available. To turn off the Wi-Fi radio, follow the above procedure, but
tap the Wi-Fi box to change the Wi-Fi radio status from Available to Off. The Wi-Fi
radio status on the Home screen will be displayed as Off.
1. Turn on the Wi-Fi radio.
2. Tap Menu Wi-Fi Settings to open the Wireless Networks Configuration
screen. By default, the device will automatically detect available wireless
networks.
Using Wireless Network
The device has a built-in wireless network module. If the device is within a wireless LAN
(WLAN) environment, it can connect to the network without any cables.
Switching On or Off the Wi-Fi Radio
By default, the Wi-Fi radio is turned off. To turn on or off the Wi-Fi radio:
1. Tap the WiFi icon on the Home screen to access Wireless Manager.
2. Tap the Wi-Fi box to change the Wi-Fi radio status from Off to Available.
Connecting to a Wireless Network
Getting Connected 6-3
Page 64
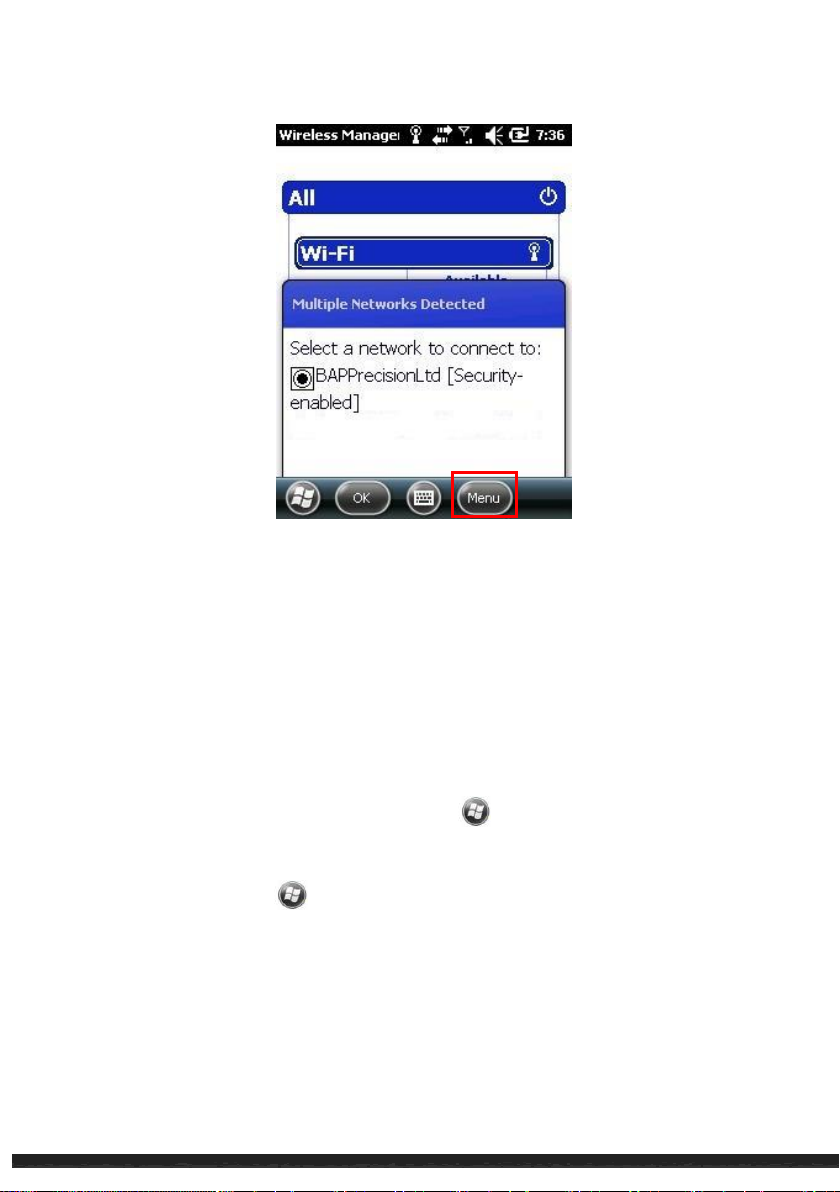
3. If more than one network is detected, the screen will display a network list. Tap
the desired network and follow the procedure to configure the wireless
network.
4. If the selected network requires a network key, enter the key and tap Next
Finish on the screen.
5. End the Wi-Fi connection by switching off its radio.
NOTE:
Search for a network to connect by tapping Settings Connections
Wi-Fi Search for Networks.
Once connected to a network, a shortcut is created in Settings. To change the
network settings, tap Settings Connections Wi-Fi. Tap the desired
network and change the settings.
Leaving the radio on will drain the battery power more quickly.
Getting Connected 6-4
Page 65

1. Tap the Wireless Manager section on the Home screen.
2. Tap the Bluetooth box to change the Bluetooth radio status from Off to On.
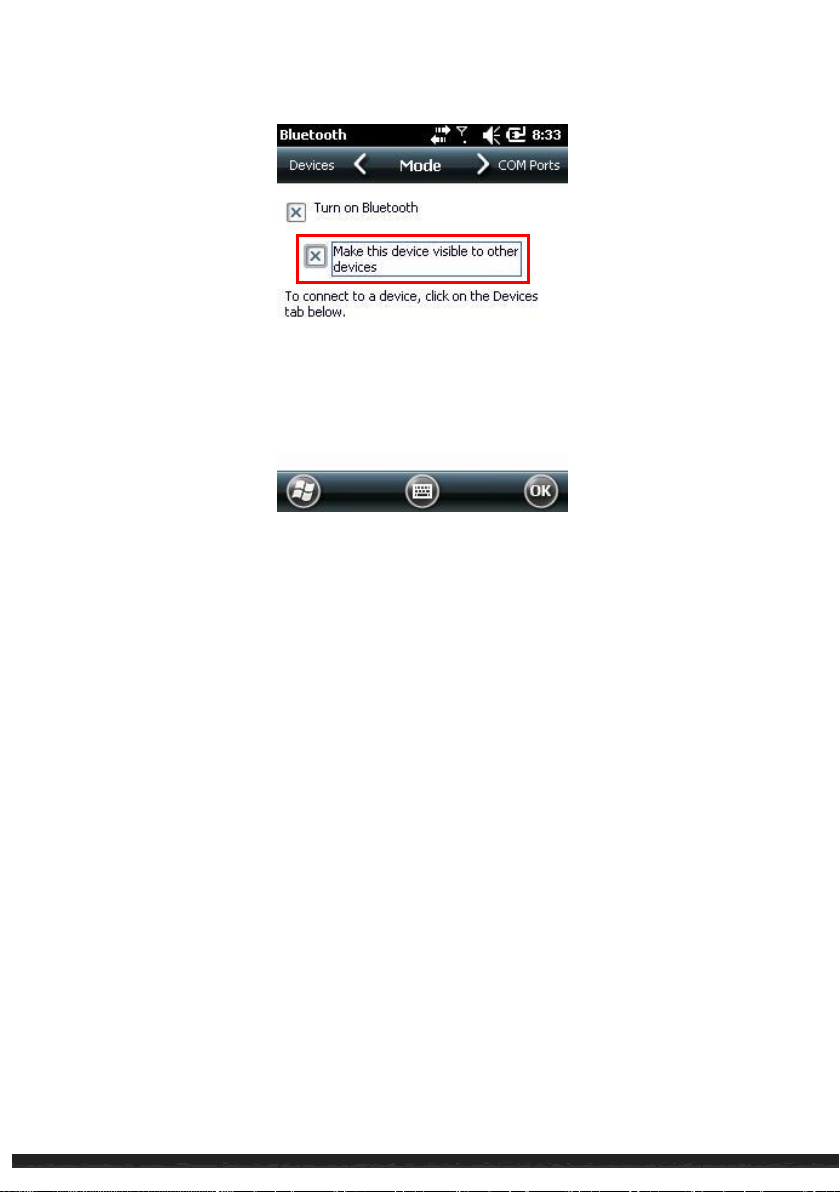
3. For other devices with Bluetooth capabilities to detect the device and attempt
to beam information to it, establish a connection, or use a Bluetooth service,
Tap Setting Bluetooth Mode Make this device visible to other
devices.
Using the Bluetooth Function
NOTE:
BAP do not guarantee that all Bluetooth headsets/devices from all manufactures are
compatible with the device.
The device incorporates Bluetooth capability. Bluetooth technology is a short-range
(approximately 10m or 30ft) wireless communications technology.
Bluetooth technology features the abilities to do the following:
Beam information, such as files, tasks, contacts, etc, to other Bluetooth
supported devices.
Connect the device to a Bluetooth enabled phone to be used as a
modem.
Use a Bluetooth service. When the device is connected to another device
or computer, the device can locate and use the services available on the
other device or computer.
Switching On or Off the Bluetooth Radio
By default, the Bluetooth radio is turned off. To turn on Bluetooth, do the following:
Getting Connected 6-5
Page 66
4. To turn off the Bluetooth radio, follow the above procedure, but tap the
Bluetooth box to change the Bluetooth radio status from On or Visible
to Off. The Bluetooth radio status on the Home screen will be displayed as
Off.
NOTE:
Leaving the radio on will drain the battery power more quickly.
1. Turn on the Bluetooth radio.
Make sure that the device and the device that is receiving the information are
within close range and that device is discoverable.
2. From the program, tap and hold the desired item.
3. Tap Beam File in the shortcut menu.
Sending Files via the Bluetooth
Getting Connected 6-6
Page 67
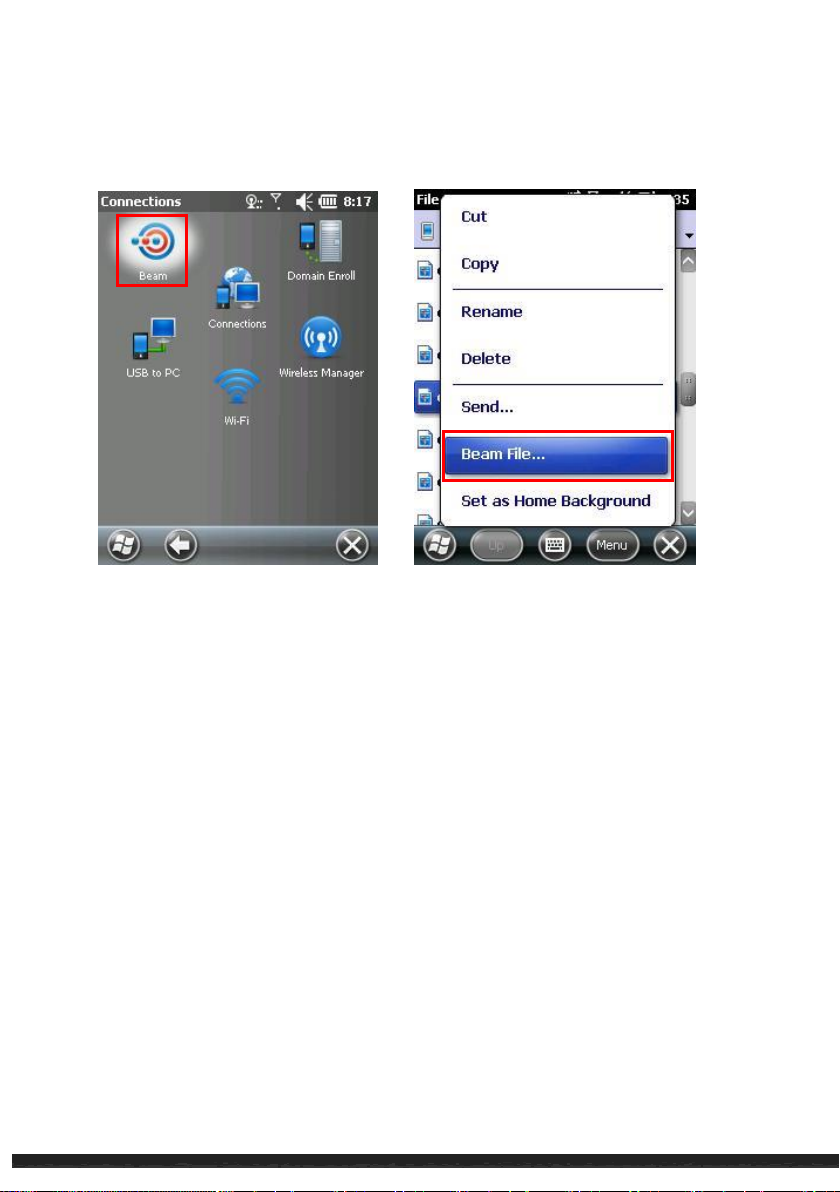
4. The device will search for other devices with Bluetooth capabilities within close
range, and will display them in the list. Tap the desired destination device.
Note:
Files are saved automatically before they are beamed. If a Word document or Excel
workbook was created on a computer, unsupported content and formatting may be
lost when the files are saved.
Receiving Files via Bluetooth
Make sure that Make this device visible to other devices in Bluetooth settings is
selected.
Make sure that the device and the destination device are within close range and
that device is discoverable.
When prompted to receive an incoming beam, tap YES to receive.
Creating a Bluetooth Partnership
A Bluetooth partnership is a connection that allows for secure information exchange via
Bluetooth technology. When a partnership between two devices is created, the devices
Getting Connected 6-7
Page 68

3. The device will search for other devices with Bluetooth capabilities and display
them in the list.
4. Tap the name of the other device, and tap Next.
5. In Passkey, enter an alphanumeric passkey between 1 and 16 characters, and
tap Next.
6. Enter the same passkey on the other device.
7. Tap Done.
do not need to be discoverable for secure information exchange. A matching passkey is
required on both devices to create a partnership. A Bluetooth partnership will work as
long as the Bluetooth function is turned on.
1. Turn both devices, set them to discoverable, and place them in close range.
2. Tap
Settings Bluetooth Devices Add new device.
Getting Connected 6-8
Page 69
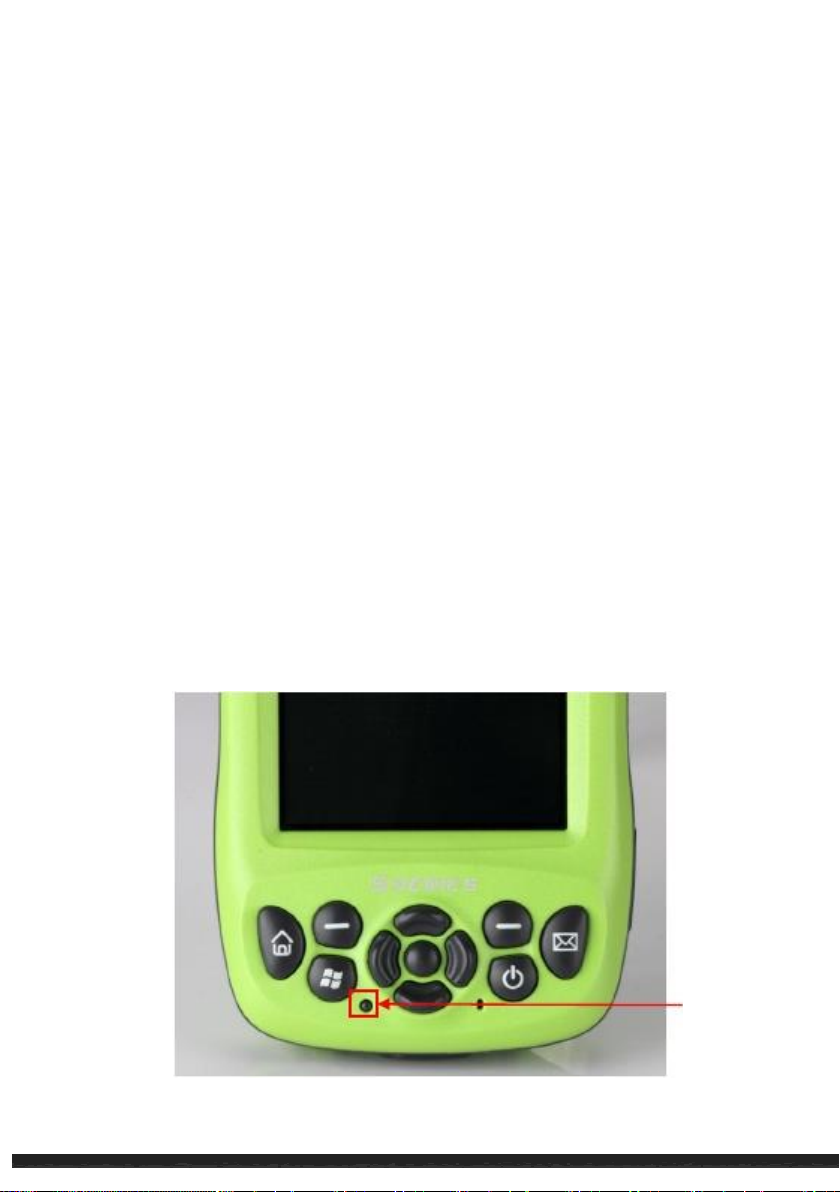
Reset utton
Chapter 7
Troubleshooting and
Maintenance
This chapter gives solutions to common device problems you may encounter. It also
provides guidelines on taking care of your device.
Resetting Your Device
If the device stops responding, or appears to be “frozen,” or is “locked up,” the device
may need resetting.
Troubleshooting and Maintenance 7-1
Page 70
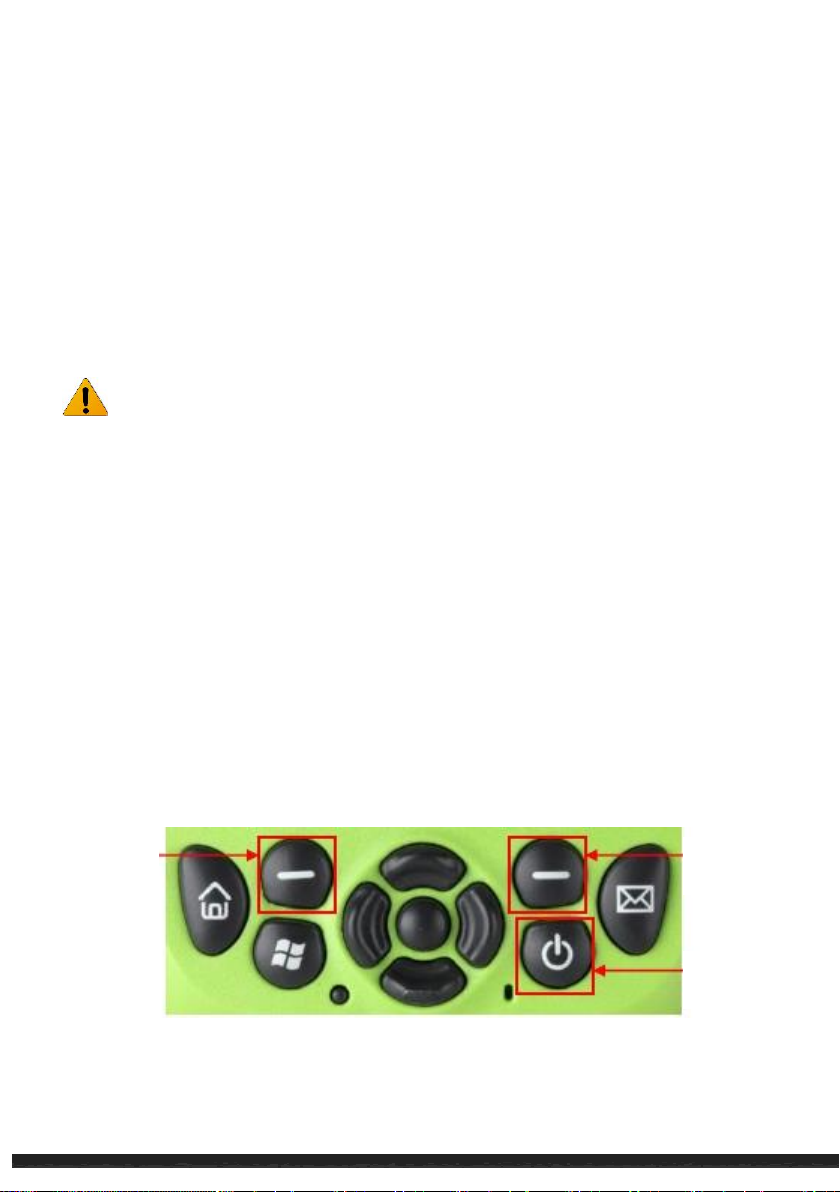
Right soft key
Power button
Left soft key
Restoring To Factory Default State
The device can be restored back to its factory default state by clearing the memory
from the device. Restoring the device back to its factory default state should be done in
the following cases:
When the device does not respond after being restarted.
When the password is forgotten.
Caution: Clearing the memory deletes all data, files, system settings, and
additional programs that were installed or synchronized!
Note:
Back up data on a computer, storage media, or another device before restoring factory
default state. Regular back up of data ensures data integrity during emergency or
accidental situations.
To clear the memory from the device, proceed with the following:
1. Turn off the system.
2. Press Left soft key (LSK), Right soft key (RSK) and Power button.
3. Release all the keys. A “Hive Clean” message should appear.
4. Press “YES”
Troubleshooting and Maintenance 7-2
Page 71
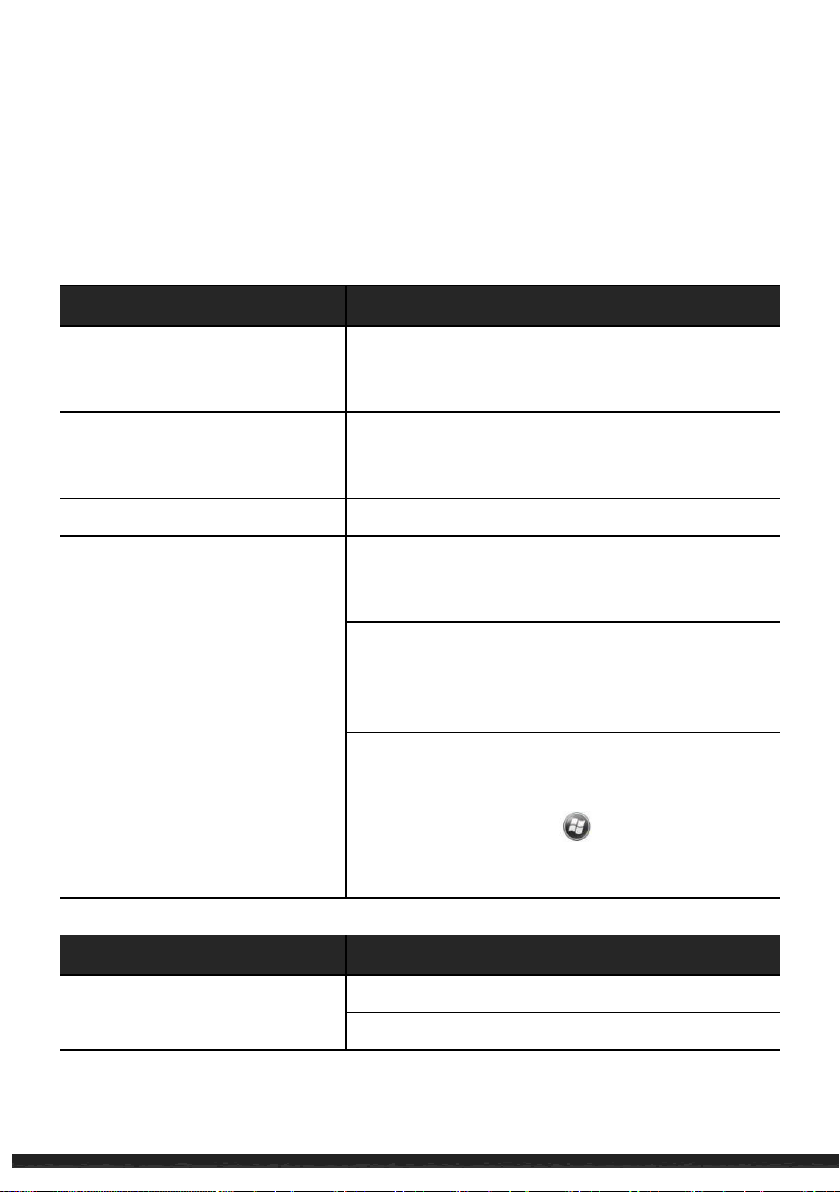
Problem
Solution
Power does not switch on when
using battery power.
The remaining battery power may be too low to
run the device. Charge the battery for 20 minutes
before use.
Screen responds slowly.
Make sure that the device is not running out of
battery power. If the problem still persists, restart
the device.
Screen freezes.
Restart the device.
Cannot establish a connection
with a computer via USB.
Make sure that the device and the computer are
both switched on before trying to establish a
connection.
Make sure that the cable is securely plugged into
the USB port on the computer and on the device.
Connect the USB cable directly to the computer.
Do not run the cable through a USB hub.
In some specific cases, the device may experience
connection problems when it is connected to a
Windows computer running ActiveSync. To resolve
the problems, please tap Settings
Connections USB to PC, and then clear Enable
advanced network functionality.
Problem
Solution
A warning message of not
enough memory appears.
Delete unneeded files.
Remove unneeded programs.
Troubleshooting
NOTE:
If a problem occurs that cannot be solved, contact the dealer for assistance.
Troubleshooting and Maintenance 7-3
Page 72
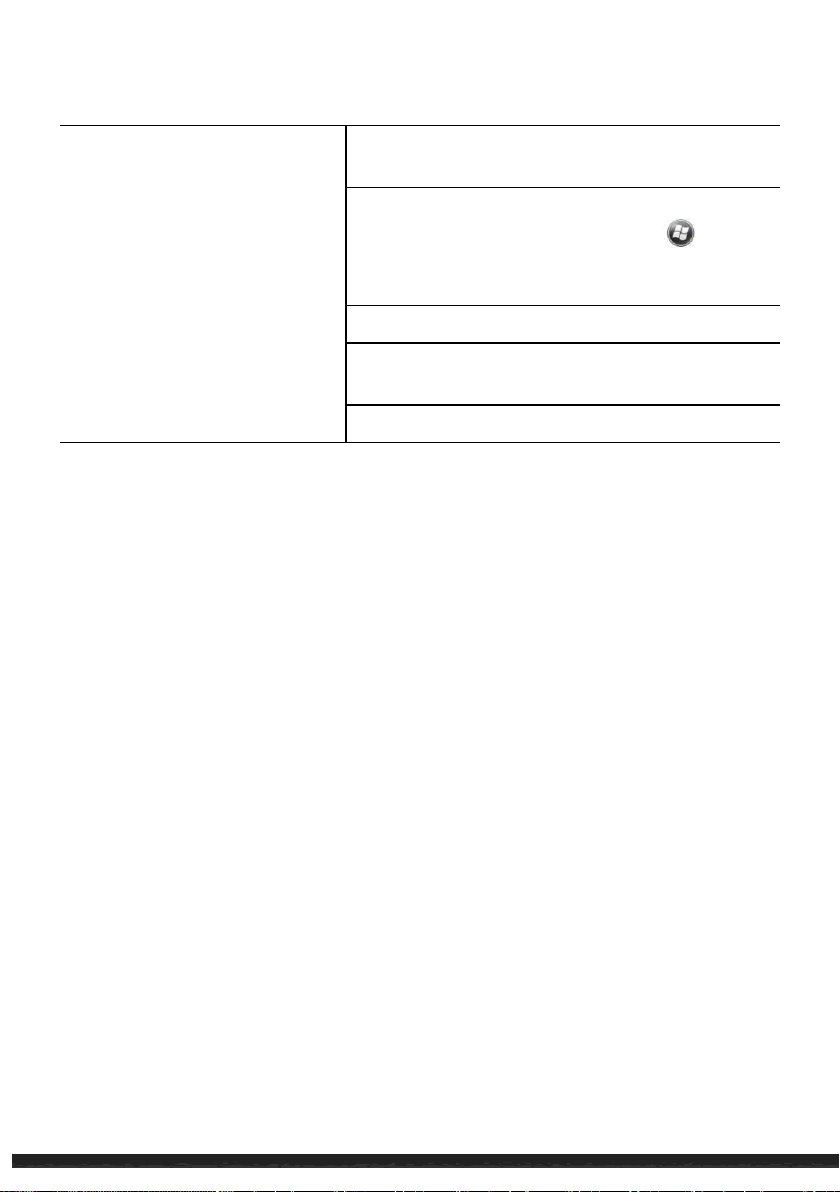
Delete all files and clear history in Internet
Explorer.
Stop programs that are not being currently used. To
check the state of active programs, tap
Settings System Task Manager. To stop the
program by tapping End Task.
Restart the device.
Move the data/file to the storage card using file
explorer.
Move Email attachments to storage card.
Caring for Your Device
Proper maintenance of the device will ensure trouble-free operation and reduce the
risk of damage to the device.
Keep the device away from excessive moisture and extreme temperatures.
Avoid exposing the device to direct sunlight or strong ultraviolet light for extended
periods of time.
Do not place anything on top of the device or drop objects on the device.
Do not drop the device or subject it to severe shock.
Do not expose the device to sudden and severe temperature changes. This could
cause moisture condensation inside the unit, which could damage the device. In
the event of moisture condensation, allow the device to dry out completely
before next use.
The screen surface can easily be scratched. Avoid touching it with sharp objects.
Non-adhesive generic screen protectors designed specifically for use on portable
devices with LCD panels may be used to help protect the screen from minor
scratches.
Never clean the device with it powered on. Use a soft, lint-free cloth to wipe
Troubleshooting and Maintenance 7-4
Page 73

the screen and the exterior of the device.
Do not use paper towels to clean the screen.
Never attempt to disassemble, repair or make any modifications to the device.
Disassembly, modification or any attempt at repair could cause damage to the
device and may even cause bodily or property damage. Disassembly or
modification of the device voids the warranty of the device.
Do not store or carry flammable liquids, gases or explosive materials in the same
compartment as the device, its parts, or its accessories.
Safety Precautions
Prolonged listening of music at maximum volume can damage the ears.
The use of headphones other than those recommended/supplied can cause
hearing impairment due to excessive sound pressure.
About Charging
Use only the AC adapter supplied with your device. Use of another type of AC
adapter will result in malfunction and/or danger.
Use only the car charger supplied by the manufacturer. Use of another type of car
charger will result in malfunction and/or danger.
Use a specified cradle approved by the manufacturer.
Use a specified battery.
About the Charger
Do not use the charger in a high moisture environment. Never touch the charger
with wet hands, feet, or any other body part.
Allow adequate ventilation around the charger when using it to operate the device
Troubleshooting and Maintenance 7-5
Page 74

or charge the battery. Do not cover the charger with paper or other objects that
will reduce cooling. Do not use the charger while it is inside a carrying case.
Connect the charger to a proper power source.
If damaged, replace the charger with a manufacturer’s approved charger. Once
damaged, the charger cannot be repaired.
About the Battery
Use a specified charger approved by the manufacturer.
Do not place the batter in fire. The battery can burst or explode, releasing
hazardous chemicals.
Important instructions
Caution:
Dispose or recycle used batteries according to the instructions.
Only use a replacement battery recommended by the manufacturer.
The battery should only be used in the specified device.
Notices
FEDERAL COMMUNICATIONS COMMISSION INTERFERENCE
STATEMENT
This equipment has been tested and found to comply with the limits for a
Class B digital device, pursuant to part 15 of the FCC Rules. These limits
are designed to provide reasonable protection against harmful interference
in a residential installation. This equipment generates, uses and can radiate
radio frequency energy and, if not installed and used in accordance with
the instructions, may cause harmful interference to radio communications.
However, there is no guarantee that interference will not occur in a particular
installation. If this equipment does cause harmful interference to radio or
television reception, which can be determined by turning the equipment off
and on, the user is encouraged to try to correct the interference by one
or more of the following measures:
-Reorient or relocate the receiving antenna.
Troubleshooting and Maintenance 7-6
Page 75

-Increase the separation between the equipment and receiver.
-Connect the equipment into an outlet on a circuit different from that to
which the receiver is connected.
-Consult the dealer or an experienced radio/ TV technician for help.
CAUTION:
Any changes or modifications not expressly approved by the grantee of this
device could void the user's authority to operate the equipment.
This device complies with Part 15 of the FCC Rules. Operation is subject
to the following two conditions: (1) this device may not cause harmful
interference, and (2) this device must accept any interference received,
including interference that may cause undesired operation.
RF Exposure Information (SAR)
This device meets the government’s requirements for exposure to radio
waves. This device is designed and manufactured not to exceed the emission
limits for exposure to radio frequency (RF) energy set by the Federal
Communications Commission of the U.S. Government.
The exposure standard employs a unit of measurement known as the Specific
Absorption Rate, or SAR. The SAR limit set by the FCC is 1.6 W/kg. Tests
for SAR are conducted using standard operating positions accepted by the
FCC with the EUT transmitting at the specified power level in different
channels.
Troubleshooting and Maintenance 7-7
Page 76

The FCC has granted an Equipment Authorization for this device with all
reported SAR levels evaluated as in compliance with the FCC RF exposure
guidelines. SAR information on this device is on file with the FCC and can
be found under the Display Grant section of www.fcc.gov/eot/ea/fccid after
searching on FCC ID: ZK7SSERIES-A
Troubleshooting and Maintenance 7-8
Page 77

Chapter 8
GeoAssist Software
Starting GeoAssist
GeoAssist is a GPS utility, designed specifically for the Flint, that allows the end user to
view the status of the GPS and allows the user to configure the GPS and optimize it for
the environment for which it will be used. This instruction guide will show you all of the
features and their application.
GeoAssist Settings
GPS Tab
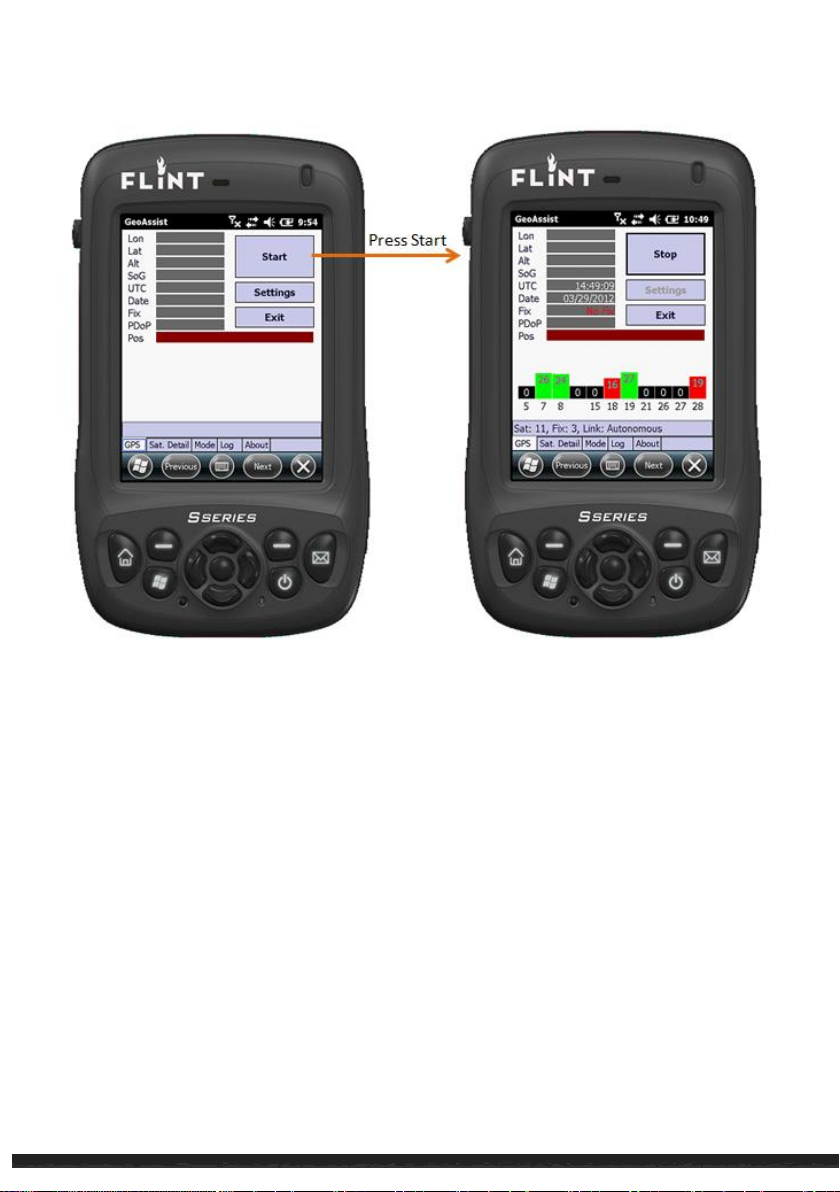
The GPS Tab allows you to set up the connection settings for the GPS, Start/Stop the
GPS communications as well as Exit the program.
The GPS Settings for the Flint handheld should be set to use COM 9 as the
communications port and the baud rate should be set to 9600.
Next, set the additional NMEA sentences you would like to have enabled. The GST
string reports the GPS Pseudorange Error (Noise) Statistics.
GeoAssist Software 8-1
Page 78
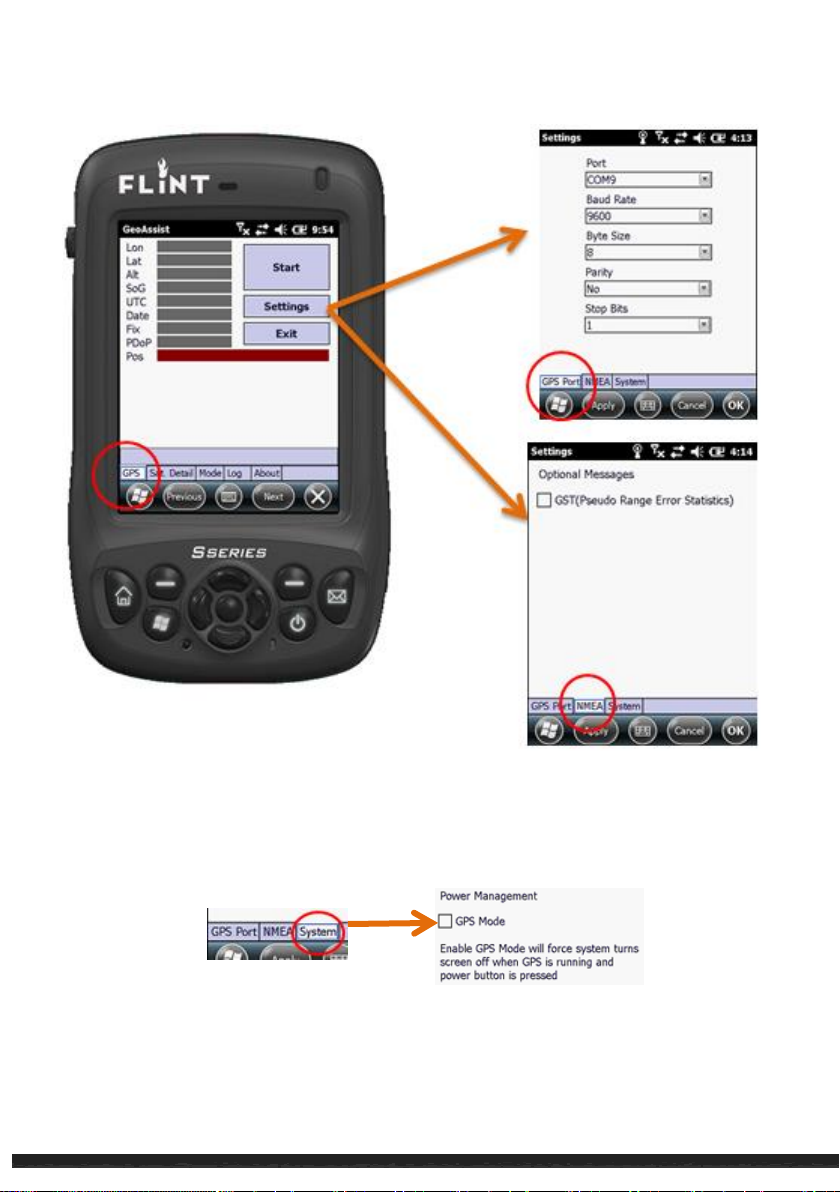
You can also force the GPS to run continuously, even though the system is turned off.
This enables immediate GPS positioning when the unit it turned on. To enable this,
select the System tab end activate the check box.
When satisfied, press the Apply button and then Start to start the GPS. GeoAssist will
access COM 9 and, once locked onto satellites, display the GPS data.
GeoAssist Software 8-2
Page 79
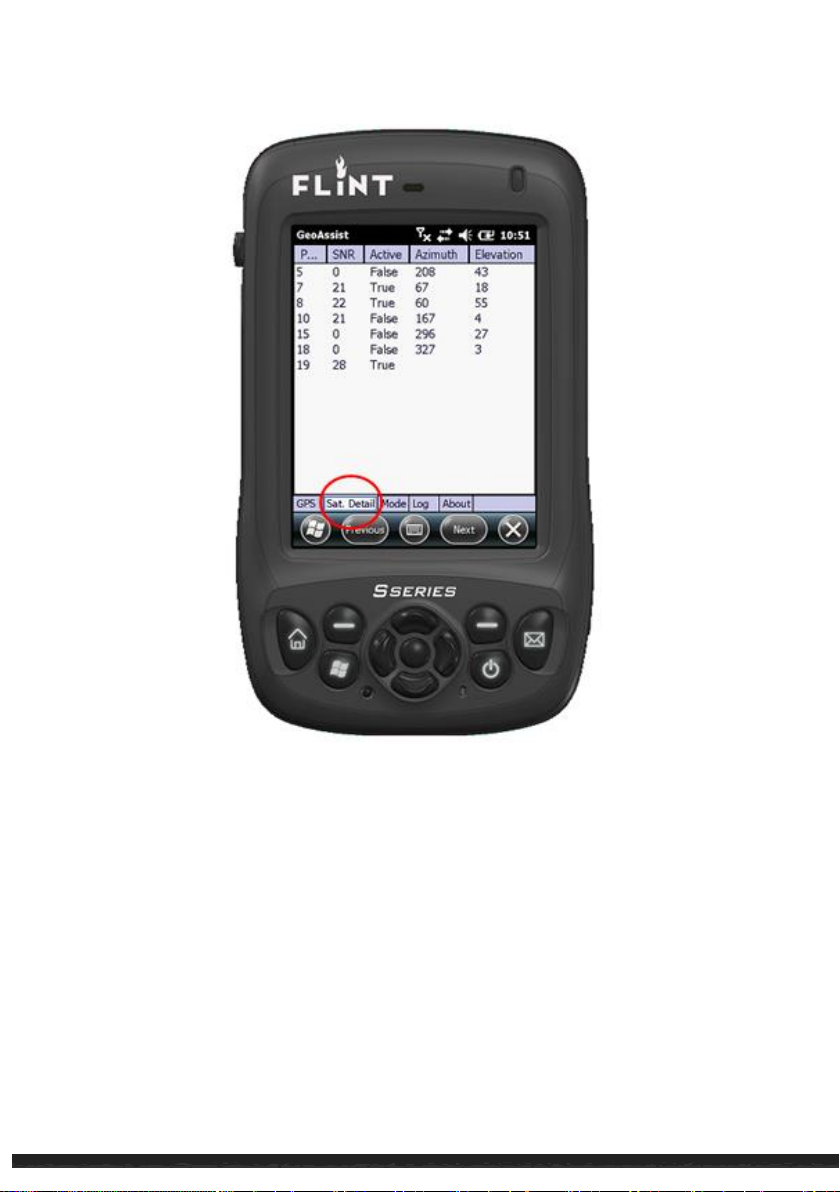
Satellite Detail Tab
The Satellite Detail tab gives you information regarding each satellite being used:
• PRN: Pseudo-Random Noise (unique identifier for each satellite)
• SNR: Signal to Noise Ratio
• Active: Used in Position – True/False
• Azimuth: Position in the Sky From True North
• Elevation: Elevation of Satellite Above the Horizon
GeoAssist Software 8-3
Page 80
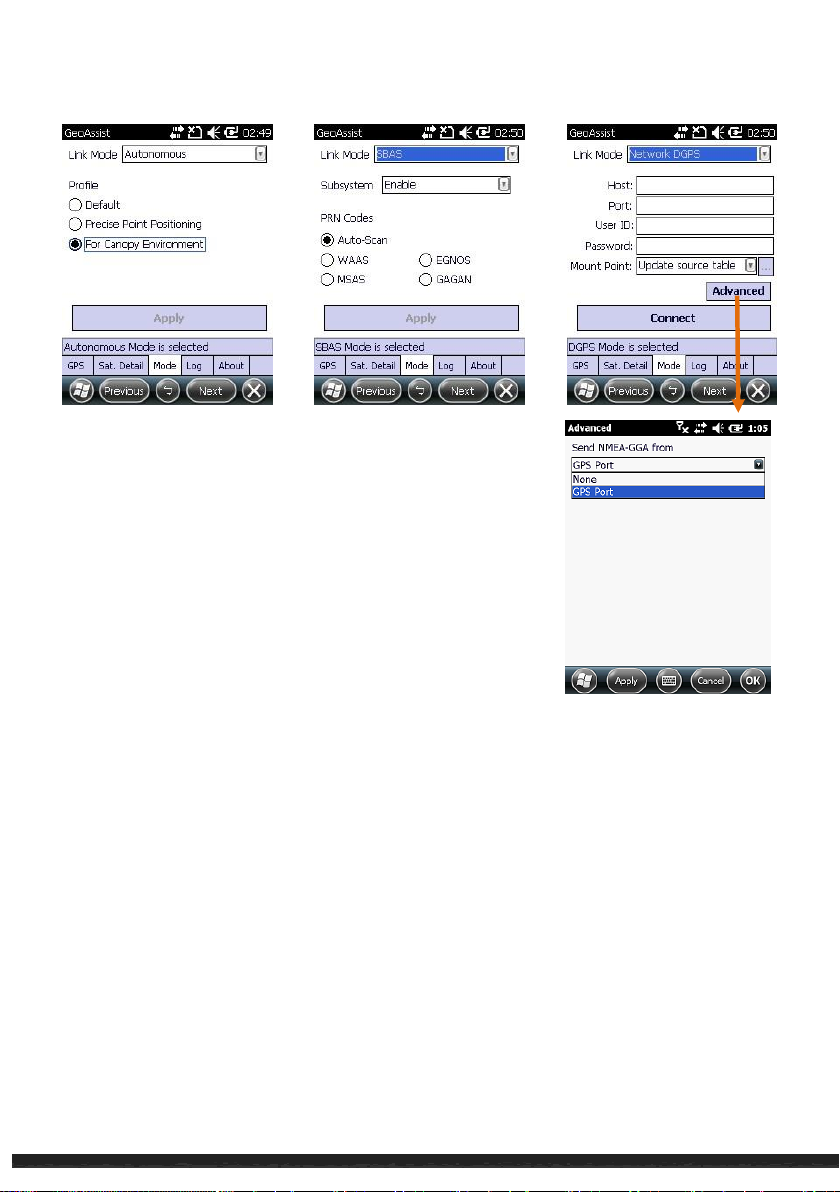
Use Mode Tab
Link Mode:
Autonomous
Profile:
1. Default– offers no enhanced settings or filter algorithms;
2. Precise Point Positioning– Precision, Open Sky
GeoAssist Software 8-4
Page 81

3. For Canopy Environments – Precision, High-Multipath Environments
SBAS
SBAS is enabled by default to automatically (auto-scan) locate the SBAS for the
local position. The GeoAssist Premium version gives you the following control over
SBAS:
• Subsystem:
1. Disable – Turn SBAS off
2. Enable – Turn SBAS on
• PRN Codes
Choose the SBAS that system that best fits your needs
• Press Apply when ready (In order for Apply to be active, the GPS must be
started)
Network DGPS
• Host: Enter your host name IP Address
• Port: Enter the Port given by provider
• User ID: Enter your User ID
• Password: Enter your Password
• Advanced – Some NTRIP Servers require the GGA string in order to process the
correction, here you can set from where the GGA string is sent.
• When the settings are correct, press the Connect button
GeoAssist Software 8-5
Page 82
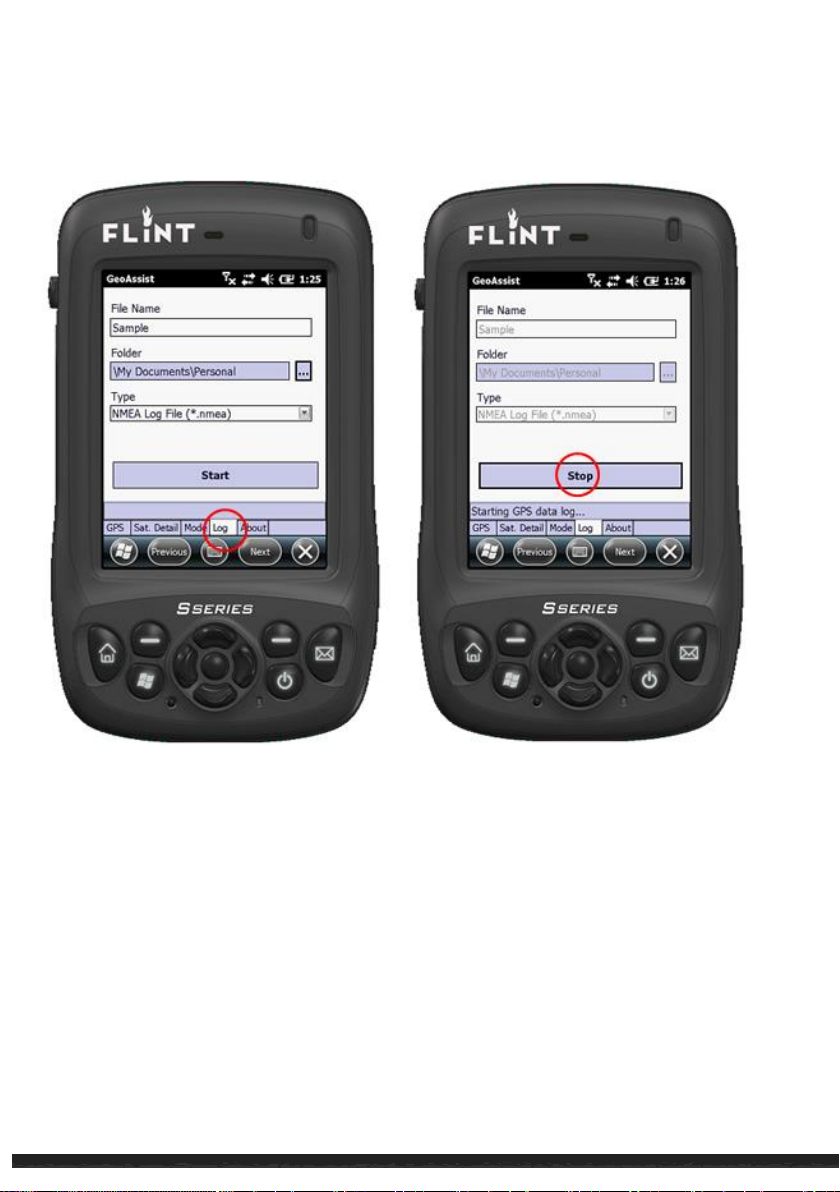
Log Tab
.nmea Data
The Log Tab gives you the ability to store NMEA data in a .nmea file.
This will not store feature, attribute or value data, just the raw .nmea string from
the gps receiver. Choose a storage location, then press Start. When you are finished,
press Stop.
GeoAssist Software 8-6
Page 83
GeoAssist Software 8-7
Page 84
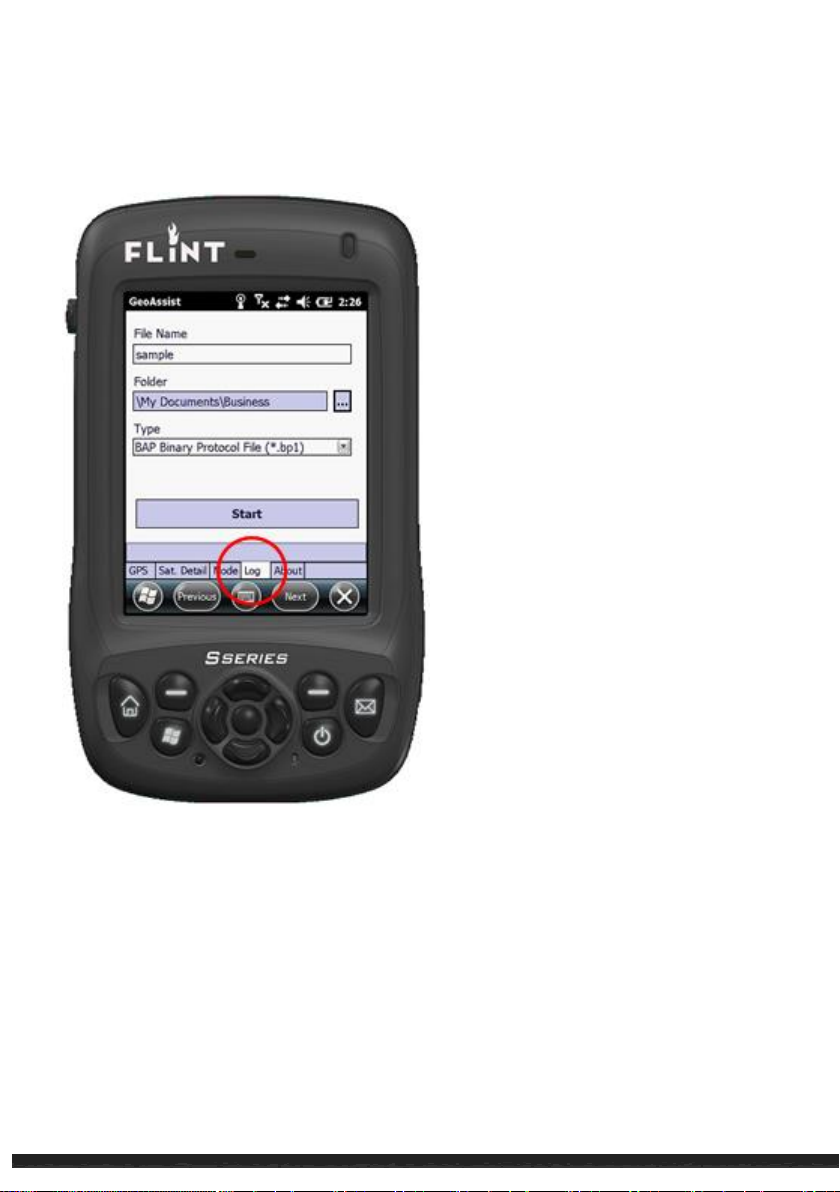
.bp1 (Binary) Data
The Flint is capable of storing Binary
data as well. This works in much the
same way as logging .nmea data. This
data can be converted to RINEX format
for post-processing. This process
requires the BAP RINEX Data Converter
for Desktop.
GeoAssist Software 8-8
Page 85
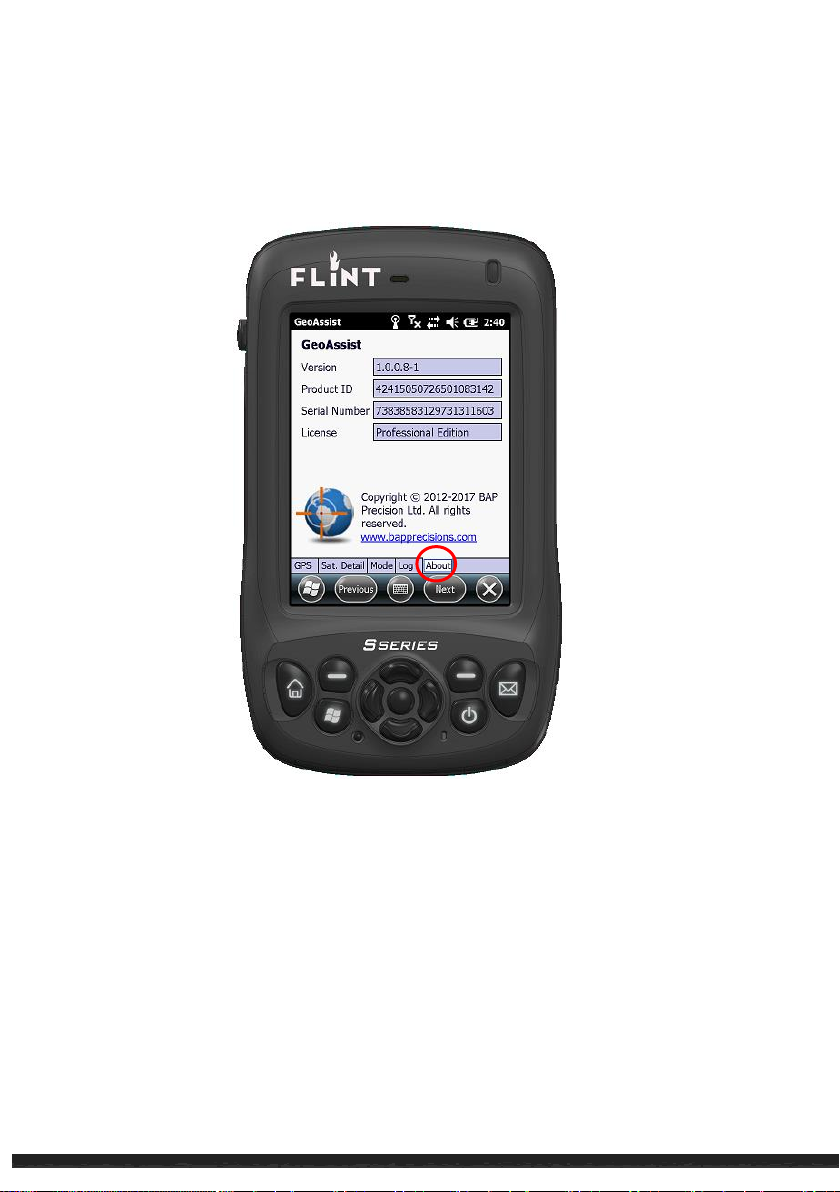
About Tab
The About Tab validates your license edition as well as version.
GeoAssist Software 8-9
Page 86

Page 87

Chapter 9
Recommended Settings
GPS Settings and Best Practices
Starting the GPS: Open GeoAssist and start the GPS. Choose the Mode tab and
select the mode for which you want to use the GPS. Leave GeoAssist running
while in use and collecting data.
GPS COM Port: COM 9
GPS Baud Rate: 9600
While in Canopy mode, it is best to walk directly to target and stop to collect
data. Wandering around target or moving the unit aimlessly may cause
inaccurate data.
If GPS performance is slow, reset the handheld.
Handheld Settings and Best Practices
Begin each day by resetting the handheld. This is normal practice for most
devices and will help with performance.
For best results and when possible, charge the device via the provided AC wall
charger or desktop battery charger. Charging via the auto adapter or USB may
take the unit longer to reach a full charge.
Recommended Settings 9-1
Page 88

Page 89

Chapter 10
Warranty Information
Warranty Terms
What this Limited Warranty Covers
F4Devices warrants that for a period of 2 years from date of purchase (the "Limited
Warranty Period"), the Flint S-Series Handheld device (the “Flint” or the “Product”) will
be materially free from defects under normal use and service. Batteries are warranted
only for 6 months from date of purchase. All other accessories are warranted for a
period of 1 year from date of purchase.
This limited warranty begins on the original date of purchase and continues through the
Limited Warranty Period. It is valid only on Flint devices purchased from a Flint
authorized reseller. Warranties are non-transferrable and are considered and
agreement between F4Devices and the original purchaser.
What this Limited Warranty Does Not Cover
Opening or dismantling of the Flint handheld device voids all warranties immediately.
This Limited Warranty does not cover:
a. damage as a result of accident, misuse, or abuse;
b. damage as a result of fire, water, lightning or other acts of nature;
c. cosmetic damage, such as to the exterior finish;
d. damage from applications and uses for which this product was not intended;
Warranty Information 10-1
Page 90

e. damage as a result of virus infection; password setting or resetting;
f. damage by modification without the prior written authorization of Flint;
g. damage as a result of service by anyone other than Flint or Flint’s authorized
agent;
h. damage as a result of normal wear and tear;
i. damage as a result of reconfiguration changes to the shipped product (either
hardware or software);
j. damage by breakage of the liquid crystal display (LCD);
k. if the Product serial number has been removed, defaced or altered;
l. if F4Devices or one of its authorized agents was not notified of the defect within
the Limited Warranty Period;
m. reception or display problems and distortion related to noise, echo, interference
or other signal transmission and delivery problems;
n. burned-in images resulting from viewing an image on the display screen for an
extended period of time;
o. minor imperfections within design specifications or that do not materially alter
functionality;
p. adjustments and failure to follow operating instructions, instructions for
installing a user-installable part, or cleaning, maintenance and environmental
instructions that are covered and prescribed in the instruction book, including
incorrect installation of hardware or software; and
q. use of products, equipment, systems, utilities, services, parts supplies,
accessories, applications, installations, repairs, external wiring or connectors not
supplied or authorized by Flint.
What F4Devices Will Do to Correct Problems
If the Product is found to be defective as a result of manufacturing defects in materials
and workmanship during the Limited Warranty Period, F4Devices will, at its sole option
(1) repair or replace the Product, at no charge, with new or refurbished parts or with a
Warranty Information 10-2
Page 91

new or refurbished functionally equivalent product, or (2) provide a refund of the
purchase price of the Product, LESS THE PRODUCT᾽S DEPRECIATED VALUE. [Do we want
to use a depreciated price? If so, we need to explain how the depreciation will be
calculated.]
The Limited Warranty Period for the repaired or replaced Product will end on the
termination date of the Limited Warranty Period of the original Product.
How Do I Obtain Warranty Service?
Before any warranty service will be provided, the purchaser must register their device at
www.f4devices.com/register.
If the product fails during the Limited Warranty Period, for reasons covered by this
Limited Warranty, you must immediately notify F4Devices or one of its authorized
agents at time of such failure. For more information on where to send your Flint
Handheld for repair, please contact F4Devices or your Reseller. In the event the
Reseller is no longer available, please contact F4Devices directly and you will receive
instructions on how to proceed.
Limitation of Liability
This Limited Warranty is the final, complete and exclusive agreement between
F4Devices and the purchaser. This warranty is governed by the State of Florida without
reference to its conflict of law provisions.
THERE ARE NO EXPRESS WARRANTIES OTHER THAN THOSE LISTED AND DESCRIBED
ABOVE. NO WARRANTIES WHETHER EXPRESS OR IMPLIED, INCLUDING, BUT NOT
LIMITED TO, ANY IMPLIED WARRANTIES OF MERCHANTABILITY OR FITNESS FOR A
PARTICULAR PURPOSE SHALL APPLY AFTER THE EXPRESS LIMITED WARRANTY
PERIODS STATED ABOVE. NO OTHER EXPRESS WARRANTY OR GUARANTY GIVEN BY
ANY PERSON, FIRM OR CORPORATION WITH RESPECT TO THIS PRODUCT SHALL BE
BINDING ON F4DEVICES. F4DEVICES ASSUMES NO RESPONSIBILITY THAT THE
PRODUCT WILL BE FIT FOR ANY PARTICULAR PURPOSE FOR WHICH YOU MAY BE
BUYING THE PRODUCT, EXCEPT AS OTHERWISE PROVIDED IN THIS LIMITED
WARRANTY OR IN APPLICABLE LAW.
Warranty Information 10-3
Page 92

F4DEVICES SHALL NOT BE LIABLE FOR LOSS OF REVENUE OR PROFITS, FAILURE TO
REALIZE SAVINGS OR OTHER BENEFITS, OR ANY OTHER SPECIAL, INCIDENTAL OR
CONSEQUENTIAL DAMAGES CAUSED BY THE USE, MISUSE OR INABILITY TO USE THE
PRODUCT, REGARDLESS OF THE LEGAL THEORY ON WHICH THE CLAIM IS BASED, AND
EVEN IF F4DEVICES HAS BEEN ADVISED OF THE POSSIBILITY OF SUCH DAMAGES. NO
RECOVERY OF ANY KIND AGAINST F4DEVICES SHALL BE GREATER IN AMOUNT THAN
THE PURCHASE PRICE OF THE PRODUCT SOLD BY F4DEVICES AND CAUSING THE
ALLEGED DAMAGE.
WITHOUT LIMITING THE FOREGOING, YOU ASSUME ALL RISK AND LIABILITY FOR LOSS,
DAMAGE OR INJURY TO YOU AND YOUR PROPERTY AND TO OTHERS AND THEIR
PROPERTY ARISING OUT OF THE USE, MISUSE OR INABILITY TO USE THE PRODUCT
NOT CAUSED DIRECTLY BY THE NEGLIGENCE OF F4DEVICES. THIS LIMITED WARRANTY
STATES YOUR EXCLUSIVE REMEDY.
If there is any inconsistency between this Limited Warranty and any other agreement or
statement included with or relating to the F4Devices products or services, this limited
warranty shall govern. If any provision of this limited warranty is found invalid or
unenforceable, it shall be deemed modified to the minimum extent necessary to make
it enforceable and the remainder of the limited warranty shall remain valid and
enforceable according to its terms.
How State Law Relates to this Limited Warranty
Some states, provinces or territories do not allow limitations on how long an implied
warranty lasts or the exclusion or limitation of incidental or consequential damages, so
the above limitations or exclusions may not apply to you. Some states may provide for
additional warranty rights and remedies, and the provisions contained in this limited
warranty are not intended to limit, modify, take away from, disclaim or exclude any
mandatory warranty requirements provided by states, including certain implied
warranties. This warranty gives you specific legal rights, and you may also have other
rights which vary from state to state.
Additional Warranty Coverage Available for an Additional Fee
Extension of Limited Warranty Period
Warranty Information 10-4
Page 93

For an additional fee, an extension of the Limited Warranty Period is available in 12
month intervals for limited warranty coverage of up to 4 years total. The additional
warranty can extend the Limited Warranty Period for up to the specified additional
time purchased, but in no event shall the Limited Warranty Period be extended beyond
four years from the date of purchase.
No Fault Warranty
For an additional fee, a No Fault Warranty is available for purchase at time of initial
Flint purchase. No Fault Warranties cannot be purchased at a later date.
***IMPORTANT***
If you choose to purchase the No Fault Warranty, Know This: The No Fault Warranty
only applies to the first year of original ownership and covers ANY accident that may
occur. This warranty can only be used only once and should be viewed as a “Get Out Of
Jail Free” card for the customer’s protection. Once the No Fault Warranty has been
used, it is no longer available, even if the Product is damaged again within the first year
of ownership. In order to receive the warranty, F4Devices must be notified of the
damage claim and receive the damaged Product within the warranty period before
replacement or remedy occurs. The No Fault Warranty does not cover theft or loss.
經型式認證合格之低功率射頻電機,非經許可,公司、商號或使用者均不得
擅自變更頻率、加大功率或變更原設計之特性及功能。
低功率射頻電機之使用不得影響飛航安全及干擾合法通信;經發現有干擾現
象時,應立即停用,並改善至無干擾時方得繼續使用。
前項合法通信,指依電信法規定作業之無線電通信。低功率射頻電機須忍受
合法通信或工業、科學及醫療用電波輻射性電機設備之干擾。
Warranty Information 10-5
 Loading...