


S SERIES |
USER MANUAL |
Rugged Portable Solutions

ENERGY STAR® is a government program that offers businesses and consumers energy-efficient solutions, making it easy to save money while protecting the environment for future generations.
Please reference ENERGY STAR® related information from www.energystar.gov.
BAP Precision LTD. has determined that this product meets the ENERGY STAR® guidelines for energy efficiency.
An ENERGY STAR® qualified computer uses 70 % less electricity than computers without enabled power management features.
Earning the ENERGY STAR®
When every home office is powered by equipment that has earned the ENERGY STAR®, the change will keep over 289 billion pounds of greenhouse gases out of the air.
If left inactive, ENERGY STAR® qualified computers enter a low-power mode and may use 15 watts or less. New chip technologies make power management features more reliable, dependable, and user-friendly than even just a few years ago.
Spending a large portion of time in low-power mode not only saves energy, but helps equipment run cooler and last longer.
Businesses that use ENERGY STAR® enabled office equipment may realize additional savings on air conditioning and maintenance.

Over its lifetime, ENERGY STAR® qualified equipment in a single home office (e.g., computer, monitor, printer, and fax) can save enough electricity to light
an entire home for more than 4 years.
Power management (“sleep settings”) on computers and monitors can result in much savings annually.
Remember, saving energy prevents pollution
Because most computer equipment is left on 24 hours a day, power management features are important for saving energy and are an easy way to reduce air pollution. By using less energy, these products help lower consumers’ utility bills, and prevent greenhouse gas emissions.
Table of Contents
Chapter 1 |
Getting Started.............................................................................................................. |
|
|
1-1 |
||
|
Identifying Hardware Components ..................................... |
1-1 |
||||
|
Front |
Components ..................................................... |
|
1-1 |
||
|
Back |
Components ..................................................... |
|
1-4 |
||
|
Bottom Components................................................... |
|
1-5 |
|||
|
Connecting to AC Power and Charging the Battery.......... |
1-6 |
||||
|
Performing |
the |
Initial |
Startup ....................................... |
1-6 |
|
|
Synchronizing |
with |
Your |
Computer.................................... |
1-7 |
|
|
Installing ActiveSync |
or WMDC .................................... |
1-8 |
|||
|
Using Options.............................................................. |
|
|
1-9 |
||
|
Using |
an |
SD Card.................................................... |
|
1-9 |
|
Chapter 2 |
Basic Skills .................................................................................................................... |
|
2-1 |
|
|
Power Saving and Turning Off |
........................................2-1 |
||
|
Backlight |
Off ............................................................ |
2-1 |
|
|
Entering |
the |
Suspend Mode ........................................ |
2-1 |
|
Turning |
Off.............................................................. |
|
2-2 |
|
Navigating |
on |
the Screen............................................... |
2-2 |
|
Stylus..................................................................... |
|
|
2-2 |
|
Today Screen .............................................................. |
|
2-3 |
|
|
Landscape View........................................................ |
2-3 |
||
|
Navigation |
Bar |
and Toolbar ............................................ |
2-3 |
i
|
Programs |
.................................................................... |
|
|
|
|
2-4 |
|
Notifications ................................................................. |
|
|
|
2-4 |
||
|
Entering |
Information....................................................... |
2-5 |
||||
|
Entering Text Using the Input Panel ............................. |
2-5 |
|||||
|
Writing |
on the |
Screen ............................................... |
2-6 |
|||
|
Drawing |
on |
the |
Screen .............................................. |
2-6 |
||
|
Recording |
a |
Message ................................................ |
2-7 |
|||
|
Using |
My |
Text ......................................................... |
|
2-8 |
||
|
Securing |
Your |
Device.................................................... |
2-8 |
|||
|
Locking |
the |
Keypad................................................... |
2-8 |
|||
|
Locking |
Your Device.................................................. |
2-8 |
||||
Chapter 3 |
Using the Phone (Select Models Only) ............................................................. |
3-1 |
|||||
|
About Your |
Phone |
........................................................ |
3-1 |
|||
|
Switching On or Off the Phone ................................... |
3-2 |
|||||
|
Starting |
Microsoft Phone............................................. |
3-2 |
||||
|
Phone |
Status Icons ................................................... |
3-3 |
||||
|
Making a |
Call ............................................................. |
|
|
3-4 |
||
|
Dialing |
|
a |
Call .......................................................... |
|
3-4 |
|
|
Making a Call from the Onscreen List .......................... |
3-4 |
|||||
|
Making a Call from Contacts....................................... |
3-5 |
|||||
|
Making a Call from the Call History List ....................... |
3-5 |
|||||
|
Making a Call from Speed Dial ................................... |
3-6 |
|||||
|
Responding to |
a Call.................................................... |
3-6 |
||||
|
Answering |
a |
Call ...................................................... |
3-7 |
|||
|
Rejecting |
a |
Call ....................................................... |
3-7 |
|||
|
Ending |
a |
Call .......................................................... |
|
3-7 |
||
|
Operations |
during |
a Call................................................ |
3-7 |
|||
|
Adjusting |
the Phone Volume........................................ |
3-7 |
||||
|
Using |
the |
Mute |
Function ............................................ |
3-8 |
||
ii
|
Using |
the |
Speakerphone............................................. |
3-8 |
||||
|
Managing More Than One Call.................................... |
3-8 |
||||||
|
Taking a Note during a Call..................................... |
3-10 |
||||||
|
Using Call |
History ...................................................... |
|
|
3-10 |
|||
|
Viewing Call History ................................................ |
|
3-10 |
|||||
|
Adding an Entry to Contacts Using Call History............. |
3-11 |
||||||
|
Using Speed |
Dial |
........................................................ |
|
|
3-11 |
||
|
Creating a Speed Dial Entry ...................................... |
3-11 |
||||||
|
Editing or Deleting a Speed Dial Entry ....................... |
3-12 |
||||||
|
Customizing |
Your |
Phone .............................................. |
|
3-13 |
|||
|
Changing |
Phone Settings .......................................... |
3-13 |
|||||
|
Changing |
Security |
Settings ........................................ |
3-13 |
||||
|
Changing |
Services |
Settings ....................................... |
3-14 |
||||
|
Changing |
Network |
Settings........................................ |
3-14 |
||||
|
Additional |
Phone |
Operations.......................................... |
3-15 |
||||
|
Using |
Text |
Messages............................................... |
|
3-15 |
|||
|
Setting up an Internet Connection .............................. |
3-15 |
||||||
|
Checking |
Your |
Voice Mail......................................... |
3-15 |
||||
|
Making |
an |
Emergency |
Call ....................................... |
3-15 |
|||
|
Dialing |
an |
International |
Call ...................................... |
3-16 |
|||
Chapter 4 |
Managing Your Device.............................................................................................. |
|
|
4-1 |
||||
|
Managing |
Power........................................................... |
|
|
|
4-1 |
||
|
Low Battery Signals and Actions.................................. |
4-1 |
||||||
|
Power-Saving |
Tips |
.................................................... |
|
4-2 |
|||
|
Customizing |
Your |
Device................................................ |
|
4-3 |
|||
|
Settings |
– |
Personal................................................... |
|
4-3 |
|||
|
Settings |
– |
System..................................................... |
|
|
4-4 |
||
|
Settings |
– |
Connections............................................... |
|
4-5 |
|||
|
Searching |
and Organizing |
Information................................ |
4-6 |
||||
iii
Chapter 5 |
Microsoft Pocket Outlook ....................................................................................... |
5-1 |
|
Calendar: Scheduling Appointments and Meetings ................ |
5-1 |
|
Creating an Appointment............................................. |
5-2 |
|
Using the Calendar Summary Screen ............................ |
5-2 |
|
Contacts: Tracking Friends and Colleagues ........................ |
5-3 |
|
Creating a Contact.................................................... |
5-3 |
|
Using the Contacts Summary Screen ............................ |
5-4 |
|
Tasks: Keeping a To Do List......................................... |
5-4 |
|
Creating a Task ....................................................... |
5-4 |
|
Using the Tasks Summary Screen................................ |
5-5 |
|
Notes: Capturing Thoughts and Ideas ............................... |
5-5 |
|
Creating a Note ....................................................... |
5-5 |
|
Messaging: Sending and Receiving Messages..................... |
5-6 |
|
About Accounts......................................................... |
5-6 |
|
Reading E-mail Messages .......................................... |
5-7 |
|
Composing and Sending an E-mail .............................. |
5-7 |
|
Reading Text Messages (Select Models Only)............... |
5-8 |
|
Composing and Sending a Text Message (Select |
|
|
Models Only) ....................................................... |
5-9 |
Chapter 6 |
More Programs ............................................................................................................ |
6-1 |
|||
|
ActiveSync................................................................... |
|
|
6-1 |
|
|
Synchronizing Data .................................................... |
6-2 |
|||
|
Synchronizing Directly with Exchange Server ................... |
6-2 |
|||
|
Office Mobile ............................................................... |
|
6-4 |
||
|
Creating |
a |
Document/Workbook/Note ............................ |
6-4 |
|
|
Opening |
a |
Document/Workbook/Note/Presentation ........... |
6-4 |
|
|
Internet |
Explorer ........................................................... |
6-5 |
||
|
Windows |
Live |
and Messenger ......................................... |
6-6 |
|
|
Setting |
up |
Windows Live............................................ |
6-6 |
|
iv
|
Signing |
in to Messenger............................................. |
6-6 |
||
|
Windows |
Media............................................................ |
|
6-7 |
|
|
Pictures |
& |
Videos ........................................................ |
|
6-7 |
|
Viewing |
Pictures |
and Videos ....................................... |
6-8 |
|
|
Camera ...................................................................... |
|
|
|
6-8 |
|
Taking Pictures......................................................... |
|
6-8 |
||
|
Recording Video |
Clips.............................................. |
6-10 |
||
|
Internet Sharing (Select Models Only)........................... |
6-12 |
|||
|
Remote |
Desktop Mobile ............................................... |
6-13 |
||
Chapter 7 |
Getting Connected ...................................................................................................... |
|
7-1 |
||
|
Types of Connections .................................................... |
7-1 |
|||
|
Using Cellular Connection (Select Models Only) ................ |
7-2 |
|||
|
Setting up a Cellular (GPRS) Connection .................... |
7-2 |
|||
|
Setting up a Dial-up Connection.................................. |
7-3 |
|||
|
Using Wireless Network ................................................. |
7-4 |
|||
|
Switching On or Off the Wi-Fi Radio........................... |
7-4 |
|||
|
Connecting to a Wireless Network ................................ |
7-4 |
|||
|
Using the |
Bluetooth |
Function .......................................... |
7-5 |
|
|
Switching On or Off the Bluetooth Radio....................... |
7-6 |
|||
|
Sending Files via the Bluetooth Function ....................... |
7-7 |
|||
|
Creating |
a Bluetooth Partnership .................................. |
7-7 |
||
Chapter 8 |
Appendix........................................................................................................................... |
|
|
7-1 |
|
|
FCC warning ............................................................... |
|
7-1 |
||
v
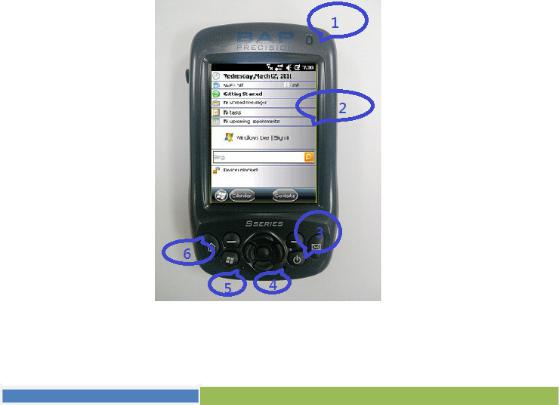
Chapter 1
Getting Started
This chapter introduces you to the external components of your device and guides you through the process of setting up your device for use.
Identifying Hardware Components
Front
Getting Started 1-1

Ref |
Component |
|
|
|
|
Description |
|
|
|
|
|
|
|
|
|||
|
LED Indicator |
blinking green shows |
charging |
|
|
|||
|
|
|
|
|
||||
|
|
steady green shows battery full |
|
|
||||
|
|
|
|
|
||||
|
|
blinking red shows battery low |
|
|
||||
|
|
|
|
|
||||
|
|
steady red shows battery fault |
|
|
||||
|
|
|
||||||
|
|
alternately showing green and amber -> battery charging with |
||||||
|
|
Windows |
notify |
|
|
|
||
|
|
|
|
|
||||
|
|
alternately showing red and amber |
-> battery low |
with |
||||
|
|
Windows |
notify |
|
|
|
||
|
|
|
||||||
|
|
alternately showing amber and green -> battery full with |
||||||
|
|
Windows |
notify |
|
|
|
||
|
|
|
||||||
|
|
alternately showing amber and red -> battery fault with |
||||||
|
|
Windows |
notify |
|
|
|
||
|
|
|
|
|
|
|
|
|
|
Touch Screen |
Displays |
the |
output of |
your device |
and responds to |
your |
|
|
|
tapping. |
|
|
|
|
|
|
|
|
|
|
|
|
|
|
|
|
Power Button |
Turns |
on |
or |
off your |
device. |
|
|
|
|
|
|
|
|
|
||
|
Microphone |
Records |
voices. |
|
|
|
||
|
|
|
||||||
|
|
Serves as the mouthpiece during a call (select models only). |
||||||
|
|
|
|
|
|
|
||
|
Reset |
Reset |
the device |
|
|
|
||
|
|
|
|
|
|
|
|
|
|
Keypad |
See |
the |
next section |
for details |
|
|
|
|
|
|
|
|
|
|
|
|
1-2 Getting Started
Keypad
Ref |
Component |
|
|
Description |
|
|
|
||
|
Left/Right Soft |
Performs the command shown on the bottom left or right |
||
|
Key |
corner of the screen. |
||
|
|
|
||
|
Home |
Bring you to “Today” screen. |
||
|
|
|
|
|
|
Message |
Composing |
and |
Sending Messages |
|
|
|
|
|
|
Start Menu |
Open the |
Start |
menu. |
|
|
|
||
|
Power Button |
Turns your Pocket PC on or off. |
||
|
|
|
||
|
Navigation |
Moves up, down, left or right by pressing the buttons |
||
|
Button |
respectively. Select the item by pressing the center button. |
||
|
|
|
|
|
Getting Started 1-3
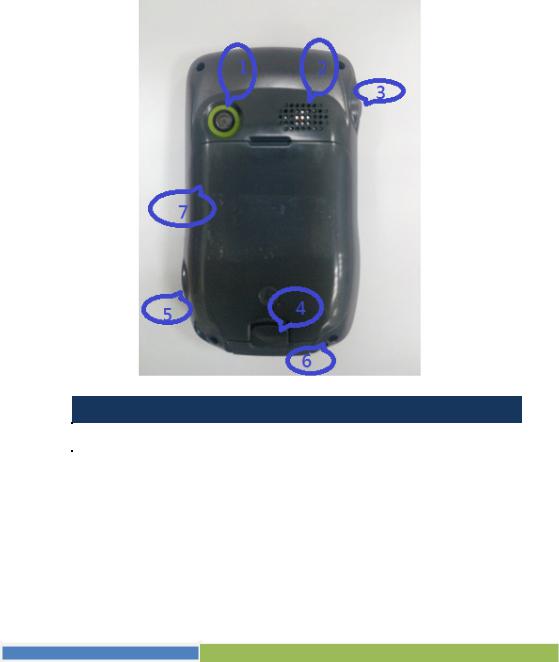
Back /Sides
Ref |
Component |
Description |
|
|
|
|
Camera |
Takes still pictures or records video clips. |
|
|
|
|
Speaker |
Plays music, sounds and voices. |
|
|
|
|
Battery Cover |
Battery Inside. |
|
|
|
|
Release button |
To open the battery cover |
|
|
|
|
Stylus |
Serves as the input device by tapping on the touch screen |
|
|
to make selections and enter information. |
|
|
|
1-4 Getting Started
|
Lanyard hole |
Hand string attaches to this hole. |
|
|
|
|
Camera button |
Press to take a photo |
|
|
|
|
External GPS |
This connector (under rubber dust cover) allows use of an |
|
Antenna |
optional external antenna which may be positioned on top |
|
|
|
|
|
of the car for better signal reception in areas with poor |
|
|
reception. |
|
|
|
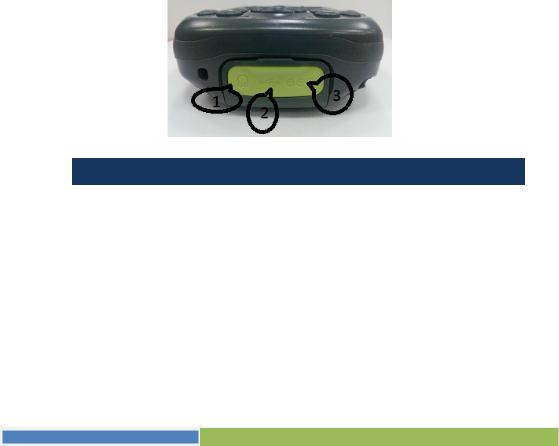
Bottom Components
Ref |
Component |
|
|
|
|
Description |
||
|
|
|
|
|
|
|
|
|
|
Headphone |
Connects |
to |
a pair |
of |
stereo |
headphones. |
|
|
Connector |
|
|
|
|
|
|
|
|
|
|
|
|
|
|
|
|
|
USB OTG (Host & |
Connects |
to |
the |
USB |
cable. |
|
|
|
Client) Connector |
|
|
|
|
|
|
|
|
|
|
|
|
|
|
|
|
|
Power Connector |
Connects |
to |
the |
AC |
adapter |
for charging the battery. |
|
|
|
|
|
|
|
|
|
|
Getting Started 1-5

Connecting to AC Power and Charging the Battery
Be |
sure to fully charge the battery before |
using your |
device for |
the |
first |
time. |
|
1. |
Fit the converter plug to the AC charger. |
|
|
|
|
|
|
2. |
Connect the DC jack end of the AC adapter to your |
device |
and |
the |
other |
||
|
end to a wall outlet. |
|
|
|
|
|
|
3. |
The LED indicator blinking green when |
charging is |
in |
progress. |
|
|
|
Do not disconnect your Pocket PC from AC power until the battery is fully charged. This will take a couple of hours.
CAUTION: For optimal performance of the lithium battery, take note of the following:
Use the included AC adapter only.
There is no need to fully discharge the battery before charging. You can charge the battery before it is discharged.
Do not charge the battery where the temperature is high (e.g. in direct sunlight).
If you will not use the product for a long period of time, be sure to fully charge the battery at least once every two weeks. Over discharge of the battery can affect the charging performance.
Your device can also be charged when it is connected to a desktop computer via the USB cable.
Performing the Initial Startup
When turning on your device for the very first time, you will be guided through a setup process.
1.Make sure that your device is either connected to AC power or the battery has power.
2.Press the power button to turn on your device.
1-6 Getting Started

3. Follow the on-screen instructions to complete the setup wizard.
4. For models with the phone function only:
If a SIM card has been inserted and the mobile phone network operator (or you) has set the PIN, you will be prompted to enter the PIN.
If a SIM card has not been inserted yet, a message of an invalid or missing SIM card will appear on the screen. You can tap Cancel to continue the startup procedure.
5.After the setup is completed, the Today screen appears. You can now use your device.
Synchronizing with Your Computer
ActiveSync and Windows Mobile Device Center (WMDC) provide an easy way to synchronize data on a Windows-based computer with your device. ActiveSync works on computers that have the Windows XP operating systems. WMDC works only on computers that have Windows 7 or Windows Vista.
ActiveSync and WMDC act as gateways between your device and your computer for transferring Outlook e-mail, appointments, contacts, and tasks, and media such as pictures, music, and videos. You can also use the Explore feature in either program to move files or programs from your computer to your device.
Getting Started 1-7

Installing ActiveSync or WMDC
If you’re using Windows XP or earlier versions of Windows, install ActiveSync.
If you’re using Windows 7 or Windows Vista, download and install Windows Mobile Device Center.
(Visit the Microsoft website to download the program and to obtain operating instructions.)
NOTE:
Before installation, make sure that you have Microsoft Outlook installed on your computer.
Connect your device to the computer AFTER ActiveSync or Windows Mobile Device Center is installed.
ActiveSync connection problems may occur in some specific cases. They are likely caused by interoperability with desktop firewall applications or applications that manage network traffic. For troubleshooting information, visit the Microsoft web site.
After the software installation, connect your device to your computer with the USB cable and you are ready to synchronize.
1-8 Getting Started

Using Options
Using an micro SD Card
Your device has a micro SD (micro Secure Digital) card slot where you can insert a micro SD memory card.
NOTE:
Make sure that no foreign objects enter the slot.
Keep a micro SD card in a well-protected box to avoid dust and humidity when you are not using it.
Getting Started 1-9

Chapter 2
Basic Skills
This chapter familiarizes you with the basic operations of your Pocket PC such
as using the stylus, navigation buttons, Home screen, menus, and programs. You
will also know how to enter information and lock your Pocket PC.
Power Saving and Turning Off
Backlight Off
The backlight of the screen dims out after a period of inactivity (default 30 seconds while on battery power and 1 minute while on external power).
To restore the backlight, tap the screen |
or press a |
button. |
Note that where you |
tap or what you press also causes the |
related task |
to be |
performed. |
Entering the Suspend Mode
Your device automatically suspends after a period of inactivity (default 3 minutes while on battery power and 5 minutes while on external power).
To manually suspend the device, briefly press the power button.
To resume operation, press the power button. You will be back to where you left off.
Basic Skills 2-1
Turning Off
If you are not using your device, press and hold the power button until the device plays a 3 second countdown notification and turns off.
Navigating on the Screen
Stylus
Use the stylus to navigate and select objects on the screen.
Pull the stylus out of the slot |
and extend it for |
ease of use. Store it in the slot |
when not in use. |
Tap
Touch the screen once with the stylus to open items and select options.
Drag
Hold the stylus on the screen and drag across
the screen to select text and images. Drag in a list to select multiple items.
Tap and hold
Tap and hold the stylus on an item to see a list of actions available for that item. On the shortcut menu that appears, tap the action you want to perform.
Navigation Button
You can also use the navigation button to navigate on the screen.
2-2 Basic Skills

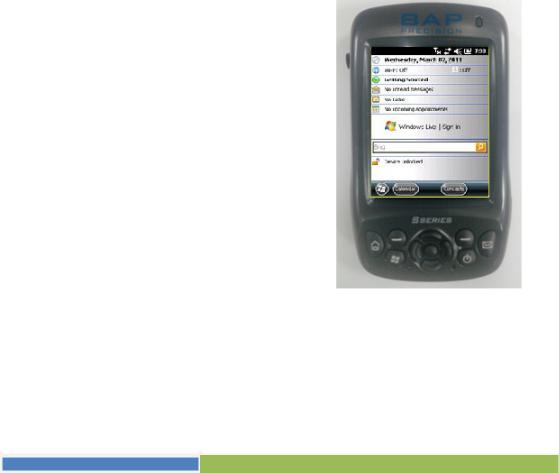
Home Screen
When you switch on your device for the first time each day, you will see the Home screen. The Home screen can be easily accessed from any screen by tapping  and then Home.
The Home screen shows your upcoming appointments, active tasks, information about e-mail messages, and more. You can tap a section on the Home screen to open the program that is associated with that section.
Landscape View
You can use your device in a landscape manner. To change the screen view, tap
 Settings System Screen General Landscape or Portrait.
Navigation Bar and Toolbar
The navigation bar is located at the top of the screen. It displays the active programs
and indicators for connectivity, volume, power, time, and others.
Basic Skills 2-3
You can tap this bar to set up related items.
The navigation bar:
Use the toolbar at the bottom of the screen to perform tasks in the active
program. The toolbar includes buttons such as the input panel button and Menu
button.
An example of the toolbar:
Programs
You can switch from one program to another without closing any program.
To run a program, tap  at the left-bottom corner of the screen to open the
Start menu. The Start menu contains all the program icons. You can drag the
screen up or down to see other program icons.
Notifications
Your device reminds you in a variety of ways when you have something to do. For example, if you have set up an appointment in Calendar, a task with a due date in Tasks or an alarm in Clock, you will be notified in any of the following ways:
2-4 Basic Skills

|
A |
message appears on the screen. |
|
A |
sound, which you can specify, is played. |
The notification indicator flashes in amber.
To choose reminder types and sounds for your device, tap  Settings Sounds & Notifications.
Entering Information
You have several options for entering new information:
Use the Input panel to enter typed text, either by using the on-screen keyboard or other input methods.
Write directly on the screen.
Draw pictures on the screen.
Speak into the microphone to record a message.
Entering Text Using the Input Panel
Use the Input panel to enter information in any program on your device. You can either type using the on-screen keyboard or write using a recognizer. In any case, the characters appear as typed text on the screen.
To show or hide the Input panel, tap the  . By default, the soft keyboard appears.
To change to a different input mode, tap and hold  and select from the popup
menu.
Basic Skills 2-5

When you use the Input panel, your device anticipates the word you are typing or
writing and displays |
it above |
the Input panel. When you tap the displayed word, |
it is inserted into your text at |
the insertion point. The more you use your device, |
|
the more words it |
learns to |
anticipate. |
Recognizer
With a recognizer, you can write letters |
using the |
stylus just as you would |
use a |
pen on paper. |
|
|
|
When you write a letter, it is converted |
to typed |
text that appears on the |
screen. |
For specific instructions on using a recognizer, open a recognizer and then tap the question mark next to the writing area.
Writing on the Screen
In any program that accepts writing, such as the Notes program, you can use your
stylus to |
write |
directly |
on the screen. Write the way you do on paper. You can |
edit and |
format |
what |
you have written and convert the information to text later. |
To write on the screen, tap  Draw to switch to drawing mode. A check (√) appears before the command.
Drawing on the Screen
You can draw on the screen in the same way that you write on the screen.
1.Tap  Draw to enable drawing mode. A check (√) appears before the command.
2-6 Basic Skills

2.To create a drawing, cross three ruled lines on your first stroke. A drawing box appears.
3.Subsequent strokes in or touching the drawing box become part of the drawing. Drawings that do not cross three ruled lines will be treated as writing.
Recording a Message
You can quickly capture thoughts, reminders and phone numbers by recording a message. In the Notes program, you can either create a stand-alone recording or include a recording in a written note. If you want to include the recording in a note, open the note first. In the Messaging program, you can add a recording to an email message.
To create a recording:
1. Tap  Notes to switch to the program.
2. Tap  View Recording Toolbar to show the Recording toolbar.
3. Hold the device’s microphone near your mouth or other source of sound.
4. Tap the  Record button on the Recording toolbar to start recording.
5. To stop recording, tap the  Stop button on the Recording toolbar. The new recording appears in the note list or as an embedded icon.
To play a recording, tap it in the list or tap its icon in the note.
Recording toolbar |
2-7 |
Basic Skills |
 Loading...