

Page 1
BeoMaster5
Page 2

Page 3

Dear Customer
This Guide contains information about the daily use of your Bang& Olufsen
product. We expect your retailer to deliver, install and set up your product.
BeoMaster5 can be used with BeoSound5 and/or connected to a television.
The operation described in this Guide applies if BeoMaster5 is connected
to a television. If only connected to BeoSound5, refer to the guides
delivered with BeoSound5.
In order to use the BeoMaster5 functions, it must be connected to the
Internet and music must be transferred to it. For this purpose dedicated
software is developed; BeoConnect and BeoPlayer. How to use the
dedicated software is described in the guides supplied with the software.
The guides are found on www.bang-olufsen.com/guides
On www.bang-olufsen.com you can also nd further information and
relevant FAQs about your product.
Your Bang& Olufsen retailer is your rst stop for all your queries.
To nd your nearest retailer, visit our website…
www.bang-olufsen.com
Technical specications, features and the use
thereof are subject to change without notice.
3510 6 42 Vers ion 1. 0 110 4
Page 4

WARNING: To reduce the risk of fire
or electric shock, do not expose this
appliance to rain or moisture. Do not
expose this equip ment to dripping or
splashing and ensure that no objects
filled with liquids, such as vases, are
placed on the equipment.
To completely disconnect this equipment
from the AC Mains, disconnect the mains
plug from the wall socket. The disconnect
device shall remain readily operable.
The lightning flash with arrowhead
symbol within an equilateral triangle,
is intended to alert the user to the
presence of un insulated “dangerous
voltage” within the product’s enclosure that may be of sufficient
magnitude to constitute a risk of
electric shock to persons.
The exclamation point within an
equi lateral triangle is intended to alert
the user to the presence of important
operating and main tenance (servicing)
instructions in the literature
accompanying the product.
Cautions
– Avoid placing the product in direct sunlight or
direct articial light, such as a spotlight.
– Make sure that the product is set up, placed and
connected in accordance with the instructions.
– Place your product on a rm surface or stand
where you want it placed permanently. Use
Bang & Olufsen approved stands and wall
brackets only!
– Do not place any items on top of your product.
– Do not subject the product to high humidity,
rain or sources of heat.
– The product is intended for indoor use in dry,
domestic environments only. Use within a
temperature range of 10–40°C (50–105°F).
– Leave enough space around the product for
adequate ventilation.
– Do not connect any of the products in your
system to the mains, until you have connected
all the cables.
– Do not attempt to open the product. Leave
such operations to qualied service personnel.
– The product can only be switched off completely
by disconnecting it from the wall socket.
– Follow instructions to ensure correct and safe
installation and interconnection of equipment in
multimedia systems.
– The supplied plug and mains cord are specially
designed for the product. Do not change the
plug and if the mains cord is damaged, you
must buy a new one from your Bang& Olufsen
retailer.
Page 5

Contents
6 Menus and symbols
7 Listen to your music
8 How to use your remote control
10 Operate sources
12 N.MUSIC
13 N.RADIO
14 PHOTO
15 WEB
16 Use from a link room
18 Set up your system
Page 6
6
Menus and symbols
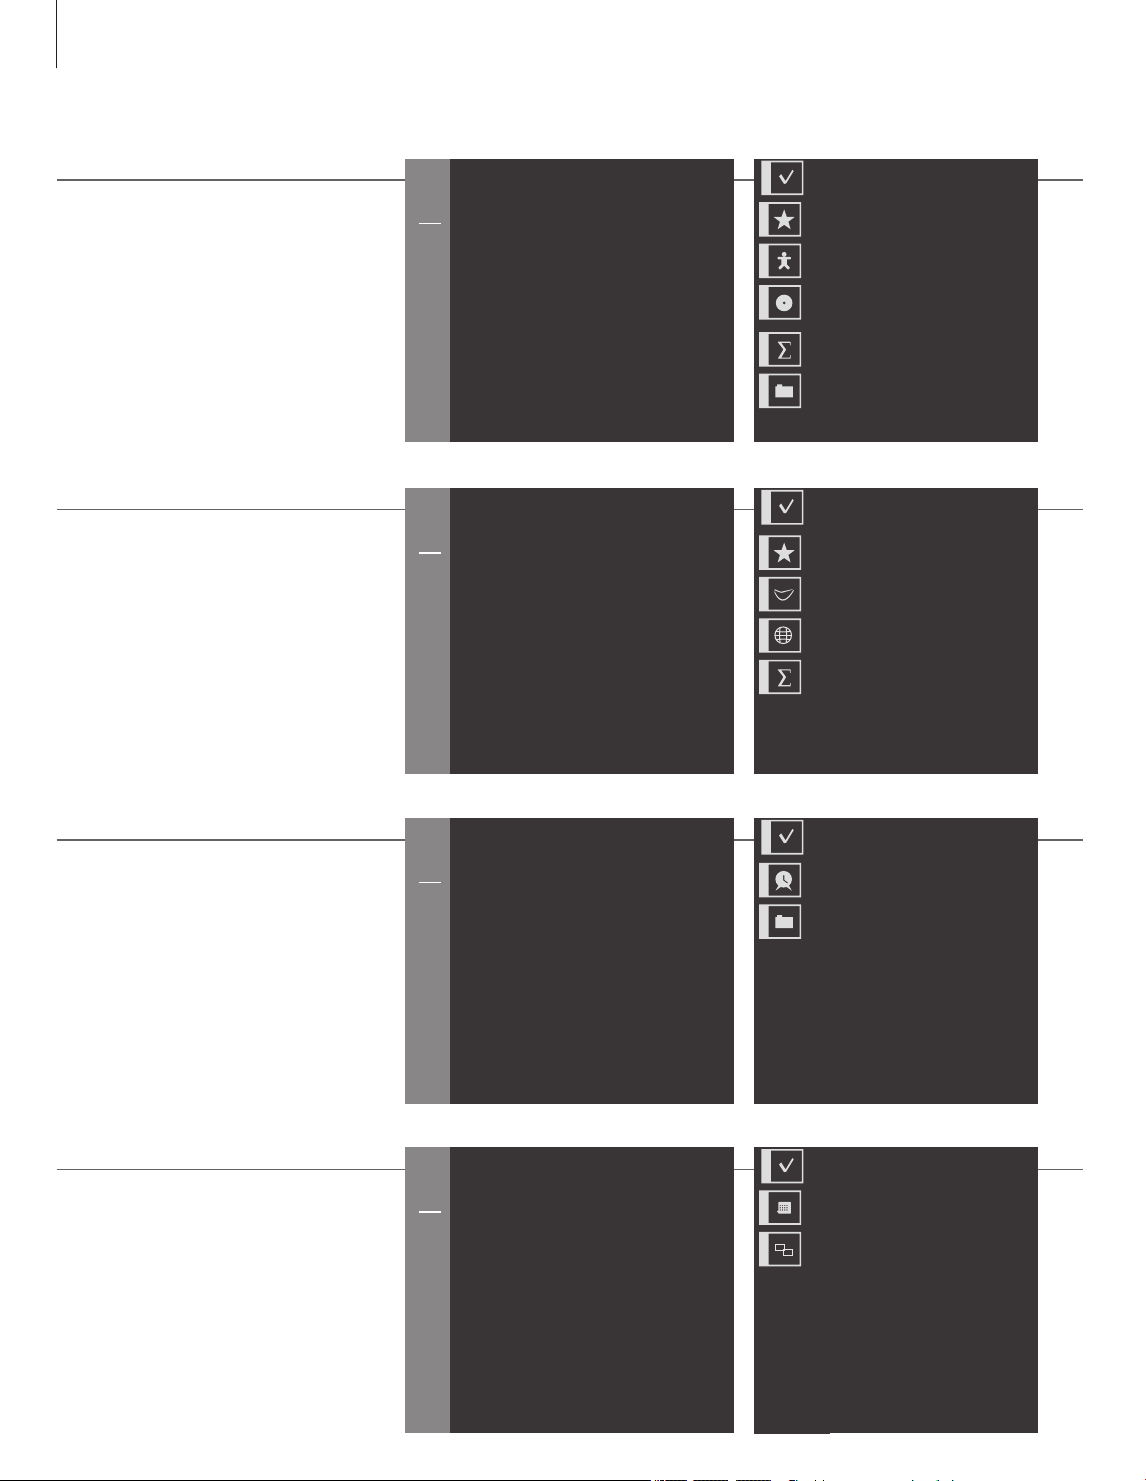
N.MUSIC and views
This menu is only available when BeoMaster5 is in
stand alone mode (without a BeoSound5).
N.RADIO and views
This menu is only available when BeoMaster5 is in
stand alone mode (without a BeoSound5).
GO
Source selection
EXIT
Leave mode
GO
Add to playlist
1
Home/Return
2
.
3
Random on/off
4
Show info/Hide info
5
List root
6
Play all/Play group
7
Full Size cover/Track info view
8
Delete
.
0
Rename
GO
Source selection
EXIT
Leave mode
GO
Add to playlist
1
Home/Return
2
.
3
.
4
.
5
List root
6
.
7
.
8
Delete
9
Conguration
0
Rename
Playlists
Genre
Artists
Albums
Titles
Folders
Playlists
Genre
Language
Country
Titles
PHOTO and views
WEB and views
GO
Source selection
EXIT
Leave mode
GO
Add to playlist
1
Home/Return
2
.
3
Slideshow
4
Show info/Hide info
5
List root
6
Rotate right
7
Zoom/Zoom off
8
Delete
9
Conguration
0
Rename
GO
Source selection
EXIT
Leave mode
GO
Add to bookmark
1
Home/Return
2
.
3
Popup list
4
Previous
5
List root
6
Next
7
.
8
Delete
9
Conguration
0
Rename
Playlists
Dates
Folders
Bookmarks
History
Popups
Page 7
Listen to your music
BeoMaster5 makes it possible for you to enjoy sources via the Bang& Olufsen
products already present in your home. Listen to digital music and Internet radio,
view digital photos and video clips and visit websites.
7
Before you start
Refer to the guide installed with
Transfer your digital content from
your computer to your BeoMaster5
BeoConnect on your computer
for more information.*1
You can download BeoConnect for Windows or Mac
from www.bang-olufsen.com /software downloads.
BeoMaster5 sources
Once BeoMaster5 starts up, you
PC 1 – 4PL AY
2
Pre ss*
can activate the sources from the
source selection menu.
N.MUSIC
N.RADIO
PHOTO
WEB
Select
source
Activate source
N.MUSIC
N.RADIO
PHOTO
WEB
or
Select and activate
source
Important
BeoPlayer/BeoPort
1
*BeoConnect
2
*PC on Beo4
If you have the BeoPlayer or BeoPort software on your computer, you can also use them to transfer music.
BeoConnect serves as a link from your media player, e.g. iTunes, to BeoMaster5. From a connected PC
or Mac, you use the dedicated BeoConnect software to transfer music to BeoMaster5.
In order to display PC on Beo4, you must rst add it to the Beo4 list of functions. For further information,
see the guide enclosed with Beo4.
Page 8
8
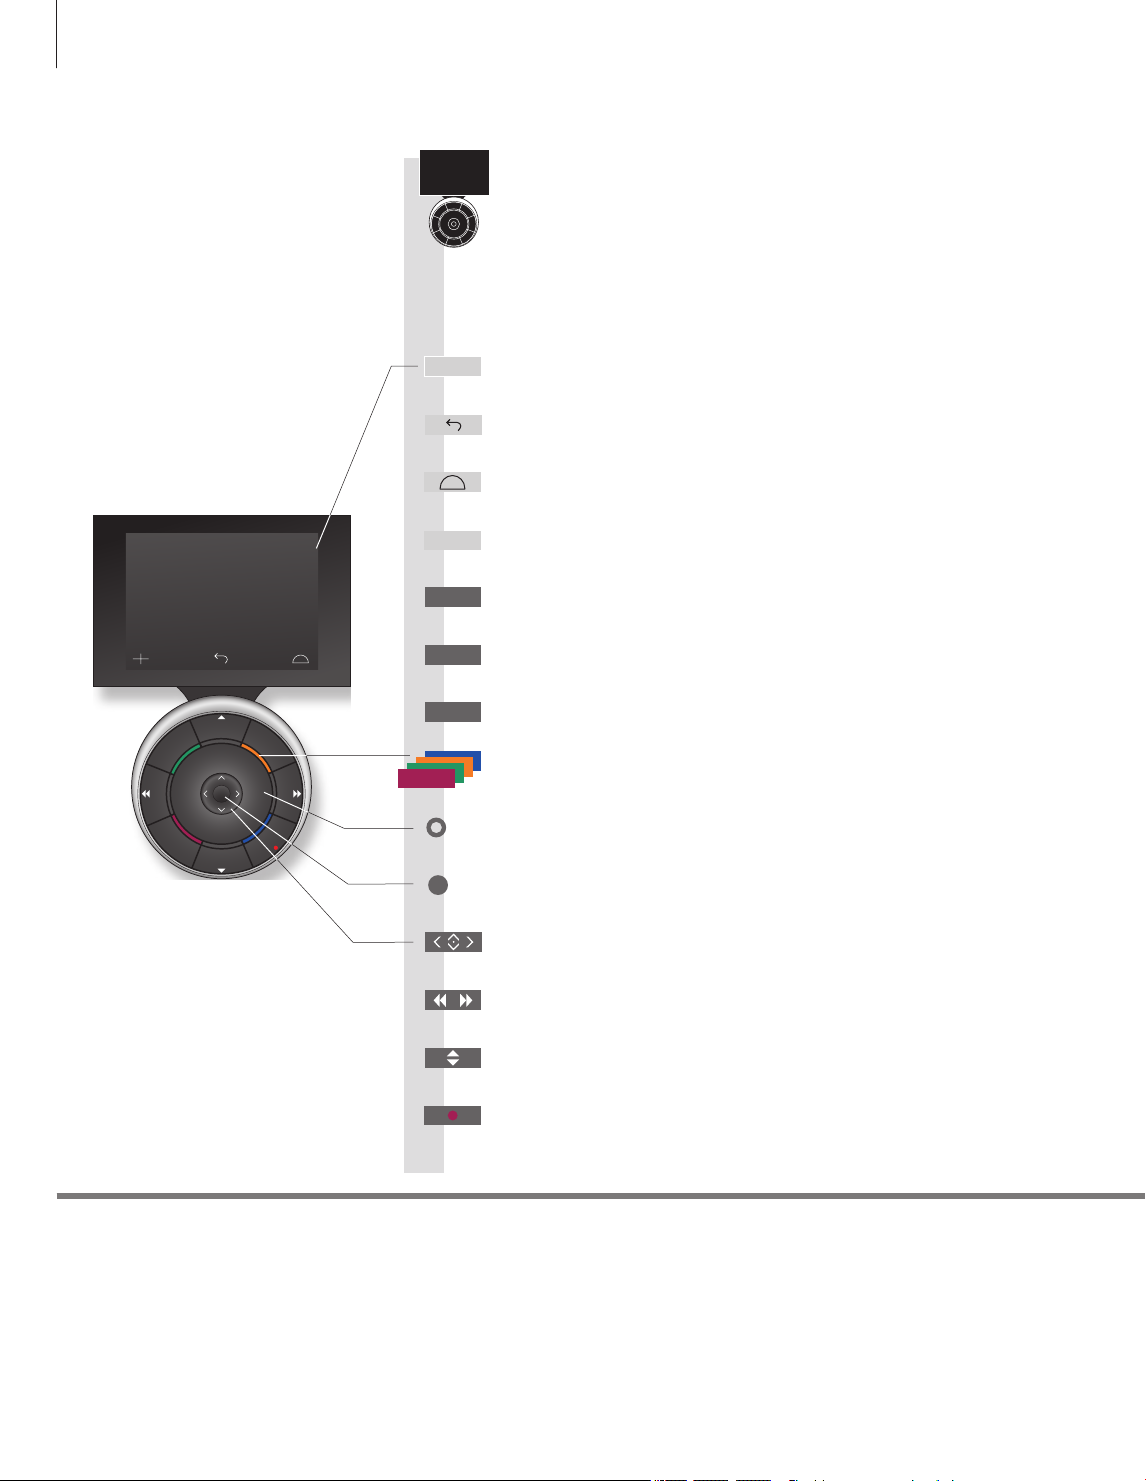
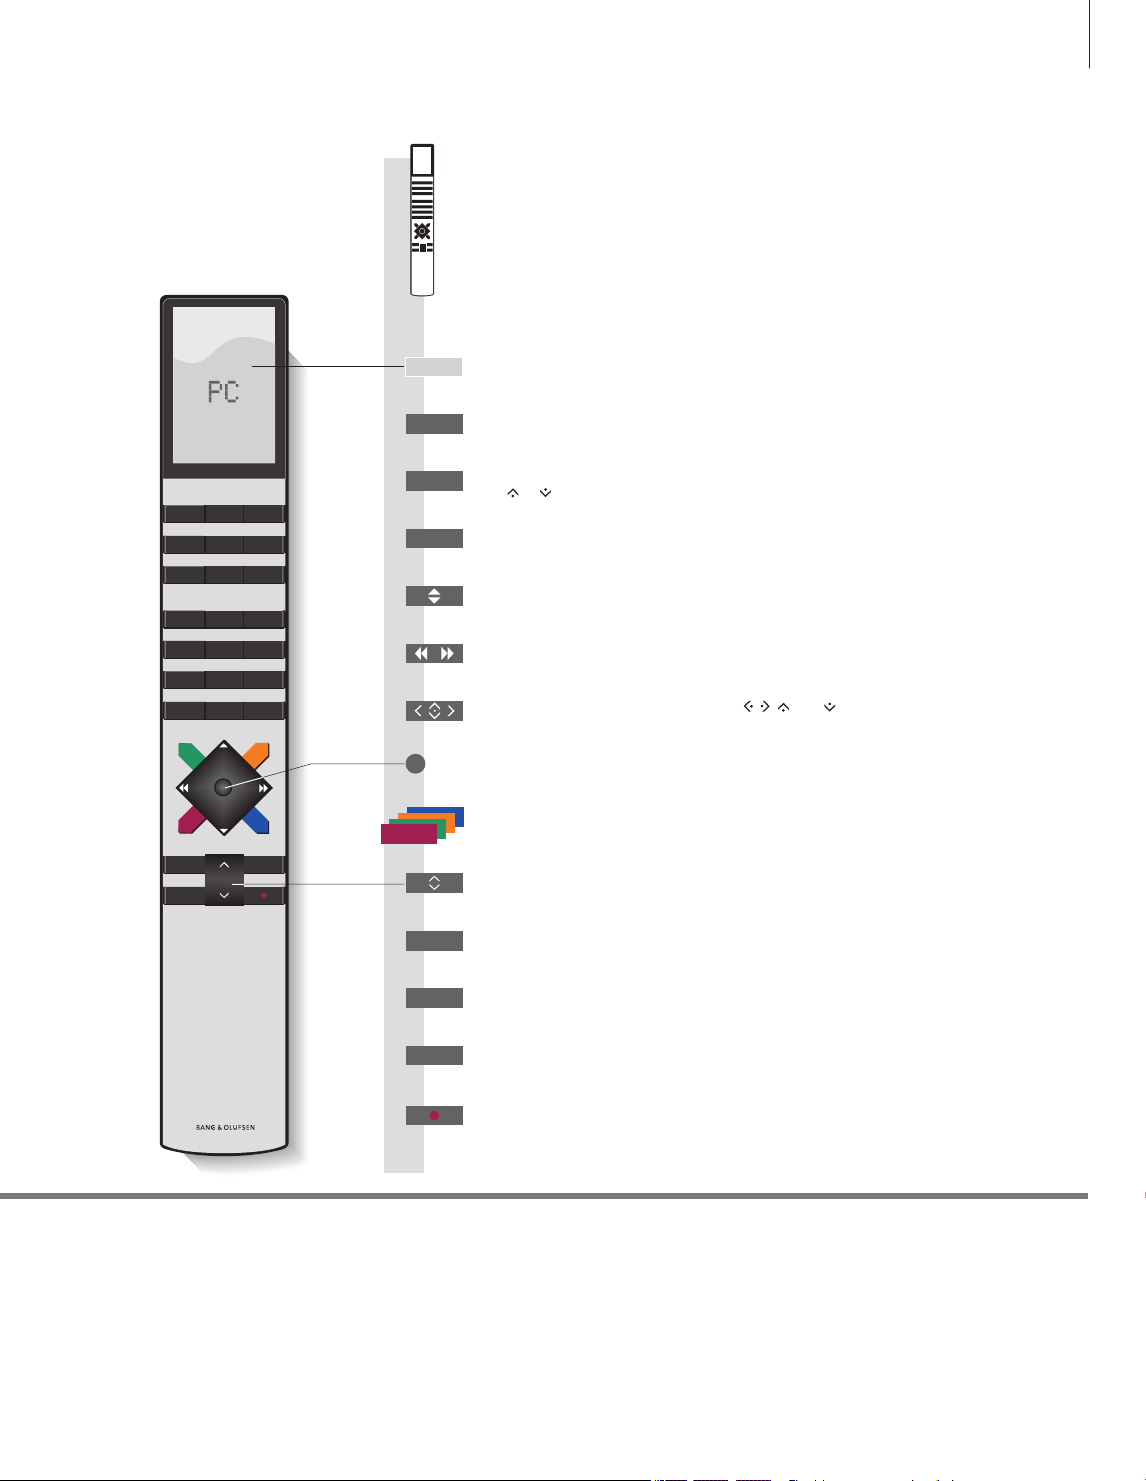
How to use your remote control
Beo6 operation
BeoMaster5 can be operated with the Beo6 remote control but you
can also operate BeoMaster5 with Beo5 which is operated similarly
to Beo6.
Activate BeoMaster5
PC
Back up through Beo6 displays
Bring up SCENE buttons, such as Zones or Speaker
Press again to return
Living Room
TV V.MEM RADIO
DTV N.MUSIC N.RADIO
PC DVD CD
STOP
BACK
PLAY
Bring up digits to select track or station
+
Press again to return
Pause and stop playback
STOP
Start playback
PL AY
Remove menu overlay
BACK
Press again to toggle
Select colour specic functions
Press volume wheel next to the colour
Turn to adjust volume
To mute, turn quickly counter-clockwise
Play highlighted track, station, etc.
Centre button is used for selecting and accepting
Navigation button left, right, up and down
Move in menus by pressing the button in the direction you need
Browse groups and albums
Step through tracks or stations
Hold for continuous step
Standby
Important – for more information: www.bang-olufsen.com
Remote control
Soft buttons on Beo6
For general information about remote control operation, see the guide enclosed with your remote control.
Depending on the activated source, different soft buttons appear on the screen. Touch the screen to
activate the function.
Page 9
TV LIGHT RADIO
DTV DVD CD
V.MEM TEXT A.MEM
7 8 9
4 5 6
1 2 3
LIST
MENU
0
Beo4 operation
Your BeoMaster5 can also be operated with the Beo4 remote control as
described in this Guide.
Press LIST to display PC
PC
Press the centre but ton to activate source
Select numbered track or station or an option
0 – 9
Display extra “buttons” for functions or sources in the Beo4 display.
LIST
MENU
or to step in the list
Use
Bring up the menu overlay
Step through tracks or stations
Hold for continuous step
Browse groups and albums
Navigation and centre button; move
Move in menus by pressing the button in the direction you need
, , and
9
STOP PLAY
BACK
Centre button; press in the middle to select and accept set tings
Play content of coloured list
Press and hold to add or remove from coloured list
Press to adjust volume
To mute, press the middle of the button
Pause playback
STOP
Start playback
PL AY
BACK
Remove menu overlay
Standby
Page 10

N.MUSIC
N.RADIO
PHOTO
WEB
10
Operate sources
Bring up and operate your sources. The basic principles of operation
are the same for all sources. Find additional functions in the menu
overlays.
Operation of N.MUSIC and N.RADIO described in this Guide only
applies when BeoMaster5 is not connected to BeoSound5, and
operation of photo and web only applies when BeoMaster5 is
connected to a television.
Beo6 operation
Select a source
Activate BeoMaster5 and select a source.
Change source
Bring up the source selection menu to change
1
so u r ce.*
Bring up menu overlay and change view
Step between groups.
Browse groups/lists
View groups, select specic track, station, photo
or website.*2
Information
Source selection
N.MUSIC
N.RADIO
PHOTO
Group
Digital music les.
Radio stations available from the Internet.
Digital photos and video clips shown on your television screen.
WEB
Selected websites displayed on your television.
Item
An item is a track, a photo, a station, a list, or an album.
A group consists of minimum one item.
List
Refers to a playlist or a coloured list.
Add to list
Remove from list*3
Add to/remove from coloured list
If the item is already present, this removes the item
from the coloured list. Works in all views except playlist
view.
Page 11

Beo4 operation
11
PC
Press
MENU
Bring up menu
overlay
MENU
Bring up menu
overlay
Step between
groups/lists
Press and hold
+
Select source and conrm
selection menu
5
Press
or
Expand group/list
Select list and conrm
Select source and conrm Bring up source
Select view and conrm
Step in a
group/list
Collapse group/list
LIST
Select PC and
conrm
MENU
Bring up menu
overlay
MENU
Bring up menu
overlay
or
Step between
groups/lists
Press and hold
5
Expand
group/list
Select source and conrm
Select source and conrm
Select view and conrm
Step in or collapse group/list
Select list and conrm
MENU 8
Bring up menu
overlay
+
Press Bring up
1
*Select a source
2
3
*Remove content from list or
*Skip groups/lists
Follow on-screen information Follow on-screen information
You can use the number buttons 1– 4 to select a source.
Press left/right on your remote control to skip groups/lists.
You can remove content from lists and coloured lists. In all other
group
views the function deletes the content.
MENU
menu overlay
Press and hold Press and hold
NOTE! When you switch on BeoMaster5, it may
take a while for the product to start up.
8
Press
Page 12

12
N.MUSIC
You can hide away all your CDs and still have access to the music through your
BeoMaster5. When you have copied your music to your BeoMaster5, you can
browse by genre, artist, album, title, or folder. The operation described here only
applies when BeoMaster5 is connected to a television and not to BeoSound5.
Bring cursor to current track
Move the cursor to the track being
played.
Switch random on/off
Play tracks in the selected group in
random order.
Show/hide information
Bring up track information.
Show views
Show the views available for N.MUSIC.
Play all/play group
Set the music system to play the entire
music collection or group/list.
Bring up menu
overlay
Bring up menu
overlay
Bring up menu
overlay
Bring up menu
overlay
Bring up menu
overlay
Press 1 for ‘Home/Return’
Press 3 for ‘Random on/off’
Press 4 for ‘Show info/Hide info’
Press 5 for ‘List root’
Press 6 for ‘Play all/Play group’
Cover/track information
Show full size cover or track information
on the screen.
Delete content
Select the content you wish to delete.
Information
Group
A group is, for example, a list, a CD or a photo album.
Guide
To learn more about the dedicated software and BeoMaster5, see the guide in
Edit lists
Back-up
BeoConnect on your computer.
We recommend that you create and edit lists on your computer.
Remember to back-up your les of music and pictures stored on BeoMaster5.
Simply copy the content from the BeoMaster5 network drive on your
computer onto a portable hard disk or CD.
Bring up menu
overlay
Select track/album/
group/list
Press 7 for ‘Full Size cover/Track info view’
Bring up menu
overlay
Press 8 for ‘Delete’
NOTE! If BeoSound5 is connected, all operation
of N.MUSIC and N.RADIO is done on BeoSound5.
Album cover is shown on the television screen also.
Follow on-screen
instructions
Page 13

N.RADIO
Access Internet radio stations worldwide. Sort the radio stations by country,
language, genre and title and make your own lists with your favourite stations.
The operation described here only applies when BeoMaster5 is connected to a
television and not to BeoSound5.
13
Bring cursor to current station
Move the cursor to the station being played.
Show views
Show the views available for N.R ADIO.
Delete content
Select the content you wish to delete in the
favourite coloured lists.
Congure N.RADIO
Change settings for N.RADIO.
Bring up menu
overlay
Bring up menu
overlay
Select station/group/
list
Bring up menu
overlay
Press 1 for ‘Home/Return’
Press 5 for ‘List root’
Bring up menu
overlay
Press 9 for
‘Conguration’
Press 8 for ‘Delete’
Change setting Store setting and leave
Follow on-screen
instructions
BACK
menu
Edit lists
Coloured lists
We recommend that you create and edit lists on your computer.
Each coloured lists for N.MUSIC can contain up to 9 items. Each coloured list
for N.RADIO can contain up 99 stations. For more information, see the
BeoConnect Guide.
NOTE! For all sources, you can press Menu
followed quickly by a number button to select an
option from the menu overlay.
Page 14

14
PHOTO
Use the dedicated software on your computer to organise photos and video clips
and enjoy digital photos and video clips on your television. The operation here only
applies when BeoMaster5 is connected to a television.
Bring cursor to photo/clip
Move the cursor to the photo/video clip
being viewed.
Start slideshow
Watch photos/clips in the selected group or
all groups.*
1
Show/hide information
Bring up photo/clip information.
Watch a video clip
While watching a video clip and no list is
shown on the screen.
Rotate/zoom photo
Rotate and zoom in on a photo on the
screen.
Bring up menu
overlay
Bring up menu
overlay
Bring up menu
overlay
Hide menu overlay
Bring up menu
overlay
Press 1 for ‘Home/Return’
Press 3 for
‘Slideshow’
Press 4 for ‘Show info/Hide info’
forwards
Press 6 for ‘Rotate
right’ and 7 for
‘Zoom/Zoom off’
Press STOP to pause
Skip frames Pause playback Cue backwards or
Press centre
button/STOP to
zoom in/zoom out
STOP
Press left/right to pan
Delete content
Select the content you wish to delete.
Congure PHOTO
Change settings for PHOTO.
Information
Edit lists
1
*Slideshow
Select photo/clip/
group/list
Bring up menu
overlay
We recommend that you create and edit lists on your computer.
Photos and video clips are shown according to your settings in the ‘Conguration’ menu. You can listen
to N.RADIO and N.MUSIC while watching a slideshow. Use the menu overlay to select N.RADIO or
N.MUSIC.
Bring up menu
overlay
Press 9 for
‘Conguration’
Press 8 for ‘Delete’
Change settings Store setting and leave
Follow on-screen
instructions
BACK
menu
Page 15

Scroll
Scroll on a website when no list is shown.
WEB
Visit your favourite websites via your television. Switch between websites and
navigate on the television screen by means of the remote control. The operation
here only applies when BeoMaster5 is connected to a television.
Scroll on the website
15
Navigate
Move to a link and bring up the new web site.
Move a bookmark
Move the highlighted bookmark to a group.
Bring cursor to website
Move the cursor to the website being viewed.
View popups
View a list of popups from the menu overlay.*2
View next/previous
Step between websites.
BACK
Hide list
Select bookmark
Bring up menu
overlay
Bring up menu
overlay
Bring up menu
overlay
Change to cursor Bring up new
Press and hold
Press 1 for ‘Home/Return’
Press 3 for ‘Popup list’
Press 4 for ‘Previous’ and 6 for ‘Next’
website
Move cursor to
a link
Release button
when menu
appears
page
Select group
BACK
Change to scroll
mode
Conrm
Congure WEB
Change settings for WEB.
Organise bookmarks and folders
Delete bookmarks
2
*Popups
Bring up menu
overlay
Add the websites you want to view on your television screen in Internet Explorer on your computer.
For more information, see the BeoConnect Guide.
Bring up the menu overlay, then press 8 and follow the on-screen instructions.
Use 4 and 6 to view the popups shown on the television screen.
Press 9 for
‘Conguration’
Change
settings
BACK
Store setting and
leave menu
Page 16

16
Use from a link room
If you have BeoLink installed in your home, you can use the following functions
from a link room. In an audio link room, you can of course only hear sound in your
speakers. Photo and web sources are not available.
Beo4 operation
See and navigate content on your link room TV.
Switch on N.MUSIC
Switch on N.MUSIC from a link room. The
sound comes from the television speakers and
the screen is switched off.
Switch on N.RADIO
Switch on N.RADIO from a link room. The
sound comes from the television speakers and
the screen is switched off.
Play coloured lists
Play coloured lists from a link room.
Play specic track/station
Press one or more digits within two seconds.
LINK MENU BACK
Select PC Select source and
N.MUSIC
2
Pre ss*
N.RADIO
2
Pre ss*
Press to play a
coloured list
Press to play a specic track or station
1
conrm*
Step in a coloured list
+
0–9
Bring up menu
overlay
Remove menu
1
overlay*
Add to coloured list
Quickly add track or station to a coloured list. If
a track or station is already in a list, it cannot be
added.
Information
1
Menu overlay in link room
*Beo4 on Mode1
2
*N.MUSIC/N.RADIO
Play Timer
Press and hold
If Beo4 is in Mode1, you have to press PL AY instead of the centre button and long press on BACK.
On some link room televisions, you may have to press 0 to bring up the menu overlay.
Which button activates N.MUSIC/ N.RADIO respectively depends on the settings on BeoSound5,
if connected.
If your main video or audio product in a link system has a Play Timer function, BeoMaster5 can be
selected as source of a Play Timer. When the Play Timer starts, the items in the red list will play. This
means that the content you want to listen to in the Play Timer function must be placed in the red list.
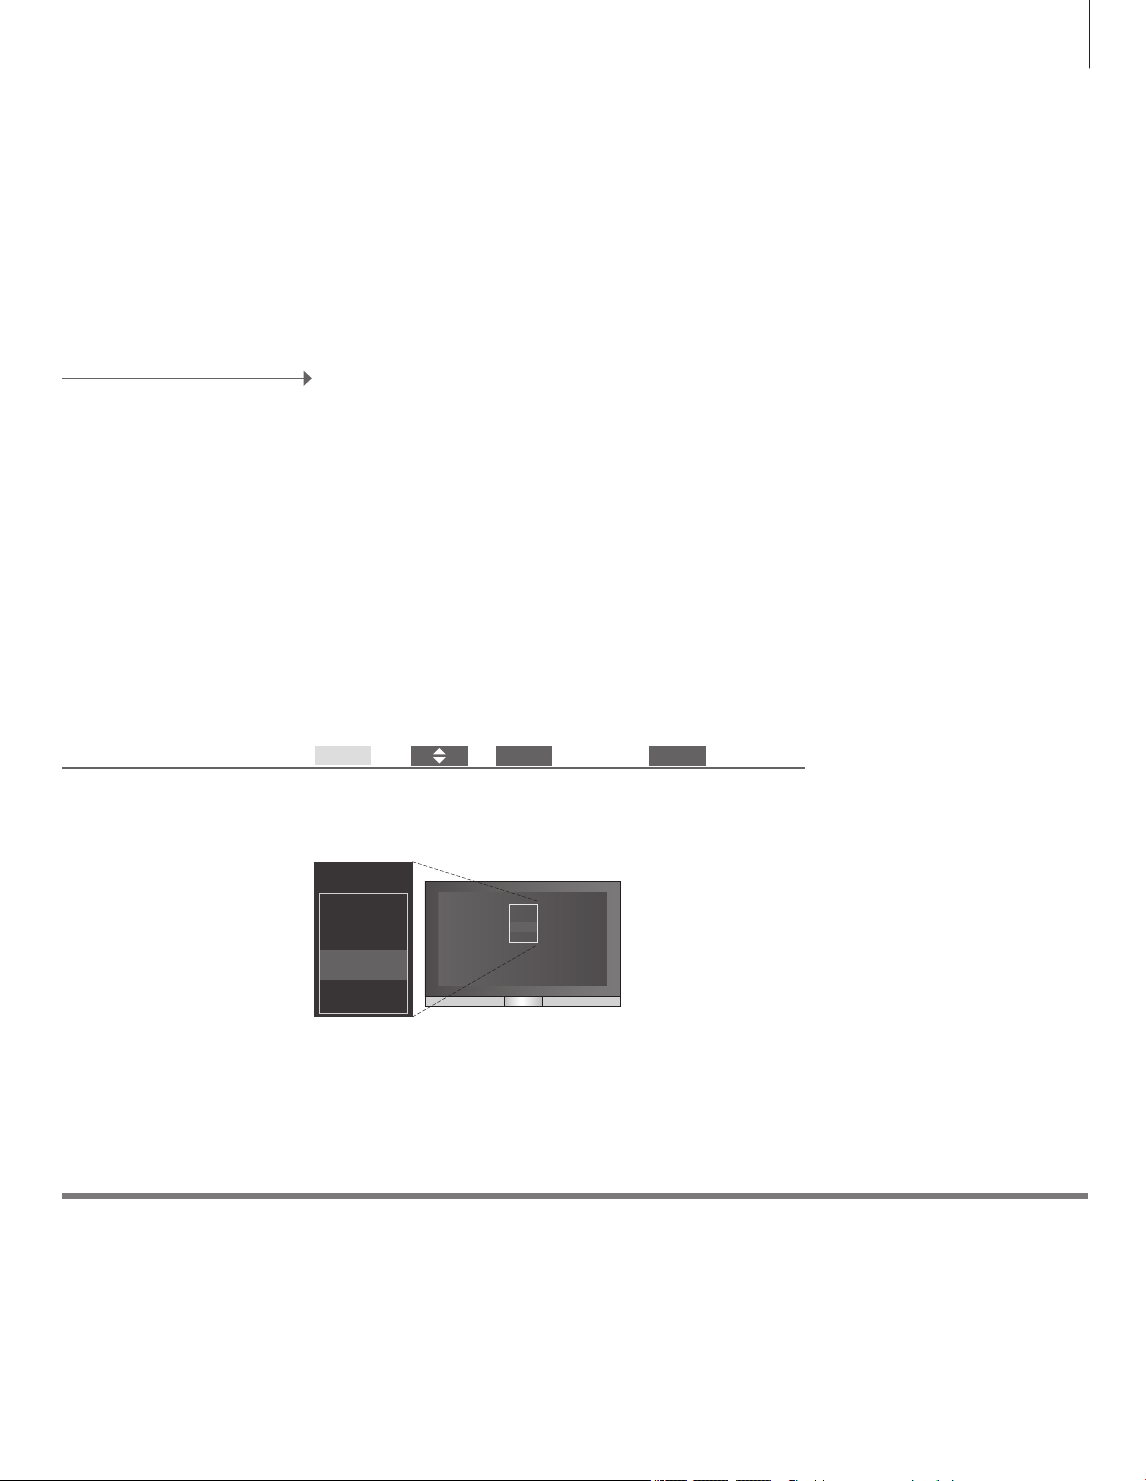
Page 17

To achieve full functionality in a Master Link setup, BeoMaster5 must be
connected to a main room television. Your options depend on your setup.
The illustration below is an example of a setup.
17
BeoMaster5/BeoSound 5setup
You can view the same content from BeoMaster5
on a link room TV as you have on a main room TV.
You can, for example, see the cover art with
album and artist name of music playing, see net
radio stations, navigate in your photo collection
and browse the Internet using your favourites.
BeoMaster5 setup
You have the same options on your link room T V
as you have on your main room TV. When
BeoSound5 is not connected, you can navigate in
N.MUSIC and N.RADIO. Also you can see cover
arts, navigate in your photo collection and browse
the Internet.
ETHERNET
BEOSOUND 5
BEOMASTER 5
MASTER LINK
Main room Link room
INTERNET
ISP
ROUTER
NETWORK
LINK
ROUTER
Link room operations
CVBS signal
You can view the same content from BeoMaster5 on a link room television as you see on your main
room television. During this the content on both televisions will be displayed in standard denition.
To make link room distribution of data possible, you need to connect a cable between BeoMaster5 and
your main room television. Contact your Bang& Olufsen retailer for further information
Page 18

18
BeoSound 5setup
When BeoMaster5 is set up with BeoSound 5,
operation of music and radio takes place via
BeoSound5.
Audio/video system setup
BeoMaster5 is set up with your audio/video
system in your home.
Set up your system
BeoMaster5 may be set up in different ways – depending on your other Bang &
Olufsen products. Contact your retailer if you need to make changes to your setup.
For information on BeoSound5 operation, see the
BeoSound5 Guide.
For information on how to set up connected
products, see the guides enclosed with the
products.
BEOMASTER 5
BEOMASTER 5
BEOSOUND 5
ETHERNET
ETHERNET
www
ROUTER
COMPUTER
www
ROUTER
Important
To ensure proper ventilation, allow at least 5 cm
(2") of space at the sides of the product and
10 cm (4") above it. Never place BeoMaster5 in a
closed cabinet without ventilation.
For safety reasons, the mains cord from the wall
outlet must be secured to the product. Use the
enclosed cable clamp and screw.
Information
Cleaning Wipe dust off the surfaces using a dry, soft cloth. To remove stains or dirt, use a soft, damp cloth and a
AV SYSTEM
COMPUTER
solution of water and mild detergent, such as washing-up liquid.
Page 19

Do not connect any of the products in your system to the mains supply, until you
have made all the connections.
19
MASTER UNIT IR
12 V DC 1.2 A
5 V DC 0.35 A
5 V DC
0.15 A
S-VIDEODVI-I
~ – Mains supply
Connection to the mains supply.
MASTER UNIT
BeoSound5 connections (POWER, USB and
VIDEO).
IR
External IR receiver.
SPDIF
For loudspeakers with a digital input.
MASTER LINK
Connection for BeoLink distribution throughout
the house.
LINE OUT
Left and right sound channel output to television.
POWER LINK
Loudspeaker connections.
SPDIF MASTER LINK
5 V DC
0.5 A
LINE
OUT
YPbPr
VIDEO
R
POWER LINK
L
DVI–I
Television connections.
Ethernet
Ethernet connection.*
1
USB audio interface
For connection of USB wireless net work card.
S–VIDEO
Television connections.
Y–Pb–Pr
Alternative television connections.
VIDEO
Alternative television connections.
ST. BY (standby)
Standby switch.
ST. BY
Software updates To receive software updates and N.RADIO, BeoMaster5 must be connected to
the Internet.
1
*NOTE! Only connect to a local area network
(LAN) that does not exit your at, house or building.
Page 20

20
End User Licence Agreement – EULA
On the BeoMaster is an embedded limited edition of Windows XP®. To use this
edition, you must read the EULA terms below.
Note that the EULA terms are in English only. No
legally correct translation is currently available.
EULA Terms
You have acquired a device, BeoMaster 5, that
includes software licensed by AmiTech from
Micro soft Licensing, GP or its afliates. Those
installed software products of MS origin, as well
as associated media, printed materials, and online
or electronic documentation, are protected by
inter national intellectual property laws and treaties.
The SOFTWARE is licensed, not sold. All rights
reserved.
IF YOU DO NOT AGREE TO THIS END USER LICENSE
AGREEMENT EULA, DO NOT USE THE DEVICE OR
COPY THE SOFTWARE. INSTEAD, PROMPTLY
CONTACT AMITECH FOR INSTRUCTIONS ON
RETURN OF THE UNUSED DEVICE; FOR A REFUND.
ANY USE OF THE SOFTWARE, INCLUDING BUT
NOT LIMITED TO USE ON THE DEVICE, WILL
CONSTITUTE YOUR AGREEMENT TO THIS EULA
(OR RATIFICATION OF ANY PREVIOUS CONSENT).
GRANT OF SOFTWARE LICENSE. This EUL A grants
you the following license: You may use the SOFTWARE only on the DEVICE.
NOT FAULT TOLERANT. THE SOFT WARE IS NOT
FAULT TOLERANT. AMITECH HAS
INDEPENDENTLY DETERMINED HOW TO USE THE
SOFT WARE IN THE DEVICE, AND MS HAS RELIED
UPON AMITECH TO CONDUCT SUFFICIENT
TESTING TO DETERMINE THAT THE SOFTWARE IS
SUITABLE FOR SUCH USE.
Limitations on Reverse Engineering, Decompilation,
and Disassembly. You may not reverse engineer,
decompile, or disassemble the SOFT WARE, except
and only to the extent that such activity is expressly
permitted by applicable law notwithstanding this
limitation.
SOFTWARE TR ANSFER ALLOWED BUT WITH
RESTRICTIONS. You may permanently transfer
rights under this EULA only as part of a permanent sale or transfer of the Device, and only if the
reci pient agrees to this EULA. If the SOFT WARE is
an upgrade, any transfer must also include all prior
versions of the SOFTWARE.
EXPORT RESTRICTIONS. You acknowledge that
SOFTWARE is subject to U.S. export jurisdiction.
You agree to comply with all applicable interna tio-
nal and national laws that apply to the SOFT WARE,
including the U.S. Export Administration
Regulations, as well as end-user, end-use and
destination restrictions issued by U.S. and other
governments. For additional information see
http://www.microsoft.com/exporting/
NO WARRANTIES FOR THE SOF TWARE. THE SOF T WARE is provided AS IS and with all faults. THE
ENTIRE RISK AS TO SATISFACTORY QUALIT Y, PERFORMANCE, ACCURACY, AND EFFORT
(INCLUDING LACK OF NEGLIGENCE) IS WITH YOU.
ALSO, THERE IS NO WARRANTY AGAINST INTERFERENCE WITH YOUR ENJOYMENT OF THE SOFTWARE OR AGAINST INFRINGEMENT. IF YOU HAVE
RECEIVED ANY WARRANTIES REGARDING THE
DEVICE OR THE SOFT WARE, THOSE WARRANTIES
DO NOT ORIGINATE FROM, AND ARE NOT
BINDING ON, MS. No Liability for Certain Damages.
EXCEPT AS PRO HIBITED BY L AW, MS SHALL HAVE
NO LIABILITY FOR ANY INDIRECT, SPECIAL,
CONSEQUENTIAL OR INCIDENTAL DAMAGES
ARISING FROM OR IN CONNECTION WITH THE
USE OR PERFORMANCE OF THE SOFTWARE. THIS
LIMITATION SHALL APPLY EVEN IF ANY REMEDY
FAILS OF ITS ESSENTIAL PURPOSE. IN NO EVENT
SHALL MS BE LIABLE FOR ANY AMOUNT IN
EXCESS OF U.S. TWO HUNDRED FIFT Y DOLL ARS
(U.S. $250.00)
Page 21

Safety copy and anti-virus program
Always keep copies of your data to ensure that your photos, music les, etc. are
not lost in the event of a system or program failure. BeoMaster5 features an
anti-virus program that blocks the most common computer viruses.
21
Safety copy
It is the responsibility of the user to regularly make
safety copies of the data, including but not limited
to les, photos, music, etc. It is the responsibility
of the user to ensure that this data is available on
media which can be immediately transferred back
to the BeoMaster or in the event that the
BeoMaster is replaced, to the new BeoMaster, and
it is the responsibility of the user to reinstall these
safety copies when necessary.
A safety copy may be placed on your ofce
computer or any other external devices, such as a
portable hard disk, or the data may be copied to
CD-roms or DVD discs.
Data must also be safety copied when handing in
the BeoMaster for service. Often it will be
necessary to format data media as par t of the
repair and such formatting with the consequential
loss of data will take place without notice. Bang&
Olufsen cannot be held liable for any loss of data.
Re-installation of data
In case you need to re-install your media
collection on the BeoMaster, you must use
BeoPlayer, BeoPort or BeoConnect (for MAC users
only) software to transfer your collection to the
BeoMaster. This ensures that you will not lose the
associated tag information.
Anti-virus program
A virus attack can result in system breakdown and
loss of important data. In serious cases the
BeoMaster may have to be handed in for service.
A repair caused by a virus attack is NOT covered
by guarantee. The BeoMaster features an antivirus program. The program protects against the
most commonly used hacker programs. The
program is automatically updated for a least ve
years via the Internet provided that the BeoMaster
is constantly connected to the Internet. The
program is installed to instantly and without
notication remove all les containing a virus.
Files transferred to the BeoMaster may be deleted
as a result.
Bang & Olufsen cannot be held liable for an loss
as a consequence of virus attack.
Page 22

22
This product is in conformity with the
provisions of the Directives 2004/108/
EC and 2006/95/ EC.
For more information about usage of Open
Source Software in Bang& Olufsen products,
please visit http://www.bang-olufsen.com/
contact-us and ll in the appropriate information.
This product incorporates copyright protection
technology that is protected by U.S. patents and
other intellectual property rights. Use of this
copy right protection technology must be
authorized by Rovi, and is intended for home and
other limited viewing uses only unless otherwise
authorized by Rovi. Reverse engineering or
disassembly is prohibited.
HDMI, the HDMI logo and High-Denition
Multi media Interface are trademarks or registered
trade marks of HDMI Licensing LLC.
Bang& Olufsen cannot vouch for the quality of
net radio stations available from programme
providers.
For the US -market only!
NOTE: This equipment has been tested and found
to comply with the limits for a class B digital
device, pursuant to part 15 of the FCC Rules.
These limits are designed to provide reasonable
protection against harm ful interference in a
residential installation.
This equipment generates, uses and can radiate
radio frequency energy and, if not installed and
used in accordance with the instructions, may
cause harmful interference to radio
communications. However, there is no guarantee
that interference will not occur in a particular
installation. If this equipment does cause harmful
interference to radio or television reception, which
can be determined by turning the equip ment off
and on, the user is encouraged to try to correct
the interference by one or more of the following
measures:
– Reorient or relocate the receiving antenna.
– Increase the separation between the equipment
and receiver.
– Connect the equipment into an outlet on a
circuit different from that to which the receiver
is connected.
– Consult the retailer or an experienced radio/TV
technician for help.
For the Canadian market only!
This class B digital apparatus meets all require-
ments of the Canadian Interference-Causing
Equipment Regulations.
Page 23

23
Waste Electrical and Electronic Equipment
(WEEE) – Environmental protection
Acknowledgements and liability
Electrical and electronic equipment, parts and
batteries marked with this symbol must not be
disposed of with normal household wastage; all
electrical and electronic equipment, parts and
batteries must be collected and disposed of
separatel y.
When disposing of electrical and electronic
equipment and batteries by use of the collection
systems available in your country, you protect the
environment, human health and contribute to the
prudent and rational use of natural resources.
Collecting electrical and electronic equipment,
batteries and waste prevents the potential
All Bang& Olufsen products comply with
applicable environmental legislation throughout
the world.
Product names mentioned in this guide may be
trade marks or registered trademarks of other
companies.
Portions utilize Microsoft Windows Media
Technologies. Copyright © 1999–2002 Microsoft
Corporation. All rights reserved. Microsoft,
Windows Media and the Windows Logo are
registered trade marks of Microsoft Corporation in
the United States and/or other countries.
contamination of nature with the hazardous
substances which may be present in electrical
and electronic products and equipment.
Your Bang& Olufsen retailer will advise you of the
correct way of disposal in your country.
If a product is too small to be marked with the
symbol, it will appear in the User guide, on the
Guarantee certicate, or on the packaging.
Please note that Bang & Olufsen will, in no event,
be liable for any consequential, incidental or
indirect damages arising out of the use or inability
to use the software.
Page 24

Page 25

Page 26

Page 27

Page 28

 Loading...