


 Loading...
Baldor-Reliance EJMM2543T, B910182, B910099, EHM2543T-8, EM2539T-G User Manual
...Above NEMA Duty Master AC Motors
Frames: 5000, 5800, 6800, 7111, 9000,
G315, G400, G500
Enclosures: Open and Totally Enclosed
Mounting: Horizontal and Vertical
Installation & Operating Manual
8/12 |
MN420 |
Any trademarks used in this manual are the property of their respective owners.
Be sure to check www.baldor.com for the latest version of this manual in Adobe Acrobat PDF format.

Table of Contents
Section 1 |
|
General Information . . . . . . . . . . . . . . . . . . . . . . . . . . . . . . . . . . . . . . . . . . . . . . . . . . . . . . . . . . . . . . . . . . . . . . . . . . . . . . . |
1-1 |
Overview . . . . . . . . . . . . . . . . . . . . . . . . . . . . . . . . . . . . . . . . . . . . . . . . . . . . . . . . . . . . . . . . . . . . . . . . . . . . . . . . . . . . . |
1-1 |
Safety Notice . . . . . . . . . . . . . . . . . . . . . . . . . . . . . . . . . . . . . . . . . . . . . . . . . . . . . . . . . . . . . . . . . . . . . . . . . . . . . . . . . . |
1-1 |
Receiving . . . . . . . . . . . . . . . . . . . . . . . . . . . . . . . . . . . . . . . . . . . . . . . . . . . . . . . . . . . . . . . . . . . . . . . . . . . . . . . . . . . . . |
1-3 |
Handling . . . . . . . . . . . . . . . . . . . . . . . . . . . . . . . . . . . . . . . . . . . . . . . . . . . . . . . . . . . . . . . . . . . . . . . . . . . . . . . . . . . . . . |
1-3 |
Storage . . . . . . . . . . . . . . . . . . . . . . . . . . . . . . . . . . . . . . . . . . . . . . . . . . . . . . . . . . . . . . . . . . . . . . . . . . . . . . . . . . . . . . . |
1-4 |
Unpacking . . . . . . . . . . . . . . . . . . . . . . . . . . . . . . . . . . . . . . . . . . . . . . . . . . . . . . . . . . . . . . . . . . . . . . . . . . . . . . . . . . . . |
1-4 |
Section 2 |
|
Installation & Operation . . . . . . . . . . . . . . . . . . . . . . . . . . . . . . . . . . . . . . . . . . . . . . . . . . . . . . . . . . . . . . . . . . . . . . . . . . . |
2-1 |
Overview . . . . . . . . . . . . . . . . . . . . . . . . . . . . . . . . . . . . . . . . . . . . . . . . . . . . . . . . . . . . . . . . . . . . . . . . . . . . . . . . . . . . . |
2-1 |
Location . . . . . . . . . . . . . . . . . . . . . . . . . . . . . . . . . . . . . . . . . . . . . . . . . . . . . . . . . . . . . . . . . . . . . . . . . . . . . . . . . . . . . . |
2-1 |
Foundation . . . . . . . . . . . . . . . . . . . . . . . . . . . . . . . . . . . . . . . . . . . . . . . . . . . . . . . . . . . . . . . . . . . . . . . . . . . . . . . . . . . . |
2-1 |
Pre Installation Checks . . . . . . . . . . . . . . . . . . . . . . . . . . . . . . . . . . . . . . . . . . . . . . . . . . . . . . . . . . . . . . . . . . . . . . . . . |
2-2 |
Doweling & Bolting . . . . . . . . . . . . . . . . . . . . . . . . . . . . . . . . . . . . . . . . . . . . . . . . . . . . . . . . . . . . . . . . . . . . . . . . . . . . . |
2-2 |
Coupling . . . . . . . . . . . . . . . . . . . . . . . . . . . . . . . . . . . . . . . . . . . . . . . . . . . . . . . . . . . . . . . . . . . . . . . . . . . . . . . . . . . . . . |
2-3 |
Grouting . . . . . . . . . . . . . . . . . . . . . . . . . . . . . . . . . . . . . . . . . . . . . . . . . . . . . . . . . . . . . . . . . . . . . . . . . . . . . . . . . . . . . . |
2-4 |
Lubrication . . . . . . . . . . . . . . . . . . . . . . . . . . . . . . . . . . . . . . . . . . . . . . . . . . . . . . . . . . . . . . . . . . . . . . . . . . . . . . . . . . . . |
2-4 |
Anti Friction Bearings (Grease Lubricated) . . . . . . . . . . . . . . . . . . . . . . . . . . . . . . . . . . . . . . . . . . . . . . . . . . . . |
2-4 |
Sleeve Bearing (Oil Lubricated) . . . . . . . . . . . . . . . . . . . . . . . . . . . . . . . . . . . . . . . . . . . . . . . . . . . . . . . . . . . . . . |
2-4 |
Electrical Connection . . . . . . . . . . . . . . . . . . . . . . . . . . . . . . . . . . . . . . . . . . . . . . . . . . . . . . . . . . . . . . . . . . . . . . . . . . . |
2-4 |
Grounding . . . . . . . . . . . . . . . . . . . . . . . . . . . . . . . . . . . . . . . . . . . . . . . . . . . . . . . . . . . . . . . . . . . . . . . . . . . . . . . . . . . . |
2-5 |
Pre−Operation Check . . . . . . . . . . . . . . . . . . . . . . . . . . . . . . . . . . . . . . . . . . . . . . . . . . . . . . . . . . . . . . . . . . . . . . . . . . |
2-6 |
First Time Uncoupled Start−Up . . . . . . . . . . . . . . . . . . . . . . . . . . . . . . . . . . . . . . . . . . . . . . . . . . . . . . . . . . . . . . . . . . |
2-6 |
Coupled Start−up . . . . . . . . . . . . . . . . . . . . . . . . . . . . . . . . . . . . . . . . . . . . . . . . . . . . . . . . . . . . . . . . . . . . . . . . . . . . . . |
2-7 |
Jogging and Repeated Starts . . . . . . . . . . . . . . . . . . . . . . . . . . . . . . . . . . . . . . . . . . . . . . . . . . . . . . . . . . . . . . . . . . . . |
2-7 |
Section 3 |
|
Maintenance & Troubleshooting . . . . . . . . . . . . . . . . . . . . . . . . . . . . . . . . . . . . . . . . . . . . . . . . . . . . . . . . . . . . . . . . . . . . |
3-1 |
Periodic Inspection . . . . . . . . . . . . . . . . . . . . . . . . . . . . . . . . . . . . . . . . . . . . . . . . . . . . . . . . . . . . . . . . . . . . . . . . . . . . . |
3-1 |
Bearing Lubrication . . . . . . . . . . . . . . . . . . . . . . . . . . . . . . . . . . . . . . . . . . . . . . . . . . . . . . . . . . . . . . . . . . . . . . . . . . . . |
3-2 |
Anti−Friction Bearing (Grease Lubricated) . . . . . . . . . . . . . . . . . . . . . . . . . . . . . . . . . . . . . . . . . . . . . . . . . . . . . . . . . |
3-2 |
Anti−Friction Bearing (Oil Mist Lubricated) . . . . . . . . . . . . . . . . . . . . . . . . . . . . . . . . . . . . . . . . . . . . . . . . . . . . . . . . . |
3-3 |
Sleeve Bearings (Oil Lubricated) . . . . . . . . . . . . . . . . . . . . . . . . . . . . . . . . . . . . . . . . . . . . . . . . . . . . . . . . . . . . . . . . . |
3-5 |
Sleeve Bearing Replacement . . . . . . . . . . . . . . . . . . . . . . . . . . . . . . . . . . . . . . . . . . . . . . . . . . . . . . . . . . . . . . . . . . . . |
3-5 |
G50 Sleeve Bearing Removal . . . . . . . . . . . . . . . . . . . . . . . . . . . . . . . . . . . . . . . . . . . . . . . . . . . . . . . . . . . . . . . |
3-6 |
G50 Sleeve Bearing Replacement . . . . . . . . . . . . . . . . . . . . . . . . . . . . . . . . . . . . . . . . . . . . . . . . . . . . . . . . . . . |
3-7 |
G5000, G315, G5810 and G40 Sleeve Bearing Removal . . . . . . . . . . . . . . . . . . . . . . . . . . . . . . . . . . . . . . . |
3-7 |
G5000, G315, G5810 and G40 Sleeve Bearing Replacement . . . . . . . . . . . . . . . . . . . . . . . . . . . . . . . . . . . |
3-8 |
Sleeve/Anti−Friction Bearing Bracket Removal . . . . . . . . . . . . . . . . . . . . . . . . . . . . . . . . . . . . . . . . . . . . . . . . . . . . . |
3-9 |
Anti−Friction Bearing Removal/Replacement . . . . . . . . . . . . . . . . . . . . . . . . . . . . . . . . . . . . . . . . . . . . . . . . . . . . . . |
3-9 |
Rotor And Stator Removal . . . . . . . . . . . . . . . . . . . . . . . . . . . . . . . . . . . . . . . . . . . . . . . . . . . . . . . . . . . . . . . . . . . . . . |
3-9 |
Winding Maintenance . . . . . . . . . . . . . . . . . . . . . . . . . . . . . . . . . . . . . . . . . . . . . . . . . . . . . . . . . . . . . . . . . . . . . . . . . . |
3-9 |
Auxiliary Cooling . . . . . . . . . . . . . . . . . . . . . . . . . . . . . . . . . . . . . . . . . . . . . . . . . . . . . . . . . . . . . . . . . . . . . . . . . . . . . . . |
3-10 |
Renewal Parts . . . . . . . . . . . . . . . . . . . . . . . . . . . . . . . . . . . . . . . . . . . . . . . . . . . . . . . . . . . . . . . . . . . . . . . . . . . . . . . . . |
3-10 |
MN420 |
Table of Contents i |

Section 4 |
|
Accessories . . . . . . . . . . . . . . . . . . . . . . . . . . . . . . . . . . . . . . . . . . . . . . . . . . . . . . . . . . . . . . . . . . . . . . . . . . . . . . . . . . . . . . |
4-1 |
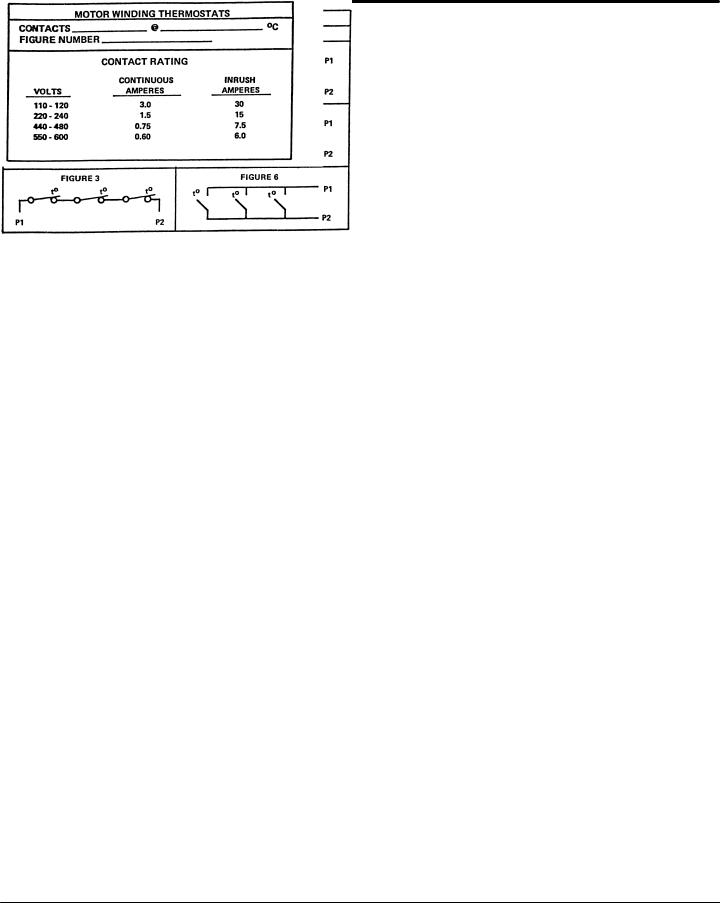
Winding Resistance Temperature Detector RTD . . . . . . . . . . . . . . . . . . . . . . . . . . . . . . . . . . . . . . . . . . . . . . . . . . . |
4-1 |
Winding Thermostat . . . . . . . . . . . . . . . . . . . . . . . . . . . . . . . . . . . . . . . . . . . . . . . . . . . . . . . . . . . . . . . . . . . . . . . . . . . . |
4-1 |
Winding Thermocouple − T/ C . . . . . . . . . . . . . . . . . . . . . . . . . . . . . . . . . . . . . . . . . . . . . . . . . . . . . . . . . . . . . . . . . . . |
4-2 |
Winding Thermistors . . . . . . . . . . . . . . . . . . . . . . . . . . . . . . . . . . . . . . . . . . . . . . . . . . . . . . . . . . . . . . . . . . . . . . . . . . . |
4-2 |
Bearing Resistant Temperature Detector − RTD . . . . . . . . . . . . . . . . . . . . . . . . . . . . . . . . . . . . . . . . . . . . . . . . . . . . |
4-2 |
Suggested Bearing and Winding RTD Setting Guidelines . . . . . . . . . . . . . . . . . . . . . . . . . . . . . . . . . . . . . . . . . . . . |
4-3 |
Bearing Thermocouple − T/C . . . . . . . . . . . . . . . . . . . . . . . . . . . . . . . . . . . . . . . . . . . . . . . . . . . . . . . . . . . . . . . . . . . . |
4-3 |
Bearing Thermostat . . . . . . . . . . . . . . . . . . . . . . . . . . . . . . . . . . . . . . . . . . . . . . . . . . . . . . . . . . . . . . . . . . . . . . . . . . . . |
4-4 |
Bearing Thermometer . . . . . . . . . . . . . . . . . . . . . . . . . . . . . . . . . . . . . . . . . . . . . . . . . . . . . . . . . . . . . . . . . . . . . . . . . . |
4-4 |
Space Heaters . . . . . . . . . . . . . . . . . . . . . . . . . . . . . . . . . . . . . . . . . . . . . . . . . . . . . . . . . . . . . . . . . . . . . . . . . . . . . . . . |
4-4 |
Oil Circulation System . . . . . . . . . . . . . . . . . . . . . . . . . . . . . . . . . . . . . . . . . . . . . . . . . . . . . . . . . . . . . . . . . . . . . . . . . . |
4-4 |
Constant Level Oiler . . . . . . . . . . . . . . . . . . . . . . . . . . . . . . . . . . . . . . . . . . . . . . . . . . . . . . . . . . . . . . . . . . . . . . . . . . . . |
4-5 |
Differential Air Pressure Switch . . . . . . . . . . . . . . . . . . . . . . . . . . . . . . . . . . . . . . . . . . . . . . . . . . . . . . . . . . . . . . . . . . |
4-5 |
Differential Air Pressure Indicator . . . . . . . . . . . . . . . . . . . . . . . . . . . . . . . . . . . . . . . . . . . . . . . . . . . . . . . . . . . . . . . . |
4-6 |
Current Transformers . . . . . . . . . . . . . . . . . . . . . . . . . . . . . . . . . . . . . . . . . . . . . . . . . . . . . . . . . . . . . . . . . . . . . . . . . . . |
4-6 |
Lightning Arrestors And Surge Capacitors . . . . . . . . . . . . . . . . . . . . . . . . . . . . . . . . . . . . . . . . . . . . . . . . . . . . . . . . . |
4-6 |
Air Filters . . . . . . . . . . . . . . . . . . . . . . . . . . . . . . . . . . . . . . . . . . . . . . . . . . . . . . . . . . . . . . . . . . . . . . . . . . . . . . . . . . . . . |
4-6 |
Section 5 |
|
Vertical Solid Shaft Motors . . . . . . . . . . . . . . . . . . . . . . . . . . . . . . . . . . . . . . . . . . . . . . . . . . . . . . . . . . . . . . . . . . . . . . . . . |
5-1 |
Overview . . . . . . . . . . . . . . . . . . . . . . . . . . . . . . . . . . . . . . . . . . . . . . . . . . . . . . . . . . . . . . . . . . . . . . . . . . . . . . . . . . . . . |
5-1 |
Maintenance . . . . . . . . . . . . . . . . . . . . . . . . . . . . . . . . . . . . . . . . . . . . . . . . . . . . . . . . . . . . . . . . . . . . . . . . . . . . . . . . . . |
5-1 |
Grease Lubricated Bearings . . . . . . . . . . . . . . . . . . . . . . . . . . . . . . . . . . . . . . . . . . . . . . . . . . . . . . . . . . . . . . . . |
5-1 |
Oil Lubricated Bearings . . . . . . . . . . . . . . . . . . . . . . . . . . . . . . . . . . . . . . . . . . . . . . . . . . . . . . . . . . . . . . . . . . . . . |
5-2 |
Adjustment of Axial Float . . . . . . . . . . . . . . . . . . . . . . . . . . . . . . . . . . . . . . . . . . . . . . . . . . . . . . . . . . . . . . . . . . . . . . . . |
5-4 |
Grease Lubricated Thrust Bearing . . . . . . . . . . . . . . . . . . . . . . . . . . . . . . . . . . . . . . . . . . . . . . . . . . . . . . . . . . . |
5-4 |
Oil Lubricated Thrust Bearing . . . . . . . . . . . . . . . . . . . . . . . . . . . . . . . . . . . . . . . . . . . . . . . . . . . . . . . . . . . . . . . |
5-4 |
Non Reverse Ratchet . . . . . . . . . . . . . . . . . . . . . . . . . . . . . . . . . . . . . . . . . . . . . . . . . . . . . . . . . . . . . . . . . . . . . . . . . . . |
5-5 |
Thrust Bearing Oil Cooler . . . . . . . . . . . . . . . . . . . . . . . . . . . . . . . . . . . . . . . . . . . . . . . . . . . . . . . . . . . . . . . . . . . . . . . |
5-5 |
Section 6 |
|
Cross Sectional Drawings . . . . . . . . . . . . . . . . . . . . . . . . . . . . . . . . . . . . . . . . . . . . . . . . . . . . . . . . . . . . . . . . . . . . . . . . . |
6-1 |
ii Table of Contents |
MN420 |

Section 1
General Information
Overview BaldorSReliance Duty Master motors provide industry leading value largely because of their 100+ year heritage of exceeding customer expectations, This includes providing Above NEMA Motors to customers for more than 50 years and in doing so, gaining a deep understanding of a broad range of industries and critical applications, The Baldor−Reliance product legacy extends from a wide range of general purpose motors to motors designed for the most hazardous and critical application extremes. In addition to Baldor’s being the most preferred supplier of industrial motors in North America, BaldorSReliance is also the most specified motor in the Petrochemical industry and is the first motor to be certified under the API 547 monogram program.
Nobody knows more about their process than the customer. That is why Baldor employs dedicated Industry teams whose sole purpose is working directly with Industry users, consultants and OEMs. These experienced Baldor engineers are dedicated to understanding the customer’s specific performance requirements and translating this into solutions and products that exceed customer expectations.
This manual contains general procedures that apply to Baldor “Above NEMA” Motor products. Be sure to read and understand the Safety Notice statements in this manual. For your protection, do not install, operate or attempt to perform maintenance procedures until you understand the Warning and Caution statements. A Warning statement indicates a possible unsafe condition that can cause harm to personnel. A Caution statement indicates a condition that can cause damage to equipment.
The following pages contain the information that you need to get the most out of your Duty Master Motor. Please read it carefully and thoroughly before unpacking and installing motor.
Safety Notice: This equipment contains high voltage! Electrical shock can cause serious or fatal injury. Only qualified personnel should attempt installation, operation and maintenance of electrical equipment.
Be sure that you are completely familiar with NEMA publication MG-2, safety standards for construction and guide for selection, installation and use of electric motors and generators, the National Electrical Code and local codes and practices. Unsafe installation or use can cause conditions that lead to serious or fatal injury. Only qualified personnel should attempt the installation, operation and maintenance of this equipment.
MN420 |
General Information 1-1 |

WARNING: |
Do not touch electrical connections before you first ensure that power has been disconnected. |
|
Electrical shock can cause serious or fatal injury. Only qualified personnel should attempt the |
|
installation, operation and maintenance of this equipment. |
WARNING: |
Be sure the system is properly grounded before applying power. Do not apply AC power before you |
|
ensure that all grounding instructions have been followed. Electrical shock can cause serious or fatal |
|
injury. National Electrical Code and Local codes must be carefully followed. |
WARNING: |
Avoid extended exposure to machinery with high noise levels. Be sure to wear ear protective |
|
devices to reduce harmful effects to your hearing. |
WARNING: |
This equipment may be connected to other machinery that has rotating parts or parts that are |
|
driven by this equipment. Improper use can cause serious or fatal injury. Only qualified |
|
personnel should attempt to install operate or maintain this equipment. |
WARNING: |
Do not by-pass or disable protective devices or safety guards. Safety features are designed to |
|
prevent damage to personnel or equipment. These devices can only provide protection if they |
|
remain operative. |
WARNING: |
Avoid the use of automatic reset devices if the automatic restarting of equipment can be |
|
hazardous to personnel or equipment. |
WARNING: |
Be sure the load is properly coupled to the motor shaft before applying power. The shaft key |
|
must be fully captive by the load device. Improper coupling can cause harm to personnel or |
|
equipment if the load decouples from the shaft during operation. |
WARNING: |
Use proper care and procedures that are safe during handling, lifting, installing, operating and |
|
maintaining operations. Improper methods may result in bodily injury. |
WARNING: |
Before performing any motor maintenance procedure, be sure that the equipment connected to |
|
the motor shaft cannot cause shaft rotation. If the load can cause shaft rotation, disconnect the |
|
load from the motor shaft before maintenance is performed. Unexpected mechanical rotation of |
|
the motor parts can cause injury or motor damage. |
WARNING: |
Disconnect all electrical power from the motor windings and accessory devices before |
|
disassembly of the motor. Electrical shock can cause serious or fatal injury. |
WARNING: |
Do not use non UL/CSA listed explosion proof motors in the presence of flammable or |
|
combustible vapors or dust. These motors are not designed for atmospheric conditions that |
|
require explosion proof operation. |
WARNING: |
Motors that are to be used in flammable and/or explosive atmospheres must display appropriate |
|
hazardous location markings including zone/division, class group and temperature codes. |
|
Specific service conditions for these motors are defined in NFPA 70 (NEC) Article 500. |
WARNING: |
UL Listed motors must only be serviced by UL Approved Authorized Baldor Service Centers if |
|
these motors are to be returned to a hazardous and/or explosive atmosphere. |
WARNING: |
This equipment is at line voltage when AC power is connected. Disconnect and lockout all |
|
ungrounded conductors of the ac power line before proceeding. Failure to observe these |
|
precautions could result in severe bodily injury or loss of life. |
WARNING: |
Rotating parts can cause serious or fatal injury. If relubrication is performed with the motor |
|
running, to avoid injury do not contact any rotating parts. |
WARNING: |
Solvents can be toxic and/or flammable. Follow manufacturer’s safety procedures and directions. |
|
Failure to observe this precaution could result in bodily injury. |
WARNING: |
Use of an air jet may cause flying debris and generate particulate matter. Wear suitable skin, eye |
|
and respiratory protection. Failure to observe this precaution may result in bodily injury. |
WARNING: |
Space Heaters operate at line voltage. Disconnect power to space heaters before performing |
|
maintenance work on motor. Failure to observe this precaution could result in severe bodily injury |
|
or loss of life. |
WARNING: |
Thermostat contacts automatically reset when the motor has slightly cooled down. To prevent |
|
injury or damage, the control circuit should be designed so that automatic starting of the motor is |
|
not possible when the thermostat resets. |
WARNING: |
High Voltage may be present even when the machine is not rotating. Ensure that power has been |
|
disconnected before touching the motor or any of its components. Electrical shock can cause |
|
serious or fatal injury. |
|
Continued on next page. |
1-2 General Information |
MN420 |

Section 1
General Information
Safety Notice Continued
Caution: |
Do not lift the motor and its driven load by the motor lifting hardware. The motor lifting hardware |
|
is adequate for lifting only the motor. Disconnect the load from the motor shaft before moving the |
|
motor. |
Caution: |
If eye bolts are used for lifting a motor, be sure they are securely tightened. The lifting direction |
|
should not exceed a 20 angle from the shank of the eye bolt or lifting lug. Excessive lifting |
|
angles can cause damage. |
Caution: |
For motors built with an external circulating oil system (flood lube), refer to the motor nameplate |
|
for the appropriate orifice, pressure and flow rates for the oil. |
Caution: |
To avoid damage to the windings do not use air pressures greater than 30 psi (200 kPa). Avoid |
|
directing the air in such a way that the dirt will be blown into inner crevices. |
Caution: |
To prevent premature equipment failure or damage, only qualified maintenance personnel should |
|
perform maintenance. |
Caution: |
Do not over−lubricate motor as this may cause premature bearing failure. |
Caution: |
Over−lubricating can cause excessive bearing temperatures, premature lubrication breakdown |
|
and bearing failure. |
Caution: |
To prevent equipment damage, be sure that the electrical service is not capable of delivering more |
|
than the maximum motor rated amps listed on the rating plate. |
Caution: |
If a HI POT test (High Potential Insulation test) must be performed, follow the precautions and |
|
procedure in NEMA MG1 and MG2 standards to avoid equipment damage. |
Caution: |
To avoid damage to motor bearings, grease must be kept free of dirt. For an extremely dirty |
|
environment, contact your Baldor distributor or an authorized Baldor District Office for additional |
|
information. |
Caution: |
Do not use solvents containing trichloroethane to clean interior or exterior of motor. Damage may |
|
occur to paint and insulation systems. |
Caution: |
When driven equipment may be damaged by incorrect rotation direction, uncouple the motor form |
|
load and check motor rotation direction during initial start and be sure rotation is correct. |
Caution: |
Motors with oil lubricated bearings (such as sleeve bearings) are shipped without oil. As soon as the |
|
motor is received, the bearing oil reservoir should be filled to the indicated level with the proper |
|
lubrication oil (see Section 4 “Constant Level Oiler”). To avoid motor damage, do not rotate the shaft |
|
until you have filled the oil reservoirs to the proper level with recommended lubricant. |
Caution: |
Repeated starts and/or jogs can greatly reduce the life of an induction motor. |
Caution: |
The space heaters are designed to operate at or below the maximum surface temperature stated |
|
on the nameplate. If the marked ambient and/or voltage are exceeded this maximum surface |
|
temperature can be exceeded and can damage the motor windings. If applied in a division 2 or |
|
zone 2 environment this excessive temperature may cause ignition of hazardous materials. |
|
If you have any questions or are uncertain about any statement or procedure, or if you require additional |
|
information please contact your Baldor District Office. |
Receiving |
Each motor is thoroughly tested at the factory and carefully packaged for shipment. |
|
When you receive your motor, there are several things you should do immediately. |
|
Do not unpack until ready for use. |
|
1. Observe the condition of the shipping container and report any damage immediately to the |
|
commercial carrier that delivered your motor. |
|
2. Verify that the part number of the motor you received is the same as the part number listed on your |
|
purchase order. |
Handling |
The motor should be lifted using the lifting lugs or eye bolts provided. |
|
1. Eyebolts or lifting lugs are intended for lifting only the motor with the standard factory installed |
|
accessories such as tachometer, etc., the lifting means on the motor must not be used to lift the motor |
|
plus additional equipment such as gears, pumps, compressors, or other driven equipment. The lifting |
|
means on the motor cannot be used to lift assemblies of motor and other equipment mounted on a |
|
common base. |
|
2. In all cases, care should be taken to assure lifting in the direction intended in the design of the lifting |
|
means. Lift using all lugs provided using a hoist with adequate capacity. |
|
Be sure lift or hoist equipment has appropriate tires for the terrain to avoid becoming stuck or tipping |
|
over. If the shipping pallet is intact, use a fork lift to move the motor. If the shipping pallet is not used, |
|
lift using all lugs provided. Likewise, precautions should be taken to prevent hazardous overloads due |
|
to deceleration, acceleration or shock forces. Angle of lift with rope or chain never to be less than 45 |
|
from horizontal. |
MN420 |
General Information 1-3 |
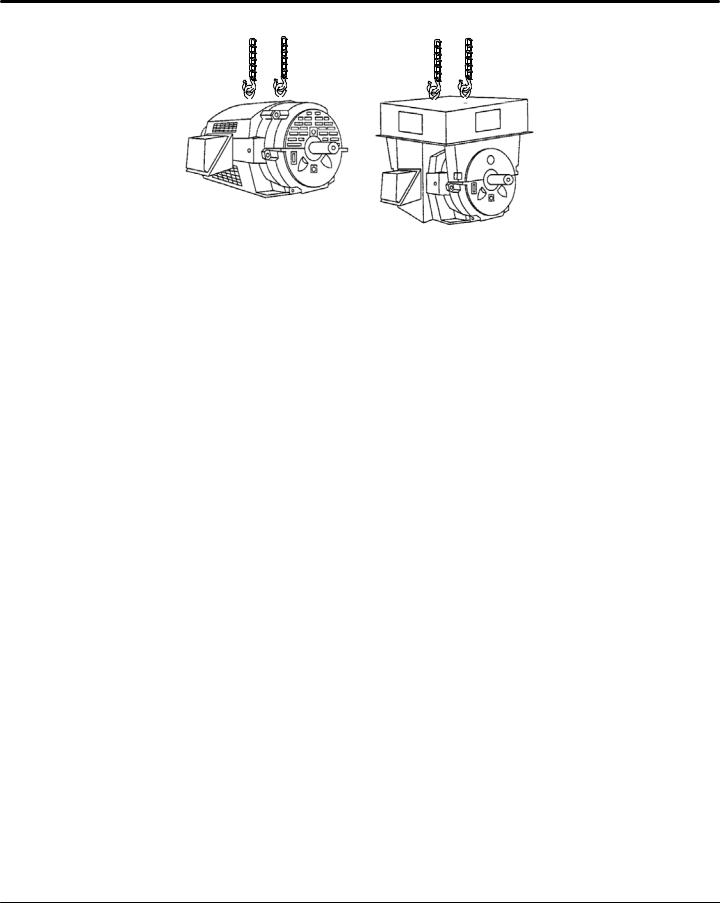
Figure 1-1 Lifting Motor
Storage |
|
|
|
|
|
|
|
|
|
|
|
|
|
|
|
Do not unpack until ready for use. If the motor is not put into service immediately, the motor must be |
|||||||||||||||
|
stored in a clean, dry and warm location. Several precautionary steps must be performed to avoid motor |
||||||||||||||
|
damage during storage. |
||||||||||||||
Caution: |
Oil lubricated motors are shipped without oil. As soon as the motor is received, the bearing oil |
||||||||||||||
|
reservoir should be filled to the indicated level with the proper lubrication oil (see Section 4 |
||||||||||||||
|
“Constant Level Oiler”). To avoid motor damage, do not rotate the shaft until you have filled the |
||||||||||||||
|
oil reservoirs to the proper level with recommended lubricant. |
||||||||||||||
|
1. The motor should be inspected periodically and the insulation resistance checked and recorded |
||||||||||||||
|
monthly (see Checking Insulation Resistance in section 3). If there is a significant change in insulation |
||||||||||||||
|
resistance, it should be investigated and corrective action should be taken. Consult your local Baldor |
||||||||||||||
|
District office for additional data. |
||||||||||||||
|
2. Do not lubricate bearings during storage. Duty Master anti−friction bearing motors are shipped with |
||||||||||||||
|
the proper amount of grease in each bearing. |
||||||||||||||
|
3. At 30 day intervals, remove only enough packing to expose the shaft and remove the shaft shipping |
||||||||||||||
|
brace, rotate the shaft (by hand) 10 to 15 revolutions. This distributes the grease, preventing bearing |
||||||||||||||
|
corrosion due to condensation, or to the presence of contaminating gases near the motor. After |
||||||||||||||
|
rotating the shaft replace protective packing and shaft shipping brace. |
||||||||||||||
|
4. If the storage location is cold, damp or humid, the motor windings must be protected from moisture. |
||||||||||||||
|
This can be done by applying power to the motors’ space heater (if available) while the motor is in |
||||||||||||||
|
storage. If space heaters are not installed, the motor can be kept warm by placing several 100 or 150 |
||||||||||||||
|
watt electric lamps inside the enclosure and connect them to a power source. |
||||||||||||||
|
5. For grease lubricated bearings, if the motor is stored and directly exposed to weather conditions, it is |
||||||||||||||
|
important that the bearing cavity be inspected for the presence of water at the grease drain. If the |
||||||||||||||
|
cavity is contaminated with water, the motor must be disassembled, grease removed from the |
||||||||||||||
|
bearing(s) and housing(s) and bearing(s) inspected for corrosion. If corrosion is present, the |
||||||||||||||
|
bearing(s) must be replaced. If there is no corrosion, repack the bearing(s) / housing(s) with grease |
||||||||||||||
|
as instructed in Section 3. |
||||||||||||||
|
6. Duty Master motors with oil lubricated sleeve bearings are tested using an oil containing a rust |
||||||||||||||
|
inhibitor. This additive protects the bearings and associated structural parts from rust and corrosion. |
||||||||||||||
|
Prior to shipment the oil is drained. A thin film of oil remains on the vital parts providing short term |
||||||||||||||
|
temporary rust protection. |
||||||||||||||
|
As soon as the motor has been received, the bearing oil reservoir should be filled to the required oil |
||||||||||||||
|
level and with the proper oil lubrication. (See Section 3 Bearing Lubrication for proper type). |
||||||||||||||
Unpacking |
Each Baldor motor is packaged for ease of handling and to prevent entry of contaminants. |
||||||||||||||
|
1. To avoid condensation inside the motor, do not unpack until the motor has reached room temperature. |
||||||||||||||
|
(Room temperature is the temperature of the room in which it will be installed). |
||||||||||||||
|
The packing provides insulation from temperature changes during transportation. |
||||||||||||||
|
2. When the motor has reached room temperature, carefully remove the motor from packaging. |
||||||||||||||
|
Lifting provisions are provided as eyebolts or cast lifting lugs located on top of the motor. |
||||||||||||||
|
Place a lifting hook in each of the lifting means provided and carefully lift the motor from its packing, |
||||||||||||||
|
see Figure 1-1. Use a hoist with adequate capacity. Use spreader bars as required to ensure that lift |
||||||||||||||
|
chains/cables do not pull at an angle and prevent damage to lifting eyes or motor hoods. |
||||||||||||||
1-4 General Information |
MN420 |

Section 2
Installation & Operation
Overview Installation should conform to the National Electrical Code as well as local codes and practices. When other devices are coupled to the motor shaft, be sure to install protective devices to prevent future accidents. Some protective devices include, coupling, belt guard, chain guard, shaft covers etc. These protect against accidental contact with moving parts. Machinery that is accessible to personnel should provide further protection in the form of guard rails, screening, warning signs etc.
1.If the motor has been in storage for an extended period or had been subjected to adverse moisture conditions, check the insulation resistance of the stator winding (see Checking Insulation Resistance in section 3).
2.Examine the motor nameplate data to make sure it agrees with the power circuit to which it will be connected. The motor is guaranteed to operate successfully at line frequency not more than 5%, and line voltage not more than 10%, above or below the nameplate ratings, or a combined variation of voltage and frequency of not more than 10% above or below nameplate ratings. Efficiency, power factor and current may vary from nameplate data.
3.Check to make sure that direction of motor rotation is corrected for the intended application.
Location It is important that motors be installed in locations that are compatible with motor enclosure and ambient conditions. Improper selection of the motor enclosure and ambient conditions can lead to reduced operating life of the motor. The motor must be located in an environment that satisfies local codes. For locations outside the USA., compliance with IEC requirements and other regulatory agencies are required. The following additional considerations should also govern its location:
For open and protected motors the installation should be in a location that provides adequate space for air circulation of the external cooling fan. Exposure to high ambient temperatures, humidity and atmospheric contamination should be avoided. Acids, alkalis and gases also have detrimental effects on electrical machinery. The location of installation should be accessible for routine maintenance and inspection.
If the room is not large enough to have natural ventilation, some external source of forced and filtered air will be necessary. The room should be such that the heat developed during operation can escape and will not be recirculated over the equipment.
Permanent handling equipment to facilitate major service and repair without complete disassembly of the individual units should be considered.
If the motor must be moved or additional handling or shipment of motor be required, be certain to block the shaft as it was blocked for shipment by the factory. Blocking the shaft, limits the rotor movement both axially and radially which prevents damage to the bearings.
Hazardous Locations are those where there is a risk of ignition or explosion due to the presence of combustible gases, vapors, dust, fibers, or flyings. Facilities requiring special equipment for hazardous locations are typically classified in accordance with local requirements. In the US market, guidance is provided by the National Electric Code.
EMC Compliance Statement for European Union
The motors described in this instruction manual are designed to comply 2004/108/EC . These motors are commercial in design and not intended for residential use.
Foundation The dimensions for mounting are shown on the outline drawing supplied with the motor software and should be referred to prior to planning of the foundation.
Large motors require a concrete foundation. The foundation should consist preferably of solid concrete walls or piers and should be carried down far enough to rest on a solid sub base. This base should be sufficient stiffness to prevent vibration and to insure long, trouble free operation. If necessary, a consulting engineer, who is familiar with foundation design, should design and supervise its construction.
If the foundation is to be steel girders instead of concrete, the girders should be well braced and supported by adequate columns to prevent vibration due to resonance. The natural frequencies of the motor and supporting structure must be at least 20% away from the speed of rotation and twice the speed of rotation and multiples of the power line frequency.
The size of the foundation is determined by the weight, size and speed of the equipment and by the type and condition of the underlying soil. The width and length of the foundation are usually made to extend at least 6 inches (150mm) beyond the equipment on all sides of the base. Increased width and weight are necessary for operation at higher speeds and for foundations that project above the floor level to give stability against rocking and resonant vibration.
Large motors are not rigid or self supporting, and should be uniformly supported. Therefore, when set on the foundation or base, adequate support should be provided by leveling plates and shims between the frame and the foundation, at points of loading; Le., under the frame feet, and intersection points of the beams as well as under long, unsupported sections of the base. The number of shims should be kept to a minimum. A few thick ones are preferred over many thin ones.
MN420 |
Installation & Operation 2-1 |
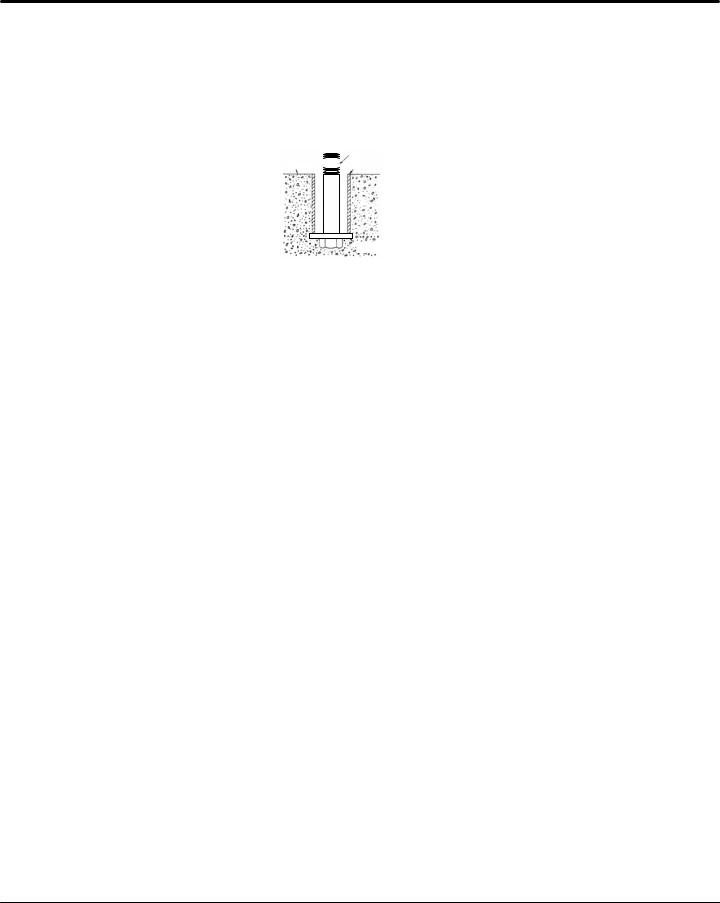
A 1 inch (25mm) space should be allowed between the base and foundation for grouting. The concrete surface should be roughed to provide a good bonding surface. The lateral clearance for positioning the base can be made by providing a space around the hold down bolts, that are secured head down to an anchoring washer, Figure 2-1. A sleeve may be used to form the hole when poring the foundation around the bolt for the length between the anchoring washer and the top surface of the concrete foundation. The size and depth of the hole will depend upon the size of the motor and accuracy of the hole location. A template can be used to locate the hold down bolts. The bolts can be locked in place later, by filling the clearance hole with grout.
Figure 2-1 Suggested Foundation Bolt Installation
Bolt
Foundation  Pipe
Pipe
Washer
Pre Installation Checks The assurance of successful start−up depends upon the use of good handling, inspection, and installation practices.
Before shipment, every motor is given a running test to check operation. Although complete factory tests have been made, motors should be checked for any change resulting from improper handling during shipment, storage, installation or by an unsatisfactory foundation. Failure to check or do the necessary work as mentioned above, could cause misalignment resulting in vibration and premature bearing failure.
Before the motor is checked for alignment, remove all shipping blocks and supports installed at the factory. The shaft should turn over freely. The degree of accuracy required in the alignment depends on the rated speed of the machine. The greater the speed, the greater the care and accuracy necessary in the alignment.
The motor must be level to maintain the proper oil level. Check the driven equipment to make sure that the motor will be coupled to a level shaft. If necessary, level it up before coupling.
Doweling & Bolting After proper alignment is verified, dowel pins should be inserted through the motor feet into the foundation. This will maintain the correct motor position should motor removal be required. (Baldor motors are designed for doweling.)
1.Drill dowel holes in diagonally opposite motor feet in the locations provided.
2.Drill corresponding holes in the foundation.
3.Ream all holes.
4.Install proper fitting dowels.
5.Mounting bolts must be carefully tightened to prevent changes in alignment. Use a flat washer and lock washer under each nut or bolt head to hold the motor feet secure. Flanged nuts or bolts may be used as an alternative to washers.
Soft foot is a condition in which one or more of the motor feet do not rest squarely on the base. This condition causes distortion of the motor frame once the mounting bolts are tightened and can lead to elevated vibration levels. Prior to alignment, the following procedure should be followed to minimize the effects of soft foot.
a.With the motor mounted on the base use a dial indicator to measure the soft foot deflection at each mounting location.
b.With all feet firmly torqued to 120 ft−lbs loosen and tighten each foot measuring the total foot deflection. The total foot deflection should not exceed 2.00 mils.
c.If the foot deflection exceeds 2.00 mils shim foot as necessary to reduce deflection”.
6.Tighten all motor mounting bolts to the identical recommended initial torque value.
7.Place a dial indicator to read vertical displacement on the top of a motor foot.
8.Loosen the mounting bolt in that foot and record the amount of deflection shown by the dial indicator.
9.Foot deflection should be limited to 0.001”−0.002”. If deflection exceeds this level, proceed to step 10. If it does not, proceed to step 11.
10.Place an amount of shims that corresponds to the measured deflection under the foot.
11.Retighten the bolt and repeat the procedure on the remaining motor feet.
2-2 Installation & Operation |
MN420 |
Coupling
1.In preparation for making the coupling alignment, wash off the rust protective slushing compound on the motor shaft and factory installed couplings with solvent. On sleeve bearing motors. remove the rust preventative from the shaft to expose the magnetic center and rotor float scribe lines.
Fill oil sumps with proper oil to the proper level.
2.The couplings should be heated for proper mounting. Do not press or drive it onto the shaft. The shaft extension key length should be sized per Figure 2-2.
Figure 2-2 |
A |
L |
B |
L= Key Length
A= Coupling Hub Length
B= Keyway Length
A ) B
L + 2
3.Motors supplied with sleeve bearings.
The drive end shaft Extension is scribed with three lines indicating the magnetic center line and rotor end float limits. A single scribe line, magnetic center only is used in cases where the float extreme scribe lines would interfere with a shaft shoulder or extension keyway.
The magnetic center scribe line is filled with light colored paint and covered with masking tape prior to coating with rust protection. The distance from the magnetic center scribe line to the reference surface is indicated on a name plate attached to the motor frame. The magnetic center is within +0.06 in. (+1.5 mm) of the rotor float mechanical center. Rotor end float is 0.50 inch (12.7 mm) minimum. Sleeve bearing motors are not designed to withstand external axial thrust. A limited axial float coupling should be used. Total end float of the coupling should not exceed 0.19 inch (4.8 mm) ( .09 inch. +2.3 mm).
The motor axial placement should be established by locating the shaft on its magnetic center and spaced from the driven equipment as recommended by the coupling manufacturer.
4.After the motor is properly positioned for axial end play and with the hold down bolts snug but not tightened prepare for the coupling alignment. Mount the coupling hubs, but do not engage the coupling.
Coupling Alignment
There are a number of procedures to properly align the motor to the driven equipment. The end result depends upon the accuracy of the parts in roundness, flatness, runout of the reference surfaces, rigidity of the mounting and the skill of the setup man. The motor base surfaces must be flat and parallel to the shafts. Make allowance for inserting shims under the motor to make the elevation adjustment.
The shims size should be the full length of the motor foot pad, they should be flat, and free from burrs. Insert the shims carefully to maintain the foot plane and to avoid bending or twisting the motor frame. For a poor mounting surface, it may be necessary to machine a shim to compensate for the slope or surface irregularity. To minimize soft stacking, use the thickest shim stock combination with the fewest shims.
A preliminary line up can be made with feeler gauge by measuring at top, bottom and sides between faces of the hubs. Angular alignment is satisfactory when there is no more than .002 in. (0.05 mm) difference between all sides of the hubs. Parallel alignment check can be made with a straight edge, or dial indicator, to determine if both hubs are parallel within 0.002 in. (0.05 mm). During shimming use shims that are as thick as possible to avoid a sponginess of an excessive number of layers.
Coupling Alignment Procedure
For more accurate alignment, refer to the manual for the driven equipment. When alignment is complete, tighten the motor and driven equipment hold down bolts and recheck alignment. The feet must be tightened uniformly. Ensure the feet are on the same plane by measuring the feet spring back when a bolt is loosened. It should not exceed 0.002 inch (0.050 mm) at any foot as the others remain tight. Repeat with two adjacent bolts loose. The shaft spring back should not exceed 0.001 inch (0.025 mm).
In some cases it may be necessary to make a hot alignment check to compensate for thermal expansion. A compensating offset alignment should be made cold. The unit may run rough until the equipment temperatures stabilize.
If for any reason alignment does not fall within limits, contact your local Baldor District Office.
MN420 |
Installation & Operation 2-3 |

Grouting
Grout should be used, but should not be applied until all alignment and leveling have been completed, and the set is running satisfactorily – from the bearing noise, temperature and vibration standpoint – after the 4 hour run in test. A good quality commercial non shrinking type of grouting compound should be used. A cement/sand ratio of 1:1 is recommended. Grout should be used with a minimum quantity of water to give a stiff mix. The roughened concrete surface should be washed to remove the dust and loose particles. Grouting should be applied to a wet surface but to assure a good bond, there must be no puddles of water or contamination from oil or grease. Prepare only the amount that can be handled within set time and without adding water to the original mix. The grouting should be done quickly and continuously. Tamp in place and vent the pockets to assure a solid casting, it is suggested that the motor remain idle while the grout is hardening. At least 48 hours curing timed is desirable for that grout to develop adequate strength before operating this set, or any nearby large equipment which could create a vibration.
Lubrication The lubrication system should be checked in preparation for rotating the shaft during the alignment operation.
Anti Friction Bearings (Grease Lubricated)
Bearing chambers are packed with grease during assembly, and do not normally need additional grease at time of installation, unless the unit has been in storage and installation for 6 months or longer. Lubricant must be added per Section 3, Maintenance.
Sleeve Bearing (Oil Lubricated)
Caution: |
Oil lubricated motors are shipped without oil. As soon as the motor is received, the bearing oil |
|
reservoir should be filled to the indicated level with the proper lubrication oil (see Section 4 “Oil |
|
Rite Oiler”). To avoid motor damage, do not rotate the shaft until you have filled the oil reservoirs |
|
to the proper level with recommended lubricant. |
|
Lubricating oils for sleeve bearing motors should be selected as follows: |
|
1. Viscosity in SUS (centistokes) at 100 F. (37.8 C): |
|
Table 2−1 |
|
|
|
|
|
|
|
Ambient Temperature Range** |
Speed |
|
|
|
1200 RPM or Less |
Over 1200 RPM |
0 |
to 120 F* (–18 C to 50 C*) |
300 (68 cSt) |
150 SUS (32 cSt) |
–20 to 50 F (–30 C to 10 C) |
150 (32 cSt) |
90 SUS (18cSt) |
|
*For higher temperatures, oil coolers should be used.
**For lower temperatures, heaters should be used to assure adequately high starting temperature.
|
2. Pour Point: Below minimum starting temperature. |
Caution: |
For motors equipped with circulating oil pump and adjustable needle valve, valve must be |
|
adjusted or flooding of oil sump may occur. Disconnect valve and adjust flow rate for 0.10 GPM |
|
flow (or as specified on data sheet). |
|
3. Quality: Use a good grade of turbine type oil with rust, foam and oxidation inhibitors. Avoid automotive |
|
oils or additives other than those specifically recommended by the oil manufacturer. |
|
To fill sleeve bearing motor oil reservoirs on motors not equipped with constant level oilers, be sure |
|
that drain plugs are in place and secure and fill through filler cap until oil level shows at top line |
|
marked on oil gauge. Oil level must never be below bottom line marked on oil gauge. For motors with |
|
constant level oilers, refer to the instructions. See Accessories Section 4. |
Electrical Connection
WARNING: |
Be sure the system is properly grounded before applying power. Do not apply AC power before |
|
you ensure that all grounding instructions have been followed. Electrical shock can cause |
|
serious or fatal injury. National Electrical Code and Local codes must be carefully followed. |
|
The user must select a motor starter and overcurrent protection suitable for this motor and its application. |
|
Consult motor starter application data as well as the National Electric Code and/or other applicable local |
|
codes. |
|
A conduit box may be provided for the power lines to the stator and other conduit boxes for all other |
|
electrical connections. Tapped holes are provided for grounding. |
2-4 Installation & Operation |
MN420 |

Grounding Failure to properly ground the motor may cause electrical shock hazard to personnel. Do not attach ground lead to motor foot bolt. In the USA consult the National Electrical Code, Article 430 for information on grounding of motors and generators, and Article 250 for general information on grounding. In making the ground connection, the installer should make certain that there is a solid and permanent metallic connection between the ground point, the motor or generator terminal housing, and the motor or generator frame. In non−USA locations consult the appropriate national or local code applicable.
All large motors should be grounded with the grounding conductor equipped with a brazed copper terminal, or with a suitable solderless terminal fastened to the motor. Soldered terminals should not be used. A washer should be used between bolt head and terminal lug. The other end should be fastened with suitable clamps or terminals to rigid metallic conduit or to the nearest available ground. Ground conductor size should be in accordance with the following National Electrical Code Table 250−122. Installation restrictions are listed in Section 250−120.
Table 2−2 Size of Equipment Ground Conductor
Rating or Setting of Automatic Overcurrent Device in Circuit |
|
Size |
Ahead of Equipment, Conduit, etc., Not Exceeding (Amperes) |
Copper Wire No. |
Aluminum or Copper Clad Aluminum Wire No.* |
15 |
14 |
12 |
20 |
12 |
10 |
30 |
10 |
8 |
40 |
10 |
8 |
60 |
10 |
8 |
100 |
8 |
6 |
200 |
6 |
4 |
300 |
4 |
2 |
400 |
3 |
1 |
500 |
2 |
1/0 |
600 |
1 |
2/0 |
800 |
0 |
3/0 |
1000 |
2/0 |
4/0 |
1200 |
3/0 |
250MCM |
1600 |
4/0 |
350MCM |
2000 |
250MCM |
400MCM |
2500 |
350MCM |
600MCM |
3000 |
400MCM |
600MCM |
4000 |
500MCM |
800MCM |
5000 |
700MCM |
1200MCM |
6000 |
800MCM |
1200MCM |
For motors installed in compliance with IEC requirements, the following minimum cross sectional area of the protective conductors should be used:
Crosssectional area of phase |
Minimum crosssectional area of the corresponding |
|
conductors, S |
protective conductor, Sp |
|
mm2 |
|
mm2 |
S< 16 |
|
S |
16 < S 3 |
35 |
16 |
S>35 |
|
0,5 S |
Equipotential bonding connection shall made using a conductor with a cross-sectional area of at least 4 mm2.
MN420 |
Installation & Operation 2-5 |
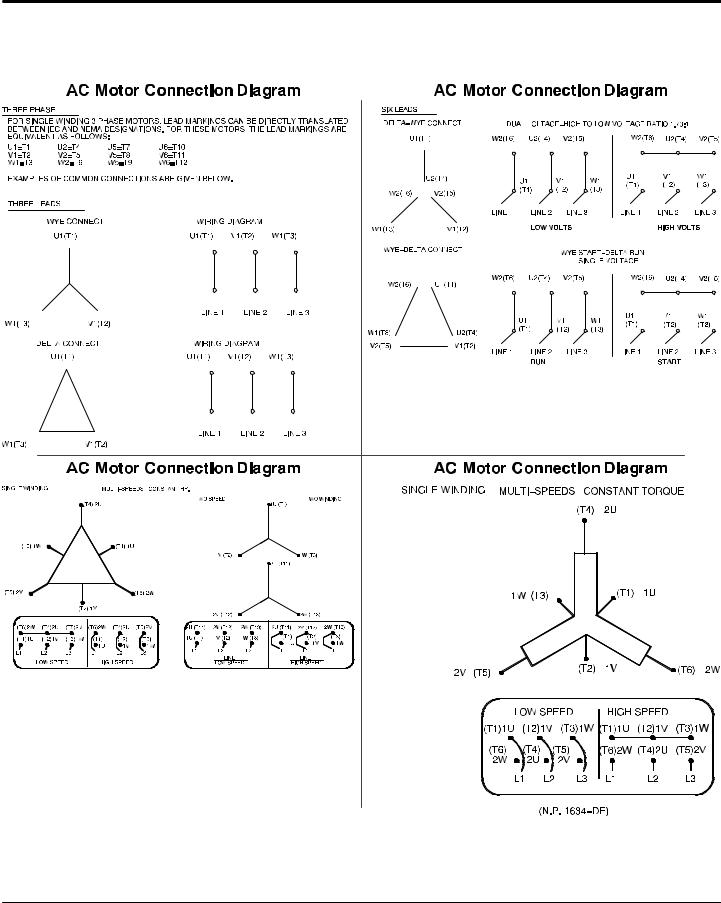
Note: Main power leads for CE Marked Motors may be marked U,V,W – for standard configurations, please consult connection diagrams.
Connection Diagrams
2-6 Installation & Operation |
MN420 |
Connection Diagrams Continued
Caution: |
The space heaters are designed to operate at or below the maximum surface temperature stated |
|
on the nameplate. If the marked ambient and/or voltage are exceeded this maximum surface |
|
temperature can be exceeded and can damage the motor windings. If applied in a division 2 or |
|
zone 2 environment this excessive temperature may cause ignition of hazardous materials. |
MN420 |
Installation & Operation 2-7 |

WARNING: |
This equipment is at line voltage when AC power is connected. Disconnect and lockout all |
|
ungrounded conductors of the ac power line before proceeding. Failure to observe these |
|
precautions could result in severe bodily injury or loss of life. |
Pre−Operation Check Be sure that all power to motor and accessories is off. Be sure the motor shaft is disconnected from the load and will not cause mechanical rotation of the motor shaft.
|
1. |
Verify that Hold Down bolts are tightened to the proper torque. |
|
2. |
If the motor has been idle for a long period of time after installation, check insulation resistance. |
|
3. |
Check the incoming power to be sure that line voltage, frequency and phase are correct for the motor |
|
|
(refer to the motor nameplate). |
|
4. |
Inspect all electrical connections for proper termination, clearance, mechanical strength and electrical |
|
|
continuity. |
|
5. |
Be sure all shipping materials and braces (if used) are removed from motor shaft. |
|
6. |
Ensure alignment is correct and motor is properly lubricated. |
|
|
a. On machines supplied with oil lubricated bearings inspect lubrication system to insure that oil |
|
|
reservoirs have been filled to the proper level with correct oil. Do not overfill oil reservoirs. |
|
|
b. Motors operating with a forced lubrication system must have the forced lubrication system |
|
|
operating before starting the motor. |
|
7. |
Manually rotate the motor shaft to ensure that it rotates freely. |
Caution: |
When driven equipment may be damaged by incorrect rotation direction, uncouple the motor from |
|
|
the load and check motor rotation direction during initial start and be sure rotation is correct. |
|
|
8. |
When the driven machine is likely to be damaged by the wrong direction of rotation, it is best to |
|
|
uncouple the motor from its load during the check for rotation and/or during the initial start. |
|
|
Some motors are designed for a single direction of rotation as indicated by nameplates. Running |
|
|
those units in the wrong direction will reduce airflow causing overheating. Check to see that both the |
|
|
motor and driven equipment are operating in the correct direction of rotation. If it is necessary to |
|
|
change rotation, disconnect and lockout all input power and interchange any two input power phases. |
|
9. |
Replace all panels and covers. |
|
10. |
Check to see that coupling guards and other protective enclosures are not blocking the ventilating air |
|
|
into the motor and exhaust openings. |
First Time Uncoupled Start−Up
Read each of the steps in the following procedure over thoroughly, so that each is fully understood, before attempting to start the motor.
1.Make the initial start by following the regular sequence of starting operations in the control instructions.
2.After starting, check that the motor is running smoothly. If the motor has excessive vibration, shut down immediately and investigate. Check for coupling and key unbalance, rusty bearing, lack of lubrication, foot planarity, structural resonance.
3.Check bearing temperatures frequently. Bearing temperature should not exceed 185 F (85 C). Likewise the rate of temperature rise should not be excessive. At initial start, the bearing temperature rate−of−rise is more indicative of trouble than overall temperature for a minimum of two hours, if at any time the rate of rise curve appears too steep, stop the motor immediately and re−check its alignment.
4.Ensure that the protective controls are functioning properly before any prolonged operation.
5.Run the motor for at least two hours.
2-8 Installation & Operation |
MN420 |

Coupled Start−up This procedure assumes a coupled start up. Also, that the first time start up procedure was successful. Read and fully understand each of the steps in the following procedure before attempting to start the motor.
1.Disconnect and lockout the power source. Ensure no power is applied to the motor.
2.After a successful uncoupled start, assemble the coupling and lubricate with the manufacturer’s recommended lubricant. Check to see that the coupling is not binding.
3.Verify the motor shaft is on its magnetic center.
4.Verify coupling axial movement is within the bearing float limit.
5.Check to see that coupling guards and other protective enclosures are not blocking the ventilating air over the motor and exhaust openings.
6.Try no load coupled start−up, repeating steps 1 to 5 of the “First Time Uncoupled Start−up” procedure.
7.Verify the driven equipment is not transmitting vibration back to the motor through the coupling or base.
8.Inspect the motor carefully. Make the initial start by following the regular sequence of starting operations in the control instructions.
9.After starting, check that the motor is running smoothly. If the motor shows excessive vibration, shut down immediately and investigate. Check for coupling and key unbalance, lack of lubrication, foot planarity and structural resonance.
10.Check vibration at the bearing housing. Motor vibration must not exceed the limits given in Table 2−3. Vibration severity and conversion of the above limits to velocity or acceleration can be determined by using the vibration nomograph in Figure 2-3. Nomograph shows accepted industry vibration levels.
11.Verify all panels and covers are securely in place.
12.Verify that coupling guards are properly installed and protective enclosures are not blocking the ventilating air into the motor and exhaust openings.
13.In addition, observe the following before attempted start−up of Belted, C−Face/D Flange and Sleeve bearing motors:
a.For belted duty, ensure motor is intended for belted service and that the belted application data has been verified. Also be aware that some belted duty motors are built with bearings that are not suited for non−belted applications.
b.Due to their size, above NEMA C−Face and D−Flange motors are supplied with mounting feet and are not designed to be supported by the C−Face or D−Flange alone.
c.Sleeve bearing motors are intended for horizontal mounting only.
Contact your local Baldor District Office for any questions concerning this installation before power is applied to the motor.
Jogging and Repeated Starts
Caution: |
Repeated starts and/or jogs can greatly reduce the life of an induction motor. |
|
Repeated starts and/or jogs can greatly reduce the life of an induction motor. If it is necessary to |
|
repeatedly start or jog a motor, check the application with your local Baldor District office. |
|
At ambient temperature, the motor is normally capable of making two starts in succession and coasting to |
|
rest between starts. |
|
The motor is also capable of making one start at its rated load operation temperature. For cooling time |
|
required before additional starts can be made consult your local Baldor District office or the motor starting |
|
nameplate if one is provided. |
|
If more starts than defined above are attempted in shorter period of time, severe damage to the motor |
|
electrical windings and rotor may result. |
|
The starting conditions listed above apply only if the inertia of the connected load, the load torque during |
|
acceleration, the applied voltage, and the starting method are those for which the motor was designed. |
|
For starting situations not covered here, consult your local Baldor District office before proceeding. |
|
Refer also to the motor nameplate which may list starting conditions. |
MN420 |
Installation & Operation 2-9 |

|
|
Table 2−3 Maximum Vibration Limits |
|
||
|
|
|
|
|
|
RPM |
|
On Bearing Housing |
|
On Shaft |
|
|
(Displacement mils Pk−Pk) |
(Velocity in/sec., Pk) |
(Displacement mils Pk−Pk) |
||
|
|
||||
3000−4000 Incl. |
0.001 |
|
0.19 |
1.75 |
|
1500−2999 |
Incl. |
0.0015 |
|
0.14 |
|
1000−1499 |
Incl. |
0.002 |
|
0.13 |
2.0 |
999 or less |
0.0025 |
|
0.12 |
|
|
Figure 2-3 Vibration Nomograph
Displacement - Inches
|
10.00 9 |
|
|
|
|
|
|
|
|
|
|
|
|
|
|
|
|
|
|
|
|
|
|
|
|
8 |
|
|
|
|
|
|
|
|
|
|
|
|
|
|
|
|
|
|
|
|
|
|
|
|
7 |
|
|
|
|
|
|
|
|
|
|
|
|
|
|
|
|
|
|
|
|
|
|
|
|
6 |
|
|
|
|
|
|
|
|
|
|
|
|
|
|
|
|
|
|
|
|
|
|
|
|
5 |
|
|
|
|
|
|
|
|
|
|
|
|
|
|
|
|
|
|
|
|
|
|
|
|
4 |
|
|
|
|
|
|
|
|
|
|
|
|
|
|
|
|
|
|
|
|
|
|
|
|
3 |
|
|
|
|
|
|
|
|
|
|
|
|
|
|
|
|
|
|
|
|
|
|
|
|
2 |
|
|
|
|
|
|
|
|
|
|
|
|
|
|
|
|
|
|
|
|
|
|
|
|
1.00 |
|
|
|
|
|
|
|
|
|
|
|
|
|
|
|
|
|
|
|
|
|
|
|
|
0.9 |
|
|
|
|
|
|
|
|
|
|
|
|
|
|
|
|
|
|
|
|
|
|
|
|
0.8 |
|
|
|
|
|
|
|
|
|
|
|
|
|
|
|
|
|
|
|
|
|
|
|
|
0.7 |
|
|
|
|
|
|
|
|
|
|
|
|
|
|
|
|
|
|
|
|
|
|
|
- Inches/Sec |
0.6 |
|
|
|
|
|
|
|
|
|
|
|
|
|
|
|
|
|
|
|
|
|
|
|
0.5 |
|
|
|
|
|
|
|
|
|
|
|
|
|
|
|
|
|
|
|
|
|
|
|
|
0.4 |
|
|
|
|
|
|
|
|
|
|
|
|
|
|
|
|
|
|
|
|
|
|
Rough, |
|
0.3 |
|
|
|
|
|
|
|
|
|
|
|
|
|
|
|
|
|
|
|
|
|
|
Needs Attention |
|
|
|
|
|
|
|
|
|
|
|
|
|
|
|
|
|
|
|
|
|
|
|
|
||
|
|
|
|
|
|
|
|
|
|
|
|
|
|
|
|
|
|
|
|
|
|
|
|
|
Velocity |
0.2 |
|
|
|
|
|
|
|
|
|
|
|
|
|
|
|
|
|
|
|
|
|
|
Fair |
|
|
|
|
|
|
|
|
|
|
|
|
|
|
|
|
|
|
|
|
|
|
|
Acceptable |
|
|
|
|
|
|
|
|
|
|
|
|
|
|
|
|
|
|
|
|
|
|
|
|
|
|
|
0.10 |
|
|
|
|
|
|
|
|
|
|
|
|
|
|
|
|
|
|
|
|
|
|
|
|
0.09 |
|
|
|
|
|
|
|
|
|
|
|
|
|
|
|
|
|
|
|
|
|
|
|
|
0.08 |
|
|
|
|
|
|
|
|
|
|
|
|
|
|
|
|
|
|
|
|
|
|
|
|
0.07 |
|
|
|
|
|
|
|
|
|
|
|
|
|
|
|
|
|
|
|
|
|
|
|
|
0.06 |
|
|
|
|
|
|
|
|
|
|
|
|
|
|
|
|
|
|
|
|
|
|
|
|
0.05 |
|
|
|
|
|
|
|
|
|
|
|
|
|
|
|
|
|
|
|
|
|
|
|
|
0.04 |
|
|
|
|
|
|
|
|
|
|
|
|
|
|
|
|
|
|
|
|
|
|
|
|
0.03 |
|
|
|
|
|
|
|
|
|
|
|
|
|
|
|
|
|
|
|
|
|
|
|
|
0.02 |
|
|
|
|
|
|
|
|
|
|
|
|
|
|
|
|
|
|
|
|
|
|
|
|
0.01 |
3 |
4 |
5 |
6 |
7 |
8 |
9 |
2 |
3 |
4 |
5 |
6 |
7 |
8 |
9 |
2 |
3 |
4 |
5 |
6 |
7 |
8 |
9 |
|
2 |
|||||||||||||||||||||||
|
100 |
|
|
|
|
|
|
1,000 |
|
|
|
|
|
|
|
10,000 |
|
|
|
|
|
|
100,000 |
|
RPM (Divide by 60 for Hz)
2-10 Installation & Operation |
MN420 |
Loading...