

Page 1
Infrared Refrigerant
Leak Detector
CFCs, HFCs, HCFC Blends,
and HFO-1234YF
Operator’s Manual
Patents 6,791,088
and 7,022,993
Product Leadership • Training • Service • Reliability
January 3, 2014
P/N: 0019-9372
Revision 0
Page 2

Tru Pointe
IR Refrigerant Leak Detector
Warranty
Bacharach, Inc. warrants to Buyer that at the time of delivery this Product will be free
from defects in material and manufacture and will conform substantially to Bacharach
Inc.’s applicable specifications. Bacharach’s liability and Buyer’s remedy under this
warranty are limited to the repair or replacement, at Bacharach’s option, of this Product
or parts thereof returned to Seller at the factory of manufacture and shown to
Bacharach Inc.’s reasonable satisfaction to have been defective; provided that written
notice of the defect shall have been given by Buyer to Bacharach Inc. within one (1) year
after the date of delivery of this Product by Bacharach, Inc.
Bacharach, Inc. warrants to Buyer that it will convey good title to this Product.
Bacharach’s liability and Buyer’s remedy under this warranty of title are limited to the
removal of any title defects or, at the election of Bacharach, to the replacement of this
Product or parts thereof that are defective in title.
THE FOREGOING WARRANTIES ARE EXCLUSIVE AND ARE GIVEN AND ACCEPTED IN LIEU
OF (I) ANY AND ALL OTHER WARRANTIES, EXPRESS OR IMPLIED, INCLUDING WITHOUT
LIMITATION THE IMPLIED WARRANTIES OF MERCHANTABILITY AND FITNESS FOR A
PARTICULAR PURPOSE: AND (II) ANY OBLIGATION, LIABILITY, RIGHT, CLAIM OR REMEDY
IN CONTRACT OR TORT, WHETHER OR NOT ARISING FROM BACHARACH’S NEGLIGENCE,
ACTUAL OR IMPLIED. The remedies of the Buyer shall be limited to those provided
herein to the exclusion of any and all other remedies including, without limitation
incidental or consequential damages. No agreement varying or extending the foregoing
warranties, remedies or this limitation will be binding upon Bacharach, Inc. unless in
writing, signed by a duly authorized officer of Bacharach.
ALL GOODS MUST BE SHIPPED TO BACHARACH BY PREPAID FREIGHT. ALL RETURNED
GOODS MUST BE PRE-AUTHORIZED BY OBTAINING A RETURN MERCHANDISE
AUTHORIZATION (RMA) NUMBER. CONTACT BACHARACH FOR A NUMBER AND
PROCEDURES REQUIRED FOR PRODUCT TRANSPORT.
Register Your Warranty by Visiting
www.mybacharach.com
Product improvements and enhancements are on-going, therefore the specifications
and information contained in this document may change without notice. Bacharach,
Inc. shall not be liable for errors contained herein or for incidental or consequential
damages in connection with the furnishing, performance, or use of this material. No
part of this document may be photocopied, reproduced, or translated to another
language without the prior written consent of Bacharach, Inc.
Copyright © 2014, Bacharach, Inc.
All rights reserved.
BACHARACH is a registered trademark of Bacharach, Inc. All other trademarks, trade
names, service marks and logos referenced herein belong to their respective owners.
2 0019-9372 Rev 0
Page 3

Tru Pointe IR Refrigerant Leak Detector
TABLE OF CONTENTS
SECTION 1. INTRODUCTION ........................................................... 4
1.1. Product Overview......................................................................................... 4
1.2. General Safety Precautions .......................................................................... 5
1.3. Lithium Battery Care and Safety .................................................................. 5
1.4. Components ................................................................................................. 6
1.5. Specifications ............................................................................................... 7
SECTION 2. OPERATION ................................................................. 8
2.1. Charging the Lithium-Ion Battery ................................................................. 8
2.2. Buttons 9
2.3. LED Indicators ............................................................................................ 10
2.4. Sensitivity Settings ..................................................................................... 11
2.5. Probe Selection .......................................................................................... 12
2.6. Leak Detection ........................................................................................... 12
SECTION 3. MAINTENANCE .......................................................... 15
3.1. Filter Replacement ..................................................................................... 15
3.2. Replacement Parts and Accessories ........................................................... 15
0019-9372 Rev 0 3
Page 4
Tru Pointe
IR Refrigerant Leak Detector
SECTION 1. INTRODUCTION
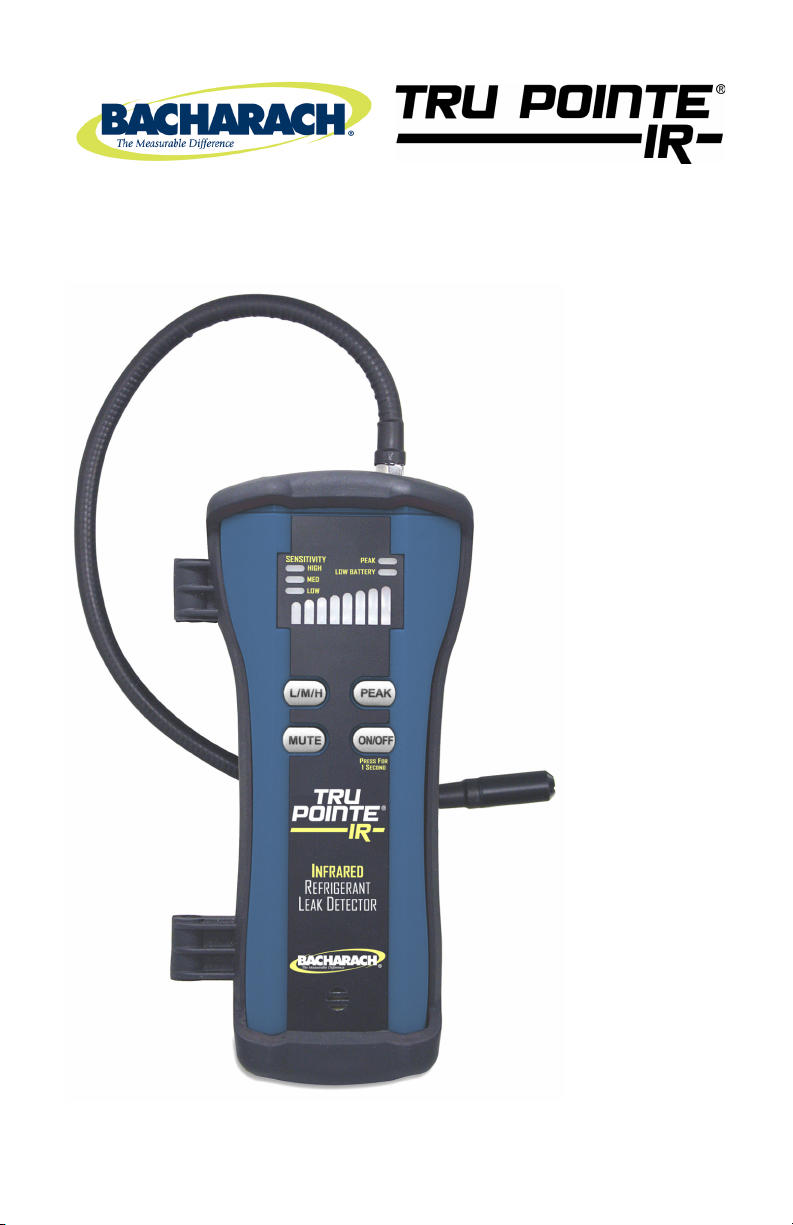
1.1. Product Overview
Tru Pointe IR is a hand-held refrigerant gas detector that uses infrared
technology and combines sensitivity, portability, and ease of use to detect
CFCs, HFCs, HCFC blends, and HFO-1234YF in HVAC/R applications. Features
include the following:
• Sensitivity <0.1 oz/yr (3 g/yr) (exceeds SAE J2791 standard)
• Adjustable squelch feature (low, medium, and high sensitivity)
• Additional Background Mode for maximum sensitivity to pick up low-level
leaks in areas heavily contaminated with refrigerant
• Never needs to be calibrated (automatically adjusts to ambient conditions
of an area that may have background refrigerant gases present)
• LED bar graph display with audible feedback and mute option
• Peak reading display
• Rechargeable lithium-ion battery with low battery alert
• Dual charging capabilities (AC adapter and DC cigarette lighter)
• Rugged housing with rubber boot and magnetic clip
• 15” flexible probe with a 9” flexible extension and 9” rigid extension
• Replaceable filter (limits moisture and contaminants)
• 30-second self-test and calibration at start-up
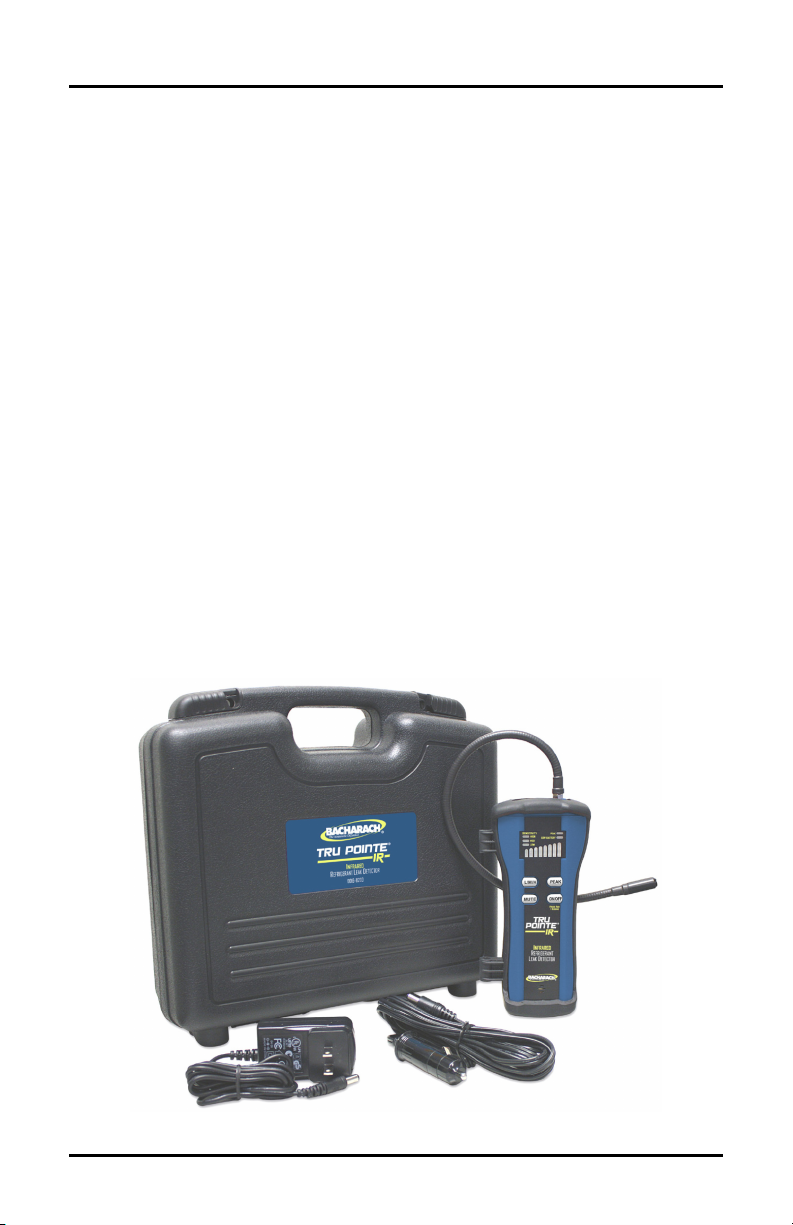
• Molded plastic carrying case.
Figure 1. Tru Pointe IR
4 0019-9372 Rev 0
Page 5
Tru Pointe IR Refrigerant Leak Detector
manual in its entirety. It is important that you have a thorough
understanding of the procedures outlined in this manual. Failure to
read and understand the labels affixed to the unit. Learn the
Inhalation of high concentrations is harmful and may cause heart
1.2. General Safety Precautions
KNOW YOUR EQUIPMENT! Before operating this unit, please read this
follow these procedures could void all manufacturer warranties. Also,
application and limitations as well as the specific potential hazards of
your equipment.
CAUTION! Avoid breathing high concentrations of refrigerant vapors.
irregularities, unconsciousness, or death.
WARNING! To prevent personal injury and/or equipment damage:
• Read, understand, and follow all warnings stated in the Lithium
Battery Care section of this manual.
• DO NOT charge the battery with any charger other than the
chargers supplied with the unit.
• DO NOT use the instrument without a clean filter correctly
installed in the tip.
• DO NOT draw moisture in through the probe.
1.3. Lithium Battery Care and Safety
The Tru Pointe IR instrument operates on a lithium-ion type NP-120 battery.
To promote the longest possible battery life and safe operation, and to prevent
personal injury and/or equipment damage, observe all warnings.
WARNING! Do not disassemble or attempt to repair the battery or
protective circuit.
WARNING! Do not expose the battery to temperatures above 140° F
(60° C).
WARNING! Do not charge the battery near a fire or in a hot vehicle or
in direct sunlight.
WARNING! Do not solder directly on the battery.
WARNING! Do not subject the battery to impact.
0019-9372 Rev 0 5
Page 6

WARNING! Do not expose the battery to moisture or immerse it in
fluid.
WARNING! Do not deform, pierce, or damage the battery.
WARNING! Do not touch a battery that is leaking electrolytes. If
battery fluid should get in your eyes, flush with fresh water, do not rub
Tru Pointe
IR Refrigerant Leak Detector
eyes, and see a physician immediately.
WARNING! Do not use a battery if it is deformed, smells bad, changes
color, or appears abnormal. Return the unit for a replacement battery
immediately.
1.4. Components
Figure 2. Tru Pointe IR Components
6 0019-9372 Rev 0
Page 7

Tru Pointe IR Refrigerant Leak Detector
1.5. Specifications
Item Description
Type of detector Locating leak detector (type C)
Refrigerants HFC, CFC, HCFC, HFO-1234YF and blends
Sensitivity level <0.1 oz/yr (<3 g/yr)
Output signal Instantaneous with audio and visual indicators
Dimensions (H×L×W) 1.25″ × 7.5″ × 2.25″ (3.18 cm × 19.05 cm × 5.72 cm)
Weight 15 oz (0.4 kg)
Environment
temperatures
Sensing element Enhanced infrared photo optics
Sensor life Approximately 10 years
Battery, type Lithium-ion; 3.7 V, 1800 mAH rechargeable
Battery, charge 8 hours continuous use before recharge
Battery, recharge Approximately 3 hours
Battery, indicator Alert LED is on when 1 hour of battery life remains
Auto off After 10 minutes of inactivity
Compliance Exceeds requirements of SAE J1627, J2791, and
Patents 6,791,088 and 7,022,993
EN14624 Data Value
Response time < 1 second
Recovery time <2 seconds
Zeroing time < 2 seconds
Calibration None required (auto calibration)
Fixed probe (static)
detection limits
Moving probe
(dynamic) limits
Contamination Lower detection limit (env.): 3.5 g/yr (0.12 oz/yr)
Repeatability 100%
Operation: 32° F to 122° F (0° C to 50° C)
Storage: -4° F to 140° F (-20° C to 60° C)
J2913; CE pending; EN 14624:2012
Upper detection limit: None (≥ 50 g/yr)
Lower detection limit: 0.5 g/yr (0.02 oz/yr)
Upper detection limit: None (≥ 50 g/yr)
Lower detection limit: 1.0 g/yr (0.04 oz/yr)
0019-9372 Rev 0 7
Page 8

Be sure to fully charge the battery before using the
Tru Pointe
IR Refrigerant Leak Detector
SECTION 2. OPERATION
2.1. Charging the Lithium-Ion Battery
IMPORTANT! Avoid discharging the battery completely. Recharging a
partially discharged battery more frequently is better for the life of a
lithium-ion battery.
To recharge the Tru Pointe IR instrument follow the instructions below.
Step Charging the Lithium-Ion Battery
1 Verify that your charging environment is appropriate. ONLY charge
the instrument within the environment specifications listed in
Section 1. Select the desired charger:
• AC charger for wall outlets (100-240 VAC, 50/60 Hz)
• DC charger for vehicle cigarette lighters.
Figure 3. AC (Wall Outlet) and DC (Vehicle) Chargers
2 Plug one end of the charger into the power source (wall outlet or a
car’s cigarette lighter outlet).
3 Plug the other end of the charger into the connector located on top
of the Tru Pointe
IR instrument.
4 Verify that the LOW-BATT LED is blinking which indicates the
battery is being charged. Refer to Figure 5.
NOTE! When the battery is low, the LOW-BATT LED will illuminate.
IMPORTANT!
instrument for the first time. The unit was packaged and shipped from
the factory with the battery only partially charged.
8 0019-9372 Rev 0
Page 9

Tru Pointe IR Refrigerant Leak Detector
To detect even the smallest leak in refrigerant-
2.2. Buttons
Button Description
L/M/H
Button
(Sensitivity
Levels)
ON/OFF
Protection
Mute Button Press the MUTE button to toggle the audio portion of the
Peak Button The PEAK function stores the highest change in refrigerant
Toggle
Background
Mode (Peak
Button x 4)
Set the unit's sensitivity level by pressing the L/M/H button.
Refer to Figure 4. Low (L), medium (M), or high (H)
sensitivity level is indicated by its respective LED. The higher
the background concentration of refrigerant in the air, the
lower the sensitivity level should be set. To detect a very
small leak in a high refrigerant background, use Background
Mode.
Press and hold the ON/OFF button for one second to turn
the instrument ON or OFF. This one-second delay protects
against accidental ON or OFF. Refer to Figure 4.
instrument ON or OFF. Refer to Figure 4.
concentration achieved while continuing to detect leaks.
Press the PEAK button to toggle this function ON and OFF.
Refer to Figure 4. The PEAK LED illuminates when this
function is turned on. Turning the PEAK function off clears
the peak information.
contaminated environments, press the PEAK button rapidly
four times when in High sensitivity mode. The green LED will
flash rapidly to show Background Mode is on. Press the
PEAK button rapidly four times again to turn Background
Mode off.
Figure 4. Buttons
0019-9372 Rev 0 9
Page 10

Tru Pointe
IR Refrigerant Leak Detector
2.3. LED Indicators
Indicator Description
LED Bar
Graph Display
Sensitivity
Level LEDs
Background
Mode
Indicator
Peak LED When in Peak mode, the Peak LED remains illuminated. In
Low-Batt LED When the battery has approximately one hour of charge
The LED bar graph display indicates the degree of change in
refrigerant concentration. As the concentration of detected
refrigerant in the air increases, the eight LED bars illuminate
from left to right (green, amber, and then red). Refer to
Figure 5.
The Sensitivity Level LEDs show which of the three main
sensitivity levels is active. Refer to Figure 5.
• Low = L
• Medium = M
• High = H
The left-most bar (green) flashes quickly when the
instrument is placed in Background Mode. Use Background
Mode to detect a very small leak in an area containing highlevels of background refrigerant. Refer to Figure 5.
addition, the highest LED in the bar graph display stays lit.
Refer to Figure 5.
remaining, the Low-Bat LED will illuminate. The LOW-BATT
LED blinks when the battery is being charged. Refer to
Figure 5.
Figure 5. LED Indicators
10 0019-9372 Rev 0
Page 11

Tru Pointe IR Refrigerant Leak Detector
2.4. Sensitivity Settings
The Tru Pointe IR has four sensitivity settings used to detect refrigerant leaks:
Low, Medium, High (default at start-up), and Background.
Use the high sensitivity setting to detect refrigerant leaks as small as 0.1 oz/yr
(3 g/yr). Medium and low sensitivity settings can also be used for progressively
larger leaks. Change this setting using the L/M/H button based on your
preference, suspected leak type, and particular application. Consecutive
presses of the L/M/H button will toggle the instrument through these three
modes.
NOTE! Generally, a retest is advisable when a leak is discovered using
the most sensitive settings or if the probe was in a static position when
the leak was discovered. In these cases, repeat the test ensuring the
probe moves past the suspected leak location while maintaining the
smallest possible gap between the suspected leak point and the tip of
the probe. Also, consider using the Medium sensitivity position of the
detector after finding an apparent leak with the High sensitivity setting.
A fourth sensitivity setting is Background Mode. Background Mode is the most
sensitive operating mode of the Tru Pointe
will trigger on extremely small refrigerant levels as well as sudden probe
movements.
IR. In this mode, the instrument
• With the instrument in High sensitivity mode, quickly press the Peak
button 4 times in succession to put the Tru Pointe
IR into Background
Mode
• The first (left most) LED in the bar graph display will blink quickly when
in Background Mode
• The leak detection tone will change from a tick to a steady tone when
in Background Mode
• To exit the Background Mode, quickly press the PEAK button 4 times
in succession, or switch from High sensitivity mode to one of the other
levels.
0019-9372 Rev 0 11
Page 12

Tru Pointe
IR Refrigerant Leak Detector
2.5. Probe Selection
The Tru Pointe IR has a 15″ (38.1 cm) flexible probe. For applications
requiring additional reach, this probe may be extended using the 9″ (22.9 cm)
flexible probe extension. For targeted detection in confined locations, the 9″
(22.9 cm) rigid “needle” probe extension may be used. Use an O-ring between
probes, the probe tip, and any extensions (if used).
Figure 6. Flexible and Rigid Probe Extensions
2.6. Leak Detection
NOTE! The Tru Pointe
of refrigerant, not the absolute concentration of refrigerant. This
allows the detection of leaks in locations that may have refrigerant in
the air, however, be sure to keep the probe tip moving during testing.
NOTE! Some leaks may not be measurable if the pressure in the HVAC
system is too low. In such cases, you may need to charge the system
with sufficient refrigerant to have a gauge pressure of at least 340 kPa
(50 psi) with the system off.
WARNING! The Tru Pointe
to 30 seconds to clear after detecting a small amount of contaminant.
It will typically clear in 2 to 15 seconds.
WARNING! Do not use cleaning agents or solvents on or near A/C
lines. Wipe away any dirt or potential false-trigger chemicals using a
dry towel.
To perform refrigerant leak detection, follow the instructions below.
IR instrument detects changes in concentration
IR instrument is sensitive and can take up
12 0019-9372 Rev 0
Page 13

Tru Pointe IR Refrigerant Leak Detector
Use shop air or compressed air to quickly clear a suspected
Step Leak Detection Procedure
1 Ensure that the instrument’s battery is fully charged before initial
use. Charging takes approximately 3 hours.
2 Press and hold the ON/OFF button for one second to turn on the
instrument.
3 Wait for the warm-up and calibration sequence to complete. This
takes approximately 30 seconds.
4 The default sensitivity level is High at startup. Change this setting
using the L/M/H button based on your preference and application.
If you suspect a large leak, use either the medium or high sensitivity
setting.
5 Locate the most likely place for a refrigerant leak. Key points to
consider include:
• soldered joints in refrigerant lines
• points that have changes in cross section
• points that have changes in direction of these lines.
Visually trace the entire refrigerant system (all lines, hoses, fittings,
couplings, service valves, etc.) looking for signs of lubricant leakage,
damage, and corrosion as indications of likely leak points.
6 Move the probe slowly (approximately 3 in/sec or 75 mm/sec) in a
sweeping back-and-forth motion no more than 0.25” (0.63 cm)
away from suspected leak areas. See Figure 7. A closer probe
position and slower “sweeping” movement normally improve the
likelihood of finding a leak.
The audio signal will increase in the number of tics per second in
proportion to the detected leak intensity. Similarly, the LED bar
graph will light from left to right (green, amber, and then red) in
proportion to leak intensity.
7 Test the entire refrigerant system by following the refrigerant
system in a continuous path to ensure complete coverage (see
Figure 8). If a leak is found, continue to test the remainder of the
refrigerant system.
8 Retest, as needed, at lower sensitivity settings. Retest service
valves with caps removed.
NOTE!
area of refrigerant build-up, and then re-test. Do not use commercially
available “canned” air to clear refrigerant build-up as it uses refrigerant
as a propellant and will further contaminate the immediate area.
0019-9372 Rev 0 13
Page 14

Tru Pointe
IR Refrigerant Leak Detector
Figure 7. Probe “Sweeping” Method for Detecting Refrigerant Leaks
Figure 8. Sample Refrigerant Path for Testing Leaks
14 0019-9372 Rev 0
Page 15

Tru Pointe IR Refrigerant Leak Detector
1
2
Remove and discard the filter. Tweezers or small needle-nosed
3
Position a new filter in the tip so the round end of the filter is
SECTION 3. MAINTENANCE
3.1. Filter Replacement
A filter located in the tip of the wand blocks moisture and other contaminants
from the sensor. When this filter becomes wet, it restricts the flow of air and
must be replaced. To replace the filter, follow the steps below.
Step Description
Unscrew and remove the probe tip (or rigid probe extension, if
used) to expose the white filter inside.
pliers may be helpful in removing the filter.
closest to the tip of the probe.
NOTE! Use only replacement filters supplied by Bacharach.
3.2. Replacement Parts and Accessories
Part
Number
0019-8200
Tru Point
IR Refrigerant Instrument Kit
0019-9372 Instruction Manual
0019-0801 Filter (5) and “O” Ring (3) Kit
0019-0802 Replacement DC Car Charger
0019-0803 Replacement AC Wall Charger
0019-0804 Replacement Rubberized Boot with Magnet
0019-0805 Replacement Probe Tip
0019-0806 Replacement Case
0019-0808 Replacement 9" (22.9 cm) Flexible Extension
0019-0809 Replacement 9" (22.9 cm) Rigid “Needle” Extension
Spare Part Description
0019-9372 Rev 0 15
Page 16

Tru Pointe
IR Refrigerant Leak Detector
621 Hunt Valley Circle, New Kensington, Pennsylvania 15068
Phone: 724-334-5000 • Toll Free: 1-800-736-4666 • Fax: 724-334-5001
Website: www.MyBacharach.com • E-mail: help@MyBacharach.com
World Headquarters
16 0019-9372 Rev 0
 Loading...