

Page 1

H25-IR
Infrared Refrigerant Gas Leak Detector
Instruction 3015-4342
Operation & Maintenance
Rev. 1 – January 2006
Product Leadership • Training • Service • Reliability
Page 2

WARRANTY
Bacharach, Inc. warrants to Buyer that at the time of delivery this Product will be free from defects in material and
manufacture and will conform substantially to Bacharach Inc.'s applicable specifications. Bacharach's liability and Buyer's
remedy under this warranty are limited to the repair or replacement, at Bacharach's option, of this Product or parts thereof
returned to Seller at the factory of manufacture and shown to Bacharach Inc.'s reasonable satisfaction to have been
defective; provided that written notice of the defect shall have been given by Buyer to Bacharach Inc. within two (2) years
after the date of delivery of this Product by Bacharach, Inc.
Bacharach, Inc. warrants to Buyer that it will convey good title to this Product. Bacharach's liability and Buyer's remedy
under this warranty of title are limited to the removal of any title defects or, at the election of Bacharach, to the
replacement of this Product or parts thereof that are defective in title.
The warranty set forth in paragraph 1 does not apply to parts the Operating Instructions designate as having a limited shelflife or as being expended in normal use (e.g., filters).
THE FOREGOING WARRANTIES ARE EXCLUSIVE AND ARE GIVEN AND ACCEPTED IN LIEU OF (I) ANY
AND ALL OTHER WARRANTIES, EXPRESS OR IMPLIED, INCLUDING WITHOUT LIMITATION THE IMPLIED
WARRANTIES OF MERCHANTABILITY AND FITNESS FOR A PARTICULAR PURPOSE: AND (II) ANY
OBLIGATION, LIABILITY, RIGHT, CLAIM OR REMEDY IN CONTRACT OR TORT, WHETHER OR NOT
ARISING FROM BACHARACH'S NEGLIGENCE, ACTUAL OR IMPLIED. The remedies of the Buyer shall be limited
to those provided herein to the exclusion of any and all other remedies including, without limitation incidental or
consequential damages. No agreement varying or extending the foregoing warranties, remedies or this limitation will be
binding upon Bacharach, Inc. unless in writing, signed by a duly authorized officer of Bacharach.
Register Your Warranty by Visiting
www.bacharach-inc.com
Notice:
Product improvements and enhancements are continuous; therefore the specifications
and information contained in this document may change without notice.
Bacharach, Inc. shall not be liable for errors contained herein or for incidental or
consequential damages in connection with the furnishing, performance, or use of this
material.
No part of this document may be photocopied, reproduced, or translated to another
language without the prior written consent of Bacharach, Inc.
Copyright © 2005–2006, Bacharach, Inc., all rights reserved.
BACHARACH
names, service marks and logos referenced herein belong to their respective owners.
A Instruction 3015-4342
®
is a registered trademark of Bacharach, Inc. All other trademarks, trade
Page 3

H25-IR Contents
Table of Contents
1 Introduction ................................................................................................................................ 1
1.1 Purpose of Instruction Manual ...........................................................................................................1
1.2 Safety Precautions...............................................................................................................................1
1.2.1 Warning Statements.............................................................................................................1
1.2.2 Caution Statements ..............................................................................................................1
1.2.3 Hazard Symbols ....................................................................................................................1
1.2.4 AC Power and Grounding.....................................................................................................1
1.2.5 Explosive Atmosphere ..........................................................................................................2
1.2.6 Working Inside the Instrument ...........................................................................................2
1.2.7 Misuse and Modifications to Instrument ............................................................................2
1.2.8 In Case of Malfunction..........................................................................................................2
1.2.9 Cleaning.................................................................................................................................2
1.3 Ordering Information ..........................................................................................................................3
1.4 Unpacking and Initial Checks ............................................................................................................3
1.5 Features and Capabilities ...................................................................................................................4
1.6 Functional Overview ...........................................................................................................................5
1.7 Names and Functions of Components................................................................................................6
1.7.1 Front View .............................................................................................................................6
1.7.2 Rear View ..............................................................................................................................7
1.7.3 Interior...................................................................................................................................7
1.7.4 Standard Probe .....................................................................................................................8
1.7.5 Standard Probe with LED and Programmable Pushbutton ..............................................8
1.7.6 Smart Probe...........................................................................................................................9
1.7.7 Smart Probe Keylock Function ............................................................................................9
1.8 Menu System .....................................................................................................................................10
2 Preparing for Operation ........................................................................................................ 11
2.1 Connecting the Probe ........................................................................................................................11
2.2 Connecting the AC Power Cord ........................................................................................................11
2.3 Turning ON the Instrument .............................................................................................................11
2.4 System Setup .....................................................................................................................................12
2.4.1 Gas Type ..............................................................................................................................12
2.4.2 Leak Units ...........................................................................................................................12
2.4.3 Relays...................................................................................................................................13
2.4.4 4–20 mA Loop ......................................................................................................................13
2.4.5 Brightness............................................................................................................................14
2.4.6 Clock ....................................................................................................................................14
2.4.7 PCHK Mode.........................................................................................................................14
2.4.8 Probe Button .......................................................................................................................14
2.4.9 Reset Defaults .....................................................................................................................14
2.5 Configuring the SETUPS Function ..................................................................................................15
2.5.1 Setup Name .........................................................................................................................15
2.5.2 Range ...................................................................................................................................15
2.5.3 Gas Type ..............................................................................................................................16
2.5.4 Feedback Mode....................................................................................................................16
2.5.5 Setpoint................................................................................................................................16
2.5.6 Search Auto Zero.................................................................................................................17
2.6 Calibration .........................................................................................................................................17
2.7 External Relay Connections..............................................................................................................18
2.8 4–40 mA Current Loop Connection ..................................................................................................19
3 Calibration................................................................................................................................. 21
3.1 Selecting Internal or External Calibration ......................................................................................21
3.1.1 Internal Calibration Selection............................................................................................21
3.1.2 External Calibration Selection and Setup.........................................................................22
3.2 Internal Calibration ..........................................................................................................................23
3.3 External Calibration..........................................................................................................................24
Instruction 3015-4342 i
Page 4

Contents H25-IR
3.4 CAL Factor......................................................................................................................................... 25
3.4.1 Simulating Other Internal Leak Source Gas Types Using the CAL Factor.................. 25
3.4.2 Improving PPM Measurement Accuracy using the CAL Factor .....................................26
3.4.3 Adjusting the CAL Factor ..................................................................................................27
3.5 Restoring Factory Calibration .......................................................................................................... 27
4 Operation....................................................................................................................................29
4.1 Instrument Location .........................................................................................................................29
4.2 Using the H25-IR ..............................................................................................................................29
4.2.1 Power ...................................................................................................................................29
4.2.2 Initial Setup ........................................................................................................................29
4.2.3 Range Selection................................................................................................................... 30
4.2.4 Setup Selection ...................................................................................................................30
4.2.5 Volume Adjustment ............................................................................................................31
4.2.6 Searching for a Leak...........................................................................................................31
4.2.7 Measuring the Leak Rate................................................................................................... 32
4.2.8 Measuring the PPM Level.................................................................................................. 32
4.2.9 Logging Measured Readings .............................................................................................. 33
4.2.10 Working with Logged Measurements................................................................................33
4.2.10.1 Viewing Logged Measurements .....................................................................33
4.2.10.2 Clearing the Log..............................................................................................34
4.2.10.3 Viewing the Total of all Logged Measurements............................................ 34
4.2.10.4 Setting the Log Limit...................................................................................... 34
4.3 What to Do when a Fault Occurs .....................................................................................................35
4.4 What is PCHK?.................................................................................................................................. 35
4.5 RS-232 Communication ....................................................................................................................35
5 Maintenance...............................................................................................................................37
5.1 Diagnostics Menu ..............................................................................................................................37
5.1.1 Sensor Data.........................................................................................................................37
5.1.2 Last Fault ............................................................................................................................ 38
5.1.3 IR Emitter ...........................................................................................................................39
5.1.4 Pressure............................................................................................................................... 39
5.2 Factory Menu..................................................................................................................................... 39
5.2.1 Auto Gain ............................................................................................................................40
5.2.2 DIGIPOT .............................................................................................................................40
5.2.3 Leak Rate ............................................................................................................................40
5.2.4 Leak Gas..............................................................................................................................40
5.2.5 Leak Temp...........................................................................................................................40
5.2.6 Leak TEMPCO.................................................................................................................... 41
5.2.7 Sensor Cal ........................................................................................................................... 41
5.2.7.1 Pressure Sensor Calibration Screen ..............................................................41
5.2.7.2 Flow Rate Sensor Calibration Screen (Factory Calibration)........................ 41
5.2.7.3 Box Temperature Calibration Screen ............................................................42
5.2.8 Model Select ........................................................................................................................42
5.2.9 Probe Type........................................................................................................................... 42
5.2.10 Firmware .............................................................................................................................42
5.3 Flashing Memory............................................................................................................................... 43
5.4 Part Replacement .............................................................................................................................. 46
5.4.1 Removing the Top Cover ....................................................................................................46
5.4.2 Fuse Replacement............................................................................................................... 47
5.4.3 Probe Tip Filter & O-Ring Replacement ........................................................................... 47
5.4.4 Internal Filter Replacement ..............................................................................................48
6 Parts and Service......................................................................................................................49
6.1 Replacement Parts ............................................................................................................................ 49
6.2 Service Centers..................................................................................................................................50
7 Specifications ............................................................................................................................51
ii Instruction 3015-4342
Page 5
H25-IR Introduction
1 Introduction
1.1 Purpose of Instruction Manual
This instruction manual provides important information on how to install, operate, and service the
Bacharach H25-IR Refrigerant Gas Leak Detector.
To assure operator safety and the proper use of this instrument, please read, understand, and follow the
contents of this manual.
Please retain these instructions for future reference.
1.2 Safety Precautions
Safety is essential in the use and maintenance of Bacharach equipment. Therefore this instruction manual
and any markings on the exterior of H25-IR case provide important safety information concerning the
operation and maintenance of this instrument.
1.2.1 Warning Statements
The use of the word WARNING in this manual denotes a potential hazard associated with the use of this
equipment. It calls attention to a procedure, practice, condition, or the like, which if not correctly
performed or adhered to, could result in injury or death of personnel using this instrument.
1.2.2 Caution Statements
The use of the word CAUTION in this manual denotes a potential hazard associated with the use of this
equipment. It calls attention to a procedure, practice, condition, or the like, which if not correctly
performed or adhered to, could result in damage to the instrument.
1.2.3 Hazard Symbols
This symbol indicates the need to consult this instruction manual when opening the enclosure.
WARNING: A potential risk exists if the operating instructions are not followed.
This symbol indicates the presence of electric shock hazards when the enclosure is opened.
WARNING: To avoid risk of injury from electric shock, do not open the enclosure when AC
power is applied to the instrument.
1.2.4 AC Power and Grounding
The H25-IR uses a universal power supply that is capable of accepting inputs of 100 to 240 VAC, 50/60 Hz.
Under no circumstances should this instrument be operated without connection to a protective ground.
Doing so creates a potential shock hazard and is also a violation of electrical safety standards applicable to
this type of equipment.
Instruction 3015-4342 1
Page 6

Introduction H25-IR
1.2.5 Explosive Atmosphere
Do not operate this instrument in the presence of flammable liquids, vapors or aerosols. Operation of any
electrical instrument in such an environment constitutes a safety hazard.
1.2.6 Working Inside the Instrument
Only qualified maintenance personnel should access the interior of this instrument. Always unplug the AC
power cord before performing any wiring or maintenance work.
1.2.7 Misuse and Modifications to Instrument
The operation of the H25-IR may be impaired if the instrument is used in a manner not specified in this
instruction manual. Changes or modifications to the instrument, not expressly approved by Bacharach,
will void the warranty.
1.2.8 In Case of Malfunction
Do not continue to use this equipment if there are any symptoms of malfunction or failure. In the case of
such occurrence, unplug the AC power cord and contact a qualified repair technician or the nearest
Bacharach Service Center.
1.2.9 Cleaning
USE a dry cloth to clean the outside of the case. DO NOT use soap and water.
2 Instruction 3015-4342
Page 7
H25-IR Introduction
1.3 Ordering Information
The H25-IR instrument along with its Probe type and Hose length are ordered by specifying 3 codes. The
codes must be listed in the following sequence:
Code A – Model Name
Code B – Gas Type
Code C – Probe Type and Hose Length
Table 1-1. H25-IR Instrument, Probe Type & Hose Length Ordering Information
Code Description
Code A H25IR Infrared Gas Leak Detector
Code B -1
-2
-3
-4
-5
Code C -1
-2
-3
-4
-5
-6
For example, to order an H25-IR that detects CFC type refrigerants, a Standard Probe with LED &
Button, and a 6 foot hose, you would order an: H25IR-1-3
CFC, HFC, HCFC & Halogen Gases
R600a
6
SF
2
CO
R227
Standard Probe, 6 foot Hose
Standard Probe, 12 foot Hose
Standard Probe, LED & Button, 6 foot Hose
Standard Probe, LED & Button, 12 foot Hose
Smart Probe, 6 foot Hose
Smart Probe, 12 foot Hose
1.4 Unpacking and Initial Checks
Your H25-IR Refrigerant Gas Leak Detector and all accessories were carefully inspected at the factory
before shipment, and packed so as to be highly resistant to damage while in transport.
When you receive the instrument, please unpack it promptly and make a visual inspection to make sure
that no damage has occurred during shipment and that all ordered items have been received. Your order
should consists of:
• H25-IR instrument
• Probe and Hose Assembly
• Both an 8 and 15 inch Flexible Probe Tube
• AC Power Cord
• Instruction Manual.
If damage was found, immediately file a claim with the carrier. If an item is missing, please contact
Bacharach’s Service Department for assistance (refer to Section
6.2 Service Centers).
Instruction 3015-4342 3
Page 8

Introduction H25-IR
1.5 Features and Capabilities
• Detects and measures (depending on instrument’s part number):
o CFCs, HCFCs, HFCs and halogens
o R600a
o SF
o CO
o R227
• Infrared detector
• Internal calibration leak standard
• Provision for external calibration on other types of gases
• User selectable leak rate measurement in either Oz/yr, g/yr, mL/s, PaM
• Easy to read Vacuum Flu orescent Display (VFD)
• Excellent background gas rejection
• 4−20 mA current loop output
• Relay outputs for external equipment control
• On screen menu system for system setup, diagnostics, calibration, and data l og gin g
• Assortment of probe and hose assemblies, available in either 6 or 12 fo ot
(1.8 or 3.7 m) hose lengths
• Assortment of fl exible probe tubes, available in either 8 or 15 i nch
(200 or 381 mm) lengths
6
2
3
/s, or ppm
4 Instruction 3015-4342
Page 9

H25-IR Introduction
1.6 Functional Overview
The H25-IR is an industrial gas leak analyzer for the detection of CFCs, HCFCs, HFCs and halogen gas
compounds, R600a, SF
as well as log and totalize a group of leaks in a system.
The H25-IR’s front panel contains 7 membrane pushbuttons, probe connector, calibration gas port, and a
3-¼ x ¾ inch VFD (Vacuum Fluorescent Display) that provides a bright, high-contrast display for easy
viewing. The instrument is housed in an all-metal case with adju stabl e handle.
The instrument has two modes of operation: Search and Measure. The Search mode is used to locate the
source of a leak. While the Measure mode is used to quantify the size of the leak. A hand-held probe is
used to draw in a gas sample from the area under inspection.
With the instrument in its Search mode, the location of a leak is pinpointed by means of visual and audio
indicators positioned on both the instrument and probe*. As the probe tip approaches the leak sourc e the
length of a bar graph at the bottom of the instrument’s front panel display, the blink rate of an LED on the
probe, and the frequency of an audible tone are all affected in a positive manner (bar graph becomes
longer, LED flashes faster, and the audio tone increases in frequency). There are three search sensiti vities
available: SM, MED and LG, indicating the size of the leak being searched for. T h is fe ature is useful in
avoiding being bothered with small leaks when searching for larger ones.
In the Measure mode, the probe tip is held over the leak source until the displayed value of the leak ra te
stabilizes. Leak rates can be displayed in units of Oz/yr, g/yr, mL/s, PaM
be used to display the quantity of gas contained in a confined space with the instrument set up in its
ppm mode.
The leak rate is measured by first capturing all the gas leaking from the component under test. Then by
accurately measuring the flow rate of the sampling stream and the gas concentration within that stream,
the leak rate can be calculated using Equation 1-1. The instrument then converts this d ata into the
desired leak rate units of measure and displays the leak rate on the instrument’s front panel.
Leak Rate = Flow Rate x Gas Concentration Eq. 1-1
where:
Leak Rate = rate of gas leak from component under test
Flow Rate = sample flow rate
Gas Concentration = concentration of gas in the sample (ppm)
A leak measurement can be logged in memory with a time/date stamp. Up to 50 leaks can be logged and
totalized. This feature is useful in testing an installation that has a maximum permissible leak rate.
Logged data can be recalled for viewing on the display.
There are four user-defined setups that allow the operator to quickly switch between frequently used
combinations of Gas Type, Range, Feedback Mode , Setpoint, and the Auto Zero Off condition.
Extensive diagnostics keep track of several system parameters. When a fault is detected, the word
“FAULT” blinks on the display and an audible beep is heard every 2 seconds. Text descriptions of all
current fault conditions can be displayed from the instrument’s Diagnostics menu.
Four SPDT relays provide control over a variety of external equipment (e.g., horns, bells, strobe lights)
that can be automatically triggered when their associated relays are energized by any one of 11 different
operating conditions.
A 4−20 mA current loop output can be used for the connection of external monitoring equipment (e.g.,
chart recorder).
, CO2 or R227. This instrument can be used to locate and then quantify gas leaks,
6
3
/s. The Measure mode can also
* The Standard Probe does not contain an LED.
Instruction 3015-4342 5
Page 10
Introduction H25-IR
1.7 Names and Functions of Components
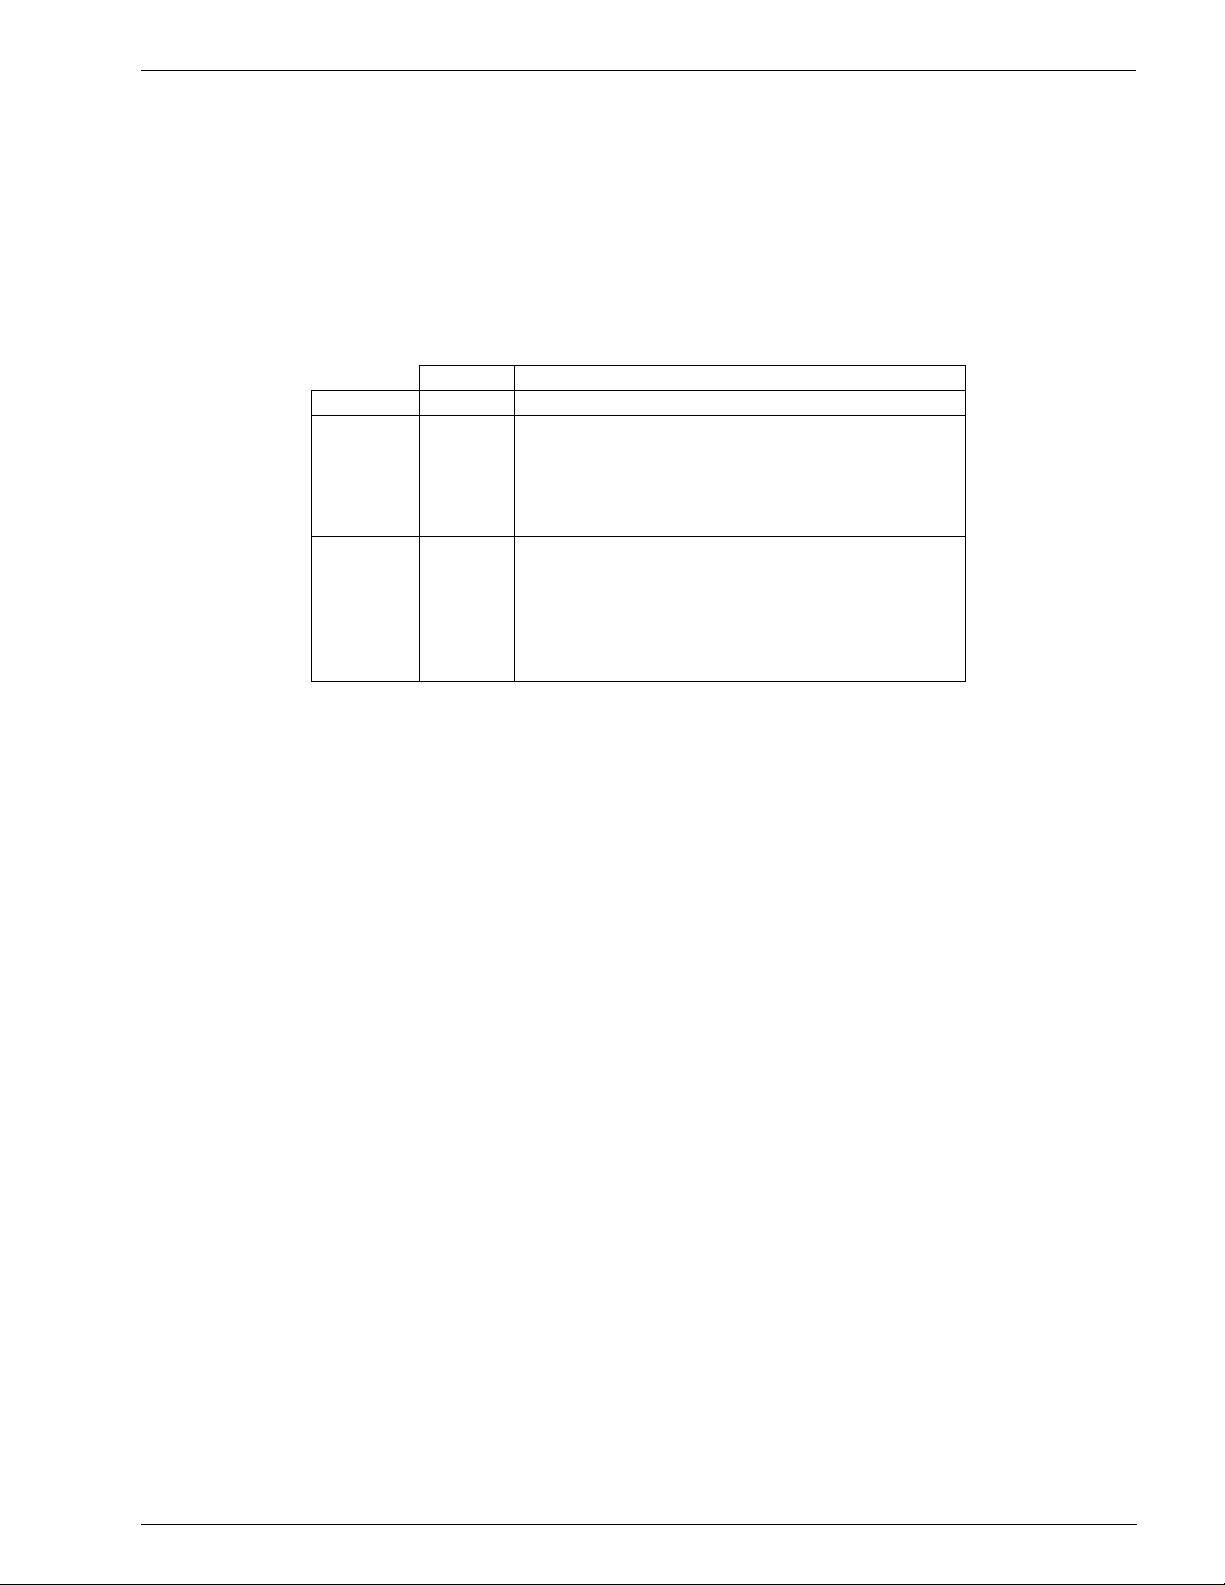
1.7.1 Front View
Front Panel Buttons
ENT
(Enter)
ESC
(Escape)
VOL
(Volume)
SETUP
MODE
RANGE
ZERO
LOG
MENU
CAL
(Calibration)
• Selects a highlighted menu item.
• Saves a selection or manually entered data (e.g. date and time).
• Displays a previously viewed menu or data screen.
• Cancels a data entry function; retains old data; and displays previous screen.
Volume adjustment. The Up and Down buttons slowly raise and lower the volume; the
Left button sets volume to minimum; and the Right button set volume to maximum.
Selects one of four user-defined setups consisting of: Range, Gas Type, Feedback Mode,
and the Auto Zero OFF condition.
Toggles the operating mode between Search and Measure.
Selects one of three sensitivity ranges (small, medium, or large leak).
Zeros the gas reading.
Logs the currently displayed gas measurement in memory when in the Measure mode,
where it can later be reviewed using the Main menu’s LOG function.
Press both the ENT and ESC buttons at the same time to display the Main menu.
Starts the calibration process where the instrument is calibrated to a known leak
source using either the instrument’s front panel Calibration Port, or a customer
supplied external leak source.
Menu selection and data entry buttons:
Up − Moves selected (highlighted) menu item up through screen, or increments an
alphanumerical value when entering data.
Down − Moves selected (highlighted) menu item down through screen, or decrements
an alphanumerical value when entering data.
Left − Moves cursor left across screen.
Right − Moves cursor right across screen.
6 Instruction 3015-4342
Page 11
H25-IR Introduction
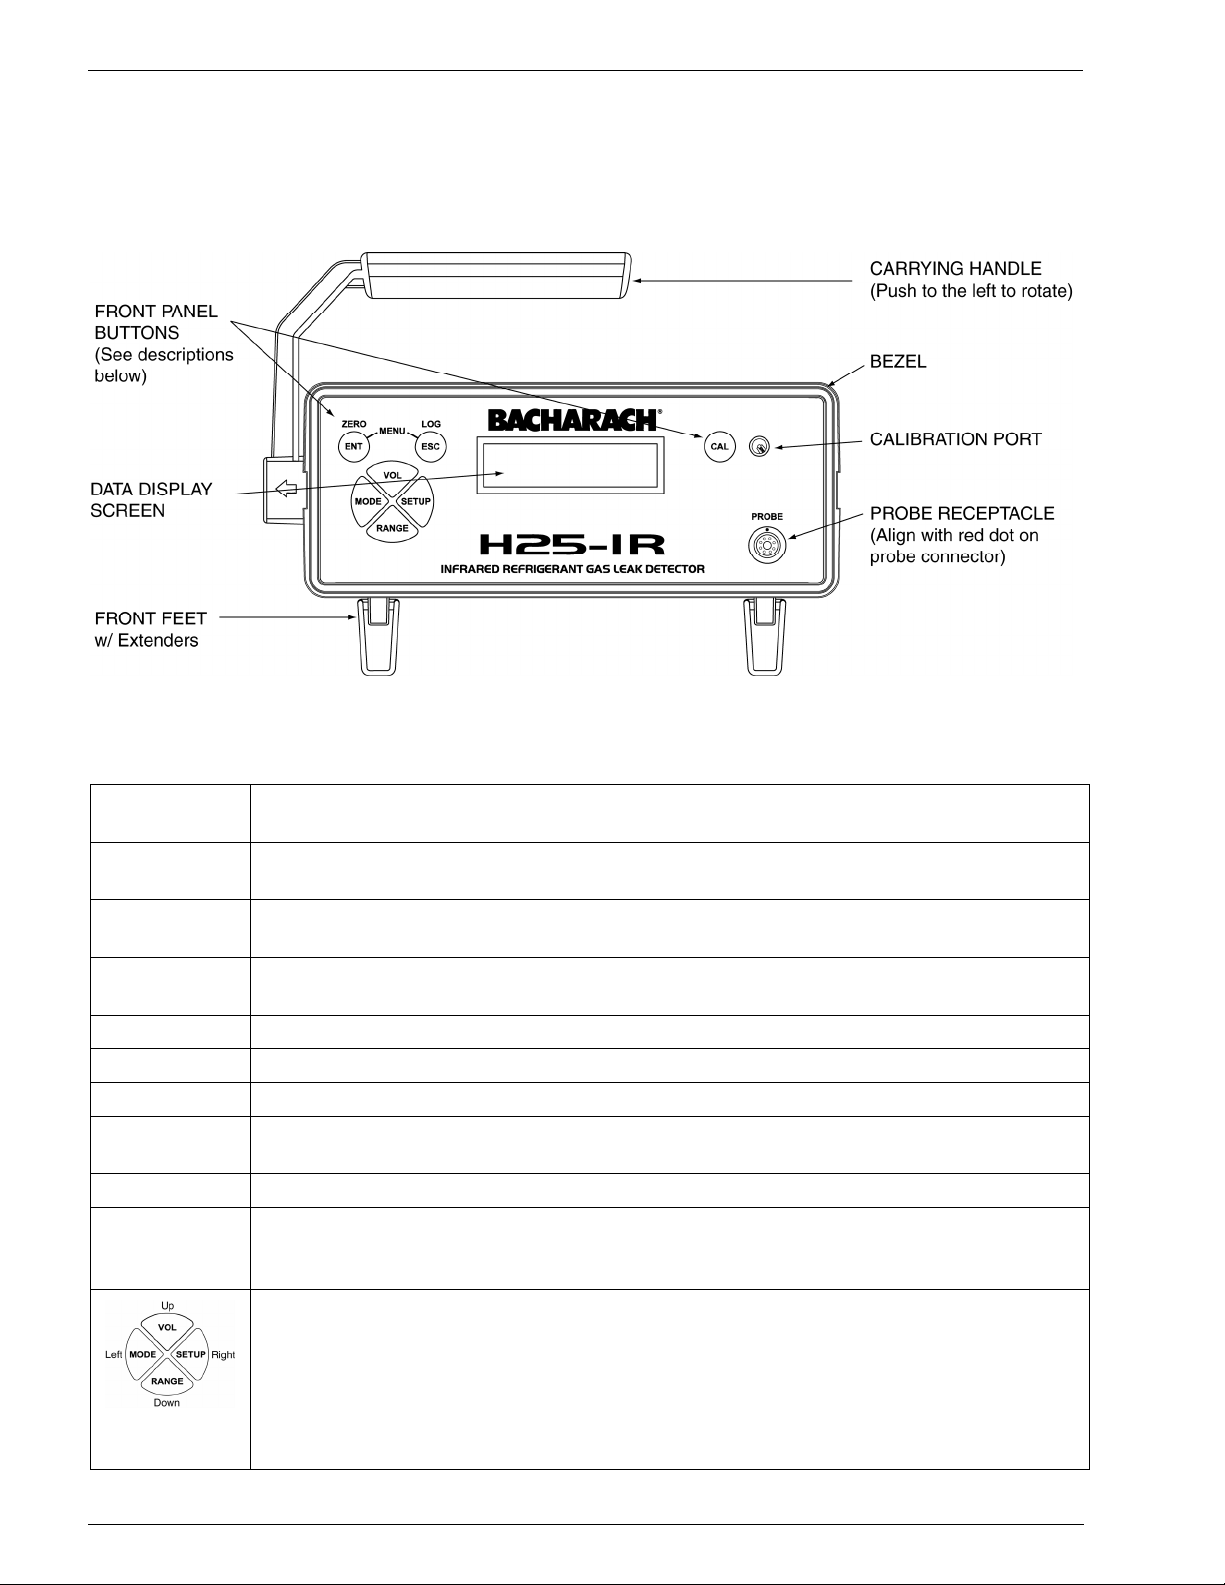
1.7.2 Rear View
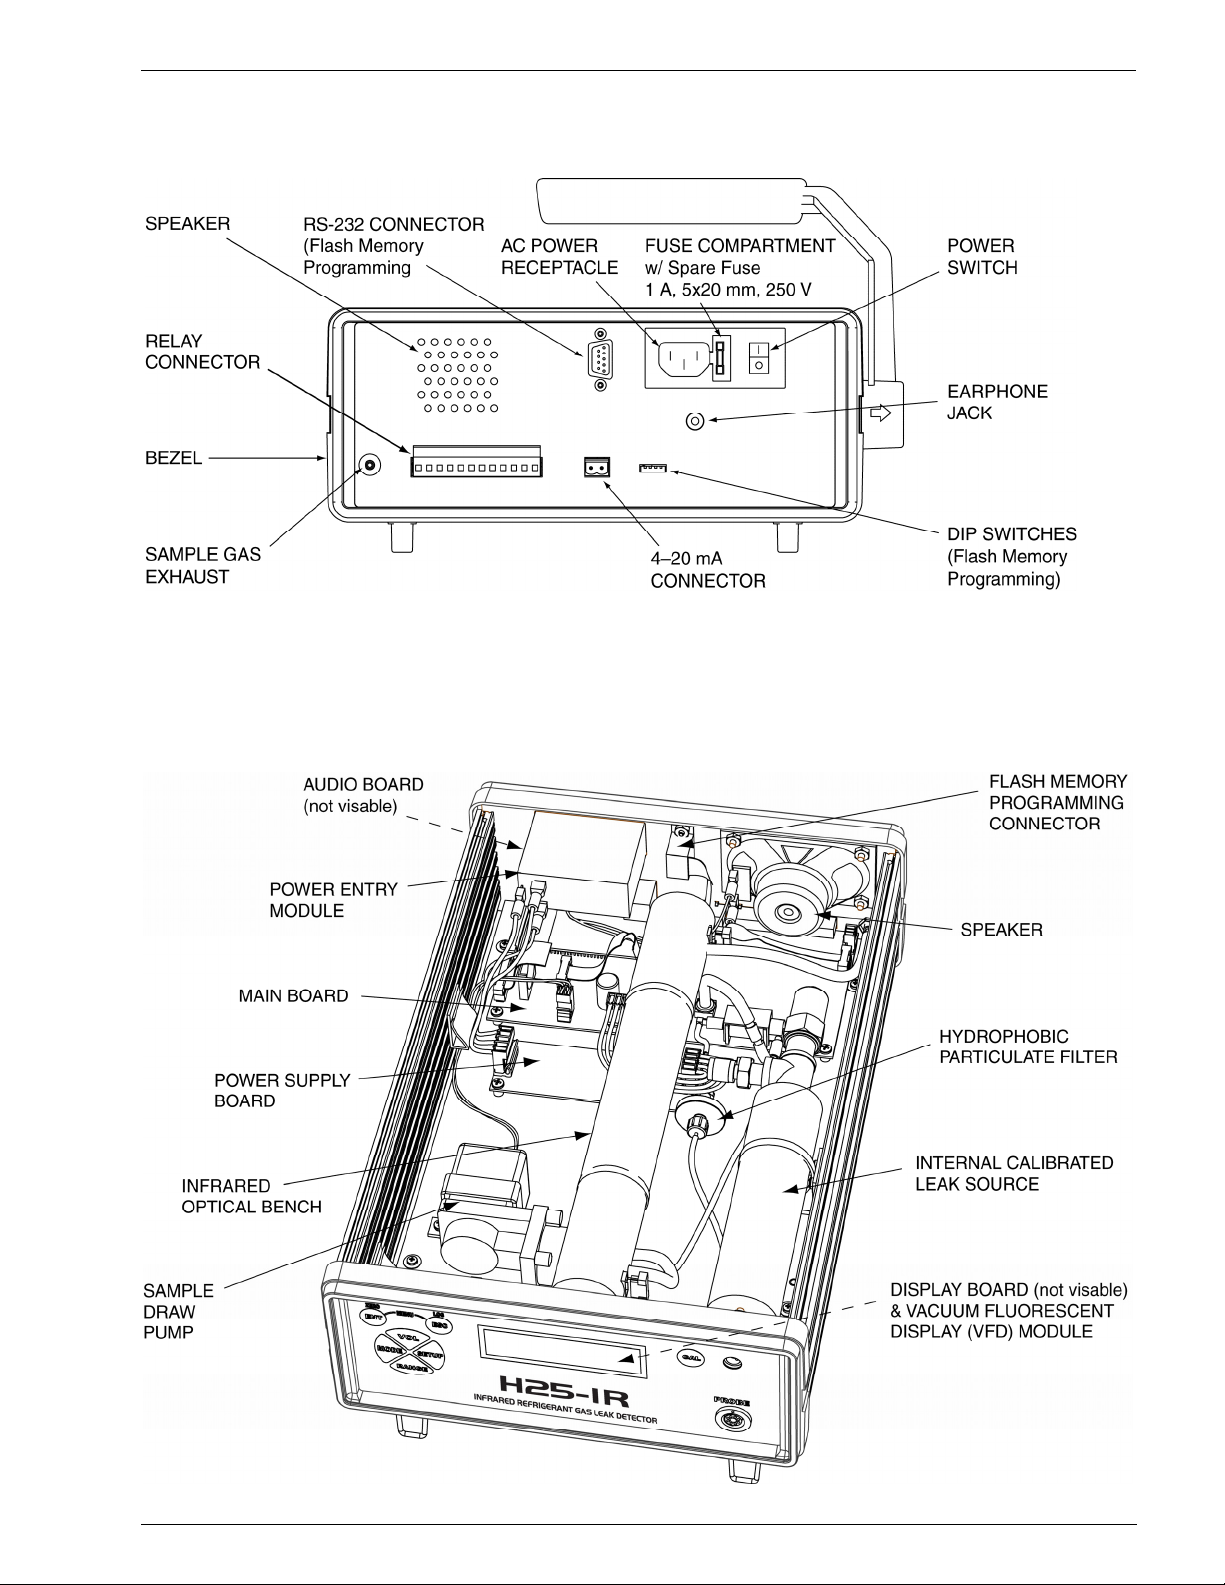
1.7.3 Interior
Instruction 3015-4342 7
Page 12
Introduction H25-IR
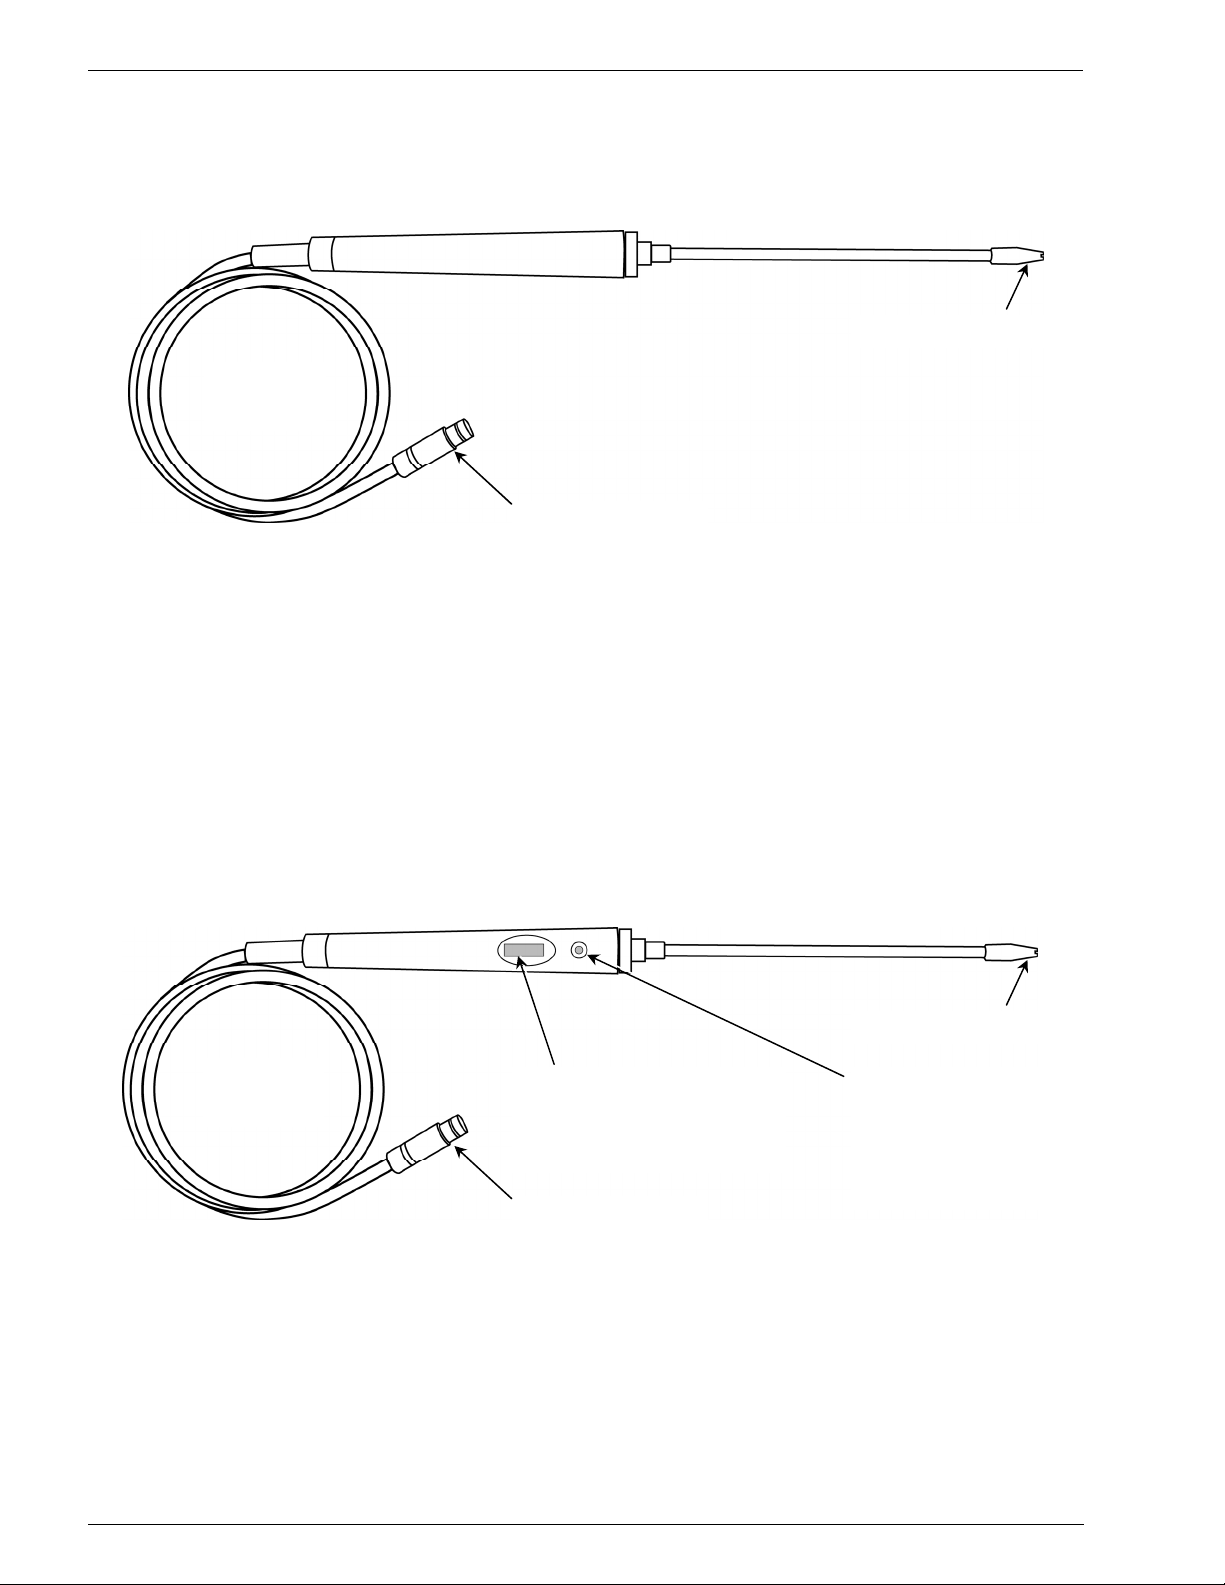
1.7.4 Standard Probe
HOSE
6 or 12 foot
(1.8 or 3.7 m)
PROBE CONNECTOR
(Align with red dot on
instrument’s front panel
PROBE receptacle)
FLEXIBLE PROBE TUBE
8 or 15 inches
(200 or 381 mm)
PROBE TIP with FILTER
1.7.5 Standard Probe with LED and Programmable Pushbutton
HOSE
6 or 12 foot
(1.8 or 3.7 m)
PROGRAMMABLE PUSHBUTTON
(Can be programmed to either zero
the instrument, or switch between
the Search and Measure mode of
operation)
PROBE CONNECTOR
(Align with red dot on
instrument’s front panel
PROBE receptacle)
FLEXIBLE PROBE TUBE
8 or 15 inches
(200 or 381 mm)
PROBE TIP with FILTER
LED
(Flash rate increases as
the detected gas level
increases, or lights
steady when a user
selected leak rate is
detected.)
8 Instruction 3015-4342
Page 13
H25-IR Introduction
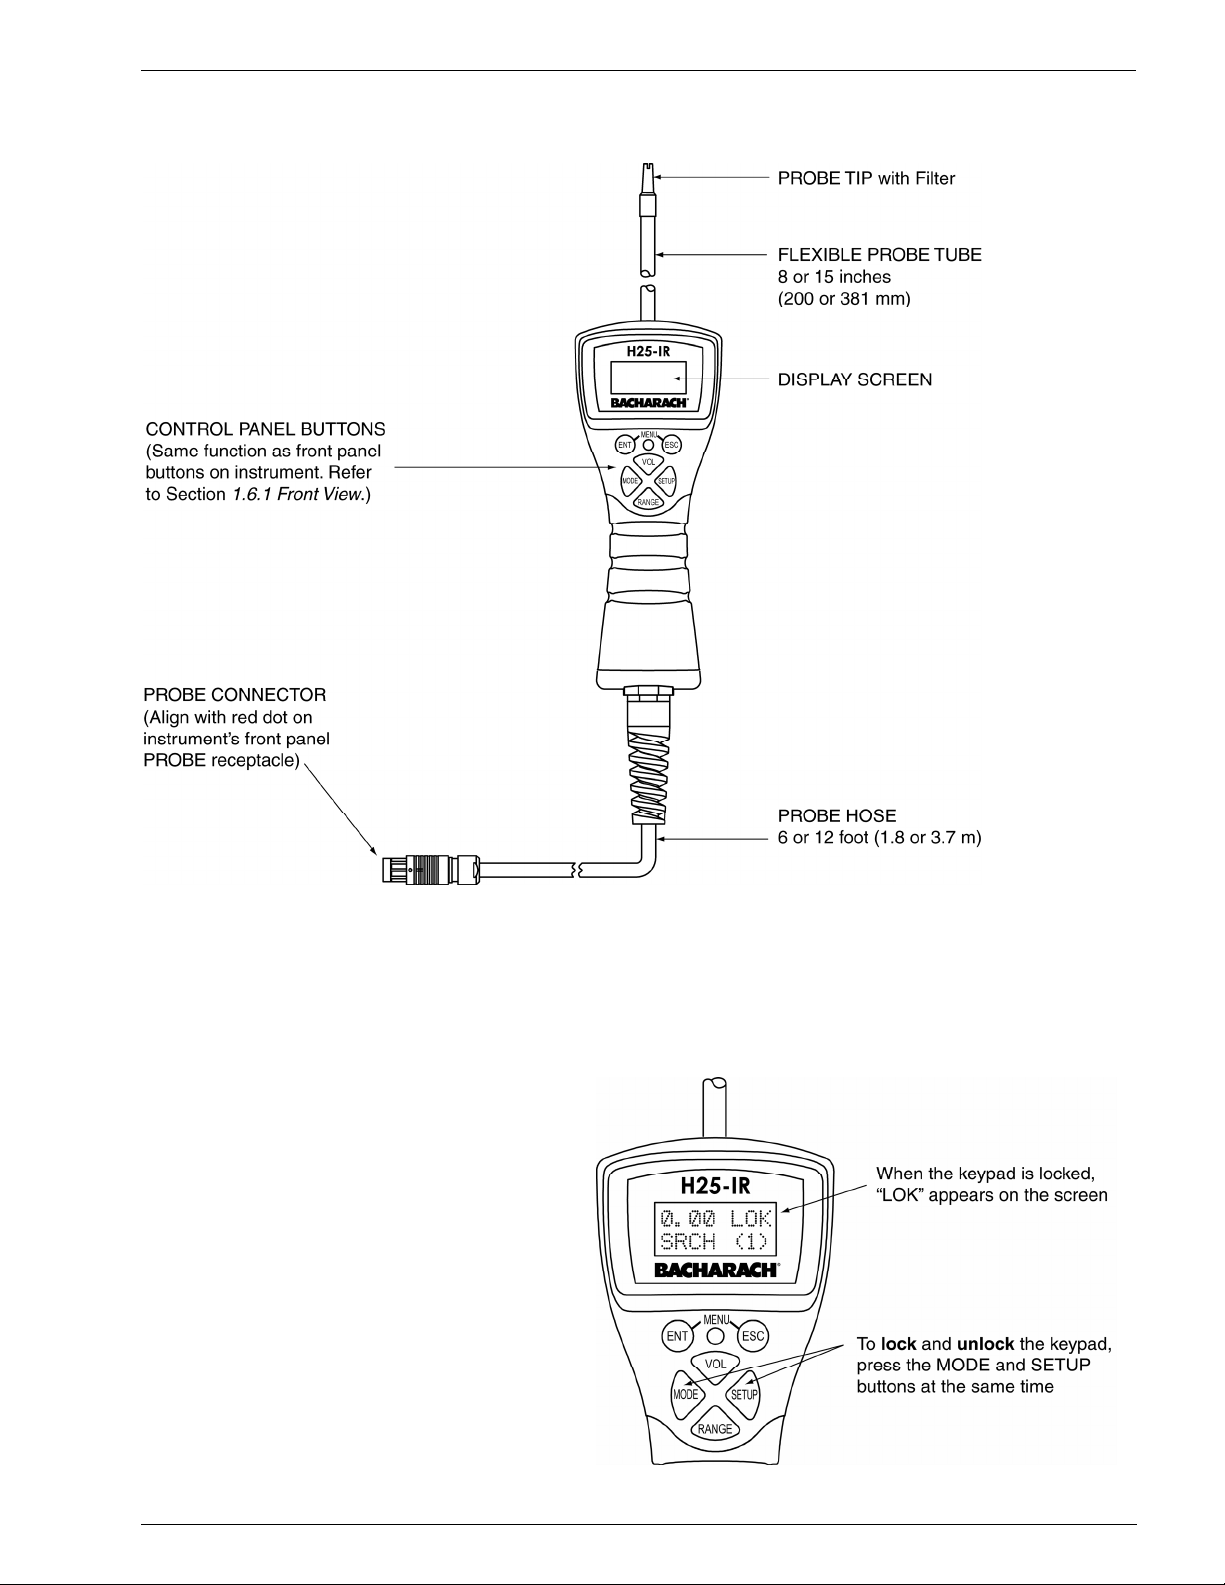
1.7.6 Smart Probe
1.7.7 Smart Probe Keylock Function
The Smart Probe’s keypad can be locked to
prevent accidental key presses when working
in tight spaces.
Instruction 3015-4342 9
Page 14
Introduction H25-IR
1.8 Menu System
Press the ENT and ESC keys at the same time to access the Main menu.
The menu system enables the operator to perform such functions as setting up the instrument, viewing
logged readings, configuring the four user-defined setups, entering calibration data, and viewing the
instrument’s diagnostic readings.
The buttons on the instrument’s front panel and probe are mapped the same and can be used interchangeably, with exception of the CAL button.
Select a menu item by first using the Up and Down buttons to highlight the desired item, and then
pressing ENT to select that item and display its data screen. After an item has been selected, use the
Left, Right, Up, and Down buttons as necessary to highlight and change data within a screen. Pressing
the ENT button saves the new data, while pressing the ESC button aborts the operation and displays the
previous screen.
Main Menu:
SYSTEM System Menu:
LOG GAS TYPE ........................ Gas being monitored
SETUPS LEAK UNITS ..................... Leak rate units of measure
CAL DATA RELAYS ............................ Relay set up for activating external equipment
DIAGNOSTICS LOOP ................................ 4−20 mA signal’s mA per ppm loop factor
FACTORY* BRIGHTNESS ................... Brightness level of display
CLOCK .............................. Date and time
PCHK MODE .....................Determines when a pressure check is performed
PROBE BUTTON ..............Selects function of button on the Standard Probe
RESET DEFAULTS ...........Resets user programmable parameters to factory defaults
(calibration data is not changed)
Log Menu:
VIEW LOG ......................... View individual logged measurements
CLEAR LOG ...................... Clear total contents of log
LOG TOTAL....................... View a numerical total of all measurements stored in log (up to 50)
LOG LIMIT .........................Total accumulated leak setpoint
Setup Menu: SETUP NAME..................Text name given to the SETUP selection
SETUP NO.1 RANGE.............................Sensitivity of instrument (small, medium, large)
SETUP NO.2 GAS TYPE .......................Gas being monitored
SETUP NO.3 FEEDBACK MODE ..........Gas-level feedback (continuous, setpoint, H25C)
SETUP NO.4 SETPOINT........................Gas value for the Feedback Mode & Search Auto
SEARCH AUTO ZERO ....Sets condition when auto zero is turned OFF
Calibration Data Menu:
CAL TYPE.......................... Internal or external leak source
EXT RATE..........................Leak rate of external leak source
EXT GAS TYPE .................Type of gas in external leak source
CAL FACTOR ....................Calibration factor
RESTORE FACTORY CAL...Restores factory leak rate calibration (internal leak source only)
Diagnostic Menu:
SENSOR DATA .................Raw data from all sensors
LAST FAULT...................... List of all current faults, or last fault
IR EMITTER.......................Infrared emitter’s voltage, amperage, wattage, & resistance
PRESSURE ....................... All measured pressures
Factory Menu:
AUTO GAIN ....................... Automatically set digital potentiometer (zero gas applied)
DIGIPOT ............................ Manually set digital potentiometer (zero gas applied)
LEAK RATE ....................... Leak rate of internal leak source
LEAK GAS .........................Gas type used in internal leak source
LEAK TEMP....................... Specified temperature for internal leak source in °C
LEAK TEMPCO .................Temperature coefficient for internal leak source in % per °C
SENSOR CAL.................... Pressure, temperature, and flow calibration settings
MODEL SELECT ............... Selects model of unit according to part number
PROBE TYPE .................... Selects type of probe connected to instrument
FIRMWARE........................ Date firmware was compiled
* The Factory Menu appears only when activated by service technicians who know the correct activation procedure.
10 Instruction 3015-4342
Page 15
H25-IR Preparing for Operation
2 Preparing for Operation
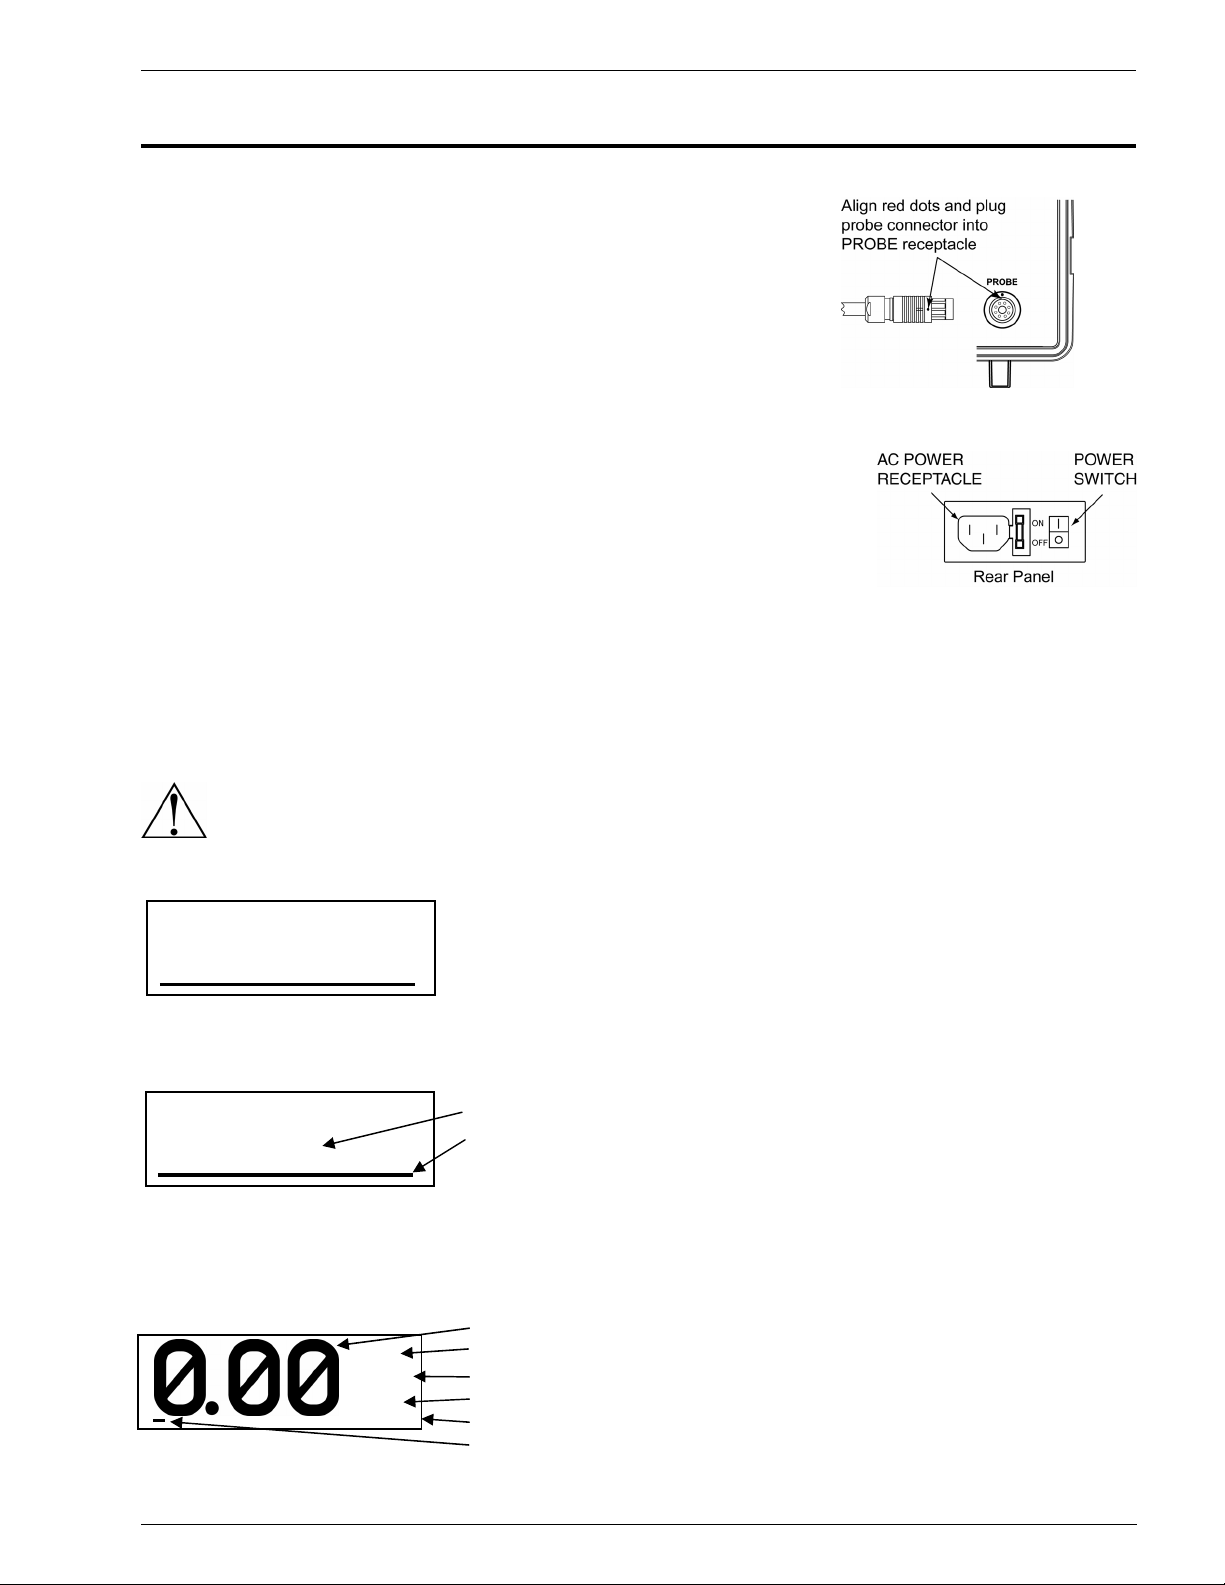
2.1 Connecting the Probe
Plug the probe connector into the front panel PROBE receptacle
by aligning the red dots on both the connector and receptacle. Screw the
desired flexible probe tube (8 or 15 inches) onto the probe assembly.
2.2 Connecting the AC Power Cord
The H25-IR is supplied with a 6 foot grounded AC power cord. Make sure
that an AC power receptacle (socket) compatible with this plug is available
nearby.
The instrument uses a universal AC power supply that accepts inputs of 100
to 240 VAC, 50/60 Hz. Power consumption is approximately 15 Watts.
Before connecting the AC power cord, first make sure the instrument’s power switch is OFF. Next, connect
the power cord to the instrument’s rear panel AC power receptacle, and then plug the power cord into a
nearby AC power receptacle.
2.3 Turning ON the Instrument
WARNING! Explosion Hazard. Do not operate this instrument in the presence of flammable liquids,
vapors or aerosols. Operation of this instrument in such an environment constitutes a safety hazard.
Turn ON the instrument by setting its power switch, located on the rear panel, to ON.
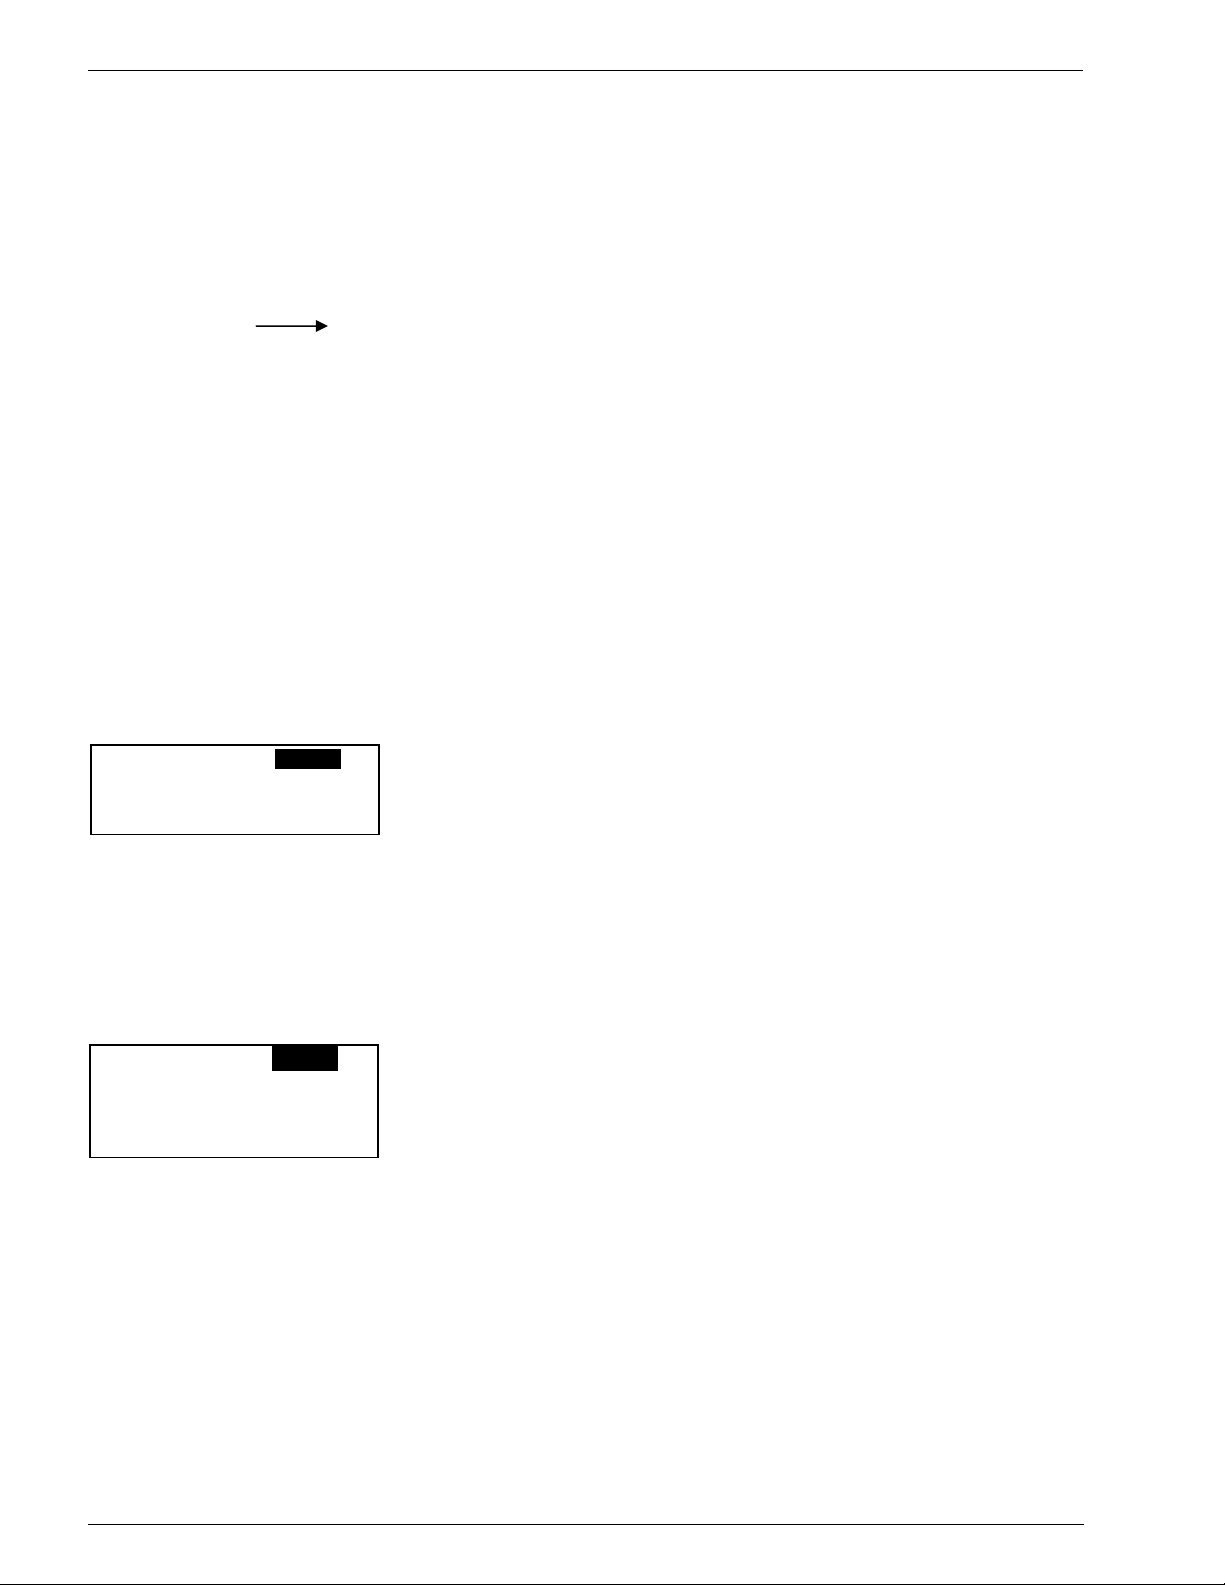
When power is first applied, the instrument produces one short beep and
BACHARACH
VERSION x.xx
Immediately afterwards, the instrument enters its warm-up mode and a countdown from 120 seconds is
started. In addition, a graphical display of the countdown period is provided by a bar graph that moves
down the screen during warm-up.
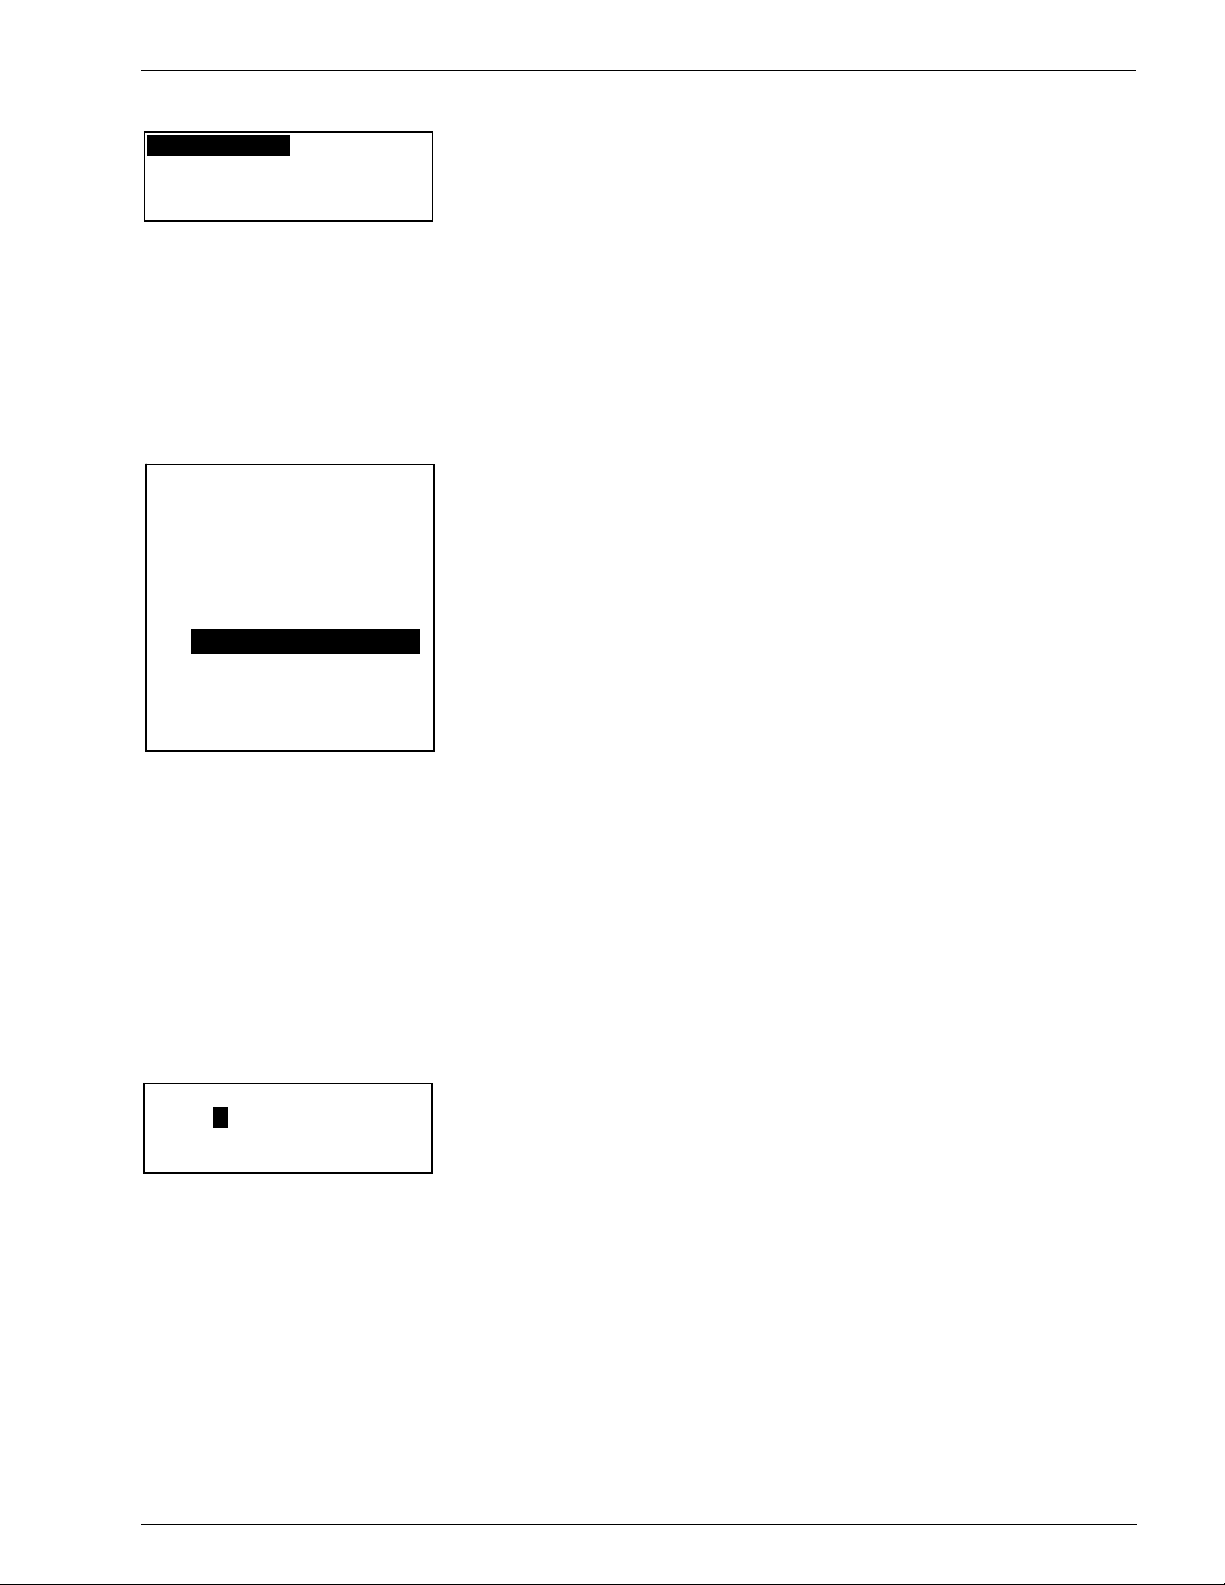
At the end of warm-up the Data Display screen appears. This screen shows the current gas measurement,
leak units, gas type, setup name, range, and mode of operation. In addition, a graphical display of the
relative gas level is provided by a bar graph that moves up the screen with increasing gas levels. Note that
the sensitivity of the bar graph is dependent on the Range setting.
WARM UP
120
Oz/yr
R134A
SETUP
SM SRCH
then performs a self-diagnostic check while displaying the instrument’s
firmware version number (approx. 15 seconds).
Remaining Warm Up Time in Seconds
Graphical Display of Warm Up Time
Gas Measurement
Leak Units
Gas Type
Setup Name (first 8 characters)
Range and Mode
Graphical Display of Relative Gas Level
Instruction 3015-4342 11
Page 16
Preparing for Operation H25-IR
2.4 System Setup
When shipped from the factory, the H25-IR has been configured according to its part number as described
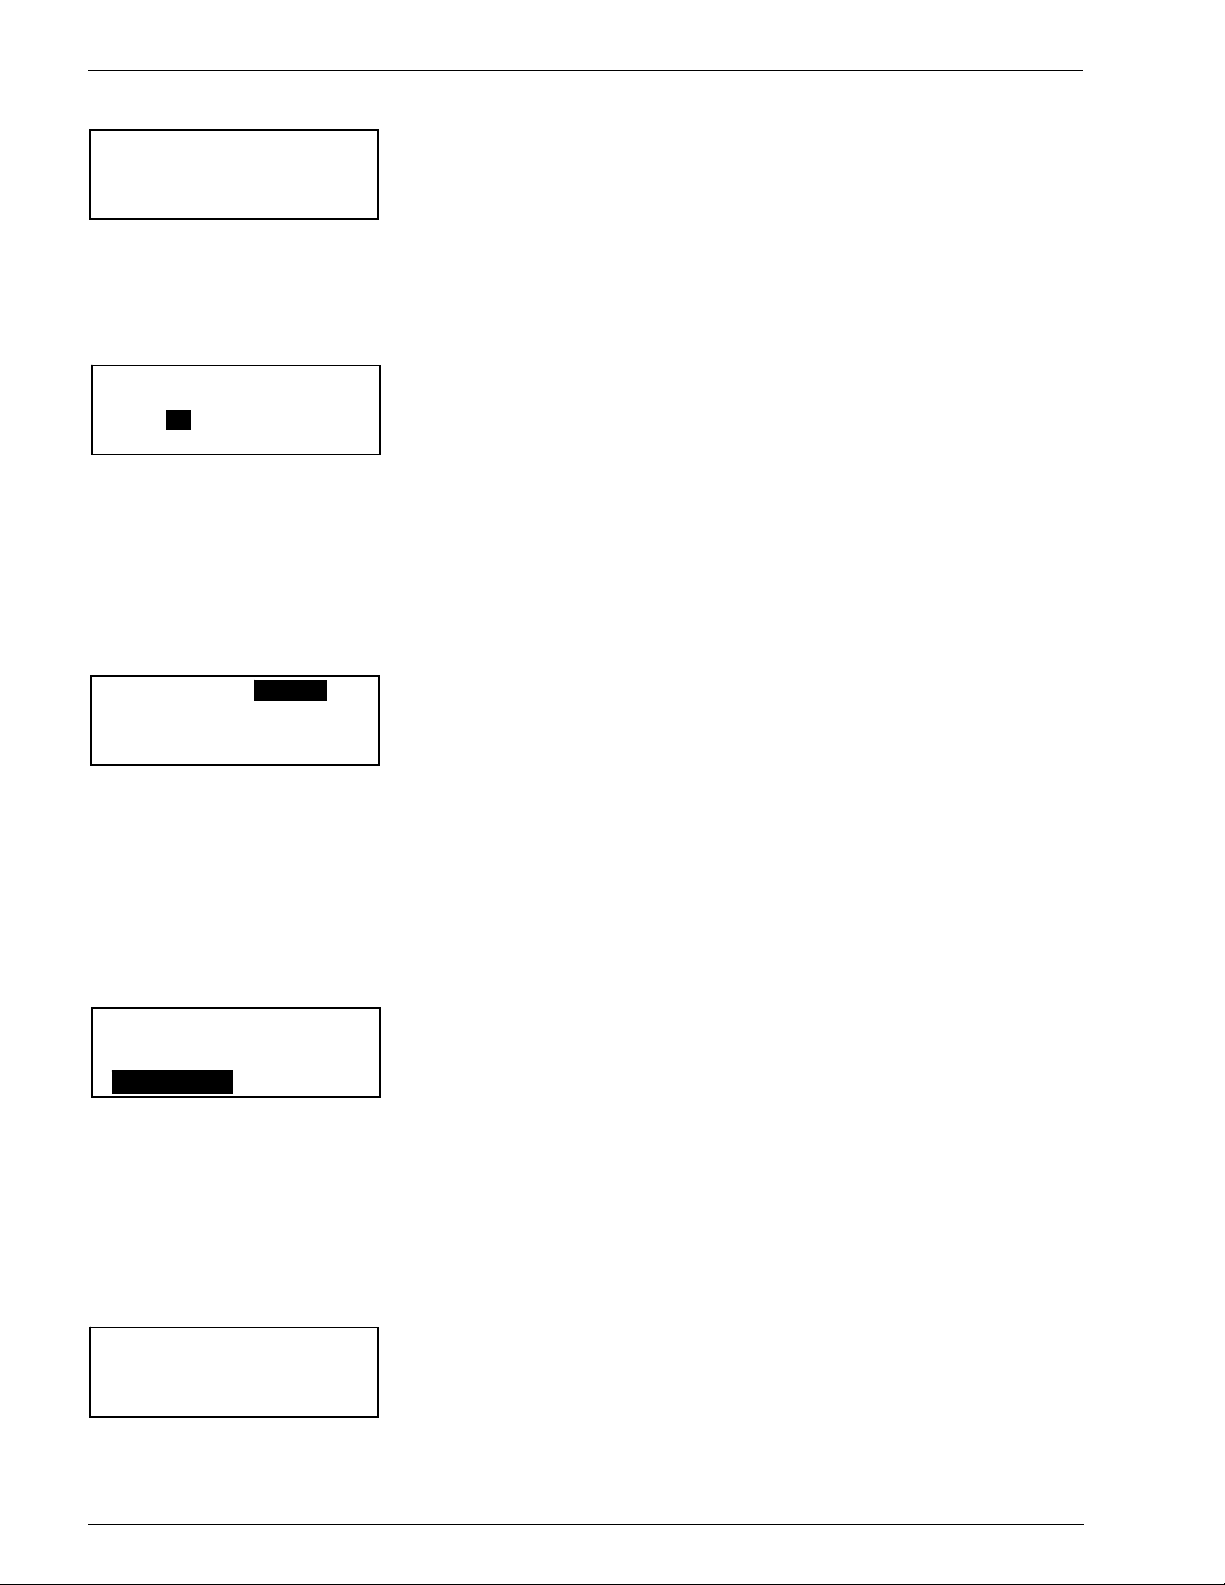
in Appendix “A”. To change any of the instrument’s system parameters, first enter System Setup by
pressing both the ENT and ESC buttons on either the instrument’s front panel or Smart probe at the
same time to display the Main menu. Next, use the Up and Down buttons to highlight “SYSTEM”, and
then press ENT to display the System Setup menu.
Main Menu:
SYSTEM
LOG
SETUPS
CAL DATA
DIAGNOSTICS
From the System Setup menu, use the Up and Down buttons to highlight the desired function. Press
ENT to select that function and display its setup screen. Then perform the appropriate system setup
procedure as described in Sections
System Setup Menu:
GAS TYPE
LEAK UNITS
RELAYS
LOOP
BRIGHTNESS
CLOCK
PCHK MODE
PROBE BUTTON
RESET DEFAULTS
2.4.1 thru 2.4.9.
2.4.1 Gas Type
GAS TYPE < R134A
R401A
R402A
< R402B
The GAS TYPE function displays a list of gases that the instrument is programmed to monitor. Refer to
Section
7 Specifications for a complete list of these gases.
Use the Up and Down buttons to highlight the desired gas. Press ENT to save the selection.
2.4.2 Leak Units
LEAK UNITS Oz/yr
g/yr
mL/s
PaM/s
ppm
The LEAK UNITS function displays a list of leak rate units of measure that the instrument is capable of
displaying. Leak rates can be displayed in units of ounces/year (Oz/yr), grams/year (g/yr), milliliters/second
(mL/s), Pascal Meters
Use the Up and Down buttons to highlight the desired leak units. Press ENT to save the selection.
3
/second (PaM/s), or parts per million (ppm).
12 Instruction 3015-4342
Page 17
H25-IR Preparing for Operation
2.4.3 Relays
1 = NOT USED
2 = NOT USED
3 = NOT USED
4 = NOT USED
Four SPDT relays (rated 3 A, 240 VAC) can be individually programmed to energize under any one of 11
different operating conditions. The contacts of these relays can be connected to an external device that will
activate when the designated operating condition is met. Refer to Section
Use the Up and Down buttons to highlight the relay to be programmed. Press ENT to make the selection
and display that relay’s assignment screen.
Use the Up and Down buttons to highlight the desired operating condition for the selected relay. Press
ENT to save the selection.
RELAY 1 ASSIGNED TO
NOT USED
CLOSE >= SETPOINT
CLOSE < SETPOINT
CLOSE ON FAULT
CLOSE DURING CAL
CLOSE IN MEASURE
CLOSE AT LOG LIMIT
CLOSE IN SETUP 1
CLOSE IN SETUP 2
CLOSE IN SETUP 3
CLOSE IN SETUP 4
NOTE: SETPOINT is the gas value as entered per Section “
LOG LIMIT is the total accumulated leak value as entered per Section “4.2.10.4 Setting the Log Limit.”
For example: If Relay 1 is programmed to “CLOSE AT LOG LIMIT,” its N.O. contacts can be connected to
an external alarm device (e.g. strobe light or buzzer) that will activate when the total accumulated leak
value in the data log has reached its programmed limit.
TIP: When measuring the total leak-rate of a system, it’s important to clear the log per Section “
Clearing the Log” before starting a new series of leak-rate measurements.
2.5.5 Setpoint.”
2.7 External Relay Connections.
4.2.10.2
2.4.4 4–20 mA Loop
EDIT LOOP FACTOR
0.016ppm
Selecting the 4–20 mA LOOP function allows the current loop factor to be changed from its factory default
of 0.016 ppm (corresponds to 0.016 mA per ppm), which provides an output range of 0 ppm (4 mA) to
1,000 ppm (20 mA). Refer to Equation 3.1.
Use the Left and Right buttons to move the blinking cursor across the screen to highlight the digit to be
modified, and then use the Up and Down buttons to modify that digit. Press ENT to save the new loop factor.
Loop Output in mA = (Loop Factor x ppm) + 4 mA Eq. 3.1
To facilitate loop zero and span checking, note that when the Loop parameter is selected the loop output is
set to 20 mA, and upon exiting this parameter the loop output is set to 4 mA.
Instruction 3015-4342 13
Page 18
Preparing for Operation H25-IR
A
2.4.5 Brightness
BRIGHTNESS
PRESS ARROW KEYS TO
ADJUST
The BRIGHTNESS function changes the brightness level of the instrument’s front panel display.
Use the Up, Down, Left, or Right button to change the brightness to any one of four levels. Press ENT to
save the selected brightness level.
2.4.6 Clock
The CLOCK function sets the instrument’s date (MM/DD/YY) and time (24 hour format, where 1:00 PM is
displayed as 13:00). The clock allows measured values to be logged with a date/time stamp (refer to Section
4.2.9 Logging Measured Readings).
Use the Left and Right buttons to move the blinking cursor across the screen to highlight the digits to be
modified, and then use the Up and Down buttons to modify those digits. Press ENT to save the new date
and time values.
SET DATE & TIME
07/16/04 13:13
2.4.7 PCHK Mode
PCHK MODE
AT CAL
The PCHK Mode setting determines when the instrument performs a ambient pressure check as follows:
AUTO – A pressure check is performed once every 60 minutes.
AT CAL – A pressure check is performed at the end of every calibration.
Note that a pressure check is always performed when the instrument is first turned ON just before the
warm-up period begins, regardless of the PCHK Mode setting.
Use the Up and Down buttons to highlight the desired setting. Press ENT to save the selection.
UTO
2.4.8 Probe Button
PROBE BUTTON
DISABLED
MODE KEY
ENTER KEY
The PROBE BUTTON function selects what action is performed by the pushbutton on the Standard Probe
with LED and Pushbutton.
DISABLED – No action performed.
MODE KEY – Toggles the instrument between its Search and Measure mode.
ENTER KEY – Performs the same function as the ENT / ZERO key on the instrument’s front panel.
Use the Up and Down buttons to highlight the desired setting. Press ENT to save the selection.
2.4.9 Reset Defaults
CONFIRM RESET TO
DEFAULTS BY PRESSING
THE UP ARROW
The RESET DEFAULTS function returns the instrument to its factory default settings per Appendix “A”.
Press the Up button to confirm resetting the instrument back to its factory default settings.
14 Instruction 3015-4342
Page 19

H25-IR Preparing for Operation
2.5 Configuring the SETUPS Function
There are four user-defined Setups that allow the operator to quickly switch between frequently used
combinations of Gas Type, Range, Feedback Mode, Setpoint, and the Auto Zero Off condition. Program the
four Setup configurations as follows:
First enter the Setups menu by pressing both the ENT and ESC buttons on either the instrument’s front
panel or Smart probe at the same time to display the Main menu. Next, use the Up and Down buttons to
highlight “SETUPS”, and then press ENT to display the Setups menu.
Main Menu:
SYSTEM
LOG
SETUPS
CAL DATA
DIAGNOSTICS
NOTE: The names listed in the Setups menu are user defined, and may vary from what is shown above.
From the Setups menu, use the Up and Down buttons to highlight the desired Setup. Press ENT to select
that Setup and display its Configuration menu.
From the Configuration menu, use the Up and Down buttons to highlight the desired function. Press
ENT to select that function and display its setup screen. Perform the appropriate setup procedure as
described in Sections
Setups Menu:
SETUP NO.1
SETUP NO.2
SETUP NO.3
SETUP NO.4
2.5.1 thru 2.5.6.
Configuration Menu:
SETUP NAME
RANGE
GAS TYPE
FEEDBACK MODE
SETPOINT
SEARCH AUTO ZERO
2.5.1 Setup Name
SETUP NAME #1
SETUP NO. 1
The SETUP NAME function allows the operator to give each Setup a unique name that will appear on the
Data Display screen. Use the Left and Right buttons to move the blinking cursor across the screen to
highlight the character to be modified, and then use the Up and Down buttons to modify that character.
When finished entering the desired characters, press ENT to save the new name.
2.5.2 Range
RANGE LG
SETUP NO. 1 MED
SM
The RANGE function sets the sensitivity of the gas-level graphical display (bar graph located at the
bottom of the display), audible tone frequency, and the hand-held probe’s LED blink rate in relation to the
detected gas level. Use the Up and Down buttons to highlight the desired sensitivity. Press ENT to save
the selection.
NOTE: The range setting has no affect on the accuracy of the gas reading as displayed on the instrument
when making a leak-rate measurement.
Instruction 3015-4342 15
Page 20

Preparing for Operation H25-IR
2.5.3 Gas Type
GAS TYPE < R134A
SETUP NO. 1 R401A
R402A
< R402B
The GAS TYPE function sets the type of gas being monitored. Use the Up and Down buttons to highlight
the desired gas. Press ENT to save the selection.
NOTE: The gases displayed depend on which optical bench is installed. Refer to Section “
7 Specifications.”
2.5.4 Feedback Mode
FEEDBACK MODE
SETUP NO. 1
CONTINUOUS
SETPOINT
H25C SETPOINT
The FEEDBACK MODE function provides the operator both visual and audible feedback in regard to the
measured leak rate. This function determines how the gas-level graphical display (bar graph located at the
bottom of the display) and audible tone operate as follows:
CONTINUOUS – The bar graph and audible tone continuously increase and decrease their values in step
with the leak rate. For example, when the leak rate increases, the bar graph moves upscale and the
audible tone increases in frequency. Their maximum values at various leak rates are determined by the
Range setting.
SETPOINT – Both the bar graph and audible tone go to their maximum values when the leak rate equals
or goes above the setpoint. Enter a setpoint value per Section
H25C SETPOINT – This setting emulates the operation of the H25C Industrial Halogen Leak Detector.
The bar graph and audible tone are suppressed when the leak rate is below the setpoint. They both go to
their 50% values when the leak rate reaches the setpoint, and then they both continuously increase in
value as the leak rate increases until reaching their maximum values at 2-times the setpoint. Enter a
setpoint value per Section
2.5.5 Setpoint.
2.5.5 Setpoint.
Use the Up and Down buttons to highlight the desired function. Press ENT to save the selection.
2.5.5 Setpoint
SETPOINT
SETUP NO. 1
00.0000 Oz/yr
The SETPOINT function establishes a leak rate at which the graphical display and audible tone are
turned ON as determined by the Feedback Mode setting (refer to the previous section).
The setpoint value also sets the leak rate at which one or more of the instrument’s relays is energized
whenever the leak rate equals, exceeds, or falls below the setpoint value (refer to Section
plus it establishes a reference point where the instrument’s auto-zero function can be turned OFF while in
the Search mode (refer to Section
Use the Left and Right buttons to move the cursor across the screen to highlight the digit to be modified,
and then use the Up and Down buttons to modify that digit. Press ENT to save the new setpoint.
2.5.6 Search Auto Zero).
2.4.3 Relays),
16 Instruction 3015-4342
Page 21

H25-IR Preparing for Operation
2.5.6 Search Auto Zero
SEARCH AUTO ZERO
SETUP NO.1
< ALWAYS ON
ALWAYS OFF
BELOW SETPOINT
BELOW 90% OF SP
BELOW 75% OF SP
BELOW 50% OF SP
The SEARCH AUTO ZERO function allows the operator to select one of the following conditions when the
auto-zero function is disabled while in the Search mode:
NOTE: This function works in conjunction with the setpoint value as entered in Section “
ALWAYS ON – The background gas level is always zeroed. If the probe is held over a gas leak, the
instrument will automatically zero-out the reading.
ALWAYS OFF – The background gas level is never zeroed. If the probe is held over a gas leak, the
instrument will not zero-out the reading, similar in operation to the Measure mode.
BELOW SETPOINT – The auto-zero function is ON when the leak-rate is below the setpoint value. If the
leak rate goes above the setpoint value, then the auto-zero function turns OFF, allowing the probe to stay
on the leak without the reading being zeroed-out.
For example: If the Setpoint is 2 Oz/yr, then the auto-zero function is ON for leaks rates that are
<2 Oz/yr. If the leak rate is ≥2 Oz/yr, then the auto-zero function turns OFF.
BELOW 90% OF SP – The auto-zero function is ON when the leak-rate is below 90% of the setpoint value.
If the leak rate goes above 90% of the setpoint value, then the auto-zero function turns OFF, allowing the
probe to stay on the leak without the reading being zeroed-out.
For example: If the Setpoint is 2 Oz/yr, then the auto-zero function is ON for leaks rates that are
<1.8 Oz/yr. If the leak rate is ≥1.8 Oz/yr, then the auto-zero function turns OFF.
BELOW 75% OF SP – The auto-zero function is ON when the leak-rate is below 75% of the setpoint value.
If the leak rate goes above 75% of the setpoint value, then the auto-zero function turns OFF, allowing the
probe to stay on the leak without the reading being zeroed-out.
For example: If the Setpoint is 2 Oz/yr, then the auto-zero function is ON for leaks rates that are
<1.5 Oz/yr. If the leak rate is ≥1.5 Oz/yr, then the auto-zero function turns OFF.
BELOW 50% OF SP – The auto-zero function is ON when the leak-rate is below 50% of the setpoint value.
If the leak rate goes above 50% of the setpoint value, then the auto-zero function turns OFF, allowing the
probe to stay on the leak without the reading being zeroed-out.
2.5.5 Setpoint.”
For example: If the Setpoint is 2 Oz/yr, then the auto-zero function is ON for leaks rates that are
<1 Oz/yr. If the leak rate is ≥1 Oz/yr, then the auto-zero function turns OFF.
2.6 Calibration
The H25-IR has been calibrated at the factory, and should not require frequent calibrations when
searching for gas leaks. When making measurements, however, the instrument should be calibrated on a
periodic basis to ensure that it meets its published accuracy specification.
Instructions on how to calibrate the instrument are contained in Section
Instruction 3015-4342 17
3 Calibration.
Page 22

Preparing for Operation H25-IR
2.7 External Relay Connections
The H25-IR includes four SPDT relays whose relay contacts are rated 3 A at 240 VAC. External alarm
devices (e.g., horns, bells, strobe lights, etc.) can be connected to these relays and activated when their
associated relay is energized. Refer to Section
Locate the external relay connector on rear of unit (refer to Section
Secure the leads from the external device and its power source to the external relay connector as shown in
the diagram below. This diagram shows a typical alarm device being connected to Relay 1. Repeat this
procedure, as necessary, for the remaining relays.
- Each relay may be connected as normally open (NO), or normally closed (NC).
2.4.3 Relays.
1.7.2 Rear View).
Typical Relay 1 Wiring
- The relay contacts are rated 3 A at 250 VAC.
- Power for the external alarm devices is supplied from an external power source.
- Jumper the ‘Neutral’ line of an external power source to the ‘Common’ terminals on the relay connector.
- Connect one end of the alarm device to the ‘NO’ terminal of the desired relay.
- The other end of the alarm device is connected to the other leg of the external power source. For protection,
install an in-line fuse of the appropriate size and design for the external alarm device being used.
18 Instruction 3015-4342
Page 23

H25-IR Preparing for Operation
2.8 4–40 mA Current Loop Connection
An external 4−20 mA monitoring device (e.g., chart recorder) can be connected to the H25-IR using a
shielded-twisted-pair cable.
IMPORTANT! The monitoring device must be isolated from ground (floating).
Locate the 4−20 mA connector on the rear of the unit (refer to Section
the resistor or shorting wire from its terminals.
NOTE: A 100 ohm, ¼ W resistor must be connected to the 4–20 mA connector if no external monitoring
device is used. Failure to install this resistor will cause a “Loop Open Error” to occur (refer to Section “
What to Do when a Fault Occurs”).
Secure the wire leads from the external monitoring device to the connector as shown in the diagram below,
making sure that the polarity at this connector matches the wiring at the monitoring device.
4–20 mA Current Loop Connector
CAUTION: Never apply power to the 4–20 mA Current Loop Connector from
an external power supply. In addition, connect only a load resistor or a
floating measurement device.
The default current-to-ppm factor is set to 0.016 mA = 1 ppm, providing a measurement range of 0 ppm
(4 mA) to 1,000 ppm (20 mA). Note that the current-to-ppm factor can be changed using the instrument’s
LOOP function (refer to Section
To facilitate loop zero and span checking, note that when the LOOP function is selected the loop output is
set to 20 mA, and upon exiting this function the loop output is set to 4 mA.
2.4.4 4–20 mA Loop).
1.7.2 Rear View), and then remove
4.3
Instruction 3015-4342 19
Page 24

Preparing for Operation H25-IR
Notes:
20 Instruction 3015-4342
Page 25

H25-IR Calibration
3 Calibration
When the instrument is supplied with an internal leak source, the operator can choose between two types
of calibration: Internal or External. Internal calibration uses the instrument’s built-in leak source, while
External calibration uses a customer supplied calibrated leak source.
If the instrument is supplied without a leak source, then the option of selecting the calibration type is
removed from the menu system. The only option for this model of instrument is to calibrate using an
external leak source.
3.1 Selecting Internal or External Calibration
Use the Main Menu > CAL DATA > CAL TYPE function to select either Internal or External calibration. If
External calibration is selected, then also use the EXT RATE and EXT GAS TYPE functions to enter the
characteristics of the external leak source.
Display the Calibration Data menu by first pressing both the ENT and ESC buttons on either the
instrument’s front panel or Smart probe at the same time to display the Main menu. Next, use the Up and
Down buttons to highlight “CAL DATA”, and then press ENT to display the Calibration Data menu.
Main Menu:
SYSTEM
LOG
SETUPS
CAL DATA
DIAGNOSTICS
Calibration Data Menu:
CAL TYPE
EXT RATE
EXT GAS TYPE
CAL FACTOR
RESTORE FACTORY CAL
3.1.1 Internal Calibration Selection
From the Calibration Data menu, use the Up and Down buttons to highlight “CAL TYPE”, and then
press ENT to display its setup screen. Use the Up and Down buttons to highlight “INTERNAL”,
and press ENT to make the selection and return to the Calibration Data menu. Press ESC as required to
return to the Data Display screen.
CAL TYPE INTERNAL
EXTERNAL
Instruction 3015-4342 21
Page 26

Calibration H25-IR
3.1.2 External Calibration Selection and Setup
When using an external leak source, the instrument must be setup for external calibration along with
entering the leak rate and gas type of the external leak source.
Select external calibration and enter the parameters of the external leak source as follows:
Select External Calibration: From the Calibration Data menu, use the Up and Down buttons to highlight
“CAL TYPE”, and then press ENT to display its setup screen. Use the Up and Down buttons to highlight
“EXTERNAL”, and press ENT to make the selection and return to the Calibration Data menu.
CAL TYPE INTERNAL
EXTERNAL
Enter External Leak Rate: From the Calibration Data menu, highlight “EXT RATE” and press ENT to
display its setup screen. Use the Left and Right buttons to move the blinking cursor across the screen to
highlight the digit to be modified, and then use the Up and Down buttons to modify that digit. Press ENT
to save the new external leak rate value and return to the Calibration Data menu.
IMPORTANT! Be sure to enter the leak rate using the same units of measure as displayed on the EXT
RATE screen. In this example, the units of measure is g/yr. If your leak source is marked in Oz/yr, then
multiply that value by a factor of 28.35. For example: If the leak source is marked 0.9 Oz/yr, then enter a
leak rate of (0.9 x 28.35=) 25.5 g/yr.
NOTE: The minimum calibration leak rate is 2 g/yr.
EXT RATE 25.5 g/yr
Enter External Gas Type: From the Calibration Data menu, highlight “EXT GAS TYPE” and press ENT to
display its setup screen. Use the Up and Down buttons to highlight the type of gas contained in the
external leak source. Press ENT to save the new external gas type and return to the Calibration Data
menu.
NOTE: The gases displayed depend on which optical bench is installed. Refer to Section “
EXT GAS TYPE < R134A
R401A
R402A
< R402B
Press ESC as required to return to the Data Display screen.
7 Specifications.”
22 Instruction 3015-4342
Page 27

H25-IR Calibration
C
3.2 Internal Calibration
Internal calibration uses the instrument’s built-in leak source. Properties of the leak source (i.e. gas type,
leak rate, temperature coefficient, and specification temperature) are entered at the factory and do not
need to be changed by the operator.
The properties of the leak source along with the current internal temperature of the instrument are used
to compute the actual leak rate when a calibration is requested. This number is displayed as the “target”
value during calibration. A spring switch located in front of the CAL Port ensures that the probe is kept in
place for the duration of the calibration process. Calibration will fail if the probe is withdrawn too early in
the process, or if the computed parameters deviate from the stored factory calibration by more than 20%.
1. Turn ON instrument and allow it to complete its 120 second warm-up.
2. Press the front panel CAL button to display the Calibration screen. Note that the display must be
reading a leak rate of “0.00” when the CAL button is pressed; otherwise, the message “LEAK
RATE MUST BE ZERO TO CALIBRATE” will appear. If necessary, press the ZERO button to
zero the display before pressing CAL.
0.89
INSERT
PROBE
TARGET
O/YR
R134A
MEASURED
O/YR
Oz/yr
R134A
SETUP
INT CAL
3. Ensure that the instrument is set up for internal calibration as indicated by “INT CAL” being
displayed at the bottom-right of the display. If “EXT CAL” (external calibration) is displayed,
perform the procedure in Section
Type to Internal.
4. Insert the probe tip into the CAL Port within 10 seconds
after pressing the CAL button. Be sure that the probe tip
makes contact with the spring switch. At this time the
calibration process should automatically start.
The top number of the Calibration screen shows the
“target” value (leak source rate), while the bottom
number shows the current measured value. Keep the
probe tip firmly against the back of the port for the
duration of the calibration process, during which time the
instrument is calibrated at both a high and low flow rate.
If the probe tip looses contact with the spring switch before the
calibration process completes, the message “CAL ABORTED” is
displayed. At this time press any key to retain the previous
calibration curve and return to the Data Display screen.
3.1 Selecting Internal or External Calibration and set the Cal
TARGET
0.89
0.00
O/YR
R134A
MEASURED
O/YR
AL
OK
5. After a successful calibration the new calibration data is saved
and the message “CAL OK” followed by “WITHDRAW PROBE
FROM LEAK SOURCE” will appear.
6. Withdrawing the probe causes the display to switch back to the
Data Display screen. Note, however, if the PCHK Mode is set to
AUTO (refer to Section
is performed prior to the display of the Data Display screen.
NOTE: After being calibrated the instrument is automatically
placed into its Search mode.
2.4.7 PCHK Mode), then a pressure check
WITHDRAW PROBE
FROM LEAK
SOURCE
Oz/yr
R134A
SETUP
INT CAL
Oz/yr
R134A
SETUP
INT CAL
Oz/yr
R134A
SETUP
INT CAL
PCHK
Oz/yr
R134A
SETUP
SM SRCH
Instruction 3015-4342 23
Page 28

Calibration H25-IR
3.3 External Calibration
External calibration uses a customer supplied leak source that matches the gas to be monitored.
Properties of the leak source must be entered by the operator using the EXT RATE and EXT GAS TYPE
functions as described in Section
the number displayed as the “target” value during calibration.
IMPORTANT! The operator is responsible for ensuring that the external leak-rate value has been
corrected for daily changes in ambient temperature and pressure at the time of calibration. It is also the
operator’s responsibility to ensure that a good calibration has been performed.
1. Turn ON instrument and allow it to complete its 120 second warm-up.
2. Press the front panel CAL button to display the Calibration screen. Note that the display must be
reading a leak rate of “0.00” when the CAL button is pressed; otherwise, the message “LEAK
RATE MUST BE ZERO TO CALIBRATE” will appear. If necessary, press the ZERO button to
zero the gas display before pressing CAL.
0.89
0.00
3. Ensure that the instrument is set up for “EXT CAL” (external calibration) as indicated at the
bottom-right of the display. If “INT CAL” (internal calibration) is displayed, perform the procedure
in Section
4. Insert probe tip into the Calibration Port of the external leak source.
5. The top number of the Calibration screen shows the “target” value (leak source rate), while the
bottom number shows the current “measured” value. Keep the probe tip inserted in the Calibration
Port for the duration of the calibration process, during which time the instrument performs a
calibration at both a high and low flow rate.
0.89
0.89
6. After the calibration cycle is complete, the new calibration data is saved and the display
automatically switches back to the Data Display screen. Note, however, if the PCHK Mode is set to
AUTO (refer to Section
of the Data Display screen.
NOTE: After calibration the instrument is automatically placed into its Search mode.
TARGET
O/YR
R134A
MEASURED
O/YR
3.1 Selecting Internal or External Calibration and set the Cal Type to External.
TARGET
OZ/YR
R134A
MEASURED
OZ/YR
3.1.2 External Calibration Selection and Setup. The EXT RATE entry is
Oz/yr
R134A
SETUP
EXT CAL
Oz/yr
R134A
SETUP
EXT CAL
2.4.7 PCHK Mode), then a pressure check is performed prior to the display
Oz/yr
R134A
SETUP
24 Instruction 3015-4342
Page 29

H25-IR Calibration
3.4 CAL Factor
The factory default CAL Factor of 1.000 will provide the level of accuracy as stated in Section 7
Specifications for all gases.
The CAL Factor can be changed for the following two reasons:
• Allow the instrum ent’s in ternal leak source to be used to calibrate the instrument,
regardless of the gas being measured
• Improve the accuracy of ppm measurements
Leak-rate accuracy can be maintained by periodically calibrating the instrument on the gas being
measured. If the instrument’s internal calibration gas is the same as the gas being measured, then it is a
simple matter of calibrating the instrument using the internal leak source. When measuring a gas that is
not the same as the instrument’s internal calibration gas, then there are two options for maintaining
accuracy. The instrument can either be calibrated using an external leak source, or the CAL Factor can be
adjusted to make the internal leak source simulate the gas being measured as described in Section 3.4.1.
The CAL Factor can also be used to improve the accuracy of ppm measurements as described in
Section 3.4.2.
3.4.1 Simulating Other Internal Leak Source Gas Types Using the CAL Factor
When measuring the leak rate of a gas that is not the same as the instrument’s internal calibration gas,
the CAL Factor can be adjusted make the instrument’s internal calibration g as sim ulate the gas being
measured. This allows the operator to calibrate th e instrument using the internal leak source, regardless
of the gas contained in the leak source. Note that this procedure is not necessary for single-gas
instruments.
Material Required:
• Calibrated External Leak Source set up for 5 to 10 times the leak rate
that the instrument is expected to detect
IMPORTANT! Remember that the accuracy will not be better than that of the
external leak source used for calibration.
Procedure:
1. Turn ON the instrument and allow it to warm up for 30 minutes before proceeding.
2. Program the instrument for the Gas Type contained in the external leak source (refer to Section
2.4.1 Gas Type).
3. Verify that the current CAL Factor is set to 1.000 by selecting the Main Menu > CAL DATA > CAL
FACTOR function. If necessary, reset the CAL Factor to 1.000. Refer to Section 3.4.3 Adjusting the
CAL Factor.
4. Perform an internal calibration in the normal way using the internal leak source (refer to Section
3.2 Internal Calibration). Note that it doesn’t matter that the gas in the internal leak source
doesn't match the Gas Type entered in Step 2.
5. Press the MODE key to place the instrument in to its Measure mode.
6. Measure the leak rate of the external leak source and record the displayed reading.
Instruction 3015-4342 25
Page 30

Calibration H25-IR
7. Compute the new CAL Factor by dividing the actual leak rate of the external leak source by the
reading recorded in Step 6. For example, if the leak rate of the external leak source is 0.4 oz/yr and
the measured rate was 0.43 oz/yr, then the new CAL Factor is 0.4 ÷ 0.43 = 0.930.
This new CAL Factor establishes the relationship between the internal calibration gas and the gas
type selected to be measured.
8. Enter the new CAL Factor as described in Section 3.4.3 Adjusting the CAL Factor. Note that the
displayed Gas Type should match the gas selected in Step 2.
9. From this point on the operator can perform an internal calibration and get accurate
measurements for other gas types using whatever gas is contained in the internal leak source.
3.4.2 Improving PPM Measurement Accuracy using the CAL Factor
The CAL Factor can be adjusted to improve the accuracy of the ppm measurement by calibrating the
instrument on the gas being measured. The accuracy of the ppm measurement after performing this
procedure will equal the accuracy of the gas sample, ±1%. Note that the accuracy of the instrument’s ppm
measurement depends on the accuracy of the gas sample.
The new CAL Factor is determined by sampling a known di lution of gas whose accuracy is better than the
ppm measurement accuracy as stated in Section 7 Specifications. The concentration of the sampl e must
also be corrected for ambient temperature and pr essure at the time of calibration. A minimum sample size
of 5 liters is required.
Calibration is best performed at or near full scale, it can however, be done at any concentration and ideally
in the range where maximum accuracy is desired down to, but not below, 100 ppm.
The instrument should be operating for at least 30 minutes prior to performing a calibration.
Verify that the current CAL Factor is set to 1.000 by selecting the Main Menu > CAL D ATA > C AL
FACTOR function. If necessary, reset the CAL Factor to 1.000. Refer to Section 3.4.3 Adjusting the CAL
Factor.
With the instrument operating in its ppm measurement mode (refer to Section 4.2.8 Measuring the PPM
Level), insert the probe tip into the gas-sample bag and allow the instrument to sample until the ppm
reading on the display is stable. At this time record the ppm re ading. The new CAL Factor is computed by
dividing the known gas concentration value by the measured value. Typically this number will be between
0.95 and 1.05. Enter the new CAL Factor as described in Section 3.4.3 Adjusting the CAL Factor.
IMPORTANT! If the instrument is switched back to measuring the leak-rate, then the instrument must be
recalibrated on the gas being measured.
26 Instruction 3015-4342
Page 31

H25-IR Calibration
3.4.3 Adjusting the CAL Factor
Display the Calibration Data menu by first pressing both the ENT and ESC buttons on either the
instrument’s front panel or Smart probe at the same time to display the Main menu. Next, use the Up and
Down buttons to highlight “CAL DATA”, and then press ENT to display the Calibration Data menu.
Main Menu:
SYSTEM
LOG
SETUPS
CAL DATA
DIAGNOSTICS
From the Calibration Data menu, highlight “CAL FACTOR” and press ENT to display its setup screen.
Use the Left and Right buttons to move the blinking cursor across the screen to highlight the digit to be
modified, and then use the Up and Down buttons to modify that digit. Press ENT to save the new CAL
factor value and return to the Calibration Data menu.
CAL FACTOR 1.000
FOR R134A
K1=310.89 K2=703.7 K3=1460.3
K4=0.0 K5=0.0
Calibration Data Menu:
CAL TYPE
EXT RATE
EXT GAS TYPE
CAL FACTOR
RESTORE FACTORY CAL
3.5 Restoring Factory Calibration
NOTE: Factory calibration cannot be restored if the instrument was calibrated using an
external leak source.
Restore an instrument to its factory calibration value as follows:
Display the Calibration Data menu by first pressing both the ENT and ESC buttons on either the
instrument’s front panel or Smart probe at the same time to display the Main menu. Next, use the Up and
Down buttons to highlight “CAL DATA”, and then press ENT to display the Calibration Data menu.
Main Menu:
SYSTEM
LOG
SETUPS
CAL DATA
DIAGNOSTICS
From the Calibration Data menu, use the Up and Down buttons to highlight “RESTORE FACTORY
CAL”, and then press ENT to display the RESTORE FACTORY CAL screen.
RESTORE FACTORY CAL
HIT ENTER TO CONFIRM
Press the ENT button to confirm restoring the instrument to its factory calibration values.
Calibration Data Menu:
CAL TYPE
EXT RATE
EXT GAS TYPE
CAL FACTOR
RESTORE FACTORY CAL
Instruction 3015-4342 27
Page 32

Calibration H25-IR
Notes:
28 Instruction 3015-4342
Page 33

H25-IR Operation
0
S
4 Operation
4.1 Instrument Location
The H25-IR Refrigerant Gas Leak Detector should be placed on a flat, horizontal surface such as a bench
or table top when in use.
When searching for leaks, the instrument does not need to be in a gas-free area. This is because of the
instrument’s ability to automatically zero-out background gases and still be able to locate gas leaks.
When making leak-rate measurements, the instrument needs a location where the air is clean and free of
the gas being monitored − this is necessary for zeroing purposes. If the area is contaminated, then a freshair source (e.g., fresh air piped in from the outside) must be made available so the operator can manually
zero the instrument before making a measurement.
4.2 Using the H25-IR
4.2.1 Power
Plug the instrument into the nearest AC outlet (100 to 240 VAC, 50/60 Hz), and then set the rear panel
power switch to its ON position. After being turned ON, the instrument requires 120 seconds to warm-up.
A detailed description of the front panel display screens that are shown during turn-on and warm-up is
contained in Section
2.3 Turning ON the Instrument.
4.2.2 Initial Setup
At this time the H25-IR should already be set up as described in Section 2 Preparing for Operation.
After warming up, the instrument’s Data Display screen will show the current Gas Measurement, Leak
Units, Gas Type, Setup Name, Range, and Mode of Operation. In addition, a graphical display of the
relative gas level is provided by a bar graph at the bottom of the screen whose length increases up the
screen as the gas level increases. An audible tone may also be heard whose pitch increases in frequency as
the gas level increases. Note that the sensitivity of the bar graph and audible tone for any given gas level
is dependent on the Range setting.
When using the Smart probe, its LCD will show the current Gas Measurement, Range, Mode of Operation,
and Setup Number in parentheses. If the probe contains a red LED, the blink rate of the LED will increase
as the gas level increases. Note that the sensitivity of the LED’s blink rate for any given gas level is
dependent on the Range setting.
Instrument Display Smart Probe Display
The Leak Units can be changed per Section
Type; the Setup changed by pressing the SETUP button; the Range changed by pressing the RANGE
button; and the Mode changed by pressing the MODE button. Note that if the Gas Type is changed during
operation, the Setup Name and Number changes to a dash (−), indicating that the previously selected
Setup is no longer valid.
Instruction 3015-4342 29
Oz/yr
R134A
SETUP
SM SRCH
Gas Measurement
Leak Units
Gas Type Mode
Setup Name (first 8 characters)
Range & Mode
Graphical Display of Gas Level
2.4.2 Leak Units; the Gas Type changed per Section 2.4.1 Gas
.00 SM
RCH (1)
Range
(Setup No.)
Page 34

Operation H25-IR
r
0
S
M
S
0
S
4.2.3 Range Selection
The H25-IR has three sensitivity ranges: SM (small), MED (medium), and LG (large). The range used
when searching for a leak depends on the size of the leak and the type of gas being monitored.
Press the RANGE button until the desired range is displayed on either the instrument’s Data Display
screen, or on the LCD of the Smart probe.
Instrument Display Smart Probe Display
Oz/yr
R134A
SETUP NO
SM SRCH
NOTE: The range setting has no affect on the accuracy of the gas reading as displayed on the instrument
when making a leak-rate measurement. It does, however, change the sensitivity of the bar graph at the
bottom of the Data Display screen, the audible tone frequency as heard from the speaker, and the blink rate
of the red LED on the hand-held probe.
The “SM” range is the highest sensitivity level, and is most likely used for fluorine based gases like R134a
and most fluorine based refrigerant blends.
The “MED” range is used for chlorine and chlorine based gases like R12, R22, R123, etc. This position is
also useful for locating large R134a or other fluorine based refrigerant leaks of 1−2 Oz/yr.
The “LG” range is used to locate very large leaks.
TIP: Blowing out the test area with shop air may enable the operator to locate a large leak more quickly.
Range: SM, MED, LG
.00 SM
RCH (1)
4.2.4 Setup Selection
There are four user-defined Setups that allow the operator to quickly switch between frequently used
combinations of Gas Type, Range, Feedback Mode, Setpoint, and the Auto Zero Off condition (refer to
Section
When first turned ON, the instrument returns to the last Setup selected. To select a different Setup, first
press the SETUP button to display the Setup Selection menu. Next, use the Up and Down buttons to
highlight the desired Setup, and then press ENT to make the selection and be returned to the Data Display
screen. The name of the newly selected Setup will appear on the Data Display screen.
SETUP NO. 1
SETUP NO. 2
SETUP NO. 3
SETUP NO. 4
NOTE: The names listed in the Setup Selection menu are user defined, and may vary from what is
shown above. The number of each setup, however, is what appears on the display of the Smart probe.
Instrument Display Smart Probe Display
2.5 Configuring the SETUPS Function).
Oz/yr
Setup Name
and Numbe
R134A
SETUP NO
.00
RCH (1)
30 Instruction 3015-4342
Page 35

H25-IR Operation
A
4.2.5 Volume Adjustment
A speaker at the rear of the instrument produces an audible tone whose frequency increases as the detected
level of gas increases. An earphone when plugged into the instrument’s earphone jack automatically
disconnects the speaker, allowing the operator to listen to the unit’s audible tone in high-noise environments.
TIP: If additional volume is required, connect an amplified speaker to the earphone jack.
Adjust the speaker and earphone volume as follows:
1. Press the VOL (volume) button to display the ADJUST SPEAKER VOLUME screen.
DJUST SPEAKER
-----
VOLUME
2. Press the Up button to increase volume, and press the Down button to decrease volume. Pressing
the Left button sets the volume to minimum, while pressing the Right button sets it to maximum.
A visual indication of the volume level is provided by a bar graph at the bottom of the Data Display
screen.
3. Press ENT to save the new volume level.
Oz/yr
R134A
SETUP
SM SRCH
Speaker Volume Bar Graph
4.2.6 Searching for a Leak
Use the following procedure to locate a leak.
1. Press the MODE button to display “SRCH” at the bottom of the Data Display screen or on the
Smart probe.
The Search Mode is used to locate leaks because of its ability to auto-zero or block out background
contamination. This greatly reduces and/or eliminates false positives while retaining the
sensitivity to quickly locate small to large leaks.
TIP: The auto-zero function can be turned OFF, or configured to automatically turn OFF at a user-
defined leak rate. Refer to Section “
2. Begin leak testing by moving the probe tip slowly toward the area being tested. Pinpointing leaks
requires continuous probe movement. (2 inches [50 mm] per second is recommended as specified
in SAE J1627 and J1628.) When the gas being monitored is detected the instrument responds in a
positive manner as follows:
• The gas reading increases
• The bar graph at the bottom of the Data Display screen moves upscale
• The audible tone from the speaker increases in frequency
• If the hand-held probe contains an LED, its blink rate will increase
3. If the probe tip is held over the leak source the instrument will zero-out the leak, causing all gas
indicators to return to their idle state. Briefly moving the probe away from the leak allows the
instrument to quickly regain its sensitivity. Returning to the leak source will again cause the
instrument to respond in a positive manner.
4. By repeating Step 3, the instrument will reliably and repeatedly pinpoint the leak with each pass
over the leak source.
2.5.6 Search Auto Zero”.
Instruction 3015-4342 31
Page 36

Operation H25-IR
2
M
3
M
4.2.7 Measuring the Leak Rate
After finding a leak, a measurement can be made to determine its leak rate as follows:
1. Press the MODE button to display “MERS” at the bottom of the Data Display screen or “MEASR”
on the Smart probe.
2. Allow the instrument to sample fresh air. The gas reading must
be “0.00” before proceeding. If
necessary, press the ZERO button to zero the reading while sampling fresh air.
3. While observing the gas reading, hold the probe tip over the leak source until the reading
stabilizes. In the examples below, a leak rate of 2.80 Oz/yr of R134a is being measured.
Instrument Display Smart Probe Display
Oz/yr
R134A
SETUP
SM MERS
.80 SM
EASR(1)
4.2.8 Measuring the PPM Level
The H25-IR can be used to measure a gas’s ppm level within a confined space, and display that level
within the range of 0 to 1,000 ppm. Set up the instrument to measure ppm levels as follows:
NOTE: Although the H25-IR can display ppm levels above its rated range of 0 to 999 ppm, the accuracy of
the reading above 999 ppm is unspecified. Refer to Section “
7 Specifications.”
1. Set up the instrument’s Leak Units to ppm as described in Section
2.4.2 Leak Units.
2. Press the MODE button to display “MERS” at the bottom of the Data Display screen or “MEASR”
on the Smart probe.
3. Allow the instrument to sample fresh air. The gas reading must
be “00.0” before proceeding. Press
the ZERO button to zero the gas reading while sampling fresh air.
4. Place probe in area to be measured. In the example below, 38.0 ppm of R134a is being measured.
Note that the display is auto ranging, causing the decimal point to turn off above 99.9 ppm.
Instrument Display Smart Probe Display
ppm
R134A
SETUP
SM MERS
8.0 SM
EASR(1)
32 Instruction 3015-4342
Page 37

H25-IR Operation
4.2.9 Logging Measured Readings
The H25-IR can log up to 50 measurements, which can then be viewed and analyzed at a later time. Each
logged measurement is given a date & time stamp for identification. The measurements are stored in nonvolatile memory, and will not be erased when the instrument is turned OFF.
With the instrument in its Measure mode, press the LOG button to log the measurement that is
currently being displayed on the Data Display screen. Note that logged data is stored on a first-in, first-out
basis. Once 50 measurements have been stored, the newest stored measurement overwrites the oldest.
NOTE: Only non-zero measurements will be logged.
In the following example, a reading of 0.48 Oz/yr is about to be logged in memory location 11. Pressing the
ENT button will confirm this action and then display a Measurement Logged screen, which confirms that
the data has been saved while also showing the current total of all leaks logged.
LOG 0.48
AS 11 OF 50
PRESS ENTER
TO CONFIRM?
Oz/yr
R134A
SETUP
SM MERS
IMPORTANT! The instrument does not perform a units-of-measure conversion. It is therefore very important
that the operator not change the leak units value after beginning to log measurements.
TIP: When measuring the total leak-rate of a system, it’s important to clear the log per Section “
Clearing the Log” before starting a new series of leak-rate measurements.
MEASUREMENT
LOGGED
TOTAL=55.8
Oz/yr
R134A
SETUP
SM MERS
4.2.10.2
4.2.10 Working with Logged Measurements
Each of the 50 logged measurements can be individually viewed, or the total accumulated value of all 50
measurements can be displayed. In addition, a log limit can be set that establishes a setpoint at which a
relay is energized when the total of all logged measurements (up to 50) equals the log limit.
Enter the Log menu by first pressing both the ENT and ESC buttons on either the instrument’s front
panel or Smart probe at the same time to display the Main menu. Next, use the Up and Down buttons to
highlight “LOG”, and then press ENT to display the Log menu.
Main Menu:
SYSTEM
LOG
SETUPS
CAL DATA
DIAGNOSTICS
4.2.10.1 Viewing Logged Measurements
Display the Log menu as described in Section 4.2.10. Next, use the Up and Down buttons to highlight
“VIEW LOG” and then press the ENT button to display the first logged data point.
LOG POINT # 1
08/09/04 07:35
LEAK RATE=2.80 Oz/yr
L/R ARROW TO CLEAR
Use the Up and Down buttons to scroll through the other log points (1 thru 50).
Use the Left or Right button to clear only the current log point. To clear all log points, refer to Section
4.2.10.2 Clearing the Log.
Log Menu:
VIEW LOG
CLEAR LOG
LOG TOTAL
LOG LIMIT
Instruction 3015-4342 33
Page 38

Operation H25-IR
4.2.10.2 Clearing the Log
Display the Log menu as described Section 4.2.10. Next, use the Up and Down buttons to highlight
“CLEAR LOG” and then press the ENT button to display the Clear Log screen.
CLEAR LOG
HIT ENTER TO CONFIRM
Press the ENT button to clear the log of all stored measurements.
CLEAR LOG
CLEARING LOG DATA.
4.2.10.3 Viewing the Total of all Logged Measurements
The ability to display the total of all logged measurements (up to 50) is useful in situations where it is
necessary to test an installation or piece of equipment that has a maximum permissible total leak rate.
For example, a halogen fire suppression system can have leaks, but the combined leak rate or the sum of
all the leaks cannot exceed a certain level, which is typically specified as a fraction of the total charge
per year.
To display the total of all logged measurements, first display the Log menu as described Section
Next, use the Up and Down buttons to highlight “LOG TOTAL” and then press the ENT button to display
the Log Total screen. Note that the display is auto ranging, causing the decimal point to turn off above the
value 99.9. In the example below, the total of all logged measurements is 78.5 Oz/yr.
LOG TOTAL
COMBINED LEAK RATE
= 78.5 Oz/yr
4.2.10.
4.2.10.4 Setting the Log Limit
The ability to set a log limit is useful when using the H-25IR to log the leak rate of a system that has a
maximum permissible total leak rate. A relay can be programmed to energize when the total of all logged
measurements (up to 50) equals the log limit (refer to Section
To set the log limit, first display the Log menu as described in Section
buttons to highlight “LOG LIMIT” and then press the ENT button to display the Log Limit screen. Use the
Left and Right buttons to move the blinking cursor across the screen to highlight the digit to be modified,
and then use the Up and Down buttons to modify that digit. Press ENT to save the log limit value and
return to the Log menu.
LOG LIMIT
IS 999.00 Oz/yr
2.4.3 Relays).
4.2.10. Next, use the Up and Down
34 Instruction 3015-4342
Page 39

H25-IR Operation
4.3 What to Do when a Fault Occurs
When the instrument’s diagnostics detects that a fault has occurred, the word “FAULT” appears in place of
the Gas Type, and an audible beep occurs every 2 seconds.
Oz/yr
FAULT
SETUP
SM SRCH
The cause of the fault can be determined by viewing the Diagnostic menu’s Last Fault function. To display
the Diagnostics menu, first press both the ENT and ESC buttons on either the instrument’s front panel or
Smart probe at the same time to display the Main menu. Next, use the Up and Down buttons to highlight
“DIAGNOSTICS” and then press ENT to display the Diagnostics menu.
Main Menu:
SYSTEM
LOG
SETUPS
CAL DATA
DIAGNOSTICS
FACTORY
Select “LAST FAULT” to display the Last Fault screen. Refer to Section
type of faults that are tracked by the diagnostics, and for information on how to possibly correct the fault.
Once the cause of the fault has been corrected, the FAULT message and the audible beep are
automatically turned OFF.
Fault has occurred
Diagnostics Menu:
SENSOR DATA
LAST FAULT
IR EMITTER
PRESSURE
5.1.2 Last Fault for a listing of the
4.4 What is PCHK?
The instrument maintains its accuracy under varying atmospheric conditions by performing an
atmospheric pressure check either once every hour, or immediately after calibration (refer to Section
Error! Reference source not found. Error! Reference source not found.). When a PCHK is
performed, the unit beeps once, the pump stops, a valve opens exposing the pressure sensor to the
atmosphere, and “PCHK” appears at the bottom-right of the display. During this time the instrument
measures the current atmospheric pressure, and then uses this value along with the current temperature
and the ideal gas law to compute the gas level. When the pressure check is complete (approximately 5
seconds), the unit beeps, the valve closes, and the pump restarts.
Oz/yr
R134A
SETUP
PCHK
Pressure check being performed
4.5 RS-232 Communication
The RS-232 connector located on the rear of the instrument (refer to Section 1.7.2 Rear View) is used to
flash the instrument’s memory. Refer to Section
5.3 Flashing Memory.
Instruction 3015-4342 35
Page 40

Operation H25-IR
Notes:
36 Instruction 3015-4342
Page 41

H25-IR Maintenance
5 Maintenance
5.1 Diagnostics Menu
The Diagnostics menu provides information about the instrument’s operation that will be useful to service
technicians for the purpose of troubleshooting various fault conditions.
To display the Diagnostics menu, first press both the ENT and ESC buttons on either the instrument’s
front panel or Smart probe at the same time to display the Main menu. Next, use the Up and Down
buttons to highlight “DIAGNOSTICS” and then press ENT to display the Diagnostics menu.
Main Menu:
SYSTEM
LOG
SETUPS
CAL DATA
DIAGNOSTICS
Diagnostics Menu:
SENSOR DATA
LAST FAULT
IR EMITTER
PRESSURE
5.1.1 Sensor Data
The Sensor Data screen provides information about the sensor’s operating parameters and its surrounding
environment. When contacting the Bacharach Service Department, the operator may be asked to provide
this information to help in the troubleshooting process.
To display the Sensor Data screen, first display the Diagnostics menu as described in Section
use the Up and Down buttons to highlight “SENSOR DATA” and then press ENT.
Sensor Data Screen Information:
LR .......................... Measured Leak Rate
FAULT ................... Current Numerical Fault Code (refer to Section
OPEN/CLOSED .... Measure / Search Flow Rate Valve Position
DET ....................... Detector Voltage
N ............................ Detector’s Output Noise Factor (with no gas detected)
Z ............................ Stored Zero Voltage of Detector
DET ....................... Detector Temperature
SPPM ..................... PPM Corrected to Standard Pressure and Temperature
BOX ....................... Enclosure Temperature
M ........................... Manifold Pressure
AMB ....................... Ambient Pressure
MPM ....................... Moles Per Minute
AU .......................... Average Optical Absorbency Unit of Gas being detected (0 = no gas)
PPM........................ Parts Per Million value of the Current Detected Gas Level
UML........................ Absolute Concentration of Gas in Micro Moles per Liter
5.1.2 Last Fault)
5.1. Next,
Instruction 3015-4342 37
Page 42

Maintenance H25-IR
5.1.2 Last Fault
The Last Fault screen provides a text description of all current faults that have been detected by the
instrument. Once the cause of the fault(s) has been cleared, its description is removed from the screen. The
name of the last fault, however, is retained on the screen. This is useful in determining the cause of an
intermittent type fault.
To display the Last Fault screen, first display the Diagnostics menu as described in Section
the Up and Down buttons to highlight “LAST FAULT” and then press ENT. If necessary, use the Up and
Down buttons to scroll through the fault list. A list of possible fault messages is shown below.
The numbers in brackets “< >” are the fault numerical codes that appear on the Diagnostics Sensor Data
screen (refer to Section
Fault Codes are Additive: The fault codes
appearing on the Sensor Data, Diagnostics
screen (refer to Section
example: A fault code of <0810> indicates that
both a Search Flow Fault <0800> and a Loop
Open error <0010> have occurred.
Box Temp Error <0001>: Enclosure temperature
is high. Check that the enclosure is not being
subjected to extreme temperatures. Use the
Sensor Data screen to check the box temperature
(refer to Section
Bench Temp Error <0002>: Optical bench
temperature is high. Check that the enclosure is
not being subjected to extreme temperatures.
Use the Sensor Data screen to check the box
temperature (refer to Section
Loop Open <0010>: The 4−20 mA current loop is
open, or there is a high resistance in the circuit.
Check the wiring to the load/monitoring circuit.
If this feature is not being used, a 100 ohm
resistor must be connected to the 4−20 mA
output connector (refer to Section
Internal CAL Error <0020>: An internal
calibration failure has occurred. Repeat internal
calibration procedure per Section
External CAL Error <0040>: An external calibration failure has occurred. Repeat external calibration procedure per Section
Digipot Range Error <0200>: The digital
potentiometer circuit is out of its normal
operating range. Call Bacharach Service with
this information for further instructions.
Leak Pressure Fault <0100>: The pressure of the
internal leak source has dropped below its
minimum value. Call Bacharach Service with
this information for further instructions.
5.1.1).
5.1.1).
5.1.1) are additive. For
5.1.1).
2.8).
3.2.
3.3.
A/D Failure <0400>: A failure has occurred in the
instrument’s analog-to-digital circuitry. Call
Bacharach Service with this information for
further instructions.
Search Flow Fault <0800>: This error occurs in
the search mode when the gas flow through the
detector has significantly changed. Check that
the probe connector is plugged into the instrument, the probe hose is not kinked, and the filter
in the probe tip is not clogged. Also check for a
blocked internal filter or failed pump.
Measure Flow Fault <1000>: This error occurs in
the measure mode when the gas flow through the
detector has significantly changed. Check that
the probe connector is plugged into the instrument, the probe hose is not kinked, and the filter
in the probe tip is not clogged. Also check for a
blocked internal filter or failed pump.
No Flow <2000>: Gas flow through the detector
has stopped. Check that the probe hose is not
kinked, and the filter in the probe tip is not
clogged. Also check for a blocked internal filter or
failed pump.
Zero Volt Error <4000>: The detector’s output
voltage may be out of tolerance. Use the Sensor
Data screen to check the detector voltage (refer
to Section
this information for further instructions.
A/D Clipping Error <8000>: The detector voltage
may be out of tolerance. Use the Sensor Data
screen to check the detector voltage (refer to
Section
information for further instructions.
5.1.1). Call Bacharach Service with
5.1.1). Call Bacharach Service with this
5.1. Next, use
38 Instruction 3015-4342
Page 43

H25-IR Maintenance
(
)
5.1.3 IR Emitter
The IR Emitter screen provides readouts of the detector’s voltage, current, resistance, and power
consumption. When contacting the Bacharach Service Department, the operator may be asked to provide
this information to help in the troubleshooting process.
To display the IR Emitter screen, first display the Diagnostics menu as described in Section
5.1. Next, use
the Up and Down buttons to highlight “IR EMITTER” and then press ENT.
IR EMITTER PARAMETERS
VOLTS=6.1740 mA=129.5
OHMS=47.7 mW=800.0
5.1.4 Pressure
The Pressure screen provides readouts of bench pressure, ambient pressure, the difference between the
two (delta), flow rate through the bench in moles per minute, and the tank pressure of the internal leak
source. When contacting the Bacharach Service Department, the operator may be asked to provide this
information to help in the troubleshooting process.
To display the Pressure screen, first display the Diagnostics menu as described in Section
the Up and Down buttons to highlight “PRESSURE” and then press ENT.
BENCH ∗ AMB DELT
11.73 14.04 −2.31
FLOW=0.00950Mpm
LEAK PSI=102.1
100.2
This screen also allows a technician to manually turn the pump ON and OFF, along with manually
controlling the position of the measure/search flow-rate valve.
Pressing the Down button toggles the pump ON and OFF.
5.1. Next, use
Pressing the Left button opens and closes the measure/search flow-rate valve. An asterisk (∗) on the
display indicates that the valve is in its measure position.
5.2 Factory Menu
The Factory menu is used to set up or troubleshoot the instrument. This menu only appears when
activated by factory personnel or service technicians who know the correct activation procedure.
When activated, display the Factory menu by first pressing both the ENT and ESC buttons on either the
instrument’s front panel or Smart probe at the same time to display the Main menu. Next, use the Up and
Down buttons to highlight “FACTORY” and then press ENT to display the Factory menu.
Main Menu:
SYSTEM
LOG
SETUPS
CAL DATA
DIAGNOSTICS
FACTORY
Factory Menu:
AUTO GAIN
DIGIPOT
LEAK RATE
LEAK GAS
LEAK TEMP
LEAK TEMPCO
SENSOR CAL
MODEL SELECT
PROBE TYPE
FIRMWARE
Instruction 3015-4342 39
Page 44

Maintenance H25-IR
5.2.1 Auto Gain
DIGIPOT=197
IR VOLT=4.2000
IMPORTANT! The instrument must be sampling fresh air (zero gas) when the Auto Gain function
is selected.
Selecting the Auto Gain function automatically sets the IR Detector’s voltage to its baseline 0 ppm level b y
controlling the instrument’s digital potentiometer (DIGIPOT) circuit.
5.2.2 DIGIPOT
DIGIPOT=197
IR VOLT=4.2000
IMPORTANT! The instrument must be sampling fresh air (zero gas) when adjusting the DIGIPOT value.
The DIGIPOT function allows manual and a more precise adjustment of the digital poten tiometer, which
controls the voltage of the IR Detector. Use the Up and Down buttons to adjust DIGIPOT value until the
IR VOLT reading is 4.200 ±0.0500 volts. Press ENT to save the new DIGIPOT value.
5.2.3 Leak Rate
LEAK RATE 25.5 g/yr
The Leak Rate value is set to match the leak rate of the internal leak source as indicated on the tag
attached to the leak source. Use the Left and Right buttons to move the blinking cursor across the screen
to highlight the digit to be modified, and then use the Up and Down buttons to modify that digit. Press
ENT to save the new Leak Rate value.
IMPORTANT! Be sure to enter the leak rate using the same units of measure as displayed on the LEAK
RATE screen. In this example, the units of measure is g/yr. If your leak source is marked in Oz/yr, then
multiply that value by a factor of 28.35. For example: If the leak source is marked 0.9 Oz/yr, then enter a
leak rate of (0.9 x 28.35=) 25.5 g/yr.
5.2.4 Leak Gas
LEAK GAS < R134A
R401A
R402A
< R402B
The Leak Gas setting is set to match the gas contained in the internal leak source as indicated on the tag
attached to the leak source. Use the Up and Down buttons to highlight the correct gas, and then press
ENT to select that gas.
5.2.5 Leak Temp
LEAK TEMP 0 23.9degC
The Leak Temperature value is set to match the tem perature of the internal leak source at its time of
manufacture as indicated on the tag attached to the leak source. Use the Left and Right buttons to move
the blinking cursor across the screen to highlight the digit to be m odif ied, and then use the Up and Down
buttons to modify that digit. Press ENT to save the new Leak Temp value.
40 Instruction 3015-4342
Page 45

H25-IR Maintenance
5.2.6 Leak TEMPCO
LEAK TEMPCO 0.54
%/degC
The Leak Temperature Coefficient value is set to match the temperature coefficient of the internal leak
source as indicated on the tag attached to the leak source. Use the Left and Right buttons to move the
blinking cursor across the screen to highlight the digit to be modified, and then use the Up and Down
buttons to modify that digit. Press ENT to save the new Leak Temperature Coefficient value.
TIP: To convert a temperature coefficient from %/degF to % degC, multiply the
degF value by a factor of 1.8. For example: 0.3%/degF x 1.8 = 0.54%/degC.
5.2.7 Sensor Cal
PRESSURE
FLOW RATE
BOX TEMP
The Sensor Calibration function allows the service technician to manually calibrate the instrument’s
Pressure, Flow Rate, and Box Temperature sensors. Use the Up and Down buttons to highlight the
sensor to be calibrated, and then press ENT to display that sensor’s calibration screen.
5.2.7.1 Pressure Sensor Calibration Screen
ENTER AMBIENT PSIA
14.18
CURRENT OFFSET=0.00
Calibrate the pressure sensor by first measuring the ambient atmospheric pressure using an appropriate
pressure measurement device calibrated to read PSIA. Next, adjust the value displayed on the Pressure
Sensor Calibration screen to match the measured pressure reading by using the Left and Right buttons
to move the blinking cursor across the screen to highlight the digit to be modified, and then using the Up
and Down buttons to modify that digit. Press ENT to save the new ambient pressure value.
Tip: To convert inHg into PSIA, multiply inHg by 0.491. For example: 30.00 inHg x 0.491 = 14.73 PSIA.
5.2.7.2 Flow Rate Sensor Calibration Screen (Factory Calibration)
S-Mpm/dP M-Mpm/dP
INT 0.0177/-1.33 0.0100/-2.28
FAC 0.0177/-1.33 0.0100/-2.28
ENTER TO SAVE INT AS FACTORY
Set the default factory calibration flow and pressure drop values by first performing an internal
calibration as described in Section
INT: Flow rate in moles/minute for both the Search and Measure modes after performing a calibration
using the internal leak source, along with showing the manifold’s pressure drop.
3.2 Internal Calibration.
FAC: Flow rate and pressure drop values that are currently stored as the default factory calibration
values. These values are used to validate calibrations performed by the operator. A calibration error will
occur if the operator’s calibration and factory values differ by more than 20%.
Press ENT to store the internal calibration numbers as factory values. These are the calibration values
that are reset when RESTORE FACTORY CAL is selected from the CAL Data menu (refer to Section
Restoring Factory Calibration).
Instruction 3015-4342 41
3.5
Page 46

Maintenance H25-IR
5.2.7.3 Box Temperature Calibration Screen
ENTER BOX TEMP degC
28.41
OFFSET=0.18 LEAK=28.41
In order to accurately determine when the internal leak source is running out of gas, the enclosure’s
temperature sensor must match the temperature of the leak source, as computed using the pressure/
temperature curve for the gas contained in the leak source and the measured pressure of the leak source.
Before making this adjustment, all enclosure lids must be in place and the instrument must be allowed to
warm up for at least 30 minutes.
Next, adjust the value displayed on the Box Temperature Calibration screen to match the calculated
“LEAK” temperature as displayed in the lower-right corner of the screen. In the example above, set the
box temperature for a reading of 28.41 by using the Left and Right buttons to move the blinking cursor
across the screen to highlight the digit to be modified, and then using the Up and Down buttons to modify
that digit. Press ENT to save the new box temperature value. Note that the “OFFSET” value is the
difference between the box temperature sensor reading, and the box temperature reading adjusted to
match the leak source temperature.
5.2.8 Model Select
MODEL SELECT
< 3015-4348 R134A
3015-4464 R600A
< 3015-4465 R600A
The Model Select function is used to set up the instrument’s operating characteristics as defined by its
Part Number (refer to Appendix “A”). Use the Up and Down buttons to select the appropriate Part
Number (as marked on the instrument’s rear panel). Press ENT to activate the selection.
5.2.9 Probe Type
PROBE TYPE
STD 6ft
STD 12ft
SMART 6 ft
SMART 12 ft
Use the Probe Type function to select the probe type that is connected to the instrument. Use the Up and
Down buttons to select the appropriate probe type. Press ENT to activate the selection. Refer to Sections
1.7.4, 1.7.5, and 1.7.6 for descriptions of available probe types.
In the example below, a Smart 6 ft probe has been selected. A message is also displayed warning that if
the probe type is changed the instrument must be recalibrated, and the new calibration value must be
saved as the default factory calibration as described in Section
SMART 6ft SELECTED
IF CHANGED, YOU MUST
RESET FACTORY CAL
5.2.7.2.
5.2.10 Firmware
REV x.xx COMPILED ON
Month Day Year
At hh:mm:ss
The Firmware screen displays the firmware’s revision number, date, and time of compilation.
42 Instruction 3015-4342
Page 47

H25-IR Maintenance
5.3 Flashing Memory
As updates to the instrument’s firmware become available, the instrument can be upgraded by flashing its
memory as described below.
IMPORTANT! After flashing memory, all operating parameters and sensor calibrations will have been
erased. The operator must
before placing the instrument back into operation:
- DIGIPOT
- Leak rate of internal leak source
- Leak gas of internal leak source
- Leak temperature of internal leak source
- Leak temperature coefficient of internal leak source
- Pressure sensor calibration
- Flow rate sensor calibration
- Box temperature sensor calibration
Items Required:
• 9-pin-Female to 9-pin-Male Serial Cable (P/N 104-4027)
• Flash Utility Software and Latest Firmware Image File
(downloaded from Website http://www.bacharach-inc.com/downloads.htm)
• Personal computer:
o Running Windows
o Open COM port
have access to the Factory menu in order to set up the following parameters
®
95/98/2000/NT/XP
Procedure:
1. Connect one end of a 9-pin female to 9-pin male serial cable to the instrument’s rear-panel
RS-232 connector.
2. Connect the other end of the cable to and an open COM port connector on the computer (it may be
necessary to use a 9-pin to 25-pin adapter to make the computer connection).
NOTE: COM1 is the default port used by the Flash Memory Program. If COM1 is already in use by
another device, then connect the instrument to the next available COM port. The software will need
to be reconfigured as described in Step
3. With the instrument turned OFF, set DIP switches 1, 2, and 3 located on the instrument’s rear
panel to their UP positions.
4. Turn ON the instrument. Observe that the pump does not start and that the front panel display
does not light.
NOTE: The following steps assume that the operator is familiar with the Windows Operating System,
and is knowledgeable in creating folders, copying files, and navigating the file system using Windows
Explorer. If necessary, refer to the Windows help files for information on performing these operations.
5. Create a folder on the computer’s hard drive named “C:\RFU” (Rabbit Field Utility).
6. Copy the flash utility software and the latest firmware image file (xxx.bin – where “xxx” is the
name and version number of the file) into the folder created in Step
9 to use this port.
5.
Instruction 3015-4342 43
Page 48

Maintenance H25-IR
7. From the C:\RFU folder, run the flash memory program by
double clicking the file rfu.exe.
8. Select Setup > Communications.
9. Under “Serial Options”, select Use Serial Connection. Then
set the Baud Rate to 115200, and select Enable Processor
Detection.
Note that COM1 is the default Comm Port. If necessary,
change the Comm Port to match the port that the instrument
was connected to in Step
2.
Click OK.
10. Select Setup > File Locations and verify that the coldload.bin,
pilot.bin, and flash.ini files are all located in the C:\RFU
folder.
Click OK if these files are in the correct folder. If necessary,
use the browse buttons in the Choose File Locations dialog
box to locate each of these files.
44 Instruction 3015-4342
Page 49

H25-IR Maintenance
11. Select File > Load Flash Image.
12. Click the browse button in the Choose Flash Image dialog
box; navigate to the C:\RFU folder; and then highlight
the bin file of the new firmware’s flash image file. In this
example, the file H25IR 1_20.bin will be loaded.
Click Open.
13. Click OK to begin the flashing process.
14. A progress-dialog box will appear during the flashing
process, and will disappear once the flashing process is
complete.
15. Once flashing is complete: Exit the flash program; turn
OFF the instrument; remove the serial cable; and reset
the DIP switches back to their normal operation position.
16. Turn ON the instrument and observe the following message should appear:
FULL SYSTEM RESET!
SELECT MODEL FROM
FACTORY MENU AND
REINIT ALL DATA/CALS
NOTE: Flashing memory with the same firmware version will not cause the instrument to reset.
After flashing memory, the instrument will perform a complete system reset, causing all system
parameters and sensor calibration data to be erased! Complete the flashing process by setting
all the parameters contained in the Factory menu (refer to Section
5.2 Factory Menu).
Instruction 3015-4342 45
Page 50

Maintenance H25-IR
5.4 Part Replacement
WARNING! Shock Hazard. Before performing any service work, remove the AC
power cord to prevent electrical shock.
Part replacement is limited to replacing filters, O-rings, and fuses. It is recommended that all other parts
be replaced by an authorized Bacharach Service Center (refer to Section
5.4.1 Removing the Top Cover
When servicing the parts inside the instrument, the instrument’s top cover is removed as follows:
Items Required:
• Medium Phillips head screwdriver
Procedure:
1. Remove both the front and rear bezels by first disengaging the plastic tabs on the right and left
sides of the bezel, and then pulling the bezel straight out.
2. Remove the two top screws that secure the front panel.
6.2 Service Centers).
3. Remove the four screws that secure the rear panel.
4. Remove the Relay, RS-485, and 4–20mA connectors from the rear panel. DO NOT remove any
connector on the interior side of the rear panel.
5. Drop down the rear panel far enough to allow the top cover to clear, being careful not to stress the
cables attached to the inside of the panel.
6. Remove top cover by sliding it toward rear of instrument.
46 Instruction 3015-4342
Page 51

H25-IR Maintenance
5.4.2 Fuse Replacement
The H25-IR is protected from electrical damage by a single 1 A fuse located next to the AC receptacle at
the rear of the instrument.
Items Required:
• Small flat-blade screwdriver
• Fuse (P/N 604-2610 – spare fuse located in fuse holder)
Procedure:
1. Remove AC power cord from instrument.
2. Using a small flat-blade screwdriver, carefully pry the fuse
holder out from the fuse compartment.
3. Visually inspect the fuse for damage or check its continuity.
Replace the fuse as necessary.
5.4.3 Probe Tip Filter & O-Ring Replacement
A filter located in the probe tip is the instrument’s first line of defense against dust, dirt, and moisture
from entering the instrument’s internal plumbing and IR detector. Replace this filter as it becomes dirty. A
clogged filter is identified by a “Search Flow Fault,” “Measure Flow Fault,” or a “No Flow” fault occurring.
Refer to Section
Periodically inspect the probe tube’s O-ring for signs of cracking. If this O-ring becomes defective, air could
be drawn into the instrument through the bottom of the probe tube resulting in inaccurate measurements.
Items Required:
• Probe Tip Filter (P/N 3015-1571)
• Probe Tube O-Ring (P/N 3015-2664)
• Pin or Tweezers
Procedure:
1. Unscrew probe tip.
2. Pick out old filter with a pin or tweezers.
3. Insert new filter inside probe tip.
4. Replace probe tip.
5. Unscrew probe tube and inspect O-ring. Replace O-ring if defective.
6. Reattach probe tube.
4.3 What to Do when a Fault Occurs.
Instruction 3015-4342 47
Page 52

Maintenance H25-IR
5.4.4 Internal Filter Replacement
A filter located inside the instrument may become blocked due to dust or water being drawn into the
instrument. A blocked filter is identified by a “Search Flow Fault,” “Measure Flow Fault,” or a “No Flow”
fault occurring. Refer to Section
Items Required:
• Replacement filter (P/N 3015-4415)
• Medium Phillips head screwdriver
Procedure:
4.3 What to Do when a Fault Occurs.
1. Remove the instrument’s top cover as described in Section
2. Remove the old filter by pulling off the tubing attached to the filter’s inlet and outlet ports.
3. Install the tubing removed in Step 2 onto the new filter.
4. Reassemble the instrument.
5.4.1 Removing the Top Cover.
48 Instruction 3015-4342
Page 53

H25-IR Parts & Service
6 Parts and Service
6.1 Replacement Parts
Item Description Part Number
Complete Instrument .............................................................................Refer to Section
Ordering Information
H25-IR Unit:
CFC, HCFC, HFC & Halogen gases ............................................... 3015-4348
R600a ................................................................................................ 3015-4464
SF
CO
R227 .................................................................................................. 3015-4466
Standard Probe Assembly:
6 ft (1.8 m) hose ................................................................................ 3015-4635
12 ft (3.7 m) hose .............................................................................. 3015-4636
Standard Probe w/ pushbutton and LED Assembly:
6 ft (1.8 m) hose ................................................................................ 3015-4639
12 ft (3.7 m) hose .............................................................................. 3015-4640
Smart Probe w/ pushbuttons and LCD Assembly:
6 ft (1.8 m) hose .................................................................................... 19-7113
12 ft (3.7 m) hose .................................................................................. 19-7114
Flexible Probe Tube Assembly:
8 in. (203 mm)................................................................................... 3015-4666
15 in. (381 mm)................................................................................. 3015-4633
Filters:
Located in probe tip:
Pack of 10 ................................................................................... 3015-4515
Pack of 50 ................................................................................... 3015-4516
Located inside instrument............................................................... 3015-4415
.................................................................................................... 3015-4477
6
................................................................................................... 3015-4473
2
1.3
Probe Tip ................................................................................................. 3015-4629
O-Ring, Probe Tube ................................................................................ 3015-2664
Bezel, Case .............................................................................................. 3015-4670
AC Power Cord.......................................................................................... 304-3459
Fuse, 1A..................................................................................................... 604-2610
Instruction 3015-4342 49
Page 54

Parts &Service H25-IR
6.2 Service Centers
Service and replacement parts can be obtained by contacting one
of the following Bacharach Service Centers:
United States
Bacharach, Inc.
621 Hunt Valley Circle
New Kensington, PA 15068
Phone: 724-334-5051
Fax: 724-334-5723
Email: help@bacharach-inc.com
Canada
Bacharach of Canada, Inc.
250 Shields Court Unit #3
Markham, Ontario L3R 9W7
Canada
Phone: 905-470-8985
FAX: 905-470-8963
E-mail: bachcan@idirect.com
México
Bacharach de México
Playa Regatas No. 473 Tercer Piso
Col. Militar Marte
Delegación Iztacalco, 08830
México D.F.
México
Phones: +52-555-634-7740
+52-555-634-7741
FAX: +52-555-634-7738
E-mail: bacharachservicio@bacharach.com.mx
Website: www.bacharach-mexico.com
Europe
Bacharach Instruments
Sovereign House, Queensway
Leamington Spa
Warwickshire CV31 3JR
United Kingdom
Phone: +44-1926-338111
FAX: +44-1926-338110
E-mail: sales@bacharach-europe.com
50 Instruction 3015-4342
Page 55

H25-IR Specifications
7 Specifications
Gases Detected..........................Detects and measures, depending on instrument’s part number:
• CFCs, HCFCs, HFCs and Halogens
R11, R12, R22, R23, R113, R114, R123, R124, R134a, R227, R236fa,
R401A, R402A, R402A, R404A, R407A, R407C, R408A, R409A, R410A,
R500, R502, R503, R507, R508B, H1211, H1301, H2402, N1230, FA188
• R600a
• SF
• CO
Detection Method......................Infrared
Measurement Units..................oz/yr, g/yr, mL/s, PaM3/s, ppm
Measurement Range.................0.03 to 5.00 oz/yr
Operating Modes.......................Search: detects presence and location of gas leaks
Response Time..........................0.5 to 1 second (dependent on probe-hose length)
Sensitivity .................................0.03 oz/yr (0.9 g/yr) all gases
Resolution..................................0.01 oz/yr (0.1 g/yr)
Accuracy:
Leak Rate.............................±1% of the accuracy value marked on tag attached to leak source
PPM......................................±10% of reading (can be improved to ±1% if recalibrated using a known
Temperature Drift....................±0.8% of reading per °C
Calibration ................................Internal: calibration performed using the unit’s built-in leak source
Relays........................................Four SPDT relays (rated 3 A, 240 VAC), each programmable to energize
Audio Speaker...........................Audible indication of leak level
AC Power...................................100 to 240 VAC, 50/60 Hz
Power Consumption..................15 Watts
Warm-Up Time.........................2 minutes (30 minutes to meet published specifications)
Operating Temperature ...........32 to 122 °F (0 to 50 °C)
Storage Temperature................−4 to 122 °F (−20 to 50 °C)
Ambient Humidity....................5 to 90% RH, non-condensing
Dimensions................................4 x 10.75 x 15.5 in.
Weight .......................................18 lb (8.2 kg)
6
2
• R227
0.85 to 142 g/yr
0.08 x 10
0.08 x 10
–4
to 100 x 10
–5
to 100 x 10–5 PaM3/s
–4
mL/s
0 to 1,000 ppm
Measure: calculates and displays leak rate
concentration of refrigerant gas)
External: calibration performed using a customer supplied leak
source of a known gas type and leak rate
under 11 different operating conditions
(101.6 x 273.1 x 393.7 mm)
Instruction 3015-4342 51
Page 56

Specifications H25-IR
Notes:
52 Instruction 3015-4342
Page 57

H25-IR Appendix A
APPENDIX A – Factory Defaults
Table A-1 lists the factory default parameters that are determined by the instrument’s part number
(as marked on the rear panel), while Table A-2 lists the default parameters that are user definable.
Table A-1. Default Parameters Defined by Part Number
Part No. Gas Type Leak Units Range PCHK Mode Leak Source
3015-4348 R134a* Oz/yr Small Auto Internal
3015-4434 R600a g/yr Small At CAL Internal
3015-4448 R134a* g/yr Small At CAL Internal
3015-4455 R600a g/yr Small At CAL External
3015-4464 R600a Oz/yr Small Auto Internal
3015-4465 R600a Oz/yr Small Auto External
3015-4466 R227 Oz/yr Small Auto Internal
3015-4472 CO2 Oz/yr Small Auto External
3015-4473 CO2 Oz/yr Small Auto Internal
3015-4475 R134a* g/yr Small At CAL External
3015-4477 SF6 Oz/yr Small Auto Internal
3015-4479 SF6 Oz/yr Small Auto External
3015-4482 CO2 g/yr Small At CAL External
3015-4483 CO2 g/yr Small At CAL Internal
3015-4485 R134a* Oz/yr Small Auto External
3015-4487 SF6 g/yr Small At CAL Internal
3015-4489 SF6 g/yr Small At CAL External
3015-4496 R227 Oz/yr Small Auto External
3015-4578 R134a* g/yr Small At CAL Internal
3015-4588 R600a g/yr Small At CAL Internal
3015-4589 SF6 g/yr Small At CAL Internal
3015-4594 CO2 g/yr Small At CAL Internal
3015-4659 R134a* g/yr Small At CAL External
3015-4660 R600a g/yr Small At CAL External
3015-4661 SF6 g/yr Small At CAL External
3015-4662 CO2 g/yr Small At CAL External
* This instrument is capable of detecting CFC, HCFC, HFC and Halogen gases
other than R134a. Refer to Section
Table A-2. Default Parameters Defined by User
Parameter Default Setting
7 Specifications for a complete list of gases.
Relays .............................. NOT USED
Loop ................................. 0.016 ppm
Setup Name .................... SETUP NO. 1
SETUP NO. 2
SETUP NO. 3
SETUP NO. 4
Feedback Mode ............... CONTINUOUS
Setpoint ........................... 00.0000
Log Limit......................... 999.00
All of the above parameters can be reset to their default settings as described in
Section
2.4.9 Reset Defaults.
Instruction 3015-4342 53
Page 58

Appendix A H25-IR
Notes:
54 Instruction 3015-4342
Page 59

H25-IR Appendix A
Notes:
Instruction 3015-4342 55
Page 60

Printed in U.S.A.
Headquarters:
621 Hunt Valley Circle, New Kensington, PA 15068
Ph: 724-334-5000 • Fax: 724-334-5001 • Toll Free: 1-800-736-4666
Website: www.bacharach-inc.com • E-mail: help@bacharach-inc.com
 Loading...