

Baby Trend BC36 Instruction Manual
Read all instructions BEFORE assembly and USE of product.
KEEP INSTRUCTIONS FOR FUTURE USE.
Lea todas las instrucciones ANTES de armar y USAR el producto.
CONSERVE LAS INSTRUCCIONES PARA USO FUTURO.
Lisez toutes les instructions du manuel AVANT l’assemblage
ou L’UTILISATION de ce produit. CONSERVEZ CES
INSTRUCTIONS POUR RÉFÉRENCE ULTÉRIEURE.
www.babytrend.com
Convenience through innovation and thoughtful design
1-800-328-7363 (8:00am ~ 4:30pm PST)
www.babytrend.com
Baby Trend, Inc.
1607 S. Campus Ave., Ontario, CA 91761
BC36
Instruction Manual
Manual de Instrucciones
Manuel d’instruction
04.15
WARRANTY
DO NOT RETURN YOUR PRODUCT TO THE STORE. PLEASE CONTACT BABY TREND
FOR REPLACEMENT PARTS, SERVICE AND REPAIR.
The Baby Trend
®
. warranty covers workmanship defects within the rst 180 days of
purchase. Any product which has been subjected to misuse, abuse, abnormal use, excessive
wear and tear, improper assembly, negligence, environmental exposure, alteration or
accident, or has had its serial number altered or removed invalidates all claims against the
manufacturer. Any damage to property during installation is the sole responsibility of the end
user. The Customer Service Department can be contacted at 1 (800) 328-7363 Monday
through Friday between 8:00am and 4:30 pm (PST). Return Authorizations are required prior
to returning product(s) to Baby Trend
®
. Warranty only valid in North America.
GARANTIA
NO DEVUELVA SU PRODUCTO A LA TIENDA. POR FAVOR CONTACTE A BABY TREND
PARA PIEZAS DE REPUESTO, SERVICIO Y REPARACION.
La garantía de Baby Trend® cubre defectos de fábrica dentro de los primeros 180 días de
la compra.Cualquier producto que haya sido sometido a uso indebido, abuso, uso anormal,
desgaste excesivo, montaje incorrecto, negligencia, exposición ambiental, alteración
o accidente, o que ha tenido su número de serie alterado o removido anula todos los
reclamos contra el fabricante. Cualquier daño a la propiedad durante la instalación es de la
exclusiva responsabilidad del usuario nal. El Departamento de Servicio al Cliente puede ser
contactado a 1 (800) 328-7363 Lunes a viernes entre 8:00 am y 4:30 pm (PST).Un numero
de autorizacion es requerido antes de la devolución de los producto(s) a Baby Trend®.
Garantia válida sólo en América del Norte.
GARANTIE
NE PAS RETOURNER VOTRE PRODUIT AU MAGASIN. VEUILLEZ CONTACTER BABY
TREND POUR DES PIÈCES DE RECHANGE, ENTRETIEN ET RÉPARATION.
La garantie Baby Trend
®
couvre les vices de fabrication dans les 180 jours suivant l'achat du
produit. Tout produit qui a été soumis à un usage abusif, une utilisation anormale, une usure
excessive, un montage incorrect, de la négligence, de l'exposition environnementale, de la
modication ou un accident, ou a eu son numéro de série modié ou supprimé annule toutes
les réclamations contre le fabricant. Tout dommage à la propriété lors de l'installation est de
la seule responsabilité de l'utilisateur nal. Le service client peut être contacté au 1 (800)
328-7363 du lundi au vendredi 8 h – 16 h 30 (PST). Une autorisation sera nécessaire avant
de retourner le produit à Baby Trend®. Garantie valable uniquement en Amérique du Nord.
PARTS
Copyright © 2015, Baby Trend Inc., All Rights Reserved. Todos los derechos reservados. Tous droits réservés.
2
1
Copyright © 2015, Baby Trend Inc., All Rights Reserved. Todos los derechos reservados. Tous droits réservés.
Table of Contents Índice Table des Matières
English 2
Parts 2
Warning 3
Assembly 4
Safety 8
Other 9
Espanol 11
Piezas 11
Advertencia 12
Montaje 13
Seguridad 17
Otro 18
Français 20
Pièces 20
Avertissement 21
Assemblage 22
Sécurité 26
Autre 27
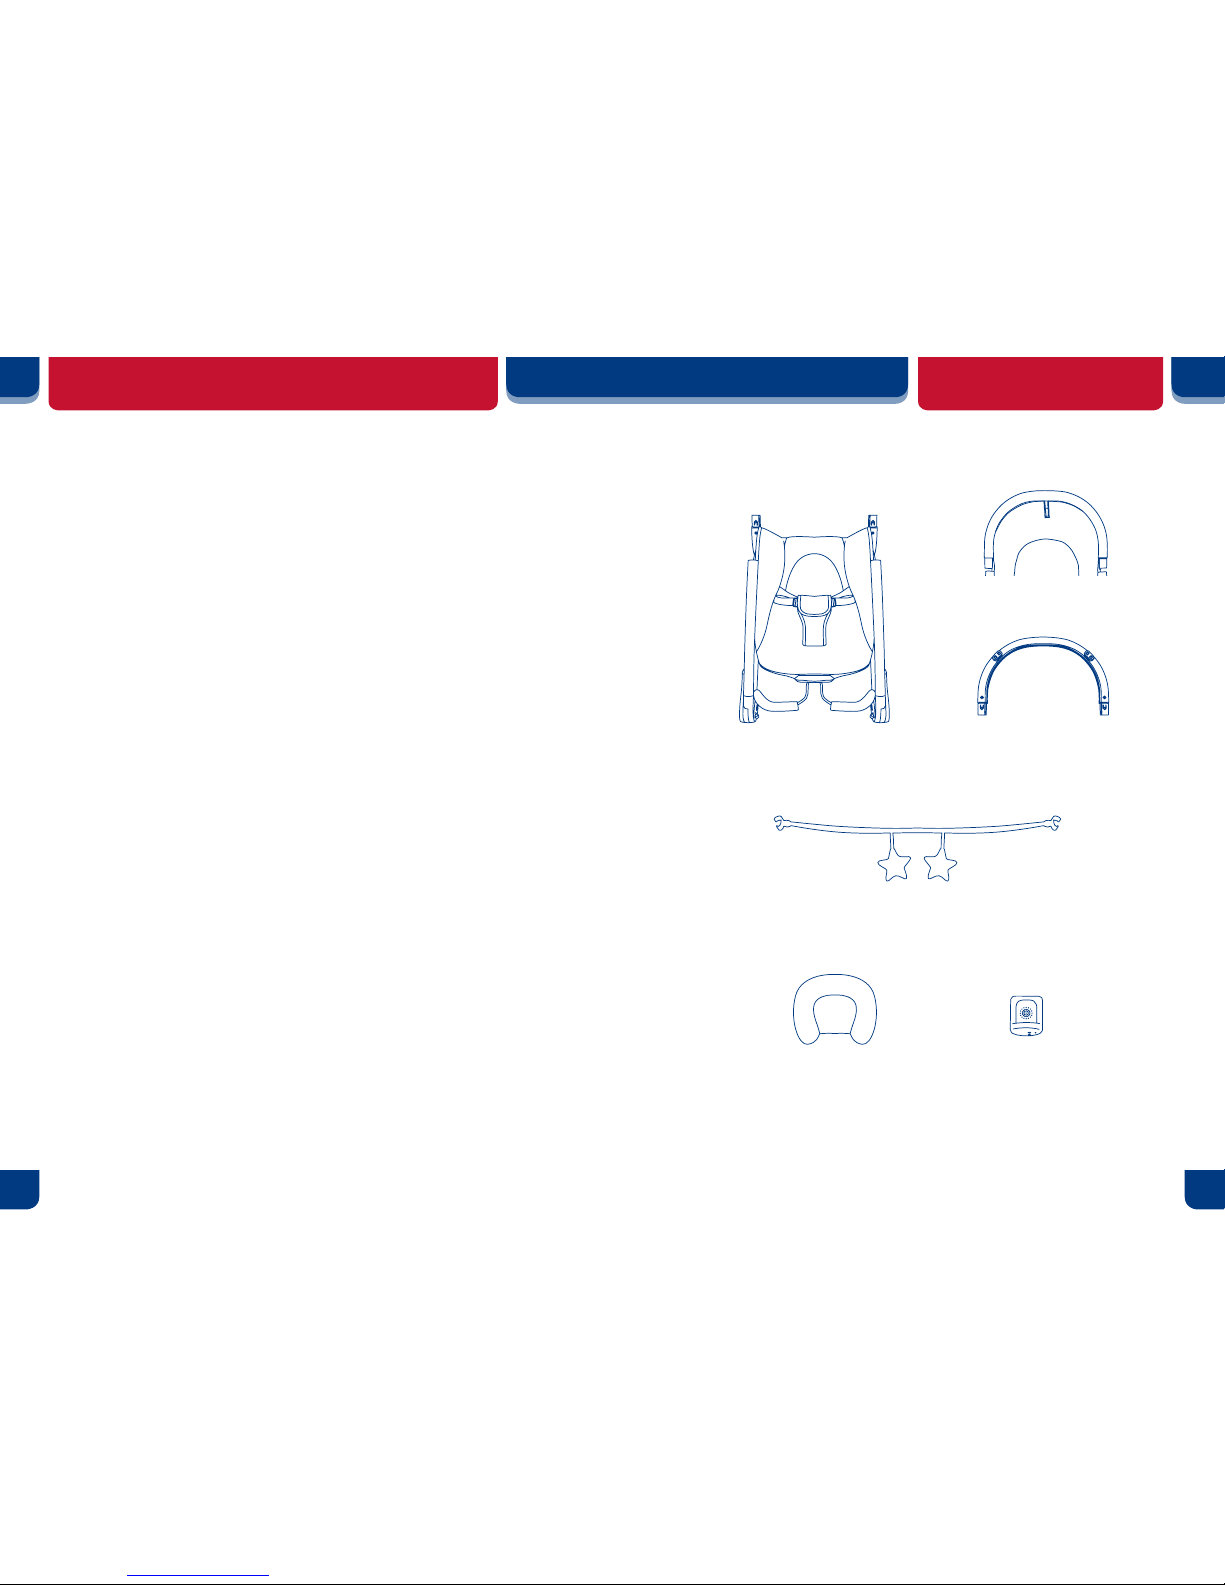
Check that you have all the parts for this model before assembly.
Toy Bar with plush toys*
*Type varies
Headrest* Music/Vibration Unit
Frame with seat pad Rear base frame
Backrest frame
Copyright © 2015, Baby Trend Inc., All Rights Reserved. Todos los derechos reservados. Tous droits réservés.
4
ASSEMBLYWARNING
3
Copyright © 2015, Baby Trend Inc., All Rights Reserved. Todos los derechos reservados. Tous droits réservés.
WARNING: Prevent serious injury or death:
WARNING: NEVER leave child unattended.
WARNING: ALWAYS use restraint system.
WARNING: NEVER use for a child able to sit up
unassisted.
FALL HAZARD: Child’s activity may move
product. Use only on oor. Never use on any elevated
surface.
SUFFOCATION HAZARD: Never use on a
soft surface (bed, sofa, cushion), as seat may tip over and
cause suffocation.
• NEVER allow your product to be used as a toy.
• Toy bar is NOT a Carry Handle.
• Never use toy bar to lift or carry product.
• NEVER move the product with the child inside.
• Product is NOT intended for use as a carrier.
• Product is NOT intended for use as a sleeper or for prolonged periods of use.
• NEVER place a child under 5 lbs. (2.26 kg) or over 25 lbs. (11 kg) in the product.
• Check your product for loose screws, worn parts, torn material or stitching on a
regular basis. Replace or repair parts as needed.
• Discontinue use of product should it malfunction or become damaged. Please
contact our customer service department at 1-800-328-7363 to arrange for repair
or obtain replacement parts.
IMPORTANT! To ensure safe operation of your
product, please follow these instructions carefully. Please
keep these instructions for future reference.
IMPORTANT! Before assembly and each use, inspect
this product for damaged hardware, loose joints, missing
parts or sharp edges. NEVER use if any parts are missing or
broken.
IMPORTANT! Adult assembly is required.
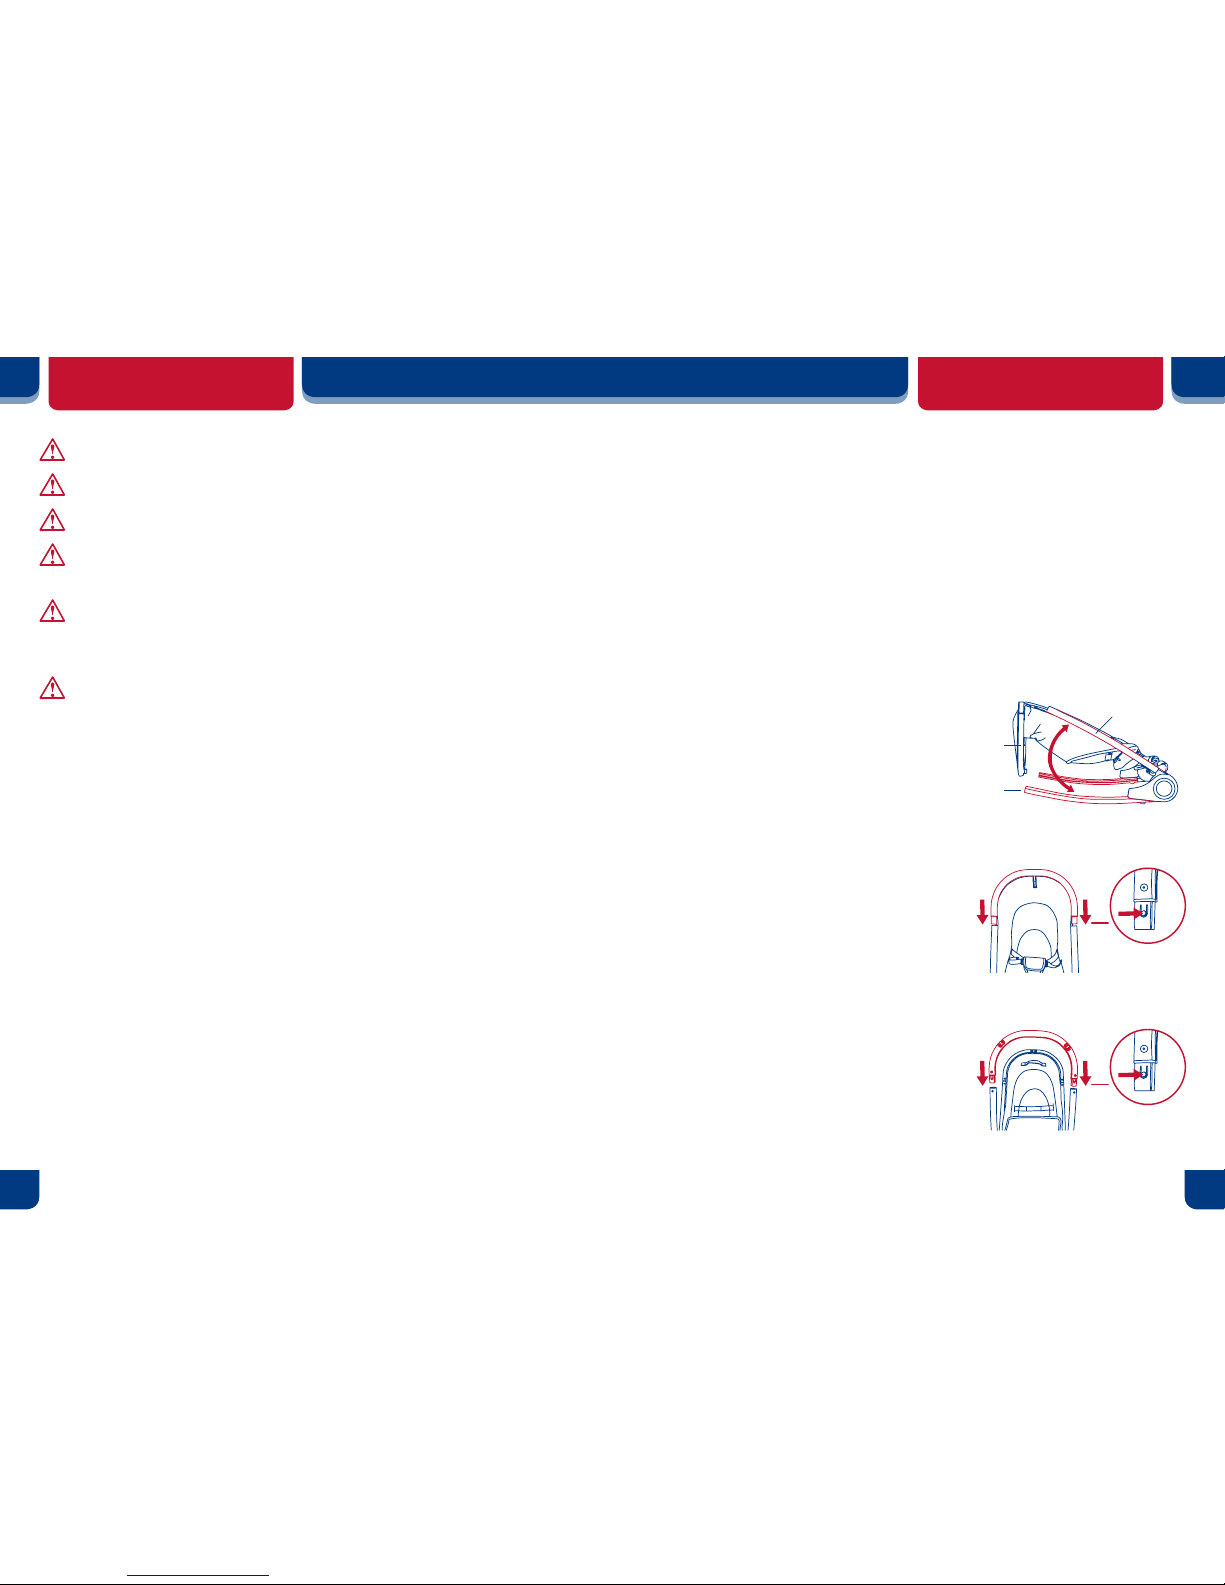
FRAME ASSEMBLY
1) • To unfold, hold Lower Seat Frame while
gently pushing Front Base Frame in
opposite direction until it locks into place
(Fig. 1a).
• Push each end of the Backrest Frame
into the Lower Seat Frame while pushing
the Tabs inward (Fig. 1b). Be sure the
Tabs lock in place.
Note: It may be necessary to slide seat
fabric down while aligning the Backrest
Frame into position.
• Insert the ends of the Rear Base Frame
into the Front Base Frame while pushing
the Tabs inward (Fig. 1c). Be sure the
Tabs lock in place.
Fig. 1a
Fig. 1b
Fig. 1c
Backrest
Frame
Front Base
Frame
Lower Seat
Frame
5
Copyright © 2015, Baby Trend Inc., All Rights Reserved. Todos los derechos reservados. Tous droits réservés.
Copyright © 2015, Baby Trend Inc., All Rights Reserved. Todos los derechos reservados. Tous droits réservés.
6
ASSEMBLY ASSEMBLY
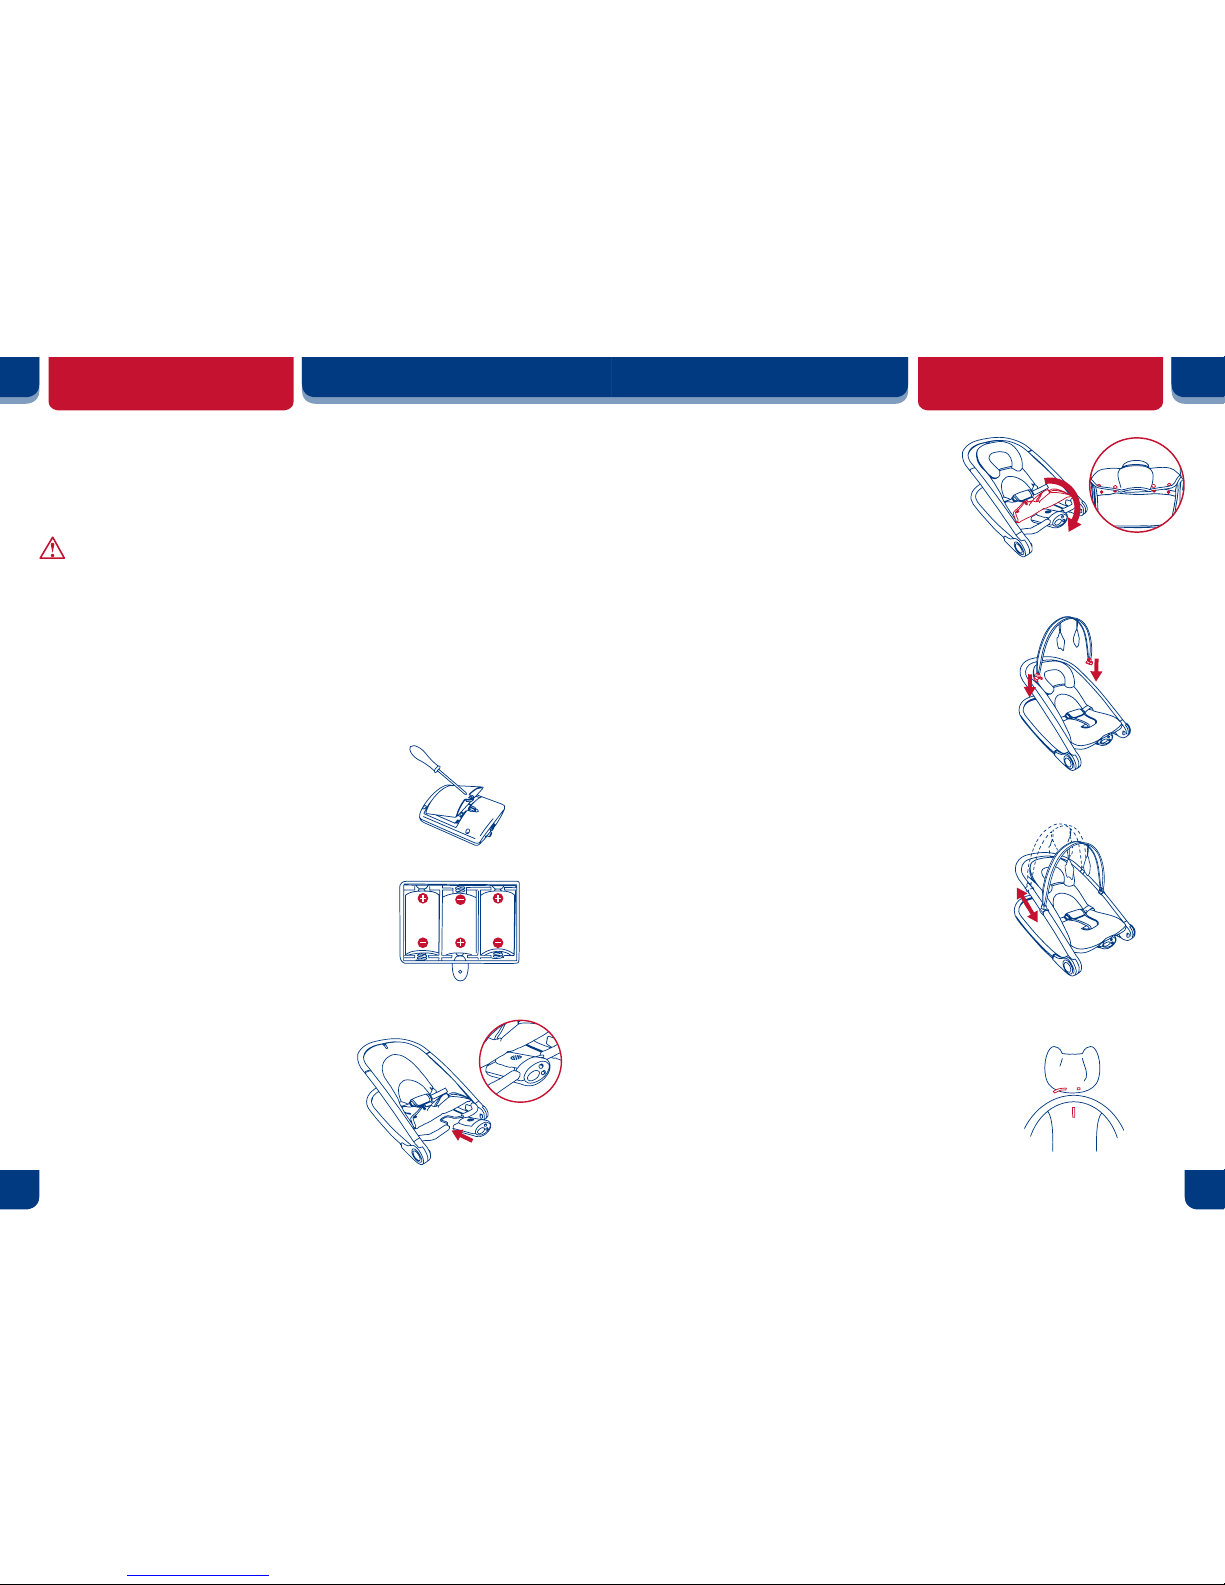
Secure Bottom Seat Cover
4) • Pull Flap down and snap all the Buttons
to the bottom of the Seat Pad (Fig. 4).
TOY BAR INSTALLATION
5) • Position the toy bar above the product
as shown (Fig. 5a). Insert the end Clips
of the toy bar on the frame.
• To adjust the toy bar position, slide the
toy bar up or down (Fig. 5b).
HEADREST
6) • Unfasten the fabric loop on the back of
the headrest. Insert the loose end of the
loop on the back of the headrest through
the loop on the seat pad. Secure the
headrest to the seat pad by fastening
the fabric loop on the back of the
headrest (Fig. 6).
INSTALLING THE BATTERIES
The music/vibration unit requires three size C batteries (not included). It is
recommended that you use alkaline batteries for longer battery life.
CAUTION: To prevent possible battery leakage, be
sure to follow the guidelines outlined below.
• Do not mix old and new batteries.
• Do not mix different types (alkaline, standard, or rechargeable).
• Keep batteries out of reach of children.
• Always dispose of batteries properly.
• Remove batteries when the product is not in use for long periods of time.
• Never leave exhausted batteries in the unit.
• Never try to recharge non-rechargeable batteries.
2) •
Remove the battery cover using a Philips
screwdriver (Fig. 2a). Install three size C
batteries as shown (Fig. 2b). Re-install
battery door and secure with screw. Do
not overtighten the screw.
INSTALLING MUSIC/VIBRATION UNIT
3) • Align the mounting groove on the unit to
the corresponding slot on footrest. Slide
the unit onto the mounting groove until it
is securely in place (Fig. 3).
Fig. 2a
Fig. 2b
Fig. 3
Fig. 5a
Fig. 4
Fig. 5b
Fig. 6
Copyright © 2015, Baby Trend Inc., All Rights Reserved. Todos los derechos reservados. Tous droits réservés.
8
SAFETY
7
Copyright © 2015, Baby Trend Inc., All Rights Reserved. Todos los derechos reservados. Tous droits réservés.
ASSEMBLY
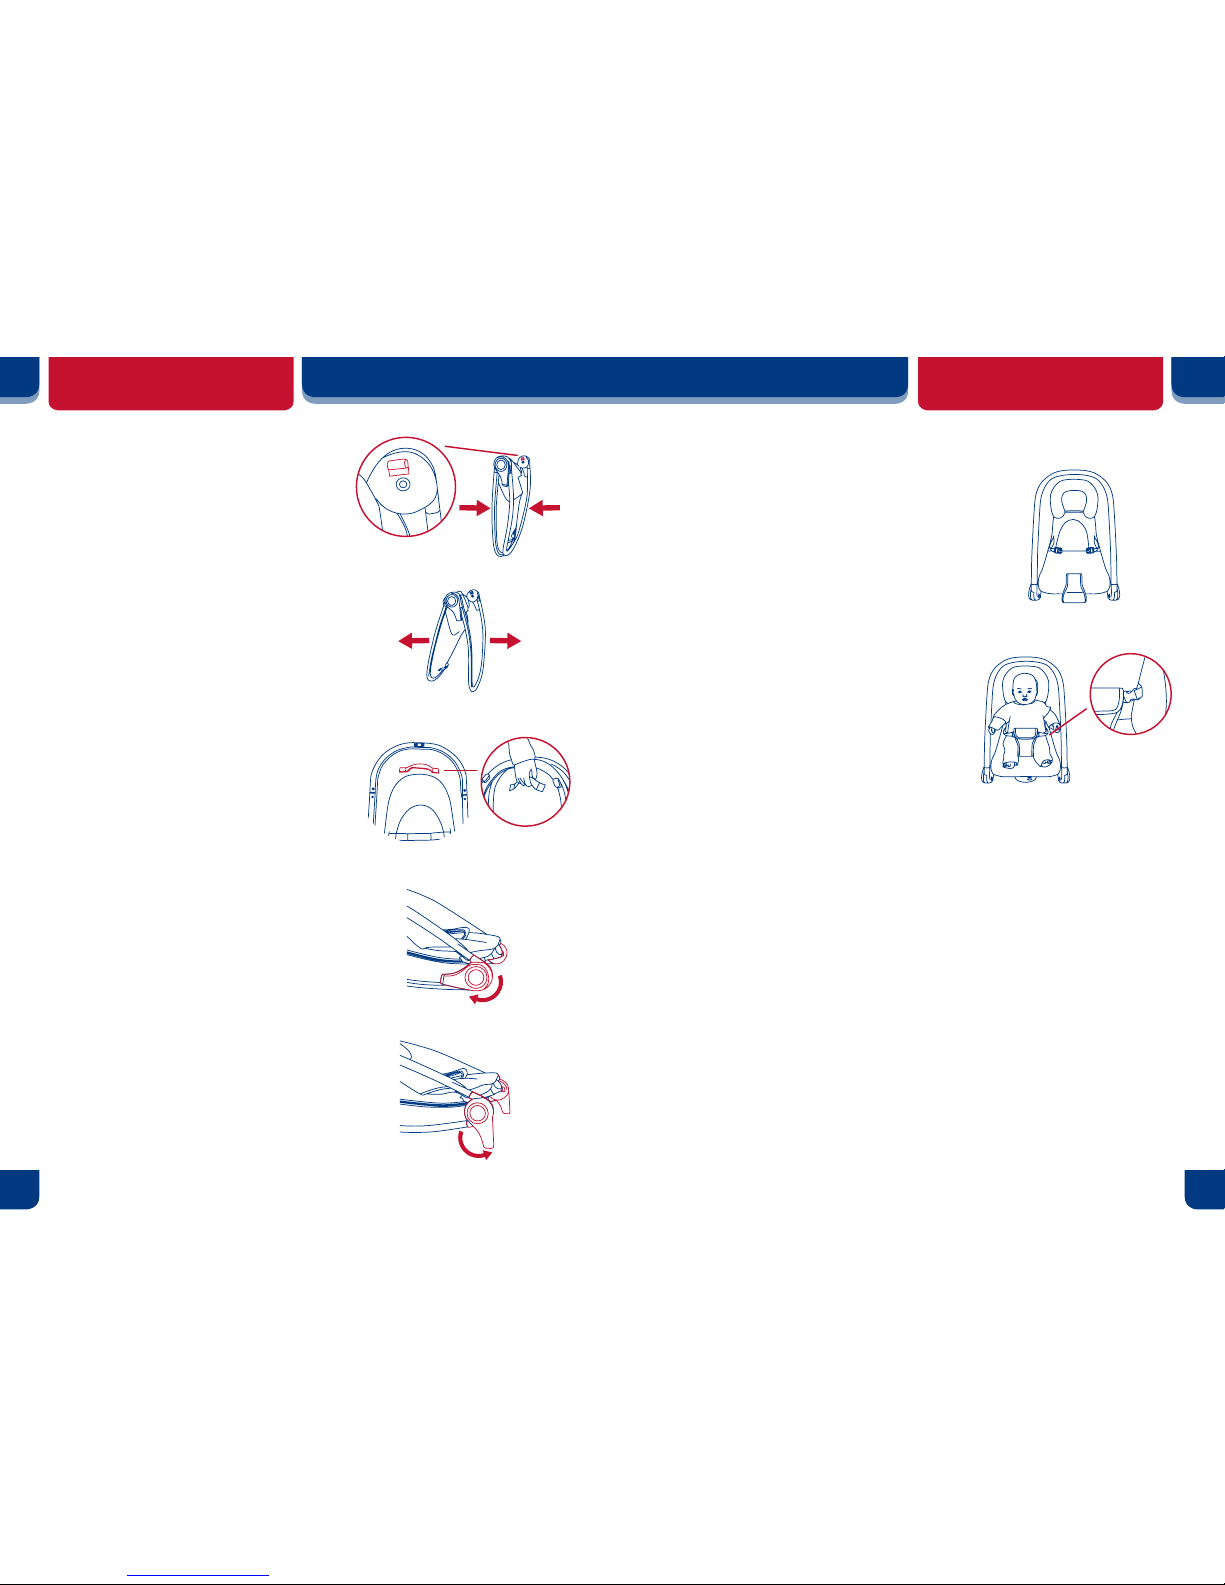
Fold
7) • Push inward then down on Fold
Button
located on both sides to fold (Fig. 7).
Note: Remove toy bar before folding.
Unfold
8) • To unfold, hold Lower Seat Frame while
gently pushing Front Base Frame in
opposite direction until locks into place
(Fig. 8).
Carry Handle
9) • Use Handle at back of Seat Pad to carry
(Fig. 9). Only use Handle when folded.
Do Not carry with hand or arm between
the frames.
Rocker Function
10) • Rotate Rocker Stopper inward on
both
sides to use rocking function (Fig. 10).
Non-Rocker Function
11) •
Rotate Rocker Stopper outward on both
sides until ends fully lock in place and
touch the ground (Fig. 11).
Note: Before moving product, return to
Rocker Function mode.
SEAT RESTRAINT
12) • Unbuckle the straps on each side of the
seat restraint (Fig. 12a) Carefully place
the child in the product seat and buckle
the straps (Fig. 12b) Adjust the straps so
that the restraint ts the child snugly.
CARE AND CLEANING
13) •
Seat pad and headrest: Using a damp
cloth and mild soap, wipe clean and air dry.
Do Not immerse in water.
14) • Toy bar and toys: Using a damp cloth
and mild soap, wipe clean and air dry.
Do Not immerse in water.
15) • Frame: Using a soft cloth and mild soap,
wipe the frame.
Fig. 10
Fig. 9
Fig. 8
Fig. 12a
Fig. 12b
Fig. 7
Fig. 11
 Loading...