

Baby Trend 9109CT, 9139CT User Manual
Read all instructions BEFORE assembly and USE of product.
KEEP INSTRUCTIONS FOR FUTURE USE.
Model # 9109CT, 9139CT
Jogger Travel System
Instruction Manual
Convenience through Innovation and thoughtful design
11.06

1
Jogger Travel System
11.06
WARNING: Please follow all of these instructions to ensure
the safety of your child. Keep these instructions for future reference.
WARNING: Failure to follow these instructions could result
in serious injury or death. Avoid serious injury from falling or sliding
out. Always use the safety harness and insure that the child is properly
positioned according to these instructions.
WARNING: Never leave child unattended.
* Purses, shopping bags, parcels, diaper bags or accessory items may change the balance of the stroller and
cause hazardous unstable conditions.
* The maximum weight that can be carried in the basket is 5 lbs, seat back pocket is 3 lbs, in the parent tray
is 3 lbs and in the canopy pocket is 3 lbs. Excessive weight may cause a hazardous unstable conditions to
exist.
* Be certain the stroller is fully erect and latched in the open position before allowing the child near the
stroller.
* Use of the stroller with a child weighing more than 50 pounds, or over 42 inches tall, will cause excessive
wear and stress on the stroller.
* DO NOT use the stroller on stairways or escalators.
* DO NOT use the stroller with roller skates or in-line skates.
* We recommend that the child occupant be at least 6 months of age prior to use of the stroller for jogging.
Because children develop at different rates, please discuss the use of a jogging stroller with your health care
provider prior to jogging with your child.
* Never allow your stroller to be used as a toy
* To clean use only mild household soap or detergent and warm water on a sponge or clean cloth.
* Check your stroller for loose screws, worn parts, torn material or stitching on a regular basis. Replace or
repair parts as needed.
* Discontinue use of stroller should it malfunction or become damaged. Please contact our customer service
Parts Hotline to arrange for repair or obtain replacement parts.
Please: If you experience any difficulty with the use of our product or have a question regarding these
instructions, please contact our Customer Service Department at (800) 328-7363 between the hours of
8:00 a.m. and 4:30 p.m. Pacific Coast Time. Please do not return to the store as once it is returned it cannot
be resold and the materials and energy used to make it are wasted.
To Contact us:
Baby Trend, Inc.
1567 S. Campus Ave.
Ontario, CA 91761
Parts Hotline:
(800) 328-7363
8:00 a.m. and 4:30 p.m. Pacific Coast Time
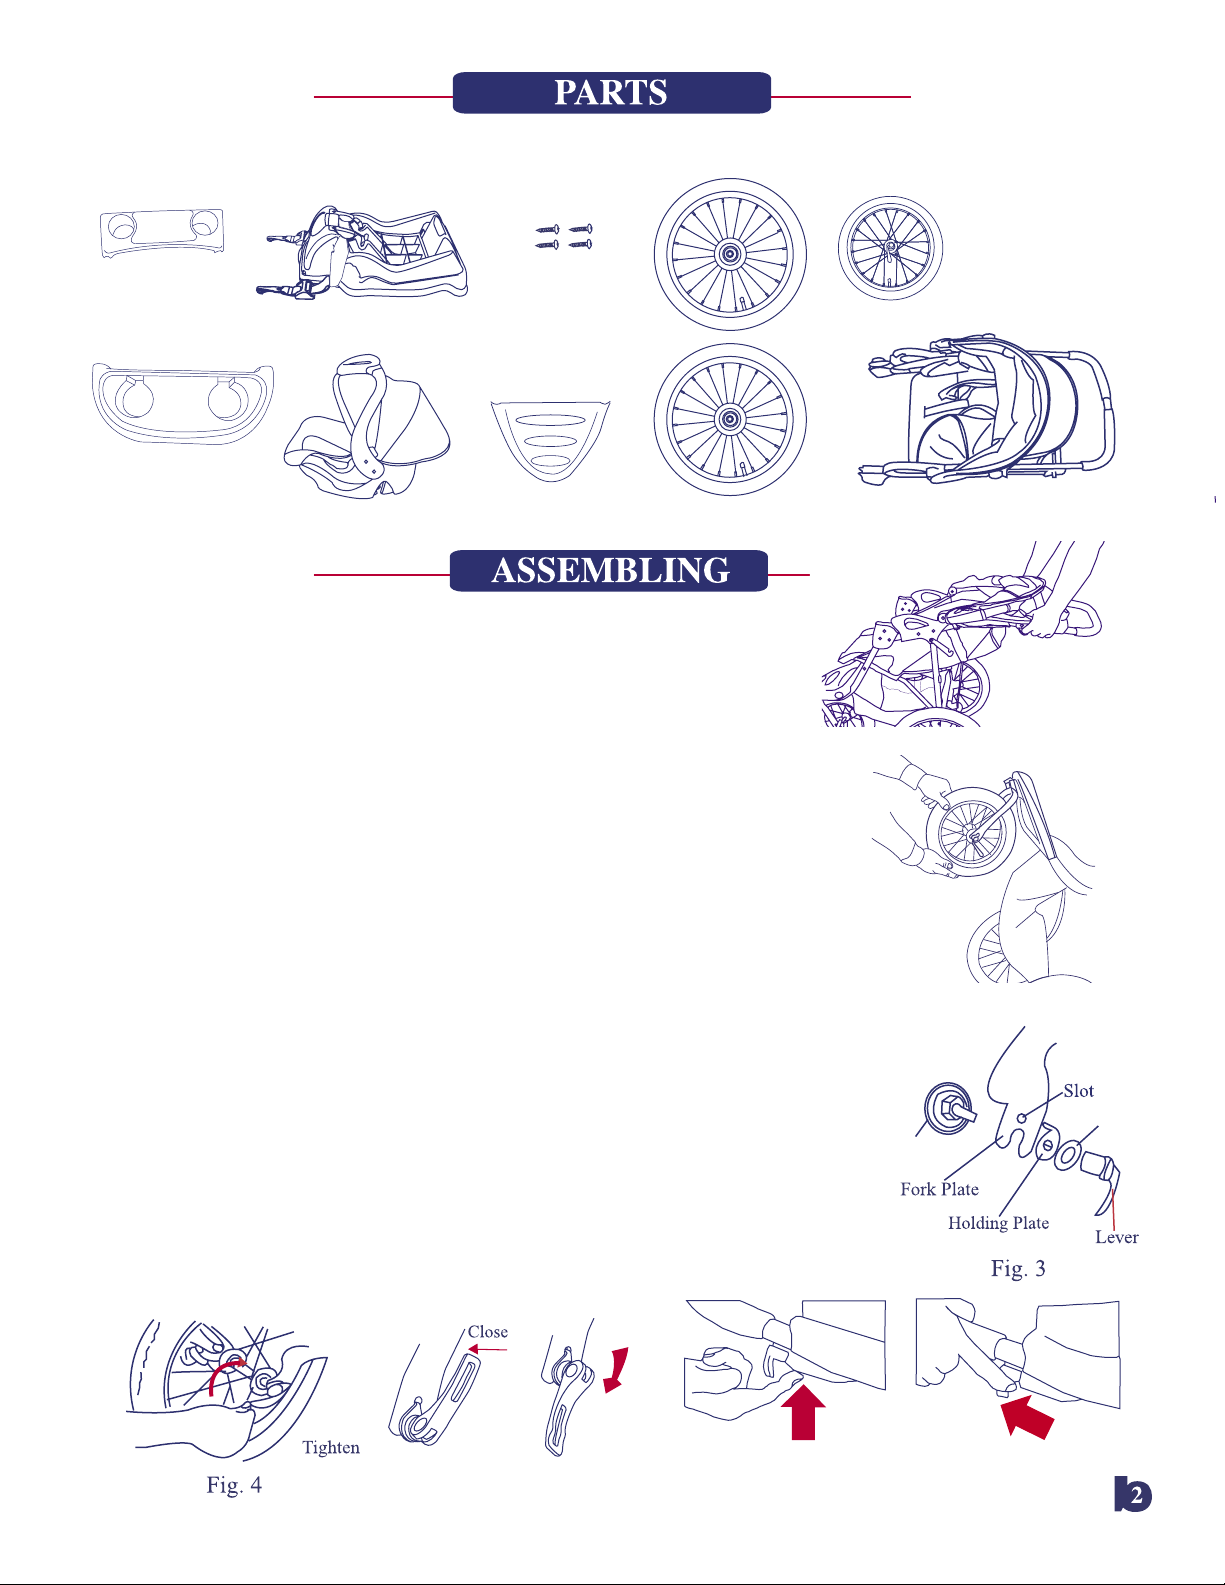
Front Wheel
Parent Tray
Footrest Screws
Base
Child Tray
Car Seat
Footrest
Rear Wheels
TO ENSURE SAFE OPERATION OF YOUR STROLLER,
PLEASE FOLLOW THESE INSTRUCTIONS CAREFULLY.
RETAIN THESE INSTRUCTIONS FOR FUTURE
REFERENCE.
ASSEMBLY:
* Remove stroller from box. The front wheel, rear wheels, footrest, child
tray and parent tray need to be installed prior to use.
* To attach the front wheel, unfold stroller as described in the section
following. See figure 1.
* Lean the stroller backwards so that it rests on the handle and rear axle
frame and the front wheel forks are pointing upward.
* The front wheel features a quick release attachment system. See figure
3. Slide the front wheel onto the front forks. See figure 2. The quick
release must be loose enough for the wheel to slide on and the wheel
lever must be in the open position (see figure 6). Line up the tab on the
Holding Plate with the slot on the fork plate. With the wheel in position,
tighten the finger nut on the axle until it is very close to contacting the
fork. See figure 4. Rotate the lever to the closed position as shown in
figure 5. You should feel significant resistance when closing the lever
and the wheel should be held tightly. If you do not, open the lever and
tighten the finger nut a bit more and close the lever again. Continue to
do this until the wheel is held tightly in the fork.
* The front swivel wheel can be locked by pushing the switch. See Figure
7a. To release the swivel wheel, pull back the lock mechanism.
See Figure 7b.
Stroller
Fig 1.
Fig 2.
Washer
Ring
Open
Fig. 6Fig. 5
Fig. 7bFig. 7a
 Loading...