

Page 1

PCI GALAXY AUDIO SOUND CARD
Users Manual
Version 1.0
Page 2
Aztech PCI Galaxy Audio Sound Card Users Manual
©Copyright Aztech Systems Ltd
The software described in this manual is protected by international copyright laws. Under this copyright law, you are
prohibited from duplicating the software for any purpose other than making archival copies for the sole purpose of
backing-up against loss.
In addition, no part of this manual may be reproduced or transmitted, in any form or by any means, electronic or
ENGLISH
mechanical, including photocopying, recording, or information storage and retrieval systems, for any purpose other
than the purchasers personal use, without the prior written permission of Aztech Systems Ltd.
QSOUND and the QLogo are registered trademarks of QSound Labs, Inc.
Intel and Pentium are registered trademarks of Intel Corp.
MMX is a trademark of Intel Corp.
Microsoft, Windows and Windows NT are registered trademarks of Microsoft Corp.
Sound Blaster is a registered trademark of Creative Technology Ltd.
All other company or product names are trademarks or registered trademarks or service marks of their respective
owners and are hereby recognized as such.
Disclaimer Statement
Aztech Systems Ltd specifically disclaims all warranties, either expressed or implied, including but not limited to
implied warranties of merchantability and fitness for a particular purpose, with respect to the hardware, software, and
the accompanying written materials. Aztech Systems Ltd reserves the right to revise or make improvements to its
product at any time and without obligation to notify any person of such revisions or improvements.
In no event shall Aztech Systems Ltd be liable for any consequential or incidental damages, including any loss of
business profits or any other commercial damages, arising out of the use of its product.
Printed in Singapore
P/N : 040-002374-102
○○○○○○○○○○○○○○○○○○○○○○○○○○○○○○○○○○○○○○○○○
2
Page 3
Aztech PCI Galaxy Audio Sound Card Users Manual
Table Of Contents
Setting up Your Sound Card -------------------------------------------
1.1 Minimum System Requirements ------------------------------------
1.2 Safety Precaution -------------------------------------------------------------
1.3 Installation Notes --------------------------------------------------------------
1.4 Installing the Sound Card ------------------------------------------------
1.5 Connecting the Sound Card --------------------------------------------
Installing Drivers and Utilities ----------------------------------------
2.1 If you are using Windows® 95------------------------------------------
2.2 If you are using Earlier Versions of Windows® 95 ---------
2.3 If you are using Windows® 98------------------------------------------
2.4 If you are using Windows NT® 4.0 -----------------------------------
2.5 Installing Yamaha Software Synthesizer S-YXG50 ---------
2.6 Installing the Q3D Demo Program --------------------------------
2.7 Installing the Clef3 Multimedia Software ----------------------
2.8 Installing Internet Explorer 4.0 (IE4) -------------------------------
ENGLISH
5
6
6
7
8
12
13
13
17
18
18
19
20
21
21
Frequently Asked Questions -------------------------------------------
Technical Specifications --------------------------------------------------
Sound Card Layout-----------------------------------------------------------
○○○○○○○○○○○○○○○○○○○○○○○○○○○○○○○○○○○○○○○○○
23
27
29
3
Page 4
Aztech PCI Galaxy Audio Sound Card Users Manual
ENGLISH
This page has been intentionally left blank.
○○○○○○○○○○○○○○○○○○○○○○○○○○○○○○○○○○○○○○○○○
4
Page 5
Chapter 1 Setting up Your Sound Card
Setting up Your Sound Card
Thank you for buying the Aztech PCI Galaxy Audio Sound Card.
With its many high-fidelity features including Q3D Positional Sound, 128-Voice
Software Wavetable Synthesis, PCI Bus Interface, AC97 Architectural Design,
Microsoft® PC98 Advanced Audio and Sound Blaster® Pro compliance, the Aztech
PCI Galaxy Audio Sound Card provides the ultimate PC audio performance.
ENGLISH
In addition, your sound card package comes with a comprehensive set of software
applications that allows you to add the impact of sound to virtually every computing
tasks. From adding voice annotations to your documents to creating multimedia
applications, your sound card and its bundled software will greatly enhance your office
productivity and home entertainment.
○○○○○○○○○○○○○○○○○○○○○○○○○○○○○○○○○○○○○○○○○
5
Page 6
Aztech PCI Galaxy Audio Sound Card Users Manual
1.1 Minimum System Requirements
PC-based computer with Pentium
processor (Pentium® 200 MHz with MMX® technology processor or
ENGLISH
better is highly recommended).
®
166 MHz with MMX® technology
PCI Bus slot.
16MB RAM (32MB RAM and above for computers Windows NT
20MB hard disk space (system files and audio drivers only).
CD-ROM drive.
Amplified/active speakers.
Windows
®
95/98 or Windows NT® 4.0.
1.2 Safety Precaution
Do not remove your sound card from its protective bag until you are
ready to install it.
Always try to hold your sound card by its edges. Avoid touching any
electronic components on your sound card.
®
).
Static electricity can cause permanent damage to your sound card. To
prevent such a damage, you must ground yourself while installing the
card. You can do this in either of two ways :
» Use a grounding strap, which is a coiled wire with a clip at one
end and an elastic strap at the other. Wear the strap around your
wrist and attach the clip to any non-painted metal surface of the
computers chassis.
» If you do not have a grounding strap, touch any non-painted
surface of the computer's chassis before you begin installation,
and again every minute or so until the installation is completed.
○○○○○○○○○○○○○○○○○○○○○○○○○○○○○○○○○○○○○○○○○
6
Page 7
Chapter 1 Setting up Your Sound Card
1.3 Installation Notes
Computers come in different shapes and sizes. Therefore, the
installation procedures in this chapter apply generally and you should
compare the illustrations here with your computer before you start the
sound card installation.
A Philips-type Screwdriver is required for the sound card installation.
Your computer s documentation should come in handy during the
sound card installation. Have it ready by your side when you start the
sound card installation.
If you have an existing sound card (that is non-plug-and-play-based)
installed in your computer, you must first un-install its audio drivers
before you remove the sound card. Refer to your existing sound card
documentation for more details on this.
If your existing sound card is plug-and-play-based, then you can
safely proceed to install your new sound card. It is recommended that
any existing sound card be removed before installing your new sound
card.
ENGLISH
○○○○○○○○○○○○○○○○○○○○○○○○○○○○○○○○○○○○○○○○○
7
Page 8
Aztech PCI Galaxy Audio Sound Card Users Manual
1.4 Installing the Sound Card
You need to remove any existing sound card installed in your computer. Note that
if the sound card is non-plug-and-play-based, you need to un-install its audio
ENGLISH
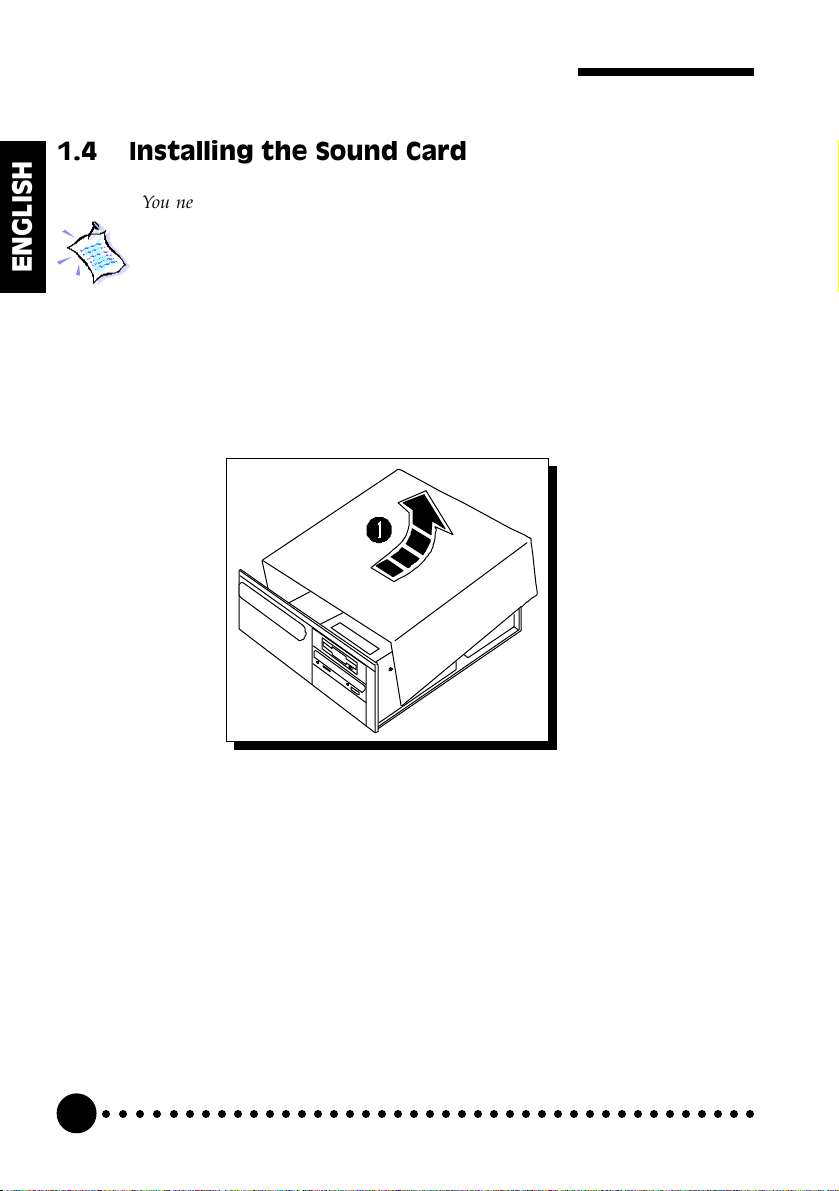
1. Remove your computers chassis cover and set it aside, somewhere
drivers before you remove it. Check your existing sound card documentation for
details on this.
Remember to switch off your computer and any connected devices before
proceeding with the installation of your sound card.
out of your way.
You need to remove any existing sound card installed in your computer.
○○○○○○○○○○○○○○○○○○○○○○○○○○○○○○○○○○○○○○○○○
8
Page 9
Chapter 1 Setting up Your Sound Card
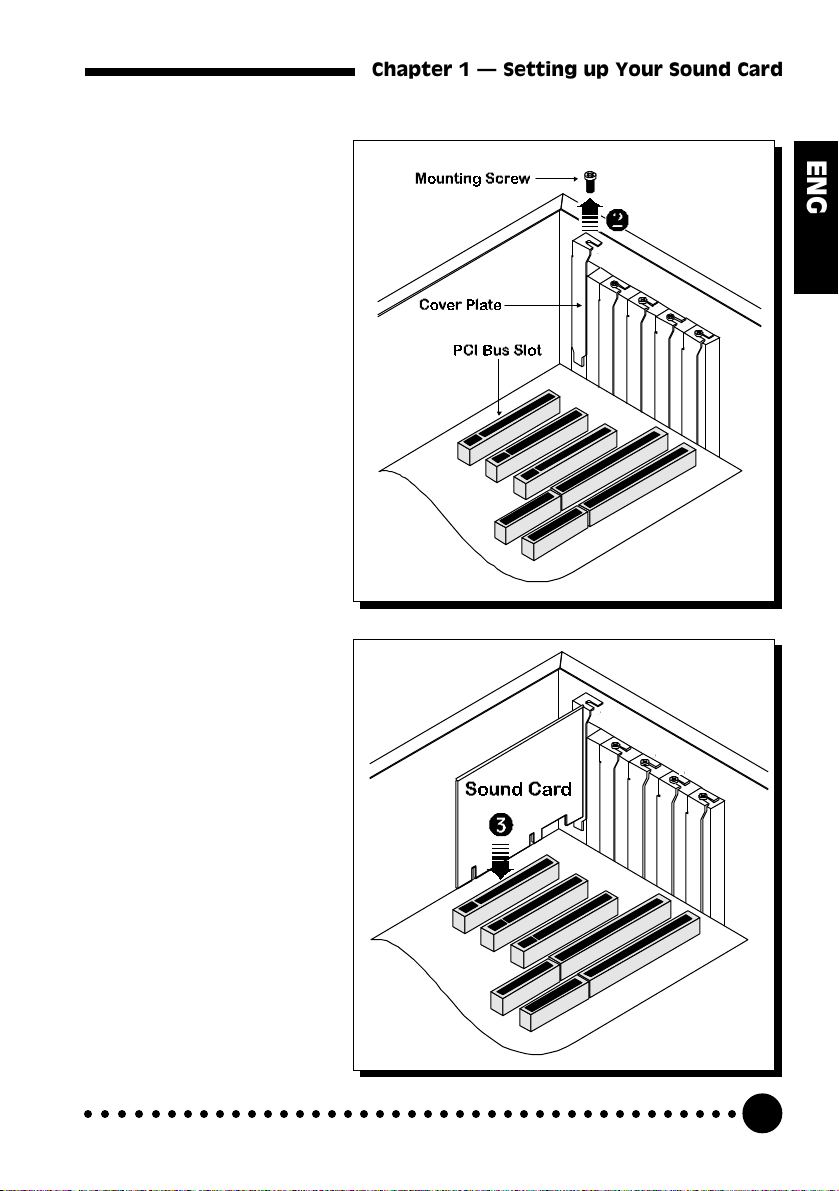
2. Select an available
PCI Bus slot and if
necessary, remove its
cover plate. Keep the
mounting screw to
secure your sound
card later.
3. Align your sound
card with the selected
PCI Bus slot and
firmly push it into the
slot. If the sound card
cannot be slide in, do
not force it. Make
sure the sound card is
lined up properly and
try again.
ENGLISH
○○○○○○○○○○○○○○○○○○○○○○○○○○○○○○○○○○○○○○○○○
9
Page 10
Aztech PCI Galaxy Audio Sound Card Users Manual
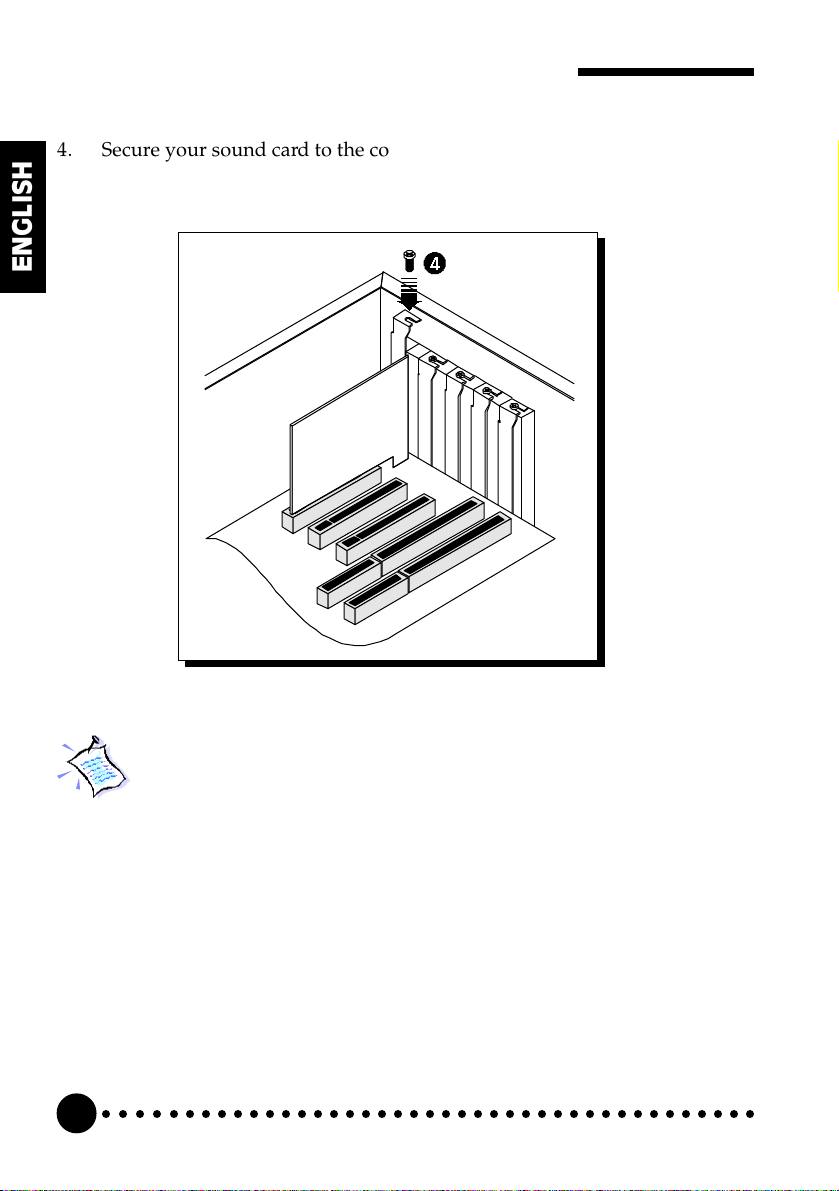
4. Secure your sound card to the computer chassis with a mounting
screw.
ENGLISH
You may wish to connect your CD-ROM audio cable to the sound card (this cable
should be supplied with the CD-ROM drive). However, as CD-ROM audio cables
are not well standardized, you need to make sure that your CD-ROM audio cable
is suited to the sound card.
The location of the CD Audio connector on the sound card and its pin-out
information can be found in Appendix C of this users manual.
○○○○○○○○○○○○○○○○○○○○○○○○○○○○○○○○○○○○○○○○○
10
Page 11

Chapter 1 Setting up Your Sound Card
5. Replace your computers chassis cover.
ENGLISH
○○○○○○○○○○○○○○○○○○○○○○○○○○○○○○○○○○○○○○○○○
11
Page 12

Aztech PCI Galaxy Audio Sound Card Users Manual
1.5 Connecting the Sound Card
You may connect a variety of audio equipment to your sound card as shown in
the illustration below:
ENGLISH
○○○○○○○○○○○○○○○○○○○○○○○○○○○○○○○○○○○○○○○○○
12
Page 13

Aztech PCI Galaxy Audio Sound Card Users Manual
Installing Drivers and Utilities
This chapter contains information on how to install your sound card drivers,
DirectX Version 5.2a drivers, Yamaha software wavetable synthesizer drivers,
Q3D demo program, Clef3 and the browser Internet Explorer.
You can always re-install the drivers by running the D:\AZTSETUP.EXE file
{assuming your CD-ROM drive is D. If not, substitute the drive letter
accordingly) when using Windows
®
95/98.
ENGLISH
2.1 If you are using Windows® 95
1. Turn on your computer to start Windows® 95.
○○○○○○○○○○○○○○○○○○○○○○○○○○○○○○○○○○○○○○○○○
13
Page 14

Aztech PCI Galaxy Audio Sound Card Users Manual
Windows® 95 will detect the newly-installed sound card and an Update
Device Driver Wizard window will appear.
For earlier versions of Windows® 95, a New Hardware Found window will
ENGLISH
appear instead. Please refer to Section 2.2 for instructions on installing the sound
card drivers.
2. Place the Multimedia Studio CD in the CD-ROM drive and click the
Next button.
Windows® 95 will now prompt you that the sound card drivers have been
located.
Click the Finish button to continue with the installation.
○○○○○○○○○○○○○○○○○○○○○○○○○○○○○○○○○○○○○○○○○
14
Page 15

Chapter 2 Installing Drivers and Utilities
3. A Setup Type window will appear. Choose the language preferred and
click Next to continue.
4. A Multimedia Studio CD Installation window will appear. Select the
components you want to install and click Next.
ENGLISH
○○○○○○○○○○○○○○○○○○○○○○○○○○○○○○○○○○○○○○○○○
15
Page 16

Aztech PCI Galaxy Audio Sound Card Users Manual
5. If you had chosen to install Clef3, a Clef Studio program group
containing the icons will be created during the installation. You will be
prompted to restart your system when the installation of drivers is
completed.
ENGLISH
(i) Select the Yes, I want to restart my computer now option and click
the Finish button.
6. After restarting, Windows® 95 will detect the sound card again. You may
also be prompted for the Windows 95 CD. This usually happens if you
did not install any Windows® 95 multimedia applications previously. If
this occurs, follow the instructions below:
(i) Place the Windows 95 CD in the CD-ROM drive and then click the
OK button.
(ii) Specify where the required files can be found on the Windows 95
CD and click OK.
○○○○○○○○○○○○○○○○○○○○○○○○○○○○○○○○○○○○○○○○○
16
Page 17

Chapter 2 Installing Drivers and Utilities
7. Restart your system when prompted. After restarting, if you had chosen
to install Yamaha Soft Synthesizer, its installation will now commence.
Follow all on-screen instructions to complete the installation of the
multimedia software.
The serial number required during registration is: G5AAS3NC4013
After the software has been installed, a Yamaha Soft Synthesizer S-
YXG50 program group will be created.
2.2 If you are using Earlier Versions of Windows® 95
If you are using an earlier version of Windows® 95, follow the instructions
below to install your sound card drivers:
1. Turn on your computer to start Windows® 95.
Windows® 95 will detect the newly-installed sound card and a New
Hardware Found window will appear.
2. Place the Multimedia Studio CD in the CD-ROM drive and click the OK
button.
ENGLISH
The Install From Disk window will appear.
3. Type D:\ in the text box and then click OK (Assuming your CD-ROM
drive is D. If not, substitute the drive letter accordingly).
4. Continue with the installation of the drivers by referring to Section 2.1
(step 3 onwards) of this manual.
○○○○○○○○○○○○○○○○○○○○○○○○○○○○○○○○○○○○○○○○○
17
Page 18

Aztech PCI Galaxy Audio Sound Card Users Manual
2.3 If you are using Windows® 98
1. Turn on your computer to start Windows® 98.
ENGLISH
Hardware Wizard window will appear. Click Next to install the drivers.
2. Select the Search for the best driver for your device (Recommended)
option and click Next.
3. Place the Multimedia Studio CD in the CD-ROM drive and select the
CD-ROM drive option.
Click the Next button to continue.
4. Windows® 98 will now prompt you that the sound card drivers have been
located.
Click the Next button to install the drivers.
5. Continue with the installation of the drivers by referring to Section 2.1
(step 3 onwards) of this manual.
2.4 If you are using Windows NT® 4.0
Windows® 98 will detect the newly-installed sound card and an Add New
1. Start Windows NT
®
4.0.
2. Place the Multimedia Studio CD in the CD-ROM drive.
3. From Windows NT® taskbar, click the Start button.
4. Select Settings and click on Control Panel.
5. Double-click the Multimedia icon.
○○○○○○○○○○○○○○○○○○○○○○○○○○○○○○○○○○○○○○○○○
18
Page 19

Chapter 2 Installing Drivers and Utilities
6. Click the Devices tab.
7. Select the Audio Devices option and click the Add button.
8. Select the Unlisted or Updated Driver option. Click OK to continue.
9. Direct Windows NT® to the DRIVERS\NT40 directory on the CD and
select the preferred language directory where the audio drivers can be
found (this would be D:\DRIVERS\NT40, assuming your CD-ROM
drive letter is D).
10. Select the PCI Audio Device option and click OK.
11. A Wavetable Sample Setup screen will appear. Click OK to proceed.
12. Do not restart your system when prompted.
13. Repeat steps 7-8 to install PCI Audio Gameport.
14. Choose Restart Now when prompted.
2.5 Installing Yamaha Software Synthesizer
S-YXG50
ENGLISH
1. Start Windows® 95/98 or Windows NT® 4.0.
2. Place the Multimedia Studio CD in the CD-ROM drive.
3. From the Windows taskbar, click the Start button, then Run.
4. Type D:\SoftSynt\Win95\<Language>\Setup.exe in the text box,
where <Language> = English
Dutch
German
French
Italian
Spanish
Substitute with Nt40 if you are using Windows NT® 4.0.
○○○○○○○○○○○○○○○○○○○○○○○○○○○○○○○○○○○○○○○○○
19
Page 20

Aztech PCI Galaxy Audio Sound Card Users Manual
(Assuming your CD-ROM drive is D, if not, substitute the drive letter
accordingly). Click OK.
5. Follow all on-screen instructions to complete the installation of the
ENGLISH
multimedia software.
The serial number required during registration is: G5AAS3NC4013
After the software has been installed, a Yamaha Soft Synthesizer S-
YXG50 program group will be created.
2.6 Installing the Q3D Demo Program
1. Start Windows® 95/98.
2. Place the Multimedia Studio CD in the CD-ROM drive.
3. From the Windows taskbar, click the Start button, then Run.
4. Type D:\Apps\Qsound\Q3d_demo.exe in the text box (Assuming
your CD-ROM drive is D, if not, substitute the drive letter accordingly)
and click OK.
5. Follow all on-screen instructions to complete the installation of the
multimedia software.
After the software has been installed, a Q3D Demo program group will
be created.
○○○○○○○○○○○○○○○○○○○○○○○○○○○○○○○○○○○○○○○○○
20
Page 21

Chapter 2 Installing Drivers and Utilities
2.7 Installing the Clef3 Multimedia Software
1. Start Windows® 95/98 or Windows NT® 4.0.
2. Place the Multimedia Studio CD in the CD-ROM drive.
3. From the Windows taskbar, click the Start button, then Run.
4. Type D:\Clef3\Setup.exe in the text box (Assuming your CD-ROM
drive is D, if not, substitute the drive letter accordingly) and click OK.
5. Follow all on-screen instructions to complete the installation of the
multimedia software.
After the software has been installed, a Clef3 program group will be
created.
6. The multimedia application comes with on-line Help which requires the
use of a browser application (eg IE 3.x/4.0 or Netscape 3.x/4.0) to view.
2.8 Installing Internet Explorer 4.0 (IE4)
1. Start Windows® 95/98.
ENGLISH
2. Place the Multimedia Studio CD in the CD-ROM drive.
3. From the Windows taskbar, click the Start button, then Run.
4. Type D:\IE40\<Language>\Setup.exe in the text box, where
<Language> = English
Dutch
German
French
Italian
Spanish
○○○○○○○○○○○○○○○○○○○○○○○○○○○○○○○○○○○○○○○○○
21
Page 22

Aztech PCI Galaxy Audio Sound Card Users Manual
IE4 will detect the language of the Operating System before installation. Selecting
a different language from your Operating System would result in unsuccessful
installation of the application.
ENGLISH
(Assuming your CD-ROM drive is D, if not, substitute the drive letter
accordingly). Click OK.
5. Follow all on-screen instructions to complete the installation of the
browser.
○○○○○○○○○○○○○○○○○○○○○○○○○○○○○○○○○○○○○○○○○
22
Page 23

Appendix A Frequently Asked Questions
Frequently Asked Questions
You may encounter some problems or doubts while installing or using your sound
card. This chapter highlights some of the more common issues concerning your sound
card and their possible solutions. Reviewing this chapter can help you solve many
problems and often eliminate the need for telephone assistance.
ENGLISH
My system does not detect the sound card when I boot up for
the first time. Whats wrong?
Make sure your sound card is fully inserted into the PCI Bus slot.
However, if the sound card has been properly installed, do the
following:
1. From the Windows® 95 task bar, click the Start button.
2. Select Settings and then click on Control Panel.
3. Double-click the System icon.
4. Click the Device Manager tab.
○○○○○○○○○○○○○○○○○○○○○○○○○○○○○○○○○○○○○○○○○
23
Page 24

Aztech PCI Galaxy Audio Sound Card Users Manual
ENGLISH
5. Check whether there is any yellow exclamation mark (error) on
each of the PCI Galaxy Audio devices. If yes, remove all devices
and re-install the sound card drivers. Refer to Chapter 2 of this
users manual for details on installing the audio drivers.
There is a yellow exclamation mark (error) for the PCI
Galaxy Legacy Audio device.
Certain motherboards with USB capability may sometimes encounter
this problem. The USB port(s), when enabled, sometimes contends
with the PCI Galaxy Legacy Audio device for the same IRQ resource
resulting in a conflict.
The PCI Galaxy Legacy Audio device typically uses IRQ 5.
○○○○○○○○○○○○○○○○○○○○○○○○○○○○○○○○○○○○○○○○○
24
Page 25

Appendix A Frequently Asked Questions
Depending on the type of motherboard you have, there may be 2
possible ways to solve this problem:
1. Reserve IRQ 5 for ISA slots (configurable in the BIOS).
2. Disable COM Port 2 (configurable in the BIOS).
After installation of the drivers, there is an error message
about unloading the EMM386.EXE. What can I do?
On some motherboards, there might be a conflict between the DOS
drivers and EMM386.EXE . Therefore, it is recommended that the
EMM386.EXE line be remarked or removed from the CONFIG.SYS
file that is located on C:|, for example, to remark a line, you can do
the following:
REM C:\WINDOWS\EMM386.EXE
I have installed the sound card drivers, but there is still no
sound. What could be wrong?
There are a variety of possible causes. However, you can check the
following:
ENGLISH
i) Have you connected a pair of active speakers or headset to the
Line-Out jack? Make sure your speakers are turned on.
ii) Is the volume playback level in the sound mixer at least half-
way up?
iii) The drivers may not have been properly installed. Un-install the
drivers (refer to the following FAQ) and then run the
AZTSETUP.EXE file from the Multimedia Studio CD to
re-install the drivers.
○○○○○○○○○○○○○○○○○○○○○○○○○○○○○○○○○○○○○○○○○
25
Page 26

Aztech PCI Galaxy Audio Sound Card Users Manual
How do I un-install my sound card audio drivers in
Windows® 95/98?
1. From the Windows® 95/98 task bar, click the Start button.
ENGLISH
2. Select Settings and then click on Control Panel.
3. Double-click the Add/Remove Programs icon.
4. Click the PCI Galaxy Audio Uninstallation option and click
the Add/Remove... button.
5. Click the OK button.
When I tried to play games, there is an error message about
the card sharing interrupt with other devices. What can I do?
The following solutions could be helpful:
i) Reserve IRQ5 to PCI Galaxy Audio from the BIOS. Please refer
to your motherboard manual for details.
ii) Remove your sound card from its present PCI slot and plug it
into another PCI slot. Boot up and try again.
I get a warning You cannot use an IRQ greater than 9
when I setup some games. What should I do?
Please ignore the message and press ESC to continue. WaveTSR will
relocate the IRQ and the game will run normally.
Some of my games do not seem to work with the Q3D
Positional Sound feature.
Not all games, especially older ones, support the Q3D Positional
Sound feature. However, Q3D Positional Sound is becoming a
popular standard among game developers.
○○○○○○○○○○○○○○○○○○○○○○○○○○○○○○○○○○○○○○○○○
26
Page 27

Technical Specifications
Sound Standards Compatibility
l Sound Blaster
l AdLib compliant
l General MIDI compliant
2.0 and Sound Blaster Pro II compliant
Appendix B Technical Specifications
ENGLISH
l Roland MPU401 UART compliant
l PCI Bus Specification Rev 2.1 compliant
l PCI Bus Power Management Interface Specification Rev 1.0 compliant
l Audio Codec '97 compliant
Sound Standards Features
l Supports Microsoft DirectSound 3D Acceleration via PCI-bus
l High quality Sample Rate Converter
l Supports simultaneous full-duplex 16-bit record/playback at
independent sampling rate
l Selectable sampling rate of up to 48kHz
○○○○○○○○○○○○○○○○○○○○○○○○○○○○○○○○○○○○○○○○○
27
Page 28
Aztech PCI Galaxy Audio Sound Card Users Manual
l High Quality Codec
l Supports 64-voice hardware wavetable
l Virtual FM real time FM-to-wavetable conversion
ENGLISH
l Supports Soft3D positional audio from QSound
l Selectable 1,1.5, 2 or 6 MB General MIDI/General Sound Sample
®
library
l Virtual GS gives General MIDI/GS command interpretation for
wavetable & effect synthesis
System Audio Sources
l Mono Microphone Audio
l Stereo Line-in Audio
l Stereo CD Audio
l Stereo Auxiliary Audio
l Mono Modem Audio
l Stereo FM Synthesized Music/Wavetable Music
l Stereo (PCM) Digital audio
l Stereo Wavetable Upgrade header
The product specifications herein are subject to change without prior notifications.
○○○○○○○○○○○○○○○○○○○○○○○○○○○○○○○○○○○○○○○○○
28
Page 29
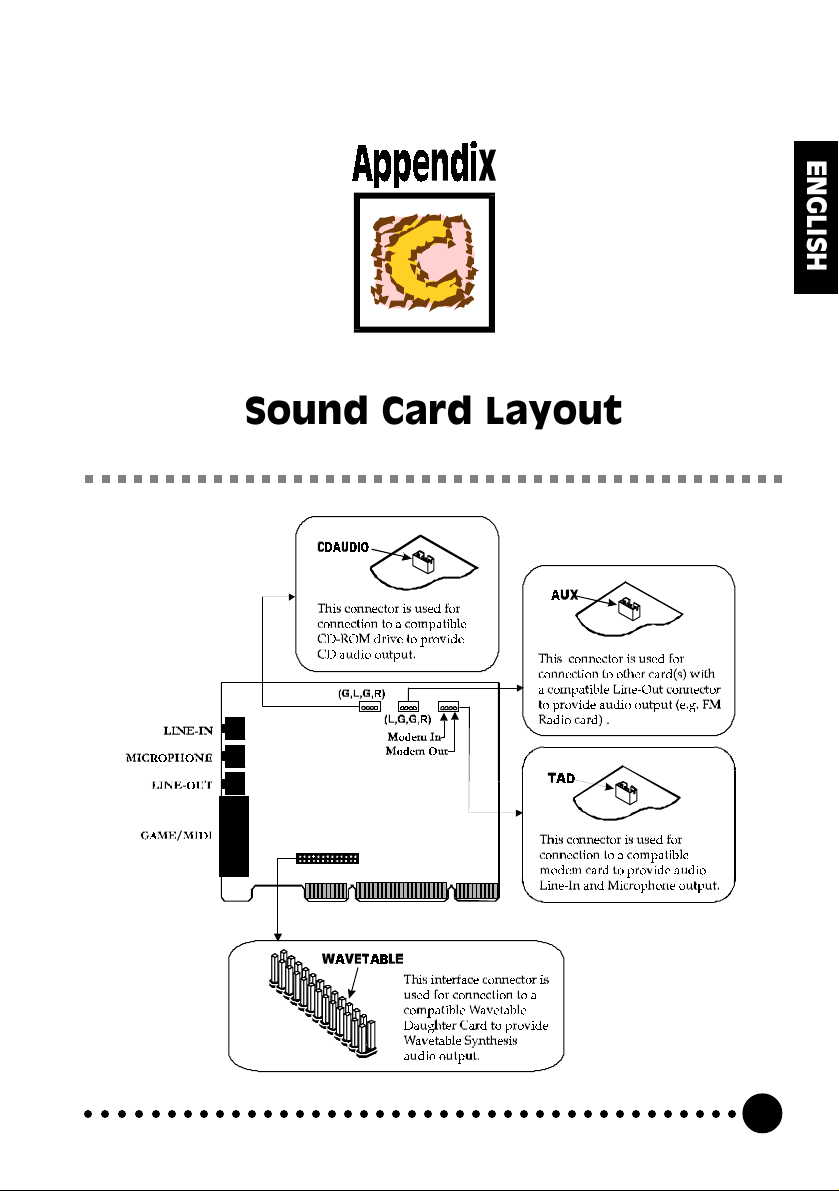
Appendix C Sound Card Layout
Sound Card Layout
ENGLISH
○○○○○○○○○○○○○○○○○○○○○○○○○○○○○○○○○○○○○○○○○
29
Page 30

Aztech PCI Galaxy Audio Sound Card Users Manual
ENGLISH
This page has been intentionally left blank.
○○○○○○○○○○○○○○○○○○○○○○○○○○○○○○○○○○○○○○○○○
30
Page 31

Aztech PCI Galaxy Audio Sound Card Users Manual
This page has been intentionally left blank.
ENGLISH
○○○○○○○○○○○○○○○○○○○○○○○○○○○○○○○○○○○○○○○○○
31
Page 32

Aztech PCI Galaxy Audio Sound Card Users Manual
ENGLISH
This page has been intentionally left blank.
○○○○○○○○○○○○○○○○○○○○○○○○○○○○○○○○○○○○○○○○○
32
 Loading...