

Page 1

PCI 368DSP SOUND CARD
Users Manual
Version 1.0
Page 2

©Copyright
The software described in this manual is protected by international copyright laws. Under this copyright law, you are
prohibited from duplicating the software for any purpose other than making archival copies for the sole purpose of
backing-up against loss.
In addition, no part of this manual may be reproduced or transmitted, in any form or by any means, electronic or
mechanical, including photocopying, recording, or information storage and retrieval systems, for any purpose other than
the purchasers personal use, without the prior written permission of Aztech Systems Ltd.
Aureal, Aureal 3D and A3D are registered trademarks of Aureal Semiconductors Inc.
Intel and Pentium are registered trademarks of Intel Corp.
MMX is a trademark of Intel Corp.
Microsoft, Windows and Windows NT are registered trademarks of Microsoft Corp.
Sound Blaster is a registered trademark of Creative Technology Ltd.
EAX is a trademark of Creative Technology Ltd in the US and/or other countries.
Voyetra is a registered trademark of Voyetra Technologies Inc.
QSound, QSound Environmental Modeling, Q3D, QEM, QMSS, QXpander, QSur round and the Qlogo are trademarks
of QSound Labs, Inc.
ThunderBird 128 is a trademark of VLSI Technology, Inc.
Half-Life is a trademark of Valve Software and Sierra Online.
Jedi Knight and Mystery of the Sith are registered trademarks of Lucasarts Entertainment Company.
Unreal is a trademark of Epic MegaGames, Inc. Sonic Foundry.
Forsaken: tm 1998 Acclaim Entertainment, Inc.
All other company or product names are trademarks or registered trademarks or service marks of their respective
owners and are hereby recognized as such.
Disclaimer Statement
Aztech Systems Ltd specifically disclaims all warranties, either expressed or implied, including but not limited to implied
warranties of merchantability and fitness for a particular purpose, with respect to the hardware, software, and the
accompanying written materials. Aztech Systems Ltd reserves the right to revise or make improvements to its product at
any time and without obligation to notify any person of such revisions or improvements.
In no event shall Aztech Systems Ltd be liable for any consequential or incidental damages, including any loss of business
profits or any other commercial damages, arising out of the use of its product.
Printed in Singapore
P/N : 040-002377-101
Page 3
Contents
○○○○○○○○○○○○○○○○○○○○
Introduction ................................................................
Before You Begin .........................................................
2.1 Minimum System Requirements ...............................................
2.2 Safety Precaution ...................................................................
2.3 Installation Notes ...................................................................
Setting Up Your Sound Card .........................................
3.1 Installing Your Sound Card ......................................................
3.2 Connecting Your Sound Card ..................................................
Installing the Sound Card Drivers & Software Utilities .......
4.1 Installing the Sound Card Drivers ..............................................
4.1.1 For Windows
4.1.2 For Windows
®
95 ...........................................................
®
98...........................................................
5
6
6
7
7
8
8
11
12
12
12
16
4.1.3 For Windows NT®4.0 .....................................................
4.2 Installing Clef Studio 3.0 ........................................................
4.3 Installing Voyetra MIDI Orchestrator Plus
(applicable for Germany only) .................................................
4.4 Installing DOS Drivers/Utilities for DOS Games ..........................
19
19
20
21
Page 4
Running the Software Utilities ........................................
22
25
5.1 Running ThunderBird 128 Control Panel .................................
5.2 Running Clef Studio 3.0 .........................................................
5.3 Running Voyetra MIDI Orchestrator Plus
(applicable for Germany only) .................................................
Frequently Asked Questions ..........................................
Technical Specifications ................................................
Sound Card Layout ......................................................
QEM .......................................................................
Glossary .................................................................................
22
25
25
26
31
34
35
40
Page 5
Chapter 1 Introduction
○○○○○○○○○○○○○○○○○○○○○○
Introduction
Congratulations on your purchase of PCI 368DSP Sound Card!
PCI 368DSP gives you a real-time 3D audio effects which creates a far more realistic
and immersive audio environment than mere stereo reproduction could ever provide.
It supports up to 4 speakers, 2 in front of your computer and 2 at the rear. With these
2 additional speakers supported, you will definitely enjoy a more alive and
powerful home-theatre like environment with your computer!
For more experienced sound card users, we are proud to reveal that PCI 368DSP
supports Microsoft DirectSound acceleration of up to 128 channels, 320-voice
wavetable synthesis and high quality sampling rate providing supreme PC audio
performance.
The control panel applet - ThunderBird 128 will give you access to the sound and
speakers configurations. The Clef Studio software package enables you to play your
favourite audio CDs, create, record or edit sound files and add sound to almost every
computing task.
The following sections will show you exactly how to install and configure your sound
card. In no time, you can sit back and let the PCI 368DSP sound card storm your
sensations !
○○○○○○○○○○○○○○○○○○○○○○○○○○○○○○○○○○○○○○○○○
5
Page 6
PCI 368DSP Sound Card Users Manual
○○○○○○○○○○○○○○○○○○○○
Before You Begin
This chapter contains information that you need to know before installing your sound
card. They are the basic system requirements needed for your sound card to run, the
safety rules to follow, as well as the installation guidelines.
2.1 Minimum System Requirements
• PC-based computer with Pentium
®
166MHz MMX processor
(Pentium® 233MHz MMX-based processor or better is highly recommended)
• PCI Bus slot
• 16MB RAM (32MB RAM and above for computers with Windows NT
• minimum 15MB hard disk space (system files and audio drivers only)
• CD-ROM drive
• Active (amplified) speakers
• Windows
®
95/98/NT® 4.0
®
)
○○○○○○○○○○○○○○○○○○○○○○○○○○○○○○○○○○○○○○○○○
6
Page 7
Chapter 2 Before You Begin
2.2 Safety Precaution
Do not remove your card from its protective bag until you are ready to
install it.
• Always try to hold your card by its edges. Avoid touching any electronic
components on your card.
• Static electricity can cause permanent damage to your card. To prevent
such a damage, you must ground yourself during the installation:
» Use a grounding strap - a coiled wire with a clip at one end and an elastic
strap at the other. Wear the strap around your wrist and attach the clip to
any non-painted metal surface of your computer chassis.
OR
» If you do not have a grounding strap, touch any non-painted surface of
your computer chassis before you begin installation, and again every
minute or so until the installation is completed.
2.3 Installation Notes
• Computers come in different shapes and sizes. The installation procedures
in this manual apply generally and you should compare the illustrations
here with your computer.
• A Philips screwdriver is required.
• The documentation for your computer should come in handy during the
installation. Have it ready by your side.
• If you have an existing non Plug-n-Play sound card installed in your
computer, you must first de-install its audio drivers before you remove the
card. Refer to the documentation of your existing sound card for more
details.
If your existing sound card is Plug-n-Play, you may proceed to install your
new sound card.
○○○○○○○○○○○○○○○○○○○○○○○○○○○○○○○○○○○○○○○○○
7
Page 8
PCI 368DSP Sound Card Users Manual
○○ ○○○○○○○○○○○○○○○○○○
Setting Up Your Sound Card
This chapter contains information on how to install the sound card to your computer
and to other audio equipment.
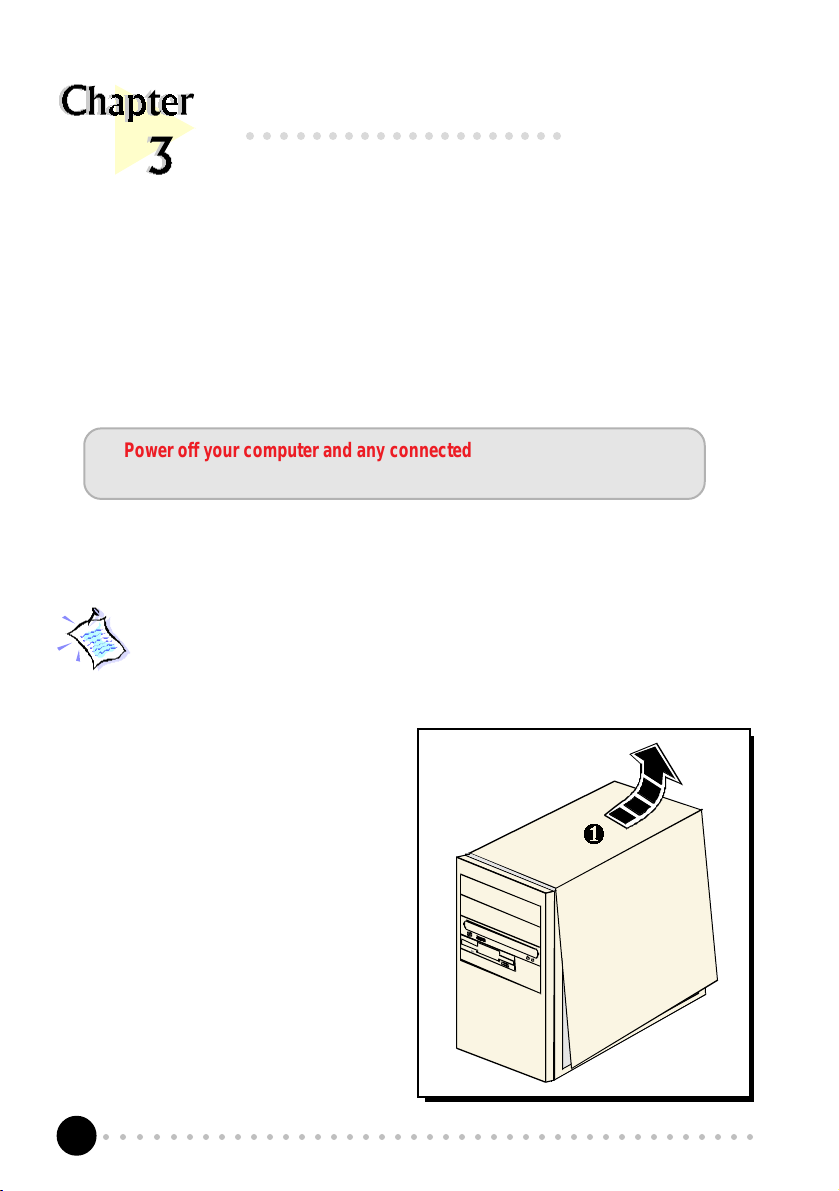
Power off your computer and any connected devices before installing
your sound card !
3.1 Installing Your Sound Card
You need to remove any existing sound card installed in your computer. If
the sound card is non Plug-and-Play, de-install its audio drivers before you
remove it from your computer. Check the documentation on your existing
sound card for details.
1. Remove the cover of your
computer.
○○○○○○○○○○○○○○○○○○○○○○○○○○○○○○○○○○○○○○○○○
8
Page 9
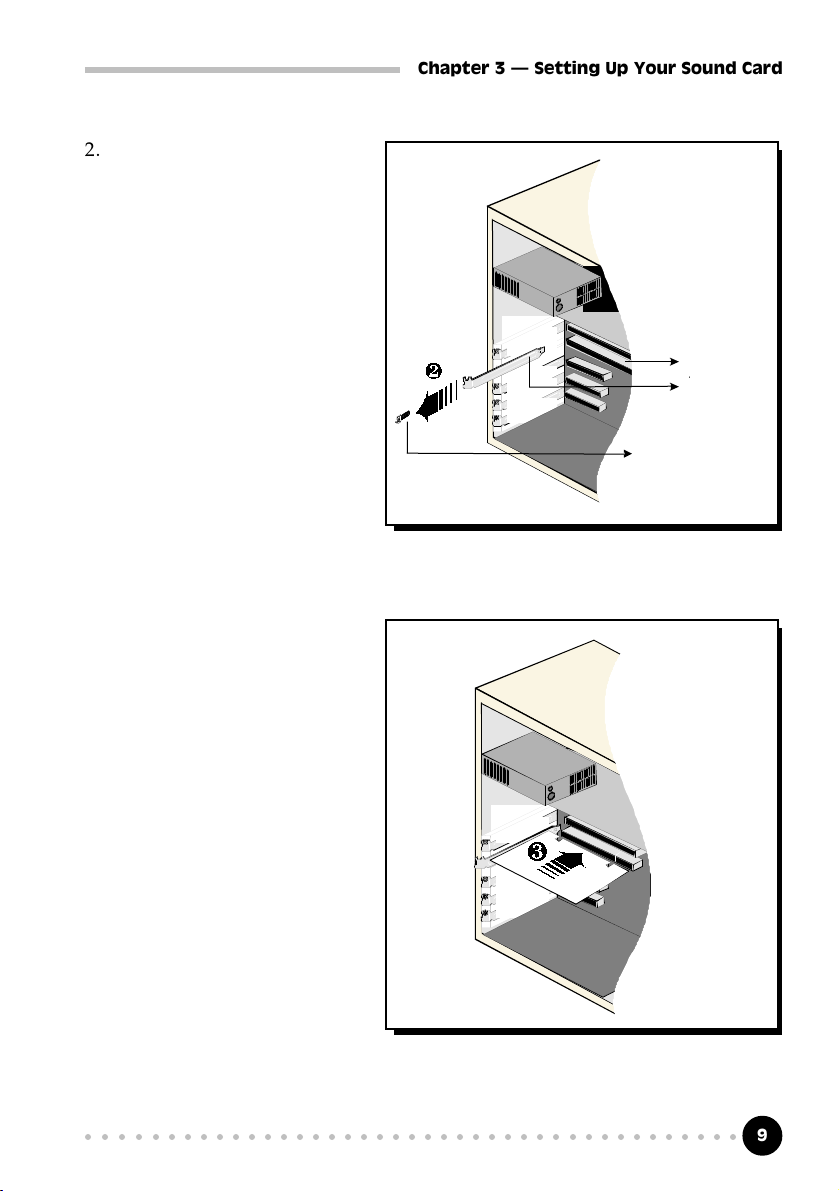
2. Select an available PCI
Bus-Slot and remove its
cover plate. Keep the
mounting screw to secure
your sound card later.
Chapter 3 Setting Up Your Sound Card
PCI Bus-Slot
Cover Plate
Mounting Screw
3. Align your sound card
with the selected PCI
Bus-Slot and firmly push
it into the slot. If the
sound card does not slide
in, do not force it. Make
sure the card is aligned
properly and try again.
○○○○○○○○○○○○○○○○○○○○○○○○○○○○○○○○○○○○○○○○○
9
Page 10
PCI 368DSP Sound Card Users Manual
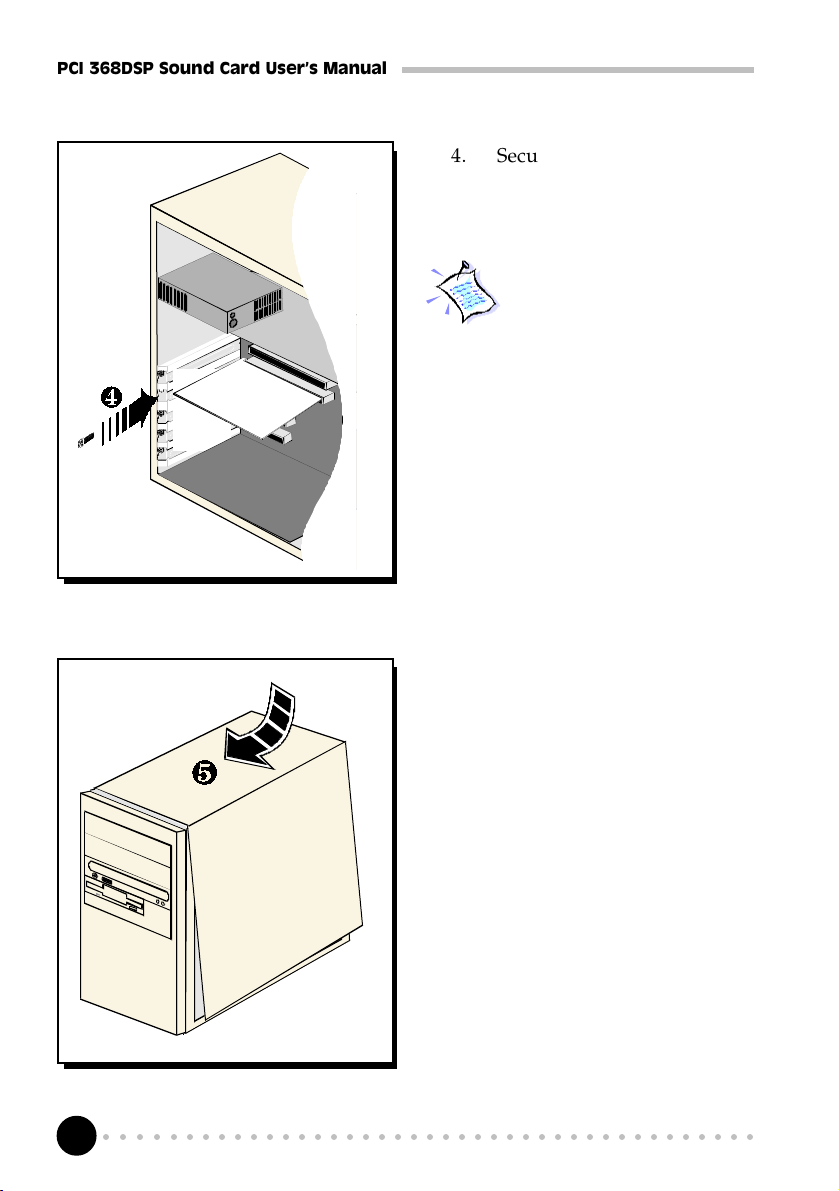
4. Secure your sound card to the
chassis of your computer with
the mounting screw.
You may wish to connect your
CD-ROM audio cable to the
sound card for CD-ROM
audio output. See Appendix
C - Sound Card Layout for
the location of the CD Audio
connector on the sound card.
(The audio cable should be
supplied with the CD-ROM
drive. However, as CD-ROM
audio cables are not
standardized, you need to
make sure that your CD-ROM
audio cable is suited for use
with this sound card)
5. Replace the cover of your
computer.
○○○○○○○○○○○○○○○○○○○○○○○○○○○○○○○○○○○○○○○○○
10
Page 11
Chapter 3 Setting Up Your Sound Card
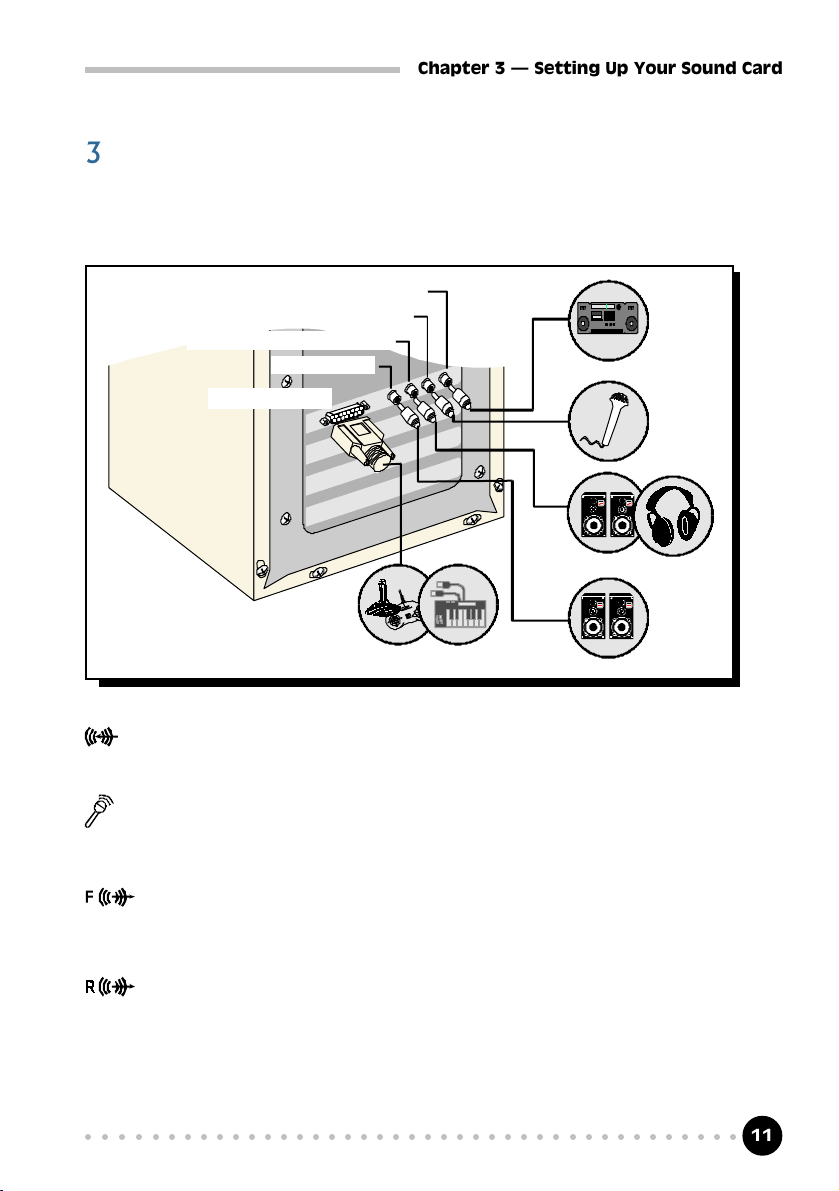
3.2 Connecting Your Sound Card
You may connect a variety of audio equipment to your sound card as shown in
the illustration below:
Line-In
Microphone
Front Speakers / Headphones
Rear Speakers
MIDI / Game Port
Line-In: Connect from any external sound sources, example, from the Line/
Audio Out of your external Audio CD-ROM or mini-hifi. (Sound will
be produced from the attached speakers)
Microphone:
Connect to a microphone. Example, you may want to sing Karaoke
through the microphone. (Sound will be produced from the attached speakers)
Front Speakers / Headphones:
Connect a pair of active speakers to the front of your computer. You
may also connect to your headphones for private listening.
Rear Speakers:
Connect a pair of active (amplified) speakers to the back of your computer.
MIDI / Game Port:
Connect to either a joystick, game pad or to your MIDI keyboard.
○○○○○○○○○○○○○○○○○○○○○○○○○○○○○○○○○○○○○○○○○
11
Page 12
PCI 368DSP Sound Card Users Manual
○○○○○○○○○○○○○○○○○○○○
Installing the Sound Card Drivers
& Software Utilities
This chapter contains information on how to install the sound card drivers and
software utilities found in the PCI Audio Multimedia Studio CD.
4.1 Installing the Sound Card Drivers
4.1.1 For Windows® 95
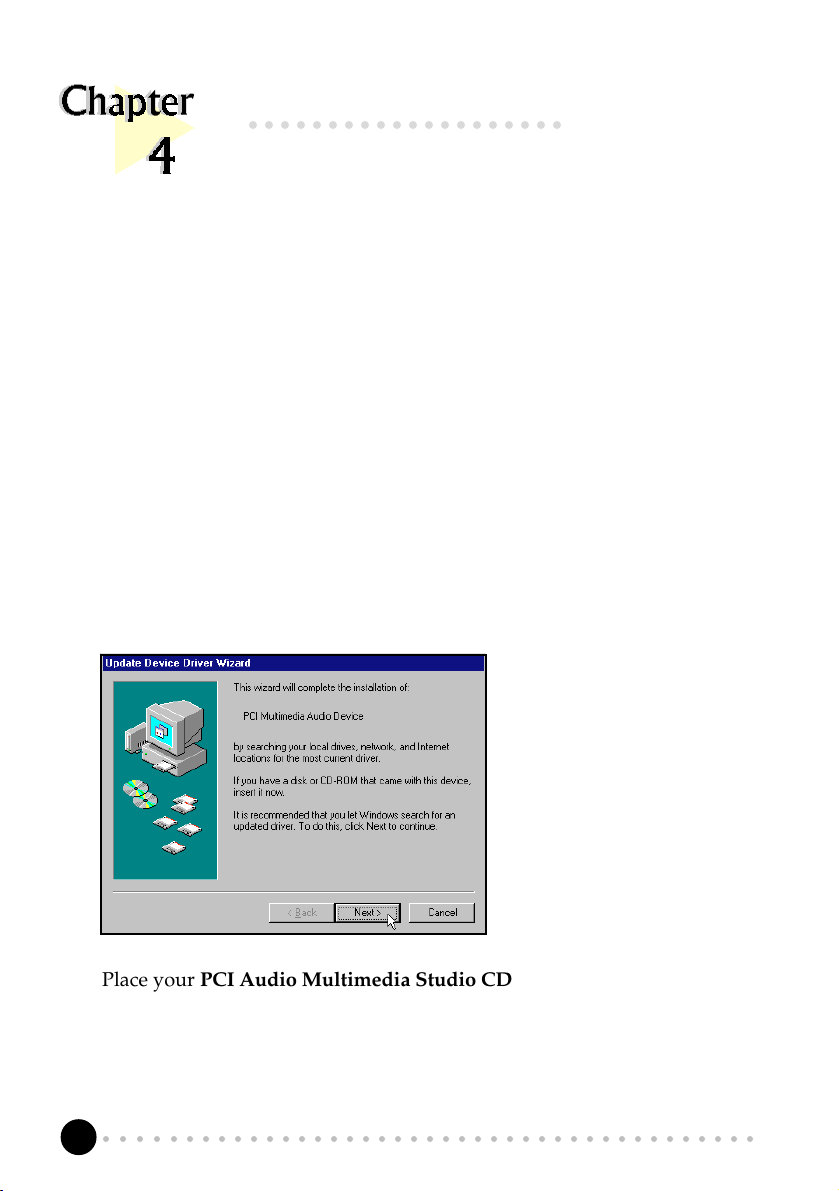
1. Power on your computer. Windows® 95 will detect your newly-installed
sound card and the following Update Device Driver Wizard will appear.
Place your PCI Audio Multimedia Studio CD in the CD-ROM drive.
Click Next.
○○○○○○○○○○○○○○○○○○○○○○○○○○○○○○○○○○○○○○○○○
12
Page 13
Chapter 4 Installing the Sound Card Drivers & Software Utilities
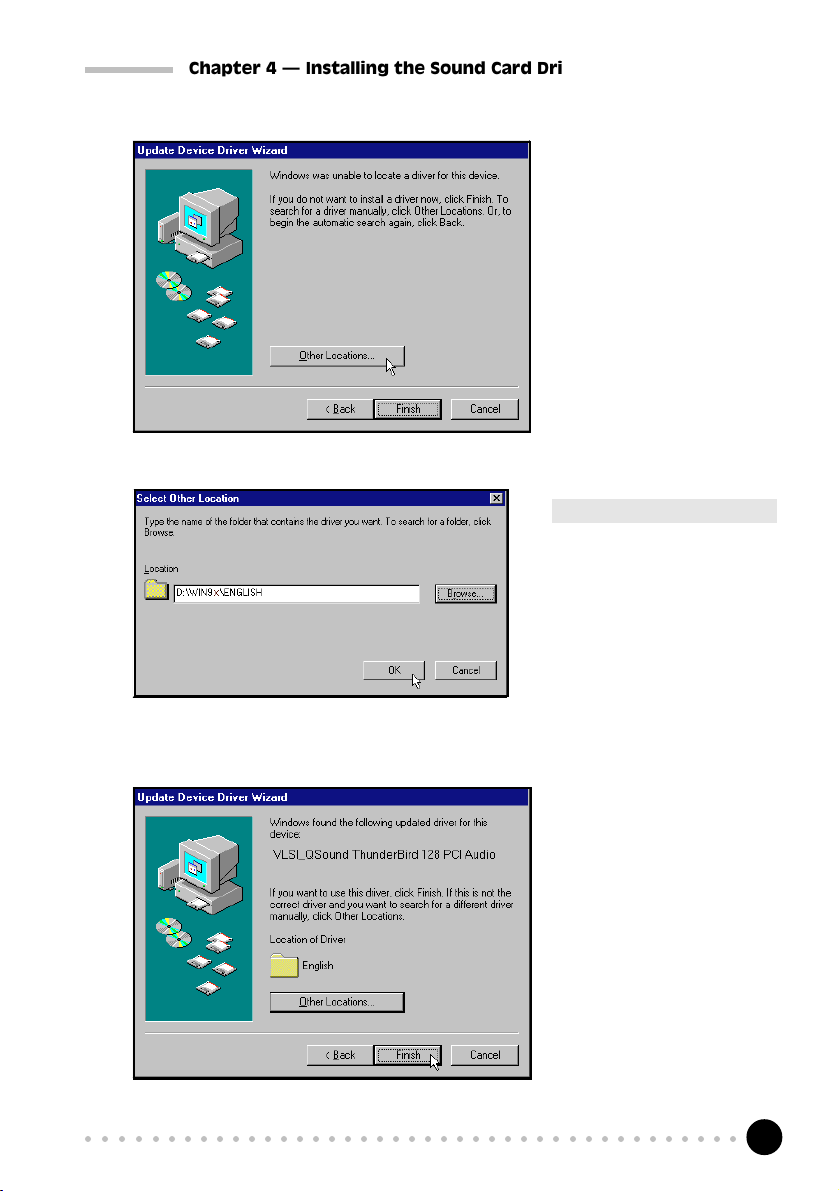
2.
Click Other Locations...
to locate the drivers from
your PCI Audio
Multimedia Studio CD.
3.
4.
Click OK.
Type
D:\WIN9x\**<Language>
in the text box.
(Assuming your CD-ROM drive
is D. If not, substitute the drive
letter accordingly)
**<Language>: You may choose
either English, German, French,
Italian, Spanish or Dutch
language.
x denotes Windows 95/98
Windows will prompt that
it has located your drivers.
Click Finish to start the
installation.
○○○○○○○○○○○○○○○○○○○○○○○○○○○○○○○○○○○○○○○○○
13
Page 14

PCI 368DSP Sound Card Users Manual
5.
Click OK to proceed.
6.
Type D:\WIN9x\**<Language> in the text box.
**<Language>: You may choose either English, German, French, Italian, Spanish or Dutch
language.
x denotes Windows 95/98
Click OK.
7. Windows® 95 may now prompt you for your Windows 95 CD.
This usually happens if you did not install any Windows® 95 multimedia
applications previously. Carry out the following:
(i) Place your Windows 95 CD in the CD-ROM drive and click OK.
(ii) Specify where the required files can be found on the Windows 95 CD
and click OK.
○○○○○○○○○○○○○○○○○○○○○○○○○○○○○○○○○○○○○○○○○
14
Page 15

Chapter 4 Installing the Sound Card Drivers & Software Utilities
The selected multimedia applications will be installed.
8. Place the PCI Audio Multimedia Studio CD in the CD-ROM drive when
prompted and click OK.
9. The system proceeds with the Software Synthesizer setup (for enhanced
sound quality). Follow the on-line instructions to complete the installation.
If the Software Synthesizer installation is not activated, you may manually
run it from your PCI Audio Multimedia Studio CD.
(i) From the Windows taskbar, click Start > Run.
(ii) In the Run text box, type
"D:\SoftSynt\**<Language>\Disk1\setup.exe"
**<Language>: You may choose either English, German, French, Italian,
Spanish or Dutch language.
(iii) Click OK.
10. Upon completion, you will be prompted to restart your system. Select the
option Yes, I want to restart my computer now and click Finish.
11. Upon system start-up, you will be prompted a DirectX(R) setup. Click
ReInstall DirectX and restart your system again.
12. A ThunderBird 128 Control Panel applet will be created.
To run the application, see section 5.1 - Running ThunderBird 128 Control
Panel. Else, you may proceed to section 4.4 - Installing Clef Studio 3.0.
○○○○○○○○○○○○○○○○○○○○○○○○○○○○○○○○○○○○○○○○○
15
Page 16

PCI 368DSP Sound Card Users Manual
4.1.2 For Windows® 98
1. Power on your computer. Windows® 98 will run and detect your newly
installed sound card. Click Next.
2. Click the option Search for the best driver for your device (Recommended).
Click Next.
○○○○○○○○○○○○○○○○○○○○○○○○○○○○○○○○○○○○○○○○○
16
Page 17

Chapter 4 Installing the Sound Card Drivers & Software Utilities
3. Place the PCI Audio Multimedia Studio CD in the CD-ROM drive.
Select the option Specify a location. In the text box, type:
D:\Win9x\**<Language>
(Assuming your CD-ROM drive is D. If not, substitute the drive letter accordingly)
**<Language>: You may choose either English, German, French, Italian, Spanish or Dutch
language.
x denotes Windows 95/98
Click Next.
4.
Windows will prompt
that it has located your
drivers.
Click Next to start the
installation.
○○○○○○○○○○○○○○○○○○○○○○○○○○○○○○○○○○○○○○○○○
17
Page 18

PCI 368DSP Sound Card Users Manual
5.
Click Finish to com-
plete the installation.
6. The system proceeds with the Software Synthesizer setup (for enhanced
sound quality). Follow the on-line instructions to complete installation.
If the Software Synthesizer installation is not activated, you may manually
run it from your PCI Audio Multimedia Studio CD.
(i) From the Windows taskbar, click Start > Run.
(ii) In the Run text box, type
"D:\SoftSynt\**<Language>\Disk1\setup.exe"
**<Language>: You may choose either English, German, French, Italian,
Spanish or Dutch language.
(iii) Click OK.
7. Upon completion, you will be prompted to restart your system. Select the
option Yes, I want to restart my computer now and click OK.
8. Upon system start-up, you will be prompted a DirectX(R) setup. Click
ReInstall DirectX and restart your system again.
9. A ThunderBird 128 Control Panel applet will be created.
To run the application, see section 5.1 - Running ThunderBird Control Panel.
Else, you may proceed to section 4.4 - Installing Clef Studio 3.0.
○○○○○○○○○○○○○○○○○○○○○○○○○○○○○○○○○○○○○○○○○
18
Page 19

Chapter 4 Installing the Sound Card Drivers & Software Utilities
4.1.3 For Windows NT® 4.0
1. Power on your computer to start Windows NT®.
2. Place your PCI Audio Multimedia Studio CD in the CD-ROM drive.
3. From Windows NT® taskbar, click Start > Run.
4. In the Run text box, type "D:\NT40\**<Language>\setup.exe".
(Assuming your CD-ROM drive is D. If not, substitute the drive letter accordingly)
**<Language>: You may choose either English, German, French, Italian, Spanish or Dutch
language.
Click OK.
5. Follow the on-line instructions to complete the installation. A ThunderBird
128 Control Panel applet will be created.
To run the application, see section 5.1 - Running ThunderBird Control Panel.
Else, you may proceed to section 4.4 - Installing Clef Studio 3.0.
4.2 Installing Clef Studio 3.0
1. Start Windows® 95/98 or Windows NT® 4.0.
2. Place the PCI Audio Multimedia Studio CD in the CD-ROM drive.
3. From the Windows taskbar, click Start > Run.
Type D:\Apps\Clef3\**<Language>\setup.exe in the text box.
(Assuming your CD-ROM drive is D. If not, substitute the drive letter accordingly)
**<Language>: You may choose either English, German, French, Italian, Spanish or Dutch
language.
○○○○○○○○○○○○○○○○○○○○○○○○○○○○○○○○○○○○○○○○○
19
Page 20

PCI 368DSP Sound Card Users Manual
Click OK .
4. Upon completion, a Clef Studio 3.0 program group containing the
multimedia applications will be created. To run the application, see section
5.2 - Running Clef Studio 3.0.
4.3 Installing Voyetra MIDI Orchestrator Plus
(applicable for Germany only)
1. Start Windows® 95/98 or Windows NT® 4.0.
2. Place the PCI Audio Multimedia Studio CD in the CD-ROM drive.
3. From the Windows taskbar, click Start > Run.
Type D:\Apps\Vmoplus\setup.exe in the text box.
(Assuming your CD-ROM drive is D. If not, substitute the drive letter accordingly)
Click OK .
4. System will run the Voyetra setup. Follow the on-line instructions to
complete the installation.
Upon completion, a Voyetra program group containing the MIDI Orchestrator
Plus will be created. To run the application, see section 5.3 - Running Voyetra
MIDI Orchestrator Plus.
○○○○○○○○○○○○○○○○○○○○○○○○○○○○○○○○○○○○○○○○○
20
Page 21

Chapter 4 Installing the Sound Card Drivers & Software Utilities
4.4 Installing DOS Drivers/Utilities for DOS Games
(This section is only applicable to Windows® 95 and Windows®98 users)
If you are playing DOS games, you will need to install the DOS drivers that
comes with the PCI Audio Multimedia Studio CD.
1. From Windows® 95/98 taskbar, click Start > Run.
2. In the Run text box, type D:\Inst_dos.bat and click OK.
(Assuming your CD is still in your CD-ROM drive is D)
Follow the on-line instructions to complete the installation. Upon
completion, restart your system ( Start > Shut Down... > Restart).
For playing of DOS games, you have to be in real-mode DOS. Restart
your system. Immediately after Windows restarting... message, press
<F8>. Select the Command prompt only option. You may execute
your DOS games in this environment.
For volume and configuration settings, type tbirdctl.exe in C prompt
(C:\) and hit <Enter>. Follow the on screen instructions to change
the settings.
○○○○○○○○○○○○○○○○○○○○○○○○○○○○○○○○○○○○○○○○○
21
Page 22

PCI 368DSP Sound Card Users Manual
○○○○○○○○○○○○○○○○○○○○
Running the Software Utilities
This chapter will give a brief guideline on running the
- ThunderBird 128 Control Panel Applet (for sound configurations)
- Clef Studio 3.0 (for creating and editing of sound files)
- MIDI Orchestrator Plus (for creating and playing of MIDI files)
5.1 Running ThunderBird 128 Control Panel
ThunderBird 128 Control Panel gives you access to the speaker settings,
volume control, sound recorder, CD Player and so on.
1. From the Windows taskbar, click Start > Settings > Control Panel.
2. Double-click the Thunder Bird 128 icon.
(Alternatively, you may double-click the icon at the corner of the taskbar.)
3. The ThunderBird 128 Control Panel will be displayed. The following
sections will describe the settings and options available under this applet.
○○○○○○○○○○○○○○○○○○○○○○○○○○○○○○○○○○○○○○○○○
22
Page 23

5.1.1 Control Panel
Chapter 5 Running The Software Utilities
for adjusting volume
for recording of sound outputs
and playback of wave files
for playing of video and sound
files
for playing of audio CDs
for configuring your sound card
and video settings
5.1.2 Demo
These programs allows you to perform the
3-dimensional sound demonstrations on
your 2/Quad speakers. You should be
able to determine the source of the sound
from the demo programs.
○○○○○○○○○○○○○○○○○○○○○○○○○○○○○○○○○○○○○○○○○
23
Page 24

PCI 368DSP Sound Card Users Manual
5.1.3 Settings
5.1.4 MIDI
Headphone : select this when you are using
your headphones
2 Speakers : select this when you are using
only the front 2 speakers
- 2D to 3D
expands normal stereo
panning to 3D when using a
2D DirectSound program
- QXpander
expands sound field to 3D for
stereo audio from Audio CD/
DVD
Quad : select this when you are using
all 4 speakers
- QMSS
redistributes image across all
4 speakers when playing
Audio CD/DVD
(for waves and MIDI files,
QMSS is enabled by default)
Studio
None : select this if you do not want to
have any special sound effects
Chorus : to adjust the chorus effect level
of the sound output
Reverb : to adjust the reverb effect level
of the sound output
Game
offers moderate wavetable quality for games
Max Polyphony
offers the highest wavetable quality (more
memory required)
○○○○○○○○○○○○○○○○○○○○○○○○○○○○○○○○○○○○○○○○○
24
Page 25

Chapter 5 Running The Software Utilities
5.1.5 QEM
QSound Environment Modeling
QEM : QEM is an environmental audio
rendering engine providing reverbe-
ration and other special audio effects.
It is compatible with the EAX API
(Application Programming Interface)
provided to software developers by
Creative Labs, Inc.
QEM for details)
Default Environment
Select from the drop-down list your preferred
default environment.
(This option will only affect Non-EAX games.
EAX games will use the environmental
effects pre-programmed with the game)
(see Appendix D -
5.2 Running Clef Studio 3.0
Clef Studio 3.0 is a comprehensive audio application that comes with PCI 368DSP.
Besides playing your favourite Audio CD, you are also able to create, record and
edit sound files using this utility.
1. From the Windows taskbar, click Start > Programs > Clef Studio 3.0.
2. Double-click Clef Studio 3.0.
3. A virtual mini-hifi will be displayed. It has similar functions to a mini-
hifi system found in most houses. The on-line help (Help > Contents) will
give a detailed descriptions on running the player.
5.3 Running Voyetra MIDI Orchestrator Plus
(applicable for Germany only)
1. From the Windows taskbar, click Start > Programs > Voyetra.
2. Double-click MIDI Orchestrator Plus.
3. The on-line help (Help > Contents) will give a detailed descriptions on
running the MIDI Orchestrator Plus.
○○○○○○○○○○○○○○○○○○○○○○○○○○○○○○○○○○○○○○○○○
25
Page 26

PCI 368DSP Sound Card Users Manual
○○○○○○○○○○○○○○○○○○○○
Frequently Asked Questions
This chapter highlights some of the more commonly asked questions and their possible
solutions. Reviewing this chapter can help you solve many problems and often
eliminate the need for telephone assistance.
Will PCI 368DSP work on all motherboards ?
Yes, it will if the motherboard has at least one free PCI slot and meets the
minimum system requirements (see section 2.1 - Minimum System
Requirements).
Is PCI 368DSP full-duplex capable ?
Full duplex is the ability for a sound card to record and playback audio at the
same time. PCI 368DSP is able to do this while maintaining full 16-bit 48KHz
quality.
Why is it that some of my games do not seem to work with the Q3D
Positional Sound feature?
Not all games, especially older ones, support the Q3D Positional Sound
feature. However, Q3D Positional Sound is becoming a popular standard
among game developers and Q3D will also work with any game written to
support the Microsoft® DirectSound3D standard.
What wave file types is PCI 368DSP compatible with (ie. what wave
types can it playback ) ?
Almost all wave files types. Most of the supported sample rates of audio
applications such as Soundforge or Wavetable are supported, although one or
two non-standard ones may not work.
○○○○○○○○○○○○○○○○○○○○○○○○○○○○○○○○○○○○○○○○○
26
Page 27

Appendix A Frequently Asked Questions
What games does PCI 368DSP support ?
It can support almost all PC titles.
Can PCI 368DSP work with A3D or EAX ?
Yes. It supports both A3D1.0 and EAX1.0.
What version of DirectX should be installed ?
For most applications and particularly for games, it is recommended that you
install DirectX5.0 or higher.
(You can install DirectX6.0 from your PCI Audio Multimedia Studio CD.
Place the CD into your CD -ROM drive. From your windows taskbar, click
Start > Run. In the text box, type D:\DirectX\Directx\Dxsetup.exe,
assuming your CD-ROM drive is D. If not, substitute the drive letter
accordingly. Click OK. DirectX6.0 will be installed in your system)
Do I need to connect all 4 speakers at the same time ?
You do not need to connect all 4 speakers to enable your sound output. You
can have only the front 2 speakers connected. To enable the 3D sound effect on
2 speakers, go to ThunderBird 128 Control Panel, select Settings tab,
click 2 Speaker option and select 2D to 3D (or QXpander option if you are
listening from Audio CD/DVD).
What does 2D to 3D remapping do ?
For 2D sound games, 2D to 3D option (found in ThunderBird 128 Control
Panel) is able to convert the 2D sound to 3D sound. For games that play 3D
sound, Q3D will work with 2 speakers on all DirectSound3D games and
A3D1.0 games.
What does QXpander do?
QXpander expands sound field to 3D for stereo audio from Audio CD/
DVD.
○○○○○○○○○○○○○○○○○○○○○○○○○○○○○○○○○○○○○○○○○
27
Page 28

PCI 368DSP Sound Card Users Manual
Why isnt there any sound from the speakers ?
Go through the following steps:
1. Make sure that the connections from your speakers to your computer are
as described in section 3.2 - Connecting Your Sound Card.
2. Your speakers are active (amplified) speakers (with built in power supply
and amplifer). Passive speakers (without built in power supply and
amplifer) can only be used if connected to an external amplifer.
3. Power from the Mains to your speakers are properly connected and powered
ON.
4. You are running Windows® 95/98/NT®4.0. If you are running Windows
95, you need to install DirectX that comes with your CD. (See the FAQ
- What version of DirectX should be installed ?)
5. The Output Mode (ThunderBird 128 Control Panel > Settings tab)
must be set to Speaker if you are using only the 2 front speakers and to
Quad, if you are using 4 speakers.
There is a yellow exclamation mark (error) for the VLSI_QSound
ThunderBird 128 PCI Legacy Audio device.
®
Certain motherboards with USB capability may encounter this problem. The
USB port(s), when enabled, may contend with the PCI 368 Sound Blaster
Emulation device for the same IRQ resource resulting in a conflict.
The PCI 368 Sound Blaster Emulation device typically uses IRQ 5 and IRQ
10.
Depending on the type of motherboard you have, there may be 2 possible ways
to solve this problem:
1. Reserve IRQ 5 for ISA slots (configurable in the BIOS).
2. Disable COM Port 2 (configurable in the BIOS).
○○○○○○○○○○○○○○○○○○○○○○○○○○○○○○○○○○○○○○○○○
28
Page 29

Appendix A Frequently Asked Questions
How do I de-install the audio drivers ?
Windows 95/98
1. From the Windows taskbar, click Start > Settings >Control Panel.
2. Double-click Add/Remove Programs icon.
3. Select ThunderBird PCI Audio Support Files from the window
prompted and click Add/Remove... .
4. The audio drivers for the ThunderBird will be removed.
Windows NT
1. From the Windows taskbar, click Start > Settings > Control Panel .
2. Double-click on the Add/Remove Programs icon.
3. Select your product devices and click Add/Remove.
4. The system will start removing your sound card drivers. Upon completion,
click Finish and restart your system.
How do I see the resources listings ?
Windows 95/98
1. From the Windows taskbar, click Start > Settings > Control Panel.
2. Double-click the System icon.
3. Select Device Manager and double-click Sound, video and game
controllers. Select your device and click Properties. Click Resources.
The IRQ and memory range used by the card will be listed.
Windows NT
Run the Windows NT Diagnostics as follows:
1. From the Windows taskbar, click Start > Programs > Administrative
Tools (Common).
2. Click Windows NT Diagnostics. From the Diagnostics Window, click
the Resources tab > Devices tab.
3. Double-click WinAcPci.
The IRQ and memory range used by the card will be listed.
○○○○○○○○○○○○○○○○○○○○○○○○○○○○○○○○○○○○○○○○○
29
Page 30

PCI 368DSP Sound Card Users Manual
My system does not detect the sound card when I boot up for the
first time. Whats wrong?
Windows 95/98
Make sure your sound card is fully inserted into the PCI Bus slot. However, if
the sound card has been properly installed, do the following:
1. From the Windows taskbar, click Start > Settings >Control Panel.
2. Double-click System icon.
3. Click the Device Manager tab.
4. Check whether there is a yellow exclamation mark (error) on any of the
VLSI_QSound ThunderBird PCI devices. If there is, remove all devices
(by selecting each device one at a time and click Remove) and re-install the
sound card drivers. See section 4.1 - Installing the Sound Card
Drivers.
Windows NT
Not applicable.
○○○○○○○○○○○○○○○○○○○○○○○○○○○○○○○○○○○○○○○○○
30
Page 31

Appendix B Technical Specifications
○○○○○○○○○○○○○○○○○○○○
Technical Specifications
This chapter contains the technical specifications of your card. The information may be
more useful for technically inclined users.
B.1 Sound Standards Compatibility
EAX using Q3D 2.0, A3D using Q3D
DLS 1.0
®
DirectSound, DirectSound3D and DirectInput, Sound Blaster
General MIDI 1.0, MPU401 UART, Audio Codec'97 rev 1.03
B.2 Sound Card Features
, Sound Bl aster® Pro
Support Microsoft DirectSound Acceleration up to 128 channels, 64 in hardware and 64 in
MMX host
Hardware 6 4-cha nne l QSo und® Q3D Positional Sound
Hardware 64 voic es Wavetable, Software 256 v oices Wavetable
®
QSurround
QMSS (QSound Multi-Speaker System) for e xpansion of normal stereo to 4 speakers
Stereo to 3D enhancement
High-quality Sample Rate Converter and Digital Mixer
WDM Streaming and USB Ready
Supports s imultaneous full-duplex record/playback at independent sampling rate
High quality codec (>90dB SBR)
Supports OPL3 FM Emulation
PCI Bus Specifications Revision 2.1
ACPI and OnNow Power Management
Supports Legacy Address MPU401 MIDI and joystick
○○○○○○○○○○○○○○○○○○○○○○○○○○○○○○○○○○○○○○○○○
2 or 4 speaker virtualization of DVD multi-ch annel audio
31
Page 32

PCI 368DSP Sound Card Users Manual
B.3 System Audio Hardware
System Audio Sources
Mono Mic-In
Stereo Line-In
Stereo CD-In
Stereo AUX-In
TAD C on nec tor
Stereo (PCM) Digital Audio
System Audio Output
Front Channel Buffered Line-Out / Headphone Out
Rear Channel Buffered Line-Out
B.4 Interfaces
MIDI Interface
MPU401 UART Mode Interface
Full duplex interface for connectors of MIDI instruments (need optional MIDI kit)
MIDI I/O goes through the joystick po rt connector
GAME Port
MIDI port doubles as game port providing support to 2 standard PC joysticks
B.5 Connectors On Board
Audio Internal
4-pin MPC (70553 - Black) connector for CD-In
4-pin PH04 (white) connector for CD-In
4-pin PH04 (blue) connector for AUX-In
4-pin PH04 (red) connector for TAD
Audio External
3.5mm jack (red) for mono microphone input
3.5mm jack (blue) for stereo Line-In
3.5mm jack (green) for stereo Front Channel buffered Line-Out / Headphone Out
3.5mm jack (white) for stereo Rear Channel buffered Line-Out / Headphone Out
○○○○○○○○○○○○○○○○○○○○○○○○○○○○○○○○○○○○○○○○○
32
Page 33

Appendix B Technical Specifications
Wavetable Upgrade
26-pins gold flash connector for Wa vetable synthes izer daughter boar d
Game Port
D-SUB 15 connector for joystick and MIDI interface
B.6 System Audio Software OS Support
Window® 95
®
Window
Windows NT
Windows NT
Real-Mode DOS
98
®
4.0
®
5.0 (WDW)
The product specifications herein are subject to change without prior
notifications.
○○○○○○○○○○○○○○○○○○○○○○○○○○○○○○○○○○○○○○○○○
33
Page 34

PCI 368DSP Sound Card Users Manual
○○○○○○○○○○○○○○○○○○○○
Sound Card Layout
○○○○○○○○○○○○○○○○○○○○○○○○○○○○○○○○○○○○○○○○○
34
Page 35

Appendix D QEM
○○○○○○○○○○○○○○○○○○○○
QEM (QSound Labs, Inc.)
D.1 What is QEM?
QEM stands for QSound® Environmental Modeling, a sound rendering
technology that produces reverberation and other special audio effects. QEM
is compatible with the EAX1.0 API (application programming interface) from
Creative Labs which means that any game written to take advantage of EAX
will also work with your sound card.
D.2 What does QEM do?
In real life, every room, or environment you enter has some sort of reverberant
quality, depending on different factors like its size , and the material the surrounding
objects (e.g. walls, mountains, etc.) are made of.
QEM attempts to model this in a game world, by applying environment effects
to DirectSound audio streams, by way of presets that can be either set manually,
or called automatically from within an EAX-enabled program. (See Figure 1)
Figure 1. How QEM Works
○○○○○○○○○○○○○○○○○○○○○○○○○○○○○○○○○○○○○○○○○
35
Page 36

PCI 368DSP Sound Card Users Manual
From a players perspective, this means that they can get ambient environment
effects on all the Direct Sound games they play. Using ThunderBird 128
Control Panel, there are 2 ways they can achieve this:
D.2a Getting QEM To Work On A Non-EAX DirectSound Game
If the game you want to play has not been programmed to take advantage of
QEM (i.e. non EAX-Enabled DirectSound games), all you need to do is select
a suitable environment from the Default Environment list in the ThunderBird
128 Control Panel, and run the game. The effect you have selected will be
present throughout the game. You can select any standard environment from
the list.
Ensure QEM is selected
The Default
Environment only
affects Non-EAX™
games.
EAX™games will
use the environments
programmed into the
game itself.
Figure 2. Control Panel QEM Tab
○○○○○○○○○○○○○○○○○○○○○○○○○○○○○○○○○○○○○○○○○
36
Page 37

Appendix D QEM
D.2b Getting QEM to work on an EAX-ENABLED DirectSound
Game
EAX-enabled is a term used for games/applications that have been
programmed to take specific advantage of EAX technology. These games use
the EAX API to make calls regularly throughout the program to change the
current environmental effect, as is appropriate to the current in-game scenario.
Heres a typical example of what an EAX-enabled game would do: If the current
scenario in the game is a cave-like setting, the game will automatically select the
cave environment preset from the Default Environment list (this all happens
internally, so you wont see anything change in the control panel). If the players
character then moves into a larger room, the game might then call for an
Auditorium environment preset, giving the overall impression that the player
has indeed, entered a large room.
In other words, an EAX-enabled game will automatically select the appropriate
environment from the list (excluding the special game-specific presets for non-EAX
games), and will keep doing this throughout the game.
(If you manually selected a preset from the list, any EAX-enabled game you play subsequently
will make its own calls that will over-ride the setting you have selected.)
(See Figure 2)
Some examples of EAX-enabled titles on the market are, Unreal (updated with
the most recent patch), Half-life, and Jurassic Park: Trespasser.
○○○○○○○○○○○○○○○○○○○○○○○○○○○○○○○○○○○○○○○○○
37
Page 38

PCI 368DSP Sound Card Users Manual
Figure 3. How to use QEM
(Remember QEM only works with DirectX Games)
○○○○○○○○○○○○○○○○○○○○○○○○○○○○○○○○○○○○○○○○○
38
Page 39

PCI 368DSP Sound Card Users Manual
Glossary
3D Positional Sound
3-Dimensional Positional sound allows you to hear sound from from every
direction in 3D space.
A3D
Positional audio standard produced by Aureal.
Active (amplified) Speakers
Speakers having a built-in amplifier and therefore requiring an external
power supply such as an AC adapter.
API
Application Programming Interface. An interface that defines the functions/
operations a programmer uses, to write software routines, sometimes specific
to a type of hardware.
DirectX drivers
Microsofts set of standardized APIs (application programming interfaces)
for games and multimedia applications. With these standards, programmers
are able to write programs that access the hardware features of the computer
without knowing exactly what hardware will be installed on the machine
where the program eventually runs.
DLS
Downloadable Sounds. It provides a means for game developers and
composers to add their own custom sounds to the GM sound set stored in a
sound cards ROM. DLS-compatible devices will automatically download
these custom sounds from the card, disk or CD-ROM into system RAM,
allowing MIDI music to be freely augmented with new instrument sounds,
dialog or special effects, providing an unlimited palette of sounds.
○○○○○○○○○○○○○○○○○○○○○○○○○○○○○○○○○○○○○○○○○
39
Page 40

PCI 368DSP Sound Card Users Manual
EAX
Environmental Audio Extensions (EAX) by Creative Labs.
Line-In Jack
Audio-in connector on the sound card that allows you to connect to your
mini-hifi / radio / CD-ROM Player. Amplified/active speakers connected
to Line-out will output the music.
Line-Out Jack
Audio-out connector on the sound card that allows you to connect to your
amplified/active speakers . Any input to your sound card (from Line-In)
will be heard from the speakers.
Microphone Jack
Microphone connector on the sound card that allows you to connect your
microphone such that you can do voice recording or playback.
MIDI
Musical Instrument Digital Interface. It is a musical communication standard
that lets you (with the help of a MIDI keyboard/guitar) instruct a sound to
play from your synthesizer.
MIDI Port
A physical interface enabling the interconnection of multimedia computers
and electronic musical instruments to record, store and play back music
performance data in the form of MIDI commands.
PCI-Bus
Peripheral Component Interconnect expansion bus connector. The PCI bus
sends/receives data 32-bits at a time, superceding the slower 16-bit ISA
(Industry Standard Architecture) expansion bus. By making use of PCI
bus, PCI 368DSP allows higher data throughput and indirectly gives rise to
faster game play.
○○○○○○○○○○○○○○○○○○○○○○○○○○○○○○○○○○○○○○○○○
40
Page 41

PCI 368DSP Sound Card Users Manual
Plug-n-Play
Also known as PnP, it is an Intel Standard for the design of PC expansion
boards. It eliminates the need to configure the IRQ (Interrrupt Request
Channel) and DMA (Direct Memory Access) settings as well as I/O and
memory addresses when adding new peripherals. Windows will
automatically configure your new device to work properly on your system.
QEM
QSound® Environmental Modeling by QSound Labs, Inc. (See Appendix
D - QEM)
QMSS
QSound® Multi-Speaker System. QMSS redistributes image across all
4 speakers when playing stereo Audio CD/DVD. This feature can be found
in ThunderBird 128 Control Panel under the Quad speakers option.
QXpander
By QSound Labs, Inc. This feature can be found in ThunderBird 128
Control Panel under 2 speakers option. It expands sound field to 3D for
stereo audio from Audio CD/DVD.
Q3D
Patented positional 3D audio technology developed by QSound Labs, Inc.
Wavetable
A table of stored sound waves that are digitized samples of actual recorded
sound.
○○○○○○○○○○○○○○○○○○○○○○○○○○○○○○○○○○○○○○○○○
41
 Loading...