

Page 1

ADSL USB Modem
Easy Start
Read Me First)
(
Version 1.4
Protocols Discussed:
RFC 1483
RFC 1577
RFC 2364
RFC 2516
Contents...
Safety Guidelines ..................................................... 4
About this Easy Start ............................................... 4
Package.................................................................. 4
LED Indicators ........................................................ 5
Step 1: Connecting the ADSL USB Modem ................ 6
Step 2: Installing the ADSL USB Modem Driver ......... 7
Step 3: Running ADSL Modem Setup Program .......... 13
Step 4: Verifying the ADSL USB Modem .................. 14
Step 5: Configuring the IP Settings
(For RFC 1577 protocol only) ...................... 15
Step 6: Setting the PVCs values .............................. 18
Step 7: Establishing the Internet Connection
(for RFC 2364 and RFC 2516 only)............. 18
Running DSL Test ................................................... 19
Advanced Settings .................................................. 20
Uninstalling Your ADSL USB Modem ........................ 21
Troubleshooting ...................................................... 22
Windows® Me, 98, 98 Second Edition and Windows® 2000 supported
Page 2

ADSL USB Modem Easy Start
Part 15 FCC Compliance Statement
This device complies with Part 15 of FCC Rules. Operation is subject to the following two conditions:
1. This device may not cause harmful interference, and
2. This device must accept any interference received, including interference that may cause undesired
operation.
Operating Environment
For Home or Office Use
Notice
This equipment has been tested and found to comply with the limits of a Class B digital device, pursuant to Part 15 of
the FCC Rules. These limits are designed to provide reasonable protection against harmful interference in a residential
installation. This equipment generates, uses and can radiate radio frequency energy and, if not installed and used in
accordance with the instructions, may cause harmful interference to radio communications. However, there is no
guarantee that interference will not occur in a particular installation, if this equipment does cause harmful interference
to radio or television reception, which can be determined by turning the equipment off and on, the user is encouraged
to try to correct the interference by one or more of the following measures:
• Re-orient or relocate the receiving antenna.
• Increase the separation between the equipment and receiver.
• Connect the equipment into an outlet on a circuit different from that to which the receiver is connected.
• Consult the dealer or an experienced radio/TV technician for help.
Caution
To comply with the limits for the Class B digital device according to Part 15 of FCC Rules, this device must be installed
in computer equipment certified to comply with the Class B limits. All cables used to connect the computers and peripherals
must be shielded and grounded. Operation with non-certified/shielded cables may result in radio/TV interference.
Modification
Any modification not expressly approved by the manufacturer of this device could void the user’s authority to operate
the device.
Party Responsible for Product Compliance:
Aztech Labs, Inc.
45645 Northport Loop East
Fremont, CA 94538, U.S.A.
Part 68 FCC Compliance Statement
(FCC ID : 4J2SNG-47095-DL-N)
This equipment complies with Part 68 of the FCC Rules. On the equipment is a label that contains, among other
information, the FCC registration number and ringer equivalence number (REN) for this equipment. If requested, this
information must be provided to your telephone company.
Connection to the telephone network should be made by using standard modular telephone jack type RJ11.
The REN is useful to determine the quantity of devices you may connect to your telephone line and still have all of those
devices ring when your telephone number is called. In most, but not all areas, the sum of the RENs of all devices connected
to one line should not exceed five (5.0). To be certain of the number of devices you may connect to your line, as determined
by the REN, you should contact your local telephone company to determine the maximum REN for your calling area.
If your telephone equipment causes harm to the telephone network, the telephone company may discontinue your service
temporarily. If possible, they will notify you in advance. But if advance notice is not practical, you will be notified as soon
as possible. You will be informed of your right to file a complaint with the FCC.
2
Page 3

ADSL USB Modem Easy Start
Your telephone company may make changes in its facilities, equipment, operations or procedures that could affect
the proper functioning of your equipment. If they do, you will be notified in advance to give you an opportunity to maintain
uninterrupted telephone service.
In the event this equipment should fail to operate properly, disconnect the unit from the telephone line. Try using another
FCC approved telephone in the same telephone jack. If the trouble persists, call the telephone company repair service
bureau. If the trouble does not persist and appears to be with this unit, disconnect the unit from the telephone line and
discontinue use of the unit until it is repaired. Please note that the telephone company may ask that you disconnect this
equipment from the telephone network until the problem has been corrected or until you're sure that the equipment is
not malfunctioning.
This equipment may not be used on coin service provided by the telephone company. Connection to party lines is subject
to state tariffs.
The Telephone Consumer Protection Act of 1991 makes it unlawful for any person to use a computer or other electronic
device to send any message via a telephone fax machine unless such message clearly contains in a margin at the top
or bottom of each transmitted page or on the first page of the transmission, the date and time it is sent and an identification
of the business or other entity, or individual sending message and the telephone number of the sending machine or such
business, or entity, or individual.
This user information can be programmed in the communication software you are using with your equipment.
Repair or Service Information
In the event of the need for service or repair, carefully package the unit along with a note of the problem and send it
to the address below or the authorized service center nearest you. Be sure to include your address (not a P.O Box),
telephone number and best time to call.
Attn:
Aztech Labs, Inc.
45645 Northport Loop East
Fremont, CA 94538, U.S.A.
Industry Canada Information
NOTlCE: The Industry Canada label identifies certified equipment. This certification means the equipment meets
telecommunications network protective, operational and safety requirements as described in the appropriate Terminal
Equipment Technical Requirements document(s). The Department does not guarantee the equipment will operate to the
user’s satisfaction.
Before installing this equipment, users should ensure that it is permissible to be connected to the facilities of the local
telecommunications company. The equipment must also be installed using an acceptable method of connection. The
customer should be aware that compliance with the above conditions may not prevent degradation of service in some
situations.
Repairs to certified equipment should be coordinated by a representative designated by the supplier. Any repairs or
alterations made by the user to this equipment, or equipment malfunctions, may give the telecommunications company
cause to request the user to disconnect the equipment.
Users should ensure for their own protection that the electrical ground connections of the power utility, telephone lines
and internal metallic water pipe system, if present, are connected together. This precaution may be particularly important
in rural areas.
Caution: Users should not attempt to make such connections themselves, but should contact the appropriate electric
inspection authority, or electrician, as appropriate.
NOTICE:
The
Ringer Equivalence Number (REN) assigned to each terminal device provides an indication of the maximum number
of terminals allowed to be connected to a telephone interface. The termination on an interface may consist of any
combination of devices subject only to the requirement that the sum of the Ringer Equivalence Numbers of all of the devices
does not exceed 5.
3
Page 4
ADSL USB Modem Easy Start
Product warranty does not apply to damage caused by lightning, power surges or wrong voltage.
Safety Guidelines
• Keep the modem away from fluid, direct sunlight and excessive heat
• During times of lightning strike/thunderstorm, do not use the modem
• This product is for use only in UL Listed computers
• To reduce the risk of fire, use only No. 26 AWG or larger telecommunication
line cord
About this
Easy Start
This booklet contains information on setting up your
ADSL USB Modem. It touches on the key installation
procedures to help you setup your modem in a breeze!
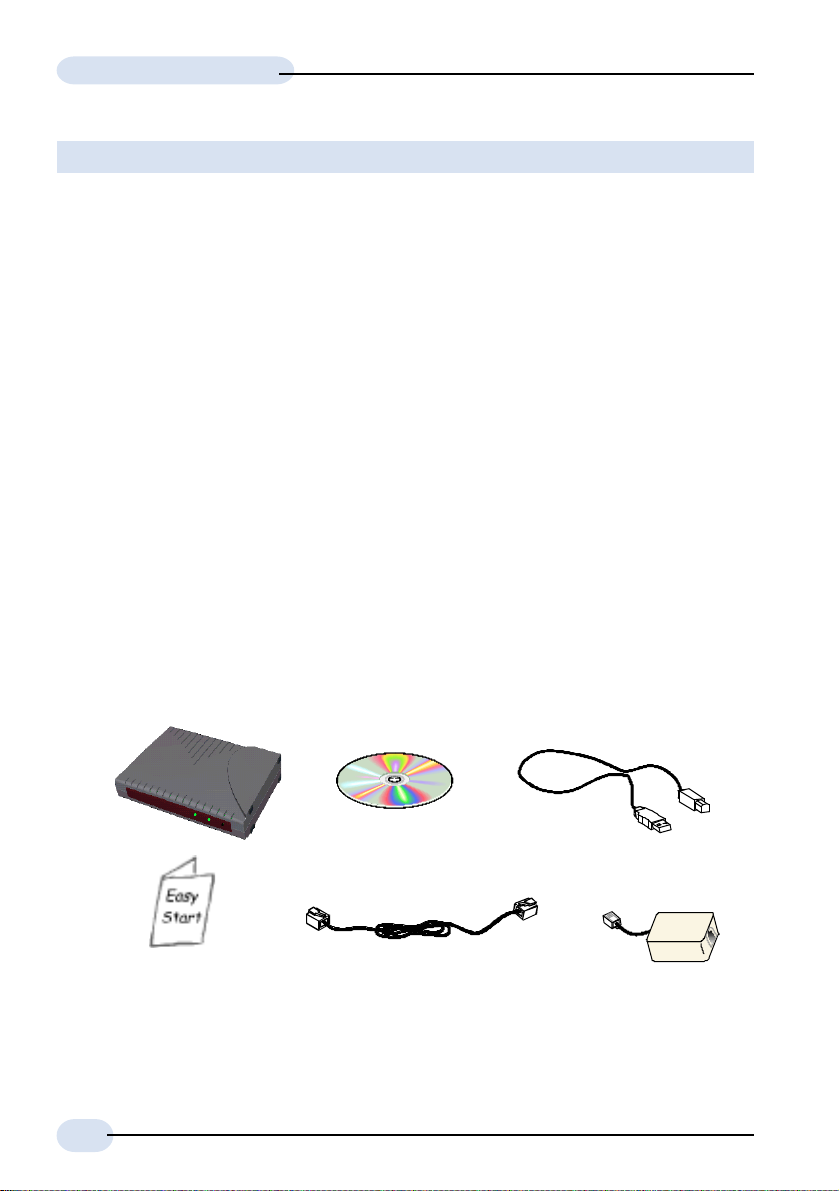
Package
Please check that you have the following items in your package. If you found
any missing items, please contact your dealer immediately.
(The actual cables that are included with your package may differ in appearance from country to
country)
Ê
Í
this Easy Start
ADSL USB Modem
Installation CD
Ë
Telephone extension cable
Î
Ì
Ï
USB cable
Micro-Filter
(optional)
1
1 Micro-Filter is only required for product model with '(M)'. If you are unsure of your product
model, refer to the label at the bottom of your modem casing. The Micro-Filter may or may not
be bundled with your package, depending on country purchased. If it is not bundled, you may
purchased it separately from your dealer.
4
Page 5
ADSL USB Modem Easy Start
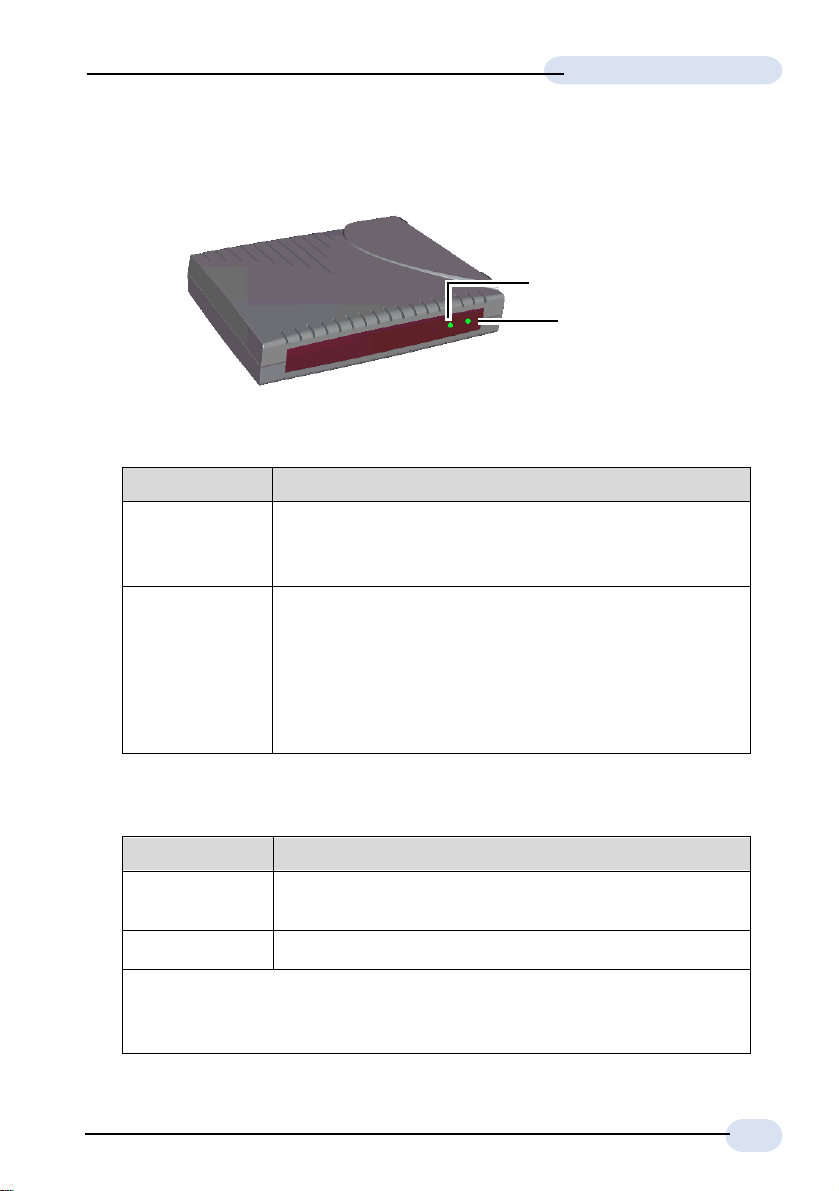
LED Indicators
Ë ADSL LINK
Ê POWER
Ê POWER
LEDs Activity Descriptions
Lights up When you have connected your modem to the
computer. Your computer must also be powered
on for the LED to light up.
Off i. You have not connected your modem to your
computer properly. See Step 1 - Connecting
Your ADSL USB Modem.
ii. You have not powered on your computer.
If problem persists, contact your dealer immediately.
Ë ADSL LINK
LEDs Activity Descriptions
Flashes Your modem is trying to establish an ADSL
connection.
Lights up When the ADSL connection is established.
If the ADSL Link LED keeps flashing and does not remain lit up, it
could be that your ADSL services has not been activated. Please
contact your ADSL Service Provider.
5
Page 6
ADSL USB Modem Easy Start
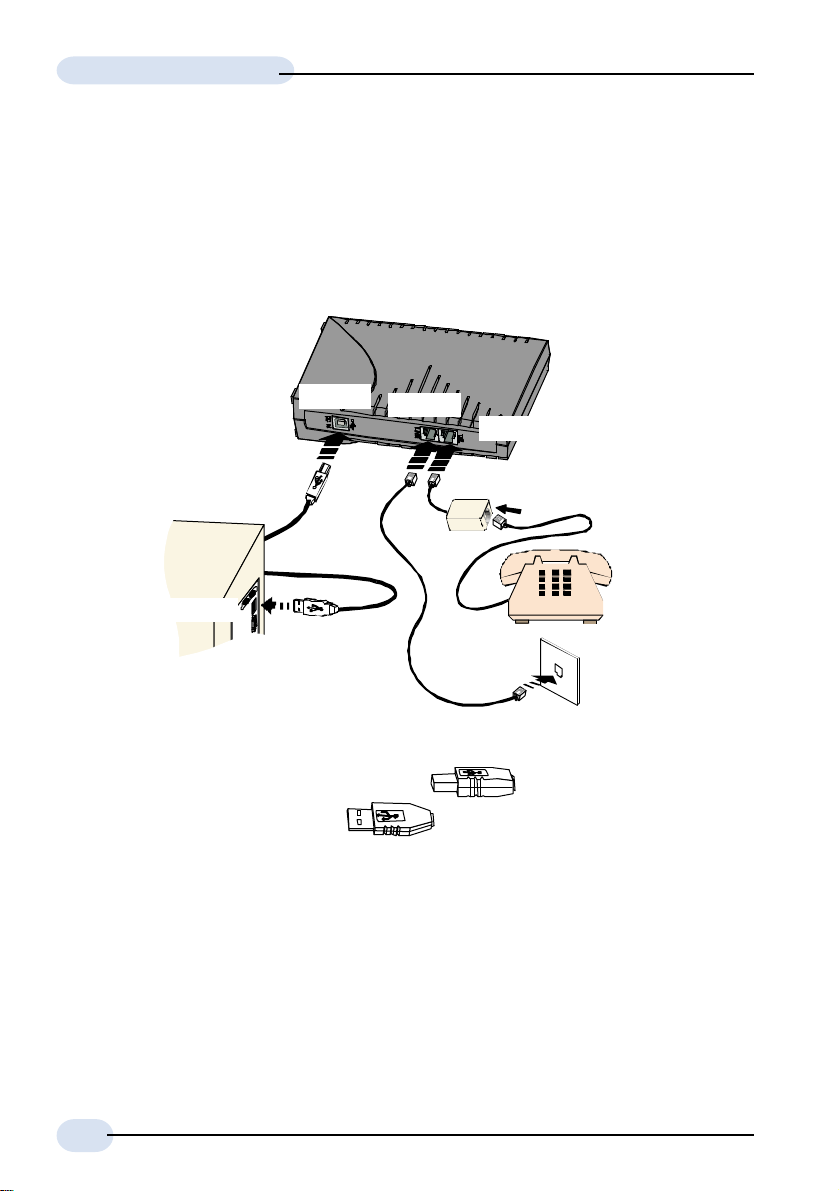
Step 1: Connecting the ADSL USB Modem
With the "Hot Swap" feature in this modem, you can connect your modem to your
computer anytime, without having to power off your system!
Carry out the connections as illustrated.
USB Port
LINE jack
TEL jack
Micro-Filter
2
Ì
USB cable
Ê
USB port
Telephone
extension
cable
Telephone set
Telephone
wall socket
Ë
Ê Connect one end of the USB cable ( ) to the USB Port on your
modem and the other end ( ) to the USB port of your computer.
Ë Connect one end of the telephone extension cable to the Line Jack on your
modem and the other end to the telephone wall socket.
Ì A telephone set can be connected to the Tel Jack on your modem.
(This optional connection enables you to use your telephone and your modem
concurrently.)
2 Micro-Filter is only required for product model with '(M)'. If you are unsure of your product model,
refer to the label at the bottom of your modem casing. For details on the usage of the Micro-
Filter, please refer to the Troubleshooting section, 'Do I need to use Micro-Filter when using
ADSL?'
6
Page 7
ADSL USB Modem Easy Start
Step 2: Installing the
ADSL USB Modem Driver
The following contains the driver installation instructions for protocols RFC 1483,
RFC 1577, RFC 2364 and RFC 2516. You only need to install one of them, as
determined by your ADSL Service Provider.
1. For Windows® 9x users, depending on your system’s configurations, you may be prompted for your Windows CD-ROM during the
driver installation. Have it ready by your side.
2. The screen shots, screens information and steps illustrated
in this manual serve only as a guide. The exact information
and steps you see on your system may vary, depending on
your system configurations. For any dissimilarities, follow
closely to the instructions as prompted on your PC screen.
2.1 Installing the ADSL USB Modem Driver
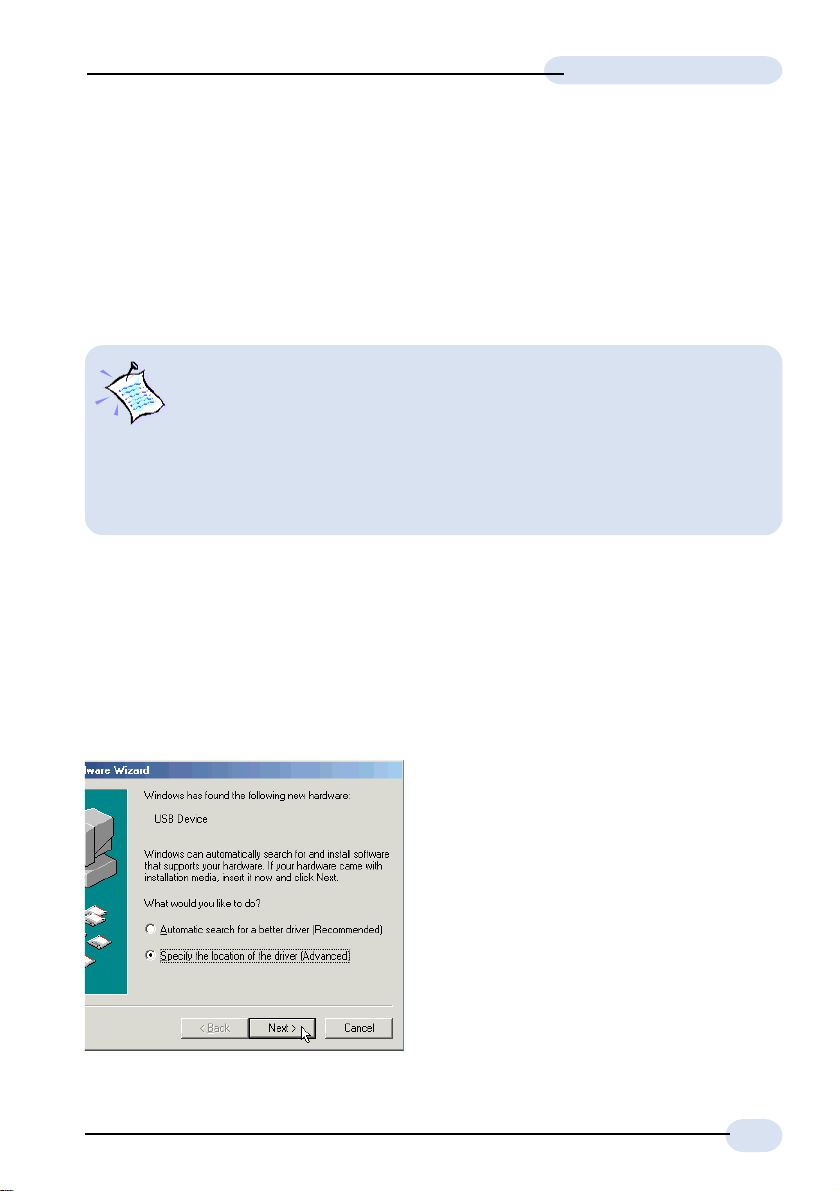
- For Windows® Me
Power on your computer (if it is not powered on during connection). If you have
connected the USB cable from your computer to your modem as illustrated in
Step 1, you will be prompted with the following window to install the driver.
i. Place the Installation CD into
your CD-ROM Drive.
Select Specify the location of
the driver (Advanced) and click
Next.
7
Page 8
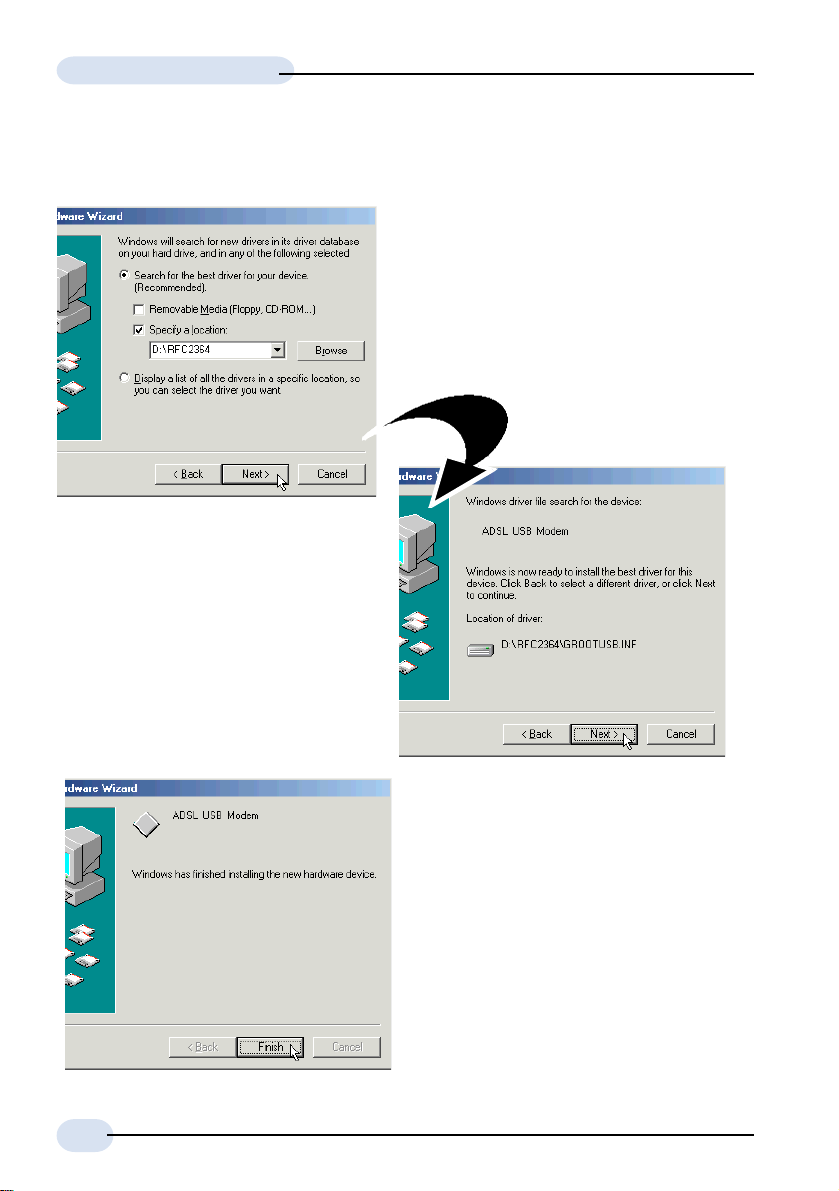
ADSL USB Modem Easy Start
(RFC2364 protocol is used as an illustration throughout this manual. Replace
it accordingly with your assigned one.)
ii. Select Specify a location.
Click Browse and navigate to the
required protocol folder, (e.g.
\RFC2364) on your Installation
CD.
Click Next.
iii. Click Next again to
proceed installation
with the specified
driver.
iv. Click Finish and proceed with
the second stage of
installation - Step 3:
Running ADSL Modem Setup
Program.
8
Page 9

ADSL USB Modem Easy Start
2.2 Installing the ADSL USB Modem Driver
®
- For Windows
Power on your computer (if it is not powered on during connection). If you have
connected the USB cable from your computer to your modem as illustrated in
Step 1, you will be prompted with the following window to install the driver.
98 Second Edition / 98
i. Place the Installation CD
into your CD-ROM Drive
and click Next.
ii. Select Search for the
best driver for your
device (Recommended)
and click Next.
(RFC2364 protocol is used as an
illustration throughout this manual.
Replace it accordingly with your
assigned one.)
iii. Select Specify a location. Click
Browse and navigate to the
required protocol folder (e.g.
\RFC2364) on your Installation
CD.
Click Next.
9
Page 10

ADSL USB Modem Easy Start
v. Click Finish and proceed
with the second stage of
installation - Step 3:
Running ADSL Modem
Setup Program.
iv. Click Next to proceed
installation with the
specified driver.
10
Page 11

ADSL USB Modem Easy Start
2.3 Installing the ADSL USB Modem Driver
®
- For Windows
Power on your computer (if it is not powered on during connection). If you have
connected the USB cable from your computer to your modem as illustrated in
Step 1, you will be prompted with the following window to install the driver.
2000
i. Place the Installation CD
onto your CD-ROM Drive
and click Next.
ii. Select Search for a
suitable driver for my
device (recommended)
and click Next.
iii. Select Specify a
location and click
Next.
11
Page 12

ADSL USB Modem Easy Start
(RFC2364 protocol is used as an illustration throughout this manual. Replace
it accordingly with your assigned one.)
iv. Click Browse and navigate
to the required protocol
folder (e.g. \RFC2364) on
your Installation CD.
Click OK.
v. Click Next again to
proceed installation
with the specified
driver.
12
vi. Click Finish and proceed with
the second stage of
installation. See Step 3:
Running ADSL Modem Setup
Program.
Page 13

ADSL USB Modem Easy Start
Step 3: Running ADSL
Modem Setup Program
i. At the following Welcome prompt, click Next. The detection of the hardware
will begin.
For Windows® Me
Upon copying files complete, click Finish to complete the installation. Restart
when prompted.
For Windows® 98 Second Edition / 98
You may be prompted for the Windows CD-ROM. Place the Windows CD-
ROM into your CD-ROM Drive and click OK.
At the prompt for files location, enter the path of your Windows CD-ROM (e.g
D:\win98) in the text box and click OK.
Restart when prompted.
For Windows® 2000
You may be prompted with a Digital Signature Not Found window twice.
Click Ye s on both occasions to proceed.
Click Finish to complete the installation.
ii. Proceed with Step 4 - Verifying the ADSL USB Modem to verify if your driver
has been installed successfully.
13
Page 14

ADSL USB Modem Easy Start
Step 4: Verifying the ADSL USB Modem
i. Ensure that your computer is powered on.
ii. From your Windows desktop, right-click on My computer icon and select
Properties.
For Windows® Me / 98 Second Edition / 98
Select the Device Manager tab. Double-click on Network adapters.
For Windows® 2000
Click on the Hardware tab and Device Manager button.
For Windows Me/98SE/98
For Windows 2000
iii. You should see ADSL USB Modem listed. This means that your modem has
been installed successfully.
If you see an exclamation mark displayed besides your modem device, it
means that you have not installed your driver properly. Click on the device
and select Remove. Install your driver again.
If your modem device is not listed at all, it also means that you did not install
the driver properly. Install your driver again.
If you are installing RFC1577 protocol, please proceed with Step 5 - Configuring
the IP Settings. For the rest of the protocols, please proceed with Step 6 -
Establishing the Internet Connection.
14
Page 15
ADSL USB Modem Easy Start
Step 5: Configuring the IP Settings
(For RFC 1577 protocol only)
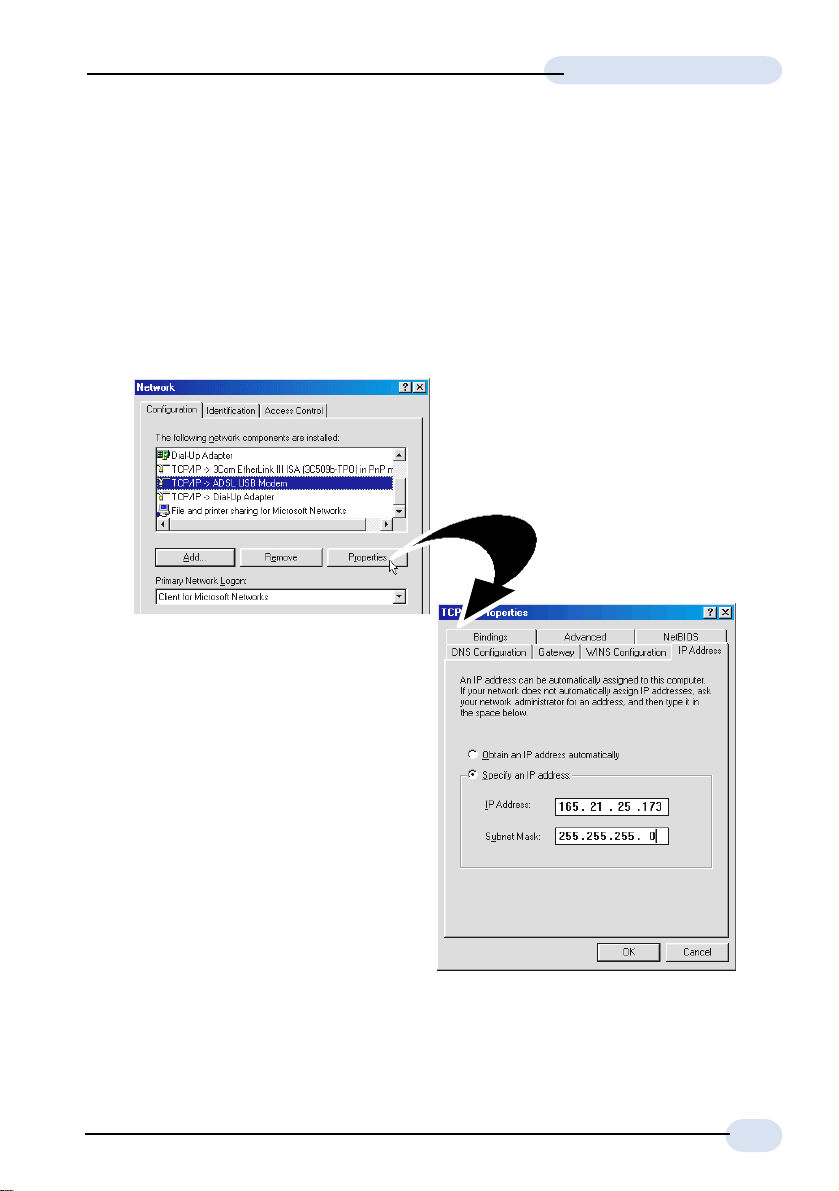
5.1 Configuring the IP Settings
- For Windows® Me / 98 Second Edition / 98
i. From your Windows desktop, right-click on the Network Neighborhood icon.
Select Properties.
ii. From the Configuration
tab, select TCP/IP-> ADSL
USB Modem and click
Properties.
iii. Select the IP Address tab.
Click Specify an IP address.
Enter the addresses as given by
your ADSL Service Provider and
click OK.
(Addresses shown here
are for examples only.)
15
Page 16

ADSL USB Modem Easy Start
iv. Select DNS Configuration tab.
Click Enable DNS.
Enter the Host name.
Enter the DNS Server Search Order.
addresses and click Add. (Values to be
provided by your ADSL Service Provider)
v. Select the Gateway tab.
Enter the New Gateway
address assigned by your
ADSL Service Provider and
click Add.
Proceed with Step 6 to set the VPI and VCI values.
16
vi. Select Advanced
tab.
Select Yes from the
Value drop-down
list and click OK.
Page 17

ADSL USB Modem Easy Start
5.2 Configuring the IP Settings - For Windows® 2000
i. From your Windows desktop, right-click on the icon My Network Places.
Select Properties.
At the Network and Dial-
up Connections window,
double-click on the Local
Area Connection icon.
If you have previously installed Network Card(s) and/or Modem Card(s) in your system,
you will see more than one Local Area Connection icons displayed. Double-click on
one of the icons. From the Connect using field at the Properties dialog box, you
should see ADSL USB Modem listed (see below for illustration). If not, double-click
another Local Area Connection icon and check.
ii. Ensure that the field Connect Using
indicates ADSL USB Modem.
Select Internet Protocol (TCP/IP)
and click Properties.
iii. Click Use the following IP
address. Enter the
addresses as given by
your ADSL Service
Provider and click OK.
Click OK again to close.
Restart your system when
prompted. Proceed with Step
6 - Establishing the Ethernet
Connection.
(Addresses shown here are for
examples only.)
17
Page 18

ADSL USB Modem Easy Start
Step 6: Setting the PVCs values
Different Service Providers have different settings for their VPI and VCI. Check with
your ADSL Service Provider for the values and follow the below instructions to
change, if necessary.
i. From your Windows taskbar, click Start > Programs > ADSL USB Modem
> Configure.
ii. Click Settings to change the VPI, VCI values and encapsulation.
Step 7: Establishing the Internet Connection
(for RFC 2364 and RFC 2516 only)
For RFC 1483 and RFC 1577, you need to install a third-party
dial-up software (e.g. WinPoET) to connect to the Internet.
i. To connect to the Internet, double-click shortcut icon ADSL USB Modem Dial-
up on the Windows desktop.
(The shortcut icon was created when you installed the modem driver successfully.)
ii. Enter your user name and password. Click Connect.
[You can also connect to your ADSL Service Provider from Control Panel > Dial-up
Networking (Windows Me & 2000) or My Computer > Dial-up Networking (Windows
98).]
iii. Upon successful dial-up, you should be able to see an icon ( )
displayed on the Windows system tray. Double-click on the icon.
Duration indicates the amount of time you are connected to the Internet.
You may click Disconnect to end your session.
If you are not able to connect to the Internet, proceed to run the DSL Test as
described in the following section.
18
Page 19

ADSL USB Modem Easy Start
Running DSL Test
(Run this test only if you are not able to establish your Internet connection.)
i. From your Windows desktop,
double-click on the DSL Test
shortcut.
(The shortcut icon is created when
you have successfully installed the
modem driver. You can also run
DSL Test by clicking on Start >
Programs > ADSL USB Modem >
DSL Test.)
ii. Click Test. If the current test failed, subsequent tests will be skipped. Proceed
to fix the problem before running DSL Test again.
RFC 2364 and RFC 2516 protocols users should get a PASS for the Interface
Test and Modem Test.
RFC 1483 and RFC 1577 protocols users should get a PASS for the Interface
Test.
If you get a FAIL for Interface or Modem Test, reinstall your modem driver.
DISABLED means that the test is not applicable for your protocol.
19
Page 20

ADSL USB Modem Easy Start
Advanced Settings
i. Once the driver has been properly installed, you will
see a new icon on your Windows system tray.
ii. Double-click it to open.
Monitor ADSL connection status
iii. You can monitor your ADSL
connection status from Physical Link
tab.
If you removed the icon from the
system tray, you can open it from the
Control Panel by double-clicking on
the ADSL USB Modem icon.
Change Modulation
iv. From the Configuration tab, you can
change the modulation from the drop-
down list.
v. Click Apply for changes to take effect.
You will be prompted to restart
connection. Click Yes .
vi. Click Save if you want the changes to
be saved permanently.
20
Page 21

ADSL USB Modem Easy Start
Uninstalling Your ADSL USB Modem
i Ensure that you do not unplug the USB cable from the modem.
ii. From your Windows desktop, click Start > Programs > ADSL USB Modem
> Uninstall. Click Remove. Follow the instructions to uninstall the driver.
iii. Unplug the USB cable from the modem when uninstallation is done. Restart
your system when prompted.
Alternatively, you may remove your modem from the Control Panel:
i. Double-click on the Add/Remove Programs icon.
ii. For Windows® Me / 98SE / 98
Under the Install/Uninstall tab, select ADSL USB Modem and click Add/
Remove... button.
Click Remove to uninstall the driver. Restart your system when prompted.
For Windows® 2000
Select ADSL USB Modem and click Change/Remove button.
Click Remove to uninstall the driver.
21
Page 22

ADSL USB Modem Easy Start
Troubleshooting
Q: I am not getting any connection. The modem Power LED lights up and the
ADSL Link LED keeps blinking (The ADSL Link LED does not remain light
up).
A: Check that the Telephone cable (RJ-11) is connected to the LINE jack on
your modem and not to the TEL jack. If this problem persists, please check
with your ADSL Service Provider.
Q: I am getting poor ADSL speed performance from my modem.
A: i) Place your modem away from devices or appliances such as monitors,
exposed computer systems (with chassis covers removed) or another
modem which exhibit magnetic fields that may cause interferences to your
modem line.
ii) Ensure that Micro-Filters are used for phone sockets at different telephone
points that are sharing the same phone line.
If your modem speed or performance is still unsatisfactory, please contact your
ADSL Service Provider.
Q: Do I need to use Micro-Filters when using ADSL ?
A: Product model DSL100U has a built-in Micro-Filter. Thus, external Micro-
Filter is not required.
For product model DSL100U(M), Micro-Filter is required when you are
sharing your ADSL line with your telephone set. If your house has more
than one Telephone sets all sharing the same ADSL line, than each of the
Telephone sets will have to be connected to a Micro-Filter (connect Micro-
Filter between your Telephone set and Telephone wall socket).
Micro-Filters eliminate noise on the telephone line to ensure the best
possible phone performance. If the DSL uses a different line and not sharing
with your telephone, then a Micro-Filter will not be necessary.
(If you are unsure of your product model, refer to the label at the bottom of your
modem casing.)
22
Page 23

Notes
Page 24

Windows® Me, 98/98SE and 2000 are registered trademarks of Microsoft Corp.
© Copyright September 2001. All Rights Reserved.
P/N: 040-511425-141 (Ref: 100)
 Loading...