

Page 1
Axis Print Servers
High Performance Multi-Protocol
Print Servers for Virtually All Networks
AXIS ONLINE CD
AXIS 5400
User's Manual
v1.3
Page 2

AXIS 5400 User’s Manual
1
NetWare
Windows
OS/2
AXIS 5400
Network Print Server
User’s Manual
Macintosh
UNIX
Page 3
2
AXIS 5400 User’s Manual
Safety Notices
Please take some time to read through the safety notices before installing the AXIS 5400.
Caution! - must be observed to avoid loss of data or damage to your equipment.
NetWare
Important: - must be observed to avoid operational impairment.
Do not proceed beyond any of the above notices unless you have taken appropriate measures!
Electromagnetic Compatibility (EMC) notices - USA
This equipment generates and radiates radio frequency energy and if not installed and used in accordance with the instruction
manual, may cause interference to radio communications. It has been tested and found to comply with the limits for a Class A
Windows
computing device pursuant to Subpart B of Part 15 of FCC rules, which are designed to provide reasonable protection against such
interference when operated in a commercial env iron ment. Operation of this eq ui p men t in a residential area is likely to ca use
interference in which ca s e the user at his own expense will be required to take whatever measure s ma y be r equired to correct the
interference. Shielded cables should be used with this unit to ensure compliance with the Class A limits.
Electromagnetic Compatibility (EMC) notices - Europe
OS/2
This digital equipment fulfils the requirements for radiated emission accordi n g to limit B of EN55022/1994, and the requirements
for immunity according to EN50082-1 /1992 residential, commercial, and light industry (Compliance is not val id for unsh iel d ed
network and printer cables).
Liability
Every care has been taken in the preparation of this manual; if you detect any inaccuracies or omissions, please inform us by
contacting your local Axis office. AXIS Communications AB cannot be held responsible for any technical or typographical errors and
reserves the right to make changes to the product and manuals without prior notice. Axis Communications AB makes no warranty of
any kind with regard to the material contained within this document, including, but not limited to, the implied warranties of
Macintosh
merchantability and fitness for a particular purpose. Axis Co mmunications AB shall not be liable nor responsible for incidental or
consequential damages in connection with the furnishing, performance or use of this material.
Year 2000 compliance
Axis Communications warra n ts that the AXIS 5400, with software version s 5.48 or later, is Year 2000 comp lia n t.
UNIX
Axis’ Trademarks
NetPilot, ThinServer, ThinWizard.
Other Trademark Acknowledgments
AIX, Apple, DEC, DOS, Ethernet, EtherTalk, HP, IBM, JetAdmin, Internet Explorer, LAN Manager, LAN Server, LANtastic,
Macintosh, Microsoft, MVS, NDPS, Netscape, Novell NetWare, OS/2, OS/400, PostScript, SCO, UNIX, VM, VMS, VSE,
Windows, are registered trademarks of the respective holders.
AXIS 5400 User’s Manual Revision 1.3
Part No: 17150 Date: January 2000
Copyright © Axis Communications AB, 1998 - 2000
Page 4

AXIS 5400 User’s Manual
Preface
3
Thank you for purchasing the AXIS 5400 Network Print Server. This product has been
developed to connect your printers anywhere in your network, allowing all network users access
to the shared printer resources.
About this manual
This manual provides introductory information as well as detailed instructions on how to set up
and manage the AXIS 5400 in various network environments. It is intended for everyone
involved in installing and managing the AXIS 5400. To fully benefit from the manual, you
should be familiar with basic networking principles.
This manual is applicable for the AXIS 5400, with software release 6.00 or later.
About Axis
Axis Communications is dedicated to providing innovative solutions for network-connected
computer peripherals. Si nce the star t in 1984 , it has b een one of the fas test gr owing co mpanie s in
the market and is now a leader in its field.
ThinServer™ Technolo gy - enables Axis’ products to act as intelligent file server independent
ThinServer devices. A ThinServer device is a network server which includes “thin” embedded
server software capable of simultaneous multiprotocol communication, scalable RISC hardware
and a built-in Web server which allows easy access and management via any standard Web
browser. The ThinServer technology makes it possible to connect any electronic device to the
network, thus providing “Access to everything”.
Today, Axis Communications is offering six major ThinServer product lines consisting of:
NetWare
Windows
OS/2
Macintosh
UNIX
Network Print Servers - offer a powerful and cost-efficient method for sharing printer resources
in your network. They connect to any standard printer, featuring high performance, simple
management and easy upgrading across the network. The print servers are available in Ethernet,
Fast Ethernet and Token Ring versions.
IBM Mainframe and S/3x - AS/400 Print Servers and Protocol Converters - include a wide
range of LAN, coax and twinax attached pri n t servers for the IBM host environment. By
emulating IBM devices, these servers provide conversion of the IPDS, SCS and 3270DS data
streams to the major ASCII printer languages.
Page 5

4
AXIS 5400 User’s Manual
Network Attached CD/DVD Servers - provide a flexible and cost-effici e nt solution for sharing
CD-ROMs, DVD-ROMs and other optical media across the network. They are available in
Ethernet, Fast Ethernet and Token Ring versions.
NetWare
Network Camera Servers - provide live images using standard Internet technology, thus enabling
access to live cameras via any standard Web browser. They offer a perfect solution for remote
surveillance over the Internet; their s harp images can bring life into any web site. These servers
support Ethernet as well as PSTN and GSM phone lines.
Network Scan Servers - enable easy distribution of paper-based information across workgroups
and the enterprise. By sending scanned documents to your destination via the Internet/intranet,
Windows
you will reduce your faxing/mailing costs, as well as save time, thus improv ing your organization’s
efficiency.
Support services
OS/2
Should you require any technical assistance, please contact your Axis dealer. If your questions
cannot be answered immediately, your Axis dealer will forward your queries through the
appropriate channels to ensure you a rapid response.
If you are connected to Internet, you can find on-line manuals, technical support, firmware
updates, application software, company information, on the addresses listed below.
Macintosh
WWW: http://www.axis.com
FTP server: ftp://ftp.axis.com/pub/axis
UNIX
Page 6

AXIS 5400 User’s Manual
Table of Contents
Section 1 Introduction . . . . . . . . . . . . . . . . . . . . . . . . . . . . . . . . . . . . . . . . . . . . . . . . . . . . . . . 7
Where to use it . . . . . . . . . . . . . . . . . . . . . . . . . . . . . . . . . . . . . . . . . . . . . . . . 8
How to use it . . . . . . . . . . . . . . . . . . . . . . . . . . . . . . . . . . . . . . . . . . . . . . . . . 9
Features and Benefits . . . . . . . . . . . . . . . . . . . . . . . . . . . . . . . . . . . . . . . . . . 10
Section 2 Product Overview . . . . . . . . . . . . . . . . . . . . . . . . . . . . . . . . . . . . . . . . . . . . . . . . . 12
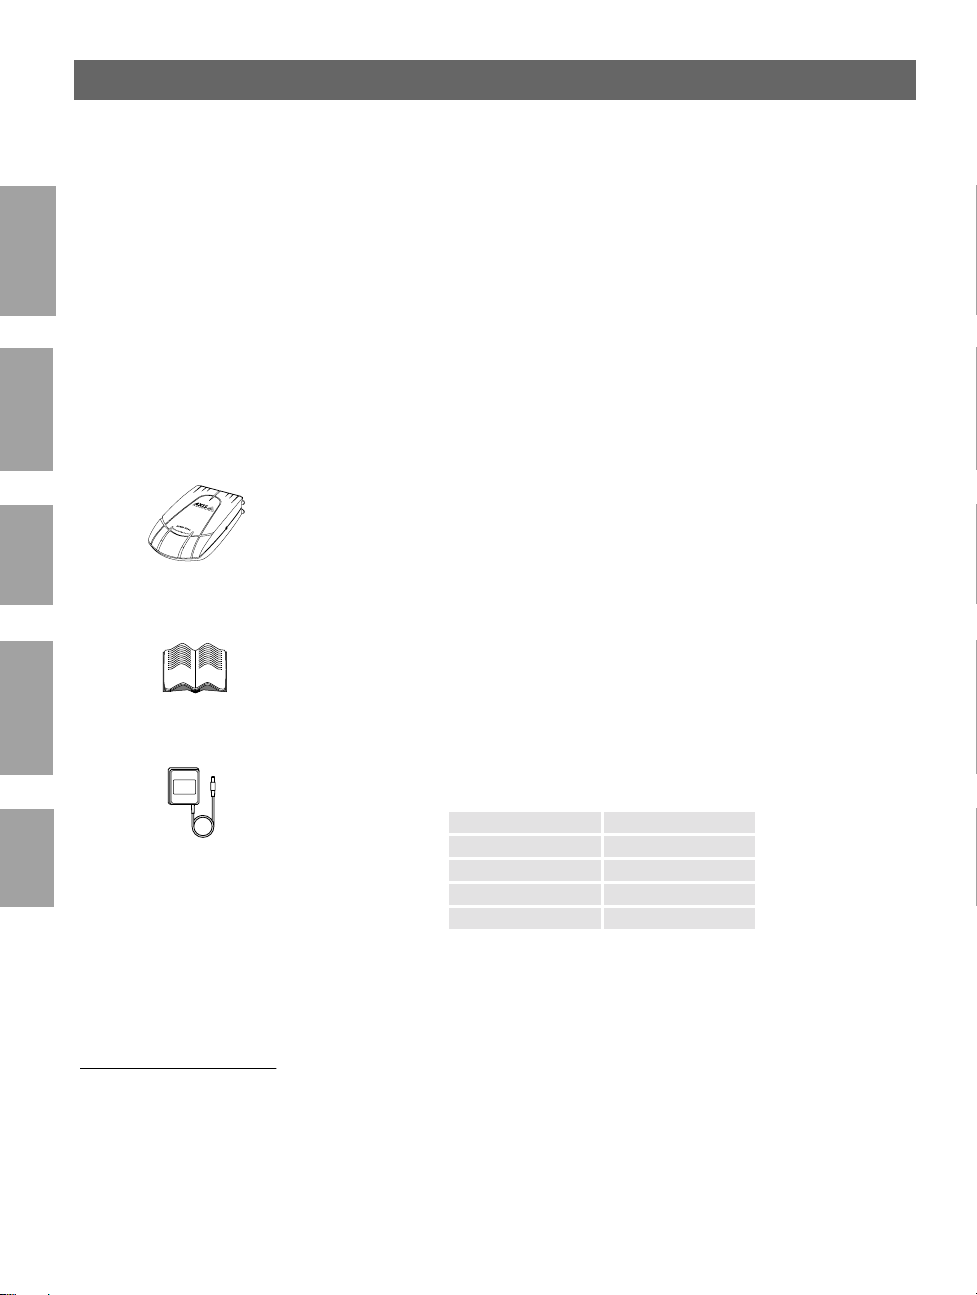
Package Contents . . . . . . . . . . . . . . . . . . . . . . . . . . . . . . . . . . . . . . . . . . . . . 12
The AXIS Online CD . . . . . . . . . . . . . . . . . . . . . . . . . . . . . . . . . . . . . . . . . . 13
AXIS 5400 Physical Description . . . . . . . . . . . . . . . . . . . . . . . . . . . . . . . . . 14
Section 3 Basic Installation. . . . . . . . . . . . . . . . . . . . . . . . . . . . . . . . . . . . . . . . . . . . . . . . . . . 16
Getting Started . . . . . . . . . . . . . . . . . . . . . . . . . . . . . . . . . . . . . . . . . . . . . . . 16
Connecting a printer to the Ethernet Network . . . . . . . . . . . . . . . . . . . . 17
Installation Guide . . . . . . . . . . . . . . . . . . . . . . . . . . . . . . . . . . . . . . . . . . . . . 19
Basic Setup with AXIS NetPilot . . . . . . . . . . . . . . . . . . . . . . . . . . . . . . . . . 21
Assigning an IP address . . . . . . . . . . . . . . . . . . . . . . . . . . . . . . . . . . . . . . . . . 25
5
NetWare
Windows
OS/2
Section 4 Setting Up - NetWare. . . . . . . . . . . . . . . . . . . . . . . . . . . . . . . . . . . . . . . . . . . . . . 34
Setup using NDPS . . . . . . . . . . . . . . . . . . . . . . . . . . . . . . . . . . . . . . . . . . . . 35
Installing the AXIS 5400 in NDPS environments . . . . . . . . . . . . . . . . . . . 36
Advanced Installation using AXIS NetPilot . . . . . . . . . . . . . . . . . . . . . . . . 38
Basic Queue-based printing (Pure IP) . . . . . . . . . . . . . . . . . . . . . . . . . . . . 41
Queue-based Printing Methods . . . . . . . . . . . . . . . . . . . . . . . . . . . . . . . . . 43
Section 5 Setting Up - Windows. . . . . . . . . . . . . . . . . . . . . . . . . . . . . . . . . . . . . . . . . . . . . . 44
AXIS Print System Overview . . . . . . . . . . . . . . . . . . . . . . . . . . . . . . . . . . . 46
Windows 95 and Windows 98 . . . . . . . . . . . . . . . . . . . . . . . . . . . . . . . . . . 47
Windows NT4.0 and Windows 2000 . . . . . . . . . . . . . . . . . . . . . . . . . . . . 52
AXIS Print Monitor Overview . . . . . . . . . . . . . . . . . . . . . . . . . . . . . . . . . . . 58
Windows NT 3.5x . . . . . . . . . . . . . . . . . . . . . . . . . . . . . . . . . . . . . . . . . . . . 59
AXIS Print Utility for Windows Overview . . . . . . . . . . . . . . . . . . . . . . . . 64
Windows 3.1 and Windows for Workgroups . . . . . . . . . . . . . . . . . . . . . 66
Windows Clients using LANtas tic . . . . . . . . . . . . . . . . . . . . . . . . . . . . . . . 69
Section 6 Setting Up - OS/2. . . . . . . . . . . . . . . . . . . . . . . . . . . . . . . . . . . . . . . . . . . . . . . . . . 70
TCP/IP Printing . . . . . . . . . . . . . . . . . . . . . . . . . . . . . . . . . . . . . . . . . . . . . . . 71
Macintosh
UNIX
Page 7

6
AXIS 5400 User’s Manual
NetBIOS/NetBEUI Pr in ti n g . . . . . . . . . . . . . . . . . . . . . . . . . . . . . . . . . . . . . 72
Section 7 Setting Up - Macintosh . . . . . . . . . . . . . . . . . . . . . . . . . . . . . . . . . . . . . . . . . . . . . 76
Installation Using the Chooser Window . . . . . . . . . . . . . . . . . . . . . . . . . . 76
NetWare
Choosing a Printer . . . . . . . . . . . . . . . . . . . . . . . . . . . . . . . . . . . . . . . . . . . . 77
Section 8 Setting Up - UNIX. . . . . . . . . . . . . . . . . . . . . . . . . . . . . . . . . . . . . . . . . . . . . . . . . 82
Installation in the UNIX Environment . . . . . . . . . . . . . . . . . . . . . . . . . . . . 82
Print Methods on TCP/IP Networks . . . . . . . . . . . . . . . . . . . . . . . . . . . . . 85
Using Logical Printers to Customize your Printing . . . . . . . . . . . . . . . . . . 88
Windows
Section 9 Management & Configuration . . . . . . . . . . . . . . . . . . . . . . . . . . . . . . . . . . . . . . . 97
Using a Web browser . . . . . . . . . . . . . . . . . . . . . . . . . . . . . . . . . . . . . . . . . 98
Using AXIS ThinWizard . . . . . . . . . . . . . . . . . . . . . . . . . . . . . . . . . . . . . . . 103
Using AXIS NetPilot . . . . . . . . . . . . . . . . . . . . . . . . . . . . . . . . . . . . . . . . . . 107
OS/2
Using FTP . . . . . . . . . . . . . . . . . . . . . . . . . . . . . . . . . . . . . . . . . . . . . . . . . . . 115
Using Telnet . . . . . . . . . . . . . . . . . . . . . . . . . . . . . . . . . . . . . . . . . . . . . . . . . 118
Using SNMP . . . . . . . . . . . . . . . . . . . . . . . . . . . . . . . . . . . . . . . . . . . . . . . . 121
Using HP Administration To ol s . . . . . . . . . . . . . . . . . . . . . . . . . . . . . . . . . 123
Using Novell Utilities . . . . . . . . . . . . . . . . . . . . . . . . . . . . . . . . . . . . . . . . . 124
Section 10 IPP . . . . . . . . . . . . . . . . . . . . . . . . . . . . . . . . . . . . . . . . . . . . . . . . . . . . . . . . . . . . . 126
Macintosh
Overview . . . . . . . . . . . . . . . . . . . . . . . . . . . . . . . . . . . . . . . . . . . . . . . . . . . 126
User Requirements . . . . . . . . . . . . . . . . . . . . . . . . . . . . . . . . . . . . . . . . . . . 127
Address Schemes . . . . . . . . . . . . . . . . . . . . . . . . . . . . . . . . . . . . . . . . . . . . 128
How It Works . . . . . . . . . . . . . . . . . . . . . . . . . . . . . . . . . . . . . . . . . . . . . . . 129
UNIX
Section 11 Upgrading the Software. . . . . . . . . . . . . . . . . . . . . . . . . . . . . . . . . . . . . . . . . . . 133
Obtaining the Updated Software . . . . . . . . . . . . . . . . . . . . . . . . . . . . . . . 133
Upgrading the Firmware Software . . . . . . . . . . . . . . . . . . . . . . . . . . . . . . 134
Appendix A Test Button. . . . . . . . . . . . . . . . . . . . . . . . . . . . . . . . . . . . . . . . . . . . . . . . . . . . . . 137
Appendix B The Parameter List . . . . . . . . . . . . . . . . . . . . . . . . . . . . . . . . . . . . . . . . . . . . . . . 139
Appendix C Technical Specifications. . . . . . . . . . . . . . . . . . . . . . . . . . . . . . . . . . . . . . . . . . . . 147
Appendix D Glossary. . . . . . . . . . . . . . . . . . . . . . . . . . . . . . . . . . . . . . . . . . . . . . . . . . . . . . . . . 150
Index. . . . . . . . . . . . . . . . . . . . . . . . . . . . . . . . . . . . . . . . . . . . . . . . . . . . . . . . . . . . 154
Page 8
AXIS 5400 User’s Manual Section 1: Introduction
Section 1 Introduction
7
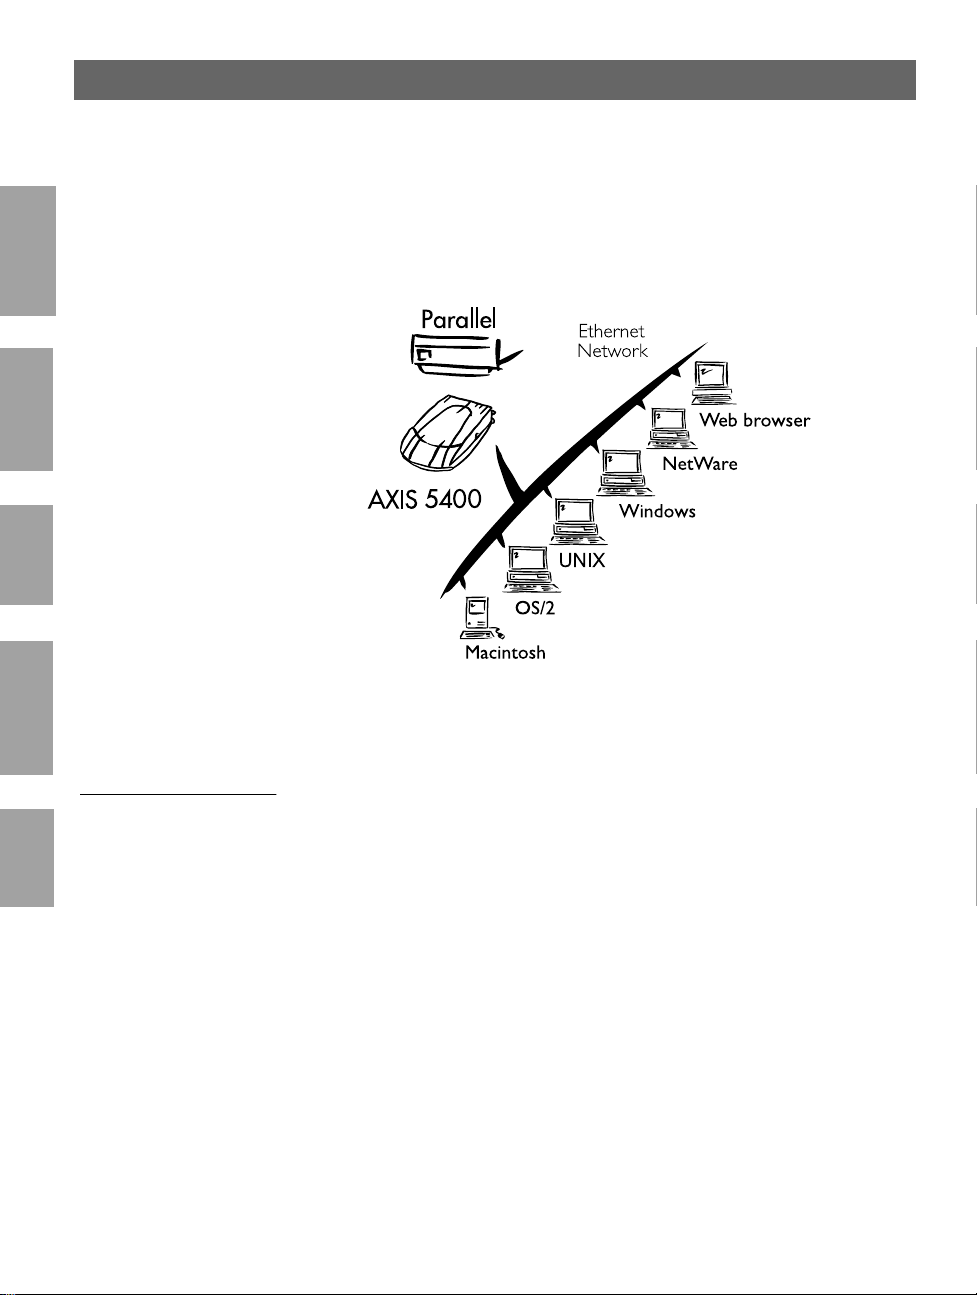
Based on the ThinServer technology, the AXIS 5400 allows you to
share your available printer resources with everyone on your network.
You can connect your AXIS 5400 directly to any standard printer.
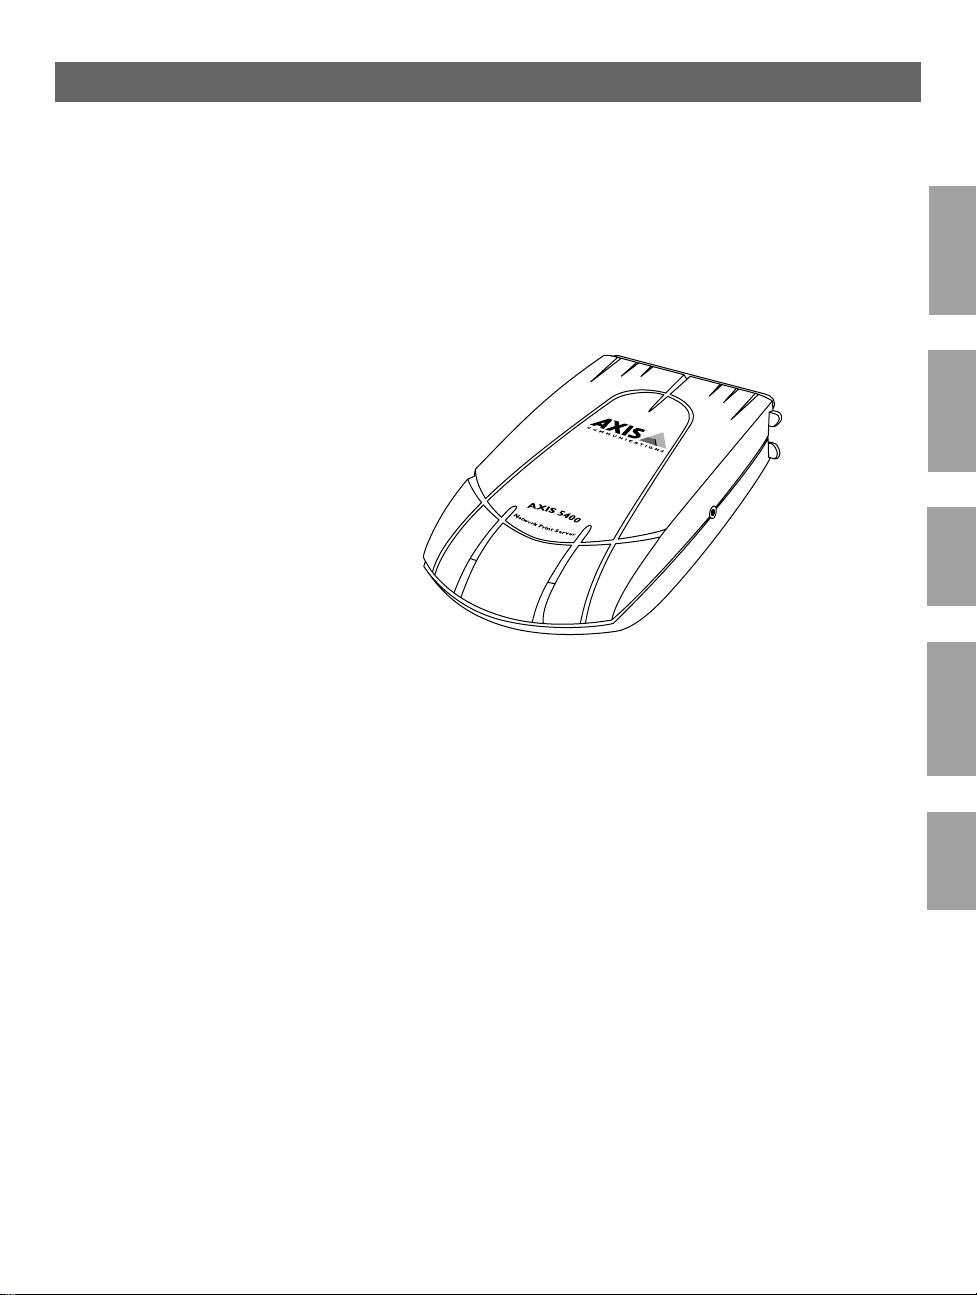
The AXIS 5400 Network Print Server
Note: ❏ If your printer supports the mini-Centronics standard, a
centronics-to-mini-centronics cable must be used.
NetWare
Windows
OS/2
Macintosh
UNIX
Page 9
8
Section 1: Introduction AXIS 5400 User’s Manual
Where to use it
NetWare
Windows
OS/2
Macintosh
UNIX
Supported
Environments
The AXIS 5400 is the ideal print server in mixed environments as it
can communicate with all the major computer systems and network
protocols including:
• NetWare
• UNIX
• Windows
• Windows clients connected to LANtastic networks
• OS/2
• Macintosh
• Internet/intranet via any standard Web browser
Page 10

AXIS 5400 User’s Manual Section 1: Introduction
How to use it
9
Installation and
Integration
Notes: ❏ The AXIS 5400 can be installed in the Macintosh environment
Configuration and
Management
The installation of the AXIS 5400 and i ts integration i nto the network
is performed u sing the appropriate Axis client softwa re , pr ov ided with
your print server:
• AXIS NetPilot™ (NetWare - IPX)
• AXIS Print System (Windows 95/98, NT4.0 and 2000)
• AXIS Print Monitor (Windows NT 3.5x)
• AXIS Print Utility for Windows (Windows 3.1 and WfW)
• AXIS Print Utility for OS/2
• axinstall (UNIX)
without any Axis client software.
❏ The AXIS 5400 can be installed in NetWare - Pure IP
environments with NetWare Administrator.
As the AXIS 5400 comprises a built-in Web server, it can be
configured and managed directly from its internal Web pages, using
HTTP over TCP/IP. Access to the AXIS 5400 via any javascriptenabled Web browser, offers you a platform-independent
management tool that is suitable for all supported network
environments.
NetWare
Windows
OS/2
Macintosh
UNIX
In TCP/IP networks you can also use AXIS ThinWizard, which
provides you with remote management capabilities for your AXIS
ThinServer devices.
If your network does not support TCP/IP, you can use AXIS NetPilot
to configure and manage the AXIS 5400. AXIS NetPilot supports
communication via IPX/SPX and NetBIOS/NetBEUI.
Page 11

10
Section 1: Introduction AXIS 5400 User’s Manual
Features and Benefits
Reliability The AXIS 5400 print server provi des hi gh p erformanc e and r e liab il ity
NetWare
Flexibility It supports printing in all the major computer systems and
Windows
combined with low power consumption. The electronic circuits are
based on the improved AXIS ETRAX100 chip, which comprises an
integrated 32 bit RISC processor and associated network controllers.
environments, including five different print methods in the TCP/IP
environment.
The integrated IPP (Internet Printing Protocol) function allows for
printing from LAN to LAN via a WAN, such as the Internet.
OS/2
Macintosh
UNIX
Speed The AXIS ETRAX 100 chip has been specifically designed for LAN
products and benefits users with a faster throughput than a direct PCto-printer connection. With a sustained data throughput of more than
1 Mbyte per second, the AXIS 5400 is fast. High speed Centronics
communication such as ECP, Hewlett-Packard Fast Mode, High
Speed and IBM Fast Byte is supported.
Easy to Install Using the available Axis installation tools, you can install the AXIS
5400 into any of the supported networking environments in just a few
minutes.
Security You can assign pa sswords to restrict both login and printer access.
Monitoring The provided AXIS Print System software, the AXIS NetPilot
software and the internal AXIS 5400 Web pages allow you to
continuously monitor printer status.
The AXIS Print System and the AXIS Print Monitor can be
configured to display pop- up messages that show the status of peer-topeer print jobs.
The AXIS 5400 additionally supports SNMP for remote monitor ing.
Page 12

AXIS 5400 User’s Manual Section 1: Introduction
Futureproof You can upgrade the AXIS 5400 Flash memory over the network.
This allows you to quickly update and enhance the operational
features of your AXIS 5400 when new print server software becomes
available. All software update s are free of charge.
Pocket-sized The AXIS 5400 is equipped with one high-speed parallel port
connector that plugs directly into the printer´s parallel port.
11
NetWare
Windows
OS/2
Macintosh
UNIX
Page 13
12
Section 2: Product Overview AXIS 5400 User’s Manual
Section 2 Product Overview
NetWare
Package Contents
Verify that nothing is missing from the prin t server package by using
the check list below. Please contact your dealer if anything should be
missing or damaged. All packing materials are recyclable.
Windows
AXIS 5400, part no: 0084-001-01
OS/2
AXIS Online CD, revision 5.3 or higher
The AXIS 5400/5600 User’s Guide, part no: 17147 rev. 1.3
Macintosh
UNIX
Power Supply:
Part nos.
(AXIS PS-B)
Australia 13269
Europe 13267
Japan 13936
UK 13268
USA 13270
Optional accessories Self-adhesive velcro ribbons, part nos: 13282 and 13283
Printer cable extension, part no: 13522
Page 14

AXIS 5400 User’s Manual Section 2: Product Overview
The AXIS Online CD
The AXIS Online CD contains an easy-to-use electronic catalog, that
includes all of the latest AXIS Utilities Software, Product Software,
White Papers, User Documentation, Technical References, etc. It is
compatible for use within all of the supported Axis computing
environments.
13
NetWare
Start-up procedures
for Wind ow s
Start-up procedures
for UNIX, OS/2
and MacOS
Note: ❏ If the Adobe Acrobat Reader 3.0 is not installed on to your
The AXIS Online CD starts automatically from a local CD drive on
Windows 95/98, NT and 2000 platforms.
Windows 3.1 user’s are simply required to navigate to the CD root
directory and click on the setup31.exe file from within the Windows
File Manager.
Using your preferred file manager application, navigate to the CD
root directory and click start.pdf .
system, you can download it by clicking the Acrobat Reader
button located on the starting page on the AXIS On line CD.
Windows
OS/2
Macintosh
UNIX
Page 15
14
Section 2: Product Overview AXIS 5400 User’s Manual
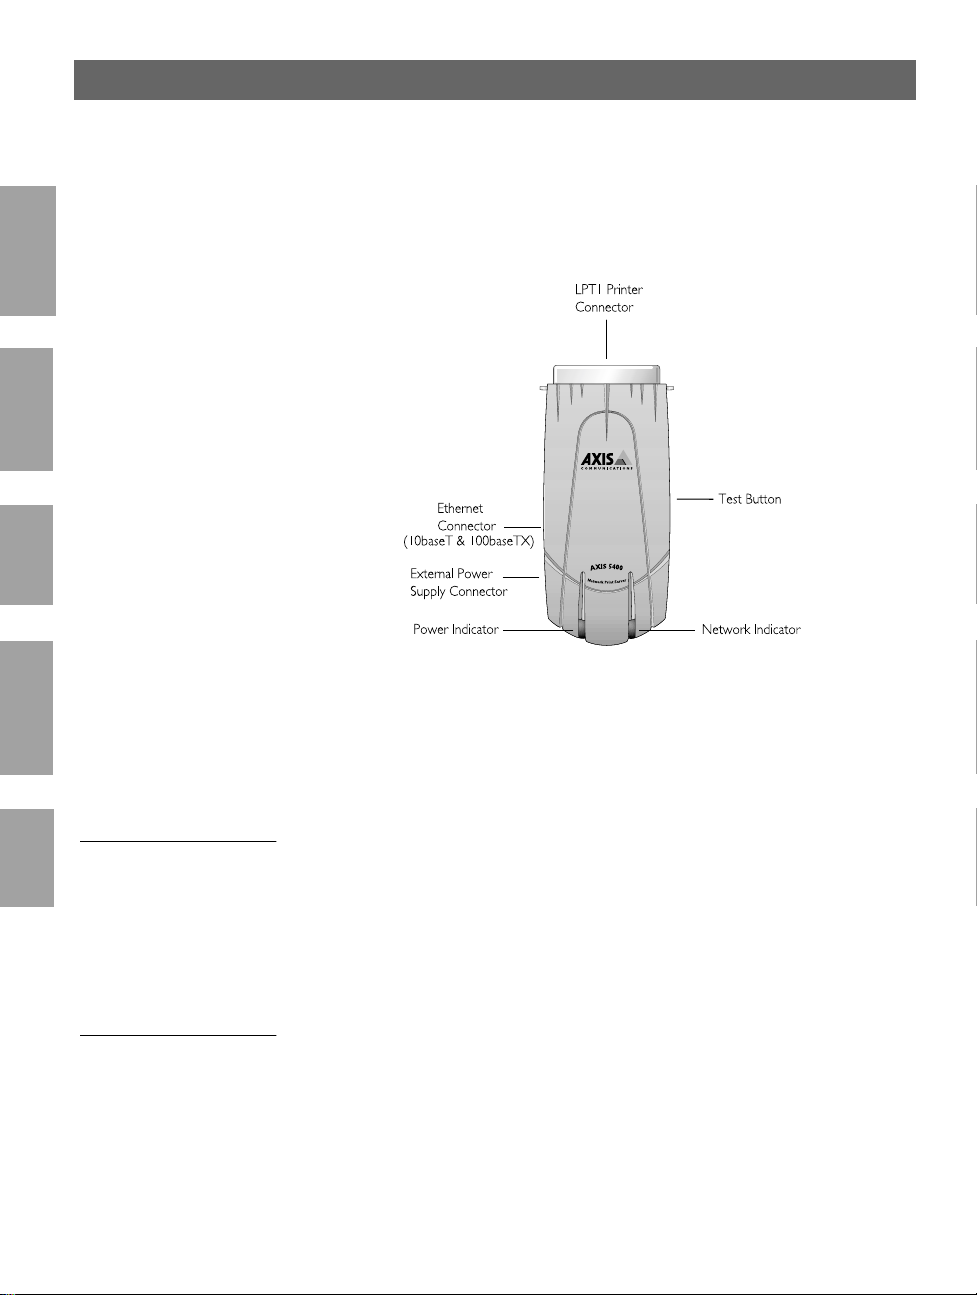
AXIS 5400 Physical Description
NetWare
Windows
OS/2
Plan view of the AXIS 5400
Macintosh
Network Connectors The AXIS 5400 is designed for 10 Mbps Ethernet and 100 Mbps Fast
Ethernet networks and connects to the network via a twisted pair
UNIX
category 5 cable (10baseT and 100bas eTX) or be tter . The AXIS 5400
is equipped with an autosensing function that detects the speed of the
local network segment and varies the speed of its data communication
accordingly, between 10 Mbps and 100 Mbps.
Printer Port The AXIS 5400 print server is provided with a single high-speed IEEE
1284 compatible parallel port, that connects directly, without the
need of cabling, to any standard printer.
Centronics-to-Centronics and Centronics-to-mini Centronics
extension cables may be obtained from your local distributor for use
with printers physically unable to accommodate the AXIS 5400.
Page 16

AXIS 5400 User’s Manual Section 2: Product Overview
Test Button The test button is used for:
• Printing a test page to check the connection to the printer.
• Printing the parameter list showing all the AXIS 5400 settings.
• Resetting the AXIS 5400 parameters to the factory default
settings.
Refer to Appendix A - Test Button, on page 137, for more information
about the test Button.
15
NetWare
Network Indicator The network indicator flashes to indicate network activity.
Power Indicator The power indicator is lit while power is applied. If it is not lit, or it
flashes, there is a problem with the AXIS 5400 or its power supply.
Windows
OS/2
Macintosh
UNIX
Page 17

16
Section 3: Basic Installation AXIS 5400 User’s Manual
Section 3 Basic Installation
NetWare
Getting Started
After you have verified that no items presented in Package Contents, on
page 12, are missing, you are now ready to install your AXIS 5400.
Windows
OS/2
Macintosh
UNIX
Follow the instructions below to install the AXIS 5400 in your
environment:
1. Start the procedure by connecting the AXIS 5400 to your
network and printer as described in Connecting a printer to the
Ethernet Network, on page 17.
2. When the AXIS 5400 is successfully connected, proceed to the
Installation Guide, on page 19, where you will find further
information about how to install and integrate the AXIS 5400 in
your network environments.
Page 18
AXIS 5400 User’s Manual Section 3: Basic Installation
Connecting a printer to the Ethernet Network
Follow the instructions below to connec t a printer to the network via
the AXIS 5400 print server.
Caution! ❏ The AXIS 5400 external power supply you are using must be
marked with the correct voltage! Refer to Package Contents, on
page 12.
1. Make sure that the printer is switched off and that the AXIS 5400
external power supply is disconnected.
2. Locate the serial number, found on the underside label of the
AXIS 5400, and write it down. You will need this number later
during the network configuration.
3. Connect the AXIS 5400 to the printer, either directly to the
5400
parallel printer port, or using the optional printer cable extension
with the optional velcro ribbons.
17
NetWare
Windows
OS/2
4. Connect your AXIS 5400 to the network using a twisted pair
category 5 cable (10baseT and 100baseTX).
5. Switch on the printer and connect the external power supply to
the AXIS 5400. The power indicator lights. If the network
indicator starts to flash, the AXIS 5400 is successfully connected
to the network.
6. Press and release the test button on the AXIS 5400 to print a test
page. If the printer and the AXIS 5400 are correctl y connected,
the AXIS 5400 internal test page will be printed.
You are now ready to install your server onto your network using one
of the methods detailed in the Installation Guide, on page 19.
Macintosh
UNIX
Page 19

18
Section 3: Basic Installation AXIS 5400 User’s Manual
Notes: ❏ The test page includes a list of the most important parameters,
including the network speed and the firmware version number.
❏ Each AXIS 5400 Print Server is pre-configured with a unique
NetWare
Windows
OS/2
node address that is identical to the serial number. The node
address can be changed using AXIS NetPilot, or any standard
Web browser. Please refer to Section 9 Management &
Configuration, on page 97, for more information.
❏ The AXIS 5400 use s high spe ed Centronic s Communication . For
use with older printers not su pporting high speed, this function
can be disabled by using AXIS NetPilot, or any standard Web
browser. Please refer to Section 9 Management & Configuration,
on page 97, for more information.
Macintosh
UNIX
Page 20

AXIS 5400 User’s Manual Section 3: Basic Installation
Installation Guide
Installation Methods The method of installation that you choose should be dictated by your
printing requirements and your supported network environments.
Select the appropriate installation me thod from the table below:
Environment Network Configuration Action
19
NetWare
NDPS (Pure IP)
Standard NetWare
(Pure IP)
NetWare
Windows
OS/2
Macintosh AppleTalk See Section 7 Setting Up - Macintosh, on page 76
NDPS (IPX) See Setup using NDPS, on page 35
Standard NetWare (IPX) See Basic Setup with AXIS NetPilot, on page 21
Advanced configuration
(IPX)
TCP/IP See Section 5 Setting Up - Windows, on page 44
NetBIOS/NetBEUI See Section 5 Setting Up - Windows, on page 44
TCP/IP
NetBIOS/NetBEUI See Section 6 Setting Up - OS/2, on page 70
See Assigning an IP address, on page 25
See Setup using NDPS, on page 35
See Assigning an IP address, on page 25
See Basic Queue-based printing (Pure IP), on
page 41
See Basic Setup with AXIS NetPilot, on page 21.
Proceed with Advanced Installation using AXIS
NetPilot, on page 38
See Assigning an IP address, on page 25
Proceed with Section 6 Setting Up - OS/2, on
page 70
Windows
OS/2
Macintosh
UNIX
UNIX TCP/IP
See Assigning an IP address, on page 25
Proceed with Section 8 Setting Up - UNIX, on
page 82
Page 21

20
Section 3: Basic Installation AXIS 5400 User’s Manual
Installation Tools The appropriate installation tools for the AXIS 5400 are summarized
in the following table:
Environment Operating System Protocols Installation Tool
NetWare
NetWare TCP/IP NetWare Administrator
IPX/SPX AXIS NetPilot
Windows
OS/2
Macintosh
UNIX
Windows
95/98/NT/2000
Windows 3.1/WfW TCP/IP LPR Spooler (*)
OS/2 TCP/IP Standard using the lprportd
Macintosh AppleTalk Standard using the Chooser
UNIX TCP/IP axinstall
TCP/IP AXIS Print System
NetBIOS/NetBEUI AXIS Print System
NetBIOS/NetBEUI AXIS Print Utility for Windows
service method
NetBIOS/NetBEUI AXIS Print Utility for OS/2
Recommended installation tools for the AXIS 5400
* A shareware LPR spooler is available for Windows for
Workgroups. Yo u can download this software from
ftp://ftp.axis.com/pub/axis/software/prt_srv/utility/wlprs/.
Page 22
AXIS 5400 User’s Manual Section 3: Basic Installation
Basic Setup with AXIS NetPilot
Follow the instructio ns available on th e AXIS Online CD to inst all the
AXIS NetPilot software on to your computer. AXIS NetPilot runs on
any of the Windows platf orms; Window s 3.x, Wi ndows 95, Wi ndows
98, Windows NT, Windows 2000 or Windows for Workgroups.
21
NetWare
Starting the
Installation
Follow the instructions below to install the AXIS 5400 with AXIS
NetPilot:
1. Start AXIS NetPilot by double-clicking the NetPilot icon, which
is located in the folder where you installed AXIS NetPilot.
2. Locate the AXIS 5400 in the ‘New Axis Units’ folder. Select it and
click the Install button on the AXIS NetPilot toolbar. If your
network is large, it could t ake a few seconds before the pr int serve r
appears in the folder.
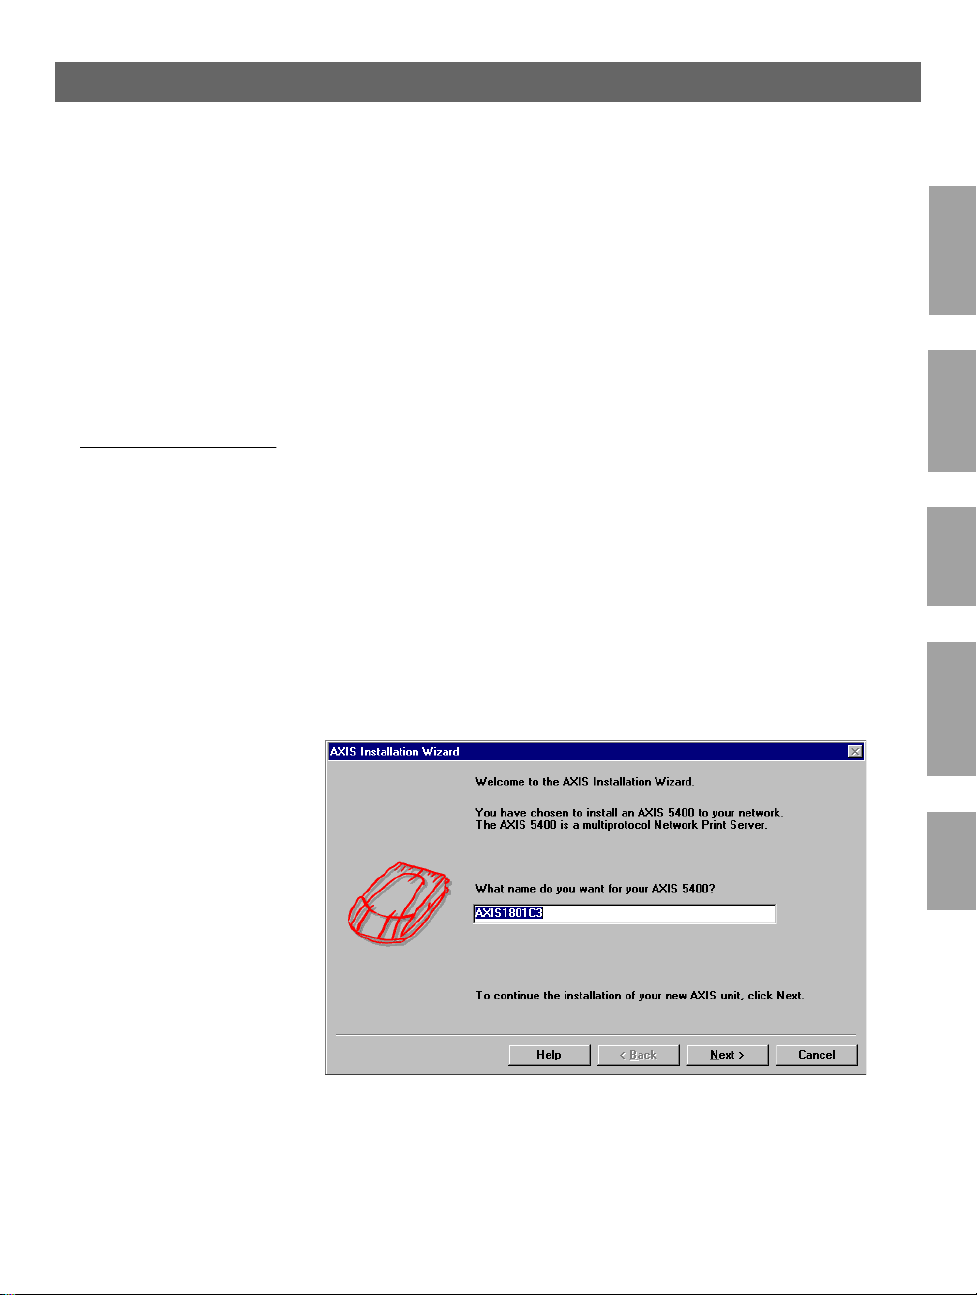
3. Choose the with Installation Wizard option and clic k OK. The
following screen appears:
Windows
OS/2
Macintosh
UNIX
The AXIS NetPilot In stallation Wizard Main window
Page 23

22
Section 3: Basic Installation AXIS 5400 User’s Manual
The AXIS NetPilot Installation Wizard guides you through the
installation process. The following options are available:
NetWare
Windows
OS/2
Macintosh
Note: ❏ The number of options varies according to the number of
environments you enable.
Print Server Name The default print server name consists of the characters ‘AXIS’
followed by the last six digits of the serial number. If you want to
change the print server name, just type the new name in the av ail a ble
text field.
Environments Choose which networking environments you want to configure the
AXIS 5400 for, i.e. NetWare, TCP/IP, Windows & OS/2 or
Macintosh. If your network co mprises vario us differen t platforms, you
can enable any combination of environments.
NetWare NDS Place NetWare Print Queues on a specific bindery server, or
alternatively into an NDS Tree.
The IP address Choose the method the AXIS 5400 should employ for obtaining an IP
address. DHCP, ARP, RARP and BOOTP are supported. You can
also select to set the IP address manually. Refer to Assigning an IP
address, on page 25 for further information about setting the IP
address.
UNIX
Page 24

AXIS 5400 User’s Manual Section 3: Basic Installation
23
Print Queues
The AXIS 5400 uses the print server name followed by the printer
port as the default Print Queue name and print server port name. If
you want to change the default printer queue names, just type the new
names in the available text fields.
Environment Default Names
NetWare AXIS1A0003_LPT1_Q
Windows & OS/2 AX1A0003.LP1
AppleTalk AXIS1A0003_LPT1
Default Print Queue Names and Print Server Port Names
for each of the operating environments.
Test Page The final user prompt in the Installation Wizard allows you to print a
test page through NetWare. The test page displays the name of all the
NetWare servers the AXIS 5400 is connected to and shows the status
of each connection.
Unless you want to connect or create additional printing queues, the
installation for the NetWare e n vironment is now completed.
NetWare
Windows
OS/2
Macintosh
UNIX
Page 25

24
Section 3: Basic Installation AXIS 5400 User’s Manual
Notes: ❏ The parameters entered during installation are not permanent;
they can be altered at any time according to your network
printing requirements.
NetWare
Windows
OS/2
Macintosh
❏ No serious or permanent damage will be caused if you make a
mistake during installation. If you find, at any time, that printing
is not satisfactory, the parameters can easily be changed to tune
the system to your requirements.
❏ For information on advanced functions, please refer to the AXIS
Network Print Server Technical Reference. You can download
this or other technical information over the Internet by accessing
the Axis WWW Home Page at http://www.axis.com/ or the
AXIS Online CD.
UNIX
Page 26

AXIS 5400 User’s Manual Section 3: Basic Installation
Assigning an IP address
To establish communication with the TCP/IP network, enabling
TCP/IP printing and Web browser management, an IP address must
be assigned to your AXIS 5400.
Before you start
25
NetWare
System privileges You need root privileges on your UNIX system, or administrator
privileges on a Windows NT server to set the IP address using RARP,
BOOTP or DHCP.
Ethernet address You need to know the Ethernet address of your AXIS 5400 to pe rform
the installation. The Ethernet address is based upon the serial number
of your AXIS 5400. This means, for example, that an AXIS 5400 with
the serial number of 00408C100086, will have the corresponding
Ethernet address of 00 40 8C 10 00 86. The serial number is located
on the bottom label of the unit.
IP address Unless you are downloading the IP address using DHCP, you must
obtain an unused IP address from your network administrator.
Important: ❏ DO NOT use the IP addresses used in the following examples
when installing your AXIS 5400. Always consult your network
administrator before assigning an IP address to your AXIS 5400.
Windows
OS/2
Macintosh
UNIX
Page 27

26
Section 3: Basic Installation AXIS 5400 User’s Manual
NetWare
Windows
OS/2
Macintosh
Methods for setting
the IP Address
Notes: ❏ The ARP and RARP methods operate on single network segments
You can set the IP address using one of the f ollo wing methods,
depending on your network operating environment:
Method Network environments See ...
AXIS IP Installer Windows 95/98/NT/2000 page 28
DHCP
ARP
RARP UNIX page 32
BOOTP UNIX, NetWare 5, OS/2 page 33
AXIS NetPilot
Windows NT/2000, UNIX,
NetWare 5, OS/2
Windows 95/98/NT/2000, OS/2 page 30
UNIX page 31
Windows 95/98/NT/2000,
NetWare 5
page 29
Basic Setup with
AXIS NetPilot, on
page 21
only, that is they cannot be used over routers.
❏ Refer to Setting Parameters, on page 80 for information about
setting the IP address in the Macintos h environment.
UNIX
Page 28

AXIS 5400 User’s Manual Section 3: Basic Installation
27
Registering and
Resolving
Host Names
In order to register the host name of the AXIS 5400 in networks with
dynamic IP address settings, WINS (Windows Inter net Name Service)
and DDNS (Dynamic Domain Naming System) are supported. It is
recommended that at least one of these methods should be used if you
are setting the IP address of the AXIS 5400 using DHCP.
The host name of the AXIS 5400 is specified by the PS_NAME
parameter. Refer to B The Parameter List, on page 139
WINS host name rul es WINS only supports 15 character long host names. If your host name
is longer than 15 characters, the AXIS 5400 truncates the host name
to 15 characters when registering wi th a WINS server. You can view
the AXIS 5400 host name that is registered at a WINS server, in the
print server’s Web interface or in AXIS NetPilot. Refer to Section 9
Management & Configuration, on page 97.
DDNS host name rules DDN S supports 53 character long host names, but they can only
consist of the characters ‘A-Z’, ’a-z’ and ‘-’. If your host name consists
of any other characters, they are converted to ‘-’, when registering with
a DDNS server. You can view the AXIS 5400 host name that is
registered at a DDNS server, in the print server’s Web interface or in
AXIS NetPilot. Refer to Section 9 Management & Configuration, on
page 97.
If the host name matches another entry in the DDNS data bas e, the
AXIS 5400 deletes the entry before registering.
NetWare
Windows
OS/2
Macintosh
Notes: ❏ The host name limitations conclude that if you want to register
the same host name at a WINS server and a DDNS server, the
host name should be no longer than 15 characters and it should
only contain the characters ‘A - Z’, ‘a-z’ and ‘-’.
❏ Refer to your system manuals or to your network administrator
for instructions on how host name resolutions are performed on
your system .
UNIX
Page 29

28
Section 3: Basic Installation AXIS 5400 User’s Manual
NetWare
Windows
OS/2
Macintosh
Using
AXIS IP Installer
Important! ❏ You should not use AXIS IP Installer to set the IP address of the
Follow the instructions below to set the IP address of your AXIS 5400
using the AXIS IP Installer:
AXIS 5400, if you have an active DHCP server in your network.
1. Download the AXIS IP Installer to your host. The software is
available on the AXIS Online CD and on the Axis home page at
http://www.axis.com/.
2. Connect the AXIS 5400 to the network. Note the serial number
that is located on the underside label of the AXIS 5400. You will
need it in the proceedings step s.
3. Start the AXIS IP Installer.
4. Click the serial number of your AXIS 5400 that appears in the
server list.
5. Enter th e des ired IP addre ss in t he d esig nated IP ad dres s f ield and
click the Set IP address button.
6. The IP setting process will take approximately 10 to 40 seconds.
Click OK in the confirmation box that appears when the IP
address has been set.
UNIX
Notes: ❏ AXIS IP Installer uses the BOOTP and DHCP protocols to
communicate with the AXIS 5400. Make sure that at least one of
these protocols is enabled in your print server.
❏ Restart your AXIS 5400, if it does not show up in the server list.
Page 30

AXIS 5400 User’s Manual Section 3: Basic Installation
Using DHCP Follow the instructions below to download the IP address using
DHCP:
1. Edit or create a scope in the DHCP manager of the DH CP
daemon. The entries included in this scope should contain the
following parameters:
• range of IP ad dresses
• subnet mask
• default router IP address
• WINS server IP address(es) or DDNS server IP address(es)
• lease duration
2. Activate the scope.
29
NetWare
Windows
The AXIS 5400 automatically downloads the DHCP parameters.
If you are using WINS or DDNS, you should include at least one
WINS or DDNS server IP address in the DHCP scope. Immediately
after the IP address has been rece i ved, the AXIS 5400 registers its host
name and IP address on the WINS alternativ ely DDNS server. Refer
to Registering and Resolving Host Names, on page 27 for more
information.
The AXIS 5400 can automatically download a customized config file
from a TFTP server. Just add the name of the config file and the
TFTP server’s IP ad dress to your DHCP scope. The config file is
downloaded immediately after the AXIS 5400 receives its IP address.
Note: ❏ You do not have to restart the AXIS 5400 to download the IP
address.
OS/2
Macintosh
UNIX
Page 31

30
Section 3: Basic Installation AXIS 5400 User’s Manual
NetWare
Windows
OS/2
Macintosh
Using ARP in
Windows and OS/2
Notes: ❏ When using the Windows 95 implementation of ARP, change the
Follow the instructions below to set the IP address using ARP:
1. Start a DOS window.
2. Type the following commands:
arp -s <IP address> <Ethernet address>
ping <IP address>
arp -d <IP address>
Example
arp -s 192.168.3.191 00-40-8c-10-00-86
ping 192.168.3.191
arp -d 192.168.3.191
The host will return
Reply from 192.168.3.191 ... or a
similar message. This indicates that the address has been set and that
communication is established.
first line to:
arp -s <IP address> <Ethernet address> <w95host IP
address>
, where <w95host IP address> is the IP address of
your Windows 95 host.
❏ When you execute the
ping command for the first time, you will
experience a significantly longer response time than is usual.
UNIX
❏ By usin g t h e
arp -d command, the static entry in the arp table is
removed from the host’s cache memory.
Page 32

AXIS 5400 User’s Manual Section 3: Basic Installation
Using ARP in UNIX Follow the instructions below to set the IP address using ARP:
Type the following commands in the shell window:
31
arp -s <host name> <Ethernet address> temp
ping <host name>
Example:
arp -s npsname 00:40:8c:10:00:86 temp
ping npsname
The host will return
npsname is alive, or a similar message. This
indicates that the address has been set and that communication is
established.
Notes: ❏ If the host name has not been mapped to an IP address, simply
replace the host name entry with the IP address in the example
above.
❏ The ARP command varies between different UNIX systems.
Some BSD type systems expect the host name and node address in
reverse order. Furthermore IBM AIX systems will require the
additional argument ether. For example:
arp -s ether <host name> 00:40:8c:10:00:86 temp
NetWare
Windows
OS/2
Macintosh
❏ When you execute the
ping command for the first time, you may
experience a significantly longer response time than is usual.
UNIX
Page 33

32
Section 3: Basic Installation AXIS 5400 User’s Manual
Using RARP in UNIX Follow the instructions below to set the IP address using RARP:
1. Append the following line to your Ethernet Address table. This is
NetWare
typically located in the
<Ethernet address> <host name>
Example:
00:40:8c:10:00:86 npsname
Windows
2. Update, if necessary, your host table and alias name databases, as
required by your system.
3. If it is not already running, start the RARP daemon. This is
OS/2
typically performed using the
4. Restart the AXIS 5400 to download the IP address.
/etc/ethers file:
rarpd -a command.
Macintosh
UNIX
Notes: ❏ If the host name has not been mapped to an IP address, simply
replace the host name entry with the IP address in the example
above.
❏ If you are using IBM AIX, you will probably not have access to a
RARP daemon. If this is the case, you can use either the ARP or
BOOTP methods instead.
Page 34

AXIS 5400 User’s Manual Section 3: Basic Installation
33
Using BOOTP
in UNIX
Notes: ❏ Enter the
Follow the instructions below to set the IP address using BOOTP:
1. Append the following entry to your boot table. This is typically
performed by editing the file: /etc/bootptab
<host name>:ht=<hardware type>:vm=<vendor magic>:\
:ha=<hardware address>:ip=<IP address>:\
:sm=<subnet mask>:gw=<gateway field>
Example:
npsname:ht=ether:vm=rfc1048:\
:ha=00408c100086:ip=192.168.3.191:\
:sm=255.255.255.0:gw=192.168.1.1
ht and vm fields exactly as shown in the example.
❏ The
ha field is the E th ernet address/node addr e ss and the ip field
is the IP address of your AXIS 5400.
❏ The
gw and sm fields correspond to the default router address and
subnet mask.
❏ If the host name has not been mapped to an IP address, simply
replace the host name entry with the IP address in the example
above.
NetWare
Windows
OS/2
Macintosh
2. If necessary, upd ate your host table and alias name databa ses, as
required by your system.
3. If it is not already running, start the BOOTP daemon. This is
typically performed using the
bootpd command.
4. Restart the AXIS 5400 to download the IP address, default router
address, and subnet mask.
The AXIS 5400 can automatically download a customized config file
from a TFTP server. Just add the name of the config file and the
TFTP server’s IP address to your boot table. The config file is
downloaded immediately after the AXIS 5400 receives its IP address.
UNIX
Page 35

34
Section 4: Setting Up - NetWare AXIS 5400 User’s Manual
Section 4 Setting Up - NetWare
NetWare
5400 in the NetWare environment. Identify which transport protocol
you are running on your network and which installation method you
should use. Continue the installation by sele cting the appropriate
installing instructions from the table below:
This section describes how to continue the installation of the AXI S
Installation
method
NDPS
Queue based
printing
Tran sp or t
protocol
TCP/IP
IPX/SPX
IPX/SPX
IPX/SPX
Advanced
configuration
Pure IP
Action
See Setup using NDPS, on page 35
Proceed with Installing the AXIS 5400 in NDPS env ironments, on page 36.
If you have performed the basic instal la tions as descri be d in Basic Setup
with AXIS NetPilot, on page 21, the AXIS 5400 is already installed for
printing in the NetWare environment.
If you need a more advanced installation that is not covered by the AXIS
NetPilot Installation Wizard, continue with Advanced Installation using AXIS
NetPilot, on page 38.
See Basic Queue-based printing (Pure IP), on page 41
If you intend to operate your AXIS 5400 in a multi-protocol, mixed
environment, you should also proceed to the other relevant sections in
this manual, namely:
Section 5 Setting Up - Windows, on page 44
Section 6 Setting Up - OS/2, on page 70
Section 7 Setting Up - Macintosh, on page 76
Section 8 Setting Up - UNIX, on page 82
Page 36

AXIS 5400 User’s Manual Section 4: Setting Up - NetWare
Setup using NDPS
The AXIS 5400 supports Novell Distributed Print Services (NDPS),
which is Novell’s new generation architecture for printing and printer
administration. You can run NDPS over Pure IP (TCP/IP) or
IPX/SPX.
Before the AXIS 5400 can be installed, make sure that NDPS and an
NDPS gateway are installed on your NetWare file server.
AXIS 5400 uses the AXIS NDPS Gateway for printing in networks
using either IP or IPX as transport protocols. The printer gateways are
included with the NDPS software and are automatically installed
together with NDPS.
Notes: ❏ NDPS requires that you run NetWare 4.11 or higher.
❏ Pure IP is only supported by NetWare 5 or higher.
35
NetWare
Page 37

36
Section 4: Setting Up - NetWare AXIS 5400 User’s Manual
Installing the AXIS 5400 in NDPS environments
Having assigned an IP address to the AXIS 5400 as described in
NetWare
Assigning an IP address, on page 25, you are now ready to install the
AXIS 5400 for NDPS printing. You can select to install the connected
printers as public or controlled access printers. Follow the instructions
below to install the AXIS 5400 using NDPS:
Notes: ❏ The
❏ If you do not have an NDPS Manager object available, start out
Public Access To create a public access printer using the NDPS Manager object in
your NetWare administrator, do the following:
1. Double-click on the NDPS Manager object you will be using to
2. At the Identification page for the NDPS Manager, click the
3. Click New. The Create Printer Agent dialog will appear.
4. Type a name of your choice in the NDPS Printer Ag ent field.
5. Choose the Axis Gateway configuration in the Gateway Type
6. Click OK.
HP-JETADMIN parameter of the AXIS 5400 must be set to
YES in order for the communication between the AXIS 5400 and
the NDPS gateway to be enabled.
with creating one in the NetWare Administrator.
control the Printer Agents.
printer Agent List button. The Printer Agent List dialog will
appear.
window. Select TCP/IP or IPX as transport protocol. (See Note
below).
7. Once you have completed the required tasks, you are ready to
print in your NDPS environment.
Notes: ❏ The Public Access print servers are immediately avai lable for
everyone on the network.
Page 38

AXIS 5400 User’s Manual Section 4: Setting Up - NetWare
❏ The Axis Gateway will appear in NetWare 5.1 and later releases.
To use the Axis Gateway with earlier versions of NetWare, you
can download the Axis Gateway Configuration utility from
www.axis.com.
❏ To print using TCP/IP, Axis print server fi rmware 6.1 or later is
required. In order to print using IPX/SPX, Axis print server
firmware 5.51 or later is needed.
Controlled Access 1. Make sure that the NDPS Gateway is not configured to
automatically create a public access printer, before you connect
the AXIS 5400 to the network.
2. Connect the AXIS 5400 to the NetWare network.
3. Use the NetWare Administrator to create an NDPS printer as an
object in the NDS Tree.
4. Create a new Printer Agent (PA) or convert a Public Access
Printer to a Controlled one.
37
NetWare
5. Choose the Axis Gateway configuration. Select TCP/IP or IPX as
transport protocol and complete required tasks.
6. You are now ready to print in your NDPS environment. Your
printer will appear as an NDS object in the Directory Tree and
will offer a full range of network security options.
Use the Novell Print Manager to instal l the co ntrolled access printer
on a client workstation.
Page 39

38
Section 4: Setting Up - NetWare AXIS 5400 User’s Manual
Advanced Installation using AXIS NetPilot
Having installed your AXIS 5400 print server in accordance with the
NetWare
basic installation procedures described in Basic Setup with AXIS
NetPilot, on page 21, your AXIS 5400 print server should now feature
in the ‘Network Print Servers’ folder located in the AXIS NetPilot
main window.
NetWare Network
Environment Window
The NetWare Network Environment window allows you to connect
additional print queues to your AXIS 5400 as well as create new ones.
Follow the steps below to gain access to the NetWare Network
Environment window:
1. Select the required Network Print Server from the ‘Network Print
Server’ folder.
2. Choose Network from the Setup menu or click on the Network
icon on the AXIS NetPilot’s toolbar.
3. If you are not logged on to your NetWare file server, a dialog box
will ask you to log on.
The AXIS NetPilot NetWare Network Environment window
Page 40

AXIS 5400 User’s Manual Section 4: Setting Up - NetWare
The AXIS 5400 periodically updates the configuration by scanning
the NDS tree or, in the case of NetWare versions 3.x, the designated
file servers.
Connecting
Print Queues
Follow the steps below to connec t a print queue to the print server
port:
1. Open the NetWare Network Environment window.
2. Select the print server port you want to connect.
3. Click the Connect... button. The Connec t NetWare Print
Queues window appears.
39
NetWare
The AXIS NetPilot Connect NetWare Print Queues window
4. Select the tree or server location of the print queue from the
Resources box.
Page 41

40
Section 4: Setting Up - NetWare AXIS 5400 User’s Manual
5. Select an existing print queue to connect to the server po rt, or
create a new print queue by clicking on Create Queue... If you
have selected an existing queue, advance to step 8. Continue with
NetWare
step 6 only if you want to create a new queue.
6. Type the queue name in the Create Queue dialog window. If you
want to create a queue in the NDS tree you must also enter the
name of the volume where the queue wi ll be located. Click OK.
7. Select the newly created queue from the queue li st.
8. Select Prin t Ser v er Mo d e or Rem o te Pr inte r Mode . If you
selected Print Server Mode, advance directly to step 11, otherwise
continue with step 9. Please refer to Queue-based Printing
Methods, on page 43, for further information about the two
printing methods.
9. Select an appropriate NetWare Print Server name, that will be
associated with the AXIS 5400 print server, by u sing the Browse...
button.
Notes: ❏ You cannot type or edit the name manually.
❏ Make sure that you have PSERVER.NLM running if you selected
Remote Printer Mode in step 8.
10. If you want to define a remote printer number slot manually,
check the Manual box and type the desired number in the box.
11. Click the OK button to return to the Network Enviro nments
window.
Page 42

AXIS 5400 User’s Manual Section 4: Setting Up - NetWare
Basic Queue-based printing (Pure IP)
Axis print servers w ith soft war e ve rsi on 6.0 o r late r all ow u sers to p rint
in a Pure IP environment using traditional queue-based printing. If
you prefer using NDPS as your printing method, please refer to Setup
using NDPS, on page 35.
In the NetWare Pure IP environment, you must use NetWare
Administrator to create the printer, print server and queue objects.
41
NetWare
Installing the
AXIS 5400
Follow the instructions below to i nstall the AXIS 5400 in the N etWare
Pure IP environment:
1. Start the Configuration Wizard from the User mode in the AXIS
5400 Web interface.
2. Click your way through the Wizard until reaching the NetWare
page. Make sure that the PSERVER_NDS parameter is set. If you
want to change the parameter value or if the parameter value is
empty, enter the desired values. The parameter value must include
the tree or the preferred file server you want to login to and the
print server name including the context. T h e syntax of the
PSERVER_NDS parameter is desc ribed in PSERVER_NDS
parameter, on page 42.
3. Use NetWare Administrator to create and link the printer, print
server and queue objects in the NDS tree.
4. Use the Add Printer Wizard to instal l the printer on your client.
Note that only NDS queue based PSERVER printing is
supported.
Any configuration and management of the AXIS 5400 can be
performed from any standard Web browser . Please refer to Using a Web
browser, on page 98.
In Pure IP environments, the AXIS 5400 supports NDS queue based
PSERVER printing or NDPS printing. Refer to Queue-based Printing
Methods, on page 43 alternatively Setup using NDPS, on page 35.
Page 43

42
Section 4: Setting Up - NetWare AXIS 5400 User’s Manual
Notes: ❏ If the PSERVER_NDS parameter includes the name of a tree and
not a specific fil e ser ver RCONAG 6.NLM mus t be r unning on at
least one file server in the specified tree.
NetWare
PSERVER_NDS
parameter
❏ If the IPX and IP transport protocols are enabled in your network,
you can use AXIS NetPilot to install the AXIS 5400 and to
connect print queues. Please refer to Basic Setup wi th AXIS
NetPilot, on page 21 and Advanced Installation using AXIS
NetPilot, on page 38.
❏ Pure IP requires that you run NetWare 5 or higher.
As shown in the instructions in Installing the AXIS 5400, on page 41,
the PSERVER_NDS parameter specifies which NDS tree or file server
the AXIS 5400 will login to. It also specifies the path to the print
server object in the tree. The syntax of the PSERVER_NDS parameter
is displayed i n the following examples:
Example 1:
TREE:NW5_TREE DevDept.acme
In this example a print server named DevDept, with context acme,
will login to the tree, NW5_TREE.
Example 2:
171.16.2.249 DevDept.acme
In this example a print server named DevDept, with context acme,
will login to a file server with the IP address 171.16.2.249. If you have
a DNS server on your network you can replace the IP address with the
host name.
Page 44

AXIS 5400 User’s Manual Section 4: Setting Up - NetWare
Queue-based Printing Methods
The following overview explains the advantages and limitations of the
two supported queue-based printing methods.
Print Server Mode The AXIS 5400 logs in to a file server(s) and repeatedly polls the pr int
queues for print jobs. In this fashion, the AXIS 5400 emulates a
NetWare print server, which is a workstation running PSERVER. It
provides high printing speed with lo w network load and is the
recommended mode for medium to large sized networks. Each print
server in PSERVER mode takes one NetWare user license.
Advantages • High performance: up to 1 Mbyte/s.
Limitations • In bindery mode, this printing method requires a NetWare user
licence for each AXIS 5400 to file server link.
43
NetWare
Remote Printer Mode The AXIS 5400 acts as Remote Printer for PSERVER.NLM running
on the NetWare file server, or to a dedicated workstation running
PSERVER.EXE. In this fashion, the AXIS 5400 emulates a
workstation running the NetWare remote printer software
RPRINTER, or NPRINTER. This mode is only recommended for
small networks where the number of NetWare user licences is a major
issue.
Advantages • NetWare user licences are not required.
Limitations • Lower performance, typically 20 - 70 kbytes/s for NLM.
• Higher network load.
Page 45

44
Section 5: Setting Up - Windows AXIS 5400 User’s Manual
Section 5 Setting Up - Windows
Having connected the AXIS 5400 to your network, as described in
Connecting a printer to the Ethernet Network, on page 17, this section
describes how to install the AXIS 5400 i n the Windo ws env ironment.
Identify your Wi ndows p latfor m and fo llow the ins talli ng inst ructi ons
from the list below .
Windows
Platform
Printing
protocol
See ...
Windows
1. AXIS Print System Overview, on page 46
2. Installing TCP/IP Printers in Windows 95/98, on page 47
1. AXIS Print System Overview, on page 46
2. Installing NetBIOS/NetBEUI printers in Windows 95/98, on
page 50
1. AXIS Print System Overview, on page 46
2. Installing TCP/IP Printers in Windows NT 4.0/2000, on page 52
Installing NetBIOS/NetBEUI printers in Windows NT 4.0/2000, on
page 55
1. AXIS Print Monitor Overview, on page 58
2. Installing TCP/IP Printers in Windows NT 3.5x, on page 59
1. AXIS Print Monitor Overview, on page 58
2. Installing NetBIOS/NetBEUI Printers in Windows NT 3.5x:, on
page 60
1. AXIS Print Utility for Windows Overview, on page 64
2. Windows 3.1 and Windows for Workgroups, on page 66
Windows 95,
Windows 98
Windows NT 4.0,
Windows 2000
Windows
NT 3.5x
Windows 3.1 &
Windows for
Workgroups
TCP/IP
NetBIOS/NetBEUI
TCP/IP
NetBIOS/NetBEUI
TCP/IP
NetBIOS/NetBEUI
NetBIOS/NetBEUI
Page 46

AXIS 5400 User’s Manual Section 5: Setting Up - Windows
If you intend to use the AXIS 5400 in a multiprotocol environment,
you should also refer to the following sections:
Section 4 Setting Up - NetWare, on page 34
Section 6 Setting Up - OS/2, on page 70
Section 7 Setting Up - Macintosh, on page 76
Section 8 Setting Up - UNIX, on page 82
45
Windows
Page 47

46
Section 5: Setting Up - Windows AXIS 5400 User’s Manual
AXIS Print System Overview
AXIS Print System is the recommended tool to use for network
printing in Windows 95, Windows 98 and Windows NT 4.0
environments. AXIS Print System allows Axis Network Print Servers
to be connected in the same simple fashion as a local printer port.
AXIS Print System has been develo ped for peer-to-peer printing,
allowing your print jobs to be sent directly to the AXIS 5400.
Windows
Peer-to-Peer Printing The AXIS Print System needs to be installed on each workstation to
Client-Server Printing AXIS Print System needs only to be installed on one server to perform
The AXIS Print System is available in an administration version and in
a user version. The only difference between them is that the
administration version includes an IP settings application called AXIS
IP Installer.
perform peer-to-peer pr inting. Once installed, the AXIS Print System
allows you to access all network printers, just as if they were connected
directly to your w orkstatio n. Peer-to- peer pr inting offe rs the followi ng
benefits:
• You can easily monitor the status o f yo ur printers
• You do not have to rely on a server.
client-server printing. The installed printers must b e configured to be
shared to allow clients to use them. Pop-up messages should not be
enabled on the server, as they wi ll not be displayed on the client
platforms.
Page 48

AXIS 5400 User’s Manual Section 5: Setting Up - Windows
Windows 95 and Windows 98
47
Installing TCP/IP
Printers in
Windows 95/98
Installing TCP/IP
Printer Ports and
Setting the IP Address
Install the AXIS Print System software on your Windows 95 or
Windows 98 client, if you have not already done so. AXIS Print
System can be downloaded from the AXIS Online CD or from the
Axis WWW home page at http://www.axis.com/.
To enable printing in the TCP/IP environment, you must ensure that
the TCP/IP protocol is ena bled on your client.
The set of instructions you should use to install TCP/IP printer ports
is dictated by the IP address of your AXIS 5400:
• If you have an active DHCP server on the network or if you have
already set the IP address of the AXIS 5400 using another
method, you should follow the inst allation instructions presented
in Installing TCP/IP Printer Ports, on page 49.
• If your AXIS 5400 is not assigned with a valid IP address, you
should follow the installation instructions presented in Installing
TCP/IP Printer Ports and Setting the IP Address, on page 47.
Follow the instructions below to install an AXIS Raw TCP/IP printer
port and set the IP address of the AXIS 5400, using AXIS Print
System:
Windows
1. Start AXIS Print System by sel ecting AXIS Print System from the
Start menu.
2. AXIS Print System starts. Select Search for newly connected print
servers... and click Next>.
3. Read the instructions and click Next>.
Page 49

48
Section 5: Setting Up - Windows AXIS 5400 User’s Manual
4. AXIS IP Installer opens. Click the serial number of the AXIS
5400 that appears in the server list. Restart the AXIS 5400 if it
does not appear in the list.
Notes: ❏ The serial number is located on the underside label of the AXIS
5400.
❏ If you have an active DHCP server in your network, you should
not use AXIS IP Installer to set the IP address. You sh ould instead
follow the installation instructions available in Installing TCP/IP
Windows
Printer Ports, on page 49.
5. Enter the desired IP address in the appropriate fields and click the
Set IP address button.
6. The AXIS IP Installer closes and the Installation Wizard starts.
Select the port you want to install from the list and click Next>.
7. AXIS Print System searches your computer and the network for a
location for a suitable printer driver for the printer. Click Next> if
a printer driver is found. If not, you have to manually find a
printer driver using the Select button before clicking the Next>
button.
8. Enter a name for the printer, select if you want to make it your
default printer and select if you want to produce a test page. Click
Finish.
The printer is now installed on your computer. The printer will
feature in the My Printers window of AXIS Print System as well as in
the Printers folder of the Windows operating system.
If you want to change the default name or the password of the AXIS
5400, use the Configuration Wizard that is available from the User
mode of the Web interface. Refer to Using a Web browser, on page 98.
Note: ❏ If you want to install LPR printer ports instead of Raw TCP/IP
printer ports, start the Microsoft Add Printer Wizard and refer to
the AXIS Print Monitor on-line help for ins tructions. The help
file is available in the folder where AXIS Print System is installed.
Page 50

AXIS 5400 User’s Manual Section 5: Setting Up - Windows
49
Installing TCP/IP
Printer Ports
Follow the instructions below to install an AXIS Raw TCP/IP printer
port, using AXIS Print System:
1. Start AXIS Print System by sel ecting AXIS Print System from the
Start menu.
2. AXIS Print System starts. Select your desired printer from the
Available Networks Printers window and click the Add to My
Printers button. The Add Axis Printers Wizard starts.
3. AXIS Print System searches your computer and the network for a
suitable printer driver for the printer connected to the AXIS 5400.
Click Next> if a printer driver is found. If not, you have to
manually find a printer driver using the Select button before
clicking the Next> button.
4. Enter a name for the printer, select if you want to make it your
default printer and select if you want to produce a test page. Click
Finish.
The printer is now installed on your computer. The printer will
feature in the My Printers window of AXIS Print System as well as in
the Printers folder of the Windows operating system.
If you want to change the default name or the password of the AXIS
5400, use the Configuration Wizard that is available from the User
mode of the Web interface. Refer to Using a Web browser, on page 98.
Windows
Note: ❏ If you want to install LPR printer ports instead of Raw TCP/IP
printer ports, start the Microsoft Add Printer Wizard and refer to
the AXIS Print Monitor on-line help for ins tructions. The help
file is available in the folder where AXIS Print System is installed.
Page 51

50
Section 5: Setting Up - Windows AXIS 5400 User’s Manual
Installing
NetBIOS/NetBEUI
printers in
Windows 95/98
Windows
Note: ❏ Even if the desired printer is available in the Manufacturers and
Follow the procedures be low to install Axis NetBIOS/NetB EUI
printer ports on a Windows 95 or Win dows 98 works tation, using the
AXIS Print System:
1. To start the Add Printer Wizard, select Settings - Printers from
the Start menu and double-click the Add Printer icon.
2. After clicking Next> in the first dialog, the Wizard asks you to
select Local printer or Network printer. Select Local printer as the
AXIS 5400 emulates a local printer port. Click Next>.
3. Choose the appropriate printer driver for your printer. If the
desired printer driver appears in the displayed Manufacturers and
Printer Models lists, highlight your selection, click Next> and
proceed directl y to st e p 6. It is only ne ce ss ar y to pe r fo rm s tep s 4 -
5 if your printer does not appear in the model list.
Printer Models list, you are advised to use the printer driver
provided with the printer. Th is assures you of the latest driver
software.
4. Click the Have Disk... button. Insert the prin ter driver
diskette/CD that was provided with your printer, select the
appropriate diskette/CD drive and click OK.
5. Select the printer driver you want to install and click Next>.
6. Select the AXIS Printer Port from the Available Ports list. The
port name appears as <name>.LP1, where <name> is AX followed
by the last six digits of the AXIS 5400 serial number, e.g.
AX100086. Click the Configure Port button.
7. Choose whether error cond ition pop-up messages are to be
displayed by checking the box in the Configure AXIS Printer
Ports dialog. Define the frequency at whi ch the error messages
should be displayed after retry. Click Next>.
8. Enter an appropriate name for your printer and click Next>.
9. Choose whether you wish to produce a test page and click Finish.
Page 52

AXIS 5400 User’s Manual Section 5: Setting Up - Windows
51
Installing Shared
Printers on your
Windows 95/98 client
Note: ❏ Even if the desired printer is available in the Manufacturers and
Follow the instructions below to install shared printers on your
Windows 95 or Windows 98 client:
1. Star t the Add P rint er Wiza rd by s ele cting Settings - Printers from
the Start menu and double-click the Add Printer icon.
2. Click Next> in the first dialog.
3. Select Network Print Server and click Next>.
4. Enter the path for the network printer or browse the network to
find and select it.
5. Choose the appropriate printer driver for your printer. If the
desired printer driver appears in the displayed Manufacturers and
Printer Models lists, highlight your selection, click Next> and
proceed directly to step 8. It is on ly necessary to perform steps 67 if your printer does not appear in the model list.
Printer Models list, you are advised to use the printer driver
provided with the printer. Th is assures you of the latest driver
software.
6. Click the Have Disk... button. Insert the prin ter driver
diskette/CD that was provided with your printer, select the
appropriate diskette/CD drive and click OK.
Windows
7. Select the printer driver you want to install and click Next>.
8. Enter an appropriate name for your printer and click Next>.
9. Choose whether you wish to produce a test page and click Finish.
Page 53

52
Section 5: Setting Up - Windows AXIS 5400 User’s Manual
Windows NT4.0 and Windows 2000
Installing TCP/IP
Printers in Windows
Windows
Installing TCP/IP
Printer Ports and
Setting the IP Address
NT 4.0/2000
Install the AXIS Print System software on your Windows NT 4.0
workstation, if you have not already done so. AXIS Print System can
be downloaded from the AXIS Online CD or from the Axis WWW
home page at http://www.axis.com/.
To enable printing in the TCP/IP environment, you must ensure that
the TCP/IP protocol is ena bled on your client.
The set of instructions you should use to install TCP/IP printer ports
is dictated by the IP address of your AXIS 5400:
• If you have an active DHCP server on the network or if you have
already set the IP address of the AXIS 5400 using another
method, you should follow the inst allation instructions presented
in Installing TCP/IP Printer Ports, on page 54.
• If your AXIS 5400 is not assigned with a valid IP address, you
should follow the installation instructions presented in Installing
TCP/IP Printer Ports and Setting the IP Address, on page 52.
Follow the instructions below to install an AXIS Raw TCP/IP printer
port and set the IP address of the AXIS 5400, using AXIS Print
System:
1. Start AXIS Print System by sel ecting AXIS Print System from the
Start menu.
2. AXIS Print System starts. Select Search for newly connected print
server... and click Next>.
3. Read the instructions and click Next>.
Page 54

AXIS 5400 User’s Manual Section 5: Setting Up - Windows
4. AXIS IP Installer opens. Click the serial number of the AXIS
5400 that appears in the server list. Restart the AXIS 5400 if it
does not appear in the list.
Notes: ❏ The serial number is located on the underside label of the AXIS
5400.
❏ If you have an active DHCP server in your network, you should
not use AXIS IP Installer to set the IP address. You sh ould instead
follow the installation instructions available in Installing TCP/IP
Printer Ports, on page 54.
5. Enter the desired IP address in the appropriate fields and click the
Set IP address button.
6. The AXIS IP Installer closes and the Installation Wizard starts.
Select the port you want to install from the list and click Next>.
7. AXIS Print System searches your computer and the network for a
location for a suitable printer driver for the printer. Click Next> if
a printer driver is found. If not, you have to manually find a
printer driver using the Select button before clicking the Next>
button.
53
Windows
8. Enter a name for the printer, select if you want to make it your
default printer and select if you want to produce a test page. Click
Finish.
The printer is now installed on your computer. The printer will
feature in the My Printers window of AXIS Print System as well as in
the Printers folder of the Windows operating system.
If you want to change the default name or the password of the AXIS
5400, use the Configuration Wizard that is available from the User
mode of the Web interface. Refer to Using a Web browser, on page 98.
Note: ❏ If you want to install LPR printer ports instead of Raw TCP/IP
printer ports, start the Microsoft Add Printer Wizard and refer to
the AXIS Print Monitor on-line help for ins tructions. The help
file is available in the folder where AXIS Print System is installed.
Page 55

54
Section 5: Setting Up - Windows AXIS 5400 User’s Manual
Installing TCP/IP
Printer Ports
Follow the instructions below to install an AXIS Raw TCP/IP printer
port, using AXIS Print System:
1. Start AXIS Print System by sel ecting AXIS Print System from the
Start menu.
2. AXIS Print System starts. Select your desired printer from the
Available Networks Printers window and click the Add to My
Printers button. The Add Axis Printers Wizard starts.
3. AXIS Print System searches your computer and the network for a
Windows
suitable printer driver for the printer connected to the AXIS 5400.
Click Next> if a printer driver is found. If not, you have to
manually find a printer driver using the Select button before
clicking the Next> button.
4. Enter a name for the printer, select if you want to make it your
default printer and select if you want to produce a test page. Click
Finish.
The printer is now installed on your computer. The printer will
feature in the My Printers window of AXIS Print System as well as in
the Printers folder of the Windows operating system.
If you want to change the default name or the password of the AXIS
5400, use the Configuration Wizard that is available from the User
mode of the Web interface. Refer to Using a Web browser, on page 98.
Note: ❏ If you want to install LPR printer ports instead of Raw TCP/IP
printer ports, start the Microsoft Add Printer Wizard and refer to
the AXIS Print Monitor on-line help for ins tructions. The help
file is available in the folder where AXIS Print System is installed.
Page 56

AXIS 5400 User’s Manual Section 5: Setting Up - Windows
55
Installing
NetBIOS/NetBEUI
printers in Windows
NT 4.0/2000
Follow the procedure below to install Axis Printer Po rts from a
Windows NT 4.0 or Windows 2000 workstation:
1. To start the Add Printer Wizard, select Settings - Printers from
the Start menu and double-click the Add Printer icon.
2. Windows 2000 only: Start the installation by clicking Next>.
3. The Wizard asks you to select My Computer or Network printer
server. Select My Computer, as the AXIS 5400 emulates a local
printer port.
4. Click Add Port... in the Available ports dialog, select AXIS Port
and click New Port...
5. Select NetBIOS/NetBEUI as your choice of network protocol
and click OK.
6. Select the AXIS Port you want to add. The port appears as
<name>.LP1, where <name> is AX followed by the last six digits
of the AXIS 5400 serial number, e.g. AX100086. Click OK.
7. Close the Printer Ports window.
8. Click the Configure Port... button. Choose whether er ror
condition pop-up messages are to be displayed by checking the
box in the Configure Axis Po rts dialog. Define the frequency at
which the error messages should be displayed after retry. Click
OK. Continue the installation by clicking Next>.
Windows
9. Choose the appropriate printer driver for your printer. Click
Next> and proceed directly to step 11. It is only necessary to
perform steps 9-10 if your printer does not appear in the list.
Note: ❏ Even if the desired printer is available in the Manufacturers and
Printer Models list, you are advised to use the printer driver
provided with your printer. This assures you of the latest driver
software.
10. Click the Have Disk... button. Insert the printer driver
diskette/CD that was provided with your printer, select the
appropriate diskette/CD drive and click OK.
Page 57

56
Section 5: Setting Up - Windows AXIS 5400 User’s Manual
11. Select the printer driver you want to install and click Next>.
12. Enter an appropriate name for your printer and click Next>.
13. Choose whether you want to share the printer with other network
users and click Next>.
14. Choose whether you want to prod uce a test page and then click
Finish.
Windows
Using the Microsoft
LPD monitor with
Windows NT 4.0
Basic Setup If you have not already done so, you should perform the TCP /IP basic
This section describes how to set up a Windows NT Server v4.0 for
LPR printing over the TCP/IP protocol, using the built-in Microsoft
LPD monitor.
setup procedures prior to installing a printer for LPD printing. These
procedures are defined in Assigning an IP address, on page 25 and
onwards.
Preparing for
LPR/LPD printing
In the Control Panel, click the Network icon. If the TCP/IP Printing
entry appears, then TCP/IP is already installed. Close the Network
folder and s kip to Installing a printer on the next page.
Follow the follow ing steps to prepare for LPR/LPD print in g:
1. Open the Co nt rol P an el and click the Network icon.
2. Select Protocols.
3. Add TCP\IP Protocol.
4. Select Services.
5. Add MS TCP\IP Printing.
Page 58

AXIS 5400 User’s Manual Section 5: Setting Up - Windows
57
Installing a printer
Follow the instructions below to install a printer for LPD printing:
1. Open the Co nt rol P an el and open the ‘Printers’ folder.
2. Click Add Printer, select My Computer and then go to Next.
3. Select Add Port. In Printer Ports, ch oose LPR Port and then click
New Port.
4. In Add LPR compatible printer, enter the host name or IP address
of the AXIS 5400 as the print server to provide LPD.
5. Enter 'pr1', 'pr2', ... 'pr8' as the name of printer or print queue on
that server.
6. Choose a suitable printer driver for your printer and go to Next.
7. Enter a printer name and go to Next.
8. Select Shared if you want to share the printer over the network.
9. Enter a share name.
10. Click Next and then Finish.
Windows
Page 59

58
Section 5: Setting Up - Windows AXIS 5400 User’s Manual
AXIS Print Monitor Overview
AXIS Print Monitor is the recommended too l to use for network
printing in Windows NT 3.5x environments. It allows AXIS Network
Print Servers to be connected in the same simple fashion as a local
printer port and once installed, is automatically initialized upon
system startup. AXIS Print Monitor has been developed for peer-topeer printing, allowing your print jobs to be sent direc tly to the print
server.
Windows
Printing Environments AXIS Print Monitor supports printing over NetBIOS/NetBEUI and
TCP/IP (LPR). To enable printing in these environments, please
ensure that the desired printing protocols are running on your client.
Peer-to-Peer Printing The AXIS Print Monitor needs to be installed on each workstation to
perform peer-to-peer pr inting. Once installed, the AXIS Print
Monitor allows you to access all network printers, just as if they were
connected directly to your workstation. Peer-to-peer printing offer s
the following benefits:
• You can easily monitor the status of your pr inters, by enabling
error condition pop-up messages.
• You do not have to rely on a server.
Client-Server Printing AXIS Print Monitor needs only to be installed on one server to
perform client-server printing. The installed printers must be
configured to be shared to allo w clients to use them. Pop-up mes sages
should not be enabled on the server as they will not be displayed on
the client platforms.
Note: ❏ AXIS Print Monitor can be used for DOS printing. Please refer to
the AXIS Print Monitor’s Readme file for instructions. The
readme file is located in t he same folder where AXIS Print
Monitor is inst alled on your PC.
Page 60

AXIS 5400 User’s Manual Section 5: Setting Up - Windows
Windows NT 3.5x
59
Installing TCP/IP
Printers in
Windows NT 3.5x
Note: ❏ Even if the desired printer is available in the Manufacturers and
Install the AXIS Print Monitor software on your Windows NT3.5x
client, if you have not already done so. AXIS Print Monitor can be
downloaded from the AXIS Online CD or from the Axis WWW
home page at http://www.axis.com/.
To be able to print using LPR, you must have installed the AXIS 5400
in the TCP/IP environment as described in
Assigning an IP address, on page 25 a nd the TCP/IP protocol must be
enabled on your client.
1. Open the Print Manager and select Create Printer from the
Printer menu.
2. Enter an appropriate name in the Printer Name field.
3. Choose an appropriate printer driver for your printer from the
drop-down Driver list. If the desired printer driver already appears
in the displayed Manufacturers and Printer Models list dialog,
proceed directl y to st e p 6. It is only ne ce ss ar y to pe r fo rm s tep s 4 -
5 if your printer does not appear in the model list.
Printer Models list, you are advised to use the printer driver
provided with your printer. This assures you of the latest driver
software.
Windows
4. Select Other... in the driver list. Insert the printer driver
diskette/CD that was provided with your printer, select the
diskette/CD drive and click OK.
5. Select the printer driver you want to install.
6. Select Other... from the “Print to” drop-down list.
7. Select AXIS Port from the list of available Print Monitors in the
Print Destination dialog. Click OK.
8. Select LPR (TCP/IP) as your choice of network protocol and
click OK.
Page 61

60
Section 5: Setting Up - Windows AXIS 5400 User’s Manual
9. From the Add LPR port dialog, enter the IP address or host name
of your print server and define a Logical printer name. Click OK
to return to the Create Printer d ialog.
10. Select the AXIS LPR port you wish to use from the “Print to”
drop-down list. The ports appear as <port name>@<IP address>
or <port name>@<host name>,
e.g. PR1@192.36.254.101.
11. Click the Settings button. Choose whether error condition pop-
Windows
up messages are to be displayed by checking the box in the
Configure AXIS LPR Ports dialog. Define the frequency at which
the error messages should be displayed after retry. Click OK to
return to the Create Printer dialog.
12. Having selected and configured the chosen port, clic k Next>.
13. Select whether you want to share the p ri n ter with other network
users. Click OK.
The printer properties are displayed in an appropriate dialog that
allows you to refine your printer setup.
Installing
NetBIOS/NetBEUI
Printers in
Windows NT 3.5x:
The Axis printer is now installed and will appear as an icon in the
Print Manager.
Install the AXIS Print Monitor software on your Windows NT3.5x
client, if you have not already done so. AXIS Print Monitor can be
downloaded from the AXIS Online CD or from the Axis WWW
home page at http://www.axis.com/.
Follow the procedure below to install Axis printer ports from a
Windows NT 3.5x workstation:
1. Open the Print Manager and select Create Printer from the
Printer menu.
2. Enter an appropriate name in the Printer Name field.
Page 62

AXIS 5400 User’s Manual Section 5: Setting Up - Windows
3. Choose an appropriate printer driver for your printer from the
Manufacturers and Printer Models list displayed and then proceed
directly to step 6. Please note that it is only necessary to perform
steps 4 - 5 if your printer does not appear in the model list.
Note: ❏ Even if the desired printer is available in the Manufacturer and
Printer Models list, you are advised to use the printer driver
provided with your printer. This assures you of the latest driver
software.
61
4. Select Other... in the driver list. Insert the printer driver
diskette/CD that was provided with your printer, select the
appropriate diskette/CD drive and click OK.
5. Select the printer driver you want to install.
6. Select Other... in the “Print to” list box.
7. Select Axis Port from the list of available Print Monitors and click
OK.
8. Select the AXIS Port you wish to add and then click OK. The
port appears as <name>.LP1, where <name> is AX followed by
the last six digits of the AXIS 5400 serial number, e.g. AX10008 6.
9. Click on Settings. Choose whether error co ndition pop-up
messages are to be displayed by ch ecking the box in t he Configur e
Axis Ports d ialog. Click OK.
10. Click OK.
Windows
Page 63

62
Section 5: Setting Up - Windows AXIS 5400 User’s Manual
Using the Microsoft
LPD monitor with
Window NT 3.5x
Basic Setup If you have not already done so, you should perform the TCP /IP basic
This section describes how to set up a Windows NT Server
v3.5 and v3.51 for LPD printing over the TCP/IP protocol, using the
built-in Microsoft LPD monitor.
setup procedures prior to installing a printer for LPD printing. These
procedures are defined in Assigning an IP address, on page 25 and
onwards.
Windows
Install the TCP/IP
Protocol Stack
In the Control Panel, click the Network icon. If the TCP/IP Printing
entry appears, then TCP/IP is already installed. Close the Network
folder and continue with Installing a printer on the next page.
Follow these steps t o install the TCP/IP protocol stack:
1. In the Control Panel, select Network.
2. Click Add Software...
3. Select “TCP/IP Protocol and related components” and then
click Continue.
4. Check “TCP/IP Network Printing Support” and then click
Continue.
5. Select path and then click Continue.
6. Click OK in the Network Settings dialog box.
Page 64

AXIS 5400 User’s Manual Section 5: Setting Up - Windows
63
Installing a Printer
Follow the following step-by-step instructions to install a printer for
LPD printing.
1. In the Control Panel, click the Print Manager.
2. In the Printer menu, select Create Printer.
3. In the Printer Name field, type a name for your printer.
4. Choose a suitable printer driver for your printer.
5. In the Print to field, select Other ...
6. In the Print Destinations dialog, choose LPR Port and then click
OK. The Add LPR Compatible Printer dialog will now appear.
7. In the Name or Address field, type the IP address or the host
name of your AXIS 5400. If you use a host name, this must be
defined in the hosts file on your server prior to the installation.
This file is normally loca ted in /winnt35/system32/drivers/etc/hosts.
8. In the Name of Printer on the Machine field, type the logical
printer number you want to use, e.g. pr1. Click OK.
9. Click OK to complete the i n stallation.
Windows
Page 65

64
Section 5: Setting Up - Windows AXIS 5400 User’s Manual
AXIS Print Utility for Windows Ov erview
AXIS Print Utilit y for Wind ows is t he tool to use f or netwo rk pri nting
in Windows for Workgroups and Windows 3.1 environments.
AXIS Print Utility for Windows can be downloaded from the
software\prt_srv\utility\axpuw\latest folder on the AXIS Online CD or
from the Axis WWW home p age at http://www.axis.com/. Install this
utility now if you have not already done so.
Windows
About
AXIS Print Utility
for Windows
AXIS Print Utility fo r Windows i s an applicat ion for net work print ing
in the Windows environment. It allows you to:
• Install and maintain AXIS 5400 printer ports as Windo ws printer
ports.
• Capture and monitor print jobs directed to the AXIS 5400 ports.
Print jobs are directed through a spool directory located on your local
hard disk (peer-to-peer mo de), or on the file server (client-server
mode). The printer port status of your AXIS 5400 can be monitored
and pop-up notification messages can be generated, keeping you
informed of completed print jobs or any problem condition.
For more information about AXIS Print Utility for Windows, see the
on-line help.
Notes: ❏ Microsoft Network (NetBIOS/NetBE UI ) must be running when
using AXIS Print Utility for Windows.
❏ AXIS Print Utility for Windows must be running when printing
in peer-to-peer mode.
❏ The AXIS Print Utility for Windows is not needed on the client
platforms for client-server printing.
❏ If you want to change the default name of your AXIS 5400 or
amend any of the default parameters, you can do so using the
AXIS NetPilot, or any standard Web browser. Refer to Section 9
Management & Configuration, on page 97.
Page 66

AXIS 5400 User’s Manual Section 5: Setting Up - Windows
65
Peer-to-Peer vs.
Client-Server Printing
Windows for Workgroups and Windows 3.1 users, requiring access to
a network printer in peer-to-peer mode, will need to install the AXIS
Print Utility fo r Windo w s s of t war e onto their workstatio n. U s er s may
then add the required network printer to their systems and use the
printer as if it was connected directly to their workstation. Peer-topeer printing offers the following benefits:
• You can monitor the printer status at all times and be notified
when print job are completed.
• You do not have to rely on a server.
Windows
Client-server operation requires only one user to install the AXIS Print
Utility for Windows software onto their workstation. This user then
adds the printer to his or her workstation (the server) and shares the
printer with other users on the n etwork. The other users (the clients)
can connect to the printer through the server via the W indows Print
Manager.
The client-server mode pr ov id es a way of maintai n ing queu e ord ering
and job priority, but at a price. This is because:
• You cannot receive printer s t atus or print job notification.
• The workstation, setup as the server, must be available at all times.
It must also have the capacity to handle the print jobs that pass
through it.
Notes: ❏ When using the client-server mode, other users can still install the
AXIS Print Utility for Windows software, for printing directly to
the network printer in peer-to-peer mode.
❏ When using the client-server mode, it is recommended that the
server is setup only on a Windows for Workgroups workstation.
Page 67

66
Section 5: Setting Up - Windows AXIS 5400 User’s Manual
Windows 3.1 and Windows for Workgroups
Windows 3.1 In order to print to a network printer, Windows 3.1 requires the
installation of network support, such as the LAN S erver or LAN
Manager Workstation software. When installed, proceed as described
under Windows for Workgroups below.
Windows for
Windows
Workgroups
Peer-to-Peer Pr i nt in g Follow the instructions below to install your AXIS 5400 for peer-to-
peer printing at a Windows f or W orkgroups workstation:
1. Double-cli ck the AXIS Print Utility icon.
2. In the Port menu, click Add.
3. In the NPS Port list, se lect the AXIS 5400 port. The port appear s
as <name>.LP1, where <name> is AX follo wed by the last six
digits of the AXIS 5400 serial number, e.g. AX100086.
4. Accept or change the suggested Windows port name and type any
required comment in the Descript ion field. Make a note of the
Windows port name as you will need this later, then click OK to
install the Windows port.
5. In the Port menu, click Connect... to bring up the Windows
Printers dialog.
6. Select a printer driver from the list of Installed Printers (or click
Add>> to install a new driver), then click Connect...
7. Select the Windows port name from step 4 above (this name can
be found at the bottom of the Ports list).
8. Click OK to close the Connect dialog, and Close to close Printers.
The setup is completed and you can now print thro ugh your
AXIS 5400.
Page 68

AXIS 5400 User’s Manual Section 5: Setting Up - Windows
Notes: ❏ AXIS Print Util ity fo r Window s must be r unning whe n you print
through your AXIS 5400. It is strongly recommended that you
copy the AXIS Print Utility icon into your StartUp folder.
❏ To enable TCP/IP printing in Windows 3.1 and Windows for
Workgroups environments, you must use a shareware LPR
spooler that can be downloaded from
ftp://ftp.axis.com/pub/axis/software/prt_srv/utility/wlprs/.
67
Client-Server Printing:
Server Setup
Note: ❏ The AXIS Print Utility for Windows must be running when you
.
Follow the instructions below to install your AXIS 5400 for clientserver printing a t a Windows for Work groups server:
1. Choose a workstation that you want to use as a server for network
printing. The server must be available at all times and must have
sufficient hard disk space for spooling print jobs.
2. Open Ne twork Setup, click Sharing..., check the I want to be
able to allow others to print to my printer(s) box .
3. Install AXIS Print Utility for Windows on the server.
4. Set up your AXIS 5400 as described under Peer-to-Peer Printing,
on page 66.
5. Open Print Manager and select your printer.
6. In the Printer menu, select Share Printer As...
7. Type a printer name in the Share As field (this is the printer name
seen by the clients, see Client Setup b elow).
Check the Re-share at Startup box, then click OK.
The server setup is now completed.
print through your AXIS 5400. It is strongly recommended that
you copy the AXIS Print Utility icon into your StartUp folder.
Windows
Page 69

68
Section 5: Setting Up - Windows AXIS 5400 User’s Manual
Client-Server Printing:
Windows
Client Setup
Follow these steps to use your AXIS 5400 for client-server printing at a
Windows for Workg roups client:
1. In the Control Panel, select Printers.
2. Select a printer driver from the list of Installed Printers, or click
Add>> to install a new driver. Click Connect...
3. Select Network... in the Device Name list, select a local port
(LPT1 - LPT3) to redirect to your network printer.
4. In the Show Shared Printers on list, select the server from Server
Setup above.
5. In the Shared Printers list, select the printer you want to use.
6. Click OK, OK and Close.
7. Exit the Control Panel.
The client setup is completed and you can now p ri n t through your
AXIS 5400.
Page 70

AXIS 5400 User’s Manual Section 5: Setting Up - Windows
Windows Clients using LANtastic
From any Windows client, the AXIS 5400 can also be used for
network printing in LANtastic environments.
LANtastic users can use the AXIS Utilities in exactly the same manner
as described in the prece ding Windows se ctions, usi ng a choice of Axis
utility software that is guided by the type of Windows client
employed:
69
• Refer to AXIS Print Utility for Windows Overview, on page 64, if
you are using a Windows for Workgroups client.
• Refer to AXIS Print Monitor Overview, on page 58, if you are
using a Windows 95, Windows 98 or Windows NT client.
Note: ❏ Make sure that your LANtastic client is running the desired
printing protoc ols.
Windows
Page 71

70
Section 6: Setting Up - OS/2 AXIS 5400 User’s Manual
Section 6 Setting Up - OS/2
Having connected the AXIS 5400 to your network, as described in
Connecting a printer to the Ethernet Network, on page 17, this section
now describes how to set up your AXIS 5400 for printing in the OS/2
environment.
Continue with the instructions pres ented in the table below:
Printing
protocol
TCP/IP TCP/IP Printing, on page 71
OS/2
NetBIOS/NetBEUI NetBIO S /N e tBEUI Printing , on page 72
See ...
If you intend to operate your AXIS 5400 in a multiprotocol
environment, you should also proceed to the other relevant sections in
this manual, namely:
Section 4 Setting Up - NetWare, on page 34
Section 5 Setting Up - Windows, on page 44
Section 7 Setting Up - Macintosh, on page 76
Section 8 Setting Up - UNIX, on page 82
Page 72

AXIS 5400 User’s Manual Section 6: Setting Up - OS/2
TCP/IP Printing
Having assigned an IP address to the AXIS 5400, as described in
Assigning an IP address, on page 25, you are now ready to install it for
TCP/IP printing in the OS/2 environment. The AXIS 5400 supports
LPR Printing using the lprportd service method.
71
Installing the
AXIS 5400
Creating a
print queue
Follow the instructions below to install the AXIS 5400 using the
lprportd servic e method:
1. Open the OS/2 System window, select TCP/IP and TCP/IP
Configuration.
2. Select Printing, type a number, e.g. 3, in the Maximum number
of LPD ports field. The Remote print server and Remote print
server's printer fi elds should remain empty.
3. Select Autostart, select lprportd, click the Autostart check box
and select Detached.
4. Exit and Save.
5. Restart your OS/2 client.
Continue with the instructions below to create a print queue:
1. Open the Templ ate group. Create an new printer from
Templates by dragging the Printer icon to the desktop with the
right mouse button.
2. Select a printer driver and double-click a free Output port, for
instance \PIPE\LPD0.
OS/2
3. Enter the host name or the IP address of the AXIS 5400 in the
LPD server field.
4. Enter one of the AXIS 5400 logical printer names, for example
pr1, in the LPD printer field.
Page 73

72
Section 6: Setting Up - OS/2 AXIS 5400 User’s Manual
NetBIOS/NetBEUI Printing
The AXIS Print Utility for OS/2 is the tool to use for
NetBIOS/NetBEUI printing in OS/2 environments.
AXIS Print Utility for OS/2 is availa ble from the
software\prt_srv\utility\axpu\latest folder located on the AXIS Online
CD. It can also be downloaded from the Axis WWW home page at
http://www.axis.com/. Install this utility now if you have not already
done so.
If you want to change the default name or any of the AXIS 5400
default parameters, you can do so using any standard Web browser or
AXIS NetPilot from any Windows plat fo rm t hat is connecte d to your
network, or WinOS/2 window under OS/2.
OS/2
Refer to Section 9 Management & Configuration, on page 97, for more
information.
The AXIS Print Utility fo r OS/2 is no t needed o n the cl ient platf orms
when using a client-server configuration.
Page 74

AXIS 5400 User’s Manual Section 6: Setting Up - OS/2
73
About AXIS Print
Utility for OS/2
Notes: ❏ The NetBEUI protocol must be active. If not, use MPTS/LAPS
Installing the
AXIS 5400
AXIS Print Utility for OS/2 is an application for NetBIOS/NetBEUI
printing in the OS/2 environment. Its allows you to:
• Install and maintain the AXIS 5400 printer ports as OS/2 printer
ports.
• Capture and monitor print jobs directed to the AXIS 5400 ports.
Print jobs are directed through a spool directory located on your local
hard disk (peer-to-peer mo de), or on the file server (client-server
mode). The printer port status of your AXIS 5400 can be monitored
and pop-up notification messages can be generated, keeping you
informed of completed print jobs or any problem condition.
(LAN Server) or SETUP (LAN Manager) to activate it.
OS/2
❏ If you are using OS/2 version 2.x and wish to print through
TCP/IP, we recommend that you use the IBM TCP/IP for OS/2
product. It supports the LPD and interactive FTP print methods.
1. When AXIS Print Utility for OS/2 is running, click Install to
install your AXIS 5400. The port appears in the list as
<name>.LP1, where <name> is AX followed by the last six digits
of your print server serial number. e.g. AX100086.LP1.
2. Select the port that you want to install, then click Install.
Repeat this procedure for each server using the AXIS 5400.
Note: ❏ The AXIS Print Utility for OS/2 must be running in order to
print through your AXIS 5400. It is strongly recommended that
you modify the startup.cmd file, enabling AXIS Print Utility for
OS/2 to automatically start when your client is re-bo oted.
Instructions are available in the AXIS Print Utility for OS/2
Readme file.
Page 75

74
Section 6: Setting Up - OS/2 AXIS 5400 User’s Manual
Creating
a Print Queue
(OS/2 version 2.x
and OS/2 Warp)
OS/2
1. Double-click the Templates folder, then drag the Printer icon out
to the Workplace Shell (or into a f ol der) while holding the right
mouse button down.
2. Type a name of your choice in the Name field.
3. Select \PIPE\<name>.LP1 from the Port list, and select a printer
driver suitable for your printer from the Standard Printer list.
4. Click OK to confirm the printer definition.
Page 76

AXIS 5400 User’s Manual Section 6: Setting Up - OS/2
75
Sharing the
Print Queue
A print queue must be made a shared resource before it can be
accessed from other clie nts or servers. The following thr ee examples
show how you can share your printer resources:
Open an OS/2 window and issue the following command:
NET SHARE <queue_name> /PRINT
Where <queue_name> is the name of the queue cre ated on the
previous side.
To share a printer resource when using OS/2 W a rp with IBM Peer
service, follow the steps below:
1. Click the right mouse button on the printer object.
OS/2
2. Select Share and then Start sharing. In the dialog box, enter a
Description.
3. Select the check-box Start sharing at LAN worksta ti o n st ar t - u p.
4. Click OK.
To share a printer resource when using LAN server 4.0, follow the
steps below:
1. Open LAN Server Administration.
2. Open your domain and then Resource Definit ion.
3. Drag and drop a printer from the template.
4. Enter the Alias name, select a Server name and the previously
created Spooler Queue Name.
5. Click OK.
The setup is completed and you can now print through your AXIS
5400.
Page 77

76
Section 7: Setting Up - Macintosh AXIS 5400 User’s Manual
Section 7 Setting Up - Macintosh
Having connected the AXIS 5400 to your network, this section now
describes how to set up your AXIS 540 0 for printing in M acintosh
environments using AppleTalk.
If you intend to operate your AXIS 5400 in a multiprotocol
environment, you should also proceed to the other relevant sections in
this manual, namely:
Section 4 Setting Up - NetWare, on page 34
Section 5 Setting Up - Windows, on page 44
Section 6 Setting Up - OS/2, on page 70
Section 8 Setting Up - UNIX, on page 82
Installation Using the Chooser Window
Macintosh
Basic Configuration Basic configuration in AppleTalk is performed simply by opening the
Chooser window and selecting a printer.
You can change the default name of your AXIS 5400 or any of default
parameters by editing the config file. To access the config file from a
Macintosh, you can use:
• any Java enabled Web browser
• FTP using MacTCP, Fetch or Anarchie
In order to use any of the methods, you must assign an IP add res s to
the AXIS 5400 as described in Setting Parameters, on page 80.
Page 78

AXIS 5400 User’s Manual Section 7: Setting Up - Macintosh
Choosing a Printer
Selecting a Printer The method for choosing a printer varies depending on which version
of LaserWriter printer driver you are using.
• The LaserWriter 7.0 driver assumes that you use a standard PostScript driver, and cannot take advantage of any printer specific
features.
• The LaserWriter 8.0 driver uses PPD files that contain printer
descriptions. This gives y ou full control over any featur es your
printer might have.
77
LaserWriter 7.0
Printer Driver
Follow the instructions below to choose a printer:
1. Select Chooser from the Apple menu.
2. Click the Lase rWriter icon.
3. If your network has more than one zone, click on the zone you
want. If your network has no zones, this box does not appear.
4. Click the name of the printer you want. The default AXIS 5400
printer name is shown as: AXIS<nnnnnn>_<port>, where
<nnnnnn> is the last six digits of the AXIS 5400 serial number,
and <port> is LPT1. For example: AXIS100086_LPT1.
5. Click the Close box. This completes the configuration and closes
the Chooser.
Repeat this procedure for each Macintosh computer on the network
using the AXIS 5400.
Macintosh
Page 79

78
Section 7: Setting Up - Macintosh AXIS 5400 User’s Manual
Macintosh
LaserWriter 8.0
Printer Driver
Follow the instructions below to choose a printer:
1. Select Chooser from the Apple menu.
2. Click the LaserWriter 8.0 icon.
3. If your network has more than one zone click on the zone you
want. If your network has no zones, this box does not appear.
4. Click the name of the printer you want. The default AXIS 5400
printer name is shown as: AXIS<nnnnnn>_<port>, where
<nnnnnn> is the last six digits of the AXIS 5400 serial number,
and <port> is LPT1. For example: AXIS100086_LPT1.
5. Click ‘Setup...’ and then ‘Auto Setup’. If the selected printer
supports bi-directional printing and the appropriate PPD file is
available, the installation is performed automaticall y an d you can
therefore proceed directly to step 7. If this is not the case, the PPD
file must be selected manually, as described in
step 6.
6. Choose the PPD file matching your printer, and click ‘OK’.
If your printer does not appear in the PPD file list, please contact
your printer vendor. Use the Generic PPD if you do not need any
printer specific features.
7. Click ‘OK’, and then click the Close box. This completes the
configuration and closes the Chooser.
Repeat this procedure for each Macintosh computer on the network
using the AXIS 5400.
Page 80

AXIS 5400 User’s Manual Section 7: Setting Up - Macintosh
Bi-directional support The AXIS 5400 allo ws the printer driver to communicate directly
with the printer and consequently facilitates complete functional
control over print jobs, e.g. automatic downloading of fonts not
resident in the printer.
This functionality h as bac k war d c omp ati bi l i ty w ith ol de r pr int e rs and
Macintosh computers, which means that the AXIS 5400 can generate
appropriate resp onses to Macintosh printer queries, when the
connected printer does not support bi-di rectional communication.
Verifying the Setup You simply need to print a document from the Macintosh computer
to verify communication to the chosen printer. The basic installation
can be considered complete if the print test is satisfactory. The AXIS
5400 is now ready to use as a print server.
Note: ❏ For information on advanced AppleTalk functions such as non-
PostScript printer support, please refer to the Axis NPS Print
Server Technical Reference on the AXIS Online CD.
79
ASCII, TBCP and BCP The Binary Communication Protocol (BCP) and the Tagged Binary
Communication Protocol (TBCP) are communication protocols used
by the serial and parallel p orts of a printer. They allow 8-bit binary
data in files concurrent with the use of some control characters, for
communication and print job control. TBCP is required for printing
with a binary data stream on some printers, e.g HP printers.
Note: ❏ Some printers, e.g. Epson InkJet printers, can not be used when
TBCP is enabled.
Macintosh
Page 81

80
Section 7: Setting Up - Macintosh AXIS 5400 User’s Manual
Setting Parameters In AppleTalk, you can change a limited number of the parameters of
the AXIS 5400. You can:
• enable and disable binary data transfers for your printing
• select the type of binary transfer protocol to use
• specify the AppleTalk printer type
• set the IP address
However, by assigning an IP address to your AXIS 5400, you have
access to all of print server’s parameters via any standard Web browser
or via FTP. Refer to Section 9 Management & Configuration, on page
97 for more information.
Example: The following example describes the how you set the AXIS 5400
parameters in AppleTalk.
Macintosh
Important: DO NOT use the parameter values from this example when
configuring your AXIS 5400. You should select values that are
appropriate for your printers and network settings.
Follow the instructions below:
1. Open the Choo ser.
2. Select a network printer driver, any LaserWriter will do.
3. Select the printer port which name ends with "_CFG".
4. Close the Chooser.
5. Open a text editor, e.g. SimpleText.
Page 82

AXIS 5400 User’s Manual Section 7: Setting Up - Macintosh
6. Write a text file containing the parameters you want to set:
BINARY_TYPE_1. :BCP
INT_ADDR. :192.168.3.191
ATYPE_1. :EPSONLQ2
Parameters that you do not want to set should be excluded fr om
the text file.
Refer to B - The Parameter List, on page 139, for information
about which values that are valid for each parameter.
7. Print the text file. The settings will be stored in the print server.
8. Open the Chooser and select the pri n ter port you wish to use for
printing documents.
9. Close the Chooser.
81
Note: ❏ The _CFG port disappears 60 minutes after the AXIS 5400 has
been powered on. If you want it to reappear, you must restart
your AXIS 5400.
Macintosh
Page 83

82
Section 8: Setting Up - UNIX AXIS 5400 User’s Manual
Section 8 Setting Up - UNIX
Installation in the UNIX Environment
Having performed the basic TCP/IP setup procedures as defined in
Assigning an IP address, on page 25 and onwards, you are now able to
print in interactive mode using LPR, FTP or Reverse Telnet protocols.
However, should you require to integrate the AXIS 5400 into your
host spooler, you can use the Axis automatic installation script
axinstall. This util ity softw are is re sident on the AXIS 5400 and can be
downloaded to your host using FTP, so no disks are required. The
axinstall script can also be downloaded from the Axis WWW home
page at http://www.axis.com/ and it is available on the AXIS Online
CD.
Having completed this operation, the printer connected to the AXIS
5400 will appear as though they are directly connected to the host
printer spooler.
UNIX
If you intend to operate your AXIS 5400 in a multiprotocol
environment, you should also proceed according to one or more of the
following sections, as appropriate to you r network.
Section 4 Setting Up - NetWare, on page 34
Section 5 Setting Up - Windows, on page 44
Section 6 Setting Up - OS/2, on page 70
Section 7 Setting Up - Macintosh, on page 76
Page 84

AXIS 5400 User’s Manual Section 8: Setting Up - UNIX
83
Integration into the
Host Printer Spooler
To integrate the AXIS 5400 into the host printer spooler, you can use
the auto installation script axinstall, resident in the AXIS 5400. Follow
the instructions below to install axinstall onto your host using FTP:
1. Login to the AXIS 5400 using the command:
ftp <host name> or ftp <IP address>
2. Enter root as the user id and pass as the password.
3. Download the script using the command:
get axinstall
Log out using the command
quit, bye or exit depending on your
FTP version.
> ftp npserver
connected to npserver.
220 AXIS 5400 FTP Print Server v6.00 Jun 17 1999
ready.
Name (npsserver:thomas): root
331 User name ok, need password
Password: pass
230 User logged in
ftp> get axinstall
200 PORT command successful.
150 Opening data connection for axinstall
(192,36,253,4,13,223), (mode ascii).
226 Transfer complete.
local: axinstall remote: axinstall
61187 bytes received in 14 seconds (4.2 kbytes/s)
ftp> bye
221 Goodbye.
>
(not visible)
UNIX
Typical FTP session for collecting the axinstall script
Page 85

84
Section 8: Setting Up - UNIX AXIS 5400 User’s Manual
The axinstall script has now been downloaded to your host. Execute
the script with this command:
sh axinstall
You will be guided through the installation b y a step-by-step
procedure. During the installation you will be asked to select a print
method; we suggest you choose LPD or, for more functionality, use
the PROS filter or named pipe methods. Please refer to the following
pages if you need guidance on the choice of print methods.
The axinstall script will suggest one of the systems listed below when
started. If you do not find the suggestion app ropriate, then manually
select any of the systems listed.
1....SunOS 4 (SUN BSD, Solaris 1.x)
2....SunOS 5 (SUN SYS V, Solaris 2.x)
3....AIX (IBM RS/6000, BULL DPX 20)
4....HP-UX (HP 9000)
5....BOS (BULL DPX 2)
6....DEC OSF/1 (Digital Equipment, Alpha)
7....ULTRIX (Digital Equipment, DEC)
8....IRIX (Silicon Graphics, SGI)
9....SCO UNIX (Santa Cruz Operation)
10...SCO UnixWare 2.x
11...SCO UnixWare 7
UNIX
12...SCO OpenServer
13...FreeBSD (Berkeley UNIX)
14...Linux
15...Generic BSD (Berkeley UNIX)
16...Generic SYS V R3 (UNIX System V Release 3)
17...Generic SYS V R4 (UNIX System V Release 4)
Systems supported by axinstall
Page 86

AXIS 5400 User’s Manual Section 8: Setting Up - UNIX
Print Methods on TCP/IP Netw orks
The AXIS 5400 supports several different print methods in the
TCP/IP environment. axinstall will suggest a print method suitable for
your particular UNIX system, but you might want to use an other
method depending on your printing requirements (banner pages,
status logging, etc).
The diagram below shows the alternative data paths taken by some of
the UNIX print methods. This illustrates some of the advantages and
limitations of the different methods. Use the following information to
determine which method to adopt.
85
File to
Print
DIRECT
FTP
RTELNET
Spooler
Printer
Print
Interface
LPD FTP
RTELNET PROS B
Axis Network Print Server
Filter/
Model
PROS A
Devices
Paralle l Port
Named Pipe
PROS print
daemon
Directly
connected
printer
Illustration of different UNIX print methods
LPD The Line Printer Daemon is a protocol for transferring print jobs
between hosts. This is the recommended method for UNIX systems,
but some System V versions do not support LPD.
Advantages:
Easy to set up – install the AXIS 5400 as a remote queue in
System V, or add a remote printer to
rm and rp fields (BSD).
/etc/printcap using the
UNIX
Page 87

86
Section 8: Setting Up - UNIX AXIS 5400 User’s Manual
Limitations:
Spooler features, and
multiple copies, are not available.
FTP The File Transfer Protocol is used for transferring files between hosts.
Advantages:
Uses industry standard network software on the hos t .
Limitations:
No printer status log g ing. In th e c a se of BS D it may conflict with
other input or output filters and does not allow both input and
output filters. In System V no filters or interface programs can be
used.
PROS A protocol developed at Axis. Comes in two versions;
named pipe (PROS A) and filter (PROS B).
printcap or lpr options (BSD) such as
UNIX
PROS A PROS A - Advantages:
The AXIS 5400 appears as a device to the system. This makes all
filter and model options available. It provides accounting and
status logging. Supports bi-directional printing. The p ri nter
information read back can be viewed in a log file.
PROS A - Limitations:
A ‘C’ compiler is required to build the PROS A drivers.
Note: ❏ You can download a ‘C’ compiler from http://www.gnu.org/.
Page 88

AXIS 5400 User’s Manual Section 8: Setting Up - UNIX
87
PROS B
PROS B - Advantages:
It provides accounting and status logging. Supports bi-directi onal
printing. The printer information read back can be viewed in a
log file.
PROS B - Limitations:
A ‘C’ compiler is r e qui re d t o bui ld t h e PR OS B d ri ve r s and in the
case of BSD, it may conflict with other input or output filters. It
does not allow both input and output filters. Interface programs
can not be used in System V.
Note: ❏ You can download a ‘C’ compiler from http://www.gnu.org/.
Reverse Telnet Often used for printing via a terminal server printer port. Only
recommended if you already have a Reverse Telnet driver installed.
Advantages:
Easy to set up with previously installed Reverse Telnet drivers.
Limitations:
No status logging. Drivers are not supplied with the AXIS 5400.
Existing drivers may be slow.
Other UNIX Systems Most UNIX systems resemble either BSD or System V and so with
some ingenui t y, a solution can also be devised for other variants.
If the system has BSD socket type networking support, then
(in the
point. It receives print data from
stderr. Nothing is written to stdout.
bsd directory of the AXIS 5400) can be used as a starting
stdin, and writes a log file to
Alternatively, FTP may be used. It is a good idea to use
sysv/ftp_sysv as a starting point.
or
prosbsd
bsd/ftp_bsd
IBM MVS Systems A sample JCL script, jclex, is available in the mvs directory of the
AXIS 5400. It gives an example of how to print a file from an MVS
mainframe to an AXIS 5400 using FTP.
UNIX
Page 89

88
Section 8: Setting Up - UNIX AXIS 5400 User’s Manual
Using Logical Printers to Customize your Printing
The AXIS 5400 has a powerful faci lity for altering the print data. This
means that your desired print format can be realized on any type of
printer. The following actions can be invoked from the AXIS 5400:
• The character set can be changed to suit the printer
• Strings can be added before and after the print data
• Strings within the print data can be substituted
• ASCII to PostScript conversion
• Hex Dump mode to assist with printing problems
If any of these actions are required, a Logical Printer is used to change
the print data before being sent to the printer port. There are eight
logical printers (PR1-PR8) that can be set up to filter the print data.
UNIX
The default logical printers settings are such that PR1- PR4 caus e no
change to the flow of print data, while PR5-PR8 add CR to LF
control characters:
Logical Printer Changes to data
PR1 no change
PR2 no change
PR3 no change
PR4 no change
PR5 add CR to LF
PR6 add CR to LF
PR7 add CR to LF
PR8 add CR to LF
Each logical printer can be set up using any Java enable d Web browser
or by directly editing the config file.
Page 90

AXIS 5400 User’s Manual Section 8: Setting Up - UNIX
Notes: ❏ The examples in this section describes how you can configure the
available logical printers using a standard Web browser. If you
want to set them directly by editing the config file, just enter the
values for the co rresponding parameters.
❏ The examples should only be viewed as suggestions how to
configure the logical printers. You should, off course, configure
them according to the needs of your network.
❏ In B - The Parameter List, on page 139, you can find a complete
list of the AXIS 5400 parameters.
❏ Refer to Section 9 Management & Configuration, on page 97, for
more information about the available management tools.
89
UNIX
Page 91

90
Section 8: Setting Up - UNIX AXIS 5400 User’s Manual
Character Set
Conversion
Example: Your network contains a host using the character set ISO 8859-2. In
A common problem in a multiple host environment is that different
hosts use different ASCII character sets. As a result of this, language
specific characters (such as å ü ô ñ) are sometimes printed incorrectly.
The AXIS 5400 solution to this problem is to assign a character set
conversion filter to a logical printer, and then link that logical printer
to the host causing the problem.
You select your desired conversion filter by setting the Character Set
Conversion (PRx_CSET) parameter. The output from the conversion
filter is always IBM PC Set 2 (Code Page 437), and this is the
character set the printer must be set up for.
order to direct its print jobs to the printer connected to the AXIS
5400, you should assign the host to a separate logical printer, and
install a character set conversion filter.
Follow the instructions below to change the conversion filter:
1. Select the Printer1 Web page.
2. Set the parameter Character Set Conversion to ISO>IBM.
3. Click the Su bmit Printer1 settin g s button.
UNIX
The ISO 8859-2 printer data that is sent to logical printer PR1
converts to IBM PC Set 2.
Page 92

AXIS 5400 User’s Manual Section 8: Setting Up - UNIX
91
Adding Strings Before
and After Print Jobs
Example: Assume that the logical printer PR5 is configured as a PostScript
Example: You have an HP LaserJet printer with dual input bins, and want to
These string functions provide a way to send printer control
commands before and after each print job. They may be specified
individually for each logical printer.
All strings are entered as hexadecimal byte values.
printer and that you want to append the PostSc ript End of File
character (hex
04) after each print job.
Follow the instructions below to add a string after the print job:
1. Select the Printer5 Web page.
2. Enter the string 04 in the String After Print Job text field.
3. Click the Su bmit Printer5 settin g s button.
print on pre-printed forms when using the logical printer PR4. The
standard forms are taken from bin 1, and the pre-printed forms are
taken from bin 2. The string before print job should contain the
E
command to select bin 2,
after print job should contain the command to select bin 1,
1B 26 6C 31 48).
(hex
l4H (hex 1B 26 6C 34 48), and the st ring
C
E
l1H
C
Follow the instructions below to add strings before and after the print
job:
1. Select the Printer4 Web page.
2. Enter the string 1B 26 6C 34 48 in the String Before Print Job
text field.
3. Enter the string 1B 26 6C 31 48 in the String After Print Job
text field.
4. Click the Su bmit Printer4 settin g s button.
UNIX
Page 93

92
Section 8: Setting Up - UNIX AXIS 5400 User’s Manual
String Substitutions The string substitution function performs search and re place
operations on the print data. The primary application is to replace
printer control commands. Up to twenty string substitutions may be
specified individually for each logical printer.
All strings must be entered as hexad ecimal byte values, and eac h match
and substitute string must be preceded by a count byte.
You substitute command strings by editing the String Substitutions
(PRx_STR) parameter.
UNIX
Example: Assume that you want to replace the UNIX New Line (hex
an ASCII NewLine (hex
0D 0A) for logical printer PR1.
Follow the instructions below to substitute command strings:
1. Select the Printer1 Web page.
2. Enter the string 01 0A 02 0D 0A in the S t rin g S ubs ti tu ti ons text
field.
Hex Code Explanation
01 length of the string you want to replace
0A the string you want to replace
02 length of the substitute string
0D 0A the substitute string
3. Click the Su bmit Printer1 settin g s button.
This is the default setting for logical printers P R 5 through PR8.
0A) with
Page 94

AXIS 5400 User’s Manual Section 8: Setting Up - UNIX
93
Example: Assume that you want to replace the UNIX New Line (hex 0A) with
an ASCII NewLine (hex
1B 47 31) with
(hex
E
0D 0A) , and the printer command
Y (hex 1B 59) for logical printer PR2.
C
E
G1
C
Follow the instructions below to substitute command strings:
1. Select the Printer2 Web page.
2. Enter the string 01 0A 02 0D 0A 03 1B 47 31 02 1B 59 in the
String Substitutions text field.
Hex code Explanation
01 length of the UNIX New Line command
0A the UNIX New Line command
02 length of the ASCII New Line command
0D 0A the ASCII New Line command
03 length of the replaced printer command
1B 47 31 the replaced printer command
02 length of the new printer command
1B 59 the new printer command
3. Click the Su bmit Printer2 settin g s button.
Note: ❏ Extensive use of string substitutions will n aturally decrease the
throughput rate of the AXIS 5400.
UNIX
Page 95

94
Section 8: Setting Up - UNIX AXIS 5400 User’s Manual
ASCII to Postscript
Conversion
Example: Follow the instructions below to convert ASCII print data to
The AXIS 5400 logical printers can translate ASCII print data into
PostScript format. This makes it possible to print with a PostScript
printer from a host that does not support PostScript. The conversion
is selected by activating a filter that converts ASCII data into
Postscript. This filter can be activated individually for each logical
printer.
Activate your desired filter by setting the Printing Language
Translation (PRx_FILT) parameter.
PostScript for logical printer PR2:
1. Select the Printer2 Web page.
2. Set the Printer Language Tr an sl a tion parameter to POSTSCR.
3. Click the Su bmit Printer2 settin g s button.
If you select the parameter value AUTO_PS, the print data for every
print job is searched and if any ASCII data is found, it is translated
into PostScript. Thi s s etting is recommended if you are not sur e if the
print data is ASCII or PostScript.
UNIX
PostScript Settings When a logical printer is set for PostScript conversion, you must
specify the following:
• page size
• page orientation
• page formats
• which font is to be used
Page 96

AXIS 5400 User’s Manual Section 8: Setting Up - UNIX
The default pa ge s ize is A4 and th e de fault page ori entati on is Po rtra it,
while the page format parameters are:
Page Format Parameter Default Value
Lines per page 66
Characters per line 0 0=disable line wrap
Characters per inch 10.0
Lines per inch 60 60 = 60 lines per inch
Left margin 30 30 = 3.0 mm
Top margin 50 50 = 5.0 mm
The PostScript font can be any font that is installed in the printer; if
no font is specified, Courier will be used.
Example: Follow the instructions below to set the PostScript parameters for
logical printer PR2:
1. Select the Printer2 Web page.
95
2. Set the Printer Language Tr an sl a tion parameter to POSTSCR.
3. Set the PostScript Page Size parameter to LETTER.
4. Set the PostScript Page Orie n tat io n parameter to LANDS.
5. Enter the string 48 0 120 60 30 50 in the PostScript Page
Format text field.
Hex code Explanation
48 48 lines per page
0 disable line wrap
120 12 characters per inch
60 6 lines per inch
30 3 mm left margin
50 5 mm top margin
6. Enter the string Helvetica in the PostS cr ipt Font text field.
7. Click the Su bmit Printer2 settin g s button.
UNIX
Page 97

96
Section 8: Setting Up - UNIX AXIS 5400 User’s Manual
Read-back of
information
Example: Follow the instructions below to disabl e the bi-directional
Debugging using the
Hex Dump Mode
The AXIS 5400 supports bi-directional printing. The information
from the printer is read back on th e parallel port when the parameter
Read Back Port (PRx_IN) has the default setting of AUTO. However,
it is required that the printer also supports bi-directional printing.
Please refer to your printer documentation for further details regarding
bi-directional printing su pport.
communicati on for logical printer PR1:
1. Select the Printer1 Web page.
2. Set the Read Back Port parameter to NONE.
3. Click the Su bmit Printer1 settin g s button.
When hex dump mode is activated , th e print data is printed as
hexadecimal byte values rather than characters; printer c ontrol
commands are also printed as hex values. This allows you to inspect
what control and print characters are being sent to the printer, which
is a useful debugging facility for the more difficult printing problems.
UNIX
Example: Follow the instructions below to activate the hex dump mode for PR3:
1. Select the Printer3 Web page.
2. Set the Hex Dump Mode Enabled radio button to YES.
3. Click the Su bmit Printer3 settin g s button.
Note: ❏ The page length for hex dump printouts is determined by the
lines per page value of the PostScript page format para meter.
Page 98

AXIS 5400 User’s Manual Section 9: Management & Configuration
Section 9 Management & Configuration
97
Configuration
Overview
The management and configuration tools that are supported by the
AXIS 5400 allows you to:
• Change the print server parameters, i.e. editing the config file
• Receive extended information about the print jobs
• Receive printer port status
• Monitor your printers
• Reset the AXIS 5400
• Upgrade the AXIS 5400 firmware (Refer to Section 11 Upgrading
the Software, on page 133)
The method you should use to manage and configure your AXIS 5400
is depending on the operating system protocols of your network. The
table below displays which metho d to use for each supported
environment.
Operating System Protocols Configuration/Management methods
IPX/SPX
(NetWare)
TCP/IP
(UNIX,
Windows 95/98/NT/2000,
Windows 3.1/WfW,
NetWare Pure IP, OS/2)
• AXIS NetPilot - See page 107
• HP JetAdmin - See page 123
• Nov ell Utilities - See page 124
• Web Browser - See page 98
• A XI S ThinWizard - See page 10 3
• FTP - See page 115
• telnet - See page 118
• S NMP - See page 121
• HP Web JetAdm in - See page 123
NetWare
Windows
OS/2
Macintosh
UNIX
NetBIOS/NetBEUI
(Windows 95/98/NT/2000,
Windows 3.1/WfW, OS/2)
AppleTalk • Web browser - See page 98
• AXIS NetPilot - See page 107
• Mac-FTP - See page 115
• A XI S NetPilot via a PC platform in the
same network - See page 107
Page 99

98
Section 9: Management & Configuration AXIS 5400 User’s Manual
Using a Web browser
Once you have established the AXIS 5400 in the TCP/IP
NetWare
Windows
User In Use r mod e, you have no rights to change any parameter settings.
OS/2
environment, as described i n Assigning an IP address on page 25, you
are free to access the AXIS 5400 Web pages from any Java enabled
Web browser.
The Web interface of the AXIS 5400 is divided into two modes of
operation, User mode and Admin mode.
However, if you have access rights to the Admin mode, you can
change some of the basic parameters from User mode via the
Configuration Wizard. This mode is intended for regular users who
are only interested in using the print server's interface for checking
print jobs or viewing printer properties. If you want to change any
other of the print server's settings, you must enter the Admin mode.
Macintosh
UNIX
Admin When in Admin mode, you have access to all the print server's
Note: ❏ If the ROOT_PWD parameter is set to pass, which is the default
Accessing the
Web Pages
parameters and you can change them to your liking. This mode is
intended for network administ rators and is password protected to
prevent unauthorized changing of the print server parameters.
value, you have access to the User mode as well as the Admin
mode.
Follow the steps below to access the internal home page of the AXIS
5400. The browser used in the following example is Netscape
Navigator 4.3.
1. Start your Web browser.
2. From the File menu, select Open Page...
Page 100

AXIS 5400 User’s Manual Section 9: Management & Configuration
3. Type the host name or the IP address of your AXIS 5400 in the
Open Page dialog, as detailed below:
You can alternatively type the host name or the IP address directly
into the Web browser’s Location text field.
99
NetWare
Windows
OS/2
The User Mode home page of yo ur AXIS 5 400 app ears in the br owser
window.
The AXIS 5400 User Home Page
Macintosh
UNIX
 Loading...