

Page 1

AXIS Camera Station
Installation Guide
Page 2

Page 3

AXIS Camera Station Installation Guide Page 3
AXIS Camera Station
Installation Guide
Minimum recommended requirements
Install AXIS Camera Station on a stand-alone computer dedicated
mainly for running this application
Hardware:
• Intel Pentium 4 with 2 GHz processor
•CD-drive
•512 MB RAM
• Hard disk: 1 GB available space for installation
• NTFS file system
• XGA (1024 x 768) or higher resolution monitor
• AGP Graphic card, Direct Draw (for MPEG-2/4) with 32 MB or more memory
• 100 MB Ethernet with a static IP address
System:
• Microsoft Windows XP Professional SP2, 2000 (SP4) 2003 Server (SP1),
Internet Explorer Version 6.0 or later, DirectX 9.0c or later (for MPEG 2/4)
• TCP/IP support
• Internet Information Server (IIS) - for Web client
• Microsoft .NET 1.1 runtime environment (included in installation package)
Minimum recommended requirements for a full 25 camera
system:
• Dual XEON 3 Ghz, 1024 MB RAM, Multiple SCSI disks
• 1000 Mbit Ethernet backbone
ENGLISH
Page 4

Page 4 AXIS Camera Station Installation Guide
Overview
This document will help you install AXIS Camera Station and
configure it for your Axis Network Cameras and Axis Video
Servers. A brief introduction to the functionality of the software is
covered here, see the online Help or the AXIS Camera Station User’s
Manual for a detailed description. The User’s Manual is available on
the CD and on www.axis.com
AXIS Camera Station is a complete monitoring and recording
system for use with Axis Network Cameras and Video Servers.
The application's main window provides quick and easy access to
all connected and configured cameras, recordings, inputs and
outputs used in the system. A background service in Windows,
AXIS Camera Station will start automatically upon system start-up
and continue running even after the user logs out.
Configuration
All dialogs that allow control and configuration of all aspects of the
AXIS Camera Station system are found under Options in the file
menu.
Remote clients
For remote clients you can use “AXIS Camera Station Client”
described on page 25 or “AXIS Camera Station Web Application”
described on page 27.
Page 5
AXIS Camera Station Installation Guide Page 5
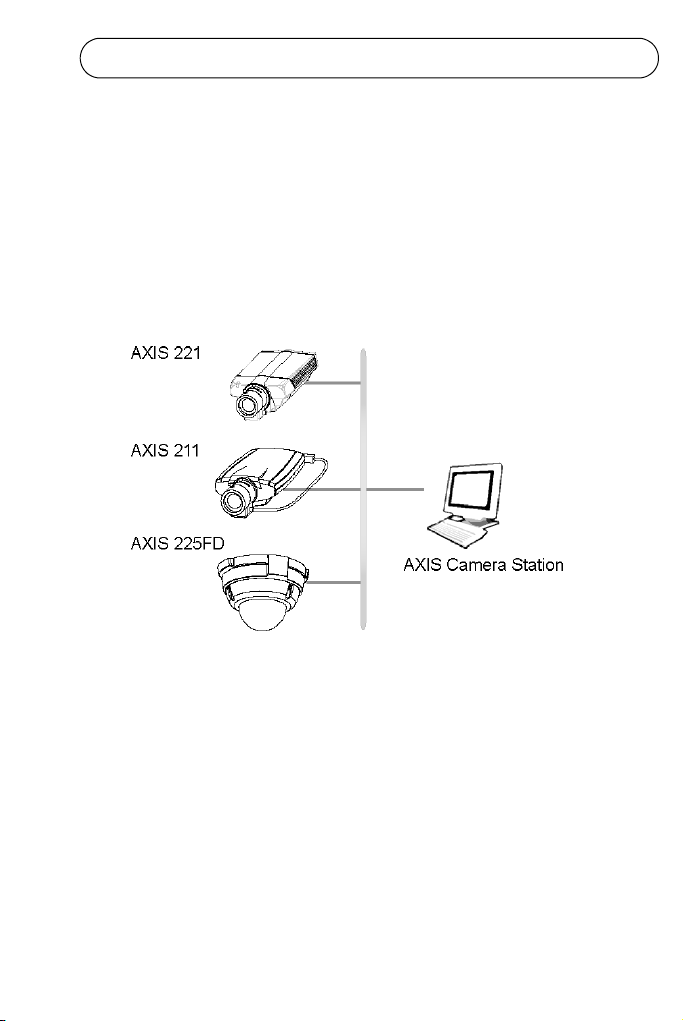
Network Configuration
AXIS Camera Station can record and play back video from
cameras that are connected over a LAN (Local Area Network) or
over a WAN (Wide Area Network).
LAN
The cameras can be connected directly to the server running AXIS
Camera Station using an Ethernet network.
ENGLISH
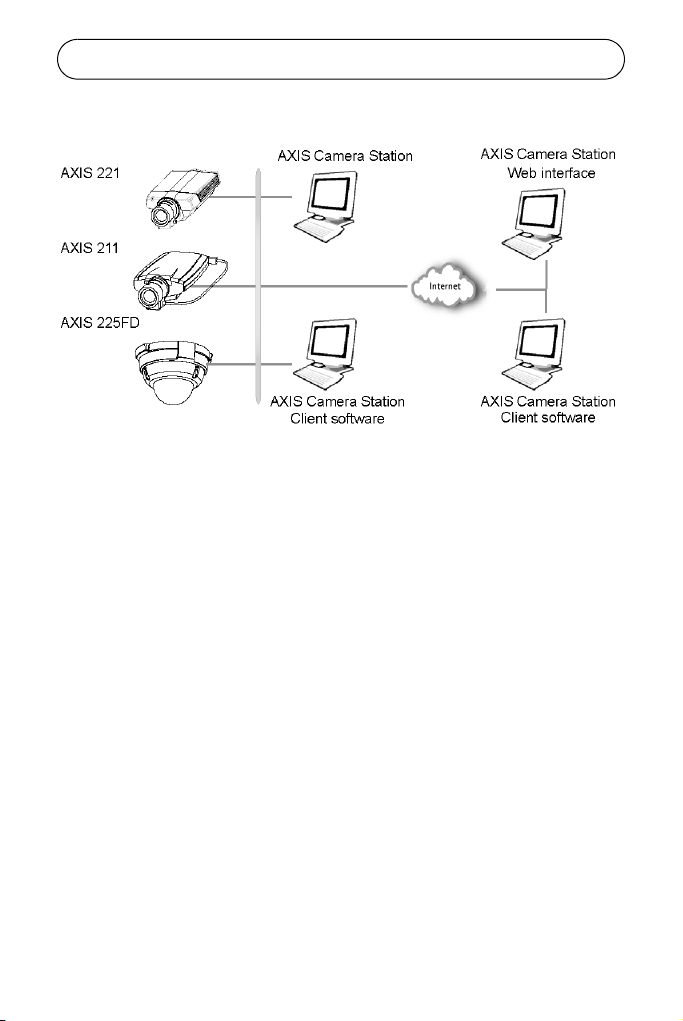
Internet (WAN)
To access AXIS Camera Station from the Internet and get live
images from the cameras you must open a set of IP addresses and
port numbers in your firewall configuration.
See Network Configuration in AXIS Camera Station user’s manual.
Page 6
Page 6 AXIS Camera Station Installation Guide
See the User’s Manual for details, available on the CD and on www.axis.com
Page 7
AXIS Camera Station Installation Guide Page 7
Install AXIS Camera Station Software
Install AXIS Camera Station on the dedicated stand-alone PC from
where you wish to run the main administration of your cameras
and video servers.
1. Insert the CD in the CD drive. If the installation CD does not
auto-start, click autorun.exe in the CD’s root folder.
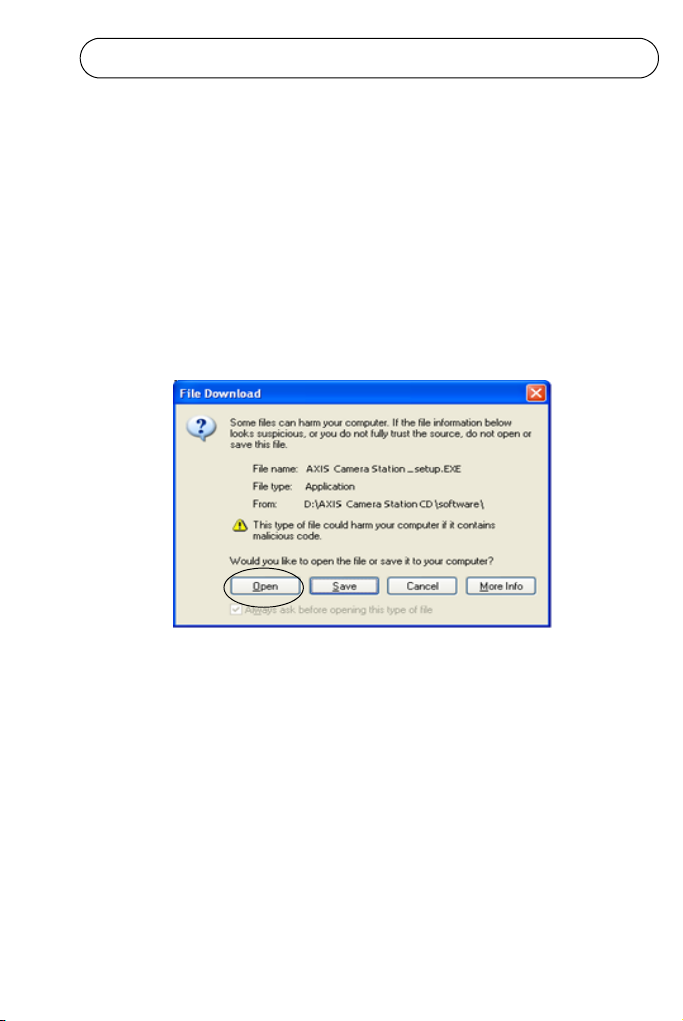
2. From the CD’s interface, click Software and then AXIS
Camera Station
ENGLISH
3. Click Open to launch the installation.
Note:
You may be prompted to install .NET Framework. Simply follow the Installation
Wizard’s instruction.
4. Next, you will be asked where you wish to install the
program. If nothing is specified the program is normally
installed in C:\Program Files\Axis Communications\AXIS
Camera Station.
5. Click your way through the Installation Wizard.
Page 8

Page 8 AXIS Camera Station Installation Guide
Note:
If running Windows XP, you will need to permit the firewall to accept incoming
requests from AXIS Camera Station Client when prompted.
6. When the installation is finished, open AXIS Camera Station
from Start > All Programs or click the program icon on
your desktop:
Page 9

AXIS Camera Station Installation Guide Page 9
AXIS Camera Station Activation
The first time you start the program you will be asked to register
your license.
Activate the software with your License Key
The License Key can be used for only one current installation.
Once registered, it cannot be used again. Do not request the access
code to activate the software until AXIS Camera Station is
installed on the target computer.
The License Key is your proof of purchase, keep it in a safe place
for future reference.
Important!
When entering the License Key and Access Code, remember that they are both case
sensitive.
License
A base license is required to run AXIS Camera Station and allows
for a specified number of cameras to be used with the program.
Licenses for additional cameras can be installed under Options >
General Settings > License, see AXIS Camera Station User’s
Manual for more information.
Licenses for the AXIS Image Enhancer component can also be
installed if you want to improve the image quality in poor
visibility conditions, such as fog, smoke, rain and snow.
ENGLISH
Page 10

Page 10 AXIS Camera Station Installation Guide
There are two types of upgrade licenses available for purchase at
your local Axis reseller:
• Additional camera license.
• Software upgrade license. You can upgrade AXIS
Camera Station for a limited time from www.axis.com
and then extend the license.
Licenses and the time period remaining are displayed in the
software interface. MyAxis (www.axis.com/reg/) shows your
registered licenses and activation dates.
Fast Internet connection: Register automatically
If AXIS Camera Station is installed on a computer with fast Internet
access you can register automatically. Your license information is
sent directly to the Axis Web server.
1. Click Register.
Page 11

AXIS Camera Station Installation Guide Page 11
2. Fill in the requested information. The License Key is found
on the inside of the AXIS Camera Station CD casing. Click
Activate.
3. Your license information will be sent to Axis
Communications and your software will be activated
automatically.
4. You can now start using AXIS Camera Station.
Note:
If the connection to the Axis Web server fails while registering the software, you
can register manually by following the instructions for No or low-speed
Internet connection: Register manually.
ENGLISH
Page 12

Page 12 AXIS Camera Station Installation Guide
No or low-speed Internet connection: Register manually
If AXIS Camera Station is installed on a computer without (or with
low-speed) access to the Internet, you can acquire the Access Code
that is needed to activate the software from the Axis Web site and
enter it manually.
1. Click Grace period.
2. Enter the License Key and click Activate Grace Period.
Page 13

AXIS Camera Station Installation Guide Page 13
3. You will see your Server ID (a code containing information
about your PC), make a note of it. You will need the Server
ID when filling in information on the Internet form for your
Access Code.
4. You can now use AXIS Camera Station for 5 days.
During the grace period you can receive the Access Code by using
any computer with Internet access. Browse to
http://www.axis.com/techsup/acs and fill in the requested
information. When complete click Submit.
ENGLISH
5. When you have received the Access Code, select Yes to this
prompt when starting up AXIS Camera Station.
Page 14

Page 14 AXIS Camera Station Installation Guide
6. Enter your Access Code. License Key and Server ID are filled
in automatically.
7. Click Activate.
8. You can now start using AXIS Camera Station.
Using the Demo version
Another option is to install AXIS Camera Station as a 30-day demo
version, which works with 4 cameras and includes Image Enhancer
for one channel.
Note:
Demo version does not allow recording or live viewing in MPEG-4.
Page 15

AXIS Camera Station Installation Guide Page 15
Configure AXIS Camera Station
After installing the software, it must be configured for your
cameras and video servers. The first time AXIS Camera Station is
started, a search function automatically finds and installs cameras/
video servers on your network. If there are more cameras on your
network than you have a license for, an Install Cameras dialog
opens automatically. Simply check the boxes of the camera/video
servers you would like to install in AXIS Camera Station.
ENGLISH
Manual configuration of camera/video servers is done from
Options menu.
Page 16

Page 16 AXIS Camera Station Installation Guide
Adding a Camera/video server to AXIS Camera Station
1.From AXIS Camera Station, click
Options > Camera settings.
Note: All settings can be found under Options.
Only a few of the most essential settings are
covered in this guide. See the online Help or
User’s Manual for a full description.
2. From Camera settings, click on the Add button.
3. Information can be entered manually or click Search to get a
list of available cameras and video servers on your network.
Page 17

AXIS Camera Station Installation Guide Page 17
4. Click on the desired camera/video server and then OK.
5. All pertinent information appears in the window. Camera
Name is how the camera will appear in AXIS Camera
Station. If you like, you may change the name to
something more descriptive such as “Backdoor” or “Garage”.
The change will only affect AXIS Camera Station and not
the camera.
ENGLISH
6. Click Link to Camera to verify that you can access the
camera.
Page 18

Page 18 AXIS Camera Station Installation Guide
Note:
The Camera Enabled box should be checked. If this box is not checked when
registering a camera, recordings and live viewing are not possible
7. If cameras are set up to use a common user name and
password, check the Use master password box under
Credentials. If the camera has a unique password, check Use
specific password and enter User Name and Password
information.
Notes:
The Master Password is setup in AXIS Camera Station under Options > General
Settings > General > Master Credentials.
Default User name = root, Password = pass.
Set up Recording
Recording can be set up as continuous, triggered or scheduled. For
information about Recording and Schedules, see the AXIS Camera
Station User’s Manual or help files.
Page 19

AXIS Camera Station Installation Guide Page 19
Defining default camera views from AXIS Camera Station
To define the camera views as seen from the main AXIS Camera
Station user interface, click on Options > Views from the file
menu.
1. Select the view according to the number of cameras
you want to configure.
Select view
Specify the
default start
view
2. Specify the default view to display from the drop-down list
when AXIS Camera Station is started. The No Live Images
option is when only the controls are visible.
3. Arrange cameras in the view by clicking first on the
position in the view and then the desired camera in the
Available Cameras list. You can also drag-and-drop a
camera to the desired position in the view.
4. Select Frame Rate (number of frames per second) and Image
Quality for live video. A high value will require less
bandwidth, but give lower quality images. A low value will
give better images due to less compression, but requires
more bandwidth. Note that the frame rate is a target value.
The actual frame rate depends on the type of camera,
network conditions and your PC configuration.
5. Click on OK to accept configuration.
Drag-and-drop
camera to view.
Select
Frame rate and
Image Quality
ENGLISH
Page 20

Page 20 AXIS Camera Station Installation Guide
AXIS Camera Station User Interface
Green light = background recording
service is running.
Red light = background recording
service is not running.
Click to
expand
view
The background recording service retrieves images from the
connected cameras and stores them to hard disk. From AXIS
Camera Station you can start or stop the background service, click
File > Start Server or Stop Server or right-click on the AXIS
Camera Station icon in the taskbar.
When the service is running there is a flashing green indicator in
the upper right corner of the window. A flashing red indicator
means the service was stopped, for example by the operator. When
the service is running there is also a green icon in the task bar, a
red icon means the service was stopped and a yellow icon indicates
that the service is starting up or experiencing problems connecting
to one of the cameras.
Recording is only possible if the background service is running, and
will continue even after logging out from the PC where AXIS
Camera Station is installed.
The background service will automatically start running upon
system start-up.
Page 21

AXIS Camera Station Installation Guide Page 21
AXIS Camera Station Controls
View Selection Select a view and you will get a window
showing live images direct from the camera. It
is possible to click in the image from Pan/Tilt/
Zoom cameras to move the camera or zoom
using the mouse scroll wheel.
No Live Images Click the No Live Images button to close the
camera windows. Showing live images in the
main window uses processor power. Not
displaying live images reduces the amount of
processor power required by the service and
does not affect recordings in any way. The
amount of bandwidth required is also less
when not showing live images. In the Views
section (Options > Views...) it is possible to set
up the system so that it always starts in this
mode.
Select Camera Select a camera to be shown in a new
window. Controls for Pan/Tilt/Zoom, audio
and AXIS Image Enhancer may also be shown
in this window.
ENGLISH
Page 22

Page 22 AXIS Camera Station Installation Guide
Monitor
I/O
Camera sequence Click to open the Camera sequence window. A
Playback
Recorded events
When clicking this button, the I/O Status of
I/Os defined in AXIS Camera Station are
displayed. Monitoring I/O defines when
events, such as an alarm or motion detection,
should be triggered. Each I/O is shown on one
line, along with a colored indicator:
• green indicator means the I/O is in its normal
state
• red indicates that the I/O is active, recording may be in progress depending on the
setup.
• yellow means there is no communication
with the I/O
Buttons for starting and stopping an I/O
output are shown, as well as a button to open
the camera’s view.
See AXIS Camera Station User’s Manual for
instructions on defining I/O.
camera sequence is a pre-defined "tour" i.e. a
configuration that automatically switches
through all of the cameras included in the
tour. Select the camera sequence to view from
the drop-down list. See the User’s Manual for
instructions on setting up a Camera Sequence.
Here you can search through recorded events.
Select a date, a time and press the search
button to get an overview of all the recorded
events. Click on a reference image to open a
Playback window to view the entire recording
of the event.
Page 23

AXIS Camera Station Installation Guide Page 23
4-camera
playback
Event Log The event log shows all of the alarms and
Here you can play recorded events from four
cameras simultaneously. Select a date and
time, and then press the search button. All the
events found for the 4 cameras will be played
starting at the specified date and time up to
the present time.
other events in the server. Click on an Alarm
or Motion detection event to view. To open
the full event log, select View >Event Log.
ENGLISH
Page 24

Page 24 AXIS Camera Station Installation Guide
Pan/Tilt/Zoom and Audio controls
These controls are only visible if the connected camera has PTZ
capability or a connected audio module. Choose a camera from the
drop-down list “Select a camera” for the controls to appear.
Pan/Tilt/Zoom
controls
Audio controls If the camera is equipped with audio
The recording properties for installed Axis network cameras and
video servers, e.g. frame rate, image size, are set under Options >
Camera Settings > Edit > Recording.
Click on the controls to steer the camera
around. You can also click on the images to
move the camera. (This feature is only
available on some PTZ cameras).
capability, the controls are shown here.
Page 25

AXIS Camera Station Installation Guide Page 25
AXIS Camera Station Client
The AXIS Camera Station Client application is used for remote
operations on client workstations, where you can perform the same
tasks as from AXIS Camera Station using a similar user interface.
Install AXIS Camera Station Client Software
1. From the client workstation, insert the CD and select
Software then AXIS Camera Station Client.
2. Click Open to launch the installation.
Note:
You may be prompted to install .NET Framework. Simply follow the installation
Wizard’s instructions
3. Next, you will be asked where to install the program. If
nothing is specified, the program is normally installed here:
C:\Program Files\Axis Communications\AXIS Camera
Station Client
4. Click your way through the Installation Wizard. When you
are finished, open AXIS Camera Station Client from Start >
All Programs or click the program icon on the desktop:
ENGLISH
5. Click File > Connection to complete the installation.
Page 26

Page 26 AXIS Camera Station Installation Guide
6. The first time you connect, this window will appear:
7. Enter the IP address or host name of the server PC where
AXIS Camera Station is installed and, if required, the User
Name and Password.
8. Click OK.
Notes:
• When working with more one than one AXIS Camera Station, a list of
recently accessed Camera Stations is available in the File menu.
• If there are problems connecting to the server, click Test con-
nection to troubleshoot the problem. Port 11007 is used and
must be opened in the firewall, router, etc.
Page 27

AXIS Camera Station Installation Guide Page 27
AXIS Camera Station Web Application
A web browser can be used on client workstations to view cameras
and perform simple operations, such as review or playback
recordings.
Once the AXIS Camera Station Web Access has been enabled in
AXIS Camera Station under Options > General > General settings,
clients can access camera views from a browser by typing
http://<server IP address>/VideoWeb in the Address field
Example: http://10.13.6.128/VideoWeb
ENGLISH
See the online Help pages or the User’s Manual for more
information. The User’s Manual is available on the AXIS Camera
Station CD and on www.axis.com
Page 28

Page 29

Page 30

AXIS Camera Station Installation Guide Rev. 4.0 May 2006
Copyright © Axis Communications AB, 2004-2006 Part No. 26390
 Loading...