

Page 1

AXIST99A11PositioningUnit24VAC/DC
InstallationGuide
Page 2

Page 3

English
EN
France:Français
Deutschland:Deutsch
Italia:Italiano
España:Español
日本:日本語
中文:简体中文
FR
DE
IT
ES
JA
ZH
Page 4

AXIST99A11PositioningUnit24VAC/DC
Safetyinformation..........................................11
Hazardlevels...................................................11
Othermessagelevels.............................................11
Safetyinstructions..........................................12
Transportation..................................................13
Packagecontents............................................15
Productoverview............................................16
Howtoinstalltheproduct.....................................18
Mountthebaseunit..............................................18
Routethecables................................................20
Installthenetworklink............................................26
Connectthecables...............................................27
Installthecamera...............................................28
InstallthePTZdriver.............................................31
Furtherinformation..........................................33
Optionalaccessories..............................................33
Warrantyinformation.............................................33
Specications..............................................34
Connectors....................................................34
Cables........................................................37
Operatingconditions.............................................37
Powerconsumption..............................................38
Informationssurlasécurité....................................39
Niveauxderisques...............................................39
Autresniveauxdemessage.........................................39
Consignesdesécurité........................................40
Transport......................................................41
Contenudel’emballage.......................................43
Vued'ensembleduproduit....................................44
Commentinstallerleproduit...................................46
Montagedel'unitédebase.........................................47
Acheminementdescâbles..........................................49
Installationdelaliaisonréseau......................................55
Branchezlescâbles..............................................56
Installationdelacaméra..........................................57
InstallationdupilotePTZ..........................................60
Informationscomplémentaires..................................62
Accessoiresenoption.............................................62
Informationssurlagarantie........................................62
Caractéristiques.............................................63
Connecteurs...................................................63
Câbles........................................................66
Conditionsdefonctionnement......................................67
Consommationd'énergie..........................................67
Sicherheitsinformationen......................................69
Gefährdungsstufen...............................................69
AndereMeldeebenen.............................................69
4
Page 5

AXIST99A11PositioningUnit24VAC/DC
Sicherheitsanweisungen.......................................70
Transport......................................................71
Lieferumfang..............................................73
Produktübersicht............................................74
InstallierendesProdukts......................................76
MontierenderGerätebasis.........................................77
DieKabelverlegen...............................................79
EinrichtenderNetzwerkverbindung...................................85
AnschließenderKabel............................................86
InstallierenderKamera............................................87
InstallierendesPTZ-Treibers........................................90
WeitereInformationen.......................................92
OptionalesZubehör..............................................92
Gewährleistungsinformationen......................................92
TechnischeDaten...........................................93
Anschlüsse....................................................93
Kabel........................................................96
Betriebsbedingungen.............................................97
Leistungsaufnahme..............................................97
Informazionidisicurezza......................................99
Livellidipericolo................................................99
Altrilivellidimessaggio...........................................99
Informazionidisicurezza......................................100
Trasporto......................................................101
Contenutodellaconfezione....................................103
Panoramicadeldispositivo.....................................104
Comeinstallareildispositivo...................................106
Montaggiodell'unitàbase.........................................107
Installazionedeicavi.............................................109
Installazionedelcollegamentodirete.................................115
Collegamentodeicavi............................................116
Installazionedellatelecamera.......................................117
InstallazionedeldriverPTZ.........................................120
UlterioriInformazioni........................................122
Accessoriopzionali...............................................122
Informazionisullagaranzia.........................................122
Speciche.................................................123
Connettori.....................................................123
Cavi.........................................................126
Condizionidifunzionamento.......................................126
Consumoenergetico..............................................127
Informacióndeseguridad.....................................129
Nivelesdepeligro...............................................129
Otrosnivelesdemensaje..........................................129
Instruccionesdeseguridad.....................................130
Transporte.....................................................131
Contenidodelpaquete........................................133
5
Page 6

AXIST99A11PositioningUnit24VAC/DC
Informacióngeneraldelproducto...............................134
Cómoinstalarelproducto.....................................136
Montajedelaunidadbase.........................................137
Guíadeloscables...............................................139
Instalacióndelenlacedered........................................144
Conexióndeloscables............................................145
Instalacióndelacámara...........................................146
InstalacióndelcontroladorPTZ......................................149
Másinformación............................................151
Accesoriosopcionales.............................................151
Informacióndegarantía...........................................151
Especicaciones............................................152
Conectores....................................................152
Cables........................................................155
Condicionesdefuncionamiento.....................................156
Consumodeenergía..............................................156
安
安 安
安
安 安
パ
パ パ
製
製 製
製
製 製
関
関 関
仕
仕 仕
安
安 安
安
安 安
包
包 包
产
产 产
如
如 如
報
全 全全情 情情報 報
危険レベル................................................157
その他のメッセージレベル...................................157
全 全全手 手手順 順
輸送.....................................................159
ッ ッッケ ケケー ーージ ジジの のの内 内内容 容
品 品品の のの概 概概要 要
品 品品の のの取 取取り りり付 付付け けけ方 方方法 法
ベースユニットの取り付け...................................164
ケーブルの配線............................................166
ネットワークリンクのインストール............................172
ケーブルの接続............................................173
カメラの設置..............................................174
PTZドライバーのインストール................................177
連 連連情 情情報 報
オプションアクセサリー.....................................179
保証情報.................................................179
様
様 様
コネクター................................................180
ケーブル.................................................183
動作条件.................................................184
消費電力.................................................184
全 全全信 信信息 息
危险等级.................................................185
其他消息等级..............................................185
全 全全说 说说明 明
运输.....................................................186
装 装装内 内内容 容
品 品品概 概概述 述
何 何何安 安安装 装装产 产产品 品
安装底座单元..............................................190
..............................................157
順
..............................................158
容
要
.............................................162
報
..............................................179
.......................................161
法
.....................................164
..................................................180
息
..............................................185
明
..............................................186
容
..............................................187
述
..............................................
品
...........................................
188
190
6
Page 7

AXIST99A11PositioningUnit24VAC/DC
布线.....................................................192
安装网络链路..............................................198
连接电缆.................................................199
安装摄像机................................................200
安装PTZ驱动程序...........................................203
更
更 更
规
规 规
息
多 多多信 信信息 息
可选附件.................................................205
质保信息.................................................205
格
格 格
接口.....................................................206
电缆.....................................................209
工作条件.................................................209
功耗.....................................................210
..............................................205
..................................................206
7
Page 8

Readthisrst
ReadthroughthisInstallationGuidecarefullybefore
installingtheproduct.KeeptheInstallationGuidefor
futurereference.
Liability
Everycarehasbeentakeninthepreparationofthis
document.PleaseinformyourlocalAxisofceof
anyinaccuraciesoromissions.AxisCommunications
ABcannotbeheldresponsibleforanytechnicalor
typographicalerrorsandreservestherighttomake
changestotheproductandmanualswithoutprior
notice.AxisCommunicationsABmakesnowarranty
ofanykindwithregardtothematerialcontained
withinthisdocument,including,butnotlimitedto,
theimpliedwarrantiesofmerchantabilityandtness
foraparticularpurpose.AxisCommunicationsAB
shallnotbeliablenorresponsibleforincidental
orconsequentialdamagesinconnectionwiththe
furnishing,performanceoruseofthismaterial.This
productisonlytobeusedforitsintendedpurpose.
Intellectualpropertyrights
AxisABhasintellectualpropertyrightsrelatingto
technologyembodiedintheproductdescribedinthis
document.Inparticular,andwithoutlimitation,these
intellectualpropertyrightsmayincludeoneormoreof
thepatentslistedataxis.com/patentandoneormore
additionalpatentsorpendingpatentapplicationsin
theUSandothercountries.
Thisproductcontainslicensedthird-partysoftware.
Seethemenuitem“About”intheproduct’suser
interfaceformoreinformation.
Thisproductcontainssourcecodecopyright
AppleComputer,Inc.,undertheterms
ofApplePublicSourceLicense2.0(see
opensource.apple.com/apsl).Thesourcecode
isavailablefromdeveloper.apple.com/bonjour/.
Equipmentmodications
Thisequipmentmustbeinstalledandusedin
strictaccordancewiththeinstructionsgivenin
theuserdocumentation.Thisequipmentcontains
nouser-serviceablecomponents.Unauthorized
equipmentchangesormodicationswillinvalidateall
applicableregulatorycerticationsandapprovals.
Trademarkacknowledgements
AXISCOMMUNICATIONS,AXISandVAPIXare
registeredtrademarksortrademarkapplicationsof
AxisABinvariousjurisdictions.Allothercompany
namesandproductsaretrademarksorregistered
trademarksoftheirrespectivecompanies.
Apple,Apache,Bonjour,Ethernet,InternetExplorer,
Linux,Microsoft,Mozilla,Real,SMPTE,QuickTime,
UNIX,Windows,andWWWareregisteredtrademarks
oftherespectiveholders.JavaandallJava-based
trademarksandlogosaretrademarksorregistered
trademarksofOracleand/oritsafliates.TheUPnP
WordMarkandUPnPLogoaretrademarksofOpen
ConnectivityFoundation,Inc.intheUnitedStatesor
othercountries.
trademarksofSD-3CLLC.SD,SDHCandSDXCare
trademarksorregisteredtrademarksofSD-3C,LLCin
theUnitedStates,othercountriesorboth.
SD,SDHC,andSDXCLogosare
Regulatoryinformation
Europe
ThisproductcomplieswiththeapplicableCEmarking
directivesandharmonizedstandards:
•ElectromagneticCompatibility(EMC)Directive
2014/30/EU.SeeElectromagneticcompatibility
(EMC)onpage8.
•LowVoltageDirective(LVD)2014/35/EU.See
Safetyonpage9.
•RestrictionofHazardousSubstances(RoHS)
Directive2011/65/EUand2015/863,including
anyamendments,updatesorreplacements.See
Disposalandrecyclingonpage9.
Acopyoftheoriginaldeclarationofconformity
maybeobtainedfromAxisCommunicationsAB.See
Contactinformationonpage9.
Electromagneticcompatibility(EMC)
Thisequipmenthasbeendesignedandtestedtofulll
applicablestandardsfor:
•Radiofrequencyemissionwheninstalled
accordingtotheinstructionsandusedinits
intendedenvironment.
•Immunitytoelectricalandelectromagnetic
phenomenawheninstalledaccordingtothe
instructionsandusedinitsintendedenvironment.
USA
Thisdevicecomplieswithpart15oftheFCCRules.
Operationissubjecttothefollowingtwoconditions:
1.Thisdevicemaynotcauseharmfulinterference,
and
2.thisdevicemustacceptanyinterferencereceived,
includinginterferencethatmaycauseundesired
operation.
Thisequipmenthasbeentestedusingashielded
networkcable(STP)andfoundtocomplywiththe
limitsforaClassAdigitaldevice,pursuanttopart15
oftheFCCRules.Theselimitsaredesignedtoprovide
reasonableprotectionagainstharmfulinterference
whentheequipmentisoperatedinacommercial
environment.Thisequipmentgenerates,uses,andcan
radiateradiofrequencyenergyand,ifnotinstalledand
usedinaccordancewiththeinstructionmanual,may
causeharmfulinterferencetoradiocommunications.
Operationofthisequipmentinaresidentialareais
likelytocauseharmfulinterferenceinwhichcasethe
userwillberequiredtocorrecttheinterferenceathis
ownexpense.Theproductshallbeconnectedusinga
shieldednetworkcable(STP)thatisproperlygrounded.
Contactinformation
AxisCommunicationsInc.
300ApolloDrive
Chelmsford,MA01824
UnitedStatesofAmerica
Tel:+19786142000
Canada
Thisdigitalapparatuscomplieswith
CANICES-3(ClassA).Theproductshallbe
connectedusingashieldednetworkcable(STP)that
isproperlygrounded.Cetappareilnumériqueest
conformeàlanormeCANNMB-3(classeA).Leproduit
doitêtreconnectéàl'aided'uncâbleréseaublindé
(STP)quiestcorrectementmisàlaterre.
Europe
Page 9

ThisdigitalequipmentfulllstherequirementsforRF
emissionaccordingtotheClassAlimitofEN55032.
Theproductshallbeconnectedusingashielded
networkcable(STP)thatisproperlygrounded.Notice!
ThisisaClassAproduct.Inadomesticenvironment
thisproductmaycauseRFinterference,inwhichcase
theusermayberequiredtotakeadequatemeasures.
Australia/NewZealand
Thisdigitalequipmentfulllstherequirements
forRFemissionaccordingtotheClassAlimitof
AS/NZSCISPR32.Theproductshallbeconnected
usingashieldednetworkcable(STP)thatisproperly
grounded.Notice!ThisisaClassAproduct.Ina
domesticenvironmentthisproductmaycauseRF
interference,inwhichcasetheusermayberequired
totakeadequatemeasures.
Japan
この装置は、クラスA機器です。この装置を
住宅環境で使⽤すると電波妨害を引き起こす
ことがあります。この場合には使⽤者が適切
な対策を講ずるよう要求されることがありま
す。VCCI‒A
本製品は、シールドネットワークケーブル
(STP)を使⽤して接続してください。また適切
に接地してください。
Korea
이기기는업무용환경에서사용할목적으로적
합성평가를받은기기로서가정용환경에서사
용하는경우전파간섭의우려가있습니다.적절
히접지된STP(shieldedtwistedpair)케이블을
사용하여제품을연결하십시오.
Safety
ThisproductcomplieswithIEC/EN/UL60950-1,
safetyofaudio/videoandITequipmentand
IEC/EN/UL60950-22,SafetyofInformation
TechnologyEquipment.Theproductshallbegrounded
usingboththeprotectiveearthwireinthepower
cableandthegroundingbraid.Makesurebothendsof
theprotectiveearthwireandthegroundingbraidare
incontactwiththeirrespectivegroundingsurfaces.
Thepowersupplyusedwiththisproductshallfulll
therequirementsforSafetyExtraLowVoltage
(SELV)accordingtoclause2.2ofIEC/UL60950-1or
CEC/NECClass2sourceofsupplyasdenedinthe
CanadianElectricalCode,CSAC22.1andNational
ElectricalCode,ANSI/NFPA70.
Disposalandrecycling
Whenthisproducthasreachedtheendofits
usefullife,disposeofitaccordingtolocallawsand
regulations.Forinformationaboutyournearest
designatedcollectionpoint,contactyourlocal
authorityresponsibleforwastedisposal.Inaccordance
withlocallegislation,penaltiesmaybeapplicablefor
incorrectdisposalofthiswaste.
Europe
Thissymbolmeansthattheproductshallnotbe
disposedoftogetherwithhouseholdorcommercial
waste.Directive2012/19/EUonwasteelectrical
andelectronicequipment(WEEE)isapplicablein
theEuropeanUnionmemberstates.Toprevent
potentialharmtohumanhealthandtheenvironment,
theproductmustbedisposedofinanapproved
andenvironmentallysaferecyclingprocess.For
informationaboutyournearestdesignatedcollection
point,contactyourlocalauthorityresponsiblefor
wastedisposal.Businessesshouldcontacttheproduct
supplierforinformationabouthowtodisposeofthis
productcorrectly.
Thisproductcomplieswiththerequirementsof
Directive201 1/65/EUand2015/863ontherestriction
oftheuseofcertainhazardoussubstancesinelectrical
andelectronicequipment(RoHS).
China
Thisproductcomplieswiththerequirements
ofSJ/T1 1364-2014,Markingfortherestrictionof
hazardoussubstancesinelectricalandelectronic
products.
有毒有害物质或元素
部
件
名
称
电
气
实
装
部
分
0:表示该有毒有害物质在该部件均质材料
中的含量均在GB/T26572标准规定的限量要
求以下。
X:表示该有毒有害物质至少在该部件的某一
均质材料中的含量超出GB/T26572标准规定的
限量要求。
Contactinformation
AxisCommunicationsAB
Emdalavägen14
22369Lund
Sweden
Tel:+46462721800
Fax:+4646136130
axis.com
汞
铅
(Hg)
(Pb)
00000
X
六
镉
价
(Cd)
铬
(Cr(VI))
多
多
溴
溴
二
联
苯
苯
醚
(PB-
(PB-
B)
DE)
Warrantyinformation
ForinformationaboutAxis’productwarrantyand
theretorelatedinformation,gotoaxis.com/warranty.
Support
Shouldyourequireanytechnicalassistance,please
contactyourAxisreseller.Ifyourquestionscannotbe
answeredimmediately,yourresellerwillforwardyour
queriesthroughtheappropriatechannelstoensurea
rapidresponse.IfyouareconnectedtotheInternet,
youcan:
•downloaduserdocumentationandsoftware
updates
Page 10

•ndanswerstoresolvedproblemsintheFAQ
database,searchbyproduct,category,orphrase
•reportproblemstoAxissupportstaffbylogging
intoyourprivatesupportarea
•chatwithAxissupportstaff
•visitAxisSupportataxis.com/support
Learnmore!
VisitAxislearningcenteraxis.com/academyforuseful
trainings,webinars,tutorialsandguides.
Page 11

AXIST99A11PositioningUnit24VAC/DC
Safetyinformation
Hazardlevels
DANGER
Indicatesahazardoussituationwhich,ifnotavoided,willresultindeathorseriousinjury.
WARNING
Indicatesahazardoussituationwhich,ifnotavoided,couldresultindeathorseriousinjury.
CAUTION
Indicatesahazardoussituationwhich,ifnotavoided,couldresultinminorormoderate
injury.
NO
TICE
NO NO
TICE TICE
Indicatesasituationwhich,ifnotavoided,couldresultindamagetoproperty.
Othermessagelevels
Important
Indicatessignicantinformationwhichisessentialfortheproducttofunctioncorrectly.
Note
Indicatesusefulinformationwhichhelpsingettingthemostoutoftheproduct.
EN
11
Page 12

AXIST99A11PositioningUnit24VAC/DC
Safetyinstructions
DANGER
Riskofelectricshock.Allcablesshallbede-energizedbeforeinstallingorperforming
maintenanceontheproduct.
WARNING
TheAxisproductshallbeinstalledbyatrainedprofessional,andincompliancewithlocal
lawsandregulations.
CAUTION
Riskofinjury.Movingparts.Keepyourbodypartsawayfromtheproductwhenin
operation.Disconnectfrompowersupplybeforeinstallingorperformingmaintenance
ontheproduct.
CAUTION
Riskofinjury.Hotsurface.Donottouchtheproductwheninoperation.Disconnect
frompowersupplyandallowthesurfacestocoolbeforeperformingmaintenanceon
theproduct.
NO
TICE
NO NO
TICE TICE
•TheAxisproductshallbeusedincompliancewithlocallawsandregulations.
•StoretheAxisproductinadryandventilatedenvironment.
•AvoidexposingtheAxisproducttoshocksorheavypressure.
•Donotinstalltheproductonunstablepoles,brackets,surfacesorwalls.
•UseonlyapplicabletoolswheninstallingtheAxisproduct.Usingexcessiveforcewith
powertoolscouldcausedamagetotheproduct.
•Donotusechemicals,causticagents,oraerosolcleaners.
•Useacleanclothdampenedwithpurewaterforcleaning.
•Useonlyaccessoriesthatcomplywiththetechnicalspecicationofyourproduct.These
canbeprovidedbyAxisorathirdparty.AxisrecommendsusingAxispowersource
equipmentcompatiblewithyourproduct.
•UseonlysparepartsprovidedbyorrecommendedbyAxis.
•Donotattempttorepairtheproductyourself.ContactAxissupportoryourAxisreseller
forservicematters.
•Donotpointthecameralenstowardthesunorotherhigh-intensityradiationsources
becausethiscouldcausedamagetothecamera.
•Useayellow/greencoloredgroundingcableofatleast0,5mm
2
or20AWG.
12
Page 13

AXIST99A11PositioningUnit24VAC/DC
Transportation
NO
TICE
NO NO
TICE TICE
•WhentransportingtheAxisproduct,usetheoriginalpackagingorequivalenttoprevent
damagetotheproduct.
EN
13
Page 14

14
Page 15

Packagecontents
•Positioningunit
•Backlid
•Powerconnector
•I/Oconnector
•Torx®bitT20andT30
•Printedmaterials
AXIST99A11PositioningUnit24VAC/DC
EN
-InstallationGuide(thisdocument)
-Extraserialnumberlabel(2x)
-AVHSAuthenticationkey
15
Page 16

AXIST99A11PositioningUnit24VAC/DC
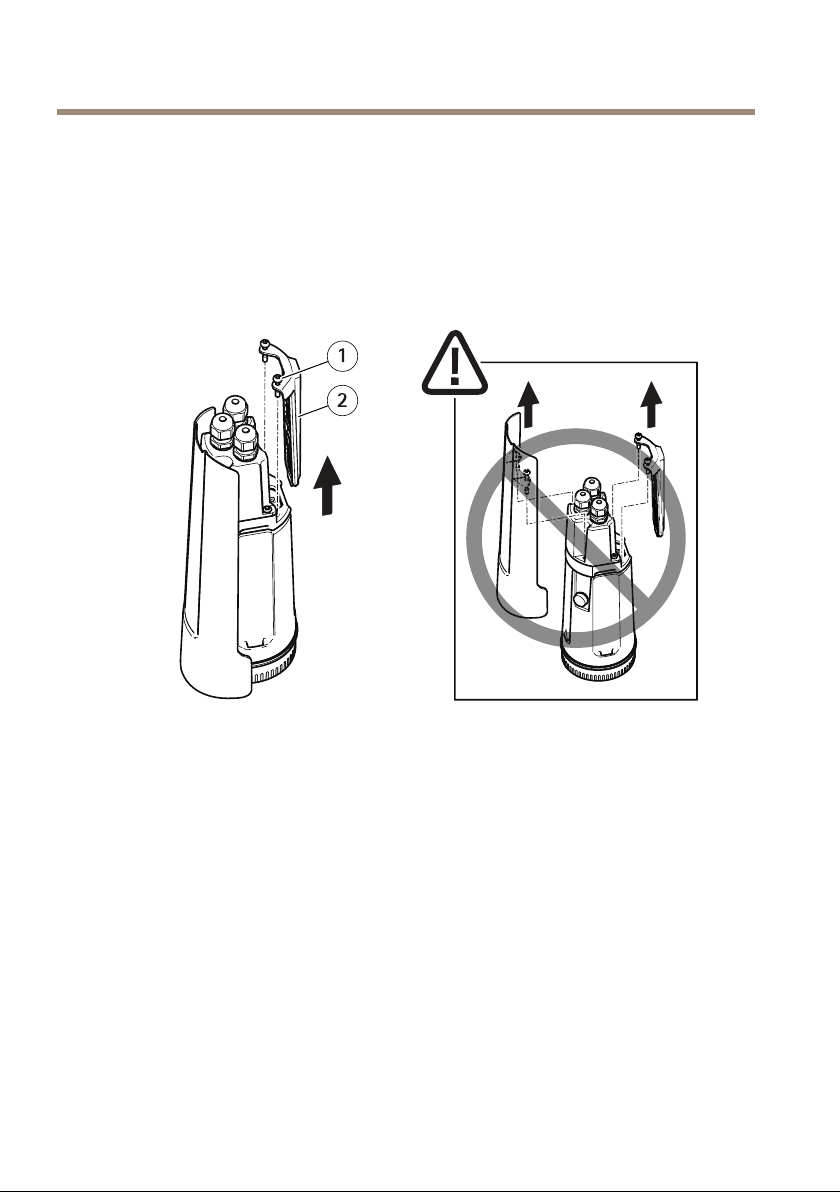
Productoverview
1
Backlid
2
Positioningunitbackcover
3
Adapter
4
Positioningunit
5
Lid
6
Baseunit
7
Baseunitscrews
16
Page 17

AXIST99A11PositioningUnit24VAC/DC
EN
1
Camerapowercable
2
Cameranetworkcable
3
Cameraserialinterfacecables
4
Inputpowerconnector
5
I/Oconnector
6
RJ45connector
7
SFPslotforSFPmodule(SFPmodulenotincluded)
17
Page 18

AXIST99A11PositioningUnit24VAC/DC
Howtoinstalltheproduct
DANGER
Riskofelectricshock.Allcablesshallbede-energizedbeforeinstallingtheproduct.
CAUTION
Theelectricalconnectionsandconduitinstallationsshallbemadebyacertiedelectrician
andincompliancewithlocalregulations.
CAUTION
Riskofinjury.Movingparts.Keepyourbodypartsawayfromtheproductwhenin
operation.Disconnectfrompowersupplybeforeinstallingorperformingmaintenance
ontheproduct.
CAUTION
Riskofinjury.Hotsurface.Donottouchtheproductwheninoperation.Disconnect
frompowersupplyandallowthesurfacestocoolbeforeperformingmaintenanceon
theproduct.
Mountthebaseunit
1
Baseunit
18
Page 19

AXIST99A11PositioningUnit24VAC/DC
1.Removethefourbaseunitscrews(T30).
2.Simultaneouslypullandturnthebaseunitcounterclockwiseuntilthearrowsonthebase
unitandtherestoftheunitarealigned.
3.Removethebaseunit.
EN
NO
TICE
NO NO
TICE TICE
Donotusesharptoolswhenremovingthetransparentbaseunitcover.
4.Removethetransparentbaseunitcover.
19
Page 20

AXIST99A11PositioningUnit24VAC/DC
1
Conduitcoverclip
2
Conduitcover
3
Screwhole(x4)
5.Forconduitinstallationsonly:removethetwoconduitcoverclipsfollowedbythe
conduitcover.
6.Attachthebaseunittothemountingsurfaceusingtheappropriatefastenersinthe
fourscrewholes.
Routethecables
WARNING
Riskofelectricshock.Theproductshallbegroundedusingboththeprotectiveearthwire
inthepowercableandthegroundingbraid.Makesurebothendsoftheprotectiveearth
wireandthegroundingbraidareincontactwiththeirrespectivegroundingsurfaces.
Important
Useonlycablesthatcomplywiththespeciedcablearea.Formoreinformation,see
Cablethicknessonpage37.
20
Page 21

AXIST99A11PositioningUnit24VAC/DC
1
Powercable(notincluded)
2
Strainrelief
3
Groundingscrew
4
Groundingbraid(notincluded)
5
Bottomcablehole
EN
1.Installtheoptionalconduitadapters(notincluded).
2.Connectthegroundingbraidtothegroundingscrew.
3.Insertthepowercable,I/Ocableandnetworkcablethroughtheholeinthebaseunitas
shownintheillustrationabove.Alternativelyinsertthemthroughthebottomcablehole.
4.Insertthepowercablethroughthestrainreliefwithadistanceof530mm(21in)from
thestrainrelieftotheendofthecable.
21
Page 22

AXIST99A11PositioningUnit24VAC/DC
1
I/Ocable(optional,notincluded)
2
Networkcable(notincluded)
5.InserttheI/Ocable(optional)throughthestrainreliefwithadistanceof420mm(16½
in)fromthestrainrelieftotheendofthecable.
6.Insertthenetworkcable(opticalbercableand/orRJ45cable)throughthestrainrelief
withadistanceof580mm(23in)fromthestrainrelieftotheendoftheconnector.
Formoreinformationondifferentnetworkconnectivityoptions,seeInstallthenetwork
linkonpage26.
7.Closeandtightenthethreestrainreliefs.
22
Page 23

AXIST99A11PositioningUnit24VAC/DC
1
Powercable(notincluded)
2
I/Ocable(optional,notincluded)
3
Networkcable(notincluded)
4
Cablegasket
5
Transparentbaseunitcover
8.Fitcablegasketsonthecables.SeeCablethicknessonpage37.
9.Insertthepower,I/Oandnetworkcablesincludingthecablegasketsthroughtheholesin
thetransparentbaseunitcoverandarrangethecablesasshownintheillustrationabove.
NO
TICE
NO NO
TICE TICE
IfyouusebothanopticalbrecableandanRJ45cablefornetworkconnectivity,routethe
opticalbrecablethroughthesamecablegasketastheI/Ocable.Applyasealantbetween
thecablesandthecablegaskettopreventleakage.Formoreinformationondifferent
networkconnectivityoptions,seeInstallthenetworklinkonpage26.
EN
10.Replacethetransparentbaseunitcoveronthebaseunitandtthecablegasketsinside
theholes.
23
Page 24

AXIST99A11PositioningUnit24VAC/DC
1
I/Oconnector
2
Powerconnector
3
O-ring
NO
TICE
NO NO
TICE TICE
Makesuretheprotectiveearthwireisabout10mm(3/8in)longerthantheothertwo
wires(inthepowercable),sothatitwillnotbedisconnectedaccidentallyifpulled.
Note
Werecommendthatyoustripapproximately90mm(3½in)ofthepowercablejacketand
70mm(2¾in)oftheI/Ocablejacketforeaseofinstallation.
11.InstallthepowerandI/Oconnectors,seeConnectorsonpage34.
12.Adjustthenetwork,I/Oandpowercablessothatthedistancefromthecablegasketto
theendoftheconnectoris240mm(10in),170mm(7in),and160mm(7in)respectively.
NO
TICE
NO NO
TICE TICE
MakesurethattheO-ringisttedcorrectlyaroundthetransparentbaseunitcover.
24
Page 25

AXIST99A11PositioningUnit24VAC/DC
EN
13.Replacethepositioningunitonthebaseunitmakingsurethatthearrowsonthetwo
unitsarealigned.
14.Turnthepositioningunitclockwisebacktoitsoriginalpositionandtightenthefour
baseunitscrews(torque3.0Nm).
NO
TICE
NO NO
TICE TICE
Makesurethatthecablesdonotgetpinchedwhenmountingthetwounits.
25
Page 26

AXIST99A11PositioningUnit24VAC/DC
Installthenetworklink
Youhavedifferentoptionsforinstallingthenetworklink:
•A:viaanopticalberorRJ45cableconnectedtotheSFPmodule(witharespective
connector)intheSFPslot.
•B:viaanRJ45cableconnectedtothexedRJ45connector.
•C:viabothoftheabove,inwhichcaseconnectionviatheSFPmodulefunctionsasthe
primarynetworklinkandconnectionviathexedRJ45connectorasthefail-overlink.
Formoreinformationonnetworkconnectorlocations,seeConnectorsonpage34.
Note
•SFPmoduleisnotincluded.FormoreinformationonavailableSFPmodules,see
www.axis.com
•EstablishinganetworklinkonlyviatheopticalbercableusingtherespectiveSFPmodule
worksasastand-alonesolutionforlongrangecablinginstallations.
26
Page 27

AXIST99A11PositioningUnit24VAC/DC
Connectthecables
1.Loosenthefourlidscrews(T20)andremovethelid.
EN
1
Inputpowerconnector
2
I/Oconnector
3
RJ45connector
4
SFPslotforSFPmodule(SFPmodulenotincluded)
2.Connectthenetwork(opticalbreand/orRJ45),I/Oandpowercables.Formore
informationondifferentnetworkconnectivityoptions,seeInstallthenetworklinkon
page26.
27
Page 28
AXIST99A11PositioningUnit24VAC/DC
3.Replacethelidandtightenthefourlidscrews(torque3.0Nm).
4.Applypowertotheproduct.
Installthecamera
Thisproductsupportsseveralnetworkcameras.Foracompletelistofsupportedcameras,see
www.axis.com.
1
PTmountbracketscrews(2x,T20)
2
PTmountbracket
1.RemovethePTmountbracketfromthecamerabylooseningthescrews.Discardthe
bracket.
28
Page 29

AXIST99A11PositioningUnit24VAC/DC
EN
3
Camera
4
Adapter
5
Adapterscrews(2x,T20)
2.Slidethecamerabackwardsintotheadapter.Fastenitwiththeadapterscrews(torque
1.0Nm)intheback.
29
Page 30
AXIST99A11PositioningUnit24VAC/DC
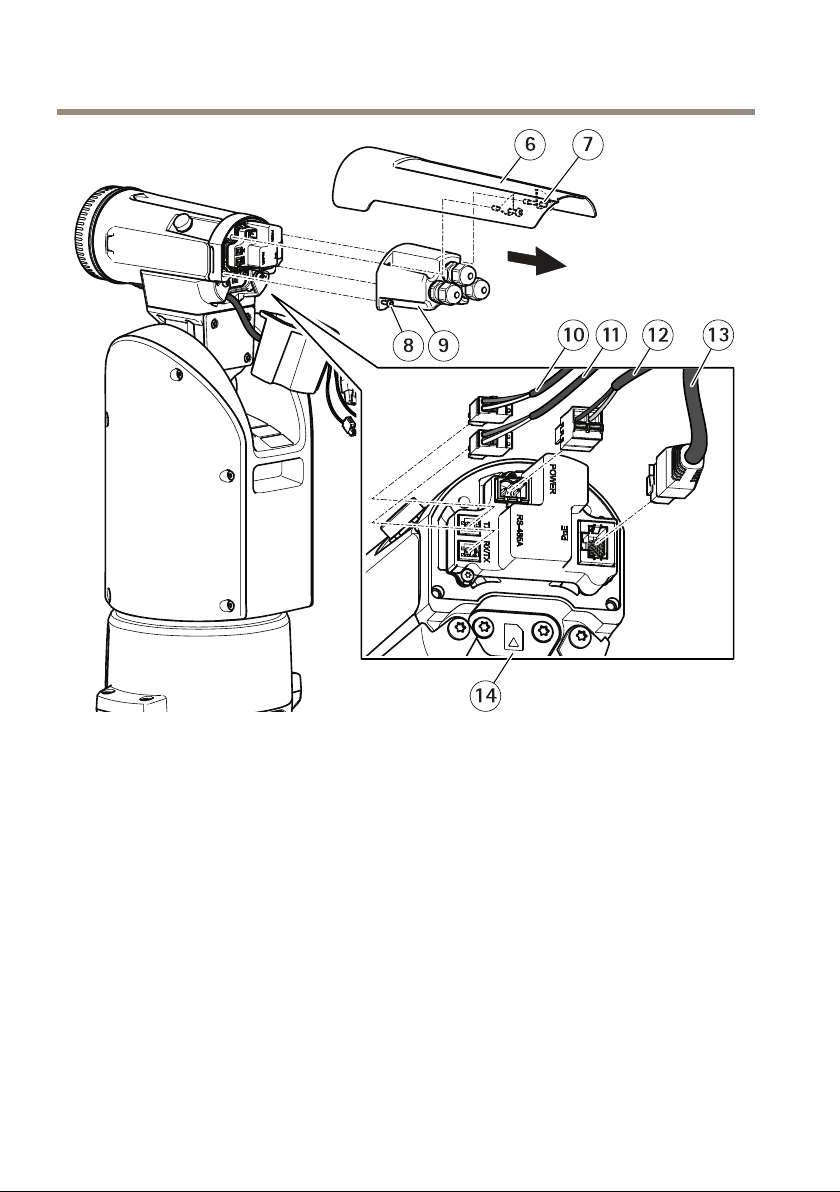
6
Sunshield
7
Sunshieldscrews(2x,T20)
8
Camerabackcoverscrews(2x,T20)
9
Camerabackcover
10
Cameraserialinterfacecable(TX)
11
Cameraserialinterfacecable(RX/TX)
12
Camerapowercable
13
Cameranetworkcable
14
SDcardlid
3.Removethesunshieldfromthecamerabylooseningthescrews.
4.Removethecamerabackcoverbylooseningthescrews.Discardthebackcover.
5.Connectthecameranetwork,serialinterfaceandpowercables.Formoreinformationon
cablespecicationsseeCablesonpage37
30
Page 31

AXIST99A11PositioningUnit24VAC/DC
6
Sunshield
7
Sunshieldscrews(2x,T20)
15
Positioningunitbackcoverscrews(2x,T20)
16
Positioningunitbackcover
17
Backlid
EN
6.Fastenthepositioningunitbackcoveronthecamerawiththescrews(torque1.0Nm).
7.Fastenthesunshieldusingthescrews(torque1.0Nm).
8.RemovetheSDcardlidandinsertthemicroSDcard(optional)intotheSDcardslotin
thecamera.FastentheSDcardlid.
9.Fastenthebacklidwiththescrew(T20,torque1.0Nm).
InstallthePTZdriver
Thisproductsupportsseveraldevices.Foracompletelistofsupporteddevices,seeaxis.com
1.Gotothecamera’swebpage.
2.Intheinstallationwizard,gotoSelectaPTZmodeandselectPTZdriverfromthe
drop-downlist.
3.Onceyou’veaccessedtheliveview,gotoSettings>System>Accessories.
4.Selectoneofthefollowingactions:
4.1IfthePTZdriverisnotuploaded,selectUploaddriver.
4.2IfthePTZdriverisuploaded,gotoSelectdrivertouseandselectPTZdriver
fromthedrop-downlist.
31
Page 32

AXIST99A11PositioningUnit24VAC/DC
5.Selectavideochannel.
6.EntertheDeviceidandselectDevicetypefromthedropdown-list.Todecidewhich
devicetypetouse,seethedocumentationsuppliedwiththePTZdriver.
7.GotothePTZtabandcheckthatthePTZsettingsareavailable.
32
Page 33

AXIST99A11PositioningUnit24VAC/DC
Furtherinformation
•Forthelatestversionofthisdocument,seeaxis.com
•Theusermanualisavailableataxis.com
•Tocheckifthereisupdatedrmwareavailableforyourdevice,seeaxis.com/support
•Forusefulonlinetrainingsandwebinars,seeaxis.com/academy
Optionalaccessories
Foracompletelistofavailableaccessoriesforthisproduct,gototheproduct’spageonaxis.com
andselectSoftware&Accessories.
Warrantyinformation
ForinformationaboutAxis’productwarrantyandtheretorelatedinformation,goto
axis.com/warranty.
EN
33
Page 34

AXIST99A11PositioningUnit24VAC/DC
Specifications
Tondthelatestversionoftheproduct’sdatasheet,gototheproductpageataxis.comand
locateSupport&Documentation.
Connectors
Networkconnector
RJ45Ethernetconnector.
SFPconnector.
NO
TICE
NO NO
TICE TICE
Theproductshallbeconnectedusingashieldednetworkcable(STP)oranopticalber
cable.Allcablesconnectingtheproducttothenetworkshallbeintendedfortheir
specicuse.Makesurethatthenetworkdevicesareinstalledinaccordancewith
themanufacturer’sinstructions.Forinformationaboutregulatoryrequirements,see
Electromagneticcompatibility(EMC)onpage8.
I/Oconnector
UsetheI/Oconnectorwithexternaldevicesincombinationwith,forexample,motiondetection,
eventtriggering,andalarmnotications.Inadditiontothe0VDCreferencepointandpower(DC
output),theI/Oconnectorprovidestheinterfaceto:
Digitalinput-Forconnectingdevicesthatcantogglebetweenanopenandclosedcircuit,for
examplePIRsensors,door/windowcontacts,andglassbreakdetectors.
Digitaloutput-ForconnectingexternaldevicessuchasrelaysandLEDs.Connecteddevicescan
beactivatedbytheVAPIX®ApplicationProgrammingInterfaceorfromtheproduct’swebpage.
6-pincongurableterminalblock
FunctionPinNotes
DCground
DCoutput
1
2
Canbeusedtopowerauxiliaryequipment.
Note:Thispincanonlybeusedaspowerout.
Specications
0VDC
12VDC
Maxload=50mA
34
Page 35

Example
(Inputor
Output)
AXIST99A11PositioningUnit24VAC/DC
3–
Digitalinput–Connecttopin1toactivate,or
6
leaveoating(unconnected)todeactivate.
Digitaloutput–Internallyconnectedtopin1(DC
ground)whenactive,andoating(unconnected)
wheninactive.Ifusedwithaninductiveload,e.g.,
arelay,connectadiodeinparallelwiththeload,
toprotectagainstvoltagetransients.
1
DCground
2
DCoutput12V,max50mA
3
I/Oconguredasinput
4
I/Oconguredasoutput
5
CongurableI/O
6
CongurableI/O
0tomax30VDC Congurable
0tomax30VDC,
opendrain,100mA
EN
Powerconnector
4-pinterminalblockforpowerinput.
24VAC/DCpowerconnector
NO
TICE
NO NO
TICE TICE
Thissectionisvalidforproductspoweredby24VACand24VDConly.
35
Page 36

AXIST99A11PositioningUnit24VAC/DC
Thistableisonlyvalidforthe24VACandthe24VDCpowerconnectors.
Position
1
2
3
4
24VAC24VDC
ProtectiveearthProtectiveearth
24VACPhase
24VACNeutral
NotconnectedNotconnected
+24V
0V
RS485/RS422connector
Two2-pinterminalblocksforRS485/RS422serialinterfaceusedtocontrolauxiliaryequipment
suchaspan-tiltdevices.
Theserialportcanbeconguredtosupport:
•Two-wireRS485halfduplex
•Four-wireRS485fullduplex
•Two-wireRS422simplex
•Four-wireRS422fullduplexpointtopointcommunication
FunctionPinNotes
RS485/RS422RX/TXA
RS485/RS422RX/TXB
1
2
(RX)ForfullduplexRS485/RS422
(RX/TX)ForhalfduplexRS485
36
Page 37

AXIST99A11PositioningUnit24VAC/DC
RS485/RS422TXA
RS485/RS422TXB
3
4
(TX)ForfullduplexRS485/RS422
Cables
Cablethickness
Thecablediameter,whenusingcablegasketsprovidedwiththeproduct,shouldbeintherangeof
5to1 1mm(0.2to0.4in).
NO
TICE
NO NO
TICE TICE
•Usecablesthatkeepwithinthespeciedcablearea
•Selectcablesincompliancewithyourlocalregulations
•Makesureallcableholesareproperlysealed
•Usecablegasketsorcableglandsthatmatchboththecableholeandthecablearea
Forinformationaboutaccessories,suchascablegasketsandcableglandsthatallowforother
cableareas,seewww.axis.com
Cameraserialinterfacecable
CablecolorSpecication
White
GreenRS485B
RS485A
EN
Camerapowercable
CablecolorSpecication
Red
Black0V
Operatingconditions
ThisAxisproductisintendedforindoorandoutdooruse.
+24VDC
37
Page 38

AXIST99A11PositioningUnit24VAC/DC
TemperatureHumidity
Normal:-50°Cto60°C(-58°Fto140°F)
Maximum(intermittent):65°C(149°F)
Coldstart:-40°Cto60°C(-40°Fto140°F)
Thestart–uptimeis2minutesat0°Cto50°C(32°Fto122°F).
10–100%RH
(non-condensing)
Powerconsumption
TypicalconsumptionMaxconsumption
10W169W
Important
Whenusingthe22m(72ft)AXISCable24VDC/24–240VAC,apowersupplycapableof
delivering220Wisrequiredtocompensateforthepowerlossinthecable.
NO
TICE
NO NO
TICE TICE
Thetypicalpowerconsumptionvaluesarebasedonthefollowing:
•Anylossesinthepowercabledisregarded
•Nopositioningactive
•Temperatureat25°C/77°F(allheatersoff)
•OneH.264streamatmaximumresolution
•MJPEGstreamrecordedtoSDcard
38
Page 39

AXIST99A11PositioningUnit24VAC/DC
Informationssurlasécurité
Niveauxderisques
DANGER
Indiqueunesituationdangereusequi,siellen'estpasévitée,entraîneraledécèsoudes
blessuresgraves.
AVERTISSEMENT
Indiqueunesituationdangereusequi,siellen'estpasévitée,pourraitentraînerledécès
oudesblessuresgraves.
ATTENTION
Indiqueunesituationdangereusequi,siellen'estpasévitée,pourraitentraînerdes
blessureslégèresoumodérées.
VIS
A AAVIS VIS
Indiqueunesituationqui,siellen'estpasévitée,pourraitendommagerl'appareil.
Autresniveauxdemessage
Important
Indiquelesinformationsimportantes,nécessairespourassurerlebonfonctionnementde
l’appareil.
Note
Indiquelesinformationsutilesquipermettrontd’obtenirlefonctionnementoptimalde
l’appareil.
FR
39
Page 40

AXIST99A11PositioningUnit24VAC/DC
Consignesdesécurité
DANGER
Risquedechocélectrique.Touslescâblesdoiventêtremishorstensionavantl'installation
ouuneinterventiondemaintenancesurleproduit.
AVERTISSEMENT
LeproduitAxisdoitêtreinstalléparunprofessionnelqualiéetconformémentauxloiset
règlementationslocalesenvigueur.
ATTENTION
Risquesdeblessures.Piècesmobiles.Restezàl'écartduproduitlorsqu'ilestencours
defonctionnement.Débranchezl'alimentationélectriqueavantd'installerleproduitou
d'effectuersonentretien.
ATTENTION
Risquesdeblessures.Surfaceschaudes.Netouchezpasleproduitlorsqu'ilesten
coursdefonctionnement.Débranchezl'alimentationélectriqueetlaissezlessurfaces
refroidiravantd'effectuerl'entretienduproduit.
VIS
A AAVIS VIS
•LeproduitAxisdoitêtreutiliséconformémentauxloisetrèglementslocaux.
•ConserverceproduitAxisdansunenvironnementsecetventilé.
•NepasexposerceproduitAxisauxchocsouauxfortespressions.
•Nepasinstallerceproduitsurdespoteaux,supports,surfacesoumursinstables.
•Utiliseruniquementdesoutilsrecommandéspourl'installationdel'appareilAxis.
L'applicationd'uneforceexcessivesurl'appareilavecdesoutilspuissantspourrait
l'endommager.
•Nepasutiliserdeproduitschimiques,desubstancescaustiquesoudenettoyants
pressurisés.
•Utiliserunchiffonpropreimbibéd'eaupurepourlenettoyage.
•Utiliseruniquementdesaccessoiresconformesauxcaractéristiquestechniquesdevotre
produit.IlspeuventêtrefournisparAxisouuntiers.Axisrecommanded'utiliserun
équipementd'alimentationAxiscompatibleavecvotreproduit.
•UtiliseruniquementlespiècesderechangefourniesourecommandéesparAxis.
•Nepasessayerderéparervous-mêmeceproduit.Contacterl'assistancetechniqued'Axis
ouvotrerevendeurAxispourdesproblèmesliésàl'entretien.
•Évitezdepointerl’objectifdelacaméraverslesoleiloutouteautresourcederadiation
dehauteintensité.Celarisqued’endommagerlacaméra.
•Utilisezuncâbledemiseàlaterredecouleurjaune/vertd'aumoins0,5mm
20AWG.
2
oude
40
Page 41

AXIST99A11PositioningUnit24VAC/DC
Transport
VIS
A AAVIS VIS
•LorsdutransportduproduitAxis,utilisezl'emballaged'origineouunéquivalentpour
éviterd'endommagerleproduit.
FR
41
Page 42

42
Page 43

Contenudel’emballage
•Unitédepositionnement
•Couverclearrière
•Connecteurd'alimentation
•ConnecteurE/S
•Torx®emboutT20etT30
•Documentsimprimés
AXIST99A11PositioningUnit24VAC/DC
FR
-Guided’installation(cedocument)
-Étiquettesupplémentairedenumérodesérie(x2)
-Cléd’authenticationAVHS
43
Page 44

AXIST99A11PositioningUnit24VAC/DC
Vued'ensembleduproduit
1
Couverclearrière
2
Couverclearrièredel'unitédepositionnement
3
Adaptateur
4
Unitédepositionnement
5
Couvercle
6
Unitédebase
7
Visdel'unitédebase
44
Page 45

AXIST99A11PositioningUnit24VAC/DC
FR
1
Câbleélectriquedelacaméra
2
Câbleréseaudelacaméra
3
Câblesinterfacesériedelacaméra
4
Connecteurd'alimentationd'entrée
5
ConnecteurE/S
6
ConnecteurRJ45
7
EmplacementSFPpourmoduleSFP(moduleSFPnoninclus)
45
Page 46

AXIST99A11PositioningUnit24VAC/DC
Commentinstallerleproduit
DANGER
Risquedechocélectrique.Touslescâblesdoiventêtrehorstensionavantd'installer
leproduit.
ATTENTION
Lesconnexionsélectriquesetlesinstallationsdeconduitesdoiventêtreeffectuéesparun
électriciencertiéetconformémentauxréglementationslocales.
ATTENTION
Risquesdeblessures.Piècesmobiles.Restezàl'écartduproduitlorsqu'ilestencours
defonctionnement.Débranchezl'alimentationélectriqueavantd'installerleproduitou
d'effectuersonentretien.
ATTENTION
Risquesdeblessures.Surfaceschaudes.Netouchezpasleproduitlorsqu'ilesten
coursdefonctionnement.Débranchezl'alimentationélectriqueetlaissezlessurfaces
refroidiravantd'effectuerl'entretienduproduit.
46
Page 47

AXIST99A11PositioningUnit24VAC/DC
Montagedel'unitédebase
FR
1
Unitédebase
1.Déposerlesquatrevisdel'unité(T30).
2.Tirezettournezsimultanémentl'unitédebasedanslesensanti-horairejusqu'àceque
lesèchessurl'unitédebaseetlerestedel'unitésoientalignées.
3.Déposezl'unitédebase.
47
Page 48

AXIST99A11PositioningUnit24VAC/DC
VIS
A AAVIS VIS
Nepasutiliserd'outilstranchantslorsdeladéposeducouvercletransparentdel'unitéde
base.
4.Déposezlecouvercletransparentdel'unitédebase.
48
Page 49

AXIST99A11PositioningUnit24VAC/DC
1
Clipducachedeconduit
2
Cachedeconduit
3
Troudevis(x4)
5.Pourdesinstallationsdeconduituniquement:déposerlesdeuxclipsducachede
conduitsuivisparlecacheduconduit.
6.Fixezl'unitédebaseàlasurfacedemontageenutilisantlesélémentsdexation
appropriésdanslesquatretrousdevis.
FR
Acheminementdescâbles
AVERTISSEMENT
Risquedechocélectrique.Leproduitdoitêtremisàlaterreàl'aideducâbledeprotection
demiseàlaterreducâbled'alimentationetdelatressedeterre.Assurez-vousqueles
deuxextrémitésducâbledeprotectiondemiseàlaterreetlatressedeterresonten
contactaveclessurfacesdemiseàlaterrecorrespondantes.
Important
Utilisezuniquementdescâblesconformesàlazonespéciée.Pourensavoirplus,consultez
Épaisseurducâblepage66.
49
Page 50

AXIST99A11PositioningUnit24VAC/DC
1
Câbled’alimentation(nonfourni)
2
Réducteurdetension
3
visdemiseàlaterre
4
Tressedeterre(nonfournie)
5
passageducâbleinférieur
1.Installezlesadaptateursdeconduitenoption(nonfournis).
2.Reliezlatressedeterreàlavisdemiseàlaterre.
3.Insérezlecâbled'alimentation,lecâbled'E/Setlecâbleréseauàtraversl'oricede
l'unitédebasecommeillustréci-dessus.Vouspouvezaussilesinsérerdansl'orice
ducâbleinférieur.
4.Insérezlecâbled'alimentationàtraversleréducteurdetensionavecunedistancede
530mm(21po)depuisleréducteurdetensionjusqu'àl'extrémitéducâble.
50
Page 51

AXIST99A11PositioningUnit24VAC/DC
1
CâbleE/S(enoption,nonfourni)
2
Câbleréseau(noninclus)
5.Insérezlecâbled'E/S(enoption)àtraversleréducteurdetensionavecunedistancede
420mm(16½po)depuisleréducteurdetensionjusqu'àl'extrémitéducâble.
6.Insérezlecâbleréseau(câblebreoptiqueet/oucâbleRJ45)àtraversleréducteurde
tensionavecunedistancede580mm(23po)depuisleréducteurdetensionjusqu'à
l'extrémitéduconnecteur.Pourplusd'informationssurlesdifférentesoptionsde
connectivitéréseau,consultezInstallationdelaliaisonréseaupage55.
7.Fermezetserrezlestroisreliefsdetraction.
FR
51
Page 52

AXIST99A11PositioningUnit24VAC/DC
1
Câbled'alimentation(noninclus)
2
CâbleE/S(enoption,nonfourni)
3
Câbleréseau(noninclus)
4
Jointdecâble
5
Couvercletransparentdel'unitédebase
8.Placezlesjointssurlescâbles.Cf.Épaisseurducâblepage66.
9.Insérezlescâblesd'alimentation,d'E/Setréseauycomprislesjointsàtraverslesorices
ducouvercletransparentdel'unitédebaseetdisposezlescâblescommeillustré
ci-dessus.
VIS
A AAVIS VIS
SivousutilisezuncâbleàbreoptiqueetuncâbleRJ45pourlaconnectivitéréseau,
acheminezlecâbleàbreoptiqueàtraverslemêmejointquelecâbled'E/S.Appliquezun
jointentrelescâblesetlejointdecâblepourempêchertoutefuite.Pourplusd'informations
surlesoptionsdeconnectivitéréseau,voirInstallationdelaliaisonréseaupage55.
10.Replacezlecouvercletransparentdel'unitédebasesurcelle-cietplacezlesjoints
danslesorices.
52
Page 53

AXIST99A11PositioningUnit24VAC/DC
1
ConnecteurE/S
2
Connecteurd'alimentation
3
Jointtorique
VIS
A AAVIS VIS
Pourévitertoutedéconnexionintempestive,lecâbledeprotectiondemiseàlaterre
doitêtrepluslongd'environ10mm(3/8po)quelesdeuxautresls(danslecâble
d'alimentation).
Note
Nousvousrecommandonsdedénuderenviron90mm(3½po)delagaineducâble
d'alimentationet70mm(2¾po)delagainedecâbled'E/Spouruneinstallationplusfacile.
FR
11.Pourinstallerlesconnecteursd'alimentationetd'E/S,voirConnecteurspage63.
12.Réglezlescâblesréseau,d'E/Setd'alimentationdesortequeladistancedepuislejoint
ducâblejusqu'àl'extrémitéduconnecteursoitrespectivementde240mm(10po),
170mm(7po)et160mm(7po).
VIS
A AAVIS VIS
Assurez-vousquelesjointstoriquessontcorrectementxésautourducouvercle
transparentdel'unitédebase.
53
Page 54

AXIST99A11PositioningUnit24VAC/DC
13.Replacezl'unitédepositionnementsurl'unitédebaseenvousassurantquelesèches
surlesdeuxunitéssontalignées.
14.Tournezl'unitédepositionnementdanslesensdesaiguillesd'unemontrejusqu'àsa
positiond'origineetserrezlesquatrevisdel'unitédebase(couplede3Nm).
VIS
A AAVIS VIS
Assurez-vousdenepaspincerlescâbleslorsdumontagedesdeuxunités.
54
Page 55

AXIST99A11PositioningUnit24VAC/DC
Installationdelaliaisonréseau
Vousdisposezdeplusieursoptionspourinstallerlaliaisonréseau:
•A:viauncâbleàbreoptiqueouuncâbleRJ45raccordéaumoduleSFP(avec
connecteurcorrespondant)surl'emplacementSFP.
•B:viauncâbleRJ45raccordéauconnecteurRJ45xe.
•C:vialesdeuxsolutionsci-dessus,auquelcasleraccordementvialemoduleSFP
fonctionnecommelaliaisonréseauprimaireetleraccordementvialeconnecteurRJ45
xecommelaliaisondesecours.
FR
Pourplusd'informationssurlesemplacementsdesconnecteursréseau,voirConnecteurspage63.
Note
•LemoduleSFPn'estpasfourni.Pourplusd’informationssurlesmodulesSFP,consultezle
sitewww.axis.com
•L'établissementd'uneliaisonréseauuniquementvialecâbleàbreoptiqueàl'aidedu
moduleSFPrespectiffonctionnecommeunesolutionautonomepourlesinstallationsde
câblagelonguedistance.
55
Page 56

AXIST99A11PositioningUnit24VAC/DC
Branchezlescâbles
1.Desserrezlesquatrevisducouvercle(T20)etretirezlecouvercle.
1
Connecteurd'alimentationd'entrée
2
ConnecteurE/S
3
ConnecteurRJ45
4
EmplacementSFPpourmoduleSFP(moduleSFPnoninclus)
2.Branchezlecâbleréseau(breoptiqueet/ouRJ45),E/Setd'alimentation.Pourplus
d'informationssurlesoptionsdeconnectivitéréseau,voirInstallationdelaliaisonréseau
page55.
56
Page 57

AXIST99A11PositioningUnit24VAC/DC
3.Replacezlecouvercle,puisserrezlesquatrevisducouvercle(coupledeserrage3,0Nm).
4.Mettezleproduitsoustension.
Installationdelacaméra
CeproduitAxisestcompatibleavecplusieurscamérasréseau.Pourconnaîtrelalistecomplète
descamérasprisesencharge,consultezlesitewww.axis.com.
1
VisdesupportdexationPT(2x,T20)
2
SupportdexationPT
1.RetirezlesupportdexationPTdelacaméraendesserrantlesvis.Déposezlesupport.
FR
57
Page 58

AXIST99A11PositioningUnit24VAC/DC
3
Caméra
4
Adaptateur
5
Visdel'adaptateur(2x,T20)
2.Faitesglisserlacaméraversl'arrièredansl'adaptateur.Fixez-leàl'aidedesvisde
l'adaptateur(coupledeserrage1,0Nm)àl'arrière.
58
Page 59

AXIST99A11PositioningUnit24VAC/DC
FR
6
Pare-soleil
7
Visdupare-soleil(2x,T20)
8
Visducouverclearrièredelacaméra(2x,T20)
9
Couverclearrièredelacaméra
10
Câbleinterfacesériedelacaméra(TX)
11
Câbleinterfacesériedelacaméra(RX/TX)
12
Câbleélectriquedelacaméra
13
Câbleréseaudelacaméra
14
CouvercledecarteSD
3.Retirezlepare-soleildelacaméraendesserrantlesvis.
4.Retirezlecouverclearrièredelacaméraendesserrantlesdeuxvis.Déposezlepanneau
arrière.
5.Branchezlescâblesréseau,interfacesérieetd'alimentation.Pourplusd’informations
concernantlescaractéristiquestechniquesdescâbles,consultezCâblespage66
59
Page 60

AXIST99A11PositioningUnit24VAC/DC
6
Pare-soleil
7
Visdupare-soleil(2x,T20)
15
Visducouverclearrièredel'unitédepositionnement(2x,T20)
16
Couverclearrièredel'unitédepositionnement
17
Couverclearrière
6.Fixezlecouverclearrièredel'unitédepositionnementsurlacaméraàl'aidedesvis
(coupledeserrage1,0Nm).
7.Fixezlepare-soleilàl’aidedesvis(coupledeserrage1,0Nm).
8.RetirezlecouvercledelacarteSDetinsérezlacartemicroSD(enoption)dansle
logementprévuàceteffetsurlacaméraFixezlecouvercledelacarteSD.
9.Fixezlecouverclearrièreàl'aidedesvis(T20,coupledeserrage1,0Nm).
InstallationdupilotePTZ
Cetproduitestcompatibleavecplusieursappareils.Pourconnaîtrelalistecomplètedesappareils
prisencharge,consultezlesiteaxis.com.
1.AccédezàlapageWebdelacaméra.
2.Dansl'Assistantd'installation,accédezàSélectionneunmodePTZetsélectionnez
PilotePTZdanslalistedéroulante.
3.Unefoisquevousavezaccédéàlavidéoendirect,accédezàParamètres>Système
>Accessoires.
4.Sélectionnezl'unedesactionssuivantes:
4.1SilepilotePTZn'estpastéléchargé,sélectionnezTéléchargerlepilote.
60
Page 61

AXIST99A11PositioningUnit24VAC/DC
4.2SivoustéléchargezlepilotePTZ,accédezàSélectionnerlepiloteàutiliser
etsélectionnezPilotePTZdanslalistedéroulante.
5.Sélectionneruncanalvidéo.
6.Saisissezl'IDdupériphériqueetsélectionnezTypedepériphériquedanslaliste
déroulante.Pourdéterminerletyped'appareilàutiliser,consultezladocumentation
fournieaveclepilotePTZ.
7.Accédezàl'ongletPTZetvériezquelesparamètresPTZsontdisponibles.
FR
61
Page 62

AXIST99A11PositioningUnit24VAC/DC
Informationscomplémentaires
•Pourobtenirlaversionlaplusàjourdecedocument,voiraxis.com
•Lemanueld'utilisateurestdisponiblesurlesiteaxis.com
•Pourvériers'ilexisteunrmwaremisàjourpourvotreappareil,voiraxis.com/support
•Pouraccéderàdesformationsetwebinairesenligneutiles,voiraxis.com/academy
Accessoiresenoption
Pourunelistecomplètedesaccessoiresdisponiblespourceproduit,accédezàlapageduproduit
suraxis.cometsélectionnezLogicieletaccessoires.
Informationssurlagarantie
Pourplusd'informationssurlagarantieduproduitAxisetdesinformationsconnexes,rendez-vous
suraxis.com/warranty.
62
Page 63

AXIST99A11PositioningUnit24VAC/DC
Caractéristiques
Pourobtenirladernièreversiondelachetechniqueduproduit,rendez-voussurlapageduproduit
surlesiteaxis.comettrouvezl'optionSupport&Documentation(Assistanceetdocumentation).
Connecteurs
Connecteurréseau
ConnecteurEthernetRJ45.
ConnecteurSFP.
VIS
A AAVIS VIS
Leproduitdoitêtreconnectéàl'aided'uncâbleréseaublindé(STP)oud'uncâbleà
bresoptiques.Touslescâblesreliantleproduitaucommutateurréseaudoiventêtre
destinésàleurusagespécique.Assurez-vousquelespériphériquesréseausontinstallés
conformémentauxinstructionsdufabricant.Pourplusd’informationssurlesexigences
réglementaires,consultezElectromagneticcompatibility(EMC)onpage8.
Connecteurd’E/S
Utilisezleconnecteurd’E/Savecdespériphériquesexternes,associésauxapplicationstellesque
ladétectiondemouvement,ledéclenchementd'événementsetlesnoticationsd'alarme.En
plusdupointderéférence0VCCetdel'alimentation(sortieCC),leconnecteurd'E/Sfournit
uneinterfaceauxélémentssuivants:
Entréenumérique-Pourconnecterdesdispositifspouvantpasserd'uncircuitouvertàuncircuit
fermé,parexemplecapteursinfrarougepassifs,contactsdeporte/fenêtreetdétecteursdebrisde
verre.
Sortienumérique-Permetdeconnecterdesdispositifsexternes,commedesrelaisoudesvoyants.
Lesappareilsconnectéspeuventêtreactivésparl'interfacedeprogrammationVAPIX®ouàpartir
delapageWebduproduit.
FR
Blocterminalcongurableà6broches
FonctionB-
MasseduCC
roche
1
Remarques
Caractéristiques
0VCC
63
Page 64

AXIST99A11PositioningUnit24VAC/DC
2
SortieCC
Congurable
(entréeou
sortie)
Exemple
Peutserviràalimenterlematérielauxiliaire.
Remarque:cettebrochenepeutêtreutiliséeque
commesortied’alimentation.
3–
Entréenumérique-Connectez-vousàlabroche1
6
pouractiveroulaissernonconnectépour
désactiver.
Sortienumérique–Connexioninterneàla
broche1(terreCC)encasd’activation,et
ottante(déconnectée)encasdedésactivation.
Encasd'utilisationavecunechargeinductive,
parexempleunrelais,connectezunediodeen
parallèleàlachargepourassurerlaprotection
contrelestransitoiresdetension.
12VCC
Chargemax.=
50mA
0à30VCCmax.
0à30VCCmax.,
drainouvert,100mA
1
2
3
4
5
6
Connecteurd'alimentation
Blocterminalà4brochespourl'alimentation.
MasseduCC
SortieCC12V,maxi.50mA
Entrée/sortieconguréecommeentrée
Entrée/sortieconguréecommesortie
E/Scongurable
E/Scongurable
64
Page 65

AXIST99A11PositioningUnit24VAC/DC
Connecteurd'alimentation24VCA/CC
VIS
A AAVIS VIS
Cettesectionconcernelesproduitsalimentésen24VCAet24VCCuniquement.
Cetableauconcerneuniquementlesconnecteursd'alimentation24VCAet24VCC.
FR
Position
1
2
3
4
24VCA24VCC
TerredeprotectionTerredeprotection
Phase24VCA
24VCANeutre
NonconnectéNonconnecté
+24V
0V
ConnecteurRS485/RS422
Deuxblocsterminauxà2brochespourl’interfacesérieRS485/RS422utiliséepourcommanderles
équipementsauxiliaires,telsquelesdispositifspanoramique/inclinaison.
Leportsériepeutêtrecongurépourlapriseenchargede:
•RS485semi-duplexsurdeuxls
•RS485duplexintégralsurquatrels
•RS422simplexsurdeuxls
•RS422duplexintégralsurquatrelspourcommunicationpointàpoint
65
Page 66

AXIST99A11PositioningUnit24VAC/DC
FonctionBro-
RS485/RS422RX/TXA
RS485/RS422RX/TXB
RS485/RS422TXA
RS485/RS422TXB
che
1
2
3
4
Notes
(RX)PourduplexintégralRS485/RS422
(RX/TX)poursemi-duplexRS485
(TX)PourduplexintégralRS485/RS422
Câbles
Épaisseurducâble
Lediamètreducâble,lorsdel'utilisationdejointsdecâblefournisavecleproduit,doitêtre
compriseentre5et1 1mm(0,2à0,4po).
VIS
A AAVIS VIS
•Utilisezdescâblesadaptésàlazonespéciée
•Sélectionnezdescâblesconformesàlalégislationlocale
•Assurez-vousquelespassgesdecâblessontcorrectementscellés
•Utilisezdesjointsdecâbleetdespresse-étoupesadaptésauxpassagesdecâbleset
àlazonedecâble
Pourplusd'informationssurlesaccessoires,telsquelesjointsdecâbleetlespresse-étoupes
adaptésàd'autreszonesdecâble,consultezwww.axis.com
Câbleinterfacesériedelacaméra
Couleurducâble
Blanc
Vert
Câbleélectriquedelacaméra
Couleurducâble
Rouge
noir0V
Caractéristiquestechniques
RS485A
RS485B
Caractéristiquestechniques
+24VCC
66
Page 67

AXIST99A11PositioningUnit24VAC/DC
Conditionsdefonctionnement
CeproduitAxisestdestinéàêtreutiliséàl'intérieuretàl'extérieur.
TempératureHumidité
Normale:-50°Cà60°C(-58°Fà140°F)
Maximale(intermittente):65°C(149°F)
Démarrageàfroid:
-40°Cà60°C(-40°Fà140°F)
Letempsdedémarrageestde2minutesde0°Cà50°C(32°Fà122°F).
10à100%HR
(sanscondensation)
Consommationd'énergie
ConsommationtypeConsommationmaximale
10W169W
Important
Encasd'utilisationd'uncâbleAXISde22m(72pi)24VCC/24–240VCA,unealimentation
capabledefournir220Westnécessairepourcompenserlaperted'alimentationdans
lecâble.
VIS
A AAVIS VIS
Lesvaleurstypiquesdeconsommationd'énergiesontbaséessurcequisuit:
FR
•Toutepertedanslecâbled'alimentationnonpriseencompte
•Aucunpositionnementactif
•Températureà25°C/77°F(touschauffageséteints)
•UnuxH.264àrésolutionmaximale
•FluxMJPEGenregistrésurlacarteSD
67
Page 68

68
Page 69

AXIST99A11PositioningUnit24VAC/DC
Sicherheitsinformationen
Gefährdungsstufen
GEFAHR
WeistaufeinegefährlicheSituationhin,welche,fallsnichtverhindert,zuTododer
schwerenVerletzungenführenkann.
WARNUNG
WeistaufeinegefährlicheSituationhin,welche,fallsnichtverhindert,zuTododer
schwerenVerletzungenführenkann.
VORSICHT
WeistaufeinegefährlicheSituationhin,welche,fallsnichtverhindert,zugeringfügiger
odermäßigerVerletzungführenkann.
HINWEIS
HINWEIS HINWEIS
WeistaufeinegefährlicheSituationhin,welche,fallsnichtverhindert,zuSachschäden
führenkann.
AndereMeldeebenen
Wichtig
WeistaufwichtigeInformationenhin,diedenrichtigenBetriebdesProduktsgewährleisten.
Beachten
WeistaufnützlicheInformationenhin,diedieoptimaleVerwendungdesProdukts
unterstützen.
DE
69
Page 70

AXIST99A11PositioningUnit24VAC/DC
Sicherheitsanweisungen
GEFAHR
Stromschlaggefahr.VorderInstallationoderWartungdesProduktsmusssichergestellt
werden,dassankeinemderKabelSpannunganliegt.
WARNUNG
DasAxisProduktmussvonfachmännischgeschultemPersonalundunterEinhaltungder
örtlichgeltendenBestimmungeninstalliertwerden.
VORSICHT
VerletzungsgefahrGefahrdurchbeweglicheTeileKörperteilewährenddesBetriebs
vomProduktfernhalten.VorderInstallationoderWartungdesProduktsalleKabelvon
derStromversorgungabklemmen.
VORSICHT
VerletzungsgefahrHeißeOberächeDasProduktwährenddesBetriebsnichtberühren.
TrennenSievorWartungsarbeitendieStromversorgungundlassenSiedieOberächendes
Produktsabkühlen.
HINWEIS
HINWEIS HINWEIS
•DasAxis-ProduktmussunterBeachtungdergeltendenGesetzeundBestimmungen
betriebenwerden.
•LagernSiedasAxisProduktineinertrockenenundbelüftetenUmgebung.
•DasAxis-ProduktwederStößennochstarkemDruckaussetzen.
•DasProduktnichtaninstabilenMasten,Halterungen,OberächenoderWändenanbringen.
•VerwendenSiebeiderInstallationdesAxisProduktsausschließlichpassendeWerkzeuge.
EinzugroßerKraftaufwandmitelektrischenWerkzeugenkanndasProduktbeschädigen.
•VerwendenSiekeinechemischen,ätzendenoderaerosolhaltigenReinigungsmittel.
•VerwendenSiezumReinigeneinsauberes,mitdestilliertemWasserangefeuchtetesTuch.
•VerwendenSienurZubehör,dasdentechnischenVorgabenIhresProduktsentspricht.
DiesesistvonAxisoderDrittanbieternerhältlich.AxisempehltdiemitIhremProdukt
kompatibleStromversorgungvonAxis.
•VerwendenSieausschließlichErsatzteiledievonAxisangebotenoderempfohlenwerden.
•VersuchenSienicht,diesesProduktselbsttätigzureparieren.WendenSiesichbezüglich
ReparaturundWartungandenAxisSupportoderIhrenAxisHändler.
•RichtenSiedasKameraobjektivnichtdirektaufdieSonneoderanderestarkeLichtquellen,
umeineBeschädigungderKamerazuvermeiden.
•VerwendenSieeingelb/grüngekennzeichnetesErdungskabelmiteinemQuerschnittvon
mindestens0,5mm
2
.
70
Page 71

AXIST99A11PositioningUnit24VAC/DC
Transport
HINWEIS
HINWEIS HINWEIS
•BeiBedarftransportierenSiedasAxisProduktinderOriginalverpackungodereiner
entsprechendenVerpackung,sodassSchädenvermiedenwerden.
DE
71
Page 72

72
Page 73

Lieferumfang
•Positionierungseinheit
•HintererDeckel
•Netzanschluss
•E/A-Anschluss
•Torx®SetT20undT30
•GedruckteDokumente
AXIST99A11PositioningUnit24VAC/DC
-Installationsanleitung(diesesDokument)
-ZusätzlicheEtikettenmitderSeriennummer(2x)
-AVHS-Authentizierungsschlüssel
DE
73
Page 74

AXIST99A11PositioningUnit24VAC/DC
Produktübersicht
1
HintererDeckel
2
HintereAbdeckungderPositionierungseinheit
3
Adapter
4
Positionierungseinheit
5
Deckel
6
Basisgerät
7
SchraubendesBasisgeräts
74
Page 75

AXIST99A11PositioningUnit24VAC/DC
DE
1
StromversorgungskabelderKamera
2
NetzwerkkabelderKamera
3
SerielleSchnittstellenkabelderKamera
4
StromversorgungsanschlussEingang
5
E/A-Anschluss
6
RJ-45-Anschluss
7
SFP-EinschubfürSFP-Module(SFP-Modulnichtenthalten)
75
Page 76

AXIST99A11PositioningUnit24VAC/DC
InstallierendesProdukts
GEFAHR
StromschlaggefahrVorderInstallationoderWartungdesProduktsmüssenalleKabelvon
derStromversorgungabgeklemmtwerden.
VORSICHT
DieInstallationderelektrischenAnschlüsseundKabelkanäledarfnurvoneinem
zugelassenenElektrikerinÜbereinstimmungmitdengeltendenBestimmungen
vorgenommenwerden.
VORSICHT
VerletzungsgefahrGefahrdurchbeweglicheTeileKörperteilewährenddesBetriebs
vomProduktfernhalten.VorderInstallationoderWartungdesProduktsalleKabelvon
derStromversorgungabklemmen.
VORSICHT
VerletzungsgefahrHeißeOberächeDasProduktwährenddesBetriebsnichtberühren.
VorderWartungdesProduktsdieOberächenabkühlenlassen.
76
Page 77

MontierenderGerätebasis
AXIST99A11PositioningUnit24VAC/DC
1
Gerätebasis
DE
1.DievierSchrauben(T30)derGerätebasisentfernen.
2.DieGerätebasisgleichzeitigziehenundgegendenUhrzeigersinndrehen,bisdiePfeile
aufderGerätebasisunddemRestdesGerätsineinerLiniestehen.
3.DieGerätebasisentfernen.
77
Page 78

AXIST99A11PositioningUnit24VAC/DC
HINWEIS
HINWEIS HINWEIS
BeimEntfernendertransparentenAbdeckungderGerätebasiskeinespitzenWerkzeuge
verwenden.
4.DietransparenteAbdeckungderGerätebasisentfernen.
78
Page 79

AXIST99A11PositioningUnit24VAC/DC
1
KlammerderKabelführung
2
AbdeckungderKabelführung
3
Schraubenbohrung(4x)
5.NurbeiInstallationenüberdieKabelführung:ZuerstdiebeidenKlammernder
KabelführungundanschließenddieAbdeckungderKabelführungentfernen.
6.DieGerätebasismitgeeignetenBefestigungselementenfürdievierSchraubenbohrungen
anderBefestigungsächeanbringen.
DE
DieKabelverlegen
WARNUNG
StromschlaggefahrDasProduktmussgeerdetwerden.DazumüssensowohlderSchutzleiter
imStromversorgungskabelalsauchdasErdungsbandverwendetwerden.Sicherstellen,dass
beideEndendesSchutzleitersunddesErdungsbandesKontaktmitdenentsprechenden
Erdungsächenhaben.
Wichtig
NurKabelmitdemvorgegebenenKabelquerschnittverwenden.WeitereInformationen
ndenSieunterKabelstärkeaufSeite96.
79
Page 80

AXIST99A11PositioningUnit24VAC/DC
1
Stromversorgungskabel(nichtimLieferumfangenthalten)
2
Zugentlastung
3
Masseschraube
4
Erdungsband(nichtimLieferumfangenthalten)
5
Kabelöffnungunten
1.DieoptionalenKabelführungsadapterinstallieren(nichtimLieferumfangenthalten).
2.DasErdungskabelmitderErdungsschraubebefestigen.
3.DieKabelfürStromversorgung,NetzwerkundE/Aeinschließlichder
KabelverschraubungenwieinderAbbildungobendurchdieÖffnungdesBasisgeräts
führen.AlternativdieKabeldurchdieuntereKabelöffnungeinführen.
4.DasStromversorgungskabeldurchdieZugentlastungführen.DabeieineLängevon530
mmzwischenZugentlastungundKabelendeeinhalten.
80
Page 81

AXIST99A11PositioningUnit24VAC/DC
1
E/A-Kabel(optional,nichtimLieferumfangenthalten)
2
Netzwerkkabel(nichtimLieferumfangenthalten)
5.DasE/A-Kabel(optional)durchdieZugentlastungführen.DabeieineLängevon420mm
zwischenZugentlastungundKabelendeeinhalten.
6.DasNetzwerkkabel(GlasfaseroderKabeltypRJ-45)durchdieZugentlastungführen.
DabeieineLängevon580mmzwischenZugentlastungundAnschlussendeeinhalten.
WeitereInformationenzudenverschiedenenAnschlussoptionenandasNetzwerk,siehe
EinrichtenderNetzwerkverbindungaufSeite85.
7.DiedreiZugentlastungenschließenundanziehen.
DE
81
Page 82

AXIST99A11PositioningUnit24VAC/DC
1
Stromversorgungskabel(nichtimLieferumfangenthalten)
2
E/A-Kabel(optional,nichtimLieferumfangenthalten)
3
Netzwerkkabel(nichtimLieferumfangenthalten)
4
Kabeldichtung
5
TransparenteAbdeckungderGerätebasis
8.DieKabeldichtungenaufdieKabelschieben.SieheKabelstärkeaufSeite96.
9.DieKabelfürStromversorgung,NetzwerkundE/AeinschließlichderKabeldichtungen
durchdieÖffnungendertransparentenAbdeckungderGerätebasisführenunddieKabel
wieinderAbbildungobendargestelltausrichten.
HINWEIS
HINWEIS HINWEIS
WirdsowohleinGlasfaserkabelalsaucheinKabeldesTypsRJ-45verwendet,das
GlasfaserkabeldurchdieselbeKabeldichtungführenwiedasE/A-Kabel.Gegendas
EindringenvonFeuchtigkeitzwischenKabelnundKabeldichtungeinDichtmittelverwenden.
WeitereInformationenzuverschiedenenAnschlussoptionenandasNetzwerk,siehe
EinrichtenderNetzwerkverbindungaufSeite85.
10.DietransparenteAbdeckungderGerätebasiswiederaufsetzenunddieKabeldichtungen
indieÖffnungenschieben.
82
Page 83

AXIST99A11PositioningUnit24VAC/DC
1
E/A-Anschluss
2
Netzanschluss
3
O-Ring
HINWEIS
HINWEIS HINWEIS
Sicherstellen,dassdieErdungsleitungetwa10mmlängeristalsdiebeidenanderen
Leitungen(imStromversorgungskabel),sodassdiesebeiZugbelastungnichtunbeabsichtigt
getrenntwird.
Beachten
DerEinbauwirderleichtert,wenndasStromversorgungskabeletwa70mmunddas
E/A-Kabeletwa90mmabisoliertwird.
DE
11.ZumEinbauderStromversorgungs-undE/A-AnschlüssesieheAnschlüsseaufSeite93.
12.DieKabelfürNetzwerk,E/AundStromversorgungsoausrichten,dassdieLängezwischen
KabeldichtungundEndedesAnschlussesjeweils240mm,170mmund160mmbeträgt.
HINWEIS
HINWEIS HINWEIS
Sicherstellen,dassderO-RingrichtigumdietransparenteAbdeckungderGerätebasis
herumeingepasstist.
83
Page 84

AXIST99A11PositioningUnit24VAC/DC
13.DasPositionierungsgerätwiederanderGerätebasisanbringenunddabeisicherstellen,
dassdiePfeilederbeidenGeräteineinerLiniestehen.
14.DiePositionierungseinheitimUhrzeigersinninihreAusgangsstellungdrehenunddievier
SchraubenderGrundeinheitanziehen(Drehmoment3,0Nm).
HINWEIS
HINWEIS HINWEIS
Sicherstellen,dassdieKabelbeimZusammenbauenderbeidenGerätenichtgequetscht
werden.
84
Page 85

AXIST99A11PositioningUnit24VAC/DC
EinrichtenderNetzwerkverbindung
EsgibtverschiedenenOptionen,dieNetzwerkverbindungeinzubauen:
•A:MithilfeeinesGlasfaserkabelsodereinesKabelsdesTypsRJ-45,das(miteinem
entsprechendenAnschluss)andasSFP-ModulimSFP-Einschubangeschlossenwird.
•B:MithilfeeinesAnschlussesdesTypsRJ-45andenfestenAnschlussdesTypsRJ-45.
•C:MithilfebeiderobenangeführtenMöglichkeiten.IndiesemFallagiertderAnschluss
überdasSFP-ModulalsdieprimäreNetzwerkverbindungunddieVerbindungüberden
festenAnschlussdesTypsRJ-45alsFail-Over-Anschluss.
DE
WeitereInformationenzurLagederNetzwerksteckverbindungen,sieheAnschlüsseaufSeite93.
Beachten
•SFP-ModulnichtimLieferumfangenthalten.WeitereInformationenzulieferbaren
SFP-Modulen,siehewww.axis.com.
•DieNetzwerkverbindungausschließlichüberdasGlasfaserkabelmittelsdes
entsprechendenSFP-ModulsdientalseigenständigeLösungfürKabelinstallationenmit
großerReichweite.
85
Page 86

AXIST99A11PositioningUnit24VAC/DC
AnschließenderKabel
1.DievierDeckelschrauben(T20)lösenunddenDeckelabnehmen.
1
StromversorgungsanschlussEingang
2
E/A-Anschluss
3
RJ-45-Anschluss
4
SFP-EinschubfürSFP-Module(SFP-Modulnichtenthalten)
2.DasNetzwerk(Glasfaserund/oderRJ-45),E/AunddieStromversorgunganschließen
WeitereInformationenzuverschiedenenAnschlussoptionenandasNetzwerk,siehe
EinrichtenderNetzwerkverbindungaufSeite85.
86
Page 87

AXIST99A11PositioningUnit24VAC/DC
3.DenDeckelaustauschenunddievierDeckelschraubenanziehen(Drehmoment3,0Nm).
4.DasProduktandieStromversorgunganschließen.
InstallierenderKamera
DiesesProduktunterstütztmehrereNetzwerk-Kameras.EinevollständigeListederunterstützten
KamerandenSieunterwww.axis.com.
DE
1
HalterungsschraubenfürdiePT-Montage(2x,T20)
2
HalterungfürdiePT-Montage
1.EntfernenSiedieHalterungfürdiePT-MontagevonderKamera,indemSiedieSchrauben
lösen.NehmenSiedieHalterungab.
87
Page 88

AXIST99A11PositioningUnit24VAC/DC
3
Kamera
4
Adapter
5
Adapterschrauben(2x,T20)
2.SchiebenSiedieKamerarückwärtsindenAdapter.BefestigenSiediesemitden
Adapterschrauben(Drehmoment1,0Nm)aufderRückseite.
88
Page 89

AXIST99A11PositioningUnit24VAC/DC
DE
6
Sonnenblende
7
SchraubenfürdieSonnenblende(2x,T20)
8
SchraubenfürdiehintereAbdeckungderKamera(2x,T20)
9
HintereAbdeckungderKamera
10
SeriellesSchnittstellenkabelderKamera(TX)
11
SeriellesSchnittstellenkabelderKamera(RX/TX)
12
StromversorgungskabelderKamera
13
NetzwerkkabelderKamera
14
SD-Speicherkartendeckel
3.EntfernenSiedieSonnenblendevonderKamera,indemSiedieSchraubenlösen.
4.EntfernenSiediehintereAbdeckungderKamera,indemSiedieSchraubenlösen.
EntfernenSiediehintereAbdeckung.
5.SchließenSiedieKabelfürKameranetzwerk,serielleSchnittstelleundStromversorgung
an.WeitereInformationenzudenSpezikationenderKabelndenSieunterKabelauf
Seite96
89
Page 90

AXIST99A11PositioningUnit24VAC/DC
6
Sonnenblende
7
SchraubenfürdieSonnenblende(2x,T20)
15
SchraubenfürdiehintereAbdeckungderPositionierungseinheit(2x,T20)
16
HintereAbdeckungderPositionierungseinheit
17
HintererDeckel
6.BefestigenSiediehintereAbdeckungderPositionierungseinheitmitdenSchrauben
(Drehmoment1,0Nm)anderKamera.
7.BefestigenSiedieSonnenblendemitdenSchrauben(Drehmoment1,0Nm).
8.EntfernenSiedenSD-SpeicherkartendeckelundschiebenSiediemicroSD-Karte(optional)
indenSD-KarteneinschubderKamera.BefestigenSiedenSD-Speicherkartendeckel.
9.BefestigenSiedenhinterenDeckelmitdenSchrauben(T20,Drehmoment1,0Nm).
InstallierendesPTZ-Treibers
DiesesProduktunterstütztmehrereGeräte.EinevollständigeListederunterstütztenGerätenden
Sieunterwww.axis.com
1.DieWebseitederKameraaufrufen.
2.RufenSieimInstallationsassistentenPTZ-ModuswählenaufundwählenSieden
PTZ-TreiberausdemAufklappmenü.
3.SobaldSieinderLive-Ansichtsind,gehenSiezuEinstellungen>System>Zubehör.
4.EinederfolgendenAktionenwählen:
4.1WennderPTZ-Treibernichthochgeladenwird,wählenSieTreiberhochladen
aus.
90
Page 91

AXIST99A11PositioningUnit24VAC/DC
4.2WennderPTZ-Treiberhochgeladenwird,wählenSieDenzuverwendenden
TreiberauswählenundwählenSiedenPTZ-TreiberindemAufklappmenü.
5.WählenSieeinenVideokanalaus.
6.GebenSiedieGeräte-IDeinundwählenSiedenGerätetypausdemAufklappmenü.Zur
WahldesrichtigenTreibers,siehediemitdemPTZ-TreibergelieferteDokumentation.
7.GehenSiezurPTZ-RegisterkarteundüberprüfenSie,obdiePTZ-Einstellungenverfügbar
sind.
DE
91
Page 92

AXIST99A11PositioningUnit24VAC/DC
WeitereInformationen
•DieaktuelleVersiondiesesDokumentsndenSieaufaxis.com
•DasBenutzerhandbuchstehtaufaxis.comzurVerfügung.
•Unteraxis.com/supportndenSiedieaktuellenFirmwareversionenfürIhrGerät.
•NützlichesOnlinetrainingundWebinarendenSieunteraxis.com/academy.
OptionalesZubehör
EinevollständigeListelieferbarenZubehörsfürdiesesProduktndenSieaufaxis.comunter
Produkt,SoftwareundZubehör.
Gewährleistungsinformationen
InformationenzurGewährleistungfürAxis-ProdukteundandereindiesemZusammenhang
relevanteInformationenndenSieunteraxis.com/warranty.
92
Page 93

AXIST99A11PositioningUnit24VAC/DC
TechnischeDaten
DieaktuelleVersiondestechnischenDatenblattsfürdasProduktndenSieaufaxis.comunter
SupportundDokumentation.
Anschlüsse
Netzwerkanschluss
RJ45-Ethernetanschluss.
SFP-Anschluss.
HINWEIS
HINWEIS HINWEIS
DasProduktmussmiteinemabgeschirmtenNetzwerkkabel(STP)odereinemGlasfaserkabel
angeschlossenwerden.AlleKabel,diedasProduktmitdemNetzwerkswitchverbinden,
müssenhierfürausgelegtsein.StellenSiesicher,dassdieNetzwerkgerätegemäß
denAnweisungendesHerstellersinstalliertwurden.Informationenzugesetzlichen
BestimmungenndenSieunterElectromagneticcompatibility(EMC)onpage8.
E/A-Anschluss
ÜberdenE/A-AnschlusswerdenexterneGeräteinVerbindungmitManipulationsalarmen,
Bewegungserkennung,Ereignisauslösung,AlarmbenachrichtigungenundanderenFunktionen
angeschlossen.AußerdemBezugspunkt0VGleichstromundStrom(Gleichstromausgang)besitzt
derE/A-AnschlusseineSchnittstellezum:
DE
Digitaleingang-ZumAnschlussvonGeräten,diezwischengeöffnetemundgeschlossenem
SchaltkreiswechselnkönnenwieetwaPIR-Sensoren,Tür-undFensterkontaktesowie
Glasbruchmelder.
Digitalausgang-ZumAnschlussexternerGerätewieRelaisundLEDs.Dieangeschlossenen
GerätekönnenüberdasVAPIX®ApplicationProgrammingInterfaceoderüberdieProduktwebsite
aktiviertwerden.
6-poligerkongurierbarerAnschlussblock
93
Page 94

AXIST99A11PositioningUnit24VAC/DC
FunktionK-
Erdung
Gleichstrom
Gleichstromausgang
Kongurierbar(EinoderAusgang)
Beispiel
HinweiseTechnischeAngaben
ontakt
1
2
DarffürdieStromversorgungvonZusatzgeräten
verwendetwerden.
Hinweis:DieserKontaktdarfnurfürden
Stromausgangverwendetwerden.
3–
Digitaleingang–ZumAktivierenanKontakt1
6
anschließen,zumDeaktivierennichtanschließen.
DigitalerAusgang-InterneVerbindungmit
Kontakt1(GleichstromErdschluss),wennaktiviert;
unverbunden,wenndeaktiviert.BeiVerwendung
miteinerinduktivenLast,wieetwaeinemRelais,
musszumSchutzvorSpannungssprüngeneine
DiodeparallelzurLastgeschaltetwerden.
0VGleichstrom
12VDC
Max.Stromstärke=
50mA
0bismax.
30VGleichstrom
0bismax.
30VGleichstrom,
Open-Drain,100mA
1
ErdungGleichstrom
2
Gleichstromausgang12V,max.50mA
3
E/AalsEingangkonguriert
4
E/AalsAusgangkonguriert
5
KongurierbarerE/A
6
KongurierbarerE/A
94
Page 95

AXIST99A11PositioningUnit24VAC/DC
Netzanschluss
4-poligerAnschlussblockfürdenStromeingang.
Netzanschluss24V,Wechselstrom/Gleichstrom
HINWEIS
HINWEIS HINWEIS
DieserAbschnittbeziehtsichnuraufProduktemitStromversorgung24VWechselstrom
und24VGleichstrom.
DieseTabellebeziehtsichnuraufdieStromanschlüssemit24VWechselstromund24Vmit Gleichstrom.
DE
Position24VWechselstrom
1
2
3
4
SchutzerdeSchutzerde
Phase24VWechselstrom+24V
Nullleiter24VWechselstrom0V
NichtverbundenNichtverbunden
24VGleichstrom
RS485-/RS422-Anschluss
Zwei2-poligeAnschlussblöckefürserielleSchnittstellenvomTypRS485/RS422zurSteuerungvon
Zusatzgeräten,beispielsweisezumSchwenkenundNeigen.
DerserielleAnschlusskannindenfolgendenAnschlussmodikonguriertwerden:
•zweiadrigerRS485-Halbduplex-Anschluss
•vieradrigerRS485-Vollduplex-Anschluss
•zweiadrigerRS422-Simplex-Anschluss
•vieradrigerRS422-Vollduplex-Anschluss(Punkt-zu-Punkt-Verbindung)
95
Page 96

AXIST99A11PositioningUnit24VAC/DC
FunktionKon-
RS485/RS422RX/TXA
RS485/RS422RX/TXB
RS485/RS422TXA
RS485/RS422TXB
takt
1
2
3
4
Hinweise
(RX)RS485/RS422fürVollduplex
(RX/TX)RS485fürHalbduplex
(TX)RS485/RS422fürVollduplex
Kabel
Kabelstärke
WenndiedemProduktbeiliegendenKabeldichtungenverwendetwerden,mussder
Kabeldurchmesserzwischen5und11mmliegen.
HINWEIS
HINWEIS HINWEIS
•Kabelverwenden,diederQuerschnittsvorgabeentsprechen.
•Kabelverwenden,diedenörtlichenVorschriftenentsprechen.
•Sicherstellen,dassalleKabeldurchführungenordnungsgemäßabgedichtetsind.
•KabeldichtungenoderKabelverschraubungenverwenden,diesowohlder
KabeldurchführungalsauchdemKabelquerschnittentsprechen.
FürInformationenzuZubehörwieKabeldichtungenundKabelverschraubungenfürandere
Kabelquerschnitte,siehe<1>www.axis.com.
SeriellesSchnittstellenkabelderKamera
Kabelfarbmarkierung
WeißRS485A
GrünRS485B
TechnischeKenndaten
96
Page 97

AXIST99A11PositioningUnit24VAC/DC
StromversorgungskabelderKamera
Kabelfarbmarkierung
Rot
Schwarz
TechnischeKenndaten
+24VGleichstrom
0V
Betriebsbedingungen
DiesesAxis-ProduktistfürdieVerwendungimInnen-undAußenbereichausgelegt.
Temperatur
Normal:-50°Cbis+60°C
Maximal(kurzzeitig)65°C
Kaltstart:-40°Cbis+60°C
DieHochfahrzeitbeträgtzwischen0°Cund+50°CzweiMinuten.
Luftfeuchtigkeit
RelativeLuftfeuchtigkeit10bis100%
(nichtkondensierend)
Leistungsaufnahme
TypischerStromverbrauchMax.Stromverbrauch
10W169W
DE
Wichtig
BeiVerwendungdesAXISCable24VGleichstrom/24–240VWechselstrommit
22mLängemussdasStromversorgungskabel220Wliefernkönnen,umLeistungsverluste
auszugleichen.
HINWEIS
HINWEIS HINWEIS
DietypischenWertederLeistungsaufnahmebasierenauffolgendenAnnahmen:
•LeitungsverlusteimStromversorgungskabelnichtberücksichtigt
•KeinePositionierungaktiv
•Temperaturbeträgt25°C(alleHeizungenausgeschaltet)
•EinH.264-StreammitmaximalerAuösung
•AufzeichneneinesMJPEG-StreamsaufSD-Karte
97
Page 98

98
Page 99

AXIST99A11PositioningUnit24VAC/DC
Informazionidisicurezza
Livellidipericolo
PERICOLO
Indicaunasituazionepericolosache,senonevitata,provocamorteolesionigravi.
AVVERTENZA
Indicaunasituazionepericolosache,senonevitata,potrebbeprovocarelamorteolesioni
gravi.
ATTENZIONE
Indicaunasituazionepericolosache,senonevitata,potrebbeprovocarelesionimedie
ominori.
VVISO
A AAVVISO VVISO
Indicaunasituazioneche,senonevitata,potrebbedanneggiarelaproprietà.
Altrilivellidimessaggio
Importante
Indicainformazioniimportanti,essenzialiperilcorrettofunzionamentodeldispositivo.
Nota
Indicainformazioniutilicheaiutanoaottenereilmassimodaldispositivo.
IT
99
Page 100

AXIST99A11PositioningUnit24VAC/DC
Informazionidisicurezza
PERICOLO
Rischiodiscosseelettriche.Tuttiicavidevonoesserediseccitatiprimadiinstallareo
eseguirelamanutenzionesuldispositivo.
AVVERTENZA
IldispositivoAxisdeveessereinstallatodaunprofessionistaqualicato,inconformità
alleleggiealledisposizionilocali.
ATTENZIONE
Rischiodilesioni.Partiinmovimento.Tenereilcorpoadistanzadaldispositivo
duranteilfunzionamento.Scollegaredall'alimentazioneprimadiinstallareoeseguire
lamanutenzionesuldispositivo.
ATTENZIONE
Rischiodilesioni.Superciecalda.Nontoccareildispositivoduranteilfunzionamento.
Scollegaredall'alimentazioneeraffreddarelesuperciprimadieseguirelamanutenzione
deldispositivo.
VVISO
A AAVVISO VVISO
•IldispositivoAxisdeveessereutilizzatoinconformitàalleleggieallenormativelocali.
•ConservareildispositivoAxisinunambienteasciuttoeventilato.
•EvitarediesporreildispositivoAxisaurtiopressionieccessive.
•Noninstallareildispositivosusupporti,superci,paretiopaliinstabili.
•UtilizzaresolostrumentiapplicabiliquandosiinstallaildispositivoAxis.Sesiutilizzauna
forzaeccessivaconstrumentinonadattièpossibilecausaredannialdispositivo.
•Nonutilizzaresostanzechimiche,agenticausticiodetergentiaerosol.
•Utilizzareunpannopulitoinumiditoinacquapuraperlapulizia.
•Utilizzaresoloaccessoricompatibiliconlespecichetecnichedeldispositivo.Questi
possonoesserefornitidaAxisodaterzeparti.Axisconsiglial'usodell'apparecchiaturadi
alimentazioneAxiscompatibileconildispositivo.
•UtilizzaresolopartidiricambioforniteoconsigliatedaAxis.
•Nontentarediriparareildispositivodasoli.Contattarel'assistenzaoilrivenditoreAxis
perquestionirelativeallamanutenzione.
•Nonrivolgerel'obiettivodellatelecameraversoilsoleoaltresorgentidiradiazionimolto
intensepoichésipotrebbedanneggiarelatelecamera.
•Utilizzareuncavodimessaaterragiallooverdedialmeno0,5mm
2
o20AWG.
100
 Loading...