

Page 1

INSTALLATION GUIDE
AXIS T97A10 Enclosure
ENGLISH DEUTSCH
FRAN
Ç
AIS
ITALIANO
ESPAÑOL
Page 2

About this Document
This document includes instructions for installing the
AXIS T97A10 Enclosure.
Equipment Modifications
This equipment must be installed and used in strict
accordance with the instructions given in the user
documentation. This equipment contains no
user-serviceable components. Unauthorized equipment
changes or modifications will invalidate all applicable
regulatory certifications and approvals.
Liability
Every care has been taken in the preparation of this
document. Please inform your local Axis office of any
inaccuracies or omissions. Axis Communications AB
cannot be held responsible for any technical or
typographical errors and reserves the right to make
changes to the product and documentation without
prior notice. Axis Communications AB makes no
warranty of any kind with regard to the material
contained within this document, including, but not
limited to, the implied warranties of merchantability
and fitness for a particular purpose. Axis
Communications AB shall not be liable nor responsible
for incidental or consequential damages in connection
with the furnishing, performance or use of this material.
Support
Should you require any technical assistance, please
contact your Axis reseller. If your questions cannot be
answered immediately, your reseller will forward your
queries through the appropriate channels to ensure a
rapid response. If you are connected to the Internet, you
can:
• find answers to resolved problems in the FAQ database.
Search by product, category, or phrases
• report problems to Axis support by logging in to your
private support area.
Page 3
AXIS T97A10 enclosure Page 3
(a)
(b)
(c)
(d)
(e)
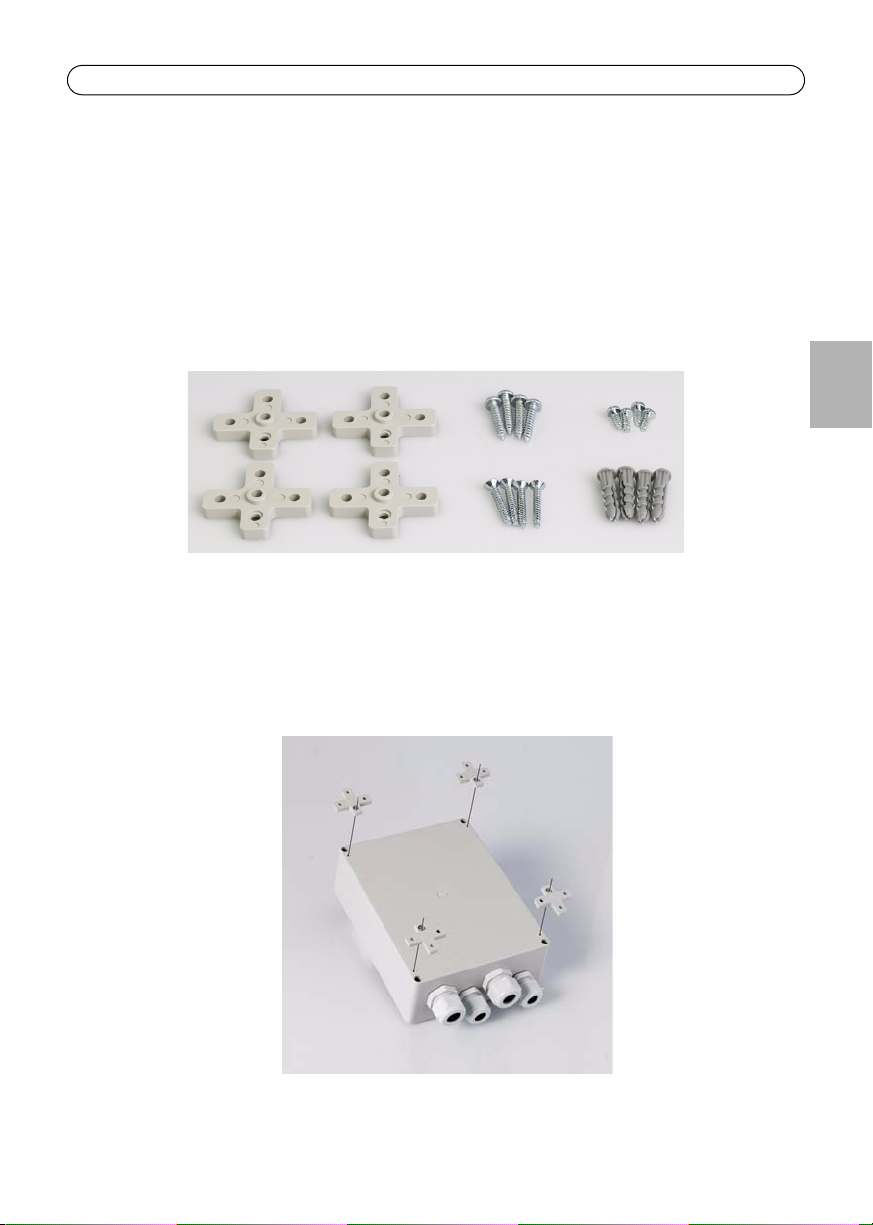
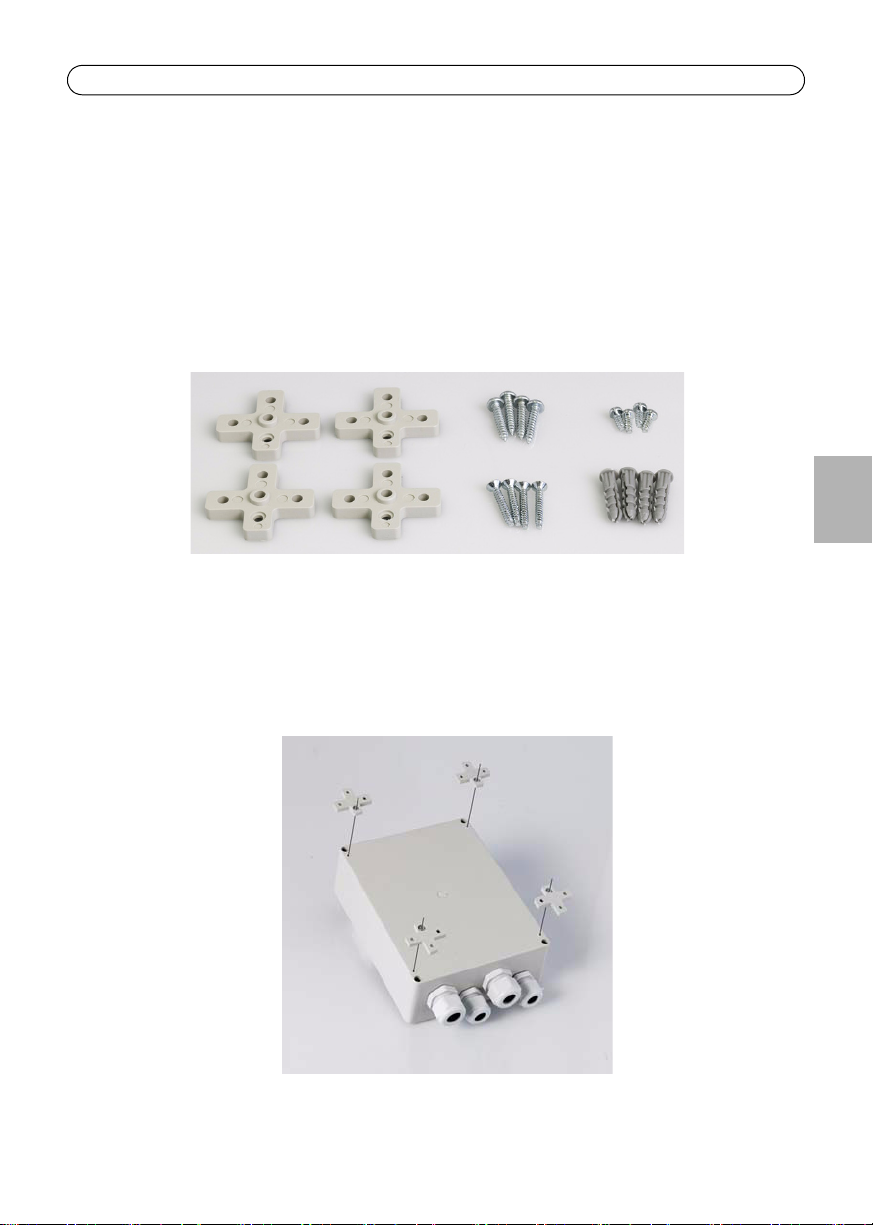
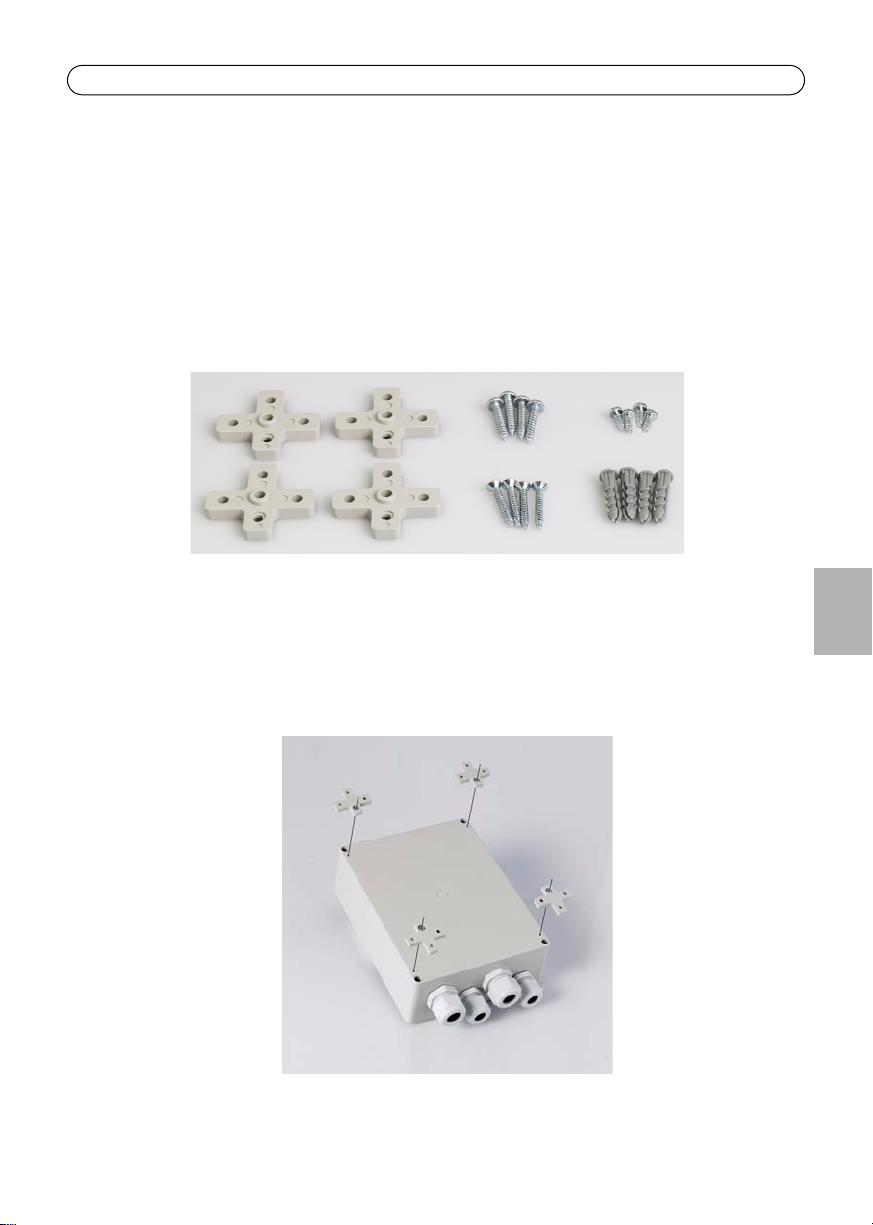
AXIS T97A10 enclosure
Package contents:
a) 4 holders
b) 4 wood screws
c) 4 screws for holders
d) 4 concrete screws
e) 4 concrete plugs (5mm drill)
Using the supplied screws (c), attach the plastic holders (a) to the back of the AXIS T97A10
enclosure.
ENGLISH
Page 4
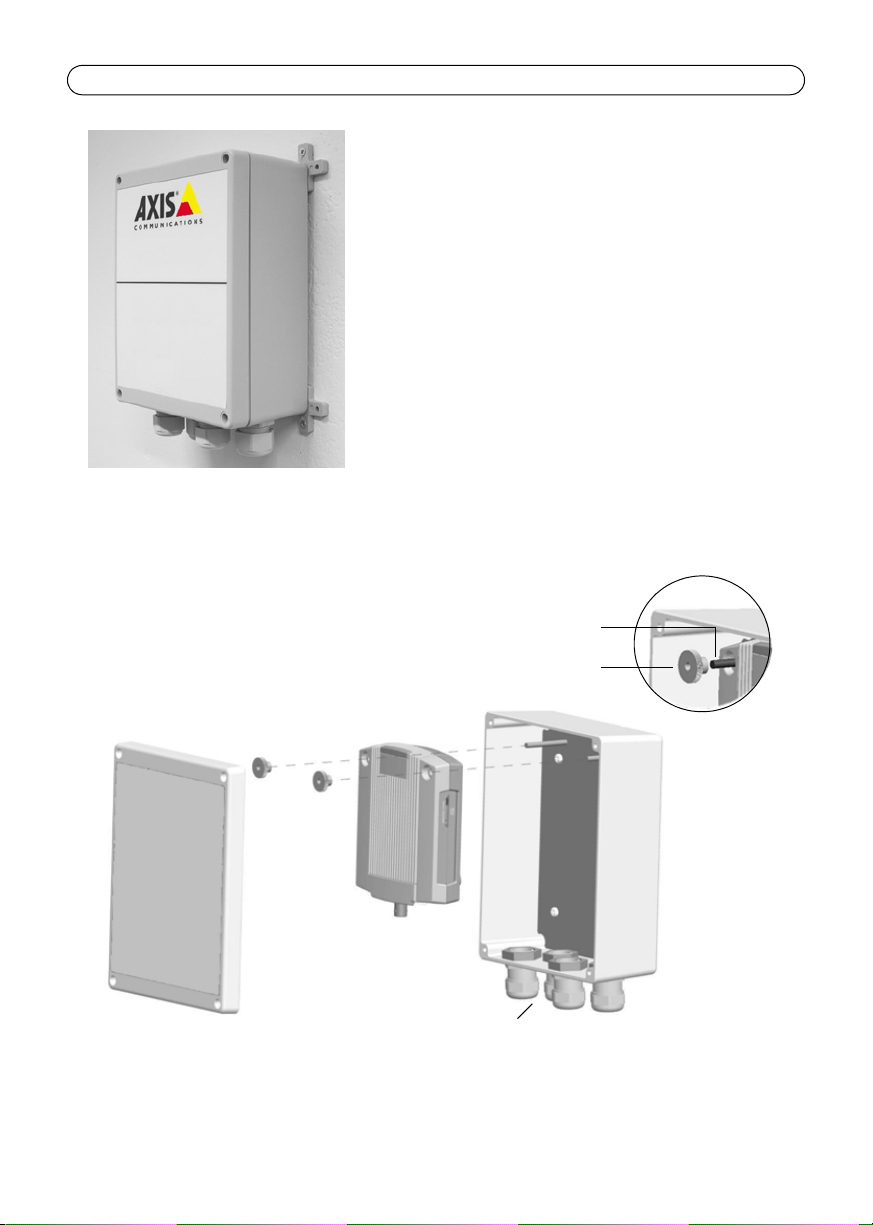
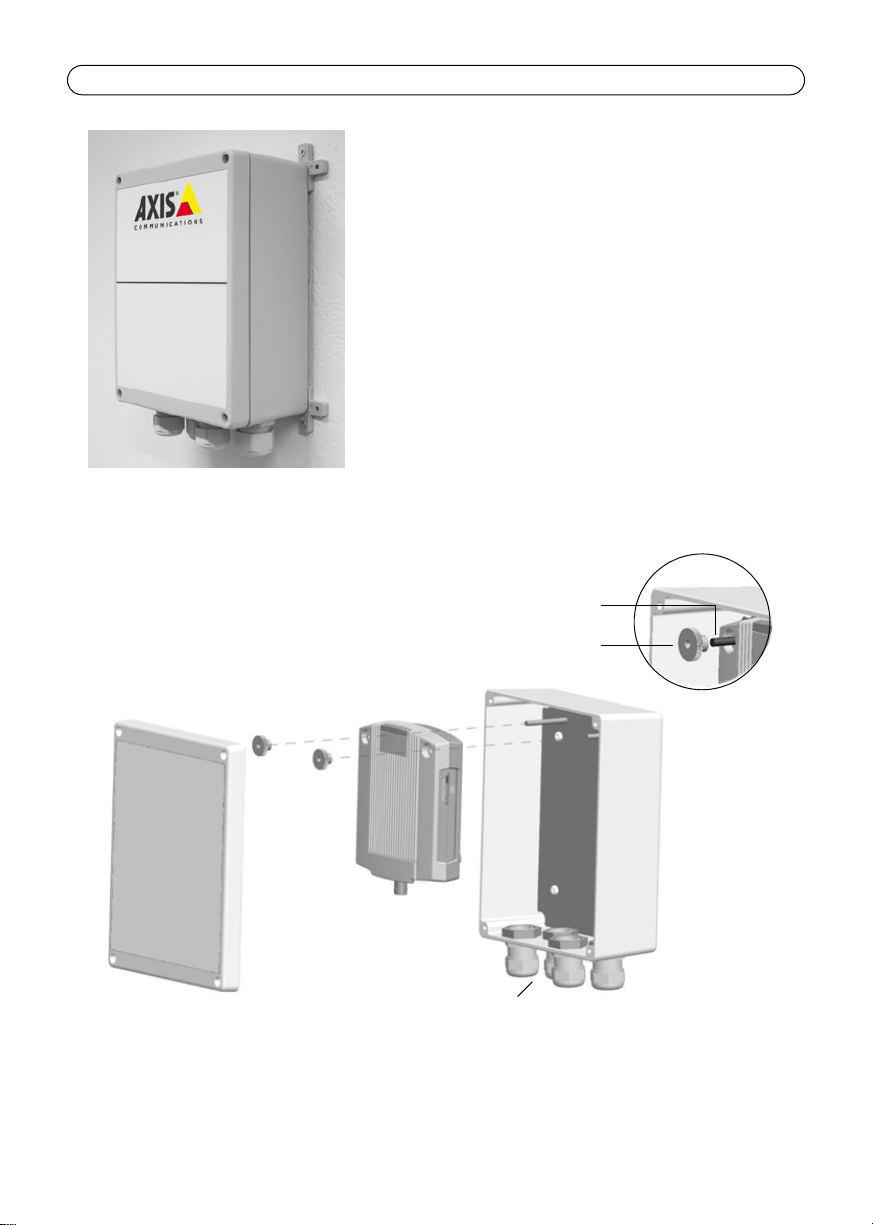
Page 4 AXIS T97A10 enclosure
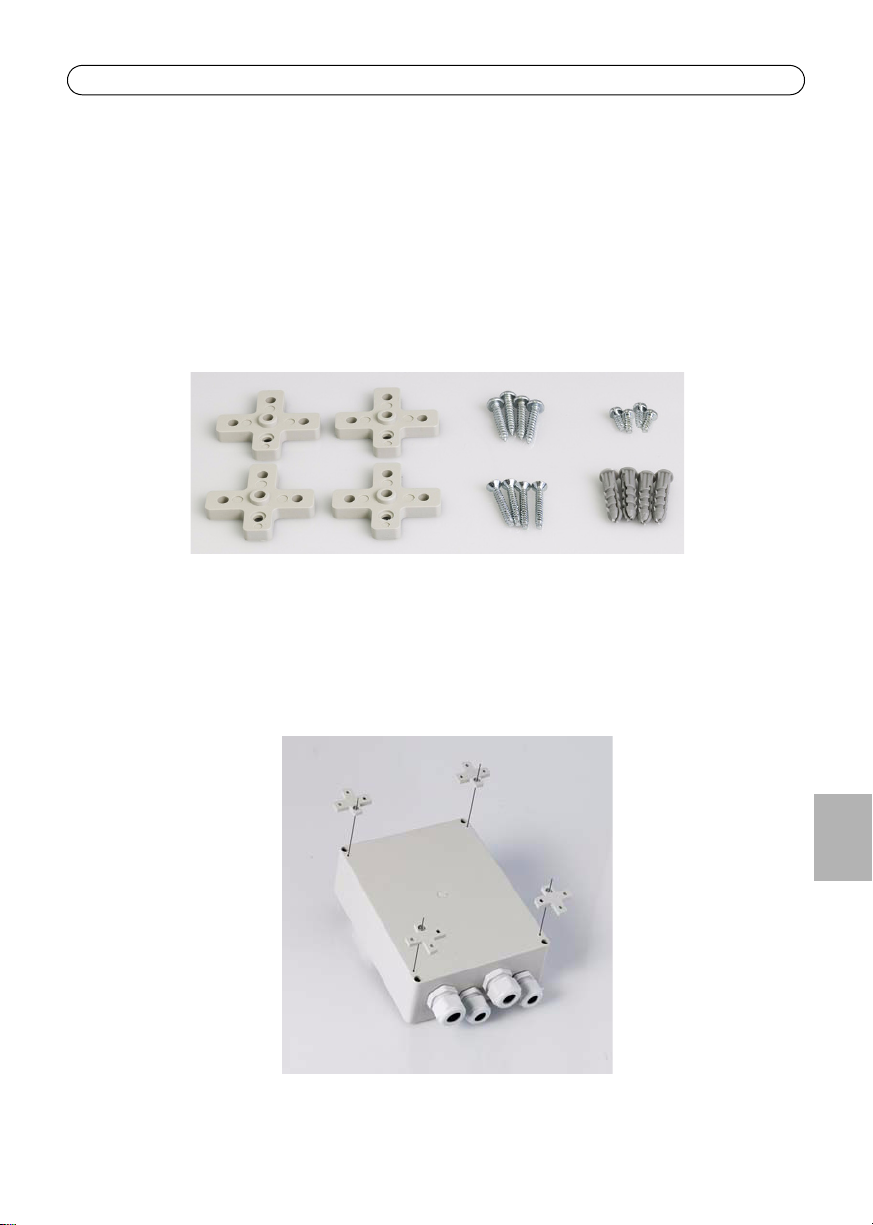
Cable glands
Internal screw
Nut
Using the appropriate screws for the wall material (wood
or concrete) and the weight of the unit, mount the AXIS
T97A10 enclosure on a flat surface with the cable glands
pointing downwards.
Attach the unit inside AXIS T97A10 enclosure by hanging it on the two internal screws. Tighten the
two nuts by hand, see illustration below. Connect the unit with the appropriate cables running
through the cable glands.
Replace the lid and tighten the screws securely.
Note:
For unused cable glands, do not remove the plug and make sure that the outer ring is tightened
securely.
Page 5
Boîtier AXIS T97A10 Page 5
(a)
(b)
(c)
(d)
(e)
Boîtier AXIS T97A10
Contenu de l'emballage :
a) 4 supports
b) 4 vis à bois
c) 4 vis pour les supports
d) 4 vis à béton
e) 4 chevilles à béton (diamètre de 5 mm)
À l'aide des vis fournies (c), connectez les supports en plastique (a) à l'arrière du boîtier AXIS
T97A10.
FRAN
Ç
AIS
Page 6
Page 6 Boîtier AXIS T97A10
Presse-étoupe
Vis interne
Écrou
Montez, à l'aide de vis adaptées au mur (en bois ou en
béton) et au poids de l'unité, le boîtier AXIS T97A10 sur
une surface plane, les presse-étoupe orientés vers le bas.
Pour fixer l'unité à l'intérieur du boîtier AXIS T97A10, accrochez-la aux deux vis internes. Serrez les
deux écrous à la main, comme illustré ci-dessous. Connectez l'unité avec des câbles adaptés via les
presse-étoupe.
Remettez le couvercle en place et serrez bien les vis.
Note:
Si des presse-étoupe ne sont pas utilisés, ne retirez pas la prise et vérifiez que la bague extérieure
est bien fixée.
Page 7
AXIS T97A10 Gehäuse Seite 7
(a)
(b)
(c)
(d)
(e)
AXIS T97A10 Gehäuse
Inhalt des Produktpakets:
a) 4 Halter
b) 4 Holzschrauben
c) 4 Schrauben für Halter
d) 4 Betonschrauben
e) 4 Dübel (5-mm-Bohrloch)
Befestigen Sie mit den beiligenden Schrauben (c) die Kunststoffhalter (a) an der Rückseite des AXIS
T97A10 Gehäuses.
DEUTSCH
Page 8

Seite 8 AXIS T97A10 Gehäuse
Kabelverschraubungen
Integrierte Schraube
Mutter
Montieren Sie das AXIS T97A10 Gehäuse mit den
Kabelverschraubungen nach unten zeigend auf einer
flachen Oberfläche. Verwenden Sie hierfür Schrauben,
die für das Deckenmaterial (Holz oder Beton) und das
Gewicht des Gehäuses geeignet sind.
Befestigen Sie das Gerät an den im AXIS T97A10 Gehäuse integrierten Schrauben. Ziehen Sie die
beiden Muttern mit der Hand fest (siehe Abbildung unten). Schließen Sie das Gerät an und führen
Sie die Kabel durch die entsprechenden Kabelverschraubungen.
Bringen Sie die Abdeckung wieder an und ziehen Sie die Schrauben fest.
Entfernen Sie nicht die Stecker der Kabelverschraubungen, die Sie nicht verwenden, und vergewis-
Note:
sern Sie sich, dass der äußere Ring festgezogen ist.
Page 9

Alloggiamento AXIS T97A10 Pagina 9
(a)
(b)
(c)
(d)
(e)
Alloggiamento AXIS T97A10
Contenuto della confezione:
a) 4 supporti
b) 4 viti da legno
c) 4 viti per i supporti
d) 4 viti per cemento
e) 4 tasselli per cemento (punta da 5 mm)
Per mezzo delle viti fornite (c), fissare i supporti in plastica (a) alla parte posteriore
dell'Alloggiamento AXIS T97A10.
ITALIANO
Page 10

Pagina 10 Alloggiamento AXIS T97A10
Pressacavi
Vite interna
Dado
Per mezzo delle viti adatte al materiale della parete
(legno o cemento) e al peso dell'unità, montare
l'Alloggiamento AXIS T97A10 su una superficie piana con
i pressacavo rivolti verso il basso.
Fissare l'unità all'interno dell'Alloggiamento AXIS T97A10, sospesa per mezzo delle due viti interne.
Serrare a mano i due dadi, come illustrato di seguito. Connettere l'unita per mezzo dei cavi adatti,
facendoli passare attraverso i pressacavi.
Rimontare il coperchio e serrare saldamente le viti.
Note:
In caso di mancato utilizzo dei pressacavi, non rimuovere il tappo e assicurarsi che l'anello esterno
sia serrato saldamente.
Page 11
Carcasa AXIS T97A10 Página 11
(a)
(b)
(c)
(d)
(e)
Carcasa AXIS T97A10
Contenido del paquete:
a) 4 sujeciones
b) 4 tornillos para madera
c) 4 tornillos para las sujeciones
d) 4 tornillos para cemento
e) 4 tacos de cemento (broca de 5 mm)
Coloque las sujeciones de plástico (a) a la parte posterior de la carcasa AXIS T97A10 empleando los
tornillos que se suministran (c).
ESPAÑOL
Page 12

Página 12 Carcasa AXIS T97A10
Prensaestopas
Tornillo interno
Tuerca
Monte la carcasa AXIS T97A10 sobre una superficie
plana con los prensaestopas de cables hacia abajo
utilizando los tornillos apropiados para el material de la
pared (madera o cemento) y el peso de la unidad.
Coloque la unidad en el interior de la carcasa AXIS T97A10 suspendiéndola con los dos tornillos
internos. Apriete las dos tuercas a mano, según la ilustración. Conecte la unidad con los cables
apropiados pasándolos por los prensaestopas.
Vuelva a colocar la tapa y apriete bien los tornillos.
Note: En los prensaestopas no utilizados, no retire los tapones y asegúrese que la junta exterior está bien
apretada.
Page 13

Page 14

Installation Guide
AXIS T97A10 Enclosure
© Axis Communications AB, 2010
Ver.1.0
Printed: September 2010
Part No. 39690
 Loading...