

Page 1

AXIS OfficeBasic USB Wireless G
Installation Guide
ENGLISH
DEUTSCH
FRANCAIS ESPAÑOL
ITALIANO
Page 2

Page 3

Regulatory Information
Safety Notices - Take some time to read through the safety notices before installing the AXIS OfficeBasic USB Wireless G.
Please observe all safety markings and instructions when using this product.
Important!: - must be observed to avoid operational impairment. Do not proceed any of the above notices, until you have
fully understood the implications.
Radio Transmission Regulatory information - Tested to comply with FCC Standards FOR HOME OR OFFICE USE.
This product must be installed and used in strict accordance with the instructions given in the user documentation. The AXIS
OfficeBasic USB Wireless G complies with the following radio frequency and safety standards:
Europe - This digital equipment fulfils the requirements for radiated emission according to limit B of EN55022, and the
requirements for immunity according to EN55024 residential, commercial, and light industry.
Technical requirements for radio equipment according to EN 300 328-1 (2001-12) and 300 328-2 (2001-12)
USA - Federal Communications Commission FCC. This device complies with Part 15 of FCC Rules. Operation of the device is
subject to the following two conditions:
(1) This device may not cause harmful interference
(2) This device must accept any interference that may cause undesired operation.
Important! - The channel must be set according to the radio frequency requir ements in your country:
Japan - This is a class B product based on the standard of the Voluntary Control Council for Interference from Information
Technology Equipment (VCCI). If this is used near a radio or television receiver in a domestic environment, it may cause radio
interference. Install and use the equipment according to the instruction manual.
Liability - Every care has been taken in the preparation of this manual; if you detect any inaccuracies or omissions, please
inform your local Axis office, which can be found on the cover of this document. Axis Communications AB cannot be held
responsible for any technical or typographical errors and reserves the right to make changes to the prod uct and manuals
without prior notice. Axis Communications AB makes no warranty of any kind with regard to the material contained within
this document, including, but not limited to, the implied warranties of merchantability and fitness for a particular purpose.
Axis Communications AB shall not be liable nor responsible for incidental or consequential damages in connection with the
furnishing, performance or use of this material.
Safety: EN60950
Trademark Acknowledgments - Apple, Ethernet, Macintosh, Microsoft, Rendezvous, Windows, are registered trademarks of
the respective holders.
Software Acknowledgments - This product includes software developed by the OpenSSL Project for use in the OpenSSL
Toolkit.
Support Services - Should you require technical assistance, please contact your Axis dealer. If your questions cannot be
answered immediately, your Axis dealer will forward your queries through the appropriate channels to ensure you a rapid
response. If you are connected to the Internet, you can find on-line manuals, technical support, software updates, application
software, corporate information, etc. at http://www.axis.com/techsup
Part nr 23556 r1.0
3
Page 4

Table of Contents
Regulatory Information . . . . . . . . . . . . . . . . . . . . . . . . . . . . . . . . . . . . . . . . . . . . . . . . . . . . . . 3
Package contents . . . . . . . . . . . . . . . . . . . . . . . . . . . . . . . . . . . . . . . . . . . . . . . . . . . . . . . . . . . . 6
Overview
Wireless Operating Modes . . . . . . . . . . . . . . . . . . . . . . . . . . . . . . . . . . . . . . . . . . . . . . . . . . . . 7
Infrastructure
Ad-hoc (Peer to Peer)
Hardware Installation . . . . . . . . . . . . . . . . . . . . . . . . . . . . . . . . . . . . . . . . . . . . . . . . . . . . . . . . 8
Setup in Infrastructure Mode . . . . . . . . . . . . . . . . . . . . . . . . . . . . . . . . . . . . . . . . . . . . . . . . . . 9
Setup in Diagnostic Mode . . . . . . . . . . . . . . . . . . . . . . . . . . . . . . . . . . . . . . . . . . . . . . . . . . . . 13
Installing a printer . . . . . . . . . . . . . . . . . . . . . . . . . . . . . . . . . . . . . . . . . . . . . . . . . . . . . . . . . . 18
Printer Installation - Mac OS X . . . . . . . . . . . . . . . . . . . . . . . . . . . . . . . . . . . . . . . . . . . . . . . 21
Web-based Print Server Management . . . . . . . . . . . . . . . . . . . . . . . . . . . . . . . . . . . . . . . . . . 23
Print Server Management with the Reset Button . . . . . . . . . . . . . . . . . . . . . . . . . . . . . . . . . 24
Troubleshooting . . . . . . . . . . . . . . . . . . . . . . . . . . . . . . . . . . . . . . . . . . . . . . . . . . . . . . . . . . . . 25
Connecting to Print Server
Printing Test Page
Printing
Lieferumfang . . . . . . . . . . . . . . . . . . . . . . . . . . . . . . . . . . . . . . . . . . . . . . . . . . . . . . . . . . . . . . 27
Übersicht
Drahtlos-Betriebsmodi . . . . . . . . . . . . . . . . . . . . . . . . . . . . . . . . . . . . . . . . . . . . . . . . . . . . . . 28
Infrastructure-Modus
Ad Hoc-Modus (Peer-to-Peer)
Hardware-Installation . . . . . . . . . . . . . . . . . . . . . . . . . . . . . . . . . . . . . . . . . . . . . . . . . . . . . . . 30
Einrichtung im Infrastructure-Modus . . . . . . . . . . . . . . . . . . . . . . . . . . . . . . . . . . . . . . . . . . 31
Einrichtung im Diagnosemodus . . . . . . . . . . . . . . . . . . . . . . . . . . . . . . . . . . . . . . . . . . . . . . . 36
Drucker installieren . . . . . . . . . . . . . . . . . . . . . . . . . . . . . . . . . . . . . . . . . . . . . . . . . . . . . . . . . 41
Druckerinstallation unter Mac OS X . . . . . . . . . . . . . . . . . . . . . . . . . . . . . . . . . . . . . . . . . . . 44
Webbasierte Druckerserver-Verwaltung . . . . . . . . . . . . . . . . . . . . . . . . . . . . . . . . . . . . . . . . 47
Druckerserver-Verwaltung per Reset-Taste . . . . . . . . . . . . . . . . . . . . . . . . . . . . . . . . . . . . . . 48
Fehlerbehebung . . . . . . . . . . . . . . . . . . . . . . . . . . . . . . . . . . . . . . . . . . . . . . . . . . . . . . . . . . . . 49
Verbindung zum Druckerserver
Testseitendruck
Drucken
Contenu de l’emballage . . . . . . . . . . . . . . . . . . . . . . . . . . . . . . . . . . . . . . . . . . . . . . . . . . . . . 51
Vue d'ensemble
Modes de fonctionnement sans fil . . . . . . . . . . . . . . . . . . . . . . . . . . . . . . . . . . . . . . . . . . . . . 52
Infrastructure
Ad-Hoc (Peer to Peer)
. . . . . . . . . . . . . . . . . . . . . . . . . . . . . . . . . . . . . . . . . . . . . . . . . . . . . . . . . . . 6
. . . . . . . . . . . . . . . . . . . . . . . . . . . . . . . . . . . . . . . . . . . . . . . . . . . . . . . 7
. . . . . . . . . . . . . . . . . . . . . . . . . . . . . . . . . . . . . . . . . . . . . . . . 7
. . . . . . . . . . . . . . . . . . . . . . . . . . . . . . . . . . . . . . . . . . . 25
. . . . . . . . . . . . . . . . . . . . . . . . . . . . . . . . . . . . . . . . . . . . . . . . . . 25
. . . . . . . . . . . . . . . . . . . . . . . . . . . . . . . . . . . . . . . . . . . . . . . . . . . . . . . . . . . 26
. . . . . . . . . . . . . . . . . . . . . . . . . . . . . . . . . . . . . . . . . . . . . . . . . . . . . . . . . 27
. . . . . . . . . . . . . . . . . . . . . . . . . . . . . . . . . . . . . . . . . . . . . . . 28
. . . . . . . . . . . . . . . . . . . . . . . . . . . . . . . . . . . . . . . . 29
. . . . . . . . . . . . . . . . . . . . . . . . . . . . . . . . . . . . . . . . 49
. . . . . . . . . . . . . . . . . . . . . . . . . . . . . . . . . . . . . . . . . . . . . . . . . . . . 49
. . . . . . . . . . . . . . . . . . . . . . . . . . . . . . . . . . . . . . . . . . . . . . . . . . . . . . . . . . . 50
. . . . . . . . . . . . . . . . . . . . . . . . . . . . . . . . . . . . . . . . . . . . . . . . . . . . 51
. . . . . . . . . . . . . . . . . . . . . . . . . . . . . . . . . . . . . . . . . . . . . . . . . . . . . . 52
. . . . . . . . . . . . . . . . . . . . . . . . . . . . . . . . . . . . . . . . . . . . . . . 53
ENGLISH
DEUTSCH
FRANCAIS ESPAÑOL
ITALIANO
4
Page 5

Installation matérielle . . . . . . . . . . . . . . . . . . . . . . . . . . . . . . . . . . . . . . . . . . . . . . . . . . . . . . . 54
Configuration en mode Infrastructure . . . . . . . . . . . . . . . . . . . . . . . . . . . . . . . . . . . . . . . . . . 55
Configuration en mode Diagnostic . . . . . . . . . . . . . . . . . . . . . . . . . . . . . . . . . . . . . . . . . . . . 60
Installation d’une imprimante . . . . . . . . . . . . . . . . . . . . . . . . . . . . . . . . . . . . . . . . . . . . . . . . 65
Installation d’une imprimante - Mac OS X . . . . . . . . . . . . . . . . . . . . . . . . . . . . . . . . . . . . . . 68
Gestion du serveur d’impression basée sur le Web . . . . . . . . . . . . . . . . . . . . . . . . . . . . . . . . 71
Gestion du serveur d’impression avec le bouton de réinitialisation . . . . . . . . . . . . . . . . . . 72
Recherche de pannes . . . . . . . . . . . . . . . . . . . . . . . . . . . . . . . . . . . . . . . . . . . . . . . . . . . . . . . 73
Connexion au serveur d'impression
Impression de la page de test
Impression
Contenido del paquete . . . . . . . . . . . . . . . . . . . . . . . . . . . . . . . . . . . . . . . . . . . . . . . . . . . . . . 75
Vista general
Modos de funcionamiento inalámbrico . . . . . . . . . . . . . . . . . . . . . . . . . . . . . . . . . . . . . . . . . 76
Infraestructura
Ad-hoc (de igual a igual)
Instalación del hardware . . . . . . . . . . . . . . . . . . . . . . . . . . . . . . . . . . . . . . . . . . . . . . . . . . . . 78
Configuración en modo de infraestructura . . . . . . . . . . . . . . . . . . . . . . . . . . . . . . . . . . . . . . 79
Configuración en modo de diagnóstico . . . . . . . . . . . . . . . . . . . . . . . . . . . . . . . . . . . . . . . . . 84
Instalación de una impresora… . . . . . . . . . . . . . . . . . . . . . . . . . . . . . . . . . . . . . . . . . . . . . . . 89
Instalación de impresoras - Mac OS X . . . . . . . . . . . . . . . . . . . . . . . . . . . . . . . . . . . . . . . . . . 92
Administración de servidor de impresión basada en la Web . . . . . . . . . . . . . . . . . . . . . . . . 95
Administración del servidor de impresión con el botón Restablecer . . . . . . . . . . . . . . . . . . 96
Localización de fallos . . . . . . . . . . . . . . . . . . . . . . . . . . . . . . . . . . . . . . . . . . . . . . . . . . . . . . . 97
Conexión al servidor de impresión
Impresión de una página de prueba
Impresión
Contenuto della confezione . . . . . . . . . . . . . . . . . . . . . . . . . . . . . . . . . . . . . . . . . . . . . . . . . . 99
Cenni generali
Modalità di funzionamento wireless . . . . . . . . . . . . . . . . . . . . . . . . . . . . . . . . . . . . . . . . . .100
Infrastructure
Ad-Hoc (Peer to Peer)
Installazione hardware . . . . . . . . . . . . . . . . . . . . . . . . . . . . . . . . . . . . . . . . . . . . . . . . . . . . .102
Configurazione in Modalità Infrastruttura . . . . . . . . . . . . . . . . . . . . . . . . . . . . . . . . . . . . . 103
Configurazione in modalità Diagnostic . . . . . . . . . . . . . . . . . . . . . . . . . . . . . . . . . . . . . . . . 108
Installazione di una stampante . . . . . . . . . . . . . . . . . . . . . . . . . . . . . . . . . . . . . . . . . . . . . .113
Installazione della stampante-Mac OS X . . . . . . . . . . . . . . . . . . . . . . . . . . . . . . . . . . . . . . 116
Gestione del server di stampa su base Web . . . . . . . . . . . . . . . . . . . . . . . . . . . . . . . . . . . . 119
Gestione del server di stampa con il pulsante di ripristino . . . . . . . . . . . . . . . . . . . . . . . . 120
Risoluzione dei problemi . . . . . . . . . . . . . . . . . . . . . . . . . . . . . . . . . . . . . . . . . . . . . . . . . . . .121
Collegamento al server di stampa
Stampa di una pagina di prova
Stampa
. . . . . . . . . . . . . . . . . . . . . . . . . . . . . . . . . . . . . . . . . . . . . . . . . . . . . . . . 74
. . . . . . . . . . . . . . . . . . . . . . . . . . . . . . . . . . . . . . . . . . . . . . . . . . . . . . 75
. . . . . . . . . . . . . . . . . . . . . . . . . . . . . . . . . . . . . . . . . . . . . . . . . . . . . 76
. . . . . . . . . . . . . . . . . . . . . . . . . . . . . . . . . . . . . . . . . . . . . 77
. . . . . . . . . . . . . . . . . . . . . . . . . . . . . . . . . . . . . . . . . . . . . . . . . . . . . . . . . 98
. . . . . . . . . . . . . . . . . . . . . . . . . . . . . . . . . . . . . . . . . . . . . . . . . . . . . 99
. . . . . . . . . . . . . . . . . . . . . . . . . . . . . . . . . . . . . . . . . . . . . . . . . . . . . 100
. . . . . . . . . . . . . . . . . . . . . . . . . . . . . . . . . . . . . . . . . . . . . . 101
. . . . . . . . . . . . . . . . . . . . . . . . . . . . . . . . . . . . . . . . . . . . . . . . . . . . . . . . . . 122
. . . . . . . . . . . . . . . . . . . . . . . . . . . . . . . . . . . . 73
. . . . . . . . . . . . . . . . . . . . . . . . . . . . . . . . . . . . . . . . . 73
. . . . . . . . . . . . . . . . . . . . . . . . . . . . . . . . . . . . . 97
. . . . . . . . . . . . . . . . . . . . . . . . . . . . . . . . . . . . 97
. . . . . . . . . . . . . . . . . . . . . . . . . . . . . . . . . . . . 121
. . . . . . . . . . . . . . . . . . . . . . . . . . . . . . . . . . . . . . . 121
ENGLISH
DEUTSCH
FRANCAIS ESPAÑOL
ITALIANO
5
Page 6
Package contents
Unpack and check all the items using the following check list.
Contact your dealer if anything is missing or damaged. All packing
materials are recyclable.
Print Server AXIS OfficeBasic USB Wireless G Print Server
Power adapter Model PS-N for Australia, Europe, UK, USA/Japan
USB cable 0.7 meter USB 2.0 cable
CD Documentation and installation software
Printed Material Installation Guide (this document)
Overview
This User’s Guide includes installation instructions for the AXIS
OfficeBasic USB Wireless G print server in Windows and Mac OS X
environments. Installation on Mac OS 9.1 or older systems is
described in the User’s Manual.
The instructions in this guide are based on the settings found in a
new AXIS OfficeBasic USB Wireless G. To reset a previously
configured AXIS OfficeBasic USB Wireless G, see Print Server
Management with the Reset Button on page 24 for instructions.
See the AXIS OfficeBasic USB Wireless G User’s Manual for detailed
descriptions on this product. The User’s Manual is located on the
AXIS OfficeBasic USB Wireless G CD and on www.axis.com
6
Page 7
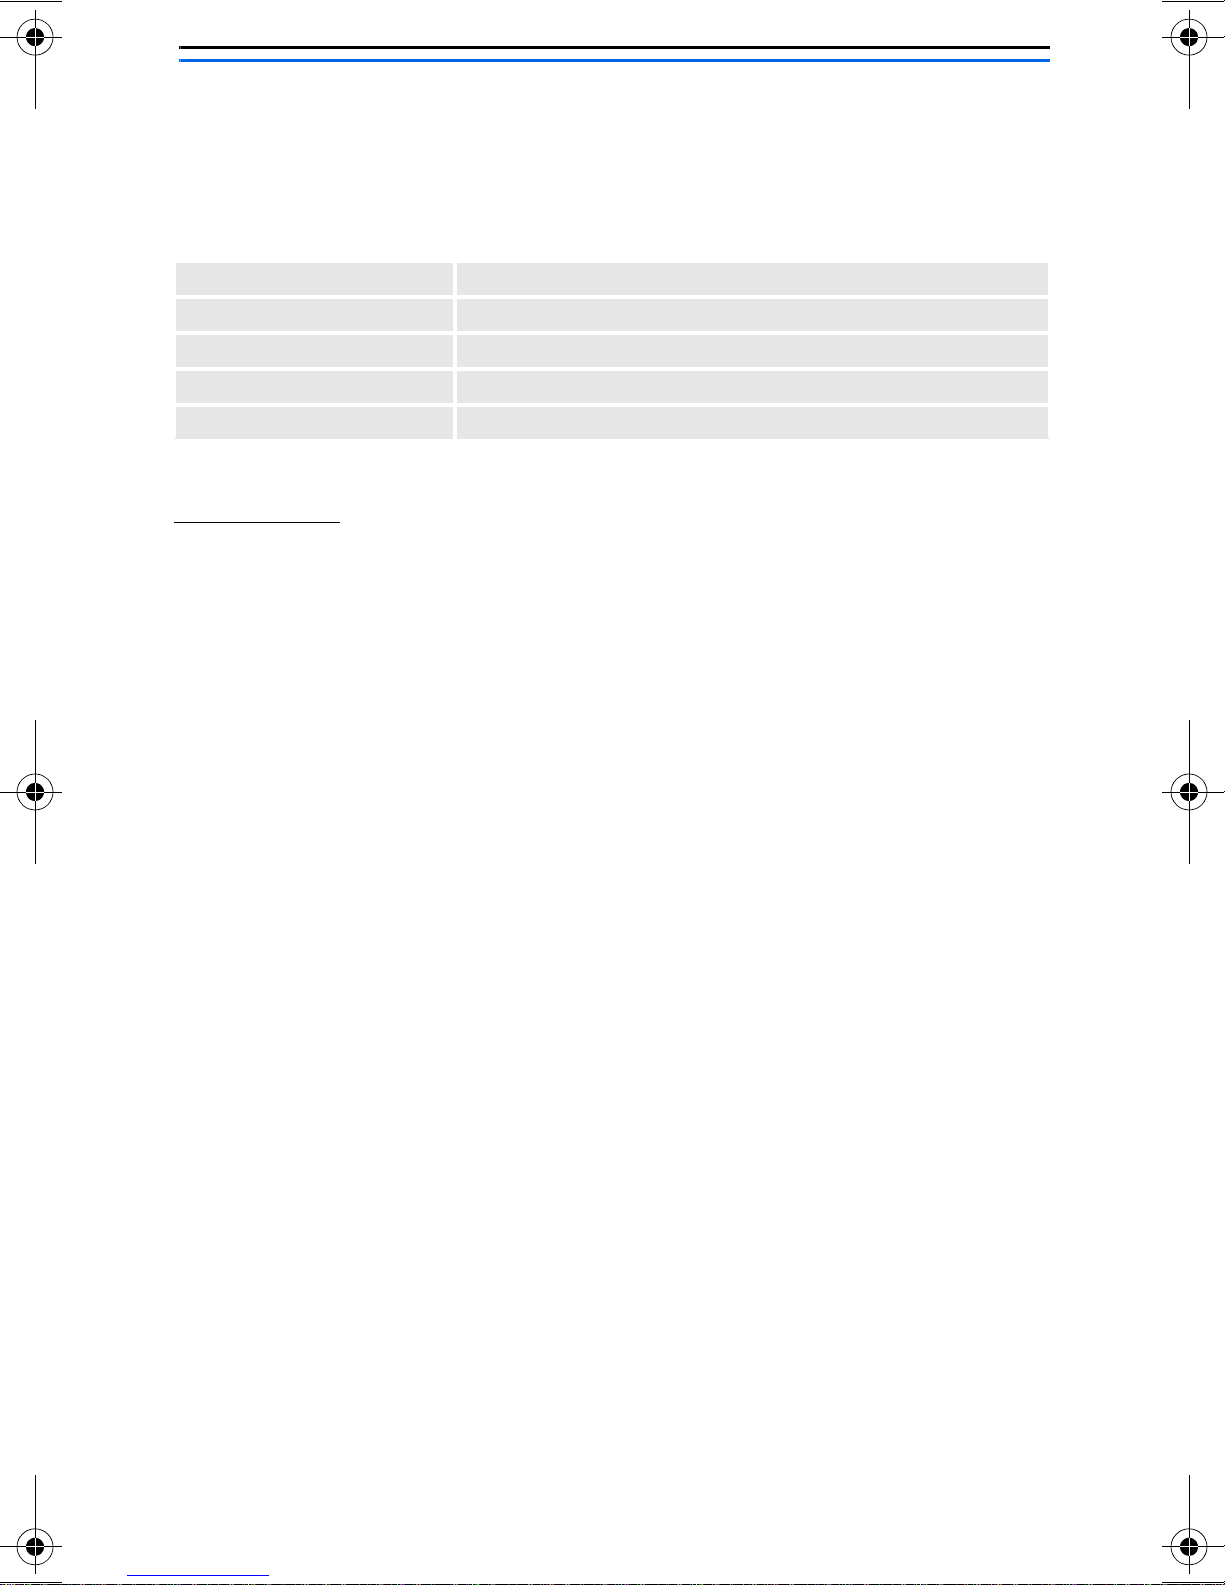
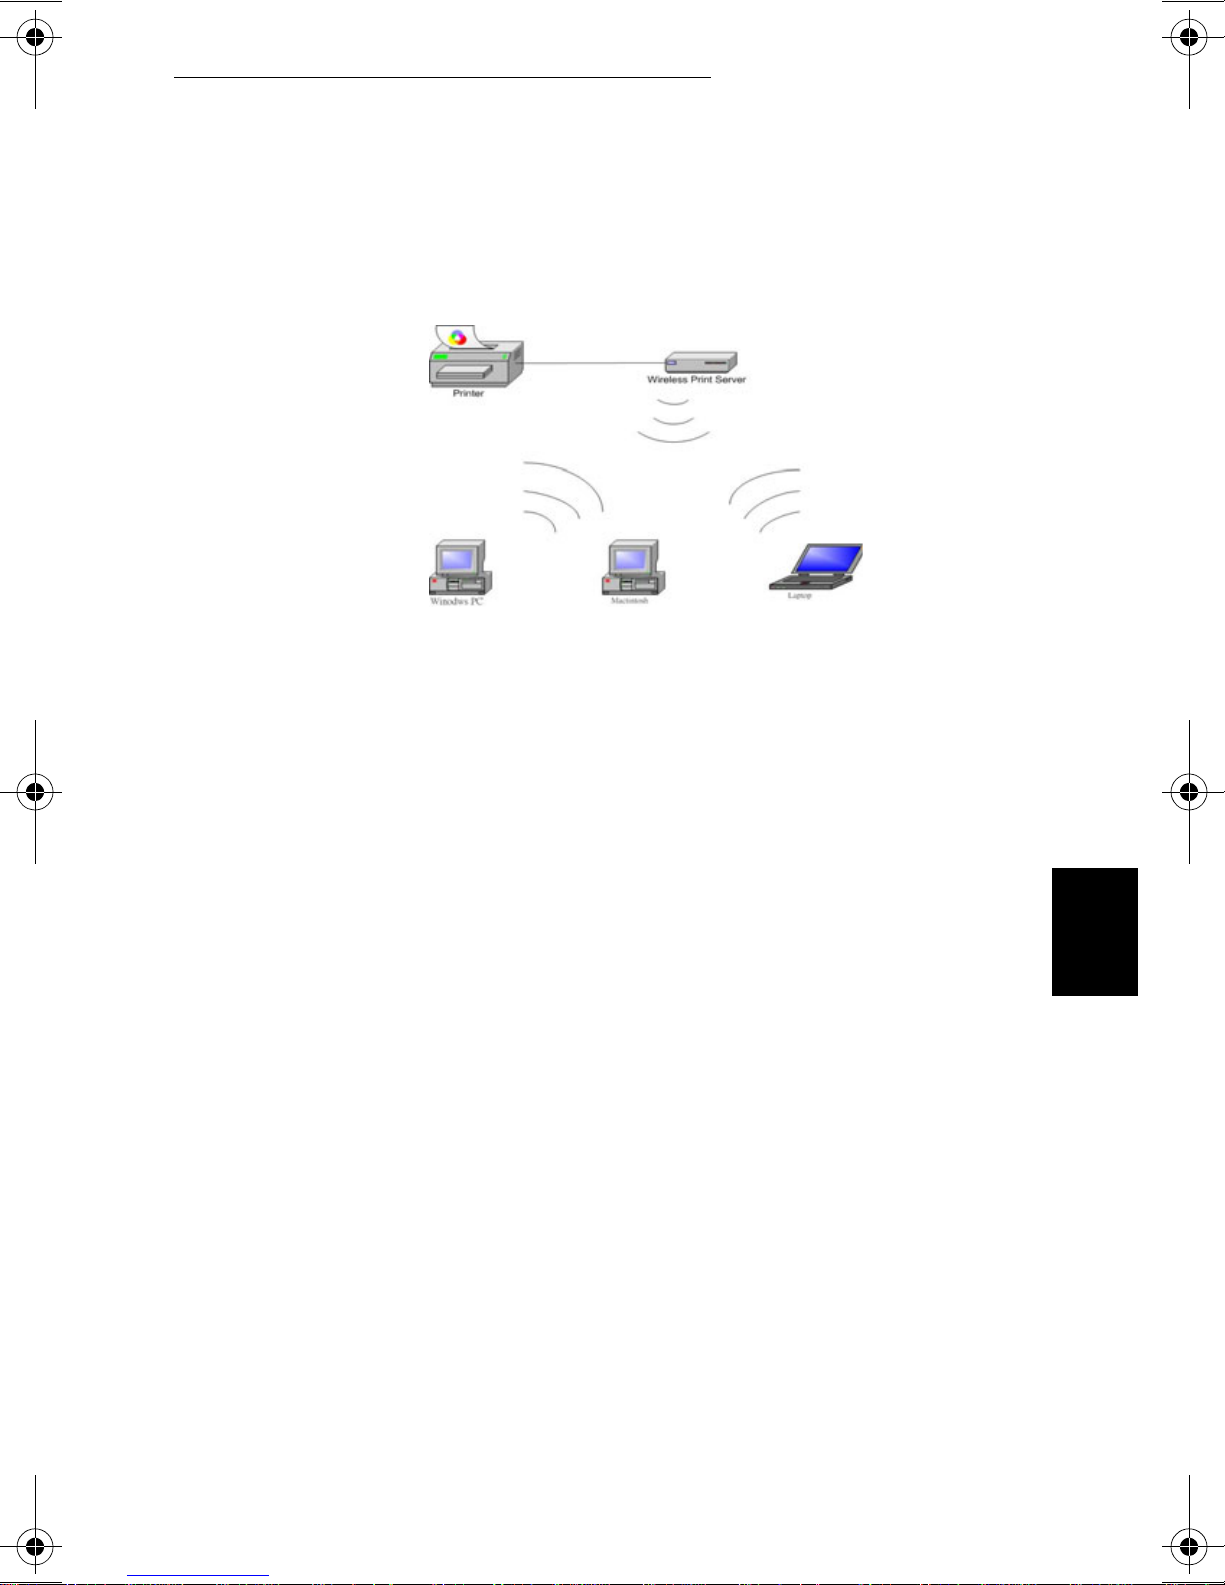
Wireless Operating Modes
The AXIS OfficeBasic USB Wireless G print server can be used in
Infrastructure and Ad-Hoc network modes using 802.11b and
802.11g wireless protocols.
Infrastructure
In Infrastructure mode, computers communicate with the print
server by first going through an Access Point. The Access Point is a
hardware device that communicates with the print server and can
be connected to computers on a wired Local Area Network (LAN) or,
wirelessly, to computers that are equipped with a wireless card.
To set up the print server in an Infrastructure network, see Setup in
Infrastructure Mode, on page 9.
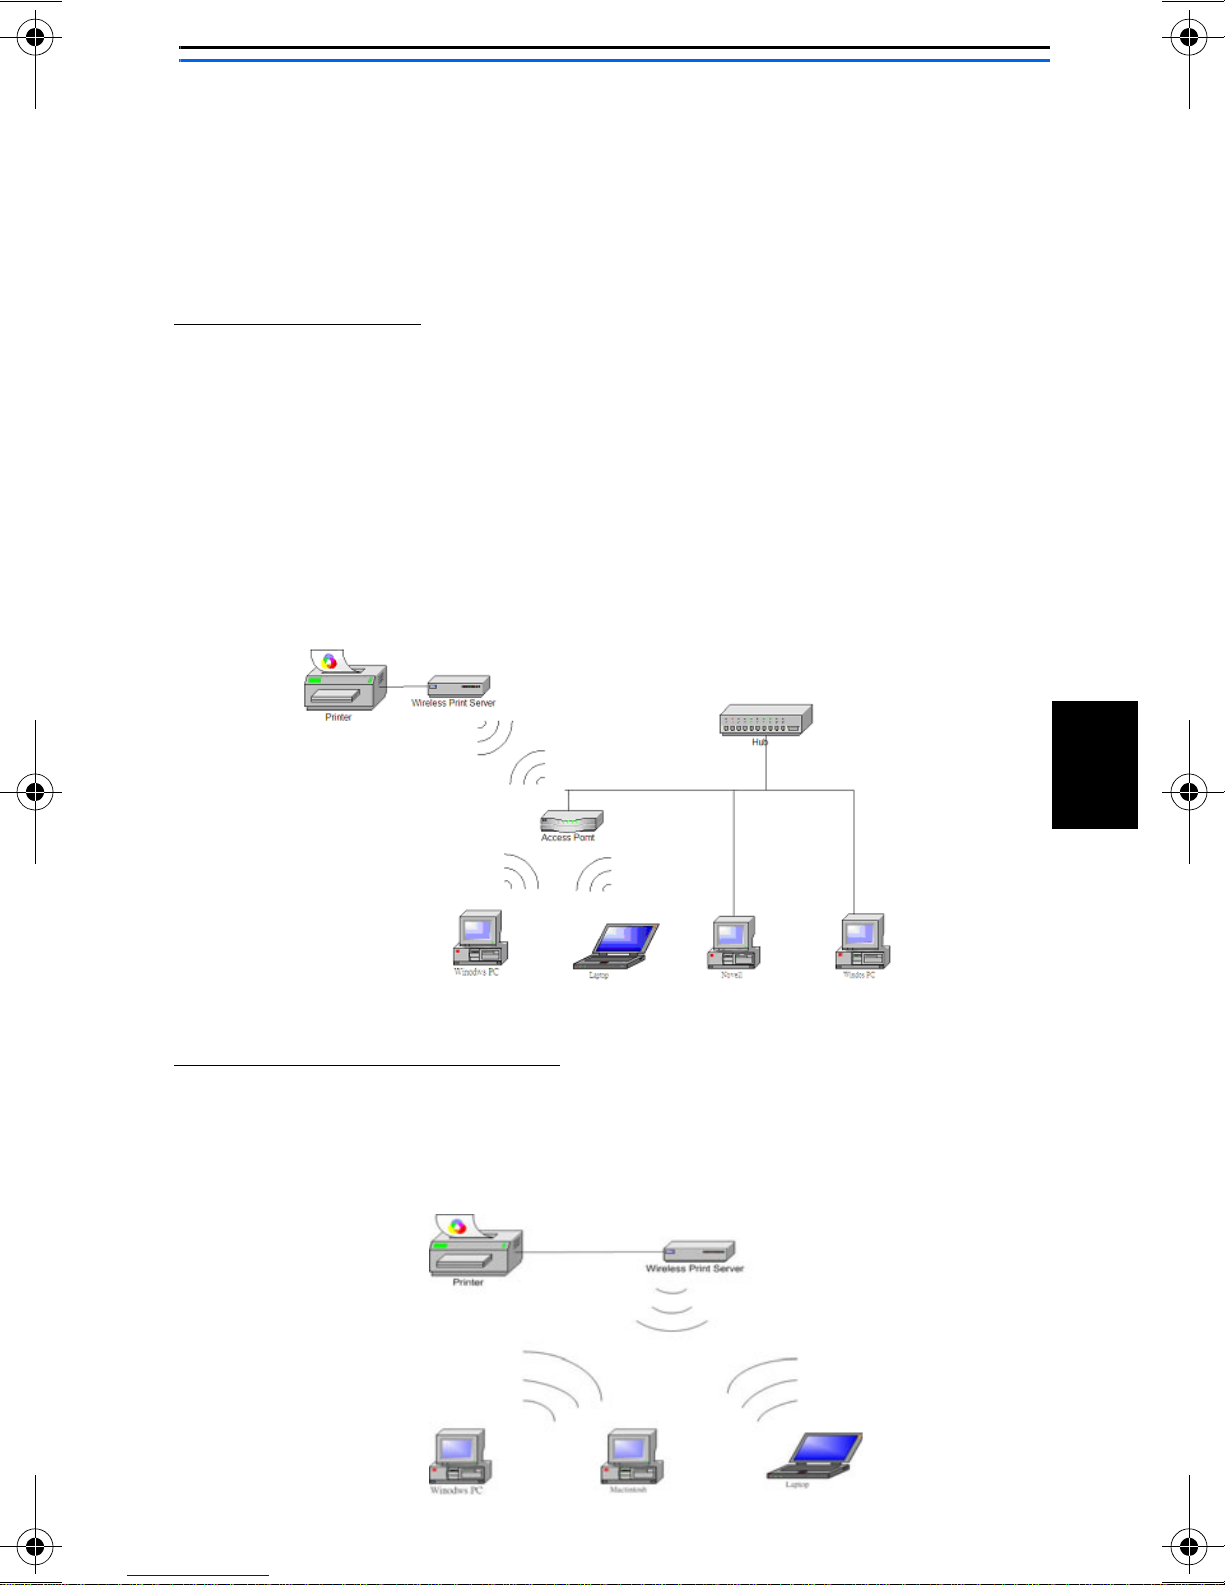
Ad-hoc (Peer to Peer)
Computers with a wireless card communicate directly with the print
server (i.e. no Access Point is used). To set up the print server in an
Ad-hoc network, see Setup in Diagnostic Mode, on page 13.
ENGLISH
7
Page 8

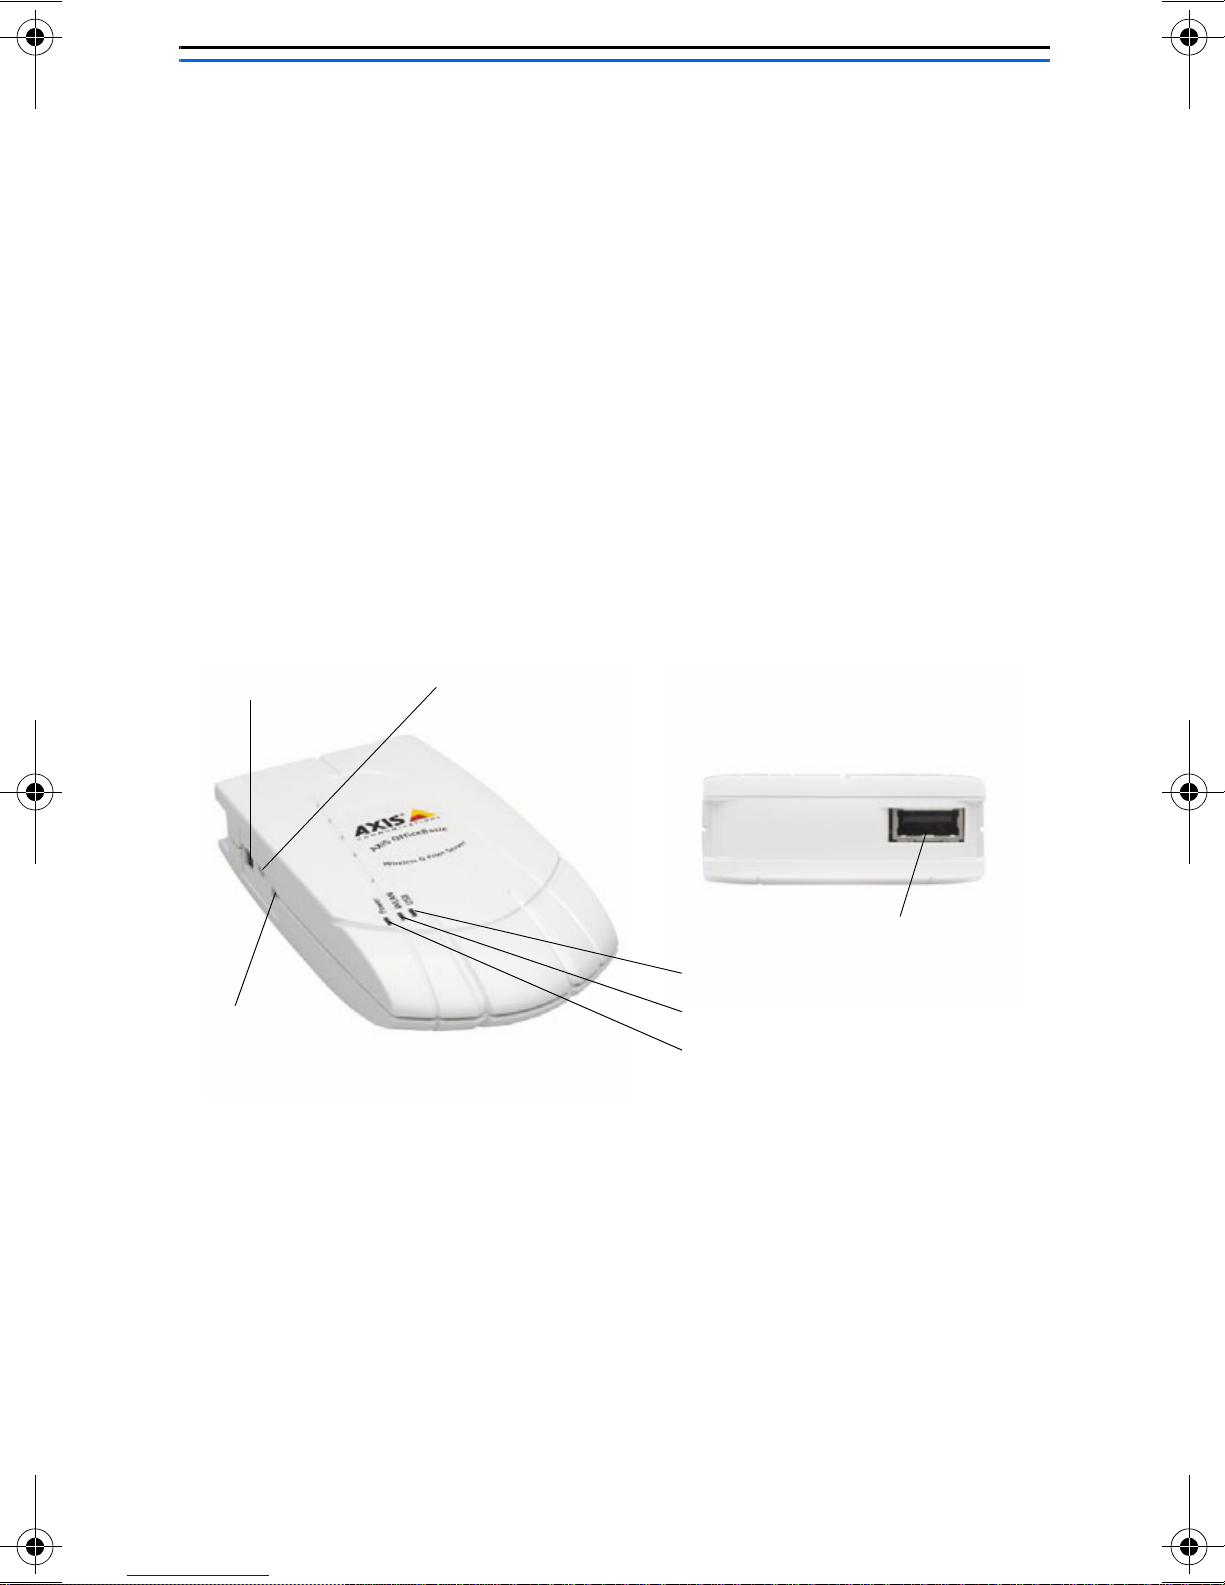
Hardware Installation
1. Turn off the printer’s power.
2. Connect the print server to your printer with the supplied USB
cable.
3. Turn the printer’s power on.
4. Plug the AC power adapter into the power connector on the
side of the wireless print server.
5. Wait 1 minute until all the LEDs have stopped flashing (the
WLAN LED will continue to flash if data is being transmitted).
6. Press the print server’s external Reset button for 5 seconds. A
test page will be printed on the connected printer, displaying
information about the print server’s IP address, firmware
number, etc.
Power connector
DIP switch:
NOR = Normal mode
DIAG = Diagnostic Mode
Reset button:
- Press once to restart print server.
- Press 5 seconds to print test page.
USB Connector
USB LED
WLAN LED
Power LED
Continue with Setup in Infrastructure Mode, on page 9 or Printer
Installation - Mac OS X, on page 21.
8
Page 9

Setup in Infrastructure Mode
This procedure works for setting up a print server in infrastructure
mode when the Access Point is unencrypted. If the Access Point is
encrypted, go to Setup in Diagnostic Mode, on page 13.
Before You Start:
• Check the SSID used by the Access Point.
• Check your network settings, i.e. available IP addresses, netmask
and gateway.
• Ensure that the TCP/IP protocol is installed on your computer.
• Ensure that the print server’s DIP is switched to NOR.
1. Insert the AXIS OfficeBasic USB Wireless G CD into your
CD-drive.
2. Select Setup Wizard to install the wireless print server and
configure the connected printer.
The Wizard will automatically install these components in
ENGLISH
C:\Program Files\Axis Communications\AXIS OBW Wizard:
• AXIS OBW Wizard.exe
• AXIS OBW Network Printer Port. DLL (Wireless Print Monitor)
After installation, AXIS OBW Wizard will be available from Start |
Programs | Axis Communications.
AXIS OBW Wizard will start in the same language as your operating
system, see Technical Specifications, on page 124.
9
Page 10
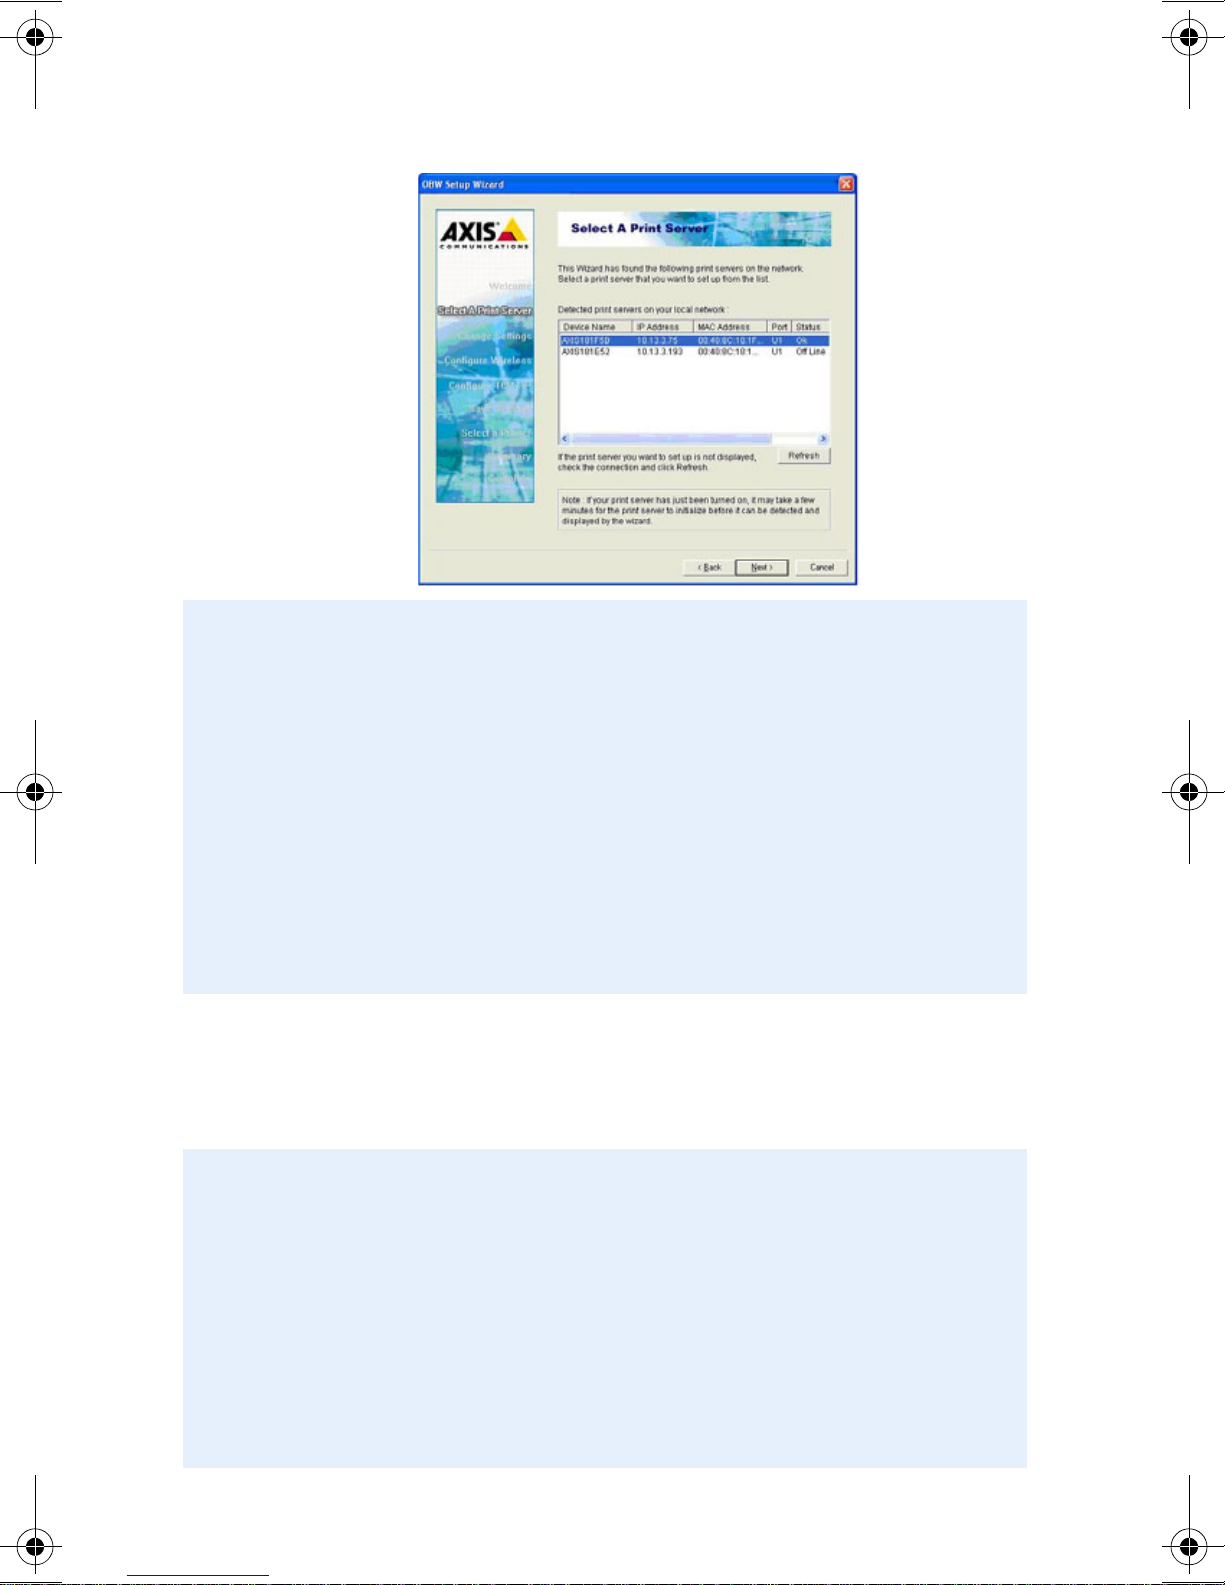
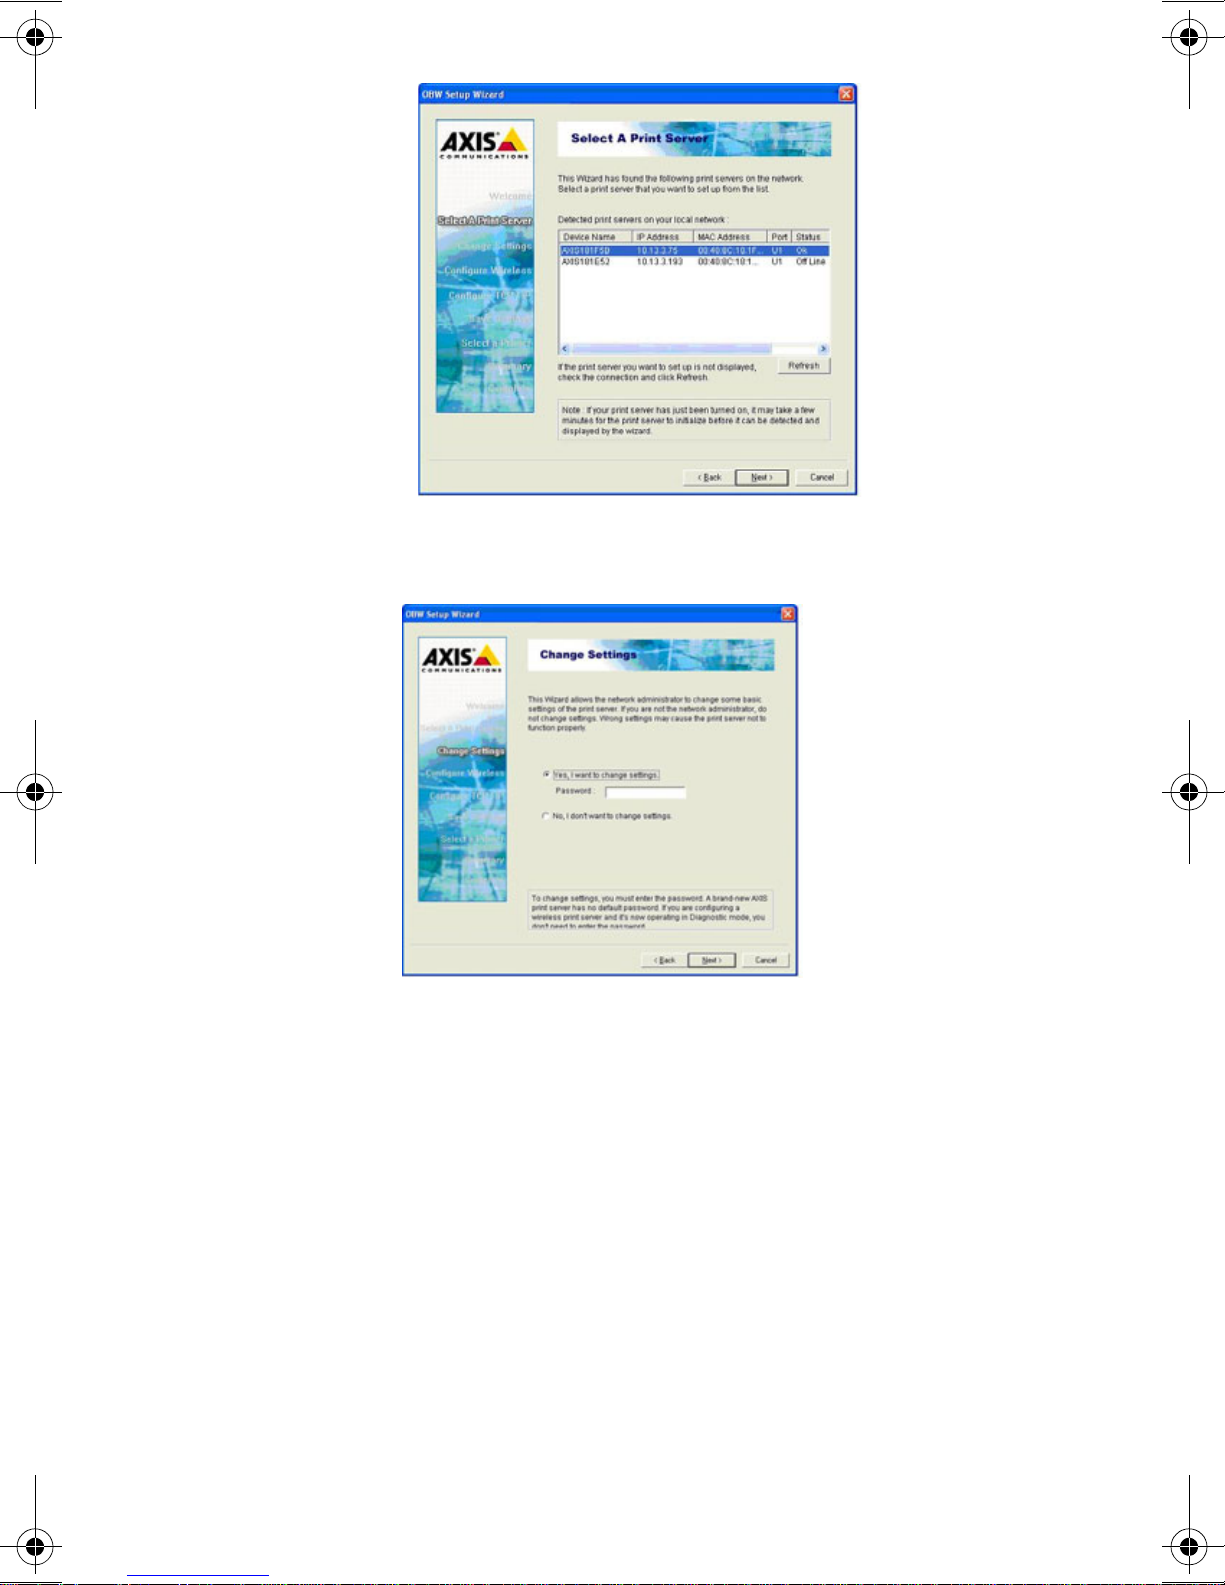
3. The Select A Print Server screen lists all the wireless print servers
that have been found, select the print server that you want to
configure and click Next.
If no print servers are found, check the following:
• No Access Point in your network - you are using an Ad-Hoc
network, go to Setup in Diagnostic Mode, on page 13.
• Access Point is encrypted and/or not broadcasting the SSID connect to the print server in Diagnostic mode, go to Setup in
Diagnostic Mode, on page 13.
• Print server has automatically connected to another Access Point have your wireless card associate with the other Access Point and
click Refresh, or change the Access Point that the print server has
connected to, go to Setup in Diagnostic Mode, on page 13.
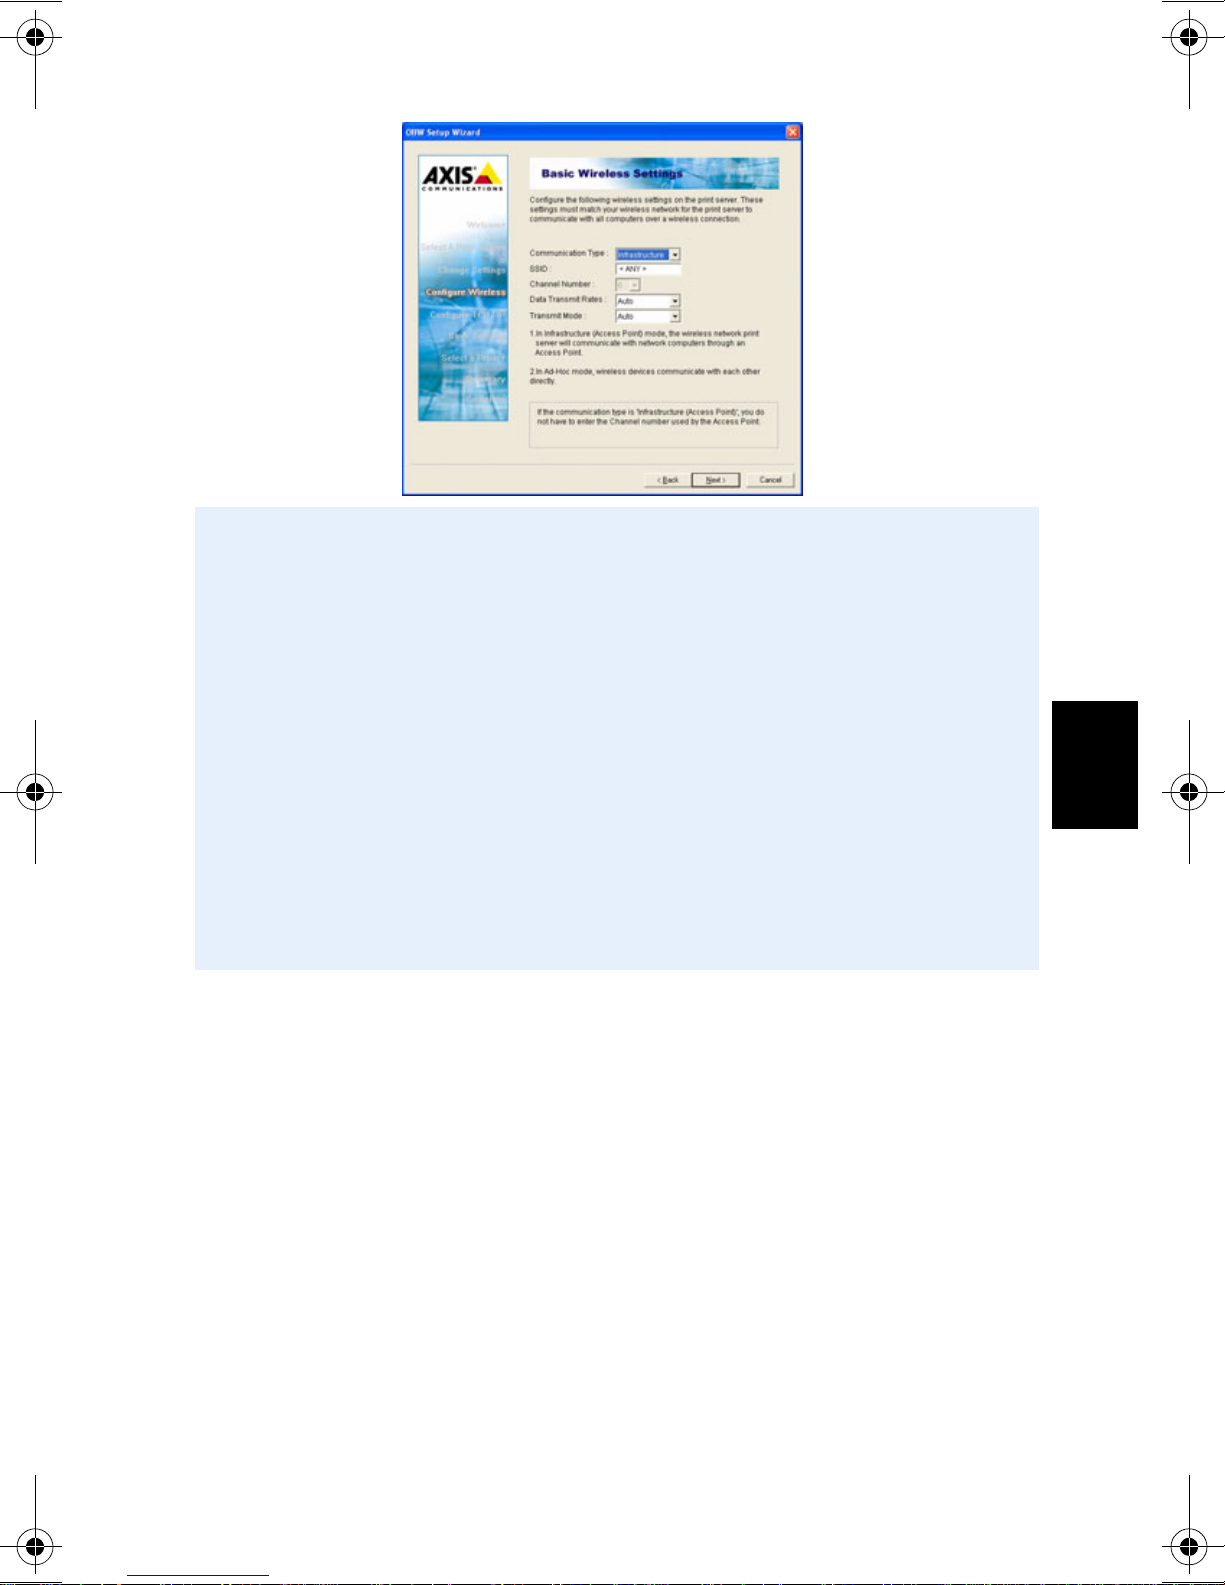
4. In the Change Settings screen, select Yes to change the
settings e.g. IP address. Otherwise, select No to use the default
settings and go to Installing a printer, on page 18.
The default settings are:
• Infrastructure mode
• SSID = <ANY>
• Data transmit rate = Auto
• Data transmit mode = Auto
• Channel = 6
• Authentication Type = Open System
• Encryption = none
•DHCP enabled
10
Page 11
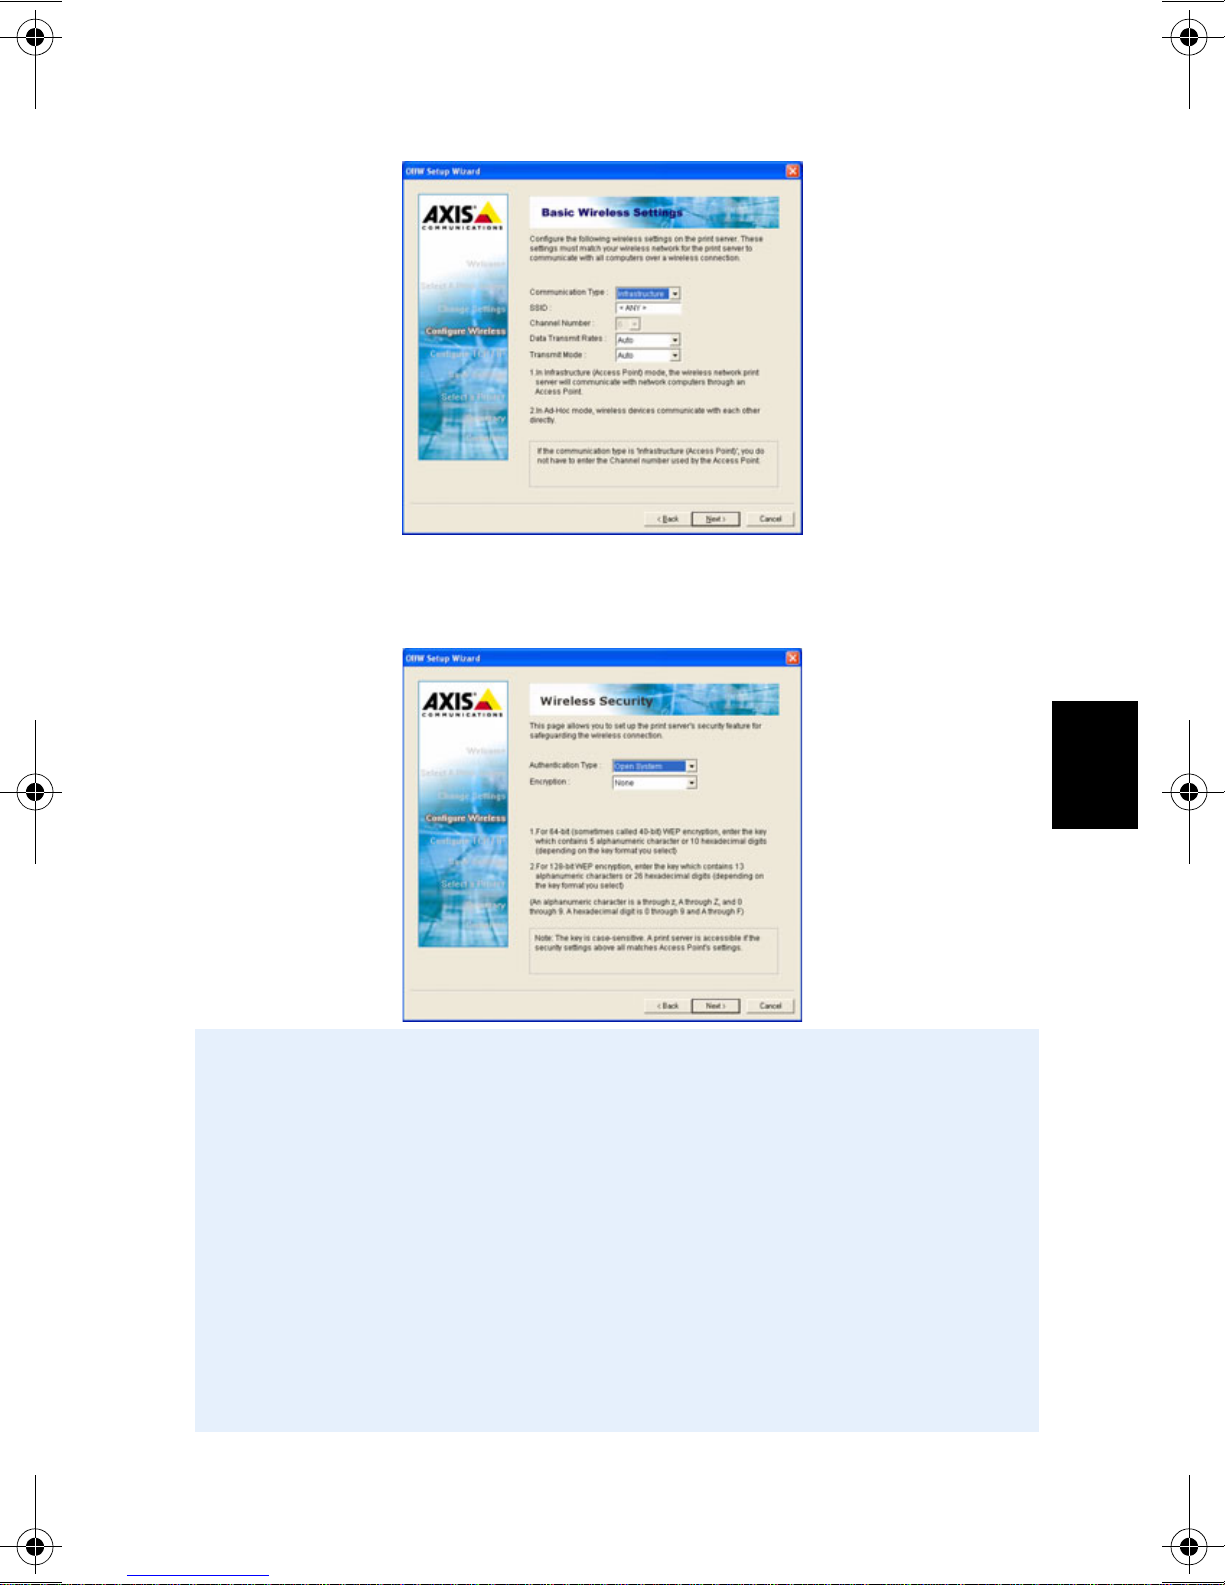
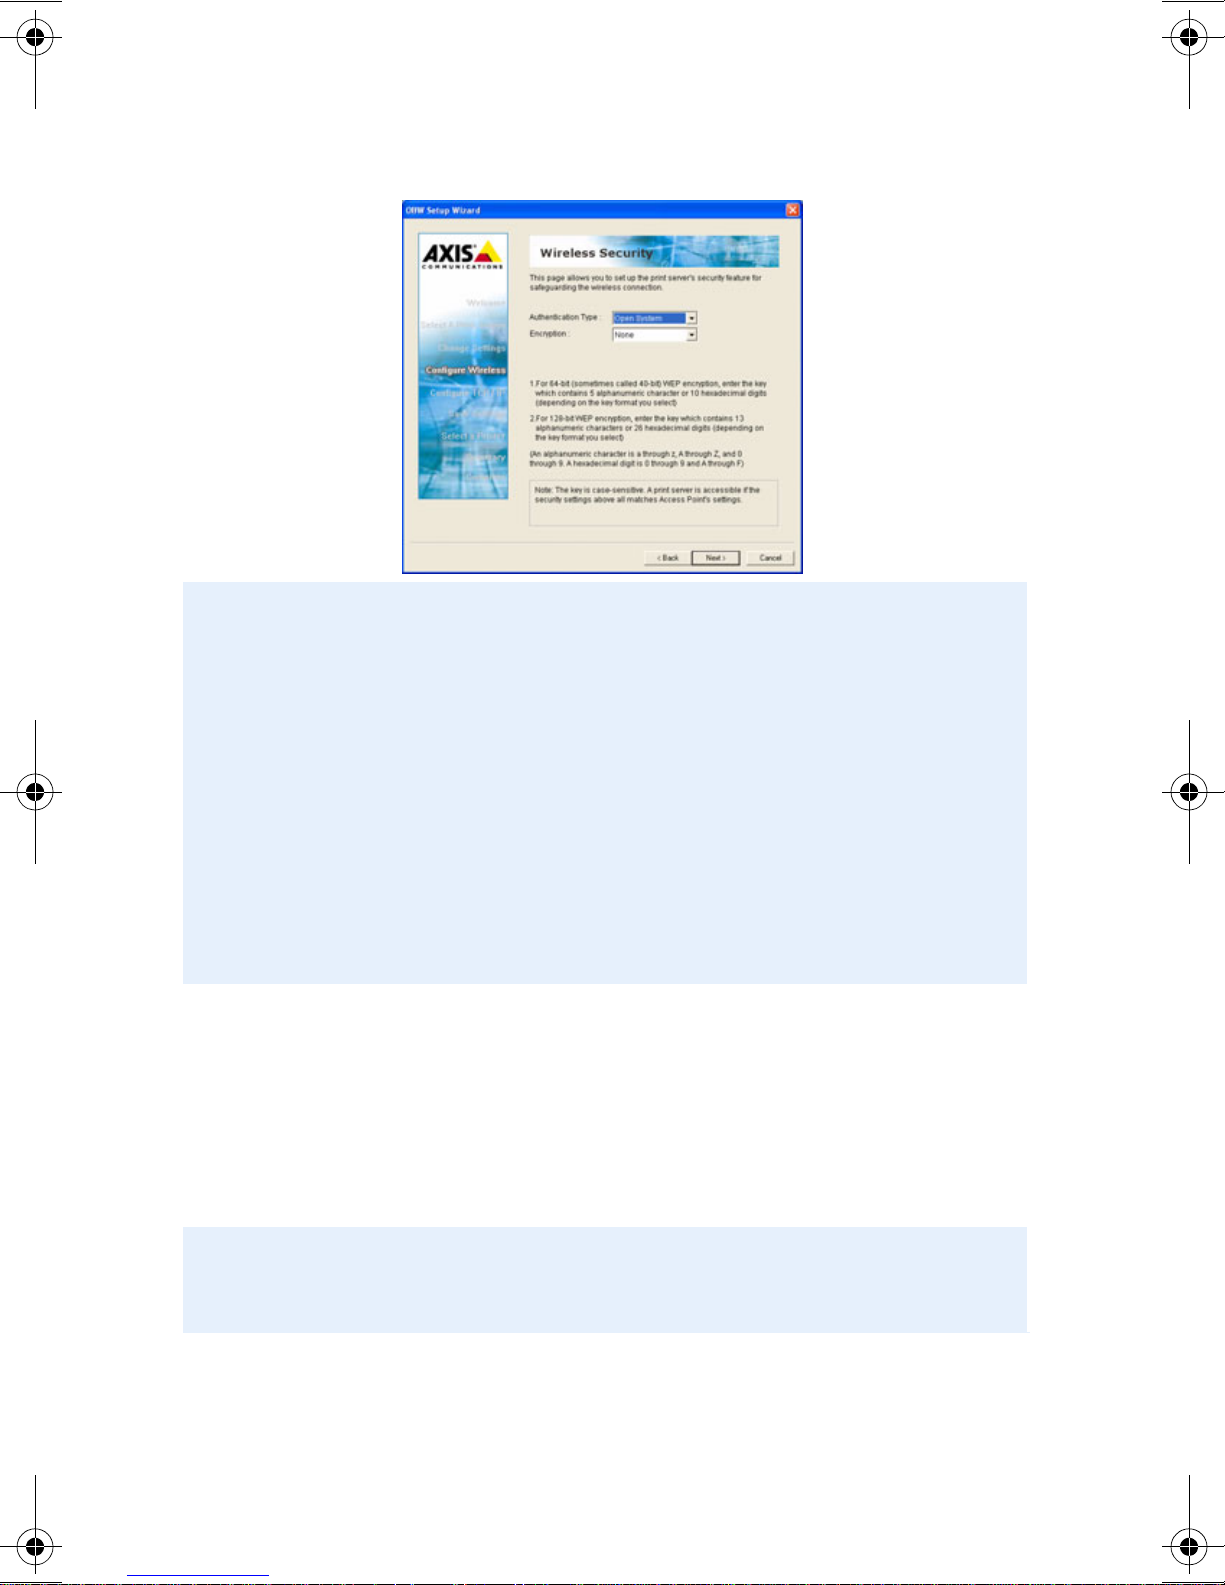
5. On the Basic Wireless Settings screen, enter the SSID for the
Access Point and, if necessary, change the transmit speed and
mode. Click Next.
6. On the Wireless Security screen, select the authentication and
encryption (if any) used by the Access Point and click Next.
• Select the Authentication Type used in your wireless network:
- Open System
- Shared Key
- WPA-PSK
- WPA2-PSK
• Select the encryption used in your wireless network. The options will
depend on the authentication type used. Note that CCMP (Counter Mode
CBC MAC Protocol) is sometimes known as AES (Advanced Encryption Standard). See the User’s Manual for more information on the different encryption types.
• If using WEP encryption, enter the Key Format and WEP Key or if using
WPA or WPA2, enter the Pre-shared Key.
ENGLISH
11
Page 12

7. On the TCP/IP Settings screen, specify a fixed IP address,
netmask and gateway for the print server (highly recommended)
or use a dynamic IP address. Click Next.
8. Check the settings in the Save Settings screen before they are
uploaded to the print server.
It is possible to verify the identity of the print server by comparing the public
key in the Save Settings screen with the test page.
If the settings in the print server do not match those in the Access Point,
communication with the print server may be lost. If this happens, reset the print
server and start over.
9. Continue by installing a printer, see Installing a printer, on page
18.
12
Page 13

Setup in Diagnostic Mode
This procedure works for setting up a print server when using an
Ad-Hoc network, the Access Point is encrypted or the print server
has connected to the wrong Access Point.
Before You Start:
• Ensure that the TCP/IP protocol is installed on your computer.
• Ensure that the print server’s DIP switch is switched to DIAG.
• Use a computer with a wireless card as you will connect directly to
the print server to configure it.
1. On your computer, run the software utility for the wireless ca rd
in your computer and change it to Ad-Hoc (i.e. PEER-TO-PEER)
mode, with the following settings:
• SSID = WLAN-PS
•Channel = 6
2. Click Connect (or similar) to establish communication with the
print server. Make sure a connection is established.
3. Insert the AXIS OfficeBasic USB Wireless G CD into your
CD-drive.
4. Select Setup Wizard to install the wireless print server and
configure the connected printer.
The Wizard will automatically install these components in
C:\Program Files\Axis Communications\AXIS OBW Wizard:
• AXIS OBW Wizard.exe
• AXIS OBW Network Printer Port. DLL (Wireless Print Monitor)
After installation, AXIS OBW Wizard will be available from Start |
Programs | Axis Communications.
ENGLISH
AXIS OBW Wizard will start in the same language as your operating
system, see Technical Specifications, on page 124.
5. From the Select A Print Server screen, select the print server that
you want to configure and click Next.
13
Page 14
6. In the Change Settings screen, select Yes to change the
settings (the password is not required initially).
14
Page 15
7. On the Basic Wireless Settings screen, select the appropriate
wireless settings.
Ad-Hoc mode:
• Change Communication Type to Ad-Hoc
•Enter an SSID for the print server, e.g. Office Printer
• Select the wireless Channel used by the wireless card
Infrastructure mode - for an encrypted Access Point or to change
Access Point:
• Leave Communication Type as Infrastructure
• Enter the SSID of the Access Point
• Channel is not used
• The Data Transmit Rates and Transmit Mode should be set to
match the Access Point, the default is Auto
ENGLISH
15
Page 16
8. On the Wireless Security screen, set the wireless security
settings to those used by the wireless card if using Ad-Hoc
mode or those used by the Access Point if using Infrastructure
mode. Click Next.
• Select the Authentication Type to be used in your wireless network:
- Open System
- Shared Key
- WPA-PSK
- WPA2-PSK
• Enter the encryption used in your wireless network. The options will depend
on your authentication type used. Note that CCMP (Counter Mode CBC
MAC Protocol) is sometimes known as AES (Advanced Encryption Standard).
See the User’s Manual for more information on the different encryption
types.
• If using WEP encryption, enter the Key Format and WEP Key or if using
WPA or WPA2, enter the Pre-shared Key.
9. On the TCP/IP Settings screen, specify an IP address or use a
dynamic IP address for the print server, a fixed IP address is
highly recommended. Click Next.
10. Check the settings in the Save Settings screen before they are
uploaded to the print server.
If the settings in the print server do not match those in the Access Point,
communication with the print server may be lost. If this happens, reset the print
server and start over.
11. On the Select a Printer screen, click Cancel (as you will
configure the printer later).
12. Move the DIP switch to NOR to restart the print server.
16
Page 17

13. The wireless card must be configured to reconnect to the print
server if using Ad-Hoc mode (run your software for the wireless
card again, keep it in Ad-Hoc mode and adjust settings
according to those set in steps 7 and 8.
14. If using a computer with a wireless card to talk to the Access
Point in Infrastructure mode, reconfigure the wireless card to
reconnect to the Access Point.
15. Run the Wizard again, but do not change the print server
settings, continue with Installing a printer, on page 18.
ENGLISH
17
Page 18
Installing a printer
This procedure is used when you have configured the print server
and want to install a printer. To install additional printers, run the
wizard again, but do not change the print server’s settings.
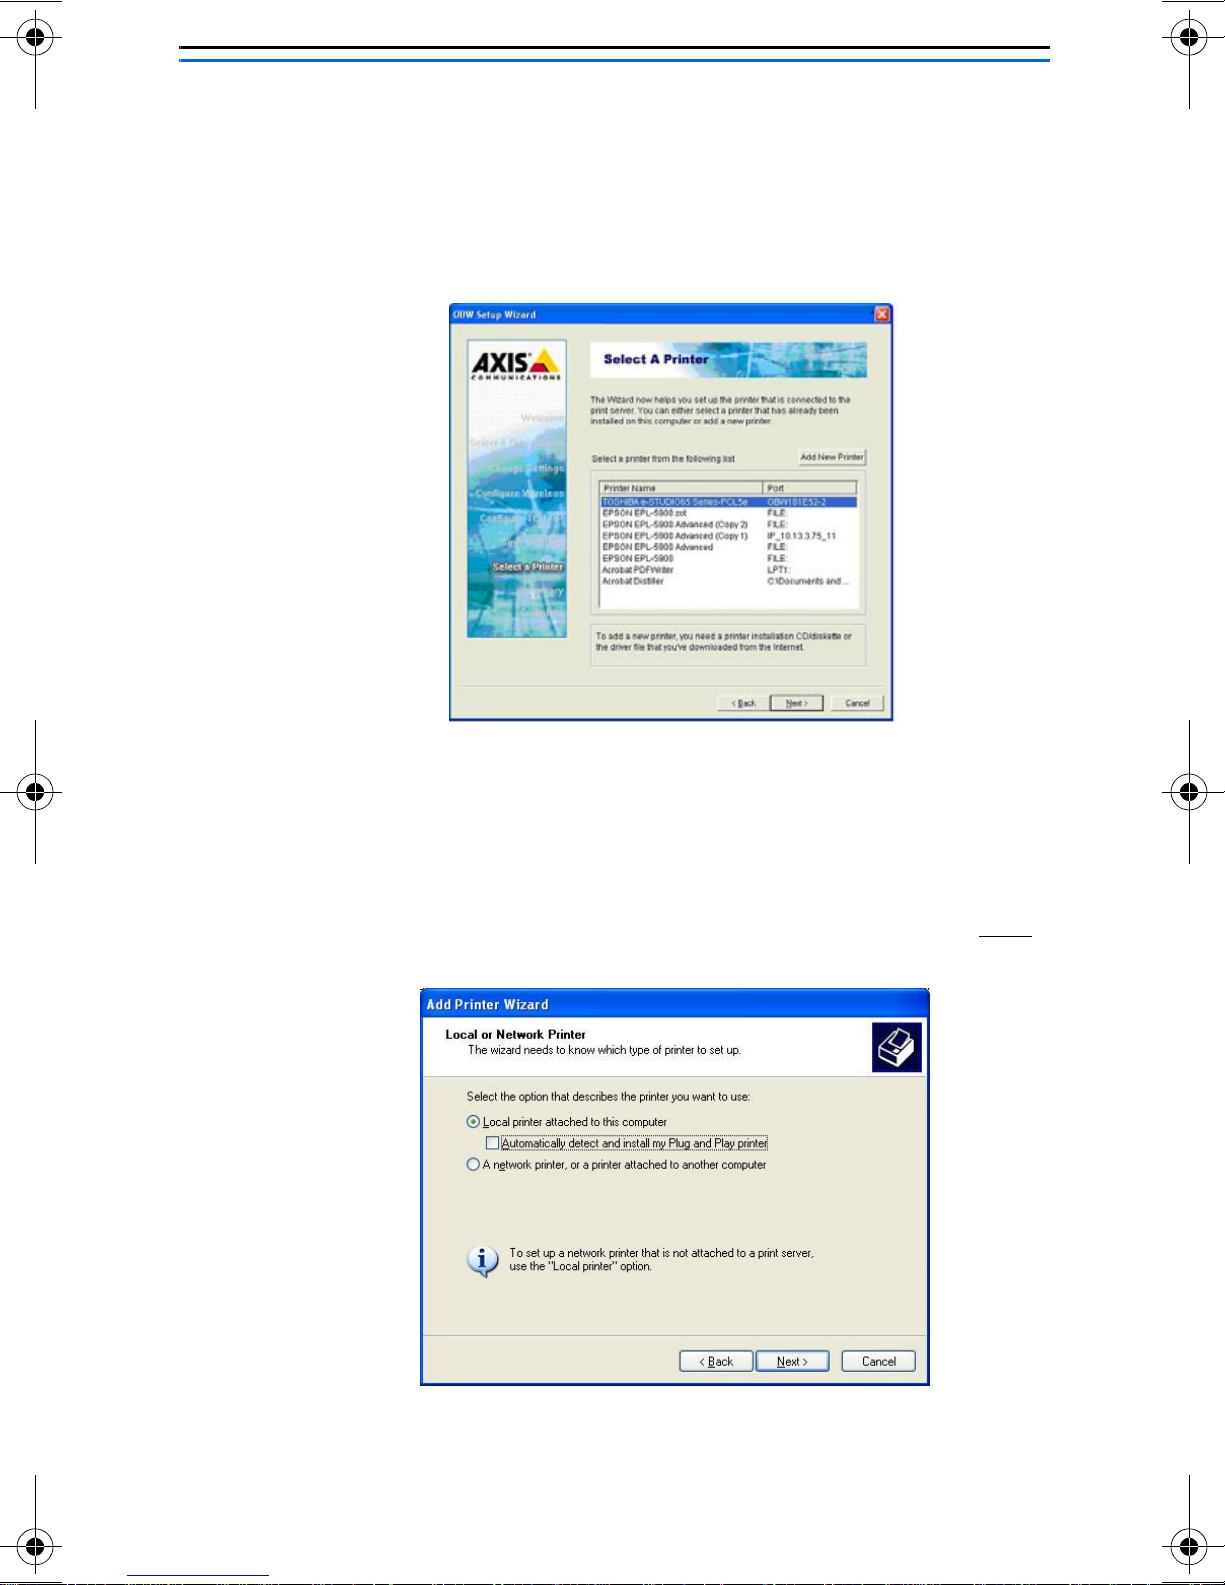
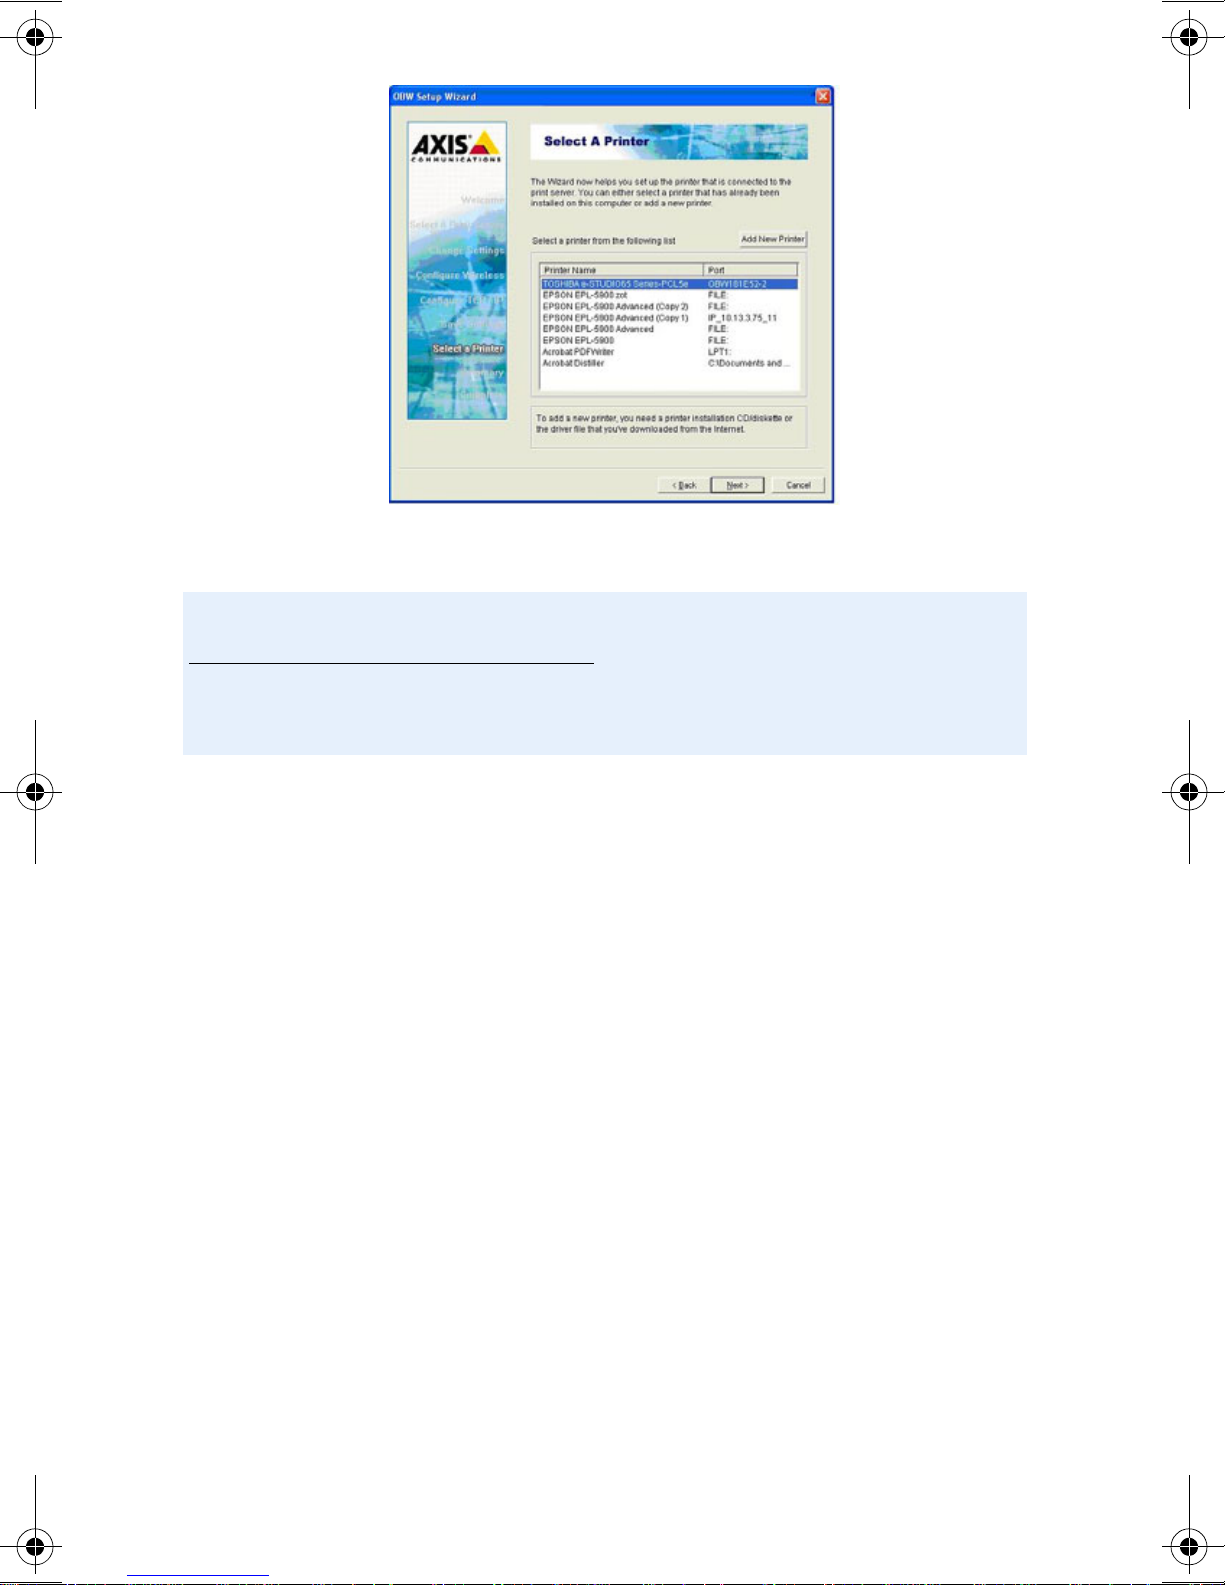
1. Select Add New Printer.
Figure: Select Add New Printer
2. Click Add New Printer to launch Windows Add Printer Wizard.
Click Next and select Local Printer, make sure the Automatically
detect and install my Plug and Play printer check box is NOT
checked:
18
Page 19
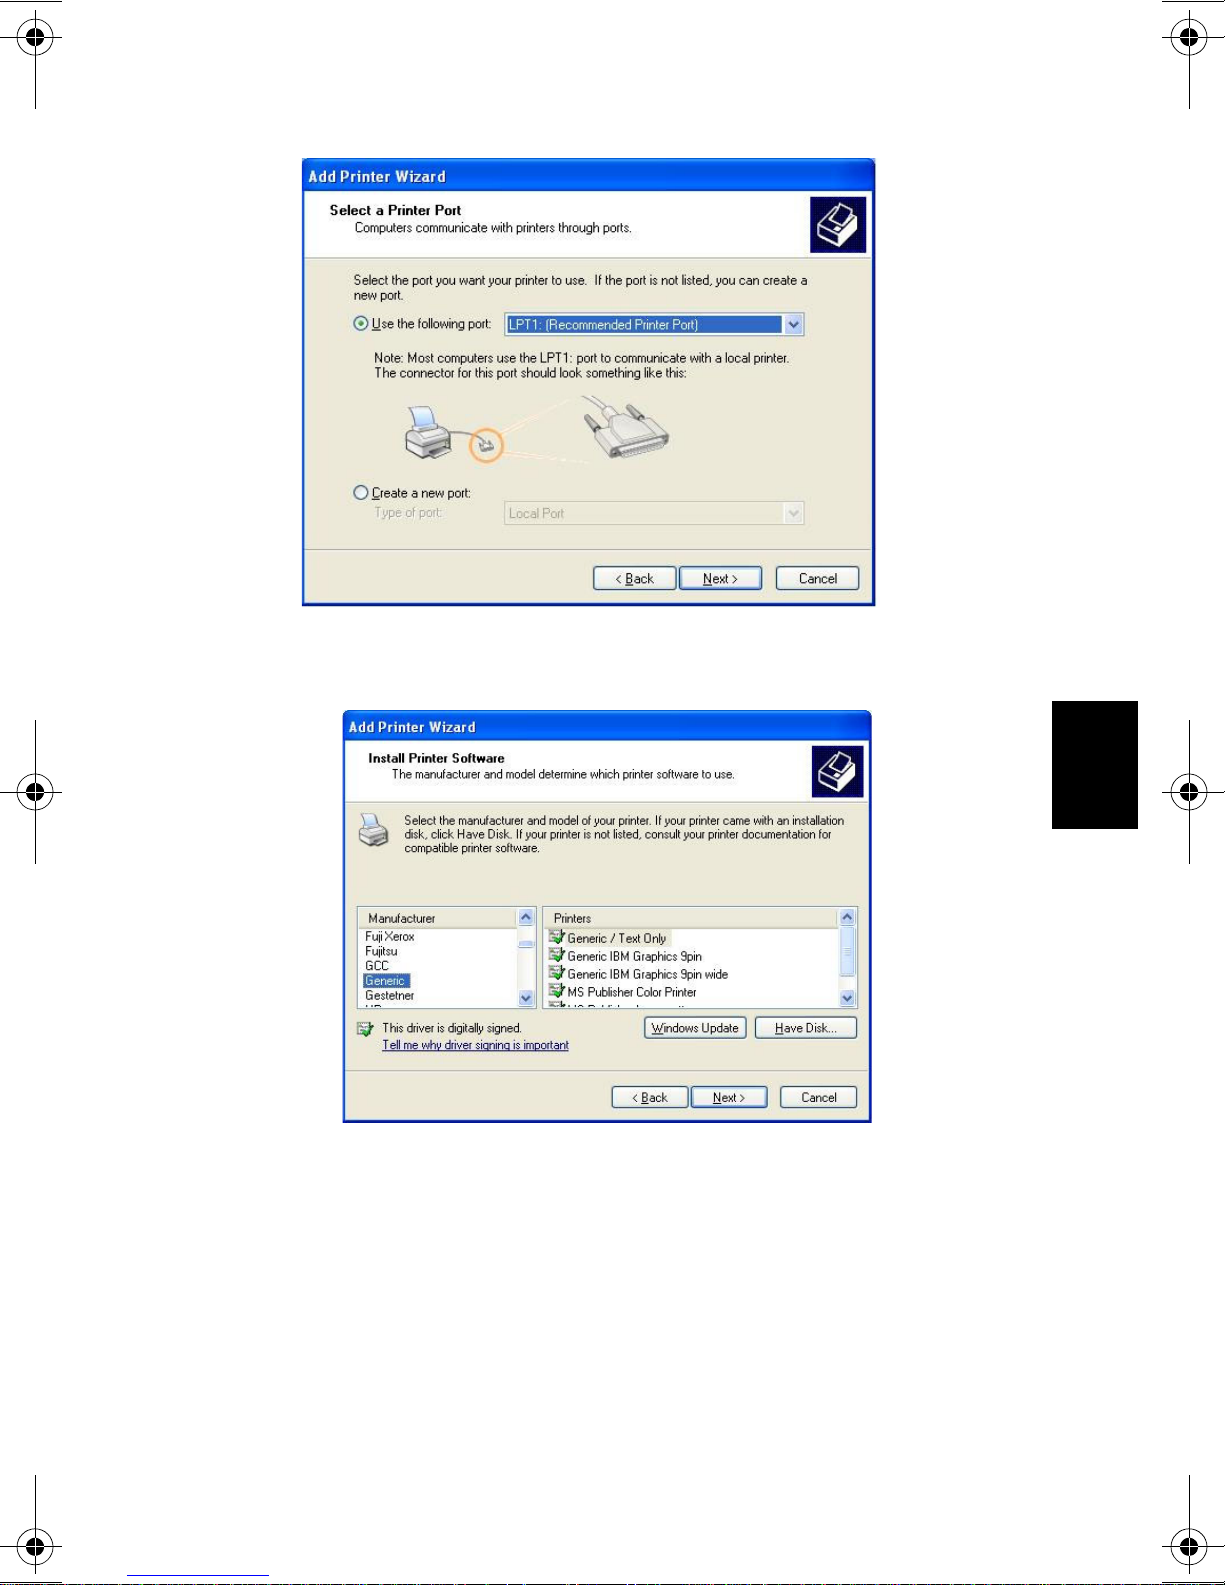
3. Make sure the Use the following port radio-button is clicked and
select LPT1: (Recommended Prin ter Port) from the drop-down
list. Click Next.
4. Select Manufacturer and Printer from the driver lists.
Click Next.
5. If you already have the printer’s driver installed, you will be asked
whether to keep it or to replace it. Click Next. Supply a name for
ENGLISH
the printer and choose whether you want to make it your default
printer. Click Next.
6. Choose whether you want to share the printer with other network
users, print a test page, etc. Select the appropriate radio button
and click Next and Finish.
19
Page 20
7. Click Next => Finish.
If you wish to install more print servers, start AXIS OBW Wizard
from your Windows Start menu
: Start | Programs | Axis
Communications | AXIS OBW Wizard and repeat the
installation procedure.
See the AXIS OfficeBasic USB Wireless G User’s Manual for
alternative Windows configuration methods. The User’s Manual is
located on the AXIS OfficeBasic USB Wireless G CD and on
www.axis.com
20
Page 21
Printer Installation - Mac OS X
Rendezvous and AppleTalk printing for Mac OS X are described here.
For instructions on IP Printing and printing from older Mac OS
environments, please see the AXIS OfficeBasic USB Wire less G User’s
Manual on the CD or www.axis.com
Rendezvous Printing in Mac OS X
1. From the Apple menu, select Go | Applications | Utilities and
start the Print Center.
2. Click Add in the Printer List.
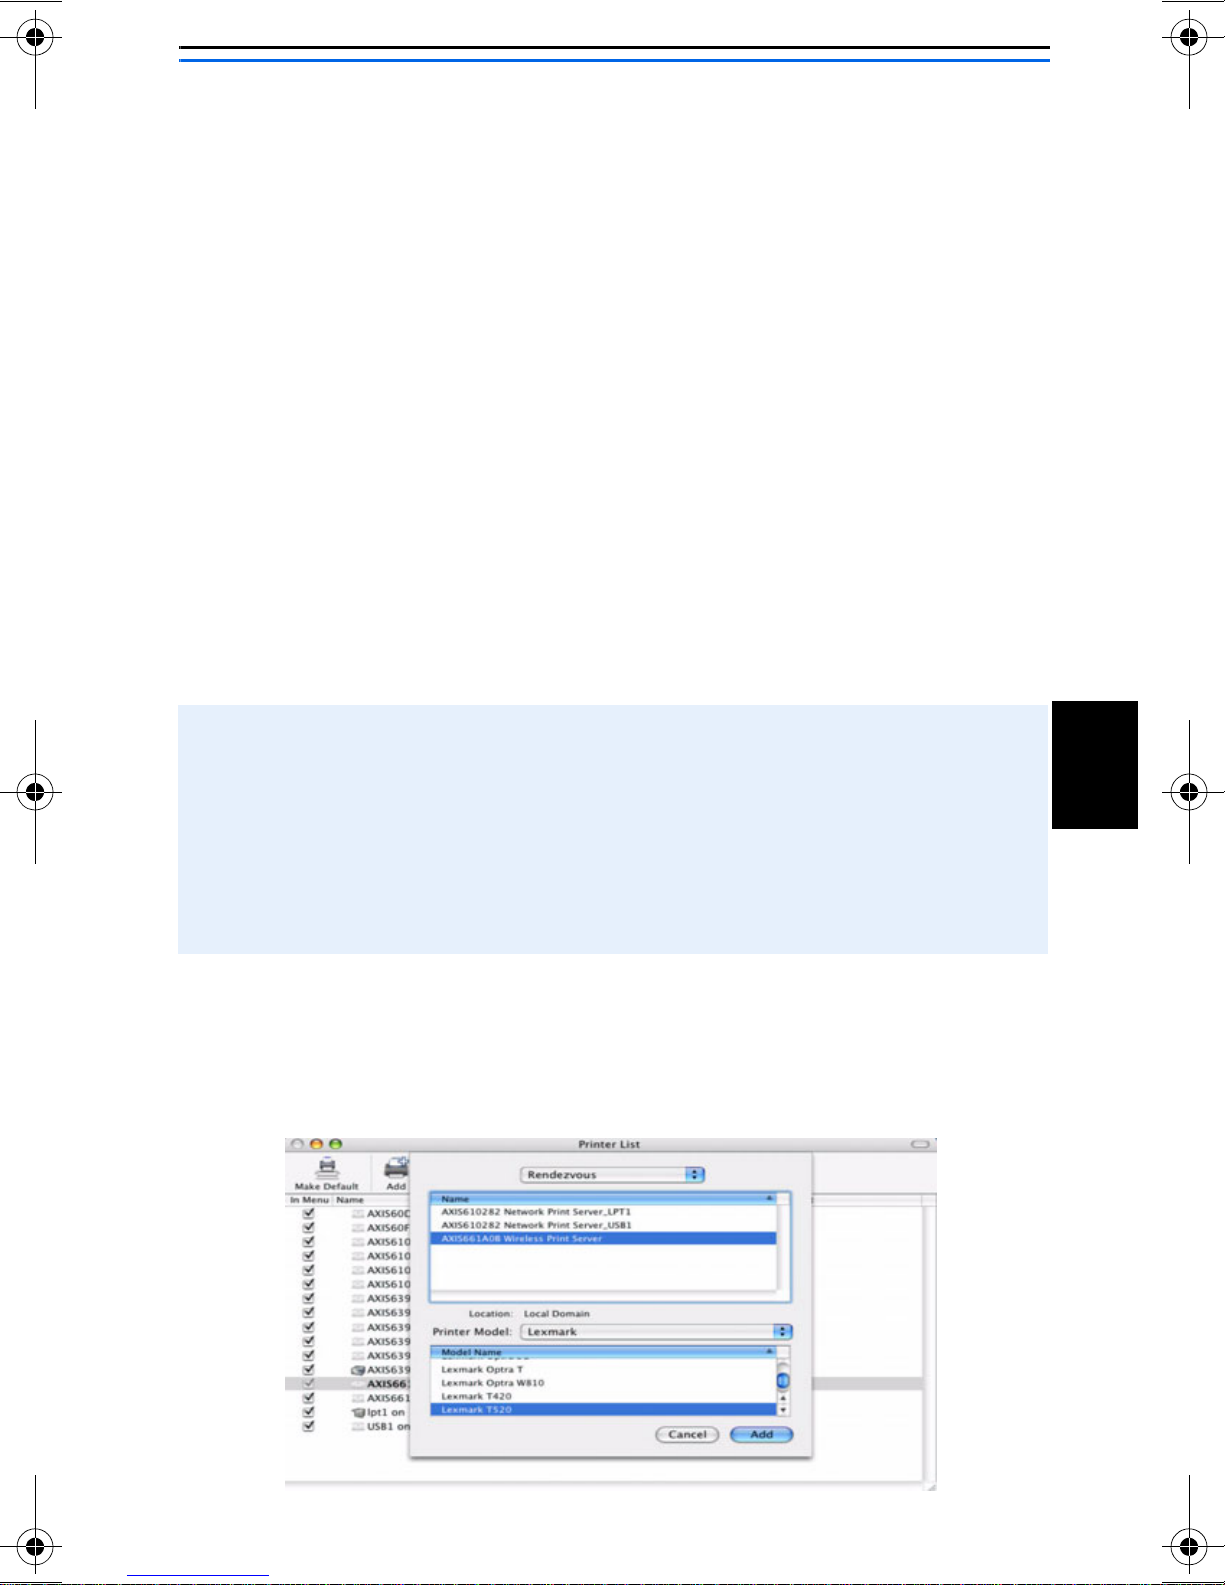
3. From the drop-down list, select Rendezvous.
4. Highlight the printer you want to install, the default print
server name is AXISxxxxxx Wireless Print Server, where the Xs
represent the last six digits of the print server’s serial number.
• You can change the print server name in the print server’s web
interface: Setup | System | Print Server Name. This will also
change the print server’s service name accordingly.
• You can also change the service name from Setup | TCP/IP|
Rendezvous | Service Name (overrides Print Server Name
setting).
5. Select printer manufacturer and model from the drop-down list
(if the PPD for the connected printer is already installed then
the Printer Manufacturer and Model are selected
automatically).
ENGLISH
21
Page 22
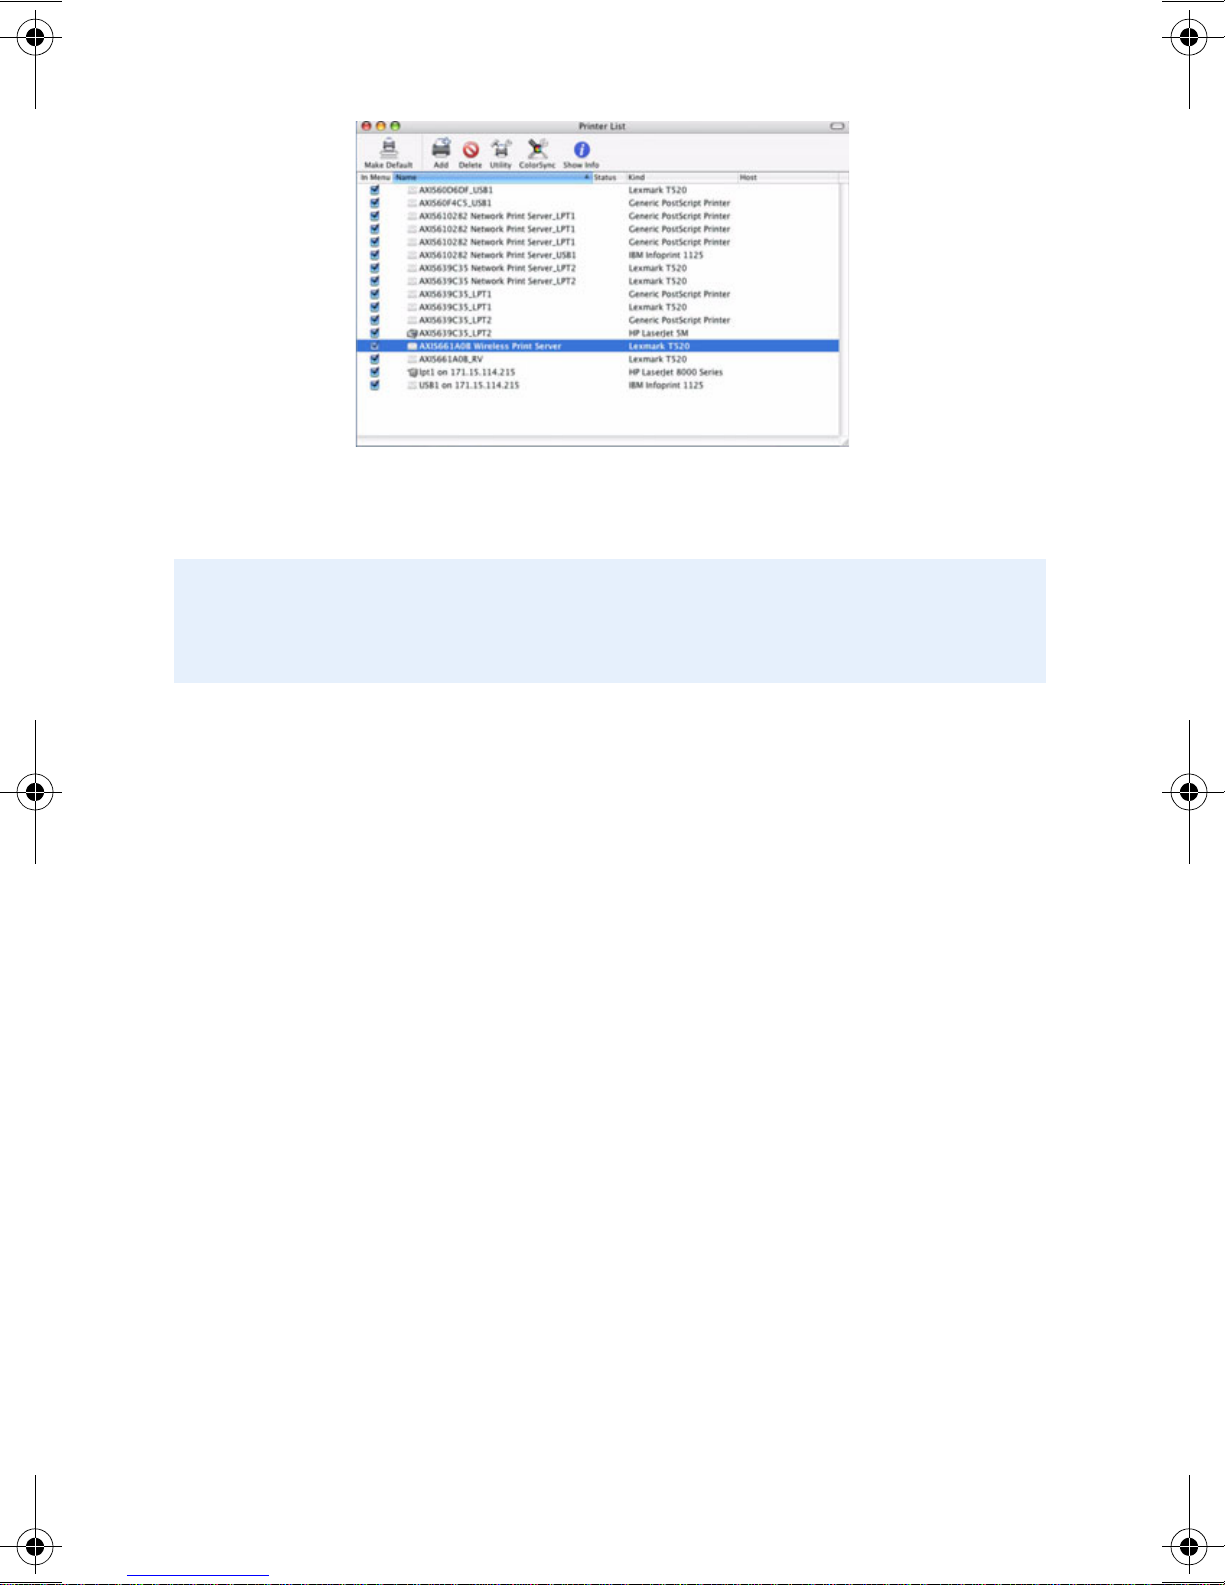
6. Click Add to finish the installation, the wireless printer ha s now
been added to the Printer List.
If you wish to configure printer settings, click Printers | Con-
figure Printer.
If the print server name or service name is changed, the print server
must be removed from the Printer List and then reinstalled with the
new Rendezvous service name.
Appletalk Printing in Mac OS X
1. In the print server’s web interface, select Setup | AppleTalk.
2. In the AppleTalk Zone field, enter the zone in which your Mac
OS operates. Click Save and Restart.
3. From the Apple menu, select Go | Applications | Utilities and
start the Print Center.
4. Click Add in the Printer List.
5. Select AppleTalk from the top drop-down menu.
6. Select the AppleTalk zone in which your Mac OS operates (same
as entered above).
7. Your networked printer will appear in the Printer List (the
default name is AXxxxxxx_USB, where the x represent the last
6 digits of the print server’s serial number).
8. From the Printer Model drop-down list, select the printer
manufacturer and model. Click Add.
22
Page 23

Web-based Print Server Management
Axis print server management and configuration is done from a Web
interface:
1. Enter the print server’s IP address in the Location/Address field
of your standard Web browser. Press Enter.
2. The Wireless Print Server page will appear. From here you can
configure all print server settings.
Notes:
A quick way of finding the print server’s IP address is to press the reset
button for 5 seconds to print a test page. The DHCP address or static IP
address is displayed on the test page.
Tip:
To change these print server settings in its Web interface:
• Print server’s IP address: go to Setup | TCP/IP
• Wireless settings: go to Setup | Wireless
ENGLISH
• The print server’s password: go to Setup | System
23
Page 24

Print Server Management with the Reset
Button
The reset button can be used for several operations:
Print a test page:
The DIP switch can be set on “NOR” or “DIAG” when printing a test page.
Hold down the reset button for 5 seconds. The test page will be
printed on the connected printer.
The test page displays information about the print server’s IP address,
MAC address, subnet mask, default gateway and it also lists the Access
Points in the vicinity.
Perform a Factory Default:
1. Verify that the DIP switch is on “NOR”.
2. Disconnect the external power supply.
3. Hold down the reset button and reconnect the external power
supply.
4. Wait 10 seconds.
5. Release the reset button, the print server will restart.
Performing a factory default will erase all settings to default and should be performed with caution! The
default settings will be reset to:
• Infrastructure mode
• SSID = <ANY> (will connect with the Access Point that has the best signal in your wireless network)
• Channel = 6
• Data transmit rate = Auto
• Transmit mode = Auto
• Authentication Type = Open System
• Encryption = None
• DHCP = Enabled
24
Page 25

Troubleshooting
Connecting to Print Server
If you are unable to find the print server when running the Wizard,
print a test page and check that the print server has found an
Access Point, i.e. see if there is an ESSID printed on the test page.
Printing Test Page
If you experience problems when printing a test page, do the
following:
• Make sure that your printer is not host based. Host based print-
ers do not work with any print server models.
• Try another printer as your printer may not have the correct font
installed.
ENGLISH
25
Page 26

Printing
Check the following if you experience problems when trying to
print:
• Check that the wireless network interface is properly configured
in the workstation/laptop trying to access the print server.
• All communicating clients must be in the same operating mode,
i.e. Ad-Hoc or Infrastructure mode.
• Check that the wireless security protocols are set according to
your wireless network settings.
• Check that the radio frequency channel setting is the same on all
communicating clients and that the channel is set according to
the requirements in your country.
Frequency bands and channels:
Country Frequency Available Channels Default Channel
Europe 2.412-2.472 GHz 1-13 11
France 2.457-2.472 GHz 10-13 (indoor use*) 11
Japan 2.484 GHz 14 14
US/Canada 2.412-2.462 GHz 1-11 11
* (France) outdoor use permitted on private property with prior authorization
26
Page 27

Lieferumfang
Kontrollieren Sie bei Erhalt den Lieferumfang anhand der folgenden
Inventarliste. Wenden Sie sich bei fehlenden oder beschädigten
Komponenten an Ihren Händler. Das gesamte Verpackungsmaterial
ist recyclingfähig.
Druckerserver Druckerserver AXIS OfficeBasic USB Wireless G
Netzstecker Modell PS-N für Australien, Europa, Großbritannien, USA/Japan
USB-Kabel USB 2.0-Kabel, Länge: 0,7 m
CD Dokumentation und Installationssoftware
Dokumentation Installationsanleitung (dieses Dokument)
Übersicht
Dieses Dokument enthält eine Installationsanleitung für den
Druckerserver AXIS OfficeBasic USB Wireless G unter Windows und
Mac OS X. Die Installation unter Mac OS 9.1 oder älteren
Betriebssystemen wird im Benutzerhandbuch beschrieben.
Die Anweisungen in diesem Dokument basieren auf den Einstellungen
in einem neuen AXIS OfficeBasic USB Wireless G. Wie Sie einen
bereits konfigurierten AXIS OfficeBasic USB Wireless G zurücksetzen,
entnehmen Sie dem Abschnitt Druckerserver-Verwaltung per
Reset-Taste auf Seite 48.
Eine detaillierte Beschreibung dieses Produkts entnehmen Sie dem
AXIS OfficeBasic USB Wireless G-Benutzerhandbuch. Das
Benutzerhandbuch befindet sich auf der AXIS OfficeBasic USB
Wireless G-CD und ist im Internet unter www.axis.com abrufbar.
DEUTSCH
27
Page 28

Drahtlos-Betriebsmodi
Der Druckerserver AXIS OfficeBasic USB Wireless G kann in den
Netzwerkmodi Infrastructure und Ad Hoc mit den Protokollen
802.11b und 802.11g für die drahtlose Datenübertragung
verwendet werden.
Infrastructure-Modus
Im Infrastructure-Modus kommunizieren Computer mit dem
Druckerserver über einen Zugangspunkt (Access Point). Bei diesem
Zugangspunkt handelt es sich um ein Hardwaregerät, das mit dem
Druckerserver kommuniziert. Dieses Gerät kann mit Computern in
einem drahtgebundenen lokalen Ne tzwerk (LAN) oder drahtlos mit
Computern verbunden werden, die über eine entsprechende
Drahtlos-Karte verfügen.
Wie Sie den Druckerserver in einem Infrastructure-Netzwerk
einrichten, entnehmen Sie dem Abschnitt Einrichtung im
Infrastructure-Modus, auf Seite 31.
28
Page 29
Ad Hoc-Modus (Peer-to-Peer)
Computer mit einer Drahtlos-Karte können direkt mit dem
Druckerserver kommunizieren. (Dabei wird kein Zugangspunkt
verwendet.) Wie Sie den Druckerserver in einem Ad hoc-Netzwerk
einrichten, entnehmen Sie dem Abschnitt Einrichtung im
Diagnosemodus, auf Seite 36.
DEUTSCH
29
Page 30
Hardware-Installation
1. Schalten Sie den Drucker aus.
2. Verbinden Sie den Druckerserver über das beiliegende
USB-Kabel mit Ihrem Drucker.
3. Schalten Sie den Drucker ein.
4. Verbinden Sie den Netzstecker mit dem Netzanschluss an der
Seite des drahtlosen Druckerservers.
5. Warten Sie 1 Minute, bis alle LEDs aufgehört haben zu blinken.
(Die WLAN-LED blinkt weiter, wenn Daten übertragen werden.)
6. Drücken Sie die Reset-Taste am Druckerserver für die Dauer von
5 Sekunden. Daraufhin wird am angeschlossenen Drucker eine
Testseite ausgegeben. Diese enthält Informationen zu
IP-Adresse, Firmware-Nummer usw. des Dr ucker s er ver s .
Netzsteckeranschluss
DIP-Schalter:
NOR = Normalmodus (Normal Mode)
DIAG = Diagnosemodus (Diagnostic Mode)
Reset-Taste:
- Einmal drücken, um den Druckerserver neu zu starten.
- 5 Sekunden drücken, um eine Testseite auszugeben.
USB-Anschluss
USB-LED
WLAN-LED
Stromversorgungs-LED
Fahren Sie mit Einrichtung im Infrastructure-Mo dus, auf Seite 31
oder Druckerinstallation unter Mac OS X, auf Seite 44 fort.
30
Page 31

Einrichtung im Infrastructure-Modus
Diese Vorgehensweise gilt für die Einrichtung eines Druckerservers im
Infrastructure-Modus, wenn der Zugangspunkt ohne Verschlüsselung
arbeitet. Wenn der Zugangspunkt mit Verschlüsselung arbeitet,
fahren Sie mit dem Abschnitt Einrichtung im Diagnosemodus, auf
Seite 36 fort.
Erste Schritte:
• Überprüfen Sie die vom Zugangspunkt verwendete SSID.
• Überprüfen Sie die Netzwerkeinstellungen, z.B. verfügbare
IP-Adressen, Netzmaske und Gateway.
• Stellen Sie sicher, dass das TCP/IP-Protokoll auf Ihrem Computer
installiert ist.
• Vergewissern Sie sich, dass sich der DIP-Schalter am Druckerserver
in der Stellung NOR befindet.
1. Legen Sie die AXIS OfficeBasic USB Wireless G-CD in das
CD-Laufwerk ein.
2. Führen Sie den Setup Wizard aus, um den drahtlosen Druckerserver
zu installieren und den angeschlossenen Drucker zu konfigurieren.
Er installiert diese Komponenten automatisch unter C:\Programme\Axis
Communications\AXIS OBW Wizard:
• AXIS OBW Wizard.exe
• AXIS OBW Network Printer Port.DLL (Drahtlos-Druckmonitor)
Nach der Installation kann der AXIS OBW Wizard über Start |
Programme | Axis Communications aufgerufen werden.
Der AXIS OBW Wizard startet mit der Sprache Ihres Betriebssystems,
siehe Technical Specifications, auf Seite 124.
DEUTSCH
31
Page 32

3. Unter Druckerserver auswählen erscheinen alle gefundenen
drahtlosen Druckerserver. Wählen Sie den zu konfigurierenden
Druckerserver aus und klicken Sie auf Weiter.
Wenn keine Druckerserver gefunden werden, überprüfen Sie Folgendes:
• Ihr Netzwerk enthält keinen Zugangspunkt: Sie verwenden ein Ad
Hoc-Netzwerk, fahren Sie mit dem Abschnitt Einrichtung im
Diagnosemodus, auf Seite 36 fort.
• Wenn der Zugangspunkt mit Verschlüsselung arbeitet und bzw.
oder im Diagnosemodus kein SSID-Verbindungssignal an den
Druckerserver sendet, fahren Sie mit dem Abschnitt Einrichtung im
Diagnosemodus, auf Seite 36 fort.
• Der Druckerserver hat automatisch eine Verbindung mit einem
anderen Zugangspunkt hergestellt: Weisen Sie Ihre Drahtlos-Karte
dem gewünschten Zugangspunkt zu und klicken Sie auf
Aktualisieren oder modifizieren Sie den Zugangspunkt, mit dem
der Druckerserver eine Verbindung hergestellt hat, siehe Abschnitt
Einrichtung im Diagnosemodus, auf Seite 36.
32
Page 33

4. Wählen Sie unter Einstellungen ändern die Option Ja aus, um
Einstellungen zu ändern (z.B. die IP-Adresse). Klicken Sie
andernfalls auf Nein, um die Standardeinstellungen zu nutzen
und fahren Sie mit dem Abschnitt Drucker installieren, auf
Seite 41 fort.
Standardeinstellungen:
• Infrastructure-Modus
• SSID = <BELIEBIG>
• Datenübertragungsrate = Auto
• Datenübertragungsmodus = Auto
•Kanal = 6
• Authentifizierungstyp = Open System
• Verschlüsselung = Keine
•DHCP aktiviert
5. Geben Sie unter Drahtlos-Grundeinstellungen die SSID für
den Zugangspunkt ein. Falls erforderlich, ändern Sie
Datenübertragungsrate und -modus. Klicken Sie auf Weiter.
DEUTSCH
33
Page 34

6. Wählen Sie unter Drahtlos-Sicherheit Authentifizierungstyp
und Verschlüsselung (falls verwendet) für den Zugangspunkt
aus und klicken Sie auf Weiter.
• Wählen Sie den Authentifizierungstyp für Ihr drahtloses Netzwerk aus:
- Open System
- Shared Key
- WPA-PSK
- WPA2-PSK
• Legen Sie die Verschlüsselung für Ihr drahtloses Netzwerk fest. Die Optionen
richten sich nach dem gewählten Authentifizierungstyp. Hinweis: CCMP
(Counter Mode CBC MAC-Protokoll) wird auch als AES (Advanced Encryption
Standard) bezeichnet. Eine eingehendere Beschreibung der verschiedenen
Verschlüsselungstypen entnehmen Sie dem Benutzerhandbuch.
• Wenn Sie eine WEP-Verschlüsselung nutzen, geben Sie Schlüsselformat
und WEP-Schlüssel ein. Wenn Sie eine WPA- oder WPA2-Verschlüsselung
nutzen, geben Sie den Preshared Key ein.
7. Geben Sie unter TCP/IP-Einstellungen eine feste IP-Adresse,
Netzmaske und Gateway für den Druckerserver ein
(ausdrücklich empfohlen). Verwenden Sie alternativ eine
dynamische IP-Adresse. Klicken Sie auf Weiter.
34
Page 35

8. Überprüfen Sie die Angaben unter Einstellungen speichern,
bevor die Informationen zum Druckerserver übertragen werden.
Ein Druckerserver lässt sich identifizieren, indem Sie den unter Einstellungen
speichern angegebenen öffentlichen Schlüssel (Public Key) mit der Testseite
vergleichen.
Wenn die Einstellungen für Druckerserver und Zugangspunkt nicht
übereinstimmen, kann die Kommunikationsverbindung mit dem Druckerserver
unterbrochen werden. Führen Sie in diesem Fall einen Reset für den
Druckerserver durch und wiederholen Sie den Vorgang.
9. Fahren Sie mit der Druckerinstallation fort, siehe Drucker
installieren, auf Seite 41.
DEUTSCH
35
Page 36

Einrichtung im Diagnosemodus
Diese Vorgehensweise gilt für die Einrichtung eines Druckerservers
in einem Ad Hoc-Netzwerk, wenn der Zugangspunkt mit
Verschlüsselung arbeitet oder wenn der Druckerserver eine
Verbindung mit einem falschen Zugangspunkt hergestellt hat.
Erste Schritte:
• Stellen Sie sicher, dass das TCP/IP-Protokoll auf Ihrem Computer
installiert ist.
• Vergewissern Sie sich, dass sich der DIP-Schalter am Druckerserver
in der Stellung DIAG befindet.
• Verwenden Sie einen Computer mit einer Drahtlos-Karte, da für die
Konfiguration eine direkte Verbindung zum Druckerserver
hergestellt wird.
1. Führen Sie auf Ihrem Computer das Dienstprogramm für die
eingebaute Drahtlos-Karte aus und wechseln Sie wie folgt in
den Ad Hoc-Modus (Peer-to-Peer-Modus):
• SSID = WLAN-PS
•Kanal = 6
2. Klicken Sie auf Verbinden (o.s.ä.), um eine Kommunikationsverbindung mit dem Druckerserver herzustellen. Stellen Sie
sicher, dass die Verbindung besteht.
3. Legen Sie die AXIS OfficeBasic USB Wireless G-CD in das
CD-Laufwerk ein.
4. Führen Sie den Setup Wizard aus, um den drahtlosen Druckerserver
zu installieren und den angeschlossenen Drucker zu konfigurieren.
Er installiert diese Komponenten automatisch unter C:\Programme\Axis
Communications\AXIS OBW Wizard:
• AXIS OBW Wizard.exe
• AXIS OBW Network Printer Port.DLL (Drahtlos-Druckmonitor)
Nach der Installation kann der AXIS OBW Wizard über Start |
Programme | Axis Communications aufgerufen werden.
Der AXIS OBW Wizard startet mit der Sprache Ihres Betriebssystems,
siehe Technical Specifications, auf Seite 124.
36
Page 37

5. Wählen Sie unter Druckerserver auswähl e n den zu
konfigurierenden Druckerserver aus und klicken Sie auf Weiter.
6. Wählen Sie unter Einstellungen ändern die Option Ja aus, um Einstellungen zu ändern. (Das Passwort wird vorerst nicht benötigt.)
DEUTSCH
37
Page 38

7. Legen Sie unter Drahtlos-Grundeinstellungen die
entsprechenden Drahtlos-Einstellungen fest.
Ad Hoc-Modus:
• Ändern Sie den Kommunikationstyp zu Ad Hoc.
• Geben Sie eine SSID für den Druckerserver ein, z.B. Bürodrucker
• Wählen Sie den Kanal für die Verbindung der Drahtlos-Karte.
Infrastructure-Modus – bei verschlüsseltem Zugangspunkt oder zum
Wechseln des Zugangspunkts:
• Belassen Sie für den Kommunikationstyp die Einstellung
Infrastructure.
• Geben Sie die SSID für den Zugangspunkt ein.
• Kanal wird nicht verwendet.
•Die Datenübertragungsraten und der Datenübertragungsmodus
sollten so eingestellt werden, dass eine Übereinstimmung mit dem
Zugangspunkt besteht. Die Standardeinstellung lautet Auto
38
Page 39

8. Legen Sie unter Drahtlos-Sicherheit die
Drahtlos-Sicherheitseinstellungen gemäß der Konfiguration für
die Drahtlos-Karte (bei Ad Hoc-Modus) oder gemäß der
Konfiguration für den Zugangspunkt fest (bei
Infrastructure-Modus). Klicken Sie auf Weiter.
• Wählen Sie den Authentifizierungstyp für Ihr drahtloses Netzwerk aus:
- Open System
- Shared Key
- WPA-PSK
- WPA2-PSK
• Legen Sie die Verschlüsselung für Ihr drahtloses Netzwerk fest. Die Optionen
richten sich nach dem gewählten Authentifizierungstyp. Hinweis: CCMP
(Counter Mode CBC MAC-Protokoll) wird auch als AES (Advanced Encryption
Standard) bezeichnet. Eine eingehendere Beschreibung der verschiedenen
Verschlüsselungstypen entnehmen Sie dem Benutzerhandbuch.
• Wenn Sie eine WEP-Verschlüsselung nutzen, geben Sie Schlüsselformat
und WEP-Schlüssel ein. Wenn Sie eine WPA- oder WPA2-Verschlüsselung
nutzen, geben Sie den Preshared Key ein.
9. Geben Sie unter TCP/IP-Einstellungen eine feste IP-Adresse ein
oder verwenden Sie eine dynamische IP-Adresse für den
Druckerserver. Eine feste IP-Adresse wird ausdrücklich
empfohlen. Klicken Sie auf Weiter.
DEUTSCH
39
Page 40

10. Überprüfen Sie die Angaben unter Einstellungen speichern,
bevor die Informationen zum Druckerserver übertragen werden.
Wenn die Einstellungen für Druckerserver und Zugangspunkt nicht
übereinstimmen, kann die Kommunikationsverbindung mit dem Druckerserver
unterbrochen werden. Führen Sie in diesem Fall einen Reset für den
Druckerserver durch und wiederholen Sie den Vorgang.
11. Klicken Sie unter Drucker auswählen auf Abbrechen (da die
Konfiguration später erfolgt).
12. Bringen Sie den DIP-Schalter in die Stellung NOR, um den
Druckerserver neu zu starten.
13. Die Drahtlos-Karte muss so konfiguriert werden, dass sie im Ad
Hoc-Modus eine erneute Verbindung zum Druckerserver
herstellt. (Rufen Sie erneut das Dienstprogramm für die
Drahtlos-Karte auf, belassen Sie die Einstellung für den Ad
Hoc-Modus und führen Sie eine Konfiguration gemäß Schritt 7
und 8 aus.)
14. Wenn Sie einen Computer mit einer Drahtlos-Karte benutzen,
um im Infrastructure-Modus eine Verbindung zum
Druckerserver herzustellen, konfigurieren Sie die Drahtlos-Karte
so, dass sie eine Verbindung mit dem Druckerserver herzustellen
versucht.
15. Führen Sie den Assistenten erneut aus. Ändern Sie jedoch nicht
die Druckerserver-Einstellungen. Fahren Sie mit Drucker
installieren, auf Seite 41 fort.
40
Page 41

Drucker installieren
Diese Vorgehensweise gilt, wenn der Druckerserver konfiguriert
wurde und der Drucker installiert werden soll. Führen Sie den
Assistenten erneut aus, um weitere Drucker zu installieren. Ändern
Sie jedoch nicht die Druckerserver-Einstellungen.
1. Wählen Sie Drucker hinzufügen aus.
Abbildung: Drucker hinzufügen auswählen
2. Klicken Sie auf Neuen Drucker hinzufügen, um den WindowsAssistenten für die Druckerinstallation zu starten. Klicken Sie
auf Weiter und wählen Sie Lokaler Drucker aus. Vergewissern Sie
sich, dass das Kontrollkästchen Meinen Plug-and-Play Drucker
automatisch finden und installieren NICHT
aktiviert ist:
DEUTSCH
41
Page 42

3. Stellen Sie sicher, dass das Optionsfeld Folgenden Anschluss
verwenden aktiviert ist, und wählen Sie den Eintrag LPT1:
(Empfohlener Druckeranschluss) aus der Dropdown-Liste aus.
Klicken Sie auf Weiter.
4. Wählen Sie Hersteller und Drucker aus den Treibe rlisten aus.
Klicken Sie auf Weiter.
5. Wenn der Druckertreiber bereits installiert ist, werden Sie gefragt,
ob dieser beibehalten oder ersetzt werden soll. Klicken Sie auf
Weiter. Geben Sie einen Namen für den Drucker ein u nd wählen
Sie aus, ob er als Standarddrucker fungieren soll. Klicken Sie auf
Weiter.
42
Page 43

6. Legen Sie fest, ob Sie den Drucker für andere Netzwerkbenutzer
freigeben oder eine Testseite drucken wollen usw. Wählen Sie das
entsprechende Optionsfeld aus. Klicken Sie auf Weiter und Fertig
stellen.
7. Klicken Sie auf Weiter => Fertig stellen.
Um weitere Druckerserver zu installieren, starten Sie den AXIS
OBW Wizard über das Windows-Startmenü
: Start | Programme |
Axis Communications | AXIS OBW Wizard und wiederholen Sie
den Installationsvorgang.
Alternative Konfigurationsmethoden unter Windows entnehmen Sie
dem AXIS OfficeBasic USB Wireless G-Benutzerhandbuch. Das
Benutzerhandbuch befindet sich auf der AXIS OfficeBasic USB
Wireless G-CD und ist im Internet unter www.axis.com abrufbar.
DEUTSCH
43
Page 44

Druckerinstallation unter Mac OS X
Im Folgenden werden Rend ezvous- und AppleTalk-Druck für Mac OS
X beschrieben. Hinweise zum IP-Druck und Drucken in älteren Mac
OS-Umgebungen entnehmen Sie dem AXIS OfficeBasic USB Wireless
G-Benutzerhandbuch auf der CD oder unter www.axis.com.
Rendezvous-Druck unter Mac OS X
1. Wählen Sie im Apple-Menü Gehe zu | Programme |
Dienstprogramme und starten Sie das Print Center.
2. Klicken Sie in der Druckerliste auf Hinzufügen.
3. Wählen Sie in der Dropdown-Liste den Eintrag Rendezvous aus.
4. Markieren Sie den zu installierenden Drucker. Der
standardmäßige Druckerservername lautet AXISxxxxxx
Wireless Print Server, wobei die Buchstaben x für die letzten
sechs Stellen der Druckerserver-Seriennummer stehen.
• Sie können den Namen in der Druckerserver-Webschnittstelle
unter Setup | System | Druckerservername ändern. Dadurch
ändert sich auch der Dienstname des Druckerservers
entsprechend.
•Sie können unter Setup | TCP/IP | Rendezvous | Dienstname
ebenfalls den Dienstnamen ändern. (Diese Angabe überschreibt
die Einstellung für den Druckerservernamen.)
44
Page 45

5. Wählen Sie Druckerhersteller und -modell aus der
Dropdown-Liste aus. (Wenn die PPD für den angeschlossenen
Drucker bereits installiert ist, werden Druckerhersteller und
-modell automatisch ausgewählt.)
6. Klicken Sie auf Hinzufügen, um die Installation abzuschließen.
Der drahtlose Drucker wurde nun in die Druckerliste
aufgenommen.
Um die Druckereinstellungen zu konfigurieren, klicken Sie auf
Drucker | Drucker konfigurieren.
Wenn der Druckerservername oder der Dienstname geändert wird,
muss der Druckerserver aus der Druckerliste entfernt und mit dem
neuen Rendezvous-Dienstnamen erneut installiert werden.
DEUTSCH
Appletalk-Druck unter Mac OS X
1. Wählen Sie in der Druckerserver-Webschnittstelle Setup |
45
Page 46

AppleTalk aus.
2. Geben Sie im Feld AppleTalk-Zone die Zone für Ihr Mac OS ein.
Klicken Sie auf Speichern und Neustart.
3. Wählen Sie im Apple-Menü Gehe zu | Programme |
Dienstprogramme und starten Sie das Print Center.
4. Klicken Sie in der Druckerliste auf Hinzufügen.
5. Wählen Sie aus dem Dropdown-Menü den Eintrag AppleTalk
aus.
6. Wählen Sie die AppleTalk-Zone für Ihr Mac OS aus (identisch
mit dem oben angegebenen Wert).
7. Ihr Netzwerkdrucker erscheint in der Druckerliste (die
Standardbezeichnung lautet AXxxxxxx_USB, wobei x für die
letzten sechs Stellen der Druckerserver-Seriennummer steht).
8. Wählen Sie aus der Dropdown-Liste Druckermodell
Druckerhersteller und -modell aus. Klicken Sie auf Hinzufügen.
46
Page 47

Webbasierte Druckerserver-Verwaltung
Die Axis-Druckerserver-Verwaltung und -Konfiguration wird über
die Webschnittstelle ausgeführt:
1. Geben Sie in der Adresszeile Ihres Standard-Webbrowsers die
IP-Adresse des Druckerservers ein. Drücken Sie die
Eingabetaste.
2. Daraufhin erscheint die Seite Drahtloser Druckerserver. Von
hier aus können Sie alle Servereinstellungen vornehmen.
Hinweise:
Die IP-Adresse des Druckerservers lässt sich schnell ermitteln, indem Sie
die Reset-Taste 5 Sekunden lang drücken und damit eine Testseite
ausgeben. Die DHCP-Adresse oder statische IP-Adresse wird
normalerweise auf der Testseite aufgeführt.
Tipp:
So ändern Sie diese Druckerserver-Einstellungen über die
Webschnittstelle:
• IP-Adresse des Druckerservers: rufen Sie Setup | TCP/IP auf.
• Drahtlos-Einstellungen: rufen Sie Setup | Drahtlos auf.
• Passwort des Druckerservers: rufen Sie Setup | System auf.
DEUTSCH
47
Page 48

Druckerserver-Verwaltung per Reset-Taste
Die Reset-Taste kann für verschiedene Aktionen benutzt werden:
Testseite drucken:
Der DIP-Schalter kann beim Drucken einer Testseite in die Stellung NOR
oder DIAG gebracht werden.
Halten Sie die Reset-Taste für die Dauer von 5 Sekunden gedrückt.
Die Druckseite wird auf dem angeschlossenen Drucker ausgegeben.
Die Testseite enthält z.B. folgende Informationen: IP-Adresse,
MAC-Adresse, Subnetzmaske und Standard-Gateway für den
Druckerserver. Außerdem führt sie die Zugangspunkte in der Umgebung
auf.
Werkseitige Voreinstellungen aufrufen:
1. Vergewissern Sie sich, dass der DIP-Schalter in der Stellung
NOR steht.
2. Trennen Sie das Gerät von der Stromversorgung.
3. Halten Sie die Reset-Taste gedrückt und schließen Sie die
Stromversorgung wieder an.
4. Warten Sie 10 Sekunden
5. Lassen Sie die Reset-Taste los. Der Druckerserver startet neu.
Durch das Aufrufen der werkseitigen Voreinstellungen werden alle Einstellungen auf die Standardwerte
zurückgesetzt. Der Vorgang sollte daher mit größter Vorsicht durchgeführt werden! Es werden folgende
werkseitigen Voreinstellungen aufgerufen:
• Infrastructure-Modus
• SSID = <BELIEBIG> (stellt eine Verbindung mit dem Zugangspunkt her, der das beste Signal in Ihrem
drahtlosen Netzwerk liefert)
• Kanal = 6
• Datenübertragungsrate = Auto
• Datenübertragungsmodus = Auto
• Authentifizierungstyp = Open System
• Verschlüsselung = Keine
•DHCP = aktiviert
48
Page 49

Fehlerbehebung
Verbindung zum Druckerserver
Wenn Sie den Druckerserver beim Ausführen des Assistenten nicht
finden können, drucken Sie eine Testseite und kontrollieren Sie, ob
der Druckerserver einen Zugangspunkt gefunden hat. (Suchen Sie
auf der Seite nach einer SSID.)
Testseitendruck
Gehen Sie wie folgt vor, wenn beim Drucken einer Testseite
Probleme auftreten:
• Stellen Sie sicher, dass Ihr Drucker nicht host-basiert
eingebunden ist. Host-basierte Drucker arbeiten nicht mit
Druckerservern.
• Wählen Sie einen anderen Drucker aus, da Ihr Drucker
möglicherweise nicht die korrekte Schriftart installiert hat.
DEUTSCH
49
Page 50

Drucken
Überprüfen Sie die folgenden Punkte, wenn beim Drucken Probleme
auftreten:
• Stellen Sie sicher, dass die Netzwerkschnittstelle auf dem
Desktop-Computer bzw. Notebook korrekt konfiguriert ist, mit
dem ein Zugriff auf den Druckerserver versucht wird.
• Alle Clients für die Kommunikation müssen im selben Modus
arbeiten, also im Ad Hoc- oder Infrastructure-Modus.
• Vergewissern Sie sich, dass die Drahtlos-Sicherheitsprotokolle
mit Ihren Drahtlos-Netzwerkeinstellungen übereinstimmen.
• Kontrollieren Sie, ob die Einstellung für den Funkfrequenzkanal
auf allen beteiligten Clients identisch ist und der Kanal
entsprechend den Vorgaben des jeweiligen Landes eingestellt
wurde.
Frequenzbänder und -kanäle :
Land Frequenz Verfügbare Kanäle Standardkanal
Europa 2,412-2,472 GHz 1-13 11
Frankreich 2,457-2,472 GHz 10-13 (Innenbereich*) 11
Japan 2,484 GHz 14 14
USA/Kanada 2,412-2,462 GHz 1-11 11
* (Frankreich) Nutzung im Außenbereich auf Privatgelände ohne vorherige
Genehmigung gestattet
50
Page 51

Contenu de l’emballage
Déballez et contrôlez soigneusement tous les élém ents à l’aide de la
liste de contrôle suivante. Contactez votre revendeur si un élément
est absent ou endommagé. Tous les matériaux d'emballage sont
recyclables.
Serveur d'impression Serveur d'impression AXIS OfficeBasi c USB Wir eless G
Transformateur Modèle PS-N pour l’Australie, l’Europe, le Royaume-Uni,
les USA/le Japon
Câble USB Câble USB 2.0 de 0,7 mètre
CD Documentation et logiciel d’installation
Documentation sur papier Guide d’installation (ce document)
Vue d'ensemble
Ce Guide de l’utilisateur comprend les instructions d’installation
pour le serveur d’impression AXIS OfficeBasic USB Wireless G dans
les environnements Windows et Mac OS X. L’installation sous
Mac OS 9.1 ou des systèmes plus anciens est décrite dans le
Manuel de l’utilisateur.
Les instructions de ce guide sont basées sur les paramètres
disponibles dans un nouveau AXIS OfficeBa sic USB Wireless G. Vous
trouverez les instructions pour réinitialiser un AXIS OfficeBasic USB
Wireless G déjà configuré dans Gestion du serveur d’impression avec
le bouton de réinitialisation à la page 72.
Reportez-vous au Manuel de l’utilisateur du serveur AXIS
OfficeBasic USB Wireless G pour davantage d'information sur ce
produit. Le Manuel de l’utilisateur se trouve sur le CD AXIS
OfficeBasic USB Wireless G et sur le site www.axis.com
FRANÇAIS
51
Page 52

Modes de fonctionnement sans fil
Le serveur d’impression AXIS OfficeBasic USB Wireless G peut être
utilisé dans les modes de réseau Infrastructure et Ad-Hoc avec les
protocoles sans fil 802.11b et 802.11g.
Infrastructure
En mode Infrastructure, les ordinateurs communiquent avec le
serveur d’impression en passant d’abord par un Point d’accès. Le
Point d’accès est un dispositif matériel qui communique avec le
serveur d’impression et peut être connecté aux ordinateurs via un
réseau local (LAN) ou, sans f il, à des ordinateurs équipés d’une carte
sans fil.
Pour configurer le serveur d’impression dans un réseau Infrastructure,
voir Configuration en mode Infrastructure, à la page 55.
52
Page 53

Ad-Hoc (Peer to Peer)
Les ordinateurs dotés d’une carte sans fil communiquent
directement avec le serveur d’impression (aucun Point d’accès n’est
alors utilisé). Pour configurer le serveur d’impression dans un réseau
Ad-Hoc, voir Configuration en mode Diagnostic, à la page 60.
FRANÇAIS
53
Page 54

Installation matérielle
1. Mettez l’imprimante hors tension.
2. Connectez le serveur d’impression à votre imprimante à l’aide
du câble USB fourni.
3. Mettez l’imprimante sous tension.
4. Branchez le transformateur AC sur le connecteur de puissance
sur le côté du serveur d’impression sans fil.
5. Attendez 1 minute jusqu’à ce que tous les voyants aient arrêté
de clignoter (le voyant WLAN continue à clignoter si des
données sont en cours de transmission).
6. Appuyez sur le bouton de Réinitialisation externe du serveur
d’impression pendant 5 secondes. Une page de test est
imprimée sur l’imprimante connectée ; elle contient des
informations sur l’adresse IP du serveur d’impression, le numéro
du logiciel, etc.
Connecteur
de puissance
Commutateur DIP :
NOR = Mode normal
DIAG = Mode diagnostic
Bouton de réinitialisation :
- Appuyez une fois pour redémarrer le serveur d’impression.
- Appuyez pendant 5 secondes pour imprimer la page de test.
Connecteur USB
Voyant USB
Voyant WLAN
Voyant d’alimentation
Passez à Configuration en mode Infrastructure, à la page 55 ou
Installation d’une imprimante - Mac OS X, à la page 68.
54
Page 55

Configuration en mode Infrastructure
Cette procédure permet de configurer un serveur d’impression en
mode infrastructure quand le Point d’accès n’est pas crypté. Si le
Point d’accès est crypté, passez à Configuration en mode Diagnostic,
à la page 60.
Avant de commencer :
• Contrôlez le SSID utilisé par le Point d’accès.
• Contrôlez les paramètres du réseau, c.-à-d. la passerelle, le masque
de réseau et les adresses IP disponibles.
• Contrôlez que le protocole TCP/IP est installé sur votre ordinateur.
• Contrôlez que le commutateur DIP du serveur d’impression est sur la
position NOR.
1. Insérez le CD AXIS OfficeBasic USB Wireless G dans votre
lecteur de CD.
2. Sélectionnez Assistant d’installation pour installer le serveur
d’impression sans fil et configurer l’imprimante connectée.
L’assistant installe automatiquement ces composants dans C:\Program
Files\Axis Communications\AXIS OBW Wizard:
• AXIS OBW Wizard.exe
• AXIS OBW Network Printer Port. DLL (Moniteur d’impression sans
fil)
Après l’installation, l’Assistant OBW d’AXIS se trouve dans Démarrer |
Programmes | Axis Communications.
L’assistant OBW d’AXIS démarre dans la langue de votre système
d’exploitation, voir Technical Specifications, à la page 124.
FRANÇAIS
55
Page 56

3. La fenêtre Sélection d’un serveur d’impression contient une liste
de tous les serveurs d’impression sans fil qui ont été trouvés.
Sélectionnez le serveur d’impression à configurer et cliquez sur
Suivant.
Si aucun serveur d'impression n’est trouvé, contrôlez ce qui suit :
• Aucun Point d’accès dans votre réseau : vous utilisez un réseau
Ad-Hoc, passez à Configuration en mode Diagnostic, à la page 60.
• Le Point d'accès est crypté et/ou aucune diffusion du SSID :
connectez le serveur d'impression en mode Diagnostic, passez à
Configuration en mode Diagnostic, à la page 60.
• Le serveur d'impression s’est connecté automatiquement à un
autre Point d'accès : associez votre carte sans fil à l’autre Point
d'accès et cliquez sur Mise à jour ou changez le Point d'accès
auquel le serveur d'impression s’est connecté, passez à
Configuration en mode Diagnostic, à la page 60.
4. Dans la fenêtre Changement des paramètres, sélectionnez Oui
pour modifier les paramètres. l’adresse IP par exemple. Vous
pouvez aussi choisir Non pour utiliser les paramètres par
défaut. Passez ensuite à Installation d’une imprimante, à la
page 65.
56
Page 57

Les paramètres par défaut sont :
• Mode Infrastructure
• SSID = <QUELCONQUE>
• Vitesse de transmission des données = Auto
• Mode de transmission des données = Auto
• Canal = 6
• Type d’authentification = Système ouvert
•Cryptage = aucun
•DHCP activé
5. Dans la fenêtre Paramètres sans fil de base, saisissez le SSID du
Point d'accès et, si nécessaire, modifiez le mode et la vitesse de
transmission. Cliquez sur Suivant.
FRANÇAIS
57
Page 58

6. Dans la fenêtre Sécurité sans fil, sélectionnez l’authentification
et le cryptage (au cas échéant) utilisés par le Point d'accès et
cliquez sur Suivant.
• Sélectionnez le Type d’authentification utilisé dans votre réseau sans fil :
- Système ouvert
- Clé partagée
- WPA-PSK
- WPA2-PSK
• Sélectionnez le cryptage utilisé dans votre réseau sans fil. Les options
dépendent du type d’authentification utilisé. Notez que CCMP (Counter
Mode CBC MAC Protocol) est parfois appelé AES (Advanced Encryption
Standard). Voir le Manuel de l’utilisateur pour davantage d’information sur
les différents types de cryptage.
• Si vous utilisez le cryptage WEP, saisissez le Format clé et la clé WEP ou si
vous utilisez WPA ou WPA2, saisissez la Clé pré-partagée.
7. Dans la fenêtre Paramètres TCP/IP, indiquez une adresse IP fixe,
un masque de réseau et une passerelle pour le serveur
d'impression (fortement recommandé) ou utilisez une adresse IP
dynamique. Cliquez sur Suivant.
58
Page 59

8. Contrôlez les paramètres dans la fenêtre Sauvegarder les
paramètres avant de les charger dans le serveur d'impression.
Il est possible de contrôler l’identité du serveur d'impression en comparant la
clé publique dans la fenêtre Sauvegarder les paramètres avec la page de test.
Si les paramètres dans le serveur d'impression ne correspondent pas à ceux dans
le Point d'accès, la communication avec le serveur d'impression peut être
perdue. Dans ce cas, réinitialisez le serveur d'impression et recommencez.
9. Poursuivez avec l’installation d’une imprimante, voir
Installation d’une imprimante, à la page 65.
FRANÇAIS
59
Page 60

Configuration en mode Diagnostic
Cette procédure permet de configurer un serveur d'impression
quand un réseau Ad-Hoc est utilisé, le Point d'accès est crypté ou le
serveur d'impression s’est connecté au mauvais Point d'accès.
Avant de commencer :
• Contrôlez que le protocole TCP/IP est installé sur votre ordinateur.
• Contrôlez que le commutateur DIP du serveur d’impression est sur la
position DIAG.
• Utilisez un ordinateur doté d’une carte sans fil car vous devez vous
connecter directement au serveur d'impression pour le configurer.
1. Sur votre ordinateur, exécutez l’utilitaire logiciel pour la carte
sans fil dans votre ordinateur et passez-le sur mode Ad-Hoc
(c.-à-d. PEER-TO-PEER = point à point) avec les paramètres
suivants :
• SSID = WLAN-PS
• Canal = 6
2. Cliquez sur Connecter (ou similaire) pour établir la
communication avec le serveur d’impression. Assurez-vous
qu’une connexion est établie.
3. Insérez le CD AXIS OfficeBasic USB Wireless G dans votre
lecteur de CD.
4. Sélectionnez Assistant d’installation pour installer le serveur
d’impression sans fil et configurer l’imprimante connectée.
L’assistant installe automatiquement ces composants dans C:\Program
Files\Axis Communications\AXIS OBW Wizard:
• AXIS OBW Wizard.exe
• AXIS OBW Network Printer Port. DLL (Moniteur d’impression sans
fil)
Après l’installation, l’Assistant OBW d’AXIS se trouve dans Démarrer |
Programmes | Axis Communications.
L’assistant OBW d’AXIS démarre dans la langue de votre système
d’exploitation, voir Technical Specifications, à la page 124.
60
Page 61

5. Depuis la fenêtre Sélection d’un serveur d’impression,
sélectionnez le serveur d’impression que vous souhaitez
configurer et cliquez sur Suivant.
6. Dans la fenêtre Changement des paramètres, sélectionnez Oui
pour modifier les paramètres (le mot de passe n’est pas
demandé au début).
FRANÇAIS
61
Page 62

7. Dans la fenêtre Paramètres sans fil de base, sélectionnez les
paramètres sans fil appropriés.
Mode Ad-Hoc :
• Passez le Type de communication sur Ad-Hoc
• Saisissez un SSID pour le serveur d'impression, Office Printer par
exemple
• Sélectionnez le Canal utilisé par la carte sans fil
Mode Infrastructure, pour un Point d'accès crypté ou pour modifier le
Point d'accès :
•Laissez le Type de communication sur Infrastructure
• Saisissez le SSID du Point d'accès
• Canal inutilisé
•Les Vitesses de transmission des données et Mode de
transmission doivent être définis pour correspondre au Point
d'accès, la valeur par défaut est Auto
62
Page 63

8. Dans la fenêtre Sécurité sans fil, définissez les paramètres de
sécurité sans fil comme ceux utilisés par la carte sans fil si vous
utilisez le mode Ad-Hoc ou comme ceux utilisés par le Point
d'accès si vous utilisez le mode Infrastructure. Cliquez sur
Suivant.
• Sélectionnez le Type d’authentification à utiliser dans votre réseau sans
fil :
- Système ouvert
- Clé partagée
- WPA-PSK
- WPA2-PSK
• Sélectionnez le cryptage utilisé dans votre réseau sans fil. Les options
dépendent du type d’authentification utilisé. Notez que CCMP (Counter
Mode CBC MAC Protocol) est parfois appelé AES (Advanced Encryption
Standard). Voir le Manuel de l’utilisateur pour davantage d’information sur
les différents types de cryptage.
• Si vous utilisez le cryptage WEP, saisissez le Format clé et la clé WEP ou si
vous utilisez WPA ou WPA2, saisissez la Clé pré-partagée.
9. Dans la fenêtre Paramètres TCP/IP, indiquez une adresse ou
utilisez une adresse IP dynamique pour le serveur d'impression ;
une adresse IP fixe est fortement recommandée. Cliquez sur
Suivant.
FRANÇAIS
63
Page 64

10. Contrôlez les paramètres dans la fenêtre Sauvegarder les
paramètres avant de les charger dans le serveur d'impression.
Si les paramètres dans le serveur d'impression ne correspondent pas à ceux dans
le Point d'accès, la communication avec le serveur d'impression peut être
perdue. Dans ce cas, réinitialisez le serveur d'impression et recommencez.
11. Dans la fenêtre Sélectionner une imprimante, cliquez sur
Annuler (car vous configurerez l’imprimante plus tard).
12. Mettez le commutateur DIP sur NOR pour redémarrer le serveur
d’impression.
13. La carte sans fil doit être configurée pour reconnecter le serveur
d'impression si vous utilisez le mode Ad-Hoc (exécutez de
nouveau votre logiciel pour la carte sans fil, laissez-le en mode
Ad-Hoc et définissez les paramètres comme indiqué aux étapes
7 et 8).
14. Si vous utilisez un ordinateur avec une carte sans fil pour
communiquer avec le Point d'accès en mode Infrastructure,
reconfigurez la carte sans fil pour vous reconnecter au Point
d'accès.
15. Exécutez de nouveau l’assistant mais ne modifiez pas les
paramètres du serveur d'impression, passez à Installation d’une
imprimante, à la page 65.
64
Page 65

Installation d’une imprimante
Cette procédure est utilisée quand vous avez configuré le serveur
d'impression et voulez installer une imprimante. Pour installer des
imprimantes supplémentaires, exécutez de nouveau l’assistant, mais
ne modifiez pas les paramètres du serveur d'impression.
1. Sélectionnez Ajouter une nouvelle imprimante.
Figure: Sélectionnez Ajouter une nouvelle imprimante
2. Cliquez sur Ajouter une nouvelle imprimante pour lancer
l’assistant ajout d’imprimante de Windows. Cliquez sur Suivant
et sélectionnez Imprimante locale. Assurez-vous que la case à
cocher Détection automatique et installation de l'imprimante
Plug-and-Play n’est PAS
cochée :
FRANÇAIS
65
Page 66

3. Assurez-vous d’avoir cliqué sur la case d’option Utiliser le port
suivant et sélectionnez LPT1 : (port d’imprimante recommandé)
dans la liste déroulante. Cliquez sur Suivant.
4. Sélectionnez les Fabricant et imprimante dans les listes de
pilotes.
Cliquez sur Suivant.
5. Si le lecteur de l’imprimante est déjà installé, on vous demande
de choisir entre le conserver et le remplacer. Cliquez sur Suivant.
Indiquez un nom pour l’imprimante et spécifiez si vous souhaitez
qu’elle soit votre imprimante par défaut. Cliquez sur Suivant.
6. Choisissez si vous souhaitez partager l’imprimante avec d’autres
utilisateurs de réseau, imprimez une page d’essai, etc.
Sélectionnez la case d’option appropriée et cliquez sur Suivant
et Terminer.
66
Page 67

7. Cliquez sur Suivant => Terminer.
Si vous souhaitez installer d’autres serveurs d’impression,
démarrez l’assistant OBW d’AXIS depuis le menu Démarrer de
Windows : Démarrer | Programmes | Axis Communications |
AXIS OBW Wizard et répétez la procédure d’installation.
Pour d’autres méthodes de configuration de Windows, voir le
Manuel de l’utilisateur AXIS OfficeBasic USB Wireless G. Le Manuel
de l’utilisateur se trouve sur le CD AXIS OfficeBasic USB Wireless G
et sur le site www.axis.com
FRANÇAIS
67
Page 68

Installation d’une imprimante - Mac OS X
L’impression avec AppleTalk et Rendezvous pour Mac OS X sont
décrits ici. Pour les instructions sur IP Printing et l’impression depuis
d’anciens environnements Mac, veuillez consulter le Manuel de
l’utilisateur AXIS OfficeBasic USB Wireless G sur le CD ou
www.axis.com
Impression Rendezvous dans Mac OS X
1. Depuis le menu Apple, sélectionnez Aller | Applications |
Utilitaires et démarrez le Centre d’impression.
2. Cliquez sur Ajouter dans la Liste des imprimantes.
3. Dans la liste déroulante, sélectionnez Rendezvous.
4. Marquez l’imprimante que vous désirez installer, le nom de
serveur d’impression par défaut est Serveur d’impression sans
fil AXISxxxxxx, où les x représentent les six derniers chiffres du
numéro de série du serveur d’impression.
• Vous pouvez changer le nom du serveur d’impression dans
l’interface Web du serveur d’impression. Installation | Système
| Nom du serveur d’impression. Le nom de service du serveur
d’impression sera aussi changé.
• Vous pouvez également modifier le nom de service à partir de
Installation | TCP/IP| Rendezvous | Nom de service (écrase le
paramètre Nom du serveur d’impression).
68
Page 69

5. Sélectionnez le fabricant et le modèle de l’imprimante dans la
liste déroulante (si le PPD pour l’imprimante connectée est déjà
installé, le fabricant et le modèle de l’imprimante sont
sélectionnés automatiquement).
6. Cliquez sur Ajouter pour terminer l’installation ; l’imprimante
sans fil a été ajoutée à la Liste des imprim antes .
Si vous souhaitez configurer les paramètres de l’imprimante,
cliquez sur Imprimantes | Configurer imprimante .
Si le nom du serveur d'impression ou le nom du service est modifié,
le serveur d'impression doit être retiré de la liste des imprimantes
et réinstallés avec le nouveau nom de service de Rendezvous.
FRANÇAIS
69
Page 70

Impression Appletalk dans Mac OS X
1. Dans l’interface Web du serveur d’impression, sélectionnez
Configuration | AppleTalk.
2. Dans le champ Zone AppleTalk, entrez la zone dans laquelle
votre Mac OS fonctionne. Cliquez sur Enregistrer et
Redémarrer.
3. Dans le menu Apple, sélectionnez Aller | Applications |
Utilitaires et démarrez le Centre d’impression.
4. Cliquez sur Ajouter dans la Liste des imprimantes.
5. Sélectionnez AppleTalk dans le menu déroulant supérieur.
6. Sélectionnez la zone AppleTalk dans laquelle votre Mac OS
fonctionne (la même que celle indiquée ci-dessus).
7. Votre imprimante de réseau apparaît alors dans la Liste des
imprimantes (le nom par défaut est AXxxxxxx_USB pour lequel
les x correspondent aux 6 derniers chiffres du numéro de série
du serveur d’impression).
8. Depuis la liste déroulante des Modèles d’imprimante,
sélectionnez le fabricant et le modèle de l’imprimante. Cliquez
sur Ajouter.
70
Page 71

Gestion du serveur d’impression basée sur
le Web
La configuration et la gestion du serveur d’impression Axis sont
effectuées depuis une interface Web :
1. Tapez l’adresse IP du serveur d’impression dans le champ
Adresse de votre navigateur Web standard. Appuyez sur Entrer.
2. La page Serveur d’impression sans fil apparaît. Vous pouvez
configurer tous les paramètres de votre serveur d’impression
depuis cette page.
Remarques :
Pour trouver rapidement l’adresse IP du serveur d’impression, appuyez
sur le bouton de réinitialisation pendant 5 secondes pour imprimer une
page de test. L’adresse DHCP ou l’adresse IP statique est affichées sur la
page de test.
Conseil :
Pour modifier ces paramètres du serveur d'impression dans son
interface Web :
• Adresse IP de serveur d’impression : allez à Installation | TCP/IP
• Réglages sans fil : allez à Installation | Sans fil.
• Mot de passe du serveur d’impression : allez à Installation | Système.
FRANÇAIS
71
Page 72

Gestion du serveur d’impression avec le
bouton de réinitialisation
Le bouton de réinitialisation peut être utilisé pour différentes
fonctions :
Impression d'une page de test :
Le commutateur DIP peut être mis sur « NOR » ou « DIAG » lors de
l’impression d’une page de test.
Maintenez enfoncé le bouton de réinitialisation pendant 5 secondes.
Une page de test s’imprime sur l’imprimante connectée.
La page de test affiche des informations sur le serveur d'impression,
adresse IP, adresse MAC, masque de sous-réseau, passerelle par défaut, et
une liste des Points d'accès à proximité.
Effectuer une configuration usine par défaut :
1. Vérifiez que le commutateur DIP est su r « NOR ».
2. Déconnectez l’alimentation électrique externe.
3. Maintenez le bouton de réinitialisation enfoncé et reconnectez
l’alimentation électrique externe.
4. Patentiez 10 secondes.
5. Relâchez le bouton de réinitialisation et le serveur d'impression
redémarre.
La restauration des paramètres usine efface tous les paramètres pour les remplacer par les valeurs par
défaut et doit être effectuée avec précaution. Les paramètres par défauts sont remis sur :
• Mode Infrastructure
• SSID = <QUELCONQUE> (connexion au Point d’accès ayant le meilleur signal dans votre réseau
sans fil)
•Canal = 6
• Vitesse de transmission des données = Auto
• Mode de transmission = Auto
• Type d’authentification = Système ouvert
•Cryptage = Aucun
•DHCP = Activé
72
Page 73

Recherche de pannes
Connexion au serveur d'impression
Si vous ne pouvez pas trouver le serveur d'impression quand vous
exécutez l’assistant, imprimez une page de test et contrôlez que le
serveur d'impression a trouvé un Point d'accès, c.-à-d. voir si un
ESSID est imprimé sur la page de test.
Impression de la page de test
Si vous rencontrez des problèmes lors de l’impression d’une page de
test, procédez comme suit :
• Veillez à ce que votre imprimante n’est pas intégrée (« host
based »). Les imprimantes intégrées ne fonctionnent pas avsec
tous les modèles de serveurs d'impression.
• Essayez une autre imprimante car la police correcte n’est peut
être pas installée sur votre imprimante.
FRANÇAIS
73
Page 74

Impression
Vérifiez les éléments suivants si vous rencontrez des problèmes en
essayant d’imprimer :
• Vérifiez que l’interface de réseau sans fil est configurée
correctement dans la station de travail/l’ordinateur portable
essayant d’atteindre le serveur d’impression.
• Tous les clients en communication doivent utiliser le même mode
de fonctionnement, le mode Ad-Hoc ou le mode Infrastructure.
• Contrôlez que les protocoles de sécurité sans fil sont définis
conformément à vos paramètres de réseau sans fil.
• Contrôlez que le réglage du canal de fréquence radio est le
même pour tous les clients en communication et que le canal est
réglé conformément aux exigences nationales.
Canaux et bandes de fréquence :
Pays Fréquence Canaux disponibles Canal par défaut
Europe 2.412-2.472 GHz 1-13 11
France 2.412-2.472 GHz 10-13 (utilisation
à l’intérieur*)
Japon 2.484 GHz 14 14
États-Unis/Canada 2.412-2.462 GHz 1-11 11
* (France) utilisation à l’extérieur autorisée sur des propriétés privées avec
autorisation préalable
11
74
Page 75

Contenido del paquete
Desembale y compruebe todos los componentes utilizando la
siguiente lista de verificación. Si algún componente está dañado o
no se incluye, póngase en contacto con su distribuidor. Todo el
material de embalaje es reciclable.
Servidor de impresión AXIS OfficeBasic USB inalámbrico G Servidor de impresión
Adaptador de alimentación Modelo PS-N para Australia, Europa, RU, EE.UU./Japón
Cable USB Cable USB 2.0 de 0,7 metros
CD Documentación y software de instalación
Material impreso Guía de instalación (este documento)
Vista general
Esta Guía del Usuario incluye las instrucciones de instalación para el
AXIS OfficeBasic USB inalámbrico G servidor de impresión en
entornos Windows y Mac OS X . Instalación en Mac OS 9.1 o en
sistemas más antiguos según se describe en el Manual del Usuario.
Las instrucciones de esta guía se basan en los parámetros de un
nuevo AXIS OfficeBasic USB inalámbrico G. Para restablecer una
configuración anterior AXIS OfficeBasic USB inalámbrico G,
consulte Administración del servidor de impresión con el botón
Restablecer en la página 96 y siga las instrucciones.
Consulte el Manual del Usuario de AXIS OfficeBasic USB
inalámbrico G para obtener una descripción detallada de este
producto. El Manual del Usuario está ubicado en el CD AXIS
OfficeBasic USB inalámbrico G y en www.axis.com
ESPAÑOL
75
Page 76

Modos de funcionamiento inalámbrico
El servidor de impresión AXIS OfficeBasic USB inalámbrico G se
puede usar en modos de infraestructura y de red Ad-hoc utilizando
los protocolos inalámbricos 802.11b y 802.11g.
Infraestructura
En el modo de infraestructura, los ordenadores se comunican con el
servidor de impresión primero a través del Access Point. El Access
Point es un dispositivo de hardware que se comunica con el servidor
de impresión y se puede conectar a los ordenadores en una red de
área local (LAN) o, de forma inalámbrica, a los ordenadores
equipados con una tarjeta inal ám br ica .
Para configurar el servidor de impresión en una red de infraestructuras,
consulte Configuración en modo de infraestructura, en la página 79.
76
Page 77

Ad-hoc (de igual a igual)
Los ordenadores con una tarjeta inalámbrica se comunican
directamente con el servidor de impresión (esto es, no se utiliza el
Access Point). Para configurar el servidor de impresión en una red
Ad-hoc, consulte Configuración en modo de diagnóstico, en la
página 84.
ESPAÑOL
77
Page 78

Instalación del hardware
1. Apague la impresora.
2. Conecte el servidor de impresión de la Impresora con el cable
USB suministrado.
3. Encienda la impresora.
4. Enchufe el adaptador de corriente CA al conector de
alimentación ubicado a un lado del servidor de impresión
inalámbrico.
5. Espere 1 minuto hasta que todos los LED dejen de parpadear
(el LED WLAN continuará parpadeando si se están
transmitiendo datos).
6. Pulse el botón Restablecer durante 5 segundos. Se imprimirá
una página de prueba en la impresora conectada, mostrando
información sobre la dirección IP del servidor de impresión,
número de firmware, etc.
Conector de
alimentación
Conmutador DIP
NOR = modo normal
DIAG = modo de diagnóstico
Botón Restablecer:
- Pulse una vez para restablecer el servidor de impresión.
- Pulse durante 5 segundos para imprimir una página de prueba.
Conector USB
LED USB
LED WLAN
LED de energía
Continúe en Configuración en modo de infraestructura, en la
página 79 o Instalación de impresoras - Mac OS X, en la página 92.
78
Page 79

Configuración en modo de infraestructura
Este procedimiento sirve para configurar un servidor de impresión
en modo de infraestructura cuando el Access Point está descifrado.
Si el Access Point está cifrado, vaya a Configuración en modo de
diagnóstico, en la página 84.
Antes de comenzar
• Compruebe el SSID utilizado por el Access Point.
• Compruebe los ajustes de la red, es decir, direcciones IP, netmask y
gateway disponibles.
• Compruebe que el protocolo TCP/IP está instalado en su ordenador.
• Compruebe que el DIP del servidor de impresión está puesto en NOR.
1. Inserte el CD AXIS OfficeBasic USB inalámbrico G en la unidad
de CD.
2. Seleccione Asistente de configuración para instalar el servidor de
impresión inalámbrico y configurar la impresora conectada.
El Asistente instalará estos componentes automáticamente en
C:\Archivos de programas\Axis Communications\AXIS OBW Wizard:
• AXIS OBW Wizard.exe
• Puerto de impresora de red AXIS OBW. DLL (Monitor de impresión
inalámbrico)
Después de la instalación, el Asistente de AXIS OBW estará disponible
desde Inicio | Programas | Axis Communications.
El Asistente de AXIS OBW utilizará el mismo idioma que su sistema
operativa, consulte Technical Specifications, en la página 124.
ESPAÑOL
79
Page 80

3. La pantalla Seleccione un servidor de impresión detalla todos los
servidores de impresión inalámbricos encontrados, seleccione el
servidor de impresión que desea para configurarlo y haga clic en
Siguiente.
Si no se ha encontrado ningún servidor de impresión, compruebe lo
siguiente:
• Su red no tiene un Access Point – usted está utilizando una red
Ad-Hoc, vaya a Configuración en modo de diagnóstico, en la
página 84.
• El Access Point está cifrado y/o no está emitiendo el SSID –
conéctelo al servidor de impresión en modo de diagnóstico, vaya a
Configuración en modo de diagnóstico, en la página 84.
• El servidor de impresión se ha conectado automáticamente a otro
Access Point – haga que su tarjeta inalámbrica se asocie con el
otro Access Point y haga clic en Actualizar, o cambie el Access
Point al que está conectado el servidor de impresión, vaya a
Configuración en modo de diagnóstico, en la página 84.
4. En la pantalla Cambiar ajustes, seleccione Sí para cambiar los
ajustes, esto es, la dirección IP. En caso contrario, seleccione No
para utilizar los valores predeterminados y vaya a Instalación de
una impresora…, en la página 89.
80
Page 81

Los ajustes predeterminados son:
• Modo de infraestructura
• SSID = <CUALQUIERA>
• Velocidad de transmisión de datos = Auto
• Modo de transmisión de datos = Auto
• Canal = 6
• Tipo de autenticación = Sistema abierto
• Cifrado = ninguno
• DHCP habilitado
5. En la pantalla Parámetros inalámbricos básicos , introduzca el
SSID para el Access Point y, si es necesario, cambie la velocidad
y el modo de transmisión. Haga clic en Siguiente.
ESPAÑOL
81
Page 82

6. En la pantalla Seguridad inalámbrica , seleccione la
autenticación y el cifrado (si lo hay) utilizado por el Access
Point y haga clic en Siguiente.
• Seleccione el Tipo de autenticación utilizado en su red inalámbrica:
- Sistema abierto
- Clave compartida
- WPA-PSK
- WPA2-PSK
• Seleccione el cifrado utilizado en su red inalámbrica: Las opciones
dependerán del tipo de autenticación utilizado. Observe que CCMP
(Protocolo CBC-MAC) también se conoce a veces como AES (Estándar de
Cifrado Avanzado). Consulte el Manual del Usuario para obtener más
información sobre los diferentes tipos de cifrado.
• Si utiliza un cifrado WEP, introduzca el Formato de la clave y la Clave WEP
o si utiliza WPA o WPA2, introduzca la Clave Pre-Compartida.
7. En la pantalla Ajustes de TCP/IP , especifique la dirección IP,
netmask y gateway fijadas para el servidor de impresión (muy
recomendable) o utilice una dirección IP dinámica. Haga clic en
Siguiente.
82
Page 83

8. Compruebe los ajustes en la pantalla Guardar ajustes antes de
cargarlos en el servidor de impresión.
Es posible verificar la identidad del servidor de impresión comparando la clave
pública en la pantalla Guardar ajustes con la página de prueba.
Si los ajustes del servidor de impresión no coinciden con los del Access Point, se
puede perder la comunicación con el servidor de impresión. Si esto ocurre,
reinicie el servidor de impresión y vuelva a empezar.
9. Continúe con la instalación de la impresora, consulte
Instalación de una impresora…, en la página 89.
ESPAÑOL
83
Page 84

Configuración en modo de diagnóstico
Este procedimiento sirve para configurar un servidor de impresión
cuando se utiliza una red Ad hoc, el Access Point está cifrado o el
servidor de impresión está conectado al Access Point incorrecto.
Antes de comenzar
• Compruebe que el protocolo TCP/IP está instalado en su ordenador.
• Compruebe que el conmutador DIP del servidor de impresión está
puesto en DIAG.
• Use un ordenador con una tarjeta inalámbrica ya que se conectará
directamente al servidor de impresión para configurarlo.
1. En su ordenador, ejecute la utilidad de software para la tarjeta
inalámbrica y cambie al modo Ad-Hoc (esto es, de igual a igual)
con los ajustes siguientes:
• SSID = WLAN-PS
• Canal = 6
2. Haga clicen Conectar (o similar) para establecer comunicación
con el servidor de impresión. Compruebe que se ha establecido
la conexión.
3. Inserte el CD AXIS OfficeBasic USB inalámbrico G en la unidad
de CD.
4. Seleccione Asistente de configuración para instalar el servidor de
impresión inalámbrico y configurar la impresora conectada.
El Asistente instalará estos componentes automáticamente en
C:\Archivos de programas\Axis Communications\AXIS OBW Wizard:
• AXIS OBW Wizard.exe
• Puerto de impresora de red AXIS OBW. DLL (Monitor de impresión
inalámbrico)
Después de la instalación, el Asistente de AXIS OBW estará disponible
desde Inicio | Programas | Axis Communications.
El Asistente de AXIS OBW utilizará el mismo idioma que su sistema
operativa, consulte Technical Specifications, en la página 124.
84
Page 85

5. Desde la pantalla Seleccione un servidor de impresión ,
seleccione el servidor de impresión que desea para configurarlo
y hacer clic en Siguiente.
6. En la pantalla Cambiar ajustes, seleccione Sí para cambiar los
ajustes (inicialmente no se requiere la contraseña).
ESPAÑOL
85
Page 86

7. En la pantalla Parámetros inalámbricos básicos , seleccione los
parámetros inalámbricos apropiados.
Modo Ad hoc:
• Cambie el Tipo de comunicación a Ad-Hoc
• Introduzca un SSID para el servidor de impresión, por ej., Impresora
Office
• Seleccione el Canal inalámbrico utilizado por la tarjeta inalámbrica
Modo de infraestructura – para un Access Point cifrado o para cambiar
el Access Point:
• Deje el Tipo de comunicación como Infraestructura
• Introduzca el SSID del Access Point
• El canal no se utiliza
•Las Velocidades de transmisión de datos y el Modo de
transmisión deben configurarse para coincidir con el Access Point,
el valor por defecto es Auto
86
Page 87

8. En la pantalla Seguridad inalámbrica , ajuste los parámetros de
seguridad inalámbrica a los utilizados por la tarjeta inalámbrica
si está en modo Ad hoc o a los utilizados por el Access Point si
está en modo de infraestructura. Haga clic en Siguiente.
• Seleccione el Tipo de autenticación a utilizar en su red inalámbrica:
- Sistema abierto
- Clave compartida
- WPA-PSK
- WPA2-PSK
• Introduzca el cifrado utilizado en su red inalámbrica: Las opciones
dependerán del tipo de autenticación que utilice. Observe que CCMP
(Protocolo CBC-MAC) también se conoce a veces como AES (Estándar de
Cifrado Avanzado). Consulte el Manual del Usuario para obtener más
información sobre los diferentes tipos de cifrado.
• Si utiliza un cifrado WEP, introduzca el Formato de la clave y la Clave WEP
o si utiliza WPA o WPA2, introduzca la Clave Pre-Compartida.
9. En la pantalla Ajustes de TCP/IP , especifique una dirección IP o
utilice una dirección IP dinámica para el servidor de impresión,
se recomienda especialmente una dirección IP fija. Haga clic en
Siguiente.
ESPAÑOL
10. Compruebe los ajustes en la pantalla Guardar ajustes antes de
cargarlos en el servidor de impresión.
Si los ajustes del servidor de impresión no coinciden con los del Access Point, se
puede perder la comunicación con el servidor de impresión. Si esto ocurre,
reinicie el servidor de impresión y vuelva a empezar.
87
Page 88

11. En la pantalla Seleccione una impresora , haga clic en Cancelar
(ya que configurará la impresora más adelante).
12. Mueva el conmutador DIP a NOR para reiniciar el servidor de
impresión.
13. Debe configurar la tarjeta inalámbrica para volver a conectar el
servidor de impresión si utiliza el modo Ad-Hoc (vuelva a
ejecutar el software para la tarjeta inalámbrica, manténgalo en
el modo Ad hoc y efectúe los ajustes de acuerdo con los
realizados en los pasos 7 y 8.
14. Si utiliza un ordenador con una tarjeta inalámbrica para hablar
con el Access Point en el modo de infraestructura, reconfigu re
la tarjeta inalámbrica para volver a conectarla al Access Point.
15. Ejecute el Asistente otra vez, pero no cambie los ajustes del
servidor de impresión, continúe en Instalación de una
impresora…, en la página 89.
88
Page 89

Instalación de una impresora…
Este procedimiento se utiliza cuando ha configurado el servidor de
impresión y desea instalar una impresora. Para instalar impresoras
adicionales, vuelva a ejecutar el Asistente, pero no cambie los
ajustes del servidor de impresión.
1. Seleccione Agregar una nueva impresora.
Figura: Seleccione Agregar una nueva impresora.
2. Haga clic en gregar una nueva impresora para iniciar el Asistente
para agregar impresoras de Windows. Haga clic en Siguiente y
seleccione Impresora local, compruebe que la casilla de
verificación Detectar e instalar automáticamente mi impresora
Plug and Play NO
está activada:
ESPAÑOL
89
Page 90

3. Compruebe que el botón de radio Usar el puerto siguiente está
pulsado y seleccione LPT1: (Puerto de impresora recomendado)
en la lista desplegable. Haga clic en Siguiente.
4. Seleccione Fabricante e impresora de la lista de controladores.
Haga clic en Siguiente.
5. Si ya tiene instalado el controlador de la impresora, se le
preguntará si desea conservarlo o reemplazarlo. Haga clic en
Siguiente. Suministre un nombre para la impresora y seleccione
si desea convertirla en su impresora por defecto. Haga clic en
Siguiente.
6. Seleccione si desea compartir la impresora con otros usuarios de
la red, imprimir una página de prueba, etc. Seleccione el botón de
radio adecuado y haga clic en Siguiente y Finalizar.
90
Page 91

7. Haga clic en Siguiente => Finalizar.
Si desea instalar más servidores de impresión, inicie el Asistente
de AXIS OBW desde el menú Inicio de Windows
: Inicio |
Programas | Axis Communications | AXIS OBW Wizard y repita
el procedimiento de instalación.
Consulte el Manual del Usuario de AXIS OfficeBasic USB
inalámbrico G para obtener información sobre métodos de
configuración de Windows alternativos. El Manual del Usuario está
ubicado en el CD AXIS OfficeBasic USB inalámbrico G y en
www.axis.com
ESPAÑOL
91
Page 92

Instalación de impresoras - Mac OS X
A continuación se describe la impresión Rendezvous y AppleTalk
para Mac OS X. Para obtener instrucciones sobre impresión IP e
impresión de entornos Mac OS más antiguos, consulte el AXIS
OfficeBasic USB inalámbrico G Manual del Usuario en el CD o en
www.axis.com
Impresión Rendezvous en Mac OS X
1. Desde el menú Apple , seleccione Go | Applications | Ut ilities e
inicie el Print Center.
2. Haga clic en Add en la Printer List.
3. En la lista desplegable, seleccione Rendezvous.
4. Resalte la impresora que desea instalar, el nombre del servidor
de impresión por defecto es Servidor de impresión inalámbrico
AXISxxxxxx, donde las X representan los últimos seis dígitos del
número de serie del servidor de impresión.
• Usted puede cambiar el nombre del servidor de impresión en la
interfaz Web del mismo: Setup | System | Print Server Name.
Esto cambiará también el nombre del servicio del servidor de
impresión, en consonancia.
• También puede cambiar el nombre del servicio desde Setup |
TCP/IP| Rendezvous | Service Name (sobrescribe el parámetro
Print Server Name).
92
Page 93

5. Seleccione el fabricante y el modelo de impresora de la lista
desplegable (si el PPD para la impresora conectada ya está
instalado, entonces el fabricante y el modelo de impresora se
seleccionan automáticamente).
6. Haga clic en Add para finalizar la instalación, ahora la
impresora inalámbrica se ha agregado a la Printer List.
Si desea configurar los ajustes de la impresora, haga clic en
Printers | Configure Printer.
Si el nombre del servidor de impresión o el nombre del servicio ha
sido modificado, debe eliminarse el servidor de impresión de la
Lista de impresoras y volver a instalarlo con el nuevo nombre de
servicio Rendezvous.
ESPAÑOL
93
Page 94

Impresión Appletalk en Mac OS X
1. En la interfaz Web del servidor de impresión, seleccione Setup |
AppleTalk.
2. En el campo AppleTalk Zone , introduzca la zona en la que
opera su Mac OS. Haga clic en Guardar y Reinicio.
3. Desde el menú Apple, seleccione Go | Applications | Utilitiese
inicie el Print Center.
4. Haga clic en Add en la Printer List.
5. Seleccione AppleTalk del menú desplegable superior.
6. Seleccione la zona AppleTalk en la que opera su Mac OS (la
misma introducida más arriba).
7. Su impresora conectada en red aparecerá en la Lista de
impresoras (el nombre por defecto es AXxxxxxx_USB, donde las
x representan los últimos 6 dígitos del número de serie del
servidor de impresión).
8. Desde la lista desplegable Modelo de impresora , seleccione el
fabricante y el modelo de impresora. Haga clic en Agregar.
94
Page 95

Administración de servidor de impresión
basada en la Web
La gestión y configuración del servidor de impresión Axis se realiza
desde una interfaz Web:
1. Escriba la dirección IP del servidor de impresión en el campo de
Ubicación/ Dirección de su navegador de Web. Pulse Intro.
2. Aparecerá la página Servidor de impresión inalámbrico. Desde
aquí puede configurar todos los parámetros del servidor de
impresión.
Notas:
Una forma rápida de encontrar la dirección IP del servidor de impresión
es pulsando el botón Restablecer durante 5 segundos para imprimir una
página de prueba. La dirección DHCP o la dirección IP estática
aparecerá en la página de prueba.
Sugerencias:
Para cambiar estos parámetros del servidor de impresión en su interfaz
Web:
• Dirección IP del servidor de impresión: vaya a Setup | TCP/IP
• Parámetros inalámbricos: vaya a Setup | Wireless
• La contraseña del servidor de impresión: vaya a Setup | System
ESPAÑOL
95
Page 96

Administración del servidor de impresión
con el botón Restablecer
El botón Restablecer se puede utilizar para varias operaciones:
Imprimir una página de prueba:
El conmutador DIP se puede poner en “NOR” o “DIAG” cuando se imprime
una página de prueba.
Mantenga pulsado el botón Restablecer durante 5 segundos. La
página de prueba se imprimirá en la impresora conectada.
La página de prueba muestra información sobre la dirección IP, dirección
MAC, máscara de subred, gateway predeterminada del servidor de
impresión y también detalla los Access Points en las proximidades.
Restaurar los valores de fábrica:
1. Verificar que el conmutado DIP está en “NOR”.
2. Desconectar la fuente de alimentación externa.
3. Mantenga pulsado el botón Restablecer y vuelva a conectar la
fuente de alimentación externa.
4. Espere 10 segundos.
5. Suelte el botón Restablecer y el servidor de impresión se
reiniciará.
La restauración de los valores de fábrica borrará todos los ajustes y volverá a los valores iniciales por lo
que debe ejecutarse con cuidado. Los ajustes predeterminados se restablecerán a:
• Modo de infraestructura
• SSID = <CUALQUIERA> ( conectará con el Access Point que tenga la mejor señal en su red
inalámbrica)
•Canal = 6
• Velocidad de transmisión de datos = Auto
• Modo de transmisión = Auto
• Tipo de autenticación = Sistema abierto
• Cifrado = ninguno
• DHCP = habilitado
96
Page 97

Localización de fallos
Conexión al servidor de impresión
Si no puede encontrar el servidor de impresión cuando ejecuta el
Asistente, imprima una página de prueba y compruebe que el
servidor de impresión ha encontrado un Access Point, esto es, vea si
hay un ESSID impreso en la página de prueba.
Impresión de una página de prueba
Si experimenta problemas mientras imprime una página de prueba,
haga lo siguiente:
• Compruebe que la impresora no está basada en host. Las
impresoras basadas en host no funcionan con ningún modelo de
servidores de impresión.
• Pruebe con otra impresora ya que es posible que la suya no tenga
la fuente correcta instalada.
ESPAÑOL
97
Page 98

Impresión
Compruebe lo siguiente si experimenta problemas cuando intenta
imprimir:
• Compruebe que la interfaz de red inalámbrica está
adecuadamente configurada en la estación de trabajo/el
ordenador portátil que intenta acceder al servidor de impresión.
• Todos los clientes en comunicación deben estar en el mismo
modo operativo, esto es, modo Ad-Hoc o modo de
infraestructura.
• Compruebe que los protocolos de seguridad inalámbricos están
configurados de conformidad con sus ajustes de red
inalámbricos.
• Compruebe que el ajuste de canal de radiofrecuencia es el
mismo en todos los clientes en comunicación y que el canal está
configurado según los requisitos de su país.
Bandas de frecuencia y canales:
País Frecuencia Canales disponibles Canal
predeterminado
Europa 2.412-2.472 GHz 1-13 11
Francia 2.457-2.472 GHz 10-13 (uso en interiores*) 11
Japón 2.484 GHz 14 14
EE.UU./Canadá 2.412-2.462 GHz 1-11 11
* (Francia) se permite el uso en exteriores en propiedades privadas con autorización
previa
98
Page 99

Contenuto della confezione
Aprire la confezione e verificare la presenza di tutti i componenti
utilizzando la seguente lista di controllo. In caso di componenti
mancanti o danneggiati, rivolgersi al rivenditore. Il materiale di
imballaggio è riciclabile.
Server di stampa Server di stampa AXIS OfficeBasic USB Wireless G
Connettore Modello PS-N per Australia, Europa, Regno Unito, USA/Giappone
Cavo USB Cavo USB 2.0 da 0,7 metri
CD Documentazione e software di installazione
Materiale stampato Guida all'installazione (questo manuale)
Cenni generali
In questo manuale vengono fornite le istruzioni per l'installazione
del server di stampa AXIS OfficeBasic USB Wireless G negli ambienti
Windows e Mac OS X. L'installazione su Mac OS 9.1 o sistemi
precedenti viene descritta nel Manuale per l'utente.
Le istruzioni riportate in questo manuale si riferiscono a un sistema
AXIS OfficeBasic USB Wireless G nuovo. Per la reimpostazione di un
sistema AXIS OfficeBasic USB Wireless G precedentemente
configurato, vedere Gestione del server di stampa con il pulsante di
ripristino a pagina 120 per le istruzioni.
Per ulteriori informazioni su questo prodotto, vedere il Manuale per
l'utente di AXIS OfficeBasic USB Wireless G disponibile sul CD AXIS
OfficeBasic USB Wireless G e all'indirizzo Web www.axis.com
ITALIANO
99
Page 100

Modalità di funzionamento wireless
Il server di stampa AXIS OfficeBasic USB Wireless G può essere
utilizzato in modalità di rete Infrastructure e Ad-Hoc impiegando i
protocolli wireless 802.11b e 802.11g.
Infrastructure
Nella Modalità Infrastruttura, il computer comunica con il server di
stampa attraverso un Access Point. L'Access Point è un dispositivo
hardware che comunica con il server di stampa e può essere
connesso ai computer su una LAN (Local Area Network) cablata o,
wireless, a computer con scheda wireless.
Per la configurazione del server di stampa in una rete Infrastructure,
vedere Configurazione in Modalità Infrastruttura, a pagina 103.
100
 Loading...