

Page 1

AXIS OfficeBasic USB Wireless
User’s Guide
ENGLISH
DEUTSCH
FRANCAIS ESPAÑOL
Part Number 21962| Rev. 1.0 | May 2004| © Copyright Axis Communications AB
ITALIANO
Page 2

Table of Contents
ENGLISH
Installation Steps 3
Print Server Management
AXIS OfficeBasic USB Wireless User’s Manual
Hardware Inventory 4
Wireless Operating Modes 5
Infrastructure (AP)
Ad hoc (Peer to Peer)
Hardware Installation 6
IP Addressing 7
Obtaining an IP address using DHCP
Set a Temporary IP Address with Arp/Ping:
Print Server setup for Windows 10
Printer Installation - Mac OS 18
Web-based Print Server Management 20
Print Server Management Using the Reset Button 21
Troubleshooting 23
DEUTSCH
Installationsschritte 25
Druckerserververwaltung
AXIS OfficeBasic USB Wireless-Benutzerhandbuch
Hardwarekomponenten 26
Drahtlos-Betriebsmodi 27
Infrastructure Mode (AP)
Ad Hoc Mode (Peer-to-Peer)
Hardwareinstallation 28
IP-Adressierung 29
IP-Adresse per DHCP beziehen
IP-Adresse mit Arp/Ping festlegen
Druckerservereinrichtung für Windows 32
Druckerinstallation unter Mac OS 40
Webbasierte Druckerserver-Verwaltung 42
Druckerserver-Verwaltung per Reset-Taste 43
Fehlerbehebung 45
FRANCAIS
Étapes de l’installation 47
Gestion du serveur d’impression
Manuel de l’utilisateur de AXIS OfficeBasic USB Wireless
Matériel 48
Modes de fonctionnement sans fil 49
Infrastructure (AP)
Ad hoc (Peer to Peer : point à point)
5
49
3
5
7
25
27
27
29
30
47
49
3
8
ENGLISH
25
DEUTSCH
FRANCAIS ESPAÑOL
47
ITALIANO
1
Page 3

Installation matérielle 50
Adressage IP 51
Obtention d’une adresse IP à l’aide de DHCP
Définir une adresse IP avec Arp/Ping:
Installation du serveur d’impression sous Windows 54
Installation d’une imprimante - Mac OS 62
Gestion du serveur d’impression basée sur le Web 64
Gestion du serveur d’impression à l’aide du bouton de réinitialisation 65
Recherche de panne 67
ESPANOL
Instalación paso por paso 69
Administración del servidor de impresión
AXIS OfficeBasic USB Wireless User’s Manual
Inventario de hardware 70
Modos de operación inalámbricos 71
Infrastructure (AP)
Ad hoc (Peer to Peer)
Instalación del hardware 72
Dirección IP 73
Obtención de una dirección IP usando DHCP
Ajuste de una dirección IP con Arp/Ping:
Configuración del servidor de impresión para Windows 76
Instalación de impresora - Mac OS 84
Administración de servidor de impresión basada en la Web 85
Administración del servidor de impresión usando el botón Reset 86
Localización de averías 88
ITALIANO
Passaggi per l'installazione 90
Gestione del server di stampa
AXIS OfficeBasic USB Wireless User's Manual
Controllo dell'hardware 91
Modalità di funzionamento wireless 92
Infrastructure (AP)
Ad hoc (Peer to Peer)
Installazione hardware 93
Indirizzo IP 94
Come ottenere un indirizzo IP utilizzando DHCP
Come impostare un indirizzo IP con Arp/Ping:
Configurazione del server di stampa per Windows 97
Installazione della stampante-Mac OS 105
Gestione del server di stampa su base Web 107
Gestione del server di stampa mediante il pulsante di ripristino 108
Risoluzione dei problemi 110
Regulatory Information 112
71
71
90
92
92
52
51
69
69
73
74
90
94
95
ENGLISH
DEUTSCH
FRANCAIS ESPAÑOL
ITALIANO
2
Page 4

Overview
This User’s Guide includes installation instructions for the AXIS
OfficeBasic USB Wireless print server in Microsoft Windows (95,
98, NT, Me, 2000, XP, Server 2003) and Mac OS environments.
The instructions in this guide are based on the settings found in a
new and non-configured AXIS OfficeBasic USB Wireless. To
establish this status in a previously configured AXIS OfficeBasic USB
Wireless, you can reset it to factory default settings. See Print Server
Management Using the Reset Button on page 21 for instructions.
Installation Steps
Follow these steps to install your AXIS OfficeBasic USB Wireless:
1. Hardware Installation, on page 6
2. IP Addressing, on page 7
3. Print Server setup for Windows, on page 10 or
Printer Installation - Mac OS, on page 18.
Print Server Management
Print server management and configuration is done from the print
server’s web interface, see page 20, alternatively from the provided
Windows-based software OBW Setup Wizard, see page 10.
AXIS OfficeBasic USB Wireless User’s Manual
See the AXIS OfficeBasic USB Wireless User’s Manual for detailed
descriptions on this product. The User’s Manual is located on the
AXIS OfficeBasic USB Wireless CD and on www.axis.com
ENGLISH
3
Page 5

Hardware Inventory
Unpack and check all the items using the following check list.
Contact your dealer if anything is missing or damaged. All packing
materials are recyclable.
Print Server Model Part Number
AXIS OfficeBasic USB Wireless PROD UNIT AXIS OB USB W <EUR> ch 1-13
PROD UNIT AXIS OB USB W <US> ch 1-11
Media Title Part Number
CD AXIS OfficeBasic USB Wireless CD 21965
Printed Material AXIS OfficeBasic USB Wireless User’s Guide 21962
Accessories Description Part Number
Cable USB 20208
Power Adapter Model Part Number
PS-M Australia
Europe
UK
USA/Japan
0208-001-01
0208-004-01
21822
21819
21820
21821
ENGLISH
4
Page 6
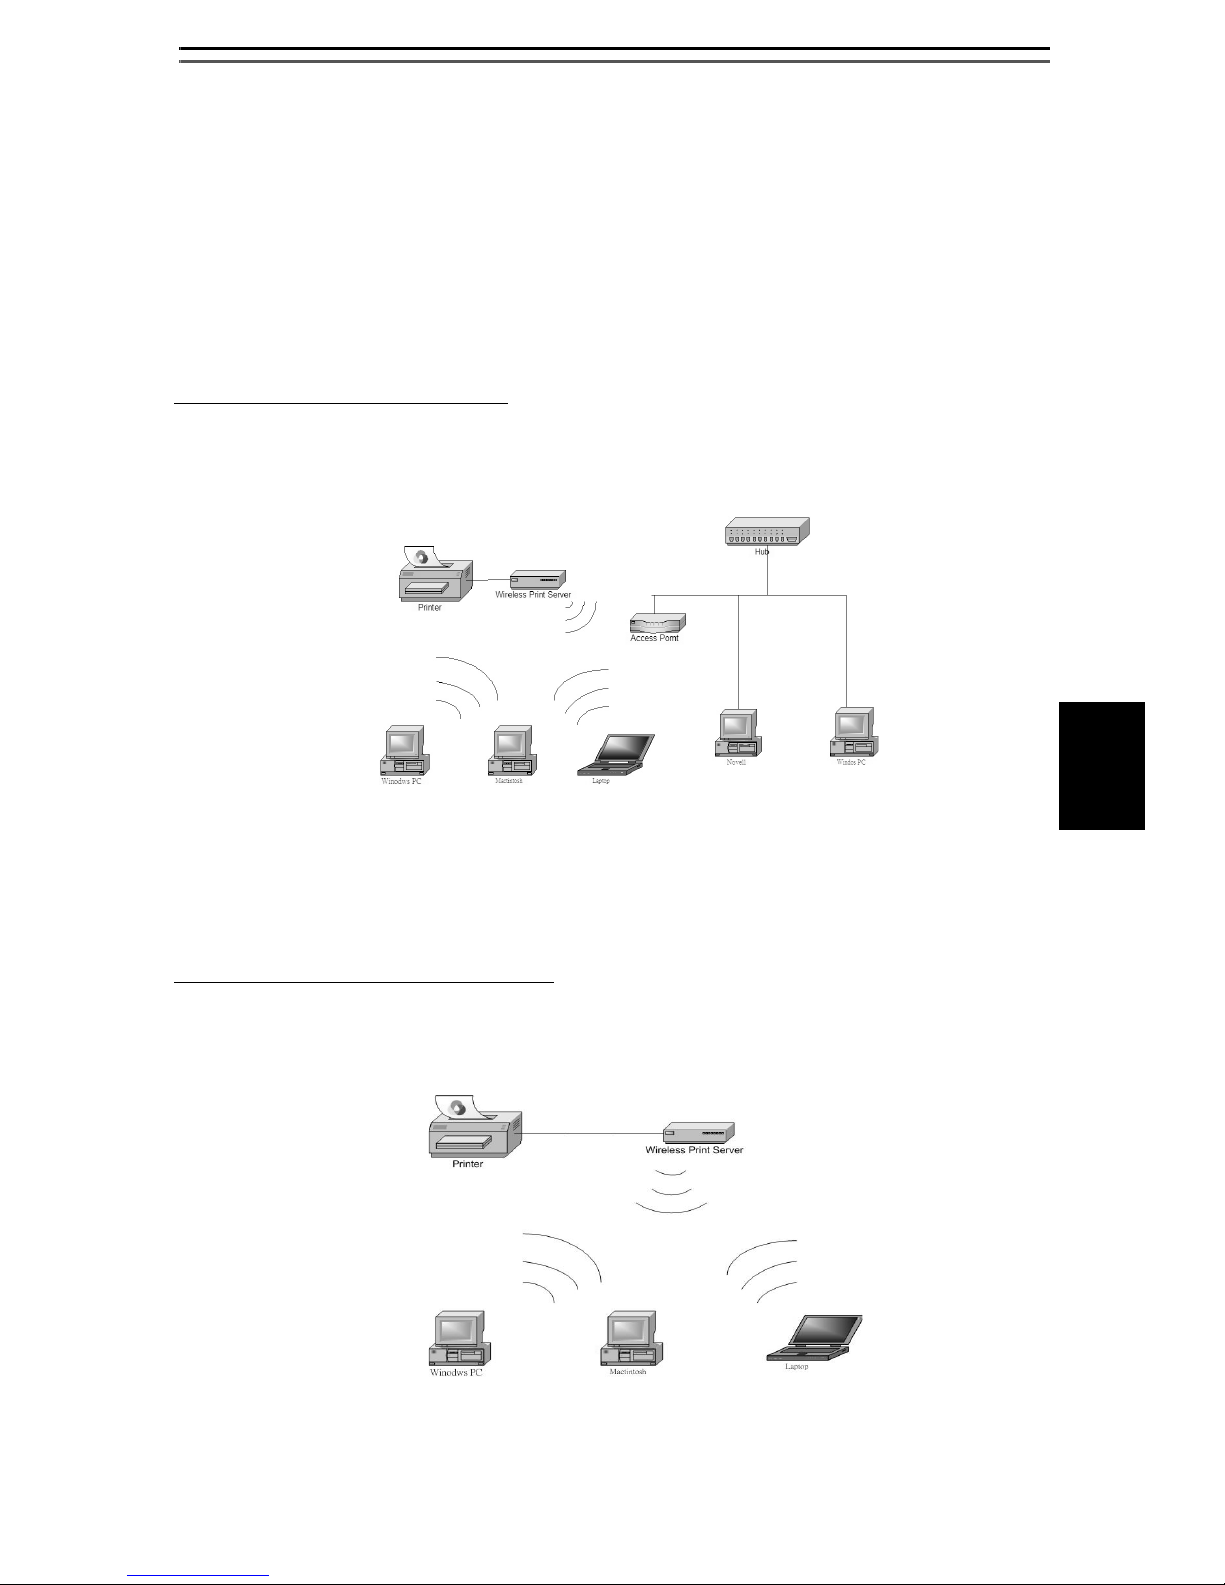
Wireless Operating Modes
The AXIS OfficeBasic USB Wireless print server communicates either
in Infrastructure mode, where there is an 802.11b Access point
acting as a bridge between the workstation/laptop and the print
server, or Ad-hoc mode, where the workstation/laptop
communicates directly with the print server.
Infrastructure (AP)
Workstations and laptops communicate over the WLAN and the LAN
through an Access Point with the print server.
See Print Server setup for Windows, on page 10 or Printer
Installation - Mac OS, on page 18 for installation instructions.
Ad hoc (Peer to Peer)
Workstations and laptop computers communicate directly over the
WLAN with the print server.
ENGLISH
See Setup in Ad Hoc (Peer-to-Peer) Networks, on page 24.
5
Page 7
Hardware Installation
1. Turn off the printer’s power.
2. Connect the print server to your printer with the supplied USB
cable.
3. Turn the printer’s power on.
4. Plug the AC power adapter into the power connector on the
backside of the wireless print server.
5. Wait 1 minute.
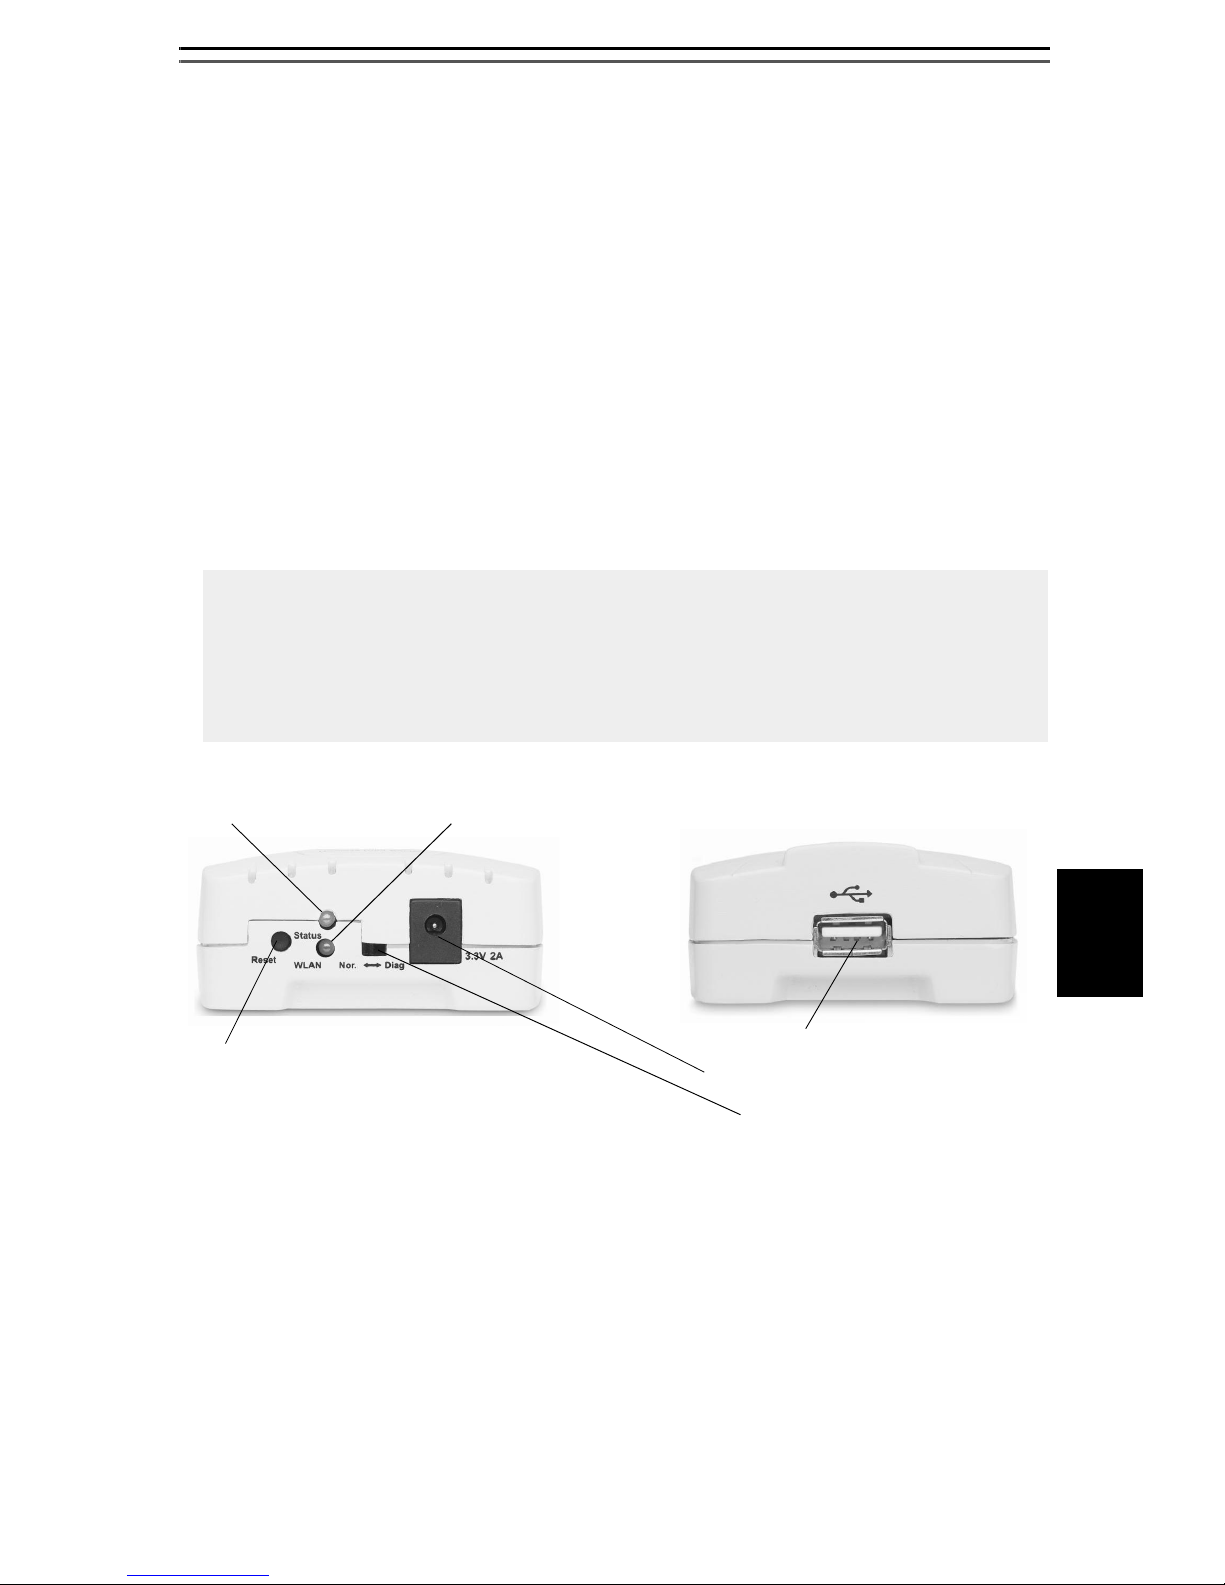
6. Press the print server’s external Reset button for 5 seconds. A
test page will be printed on the connected printer, displaying
information about the print server’s IP address, firmware
number, etc.
• The Status LED will flicker when data is being transmitted and
printed.
• When the print server is powered on, the Status LED will flash 5
times as part of the unit’s Power On Self Test (POST). If the LED
doesn’t flash 5 times when you power on the unit, disconnect all
cables and repeat the installation procedure described here.
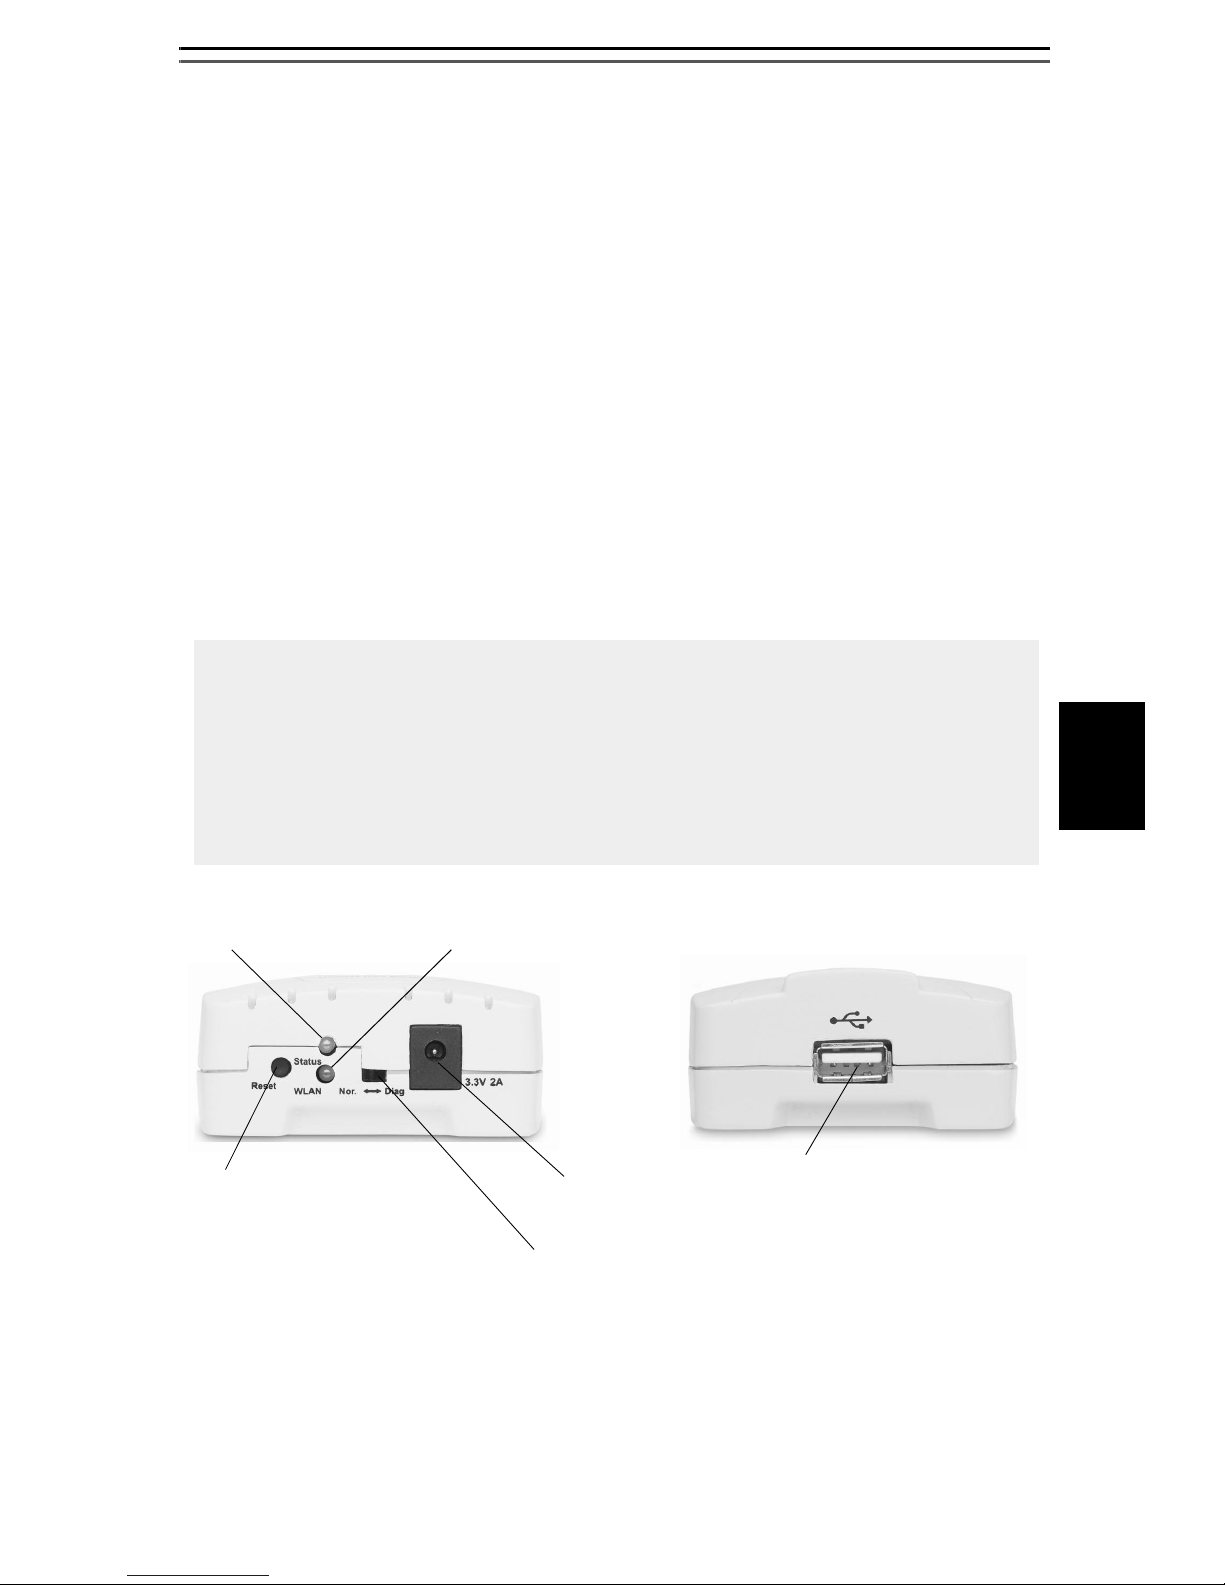
Status LED (orange)
Reset button:
- Press once to restart print server.
- Press 5 seconds to print test page.
WLAN LED (green)
Power connector
DIP switch:
Nor. = Normal mode
Diag. = Diagnostic Mode
USB Connector
ENGLISH
See Print Server Management Using the Reset Button, on page 21 for
detailed instructions on using the reset button.
6
Page 8

IP Addressing
To enable network communication with the print server, it must
have a proper IP address. Use one of these methods to assign an IP
address to the print server:
Method:
DHCP DHCP server
Arp/Ping
Server
Required:
Operating System Comment:
The print server obtains an
Windows
Mac OS
Mac OS
Windows
IP address automatically
from a DHCP server. By
default, the print server’s
DHCP function is enabled.
Manual assignment of an IP
address.
Obtaining an IP address using DHCP
If you are working in a network with dynamic IP address
assignment, your print server will obtain an IP address automatically
when you connect it to the network. Follow the instructions on this
page to verify the IP address:
ENGLISH
1. Print a test page by pressing the reset button for 5 seconds.
Locate the print server’s IP address on the test page.
2. Open a web browser (e.g. Internet Explorer).
3. In the Web browser’s Location/Address field, enter the print
server’s IP address and press Enter.
4. If the Wireless Print Server web page appears in your Web
browser, the IP address is fully functional. Continue with
Windows Setup, on page 13 or Printer Installation - Mac OS, on
page 18.
5. If the Wireless Print Server web page does not appear, you
need to set the print server’s IP address manually, described in
Set a Temporary IP Address with Arp/Ping:, on page 8.
7
Page 9
Set a Temporary IP Address with Arp/Ping:
You can assign a temporary IP address to the print server using
arp/ping and then access the print server’s internal web pages to
assign a fixed IP address:
1. Locate the print server’s serial number (S/N) found on the print
server’s underside label. The Ethernet address is based on the
serial number:
Serial number: MAC/Ethernet address:
00408c181cf0 00-40-8c-18-1c-f0 (Windows)
00:40:8c:18:1c:f0 (Mac OS)
2. Open a Command Prompt or Terminal and enter the following
syntax:
Syntax Example Windows (Command prompt)
1
arp -s <IP address> <Ethernet address>
2
ping <IP address>
arp -s 192.168.3.191 00-40-8c-18-1c-f0
ping 192.168.3.191
Syntax Example Mac OS (Terminal)
1
arp -s <IP address> <Ethernet address>
2
ping <IP address>
arp -s 192.168.3.191 00:40:8c:18:1c:f0
ping 192.168.3.191
3. The host will return psname is alive (Mac OS Terminal) or Reply
from 192.168.3.191... (Windows Command prompt) or a
similar message. This indicates that a temporary IP address has
been set and that communication is established.
4. Next, open a web browser (e.g. Internet Explorer).
5. In the Web browser’s Location/Address field, enter the print
server’s IP address and press Enter.
ENGLISH
8
Page 10
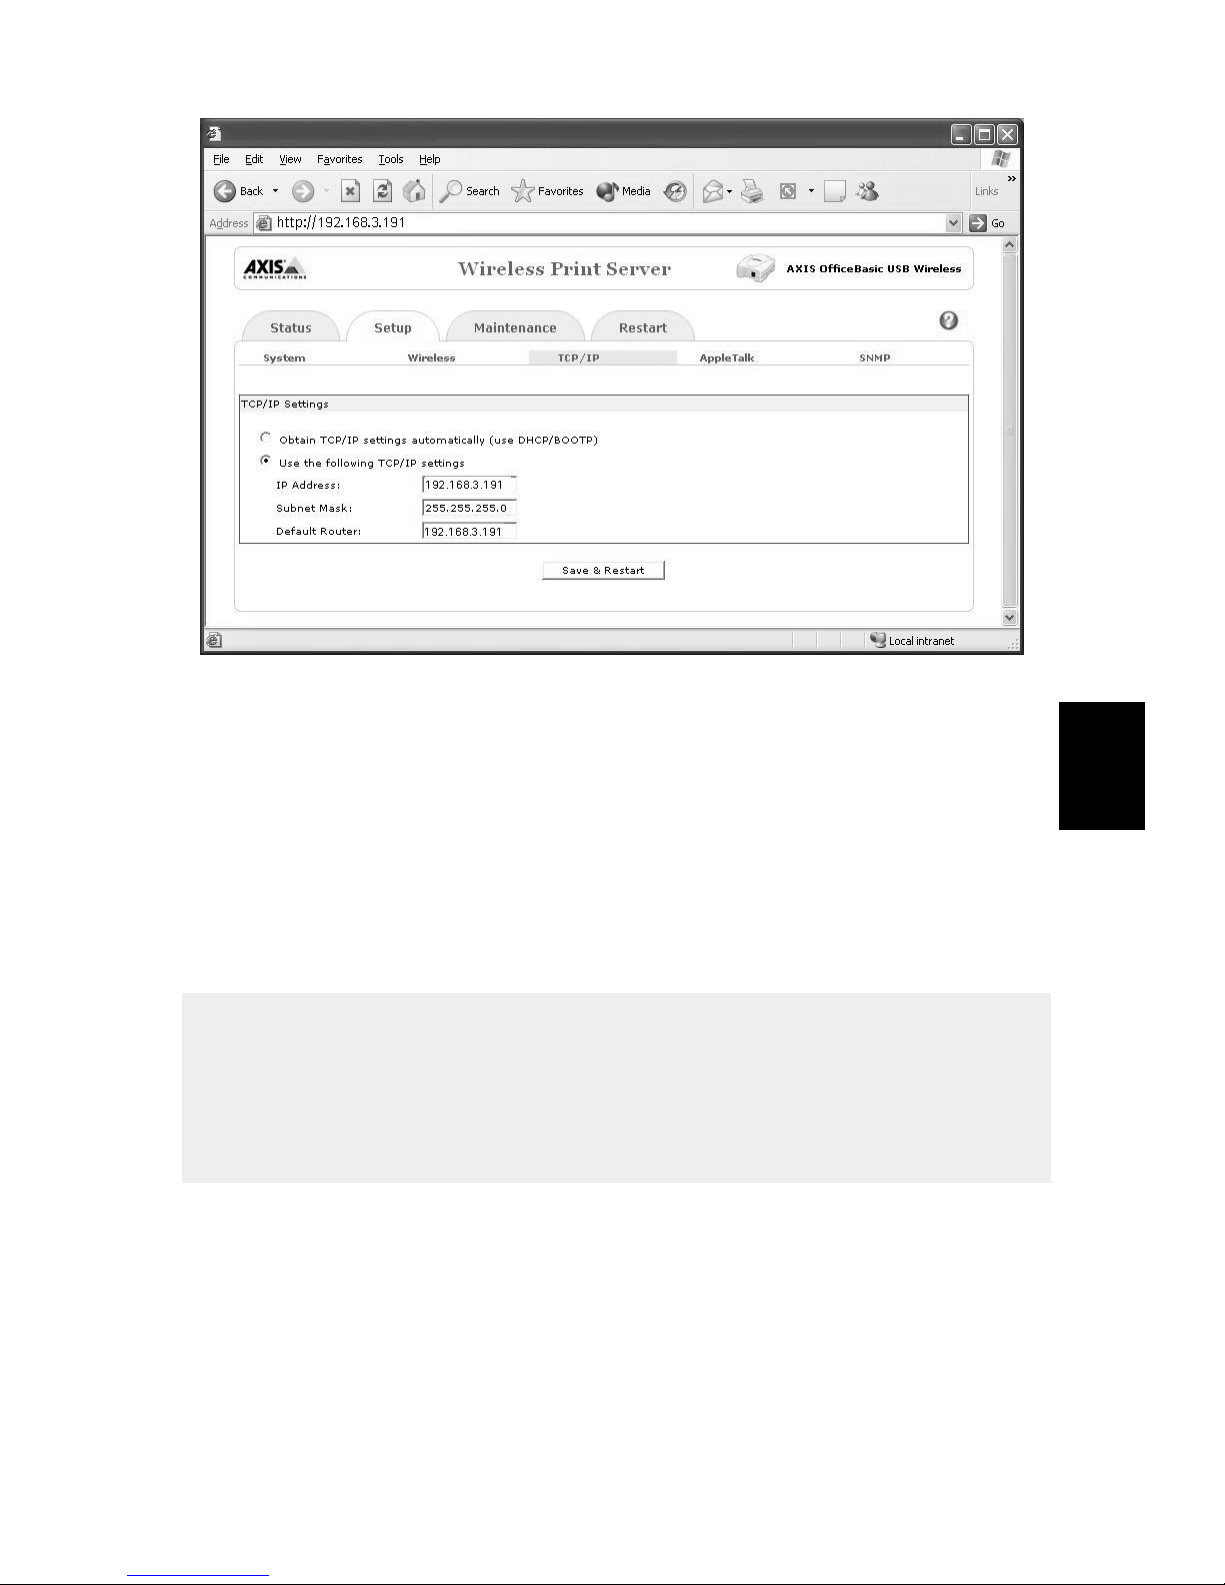
6. The print server’s web page will appear. Go to Setup | TCP/IP:
7. Assign a fixed IP address to the print server: select Use the
following TCP/IP settings radio-button and enter a valid IP
address, Subnet Mask and Default Router.
8. Click Save and Restart. The new, static IP address will be
loaded.
9. Check the communication by entering the new IP address in the
browser and that the print server’s web pages appear again.
• When you execute the ping command for the first time, you may
experience a significantly longer response time than usual.
• The IP address and serial number used here are sample values. You
must acquire a new and unused IP address from your network administrator.
Continue with Windows Setup, on page 13 or Mac OS Setup, on
page 27.
ENGLISH
9
Page 11
Print Server setup for Windows
Before You Start:
• Make sure you have an Access Point in your network and that it has
a valid IP address. Example: 192.168.1.100
• Make sure that the TCP/IP protocol is installed on your computer.
• Make sure the print server’s DIP switch is in Normal mode (Nor.)
1. Insert the AXIS OfficeBasic USB Wireless CD into your CD-drive.
2. Select Setup Wizard to install the wireless print server and
configure the connected printer.
The Wizard will automatically install these components in
C:\Program Files\Axis Communications\AXIS OBW Wizard:
• AXIS OBW Wizard.exe
• AXIS OBW Network Printer Port. DLL (Wireless Print Monitor)
After installation, AXIS OBW Wizard will be available from Start |
Programs | Axis Communications.
AXIS OBW Wizard will start in the same language as your operatings
system, see Technical Specifications, on page 113.
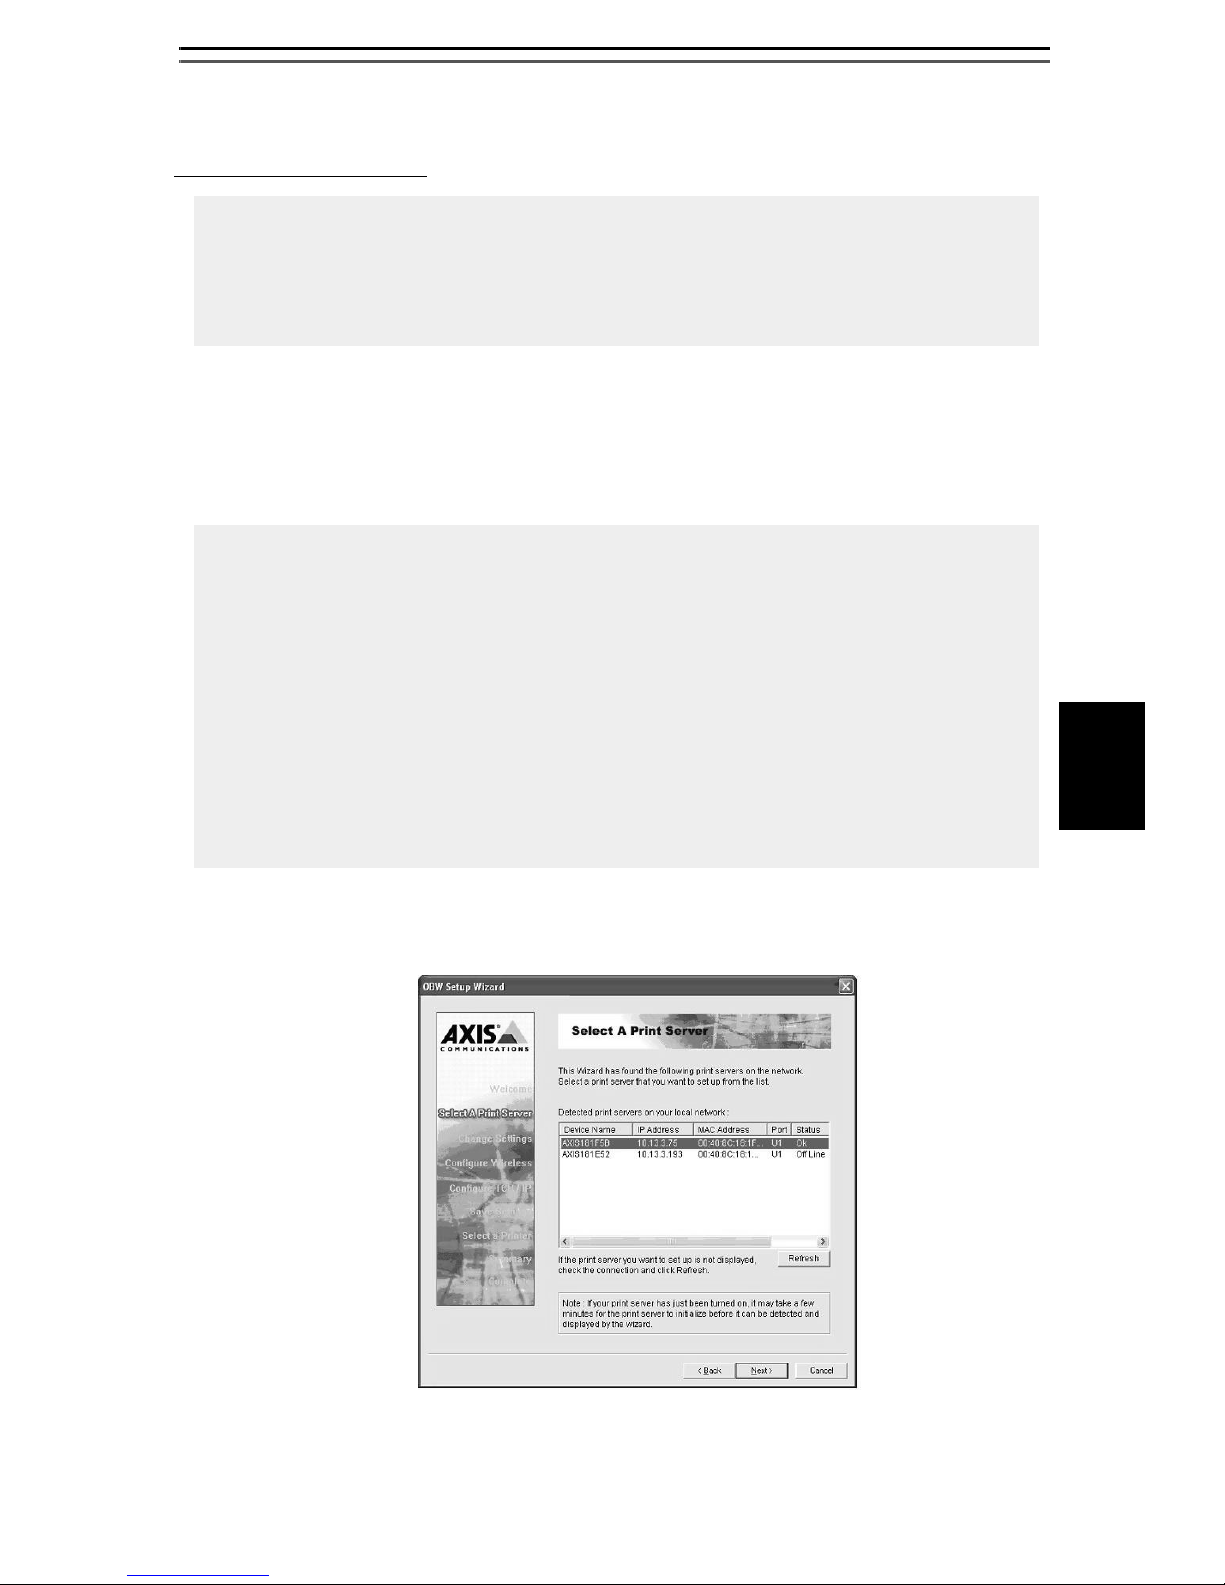
3. From the Select A Print Server screen, select the print server that
you want to configure and click Next.
ENGLISH
10
Page 12
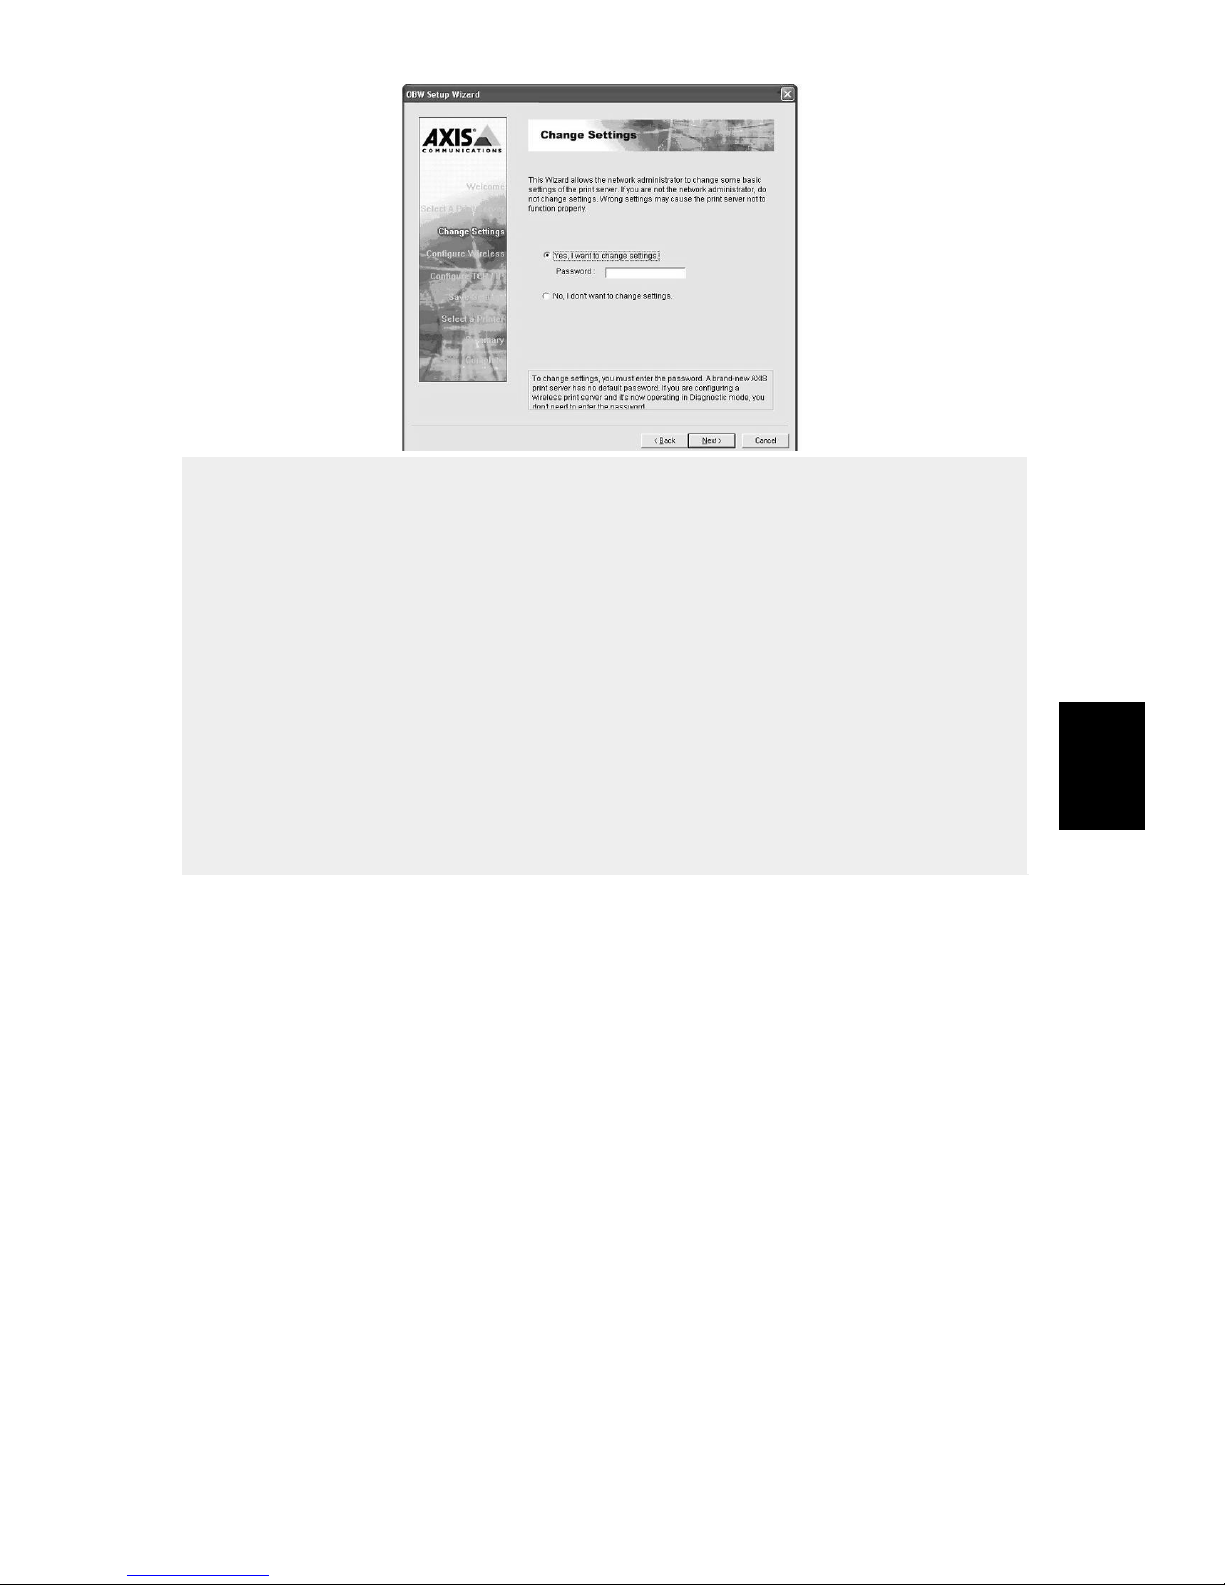
4. On the Change Settings screen, select No or Yes:
Select No if you want the print server to use the assigned DHCP address and
keep the default Infrastructure settings:
• Infrastructure mode
• SSID = <ANY>
• Data transmit rate = Auto
• Channel = 6
• No WEP encryption
• Authentication Type = Open System
•DHCP enabled
Click Next in the program until you reach Figure: Select an already configured
printer or click Add New Printer, on page 13. Follow the instructions from there
on.
ENGLISH
11
Page 13

Select Yes if you want change wireless settings or assign a static IP address to
the print server:
•On the Basic Wireless Settings screen, select Communications Type
according to your network:
- Infrastructure
- 802.11b Ad-hoc
• Enter the proper SSID of your wireless network. The default value <ANY>
will connect with the AP that has the best signal in your wireless network.
- Channel: optional.
- Data Transmit Rates: select Auto, 1,2Mbps, 5.5Mbps or 11Mbps.
•On the Security and WEP Encryption Settings page, enable or disable
WEP Encryption, configure according to your wireless network and click
Next.
• If your network uses 802.1X (EAP) authentication, select None or MD5 as
your authentication type. If you choose MD5 you must enter the same
Login Name and Password as defined on the Radius server.
• Specify a fixed or dynamic IP address for the print server, a fixed IP address
is highly recommended. Click Next.
Click Next in the program until you reach Figure: Select an already configured
printer or click Add New Printer, on page 13. Follow the instructions from there
on.
ENGLISH
Notes:
• If you use WEP encryption on your WLAN and accidentally change the WEP
format or keys in the print server, you will lose contact with the print
server. Follow the steps described in the User’s Manual to recover the con-
nection. The User’s Manual is located on the CD and on www.axis.com.
• The IP address of the wireless print server must be within the same subnet
as your wireless adapter.
• A quick way of finding the print server’s IP address is to press the reset but-
ton for 5 seconds to print a test page. The print server’s DHCP address or
static IP address is normally displayed on the test page.
12
Page 14
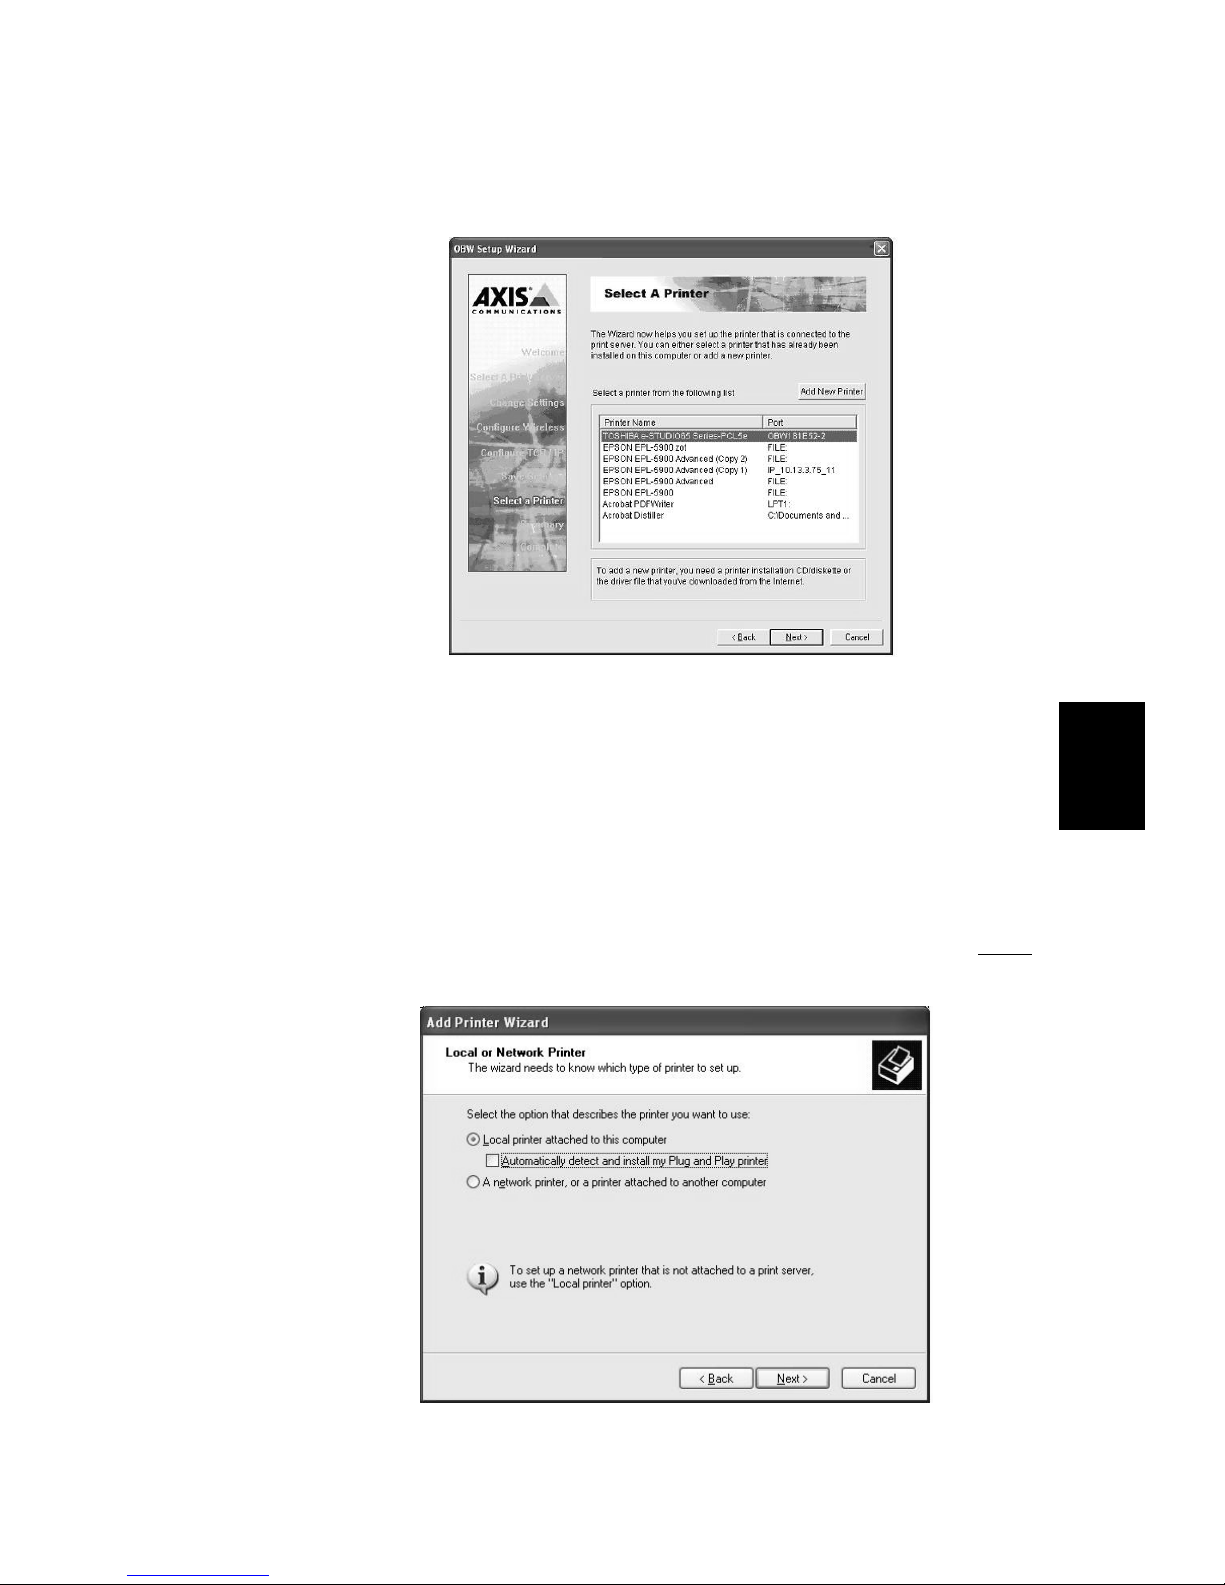
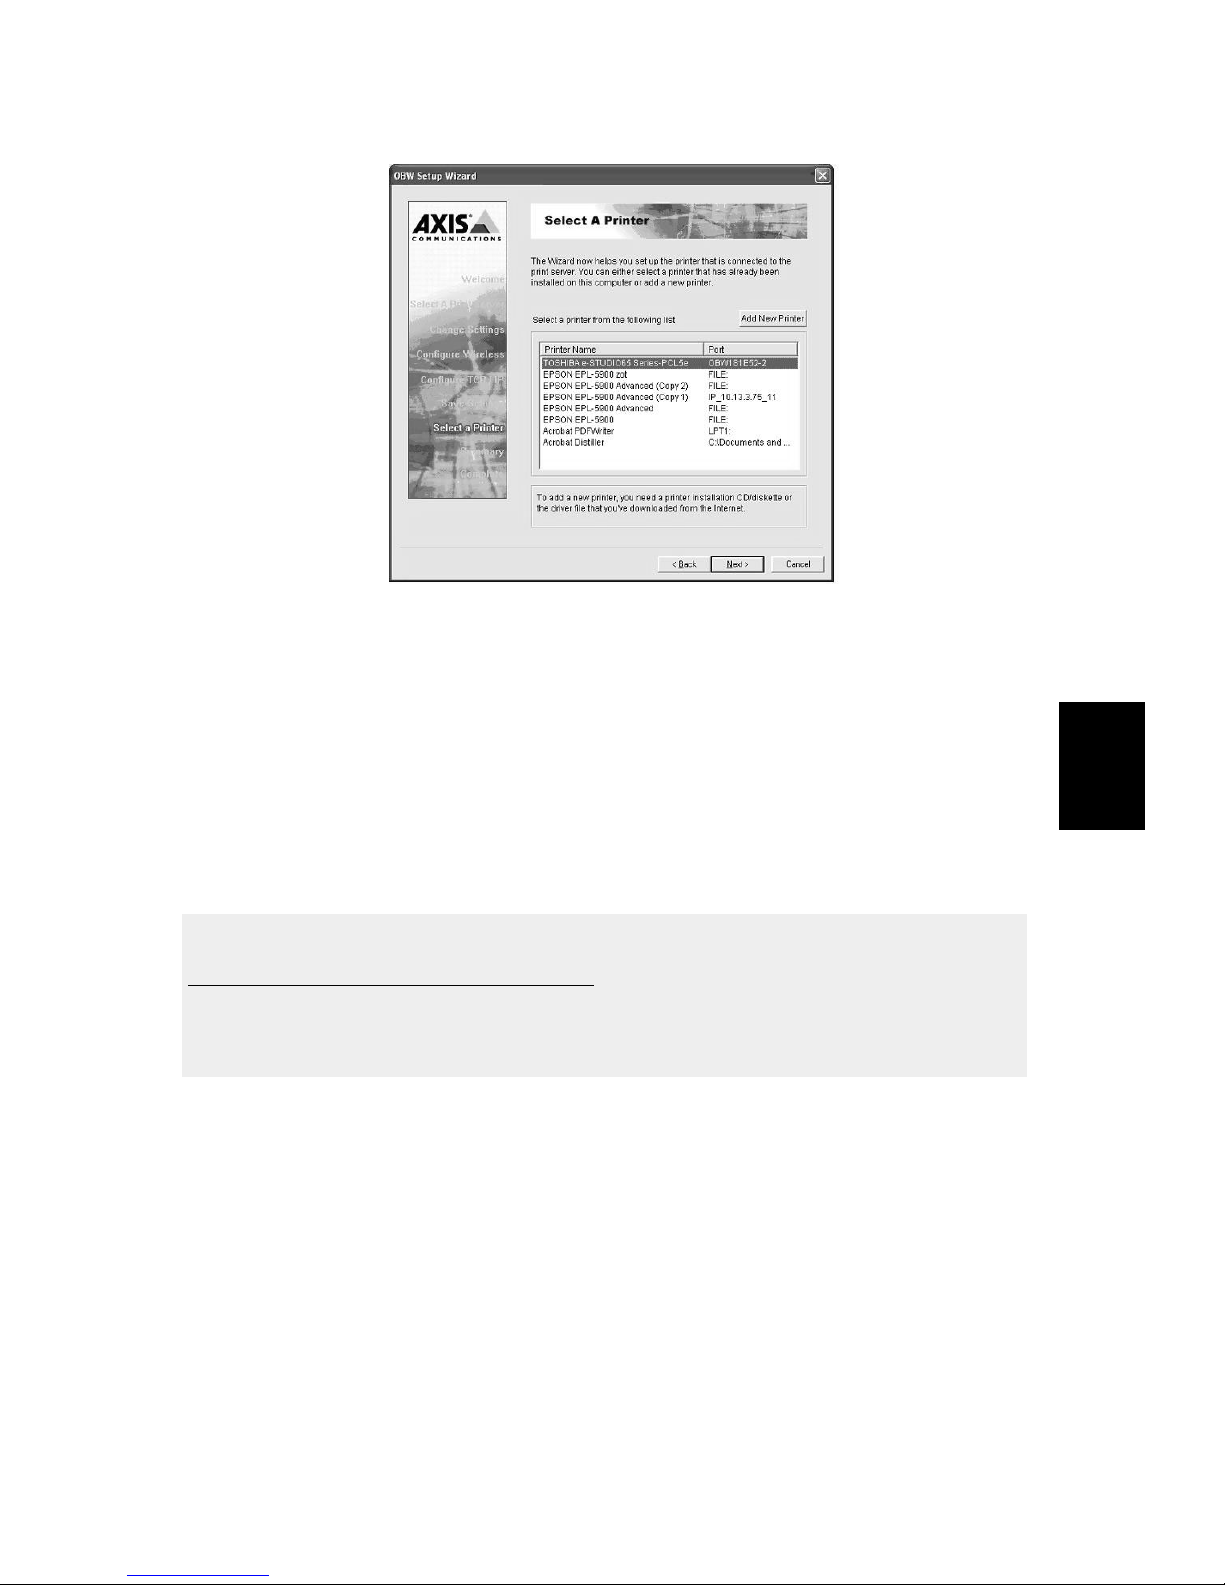
5. In the Wizard, select an already configured printer from the list,
click Next and then Finish to complete the installation.
or
Select Add New Printer if the print server is connected to a printer
that has not been installed before and does not appear in the list.
Figure: Select an already configured printer or click Add New Printer
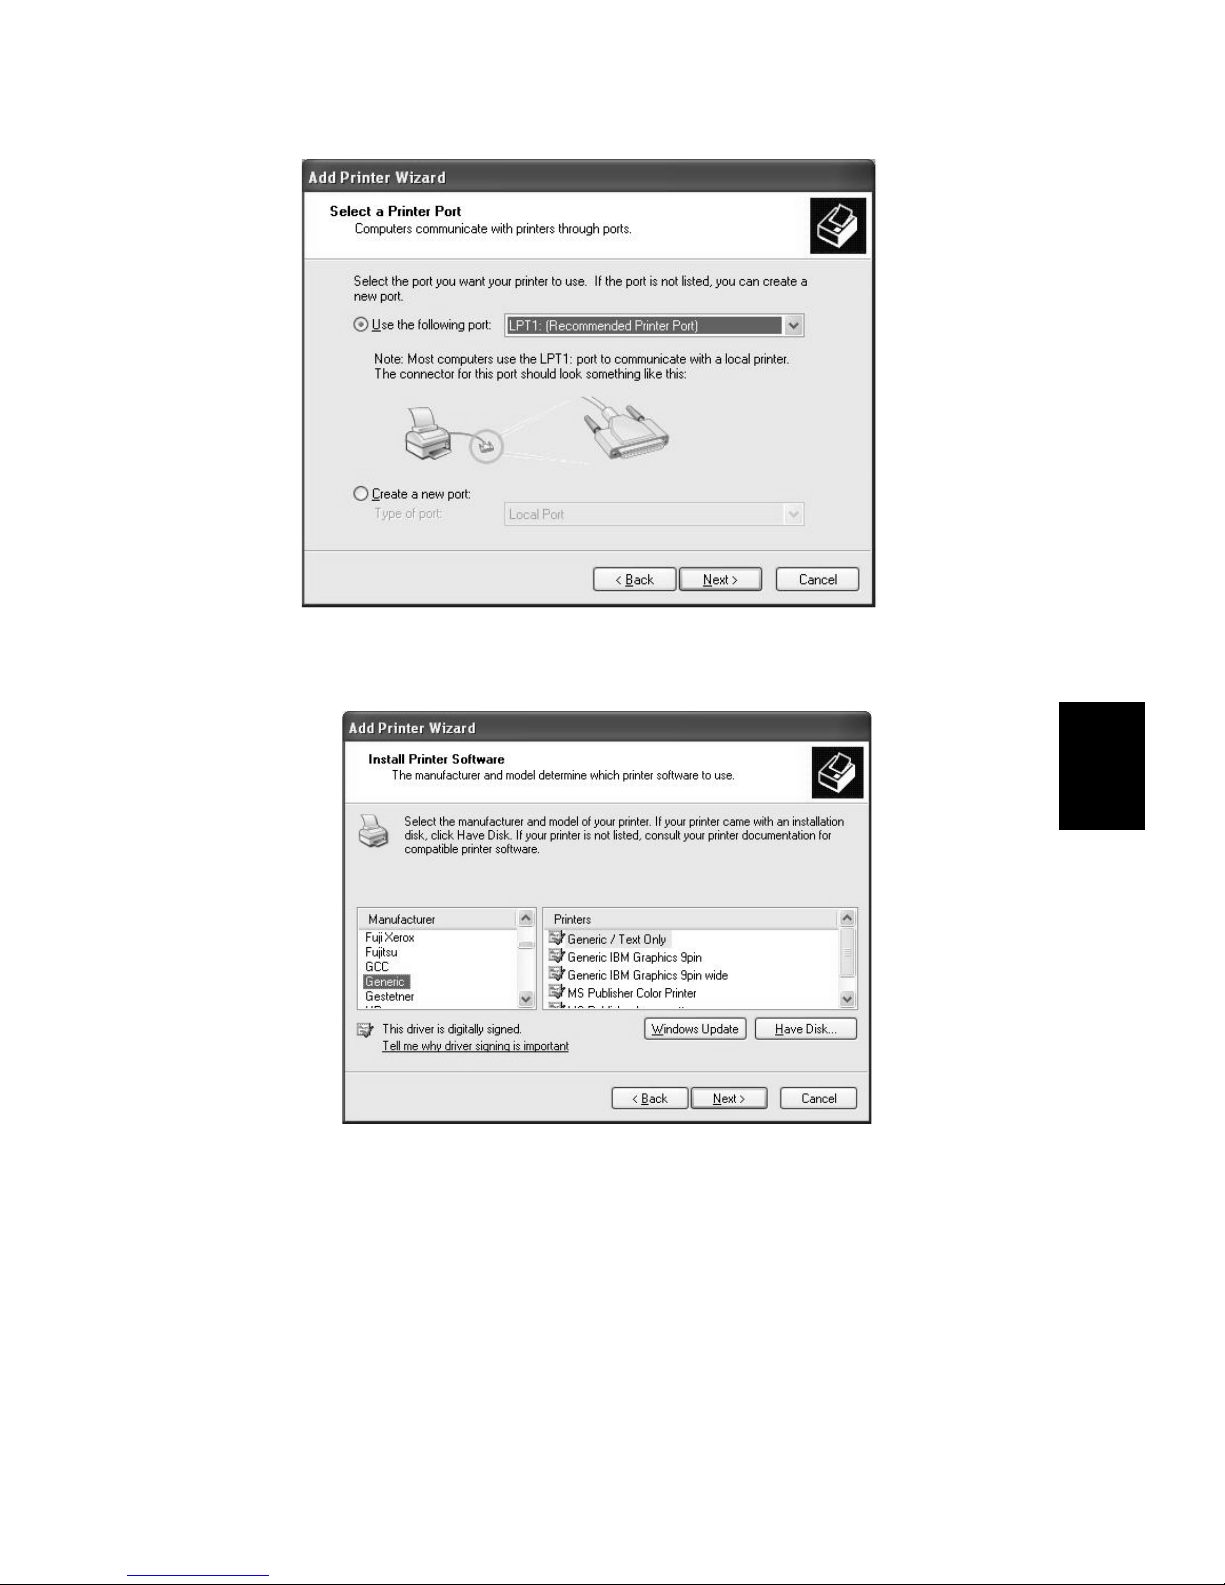
6. For Windows NT/98/Me, go to page 16 or page 17.
For Windows 2000/XP/2003:
Click Add New Printer to launch Windows Add Printer Wizard.
Click Next and select Local Printer, make sure the Automatically
detect and install my Plug and Play printer check box is NOT
checked:
ENGLISH
13
Page 15
7. Make sure the Use the following port radio-button is clicked and
select LPT1: (Recommended Printer Port) from the drop-down
list. Click Next.
8. Select Manufacturer and Printer from the driver lists.
Click Next.
9. If you already have the printer’s driver installed, you will be asked
whether to keep it or to replace it. Click Next. Supply a name for
ENGLISH
the printer and choose whether you want to make it your default
printer. Click Next.
10. Choose whether you want to share the printer with other network
users, print a test page, etc. Select the appropriate radio button
and click Next and Finish.
14
Page 16
11. In AXIS OBW Wizard, finish the installation by highlighting the
installed printer in the Select a Printer list and click Next =>
Finish.
12. From Windows, go to Start | Printers (and Faxes) and highlight
your newly installed printer.
13. Right-click, select Properties and verify that the AXIS OfficeBasic
USB Wireless port appears as OBWXXXXXX-1 (the Xs represent
the last six digits of the print server’s serial number).
14. Print a test page to verify the configuration.
If you wish to install more print servers, start AXIS OBW Wizard
from your Windows Start menu
: Start | Programs | Axis
Communications | AXIS OBW Wizard and repeat the
installation procedure.
See the AXIS OfficeBasic USB Wireless User’s Manual for alternative
Windows configuration methods. The User’s Manual is located on
the AXIS OfficeBasic USB Wireless CD and on www.axis.com
ENGLISH
15
Page 17

Setup in Windows NT
1. Configure according to the description in Print Server setup
for Windows, on page 10 until you reach Figure: Select an
already configured printer or click Add New Printer, on page
13. Click Add New Printer to launch Windows Add Printer
Wizard.
2. Select My Computer and click Next.
3. Select LPT1 as Local Port and click Next.
4. Select Printer Manufacturer and Printer model, click Next and
Finish.
5. In the AXIS OBW Wizard, select the newly added printer from
the list, click Next and Finish to complete the installation.
6. From Windows, go to Start | Settings | Printers and highlight
your newly installed printer.
7. Right-click, select Properties and verify that the AXIS
OfficeBasic USB Wireless port appears as OBWXXXXXX-1 (the
Xs represent the last six digits of the print server’s serial
number).
8. Print a test page to verify the configuration.
See the AXIS OfficeBasic USB Wireless User’s Manual for alternative
Windows configuration methods. The User’s Manual is located on
the AXIS OfficeBasic USB Wireless CD and on www.axis.com
ENGLISH
16
Page 18

Setup in Windows 98/Me
1. Configure according to the description in Print Server setup
for Windows, on page 10 until you reach Figure: Select an
already configured printer or click Add New Printer, on page
13. Click Add New Printer to launch Windows Add Printer
Wizard.
2. Select Local Printer and click Next.
3. Select Printer Manufacturer and Printer model. Do not print a
test page.
4. Select LPT1 (ECP Printer Port) and click Next and Finish to
complete the installation.
5. From Windows, go to Start | Settings | Printers and highlight
your newly installed printer.
6. Right-click, select Properties and verify that the AXIS
OfficeBasic USB Wireless port appears as OBWXXXXXX-1 (the
Xs represent the last six digits of the print server’s serial
number).
7. Print a test page to verify the configuration.
See the AXIS OfficeBasic USB Wireless User’s Manual for alternative
Windows configuration methods. The User’s Manual is located on
the AXIS OfficeBasic USB Wireless CD and on www.axis.com
ENGLISH
17
Page 19

Printer Installation - Mac OS
AppleTalk and IP Printing for Mac OS is described here. For
instructions on printing from older Mac OS environments, please see
the AXIS OfficeBasic USB Wireless User’s Manual on the CD or
www.axis.com
Appletalk Printing (Mac OS X)
1. In the print server’s web interface, select Setup | AppleTalk.
2. In the AppleTalk Zone field, enter the zone in which your Mac
OS operates. Click Save and Restart.
3. From the Apple menu, select Go | Applications | Utilities and
start the Print Center.
4. Click Add in the Printer List.
5. Select AppleTalk from the top drop-down menu.
6. Select the AppleTalk zone in which your Mac OS operates (same
as entered above).
7. Your networked printer will appear in the Printer List (the
default name is AXxxxxxx_USB, where the x represent the last
6 digits of the print server’s serial number).
8. From the Printer Model drop-down list, select the printer
manufacturer and model. Click Add.
ENGLISH
18
Page 20

IP Printing (Mac OS X)
1. From the Apple menu, select Go | Applications | Utilities and
start the Print Center.
2. Click Add in the Printer List.
3. Select IP Printing from the top drop-down menu.
4. In the Printer’s Address field, enter the print server’s IP address.
5. Either accept using the default user queue on the server by
making sure the Use default queue on server checkbox is
checked, or enter lp1 in the Queue name field:
6. From the Printer Model drop-down list, select the printer
manufacturer and model. Click Add.
7. Your newly added printer will appear in the Printer List as the
default printer (bold). Test the installation by sending a print job
to the printer.
ENGLISH
19
Page 21
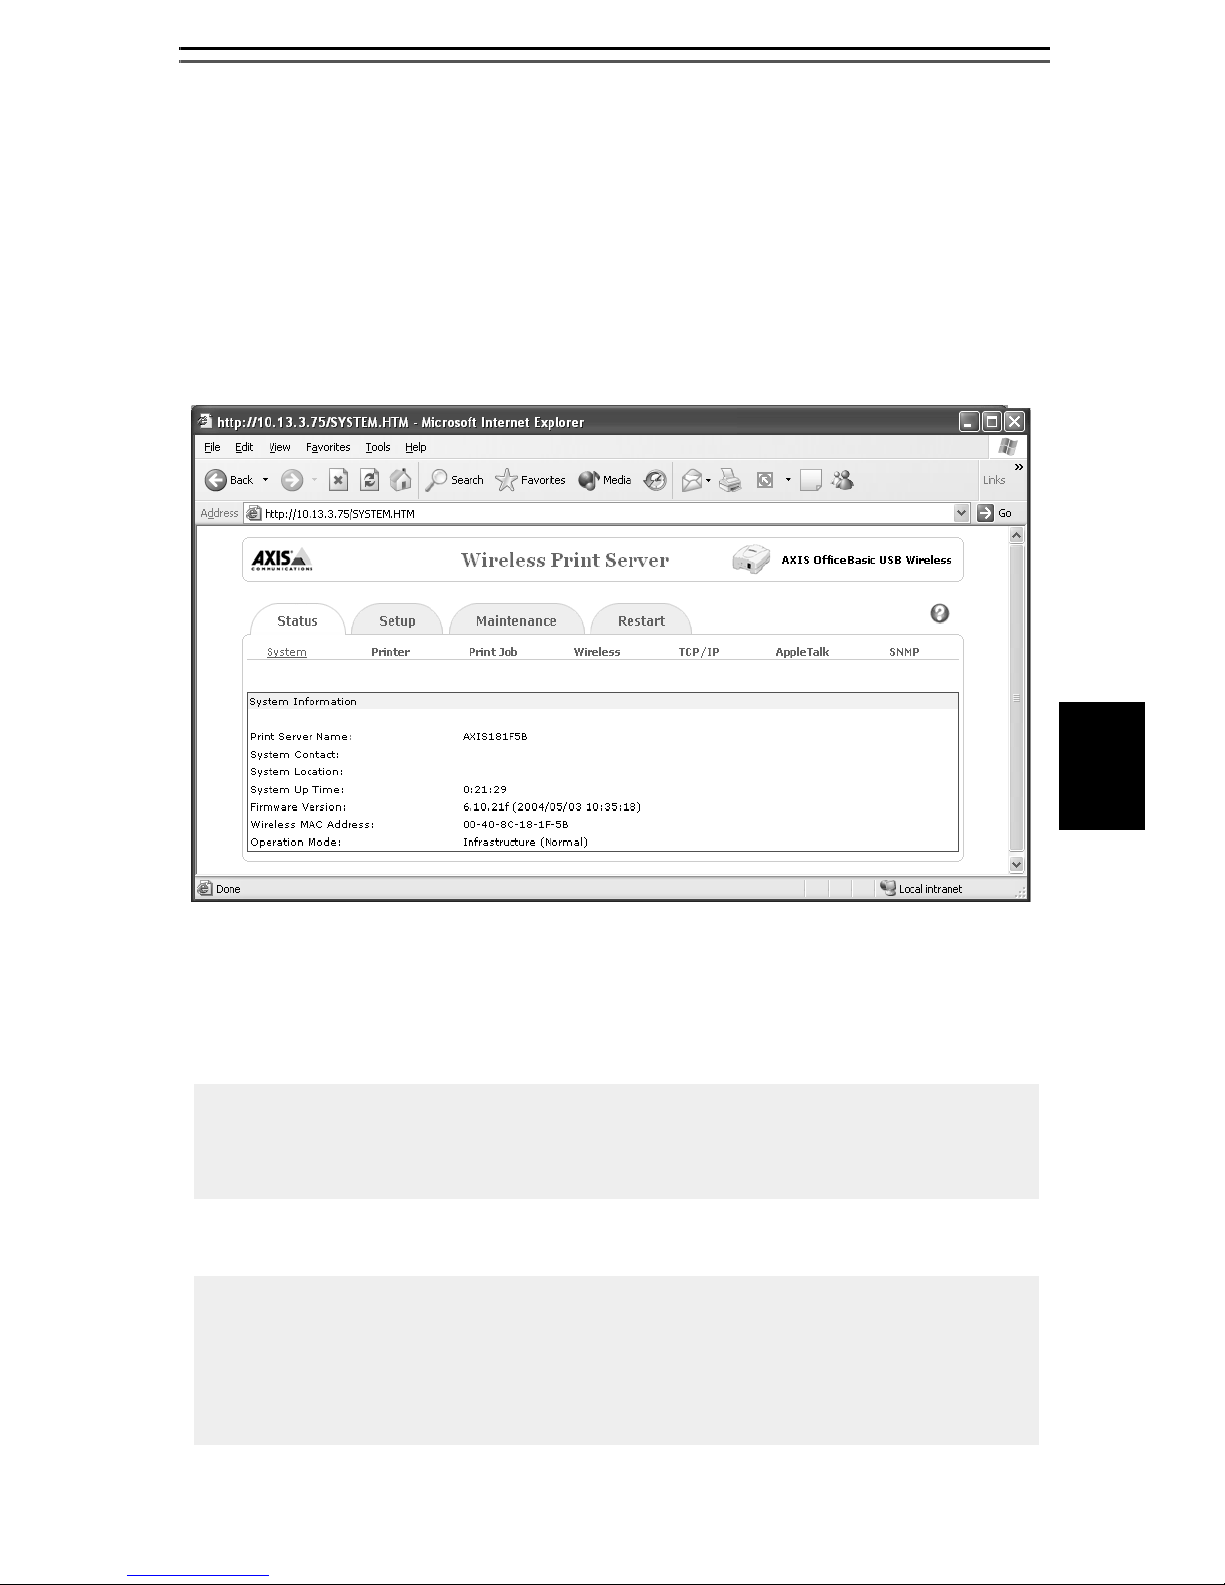
Web-based Print Server Management
Axis print server management and configuration is done from its
Web interface:
1. Enter the print server’s IP address in the Location/Address field
of your standard Web browser. Press Enter.
2. The Wireless Print Server page will appear. From here you can
configure all print server settings.
The print server has a default User name = root
default Password = pass
Notes:
A quick way of finding the print server’s IP address is to press the reset
button for 5 seconds to print a test page. The DHCP address or static IP
address is displayed on the test page.
Tip:
To change these print server settings in its Web interface:
ENGLISH
• Print server’s IP address: go to Setup | TCP/IP
• Wireless settings: go to Setup | Wireless
• The print server’s password: go to Setup | System
20
Page 22

Print Server Management Using the Reset
Button
The reset button can be used for several operations:
Print a test page:
1. Verify that the DIP switch is on “Nor.”
2. Hold down the reset button for 5 seconds. The test page will be
printed on the connected printer.
The test page displays information about e.g. the print server’s IP
address, MAC address, subnet mask, default gateway.
Reset:
1. Verify that the DIP switch is on “Nor.”
2. Press the reset button once.
WARNING! This will restart the print server and stop all on-going and
ENGLISH
pending print jobs!
Perform a Factory Default:
1. Verify that the DIP switch is on “Nor.”
2. Disconnect the external power supply.
3. Hold down the reset button and reconnect the external power
supply.
4. Wait until the orange and green LED indicators have blinked
twice simultaneously.
5. Release the reset button.
6. The print server will restart.
21
Page 23

IMPORTANT!
• Performing a Factory Default will erase all settings to default and
should be performed with caution!
• After performing a Factory Default, the default settings will be:
• Infrastructure mode
• SSID = <ANY> (will connect with the Access Point that has the
best signal in your wireless network)
• Data transmit rate = Auto
• WEP = Disabled
• Authentication Type = Open System
• Channel = 6
• DHCP = Enabled
ENGLISH
22
Page 24
Troubleshooting
Check the following if you experience problems when trying to print
over the WLAN:
• Check that the WLAN network interface is properly configured in
the workstation/laptop trying to access the print server.
• All communicating clients must be in the same operating mode,
i.e. Ad Hoc or Infrastructure mode.
• Check that the SSID and the WEP keys are set according to your
WLAN network settings.
• Check that the radio frequency channel setting is the same on all
communicating clients and that the channel is set according to
the requirements in your country.
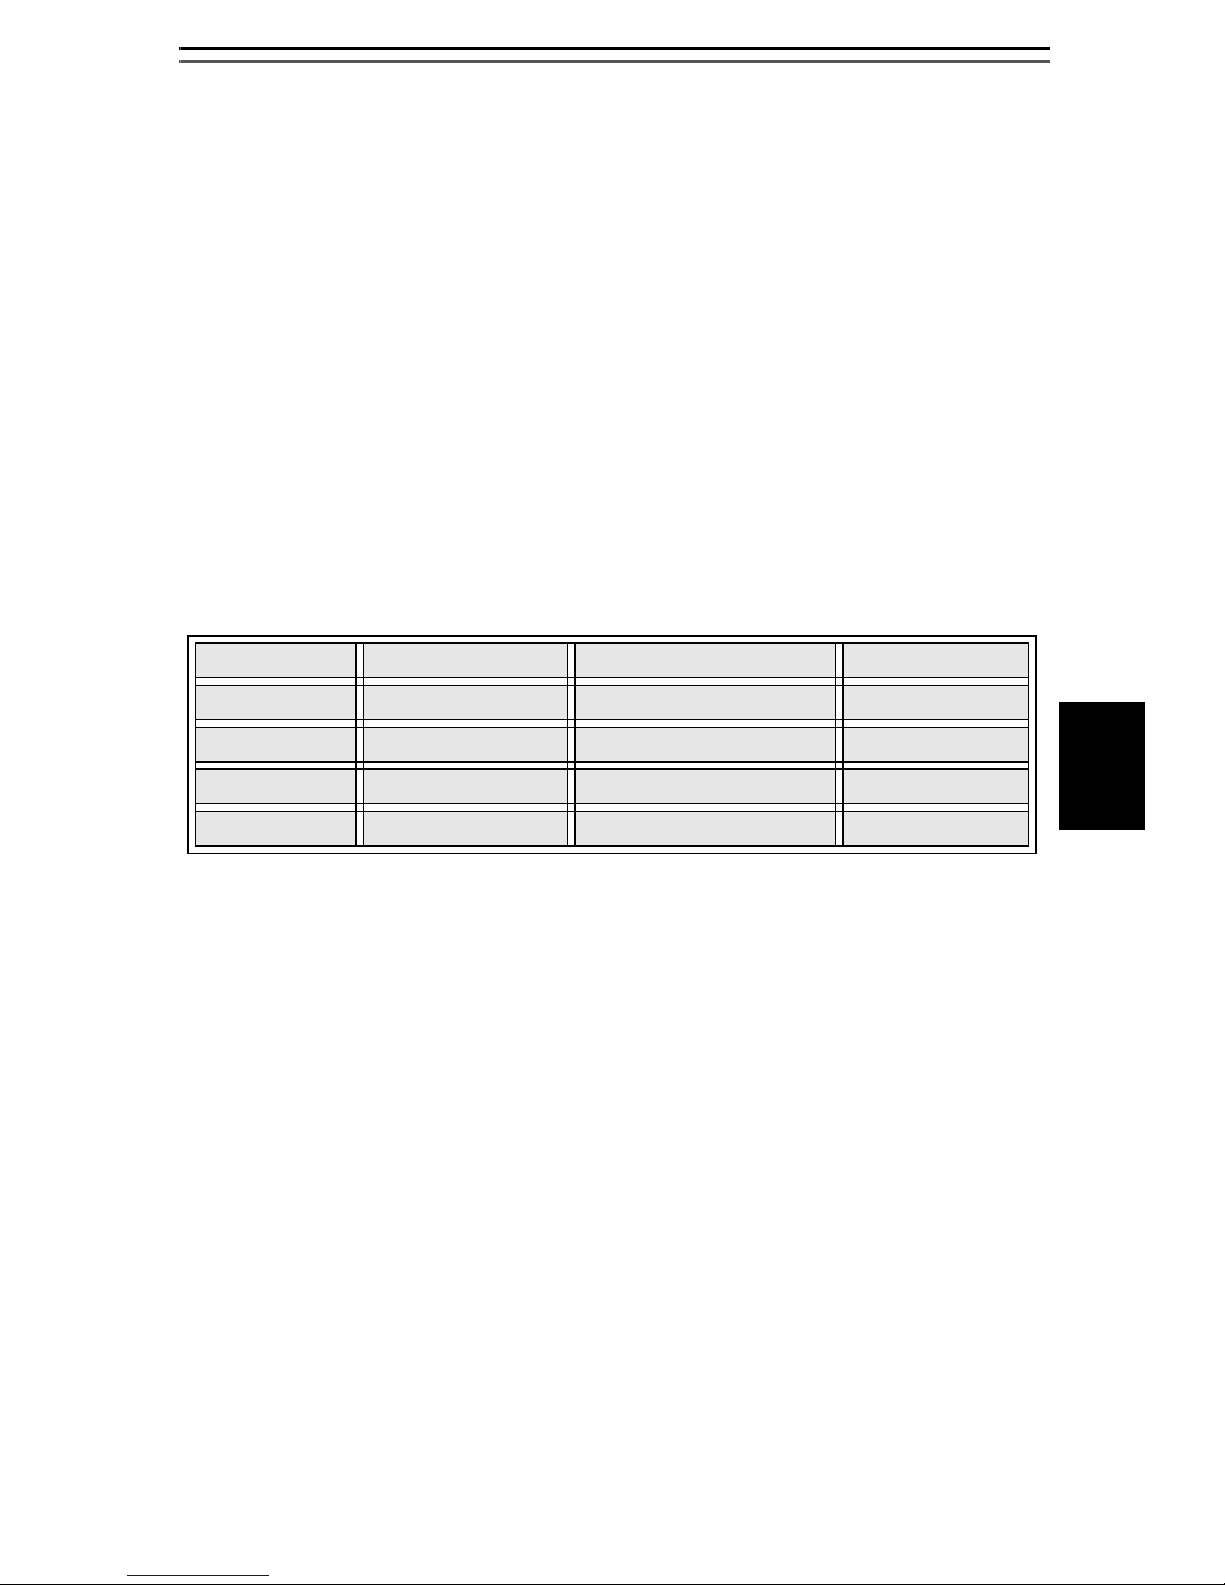
Frequency bands and channels:
Country Frequency Available Channels Default Channel
Europe 2.412-2.472 GHz 1-13 11
France 2.457-2.472 GHz 10-13 (indoor use*) 11
Japan 2.484 GHz 14 14
US/Canada 2.412-2.462 GHz 1-11 11
* (France) outdoor use permitted on private property with prior authorization
ENGLISH
23
Page 25

Setup in Ad Hoc (Peer-to-Peer) Networks
If you do not have an Access Point in your network or the print server cannot be
discovered, please follow these steps:
1. Switch the print server’s DIP switch to DIAG mode.
2. Check that the TCP/IP protocol is installed in your computer and you have
assigned an IP address to your wireless adapter, E.g 192.168.1.100
3. On your laptop, run your wireless adapter’s software utility and change it
to Ad-hoc (i.e. PEER-TO-PEER) mode, with the following settings:
• SSID = WLAN-PS
• Channel = 6
4. Click Connect (or similar) to establish communication with the print
server. Make sure a connection is established.
5. Access the print server’s web interface by entering its IP address in the
Location/Address field of a Web browser (see page 20 if you need
instructions).
6. In the print server’s web interface, go to Setup | Wireless.
7. Change from default Infrastructure (in NOR mode) to 802.11b Ad-hoc
mode.
8. Create a new SSID of your choice and select Channel according to your
country regulations.
Example: SSID = AXISOBW, Channel = 9
9. Click Save and Restart.
10. Switch the DIP back to NOR mode and restart the print server by pressing
the print server’s reset button once.
11. On your laptop, run your wireless adapter’s software utility again, keep it
in Ad-hoc (i.e. PEER-TO-PEER) mode, and adjust settings according to
those set in step 8 in order to reconnect to the print server.
12. Run the AXIS OBW Wizard as described in Print Server setup for Windows,
on page 10 in order to install the print server on your local machine.
Note: In DIAG mode, the print server ALWAYS has the below default settings.
These settings cannot be modified!
• Communication type = 802.11b Ad Hoc
ENGLISH
• SSID = WLAN-PS
• Channel = 6
• Data transmit rates = Auto
•WEP = Disabled
24
Page 26

Übersicht
Dieses Benutzerhandbuch enthält Installationsanleitungen für den Druckerserver AXIS OfficeBasic USB Wireless unter Microsoft Windows (95, 98,
NT, Me, 2000, XP, Server 2003) und Mac OS.
Die Anweisungen in diesem Handbuch gelten für die Einstellungen in
neuen und unkonfigurierten AXIS OfficeBasic USB Wireless-Modellen. Um
diesen Zustand für ein bereits konfiguriertes AXIS OfficeBasic USB Wireless-Modell wieder herzustellen, können Sie es auf seine werkseitigen Voreinstellungen zurücksetzen. Nähere Hinweise entnehmen Sie dem
Abschnitt Druckerserver-Verwaltung per Reset-Taste auf Seite 43.
Installationsschritte
Führen Sie zur Installation von AXIS OfficeBasic USB Wireless folgende
Schritte aus:
1. Hardwareinstallation, auf Seite 28
2. IP-Adressierung, auf Seite 29
3. Druckerservereinrichtung für Windows, auf Seite 32 oder
Druckerinstallation unter Mac OS, auf Seite 40.
Druckerserververwaltung
Die Druckerserververwaltung und -konfiguration wird über die Druckerserver-Webschnittstelle (siehe Seite 42) bzw. mithilfe der beiliegenden
Windows-Software OBW Setup Wizard (siehe Seite 32) ausgeführt.
AXIS OfficeBasic USB Wireless-Benutzerhandbuch
Eine detaillierte Beschreibung dieses Produkts entnehmen Sie dem AXIS
OfficeBasic USB Wireless-Benutzerhandbuch. Das Benutzerhandbuch
befindet sich auf der AXIS OfficeBasic USB Wireless-CD und ist im Internet
DEUTSCH
unter www.axis.com abrufbar.
25
Page 27

Hardwarekomponenten
Kontrollieren Sie bei Erhalt den Lieferumfang anhand der folgenden Inventarliste. Wenden Sie sich bei fehlenden oder beschädigten Komponenten
an Ihren Händler. Das gesamte Verpackungsmaterial ist recyclingfähig.
Hardware Modell Artikelnummer
AXIS OfficeBasic USB Wireless-Druckerserver
Medium Bezeichnung Artikelnummer
CD AXIS OfficeBasic USB Wireless-CD 21965
Dokumente AXIS OfficeBasic USB Wireless-Benutzerhand-
Zubehör Beschreibung Artikelnummer
Kabel USB 20208
Netzstecker Modell Artikelnummer
PS-M Australien
PROD UNIT AXIS OB USB W <EUR> ch 1-13
PROD UNIT AXIS OB USB W <US> ch 1-11
buch
Europa
Großbritannien
USA/Japan
0208-001-01
0208-004-01
21962
21822
21819
21820
21821
DEUTSCH
26
Page 28

Drahtlos-Betriebsmodi
Der Druckerserver AXIS OfficeBasic USB Wireless arbeitet entweder im
Infrastructure Mode, wenn ein 802.11b-Zugangspunkt als Brücke zwischen
Desktop-Computer bzw. Notebook und Druckerserver vorhanden ist, oder
im Ad Hoc Mode, wenn Desktop-Computer bzw. Notebook direkt mit dem
Druckerserver kommunizieren.
Infrastructure Mode (AP)
Desktop-Computer und Notebooks kommunizieren per WLAN und LAN
über einen Zugangspunkt mit dem Druckerserver.
Installationshinweise entnehmen Sie dem Abschnitt Druckerservereinrich-
tung für Windows, auf Seite 32 oder Druckerinstallation unter Mac OS, auf
Seite 40.
Ad Hoc Mode (Peer-to-Peer)
1. Desktop-Computer und Notebooks kommunizieren direkt per WLAN
mit dem Druckerserver.
DEUTSCH
Siehe Einrichtung in Ad Hoc-Netzwerken (Peer-to-Peer), auf Seite 46.
27
Page 29
Hardwareinstallation
1. Schalten Sie den Drucker aus.
2. Verbinden Sie den Druckerserver über das beiliegende USB-Kabel mit
Ihrem Drucker.
3. Schalten Sie den Drucker ein.
4. Verbinden Sie den Netzstecker mit dem Netzanschluss an der Rückseite des drahtlosen Druckerservers.
5. Warten Sie eine Minute.
6. Drücken Sie die Reset-Taste am Druckerserver für die Dauer von 5
Sekunden. Daraufhin wird am angeschlossenen Drucker eine Testseite
ausgegeben. Diese enthält Informationen zu IP-Adresse, Firmware-Nummer usw. des Druckerservers.
• Die Status-LED blinkt, wenn Daten übertragen und gedruckt werden.
• Beim Einschalten des Druckerservers blinkt die Status-LED fünfmal im Rahmen eines Selbsttests (Power On Self Test, POST). Wenn die LED beim Einschalten des Geräts nicht fünfmal blinkt, trennen Sie alle Kabel und
wiederholen Sie den hier beschriebenen Installationsvorgang.
Status-LED (orange)
Reset-Taste:
- Einmal drücken, um den Druckerserver neu zu starten.
- 5 Sekunden drücken, um eine Testseite auszugeben.
WLAN-LED (grün)
USB-Anschluss
Netzanschluss
DIP-Schalter:
Nor. = Normal Mode
Diag. = Diagnostic Mode
Nähere Hinweise zur Verwendung der Reset-Taste entnehmen Sie dem
Abschnitt Druckerserver-Verwaltung per Reset-Taste, auf Seite 43.
DEUTSCH
28
Page 30

IP-Adressierung
Um eine Netzwerkkommunikation mit dem Druckerserver herstellen zu
können, muss dieser über eine korrekte IP-Adresse verfügen. Verwenden
Sie eine der folgenden Methoden, um dem Druckerserver eine IP-Adresse
zuzuweisen:
Methode:
DHCP DHCP-Server
Arp/Ping
Erforderlicher
Server:
Betriebssystem Anmerkung:
Der Druckerserver bezieht
seine IP-Adresse und die zuge-
Windows
Mac OS
Mac OS
Windows
hörigen TCP/IP-Einstellungen
automatisch von einem
DHCP-Server. Die DHCP-Funktion des Druckerservers ist
standardmäßig aktiviert.
Manuelle Zuweisung einer
IP-Adresse.
IP-Adresse per DHCP beziehen
Wenn Sie in einem Netzwerk mit dynamischer IP-Adresszuweisung arbeiten, erhält der Druckerserver beim Anschluss an das Netzwerk automatisch eine IP-Adresse. Befolgen Sie zur Überprüfung der IP-Adresse die
Anweisungen auf dieser Seite:
DEUTSCH
1. Drucken Sie eine Testseite, indem Sie die Reset-Taste 5 Sekunden
gedrückt halten. Suchen Sie auf der Testseite nach der IP-Adresse des
Druckerservers.
2. Öffnen Sie einen Webbrowser (z.B. Internet Explorer).
3. Geben Sie in der Adresszeile des Webbrowsers die IP-Adresse des
Druckerservers ein und drücken Sie die Eingabetaste.
4. Wenn die Website für den drahtlosen Druckerserver im Webbrowser
erscheint, funktioniert die IP-Adresse korrekt. Fahren Sie mit Windows
Setup, auf Seite 13 oder Druckerinstallation unter Mac OS, auf Seite
40 fort.
5. Wenn die Website für den drahtlosen Druckerserver nicht erscheint,
müssen Sie die IP-Adresse des Druckerservers manuell festlegen (siehe
IP-Adresse mit Arp/Ping festlegen, auf Seite 30).
29
Page 31

IP-Adresse mit Arp/Ping festlegen
Sie können dem Druckerserver eine temporäre IP-Adresse per Arp/Ping
zuweisen und anschließend auf die internen Druckerserver-Webseiten
zugreifen, um eine feste IP-Adresse zu vergeben:
1. Suchen Sie nach der Seriennummer (S/N) des Druckerservers auf dem
Etikett an der Unterseite des Geräts. Die Ethernet-Adresse richtet sich
nach der Seriennummer.
Seriennummer: MAC/Ethernet-Adresse
00408c181cf0 00-40-8c-18-1c-f0 (Windows)
00:40:8c:18:1c:f0 (Mac OS )
2. Öffnen Sie eine Befehlszeile bzw. ein Terminalfenster und geben Sie
die folgende Syntax ein:
Syntax Beispiel für Windows (Befehlszeile)
1
arp -s <IP-Adresse> <Ethernet-Adresse>
2
ping <IP-Adresse>
arp -s 192.168.3.191 00-40-8c-18-1c-f0
ping 192.168.3.191
Syntax Beispiel für Mac OS (Terminalfenster)
1
arp -s <IP-Adresse> <Ethernet-Adresse>
2
ping <IP-Adresse>
arp -s 192.168.3.191 00:40:8c:18:1c:f0
ping 192.168.3.191
3. Der Host antwortet mit psname is alive (Mac OS -Terminalfenster),
Reply from 192.168.3.191... (Windows-Befehlszeile) oder einer
ähnlichen Meldung. Dadurch wird angezeigt, dass eine temporäre
IP-Adresse festgelegt und die Kommunikation hergestellt wurde.
4. Öffnen Sie nun einen Webbrowser (z.B. Internet Explorer).
5. Geben Sie in der Adresszeile des Webbrowsers die IP-Adresse des
Druckerservers ein und drücken Sie die Eingabetaste.
DEUTSCH
30
Page 32

6. Daraufhin erscheint die Druckerserver-Webseite. Rufen Sie Setup |
TCP/IP auf:
7. Aktivieren Sie die Option Folgende TCP/IP-Einstellungen verwenden
und geben Sie gültige Werte für IP-Adresse, Subnetzmaske und Stan-
dard-Router ein.
8. Klicken Sie auf Speichern und neu starten. Die neue IP-Adresse wird
geladen.
9. Überprüfen Sie den Kommunikationsstatus, indem Sie die neue
IP-Adresse im Webbrowser eingeben, woraufhin die Druckerserver-Webseiten erneut erscheinen sollten.
• Bei der ersten Ausführung des Befehls ping kann die Antwortzeit
erheblich länger als normal ausfallen.
• Die hier verwendete IP-Adresse und Seriennummer stellen lediglich
Beispielwerte dar. Sie müssen sich von Ihrem Netzwerkadministrator eine
neue und unbenutzte IP-Adresse zuweisen lassen.
Fahren Sie mit Windows Setup, auf Seite 13 oder Mac OS Setup, auf Seite
27 fort.
DEUTSCH
31
Page 33

Druckerservereinrichtung für Windows
Erste Schritte:
• Vergewissern Sie sich, dass in Ihrem Netzwerk ein Zugangspunkt existiert
und dieser über eine gültige IP-Adresse verfügt. Beispiel: 192.168.1.100
• Stellen Sie sicher, dass das TCP/IP-Protokoll auf Ihrem Computer installiert
ist.
• Vergewissern Sie sich, dass der DIP-Schalter am Druckerserver auf Normal
Mode (Nor.) gestellt ist.
1. Legen Sie die AXIS OfficeBasic USB Wireless-CD in das CD-Laufwerk
ein.
2. Nutzen Sie den Setup Wizard, um den drahtlosen Druckerserver zu
installieren und den angeschlossenen Drucker zu konfigurieren.
Er installiert diese Komponenten automatisch unter C:\Programme\Axis
Communications\AXIS OBW Wizard:
• AXIS OBW Wizard.exe
• AXIS OBW Network Printer Port.DLL (Drahtlos-Druckmonitor)
Nach der Installation kann der AXIS OBW Wizard über Start | Pro-
gramme | Axis Communications aufgerufen werden.
Der AXIS OBW Wizard startet mit der Sprache Ihres Betriebssystems,
siehe Technical Specifications, auf Seite 113.
3. Wählen Sie unter Druckerserver auswählen den zu konfigurierenden
Druckerserver aus und klicken Sie auf Weiter.
DEUTSCH
32
Page 34

Wählen Sie im Dialogfeld Einstellungen ändern die Option Nein oder Ja aus:
Wählen Sie Nein aus, wenn der Druckerserver die zugewiesene
DHCP-Adresse verwenden und die standardmäßigen Infrastructure-Einstellungen beibehalten soll:
• Infrastructure Modus
• SSID = <ANY>
• Datenübertragungsrate = Auto
• Kanal = 6
• Keine WEP-Verschlüsselung
• Authentifizierungstyp = Open System
•DHCP aktiviert
Klicken Sie im Assistenten auf Weiter, bis Sie zu Wählen Sie einen bere-
its konfigurierten Drucker aus oder klicken Sie auf Neuen Drucker hinzufügen., auf Seite 35 gelangen. Befolgen Sie die Anweisungen von dort
an.
DEUTSCH
33
Page 35

Wählen Sie Ja aus, wenn Sie die Drahtlos-Einstellungen ändern oder
dem Druckerserver eine statische IP-Adresse zuweisen wollen:
• Wählen Sie im Dialogfeld Drahtlos-Grundeinstellungen den Kommunika-
tionstyp entsprechend Ihrem Netzwerk aus:
- Infrastructure
- 802.11b Ad Hoc
• Geben Sie die korrekte SSID für Ihr drahtloses Netzwerk ein. Der Standarwert <ANY> stellt eine Verbindung mit dem Zugangspunkt her, der das
beste Signal in Ihrem drahtlosen Netzwerk liefert.
- Kanal: optional.
- Datenübertragungsraten: wählen Sie Auto; 1,2 Mbps; 5.5 Mbps oder 11
Mbps aus.
• Aktivieren oder deaktivieren Sie auf der Seite Sicherheits- und WEP-Ver-
schlüsselungseinstellungen die WEP-Verschlüsselung. Nehmen Sie eine
Konfiguration entsprechend Ihrem drahtlosen Netzwerk vor und klicken
Sie auf Weiter.
• Wenn in Ihrem Netzwerk eine 802.1X (EAP)-Authentifizierung zum Einsatz
kommt, wählen Sie als Authentifizierungstyp None (Kein) oder MD5 aus.
Bei Auswahl von MD5, müssen Sie dieselben Werte für Benutzername und
Passwort angeben, wie unter Radius-Server festgelegt.
• Legen Sie eine feste oder dynamische IP-Adresse für den Druckerserver fest.
Die Verwendung einer festen IP-Adresse wird dringend empfohlen. Klicken
Sie auf Weiter.
Klicken Sie im Assistenten auf Weiter, bis Sie zu Wählen Sie einen bere-
its konfigurierten Drucker aus oder klicken Sie auf Neuen Drucker hinzufügen., auf Seite 35 gelangen. Befolgen Sie die Anweisungen von dort
an.
Hinweise:
• Wenn in Ihrem WLAN eine WEP-Verschlüsselung genutzt wird und Sie aus
Versehen das WEP-Format oder Schlüssel im Druckerserver ändern, wird die
Verbindung mit dem Druckerserver getrennt. Befolgen Sie die Schritte im
Benutzerhandbuch, um die Verbindung wieder herzustellen.
• Die IP-Adresse des drahtlosen Druckerservers muss im selben Subnetz wie
Ihr Drahtlos-Adapter liegen.
• Die IP-Adresse des Druckerservers lässt sich schnell ermitteln, indem Sie die
Reset-Taste 5 Sekunden lang drücken und damit eine Testseite ausgeben.
Die DHCP-Adresse oder statische IP-Adresse des Druckerservers wird normalerweise auf der Testseite aufgeführt.
DEUTSCH
34
Page 36

4. Wählen Sie im Assistenten einen bereits konfigurierten Drucker aus
der Liste aus, klicken Sie auf Weiter und danach auf Fertig stellen, um
die Installation abzuschließen.
oder
Wählen Sie Neuen Drucker hinzufügen aus, wenn der Druckerserver
mit einem Drucker verbunden ist, der noch nicht installiert wurde und
daher nicht in der Liste erscheint.
Wählen Sie einen bereits konfigurierten Drucker aus oder klicken Sie auf Neuen
Drucker hinzufügen.
DEUTSCH
35
Page 37

5. Für Windows NT/98/Me: Lesen Sie weiter auf Seite 38 oder Seite 39.
Für Windows 2000/XP/2003:
Klicken Sie auf Neuen Drucker hinzufügen, um den Windows-Assis-
tenten für die Druckerinstallation zu starten. Klicken Sie auf Weiter
und wählen Sie Lokaler Drucker aus. Vergewissern Sie sich, dass das
Kontrollkästchen Meinen Plug-and-Play Drucker automatisch fin-
den und installieren NICHT
aktiviert ist:
6. Stellen Sie sicher, dass das Optionsfeld Folgenden Anschluss ver-
wenden aktiviert ist, und wählen Sie den Eintrag LPT1: (Empfohlener
Druckeranschluss) aus der Dropdown-Liste aus. Klicken Sie auf Weiter.
DEUTSCH
36
Page 38

7. Wählen Sie Hersteller und Drucker aus den Treiberlisten aus. Klicken
Sie auf Weiter.
8. Wenn der Druckertreiber bereits installiert ist, werden Sie gefragt, ob
dieser beibehalten oder ersetzt werden soll. Klicken Sie auf Weiter.
Geben Sie einen Druckernamen ein. Legen Sie fest, ob er als Standarddrucker fungieren soll. Klicken Sie auf Weiter.
9. Legen Sie fest, ob Sie den Drucker für andere Netzwerkbenutzer
freigeben oder eine Testseite drucken wollen usw. Wählen Sie das
entsprechende Optionsfeld aus. Klicken Sie auf Weiter und Fertig
stellen.
10. Beenden Sie im AXIS OBW Wizard die Installation, indem Sie den
installierten Drucker in der Liste Drucker auswählen markieren und
auf Weiter => Fertig stellen klicken.
DEUTSCH
11. Wählen Sie unter Windows Start | Einstellungen | Drucker (und
Faxgeräte) aus und markieren Sie den soeben installierten Drucker.
37
Page 39

12. Führen Sie einen Rechtsklick aus, wählen Sie den Menüeintrag Eigen-
schaften aus und überprüfen Sie, ob der AXIS OfficeBasic USB Wireless-Anschluss als OBWXXXXXX-1 erscheint (X bezeichnet die letzten
sechs Stellen der Druckerserver-Seriennummer).
13. Drucken Sie eine Testseite, um die Konfiguration zu überprüfen.
Um weitere Druckerserver zu installieren, starten Sie den AXIS OBW
Wizard über das Windows-Startmenü: Start | Programme | Axis Com-
munications | AXIS OBW Wizard und wiederholen Sie den Installationsvorgang.
Einrichtung unter Windows NT
1. Nehmen Sie die Konfiguration gemäß der Anleitung unter Druckerservereinrichtung für Windows, auf Seite 32 vor, bis Sie zu
Wählen Sie einen bereits konfigurierten Drucker aus oder klicken Sie
auf Neuen Drucker hinzufügen., auf Seite 35 gelangen. Klicken Sie
auf Neuen Drucker hinzufügen, um den Windows-Assistenten für
die Druckerinstallation zu starten.
2. Wählen Sie Mein Computer und klicken Sie auf Weiter.
3. Wählen Sie LPT1 als lokalen Anschluss aus und klicken Sie auf
Weiter.
4. Wählen Sie Druckerhersteller und -modell aus. Klicken Sie auf
Weiter und Fertig stellen.
5. Wählen Sie im AXIS OBW Wizard den soeben hinzugefügten
Drucker aus der Liste aus. Klicken Sie auf Weiter und Fertig stellen,
um die Installation abzuschließen.
6. Wählen Sie unter Windows Start | Einstellungen | Drucker (und
Faxgeräte) aus und markieren Sie den soeben installierten Drucker.
7. Führen Sie einen Rechtsklick aus, wählen Sie den Menüeintrag
Eigenschaften aus und überprüfen Sie, ob der AXIS OfficeBasic
USB Wireless-Anschluss als OBWXXXXXX-1 erscheint (X bezeichnet die letzten sechs Stellen der Druckerserver-Seriennummer).
DEUTSCH
8. Drucken Sie eine Testseite, um die Konfiguration zu überprüfen.
38
Page 40

Einrichtung unter Windows 98/Me
1. Nehmen Sie die Konfiguration gemäß der Anleitung unter Druckerservereinrichtung für Windows, auf Seite 32 vor, bis Sie zu
Wählen Sie einen bereits konfigurierten Drucker aus oder klicken Sie
auf Neuen Drucker hinzufügen., auf Seite 35 gelangen. Klicken Sie
auf Neuen Drucker hinzufügen, um den Windows-Assistenten für
die Druckerinstallation zu starten.
2. Wählen Sie Lokaler Drucker aus und klicken Sie auf Weiter.
3. Wählen Sie Druckerhersteller und -modell aus der jeweiligen Liste
aus. Drucken Sie keine Testseite.
4. Wählen Sie LPT1 (ECP-Druckeranschluss) aus. Klicken Sie auf
Weiter und Fertig stellen, um die Installation abzuschließen.
5. Wählen Sie unter Windows Start | Einstellungen | Drucker (und
Faxgeräte) aus und markieren Sie den soeben installierten Drucker.
6. Führen Sie einen Rechtsklick aus, wählen Sie den Menüeintrag
Eigenschaften aus und überprüfen Sie, ob der AXIS OfficeBasic
USB Wireless-Anschluss als OBWXXXXXX-1 erscheint (X bezeich-
net die letzten sechs Stellen der Druckerserver-Seriennummer).
7. Drucken Sie eine Testseite, um die Konfiguration zu überprüfen.
DEUTSCH
39
Page 41

Druckerinstallation unter Mac OS
AppleTalk und IP-Druck für Mac OS werden im Folgenden beschrieben.
Hinweise zum Drucken in älteren Mac OS-Umgebungen entnehmen Sie
dem AXIS OfficeBasic USB Wireless-Benutzerhandbuch auf der CD oder
unter www.axis.com.
Drucken mit AppleTalk (Mac OS X)
1. Wählen Sie in der Druckerserver-Webschnittstelle Setup | AppleTalk
aus.
2. Geben Sie im Feld AppleTalk-Zone die Zone für Ihr Mac OS ein.
Klicken Sie auf Speichern und Neustart.
3. Wählen Sie im Apple-Menü Gehe zu | Programme | Dienstpro-
gramme und starten Sie das Print Center.
4. Klicken Sie in der Druckerliste auf Hinzufügen.
5. Wählen Sie aus dem Dropdown-Menü den Eintrag AppleTalk aus.
6. Wählen Sie die AppleTalk-Zone für Ihr Mac OS aus (identisch mit dem
oben angegebenen Wert).
7. Ihr Netzwerkdrucker erscheint in der Druckerliste (die Standardbezeichnung lautet AXxxxxxx_USB, wobei X für die letzten sechs Stellen
der Druckerserver-Seriennummer steht).
8. Wählen Sie aus der Dropdown-Liste Druckermodell Druckerhersteller
und -modell aus. Klicken Sie auf Hinzufügen.
IP-Druck (Mac OS X)
1. Wählen Sie im Apple-Menü Gehe zu | Programme | Dienstpro-
gramme und starten Sie das Print Center.
2. Klicken Sie in der Druckerliste auf Hinzufügen.
3. Wählen Sie aus dem Dropdown-Menü den Eintrag IP-Druck aus.
4. Geben Sie im Feld Druckeradresse die IP-Adresse des Druckerservers
ein.
DEUTSCH
5. Akzeptieren Sie entweder die vorgegebene Benutzerwarteschlange auf
dem Server, indem Sie die Option Standardwarteliste auf dem Server
verwenden aktivieren, oder geben Sie im Feld Warteschlangenname
den Wert lp1 ein.
40
Page 42

6. Wählen Sie aus der Dropdown-Liste Druckermodell Druckerhersteller
und -modell aus. Klicken Sie auf Hinzufügen.
7. Der soeben hinzugefügte Drucker erscheint in der Druckerliste als
Standarddrucker (fett). Testen Sie die Installation, indem Sie einen
Druckauftrag an den Drucker senden.
DEUTSCH
41
Page 43

Webbasierte Druckerserver-Verwaltung
Die Axis-Druckerserver-Verwaltung und -Konfiguration wird über die Webschnittstelle ausgeführt:
1. Geben Sie in der Adresszeile Ihres Standard-Webbrowsers die
IP-Adresse des Druckerservers ein. Drücken Sie die Eingabetaste.
2. Daraufhin erscheint die Seite Drahtloser Druckerserver. Von hier aus
können Sie alle Servereinstellungen vornehmen.
Der standardmäßige Benutzername für den Druckerserver lautet root
Das standardmäßige Passwort lautet pass
Hinweise:
Die IP-Adresse des Druckerservers lässt sich schnell ermitteln, indem Sie
die Reset-Taste 5 Sekunden lang drücken und damit eine Testseite ausgeben. Die DHCP-Adresse oder statische IP-Adresse wird normalerweise
auf der Testseite aufgeführt.
Tipp:
So ändern Sie diese Druckerserver-Einstellungen:
• IP-Adresse des Druckerservers: rufen Sie Setup | TCP/IP auf.
• Drahtlos-Einstellungen: rufen Sie Setup | Drahtlos auf.
• Passwort des Druckerservers: rufen Sie Setup | System auf.
DEUTSCH
42
Page 44

Druckerserver-Verwaltung per Reset-Taste
Die Reset-Taste kann für verschiedene Aktionen benutzt werden:
Testseite drucken:
1. Vergewissern Sie sich, dass der DIP-Schalter in der Stellung ”Nor.”
steht.
2. Halten Sie die Reset-Taste für die Dauer von 5 Sekunden gedrückt. Die
Druckseite wird auf dem angeschlossenen Drucker ausgegeben.
Die Testseite enthält z.B. folgende Informationen: IP-Adresse, MAC-Adresse,
Subnetzmaske und Standard-Gateway für den Druckerserver.
Reset:
1. Vergewissern Sie sich, dass der DIP-Schalter in der Stellung ”Nor.”
steht.
2. Drücken Sie die Reset-Taste einmal.
WARNUNG! Dadurch wird der Druckerserver neu gestartet und alle laufenden
Druckaufträge angehalten!
Werkseitige Voreinstellungen aufrufen:
1. Vergewissern Sie sich, dass der DIP-Schalter in der Stellung ”Nor.”
steht.
2. Trennen Sie das Gerät von der Stromversorgung.
3. Halten Sie die Reset-Taste gedrückt und schließen Sie die Stromversorgung wieder an.
4. Warten Sie, bis orangefarbene und grüne LED zweimal gleichzeitig
geblinkt haben.
5. Lassen Sie die Sie die Reset-Taste los.
6. Der Druckerserver startet neu.
DEUTSCH
43
Page 45

WICHTIG!
• Durch das Aufrufen der werkseitigen Voreinstellungen werden alle
Einstellungen auf die Standardwerte zurückgesetzt. Der Vorgang
sollte daher mit größter Vorsicht durchgeführt werden!
• Nach dem Aufrufen der werkseitigen Voreinstellungen gelten folgende standardmäßige Drahtlos-Einstellungen:
• Infrastructure Modus
• SSID = <ANY> (stellt eine Verbindung mit dem Zugangspunkt her, der
das beste Signal in Ihrem drahtlosen Netzwerk liefert)
• Datenübertragungsrate = Auto
• Kanal = 6
• WEP = Deaktiviert
• Authentifizierungstyp = Open System
•DHCP = aktiviert
DEUTSCH
44
Page 46

Fehlerbehebung
Überprüfen Sie die folgenden Punkte, wenn beim Drucken per WLAN Probleme auftreten:
• Stellen Sie sicher, dass die WLAN-Netzwerkschnittstelle auf dem Desktop-Computer bzw. Notebook korrekt konfiguriert ist, mit dem ein
Zugriff auf den Druckerserver versucht wird.
• Alle Clients für die Kommunikation müssen im selben Modus arbeiten,
also im Ad Hoc oder Infrastructure Mode.
• Vergewissern Sie sich, dass SSID und WEP-Schlüssel Ihren
WLAN-Netzwerkeinstellungen entsprechen.
• Kontrollieren Sie, ob die Einstellung für den Funkfrequenzkanal auf
allen beteiligten Clients identisch ist und der Kanal entsprechend den
Vorgaben des jeweiligen Lands eingestellt wurde.
Frequenzbänder und -kanäle :
Land Frequenz Verfügbare Kanäle Standardkanal
Europa 2,412-2,472 GHz 1-13 11
Frankreich 2,457-2,472 GHz 10-13 (Innenbereich*) 11
Japan 2,484 GHz 14 14
USA/Kanada 2,412-2,462 GHz 1-11 11
* (Frankreich) Nutzung im Außenbereich auf Privatgelände ohne vorherige Geneh-
migung gestattet
DEUTSCH
45
Page 47

Einrichtung in Ad Hoc-Netzwerken (Peer-to-Peer)
Wenn in Ihrem Netzwerk kein Zugangspunkt existiert oder der Druckerserver nicht
erkannt wird, befolgen Sie diese Schritte:
1. Bringen Sie den DIP-Schalter am Druckerserver in die Stellung für den DIAG-Modus.
2. Vergewissern Sie sich, dass das TCP/IP-Protokoll auf Ihrem Computer installiert ist
und Sie Ihrem Drahtlos-Adapter eine IP-Adresse zugewiesen haben, z.B.
192.168.1.100.
3. Führen Sie auf Ihrem Notebook das Dienstprogramm für den Drahtlos-Adapter aus
und ändern Sie den Modus zu Ad Hoc (Peer-to-Peer) mithilfe der folgenden Einstellungen:
• SSID = WLAN-PS
• Kanal = 6
4. Klicken Sie auf Verbinden (o.s.ä.), um eine Kommunikationsverbindung mit dem
Druckerserver herzustellen. Stellen Sie sicher, dass die Verbindung besteht.
5. Rufen Sie die Druckerserver-Webschnittstelle auf, indem Sie ihre IP-Adresse in der
Adresszeile eines Webbrowsers eingeben (Hinweise dazu entnehmen Sie Seite 42).
6. Wählen Sie in der Druckerserver-Webschnittstelle Setup | Drahtlos aus.
7. Ändern Sie den Modus von der Vorgabeeinstellung Infrastructure (im NOR-Modus)
zu 802.11b Ad Hoc.
8. Erstellen Sie eine neue SSID und wählen Sie den Kanal anhand der Vorgaben für Ihr
Land aus.
Beispiel: SSID = AXISOBW, Kanal = 9
9. Klicken Sie auf Speichern und neu starten.
10. Stellen Sie den DIP-Schalter zurück in den NOR-Modus und starten Sie den Druckerserver neu, indem Sie die Reset-Taste am Druckerserver einmal drücken.
11. Führen Sie auf Ihrem Notebook erneut das Dienstprogramm für den Drahtlos-Adapter aus. Belassen Sie als Modus Ad Hoc (Peer-to-Peer) und passen Sie die
Einstellungen gemäß Schritt 8 an, um erneut eine Verbindung zum Druckerserver
herzustellen.
12. Starten Sie den AXIS OBW Wizard wie in Druckerservereinrichtung für Windows, auf
Seite 32 beschrieben, um den Druckerserver auf Ihrem lokalen Computer zu installieren.
Hinweis: Im DIAG-Modus verwendet der Druckerserver IMMER die folgenden Standardeinstellungen.
Diese Einstellungen können nicht geändert werden!
DEUTSCH
• Kommunikationstyp = 802.11b Ad Hoc
• SSID = WLAN-PS
• Kanal = 6
• Datenübertragungsrate = Auto
•WEP = Deaktiviert
46
Page 48

Présentation
Ce manuel de l’utilisateur contient des instructions pour l’installation du
serveur d’impression AXIS OfficeBasic USB Wireless dans les environnements
Windows (95, 98, NT, Me, 2000, XP, Server 2003) de Microsoft et Mac OS.
Les instructions contenues de ce manuel se basent sur les paramètres se
trouvant dans unAXIS OfficeBasic USB Wireless neuf et non configuré. Pour
remettre un AXIS OfficeBasic USB Wireless précédemment configuré dans
cet état, vous pouvez restaurer les paramètres d’usine. Vous trouverez les
instructions nécessaires dans la section Gestion du serveur d’impression à
l’aide du bouton de réinitialisation à la page 65.
Étapes de l’installation
Suivez ces étapes pour installer votre AXIS OfficeBasic USB Wireless :
1. Installation matérielle, à la page 50
2. Adressage IP, à la page 51
3. Installation du serveur d’impression sous Windows, à la page 54 ou
Installation d’une imprimante - Mac OS, à la page 62.
Gestion du serveur d’impression
La configuration et la gestion du serveur d’impression sont effectuées depuis
l’interface Web du serveur d’impression, voir page 64, ou à partir du logiciel
fonctionnant sous Windows fourni, l’Assistant d’installation OBW (OBW
Setup Wizard), voir page 54.
Manuel de l’utilisateur de AXIS OfficeBasic USB
Wireless
Reportez-vous au Manuel de l’utilisateur de l’AXIS OfficeBasic USB Wireless
pour des informations plus détaillées sur ce produit. Le manuel de l’utili-
FRANCAIS
sateur est disponible sur le CD AXIS OfficeBasic USB Wireless et sur le site
www.axis.com
47
Page 49

Matériel
Déballez et contrôlez tous les éléments à l’aide de la liste de contrôle suivante. Contactez votre revendeur si un élément est absent ou endommagé.
Tous les matériaux d'emballage sont recyclables.
Matériel Modèle Référence
Serveur d'impression AXIS OfficeBasic USB Wireless
Support Titre Référence
CD CD AXIS OfficeBasic USB Wireless 21965
Documentation sur papier Manuel de l’utilisateur de AXIS OfficeBasic USB
Accessoires Description Référence
Câble USB 20208
Adaptateur de
puissance
PS-M Australie
PROD UNIT AXIS OB USB W <EUR> ch 1-13
PROD UNIT AXIS OB USB W <US> ch 1-11
Wireless
Modèle Référence
Europe
Royaume-Uni
États-Unis / Japon
0208-001-01
0208-004-01
21962
21822
21819
21820
21821
FRANCAIS
48
Page 50

Modes de fonctionnement sans fil
Le serveur d’impression AXIS OfficeBasic USB Wireless communique soit en
mode Infrastructure, auquel cas un point d’accès 802.11b sert de passerelle
entre la station de travail/l’ordinateur portable et le serveur d’impression,
soit en mode Ad-hoc, auquel cas la station de travail/l’ordinateur portable
communique directement avec le serveur d’impression.
Infrastructure (AP)
Les stations de travail et les ordinateurs portables communiquent avec le
serveur d’impression sur le WLAN et le LAN via un point d’accès.
Consultez les sections Installation du serveur d’impression sous Windows, à la
page 54 ou Installation d’une imprimante - Mac OS, à la page 62 pour les
instructions d’installation.
Ad hoc (Peer to Peer : point à point)
Les stations de travail et les ordinateurs portables communiquent directement sur le WLAN avec le serveur d’impression.
Consultez la section Installation dans les réseaux Ad Hoc (Peer-to-Peer =
FRANCAIS
point à point), à la page 68.
49
Page 51

Installation matérielle
1. Mettez l’imprimante hors tension.
2. Connectez le serveur d’impression à votre imprimante à l’aide du câble
USB fourni.
3. Mettez l’imprimante sous tension.
4. Branchez l’adaptateur de puissance AC sur le connecteur de puissance à
l’arrière du serveur d’impression sans fil.
5. Attendez une minute.
6. Appuyez sur le bouton de réinitialisation externe du serveur d’impression pendant 5 secondes. Une page de test est imprimée sur l’imprimante connectée ; elle contient des informations sur l’adresse IP du
serveur d’impression, le numéro du logiciel, etc.
• La DEL d’état clignote au cours de la transmission et de l’impression
de données.
• Quand le serveur d’impression est mis sous tension, la DEL d’état clignote 5 fois pour indiquer que l’autotest de mise sous tension est en
cours. Si la DEL ne clignote pas 5 fois quand vous mettez l’unité sous
tension, déconnectez tous les câbles et effectuez de nouveau la
procédure d’installation venant d’être décrite.
DEL d’état (orange)
Bouton de réinitialisation :
- Appuyez une fois pour redémarrer le serveur d’impression.
- Appuyez pendant 5 secondes pour imprimer la page de test.
DEL WLAN (verte)
FRANCAIS
Connecteur USB
Connecteur de puissance
Commutateur DIP :
Nor. = Mode normal
Diag. = Mode diagnostic
Consultez la section Gestion du serveur d’impression à l’aide du bouton de
réinitialisation, à la page 65 pour des informations détaillées sur l’utilisation
du bouton de réinitialisation.
50
Page 52

Adressage IP
Pour activer la communication réseau avec le serveur d’impression, il doit
disposer d’une adresse IP correcte. Utilisez une des ces méthodes pour attribuer une adresse IP au serveur d’impression :
Méthode :
Serveur nécessaire :
DHCP Serveur DHCP
Arp/Ping
Système d’exploitation
Windows
Mac OS
Mac OS
Windows
Remarque :
Le serveur d’impression
obtient automatiquement
une adresse IP et les
paramètres TCP/IP associés
d’un serveur DHCP. Par
défaut, la fonction DHCP du
serveur d’impression est
activée.
Attribution manuelle d’une
adresse IP.
Obtention d’une adresse IP à l’aide de DHCP
Si vous travaillez dans un réseau avec attribution dynamique d’adresse IP,
une adresse IP est automatiquement attribuée à votre serveur d’impression
quand vous le connectez au réseau. Suivez les instructions données sur cette
page pour vérifier l’adresse IP :
1. Imprimez une page de test en appuyant sur le bouton de réinitialisation
pendant 5 secondes. Localisez l’adresse IP du serveur d’impression sur la
page de test.
2. Ouvrez un navigateur Web (Internet Explorer par exemple).
3. Dans le champ Adresse du navigateur Web, saisissez l’adresse IP du
serveur d’impression et appuyez sur Entrer.
4. Si la page Web du serveur d’impression sans fil apparaît dans votre
navigateur Web, l’adresse IP fonctionne correctement. Passez à Win-
dows Setup, à la page 13 ou Installation d’une imprimante - Mac OS, à la
page 62.
5. Si la page Web du serveur d’impression sans fil n’apparaît pas , vous
devez définir manuellement l’adresse IP du serveur d’impression comme
décrit dans Définir une adresse IP avec Arp/Ping:, à la page 52.
FRANCAIS
51
Page 53

Définir une adresse IP avec Arp/Ping:
Vous pouvez attribuer une adresse IP temporaire au serveur d’impression en
utilisant arp/ping et accédant ensuite aux pages Web internes du serveur
d’impression pour attribuer une adresse IP fixe :
1. Localisez le numéro de série (S/N) du serveur d’impression sur l’étiquette collée sous le serveur d’impression. L'adresse Ethernet est basée
sur le numéro de série du serveur :
Numéro de série : Adresse MAC/Ethernet :
00408c181cf0 00-40-8c-18-1c-f0 (Windows)
00:40:8c:18:1c:f0 (Mac OS )
2. Ouvrez une invite de commande ou Terminal et entrez la syntaxe suivante :
Syntaxe Exemple sous Windows (invite de com-
mande)
1
arp -s <adresse IP> <adresse Ethernet>
2
ping <adresse IP>
arp -s 192.168.3.191 00-40-8c-18-1c-f0
ping 192.168.3.191
Syntaxe Exemple sous Mac OS (Terminal)
1
arp -s <adresse IP> <adresse Ethernet>
2
ping <adresse IP>
arp -s 192.168.3.191 00:40:8c:18:1c:f0
ping 192.168.3.191
3. L’hôte renvoie le message nom ps activé (Mac OS Teminal) ou Réponse
de 192.168.3.191... (invite de commande sous Windows) ou un message similaire. Cela indique que l’adresse IP temporaire a été définie et
que la communication est établie.
4. Ouvrez ensuite un navigateur Web (Internet Explorer par exemple).
5. Dans le champ Adresse du navigateur Web, saisissez l’adresse IP du
serveur d’impression et appuyez sur Entrer.
FRANCAIS
52
Page 54

6. La page Web du serveur d’impression apparaît. Allez à Installation |
TCP/IP :
7. Sélectionnez la case d’option Utiliser les paramètres TCP/IP suivants et
entrez une adresse IP, un masque de sous réseau et un routeur par
défaut valides.
8. Cliquez sur Sauvegarder et redémarrer. La nouvelle adresse IP est
chargée.
9. Contrôlez la communication en entrant la nouvelle adresse IP dans le
navigateur et contrôlant que les pages Web du serveur d’impression
sont de nouveaux affichées.
• Lorsque vous exécutez la commande ping pour la première fois, le
temps de réponse peut être beaucoup plus long que d’habitude.
• L’adresse IP et le numéro de série utilisés ici sont des exemples. Vous
devez obtenir une nouvelle adresse IP inutilisée auprès de l’administrateur de votre réseau.
Passez à Windows Setup, à la page 13 ou Mac OS Setup, à la page 27.
FRANCAIS
53
Page 55

Installation du serveur d’impression sous Windows
Avant de commencer :
• Vérifiez que votre réseau dispose d’un point d’accès avec une
adresse IP valide. Exemple : 192.168.1.100
• Contrôlez que le protocole TCP/IP est installé sur votre ordinateur.
• Vérifiez que le commutateur DIP du serveur d’impression est sur le
mode Normal (Nor.)
1. Insérez le CD AXIS OfficeBasic USB Wireless dans votre lecteur de CD.
2. Sélectionnez Assistant d’installation pour installer le serveur d’impression sans fil et configurer l’imprimante connectée..
L’assistant installe automatiquement ces composants dans
C:\Program Files\Axis Communications\AXIS OBW Wizard:
• AXIS OBW Wizard.exe
• AXIS OBW Network Printer Port. DLL (Moniteur d’impression sans
fil)
Après l’installation, vous pouvez ouvrir l’Assistant OBW d’AXIS depuis
Démarrer | Programmes | Axis Communications.
L’assistant OBW d’AXIS démarre dans la langue de votre système
d’exploitation, consultez la section Technical Specifications, à la page
113.
FRANCAIS
54
Page 56

3. Dans la fenêtre Sélectionner un serveur d’impression, sélectionnez le
serveur d’impression que vous souhaitez configurer et cliquez sur Suivant.
Dans la fenêtre Modifier des paramètres, sélectionnez Non ou Oui:
Sélectionnez Non si vous voulez que le serveur d’impression utilise l’adresse
DHCP attribuée et conserve les
• mode Infrastructure
• SSID = <ANY>
• Vitesse de transmission des données = Auto
• Voie = 6
• Aucun cryptage WEP
• Type d’authentification = Open System (Système ouvert)
•DHCP activé
Cliquez sur Suivant dans le programme jusqu’à Sélectionnez une imprimante déjà
configurée ou cliquez sure Ajouter une nouvelle imprimante
ensuite les instructions.
FRANCAIS
paramètres Infrastructure par défaut :
, à la page 57. Suivez
55
Page 57

Sélectionnez Oui si vous souhaitez modifier les paramètres sans fil ou attribuer
une adresse IP statique au serveur d’impression :
•Dans la fenêtre Paramètre sans fil de base , sélectionnez Type de communi-
cation en fonction de votre réseau :
- Infrastructure
- 802.11b Ad-hoc
• Saisissez le SSID correct de votre réseau sans fil. La valeur par défaut <ANY>
entraîne une connexion à l’AP ayant le meilleur signal dans votre réseau
sans fil.
- Voie: option.
- Vitesses de transmission des données : sélectionnez Auto, 1,2 Mbps, 5,5
Mbps ou 11 Mbps.
•Dans la fenêtre Paramètres de cryptage WEP et de sécurité, activez ou désactivez le cryptage WEP, configurez en fonction de votre réseau sans fil et
cliquez sur Suivant.
• Si votre réseau utilise l’authentification 802.1X (EAP), sélectionnez None
(Aucune) ou MD5 comme votre type d’authentification. Si vous sélectionnez
MD5, vous devez saisir le même Nom pour la connexion et Mot de passe
que ceux définis dans le serveur Radius.
• Indiquez une adresse IP dynamique ou fixe pour le serveur d’impression, une
adresse IP fixe est fortement recommandée. Cliquez sur Suivant.
Cliquez sur Suivant dans le programme jusqu’à ce Sélectionnez une imprimante
déjà configurée ou cliquez sure Ajouter une nouvelle imprimante, à la page 57.
Suivez ensuite les instructions.
Remarques :
• Si vous utilisez le cryptage WEP dans votre WLAN et modifiez par erreur le
format WEP ou les clés dans le serveur d’impression, vous perdez le contact
avec les serveur d’impression. Suivez les étapes décrites dans le manuel de
l’utilisateur pour rétablir la connexion.
• L’adresse IP du serveur d’impression sans fil doit se trouver dans le même sous
réseau que votre adaptateur sans fil.
• Une méthode rapide pour trouver l’adresse IP du serveur d’impression est
d’appuyer sur le bouton de réinitialisation pendant 5 secondes et d’imprimer
une page de test. L’adresse DHCP ou l’adresse IP statique du serveur d’impres-
sion est normalement imprimée sur la page de test
FRANCAIS
56
Page 58

4. Dans l’assistant, sélectionnez une imprimante déjà configurée dans la liste,
cliquez sur Suivant puis sur Terminer pour terminer l’installation.
ou
Sélectionnez Ajout une nouvelle imprimante si le serveur d’impression
est connecté à une imprimante qui n’a pas déjà été installée et n’apparaît
donc pas dans la liste.
Sélectionnez une imprimante déjà configurée ou cliquez sure Ajouter une
nouvelle imprimante
5. Pour Windows NT/98/Me, passez à la page 60 ou à la page 61.
Pour Windows 2000/XP/2003 :
Cliquez sur Ajouter une nouvelle imprimante pour démarrer l’assistant
d’ajout d’imprimante de Windows. Cliquez sur Suivant et sélectionnez
Imprimante locale. Assurez-vous que la case à cocher Détection automatique et installation de l'imprimante Plug-and-Play n’est PAS
cochée :
FRANCAIS
57
Page 59

6. Assurez-vous d’avoir cliqué sur la case d’option Utiliser le port suivant et
sélectionnez LPT1 : (port d’imprimante recommandé) dans la liste dérou-
lante. Cliquez sur Suivant.
7. Sélectionnez les Fabricant et imprimante dans les listes de pilotes. Cliquez
sur Suivant.
8. Si le pilote de l’imprimante est déjà installé, il vous est demandé si vous
souhaitez le conserver ou le remplacer. Cliquez sur Suivant. Indiquez un
nom pour l’imprimante et si vous souhaitez qu’elle soit utilisée comme
FRANCAIS
imprimante par défaut. Cliquez sur Suivant.
9. Choisissez si vous souhaitez partager l’imprimante avec d’autres utilisateurs du réseau, imprimez une page de test, etc. Sélectionnez la case
d’option appropriée et cliquez sur Suivant et Terminer.
58
Page 60

10. Dans l’assistant OBW d’AXIS, terminez l’installation en faisant apparaître
en surbrillance l’imprimante installée dans la liste Sélectionner une
imprimante et cliquez sur Suivant => Terminer.
11. Dans Windows, allez à Démarrer | Imprimantes (et télécopieurs) et faîtes
apparaître en surbrillance l’imprimante venant juste d’être installée.
12. Cliquez du bouton droit, sélectionnez Propriétés et vérifiez que le port
AXIS OfficeBasic USB Wireless apparaît comme OBWXXXXXX-1 (les X
correspondent aux six derniers chiffres dans le numéro de série du serveur
d’impression).
13. Imprimez une page de test pour contrôler la configuration.
Si vous souhaitez installer d’autres serveurs d’impression, démarrez
l’assistant OBW d’AXIS depuis le menu Démarrer de Windows : Démarrer
| Programmes | Axis Communications | AXIS OBW Wizard et répétez la
procédure d’installation.
FRANCAIS
59
Page 61

Installation sous Windows NT
1. Configurez comme décrit dans Installation du serveur d’impression
sous Windows, à la page 54 jusqu’à Sélectionnez une imprimante
déjà configurée ou cliquez sure Ajouter une nouvelle imprimante, à la
page 57. Cliquez sur Ajouter une nouvelle imprimante pour démarrer l’assistant d’ajout d’imprimante de Windows.
2. Sélectionnez Poste de travail et cliquez sur Suivant.
3. Sélectionnez LPT1 comme port local et cliquez sur Suivant.
4. Sélectionnez le fabricant de l’imprimante et le modèle d’imprimante,
cliquez sur Suivant et Terminer.
5. Dans l’assistant OBW d’AXIS, sélectionnez l’imprimante venant d’être
ajoutée dans la liste, cliquez sur Suivant puis sur Terminer pour terminer l’installation.
6. Sous Windows, allez à Démarrer | Paramètres | Imprimantes et faîtes
apparaître en surbrillance l’imprimante venant juste d’être installée.
7. Cliquez du bouton droit, sélectionnez Propriétés et vérifiez que le port
AXIS OfficeBasic USB Wireless apparaît comme OBWXXXXXX-1 (les
X correspondent aux six derniers chiffres dans le numéro de série du
serveur d’impression).
8. Imprimez une page de test pour contrôler la configuration.
FRANCAIS
60
Page 62

Installation sous Windows 98/Me
1. Configurez comme décrit dans Installation du serveur d’impression
sous Windows, à la page 54 jusqu’à Sélectionnez une imprimante
déjà configurée ou cliquez sure Ajouter une nouvelle imprimante, à la
page 57. Cliquez sur Ajouter une nouvelle imprimante pour démarrer l’assistant d’ajout d’imprimante de Windows.
2. Sélectionnez Imprimante locale et cliquez sur Suivant.
3. Sélectionnez le fabricant de l’imprimante et le modèle d’imprimante.
N’imprimez pas de page de test.
4. Sélectionnez LPT1 (Port imprimante ECP) et cliquez sur Suivant et Ter-
miner pour terminer l’installation.
5. Sous Windows, allez à Démarrer | Paramètres | Imprimantes et faîtes
apparaître en surbrillance l’imprimante venant juste d’être installée.
6. Cliquez du bouton droit, sélectionnez Propriétés et vérifiez que le port
AXIS OfficeBasic USB Wireless apparaît comme OBWXXXXXX-1 (les
X correspondent aux six derniers chiffres dans le numéro de série du
serveur d’impression).
7. Imprimez une page de test pour contrôler la configuration.
FRANCAIS
61
Page 63

Installation d’une imprimante - Mac OS
L’impression avec AppleTalk et IP pour Mac OS est décrite ici. Vous trouverez
des instructions pour imprimer sous d’anciens environnements Mac OS dans
le manuel de l’utilisateur d’AXIS OfficeBasic USB Wireless sur le CD ou sur
www.axis.com
Impression avec AppleTalk (Mac OS X)
1. Dans l’interface Web du serveur d’impression, sélectionnez Configuration | AppleTalk.
2. Dans le champ Zone AppleTalk, entrez la zone dans laquelle votre Mac
OS fonctionne. Cliquez sur Enregistrer et redémarrer.
3. Dans le menu Apple, sélectionnez Aller | Applications | Utilitaires et
démarrez le Centre d’impression.
4. Cliquez sur Ajouter dans la Liste des imprimantes.
5. Sélectionnez AppleTalk dans le menu déroulant supérieur.
6. Sélectionnez la zone AppleTalk dans laquelle votre Mac OS fonctionne
(la même que celle indiquée ci-dessus).
7. Votre imprimante de réseau apparaît alors dans la Liste des impri-
mantes (le nom par défaut est AXxxxxxx_USB pour lequel les x correspondent aux 6 derniers chiffres du numéro de série du serveur
d’impression).
8. Dans la liste déroulante Modèle d’imprimante, sélectionnez le fabricant
et le modèle d’imprimante. Cliquez sur Ajouter.
Impression avec IP (Mac OS X)
1. Dans le menu Apple, sélectionnez Aller | Applications | Utilitaires et
démarrez le Centre d’impression.
2. Cliquez sur Ajouter dans la Liste des imprimantes.
3. Sélectionnez Impression IP dans le menu déroulant supérieur.
4. Dans le champ Adresse de l’imprimante , entrez l’adresse IP du serveur
FRANCAIS
d’impression.
5. Soit vous acceptez en utilisant la file d’attente des utilisateurs par
défaut du serveur et veillant à ce que la case à cocher Utiliser la file
d’attente par défaut du serveur est cochée, soit vous saisissez lp1
dans le champ Nom de la file d’attente :
62
Page 64

6. Dans la liste déroulante Modèle d’imprimante, sélectionnez le fabricant
et le modèle d’imprimante. Cliquez sur Ajouter.
7. L’imprimante venant juste d’être ajoutée apparaît dans la Liste des
imprimantes comme imprimante par défaut (en gras). Testez l’installation en envoyant une tâche d’impression à l’imprimante.
FRANCAIS
63
Page 65

Gestion du serveur d’impression basée sur le
Web
La configuration et la gestion du serveur d’impression Axis sont effectuées
depuis son interface Web :
1. Tapez l’adresse IP du serveur d’impression dans le champ Adresse de
votre navigateur Web standard. Appuyez sur Entrer.
2. La fenêtreServeur d’impression sans fil apparaît. Elle vous permet de
configurer tous les paramètres du serveur d’impression.
Par défaut, le serveur d’impression a le nom d’utilisateur = root
Par défaut, mot de passe = pass
Remarques :
Une méthode rapide pour trouver l’adresse IP du serveur d’impression est
d’appuyer sur le bouton de réinitialisation pendant 5 secondes et
d’imprimer une page de test. L’adresse DHCP ou l’adresse IP statique est
affichées sur la page de test.
Conseil :
Pour modifier ces paramètres du serveur d’impression :
• Adresse IP du serveur d‘impression : allez à Installation | TCP/IP
• Paramètres sans fil : allez à Installation | Sans fil
• Le mot de passe du serveur d’impression : allez à Installation |
Système
FRANCAIS
64
Page 66

Gestion du serveur d’impression à l’aide du
bouton de réinitialisation
Le bouton de réinitialisation peut être utilisé pour différentes opérations :
Impression d'une page de test :
1. Vérifiez que le commutateur DIP est sur « Nor. »
2. Maintenez le bouton de réinitialisation enfoncé pendant 5 secondes. La
page de test est imprimée sur l’imprimante connectée.
La page de test contient des informations sur l’adresse IP du serveur
d’impression, l’adresse MAC, le masque de sous réseau, la passerelle par
défaut par ex.
Réinitialisation :
1. Vérifiez que le commutateur DIP est sur « Nor. »
2. Appuyez une fois sur le bouton de réinitialisation.
AVERTISSEMENT ! Cela redémarre le serveur d’impression et interrompt
toutes les impressions en cours et en attente.
Restauration des paramètres usine :
1. Vérifiez que le commutateur DIP est sur « Nor. »
2. Déconnectez l’alimentation électrique externe.
3. Maintenez le bouton de réinitialisation enfoncé et reconnectez l’alimentation électrique externe.
4. Attendez que les voyants DEL orange et vert aient clignoté deux fois
simultanément.
5. Relâchez le bouton de réinitialisation.
6. Le serveur d’impression redémarre.
FRANCAIS
65
Page 67

IMPORTANT !
• La restauration des paramètres usine efface tous les paramètres pour
les remplacer par les valeurs par défaut et doit être effectuée avec
précaution.
• Après la restauration des paramètres usine, les paramètres sans fil par
défaut sont :
• Mode Infrastructure
• SSID = <ANY> (connexion au point d’accès ayant le meilleur signal
dans votre réseau sans fil)
• Vitesse de transmission des données = Auto
• WEP = Désactivé
• Type d’authentification = Open System (Système ouvert)
•Voie= 6
• DHCP = Activé
FRANCAIS
66
Page 68

Recherche de panne
Contrôlez ce qui suit si vous rencontrez des problèmes quand vous essayez
d’imprimer sur le WLAN :
• Contrôlez que l’interface réseau du WLAN est configurée correctement
dans la station de travail/l’ordinateur portable essayant d’accéder au
serveur d’impression.
• Tous les clients communicants doivent être dans le même mode de fonctionnement, c.-à-d. le mode Ad Hoc ou Infrastructure.
• Contrôlez que les clés SSID et WEP sont définies conformément aux
paramètres de réseau de votre WLAN.
• Contrôlez que le paramètre du canal de la fréquence radio est le même
pour tous les clients communicants et que le canal est défini conformément aux exigences nationales.
Canaux et bandes de fréquence:
Pays Fréquence Canaux disponibles Canal par
défaut
Europe 2,412 - 2,472 GHz 1-13 11
France 2,457 - 2,472 GHz 10-13 (utilisation en
intérieur*)
Japon 2,484 GHz 14 14
US/Canada 2,412 - 2,462 GHz 1-11 11
* (France) utilisation en extérieur autorisée sur les propriétés privées avec
autorisation préalable
11
FRANCAIS
67
Page 69

Installation dans les réseaux Ad Hoc (Peer-to-Peer = point à point)
Si vous ne disposez pas d’un point d’accès dans votre réseau ou si le serveur d’impression est introuvable, veuillez suivre les étapes suivantes :
1. Mettez le commutateur DIP du serveur d’impression sur le mode DIAG.
2. Vérifiez que le protocole TCP/IP est installé sur votre ordinateur et que vous avez
attribué une adresse IP à votre adaptateur sans fil, 192.168.1.100 par exemple.
3. Sur votre ordinateur portable, exécutez l’utilitaire logiciel de votre adaptateur
sans fil et passez-le sur mode Ad-hoc (c.-à-d. PEER-TO-PEER = point à point)
avec les paramètres suivants :
• SSID = WLAN-PS
• Canal = 6
4. Cliquez sur Connecter (ou similaire) pour établir la communication avec le
serveur d’impression. Assurez-vous qu’une connexion est établie.
5. Accédez à l’interface Web du serveur d’impression en entrant son adresse IP dans
le champ Adresse d’un navigateur Web (voir la page 64 pour les instructions
appropriées).
6. Dans l’interface Web du serveur d’impression, allez à Installation | Sans fil.
7. Passez du mode par défaut, Infrastructure (en mode NOR), au mode 802.11b
Ad-hoc.
8. Créez un nouveau SSID de votre choix et sélectionnez le Canal conformément
aux règlements nationaux.
Exemple : SSID = AXISOBW, Canal = 9
9. Cliquez sur Enregistrer et redémarrer.
10. Remettez le DIP sur NOR et redémarrez le serveur d’impression en appuyant une
fois sur le bouton de réinitialisation du serveur d’impression.
11. Sur votre ordinateur portable, exécutez de nouveau l’utilitaire logiciel de votre
adaptateur sans fil, restez en mode Ad-hoc (c.-à-d. PEER-TO-PEER = point à
point) et réglez les paramètres conformément à ceux définis à l’étape 8 afin de
reconnecter le serveur d’impression.
12. Exécutez l’assistant OBW d’AXIS comme décrit dans Installation du serveur
d’impression sous Windows, à la page 54 afin d’installer le serveur d’impression
sur votre machine locale.
Remarque : En mode DIAG, les paramètres du serveur d’impression sont TOUJOURS les
paramètres par défaut ci-dessous.
Ces paramètres ne peuvent pas être modifiés !
FRANCAIS
• Type de communication = 802.11b Ad Hoc
•SSID = WLAN-PS
• Canal = 6
• Vitesses de transmission des données = Auto
•WEP = Désactivé
68
Page 70

Generalidades
Esta Guía del Usuario incluye instrucciones de instalación para el servidor de
impresión AXIS OfficeBasic USB Wireless en los entornos Microsoft Windows
(95, 98, NT, Me, 2000, XP, Server 2003) y Mac OS.
Las instrucciones de esta guía se basan en los parámetros de un AXIS OfficeBasic USB Wirelessnuevo y sin configurar. Para establecer este estado en un AXIS
OfficeBasic USB Wireless preconfigurado, puede reconfigurarlo a los valores
iniciales de fábrica. Para más instrucciones, ver Administración del servidor de
impresión usando el botón Reset en la página 86.
Instalación paso por paso
Siga los pasos detallados a continuación para instalar su AXIS OfficeBasic USB
Wireless:
1. Instalación del hardware, en la página 72
2. Dirección IP, en la página 73
3. Configuración del servidor de impresión para Windows, en la página 76o
Instalación de impresora - Mac OS, en la página 84.
Administración del servidor de impresión
La administración y configuración del servidor de impresión se realizan desde
la interfaz Web del servidor de impresión, ver página 85, o bien desde el software suministrado basado en Windows, OBW Setup Wizard, ver página 76.
AXIS OfficeBasic USB Wireless User’s Manual
Consulte el AXIS OfficeBasic USB Wireless User’s Manual para obtener información detallada sobre este producto. El User’s Manual se encuentra en el CD
AXIS OfficeBasic USB Wireless y en www.axis.com
ESPAÑOL
69
Page 71

Inventario de hardware
Desembale y compruebe todos los componentes utilizando la siguiente lista de
verificación. Si algún componente está dañado o no se incluye, póngase en
contacto con su distribuidor. Todo el material de embalaje es reciclable.
Hardware Modelo Nº de ref.
Servidor de impresión AXIS OfficeBasic USB Wireless
Imagen y sonido Título Nº de ref.
CD AXIS OfficeBasic USB Wireless CD 21965
Material impreso Guía del usuario de AXIS OfficeBasic USB
Accesorios Descripción Nº de ref.
Cable USB 20208
Adaptador de corriente Modelo Nº de ref.
PS-M Australia
PROD UNIT AXIS OB USB W <EUR> ch 1-13
PROD UNIT AXIS OB USB W <US> ch 1-11
Wireless
Europa
RU
EE.UU./Japón
0208-001-01
0208-004-01
21962
21822
21819
21820
21821
ESPAÑOL
70
Page 72

Modos de operación inalámbricos
El servidor de impresión AXIS OfficeBasic USB Wireless se comunica en modo
Infrastructure, en el cual existe un 802.11b Access point que funciona como un
puente entre la estación de trabajo/el ordenador portátil y el servidor de
impresión, o modo Ad-hoc , en el cual la estación de trabajo/el ordenador
portátil se comunica directamente con el servidor de impresión.
Infrastructure (AP)
Las estaciones de trabajo y ordenadores portátiles se comunican a través de
WLAN y el LAN a través de un Access Point con el servidor de impresión.
Ver las instrucciones de instalación en Configuración del servidor de impresión
para Windows, en la página 76 o Instalación de impresora - Mac OS, en la
página 84.
Ad hoc (Peer to Peer)
Las estaciones de trabajo y los ordenadores portátiles se comunican directamente a través de WLAN con el servidor de impresión.
Consulte Configuración en Redes Ad Hoc (Peer-to-Peer), en la página 89.
ESPAÑOL
71
Page 73

Instalación del hardware
1. Apague la impresora.
2. Conecte el servidor de impresión a su impresora con el cable USB suministrado.
3. Encienda la impresora.
4. Enchufe el adaptador de CA al conector de alimentación en el lado trasero
del servidor de impresión inalámbrico.
5. Espere 1 minuto.
6. Presione durante 5 segundos el botón Reset externo del servidor de
impresión. En la impresora conectada se imprime una página de prueba
que presenta toda la información sobre la dirección IP del servidor de
impresión, número de firmware, etc.
• El LED de estado parpadea cada vez que se transmiten o imprimen datos.
• Cuando se activa el servidor de impresión, el LED de estado parpadea 5
veces como parte de la Autocomprobación de encendido (POST, por sus
siglas en inglés) de la unidad. Si el LED no parpadea 5 veces cuando Ud.
enciende la unidad, desconecte todos los cables y repita el procedimiento
de instalación que se describe aquí.
LED de estado (naranja)
Botón Reset :
- Presionarlo una vez para reiniciar el servidor de impresión.
- Presionarlo durante 5 segundos para imprimir una página de prueba.
LED de WLAN (verde)
Conector USB
Conector de alimentación
Interruptor DIP:
Nor. = Modo Normal
Diag. = Modo Diagnostic
Para instrucciones más detalladas sobre el uso del botón Reset, ver Administración del servidor de impresión usando el botón Reset, en la página 86 .
ESPAÑOL
72
Page 74

Dirección IP
Para permitir la comunicación de red con el servidor de impresión, debe tener
una dirección IP adecuada. Use uno de estos métodos para asignar una dirección IP al servidor de impresión:
Método:
DHCP Servidor DHCP
Arp/Ping
Servidor
requerido:
Sistema operativo Comentario:
El servidor de impresión
obtiene una dirección IP y
los parámetros de TCP/IP
Windows
Mac OS
Mac OS
Windows
relacionados automáticamente de un servidor
DHCP. Por defecto, está
habilitada la función DHCP
del servidor de impresión.
Asignación manual de una
dirección IP.
Obtención de una dirección IP usando DHCP
Si está trabajando en una red con asignación dinámica de dirección IP, su
servidor de impresión obtendrá automáticamente una dirección IP cuando lo
conecte a la red. Siga las instrucciones de esta página para verificar la dirección IP:
1. Imprima una página de prueba presionando el botón Reset durante 5 segundos. Ubique la dirección IP del servidor de impresión en la página de
prueba.
2. Abra un navegador Web (por ejemplo, Internet Explorer).
3. En el campo Ubicación/Dirección del navegador Web, escriba la dirección
IP del servidor de impresión y pulse Intro.
4. Si aparece la página Web Wireless Print Server en su navegador Web, la
dirección IP funciona correctamente. Continúe con Windows Setup, en la
página 13 o Instalación de impresora - Mac OS, en la página 84.
5. Si la página Web Wireless Print Server no aparece, debe configurar manualmente la dirección IP del servidor de impresión utilizando uno de los
métodos descritos en Ajuste de una dirección IP con Arp/Ping:, en la página
74.
ESPAÑOL
73
Page 75

Ajuste de una dirección IP con Arp/Ping:
Ud. puede asignar una dirección IP temporaria al servidor de impresión usando
arp/ping y después acceder a las páginas Web internas del servidor de
impresión para asignar una dirección IP fija:
1. Ubique el número de serie (S/N) del servidor de impresión que se encuentra en la etiqueta inferior del servidor de impresión. La dirección de Ethernet se basa en el número de serie:
Número de serie: Dirección MAC/Ethernet:
00408c181cf0 00-40-8c-18-1c-f0 (Windows)
00:40:8c:18:1c:f0 (Mac OS )
2. Abra una línea de comando o terminal e ingrese la sintaxis siguiente:
Sintaxis Ejemplo Windows (Línea de comando)
1
arp -s <dirección IP> <dirección Ethernet>
2
ping <dirección IP>
Sintaxis Ejemplo Mac OS (Terminal)
1
arp -s <dirección IP> <dirección Ethernet>
2
ping <dirección IP>
arp -s 192.168.3.191 00-40-8c-18-1c-f0
ping 192.168.3.191
arp -s 192.168.3.191 00:40:8c:18:1c:f0
ping 192.168.3.191
3. El host retornará psname is alive (Terminal de Mac OS ) o Reply from
192.168.3.191... (línea de comando de Windows) o un mensaje similar.
Esto indica que se ha configurado una dirección IP temporaria y que se ha
establecido una comunicación.
4. A continuación, abra un navegador Web (por ejemplo, Internet Explorer).
5. En el campo Ubicación/Dirección del navegador Web, escriba la dirección
IP del servidor de impresión y pulse Intro.
ESPAÑOL
74
Page 76

6. Aparecerá la página Web del servidor de impresión. Vaya a Configuración
| TCP/IP:
7. Seleccione el botón de radio Utilizar la siguente configuracion de TCP/IP
e ingrese un valor correcto para Direccion IP, Mascara de subred y Enru-
tador predeterminado.
8. Haga clic en Guardar y reiniciar. La nueva dirección IP será cargada.
9. Compruebe la comunicación ingresando la nueva dirección IP en el navegador y que las páginas Web del servidor de impresión aparezcan nuevamente.
• Cuando ejecute el comando ping por primera vez, puede advertir un
tiempo de respuesta considerablemente más largo que lo habitual.
• La dirección IP y el número de serie utilizados aquí son valores de ejemplo.
Ud. debe adquirir una dirección IP nueva y sin utilizar de su administrador
de red.
Continúe con Windows Setup, en la página 13 o Mac OS Setup, en la página
27.
ESPAÑOL
75
Page 77

Configuración del servidor de impresión
para Windows
Antes de comenzar:
• Asegúrese de que tiene un Access Point en su red y de que tiene una dirección IP válida. Ejemplo: 192.168.1.100
• Asegúrese de que el protocolo TCP/IP esté instalado en su ordenador.
• Asegúrese de que el interruptor DIP del servidor de impresión esté en modo
Normal (Nor.)
1. Introduzca el CD de AXIS OfficeBasic USB Wireless en su unidad de CD.
2. Seleccione Setup Wizard para instalar el servidor de impresión inalámbrico
y configurar la impresora conectada.
La impresora instalará automáticamente estos componentes en
C:\Program Files\Axis Communications\AXIS OBW Wizard:
• AXIS OBW Wizard.exe
• AXIS OBW Network Printer Port. DLL (Wireless Print Monitor)
Después de la instalación, AXIS OBW Wizard estará disponible desde Inicio |
Programas | Axis Communications.
AXIS OBW Wizard se iniciará en el mismo idioma que su sistema operativo,
ver Technical Specifications, en la página 113.
3. Desde la pantalla Select a Print Server, seleccione el servidor de impresión
que desea configurar y haga clic en Siguente.
ESPAÑOL
76
Page 78

En la pantalla Change Settings, seleccione No o Yes:
Seleccione No si desea que el servidor de impresión use la dirección DHCP
asignada y conserve los parámetros de Infrastructure por defecto:
• Infrastructure modo
• SSID = <ANY>
• Tasas de transmission de datos= Auto
• Canal = 6
• Emplear WEP = Incapacitado
• Tipo de authenticacion = Open System
• DHCP permitido
Haga clic en Siguiente en el programa hasta que llegue a Seleccione una impre-
sora ya configurada y haga clic en Add New Printer, en la página 79. Siga las
instrucciones a partir de allí.
ESPAÑOL
77
Page 79

Seleccione Yes si desea cambiar los parámetros inalámbricos o asignar una
dirección IP estática al servidor de impresión:
• En la pantalla Basic Wireless Settings , seleccione Communications Type
según su red:
- Infrastructure
- 802.11b Ad-hoc
• Ingrese la SSID adecuada de su red inalámbrica. El valor por defecto
<ANY> se conectará con el AP que tenga la mejor señal en su red inalám-
brica.
- Canal: optional.
- Tasas de transmision de datos: seleccione Auto, 1,2Mbps, 5.5Mbps o
11Mbps.
• En la página Security and WEP Encryption Settings habilite o inhabilite
WEP Encryption, configure de acuerdo con su red inalámbrica y haga clic
en Siguiente.
• Si su red usa autenticación 802.1X (EAP), seleccione None o MD5 como
su tipo de autenticación. Si selecciona MD5 debe ingresar el mismo Login
Name y Password que se definen en el Radius Server.
•Indique una dirección IP fija o dinámica para el servidor de impresión, se
recomienda una dirección IP fija. Haga clic en Siguiente.
Haga clic en Siguiente en el programa hasta que llegue a Seleccione una impre-
sora ya configurada y haga clic en Add New Printer, en la página 79. Siga las
instrucciones a partir de allí.
Notas:
• Si usa WEP encryption en su WLAN e involuntariamente cambia el formato
WEP o las teclas en el servidor de impresión, perderá contacto con el servi-
dor de impresión. Siga los pasos indicados en el User’s Manual para recu-
perar la conexión.
• La dirección IP del servidor de impresión inalámbrico debe estar dentro de la
misma subred que su adaptador inalámbrico.
• Una forma rápida de encontrar la dirección IP del servidor de impresión es
presionar el botón Reset durante 5 segundos para imprimir una página de
prueba. La dirección DHCP o dirección IP estática del servidor de impresión
se presenta normalmente en la página de prueba.
ESPAÑOL
78
Page 80

4. En el Asistente, seleccione una impresora ya configurada de la lista, haga
clic en Siguenet y después en Finalizar para completar la instalación.
o
Seleccione Add New Printer si el servidor de impresión está conectado a una
impresora que no ha sido instalada anteriormente y que no aparece en la
lista.
Seleccione una impresora ya configurada y haga clic en Add New Printer
5. Para Windows NT/98/Me, vaya a la página 82 o página 83.
Para Windows 2000/XP/2003:
Haga clic en Agregar nueva impresora para iniciar el Asistente para agregar
impresoras de Windows. Haga clic en Siguiente y seleccione Impresora
local, asegúrese de que la casilla de verificación Detectar e instalar mi
impresora Plug and Play automáticamente NO
esté marcada:
ESPAÑOL
79
Page 81

6. Asegúrese de que esté marcado el botón de radio Usar el puerto siguiente
y seleccione LPT1: (Puerto de impresora recomendado) de la lista desplegable. Haga clic en Siguiente.
7. Seleccione Fabricantes e impresoras de las listas de controladores. Haga clic
en Siguiente.
8. Si ya tiene instalado el controlador de la impresora, se le preguntará si desea
conservarlo o reemplazarlo. Haga clic en Siguiente. Suministre un nombre
para la impresora y seleccione si desea convertirla en su impresora por
ESPAÑOL
defecto. Haga clic en Siguiente.
9. Seleccione si desea compartir la impresora con otros usuarios de la red,
imprimir una página de prueba, etc. Seleccione el botón de radio adecuado
y haga clic en Siguiente y Finalizar.
80
Page 82

10. En AXIS OBW Wizard, finalice la instalación marcando la impresora instalada
en la lista Select a Printer y haga clic en Siguiente y Finalizar.
11. Desde Windows, vaya a Inicio | Impresoras y Faxes y marque la impresora
que acaba de instalar.
12. Haga clic en el botón derecho del ratón, seleccione Propiedades y compruebe
que aparezca el puerto AXIS OfficeBasic USB Wireless como
OBWXXXXXX-1 (las X representan los seis últimos dígitos del número de
serie del servidor de impresión).
13. Imprima una página de prueba para verificar la configuración.
Si desea instalar más servidores de impresión, inicie AXIS OBW Wizard
desde su menú de Inicio de Windows: Inicio | Programas | Axis Communi-
cations | AXIS OBW Wizard y repita el procedimiento de instalación.
ESPAÑOL
81
Page 83

Configuración en Windows NT
1. Configure como se describe en Configuración del servidor de impresión
para Windows, en la página 76 hasta que llegue a Seleccione una
impresora ya configurada y haga clic en Add New Printer, en la página
79. Haga clic en Agregar nueva impresora para iniciar el Asistente
para agregar impresoras de Windows.
2. Seleccione Mi PC, y haga clic en Siguiente.
3. Seleccione LPT1 como puerto local y haga clic en Siguiente.
4. Seleccione Fabricantes e Impresoras, haga clic en Siguiente y Finalizar.
5. En el AXIS OBW Wizard, seleccione la impresora recién agregada de la
lista, haga clic en Next y Finish para completar la instalación.
6. Desde Windows, vaya a Inicio | Impresoras y Faxes y marque la impresora
que acaba de instalar.
7. Haga clic en el botón derecho del ratón, seleccione Propiedades y compruebe que aparezca el puerto AXIS OfficeBasic USB Wireless como
OBWXXXXXX-1 (las X representan los seis últimos dígitos del número
de serie del servidor de impresión).
8. Imprima una página de prueba para verificar la configuración.
ESPAÑOL
82
Page 84

Configuración en Windows 98/Me
1. Configure como se describe en Configuración del servidor de
impresión para Windows, en la página 76 hasta que llegue a Seleccione una impresora ya configurada y haga clic en Add New Printer, en
la página 79. Haga clic en Agregar nueva impresora para iniciar el
Asistente para agregar impresoras de Windows.
2. Seleccione Impresora local, y haga clic en Siguiente.
3. Seleccione Fabricantes e Impresoras. No imprima una página de prueba.
4. Seleccione LPT1 (Puerto de impresora ECP) y haga clic en Siguiente y
Finalizar para completar la instalación.
5. Desde Windows, vaya a Inicio | Impresoras y Faxes y marque la impresora
que acaba de instalar.
6. Haga clic en el botón derecho del ratón, seleccione Propiedades y compruebe que aparezca el puerto AXIS OfficeBasic USB Wireless como
OBWXXXXXX-1 (las X representan los seis últimos dígitos del número
de serie del servidor de impresión).
7. Imprima una página de prueba para verificar la configuración.
ESPAÑOL
83
Page 85

Instalación de impresora - Mac OS
Aquí se describe la Impresión AppleTalk y la Impresión IP para MacOSX. Para
instrucciones sobre impresión de entornos Mac OS anteriores, consulte el AXIS
OfficeBasic USB Wireless User’s Manual en el CD o www.axis.com
Impresión Appletalk (Mac OS X)
1. En la interfaz Web del servidor de impresión, seleccione Inicio | AppleTalk.
2. En el campo Zona AppleTalk, ingrese a la zona en la que funciona su Mac OS.
Haga clic en Guardar y Reinicio.
3. Desde el menú de Apple, seleccione Ir a | Aplicaciones | Utilidades e inicie el
Centro de impresión.
4. Haga clic en Agregar en la Lista de impresoras.
5. Seleccione AppleTalk del menú superior desplegable.
6. Seleccione la zona ApleTalk en la que funciona su Mac OS (la misma que se
ingresó anteriormente).
7. Su impresora de red aparecerá en la Lista de impresoras (el nombre por
defecto es AXxxxxxx_USB, dónde las x representan los 6 dígitos del número
de serie del servidor de impresión).
8. Desde la lista desplegable deModelo de impresora , seleccione el fabricante y
la impresora. Haga clic en Agregar.
Impresión IP (Mac OS X)
1. Desde el menú de Apple, seleccione Ir a | Aplicaciones | Utilidades e inicie el
Centro de impresión.
2. Haga clic en Agregar en la Lista de impresoras.
3. Seleccione Impresión IP del menú superior desplegable.
4. En el campo Dirección de impresora , ingrese la dirección IP del servidor de
impresión.
5. Acéptela usando la cola de usuario por defecto en el servidor asegurándose de
que esté marcada la casilla de comprobación Utilizar cola predeterminada en
el servidor, o ingrese lp1 en el campo Nombre de la cola:
6. Desde la lista desplegable deModelo de impresora , seleccione el fabricante y
la impresora. Haga clic en Agregar.
7. La impresora que acaba de agregar aparecerá en la Lista de impresoras como
la impresora por defecto (en negritas). Pruebe la instalación enviando un trabajo de impresión a la impresora.
ESPAÑOL
84
Page 86

Administración de servidor de impresión
basada en la Web
La administración y configuración del servidor de impresión Axis se realiza
desde su interfaz Web:
1. Escriba la dirección IP del servidor de impresión en el campo de Ubi-
cación/ Dirección de su navegador Web estándar. Pulse Intro.
2. Aparecerá la página Servidor de impresión inalámbrico. Desde aquí,
puede configurar todos los parámetros del servidor de impresión.
El servidor de impresión tiene un Nombre de usuario por defecto = root
Contraseña por defecto = pass
Notas:
Una forma rápida de encontrar la dirección IP del servidor de impresión es
presionar el botón Reset durante 5 segundos para imprimir una página de
prueba. La dirección DHCP o la dirección IP estática se presenta en la
página de prueba.
Sugerencias:
Para cambiar los parámetros del servidor de impresión:
• Dirección IP del servidor de impresión: vaya a Configuración | TCP/IP
• Parámetros de Wireless: vaya a Configuración | Inalambrico
• La contraseña del servidor de impresión: vaya a Configuración | Sistema
85
ESPAÑOL
Page 87

Administración del servidor de impresión
usando el botón Reset
El botón Reset se puede usar para varias operaciones:
Imprimir una página de prueba:
1. Verificar que el interruptor DIP esté en “Nor.”
2. Mantener presionado el botón Reset durante 5 segundos. La página de
prueba se imprimirá en la impresora conectada.
La página de prueba presenta información sobre la dirección IP del servidor de
impresión, dirección MAC, máscara de subred, pasarela por defecto, etc.
Restablecimiento:
1. Verifique que el interruptor DIP esté en “Nor.”
2. Pulse el botón Reset una vez.
¡Advertencia! ¡Esto reiniciará el servidor de impresión y detendrá todos los trabajos de impresión en curso y pendientes!
Reconfiguración a los valores iniciales:
1. Verifique que el interruptor DIP esté en “Nor.”
2. Desconecte la fuente de alimentación externa.
3. Mantenga presionado el botón Reset y vuelva a conectar la fuente de alimentación externa.
4. Espere a que los indicadores LED naranja y verde parpadeen dos veces de
forma simultánea.
5. Suelte el botón Reset.
6. El servidor de impresión volverá a arrancar.
ESPAÑOL
86
Page 88

IMPORTANTE
• Si se realiza una Reconfiguración a los valores iniciales todos los
parámetros serán borrados y reemplazados por los valores por defecto.
¡Esta medida debe tomarse con precaución!
• Después de efectuar una Reconfiguración a los valores iniciales, los
parámetros inalámbricos por defecto son:
• Infrastructure modo
• SSID = <ANY> (conectará con el Access Point que tiene la mejor
señal en su red inalámbrica)
• Tasas de transmision de datos= Auto
• WEP = Incapacitado
• Tipo de autentificacion= Open System
• Canal = 6
• DHCP = permitido
ESPAÑOL
87
Page 89

Localización de averías
Controle lo siguiente si tiene problemas al tratar de imprimir a través de
WLAN:
• Compruebe que la interfaz de red WLAN esté debidamente configurada en
la estación de trabajo/ordenador portátil tratando de acceder al servidor de
impresión.
• Todos los clientes de comunicación deben estar en el mismo modo operativo, es decir modo Ad Hoc o Infrastructure.
• Compruebe que las claves SSID y WEP estén ajustadas de acuerdo con sus
parámetros de red WLAN.
• Compruebe que la configuración del canal de frecuencia de radio sea la
misma en todos los clientes que se están comunicando, y que el canal esté
configurado conforme a los requisitos de cada país.
Bandas y canales de frecuencia:
País Frecuencia Canales disponibles Canal por
defecto
Europa 2.412-2.472 GHz 1-13 11
Francia 2.457-2.472 GHz 10-13 (uso interior*) 11
Japón 2.484 GHz 14 14
EE.UU./Canadá2.412-2.462 GHz 1-11 11
* (Francia) está permitido el uso al aire libre en propiedad privada sin
autorización previa
ESPAÑOL
88
Page 90

Configuración en Redes Ad Hoc (Peer-to-Peer)
Si no tiene un Access Point en su red o no puede encontrarse el servidor de impresión,
proceda así:
1. Coloque el interruptor DIP del servidor de impresión en el modo DIAG.
2. Compruebe que el protocolo TCP/IP esté instalado en su ordenador y que Ud. ha
asignado una dirección IP a su adaptador inalámbrico, por ej. 192.168.1.100
3. En su ordenador portátil, ejecute la utilidad de software del adaptador inalámbrico
y cámbielo al modo Ad-hoc (es decir, PEER-TO-PEER), con los siguientes
parámetros:
• SSID = WLAN-PS
•Channel = 6
4. Haga clic en Conectar (o similar) para establecer comunicación con el servidor de
impresión. Asegúrese de que se haya establecido una comunicación.
5. Acceda a la interfaz Web del servidor de impresión ingresando su dirección IP en el
campo Ubicación/Dirección de un navegador Web (ver página 85 si necesita
instrucciones).
6. En la interfaz Web del servidor de impresión, vaya a Configuración | Inalambrico.
7. Cambie del parámetro por defecto Infrastructure (en modo NOR) al modo 802.11b
Ad-hoc.
8. Cree un SSID nuevo de su elección y seleccione Channel según las regulaciones de
su país.
Ejemplo: SSID = AXISOBW, Channel = 9
9. Haga clic en Save and Restart.
10. Vuelva a colocar el interruptor DIP en el modo NOR y reinicie el servidor de
impresión pulsando una vez el botón Reset del servidor de impresión.
11. En su laptop, ejecute otra vez la utilidad de software del adaptador inalámbrico,
manténgalo en modo Ad-hoc (es decir, PEER-TO-PEER), y ajuste los parámetros
según los configurados en el paso 8 a fin de reconectarlo al servidor de impresión.
12. Ejecute el AXIS OBW Wizard como se describe en Configuración del servidor de
impresión para Windows, en la página 76 para instalar el servidor de impresión en
su máquina local.
Nota: En el modo DIAG, el servidor de impresión SIEMPRE tiene los valores iniciales
indicados a continuación.
¡Estos valores no pueden modificarse!
• Modo = 802.11b Ad Hoc
• SSID = WLAN-PS
•Canal = 6
• Tasas de transmision de datos= Auto
•WEP = Incapacitado
ESPAÑOL
89
Page 91

Cenni generali
In questo manuale vengono fornite le istruzioni per l'installazione del
server di stampa AXIS OfficeBasic USB Wireless negli ambienti Microsoft
Windows (95, 98, NT, Me, 2000, XP, Server 2003) e Mac OS.
Le istruzioni riportate in questo manuale si riferiscono a un sistema AXIS
OfficeBasic USB Wireless nuovo e non configurato. Per definire questo
stato in un sistema AXIS OfficeBasic USB Wireless precedentemente configurato, è possibile ripristinare le impostazioni predefinite. Per istruzioni,
vedere la sezione Gestione del server di stampa mediante il pulsante di
ripristino alla pagina 108.
Passaggi per l'installazione
Seguire questi passaggi per installare l'AXIS OfficeBasic USB Wireless:
1. Installazione hardware, alla pagina 93
2. Indirizzo IP, alla pagina 94
3. Configurazione del server di stampa per Windows, alla pagina 97
oppure
Installazione della stampante-Mac OS, alla pagina 105.
Gestione del server di stampa
La gestione e la configurazione del server di stampa viene eseguita
dall'interfaccia Web del server di stampa, vedere a pagina 107 oppure da
OBW Setup Wizard dell'apposito software basato su Windows, vedere a
pagina 97.
AXIS OfficeBasic USB Wireless User's Manual
Per ulteriori informazioni su questo prodotto, vedere AXIS OfficeBasic USB
Wireless User's Manual. User's Manual è disponibile sul CD AXIS OfficeBasic USB Wireless e all'indirizzo Web www.axis.com
ITALIANO
90
Page 92

Controllo dell'hardware
Aprire la confezione e verificare la presenza di tutti i componenti utilizzando la seguente lista di controllo. In caso di componenti mancanti o
danneggiati, rivolgersi al rivenditore. Il materiale di imballaggio è riciclabile.
Hardware Modello Numero parte
Server di stampa AXIS OfficeBasic USB Wireless
Supporti Titolo Numero parte
CD CD AXIS OfficeBasic USB Wireless 21965
Materiale stampato AXIS OfficeBasic USB Wireless User's Guide 21962
Accessori Descrizione Numero parte
Cavo USB 20208
Adattatore di alimentazione Modello Numero parte
PS-M Australia
PROD UNIT AXIS OB USB W <EUR> ch 1-13
PROD UNIT AXIS OB USB W <US> ch 1-11
Europa
Regno Unito
USA/Giappone
0208-001-01
0208-004-01
21822
21819
21820
21821
ITALIANO
91
Page 93

Modalità di funzionamento wireless
Il server di stampa AXIS OfficeBasic USB Wireless comunica in Modalità
Infrastructure , quando è disponibile un Access point da 802.11b come
ponte tra la workstation o il portatile e il server di stampa, oppure in
Modalità Ad-hoc, quando la workstation o il portatile comunica direttamente con il server di stampa.
Infrastructure (AP)
Le workstation e i laptop comunicano tramite WLAN e la LAN attraverso un
Access Point con il server di stampa.
Per istruzioni sull'installazione, vedere Configurazione del server di stampa
per Windows, alla pagina 97 o Installazione della stampante-Mac OS, alla
pagina 105.
Ad hoc (Peer to Peer)
Le workstation e i laptop comunicano direttamente sulla WLAN con il
server di stampa.
Vedere Configurazione nelle reti Ad hoc (Peer-to-Peer), alla pagina 111.
ITALIANO
92
Page 94

Installazione hardware
1. Spegnere la stampante.
2. Collegare il server di stampa alla stampante con il cavo USB fornito
nella confezione.
3. Accendere la stampante.
4. Inserire il cavo dell'adattatore di alimentazione CA nel connettore
posto sulla parte posteriore del server di stampa wireless.
5. Attendere 1 minuto.
6. Premere il pulsante esterno Reset (Ripristina) del server di stampa per
5 secondi. Verrà stampata una pagina di prova sulla stampante collegata, che visualizza informazioni sull'indirizzo IP del server di stampa,
il numero del firmware, ecc.
• Durante la trasmissione e la stampa dei dati, il LED di stato emetterà una
luce tremolante.
• Quando si accende il server di stampa, il LED di stato deve lampeggiare 5
volte come parte del test automatico all'avvio (POST, power-on-self-test).
All'accensione dell'unità, verificare che il LED lampeggi 5 volte altrimenti
scollegare tutti i cavi e ripetere la procedura di installazione descritta.
LED di stato (arancione)
Pulsante Reset (Ripristina):
- Per avviare il server di stampa, premere una volta.
- Per stampare la pagina di prova, tenere premuto per 5 secondi.
LED WLAN (verde)
Connettore USB
Connettore di alimentazione
Microinterruttore:
Nor. = Modalità Normal
Diag. = Modalità Diagnostic
Per informazioni dettagliate sull'utilizzo del pulsante di ripristino, vedere la
sezione Gestione del server di stampa mediante il pulsante di ripristino, alla
pagina 108.
ITALIANO
93
Page 95

Indirizzo IP
Per consentire la comunicazione della rete con il server di stampa, è necessario avere un indirizzo IP corretto. Utilizzare uno di questi metodi per
assegnare un indirizzo IP al server di stampa:
Metodo:
DHCP Server DHCP
Arp/Ping
Server richiesto:
Sistema operativo Commento:
Il server di stampa ottiene
un indirizzo IP e le relative
impostazioni TCP/IP auto-
Windows
Mac OS
Mac OS
Windows
maticamente da un server
DHCP. Per impostazione
predefinita, viene abilitata
la funzione DHCP del server
di stampa.
Assegnazione manuale di
un indirizzo IP.
Come ottenere un indirizzo IP utilizzando DHCP
Se si utilizza una rete con assegnazione dinamica dell'indirizzo IP, al server
di stampa sarà assegnato automaticamente un indirizzo IP quando viene
collegato alla rete. Per verificare l'indirizzo IP, seguire le istruzioni riportate
su questa pagina:
1. Stampare una pagina di prova tenendo premuto il pulsante di ripristino per 5 secondi. Individuare l'indirizzo IP del server di stampa nella
pagina di prova.
2. Aprire un browser Web (ad esempio, Internet Explorer).
3. Nel campo Indirizzo del browser Web immettere l'indirizzo IP del
server di stampa e premere Invio.
4. Se la pagina Web del server di stampa wireless viene visualizzata nel
browser Web, l'indirizzo IP è interamente funzionale. Continuare con
Windows Setup, alla pagina 13 o Installazione della stampante-Mac
OS, alla pagina 105.
5. Se la pagina Web del server di stampa wireless non viene visualizzata, sarà necessario impostare manualmente l'indirizzo IP del server
di stampa, descritto in Come impostare un indirizzo IP con Arp/Ping:,
ITALIANO
alla pagina 95.
94
Page 96

Come impostare un indirizzo IP con Arp/Ping:
È possibile assegnare un indirizzo IP temporaneo al server di stampa utilizzando arp/ping, quindi accedere alle pagine Web del server di stampa per
assegnare un indirizzo IP fisso:
1. Individuare il numero di serie (S/N) del server di stampa sull'etichetta
posta nella parte inferiore del server di stampa. L'indirizzo Ethernet si
basa sul numero di serie:
Numero di serie: Indirizzo MAC/Ethernet:
00408c181cf0 00-40-8c-18-1c-f0 (Windows)
00:40:8c:18:1c:f0 (Mac OS )
2. Aprire un prompt dei comandi o un terminale e digitare i seguenti
comandi:
Sintassi Esempio per Windows (prompt dei
comandi)
1
arp -s <indirizzo IP> <indirizzo Ethernet >
ping <indirizzo IP>
2
arp -s 192.168.3.191 00-40-8c-18-1c-f0
ping 192.168.3.191
Sintassi Esempio per Mac OS (terminale)
1
arp -s <indirizzo IP> <indirizzo Ethernet >
ping <indirizzo IP>
2
arp -s 192.168.3.191 00:40:8c:18:1c:f0
ping 192.168.3.191
3. L'host restituirà psname is alive (terminale di Mac OS ) o Risposta da
192.168.3.191... (prompt dei comandi di Windows) o un messaggio
simile. Ciò indica che un indirizzo IP temporaneo è stato impostato e
che la comunicazione è stata stabilita.
4. Quindi, aprire un browser Web (ad esempio, Internet Explorer).
5. Nel campo Indirizzo del browser Web immettere l'indirizzo IP del
server di stampa e premere Invio.
ITALIANO
95
Page 97

6. Verrà visualizzata la pagina Web del server di stampa. Selezionare
Setup (Configurazione) | TCP/IP
7. Selezionare il pulsante di opzione Use the following TCP/IP settings
(Utilizza le seguenti impostazioni TCP/IP) e immettere un valido IP
address (Indirizzo IP), Subnet Mask e Default Router (Router predefinito).
8. Fare clic su Save and Restart (Salva e Riavvia). Il nuovo indirizzo IP
verrà caricato.
9. Verificare il collegamento immettendo il nuovo indirizzo IP nel
browser e verificare che le pagine Web del server di stampa vengano
visualizzate di nuovo.
• Quando si esegue il comando ping per la prima volta, è possibile che il
tempo di risposta sia molto più lungo del normale.
• L'indirizzo IP e il numero di serie utilizzati in questo manuale sono valori di
esempio. È necessario richiedere all'amministratore di rete un indirizzo IP
nuovo o non utilizzato.
Continuare con Windows Setup, alla pagina 13 o Mac OS Setup, alla pagina
27.
ITALIANO
96
Page 98

Configurazione del server di stampa per
Windows
Introduzione:
• Accertarsi di disporre di un Access Point nella rete e che l'indirizzo IP sia
valido. Esempio: 192.168.1.100
• Accertarsi che il protocollo TCP/IP sia installato sul computer.
• Accertarsi che il microinterruttore del server di stampa sia in modalità Normal (Nor.)
1. Inserire il CD AXIS OfficeBasic USB Wireless nell'apposita unità.
2. Scegliere Installazione guidata per installare il server di stampa wireless
e configurare la stampante connessa.
L'installazione installerà automaticamente questi componenti in
C:\Programmi\Axis Communications\AXIS OBW Wizard:
• AXIS OBW Wizard.exe
• AXIS OBW Network Printer Port. DLL (Wireless Print Monitor)
Dopo l'installazione, la procedura guidata AXIS OBW sarà disponibile da Avvia |
Programmi | Axis Communications.
La procedura guidata AXIS OBW verrà avviata nella stessa lingua del sistema
operativo in uso, vedereTechnical Specifications, alla pagina 113.
3. Dalla schermata Select A Print Server (Seleziona un server di stampa),
selezionare il server di stampa da configurare e fare clic su Next (Avanti).
ITALIANO
97
Page 99

4. Nella schermata Change Settings (Modifica impostazioni), selezionare No o Yes (Sì):
Selezionare No se si desidera che il server di stampa utilizzi l'indirizzo DHCP
assegnato e mantenga le impostazioni di Infrastructure predefinite:
• Modalità Infrastructure
• SSID = <ANY> (qualsiasi)
• Data transmit rate (Velocità di trasmissione dati) = Auto (Automatica)
• Canale = 6
• No WEP encryption (Nessuna crittografia WEP)
• Authentication Type (Tipo autenticazione) = Open System (Sistema aperto)
• DHCP enabled (DHCP abilitato)
Fare clic su Avanti nel programma fino ad arrivare a Selezionare una stampante già con-
figurata o fare clic su Aggiungi stampante, alla pagina 100. Seguire le istruzioni visualizzate a partire da questa finestra.
ITALIANO
98
Page 100

Selezionare Yes (Sì) se si desidera modificare le impostazioni wireless o assegnare un indirizzo IP statico al server di stampa:
• Nella schermata Basic Wireless Settings (Impostazioni wireless di base),
selezionare il Communications Type (Tipo di comunicazione) relativo alla
rete:
- Infrastructure
- 802.11b Ad-hoc
• Immettere il valore SSID appropriato alla rete wireless. Il valore predefinito
è <ANY> (Qualsiasi) che utilizzerà il collegamento con l'AP che presenta il
miglior segnale nella rete wireless.
- Channel (Canale): facoltativo.
- Data Transmit Rates (Velocità di trasmissione): selezionare Auto,
1,2Mbps, 5,5Mbps o 11Mbps.
• Nella pagina Security and WEP Encryption Settings (Impostazioni di protezione e crittografia WEP), abilitare o disabilitare la crittografia WEP ed
eseguire la configurazione in base alla rete wireless, quindi fare clic su
Avanti.
• Se la rete utilizza l'autenticazione 802.1X (EAP), selezionare None (Nessuno) o MD5 come tipo di autenticazione. Se si sceglie MD5, è necessario
immettere lo stesso Login Name (Nome di login) e Password come
definito nel server Radius.
•Specificare un indirizzo IP fisso o dinamico per il server di stampa; un indirizzo
IP fisso è altamente raccomandato. Fare clic su Avanti.
Fare clic su Avanti nel programma fino ad arrivare a Selezionare una stampante
già configurata o fare clic su Aggiungi stampante, alla pagina 100. Seguire le
istruzioni visualizzate a partire da questa finestra.
Note
• Se si utilizza la crittografia WEP sulla WLAN e per sbaglio si cambia il for-
mato WEP o i tasti nel server di stampa, si perderà la connessione con il
server di stampa. Seguire i passaggi descritti nel manuale dell'utente per
ripristinare la connessione.
• L'indirizzo IP del server di stampa wireless deve essere compreso nella
stessa subnet dell'adattatore wireless.
• Per ricercare in modo rapido l'indirizzo IP del server di stampa, tenere pre-
muto il pulsante di ripristino per 5 secondi e stampare una pagina di prova.
Nella pagina di prova viene generalmente visualizzato l'indirizzo DHCP del
server di stampa o l'indirizzo IP statico.
99
ITALIANO
 Loading...