

Page 1

AXIS OfficeBasic Parallel
AXIS OfficeBasic USB
Print Servers
Contents
AXIS OfficeBasic Parallel/AXIS OfficeBasic USB Installation Guide . . . . . . . . . . . . . . . 3
Guide d’installation AXIS OfficeBasic parallèle/AXIS OfficeBasic USB . . . . . . . . . . . . 9
AXIS OfficeBasic Parallel/AXIS OfficeBasic USB Montageanweisung. . . . . . . . . . . . . 15
Guía de instalación AXIS OfficeBasic Parallel/AXIS OfficeBasic USB. . . . . . . . . . . . . 21
Guida all'installazione di AXIS OfficeBasic Parallel/AXIS OfficeBasic USB . . . . . . . . 27
Page 2

Page 3

AXIS OfficeBasic Parallel/AXIS OfficeBasic USB Installation Guide Page 3
AXIS OfficeBasic Parallel/AXIS OfficeBasic
USB Installation Guide
Package contents
Item Notes
Network Print Server AXIS OfficeBasic Parallel or AXIS OfficeBasic USB
Power adapter Model PS-H. Country-specific.
USB cable 0.7 meter. For AXIS OfficeBasic USB only.
Adhesive holder and clip. Mounting kit. For AXIS OfficeBasic USB only.
CD Documentation and installation software.
Printed Materials • AXIS OfficeBasic Parallel/ AXIS OfficeBasic USB Installation Guide (this document)
•Axis Warranty Document
Overview
To install your Axis print server in
Windows 2000, Windows XP and
Windows Server 2003, see the
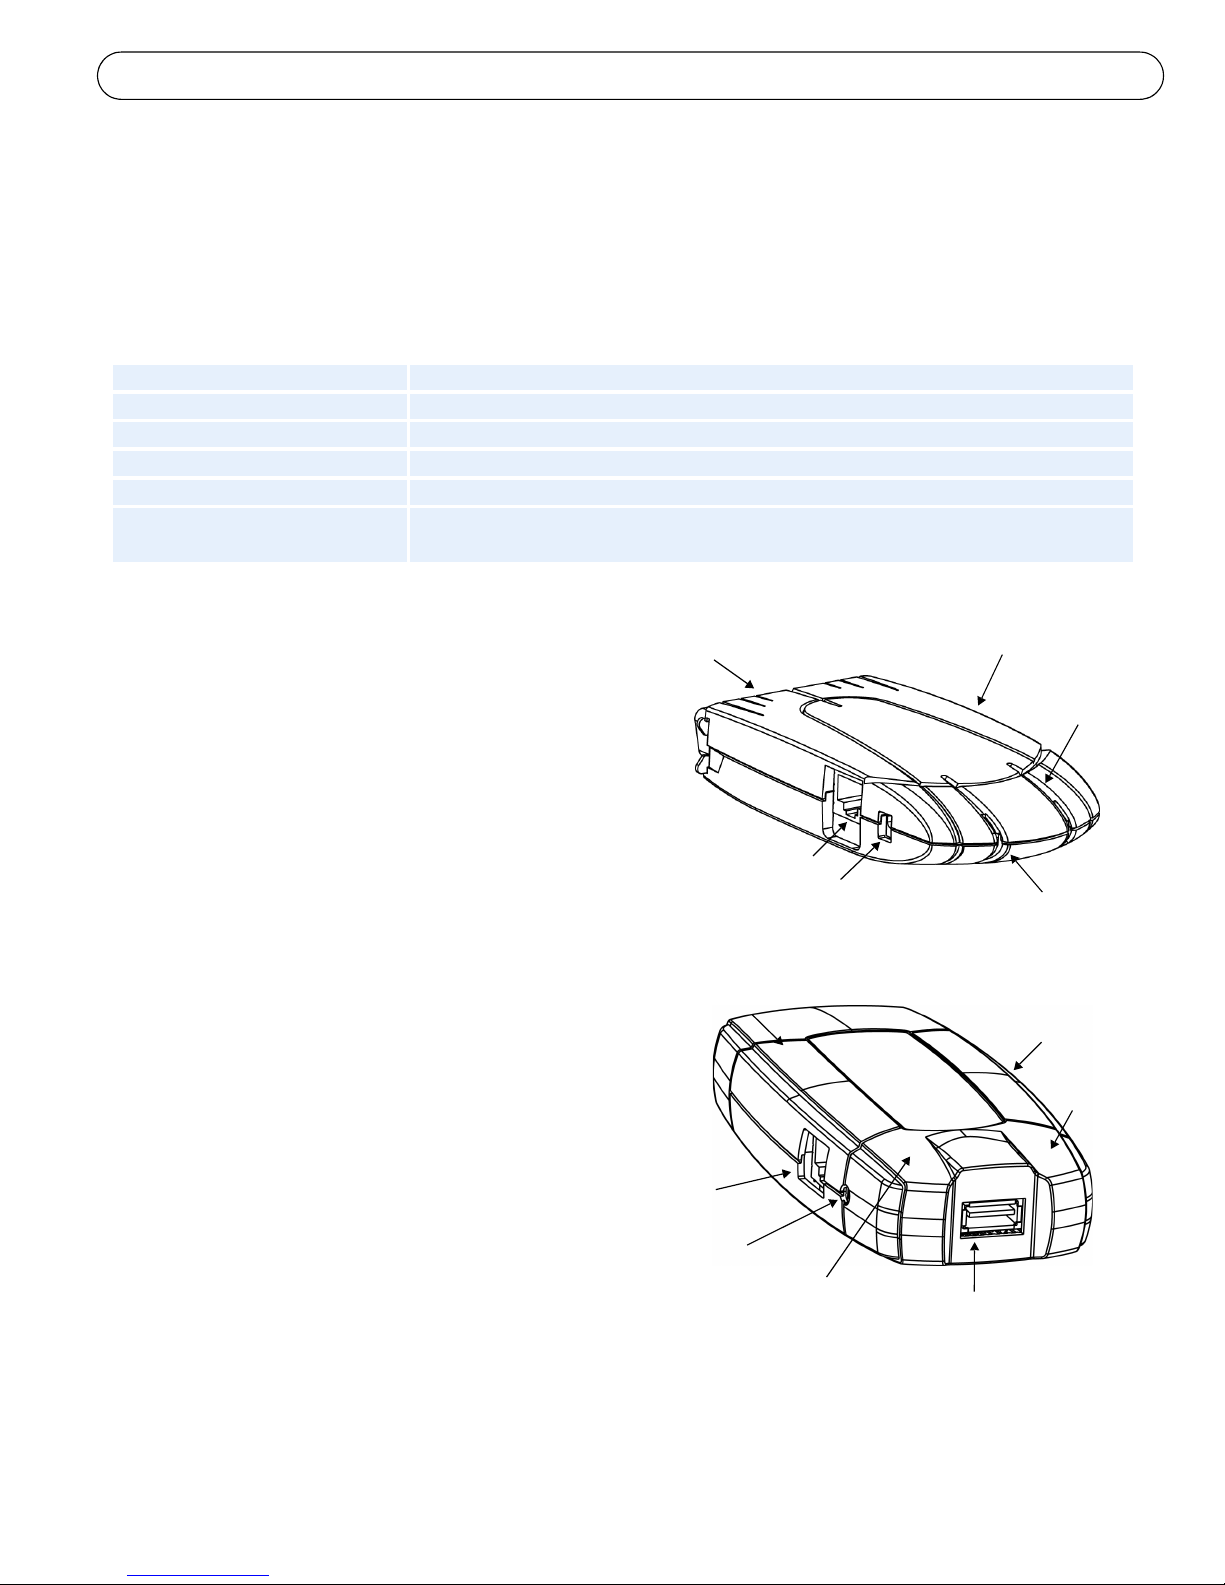
AXIS OfficeBasic Parallel
Parallel printer port
LPT1
Test button
Network
indicator
instructions on the following page. To
install on Macintosh, see page 6. For
all other operating systems, please see
the user's manual.
To perform the installation in
Windows you will need:
• The Axis print server and its
AXIS OfficeBasic USB
Network connector
Power connector
Power
indicator
power adapter.
• A printer with a parallel port for
AXIS OfficeBasic Parallel, or a
USB port for AXIS OfficeBasic
Test button
Network
indicator
USB.
• AXIS AddPrinter, the free
Network connector
installation tool included on the
CD supplied with your Axis print
Power connector
server, or download it from
www.axis.com
• You may also need a printer driver for
Power indicator
USB printer port
(USB1)
your printer. Some printer drivers are
already included in Windows, or may be on your Windows installation CD. Printer drivers can often
be found on the CD supplied with the printer, or they can be downloaded from the manufacturer's
web site.
Page 4

Page 4 AXIS OfficeBasic Parallel/AXIS OfficeBasic USB Installation Guide
Installation in Windows
1. a) Connect the printer to the Axis
print server.
b) Power up the printer.
c) Connect the print server to the
network.
d) Power up the print server.
2. Start AXIS AddPrinter and click
Next.
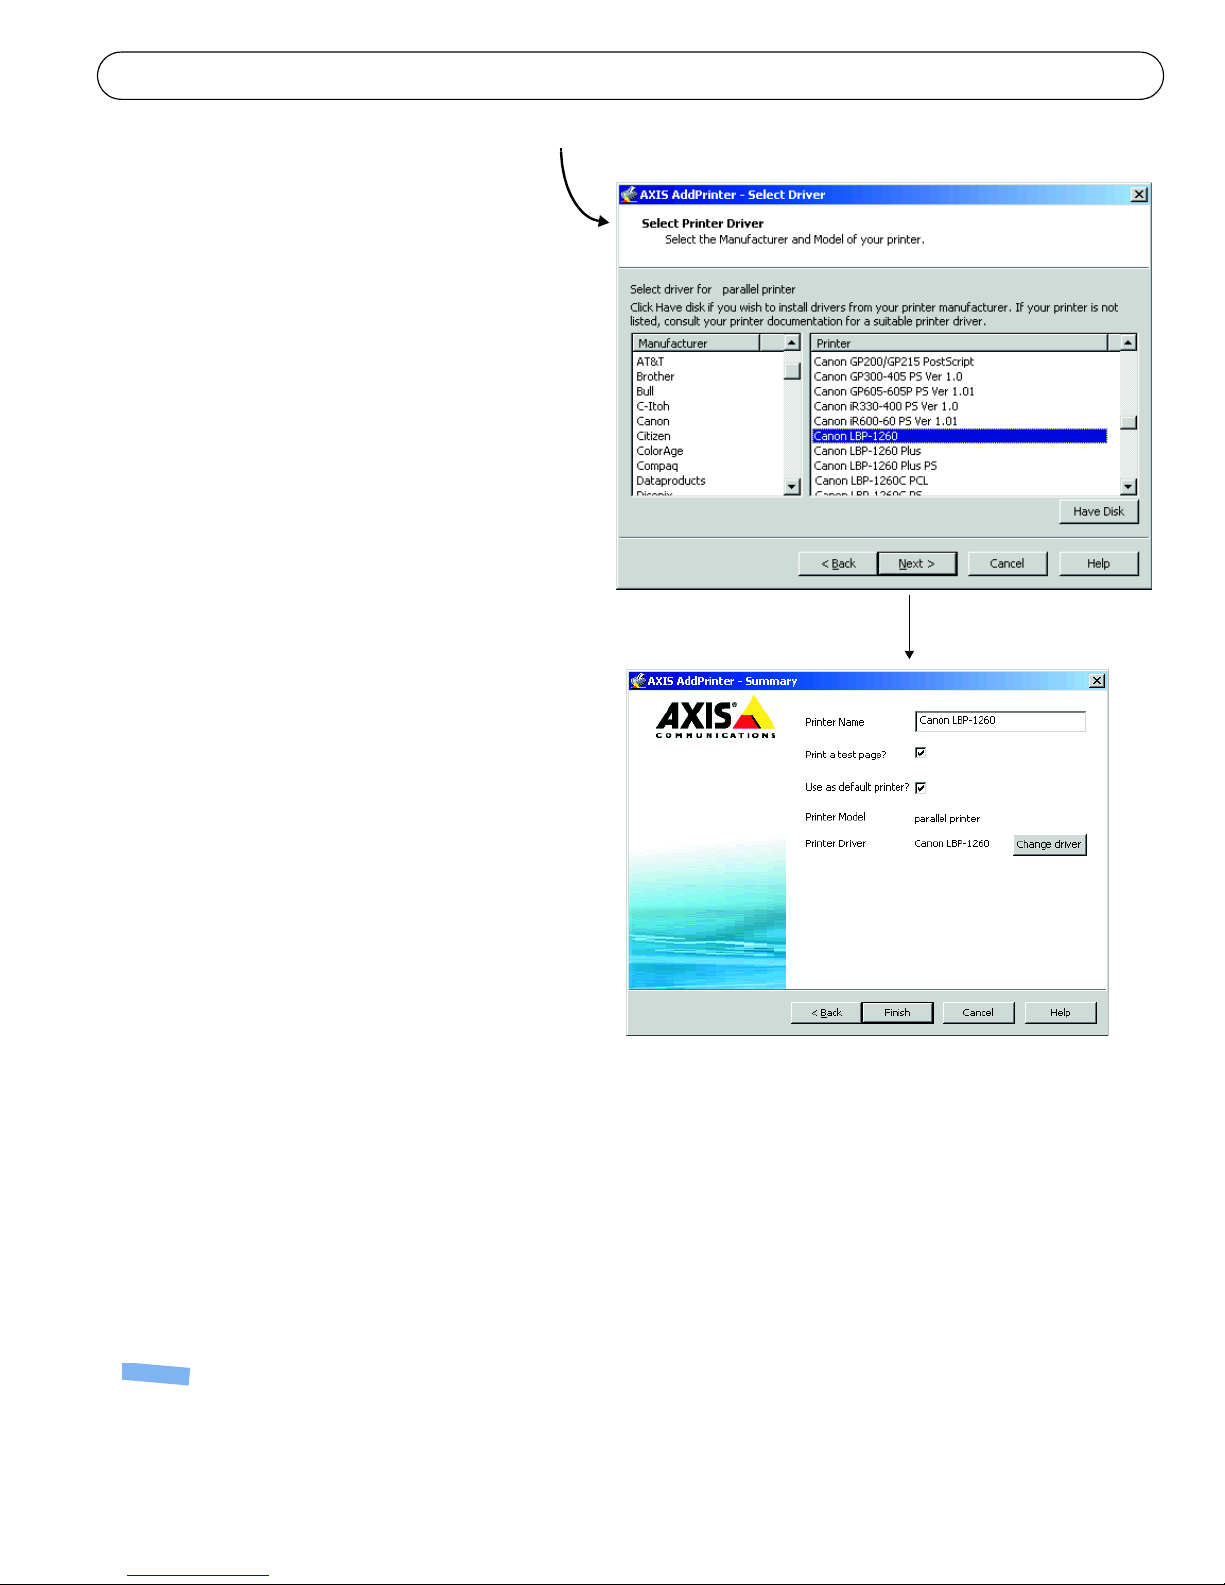
3. Now identify and select your
network printer from the list shown
in the window. Click Next.
4. If your print server is configured to
use a dynamic IP address you will
now have the opportunity to
change this to a static IP address
(recommended).
❶
❷
❸
If the print server already has a
static IP address, this step will be
skipped. For more information on
network settings you may need to
contact your network administrator.
After the IP address has been
configured, click Next.
Notes:
• Some printers may show in the list as "parallel printer"
or “serial printer”, but this will change when the
printer driver is installed.
• The print server’s serial number can be found on the
label on the product’s casing.
• If the function is supported by your printer, pressing
the print server’s Test button once will print a test
page showing the IP address.
❹
Page 5
AXIS OfficeBasic Parallel/AXIS OfficeBasic USB Installation Guide Page 5
5. If AXIS AddPrinter does not
automatically find a suitable driver
for your printer, this dialog will be
displayed. If your printer brand
and model is available from this
list, select it and click Next.
If your printer is not listed, click
Have Disk. You can now browse to
the driver file, e.g. on the CD that
came with the printer, or use the
Search Folder feature to let AXIS
AddPrinter find the driver for you.
6. After the printer driver has been
selected and installed, you will see
a summary of the printer
installation. The printer name can
be changed and you can e.g.
choose to print a test page. Click
Finish.
❺
❻
Ready to print
Your printer has now been installed on
the network and is ready for use.
For installation on all other operating
systems, and for help on all aspects of
printing, please consult the user’s
manual for your print server.
To reset the print server to the factory default settings, please see page 7.
Notes:
• Printer driver files are often named setup.inf. Alternatively, the file name may include part of the printer name, e.g. mynewprinter.inf
• When inserting the CD provided with your printer into the CD drive, this may start an automatic installation process that will
interfere with the installation via AXIS AddPrinter. Click Cancel to stop the automatic installation and instead let AXIS AddPrinter
find the .inf file.
Page 6
Page 6 AXIS OfficeBasic Parallel/AXIS OfficeBasic USB Installation Guide
Installation in Mac OS X
This section describes how to set up your Axis print server for printing in Mac OS X 10.2 and
later. For installation on an older Mac OS, refer to the user’s manual on www.axis.com
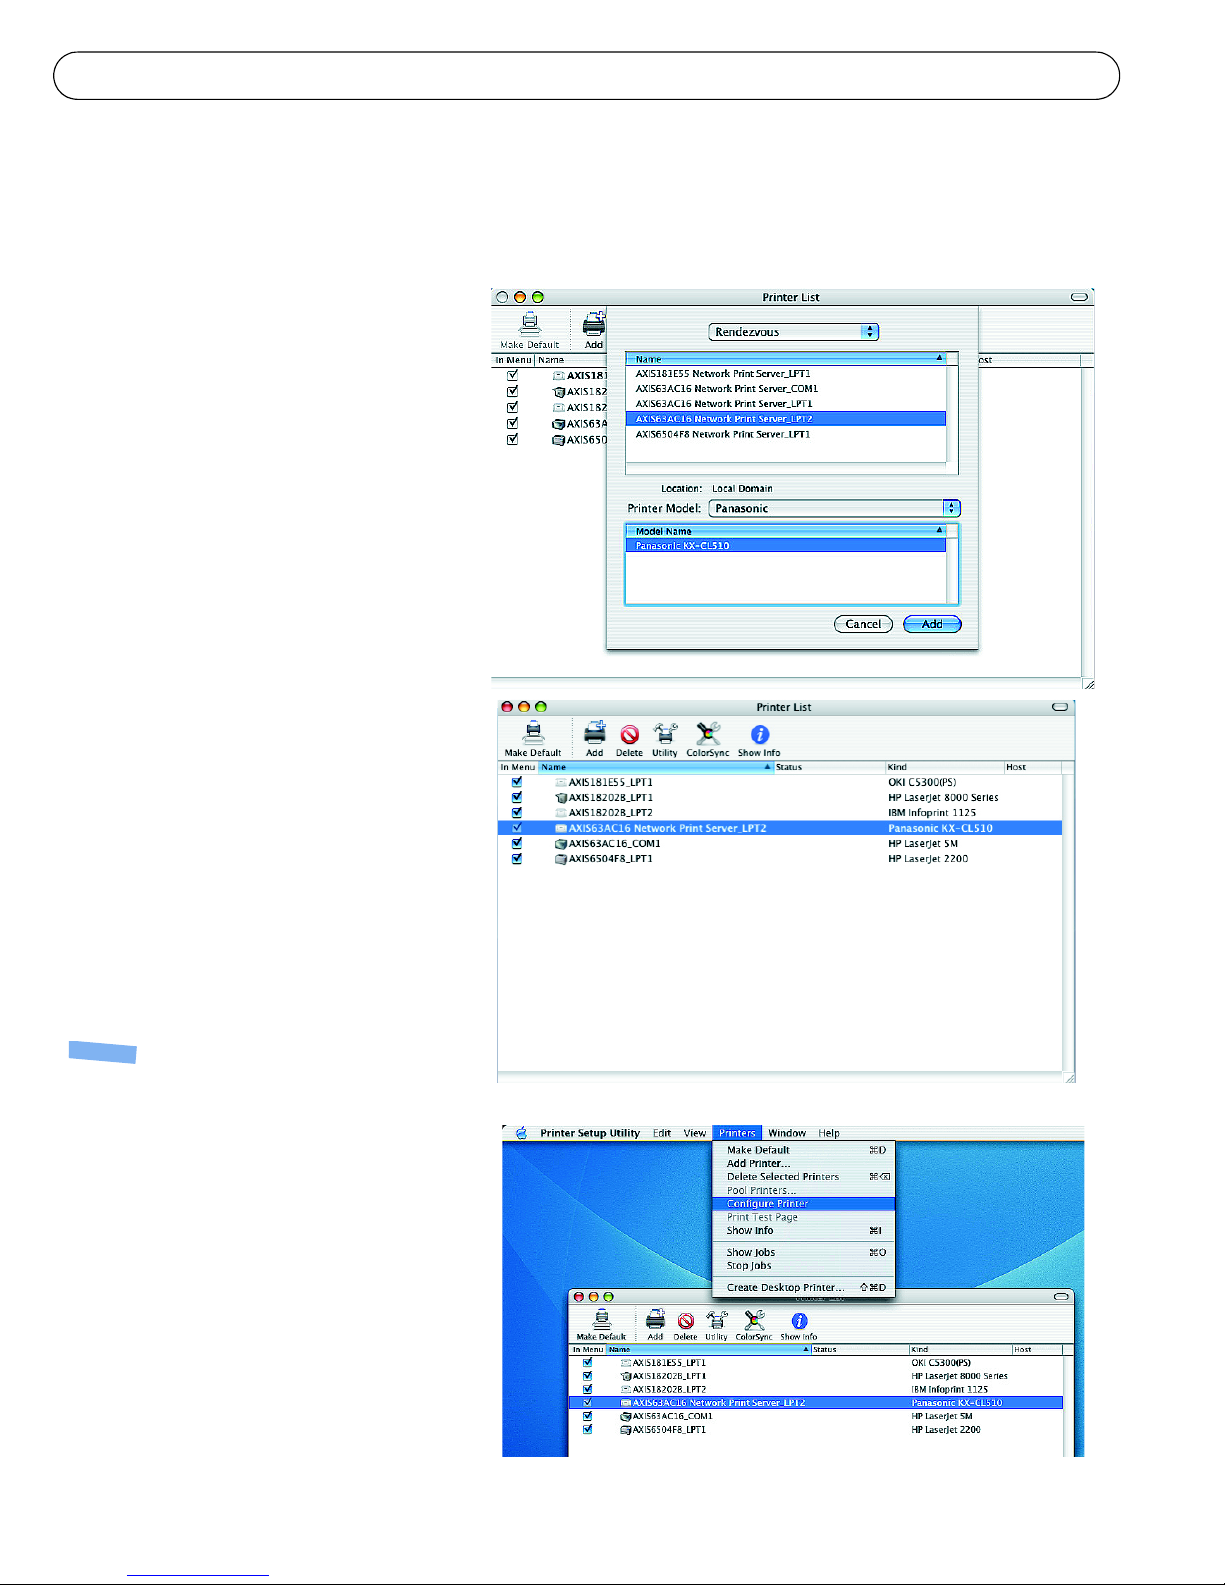
1. From the Apple menu, select
Go > Applications > Utilities
and start the Print Center.
2. Click Add in the Printer List.
3. From the drop-down list, select
Rendezvous.
4. Highlight the printer you wish
to install. The default print
server name is AXISxxxxxx
Network Print Server_<port>,
where xxxxxx represents the
last six digits of the print
server’s serial number.
5. Select the printer brand and
model from the drop-down list.
If the printer’s PPD is already
installed, the brand and model
are selected automatically.
6. To complete the installation,
click Add. The printer is now
added to the Printer List.
Notes:
• The print server’s serial number can be found on
the label on the product casing.
• To configure printer settings, click Printers >
Configure Printer.
• If the print server using Rendezvous is already
installed and the print server name or service
name is changed, the print server must be
removed from the Printer List and then
re-installed with the new Rendezvous service
name.
• If you change the service name from Setup >
TCP/IP > Rendezvous > Service Name, this name
will then override the Print Server Name setting
as set in the admin tools in the product’s web
interface.
Page 7

AXIS OfficeBasic Parallel/AXIS OfficeBasic USB Installation Guide Page 7
Resetting to the Factory Default Settings
This will reset all the product parameters (including the IP address) to the factory default
settings:
1. Disconnect the power adapter cable.
2. Press and hold the Test button and reconnect power, keeping the button pressed the whole
time.
3. Keep the button pressed until the Network indicator remains constantly lit. This should
take about 20 seconds. Then release the button.
4. Restart the print server again, by disconnecting and reconnecting the power adapter.
Page 8

Page 9
Guide d’installation AXIS OfficeBasic parallèle/AXIS OfficeBasic USB Page 9
Guide d’installation AXIS OfficeBasic
parallèle/AXIS OfficeBasic USB
Contenu de l’emballage
Article Remarques
Serveur d’impression réseau AXIS OfficeBasic parallèle ou AXIS OfficeBasic USB.
Transformateur Modèle PS-H. Propre à chaque pays.
Câble USB 0,7 mètre. Uniquement pour AXIS Office Basic USB.
Support adhésif et clip. Kit de montage. Uniquement pour AXIS Office Basic USB.
CD Documentation et logiciel d’installation.
Documentation imprimée • Guide d’installation AXIS OfficeBasic parallèle/AXIS OfficeBasic USB (ce document)
• Document de garantie d’Axis
Présentation
Pour installer votre serveur d’impression
sous Windows 2000, Windows XP et
Windows Server 2003, reportez-vous aux
instructions de la page suivante. Pour une
installation sur un Macintosh, reportez
vous à la rubrique page 12. Pour les
autres systèmes d’exploitation,
reportez-vous au manuel de l’utilisateur.
Pour effectuer une installation sous
Windows, les éléments suivants sont
nécessaires :
• Le serveur d’impression Axis et son
alimentation.
• Une imprimante dotée d’un port
parallèle pour AXIS OfficeBasic
parallèle, ou d’un port USB pour
AXIS OfficeBasic USB.
• AXIS AddPrinter, l’outil d’installation
gratuit inclus dans le CD fourni avec
votre serveur d’impression Axis ou
téléchargeable sur www.axis.com.
• Il est possible que vous ayez également
besoin d’un pilote pour votre imprimante.
Certains pilotes d’imprimante sont inclus
dans Windows ou peuvent se trouver sur le CD d’installation de Windows. Les pilotes d’imprimante sont
généralement inclus sur le CD fourni avec l’imprimante ou peuvent être téléchargés sur le site Internet du
fabricant.
AXIS OfficeBasic parallèle
Port parallèle imprimante
LPT1
Connecteur de réseau
Connecteur d’alimentation
AXIS OfficeBasic USB
Connecteur
de réseau
Connecteur
d’alimentation
Voyant d’alimentation
Bouton de test
Voyant
d’alimentation
Bouton de test
Port USB imprimante
(USB1)
Voyant
de réseau
Voyant
réseau
Page 10
Page 10 Guide d’installation AXIS OfficeBasic parallèle/AXIS OfficeBasic USB
Installation sous
Windows
❶
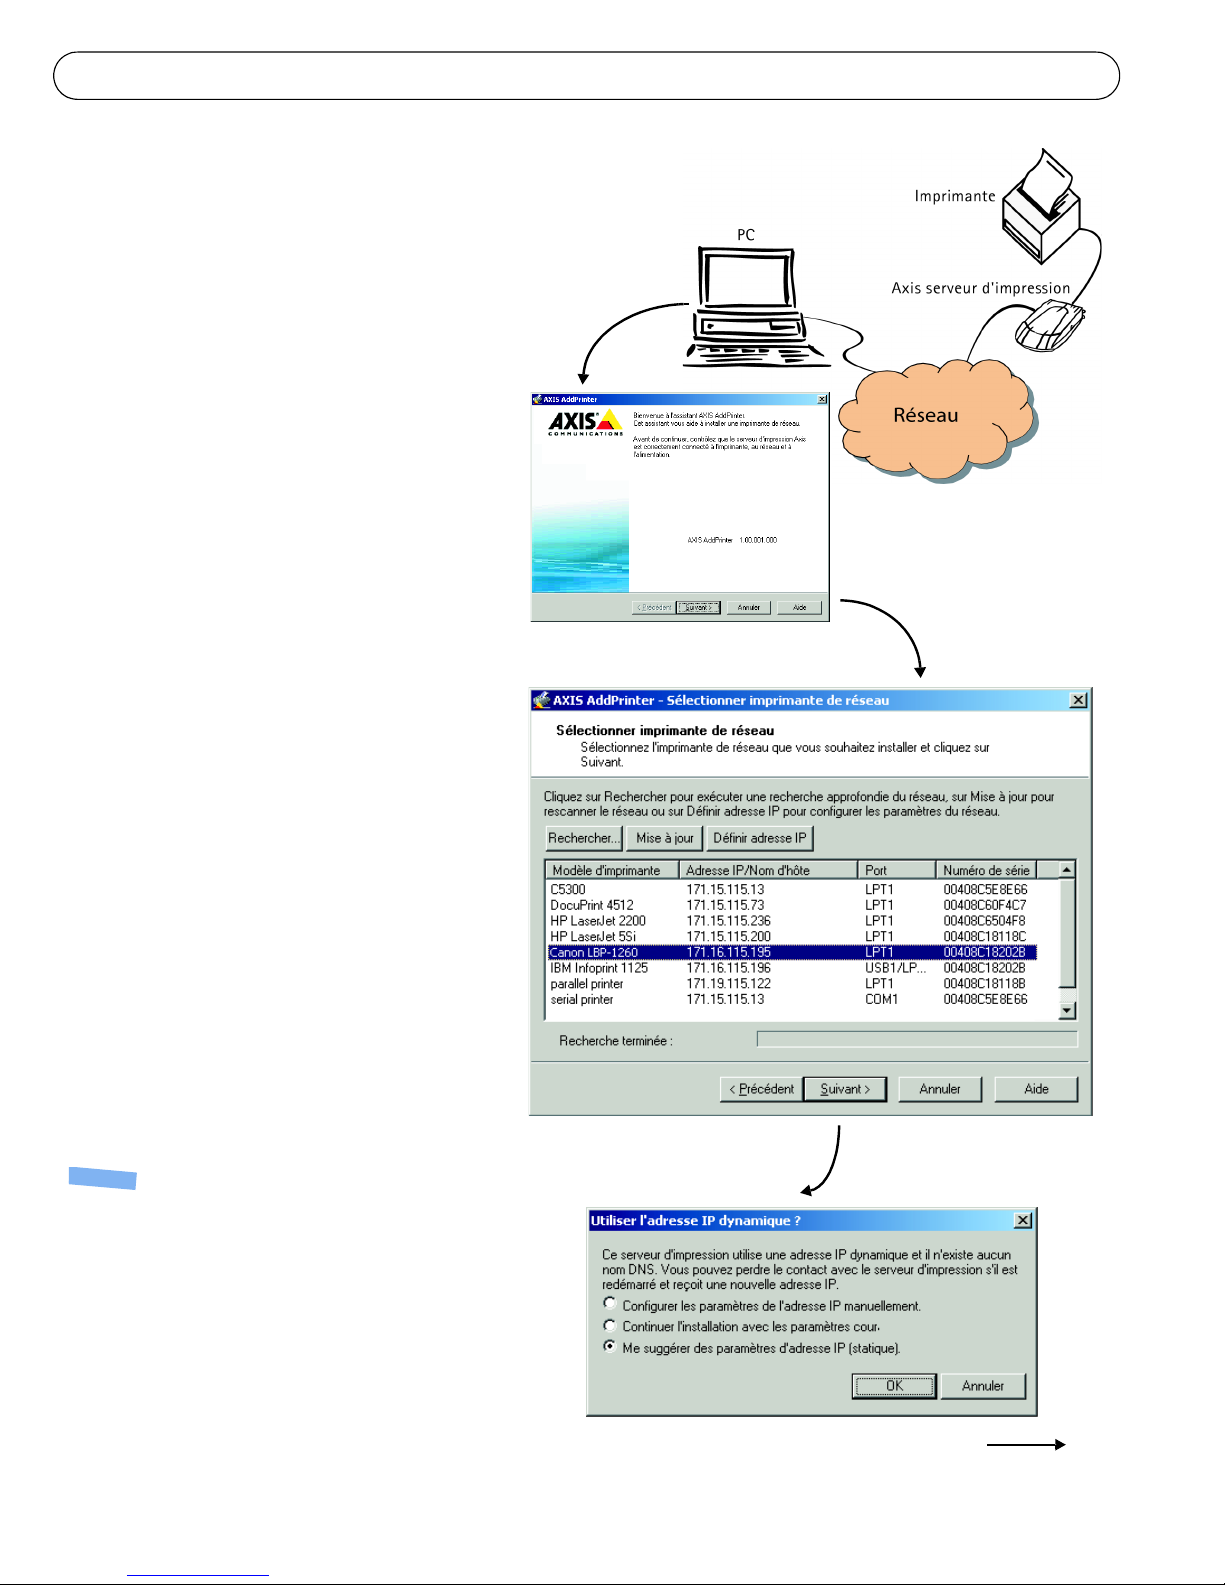
1. a) Connectez l’imprimante au serveur
d’impression Axis.
b) Allumez l’imprimante.
c) Connectez le serveur d’impression au
réseau.
d) Allumez le serveur d’impression.
2. Lancez AXIS AddPrinter et cliquez sur
Suivant.
3. Identifiez et sélectionnez votre
imprimante réseau dans la liste affichée
dans la fenêtre. Cliquez sur Suivant.
❷
4. Si votre imprimante réseau est
configurée pour utiliser une adresse IP
dynamique vous pouvez à cette étape
la modifier pour en faire une adresse IP
statique (recommandé).
Si le serveur d’impression est déjà doté
d’un adresse IP statique, cette étape ne
s’affiche pas à l’écran. Pour de plus
amples informations à propos de vos
paramètres réseau, contactez votre
administrateur réseau.
Une fois l’adresse IP configurée, cliquez
sur Suivant.
Remarques :
• Il est possible que certaines imprimantes soient
indiquées dans la liste comme étant des « imprimantes
parallèles » ou des « imprimantes série », mais cela
sera modifié une fois le pilote d’imprimante installé.
❸
❹
• Le numéro de série du serveur d’impression est indiqué
sur l’étiquette du boîtier du produit.
• Si cette fonction est prise en charge par votre
imprimante, une pression sur le bouton Test du
serveur d’impression entraînera l’impression d’une
page de test indiquant l’adresse IP.
Page 11
Guide d’installation AXIS OfficeBasic parallèle/AXIS OfficeBasic USB Page 11
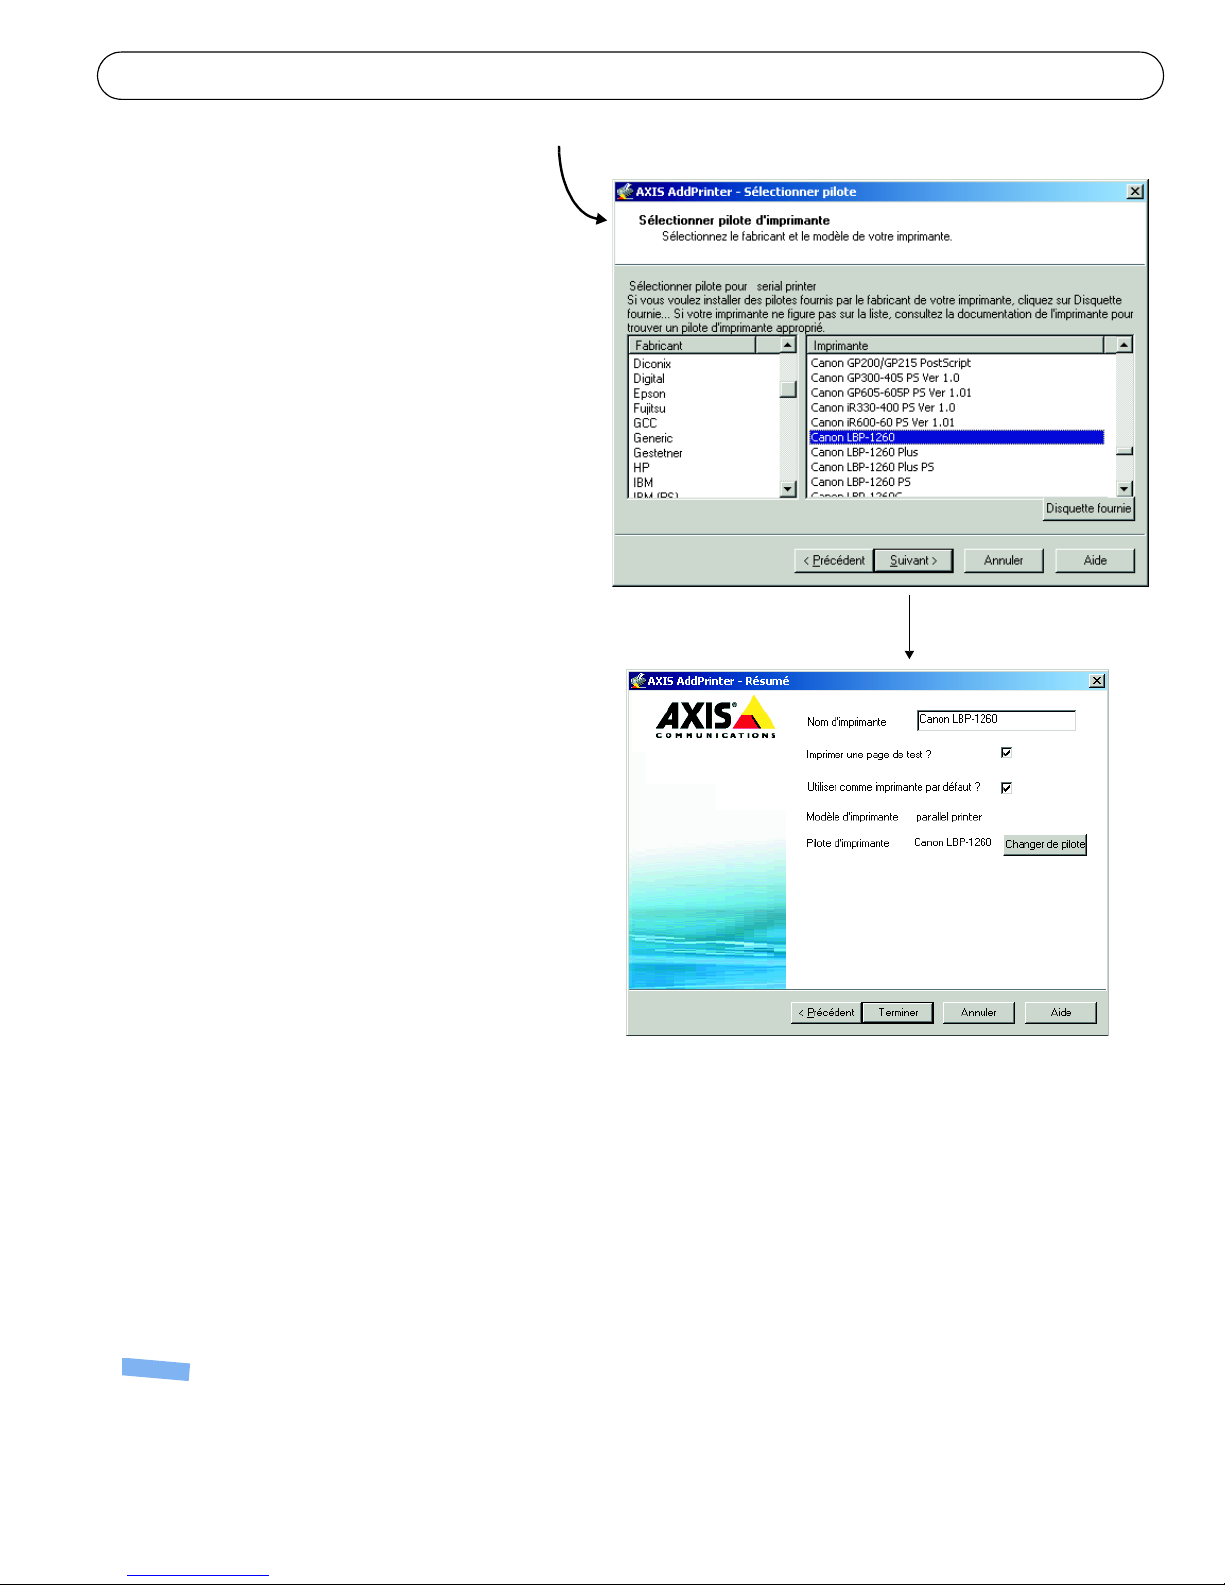
5. Si AXIS AddPrinter n’identifie pas
automatiquement un pilote adapté à
votre imprimante, la boîte de dialogue
ci-contre s’affiche. Si la marque et le
modèle de votre imprimante sont
disponibles dans la liste,
sélectionnez-les et cliquez sur
Suivant.
Si votre imprimante n’est pas
répertoriée, cliquez sur Disquette
fournie. Vous pouvez maintenant
parcourir vos dossiers pour trouver le
fichier du pilote, par exemple en
navigant jusqu’au CD fourni avec
votre imprimante, ou utiliser la
fonction Rechercher un dossier pour
qu’AXIS AddPrinter recherche
automatiquement le pilote à votre
place.
❺
❻
6. Une fois le pilote d’imprimante
sélectionné et installé, un résumé de
l’installation de l’imprimante s’affiche
à l’écran. Le nom de l’imprimante peut
être modifié et vous pouvez entre
autres imprimer une page de test.
Cliquez sur Terminer.
Prêt pour l’impression !
Votre imprimante est désormais installée
en réseau et prête à l’emploi.
Pour les installations sous d’autres systèmes d’exploitation et pour obtenir une aide sur tous les aspects
de l’impression, veuillez consulter le manuel d’utilisation de votre serveur d’impression.
Pour restaurer les paramètres d’usine par défaut du serveur d’impression, reportez-vous à la rubrique
page 13.
Remarques :
• En général, les fichiers de pilotes d’installation sont appelés setup.inf. Dans d’autres cas, le nom du fichier peut inclure une partie du
nom de l’imprimante, par exemple mynewprinter.inf.
• Il est possible que l’insertion dans le lecteur de CD-ROM du CD fourni avec votre imprimante entraîne le lancement automatique d’un
processus d’installation interférant avec l’installation via AXIS AddPrinter. Cliquez sur Annuler pour arrêter l’installation automatique
et laisser AXIS AddPrinter identifier le fichier .inf.
Page 12

Page 12 Guide d’installation AXIS OfficeBasic parallèle/AXIS OfficeBasic USB
Installation sous Mac OS X
Cette rubrique décrit l’installation du serveur d’impression Axis pour effectuer des impressions sous Mac
OS X 10.2 et supérieur. Pour une installation sur une version antérieure de Mac OS, reportez-vous au
manuel d’utilisation disponible à l’adresse www.axis.com
1. Dans le menu Pomme, sélectionnez
Go > Applications > Utilitaires et
démarrez le Centre d’impression.
2. Cliquez sur Ajouter dans la Liste
des imprimantes.
3. Dans le menu déroulant,
sélectionnez Rendezvous.
4. Mettez en surbrillance
l’imprimante que vous désirez
installer. Le nom par défaut du
serveur d’impression est
AXISxxxxxx Network Print
Server_<port>, dans lequel
xxxxxx correspond aux six
derniers chiffres du numéro de
série du serveur d’impression.
5. Sélectionnez la marque et le
modèle d’imprimante dans le menu
déroulant. Si le PPD de
l’imprimante est déjà installé, la
marque et le modèle sont
automatiquement sélectionnés.
6. Pour terminer l’installation, cliquez
sur Ajouter. L’imprimante apparaît
désormais dans la Liste
d’imprimantes.
Remarques :
• Le numéro de série du serveur d’impression est
indiqué sur l’étiquette du boîtier du produit.
• Pour régler les paramètres de l’imprimante, cliquez
sur Imprimantes> Configurer l’imprimante.
• Si le serveur d’impression utilisant Rendezvous est
déjà installé et que le nom du serveur d’impression
ou que le nom de service est modifié, le serveur
d’impression doit être enlevé de la Liste
d’imprimantes puis réinstallé avec le nouveau nom
de service Rendezvous.
• Si vous modifiez le nom de service à partir de
Configuration > TCP/IP > Rendezvous > Nom de
service, ce nom remplacera la configuration du
Nom de serveur d’impression telle que définie dans
les outils d’administration de l’interface web du
produit.
Page 13

Guide d’installation AXIS OfficeBasic parallèle/AXIS OfficeBasic USB Page 13
Retour aux paramètres par défaut définis en usine
Procédez comme suit pour revenir aux paramètres par défaut définis en usine et réinitialiser l’adresse IP :
1. Déconnectez le câble d’alimentation.
2. Tout en maintenant le bouton Test enfoncé, reconnectez le câble d’alimentation.
3. Maintenez le bouton enfoncé jusqu’à ce que le voyant Réseau reste constamment allumé. Cela prend
environ 20 secondes. Relâchez le bouton.
4. Redémarrez le serveur d’impression en déconnectant puis en reconnectant l’alimentation.
Page 14

Page 15

AXIS OfficeBasic Parallel/AXIS OfficeBasic USB Montageanweisung Seite 15
AXIS OfficeBasic Parallel/AXIS OfficeBasic
USB Montageanweisung
Lieferumfang
Komponente Hinweise
Netzwerk-Druckerserver AXIS OfficeBasic Parallel oder AXIS OfficeBasic USB.
Netzteil Modell PS-H. Landesspezifisch.
USB-Kabel 0,7 Meter. Nur für AXIS OfficeBasic USB.
Klebehalterung und -clip. Montagesatz. Nur für AXIS OfficeBasic USB.
CD Dokumentation und Installationsdateien.
Gedruckte Dokumente • AXIS OfficeBasic Parallel/AXIS OfficeBasic USB Installationshandbuch (dieses Dokument)
• Axis-Garantieerklärung
Übersicht
Anweisungen zur Installation des
Axis-Druckerservers unter Windows
2000, Windows XP und Windows Server
2003 finden Sie auf der nächsten Seite.
Anweisungen für die Installation unter
Mac OS finden Sie ab Seite 18. Wenn Sie
ein anderes Betriebssystem verwenden,
finden Sie im Benutzerhandbuch weitere
Informationen.
Für die Installation unter Windows
benötigen Sie:
• Axis-Druckerserver mit entsprechen-
dem Netzteil.
• Drucker mit Parallelanschluss für
AXIS OfficeBasic Parallel, oder mit
USB-Anschluss für AXIS OfficeBasic
USB.
• AXIS AddPrinter, das kostenlose
Installations-Tool. Sie finden es auf
der CD, die dem Axis-Druckerserver
beigelegt ist, oder unter
www.axis.com zum Herunterladen
aus dem Internet.
• Möglicherweise benötigen Sie außerdem
einen gesonderten Treiber für Ihren Drucker. Für viele Drucker ist bereits ein Treiber in Windows bzw. auf der
Windows-Installations-CD enthalten. Druckertreiber werden oft auch zusammen mit dem Drucker geliefert,
oder können von der Website des Druckerherstellers heruntergeladen werden.
AXIS OfficeBasic Parallel
Paralleler Druckeranschluss
LPT1
Netzwerkanschluss
Anschluss für Stromversorgung
AXIS OfficeBasic USB
Netzwerkanschluss
Anschluss für
Stromversorgung
Betriebsanzeige
Taste „Test“
Netzwerkanzeige
Betriebsanzeige
Taste „Test“
Netzwerkanzeige
USB-Druckeranschluss
(USB1)
Page 16

Seite 16 AXIS OfficeBasic Parallel/AXIS OfficeBasic USB Montageanweisung
Installation unter
Windows
❶
1. a) Schließen Sie den Drucker an den
Axis-Druckerserver an.
b) Schalten Sie den Drucker ein.
c) Schließen Sie den Druckerserver an
das Netzwerk an.
d) Schalten Sie den Druckerserver ein.
2. Starten Sie AXIS AddPrinter, und
klicken Sie auf Weiter.
3. Wählen Sie in der Liste der Netzwerkdrucker Ihr Gerät aus. Klicken Sie auf
Weiter.
❷
4. Wenn Ihrem Druckerserver die
IP-Adresse bisher dynamisch zugewiesen wurde, können Sie ihm jetzt eine
statische Adresse zuweisen (empfohlen).
Dieser Schritt ist nicht erforderlich,
falls der Druckerserver bereits eine
statische IP-Adresse besitzt. Wenden
Sie sich an Ihren Netzwerkadministrator, wenn Sie weitere Informationen zu
den Netzwerkeinstellungen benötigen.
Klicken Sie nach dem Konfigurieren
der IP-Adresse auf Weiter.
Hinweise:
• Möglicherweise erscheinen einige Drucker nur als
„Parallel printer“ oder „Serial printer“ in der Liste. Das
ändert sich mit der Installation des Druckertreibers.
❸
❹
• Die Seriennummer des Druckerservers befindet sich
auf dem Etikett auf dem Gerätegehäuse.
• Durch Drücken der Taste Test (am Druckerserver)
können Sie eine Testseite mit der IP-Adresse
ausdrucken (falls Ihr Drucker diese Funktion
unterstützt).
Page 17

AXIS OfficeBasic Parallel/AXIS OfficeBasic USB Montageanweisung Seite 17
5. Falls AXIS AddPrinter nicht automatisch einen geeigneten Treiber für
Ihren Drucker findet, wird folgendes
Dialogfeld angezeigt: Wählen Sie
Druckerhersteller und -modell aus,
und klicken Sie auf Weiter.
Sollte Ihr Drucker nicht aufgeführt
sein, klicken Sie auf Datenträger.
Wählen Sie ein Laufwerk, z. B. das
CD-Laufwerk mit der CD, die dem
Drucker beigelegt war. Durchsuchen
Sie das Laufwerk nach der Treiberdatei, oder klicken Sie auf Search
Folder, um AXIS AddPrinter danach
suchen zu lassen.
6. Nachdem Sie den Druckertreiber ausgewählt und installiert haben, wird
eine Zusammenfassung der Druckerinstallation angezeigt. Sie können den
Namen des Druckers ändern, und festlegen, ob eine Testseite ausgedruckt
werden soll. Klicken Sie auf Fertig
stellen.
❺
❻
Bereit zum Drucken
Ihr Drucker ist jetzt im Netzwerk installiert,
und steht zum Drucken bereit.
Informationen zur Installation unter
anderen Betriebssystemen und umfassende Informationen zum Drucken finden Sie im Benutzerhandbuch zum Druckerserver.
Wie Sie den Druckerserver auf die werkseitigen Standardeinstellungen zurücksetzen, wird auf Seite 19
beschrieben.
Hinweise:
• Druckertreiber haben häufig den Dateinamen „setup.inf“. Gelegentlich finden sich im Dateinamen auch Teile der Druckerbezeichnung,
z. B. „druckerabc.inf“.
• Beim Einlegen der Treiber-CD, die mit dem Drucker geliefert wurde, wird möglicherweise ein automatischer Installationsvorgang
gestartet, der die Installation durch AXIS AddPrinter beeinträchtigt. Klicken Sie auf Abbrechen, um die automatische Installation
abzubrechen, und die INF-Datei mit AXIS AddPrinter zu suchen.
Page 18

Seite 18 AXIS OfficeBasic Parallel/AXIS OfficeBasic USB Montageanweisung
Installation unter Mac OS X
In diesem Abschnitt wird beschrieben, wie Sie Ihren Axis-Druckerserver für das Drucken unter Mac OS
X 10.2 oder höher einrichten. Hinweise zur Installation unter einer früheren Version von Mac OS finden
Sie im Benutzerhandbuch auf www.axis.com.
1. Wählen Sie im Apple-Menü die
Optionen
Gehe zu > Programme > Dienstprogramme, und starten Sie das
Print Center.
2. Klicken Sie in der Druckerliste auf
Hinzufügen.
3. Wählen Sie in der Dropdown-Liste
die Option Rendezvous.
4. Markieren Sie den Drucker, den Sie
installieren möchten. Der Name
des Druckerservers ist standardmäßig „AXISxxxxxx Network
Print Server_<Anschluss>“, wobei
„xxxxxx“ für die letzten sechs
Ziffern der Seriennummer des
Druckerservers steht.
5. Wählen Sie Druckerhersteller und
-modell aus. Wenn die PPD-Datei
für den Drucker bereits installiert
ist, werden Hersteller und Modell
automatisch ausgewählt.
6. Klicken Sie auf Hinzufügen, um
die Installation abzuschließen. Der
Drucker wird jetzt in der Drucker-
liste aufgeführt.
Hinweise:
• Die Seriennummer des Druckerservers befindet sich auf
einem Etikett auf dem Gerätegehäuse.
• Wählen Sie „Drucker > Drucker konfigurieren“, um die
Druckereinstellungen festzulegen.
• Wenn nach der Installation des Druckerservers, der
Rendezvous verwendet, der Name des Druckerservers
oder des Diensts verändert wird, muss der Drucker aus
der Liste entfernt werden und mit dem neuen
Rendezvous-Dienstnamen neu installiert werden.
• Bei einer Änderung des Dienstnamens über
„Konfiguration > TCP/IP > Rendezvous > Dienstname“
werden die Einstellungen „Print Server Name“
überschrieben, die mit den Admin-Tools des Produkts
festgelegt wurden. Auf diese Tools kann über die
Web-Schnittstelle des Produkts zugegriffen werden.
Page 19

AXIS OfficeBasic Parallel/AXIS OfficeBasic USB Montageanweisung Seite 19
Werkseitige Standardeinstellungen wiederherstellen
Gehen Sie folgendermaßen vor, um sämtliche Produktparameter (einschl. der IP-Adresse) auf die werkseitigen Standardeinstellungen zurückzusetzen:
1. Trennen Sie den Druckerserver von der Stromversorgung.
2. Drücken Sie die Taste „Test“, und halten Sie diese gedrückt. Stellen Sie die Stromversorgung wieder
her.
3. Halten Sie die Taste weiter gedrückt, bis die Betriebsanzeige konstant leuchtet. Dies sollte nach ca.
20 Sekunden der Fall sein. Lassen Sie dann die Taste wieder los.
4. Starten Sie den Druckerserver neu, indem Sie den Netzstecker abziehen und wieder verbinden.
Page 20

Page 21

Guía de instalación AXIS OfficeBasic Parallel/AXIS OfficeBasic USB Página 21
Guía de instalación AXIS OfficeBasic
Parallel/AXIS OfficeBasic USB
Contenido del paquete
Artículo Notas
Servidor de impresión en red AXIS OfficeBasic Parallel o AXIS OfficeBasic USB.
Adaptador de corriente El modelo PS-H. es específico del país.
Cable USB 0,7 metros. Únicamente para AXIS OfficeBasic USB.
Soporte adhesivo y pinza Kit de montaje. Únicamente para AXIS OfficeBasic USB.
CD Documentación y software de instalación.
Material impreso • Guía de instalación AXIS OfficeBasic Parallel/AXIS OfficeBasic USB (este documento)
• Documento de garantía de Axis
Descripción
Para instalar el servidor de impresión
Axis en Windows 2000, Windows XP y
Windows Server 2003, consulte las
instrucciones de la página siguiente. Para
instalarlo en Macintosh, consulte la
página 24. Para el resto de los sistemas
operativos, consulte el manual de usuario.
Para llevar a cabo la instalación en
Windows necesitará:
• El servidor de impresión Axis y el
adaptador de corriente.
• Una impresora con un puerto
paralelo para AXIS OfficeBasic
Parallel, o puerto USB para AXIS
OfficeBasic USB.
• AXIS AddPrinter, la herramienta de
instalación gratuita que se incluye
en el CD suministrado con el
servidor de impresión Axis o que
puede descargarse desde
www.axis.com
• Es posible que necesite también un
controlador de impresora para su
impresora. Algunos controladores de
impresora se encuentran incluidos en Windows o pueden encontrarse en el CD de instalación de Windows.
En ocasiones, los controladores de impresora pueden encontrarse en el CD que se proporciona junto con la
impresora o pueden descargarse desde la página web del fabricante.
AXIS OfficeBasic Parallel
Puerto paralelo de la impresora
(LPT1)
Conector de red
Conector de alimentación
AXIS OfficeBasic USB
Conector de red
Conector de alimentación
Indicador de
alimentación
Botón Prueba
Indicador
de red
Indicador
de alimentación
Botón Prueba
Puerto USB de la impresora
(USB1)
Indicador
de red
Page 22

Página 22 Guía de instalación AXIS OfficeBasic Parallel/AXIS OfficeBasic USB
Instalación en Windows
1. a) Conecte la impresora al servidor de
impresión Axis.
b) Encienda la impresora.
c) Conecte el servidor de impresión a la
red.
d) Encienda el servidor de impresión.
2. Inicie AXIS AddPrinter y haga clic en
Siguiente.
3. Ahora identifique y seleccione su
impresora de red de la lista que aparece
en la ventana. Haga clic en Siguiente.
4. Si su servidor de impresión está
configurado para usar una dirección IP
dinámica, podrá en este momento
cambiarla por una dirección IP estática
(recomendado).
❶
❷
❸
Si el servidor de impresión ya tiene una
dirección IP estática, el sistema omitirá
este paso. Si desea obtener más
información sobre las configuraciones
de red, póngase en contacto con su
administrador de red.
Una vez configurada la dirección IP,
haga clic en Siguiente.
Notas:
• Algunas impresoras pueden aparecer en la lista como
“impresora paralela” o “impresora en serie”, lo que
cambiará al instalar el controlador de impresora.
• El número de serie del servidor de impresión puede verse
en la etiqueta de la caja del producto.
• Si su impresora admite dicha función, presione una vez el
botón Prueba del servidor de impresión para imprimir una
página de prueba en la que aparezca su dirección IP.
❹
Page 23

Guía de instalación AXIS OfficeBasic Parallel/AXIS OfficeBasic USB Página 23
5. Si AXIS AddPrinter no encuentra de
manera automática un controlador
adecuado para su impresora, aparecerá
el diálogo siguiente. Si la marca y el
modelo de su impresora aparecen en la
lista, selecciónelos y haga clic en
Siguiente.
Si su impresora no aparece en la lista,
haga clic en Utilizar disco. Ahora
puede navegar hasta encontrar el
archivo del controlador, por ejemplo,
en el CD suministrado con la
impresora, o usar la función Buscar
carpeta para que AXIS AddPrinter
encuentre el controlador por usted.
6. Una vez que el controlador de la
impresora se ha seleccionado e
instalado, aparecerá un resumen de la
instalación de la impresora. Puede
cambiar el nombre de la impresora o,
por ejemplo, puede elegir imprimir
una página de prueba. Haga clic en
Finalizar.
❺
❻
Lista para imprimir
Su impresora ya se ha instalado en la red y
está lista para imprimir.
En lo que respecta a la instalación en otros
sistemas operativos y para obtener ayuda
en todos los aspectos de la impresión, consulte el manual de usuario del servidor de impresión.
Para restablecer el servidor de impresión a los valores iniciales, consulte la página 25.
Notas:
• A menudo, los archivos del controlador de impresora se llaman setup.inf. Como opción, el nombre del archivo puede incluir parte del nombre
de la impresora, por ejemplo, miimpresoranueva.inf
• Al insertar el CD que se proporciona junto con la impresora en la unidad de CD, éste puede iniciar un proceso de instalación automático que
interferirá en la instalación mediante AXIS AddPrinter. Haga clic en Cancelar para detener la instalación automática y en su lugar deje que
AXIS AddPrinter encuentre el archivo .inf
Page 24

Página 24 Guía de instalación AXIS OfficeBasic Parallel/AXIS OfficeBasic USB
Instalación en Mac OS X
En esta sección se describe cómo configurar el servidor de impresión Axis para imprimir en Mac OS X
10.2 y posteriores. Para la instalación en versiones anteriores de Mac OS, consulte el manual de usuario
en www.axis.com
1. Desde el menú Apple, seleccione
Ir a > Aplicaciones > Utilidades e
inicie el Centro de impresión.
2. Haga clic en Agregar en la Lista de
impresoras.
3. Desde la lista desplegable,
seleccione Rendezvous.
4. Resalte la impresora que desea
instalar. El nombre del servidor de
impresión predeterminado es
AXISxxxxxx Network Print
Server_<puerto>, donde xxxxxx
representa los seis últimos dígitos
del número de serie del servidor de
impresión.
5. Seleccione la marca y el modelo de
la impresora en la lista
desplegable. Si el PPD de la
impresora ya está instalado, la
marca y el modelo se seleccionan
de manera automática.
6. Para completar la instalación, haga
clic en Agregar. La impresora ya se
ha añadido a la Lista de
impresoras.
Notas:
• El número de serie del servidor de impresión puede
verse en la etiqueta de la caja del producto.
• Para configurar la impresora, haga clic en
Impresoras > Configurar impresora.
• Si el servidor de impresión que utiliza Rendezvous
ya está instalado y el nombre del servidor de
impresión o el nombre de servicio se han
modificado, ha de retirarse el servidor de impresión
de la Lista de impresoras y, a continuación, volver a
instalarlo con el nombre nuevo del servidor
Rendezvous.
• Si modifica el nombre desde Configuración > TCP/IP
> Rendezvous > Nombre de servicio, dicho nombre
invalidará la configuración del nombre de servidor
de impresión asignado den las herramientas admin
de la interfaz web del producto.
Page 25

Guía de instalación AXIS OfficeBasic Parallel/AXIS OfficeBasic USB Página 25
Restablecimiento de los valores iniciales
Siguiendo estas instrucciones, podrá restablecer todos los parámetros del producto (incluida la dirección
IP) a los valores iniciales:
1. Desconecte el cable del adaptador de corriente.
2. Mantenga presionado el botón Prueba y vuelva a conectar la alimentación, manteniendo el botón
presionado continuamente.
3. Mantenga el botón presionado hasta que el indicador de red permanezca iluminado de manera
constante. Esto tarda approximadamente 20 segundos. Luego, suelte el botón.
4. Vuelva a reiniciar el servidor de impresión desconectando y volviendo a conectar el adaptador de
corriente.
Page 26

Page 27

AXIS OfficeBasic Parallel/AXIS OfficeBasic USB Guida all'installazione Pagina 27
Guida all'installazione di AXIS OfficeBasic
Parallel/AXIS OfficeBasic USB
Contenuto della confezione
Articolo Note
Server di stampa di rete AXIS OfficeBasic Parallel o AXIS OfficeBasic USB.
Adattatore di alimentazione Modello PS-H. Specifico per il paese.
Cavo USB 0,7 metri. Solo per AXIS OfficeBasic USB.
Supporto adesivo e fermo Kit di montaggio. Solo per AXIS OfficeBasic USB.
CD Documentazione e software di installazione.
Documentazione cartacea • Guida all'installazione di AXIS OfficeBasic Parallel/AXIS OfficeBasic USB (il presente
documento)
• Documento di garanzia Axis.
Cenni generali
Per installare il server di stampa Axis in
Windows 2000, Windows XP e Windows
Server 2003, consultare le istruzioni
riportate nella pagina seguente. Per
l'installazione su sistemi Macintosh,
vedere pagina 30. Per tutti gli altri sistemi
operativi, fare riferimento al manuale
dell'utente.
Per eseguire l'installazione in Windows è
necessario quanto indicato di seguito.
• Server di stampa Axis e relativo
adattatore di alimentazione.
• Stampante con porta parallela per
AXIS OfficeBasic Parallel, o con
porta USB per AXIS OfficeBasic USB.
• AXIS AddPrinter, programma di
installazione gratuito fornito con il
CD del server di stampa Axis o
disponibile sul sito Web all'indirizzo
www.axis.com.
• È inoltre possibile che sia necessario un
driver di stampa. Alcuni driver di stampa
sono già disponibili in Windows o nel CD
di installazione del sistema operativo e
spesso nel CD fornito con la stampante. In alternativa, è possibile scaricarli dal sito Web del produttore.
AXIS OfficeBasic Parallel
Porta stampante parallela
LPT1
Connettore di rete
Connettore di
alimentazione
AXIS OfficeBasic Parallel
Connettore di rete
Connettore di
alimentazione
Spia di alimentazione
Pulsante Test
Spia di
alimentazione
Pulsante Test
Porta stampante USB
(USB1)
Indicatore
di rete
Indicatore
di rete
Page 28

Pagina 28 AXIS OfficeBasic Parallel/AXIS OfficeBasic USB Guida all'installazione
Installazione in
Windows
❶
1. a) Collegare la stampante al server di
stampa Axis.
b) Accendere la stampante.
c) Collegare il server di stampa alla
rete.
d) Accendere il server di stampa.
2. Avviare AXIS AddPrinter e fare clic su
Avanti.
3. Individuare e selezionare la stampante
di rete dall'elenco visualizzato nella
finestra. Fare clic su Avanti.
❷
4. Se il server di stampa è configurato per
l'utilizzo di un indirizzo IP dinamico,
verrà proposta l'opzione di convertirlo
in un indirizzo IP statico (consigliata).
Se al server di stampa è stato già
assegnato un indirizzo IP statico,
saltare questo passaggio. Per ulteriori
informazioni sulle impostazioni di rete,
rivolgersi all'amministratore di rete.
Al termine della configurazione
dell'indirizzo IP, fare clic su Avanti.
Note:
• È possibile che alcune stampanti vengano indicate come
"parallele" o "seriali" ma tale impostazione verrà
modificata al termine dell'installazione del driver di
stampa.
❸
❹
• Il numero di serie del server di stampa è posto
sull'etichetta della confezione del prodotto.
• Se la funzione è supportata dalla stampante, premere il
pulsante Test del server di stampa per stampare una
pagina con l'indirizzo IP.
Page 29

AXIS OfficeBasic Parallel/AXIS OfficeBasic USB Guida all'installazione Pagina 29
5. Se AXIS AddPrinter non è in grado di
individuare un driver adatto alla
stampante in modo automatico, verrà
visualizzata la finestra di dialogo
indicata a lato. Se nell'elenco è
disponibile il modello della stampante
in uso, selezionarlo e fare clic su
Avanti.
In caso contrario, fare clic su Disco
driver. A questo punto sarà possibile
cercare il file del driver, ad esempio
sul CD fornito con la stampante
oppure in modo automatico tramite
l'opzione Cerca cartella.
6. Al termine dell'installazione del driver
di stampa, verrà visualizzata una
finestra di riepilogo relativa
all'installazione della stampante. Sarà
possibile modificare il nome della
stampante e stampare una pagina di
prova. Fare clic su Fine.
❺
❻
Pronta per la stampa
La stampante è installata in rete
correttamente ed è ora pronta all'uso.
Per l'installazione in tutti gli altri sistemi
operativi e per informazioni relative a tutte
le operazioni di stampa, vedere il manuale
dell'utente del server di stampa.
Per ripristinare i parametri del server di stampa impostati dal produttore, vedere pagina 31.
Note:
• i file dei driver di stampa sono spesso denominati setup.inf. In alternativa, è possibile includere parte del nome della stampante, ad esempio
nuovastampanteinuso.inf.
• Quando viene inserito il CD fornito con la stampante nell'apposita unità, è possibile che venga avviato un processo di installazione automatico
che potrebbe interferire con l'installazione via AXIS AddPrinter. Fare clic su Annulla per arrestare l'installazione automatica e trovare il file .inf
tramite AXIS AddPrinter.
Page 30

Pagina 30 AXIS OfficeBasic Parallel/AXIS OfficeBasic USB Guida all'installazione
Installazione in Mac OS X
In questa sezione viene descritta la configurazione del server di stampa Axis per la stampa in ambiente
Macintosh (Mac OS) 10.2 e versioni successive. Per l'installazione in versioni precedenti di Mac OS,
vedere il manuale dell'utente sul sito Web all'indirizzo www.axis.com.
1. Dal menu Apple, selezionare
Vai > Applicazioni > Utility e
avviare Centro stampa.
2. Fare clic su Aggiungi in Elenco
stampanti.
3. Dall'elenco a discesa, selezionare
Rendezvous.
4. Selezionare la stampante da
installare. Il nome predefinito del
server di stampa è AXISxxxxxx
Network Print Server_<porta>,
dove xxxxxx sono le ultime sei
cifre del numero di serie.
5. Selezionare il modello della
stampante dall'elenco a discesa. Se
il PPD della stampante è già
installato, il modello della
stampante verrà selezionato in
modo automatico.
6. Per completare l'installazione, fare
clic su Aggiungi. La nuova
stampante viene aggiunta
all'Elenco stampanti.
Note:
• Il numero di serie del server di stampa è posto
sull'etichetta della confezione del prodotto.
• Per configurare le impostazioni della stampante,
fare clic su Stampanti > Configura stampante.
• Se il server di stampa in cui è attiva la funzionalità
Rendezvous è già installato e il nome del server di
stampa o del servizio è stato modificato, è
necessario eliminare il server di stampa dall'elenco
e reinstallarlo con il nuovo nome del servizio
Rendezvous.
• Se il nome del servizio viene modificato dal menu
Setup (Configurazione) > TCP/IP > Rendezvous >
Nome servizio, le impostazioni del nome del server
di stampa configurate negli strumenti di
amministrazione dell'interfaccia del sito Web del
prodotto verranno ignorate.
Page 31

AXIS OfficeBasic Parallel/AXIS OfficeBasic USB Guida all'installazione Pagina 31
Ripristino delle impostazioni di fabbrica
Questa procedura consentirà di ripristinare le impostazioni di fabbrica per tutti i parametri (incluso
l'indirizzo IP).
1. Scollegare l'adattatore di alimentazione.
2. Tenere premuto il pulsante Test durante tutto il periodo di riconnessione all'alimentatore.
3. Tenere premuto il pulsante finché l'indicatore di rete non rimane costantemente acceso.
L'operazione dovrebbe durare 20 secondi circa. Al termine rilasciare il pulsante.
4. Riavviare il server di stampa scollegando e ricollegando l'adattatore di alimentazione.
Page 32

Page 33

Page 34

Install Guide AXIS OB Parallel/USB v1.0 November 2004
Copyright © Axis Communications AB, 2004 Part No. 22910
 Loading...