

Axis Object Analytics Integration guide for GenetecTM Security Center and AXIS Object Analytics
Page 1

INTEGRATION GUIDE
HOW TO
Integration guide for
Genetec™ Security Center and
AXIS Object Analytics
January 2022
Page 2

Table of contents
1
AXIS OBJECT ANALYTICS 3
1.1 Step 1 – Prepare AXIS Object Analytics 3
1.2 Step 2 – Enable AXIS Object Analytics on the camera 3
1.3 Step 3 –Configure AXIS Object Analytics 4
1.4 Step 4 – Enable metadata overlay 7
2 GENETECTM CONFIG TOOL 8
2.1 Step 1 – Enable AXIS Object Analytics events 8
2.2 Step 2 – Configure AXIS Object Analytics events 10
2.3 Step 3 – Configure Event to Action sequence 11
3 GENETEC™ SECURITY CENTER 13
3.1 Step 1 – Receive AXIS Object Analytics events 14
3.2 Step 2 – Receive AXIS Object Analytics events within the Monitoring View 14
3.3 Step 3 – Acknowledge AXIS Object Analytics events 18
2
Page 3

Introduction
This document explains how to integrate AXIS Object Analytics events into Genetec™ Security Center.
Axis takes no responsibility for how this configuration may affect your system. If the modification fails or
if you get other unexpected results, you may have to restore the settings to default.
1 AXIS Object Analytics
1.1 Step 1 – Prepare AXIS Object Analytics
1. Make sure that the camera’s firmware version is 10.2 or higher.
2. It is recommended to ensure that AXIS Object Analytics has been configured and running on
the camera, before building out the rules in Milestone.
1.2 Step 2 – Enable AXIS Object Analytics on the camera
1. In a web browser, go to the camera’s user interface.
2. Click Apps.
3. Start and open AXIS Object Analytics on the camera.
3
Page 4

1.3 Step 3 –Configure AXIS Object Analytics
1. Follow the step-by-step guide in the application’s user interface.
2. Select triggering objects.
4
Page 5

3. Select trigger conditions.
4. Configure the trigger condition for your scene within the camera’s field of view.
5
Page 6

5. Verify your settings.
6. You can rename your scenarios to make the trigger conditions easier to find.
NOTE: When you have completed the step-by-step guide, configure the perspective calibration for the
scene that has been created.
6
Page 7

1.4 Step 4 – Enable metadata overlay
1. In AXIS Object Analytics, click settings.
2. In Advanced > Metadata overlay, select the desired resolution to burn in the metadata overlay.
3. The selected resolution will be used for both for the live view and the recordings.
NOTE: We recommend that you use the same resolution for recordings as for the metadata overlay
.
7
Page 8

2 GenetecTM Config Tool
2.1 Step 1 – Enable AXIS Object Analytics events
1. When you have installed and added the camera to Genetec, go to the Security Center to
enable AXIS Object Analytics events.
2. Open Video/Roles and units.
a. Go to the Archiver, then to the Unit, and select Properties.
b. Select the camera that is running AXIS Object Analytics and has been configured with
scenarios.
8
Page 9
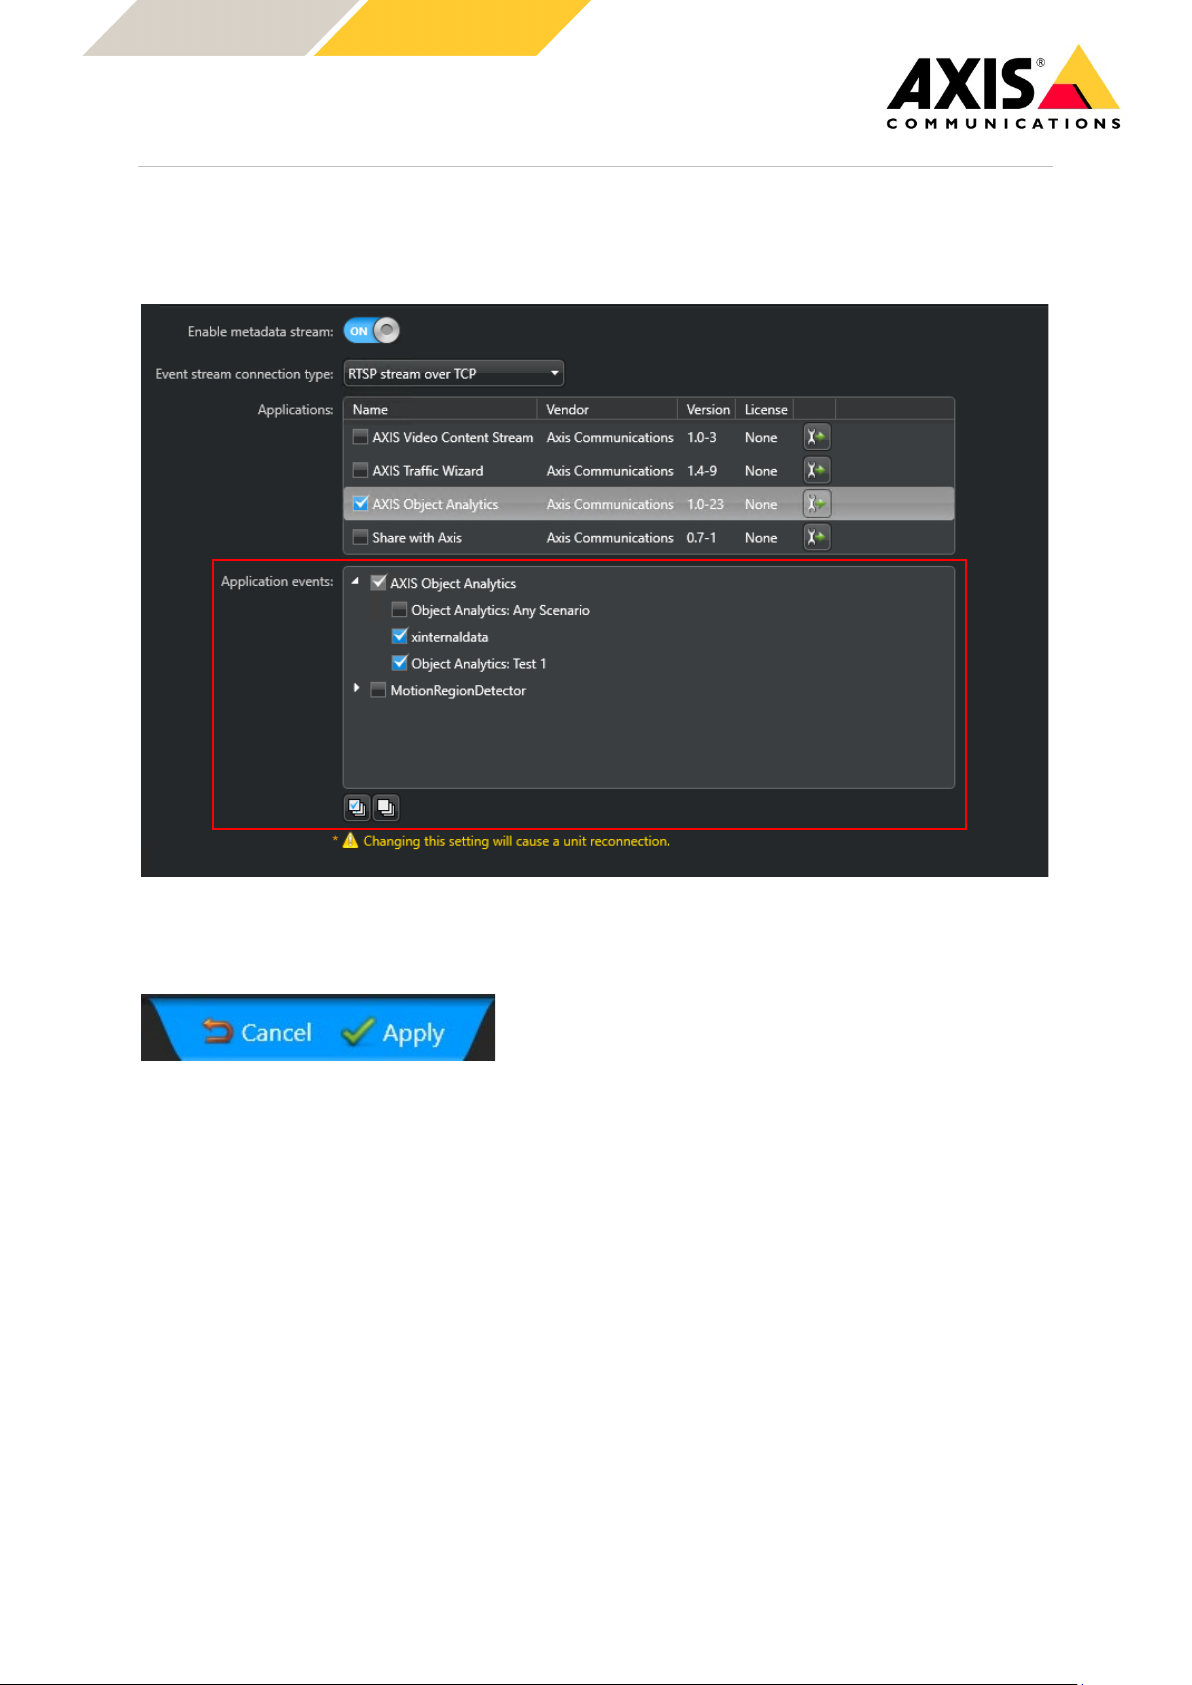
3. Select AXIS Object Analytics and enable the following:
a. Xinternaldata (this can be turned off depending on system configuration).
b. AXIS Object Analytics: Test 1 (or the scenario that has been created.
4. To save the changes, click Apply.
9
Page 10

2.2 Step 2 – Configure AXIS Object Analytics events
1. Within Archiver, select the camera that has AXIS Object Analytics configured.
2. Go to Relationships and select Actions.
3. To add the Event to action, click +
10
Page 11

2.3 Step 3 – Configure Event to Action sequence
1. Select AXIS Object Analytics and the scenario.
2. Select the action that needs to be configured.
3. Select the type of alarm that has been created.
11
Page 12

4. Configure an Alarm recipient.
a. Within the Alarms section, create the recipients list to receive the notification on the
alarm.
b. List the action to take once the alarm has taken place.
12
Page 13

The final view of the Actions that have been configured:
3 Genetec™ Security Center
13
Page 14

3.1 Step 1 – Receive AXIS Object Analytics events
1. In the Security Center, in Tasks, configure the live view and the alarming view.
3.2 Step 2 – Receive AXIS Object Analytics events within the Monitoring View
1. Add the camera views to the tile grid.
14
Page 15

2. To get the Metadata overlay into the live view and recording view, configure the resolution of
the live view to the resolution selected in AXIS Object Analytics.
3. To configure the tiles to display live view or alarming views, right-click the tile.
15
Page 16

Live View
Live View with active alarm
16
Page 17

Live View with active alarm and burnt-in metadata
Standard Alarm monitoring view
17
Page 18

3.3 Step 3 – Acknowledge AXIS Object Analytics events
1. The AXIS Object Analytics events will be sent and displaying in the Alarm Monitoring view.
2. You can review the Event and acknowledging and clear the event that triggered.
18
 Loading...