

Page 1
AXISM11-ENetworkCameraSeries
AXISM1124-ENetworkCamera
AXISM1125-ENetworkCamera
ENGLISH
FRANÇAIS
DEUTSCH
ITALIANO
ESPANÕL
ò
ò
¨
¨
¾
¾
InstallationGuide
Page 2

LegalConsiderations
Videosurveillancecanberegulatedbylawsthatvaryfrom
countrytocountry.Checkthelawsinyourlocalregion
beforeusingthisproductforsurveillancepurposes.
Thisproductincludesone(1)H.264decoderlicense.To
purchasefurtherlicenses,contactyourreseller.
Liability
Everycarehasbeentakeninthepreparationofthis
document.PleaseinformyourlocalAxisofceofany
inaccuraciesoromissions.AxisCommunicationsABcannot
beheldresponsibleforanytechnicalortypographicalerrors
andreservestherighttomakechangestotheproductand
manualswithoutpriornotice.AxisCommunicationsAB
makesnowarrantyofanykindwithregardtothematerial
containedwithinthisdocument,including,butnotlimited
to,theimpliedwarrantiesofmerchantabilityandtnessfor
aparticularpurpose.AxisCommunicationsABshallnot
beliablenorresponsibleforincidentalorconsequential
damagesinconnectionwiththefurnishing,performance
oruseofthismaterial.Thisproductisonlytobeusedfor
itsintendedpurpose.
IntellectualPropertyRights
AxisABhasintellectualpropertyrightsrelatingto
technologyembodiedintheproductdescribedinthis
document.Inparticular,andwithoutlimitation,these
intellectualpropertyrightsmayincludeoneormoreof
thepatentslistedatwww.axis.com/patent.htmandoneor
moreadditionalpatentsorpendingpatentapplicationsin
theUSandothercountries.
Thisproductcontainslicensedthird-partysoftware.See
themenuitem“About”intheproduct’suserinterfacefor
moreinformation.
ThisproductcontainssourcecodecopyrightAppleComputer,
Inc.,underthetermsofApplePublicSourceLicense2.0
(seewww.opensource.apple.com/apsl).Thesourcecodeis
availablefromhttps://developer.apple.com/bonjour/
EquipmentModications
Thisequipmentmustbeinstalledandusedin
strictaccordancewiththeinstructionsgiveninthe
userdocumentation.Thisequipmentcontainsno
user-serviceablecomponents.Unauthorizedequipment
changesormodicationswillinvalidateallapplicable
regulatorycerticationsandapprovals.
TrademarkAcknowledgments
AXISCOMMUNICATIONS,AXIS,ETRAX,ARTPECandVAPIX
areregisteredtrademarksortrademarkapplicationsofAxis
ABinvariousjurisdictions.Allothercompanynamesand
productsaretrademarksorregisteredtrademarksoftheir
respectivecompanies.
Apple,Boa,Apache,Bonjour,Ethernet,InternetExplorer,
Linux,Microsoft,Mozilla,Real,SMPTE,QuickTime,UNIX,
Windows,WindowsVistaandWWWareregistered
trademarksoftherespectiveholders.Javaandall
Java-basedtrademarksandlogosaretrademarksor
registeredtrademarksofOracleand/oritsafliates.
UPnP
TM
isacerticationmarkoftheUPnP
TM
Implementers
Corporation.
RegulatoryInformation
Europe
ThisproductcomplieswiththeapplicableCEmarking
directivesandharmonizedstandards:
•ElectromagneticCompatibility(EMC)Directive
2004/108/EC.SeeElectromagneticCompatibility(EMC)
onpage2.
•LowVoltage(LVD)Directive2006/95/EC.SeeSafety
onpage3.
•RestrictionsofHazardousSubstances(RoHS)Directive
201 1/65/EU.SeeDisposalandRecyclingonpage3.
Acopyoftheoriginaldeclarationofconformitymaybe
obtainedfromAxisCommunicationsAB.SeeContact
Informationonpage3.
ElectromagneticCompatibility(EMC)
Thisequipmenthasbeendesignedandtestedtofulll
applicablestandardsfor:
•Radiofrequencyemissionwheninstalledaccordingto
theinstructionsandusedinitsintendedenvironment.
•Immunitytoelectricalandelectromagneticphenomena
wheninstalledaccordingtotheinstructionsandused
initsintendedenvironment.
USA
Thisequipmenthasbeentestedusingashieldednetwork
cable(STP)andfoundtocomplywiththelimitsfora
ClassAdigitaldevice,pursuanttopart15oftheFCCRules.
Theselimitsaredesignedtoprovidereasonableprotection
againstharmfulinterferencewhentheequipmentis
operatedinacommercialenvironment.Thisequipment
generates,uses,andcanradiateradiofrequencyenergy
and,ifnotinstalledandusedinaccordancewiththe
instructionmanual,maycauseharmfulinterferenceto
radiocommunications.Operationofthisequipmentin
aresidentialareaislikelytocauseharmfulinterference
inwhichcasetheuserwillberequiredtocorrectthe
interferenceathisownexpense.
Theproductshallbeconnectedusingashieldednetwork
cable(STP)thatisproperlygrounded.
Canada
ThisdigitalapparatuscomplieswithCANICES-3(ClassA).
Theproductshallbeconnectedusingashieldednetwork
cable(STP)thatisproperlygrounded.
Cetappareilnumériqueestconformeàlanorme
NMBICES-3(classeA).Leproduitdoitêtreconnectéà
l'aided'uncâbleréseaublindé(STP)quiestcorrectement
misàlaterre.
Europe
ThisdigitalequipmentfulllstherequirementsforRF
emissionaccordingtotheClassAlimitofEN55022.The
productshallbeconnectedusingashieldednetworkcable
(STP)thatisproperlygrounded.Notice!ThisisaClassA
product.Inadomesticenvironmentthisproductmaycause
RFinterference,inwhichcasetheusermayberequired
totakeadequatemeasures.
Thisproductfulllstherequirementsforimmunity
accordingtoEN61000-6-1residential,commercialand
light-industrialenvironments.
Thisproductfulllstherequirementsforimmunity
accordingtoEN61000-6-2industrialenvironments.
Australia/NewZealand
ThisdigitalequipmentfulllstherequirementsforRF
emissionaccordingtotheClassAlimitofAS/NZSCISPR22.
Theproductshallbeconnectedusingashieldednetwork
cable(STP)thatisproperlygrounded.Notice!Thisisa
ClassAproduct.Inadomesticenvironmentthisproduct
maycauseRFinterference,inwhichcasetheusermaybe
requiredtotakeadequatemeasures.
Japan
この装置は、クラスA情報技術装置です。この装
置を家庭環境で使用すると電波妨害を引き起こす
Page 3

ことがあります。この場合には使用者が適切な対
策を講ずるよう要求されることがあります。本
製品は、シールドネットワークケーブル(STP)を
使用して接続してください。また適切に接地し
てください。
Korea
이기기는업무용(A급)전자파적합기기로서판매
자또는사용자는이점을주의하시기바라며,가
정외의지역에서사용하는것을목적으로합니다.
적절히접지된STP(shieldedtwistedpair)케이블
을사용하여제품을연결하십시오.
Safety
ThisproductcomplieswithIEC/EN/UL60950-1and
IEC/EN/UL60950-22,SafetyofInformationTechnology
Equipment.Theproductshallbegroundedeitherthrougha
shieldednetworkcable(STP)orotherappropriatemethod.
Thepowersupplyusedwiththisproductshallfulll
therequirementsforSafetyExtraLowVoltage
(SELV)andLimitedPowerSource(LPS)accordingto
IEC/EN/UL60950-1.
DisposalandRecycling
Whenthisproducthasreachedtheendofitsusefullife,
disposeofitaccordingtolocallawsandregulations.For
informationaboutyournearestdesignatedcollectionpoint,
contactyourlocalauthorityresponsibleforwastedisposal.
Inaccordancewithlocallegislation,penaltiesmaybe
applicableforincorrectdisposalofthiswaste.
Europe
Thissymbolmeansthattheproductshallnotbe
disposedoftogetherwithhouseholdorcommercialwaste.
Directive2012/19/EUonwasteelectricalandelectronic
equipment(WEEE)isapplicableintheEuropeanUnion
memberstates.Topreventpotentialharmtohumanhealth
andtheenvironment,theproductmustbedisposedofin
anapprovedandenvironmentallysaferecyclingprocess.
Forinformationaboutyournearestdesignatedcollection
point,contactyourlocalauthorityresponsibleforwaste
disposal.Businessesshouldcontacttheproductsupplierfor
informationabouthowtodisposeofthisproductcorrectly.
Thisproductcomplieswiththerequirementsof
Directive2011/65/EUontherestrictionoftheuseof
certainhazardoussubstancesinelectricalandelectronic
equipment(RoHS).
China
Thisproductcomplieswiththerequirementsofthe
legislativeactAdministrationontheControlofPollution
CausedbyElectronicInformationProducts(ACPEIP).
ContactInformation
AxisCommunicationsAB
Emdalavägen14
22369Lund
Sweden
Tel:+46462721800
Fax:+4646136130
www.axis.com
Support
Shouldyourequireanytechnicalassistance,pleasecontact
yourAxisreseller.Ifyourquestionscannotbeanswered
immediately,yourresellerwillforwardyourqueriesthrough
theappropriatechannelstoensurearapidresponse.Ifyou
areconnectedtotheInternet,youcan:
•downloaduserdocumentationandsoftwareupdates
•ndanswerstoresolvedproblemsintheFAQdatabase.
Searchbyproduct,category,orphrase
•reportproblemstoAxissupportstaffbylogginginto
yourprivatesupportarea
•chatwithAxissupportstaff
•visitAxisSupportatwww.axis.com/techsup/
LearnMore!
VisitAxislearningcenterwww.axis.com/academy/for
usefultrainings,webinars,tutorialsandguides.
Page 4

Page 5

AXISM11-ENetworkCameraSeries
SafetyInformation
ReadthroughthisInstallationGuidecarefullybeforeinstallingtheproduct.KeeptheInstallation
Guideforfuturereference.
HazardLevels
DANGER
Indicatesahazardoussituationwhich,ifnotavoided,willresultin
deathorseriousinjury.
WARNING
Indicatesahazardoussituationwhich,ifnotavoided,couldresult
indeathorseriousinjury.
CAUTION
Indicatesahazardoussituationwhich,ifnotavoided,couldresult
inminorormoderateinjury.
NO NO
NO
TICE TICE
TICE
Indicatesasituationwhich,ifnotavoided,couldresultindamage
toproperty.
OtherMessageLevels
ImportantIndicatessignicantinformationwhichisessentialfortheproduct
tofunctioncorrectly.
NoteIndicatesusefulinformationwhichhelpsingettingthemostout
oftheproduct.
5
ENGLISH
Page 6

AXISM11-ENetworkCameraSeries
SafetyInstructions
NO NO
NO
TICE TICE
TICE
•TheAxisproductshallbeusedincompliancewithlocallawsandregulations.
•StoretheAxisproductinadryandventilatedenvironment.
•AvoidexposingtheAxisproducttoshocksorheavypressure.
•Donotinstalltheproductonunstablebrackets,surfacesorwalls.
•UseonlyapplicabletoolswheninstallingtheAxisproduct.Usingexcessiveforcewith
powertoolscouldcausedamagetotheproduct.
•Donotusechemicals,causticagents,oraerosolcleaners.
•Useacleanclothdampenedwithpurewaterforcleaning.
•Useonlyaccessoriesthatcomplywithtechnicalspecicationoftheproduct.Thesecanbe
providedbyAxisorathirdparty.
•UseonlysparepartsprovidedbyorrecommendedbyAxis.
•Donotattempttorepairtheproductbyyourself.ContactAxissupportoryourAxis
resellerforservicematters.
Transportation
NO NO
NO
TICE TICE
TICE
•WhentransportingtheAxisproduct,usetheoriginalpackagingorequivalenttoprevent
damagetotheproduct.
Battery
TheAxisproductusesa3.0VBR/CR2032lithiumbatteryasthepowersupplyforitsinternal
real-timeclock(RTC).Undernormalconditionsthisbatterywilllastforaminimumofveyears.
LowbatterypoweraffectstheoperationoftheRTC,causingittoresetateverypower-up.When
thebatteryneedsreplacing,alogmessagewillappearintheproduct’sserverreport.Formore
informationabouttheserverreport,seetheproduct´ssetuppagesorcontactAxissupport.
Thebatteryshouldnotbereplacedunlessrequired,butifthebatterydoesneedreplacing,contact
Axissupportatwww.axis.com/techsupforassistance.
WARNING
•Riskofexplosionifthebatteryisincorrectlyreplaced.
•ReplaceonlywithanidenticalbatteryorabatterywhichisrecommendedbyAxis.
•Disposeofusedbatteriesaccordingtolocalregulationsorthebatterymanufacturer's
instructions.
6
Page 7

AXISM11-ENetworkCameraSeries
InstallationGuide
ThisInstallationGuideprovidesinstructionsforinstallingAXISM1124-E/M1125-ENetwork
Cameraonyournetwork.Forotheraspectsofusingtheproduct,seetheUserManualavailable
atwww.axis.com
InstallationSteps
1.Makesurethepackagecontents,toolsandothermaterialsnecessaryfortheinstallation
areinorder.Seepage7.
2.Studythehardwareoverview.Seepage8.
3.Studythespecications.Seepage13.
4.Installthehardware.Seepage15.
5.Accesstheproduct.Seepage21.
PackageContents
•AXISM1 124–E/M1 125–ENetworkCamera
•Terminalblockconnectorkit
•AXIST93G05ProtectiveHousing
-AXISGasketCM20(x1)
-Desiccantbag
-TorxscrewdriverT20
-AXISConnectorGuardA
•AXIST94Q01AWallMount
-ScrewbitT30
•Printedmaterials
-InstallationGuide(thisdocument)
-InstallationGuideforAXIST94Q01AWallMount
-Extraserialnumberlabel(2x)
-AVHSAuthenticationkey
RecommendedTools
•Drill–forinstallingthewallmount
•Screwdriverforscrewbit
7
ENGLISH
Page 8

AXISM11-ENetworkCameraSeries
OptionalAccessories
•AXISDoorSwitchA
•AXIST94R01PConduitBackBox
•Illuminators
•HousingMounts
•Cablegasketsandcableglands
•AXIST98A16-VESurveillanceCabinet
•AXIST91A47PoleMounts
•VTCeilingBracketIntcableWCM4A
•VTCornerMountWCWA
Forinformationaboutavailableaccessories,seewww.axis.com
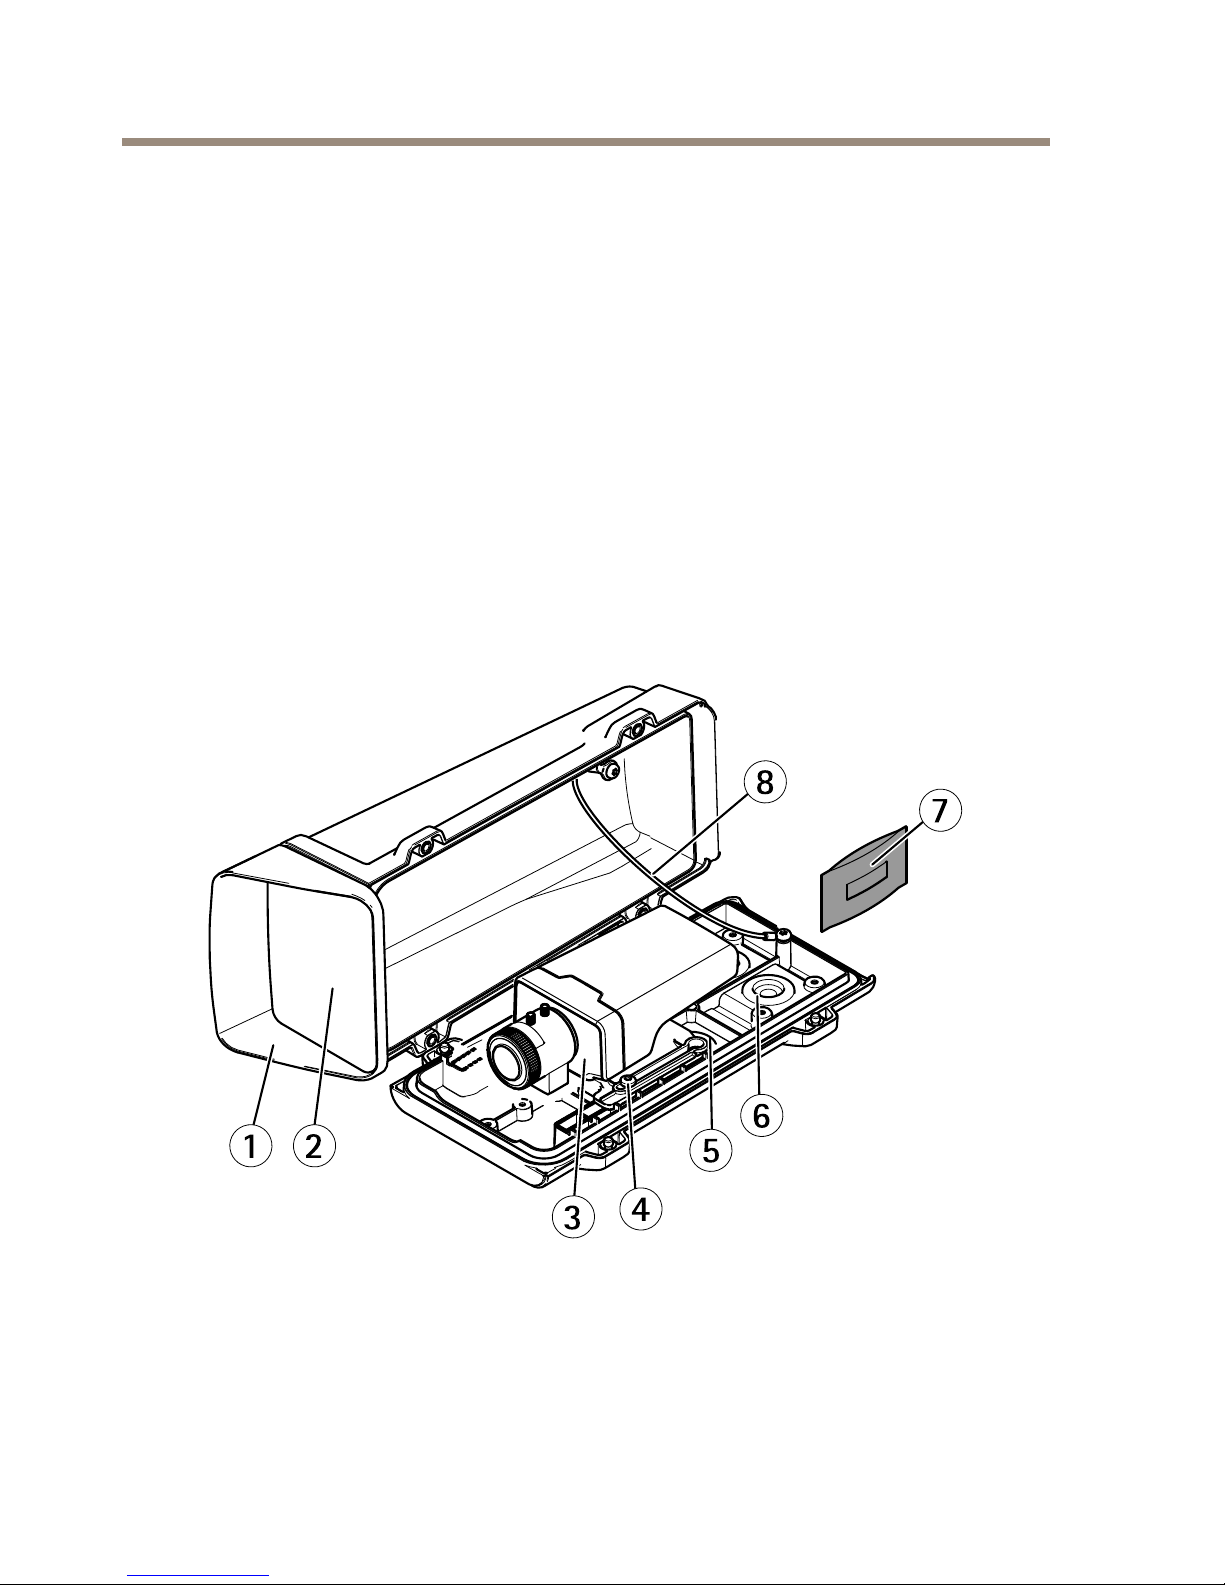
HardwareOverview
1
2
3
4
5
6
8
7
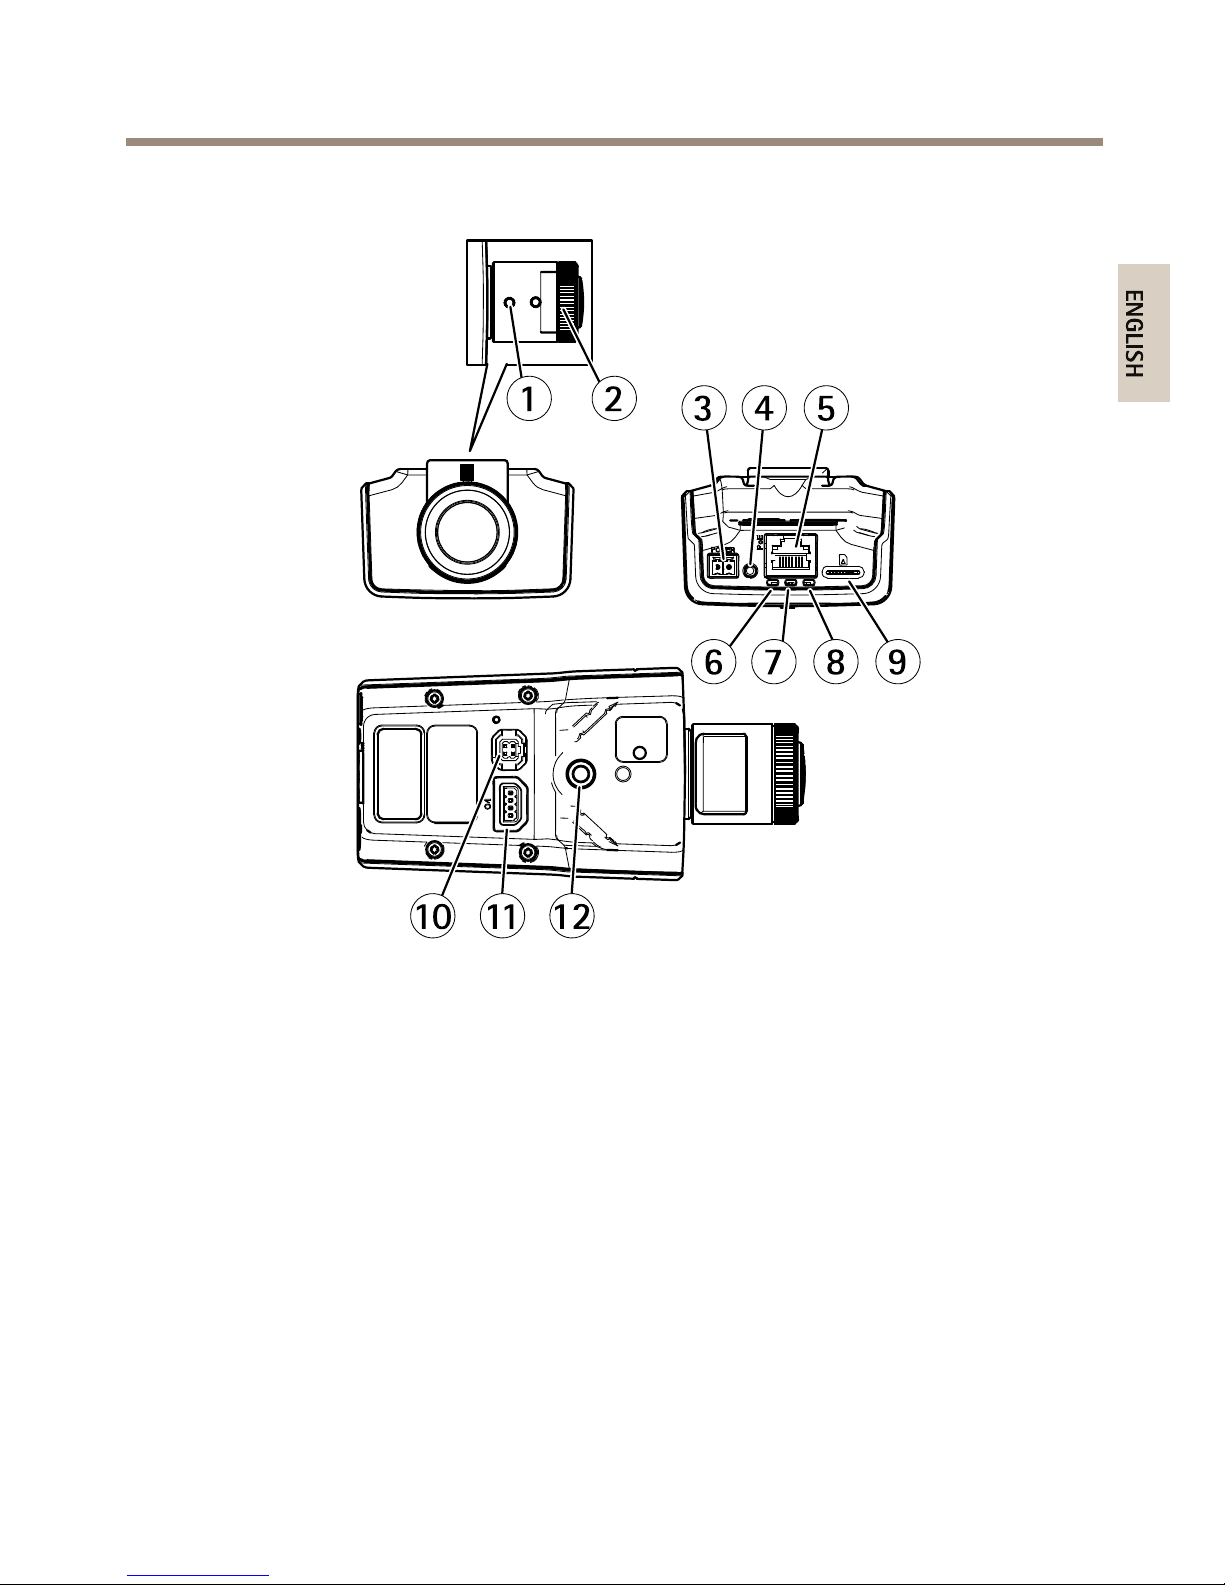
1
Topcover
2
Frontwindow
3
Networkcamera
4
Holderscrew(2x)
5
Drill-outsforextracablesholes
6
Cablegasket
7
Desiccantbag
8
Page 9
AXISM11-ENetworkCameraSeries
8
Safetywire
1
2
10
11
12
6
7
8
9
3
4
5
1
Zoompuller
2
Focusring
3
Powerconnector
4
Controlbutton
5
Networkconnector
6
PowerLED
7
StatusLED
8
NetworkLED
9
microSDcardslot
10
Irisconnector
11
I/Oconnector
12
¼
²
Screwmount
9
ENGLISH
Page 10
AXISM11-ENetworkCameraSeries
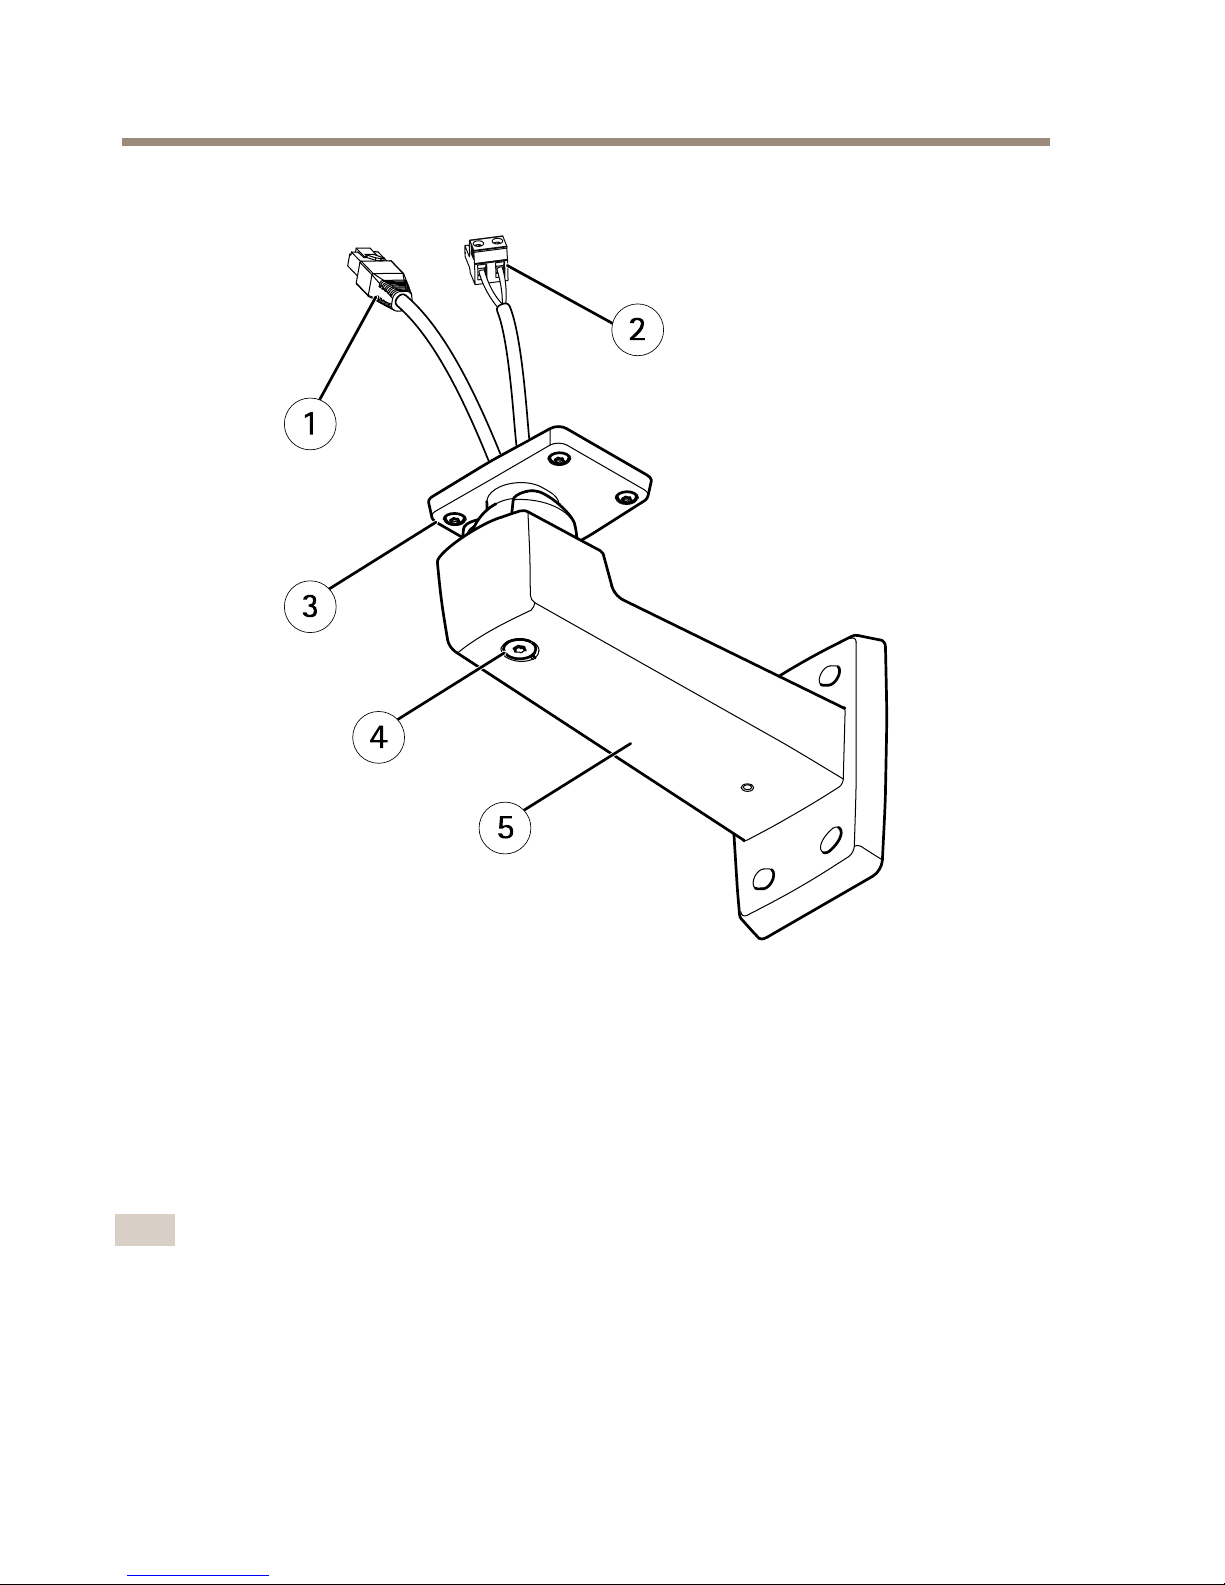
WallMount
1
3
4
5
2
1
Networkcable(routethroughwallbracket)
2
Powercable(routethroughwallbracket)(forproductsequippedwithpower
connector)
3
ScrewT20(4x)
4
BracketadjustmentscrewT30
5
Wallmount
LEDIndicators
Note
•TheStatusLEDcanbeconguredtobeunlitduringnormaloperation.Tocongure,go
toSetup>SystemOptions>Ports&Devices>LED.Seetheonlinehelpformore
information.
•TheStatusLEDcanbeconguredtoashwhileaneventisactive.
•TheStatusLEDcanbeconguredtoashforidentifyingtheunit.GotoSetup>System
Options>Maintenance.
10
Page 11
AXISM11-ENetworkCameraSeries
StatusLED
Indication
GreenSteadygreenfornormaloperation.
Amber
Steadyduringstartupandwhenrestoringsettings.
Note
TheNetworkLEDcanbedisabledsothatitdoesnotashwhenthereisnetworktrafc.
Tocongure,gotoSetup>SystemOptions>Ports&Devices>LED.Seetheonline
helpformoreinformation.
NetworkLEDIndication
Green
Steadyforconnectiontoa100Mbit/snetwork.Flashesfor
networkactivity.
Amber
Steadyforconnectiontoa10Mbit/snetwork.Flashesfor
networkactivity.
UnlitNonetworkconnection.
Note
ThePowerLEDcanbeconguredtobeunlitduringnormaloperation.Tocongure,go
toSetup>SystemOptions>Ports&Devices>LED.Seetheonlinehelpformore
information.
PowerLEDIndication
Green
Normaloperation.
Amber
Flashesgreen/amberduringrmwareupgrade.
ConnectorsandButtons
Forspecicationsandoperatingconditions,seepage13.
NetworkConnector
RJ45EthernetconnectorwithPoweroverEthernet(PoE).
11
ENGLISH
Page 12

AXISM11-ENetworkCameraSeries
NO NO
NO
TICE TICE
TICE
Theproductshallbeconnectedusingashieldednetworkcable(STP).Allcablesconnecting
theproducttothenetworkshallbeintendedfortheirspecicuse.Makesurethatthe
networkdevicesareinstalledinaccordancewiththemanufacturer’sinstructions.For
informationaboutregulatoryrequirements,seeElectromagneticCompatibility(EMC)on
page2.
I/OConnector
Usewithexternaldevicesincombinationwith,forexample,tamperingalarms,motiondetection,
eventtriggering,timelapserecordingandalarmnotications.Inadditiontothe0VDCreference
pointandpower(DCoutput),theI/Oconnectorprovidestheinterfaceto:
•Digitaloutput–ForconnectingexternaldevicessuchasrelaysandLEDs.Connected
devicescanbeactivatedbytheVAPIX®ApplicationProgrammingInterface,output
buttonsontheLiveViewpageorbyanActionRule.Theoutputwillshowasactive
(shownunderSystemOptions>Ports&Devices)ifthealarmdeviceisactivated.
•Digitalinput–Analarminputforconnectingdevicesthatcantogglebetweenanopen
andclosedcircuit,forexample:PIRs,door/windowcontacts,glassbreakdetectors,
etc.Whenasignalisreceivedthestatechangesandtheinputbecomesactive(shown
underSystemOptions>Ports&Devices).
PowerConnector
2-pinterminalblockforpowerinput.UseaSafetyExtraLowVoltage(SELV)compliantlimited
powersource(LPS)witheitheraratedoutputpowerlimitedto≤100Woraratedoutputcurrent
limitedto≤5A.
SDCardSlot
ForSDcardrecommendations,seewww.axis.com
ControlButton
Forlocationofthecontrolbutton,seeHardwareOverviewonpage8.
Thecontrolbuttonisusedfor:
•Resettingtheproducttofactorydefaultsettings.Seepage22.
•ConnectingtoanAXISVideoHostingSystemserviceorAXISInternetDynamicDNS
Service.Formoreinformationabouttheseservices,seetheUserManual.
12
Page 13
AXISM11-ENetworkCameraSeries
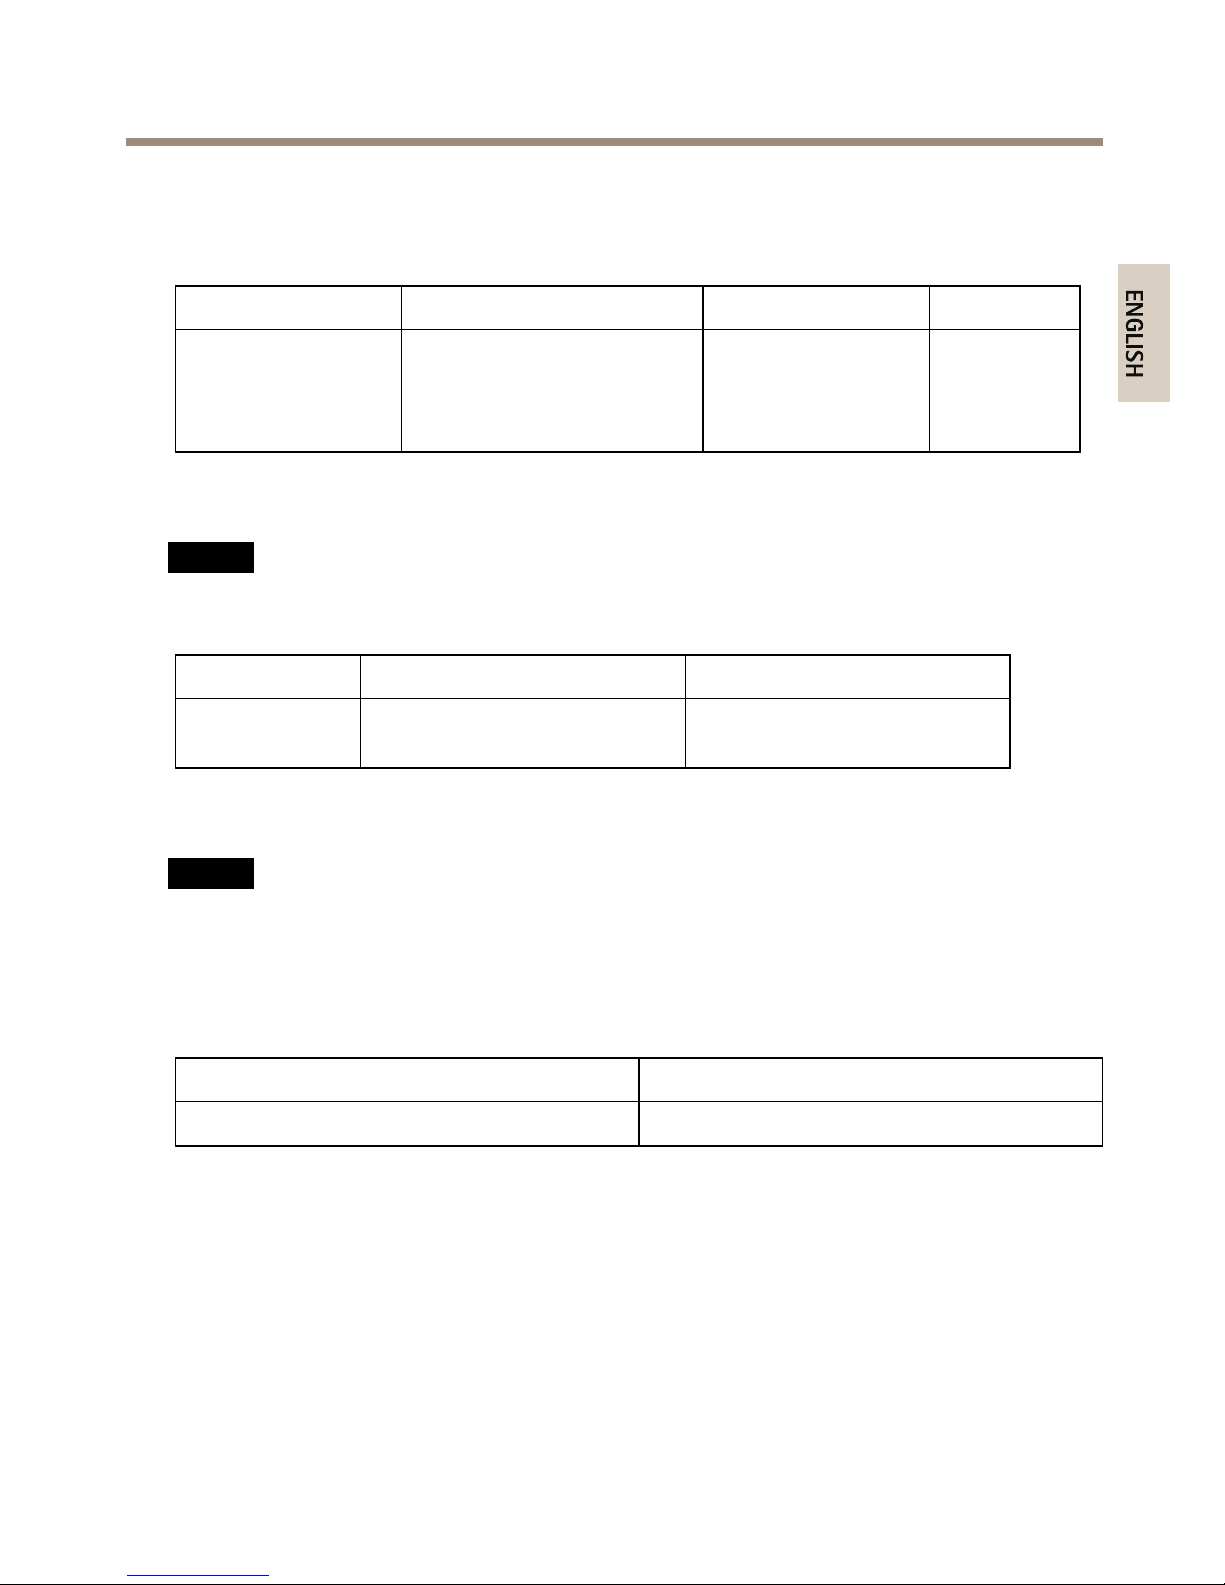
Specications
OperatingConditions
Product
Classication
TemperatureHumidity
AXISM1124–E
AXISM1125–E
IEC60721-3-4Class3M4,
Class4M4
IEC/EN60529IP66
NEMA250Type4X
–20°Cto50°C
(–4°Fto122°F)
10-100%RH
(condensing)
PowerConsumption
NO NO
NO
TICE TICE
TICE
Usealimitedpowersource(LPS)witheitheraratedoutputpowerlimitedto≤100W
oraratedoutputcurrentlimitedto≤5A.
Product
DC
PoE
AXISM1124–E
AXISM1125–E
8–28VDC
PoweroverEthernetIEEE
802.3afClass2
CableArea
NO NO
NO
TICE TICE
TICE
•Usecablesthatkeepwithinthespeciedcablearea.
•Selectcablesincompliancewithyourlocalregulations.
•Makesureallcableholesareproperlysealed.
•Usecablegasketsorcableglandsthatmatchboththecableholeandthecablearea.
Diameter
AWG
From5to15mm(0.197to0.591in)
Approximatelyfrom4to6/0
Tocreateextracableholes,openthedrill-outslocatedinthebottomofthehousing.SeeHardware
Overviewonpage8.
Forinformationaboutaccessories,suchascablegasketsandcableglandsthatallowforother
cableareas,seewww.axis.com
13
ENGLISH
Page 14
AXISM11-ENetworkCameraSeries
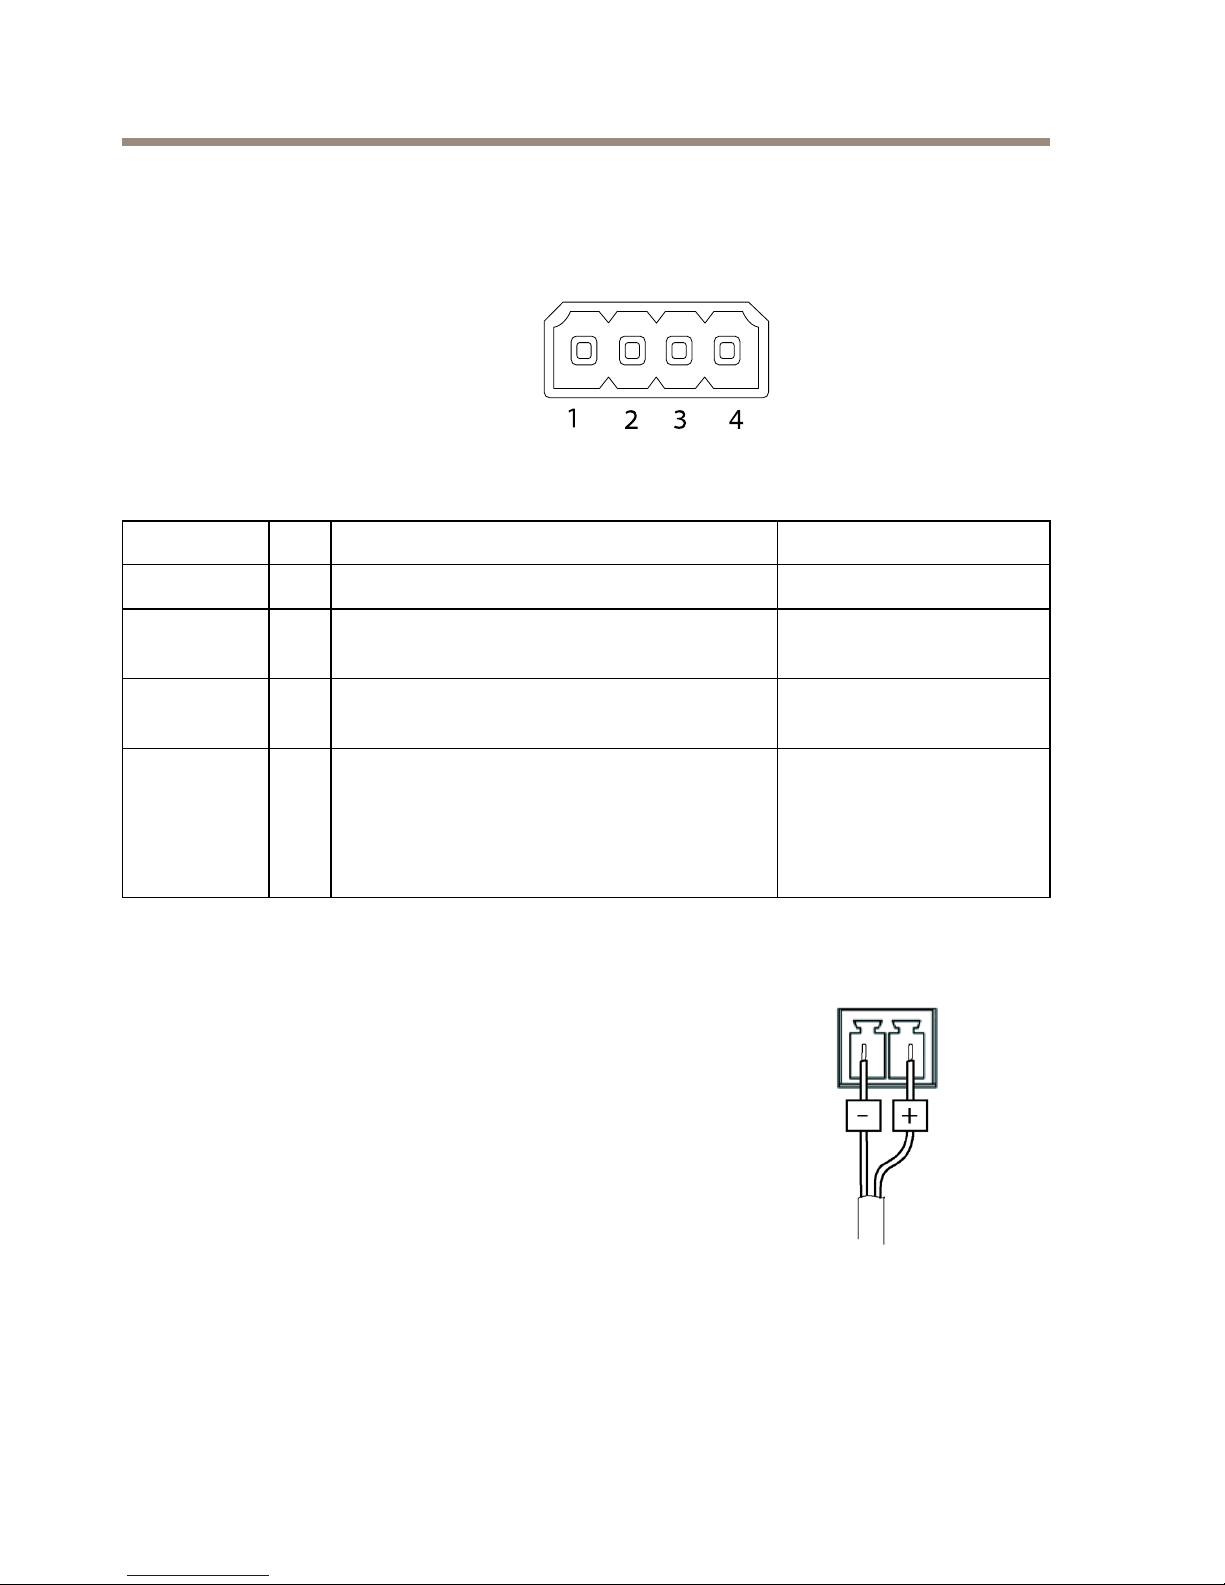
Connectors
I/OConnector
4–pinterminalblock
1
2 3 4
Foranexamplediagram,seeConnectionDiagramsonpage15.
FunctionPinNotes
Specications
0VDC(-)
1
0VDC
DCoutput
2
Canbeusedtopowerauxiliaryequipment.
Note:Thispincanonlybeusedaspowerout.
12VDC
Maxload=15mA
DigitalInput
3
Connecttopin1toactivate,orleaveoating
(unconnected)todeactivate.
0tomax30VDC
Digital
Output
4
Connectedtopin1whenactivated,oating
(unconnected)whendeactivated.Ifused
withaninductiveload,e.g.arelay,adiode
mustbeconnectedinparallelwiththeload,
forprotectionagainstvoltagetransients.
0tomax30VDC,open
drain,100mA
PowerConnector
2-pinterminalblockforDCpowerinput.UseaSafetyExtraLowVoltage
(SELV)compliantlimitedpowersource(LPS)witheitheraratedoutput
powerlimitedto≤100Woraratedoutputcurrentlimitedto≤5A.
14
Page 15
AXISM11-ENetworkCameraSeries
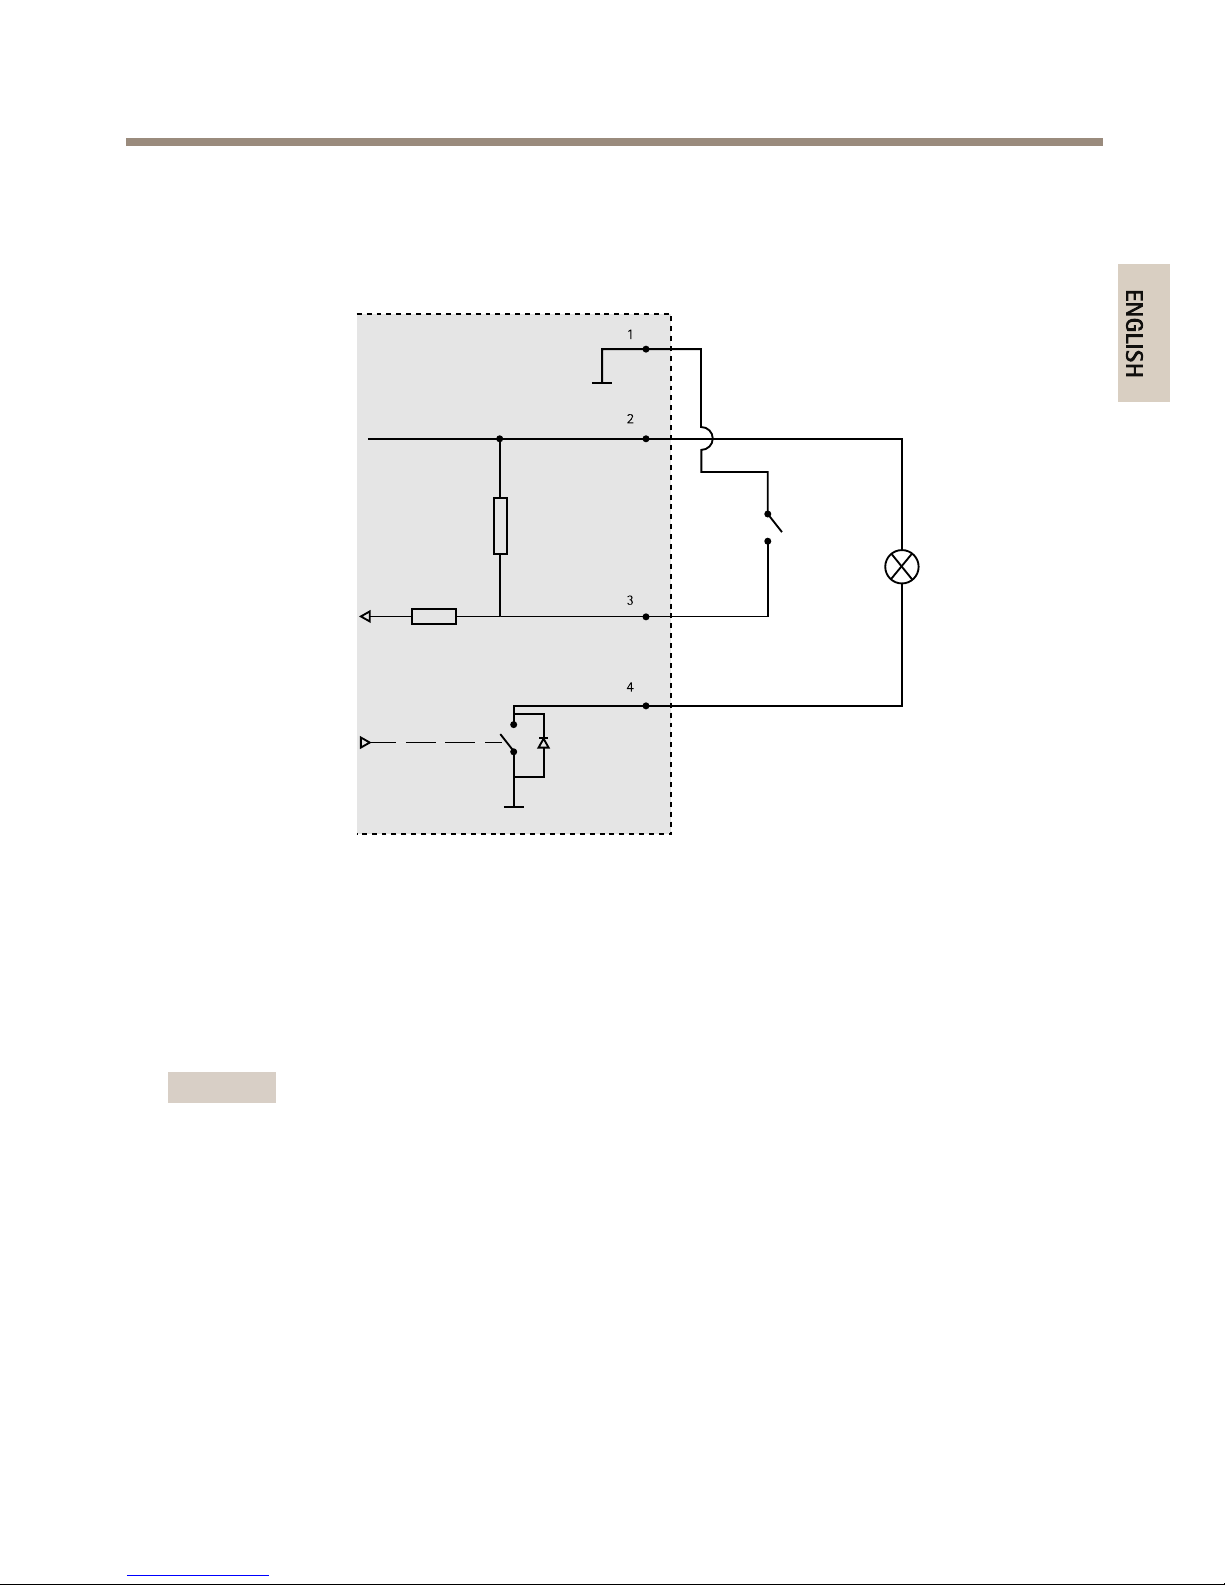
ConnectionDiagrams
I/OConnector
1
2
3
4
1
0VDC(-)
2
DCoutput12V,max15mA
3
I/Oconguredasinput
4
I/Oconguredasoutput
InstalltheHardware
Important
AXISM11Seriesisdesignedforindoorandoutdooruse.Tousethecameraoutdoors,install
inanapprovedoutdoorhousing.Seewww.axis.comformoreinformationaboutoutdoor
housings.
1.IfusingamicroSDcardforlocalstorage,insertthecardintothecamera’sSDcard
slot,seeHardwareOverviewonpage8.
2.Installthewallmount,seepage16.
3.Installthehousing,seepage18.
15
ENGLISH
Page 16

AXISM11-ENetworkCameraSeries
InstalltheWallMount
CAUTION
Makesurethatthescrewsandplugsareappropriateforthematerial(e.g.wood,metal,
drywall,stone)andthatthematerialisstrongenoughtosupportthecombinedweight
ofthecamera,housing,andwallmount.
Note
•Seealsothewallmount’sInstallationGuidesuppliedinthepackageandavailableon
www.axis.com
•Fortechnicalspecicationsabouttheconnectors,seethecamera’sUserManualavailable
onwww.axis.com
1.Preparethewallforinstallationofthewallmount.Usethewallbracketasatemplate
andmarktheholesbeforedrillingtheholes.
2.Routethenetworkcableand,ifrequired,thepowercablethroughthewallbracket.
Leaveapproximately30cm(11.8in)ofcableforconnectingthecamera.
3.Ifconnectinganauxiliarydevice,forexampleanI/O,audio,orexternalpowerdevice,to
thecamera,repeatthestepaboveasapplicabletothespecicdevice.
4.Fastenthewallbrackettothewallbytighteningthescrews.
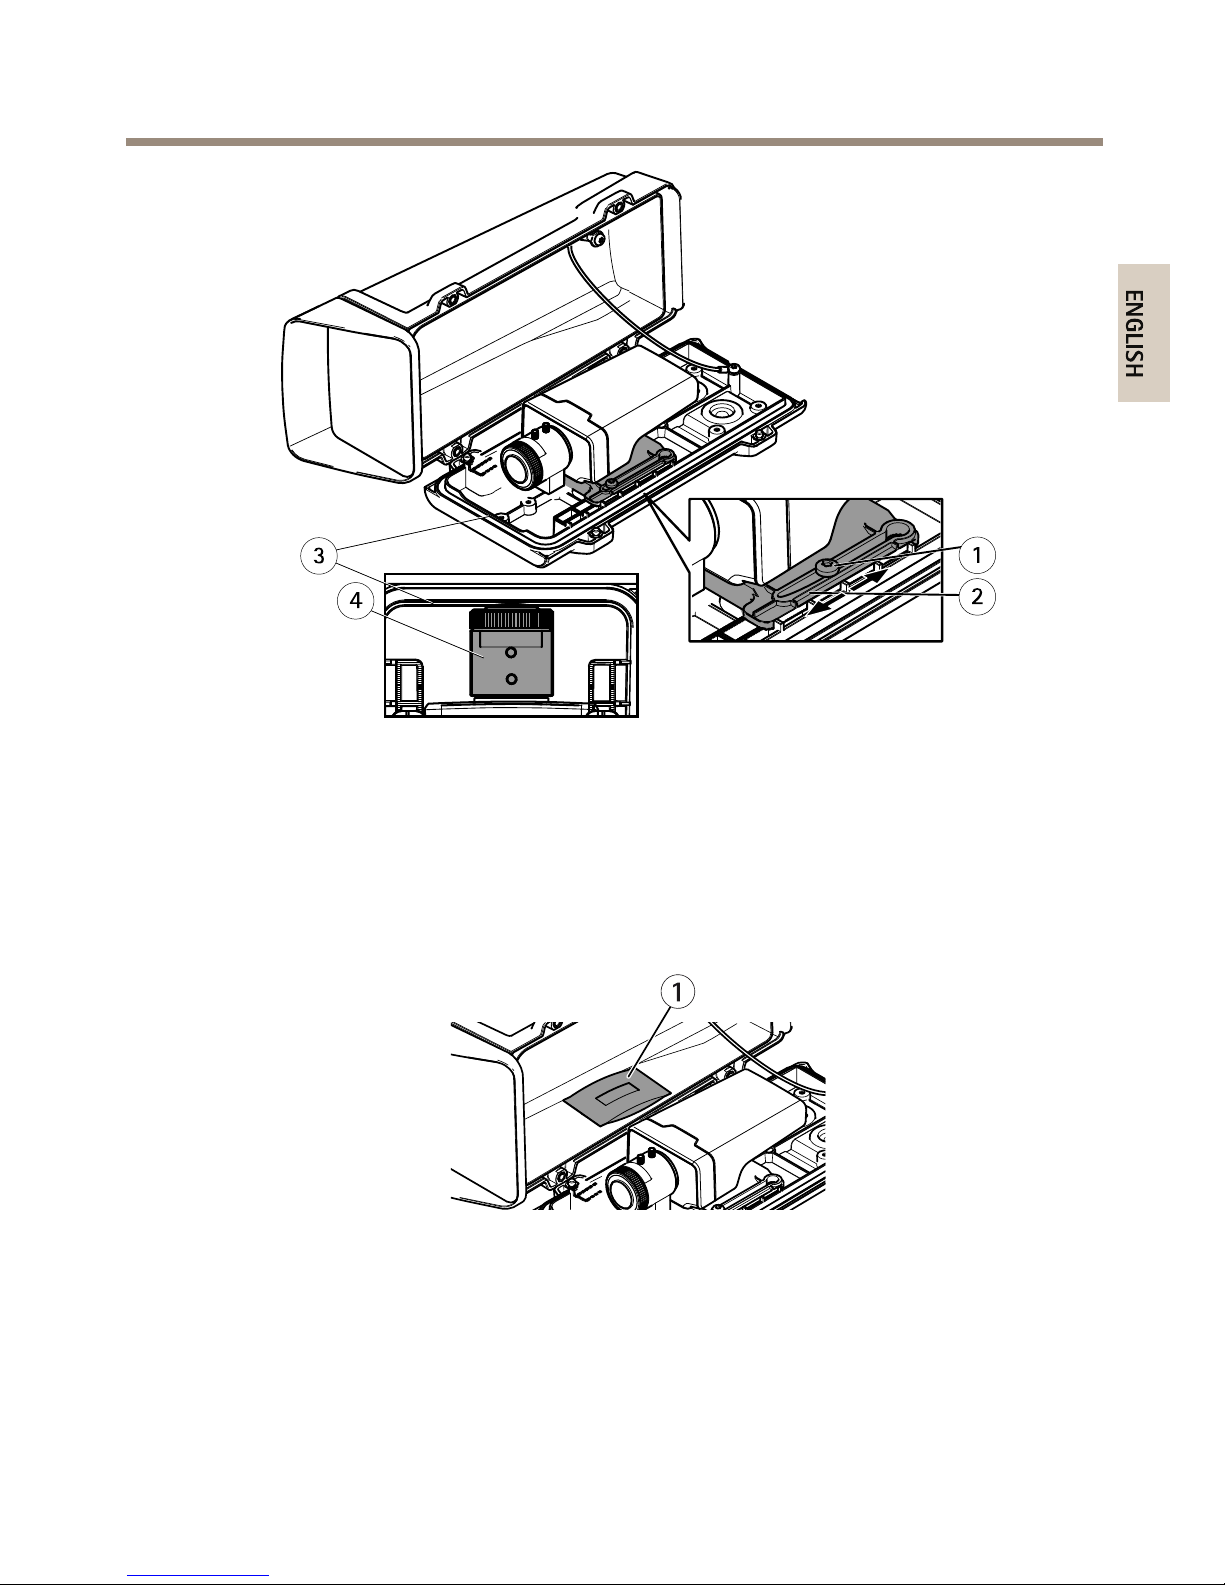
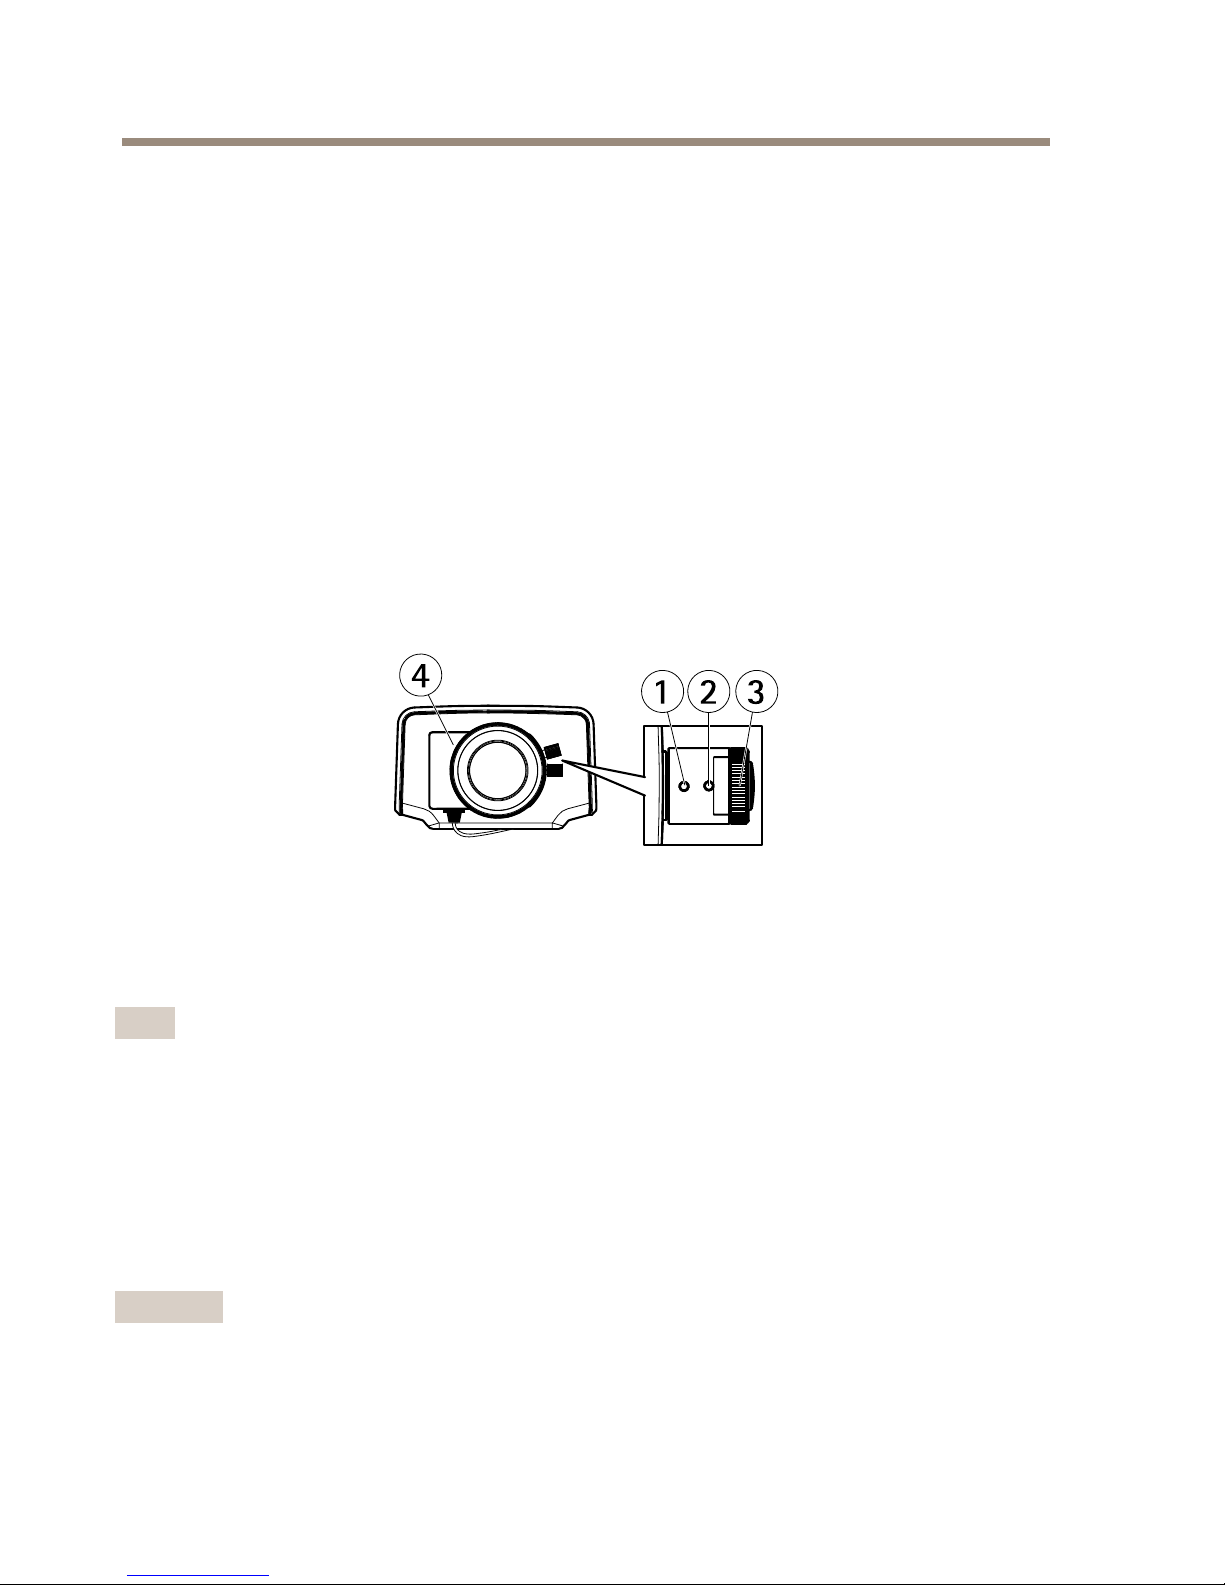
InstalltheCameraintheHousing
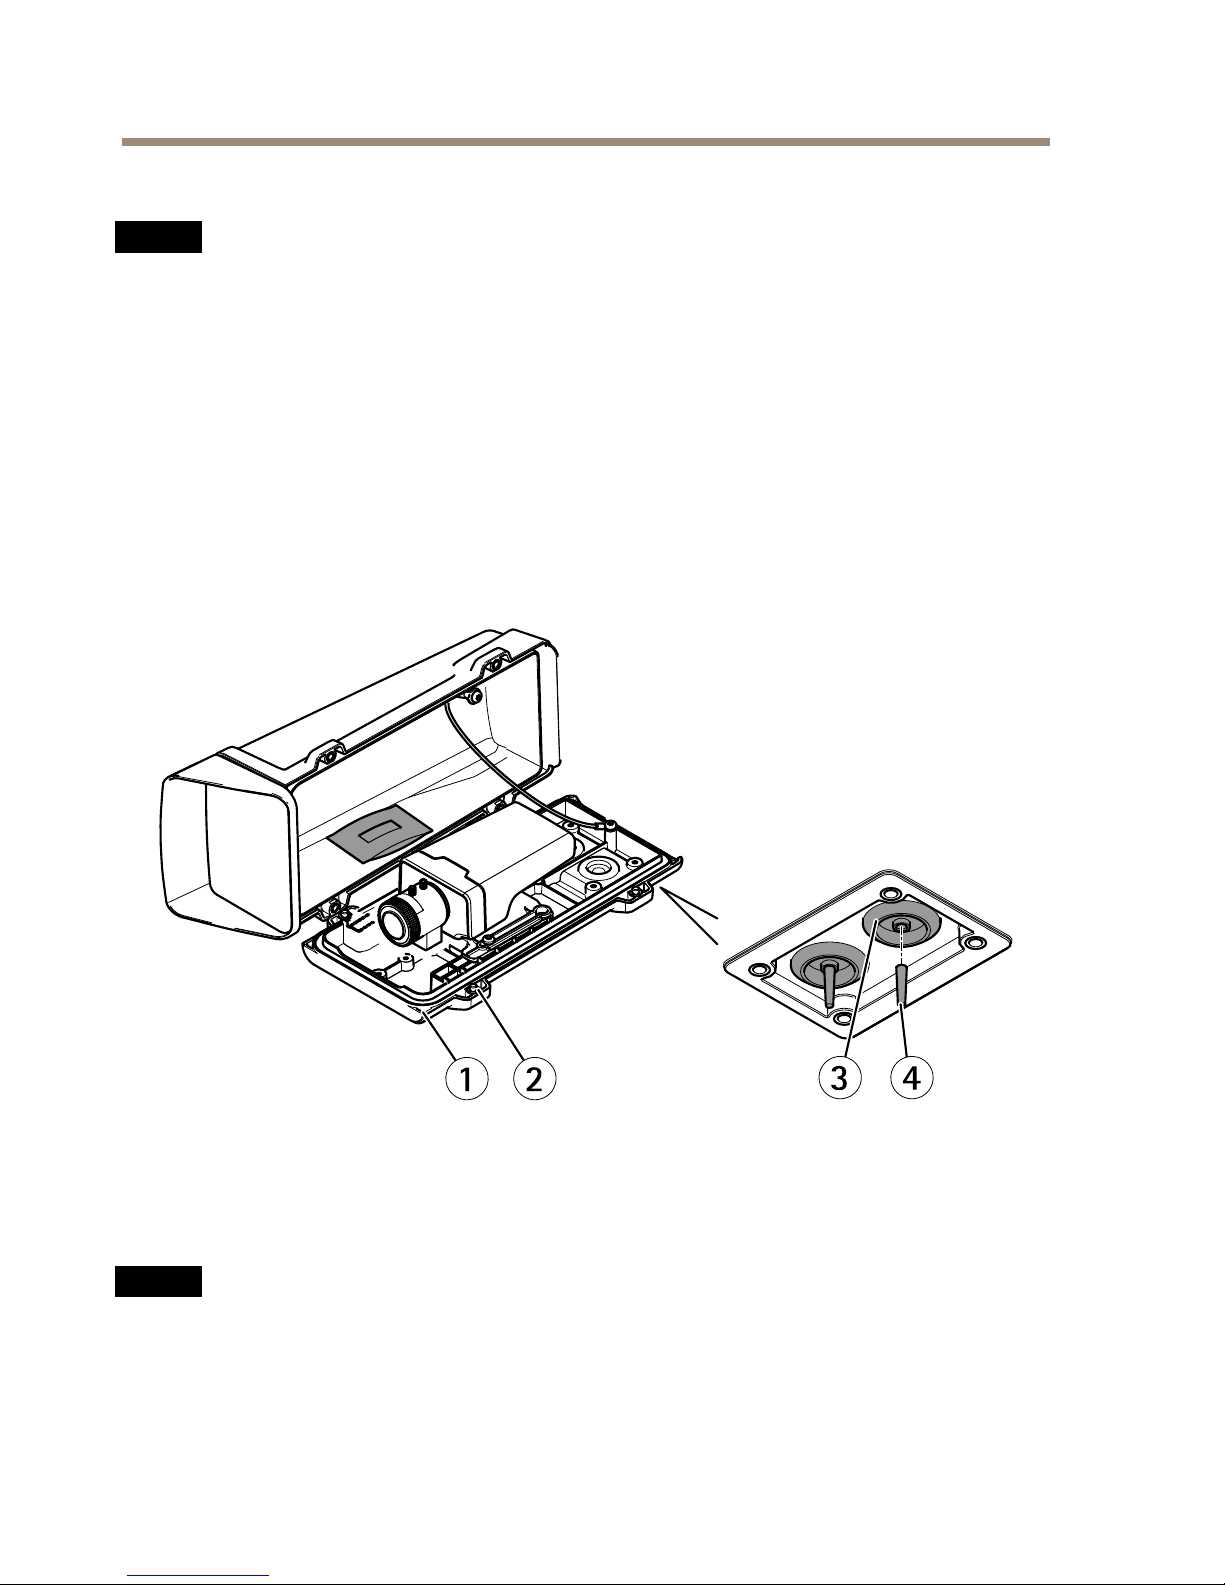
1.Adjustthepositionoftheholdercarefullyandthentightentheholderscrews(torque
0.5Nm).
NO NO
NO
TICE TICE
TICE
TofullltheIK10ratingrequirements,adjusttheholder’spositionsothatthecameralens
(4)isalignedwiththehousingedge(3),seetheillustration.
16
Page 17
AXISM11-ENetworkCameraSeries
1
2
4
3
1
HolderscrewT20(2x)
2
Holder
3
Housingedge
4
Cameralens
2.Removetheplasticwrapperfromthedesiccantbagandputthedesiccantbagonthe
insidewallofthehousing.
1
1
Desiccantbag
17
ENGLISH
Page 18
AXISM11-ENetworkCameraSeries
InstalltheHousingtotheWallMount
NO NO
NO
TICE TICE
TICE
•Usecablesthatkeepwithinthespeciedcablearea,seepage13.Usinganyotherthan
theprovidedcablegasketcouldcausewatertoseepinanddamagetheproduct.For
informationaboutcablegasketsandcableglandsthatallowforothercableareas,see
www.axis.com
•Ifmorethanonecableisused,eachcablemustberoutedthroughaseparatecablegasket.
•Onlyopenaholeincablegasketsthatwillbeusedandifacablegasketistorn,replaceit
withanewcablegasket.Leavingacablegasketopenorusingatorncablegasketcould
causewatertoseepinanddamagetheproduct.
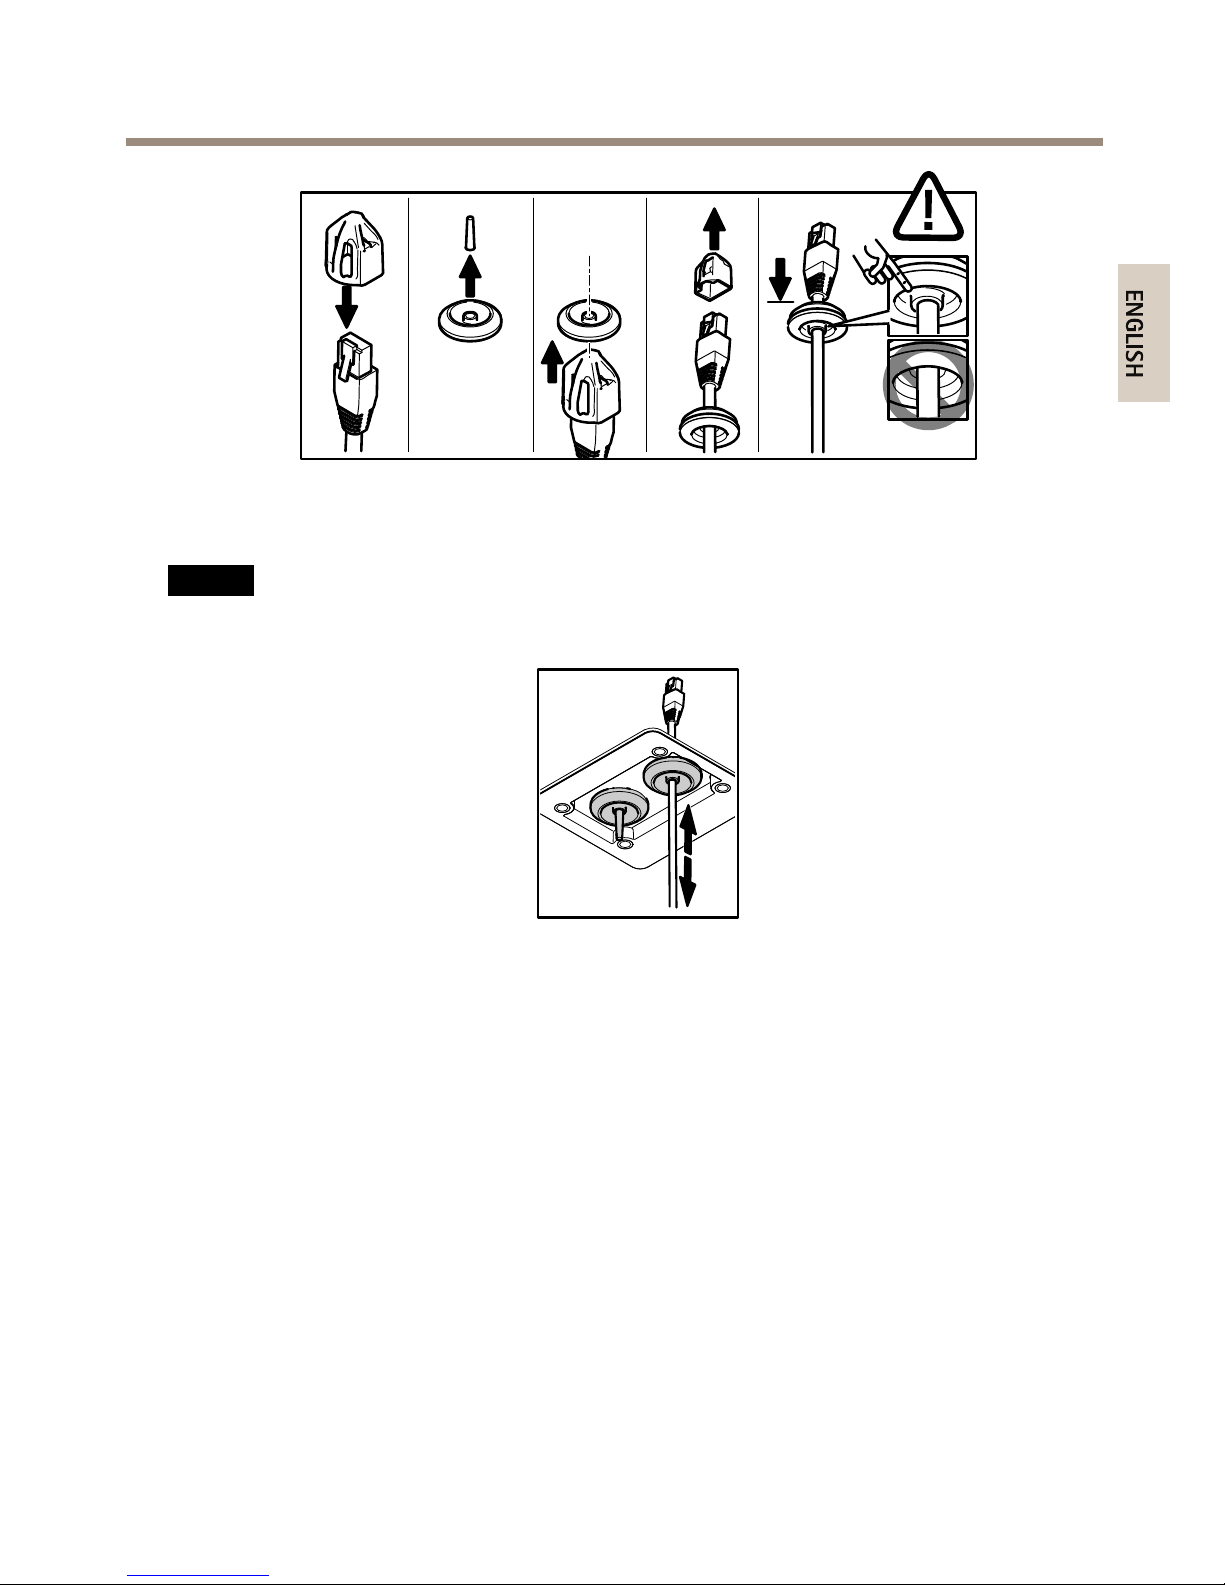
1.Loosenthebottomcoverscrewsandliftthetopcover.
2.Selectwhichcablegaskettouseandpullthetabtoopenaholeforthenetworkcable.
1
2
4
3
1
Bottomcover
2
BottomcoverscrewT20(4x)
3
CablegasketM20(2x)
4
Tab
NO NO
NO
TICE TICE
TICE
Ifthenetworkcablehasapre-mountednetworkconnector,removethecablegasketand
usethesuppliedconnectorguardtopreventtearingofthecablegasket.Avoidusing
networkcableswithcappednetworkconnectorsbecausetheycouldcausetearingofthe
cablegasketdespiteusingtheconnectorguard.
18
Page 19
AXISM11-ENetworkCameraSeries
3.Pushthenetworkcablethroughthecablegasket.
4.Pullthenetworkcablebackslightlysothatthecablegasketadjustsitselfonthecable.
NO NO
NO
TICE TICE
TICE
Notpullingthecablebackcouldcausewatertoseepinanddamagetheproduct.
5.Makesurethatthecablegasketisttedproperly.
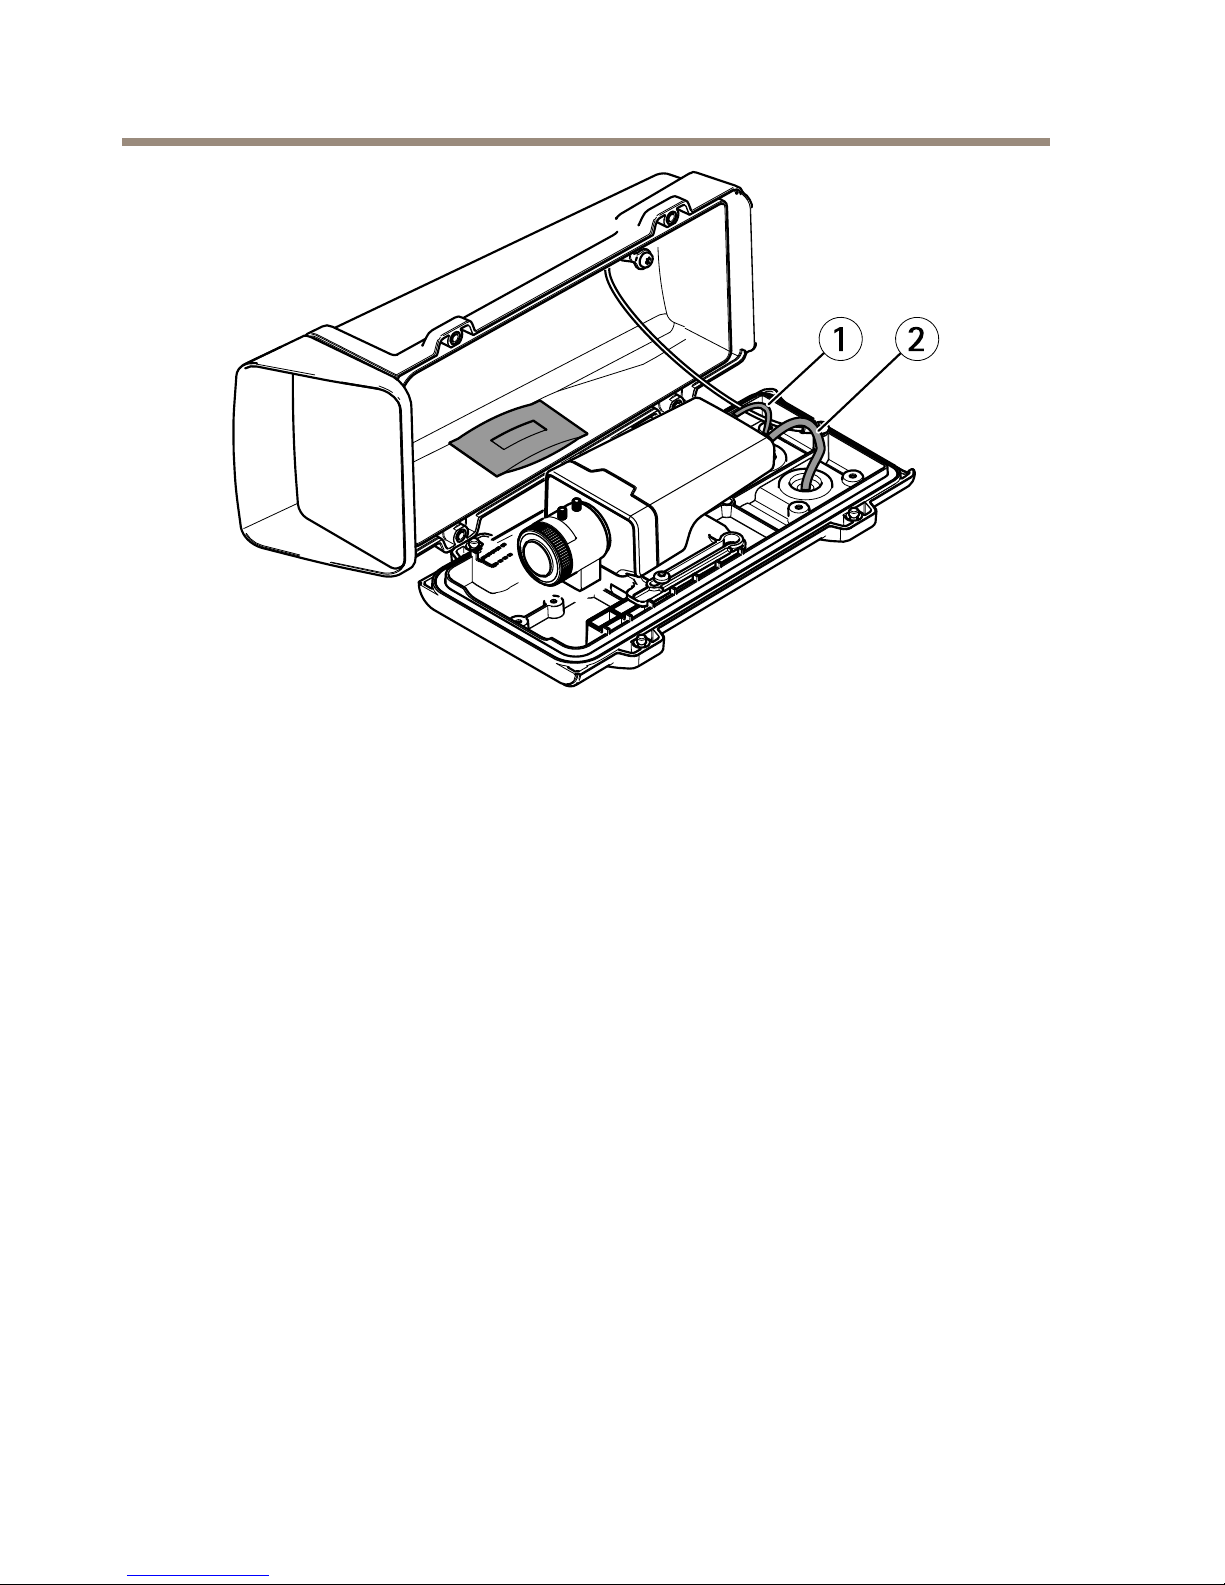
6.Connectthenetworkcabletothenetworkconnector.
7.IfconnectingapowercableoranI/Odevicetothecamera,repeatthestepsaboveas
applicabletothespecicdevice.
19
ENGLISH
Page 20
AXISM11-ENetworkCameraSeries
1
2
1
Powercable(optional)
2
Networkcable
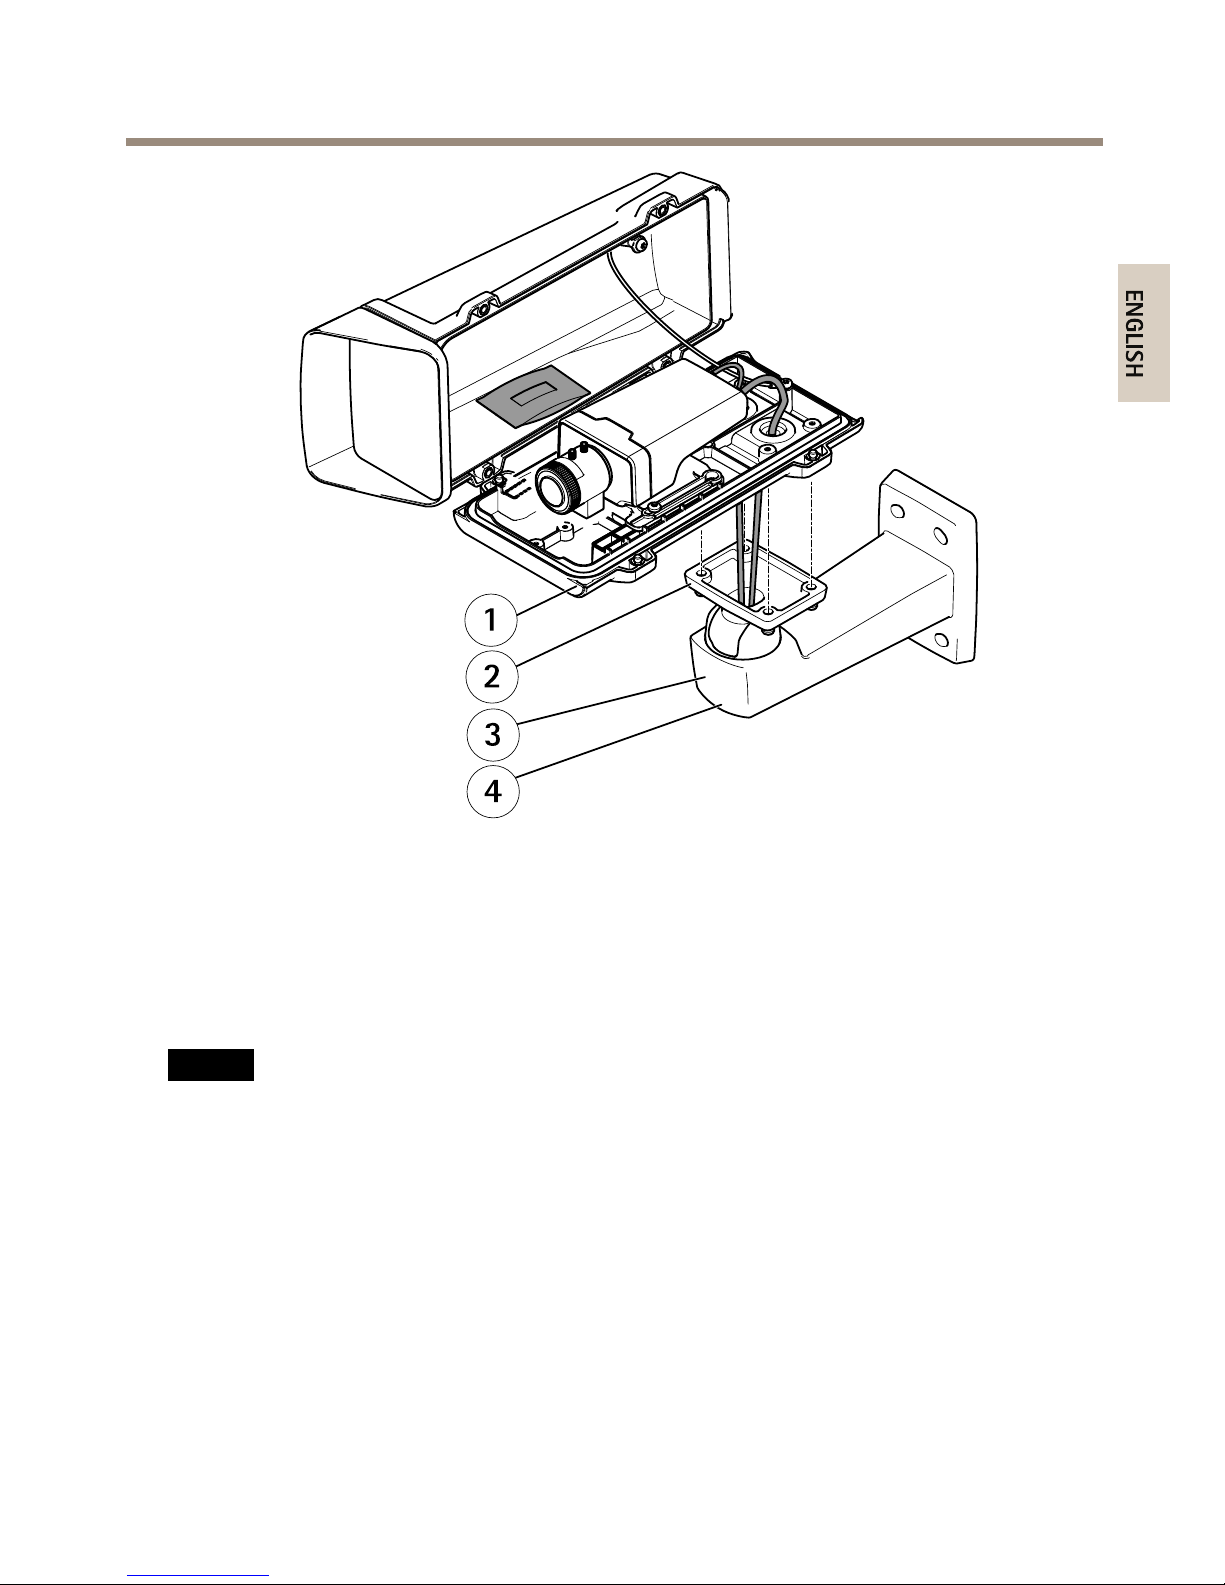
8.Putthebottomcoveronthewallmountandtightenthescrews(torque2Nm).
9.MakesurethatthecameraLEDsindicatethecorrectconditions.
10.Loosenthebracketadjustmentscrewtoaimthecameratothepointofinterest.
20
Page 21
AXISM11-ENetworkCameraSeries
1
2
3
4
1
Bottomcover
2
ScrewT20(4x)
3
Wallmount
4
BracketadjustmentscrewT30
12.Forinformationabouthowtoviewthevideostream,seeAccesstheProduct.
13.Adjustthefocusandzoom,seepage22.
NO NO
NO
TICE TICE
TICE
Makesurenottopinchanycableswhenclosingthehousing.
14.Closethehousing.Makesuretoalternatelytightenthebottomcoverscrewsafewturns
atatimeuntiltheyaretight(torque1.5Nm).Thiswillhelpensurethatthebottom
covergasketiscompressedevenly.
AccesstheProduct
AXISIPUtilityandAXISCameraManagementarerecommendedmethodsforndingAxisproducts
onthenetworkandassigningthemIPaddressesinWindows®.Bothapplicationsarefreeandcan
bedownloadedfromwww.axis.com/techsup
21
ENGLISH
Page 22
AXISM11-ENetworkCameraSeries
Theproductcanbeusedwithmostoperatingsystemsandbrowsers.Therecommendedbrowsersare
•InternetExplorer
®
withWindows
®
•Safari
®
withOSX
®
and
•Chrome
TM
orFirefox
®
withotheroperatingsystems.
Formoreinformationaboutusingtheproduct,seetheUserManualavailableatwww.axis.com
AdjustFocusandZoom
1.Ifnecessary,removethetopcoverofthehousing.
2.Loosenthelockscrewforthefocusring.
3.AdjustthefocusandzoombynavigatingtoSetup>Focusontheproduct’swebpage.
Followtheinstructionsintheonlinehelp.
4.Re-tightenthelockscrewforthefocusring.
1
2
3
4
1
Zoompuller
2
Lockscrew
3
Focusring
4
Lens
Note
Afteradjustingzoomandfocus,ifoptimalcornerfocusisnotachieved,rotatetheentire
lenstothefactory-setpositionshownintheillustrationabove.Thenslightlyrotatethe
lensclockwiseorcounter-clockwisetoreachfocusinallcorners.
5.Attachthetopcoverofthehousing.
ResettoFactoryDefaultSettings
Important
Resettofactorydefaultshouldbeusedwithcaution.Aresettofactorydefaultwillreset
allsettings,includingtheIPaddress,tothefactorydefaultvalues.
22
Page 23

AXISM11-ENetworkCameraSeries
Note
Theinstallationandmanagementsoftwaretoolsareavailablefromthesupportpages
onwww.axis.com/techsup
Toresettheproducttothefactorydefaultsettings:
1.Disconnectpowerfromtheproduct.
2.Pressandholdthecontrolbuttonandreconnectpower.SeeHardwareOverviewon
page8.
3.Keepthecontrolbuttonpressedfor15–30secondsuntilthestatusLEDindicatorashes
amber.
4.Releasethecontrolbutton.TheprocessiscompletewhenthestatusLEDindicatorturns
green.Theproducthasbeenresettothefactorydefaultsettings.IfnoDHCPserveris
availableonthenetwork,thedefaultIPaddressis192.168.0.90
5.Usingtheinstallationandmanagementsoftwaretools,assignanIPaddress,setthe
password,andaccessthevideostream.
Itisalsopossibletoresetparameterstofactorydefaultviathewebinterface.GotoSetup
>SystemOptions>Maintenance.
FurtherInformation
TheUserManualisavailableatwww.axis.com
Visitwww.axis.com/techsuptocheckifthereisupdatedrmwareavailableforyournetwork
product.Toseethecurrentlyinstalledrmwareversion,gotoSetup>About.
VisitAxislearningcenterwww.axis.com/academyforusefultrainings,webinars,tutorialsand
guides.
WarrantyInformation
ForinformationaboutAxis’productwarrantyandtheretorelatedinformation,see
www.axis.com/warranty/
23
ENGLISH
Page 24

24
Page 25

AXISM11-ENetworkCameraSeries
Informationssurlasécurité
Lisezattentivementceguided'installationavantd'installerl'appareil.Conservezleguide
d'installationpourtouteréférenceultérieure.
Niveauxderisques
DANGER
Indiqueunesituationdangereusequi,siellen'estpasévitée,
entraîneraledécèsoudesblessuresgraves.
AVERTISSEMENT
Indiqueunesituationdangereusequi,siellen'estpasévitée,
pourraitentraînerledécèsoudesblessuresgraves.
ATTENTION
Indiqueunesituationdangereusequi,siellen'estpasévitée,
pourraitentraînerdesblessureslégèresoumodérées.
A AAVIS VIS
VIS
Indiqueunesituationqui,siellen'estpasévitée,pourrait
endommagerl'appareil.
Autresniveauxdemessage
ImportantIndiquelesinformationsimportantes,nécessairespourassurerle
bonfonctionnementdel'appareil.
NoteIndiquelesinformationsutilesquipermettrontd'obtenirle
fonctionnementoptimaldel'appareil.
25
FRANÇAIS
Page 26

AXISM11-ENetworkCameraSeries
Consignesdesécurité
A AAVIS VIS
VIS
•LeproduitAxisdoitêtreutiliséconformémentauxloisetrèglementationslocalesen
vigueur.
•ConserverceproduitAxisdansunenvironnementsecetventilé.
•NepasexposerceproduitAxisauxchocsouauxfortespressions.
•Nepasinstallerceproduitsurdessupports,surfacesoumursinstables.
•Utiliseruniquementdesoutilsrecommandéspourl'installationdel'appareilAxis.
L'applicationd'uneforceexcessivesurl'appareilavecdesoutilspuissantspourrait
l'endommager.
•Nepasutiliserdeproduitschimiques,desubstancescaustiquesoudenettoyants
pressurisés.
•Utiliserunchiffonpropreimbibéd'eaupurepourlenettoyage.
•Utiliseruniquementdesaccessoiresconformesauxcaractéristiquestechniquesduproduit.
IlspeuventêtrefournisparAxisouuntiers.
•UtiliseruniquementlespiècesderechangefourniesourecommandéesparAxis.
•Nepasessayerderéparerceproduitparvous-même.Contacterl'assistancetechnique
d'AxisouvotrerevendeurAxispourdesproblèmesliésàl'entretien.
Transport
A AAVIS VIS
VIS
•LorsdutransportduproduitAxis,utilisezl'emballaged'origineouunéquivalentpour
éviterd'endommagerleproduit.
Batterie
LeproduitAxisutiliseunebatterieaulithiumBR/CR20323,0Vcommealimentationdeson
horlogeentempsréelinterne(RTC).Dansdesconditionsnormales,cettebatterieauneduréede
vieminimaledecinqans.
Silabatterieestfaible,lefonctionnementdel'horlogeentempsréelpeutêtreaffectéetentraîner
saréinitialisationàchaquemisesoustension.Unmessageenregistréapparaîtdanslerapportde
serveurduproduitlorsquelabatteriedoitêtreremplacée.Pourtoutcomplémentd'information
concernantlerapportdeserveur,reportez-vousauxpagesdeCongurationduproduitoucontactez
l'assistancetechniqued'Axis.
Labatteriedoitêtreremplacéeuniquementencasdebesoin,etpourcefaire,contactezl'assistance
techniqued'Axisàl'adressewww.axis.com/techsupetobtenirdel'aide.
26
Page 27

AXISM11-ENetworkCameraSeries
AVERTISSEMENT
•Risqued'explosionsilabatterieestremplacéedefaçonincorrecte.
•Remplacez-launiquementparunebatterieidentiqueouunebatterierecommandéepar
Axis.
•Mettezaurebutlesbatteriesusagéesconformémentauxréglementationslocalesou
auxinstructionsdufabricantdelabatterie.
27
FRANÇAIS
Page 28

28
Page 29

AXISM11-ENetworkCameraSeries
Guided’installation
Ceguided’installationexpliquecommentinstallerlacaméraréseauAXISM1124-E/M1 125-Esur
votreréseau.Pourtouteautreinformationrelativeàl’utilisationduproduit,consultezlemanuelde
l’utilisateurdisponiblesurlesitewww.axis.com
Procéduresd’installation
1.Assurez-vousquelesoutilsetautresmatérielsnécessairesàl'installationsontinclus
dansl'emballage.Cf.page29.
2.Consultezladescriptiondumatériel.Cf.page30.
3.Étudiezlescaractéristiques.Cf.page13.
4.Installezlematériel.Cf.page39.
5.Utilisezleproduit.Cf.page44.
Contenudel’emballage
•CaméraréseauAXISM1 124–E/M1 125–E
•Kitdeconnecteurspourblocterminal
•BoîtierdeprotectionAXIST93G05
-JointAXISCM20(x1)
-Sachetdessiccatif
-TournevisTorxT20
-ProtectionduconnecteurAXISA
•MontagemuralAXIST94Q01A
-EmboutpourvisT30
•Documentsimprimés
-Guided’installation(cedocument)
-Guided’installationpourxationmuraleAXIST94Q01A
-Étiquettesupplémentairedenumérodesérie(x2)
-Cléd’authenticationAVHS
Outilsrecommandés
•Perceuse–pourinstallerlaxationmurale
•Tournevispouremboutpourvis
29
FRANÇAIS
Page 30
AXISM11-ENetworkCameraSeries
Accessoiresenoption
•InterrupteurdeporteAXISA
•Boîtierarrièredestinéauconduitdel'AXIST94R01P
•Illuminateurs
•Fixationspourboîtier
•Jointsdecâbleetpresse-étoupes
•CoffretdesurveillanceAXIST98A16-VE
•FixationspourpoteauAXIST91A47
•CâbleintérieurpourxationauplafondVTWCM4A
•FixationangulaireVTWCWA
Pourplusd’informationssurlesaccessoiresdisponibles,consultezlesitewww.axis.com
Aperçudumatériel
1
2
3
4
5
6
8
7
1
Couverclesupérieur
2
Fenêtreavant
3
Caméraréseau
4
Visdusupport(x2)
5
Perforationspourautrestrousdecâbles
6
Jointdecâble
30
Page 31

AXISM11-ENetworkCameraSeries
7
Sachetdessiccatif
8
Câbledesécurité
1
2
10
11
12
6
7
8
9
3
4
5
1
Commandedezoom
2
Baguedemiseaupoint
3
Connecteurd'alimentation
4
Boutondecommande
5
Connecteurréseau
6
Voyantd’alimentation
7
Voyantd'état
8
VoyantDELréseau
9
LogementdecartemicroSD
10
Connecteurdel'iris
11
Connecteurd'E/S
12
Montureàvis1/4pouce
31
FRANÇAIS
Page 32

AXISM11-ENetworkCameraSeries
Fixationmurale
1
3
4
5
2
1
Câbleréseau(acheminéàtraverslesupportmural)
2
Câbled'alimentation(acheminéàtraverslesupportmural)(pourlesproduits
équipésd'unconnecteurd'alimentation)
3
VisT20(x4)
4
VisderéglagedusupportT30
5
Fixationmurale
32
Page 33

AXISM11-ENetworkCameraSeries
Voyants
Note
•Levoyantd'étatpeutêtreéteintpendantlefonctionnementnormal.Pourcefaire,
rendez-vousdansSetup>SystemOptions>Ports&Devices>LED(Conguration
>Optionssystème>Portsetdispositifs>DEL).Consultezl'aideenlignepourplus
d'informations.
•Levoyantd'étatpeutclignoterlorsqu'unévénementestactif.
•Levoyantd'étatpeutclignoterpendantl'identicationdel'appareil.Rendez-vousdans
Setup>SystemOptions>Maintenance(Conguration>Optionsdusystème>
Maintenance).
Voyantd’état
Indication
VertVertxeencasdefonctionnementnormal.
Orange
Fixependantledémarrageetlorsdelarestaurationdes
paramètres.
Note
Levoyantderéseaupeutêtredésactivéanqu'ilneclignotepasencasdetracréseau.
Pourcefaire,rendez-vousdansSetup>SystemOptions>Ports&Devices>LED
(Conguration>Optionssystème>Portsetdispositifs>DEL).Consultezl'aideenligne
pourplusd'informations.
VoyantDELréseau
Indication
Vert
Fixeencasdeconnexionàunréseaude100Mbits/s.Clignote
encasd’activitéréseau.
Orange
Fixeencasdeconnexionàunréseaude10Mbits/s.Clignote
encasd’activitéréseau.
Éteint
Pasdeconnexionréseau.
Note
Levoyantd'alimentationpeutêtreéteintpendantlefonctionnementnormal.Pourcefaire,
rendez-vousdansSetup>SystemOptions>Ports&Devices>LED(Conguration
>Optionssystème>Portsetdispositifs>DEL).Consultezl'aideenlignepourplus
d'informations.
33
FRANÇAIS
Page 34

AXISM11-ENetworkCameraSeries
Voyantd'alimentationIndication
VertFonctionnementnormal.
Orange
Levoyantvert/orangeclignotependantlamiseàniveaudu
microprogramme.
Connecteursetboutons
Pourlescaractéristiquesetlesconditionsd'utilisation,consultezpage35.
Connecteurréseau
ConnecteurEthernetRJ45avecl'alimentationparEthernet(PoE).
A AAVIS VIS
VIS
Leproduitdoitêtreconnectéàl'aided'uncâbleréseaublindé(STP).Touslescâbles
reliantleproduitaucommutateurréseaudoiventêtredestinésàleurusagespécique.
Assurez-vousquelespériphériquesréseausontinstallésconformémentauxinstructions
dufabricant.Pourplusd’informationssurlesexigencesréglementaires,consultez
ElectromagneticCompatibility(EMC)onpage2.
Connecteurd'E/S
Utilisez-leavecdespériphériquesexternesassociésauxapplicationstellesquelesalarmesde
détérioration,ladétectiondemouvement,ledéclenchementd'événements,l'enregistrementà
intervallesetlesnoticationsd'alarme.Enplusdupointderéférence0VCCetdel'alimentation
(sortieCC),leconnecteurd'E/Sfournituneinterfaceauxélémentssuivants:
•Sortienumérique–Permetdeconnecterdesdispositifsexternes,commedesrelais
oudesvoyants.Lesappareilsconnectéspeuventêtreactivésparl'interfacede
programmationVAPIX®,desboutonsdesortiesurlapageLiveView(Vidéoendirect)
ouparunerègled'action.Lasortieestconsidéréecommeétantactive(commeindiqué
dansSystemOptions>Ports&Devices(Optionsdusystème>Portsetdispositifs))si
ledispositifd’alarmeestactivé.
•Entréenumérique–Entréed'alarmeutiliséepourconnecterdesdispositifspouvant
passerd'uncircuitouvertàuncircuitfermé,parexemple:détecteursinfrarougepassifs,
contactsdeporte/fenêtre,détecteursdebrisdeverre,etc.Àlaréceptiond'unsignal,
l'étatchangeetl'entrées'active(sousSystemOptions>Ports&Devices(Optionsdu
système>Portsetdispositifs)).
Connecteurd’alimentation
Blocterminalà2brochespourl'alimentation.Utilisezunesourced'alimentationlimitée(LPS)
conformeauxexigencesdeTrèsbassetensiondesécurité(TBTS)dontlapuissancedesortie
nominaleestlimitéeà≤100Woudontlecourantdesortienominalestlimitéà≤5A.
34
Page 35

AXISM11-ENetworkCameraSeries
EmplacementpourcarteSD
A AAVIS VIS
VIS
•LacarteSDrisqued'êtreendommagée.Nepasutiliserd'outilstranchantsetnepasforcer
lorsdel'insertionouduretraitdelacarteSD.
•Risquedepertededonnées.Pouréviterlacorruptiondesdonnées,lacarteSDdoitêtre
démontéeavantsonretrait.Pourcefaire,rendez-vousdansSetup>SystemOptions>
Storage>SDCard(Conguration>Optionsdusystème>Stockage>CarteSD)et
cliquezsurUnmount(Démonter).
CetappareilestcompatibleavecdescartesmicroSD/microSDHC/microSDXC(cartesnonfournie).
PourobtenirdesconseilssurlacarteSD,rendez-voussurwww.axis.com
Boutondecommande
Pourconnaîtrel'emplacementduboutondecommande,consultezAperçudumatérielpage30.
Leboutondecommandepermetderéaliserlesopérationssuivantes:
•Réinitialisationduproduitauxparamètresd’usinepardéfaut.Cf.page46.
•ConnexionauserviceduSystèmed'hébergementvidéoAXISouauserviceAXISInternet
DynamicDNS.Pourplusd'informationssurcesservices,reportez-vousauManuelde
l'utilisateur.
Caractéristiquestechniques
Conditionsd’utilisation
Produit
Classication
TempératureHumidité
AXISM1124–E
AXISM1125–E
IEC60721-3-4Classe3M4,
Classe4M4
IEC/EN60529IP66
NEMA250Type4X
–20°Cà50°C
(–4°Fà122°F)
Humiditérelative10100%(condensation)
Consommationélectrique
A AAVIS VIS
VIS
Utilisezunesourced'alimentationlimitée(LPS)dontlapuissancedesortienominaleest
limitéeà≤100Woudontlecourantdesortienominalestlimitéà≤5A.
35
FRANÇAIS
Page 36

AXISM11-ENetworkCameraSeries
Produit
CC
PoE
AXISM1124–E
AXISM1125–E
8–28VCC
AlimentationparEthernetIEEE
802.3afClasse2
Zonedecâble
A AAVIS VIS
VIS
•Utilisezdescâblesadaptésàlazonespéciée.
•Sélectionnezdescâblesconformesàlalégislationlocale.
•Assurez-vousquelestrousdecâblessontcorrectementscellés.
•Utilisezdesjointsdecâbleetdespresse-étoupesadaptésauxtrousdecâblesetàla
zonedecâble.
Diamètre
AWG
De5à15mm(0,197à0,591po)
Environde4à6/0
Pourcréerd'autrestrousdecâbles,ouvrezlesperforationssituéesdanslapartieinférieuredu
boîtier.Cf.Aperçudumatérielpage30.
Pourplusd'informationssurlesaccessoires,telsquelesjointsdecâbleetlespresse-étoupes
adaptésàd'autreszonesdecâble,consultezwww.axis.com
Connecteurs
Connecteurd'E/S
Blocterminalà4brochespour:
•Alimentationauxiliaire
(sortieCC)
•Entréenumérique
•Sortienumérique
•0VCC(-)
1
2 3 4
FonctionBrocheNotes
Caractéristiques
0VCC(-)
1
0VCC
36
Page 37

AXISM11-ENetworkCameraSeries
SortieCC
2
Peutserviràalimenterlematériel
auxiliaire.
Remarque:cettebrochenepeut
êtreutiliséequecommesortie
d’alimentation.
12VCC
Chargemaximale=15mA
Entrée
numérique
3
Connectez-laàlabroche1pour
l’activeroulaissez-laotter
(déconnectée)pourladésactiver.
0à30VCC
Sortie
numérique
4
Connectéeàlabroche1lorsqu'elle
estactivée,otte(déconnectée)
lorsqu'elleestdésactivée.Sivous
l’utilisezavecunechargeinductive,
parexempleunrelais,unediodedoit
êtreconnectéeenparallèleavecla
charge,enguisedeprotectioncontre
lestensionstransitoires.
0à30VCCmax.,collecteur
ouvert,100mA
12 V max 15 mA
1
2
3
4
37
FRANÇAIS
Page 38

AXISM11-ENetworkCameraSeries
Connecteurd’alimentation
Blocterminalà2brochespourl'alimentationCC.Utilisezunesource
d'alimentationlimitée(LPS)conformeauxexigencesdeTrèsbasse
tensiondesécurité(TBTS)dontlapuissancedesortienominaleest
limitéeà≤100Woudontlecourantdesortienominalestlimitéà≤5A.
Schémasdeconnexion
Connecteurd'E/S
1
2
3
4
1
0VCC(-)
2
SortieCC12V,maxi.15mA
3
Entrée/sortieconguréecommeentrée
4
Entrée/sortieconguréecommesortie
38
Page 39

AXISM11-ENetworkCameraSeries
Installationdumatériel
Important
LasériedecamérasAXISM1 1estconçuepouruneutilisationintérieureetextérieure.
Pouruneutilisationenextérieur,lacaméradoitêtreplacéedansunboîtierd’extérieur
homologué.Consultezlesitewww.axis.compourobtenirplusd’informationssurles
boîtiersd’extérieur.
1.SivousutilisezunecartemicroSDcommeespacedestockagelocal,insérezlacartedans
lelogementprévuàceteffetsurlacaméra,cf.Aperçudumatérielpage30.
2.Installationdumontagemural,cf.page39.
3.Pourinstallerleboîtier,consultezpage41.
Installationdelaxationmurale
ATTENTION
Assurez-vousquelesvisetleschessontadaptéesaumatériau(bois,métal,cloisonsèche,
pierre,etc.)etquelematériauestsufsammentrésistantpoursupporterlepoidscombiné
delacaméra,duboîtieretdusupportmural.
Note
•Reportez-vouségalementauguided'installationdelaxationmuraledisponibledansla
boîteetsurlesitewww.axis.com.
•Pourplusdecaractéristiquestechniquesconcernantlesconnecteurs,reportez-vousau
manueld’utilisationdelacaméra,disponiblesurwww.axis.com
1.Préparezlemurpourl'installationdusupportmural.Utilisezlesupportmuralcomme
gabaritetmarquezlesemplacementsdestrousavantdelespercer.
2.Acheminezlecâbleréseauet,lecaséchéant,lecâbled'alimentationenlefaisantpasser
autraversdusupportmural.Laissezenviron30cm(11,8'')decâblepourlaconnexion
delacaméra.
3.Sivousconnectezunpériphériqueauxiliaire(parexemple,unpériphérique
d'entrée/sortie,audiooud'alimentationexterne)àlacaméra,répétezl'étapeci-dessus
pourchaquepériphérique.
4.Serrezlesvisdusupportmuralpourlexer.
Installationdelacaméradansleboîtier
1.Ajustezprécisémentlapositiondusupport,puisserrezlesvisdecedernier
(couple0,5Nm).
39
FRANÇAIS
Page 40

AXISM11-ENetworkCameraSeries
A AAVIS VIS
VIS
PourrépondreauxexigencesdelacerticationIK10,ajustezlapositiondusupportdesorte
quel'objectifdelacaméra(4)soitalignésurlebordduboîtier(3),commeillustréci-contre.
1
2
4
3
1
VisdusupportT20(x2)
2
Support
3
Bordduboîtier
4
Objectifdelacaméra
2.Retirezl’emballageplastiquedusachetdessiccatifetplacezlesachetdessiccatifsurla
paroiintérieureduboîtier.
1
1
Sachetdessiccatif
40
Page 41

AXISM11-ENetworkCameraSeries
Installationduboîtiersurlaxationmurale
A AAVIS VIS
VIS
•Utilisezdescâblesadaptésàlazonespéciée.Reportez-vousàlasectionpage36.
L’utilisationd’unjointdecâbleautrequeceluifournirisqued’entraîneruneinltration
d’eauetd’endommagerleproduit.Pourplusd’informationssurlesjointsdecâbleetles
presse-étoupesadaptésàd’autreszonesdecâble,consultezwww.axis.com
•Sivousutilisezplusd’uncâble,chaquecâbledoitêtreacheminéautraversd’unjointde
câbledistinct.
•Ouvrezuniquementuntroudanslesjointsdecâblequiserontutilisés.Siunjointdecâble
estendommagé,remplacez-leparunnouveau.L’utilisationd’unjointdecâbleouvertou
endommagérisqued’entraîneruneinltrationd’eauetd’endommagerleproduit.
1.Desserrezlesvisducouvercleinférieuretsoulevezlecouverclesupérieur.
2.Sélectionnezlejointdecâbleàutiliserettirezsurlapattepourouvriruntrouau
niveauducâbleréseau.
1
2
4
3
1
Couvercleinférieur
2
VisducouvercleinférieurT20(x4)
3
JointdecâbleM20(x2)
4
Patte
41
FRANÇAIS
Page 42

AXISM11-ENetworkCameraSeries
A AAVIS VIS
VIS
Silecâbleréseaudisposed’unconnecteurréseaupré-installé,retirezlejointdecâbleet
utilisezlaprotectionduconnecteurfourniepourévitertoutendommagementdujointde
câble.Évitezd’utiliserdescâblesréseauéquipésdeconnecteursréseaurecouverts,carils
peuventendommagerlejointdecâble,etcemalgréleurprotection.
3.Faitespasserlecâbleréseauàtraverslejointdecâble.
4.Tirezlégèrementsurlecâbleréseaupourquelejoints’ajustedessus.
A AAVIS VIS
VIS
Sivousnetirezpassurlecâble,ilexisteunrisqued’inltrationd’eauetd’endommagement
duproduit.
5.Assurez-vousquelejointdecâbleestcorrectementinstallé.
6.Branchezlecâbleréseauauconnecteurréseau.
7.Sivousconnectezuncâbled’alimentationouunpériphériqued’entrée/sortieàlacaméra,
répétezlesétapesci-dessuspourchaquepériphérique.
42
Page 43

AXISM11-ENetworkCameraSeries
1
2
1
Câbled’alimentation(enoption)
2
Câbleréseau
8.Placezlecouvercleinférieursurlaxationmuraleetserrezlesvis(couple2Nm).
9.Vériezquelesvoyantssurlacaméraindiquentlesconditionscorrectes.
10.Desserrezlavisderéglagedusupportand’orienterlacaméradansladirectionvoulue.
43
FRANÇAIS
Page 44

AXISM11-ENetworkCameraSeries
1
2
3
4
1
Couvercleinférieur
2
VisT20(x4)
3
Fixationmurale
4
VisderéglagedusupportT30
12.Poursavoircommentvoirleuxdedonnéesvidéo,consultezUtilisezleproduit.
13.Réglezlamiseaupointetlezoom,cf.page45.
A AAVIS VIS
VIS
Assurez-vousdenepinceraucuncâbleàlafermetureduboîtier.
14.Fermezleboîtier.Assurez-vousdeserrerenalternancelesvisducouvercleinférieurde
quelquestoursàlafoisjusqu’àcequ’ellessoienttoutesbienserrées(couple1,5Nm).Cela
permettradegarantirquelejointducouvercleinférieurestcompressédefaçonrégulière.
Utilisezleproduit
SivoussouhaitezrechercherdesproduitsAxissurleréseauouleuraffecterdesadresses
IPsousWindows®,nousrecommandonsl’utilisationdesapplicationsAXISIPUtilityet
AXISCameraManagement.Cesdeuxapplicationssontgratuitesetpeuventêtretéléchargées
depuiswww.axis.com/techsup
44
Page 45

AXISM11-ENetworkCameraSeries
Leproduitpeutêtreutiliséaveclaplupartdessystèmesd’exploitationetdesnavigateurs.Les
navigateursrecommandéssont
•InternetExplorer
®
avecWindows
®
,
•Safari
®
avecOSX
®
et
•Chrome
TM
ouFirefox
®
aveclesautressystèmesd'exploitation.
Pourplusd’informationsconcernantl’utilisationduproduit,consultezlemanueldel’utilisateur
disponiblesurlesitewww.axis.com
Réglagedelamiseaupointetduzoom
1.Sinécessaire,retirezlecouverclesupérieurduboîtier.
2.Desserrezlavisdeverrouillagedelabaguedemiseaupoint.
3.RéglezlamiseaupointetlezoomensélectionnantSetup>Focus(Conguration>Mise
aupoint)surlapageWebduproduit.Suivezlesinstructionsdel’aideenligne.
4.Resserrezlavisdeverrouillagedelabaguedemiseaupoint.
1
2
3
4
1
Commandedezoom
2
Visdeverrouillage
3
Baguedemiseaupoint
4
Objectif
Note
Aprèsleréglageduzoometdelamiseaupoint,silamiseaupointn’estpasparfaitejusque
danslescoins,tournezl’objectifpourrevenirauxparamètrespardéfautcommeindiqué
dansl’illustrationci-dessus.Tournezensuitelentementl’objectifdanslesensdesaiguilles
d’unemontreoudanslesensinversepoureffectuerlamiseaupointdetouslescoins.
5.Fixezlecouverclesupérieurduboîtier.
45
FRANÇAIS
Page 46

AXISM11-ENetworkCameraSeries
Réinitialisationauxparamètresd’usinepardéfaut
Important
Laréinitialisationauxparamètrespardéfautdoitêtreutiliséeavecprudence.Cette
opérationreconguretouslesparamètres,ycomprisl’adresseIP,auxvaleursd’usinepar
défaut.
Note
Leslogicielsd’installationetdegestionsontdisponiblessurlespagesd’assistancedu
sitewww.axis.com/techsup
Pourréinitialiserl’appareilauxparamètresd’usinepardéfaut:
1.Déconnectezl’alimentationdel’appareil.
2.Maintenezleboutondecommandeenfoncéetremettezl’appareilsoustension.
ConsultezAperçudumatérielpage30.
3.Maintenezleboutondecommandeenfoncépendant15à30secondes,jusqu’àcequele
voyantd'étatpasseàl’orangeetclignote.
4.Relâchezleboutondecommande.Leprocessusestterminélorsquelevoyantd’étatpasse
auvert.Lesparamètresd’usinepardéfautdel’appareilontétérétablis.Enl’absenced’un
serveurDHCPsurleréseau,l’adresseIPpardéfautest192.168.0.90.
5.Utilisezlesoutilsd’installationetdegestionpourattribueruneadresseIP,congurerle
motdepasseetaccéderauuxdedonnéesvidéo.
Ilestégalementpossiblederétablirlesparamètresd’usineàpartirdel’interfaceWeb.Accédezà
Setup>SystemOptions>Maintenance(Conguration>Optionsdusystème>Maintenance).
Pourobtenirplusderenseignements
LeManueldel’utilisateurestdisponibleàl’adressesuivante:www.axis.com
Consultezlesitewww.axis.com/techsuppourvériersiunemiseàjourdumicroprogrammeest
disponiblepourvotreappareilréseau.Pourconnaîtrelaversiondumicroprogrammeactuellement
installée,reportez-vousàlapageSetup>About(Conguration>Àproposde).
VisitezlecentredeformationenligneAxissurlesitewww.axis.com/academypourensavoirplus
surlesformations,leswebinaires,lestutorielsetlesguides.
Informationssurlagarantie
PourobtenirdeplusamplesinformationssurlagarantieduproduitAXISetdesrenseignements
connexes,allezsurlesitewww.axis.com/warranty/
46
Page 47

AXISM11-ENetworkCameraSeries
Sicherheitsinformation
LesenSiedasInstallationshandbuchsorgfältigdurchbevorsiedasProduktinstallieren.Bewahren
SiedasInstallationshandbuchfürzukünftigeZweckeauf.
Gefährdungsstufen
GEFAHRWeistaufeinegefährlicheSituationhin,die,fallsnichtverhindert,
zuTododerschwerenVerletzungenführt.
WARNUNGWeistaufeinegefährlicheSituationhin,welche,fallsnicht
verhindert,zuTododerschwerenVerletzungenführenkann.
VORSICHTWeistaufeinegefährlicheSituationhin,welche,fallsnicht
verhindert,zugeringfügigerodermäßigerVerletzungführenkann.
HINWEIS HINWEIS
HINWEIS
WeistaufeinegefährlicheSituationhin,welche,fallsnicht
verhindert,zuSachschädenführenkann.
WeitereNachrichtenstufen
WichtigWeistaufwichtigeInformationenhin,diedenrichtigenBetrieb
desProduktsgewährleisten.
BeachtenWeistaufnützlicheInformationenhin,diedieoptimale
VerwendungdesProduktsunterstützen.
47
DEUTSCH
Page 48

AXISM11-ENetworkCameraSeries
Sicherheitsanweisungen
HINWEIS HINWEIS
HINWEIS
•DieAnwendungdesAxisProduktsmussunterBeachtungderörtlichgeltendenrechtlichen
Bestimmungenerfolgen.
•LagernSiedasAxisProduktineinertrockenenundbelüftetenUmgebung.
•AchtenSiedarauf,dassdasAxisProduktwederStößennochstarkemDruckausgesetztist.
•InstallierenSiedasProduktnichtaninstabilenHalterungen,OberächenoderWänden.
•VerwendenSiebeiderInstallationdesAxisProduktsausschließlichpassendeWerkzeuge.
EinzugroßerKraftaufwandmitelektrischenWerkzeugenkanndasProduktbeschädigen.
•VerwendenSiekeinechemischen,ätzendenoderaerosolhaltigenReinigungsmittel.
•VerwendenSiezumReinigeneinsauberes,mitlauwarmemWasserangefeuchtetesTuch.
•VerwendenSienurZubehör,dasdentechnischenDatendesProduktsentspricht.Dieses
istvonAxisoderDrittanbieternerhältlich.
•VerwendenSieausschließlichErsatzteiledievonAxisbereitgestelltoderempfohlen
werden.
•VersuchenSienicht,dasProduktselbstständigzureparieren.WendenSiesichbezüglich
ReparaturundWartungandenAxisSupportoderIhrenAxisHändler.
Transport
HINWEIS HINWEIS
HINWEIS
•BeiBedarftransportierenSiedasAxisProduktinderOriginalverpackungodereiner
entsprechendenVerpackung,sodassSchädenvermiedenwerden.
Batterie
DasAxis-Produktistmiteiner3,0V-BR/CR2032-Lithium-Batterieausgestattet,mitderdieinterne
Echtzeituhr(RTC)versorgtwird.UnternormalenBedingungenhatdieBatterieeineLebensdauer
vonmindestensfünfJahren.
BeientladenerBatterieistderBetriebderEchtzeituhrnichtmehrgewährleistet,sodassdieUhrbei
jedemSystemstartzurückgesetztwird.SieerhalteneineProtokollnachrichtimServerberichtdes
Produkts,wenneinBatteriewechselerforderlichist.WeitereInformationenüberdenServerbericht
ndenSieaufdenSetup-SeitendesProdukts,oderwendenSiesichandenAxisSupport.
DieBatteriesolltenurbeiBedarfersetztwerden.WendenSiesichindiesemFallandenAxis
Supportunterwww.axis.com/techsup.
48
Page 49

AXISM11-ENetworkCameraSeries
WARNUNG
•ExplosionsgefahrbeifehlerhaftemBatteriewechsel.
•DieBatteriedarfnurdurcheineidentischeBatterieodereinevonAxisempfohlene
Batterieersetztwerden.
•VerbrauchteBatteriensindgemäßdenörtlichenVorschriftenoderdenAnweisungendes
Herstellerszuentsorgen.
49
DEUTSCH
Page 50

50
Page 51

AXISM11-ENetworkCameraSeries
Installationsanleitung
IndieserAnleitungwirddieInstallationderAXISM1124-E/M1125-ENetzwerk-Kamerain
IhremNetzwerkbeschrieben.WeitereInformationenzurNutzungdiesesProduktsndenSieim
Benutzerhandbuchunterwww.axis.com.
Installationsschritte
1.StellenSiesicher,dassdiePackungsinhalte,Werkzeugeundanderenotwendige
MaterialienfürdieInstallationinOrdnungsind.SieheSeite51.
2.MachenSiesichmitderHardware-Übersichtvertraut.SieheSeite52.
3.MachenSiesichmitdentechnischenDatenvertraut.SieheSeite57.
4.InstallierenSiedieHardware.SieheSeite60.
5.ZugriffaufdasProdukt.SieheSeite66.
Lieferumfang
•AXISM1 124–E/M1 125–ENetzwerk-Kamera
•Anschlussblock-Anschlussausrüstung
•AXIST93G05Schutzgehäuse
-AXISDichtungCM20(1x)
-Antikondensationsbeutel
-TorxT20-Schraubendreher
-AXISAnschlussstückA
•AXIST94Q01A-Wandhalterung
-SchraubensetT30
•GedruckteDokumente
-Installationsanleitung(diesesDokument)
-InstallationsanleitungfürdieAXIST94Q01A-Wandhalterung
-ZusätzlicheEtikettenmitderSeriennummer(2x)
-AVHS-Authentizierungsschlüssel
EmpfohleneWerkzeuge
•BohrmaschinezurMontagederWandhalterung
•SchraubendreherfürSchraubenset
51
DEUTSCH
Page 52

AXISM11-ENetworkCameraSeries
OptionalesZubehör
•AXISTürschalterA
•AXIST94R01PKabelführungsdose
•Leuchten
•Gehäusehalterungen
•KabeldichtungenundKabelverschraubungen
•AXIST98A16-VEÜberwachungsschrank
•AXIST91A47Masthalterungen
•VT-Deckenhalterung(Kabel,int.)WCM4A
•VT-EckhalterungWCWA
Unterwww.axis.comndenSieInformationenüberverfügbaresZubehör.
ÜbersichtüberdieHardware
1
2
3
4
5
6
8
7
1
ObereAbdeckung
2
Frontfenster
3
Netzwerk-Kamera
4
Halterungsschraube(2x)
5
AufbohrungenfürzusätzlicheKabellöcher
6
Kabeldichtung
52
Page 53

AXISM11-ENetworkCameraSeries
7
Antikondensationsbeutel
8
Sicherheitsdraht
1
2
10
11
12
6
7
8
9
3
4
5
1
Zoomregler
2
Fokusring
3
Netzanschluss
4
Steuertaste
5
Netzwerkanschluss
6
Netz-LED
7
Status-LED
8
Netzwerk-LED
9
microSD-Karteneinschub
10
Blendenanschluss
11
E/A-Anschluss
12
1/4-Zoll-Schraubenloch
53
DEUTSCH
Page 54

AXISM11-ENetworkCameraSeries
Wandmontage
1
3
4
5
2
1
Netzwerkkabel(durchWandhalterungführen)
2
Stromkabel(durchWandhalterungführen)(fürProduktemitStromanschluss)
3
SchraubeT20(4x)
4
EinstellschraubeT30fürHalterung
5
Wandhalterung
54
Page 55

AXISM11-ENetworkCameraSeries
LEDs
Beachten
•DieStatus-LEDkannsoeingestelltwerden,dasssiewährenddesNormalbetriebsnicht
leuchtet.DieseKongurationkönnenSieunterSetup>SystemOptions>Ports&
Devices>LED(Setup>Systemoptionen>PortsundGeräte>LED)einstellen.Weitere
InformationenndenSieinderOnline-Hilfe.
•DieStatus-LEDkannsoeingestelltwerden,dasssieblinkt,wenneinEreignisaktivist.
•DieStatus-LEDkannsoeingestelltwerden,dasssieblinkt,wenndieEinheiterkanntwird.
RufenSieSetup>SystemOptions>Maintenance(Einrichtung>Systemoptionen>
Wartung)auf.
Status-LED
Bedeutung
Grün
LeuchtetbeiNormalbetriebgrün.
GelbLeuchtetbeimStartundbeimWiederherstellender
Einstellungen.
Beachten
DieNetzwerk-LEDkanndeaktiviertwerden,sodassSiebeiDatenverkehrüberdasNetzwerk
nichtblinkt.DieseKongurationkönnenSieunterSetup>SystemOptions>Ports&
Devices>LED(Setup>Systemoptionen>PortsundGeräte>LED)einstellen.Weitere
InformationenndenSieinderOnline-Hilfe.
Netzwerk-LEDBedeutung
Grün
LeuchtetbeiVerbindungmiteinem100MBit/s-Netzwerk.Blinkt
beiNetzwerkaktivität.
Gelb
LeuchtetbeiVerbindungmiteinem10MBit/s-Netzwerk.Blinkt
beiNetzwerkaktivität.
LeuchtetnichtKeineNetzwerkverbindungvorhanden.
Beachten
DieNetz-LEDkannsoeingestelltwerden,dasssiewährenddesNormalbetriebsnicht
leuchtet.DieseKongurationkönnenSieunterSetup>SystemOptions>Ports&
Devices>LED(Setup>Systemoptionen>PortsundGeräte>LED)einstellen.Weitere
InformationenndenSieinderOnline-Hilfe.
55
DEUTSCH
Page 56

AXISM11-ENetworkCameraSeries
Netz-LEDBedeutung
Grün
NormalerBetrieb.
Gelb
Blinktgrün/gelbbeiderFirmware-Aktualisierung.
AnschlüsseundTasten
FürdietechnischenDatenundBetriebsbedingungensieheSeite57.
Netzwerkanschluss
RJ-45-EthernetanschlussmitPoweroverEthernet(PoE).
HINWEIS HINWEIS
HINWEIS
DasProduktmussmiteinemabgeschirmtenNetzwerkkabel(STP)angeschlossenwerden.
AlleKabel,diedasProduktmitdemNetzwerkswitchverbinden,müssenhierfürausgelegt
sein.StellenSiesicher,dassdieNetzwerkgerätegemäßdenAnweisungendesHerstellers
installiertwurden.InformationenzugesetzlichenBestimmungenndenSieunter
ElectromagneticCompatibility(EMC)onpage2.
E/A-Anschluss
ZurVerwendungmitexternenGerätenwiezumBeispielinVerbindungmitManipulationsalarmen,
Bewegungserkennung,Ereignisauslösung,ZeitrafferaufnahmenundAlarmbenachrichtigungen.
Abgesehenvom0VDC-BezugspunktundStrom(Gleichstromausgang)verfügtdie
E/A-KlemmenleisteübereineSchnittstellezu:
•Digitalausgang–zumAnschlussexternerGerätewieRelaisundLEDs.
AngeschlosseneGerätekönnenüberdieVAPIX®ApplicationProgrammingInterface
(Programmierschnittstelle)mitdenSchaltächenfürdenAusgangaufderSeite„Live
View”oderdurcheineAktionsregelaktiviertwerden.DerAusgangwirdalsaktiv(siehe
SystemOptions>Ports&Devices(Systemoptionen>Anschlüsse&Geräte))angezeigt,
wenndasAlarmmeldegerätaktiviertist.
•Digitaleingang–AlarmeingangfürdenAnschlussvonGeräten,diezwischen
geöffnetemundgeschlossenemSchaltkreiswechselnkönnen,z.B.:PIR-Sensoren,
Tür-/Fensterkontakte,Glasbruchmelderusw.BeiEmpfangeinesSignalsändertsich
derStatusundderEingangwirdaktiviert(sieheSystemOptions>Ports&Devices
(Systemoptionen>Anschlüsse&Geräte)).
Netzanschluss
2-poligerAnschlussblockfürdieStromversorgung.VerwendenSieeinemitdenAnforderungen
fürSchutzkleinspannung(SELV)kompatibleStromquellemitbegrenzterLeistung(LPS)miteiner
Nennausgangsleistungvon≤100Wodereinemdauerhaftauf≤5AbegrenztenNennausgangsstrom.
56
Page 57

AXISM11-ENetworkCameraSeries
SD-Kartensteckplatz
HINWEIS HINWEIS
HINWEIS
•GefahrvonSchädenanderSD-Karte.VerwendenSiebeimEinlegenoderEntfernender
SD-Kartekeinescharfen/spitzenWerkzeugeundwendenSienichtzuvielKraftan.
•GefahrvorDatenverlust.UmeinerBeschädigungderAufnahmenvorzubeugen,solltedie
SD-KartevordemmechanischenAuswerfengetrenntwerden.RufenSiezumTrennen
Setup>SystemOptions>Storage>SDCard(Einrichtung>Systemoptionen>
Speicher>SD-Karte)aufundklickenSieaufUnmount(Trennen).
DiesesProduktunterstütztmicroSD-/microSDHC-/microSDXC-Karten(separaterhältlich).
EmpfehlungenzuSD-KartenndenSieunterwww.axis.com.
Steuertaste
DiePositionderSteuertastendenSieunter:ÜbersichtüberdieHardwareaufSeite52.
DieSteuertastehatfolgendeFunktionen:
•ZurücksetzendesProduktsaufdieWerkseinstellungen.SieheSeite68.
•VerbindenmiteinemAXISVideoHostingSystem-ServiceodereinemAXISInternet
DynamicDNS-Service.WeitereInformationenzudiesenDienstenndenSieinder
Bedienungsanleitung.
TechnischeDaten
Betriebsbedingungen
Produkt
Klassikation
Temperatur
Luftfeuchtigkeit
AXISM1124–E
AXISM1125–E
IEC60721-3-4Klasse3M4,
Klasse4M4
IEC/EN60529IP66
NEMA250Typ4X
-20°Cbis50°C
10bis100
%rF(kondensierend)
Stromverbrauch
HINWEIS HINWEIS
HINWEIS
VerwendenSieeineStromquellemitbegrenzterLeistung(LPS),entwedermiteiner
Nennausgangsleistungvon≤100Wodereinemdauerhaftauf≤5Abegrenzten
Nennausgangsstrom.
57
DEUTSCH
Page 58

AXISM11-ENetworkCameraSeries
Produkt
DC
PoE
AXISM1124–E
AXISM1125–E
8–28VDC
PoweroverEthernetIEEE
802.3afKlasse2
Kabelbereich
HINWEIS HINWEIS
HINWEIS
•VerwendenSieKabelausdemangegebenenKabelbereich.
•VerwendenSieKabel,diedenörtlichenVorschriftenentsprechen.
•StellenSiesicher,dassalleKabellöcherordnungsgemäßverschlossensind.
•VerwendenSieKabeldichtungenoderKabelverschraubungen,diesowohlzur
KabeldurchführungalsauchzumKabelbereichpassen.
Durchmesser
AWG
5bis15mm
Ca.4bis6/0
ÖffnenSiefürzusätzlicheKabellöcherdieAufbohrungeninderGehäuseunterseite.SieheÜbersicht
überdieHardwareaufSeite52.
Unterwww.axis.comndenSieInformationenüberZubehörwieKabeldichtungenund
KabelverschraubungenfürandereKabelbereiche.
Anschlüsse
E/A-Anschluss
4-poligerAnschlussblock
1
2 3 4
EinBeispielschaltbildndenSieunterAnschlussschaltbilderaufSeite60.
FunktionKon-taktHinweiseTechnischeDaten
0V(-)DC
1
0VDC
58
Page 59

AXISM11-ENetworkCameraSeries
Gleichstromausgang
2
KannfürdieStromversorgungvon
Zusatzgerätenverwendetwerden.
Hinweis:DieserKontaktkannnur
fürdenStromausgangverwendet
werden.
12VDC
Max.Stromstärke=
15mA
Digitaleingang
3
ZumAktivierenmitPin1verbinden;
zumDeaktivierennichtanschließen.
0bismax.30VDC
Digitalausgang
4
BeiAktivierungmitPin1verbunden;
wenndeaktiviert:frei(nicht
verbunden).BeiVerwendungmit
einerinduktivenLast,z.B.einem
Relais,mussparallelzurLastzum
SchutzvorSpannungsspitzeneine
Diodezwischengeschaltetwerden.
0bismax.30VDC,Open
Drain,100mA
Netzanschluss
2-poligerAnschlussblockfürdieGleichstromversorgung.Verwenden
SieeinemitdenAnforderungenfürSchutzkleinspannung(SELV)
kompatibleStromquellemitbegrenzterLeistung(LPS)miteiner
Nennausgangsleistungvon≤100Wodereinemdauerhaftauf
≤5AbegrenztenNennausgangsstrom.
59
DEUTSCH
Page 60

AXISM11-ENetworkCameraSeries
Anschlussschaltbilder
E/A-Anschluss
1
2
3
4
1
0V(-)DC
2
DC-Ausgang12V,max.15mA
3
E/AalsEingangkonguriert
4
E/AalsAusgangkonguriert
InstallierenderHardware
Wichtig
DieAXISM11-SerieistsowohlfürdieVerwendunginInnenräumenalsauchfürden
Außeneinsatzgeeignet.WennSiedieKameraimFreienverwendenmöchten,installieren
SiesieineinemzugelassenenGehäusefürdenAußenbereich.WeitereInformationenüber
GehäusefürdenAußenbereichndenSieunterwww.axis.com.
1.WennSieeinemicroSD-KartealslokalenSpeicherverwenden,schiebenSiedieKartein
denSD-KarteneinschubderKamera.SieheÜbersichtüberdieHardwareaufSeite52.
2.BringenSiedieWandhalterungan.SieheSeite61.
3.MontierenSiedasGehäuse.SieheSeite63.
60
Page 61

AXISM11-ENetworkCameraSeries
MontagederWandhalterung
VORSICHT
StellenSiesicher,dassSiediefürdasMaterial(z.B.Holz,Metall,Gipskarton,Stein)
geeignetenSchraubenundDübelverwendenunddasMaterialstabilgenugist,umdas
GesamtgewichtvonKamera,GehäuseundWandhalterungzutragen.
Beachten
•WeitereInformationenndenSieinderbeiliegendenInstallationsanleitungfürdie
Wandhalterungoderunterwww.axis.com.
•DietechnischenDatenderAnschlüssendenSieimBenutzerhandbuchderKameraunter
www.axis.com.
1.BereitenSiedieWandfürdieInstallationderWandhalterungvor.MarkierenSievordem
BohrendieBohrlöchermitderWandhalterungalsVorlage.
2.FührenSiedasNetzwerkkabelundggf.dasNetzkabeldurchdieWandhalterung.Lassen
SiezumAnschließenderKameraca.30cmKabelfrei.
3.WennSieeinzusätzlichesGerätandieKameraanschließen,z.B.einE/A-oder
Audiogerätbzw.einexternesNetzteil,wiederholenSiedieobenaufgeführtenSchritte
fürjedesGerät.
4.BefestigenSiedieWandhalterunganderWand,indemSiedieSchraubenfestziehen.
EinbauenderKameraindasGehäuse
1.GleichenSiediePositiondesHaltersvorsichtiganundziehenSiedanndieSchrauben
desHaltersfest(Drehmoment0,5Nm).
HINWEIS HINWEIS
HINWEIS
DieAnforderungenfürdieIK10-ZertizierungkönnenSieerfüllen,indemSiediePosition
desHalterssoeinstellen,dassdasObjektiv(4)unddieKantedesGehäuses(3)wieinder
Abbildungdargestelltaneinanderausgerichtetsind.
61
DEUTSCH
Page 62

AXISM11-ENetworkCameraSeries
1
2
4
3
1
SchraubeT20fürHalter(2x)
2
Halter
3
Gehäusekante
4
Objektiv
2.EntfernenSiediePlastikschutzhülledesAntikondensationsbeutelsundlegenSieden
AntikondensationsbeutelinnenandieGehäusewand.
1
1
Antikondensationsbeutel
62
Page 63

AXISM11-ENetworkCameraSeries
AnbringendesGehäusesanderWandhalterung
HINWEIS HINWEIS
HINWEIS
•VerwendenSieKabelausdemangegebenenKabelbereich,sieheSeite58.Wenneine
andereKabeldichtungalsdiemitgelieferteverwendetwird,kannWassereindringen
unddasProduktbeschädigen.Unterwww.axis.comndenSieInformationenzu
KabeldichtungenundKabelverschraubungenfürandereKabelbereiche.
•WirdmehralseinKabelverwendet,mussjedesKabeldurcheineseparateKabeldichtung
geführtwerden.
•ÖffnenSiebeidenverwendetenKabeldichtungennureinLoch.WenneineKabeldichtung
eingerissenist,ersetzenSiediesedurcheineneue.WenneineKabeldichtunggeöffnet
bleibtodereineeingerisseneKabeldichtungverwendetwird,kannWassereindringenund
dasProduktbeschädigen.
1.LösenSiedieSchraubenanderunterenAbdeckung,undhebenSiedieobereAbdeckung
an.
2.WählenSiediezuverwendendeKabeldichtungaus,undziehenSieanderLasche,um
einLochfürdasNetzwerkkabelzuöffnen.
1
2
4
3
1
UntereAbdeckung
2
SchraubeT20füruntereAbdeckung(4x)
3
KabeldichtungM20(2x)
4
Lasche
63
DEUTSCH
Page 64

AXISM11-ENetworkCameraSeries
HINWEIS HINWEIS
HINWEIS
WenndasNetzwerkkabelübereinenvormontiertenNetzwerksteckerverfügt,entfernenSie
dieKabeldichtungundverwendenSiedasmitgelieferteAnschlussstück,umeinReißender
Kabeldichtungzuverhindern.VerwendenSiekeineNetzwerkkabel,dieNetzwerkstecker
mitDeckelnaufweisen,dadieseauchbeiVerwendungdesAnschlussstückszumReißen
derKabeldichtungführenkönnen.
3.FührenSiedasNetzwerkkabeldurchdieKabeldichtung.
4.ZiehenSiedasNetzwerkkabeleinwenigzurück,bisdieKabeldichtungbündigumdas
Kabelsitzt.
HINWEIS HINWEIS
HINWEIS
WirddasKabelnichtzurückgezogen,kannWassereindringenunddasProduktbeschädigen.
5.VergewissernSiesich,dassdieKabeldichtungordnungsgemäßsitzt.
6.SchließenSiedasNetzwerkkabelandenNetzwerkanschlussan.
7.WennSieeinNetzkabelodereinE/A-GerätandieKameraanschließen,wiederholenSie
dieobenaufgeführtenSchrittefürdasjeweiligeGerät.
64
Page 65

AXISM11-ENetworkCameraSeries
1
2
1
Netzkabel(optional)
2
Netzwerkkabel
8.SetzenSiedieuntereAbdeckungaufdieWandhalterungundziehendieSchrauben
an(Drehmoment2Nm).
9.VergewissernSiesich,dassdieKamera-LEDsdierichtigenBedingungenanzeigen.
10.LösenSiedieEinstellschraubederHalterungundrichtenSiedieKameraaufdas
gewünschteZielaus.
65
DEUTSCH
Page 66

AXISM11-ENetworkCameraSeries
1
2
3
4
1
UntereAbdeckung
2
SchraubeT20(4x)
3
Wandhalterung
4
EinstellschraubeT30fürHalterung
12.InformationenzumAnzeigendesVideostromsndenSieunterZugriffaufdasProdukt.
13.StellenSieFokusundZoomein.SieheSeite67.
HINWEIS HINWEIS
HINWEIS
StellenSiesicher,dassbeimSchließendesGehäuseskeineKabeleingeklemmtwerden.
14.SchließenSiedasGehäuse.ZiehenSiedieSchraubenderunterenAbdeckungimWechsel
jeweilswenigeUmdrehungenan,bissiefestsitzen(Drehmoment1,5Nm).Aufdiese
Weisewirdsichergestellt,dassdieDichtungderunterenAbdeckunggleichmäßigsitzt.
ZugriffaufdasProdukt
FürdieSuchenachAxisProduktenimNetzwerkundzurZuweisungeinerIP-Adresseunter
Windows®werdenAXISIPUtilityundAXISCameraManagementempfohlen.BeideAnwendungen
sindkostenlosundkönnenvonunsererWebsiteunterwww.axis.com/techsupheruntergeladen
werden.
66
Page 67

AXISM11-ENetworkCameraSeries
DasProduktistmitdenmeistenStandard-BetriebssystemenundBrowsernkompatibel.Empfohlen
werdendieBrowser
•InternetExplorer
®
unterWindows
®
•Safari
®
unterOSX®und
•Chrome
TM
oderFirefox
®
unteranderenBetriebssystemen.
WeitereInformationenzurNutzungdiesesProduktsndenSieimBenutzerhandbuchunter
www.axis.com.
EinstellenvonFokusundZoom
1.NehmenSieggf.dieobereAbdeckungdesGehäusesab.
2.LösenSiedieFeststellschraubefürdenFokusring.
3.StellenSieFokusundZoomein,indemSieaufderWebseitedesProduktsSetup>Focus
(Setup>Fokus)aufrufen.FolgenSiedenAnweisungeninderOnlinehilfe.
4.ZiehenSiedieFeststellschraubefürdenFokusringwiederfest.
1
2
3
4
1
Zoomregler
2
Feststellschraube
3
Fokusring
4
Objektiv
Beachten
DrehenSiedasObjektivaufdieinderobigenAbbildunggezeigteWerkseinstellung,wenn
beimEinstellenvonZoomundFokuskeinoptimalerFokusindenEckenerzieltwird.Drehen
SiedasObjektivanschließendvorsichtigimbzw.entgegendemUhrzeigersinn,bisdasBild
inallenEckenscharfist.
5.BringenSiedieobereAbdeckungamGehäusean.
67
DEUTSCH
Page 68

AXISM11-ENetworkCameraSeries
ZurücksetzenaufWerkseinstellungen
Wichtig
DasZurücksetzenaufdieWerkseinstellungensolltemitVorsichtverwendetwerden.Beim
ZurücksetzenaufdieWerkseinstellungenwerdenalleEinstellungeneinschließlichder
IP-AdresseaufdieWerkseinstellungenzurückgesetzt.
Beachten
DieSoftware-ToolsfürInstallationundVerwaltungsindüberdieSupportseitenunter
www.axis.com/techsupverfügbar.
SowirddasProduktaufdieWerkseinstellungenzurückgesetzt:
1.TrennenSiedasProduktvonderStromversorgung.
2.HaltenSiedieSteuertastegedrücktundsteckenSiedenNetzsteckerwiederein.Siehe
ÜbersichtüberdieHardwareaufSeite52.
3.HaltenSiedieSteuertasteetwa15bis30Sekundengedrückt,bisdieLED-Statusanzeige
gelbblinkt.
4.LassenSiedieSteuertastelos.DerVorgangistabgeschlossen,wenndie
LED-Statusanzeigegrünleuchtet.DasProduktwurdeaufdieWerkseinstellungen
zurückgesetzt.WennkeinDHCP-ServerimNetzwerkverfügbarist,lautetdie
Standard-IP-Adresse192.168.0.90.
5.VerwendenSiedieSoftware-ToolsfürInstallationundVerwaltung,umeineIP-Adresse
zuzuweisen,einKennworteinzurichtenundaufdenVideostreamzuzugreifen.
DieParameterkönnenauchüberdieWeboberächeaufdieWerkseinstellungenzurückgesetzt
werden.RufenSieSetup>SystemOptions>Maintenance(Setup>Systemoptionen>
Wartung)auf.
WeitereInformationen
DasBenutzerhandbuchndenSieunterwww.axis.com.
Unterwww.axis.com/techsupndenSieFirmware-AktualisierungenfürIhreNetzwerkprodukte.Um
dieaktuellinstallierteFirmware-Versionzusehen,gehenSieaufEinrichten>Über.
BesuchenSiedasAxis-Schulungszentrumwww.axis.com/academyfüranregendeSchulungen,
Webinare,LernprogrammeundAnleitungen.
Gewährleistung
InformationenzurGewährleistungderAxisProdukteundhierzuverbundeneInformationen,nden
Sieunterwww.axis.com/warranty/
68
Page 69

AXISM11-ENetworkCameraSeries
Informazionidisicurezza
Leggereconattenzionequestaguidaall'installazioneprimadiinstallareildispositivo.Conservare
questodocumentoperusifuturi.
Livellidipericolo
PERICOLO
Indicaunasituazionepericolosache,senonevitata,provocamorte
olesionigravi.
AVVERTENZAIndicaunasituazionepericolosache,senonevitata,puòprovocare
lamorteolesionigravi.
ATTENZIONE
Indicaunasituazionepericolosache,senonevitata,puòprovocare
lesionimedieominori.
A AAVVISO VVISO
VVISO
Indicaunasituazioneche,senonevitata,puòdanneggiarela
proprietà.
Altrilivellidimessaggio
ImportanteIndicainformazioniimportanti,essenzialiperilcorretto
funzionamentodeldispositivo.
NotaIndicainformazioniutilicheaiutanoaottenereilmassimodal
dispositivo.
69
ITALIANO
Page 70

AXISM11-ENetworkCameraSeries
Istruzionidisicurezza
A AAVVISO VVISO
VVISO
•IldispositivoAxisdeveessereutilizzatoinconformitàalleleggiealledisposizionilocali.
•ConservareildispositivoAxisinunambienteasciuttoeventilato.
•EvitarediesporreildispositivoAxisaurtiopressionieccessive.
•Noninstallareildispositivosusupporti,supercioparetiinstabili.
•UtilizzaresolostrumentiapplicabiliquandosiinstallaildispositivoAxis.Sesiutilizzauna
forzaeccessivaconglistrumentidell'alimentazioneèpossibilecausaredannialdispositivo.
•Nonutilizzaresostanzechimiche,agenticausticiodetergentiaerosol.
•Utilizzareunpannopulitoinumiditoinacquapuraperlapulizia.
•Utilizzaresoloaccessoricompatibiliconlespecichetecnichedeldispositivo.Questi
possonoesserefornitidaAxisodaterzeparti.
•UtilizzaresolopartidiricambioforniteoconsigliatedaAxis.
•Nontentarediriparareildispositivodasoli.Contattarel'assistenzaoilrivenditoreAxis
perquestionirelativeallamanutenzione.
Trasporto
A AAVVISO VVISO
VVISO
•DuranteiltrasportodeldispositivoAxis,utilizzarel'imballaggiooriginaleoequivalente
perevitaredannialdispositivo.
Batteria
IlprodottoAxisutilizzaunabatteriaallitioda3,0VBR/CR2032comealimentazioneperilsuo
real-timeclock(RTC)interno.Incondizioninormaliquestabatteriaavràunadurataminima
dicinqueanni.
UnabassacaricadellabatteriainuiscesulfunzionamentodelRTC,facendoloresettareaogni
accensione.Quandolabatteriadeveesseresostituita,unmessaggiodiregistrovienevisualizzato
nelreportserverdelprodotto.Perulterioriinformazionisulreportserver,vederelepaginedi
congurazionedelprodottoocontattarel'assistenzaAxis.
Labatterianondeveesseresostituitasenonrichiesto,manelcasoincuiquestofossenecessario,
contattareilsupportoAxisall'indirizzowww.axis.com/techsupperassistenza.
70
Page 71

AXISM11-ENetworkCameraSeries
AVVERTENZA
•Rischiodiesplosioneselabatteriavienesostituitainmodoerrato.
•SostituiresoloconunabatteriaidenticaounabatteriaconsigliatadaAxis.
•Smaltirelebatterieusateinbaseallenormativelocalioalleistruzionidelproduttore
dellabatteria.
71
ITALIANO
Page 72

72
Page 73

AXISM11-ENetworkCameraSeries
Guidaall'installazione
LapresenteGuidaall'installazionefornisceleistruzioninecessarieperinstallarelatelecameradi
reteAXISM1 124-E/M1125-Enellareteinuso.Perulterioriinformazionisull'utilizzodeldispositivo,
consultarelaguidaperl'utentedisponibileall'indirizzowww.axis.com
Procedurediinstallazione
1.Assicurarsicheilcontenutodellaconfezione,glistrumentiealtrimaterialinecessariper
l'installazionesianoinordine.Consultarepagina73.
2.Studiareladescrizionedell'hardware.Consultarepagina74.
3.Studiarelespeciche.Consultarepagina79.
4.Installazionedell’hardware.Consultarepagina82.
5.Accederealprodotto.Consultarepagina88.
Contenutodellaconfezione
•TelecameradireteAXISM1124–E/M1125–E
•Kitdiconnessionedellamorsettiera
•CustodiaprotettivaAXIST93G05
-GuarnizioneCM20AXIS(x1)
-Sacchettodell'essiccante
-CacciaviteTorxT20
-ProtezionedelconnettoreAXISA
•SupportopermontaggioapareteAXIST94Q01A
-PuntadacacciaviteT30
•Materialistampati
-Guidaall'installazione(questodocumento)
-Guidaall'installazionedelsupportoapareteAXIST94Q01A
-Etichettaaggiuntivaconnumerodiserie(2x)
-ChiavediautenticazioneAVHS
Strumenticonsigliati
•Trapano(perl'installazionedelsupportoperilmontaggioaparete)
•Cacciaviteperpunta
73
ITALIANO
Page 74

AXISM11-ENetworkCameraSeries
Accessoriopzionali
•InterruttoreperportaAXISA
•ScatoladicollegamentoAXIST94R01P
•Illuminatori
•Supportiperilmontaggiodell'alloggiamento
•Pressacavieguarnizionipercavi
•ArmadiodisorveglianzaAXIST98A16-VE
•SupportiperilmontaggiosupaloAXIST91A47
•CavointernostaffaasofttoVTWCM4A
•SupportoperilmontaggioadangoloVTWCWA
VisitareilsitoWebwww.axis.comperottenereinformazionisugliaccessoridisponibili.
Panoramicadell'hardware
1
2
3
4
5
6
8
7
1
Coperchiosuperiore
2
Finestraanteriore
3
Telecameradirete
4
Vitedelsupporto(2x)
5
Preforiperulterioriforipericavi
6
Guarnizionepercavi
7
Sacchettodell'essiccante
74
Page 75

AXISM11-ENetworkCameraSeries
8
Cavodisicurezza
1
2
10
11
12
6
7
8
9
3
4
5
1
Levettazoom
2
Ghieradimessaafuoco
3
Connettoredialimentazione
4
Pulsantedicomando
5
Connettoredirete
6
LEDdialimentazione
7
LEDdistato
8
LEDdirete
9
SlotperschedamicroSD
10
Connettoredeldiaframma
11
ConnettoreI/O
12
Forolettatoda¼"
75
ITALIANO
Page 76

AXISM11-ENetworkCameraSeries
Montaggioaparete
1
3
4
5
2
1
Cavodirete(dainstradareattraversolastaffaaparete)
2
Cavodialimentazione(dainstradareattraversolastaffaaparete)(perdispositivi
dotatidiconnettoredialimentazione)
3
ViteT20(4x)
4
VitediregolazionedellastaffaT30
5
Supportopermontaggioaparete
76
Page 77

AXISM11-ENetworkCameraSeries
IndicatoriLED
Nota
•LostatodelLEDpuòessereconguratoperesserespentoduranteilnormale
funzionamento.Percongurarlo,selezionareSetup>SystemOptions>Ports&Devices
>LED(Congurazione>Opzionidisistema>Porte&Dispositivi>LED).Perulteriori
informazioni,consultarel'aiutoinlinea.
•IlLEDdistatopuòessereconguratoperlampeggiarequandouneventoèattivo.
•IlLEDdistatopuòessereconguratoperlampeggiareperidenticarel'unità.Andare
suSetup>SystemOptions>Maintenance(Congurazione>Opzionidisistema
>Manutenzione).
LEDdistatoIndicazione
VerdeLuceverdessa:condizionidinormaleutilizzo.
Giallo
Fissadurantel'avvioequandosiripristinanoleimpostazioni.
Nota
IlLEDdiretepuòesseredisattivatoinmododanonlampeggiareincasoditrafco
direte.Percongurarlo,selezionareSetup>SystemOptions>Ports&Devices>
LED(Congurazione>Opzionidisistema>Porte&Dispositivi>LED).Perulteriori
informazioni,consultarel'aiutoinlinea.
LEDdireteIndicazione
Verde
Lucessaperconnessionediretea100Mbit/s.Luce
lampeggiante:attivitàdirete.
Giallo
Lucessaperconnessionediretea10Mbit/s.Luce
lampeggiante:attivitàdirete.
Spento
Assenzadiconnessione.
Nota
IlLEDdialimentazionepuòessereconguratoperesserespentoduranteilnormale
funzionamento.Percongurarlo,selezionareSetup>SystemOptions>Ports&Devices
>LED(Congurazione>Opzionidisistema>Porte&Dispositivi>LED).Perulteriori
informazioni,consultarel'aiutoinlinea.
77
ITALIANO
Page 78

AXISM11-ENetworkCameraSeries
LEDdialimentazioneIndicazione
VerdeNormaleutilizzo.
Giallo
Lucelampeggianteverde/gialla:aggiornamentormware.
Connettoriepulsanti
Perlespecicheelecondizionidifunzionamento,consultarepagina79.
Connettoredirete
ConnettoreEthernetRJ45conPoweroverEthernet(PoE+).
A AAVVISO VVISO
VVISO
Collegareildispositivoconuncavodireteschermato(STP).Tuttiicavichecolleganoil
dispositivoallaretesonodestinatiallorousospecico.Accertarsicheidispositividirete
sianoinstallatisecondoleistruzionidelproduttore.Permaggioriinformazionisuirequisiti
normativi,consultareElectromagneticCompatibility(EMC)onpage2.
ConnettoreI/O
Utilizzarecondispositiviesterniincombinazionecon,adesempio,allarmiantimanomissione,
rilevazionedelmovimento,attivazionedieventi,registrazionetemporizzataenotichediallarme.
Oltrealpuntodiriferimento0VCCeall'alimentazione(uscitaCC),ilconnettoreI/Ofornisce
l'interfacciaper:
•Uscitadigitale–PercollegaredispositiviesternicomerelèoLED.Leperiferichecollegate
possonoessereattivatetramiteVAPIX®API(interfacciaperlaprogrammazionedi
applicazioni),tramiteipulsantidicomandodellapaginaLiveView(Immaginidalvivo)
oppuretramitel'opzioneActionRule(regoladiazione).L’uscitaverràvisualizzatacome
attiva(visualizzatainOpzionidiSistema>PorteeDispositivi)seildispositivodi
allarmeèattivato.
•Ingressodigitale–Ingressoallarmeutilizzabilepercollegareleperiferiche,chepuò
passaredalcircuitochiusoalcircuitoaperto,adesempio:Sensoridimovimento(PIR),
contattiporta/nestra,rilevatoridirotturavetriecosìvia.Dopolaricezionedelsegnale
lostatocambiael’ingressodiventaattivo(visualizzatoinSystemOptions>Ports&
Devices(OpzionidiSistema>PorteeDispositivi)).
Connettoredialimentazione
Morsettieraa2pinperingressoalimentazione.Utilizzareunasorgentedialimentazionelimitata
(LPS)compatibileconunabassissimatensionedisicurezza(SELV)conunapotenzadiuscita
nominalelimitataa≤100Wounacorrentenominalediuscitalimitataa≤5A.
78
Page 79

AXISM11-ENetworkCameraSeries
SlotperschedaSD
A AAVVISO VVISO
VVISO
•RischiodidanniallaschedaSD.Nonutilizzarestrumentiappuntitienonesercitare
eccessivaforzadurantel'inserimentoolarimozionedellaschedaSD.
•Rischiodiperditadidati.Perprevenireildanneggiamentodeidati,laschedaSDdeve
esserescollegataprimadellarimozione.Perscollegare,andareaSetup>SystemOptions
>Storage>SDCard(Congurazione>Opzionidisistema>Archiviazione>Scheda
SD)efareclicsuUnmount(Smonta).
QuestodispositivosupportaschedemicroSD/microSDHC/microSDXC(schedadimemorianon
inclusa).
PericonsiglisullaschedaSD,visitareilsitoWebwww.axis.com.
Pulsantedicomando
Perl'ubicazionedelpulsantedicomando,vederePanoramicadell'hardwareallapagina74.
Ilpulsantedicomandovieneutilizzatoper:
•Ripristinodeldispositivoalleimpostazionipredenitedifabbrica.Consultarepagina90.
•CollegamentoaunservizioAXISVideoHostingSystemoAXISInternetDynamicDNS
Service.Perulterioriinformazionisuquestiservizi,consultareilManualeUtente.
Datitecnici
Condizionidifunzionamento
Dispositivo
Classicazione
Temperatura
Umidità
AXISM1124–E
AXISM1125–E
IEC60721-3-4Classe3M4,
Classe4M4
IEC/EN60529IP66
NEMA250Tipo4X
Da-20°Ca50°C
(da-4°Fa122°F)
10-100%(
umiditàrelativaconcondensa)
Consumoenergetico
A AAVVISO VVISO
VVISO
Utilizzareunasorgentedialimentazionelimitata(LPS)siaconunapotenzadiuscita
nominalelimitataa≤100Wounacorrentenominalediuscitalimitataa≤5A.
79
ITALIANO
Page 80

AXISM11-ENetworkCameraSeries
Dispositivo
CC
PoE
AXISM1124–E
AXISM1125–E
8-28VCC
PoweroverEthernetIEEE
802.3afClasse2
Areadeicavi
A AAVVISO VVISO
VVISO
•Utilizzarecavidilunghezzaadeguataall'areaspecicata.
•Selezionareicavinelrispettodellenormativelocali.
•Vericarecheiforideicavisianocorrettamentesigillati.
•Usareguarnizionipercaviopressacavicorrispondentialforoeall'areadeicavi.
Diametro
AWG
Da5a15mm(da0,197a0,591pollici)
Approssimativamenteda4a6/0
Percreareulterioriforipericavi,aprireipreforicollocatinellaparteinferioredellacustodia.
ConsultarePanoramicadell'hardwareallapagina74.
Perinformazionisugliaccessoridisponibili,comeadesempioguarnizionipercaviepressacavi
adattiperaltreareedeicavi,visitareilsitoWebwww.axis.com.
Connettori
ConnettoreI/O
Morsettieraa4pin
1
2 3 4
Perunesempiodischema,consultareSchemadelleconnessioniallapagina82.
FunzionePinNote
Speciche
0VCC(-)
1
0VCC
80
Page 81

AXISM11-ENetworkCameraSeries
UscitaCC
2
Puòessereutilizzatoancheperalimentare
unaperifericaausiliaria.
Nota:questopinpuòessereusatosolo
comeuscitaalimentazione.
12VCC
Caricomassimo=15mA
Ingresso
digitale
3
Collegarealpin1perattivarlooppure
lasciarloisolato(scollegato)per
disattivarlo.
Da0amax30VCC
Uscita
digitale
4
Collegarealpin1quandoattiva,isolata
(scollegata)quandoinattiva.Seutilizzata
conuncaricoinduttivo,adesempioun
relèesterno,ènecessariocollegareun
diodoinparalleloalcaricoperproteggere
ildispositivodasovratensioni.
Da0amax30VCC,
open-drain,100mA
Connettoredialimentazione
Morsettieraa2pinperingressoalimentazioneCC.Utilizzareuna
sorgentedialimentazionelimitata(LPS)compatibileconunabassissima
tensionedisicurezza(SELV)conunapotenzadiuscitanominalelimitata
a≤100Wounacorrentenominalediuscitalimitataa≤5A.
81
ITALIANO
Page 82

AXISM11-ENetworkCameraSeries
Schemadelleconnessioni
ConnettoreI/O
1
2
3
4
1
0VCC(-)
2
UscitaCC12V,max15mA
3
I/Oconguratocomeingresso
4
I/Oconguratocomeuscita
Installazionedell'Hardware
Importante
LaserieAXISM11èstataprogettataperl'usoinambientiinterniedesterni.Perutilizzare
latelecameraall'esterno,installarlainunacustodiaperesterniapprovata.Andaresu
www.axis.comperulterioriinformazionisullecustodiedaesterni.
1.SesiutilizzaunaschedamicroSDperl'archiviazionelocale,inserirlanell'appositoslot
dellatelecamera,comeindicatoinPanoramicadell'hardwareallapagina74.
2.Installareilsupportoperilmontaggioaparete,comeindicatoinpagina83.
3.Installarelacustodia,comeindicatoinpagina85.
82
Page 83

AXISM11-ENetworkCameraSeries
Installazionedelsupportoperilmontaggioaparete
ATTENZIONE
Vericarechelevitieitassellisianoadattialmaterialedellaparete(es.legno,metallo,
cartongesso,pietra)echeilmaterialesiaingradodisosteneretelecamera,custodiae
supportoperilmontaggioaparete.
Nota
•Perinformazioni,consultareanchelaguidaall'installazionedelsupportodimontaggioa
paretepresentenellaconfezioneedisponibileall'indirizzowww.axis.com
•Perlespecichetecnichedeiconnettori,consultarelaguidaperl'utentedellatelecamera
sulsitowww.axis.com
1.Prepararelapareteperl'installazionedelsupporto.Utilizzareilsupportoperilmontaggio
aparetecomeproloecontrassegnareipuntidatrapanare.
2.Inserireilcavodiretee,senecessario,ilcavodialimentazioneattraversolastaffaper
ilmontaggioaparete.Lasciarecirca30cm(1 1,8pollici)dicavoperilcollegamento
allatelecamera.
3.Incasodiconnessionediundispositivo(es.diI/O,audiooalimentazioneesterna)alla
telecamera,ripetereilpassaggioprecedente(seconsentitoperildispositivoinquestione).
4.Fissarelastaffaallapareteserrandoleviti.
Installazionedellatelecameranellacustodia
1.Regolareconcuralaposizionedelsupportoeserrareleviti(conunacoppiadi0,5Nm).
A AAVVISO VVISO
VVISO
PersoddisfareirequisitidellaclassicazioneIK10,regolarelaposizionedelsupportoin
modochel'obiettivodellatelecamera(4)risultiallineatoconilbordodellacustodia(3),
comemostratonell'illustrazione.
83
ITALIANO
Page 84

AXISM11-ENetworkCameraSeries
1
2
4
3
1
VitedelsupportoT20(2x)
2
Supporto
3
Bordodellacustodia
4
Obiettivodellatelecamera
2.Rimuoverelabustadiplasticadelsacchettodell'essiccanteecollocareilsacchetto
dell'essiccantesullapareteinternadellacustodia.
1
1
Sacchettodell'essiccante
84
Page 85

AXISM11-ENetworkCameraSeries
Installazionedellacustodiasulsupportoperilmontaggioaparete
A AAVVISO VVISO
VVISO
•Utilizzarecavidilunghezzaadeguataall'areacavispecicata,vederepagina80.L'utilizzo
diunaguarnizionepercavidiversadaquellaindotazionepuòcausareinltrazionid'acqua
edannialprodotto.Perinformazionisulleguarnizionipercavieipressacaviadattiper
altreareedeicavi,visitareilsitoWebwww.axis.com.
•Utilizzandopiùdiuncavo,instradareciascuncavoattraversounaguarnizioneseparata.
•Aprireunforosolonelleguarnizioniutilizzateesostituirleincasodidanno.Una
guarnizionepercaviapertaodanneggiatapotrebbecausareinltrazionid'acquanel
prodottoegravidanni.
1.Allentarelevitidelcoperchioinferioreesollevareilcoperchiosuperiore.
2.Sceglierelaguarnizionepercavidausareetirarelalinguettaperaprireilforoper
ilcavodirete.
1
2
4
3
1
Coperchioinferiore
2
VitedelcoperchioinferioreT20(4x)
3
GuarnizionecavoM20(2x)
4
Linguetta
A AAVVISO VVISO
VVISO
Seilcavodiretedisponediunconnettorepreinstallato,rimuoverelaguarnizionepercavie
usarelaprotezionedelconnettoreindotazioneperevitaredanniallaguarnizione.Non
usarecavidiretedotatidiconnettoridiretecontappi,poichépotrebberodanneggiarela
guarnizionedelcavononostantelaprotezionedelconnettore.
85
ITALIANO
Page 86

AXISM11-ENetworkCameraSeries
3.Inserireilcavodireteattraversolaguarnizionepercavi.
4.Tiraredelicatamenteilcavodireteinmododaadattarelaguarnizionealcavo.
A AAVVISO VVISO
VVISO
Seilcavononvienetiratopotrebberovericarsiinltrazionid'acquaedannialdispositivo.
5.Vericareilcorrettomontaggiodellaguarnizionedelcavo.
6.Collegareilcavodiretealconnettoredirete.
7.IncasodiconnessionediuncavodialimentazioneodiundispositivoI/Oallatelecamera,
ripetereipassaggiprecedenti(seconsentitoperildispositivoinquestione).
86
Page 87

AXISM11-ENetworkCameraSeries
1
2
1
Cavodialimentazione(opzionale)
2
Cavodirete
8.Inserireilcoperchioinferioresulsupportoperilmontaggioapareteeserrareleviti
(conunacoppiadi2Nm).
9.VericarecheiLEDdellatelecameraindichinolecorrettecondizioni.
10.Allentarelavitediregolazionedellastaffaperorientarelatelecameraversoilpunto
desiderato.
87
ITALIANO
Page 88

AXISM11-ENetworkCameraSeries
1
2
3
4
1
Coperchioinferiore
2
ViteT20(4x)
3
Montaggioaparete
4
VitediregolazionedellastaffaT30
12.Perinformazionisullavisualizzazionedelussovideo,vedereAccederealdispositivo.
13.Regolarelamessaafuocoelozoom,comeindicatoinpagina89.
A AAVVISO VVISO
VVISO
Vericarecheicavinonrestinoincastratidurantelachiusuradellacustodia.
14.Chiuderelacustodia.Girarelevitidelcoperchioinferioreinmanieraalternatanoa
quandononsarannotutteserrate(conunacoppiadi1,5Nm).Inquestomodoèpossibile
comprimerelaguarnizionedelcoperchioinferioreinmodouniforme.
Accederealdispositivo
AXISIPUtilityeAXISCameraManagementsonoimetodiconsigliatipertrovareidispositiviAxisin
reteeassegnarelorounindirizzoIPinWindows®.Questeapplicazionisonoentrambegratuitee
possonoesserescaricatedawww.axis.com/techsup
88
Page 89

AXISM11-ENetworkCameraSeries
Ildispositivopuòessereutilizzatoconlamaggiorpartedeisistemioperativiedeibrowser.
Ibrowserconsigliatisono
•InternetExplorer
®
conWindows
®
•Safari
®
conOSX
®
e
•Chrome
TM
oFirefox
®
conaltrisistemioperativi.
Perulterioriinformazionisull'utilizzodeldispositivo,consultarelaGuidaperl'utentedisponibile
all'indirizzowww.axis.com
Regolazionedellamessaafuocoedellozoom
1.Senecessario,rimuoverelacoperturasuperioredellacustodia.
2.Allentarelavitediarrestodellaghieradimessafuoco.
3.RegolarelamessaafuocoelozoominSetup>Focus(Congurazione>Messaafuoco)
sullapaginaWebdeldispositivo.SeguireleistruzioniriportatenellaGuidainlinea.
4.Avvitarenuovamentelavitediarrestodellaghieradimessafuoco.
1
2
3
4
1
Levettazoom
2
Vitediarresto
3
Ghieradimessaafuoco
4
Obiettivo
Nota
Dopoaverregolatolozoomeilfuoco,senonsiriescearaggiungereunamessaafuoco
angolareottimale,ruotarel'interoobiettivosullaposizionepredenitadifabbricaindicata
nell'illustrazioneprecedente.Quindi,ruotareleggermentel'obiettivoinsensoorarioo
antiorarioperottenerelamessaafuocodatuttigliangoli.
5.Fissarelacoperturasuperioredellacustodia.
89
ITALIANO
Page 90

AXISM11-ENetworkCameraSeries
Ripristinodeivaloripredenitidifabbrica
Importante
Ilripristinodelleimpostazionidifabbricadeveessereusatoconcautela.Unripristinodelle
impostazionidifabbricaconsentiràdiripristinareleimpostazionidifabbricapertuttii
parametri,inclusol'indirizzoIP.
Nota
Glistrumentiperl'installazioneelagestionedelsoftwaresonodisponibilinellepagine
dedicateall'assistenzasulsitoWebwww.axis.com/techsup.
Perripristinareildispositivoalleimpostazionipredenitedifabbrica:
1.Scollegarel'alimentazionedaldispositivo.
2.Tenerepremutoilpulsantedicontrolloericollegarel'alimentazione.Consultare
Panoramicadell'hardwareallapagina74.
3.Tenerepremutoilpulsantedicontrolloper15-30secondinoaquandol'indicatore
LEDdistatolampeggeràingiallo.
4.Rilasciareilpulsantedicomando.IlprocessoècompletoquandoilLEDdistatodiventerà
verde.Ildispositivoèstatoreimpostatoalleimpostazionidifabbricapredenite.Se
nessunserverDHCPèdisponibileinrete,l'indirizzoIPpredenitoè192.168.0.90.
5.Medianteglistrumentiperl'installazioneelagestionedelsoftware,assegnareun
indirizzoIP,impostarelapasswordeaccederealussovideo.
Èanchepossibilereimpostareiparametrialleimpostazionipredenitedifabbricamediante
l'interfacciaWeb.AndareaSetup>SystemOptions>Maintenance(Congurazione>Opzionidi
sistema>Manutenzione).
UlterioriInformazioni
Ilmanualeperl'utenteèdisponibileall'indirizzowww.axis.com
Visitareilsitoall’indirizzowww.axis.com/techsuppervericaresesonostatipubblicati
aggiornamentidelrmwareperilpropriodispositivodirete.Perconoscerelaversionedelrmware
installata,andaresuSetup(Impostazioni)>About(Informazionisu).
VisitareilcentrodiapprendimentoAxisallapaginawww.axis.com/academyperservizidi
formazioneutili,webinar,tutorialeguide.
Informazionisullagaranzia
PerinformazionisullagaranziadeldispositivoAxiseinformazioniadessorelative,consultare
lapaginawww.axis.com/warranty/
90
Page 91

AXISM11-ENetworkCameraSeries
Informacióndeseguridad
LeaestaGuíadeinstalaciónconatenciónantesdeinstalarelproducto.GuardelaGuíade
instalaciónparapoderconsultarlaenotromomento.
Nivelesdepeligrosidad
PELIGRO
Indicaunasituaciónpeligrosaque,sinoseevita,provocará
lesionesgravesolamuerte.
ADVERTENCIA
Indicaunasituaciónpeligrosaque,sinoseevita,puedeprovocar
lesionesgravesolamuerte.
ATENCIÓN
Indicaunasituaciónpeligrosaque,sinoseevita,puedeprovocar
lesionesmoderadasoleves.
A AAVISO VISO
VISO
Indicaunasituaciónpeligrosaque,sinoseevita,puedeprovocar
dañosmateriales.
Otrosnivelesdemensaje
ImportanteIndicainformaciónimportantequeesfundamentalparaqueel
productofuncionecorrectamente.
NotaIndicainformaciónútilqueayudaaaprovecharelproductoal
máximo.
91
ESPANÕL
Page 92

AXISM11-ENetworkCameraSeries
Instruccionesdeseguridad
A AAVISO VISO
VISO
•ElproductodeAxisdebeutilizarsedeacuerdoconlalegislaciónylanormativalocales.
•AlmaceneelproductodeAxisenunentornosecoyventilado.
•EvitelaexposicióndelproductodeAxisachoquesoaunafuertepresión.
•Noinstaleelproductoensoportes,superciesoparedesinestables.
•UtilicesololasherramientascorrespondientescuandoinstaleelproductodeAxis.La
aplicacióndeunafuerzaexcesivaconherramientaseléctricaspuedeprovocardaños
enelproducto.
•Noutilicelimpiadoresenaerosol,agentescáusticosniproductosquímicos.
•Limpieconunpañolimpiohumedecidoconaguapura.
•Utilicesoloaccesoriosquecumplanconlasespecicacionestécnicasdelproducto.Estos
accesorioslospuedeproporcionarAxisountercero.
•UtilicesolopiezasderepuestoproporcionadasorecomendadasporAxis.
•Nointenterepararelproductoustedmismo.Póngaseencontactoconelserviciode
asistenciatécnicadeAxisoconsudistribuidordeAxisparatratarasuntosdereparación.
Transporte
A AAVISO VISO
VISO
•CuandotransporteelproductodeAxis,utiliceelembalajeoriginalounequivalentepara
evitardañosenelproducto.
Batería
EsteproductodeAxisutilizaunabateríadelitioBR/CR2032de3,0Vcomofuentedealimentación
delrelojinternoentiemporeal.Encondicionesnormales,estabateríaduraráunmínimodecinco
años.
Unnivelbajodebateríaafectaráalfuncionamientodelrelojentiemporeal,loqueprovocaráel
restablecimientodeestecadavezqueseenciendaelproducto.Cuandoseanecesariosustituirla
batería,apareceráunmensajederegistroenelinformedelservidordelproducto.Paraobtenermás
informaciónsobreelinformedelservidor,consultelaspáginasdeconguracióndelproductoo
póngaseencontactoconelserviciodeasistenciatécnicadeAxis.
Labateríanodebesustituirseamenosqueseanecesario;noobstante,siprecisahacerlo,póngaseen
contactoconelserviciodeasistenciatécnicadeAxisenwww.axis.com/techsupparasolicitarayuda.
92
Page 93

AXISM11-ENetworkCameraSeries
ADVERTENCIA
•Lasustituciónincorrectadelabateríaimplicariesgodeexplosión.
•SustituyalabateríaporunabateríaidénticauotrabateríarecomendadaporAxis.
•Desechelasbateríasusadasdeconformidadconlanormativalocalolasinstrucciones
delfabricante.
93
ESPANÕL
Page 94

94
Page 95

AXISM11-ENetworkCameraSeries
Guíadeinstalación
EstaGuíadeinstalaciónincluyelasinstruccionesnecesariasparainstalarlascámarasdered
AXISM1124-E/M1125-Eensured.Paraconocerotrosaspectosdeusodelproducto,consulteel
Manualdelusuariodisponibleenwww.axis.com.
Pasosdelainstalación
1.Asegúresedequedisponedelcontenidodelpaquete,lasherramientasylosdemás
materialesnecesariosparalainstalación.Veapágina95.
2.Estudielainformacióngeneraldelhardware.Veapágina96.
3.Estudielasespecicaciones.Veapágina101.
4.Instaleelhardware.Veapágina104.
5.Accedaalproducto.Veapágina11 1.
Contenidodelpaquete
•CámaraderedAXISM1124–E/M1125
•Kitdebloquedeconectores
•CarcasadeprotecciónAXIST93G05
-JuntaAXISCM20(x1)
-Bolsadesecante
-DestornilladorTorxT20
-ProtectordelconectorAdeAXIS
•MontajeenparedAXIST94Q01A
-PuntadedestornilladorT30
•Materialesimpresos
-Guíadeinstalación(estedocumento)
-GuíadeinstalaciónparaelmontajeenparedAXIST94Q01A
-Etiquetasadicionalesconelnúmerodeserie(x2)
-ClavedeautenticaciónAVHS
Herramientasrecomendadas
•Taladro,parainstalarelmontajeenpared
•Destornilladorparalapuntadetornillos
95
ESPANÕL
Page 96

AXISM11-ENetworkCameraSeries
Accesoriosopcionales
•InterruptordepuertaAXISA
•CajaposteriordeconexionesAXIST94R01P
•Iluminadores
•Montajesencarcasa
•Juntasdecableyprensaestopas
•ArmariodevigilanciaAXIST98A16-VE
•MontajesenposteAXIST91A47
•CableWCM4AinteriordeescuadradetechoVT
•MontajeenesquinaVTWCWA
Paraobtenerinformaciónsobrelosaccesoriosdisponibles,visitewww.axis.com.
Informacióngeneraldelhardware
1
2
3
4
5
6
8
7
1
Cubiertasuperior
2
Ventanadelantera
3
Cámaradered
4
Tornillosdelsoporte(2)
5
Oriciosperforadosparacablesadicionales
6
Juntadecable
96
Page 97

AXISM11-ENetworkCameraSeries
7
Bolsadesecante
8
Cabledeseguridad
1
2
10
11
12
6
7
8
9
3
4
5
1
Palancadezoom
2
Anillodeenfoque
3
Conectordealimentación
4
Botóndecontrol
5
Conectordered
6
LEDdealimentación
7
LEDdeestado
8
LEDdered
9
RanuraparatarjetasmicroSD
10
Conectordeiris
11
ConectordeE/S
12
Receptáculodetornillode¼"
97
ESPANÕL
Page 98

AXISM11-ENetworkCameraSeries
Montajeenpared
1
3
4
5
2
1
Cabledered(guiadoatravésdelaescuadradepared)
2
Cabledealimentación(guiadoatravésdelaescuadradepared)(paratodoslos
productosequipadosconconectordealimentación)
3
TornillosT20(4)
4
TornillodeajustedeescuadraT30
5
Montajeenpared
98
Page 99

AXISM11-ENetworkCameraSeries
IndicadoresLED
Nota
•SepuedecongurarelLEDdeestadoparaqueseapagueduranteelfuncionamiento
normal.Paraello,vayaaSetup>SystemOptions>Ports&Devices>LED
(Conguración>Opcionesdelsistema>Puertosydispositivos>LED).Vealaayuda
enlíneaparaobtenermásinformación.
•SepuedecongurarelLEDEstadoparaqueparpadeemientrashayauneventoactivo.
•SepuedecongurarelLEDdeestadoparaqueparpadeeeidentiquelaunidad.Vaya
aSetup>SystemOptions>Maintenance(Conguración>Opcionesdelsistema
>Mantenimiento).
LEDdeestado
Indicación
VerdeVerdejoparaindicarunfuncionamientonormal.
Ámbar
Fijoduranteelinicioyalrestaurarvaloresdeconguración.
Nota
ElLEDderedpuededesactivarseparaquenoparpadeecuandoexistatrácodered.Para
ello,vayaaSetup>SystemOptions>Ports&Devices>LED(Conguración>Opciones
delsistema>Puertosydispositivos>LED).Vealaayudaenlíneaparaobtenermás
información.
LEDdered
Indicación
Verde
Fijoparaindicarunaconexiónaunaredde100Mbits/s.
Parpadeacuandohayactividaddered.
Ámbar
Fijoparaindicarunaconexiónaunaredde10Mbits/s.Parpadea
cuandohayactividaddered.
ApagadoNohayconexiónalared.
Nota
SepuedecongurarelindicadorLEDdealimentaciónparaqueseapagueduranteel
funcionamientonormal.Paraello,vayaaSetup>SystemOptions>Ports&Devices>
LED(Conguración>Opcionesdelsistema>Puertosydispositivos>LED).Veala
ayudaenlíneaparaobtenermásinformación.
99
ESPANÕL
Page 100

AXISM11-ENetworkCameraSeries
LEDdealimentaciónIndicación
VerdeFuncionamientonormal.
Ámbar
Parpadeaenverde/ámbardurantelaactualizacióndelrmware.
Conectoresybotones
Paraconocerlasespecicacionesylascondicionesdefuncionamiento,veapágina101.
Conectordered
ConectorEthernetRJ45conalimentaciónatravésdeEthernet(PoE).
A AAVISO VISO
VISO
Elproductoseconectarámedianteuncablederedblindado(STP).Todosloscablesque
conectenelproductoalareddeberánestarblindadosparasuusoespecíco.Asegúrese
dequelosdispositivosderedesténinstaladosdeconformidadconlasinstruccionesdel
fabricante.Paraobtenerinformaciónsobrelosrequisitosnormativos,veaElectromagnetic
Compatibility(EMC)onpage2.
ConectordeE/S
Seutilizacondispositivosexternoscombinados,porejemplo,conalarmasantimanipulación,
deteccióndemovimiento,activacióndeeventos,grabacióndeintervalosdetiempoynoticaciones
dealarma.Ademásdelpuntodereferenciade0VCCylapotencia(salidadeCC),elconectorde
E/Sofrecelainterfazpara:
•Salidadigital:paraconectardispositivosexternoscomorelésyLED.Losdispositivos
conectadossepuedenactivarmediantelaInterfazdeprogramacióndeaplicaciones(API)
VAPIX®,losbotonesdesalidadelapáginaLiveViewomedianteunaregladeacción.La
salidasemostraráactiva(seindicaenSystemOptions>Ports&Devices(Opcionesdel
sistema>Puertosydispositivos))sieldispositivodealarmaestáactivado.
•Entradadigital:unaentradadealarmaparaconectardispositivosquepuedanalternar
circuitoscerradosyabiertos,comodetectoresPIR,contactosdepuertasyventanas,
detectoresderoturadecristales,etc.Cuandoserecibeunaseñal,elestadocambiayla
entradasevuelveactiva(seindicaenSystemOptions>Ports&Devices(Opcionesdel
sistema>Puertosydispositivos)).
Conectordealimentación
Bloquedeterminalesde2pinesparalaentradadealimentación.Useunafuentedealimentación
limitada(LPS)quecumplalosrequisitosdeseguridaddemuybajatensión(SELV)conunapotencia
nominaldesalidalimitadaa≤100Wounacorrientenominaldesalidalimitadaa≤5A.
100
 Loading...