

Page 1

INSTALLATION GUIDE
AXIS M11 Series
AXIS M1103 Network Camera
AXIS M1104 Network Camera
AXIS M1113 Network Camera
AXIS M1114 Network Camera
ENGLISH DEUTSCH
FRAN
Ç
AIS
ITALIANO
ESPAÑOL
日本語
Page 2

Legal Considerations
Korea -
ࢇЕɼࢽࡈ%ࢷળࢶଢԻ۰
࣯Իɼࢽ߾۰یࡈଜЕʨࡶּࢶࡳԻଜֲֻҘ
ࠇ߾۰یࡈଟܹݡТЬࢶࢸࢻѹ673
VKLHOGHGWZLVWHGSDLUৼࢇٴࡶیࡈଜࠆࢿ૽
ࡶࠉʼଜݫݤࠝ
Video and audio surveillance can be prohibited by laws that vary
from country to country. Check the laws in your local region
before using this product for surveillance purposes. This product
includes one (1) H.264 decoder license and one (1) AAC decoder
license. To purchase further licenses, contact your reseller.
Liability
Every care has been taken in the preparation of this
document. Please inform your local Axis office of any
inaccuracies or omissions. Axis Communications AB cannot
be held responsible for any technical or typographical errors
and reserves the right to make changes to the product and
manuals without prior notice. Axis Communications AB
makes no warranty of any kind with regard to the material
contained within this document, including, but not limited
to, the implied warranties of merchantability and fitness for
a particular purpose. Axis Communications AB shall not be
liable nor responsible for incidental or consequential
damages in connection with the furnishing, performance or
use of this material. This product is only to be used for its
intended purpose.
Intellectual Property Rights
Axis AB has intellectual property rights relating to
technology embodied in the product described in this
document. In particular, and without limitation, these
intellectual property rights may include one or more of the
patents listed at www.axis.com/patent.htm and one or more
additional patents or pending patent applications in the US
and other countries.
This product contains licensed third-party software. See the
menu item “About” in the product’s user interface for more
information.
This product contains source code copyright Apple Computer,
Inc., under the terms of Apple Public Source License 2.0 (see
www.opensource.apple.com/apsl). The source code is
available from https://developer.apple.com/bonjour/
Equipment Modifications
This equipment must be installed and used in strict
accordance with the instructions given in the user
documentation. This equipment contains no user-serviceable
components. Unauthorized equipment changes or
modifications will invalidate all applicable regulatory
certifications and approvals.
Trademark Acknowledgments
AXIS COMMUNICATIONS, AXIS, ETRAX, ARTPEC and VAPIX are
registered trademarks or trademark applications of Axis AB in
various jurisdictions. All other company names and products are
trademarks or registered trademarks of their respective
companies. Apple, Boa, Apache, Bonjour, Ethernet, Internet
Explorer, Linux, Microsoft, Mozilla, Real, SMPTE, QuickTime,
UNIX, Windows, Windows Vista and WWW are registered
trademarks of the respective holders. Java and all Java-based
trademarks and logos are trademarks or registered trademarks of
Oracle and/or its affiliates. UPnPTM is a certification mark of the
UPnPTM Implementers Corporation.
Regulatory Information
Europe
This product complies with the applicable CE marking
directives and harmonized standards:
• Electromagnetic Compatibility (EMC) Directive
2004/108/EC. See Electromagnetic Compatibility (EMC).
• Low Voltage (LVD) Directive 2006/95/EC. See Safety.
• Restrictions of Hazardous Substances (RoHS) Directive
2011/65/EU. See Disposal and Recycling.
A copy of the original declaration of conformity may be obtained
from Axis Communications AB. See Contact Information.
Electromagnetic Compatibility (EMC)
This equipment has been designed and tested to fulfill
applicable standards for:
• Radio frequency emission when installed according to the
instructions and used in its intended environment.
• Immunity to electrical and electromagnetic phenomena
when installed according to the instructions and used in its
intended environment.
USA
This equipment has been tested using a shielded network cable
(STP) and found to comply with the limits for a Class B digital
device, pursuant to part 15 of the FCC Rules. These limits are
designed to provide reasonable protection against harmful
interference in a residential installation. This equipment
generates, uses and can radiate radio frequency energy and, if
not installed and used in accordance with the instructions, may
cause harmful interference to radio communications. However,
there is no guarantee that interference will not occur in a
particular installation. If this equipment does cause harmful
interference to radio or television reception, which can be
determined by turning the equipment off and on, the user is
encouraged to try to correct the interference by one or more of
the following measures:
• Reorient or relocate the receiving antenna.
• Increase the separation between the equipment and receiver.
• Connect the equipment into an outlet on a circuit different
from that to which the receiver is connected.
• Consult the dealer or an experienced radio/TV technician for
help.
The product shall be connected using a shielded network cable
(STP) that is properly grounded. technician for help
Canada
This digital apparatus complies with CAN ICES-3 (Class B). The
product shall be connected using a shielded network cable (STP)
that is properly grounded.
Cet appareil numérique est conforme à la norme CAN NMB-3
(classe B). Le produit doit être connecté à l'aide d'un câble
réseau blindé (STP) qui est correctement mis à la terre.
Europe
This digital equipment fulfills the requirements for RF emission
according to the Class B limit of EN 55022. The product shall be
connected using a shielded network cable (STP) that is properly
grounded.
This product fulfills the requirements for immunity according to
EN 61000-6-1 residential, commercial and light-industrial
environments.
This product fulfills the requirements for immunity according to
EN 55024 office and commercial environments .
Australia/New Zealand
This digital equipment fulfills the requirements for RF
emission according to the Class B limit of AS/NZS CISPR 22.
The product shall be connected using a shielded network
cable (STP) that is properly grounded.
.
Japan -
この装置は、クラスB情報技術装置です。
この装置は、家庭環境で使用することを目的として
いますが、この装置がラジオやテレビジョン受信機
に近接して使用されると、受信障害を引き起こすこ
とがあります。取扱説明書に従って正しい取り扱い
をして下さい。本製品は、シールドネットワーク
ケーブル(STP)を使用して接続してください。また
適切に接地してください。
Page 3

Safety
This product complies with IEC/EN 60950-1, Safety of
Information Technology Equipment. If its connecting cables are
routed outdoors, the product shall be grounded either through a
shielded network cable (STP) or other appropriate method.
Disposal and Recycling
When this product has reached the end of its useful life, dispose
of it according to local raws and regulations. For information
about your nearest designated collection point, contact your
local authority responsible for waste disposal. In accordance
with local legislation, penalties may be applicable for incorrect
disposal of this waste.
Europe
This symbol means that the product shall not be
disposed of together with household or commercial
waste. Directive 2012/19/EU on waste electrical and
electronic equipment (WEEE) is applicable in the
European Union member states. To prevent potential
harm to human health and the environment, the product must
be disposed of in an approved and environmentally safe
recycling process. For information about your nearest designated
collection point, contact your local authority responsible for
waste disposal. Businesses should contact the product supplier
for information about how to dispose of this product correctly.
This product complies with the requirements of Directive
2011/65/EU on the restriction of the use of certain hazardous
substances in electrical and electronic equipment (RoHS).
China
This product complies with the requirements of the
legislative act Administration on the Control of
Pollution Caused by Electronic Information Products
(ACPEIP).
Contact Information
Axis Communications AB
Emdalavägen 14
223 69 Lund
Sweden
Tel: +46 46 272 18 00
Fax: +46 46 13 61 30
www.axis.com
Support
Should you require any technical assistance, please contact your
Axis reseller. If your questions cannot be answered immediately,
your reseller will forward your queries through the appropriate
channels to ensure a rapid response. If you are connected to the
Internet, you can:
• download user documentation and software updates
• find answers to resolved problems in the FAQ database.
Search by product, category, or phrase
• report problems to Axis support staff by logging in to your
private support area
• chat with Axis support staff (selected countries only)
• visit Axis Support at www.axis.com/techsup/
Should you require any technical assistance, please contact
appropriate channels according to your AVHS license
agreement to ensure a rapid response.
Learn More!
Visit Axis learning center www.axis.com/academy/ fo r useful
trainings, webinars, tutorials and guides.
Page 4

Page 5
AXIS M11 Series Installation Guide Page 5
Safety Information
Read through this Installation Guide carefully before installing the product. Keep the Installation Guide for
future reference.
Hazard Levels
Indicates a hazardous situation which, if not
avoided, will result in death or serious injury.
Indicates a hazardous situation which, if not
avoided, could result in death or serious injury.
Indicates a hazardous situation which, if not
avoided, could result in minor or moderate
injury.
Indicates a situation which, if not avoided,
could result in damage to property.
Other Message Levels
Indicates significant information which is
essential for the product to function correctly.
Indicates useful information which helps in
getting the most out of the product.
ENGLISH
Page 6

Page 6 AXIS M11 Series Installation Guide
Safety Instructions
• The Axis product shall be installed by a trained professional.
• The Axis product shall be used in compliance with local laws and regulations.
• Store the Axis product in a dry and ventilated environment.
• Avoid exposing the Axis product to shocks or heavy pressure.
• Do not install the product on unstable brackets, surfaces or walls.
• Use only applicable tools when installing the Axis product. Excessive force could cause damage to
the product.
• Do not use chemicals, caustic agents, or aerosol cleaners. Use a clean cloth dampened with pure
water for cleaning.
• Use only accessories that comply with technical specification of the product. These can be provided
by Axis or a third party.
• Use only spare parts provided by or recommended by Axis.
• Do not attempt to repair the product by yourself. Contact Axis support or your Axis reseller for
service matters.
Transportation
• Keep the protective packaging. When transporting the Axis product, the protective packaging shall
be replaced in its original position.
• When transporting the Axis product, use the original packaging or equivalent to prevent damage to
the product.
Battery
The Axis product uses a 3.0 V BR/CR2032 lithium battery as the power supply for its internal real-time clock
(RTC). Under normal conditions this battery will last for a minimum of five years.
Low battery power affects the operation of the RTC, causing it to reset at every power-up. When the battery
needs replacing, a log message will appear in the product’s server report. For more information about the server
report, see the product’s setup pages or contact Axis support.
The battery should not be replaced unless required, but if the battery does need replacing, contact Axis support
at www.axis.com/techsup for assistance.
• Risk of explosion if the battery is incorrectly replaced.
• Replace only with an identical battery or a battery which is recommended by Axis.
• Dispose of used batteries according to local regulations or the battery manufacturer's instructions.
Page 7

AXIS M11 Series Installation Guide Page 7
Installation Guide
This guide helps you to install the AXIS M11 Series on your network. For further information, please
see the User Manual available on the CD, or from www.axis.com/techsup
Installation Steps
This product must be used in compliance with local laws and regulations.
1. Check the package contents against the list below.
2. Hardware overview on page 8.
3. Install the hardware on page 10.
4. Access the Product on page 10.
5. Adjust image and focus on page 11.
ENGLISH
Page 8
Page 8 AXIS M11 Series Installation Guide
Package Contents
Item Title/Variants
Network camera AXIS M1103
AXIS M1104
AXIS M1113
AXIS M1114
Camera stand
Accessory
CD AXIS Network Video CD, including prod-
Printed material Installation Guide and Warranty
uct documentation, installation tools
and other software.
document
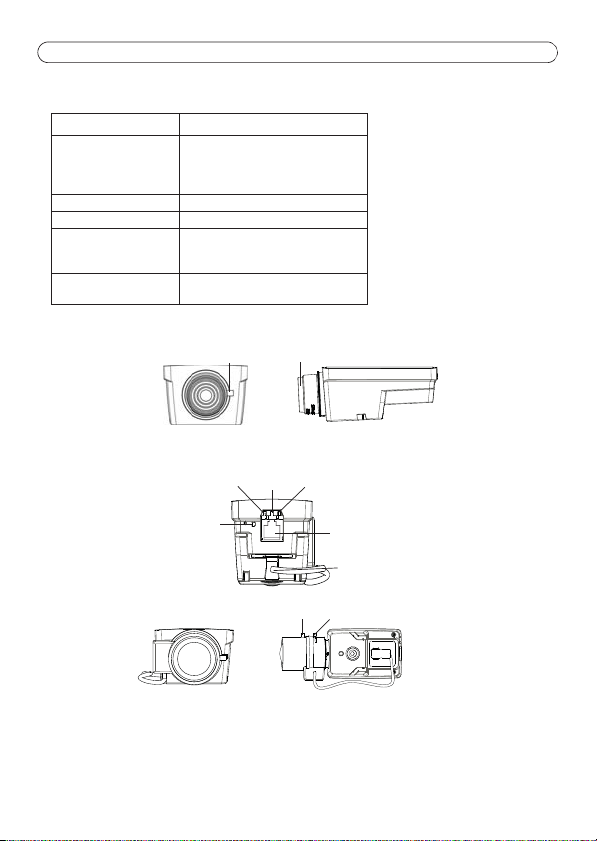
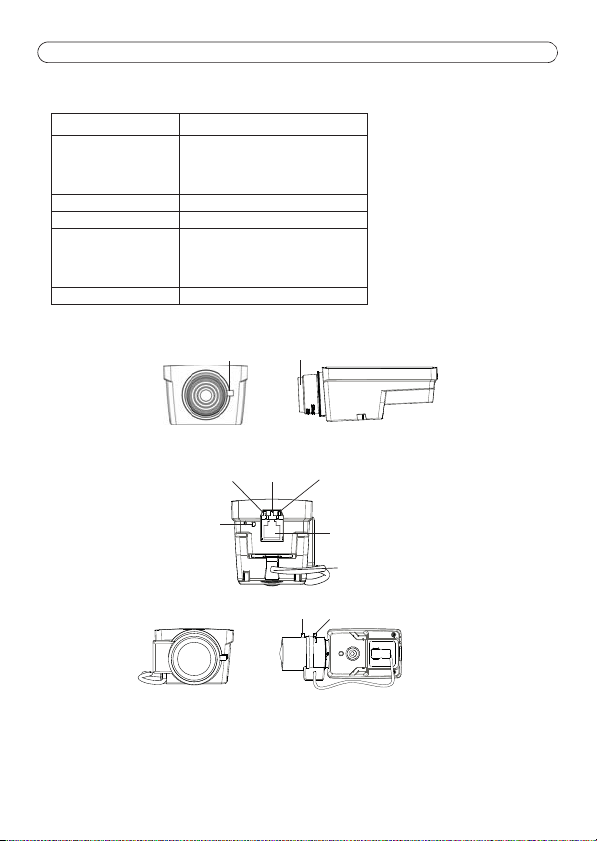
Hardware Overview
Focus puller
AXIS M1103/M1104
Network
LED
Grip this part to adjust focus
Status
Power
LED
LED
Control
button
AXIS M1113/M1114
Network
connector
Iris connector
(AXIS M1113/M1114)
Focus pullerZoom puller
Page 9
AXIS M11 Series Installation Guide Page 9
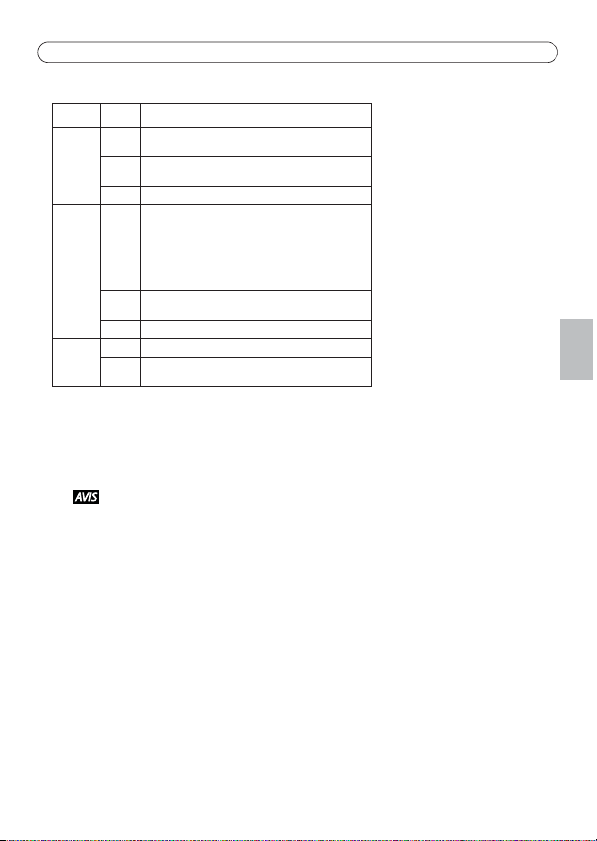
LED Indicators
LED Color Indication
Network Green Steady for connection to a 100 Mbit/s network. Flashes
Status Green Steady green for normal operation.
Power Green Normal operation.
for network activity.
Amber Steady for connection to 10 Mbit/s network. Flashes for
network activity.
Unlit No network connection.
Note: Configure the Status LED to be unlit during normal
operation, or to flash only when the camera is accessed
from Setup > System Options > LED. See the online help
files for more information.
Amber Steady during startup, reset to factory default or when
restoring settings.
Red Slow flash for failed upgrade.
Amber Flashes green/amber during firmware upgrade.
Connectors and Buttons
Network Connector
RJ45 Ethernet connector with Power over Ethernet (PoE).
The product shall be connected using a shielded network cable (STP). All cables connecting
the product to the network shall be intended for their specific use. Make sure that the
network devices are installed in accordance with the manufacturer’s instructions. For
information about regulatory requirements, see Electromagnetic Compatibility (EMC), on
page 2.
Control Button
The control button is used for:
• Resetting the product to factory default settings. See Reset to Factory Default Settings.
• Connecting to an AXIS Video Hosting System service or AXIS Internet Dynamic DNS Service.
For more information about these services, see the User Manual.
ENGLISH
Page 10

Page 10 AXIS M11 Series Installation Guide
Install the Hardware
AXIS M11 Series is designed for indoor and outdoor use. To use the camera outdoors, install
in an approved outdoor housing. Please see www.axis.com for more information on outdoor
housings.
1. Attach the stand to the camera by screwing it on. For wall mounting, attach the stand to wall
first, using 3 appropriate screws.
2. Attach the cable to the network connector (supports PoE class 1) in the camera.
3. Check that the indicator LEDs indicate the correct conditions. See the table above.
Access the Product
Use the tools provided on the Installation and Management Software CD to assign an IP address,
set the password and access the video stream. This information is also available from the support
pages on www.axis.com/techsup/
Page 11
AXIS M11 Series Installation Guide Page 11
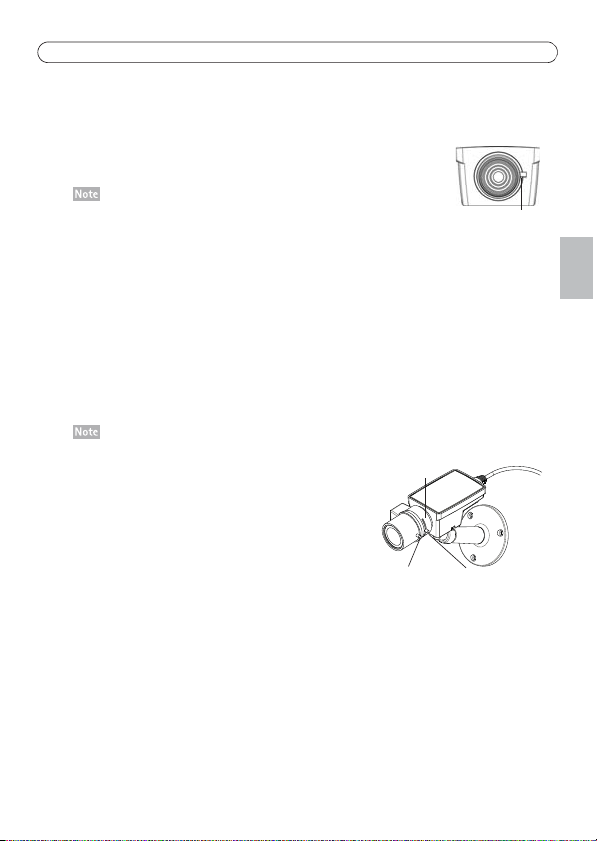
Focus puller
Adjust Image and Focus
AXIS M1103/M1104:
Unscrew the focus puller on the lens. Adjust the focus as required. Re-tighten
the focus puller.
Grip the outer rim of the lens while focusing (see Hardware Overview).
Gripping the whole lens could cause the lens to come unscrewed.
AXIS M1113/M1114:
1. Click the Setup link at the top, right in the camera’s web interface and go to Basic Setup >
Focus.
2. In the Focus Adjustment page set the DC-Iris to Disabled and click Save.
3. Unscrew the zoom puller on the lens by turning it anti-clockwise. Adjust the zoom setting as
required. Re-tighten the zoom puller.
4. Unscrew the focus puller on the lens. Adjust the focus as required. Re-tighten the focus puller.
5. From the Focus Adjustment page, set the DC-Iris to Enabled and click Save.
ENGLISH
• The DC-Iris should always be disabled while focusing the
camera. This opens the iris to its maximum, which gives the
smallest depth of field and thus the best conditions for correct
focusing. When the focus is set with this method it will then be
maintained in all light conditions
• The design of AXIS M11 Series allows for slight lens movement
to ensure sensor alignment.
Lens
Focus puller Zoom puller
Page 12

Page 12 AXIS M11 Series Installation Guide
Reset to Factory Default Settings
Reset to factory default should be used with caution. A reset to factory default will reset all
settings, including the IP address, to the factory default values.
The installation and management software tools are available on the CD supplied with the
product and from the support pages on www.axis.com/techsup
To reset all parameters and the IP address to Factory Default settings:
1. Disconnect the power from the product.
2. Press and hold the Control button and reconnect power.
3. Keep the Control button pressed for about 15-30 seconds until the Status LED indicator flashes
amber.
4. Release the Control button.
5. When the Status indicator displays green (which can take up to 1 minute) the process is
complete and the product has been reset to factory default settings.
6. Using the installation and management software tools, assign an IP address, set the password,
and access the video stream.
Further information
The user’s manual is available from the Axis web site at www.axis.com or from the Axis Network
Video Product CD supplied with this product.
Visit www.axis.com/techsup to check if there is updated firmware available for the AXIS M11
Series. To see the currently installed firmware version, see Setup > About in the camera’s web
pages.
Page 13
Série AXIS M11 Guide d'installation Page 13
Informations sur la sécurité
Lisez attentivement ce guide d'installation avant d'installer l'appareil. Conservez le guide d'installation pour
toute référence ultérieure.
Niveaux de risques
Indique une situation dangereuse qui, si elle
n'est pas évitée, entraînera le décès ou des
blessures graves.
Indique une situation dangereuse qui, si elle
n'est pas évitée, pourrait entraîner le décès ou
des blessures graves.
Indique une situation dangereuse qui, si elle
n'est pas évitée, pourrait entraîner des
blessures légères ou modérées.
Indique une situation qui, si elle n'est pas
évitée, pourrait endommager l'appareil.
Autres niveaux de message
Indique les informations importantes,
nécessaires pour assurer le bon
fonctionnement de l'appareil.
Indique les informations utiles qui permettront
d'obtenir le fonctionnement optimal de
l'appareil.
FRAN
Ç
AIS
Page 14
Page 14 Série AXIS M11 Guide d’installation
Consignes de sécurité
• Le produit Axis doit être installé par un professionnel habilité.
• Le produit Axis doit être utilisé conformément aux lois et règlementations locales en vigueur.
• Conserver ce produit Axis dans un environnement sec et ventilé.
• Ne pas exposer ce produit Axis aux chocs ou aux fortes pressions.
• Ne pas installer ce produit sur des supports, surfaces ou murs instables.
• Utiliser uniquement des outils recommandés pour l'installation de l'appareil Axis. Une force excessive
appliquée sur l'appareil pourrait l'endommager.
• Ne pas utiliser de produits chimiques, de substances caustiques ou de nettoyants pressurisés. Utiliser
un chiffon propre imbibé d'eau pure pour le nettoyage.
• Utiliser uniquement des accessoires conformes aux caractéristiques techniques du produit. Ils
peuvent être fournis par Axis ou un tiers.
• Utiliser uniquement les pièces de rechange fournies ou recommandées par Axis.
• Ne pas essayer de réparer ce produit par vous-même. Contacter l'assistance technique d'Axis ou votre
revendeur Axis pour des problèmes liés à l'entretien.
Transport
• Conservez l'emballage de protection. Lors du transport du produit Axis, l'emballage de protection doit
être remis dans sa position d'origine.
• Lors du transport du produit Axis, utilisez l'emballage d'origine ou un équivalent pour éviter
d'endommager le produit.
Batterie
Le produit Axis utilise une batterie au lithium BR/CR2032 3,0 V comme alimentation de son horloge en temps
réel interne (RTC). Dans des conditions normales, cette batterie a une durée de vie minimale de cinq ans.
Si la batterie est faible, le fonctionnement de l'horloge en temps réel peut être affecté et entraîner sa
réinitialisation à chaque mise sous tension. Un message enregistré apparaît dans le rapport de serveur du
produit lorsque la batterie doit être remplacée. Pour tout complément d'information concernant le rapport de
serveur, reportez-vous aux pages de Configuration du produit ou contactez l'assistance technique d'Axis.
La batterie doit être remplacée uniquement en cas de besoin, et pour ce faire, contactez l'assistance technique
d'Axis à l'adresse www.axis.com/techsup pour obtenir de l'aide.
• Risque d'explosion si la batterie est remplacée de façon incorrecte.
• Remplacez-la uniquement par une batterie identique ou une batterie recommandée par Axis.
• Mettez au rebut les batteries usagées conformément aux réglementations locales ou aux instructions
du fabricant de la batterie.
Page 15

Série AXIS M11 Guide d'installation Page 15
Guide d'installation
Ce guide est destiné à vous aider à installer la Série AXIS M11 sur votre réseau. Pour tout
complément d’information, veuillez vous reporter au manuel de l’utilisateur présent sur le CD ou sur
www.axis.com/techsup.
Procédure d’installation
Ce produit doit être utilisé conformément à la législation locale.
1. Vérifiez que l’emballage contient bien tous les éléments répertoriés dans la liste ci-dessous.
2. Présentation du matériel. Consultez la page 16.
3. Installation du matériel. Consultez la page 18.
4. Accès au produit. Consultez la page 18.
5. Réglage de l'image et de la mise au point. Consultez la page 19.
FRAN
Ç
AIS
Page 16
Page 16 Série AXIS M11 Guide d’installation
Connecteur réseau
Voyant réseau Voyant d’état Voyant d'alimentation
Bouton de
Connecteur du diaphragme
AXIS M1103/M1104
AXIS M1113/M1114
Commande de mise au pointCommande de zoom
Commande de mise au point
Saisissez cette partie pour régler la mise au point
commande
(AXIS M1113/M1114)
Contenu de l’emballage
Élément Titre/Variantes
Caméra réseau AXIS M1103
AXIS M1104
AXIS M1113
AXIS M1114
Support de caméra
Accessoires
CD CD du produit de vidéo sur IP AXIS, com-
prenant une documentation, des outils
d’installation et des logiciels complé-
mentaires.
Documentation imprimée Guide d'installation et bon de garantie
Vue d'ensemble du matériel
Page 17
Série AXIS M11 Guide d'installation Page 17
Voyants
Voyant Couleur Indication
Réseau Vert Fixe en cas de connexion à un réseau de 100 Mbits/s.
État Vert Vert fixe en cas de fonctionnement normal.
Alimentation
Clignote en cas d’activité réseau.
Orange Fixe en cas de connexion à un réseau de 10 Mbits/s.
Clignote en cas d’activité réseau.
Éteint Pas de connexion réseau.
Remarque : le voyant d'état peut être configuré pour être
éteint lors du fonctionnement normal, ou pour clignoter
uniquement en cas d'accès à la caméra. Pour ce faire,
cliquez sur Setup (Configuration) > System Options
(Options système) > LED (Voyant DEL). Reportez-vous à
l’aide en ligne pour plus d’informations.
Orange Continu pendant le démarrage, la réinitialisation des
valeurs d’usine ou la restauration des paramètres.
Rouge Clignote lentement en cas d’échec de la mise à niveau.
Vert Fonctionnement normal.
Orange Le voyant vert/orange clignote pendant la mise à niveau
du microprogramme.
Connecteurs et boutons
Connecteur réseau
Connecteur Ethernet RJ45 avec l'alimentation par Ethernet (PoE).
Le produit doit être connecté à l'aide d'un câble réseau blindé (STP). Tous les câbles reliant
le produit au commutateur réseau doivent être destinés à leur usage spécifique. Assurezvous que les périphériques réseau sont installés conformément aux instructions du
fabricant. Pour plus d’informations sur les exigences réglementaires, consultez
Electromagnetic Compatibility (EMC), à la page 2.
Bouton de commande
Le bouton de commande permet de réaliser les opérations suivantes :
• Réinitialisation du produit aux paramètres d’usine par défaut. Cf. Réinitialisation aux para-
mètres d'usine par défaut.
• Connexion au service du Système d'hébergement vidéo AXIS ou au service AXIS Internet
Dynamic DNS. Pour plus d'informations sur ces services, reportez-vous au Manuel de l'utilisateur.
FRAN
Ç
AIS
Page 18

Page 18 Série AXIS M11 Guide d’installation
Installation du matériel
La caméra Série AXIS M11 est conçue pour des utilisations en intérieur et en extérieur. Pour
une utilisation en extérieur, la caméra doit être placée dans un boîtier d’extérieur
homologué. Consultez le site www.axis.com pour obtenir plus d'informations sur les boîtiers
d'extérieur.
1. Vissez le support sur la caméra. Pour un montage mural, fixez d'abord le support sur le mur à
l'aide de 3 vis adaptées.
2. Fixez le câble au connecteur réseau de la caméra (alimentation par Ethernet [PoE] classe 1 prise
en charge).
3. Vérifiez que les voyants DEL indiquent le bon état de fonctionnement. Reportez-vous au tableau
ci-dessus.
Accès au produit
Utilisez les outils fournis sur le CD d'installation et de gestion pour attribuer une adresse IP,
configurez le mot de passe et accédez au flux de données vidéo. Ces informations sont également
disponibles sur les pages d'assistance technique du site www.axis.com/techsup/
Page 19

Série AXIS M11 Guide d'installation Page 19
Réglage de l'image et de la mise au point
AXIS M1103/M1104 :
Desserrez le dispositif de mise au point de l’objectif. Réglez la mise au point, si
nécessaire. Remettez le dispositif de mise au point en place.
Saisissez le bord extérieur de l'objectif tout en faisant la mise au point (voir
Vue d'ensemble du matériel). Si vous saisissez l'ensemble de l'objectif, vous
risquez de le dévisser.
Commande de
mise au point
AXIS M1113/M1114 :
1. Cliquez sur le lien Setup (Configuration) en haut à droite dans l’interface Web de la caméra et
sélectionnez Basic Setup > Focus. (Configuration de base > Mise au point).
2. Sur la page Focus Adjustment (Réglage de la mise au point), placez le paramètre DC-Iris
(Diaphragme DC) sur Disabled (Désactivé), puis cliquez sur Save (Enregistrer).
3. Desserrez le point zoom de l’objectif en le faisant tourner dans le sens inverse des aiguilles
d’une montre. Réglez le zoom, si nécessaire. Resserrez la commande de zoom.
4. Desserrez le dispositif de mise au point de l’objectif. Réglez la mise au point, si nécessaire.
Remettez le dispositif de mise au point en place.
5. Sur la page Focus Adjustment (Réglage de la mise au point), définissez le paramètre DC-Iris
(Diaphragme DC) sur Enabled (Activé), puis cliquez sur Save (Enregistrer).
• Le DC-Iris doit toujours être désactivé lors de la mise au point
de la caméra. Le diaphragme s’ouvre alors au maximum, offrant
la plus petite profondeur de champ et, par conséquent, les
meilleures conditions pour une mise au point correcte. Lorsque
la mise au point est réglée par cette méthode, elle est conservée
dans toutes les conditions d'éclairage.
• La conception de la série AXIS M11 permet de déplacer
légèrement l'objectif pour aligner le capteur.
Objectif
Commande de Commande de zoom
mise au point
FRAN
Ç
AIS
Page 20

Page 20 Série AXIS M11 Guide d’installation
Réinitialisation aux paramètres d'usine par défaut
La réinitialisation aux paramètres par défaut doit être utilisée avec prudence. Cette
opération reconfigure tous les paramètres, y compris l'adresse IP, aux valeurs d'usine par
défaut.
Les logiciels d'installation et de gestion sont disponibles sur le CD fourni avec le produit et
sur les pages d'assistance du site www.axis.com/techsup
Procédez comme suit pour rétablir tous les paramètres d’usine par défaut, y compris l’adresse IP :
1. Déconnectez l'alimentation de l'appareil.
2. Maintenez le bouton de commande enfoncé et remettez l'appareil sous tension.
3. Maintenez le bouton de commande enfoncé pendant 15 à 30 secondes, jusqu’à ce que le voyant
d'état passe à l’orange et clignote.
4. Relâchez le bouton de commande.
5. Lorsque le voyant d'état s’allume en vert (ce qui peut prendre 1 minute), le processus est
terminé et les paramètres par défaut du produit sont rétablis.
6. Utilisez les outils d'installation et de gestion pour attribuer une adresse IP, configurer le mot de
passe et accéder au flux de données vidéo.
Informations complémentaires
Le manuel de l’utilisateur est disponible sur le site Web d’Axis (www.axis.com) ou sur le CD de vidéo
sur IP Axis fourni avec ce produit.
Visitez le site www.axis.com/techsup pour vérifier si des mises à jour du micrologiciel sont
disponibles pour la caméra réseau Série AXIS M11. Pour connaître la version du micrologiciel
actuellement installée, allez dans Setup (Configuration) > About (À propos de) dans les pages Web
de la caméra.
Page 21

AXIS M11-Serie Installationsanleitung Seite 21
Sicherheitsinformation
Lesen Sie die Installationsanleitung sorgfältig durch, bevor Sie das Produkt installieren. Bewahren Sie die
Installationsanleitung zur zukünftigen Verwendung auf.
Gefährdungsstufen
Weist auf eine gefährliche Situation hin, die
zum Tod oder zu schweren Verletzungen führt.
Weist auf eine gefährliche Situation hin, die
unter Umständen zum Tod oder zu schweren
Verletzungen führen kann.
Weist auf eine gefährliche Situation hin, die zu
geringfügigen oder mittelschweren
Verletzungen führen kann.
Weist auf eine Situation hin, die zu
Sachschäden führen kann.
Weitere Nachrichtenstufen
Weist auf wichtige Informationen hin, die den
richtigen Betrieb des Produkts gewährleisten.
Weist auf nützliche Informationen hin, die die
optimale Verwendung des Produkts
unterstützen.
DEUTSCH
Page 22

Seite 22 AXIS M11-Serie Installationsanleitung
Sicherheitsanweisungen
• Das Axis Produkt muss von fachmännischem Personal installiert werden.
• Die Anwendung des Axis Produkts muss unter Beachtung der örtlich geltenden rechtlichen
Bestimmungen erfolgen.
• Lagern Sie das Axis Produkt in einer trockenen und belüfteten Umgebung.
• Achten Sie darauf, dass das Axis Produkt weder Stößen noch starkem Druck ausgesetzt ist.
• Installieren Sie das Produkt nicht an instabilen Halterungen, Oberflächen oder Wänden.
• Verwenden Sie bei der Installation des Axis Produkts ausschließlich geeignete Werkzeuge. Ein zu
großer Kraftaufwand kann das Produkt beschädigen.
• Verwenden Sie keine chemischen, ätzenden oder aerosolhaltigen Reinigungsmittel. Verwenden Sie
zum Reinigen ein sauberes, mit lauwarmem Wasser angefeuchtetes Tuch.
• Verwenden Sie nur Zubehör, das den technischen Daten des Produkts entspricht. Dieses ist von Axis
oder Drittanbietern erhältlich.
• Verwenden Sie ausschließlich Ersatzteile die von Axis bereitgestellt oder empfohlen werden.
• Versuchen Sie nicht, das Produkt selbstständig zu reparieren. Wenden Sie sich bezüglich Reparatur
und Wartung an den Axis Support oder Ihren Axis Händler.
Transport
• Bewahren Sie die Schutzverpackung auf. Transportieren Sie das Axis Produkt bei Bedarf in der
Originalverpackung.
• Transportieren Sie das Axis Produkt bei Bedarf in der Originalverpackung oder einer entsprechenden
Verpackung, sodass Schäden vermieden werden.
Batterie
Das Axis Produkt ist mit einer 3,0V-BR/CR2032-Lithium-Batterie ausgestattet, mit der die interne Echtzeituhr
(RTC) versorgt wird. Unter normalen Bedingungen hat die Batterie eine Lebensdauer von mindestens fünf
Jahren.
Bei entladener Batterie ist der Betrieb der Echtzeituhr nicht mehr gewährleistet, sodass die Uhr bei jedem
Systemstart zurückgesetzt wird. Sie erhalten eine Protokollnachricht im Serverbericht des Produkts, wenn ein
Batteriewechsel erforderlich ist. Weitere Informationen über den Serverbericht finden Sie auf den Setup-Seiten
des Produkts, oder wenden Sie sich an den Axis Support.
Die Batterie sollte nur bei Bedarf ersetzt werden. Wenden Sie sich in diesem Fall an den Axis Support unter
www.axis.com/techsup.
• Explosionsgefahr bei fehlerhaftem Batteriewechsel.
Page 23

AXIS M11-Serie Installationsanleitung Seite 23
• Die Batterie darf nur durch eine identische Batterie oder eine von Axis empfohlene Batterie ersetzt
werden.
• Verbrauchte Batterien sind gemäß den örtlichen Vorschriften oder den Anweisungen des Herstellers
zu entsorgen.
DEUTSCH
Page 24

Seite 24 AXIS M11-Serie Installationsanleitung
Page 25

AXIS M11-Serie Installationsanleitung Seite 25
Installationsanleitung
Verwenden Sie diese Anleitung bei der Installation der AXIS M11-Serie in Ihrem Netzwerk. Weitere
Informationen zu diesem Produkt finden Sie im Benutzerhandbuch, das auf der beiliegenden CD
oder auf unserer Website unter „www.axis.com/techsup“ zur Verfügung steht.
Installationsschritte
Beachten Sie bei der Verwendung dieses Produkts die geltenden Gesetze und
Bestimmungen.
1. Prüfen Sie, ob alle in der nachfolgenden Liste aufgeführten Komponenten vorhanden sind.
2. Sehen Sie sich die Hardwareübersicht auf Seite 26 an.
3. Installieren Sie die Hardware gemäß den Anweisungen auf Seite 28.
4. Beachten Sie die Informationen zum Zugriff auf das Produkt auf Seite 28.
5. Stellen Sie die Bildschärfe wie auf Seite 29 angegeben ein.
DEUTSCH
Page 26

Seite 26 AXIS M11-Serie Installationsanleitung
Lieferumfang
Artikel Bezeichnung/Ausführung
Netzwerk-Kamera AXIS M1103
Kameramontagefuß
Zubehör
CD CD für AXIS Netzwerkvideoprodukte ein-
Dokumente Installationsanleitung und
AXIS M1104
AXIS M1113
AXIS M1114
schließlich Produktdokumentation,
Installationstools und weitere Software.
Gewährleistungserklärung
Übersicht über die Hardware
Schärferegler
AXIS M1103/M1104
Netzwerk-LED Status-LED Netz-LED
Zum Einstellen der Schärfe hier greifen
Steuertaste
AXIS M1113/M1114
Netzwerkanschluss
Blendenanschluss
(AXIS M1113/M1114)
SchärfereglerZoomregler
Page 27

AXIS M11-Serie Installationsanleitung Seite 27
LED-Anzeigen
LED Farbe Bedeutung
Netzwerk Grün Leuchtet bei Verbindung mit einem 100 MBit/s-Netzwerk.
Status Grün Leuchtet bei Normalbetrieb grün.
Stromversorgung
Blinkt bei Netzwerkaktivität.
Gelb Leuchtet bei Verbindung mit einem 10 MBit/s-Netzwerk.
Blinkt bei Netzwerkaktivität.
Leuchte
Keine Netzwerkverbindung vorhanden.
t nicht
Hinweis: Die Status-LED kann so konfiguriert werden, dass
sie bei normalem Betrieb nicht leuchtet oder nur dann
blinkt, wenn folgendermaßen auf die Kamera zugegriffen
wird: Setup > System Options > LED (Setup >
Systemoptionen > LED). Weitere Informationen hierzu
finden Sie in der Online-Hilfe.
Gelb Leuchtet dauerhaft beim Start, beim Zurücksetzen auf die
werksseitigen Standardeinstellungen oder bei der
Wiederherstellung von Einstellungen.
Rot Blinkt langsam bei ei nem Aktualisierungsfehler.
Grün Normaler Betrieb.
Gelb Blinkt grün/gelb bei der Firmware-Aktualisierung.
Anschlüsse und Tasten
Netzwerkanschluss
RJ45-Ethernetanschluss mit Power over Ethernet (PoE).
Das Produkt muss mit einem abgeschirmten Netzwerkkabel (STP) angeschlossen werden.
Alle Kabel, die das Produkt mit dem Netzwerkswitch verbinden, müssen hierfür ausgelegt
sein. Stellen Sie sicher, dass die Netzwerkgeräte gemäß den Anweisungen des Herstellers
installiert wurden. Informationen zu gesetzlichen Bestimmungen finden Sie unter
Electromagnetic Compatibility (EMC), auf Seite 2.
Steuertaste
Die Steuertaste hat folgende Funktionen:
• Zurücksetzen des Produkts auf die werksseitigen Standardeinstellungen. Siehe Zurückset-
zen auf die werksseitige Standardeinstellungen.
• Verbinden mit einem AXIS Video Hosting System-Service oder einem AXIS Internet Dynamic
DNS-Service. Weitere Informationen zu diesen Diensten finden Sie in der Bedienungsanleitung.
DEUTSCH
Page 28

Seite 28 AXIS M11-Serie Installationsanleitung
Installieren der Hardware
Die AXIS M11-Serie ist für die Verwendung in Innen- und Außenbereichen vorgesehen.
Wenn Sie die Kamera im Freien verwenden möchten, installieren Sie sie in einem
zugelassenen Gehäuse für den Außenbereich. Weitere Informationen über Gehäuse für den
Außenbereich finden Sie unter www.axis.com.
1. Schrauben Sie den Montagefuß an der Kamera an. Befestigen Sie für die Wandmontage
zunächst den Montagefuß mit 3 entsprechenden Schrauben an der Wand.
2. Schließen Sie das Kabel am Netzwerkanschluss (unterstützt PoE, Klasse 1) der Kamera an.
3. Überprüfen Sie, ob die LED-Anzeigen die Betriebszustände korrekt angeben. Diese finden Sie in
der vorangegangenen Tabelle.
Zugriff auf das Produkt
Verwenden Sie die bereitgestellten Tools der Installations- und Management-Software-CD, um eine
IP-Adresse zuzuordnen, ein Passwort einzurichten und auf den Videostream zuzugreifen. Diese
Information finden Sie ebenso auf den Support-Seiten unter „www.axis.com/techsup/“.
Page 29

AXIS M11-Serie Installationsanleitung Seite 29
Einstellen der Bildschärfe
AXIS M1103/M1104:
Lösen Sie den Schärferegler am Objektiv. Stellen Sie die Bildschärfe ein. Drehen
Sie den Schärferegler wieder fest.
Fokussieren Sie die Kamera durch Bewegen des Objektivaußenrings (siehe
Übersicht über die Hardware). Wenn Sie am ganzen Objektiv drehen,
schrauben Sie dieses möglicherweise ab.
Schärferegler
AXIS M1113/M1114:
1. Klicken Sie in der Weboberfläche der Kamera oben auf den Link Setup (Einrichtung), und rufen
Sie Basic Setup > Focus (Grundeinstellungen > Fokus) auf.
2. Legen Sie auf der Seite Focus Adjustment (Fokus-Anpassung) die DC-Blende auf „Disabled“
(Deaktiviert) fest, und klicken Sie auf „Save“ (Speichern).
3. Lösen Sie den Zoomregler am Objektiv, indem Sie diesen entgegen dem Uhrzeigersinn drehen.
Stellen Sie den Zoom nach Bedarf ein. Drehen Sie den Zoomregler wieder fest.
4. Lösen Sie den Schärferegler am Objektiv. Stellen Sie die Bildschärfe ein. Drehen Sie den
Schärferegler wieder fest.
5. Legen Sie auf der Seite Focus Adjustment (Fokus-Anpassung) die DC-Blende auf „Enabled“
(Aktiviert) fest, und klicken Sie auf „Save“ (Speichern).
• Die DC-Blende sollte beim Scharfstellen der Kamera immer
deaktiviert sein. Sie ist dann vollständig geöffnet, und die
niedrigste Schärfentiefe kann erreicht werden. Dies sind die
besten Voraussetzungen für eine richtige Fokussierung. Wenn
Sie die Schärfe auf diese Weise regulieren, wird sie bei allen
Lichtverhältnissen beibehalten.
• Die Bauweise der AXIS M11-Serie ermöglicht ein geringfügiges
Bewegen des Objektivs zur korrekten Sensorausrichtung.
Objektiv
Schärferegler Zoomregler
DEUTSCH
Page 30

Seite 30 AXIS M11-Serie Installationsanleitung
Zurücksetzen auf die werksseitige Standardeinstellungen
Gehen Sie beim Zurücksetzen auf die werksseitigen Standardeinstellungen umsichtig vor.
Beim Zurücksetzen auf die werksseitigen Standardeinstellungen werden alle Einstellungen
einschließlich der IP-Adresse auf die Werkseinstellungen zurückgesetzt.
Die Software-Tools für Installation und Verwaltung stehen auf der mit dem Produkt
gelieferten CD-ROM und über die Supportseiten unter „www.axis.com/techsup“ zur
Verfügung.
Gehen Sie zum Zurücksetzen sämtlicher Parameter und der IP-Adresse auf die werksseitigen
Standardeinstellungen folgendermaßen vor:
1. Trennen Sie das Produkt von der Stromversorgung.
2. Halten Sie die Steuertaste gedrückt, und stecken Sie den Netzstecker wieder ein.
3. Halten Sie die Steuertaste etwa 15 bis 30 Sekunden gedrückt, bis die LED-Statusanzeige gelb
blinkt.
4. Lassen Sie die Steuertaste los.
5. Sobald die Statusanzeige grün leuchtet (was bis zu einer Minute dauern kann), ist der Vorgang
abgeschlossen und das Gerät auf die werksseitigen Standardeinstellungen zurückgesetzt.
6. Verwenden Sie die Software-Tools für Installation und Verwaltung, um eine IP-Adresse
zuzuweisen, ein Kennwort einzurichten und auf den Videostream zuzugreifen.
Weitere Informationen
Das Benutzerhandbuch steht auf der Website von Axis unter „www.axis.com“ sowie der
mitgelieferten CD für Axis Netzwerkvideoprodukte zur Verfügung.
Unter „www.axis.com/techsup“ finden Sie Firmware-Aktualisierungen für AXIS M11-Serie. Die
derzeit installierte Firmware-Version können Sie auf den Webseiten der Kamera unter „Setup >
About“ (Einrichtung > Über) anzeigen.
Page 31

Serie AXIS M11 Guida all'installazione Pagina 31
Informazioni di sicurezza
Leggere con attenzione questa Guida all'Installazione prima di installare il prodotto. Conservare la Guida
all'Installazione per usi futuri.
Livelli di pericolo
Indica una situazione pericolosa che, se non
evitata, provoca morte o lesioni gravi.
Indica una situazione pericolosa che, se non
evitata, può provocare la morte o lesioni gravi.
Indica una situazione pericolosa che, se non
evitata, può provocare lesioni medie o minori.
Indica una situazione che, se non evitata, può
danneggiare la proprietà.
Livelli altro messaggio
Indica informazioni importanti, essenziali per il
corretto funzionamento del prodotto.
Indica informazioni utili che aiutano a
ottenere il massimo dal prodotto.
ITALIANO
Page 32

Pagina 32 Serie AXIS M11 Guida all'installazione
Istruzioni di sicurezza
• Il prodotto Axis deve essere installato da un professionista qualificato.
• Il prodotto Axis deve essere utilizzato in conformità alle leggi e alle disposizioni locali.
• Conservare il prodotto Axis in un ambiente asciutto e ventilato.
• Evitare di esporre il prodotto Axis a urti o pressioni eccessive.
• Non installare il prodotto su supporti, superfici o pareti instabili.
• Per l'installazione del prodotto Axis utilizzare solo strumenti adeguati. Una forza eccessiva può
causare danni al prodotto.
• Non utilizzare sostanze chimiche, agenti caustici o detergenti aerosol. Utilizzare un panno pulito
inumidito in acqua pura per la pulizia.
• Utilizzare solo accessori compatibili con le specifiche tecniche del prodotto. Questi possono essere
forniti da Axis o da terze parti.
• Utilizzare solo parti di ricambio fornite o consigliate da Axis.
• Non tentare di riparare il prodotto da soli. Contattare l'assistenza o il rivenditore Axis per questioni
relative alla manutenzione.
Trasporti
• Conservare l'imballaggio di protezione. Durante il trasporto del prodotto Axis, l'imballaggio di
protezione deve essere ricollocato nella sua posizione originale.
• Durante il trasporto del prodotto Axis, utilizzare l'imballaggio originale o equivalente per evitare
danni al prodotto.
Batteria
Il prodotto Axis utilizza una batteria al litio da 3,0 V BR/CR2032 come alimentazione per il suo real-time clock
(RTC) interno. In condizioni normali questa batteria avrà una durata minima di cinque anni.
Una bassa carica della batteria influisce sul funzionamento del RTC, facendolo resettare a ogni accensione.
Quando la batteria deve essere sostituita, un messaggio di registro viene visualizzato nel report server del
prodotto. Per ulteriori informazioni sul report server, consultare le pagine di configurazione del prodotto o
contattare l'assistenza Axis.
La batteria non deve essere sostituita se non richiesto, ma nel caso in cui questo fosse necessario, contattare il
supporto Axis all'indirizzo www.axis.com/techsup per assistenza.
• Rischio di esplosione se la batteria viene sostituita in modo errato.
• Sostituire solo con una batteria identica o una batteria consigliata da Axis.
• Smaltire le batterie usate in base alle normative locali o alle istruzioni del produttore della batteria.
Page 33

Serie AXIS M11 Guida all'installazione Pagina 33
Guida all'installazione
Questa guida spiega come installare la Serie AXIS M11 su una rete. Per ulteriori informazioni,
consultare la Guida per l'utente, disponibile sul CD o all'indirizzo www.axis.com/techsup
Procedure di installazione
Questo prodotto deve essere utilizzato in conformità alle leggi e alle disposizioni locali.
1. Controllare il contenuto della confezione con l'elenco che segue.
2. Panoramica dell'hardware a pagina 34.
3. Installazione dell'hardware a pagina 36.
4. Accedere al Prodotto a pagina 36.
5. Regolazione dell'immagine e della messa a fuoco a pagina 37.
ITALIANO
Page 34

Pagina 34 Serie AXIS M11 Guida all'installazione
Connettore di rete
LED di rete LED di stato LED di alimentazione
Pulsante di
Connettore del diaframma
AXIS M1103/M1104
AXIS M1113/M1114
Levetta di messa a fuocoLevetta zoom
Levetta di messa a fuoco
Afferrare questa parte per regolare la messa a fuoco
comando
(AXIS M1113/M1114)
Contenuto della confezione
Elemento Nome/Varianti
Telecamera di rete AXIS M1103
AXIS M1104
AXIS M1113
AXIS M1114
Cavalletto
Accessorio
CD CD AXIS Network Video, che comprende
Documentazione cartacea Guida all'installazione e documento di
la documentazione del prodotto, le uti-
lity di installazione e altro software.
garanzia
Panoramica dell'hardware
Page 35

Serie AXIS M11 Guida all'installazione Pagina 35
Indicatori LED
LED Colore Indicazione
Rete Verde Luce fissa per connessione di rete a 100 Mbit/s. Luce
LED di
stato
Alimentazione
lampeggiante: attività di rete.
Giallo Luce fissa per connessione di rete a 10 Mbit/s. Luce
lampeggiante: attività di rete.
Spento Assenza di connessione.
Verde Luce verde fissa: condizioni di normale utilizzo.
Nota: Configurare il LED di stato in modo che rimanga
spento in condizioni di normale utilizzo oppure che
lampeggi quando si effettua l’accesso alla telecamera in
Configurazione > Opzioni di sistema > LED. Per ulteriori
informazioni, consultare la Guida in linea.
Giallo Luce fissa: durante l'avvio o il ripristino delle impostazioni
predefinite o della configurazione.
Rosso Luce lampeggiante lenta: aggiornamento non riuscito.
Verde Normale utilizzo.
Giallo Luce lampeggiante verde/gialla: aggiornamento firmware.
Connettori e pulsanti
Connettore di rete
Connettore Ethernet RJ45 con Power over Ethernet (PoE+).
Il prodotto deve essere collegato con un cavo di rete schermato (STP). Tutti i cavi che
collegano il prodotto alla rete sono destinati al loro uso specifico. Verificare che i dispositivi
di rete siano installati secondo le istruzioni del produttore. Per maggiori informazioni sui
requisiti normativi, consultare Electromagnetic Compatibility (EMC), a pagina 2.
Pulsante di comando
Il pulsante di comando viene utilizzato per:
• Ripristino del prodotto alle impostazioni predefinite di fabbrica. Consultare Ripristino dei
valori predefiniti di fabbrica.
• Collegamento a un servizio AXIS Video Hosting System o AXIS Internet Dynamic DNS Service. Per ulteriori informazioni su questi servizi, consultare il Manuale Utente.
ITALIANO
Page 36

Pagina 36 Serie AXIS M11 Guida all'installazione
Installare l’hardware
Serie AXIS M11 è adatta sia ad ambienti interni che esterni. Per utilizzare la telecamera
all'esterno, installarla in un alloggiamento per esterni approvato. Andare su www.axis.com
per ulteriori informazioni su alloggiamenti da esterni.
1. Fissare il supporto alla telecamera avvitandolo su di essa. Per il montaggio a parete, fissare
prima il supporto al muro, usando 3 viti appropriate.
2. Collegare il cavo al connettore di rete (supporta un'alimentazione PoE di classe 1) sulla
videocamera.
3. Verificare che i LED indichino le condizioni di funzionamento corrette. Vedere la tabella
precedente.
Accedere al Prodotto
Utilizzare le utility contenute nel CD del software d'installazione e gestione per assegnare un
indirizzo IP, impostare la password ed accedere al flusso video. Queste informazioni sono disponibili
anche sulle pagine dedicate all'assistenza sul sito www.axis.com/techsup/
Page 37

Serie AXIS M11 Guida all'installazione Pagina 37
Regolazione dello zoom e della messa a fuoco
AXIS M1103/M1104:
Svitare la levetta di messa a fuoco sull'obiettivo. Regolare la messa a fuoco.
Riavvitare la levetta di messa a fuoco.
Afferrare il bordo esterno dell'obiettivo mentre si esegue la messa a fuoco
(vedere Panoramica dell'hardware). Afferrando tutto l'obiettivo infatti
potrebbe svitarsi.
Levetta di messa
a fuoco
AXIS M1113/M1114:
1. Fare clic sul collegamento Impostazione nella parte superiore destra dell'interfaccia Web della
telecamera, quindi andare a Impostazione messa a fuoco > di base.
2. Nella pagina Regolazione messa a fuoco impostare DC-Iris su Disabilitato e fare clic su Salva.
3. Svitare la levetta dello zoom sull'obiettivo girandola in senso antiorario. Regolare
l’impostazione dello zoom. Riavvitare la levetta dello zoom.
4. Svitare la levetta di messa a fuoco sull'obiettivo. Regolare la messa a fuoco. Riavvitare la
levetta di messa a fuoco.
5. Nella pagina Regolazione messa a fuoco impostare DC-Iris su Abilitato e fare clic su Salva.
• DC-Iris deve sempre essere disabilitato quando si regola le
messa a fuoco della telecamera. In questo modo l'obiettivo
viene aperto al massimo dando la minima profondità di campo
e offrendo le condizioni migliori per una corretta messa a fuoco.
La messa a fuoco impostata con questo metodo verrà
mantenuta in qualsiasi condizione di luce
• La progettazione della serie AXIS M11 consente piccoli
movimenti dell'obiettivo per consentire l'allineamento del
sensore.
Obiettivo
Levetta di messa Levetta zoom
a fuoco
ITALIANO
Page 38

Pagina 38 Serie AXIS M11 Guida all'installazione
Ripristino dei valori predefiniti di fabbrica
Il ripristino delle impostazioni di fabbrica deve essere usato con cautela. Un ripristino delle
impostazioni di fabbrica consentirà di ripristinare le impostazioni di fabbrica per tutti i
parametri, incluso l'indirizzo IP.
Gli strumenti per l'installazione e la gestione del software sono disponibili sul CD fornito
con il prodotto e sulle pagine dedicate all'assistenza sul sito Web www.axis.com/techsup.
Per ripristinare tutti i parametri e l’indirizzo IP ai valori predefiniti in fabbrica.
1. Scollegare l'alimentazione dal prodotto.
2. Tenere premuto il pulsante di comando e ricollegare l'alimentazione.
3. Tenere premuto il pulsante di controllo per 15-30 secondi circa fino a quando l'indicatore LED
di stato lampeggerà in giallo.
4. Rilasciare il pulsante di comando.
5. Appena l'indicatore di stato diventa verde (l'operazione può richiedere fino a 1 minuto),
significa che la procedura è terminata e che il prodotto è stato reimpostato con le impostazioni
predefinite di fabbrica.
6. Mediante gli strumenti per l'installazione e la gestione del software, assegnare un indirizzo IP,
impostare la password e accedere al flusso video.
Ulteriori Informazioni
La Guida per l’utente è disponibile sul sito Web di Axis all'indirizzo www.axis.com oppure sul CD
fornito con il prodotto.
Visitare il sito www.axis.com/techsup per verificare se sono stati pubblicati aggiornamenti del
firmware per la telecamera Serie AXIS M11. Per conoscere la versione installata del firmware,
selezionare Configurazione > Informazioni su nelle pagine web della telecamera.
Page 39

Serie AXIS M11 Guía de instalación Página 39
Información de seguridad
Lea esta Guía de instalación con atención antes de instalar el producto. Guarde la Guía de instalación para
poder consultarla en otro momento.
Niveles de peligro
Indica una situación peligrosa que, si no se
evita, provocará lesiones graves o la muerte.
Indica una situación peligrosa que, si no se
evita, puede provocar lesiones graves o la
muerte.
Indica una situación peligrosa que, si no se
evita, puede provocar lesiones moderadas o
leves.
Indica una situación peligrosa que, si no se
evita, puede provocar daños materiales.
Otros niveles de mensaje
Indica información importante que es
fundamental para que el producto funcione
correctamente.
Indica información útil que ayuda a
aprovechar el producto al máximo.
ESPAÑOL
Page 40

Página 40 Serie AXIS M11 Guía de instalación
Instrucciones de seguridad
• El encargado de instalar el producto de Axis debe ser un profesional con experiencia.
• El producto de Axis debe utilizarse de acuerdo con las leyes y normas locales.
• Almacene el producto de Axis en un entorno seco y ventilado.
• Evite la exposición del producto de Axis a choques o a una fuerte presión.
• No instale el producto en soportes, superficies o paredes inestables.
• Utilice solo las herramientas correspondientes cuando instale el producto de Axis. La aplicación de
una fuerza excesiva puede provocar daños en el producto.
• No utilice limpiadores en aerosol, agentes cáusticos ni productos químicos. Limpie con un trapo
limpio humedecido con agua pura.
• Utilice solo accesorios que cumplan con las especificaciones técnicas del producto. Estos accesorios
los puede proporcionar Axis o un tercero.
• Utilice solo piezas de repuesto proporcionadas o recomendadas por Axis.
• No intente reparar el producto usted mismo. Póngase en contacto con el servicio de asistencia
técnica de Axis o con su distribuidor de Axis para tratar asuntos de reparación.
Transporte
• Mantenga el embalaje de protección. Cuando transporte el producto de Axis, el embalaje de
protección debe volver a ponerse en su posición original.
• Cuando transporte el producto de Axis, utilice el embalaje original o un equivalente para evitar daños
en el producto.
Batería
Este producto de Axis utiliza una batería de litio BR/CR2032 de 3,0 V como fuente de alimentación del reloj
interno en tiempo real. En condiciones normales, esta batería durará un mínimo de cinco años.
Un nivel bajo de batería afectará al funcionamiento del reloj en tiempo real, lo que provocará el
restablecimiento de este cada vez que se encienda el producto. Cuando sea necesario sustituir la batería,
aparecerá un mensaje de registro en el informe del servidor del producto. Para obtener más información sobre el
informe del servidor, consulte las páginas de configuración del producto o póngase en contacto con el servicio
de asistencia técnica de Axis.
La batería no debe sustituirse a menos que sea necesario; no obstante, si precisa hacerlo, póngase en contacto
con el servicio de asistencia técnica de Axis en www.axis.com/techsup para solicitar ayuda.
• La sustitución incorrecta de la batería implica riesgo de explosión.
• Sustituya la batería con una batería idéntica u otra batería recomendada por Axis.
• Deseche las baterías usadas de conformidad con la normativa local o las instrucciones del fabricante.
Page 41

Serie AXIS M11 Guía de instalación Página 41
Guía de instalación
Esta guía le ayudará a instalar la Serie AXIS M11 en su red. Para obtener más información, consulte
el Manual de usuario disponible en el CD o en www.axis.com/techsup
Pasos de la instalación
Este producto debe utilizarse de acuerdo con las leyes y normas locales.
1. Compruebe el contenido del paquete con la siguiente lista.
2. Información general del hardware en la página 42.
3. Instalación del hardware en la página 44.
4. Acceso al producto en la página 44.
5. Ajuste de imagen y enfoque en la página 45.
ESPAÑOL
Page 42

Página 42 Serie AXIS M11 Guía de instalación
Conector de red
LED de red LED de estado LED de alimentación
Botón de
Conector de iris
AXIS M1103/M1104
AXIS M1113/M1114
Palanca de enfoquePalanca de zoom
Palanca de enfoque
Sujete esta parte para ajustar el enfoque
control
(AXIS M1113/M1114)
Contenido del paquete
Elemento Título/Variantes
Cámara de red AXIS M1103
AXIS M1104
AXIS M1113
AXIS M1114
Soporte de la cámara
Accesorio
CD CD de vídeo en red de AXIS, incluye la
Material impreso Guía de instalación y documento de
documentación del producto, herramien-
tas de instalación y otro software.
garantía
Información general del hardware
Page 43

Serie AXIS M11 Guía de instalación Página 43
Indicadores LED
LED Color Indicación
Red Verde Fijo para indicar una conexión a una red de 100 Mbits/s.
Estado Verde V erde fijo para indicar un funcionamiento normal.
Alimentación
Parpadea cuando hay actividad de red.
Ámbar Fijo para indicar una conexión a una red de 10 Mbits/s.
Parpadea cuando hay actividad de red.
Apagado No hay conexión a la red.
Nota: Configure el LED de estado para que permanezca
apagado durante el funcionamiento normal, o para que
parpadee solo cuando se acceda a la cámara desde Setup
> System Options > LED (Configuración > Opciones del
sistema > LED). Vea los archivos de la ayuda en línea para
obtener más información.
Ámbar Fijo durante el inicio, al restablecer a la configuración
predeterminada de fábrica y al restaurar valores de
configuración.
Rojo Parpadea despacio si se ha producido un error en una
actualización.
Verde Funcionamiento normal.
Ámbar Parpadea en verde/ámbar durante la actualización del
firmware.
Conectores y botones
Conector de red
Conector Ethernet RJ45 con alimentación a través de Ethernet (PoE).
El producto se conectará mediante un cable de red blindado (STP). Todos los cables que
conecten el producto a la red deberán estar blindados para su uso específico. Asegúrese de
que los dispositivos de red estén instalados de conformidad con las instrucciones del
fabricante. Para obtener información sobre los requisitos normativos, vea Electromagnetic
Compatibility (EMC), en la página 2.
Botón de control
El botón de control se utiliza para lo siguiente:
• Restablecer el producto a la configuración predeterminada de fábrica. Vea Restableci-
miento a la configuración predeterminada de fábrica.
• Conectarse a un servicio AXIS Video Hosting System o al Servicio de DNS dinámico de Internet de AXIS. Para obtener más información sobre estos servicios, vea el Manual del usuario.
ESPAÑOL
Page 44

Página 44 Serie AXIS M11 Guía de instalación
Instalación del hardware
Serie AXIS M11 está diseñado para su uso en interiores o en exteriores. Para usar la cámara
en exteriores, instálela en una carcasa para exteriores aprobada. Vea www.axis.com para
obtener más información sobre carcasas para exteriores.
1. Fije el soporte a la cámara atornillándolo. Para el montaje en la pared, fije primero el soporte a
la pared con tres tornillos adecuados.
2. Conecte el cable al conector de red de la cámara (admite PoE clase 1).
3. Compruebe que los indicadores LED indican las condiciones correctas. Consulte la tabla
anterior.
Acceso al producto
Utilice las herramientas suministradas en el CD del software de instalación y gestión para asignar
una dirección IP, establecer la contraseña y acceder a la transmisión de vídeo. Esta información
también está disponible en las páginas de asistencia técnica en www.axis.com/techsup/
Page 45

Serie AXIS M11 Guía de instalación Página 45
Palanca de enfoque
Ajuste de imagen y enfoque
AXIS M1103/M1104:
Desenrosque la palanca de enfoque del objetivo. Ajuste el enfoque según
corresponda. Apriete de nuevo la palanca de enfoque.
Sujete el borde exterior del objetivo al enfocar (vea Información general del
hardware). Si sujeta todo el objetivo podría desenroscarlo.
AXIS M1113/M1114:
1. Haga clic en el enlace Setup (Configuración) en la parte superior de la interfaz web de la
cámara y diríjase a Basic Setup > Focus (Configuración básica > Enfoque).
2. En la página Focus Adjustment (Ajuste del enfoque) establezca el iris tipo DC en Disabled
(Desactivado) y haga clic en Save (Guardar).
3. Desenrosque la palanca de zoom del objetivo girándola en el sentido contrario a las agujas del
reloj. Ajuste la configuración de zoom según corresponda. Apriete de nuevo la palanca de zoom.
4. Desenrosque la palanca de enfoque del objetivo. Ajuste el enfoque según corresponda. Apriete
de nuevo la palanca de enfoque.
5. En la página Focus Adjustment (Ajuste del enfoque) establezca el iris tipo DC en Enabled
(Activado) y haga clic en Save (Guardar).
• Durante el enfoque de la cámara, el iris tipo DC debe estar
siempre desactivado. De esta manera el iris se abre al máximo
para conseguir la menor profundidad de campo posible y, por
tanto, las condiciones óptimas para el enfoque correcto.
Cuando el enfoque se establezca con este método, se
mantendrá en todas las condiciones de iluminación
• El diseño de la serie AXIS M11 permite leves movimientos del
objetivo para garantizar la alineación del sensor.
Objetivo
ESPAÑOL
Palanca de enfoque Palanca de zoom
Page 46

Página 46 Serie AXIS M11 Guía de instalación
Restablecimiento a la configuración predeterminada de fábrica
Hay que tener cuidado al restablecer la configuración predeterminada de fábrica. Todos los
valores, incluida la dirección IP, se restablecerán a la configuración predeterminada de
fábrica.
Las herramientas del software de instalación y gestión están disponibles en el CD
suministrado con el producto, así como en las páginas de asistencia técnica en
www.axis.com/techsup.
Para restablecer todos los parámetros y la dirección IP a la configuración predeterminada de
fábrica:
1. Desconecte la alimentación del producto.
2. Mantenga pulsado el botón de control y vuelva a conectar la alimentación.
3. Mantenga pulsado el botón de control durante 15-30 segundos hasta que el indicador LED de
estado parpadee en ámbar.
4. Suelte el botón de control.
5. Cuando el indicador de estado emita una luz verde (lo que puede tardar hasta 1 minuto), ha
finalizado el proceso y se ha restablecido el producto a la configuración predeterminada de
fábrica.
6. Utilice las herramientas del software de instalación y gestión para asignar una dirección IP,
establecer la contraseña y acceder a la transmisión de vídeo.
Más información
El manual de usuario se encuentra disponible en el sitio web de Axis en www.axis.com o en el CD de
productos de vídeo en red de AXIS que se proporciona con este producto.
Visite www.axis.com/techsup para comprobar si existe un firmware actualizado disponible para la
Serie AXIS M11. Para ver la versión del firmware instalado actualmente, vea Setup > About
(Configuración > Acerca de) en las páginas web de la cámara.
Page 47

AXISM11 シリーズインストールガイド 47ページ
注意
安全情報
本製品を設置する前に、このインストールガイドをよくお読みください。インストールガイドは、
後で参照できるように保管しておいてください。
危険レベル
回避しない場合、死亡または重傷につな
がる危険な状態を示します。
回避しない場合、死亡または重傷につな
がるおそれのある危険な状態を示しま
す。
回避しない場合、軽傷または中程度の怪
我につながるおそれのある危険な状態を
示します。
回避しない場合、器物の破損につながる
おそれのある状態を示します。
その他のメッセージレベル
製品を正しく機能させるために不可欠な
重要情報を示します。
製品を最大限に活用するために役立つ有
用な情報を示します。
日本語
Page 48

48ページ AXISM11 シリーズインストールガイド
安全手順
• 本製品の設置は、訓練を受けた専門技術者が行ってください。
• 本製品は、お使いになる地域の法律や規制に準拠して使用してください。
• 本製品は乾燥した換気のよい環境に保管してください。
• 本製品に衝撃または強い圧力を加えないでください。
• 本製品を不安定なブラケット、表面、または壁に設置しないでください。
• 本製品を設置する際には、適切な工具のみを使用してください。過剰な力がかかると、
製品が損傷することがあります。
• 化学薬品、腐食剤、噴霧式クリーナーは使用しないでください。清掃には、きれいな水
に浸した清潔な布を使用してください。
• 製品の技術仕様に準拠したアクセサリーのみを使用してください。これらのアクセサ
リーは、Axis またはサードパーティから入手できます。
• Axis が提供または推奨する交換部品のみを使用してください。
• 製品を自分で修理しないでください。修理については、Axis サポートまたは販売代理店
にお問い合わせください。
輸送
• 保護包装は保管しておいてください。本製品を輸送する際には、必ず保護包装を元の位
置に戻してください。
• 本製品を運搬する際は、製品が損傷しないよう、元の梱包か同等の梱包を使用してくだ
さい。
バッテリー
本製品は、内部リアルタイムクロック(RTC)用電源として、3.0VBR/CR2032 リチウムバッテリー
を使用します。このバッテリーは、通常条件下で最低 5 年間使用できます。
バッテリーが低電力状態になると、RTC の動作に影響し、電源を入れるたびに RTC がリセットさ
れます。バッテリーの交換が必要になると、製品のサーバーレポートにログメッセージが表示さ
れます。サーバーレポートの詳細については、製品の設定ページを参照するか、Axis サポートま
でお問い合わせください。
必要な場合以外はバッテリーを交換しないでください。バッテリーの交換が必要な場合は、Axis
サポート(www.axis.com/techsup)までご連絡ください。
• バッテリーは、正しく交換しないと爆発する危険があります。
• 交換用バッテリーとしては、同一品または Axis が推奨するバッテリーのみを使用してく
ださい。
• 使用済みバッテリーは、地域の規制またはバッテリーメーカーの指示に従って廃棄して
ください。
Page 49

AXISM11 シリーズインストールガイド 49ページ
インストールガイド
このインストールガイドでは、AXISM11 シリーズをネットワークにインストールする
手順について説明します。技術仕様の詳細については、ユーザーズマニュアルを参照
してください。ユーザーズマニュアルは、CD または Axis のホームページ
(www.axis.com/techsup)から入手できます。
設置手順
本製品はお使いになる国の法律および規制にしたがって使用してください。
1. 以下のリストを参照して、パッケージの内容を確認してください。
2. ハードウェアの概要(50 ページ )。
3. ハードウェアの設置(52 ページ )。
4. 製品へのアクセス(52 ページ )。
5. 画像およびピントの調節(53 ページ )。
日本語
Page 50

50ページ AXISM11 シリーズインストールガイド
ネットワークコネクタ
ネットワーク ステータス 電源 LED
コントロー
アイリスコネクタ
AXISM1103/M1104
AXISM1113/M1114
ピント調節レバーズーム調節レバー
ピントを調節するにはこの部品をつかみます
ルボタン
(AXISM1113/M1114)
LED
LED
パッケージの内容
アイテム タイトル / バリエーション
ネットワークカメラ AXISM1103
AXISM1104
AXISM1113
AXISM1114
カメラスタンド
アクセサリー
CD AXIS ネットワークビデオ CD( 製品
マニュアル、インストールツール、
その他のソフトウェア )。
印刷物 インストールガイドおよび保証書
ハードウェアの概要
Page 51

AXISM11 シリーズインストールガイド 51ページ
LED インジケーター
LED 色 説明
ネットワーク緑 100Mbit/sネットワークに接続している場合、点
ステータス 緑 正常動作であれば緑色に点灯。
電源 緑 正常動作。
灯します。ネットワークパケットを送受信した場
合、点滅します。
黄 10Mbit/sネットワークに接続している場合、点灯
します。ネットワークパケットを送受信した場合、
点滅します。
無点灯 ネットワーク接続なし。
注 :Setup>SystemOptions>LED 設定で、ステー
タス LED が通常作動時に点灯しないように、ある
いはカメラにアクセスする時のみ点滅するように
設定します。詳細については、オンラインヘルプ
のファイルを参照してください。
黄 スタートアップ中または工場出荷時の設定へのリ
セット中、設定の復元時に黄色に点灯。
赤 アップグレードに失敗した場合に、ゆっくりと点
滅します。
黄 ファームウェアアップグレード中は緑と黄の交互
点滅。
コネクターとボタン
ネットワークコネクタ
RJ45 イーサネットコネクタ、PoweroverEthernet(PoE)対応。
本製品は、シールドネットワークケーブル(STP)を使用して接続してください。
本製品は、用途に合ったケーブルを使用してネットワークに接続してください。
ネットワーク装置がメーカーの指示どおりに設置されていることを確認してく
ださい。法的要件については
を参照してください。
コントロールボタン
コントロールボタンは、以下の用途で使用します。
• 製品を工場出荷時の設定にリセットする。
参照してください。
• AXISVideoHostingSystem サービスまたは AXISInternetDynamicDNS サービ
スに接続する。これらのサービスの詳細については、ユーザーズマニュアルを
参照してください。
ElectromagneticCompatibility(EMC)
工場出荷時の設定にリセットする
(2ページ )
を
日本語
Page 52

52ページ AXISM11 シリーズインストールガイド
ハードウェアの設置
AXISM11 シリーズは、屋内、屋外で使用できるように設計されています。屋外
で使用する場合は、認定済みの屋外用ハウジングに収容して設置する必要があ
ります。屋外用ハウジングの詳細については、Axis のホームページ
(www.axis.com)を参照してください。
1. スタンドをカメラにネジで取り付けます。壁に設置する場合は、まず、スタンドを
3 本のネジで壁に取り付けます。
2. ケーブルをカメラのネットワークコネクタ(PoEclass1 に対応 )に接続します。
3. LED インジケーターが正常な状態を示すことを確認します。以下の表を参照してく
ださい。
製品へのアクセス
IP アドレスの割り当て、パスワードの設定、ビデオストリームへのアクセスを行うに
は、インストール・管理ソフトウェア CD に収録されているツールを使用します。こ
の情報は、Axis のサポートページ(www.axis.com/techsup/)にも掲載されています。
Page 53

AXISM11 シリーズインストールガイド 53ページ
ピント調節レバー
注意
注意
ピント調節レバー
ズーム調節レバー
レンズ
画像およびピントの調節
AXISM1103/M1104:
レンズのピント調節レバーを緩めます。必要に応じてピントを調節し
ます。ピント調節レバーを締め直します。
ピントを調節するときは、レンズの外側リングをつかみます(
ハードウェアの概要
れる原因となるおそれがあります。
AXISM1113/M1114:
1. カメラの Web インターフェースの右上にある [Setup]( 設定 ) リンクをクリックし、
[BasicSetup]( 基本設定 )>-[Focus]( フォーカス )に進みます。
2. [FocusAdjustment]( フォーカスの調節 ) ページで、[DC-Iris](DC アイリス ) を
[Disabled]( 無効 ) に設定し、[Save]( 保存 ) をクリックします。
3. ズーム調節レバーを反時計方向に回して緩めます。必要に応じてズームの設定を調
節します。ズーム調節レバーを締め直します。
4. レンズのピント調節レバーを緩めます。必要に応じてピントを調節します。ピント
調節レバーを締め直します。
5. [FocusAdjustment]( フォーカスの調節 ) ページで、[DC-Iris](DC アイリス ) を
[Enabled]( 有効 ) に設定し、[Save]( 保存 ) をクリックします。
• DC アイリスはカメラのピントスを合わせている間は必
ず無効にしておきます。これにより、絞りが最大まで
開かれ、被写界深度が最小になり、ピントの調整に最
適な条件になります。この方法でピントが設定される
と、その後は光の条件に関わらず維持されます。
• AXISM11 シリーズではレンズをわずかに移動させ、セ
ンサーの位置合わせを行うことができるように設計さ
れています。
を参照 )。レンズ全体をつかむと、レンズが外
日本語
Page 54

54ページ AXISM11 シリーズインストールガイド
注意
工場出荷時の設定にリセットする
工場出荷時の設定へのリセットは慎重に行ってください。工場出荷時の設定へ
のリセットを行うと、IP アドレスを含むすべての設定が工場出荷時の値にリ
セットされます。
インストール・管理ソフトウェアツールは、製品に付属の CD と、
www.axis.com/techsup のサポートページから入手できます。
すべてのパラメータおよび IP アドレスをリセットし、工場出荷時の設定に戻すには、
次の手順にしたがいます。
1. 本製品の電源を切ります。
2. コントロールボタンを押し続けながら電源を再投入します。
3. ステータス LED インジケーターが黄色に点滅するまで、コントロールボタンを約
15 〜 30 秒間押し続けます。
4. コントロールボタンを離します。
5. ステータスインジケーターが緑色に変わったら( 最大 1 分 )、処理は完了し、製品
は工場出荷時の設定にリセットされました。
6. インストール・管理ソフトウェアツールを使用して、IP アドレスの割り当て、パス
ワードの設定、ビデオストリームへのアクセスを行います。
関連情報
ユーザーズマニュアルは、本製品に付属の AXIS ネットワークビデオ製品 CD または
Axis の Web サイト(www.axis.com)から入手できます。
www.axis.com/techsup にアクセスして、AXISM11 シリーズのファームウェアのアッ
プデート版がリリースされていないかどうか確認してください。現在インストールさ
れているファームウェアのバージョンを確認するには、カメラのウェブページにある
[Setup( 設定 )]>[About( バージョン情報 )]を参照してください。
Page 55

Page 56

Installation Guide Ver. 1.5
AXIS M11 Series Network Camera Printed: October 2014
© Axis Communications AB, 2014 Part No. 60181
 Loading...