

Page 1

INSTALLATION GUIDE
AXIS M1011 Network Camera
AXIS M1011-W Network Camera
AXIS M1031-W Network Camera
ENGLISH DEUTSCH
FRAN
Ç
AIS
ITALIANO
ESPAÑOL
Page 2

About this Document
This document includes instructions for installing the
AXIS M1011/M1031 on your network. Previous
experience of networking will be beneficial when
installing the product.
Legal Considerations
Video and audio surveillance can be prohibited by laws
that vary from country to country. Check the laws in
your local region before using this product for
surveillance purposes.
This product includes one (1) H.264 decoder license and
(1) MPEG-4 decoder license. To purchase further
licenses, contact your reseller.
Electromagnetic Compatibility (EMC)
This equipment generates, uses and can radiate radio
frequency energy and, if not installed and used in
accordance with the instructions, may cause harmful
interference to radio communications. However, there is
no guarantee that interference will not occur in a
particular installation.
If this equipment does cause harmful interference to
radio or television reception, which can be determined
by turning the equipment off and on, the user is
encouraged to try to correct the interference by one or
more of the following measures: Re-orient or relocate
the receiving antenna. Increase the separation between
the equipment and receiver. Connect the equipment to
an outlet on a different circuit to the receiver. Consult
your dealer or an experienced radio/TV technician for
help. Shielded (STP) network cables must be used with
this unit to ensure compliance with EMC standards.
Radio Transmission Regulatory Information & EMC,
on page 87 for more information on this product’s
compliance with radio frequency and safety
standards.
See
RoHS
This product complies with both the European
RoHS directive, 2002/95/EC, and the Chinese
RoHS regulations, ACPEIP.
WEEE Directive
The European Union has enacted a Directive
2002/96/EC on Waste Electrical and Electronic
Equipment (WEEE Directive). This directive is
applicable in the European Union member
states.
The WEEE marking on this product (see right) or its
documentation indicates that the product must not be
disposed of together with household waste. To prevent
possible harm to human health and/or the environment,
the product must be disposed of in an approved and
environmentally safe recycling process. For further
information on how to dispose of this product correctly,
contact the product supplier, or the local authority
responsible for waste disposal in your area.
Business users should contact the product supplier for
information on how to dispose of this product correctly.
This product should not be mixed with other commercial
waste. For more information, visit
www.axis.com/techsup/.
Support
Should you require any technical assistance, please
contact your Axis reseller. If your questions cannot be
answered immediately, your reseller will forward your
queries through the appropriate channels to ensure a
rapid response. If you are connected to the Internet, you
can:
• download user documentation and firmware updates
• find answers to resolved problems in the FAQ database.
Search by product, category, or phrases
• report problems to Axis support by logging in to your
private support area.
Equipment Modifications
This equipment must be installed and used in strict
accordance with the instructions given in the user
documentation. This equipment contains no
user-serviceable components. Unauthorized equipment
changes or modifications will invalidate all applicable
regulatory certifications and approvals.
Liability
Every care has been taken in the preparation of this
document. Please inform your local Axis office of any
inaccuracies or omissions. Axis Communications AB
cannot be held responsible for any technical or
typographical errors and reserves the right to make
changes to the product and documentation without
prior notice. Axis Communications AB makes no
warranty of any kind with regard to the material
contained within this document, including, but not
limited to, the implied warranties of merchantability
and fitness for a particular purpose. Axis
Communications AB shall not be liable nor responsible
for incidental or consequential damages in connection
with the furnishing, performance or use of this material.
Page 3

AXIS M1011/M1011-W/M1031-W Installation Guide Page 3
Important!
This product must be used in
compliance with local laws and
regulations.
AXIS M1011/-W & AXIS M1031-W
Installation Guide
This installation guide provides instructions for installing the AXIS M1011/-W / AXIS M1031-W
Network Camera on your network. For all other aspects of using the product, please see the User’s
Manual, available on the CD included in this package, or from www.axis.com/techsup
Installation steps
1. Check the package contents against the list below.
2. Hardware overview. See page 4.
3. Install the hardware. See page 5.
4. Assign an IP address. See page 6.
5. Set the password. See page 9.
6. Configure the wireless connection. See page 11.
(AXIS M1011-W/M1031-W only)
Package contents
Item Models/variants/notes
Network Camera AXIS M1011
Indoor power adaptor
(country specific)
Camera stand Including fitted extension section and 4 mounting screws/plugs
Flexible clamp For shelf mounting
CD AXIS Network Video Product CD, including product documentation,
Printed Materials AXIS M1011/M1011-W/M1031-W Installation Guide (this document)
AXIS M1011-W
AXIS M1031-W
PS-H* or PS-V
Europe, UK, USA/Japan, Australia, Korea, Argentina, China
*power adaptor extension cable 1.8m (5.9ft), PS-H only
installation tools and other software
Axis Warranty Document
ENGLISH
Page 4
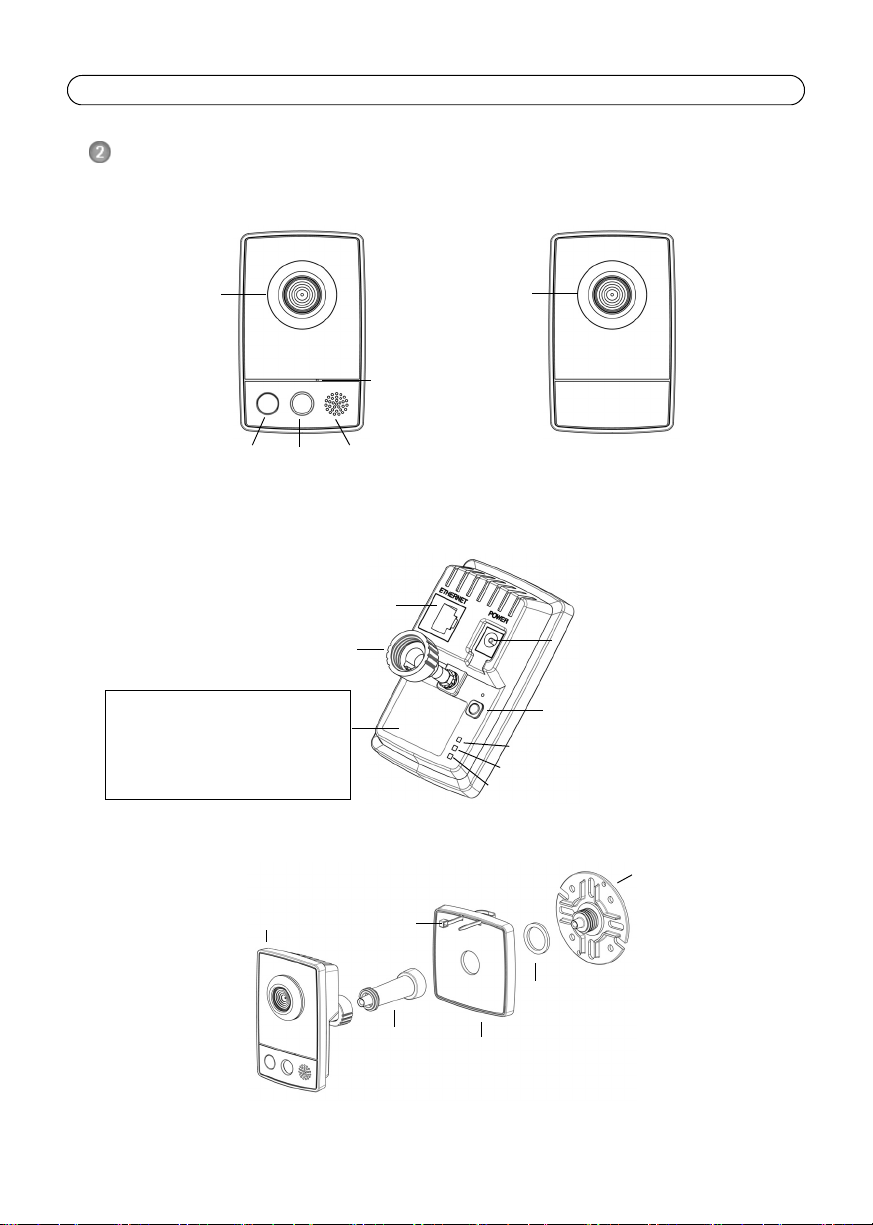
Page 4 AXIS M1011/M1011-W/M1031-W Installation Guide
Product number (P/N) &
The serial number may be
required during the installation.
Power connector
Control button
Network connector
Power Indicator LED
Network Indicator LED
Lock ring
Microphone
Light PIR
Wireless Indicator LED
(activated on wireless models only)
Lens with
Speaker
AXIS M1031-W
AXIS M1011/-W
Rear view
Status Indicator
LED
Lens with
Status Indicator
LED
(both models)
Cable tie
Base plate
Rubber washer
Stand
Extension
section
Network camera
Front view
Assembly
sensor
(optional)
Serial number (S/N).
Hardware overview
Please refer to page 15 for details on the connectors and LED indicators.
Page 5

AXIS M1011/M1011-W/M1031-W Installation Guide Page 5
Lock
ring
Extension
section
Stand
AXIS M1031-W Wall mount
AXIS M1031-W Shelf mount
Clamp
Lock
ring
Fixing screw
(optional)
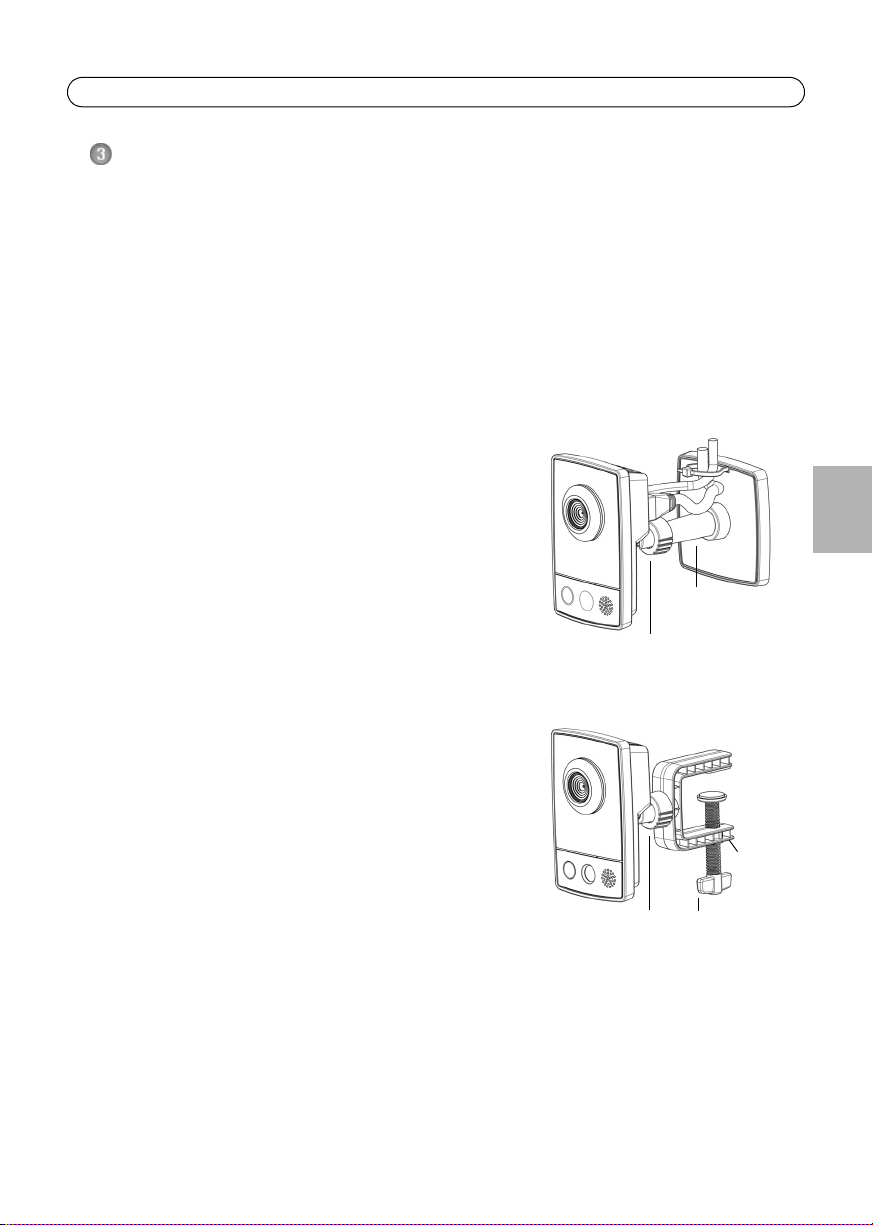
Install the hardware
IMPORTANT!
AXIS M1011/M1011-W/M1031-W is not approved for outdoor use - the product
!
may be installed in indoor environments only.
Mount the camera
AXIS M1011/M1011-W/M1031-W is shipped with the stand and extension section mounted.
Disassemble the stand and, depending on the intended installation, follow these instructions for
wall mounting or shelf mounting.
Wall mounting
1. Unscrew the extension section to release the base plate
from the stand.
2. Using the supplied screws, fix the base plate to a flat
(horizontal or vertical) surface.
3. Attach the stand and optionally the extension section.
4. Attach the camera, adjust the angle and tighten the lock
ring.
5. The stand is equipped with a cable tie to secure the cables
once connected.
Shelf mounting
1. Position the clamp and tighten the fixing screw securely.
2. Attach the lock ring on the camera to the clamp.
3. Adjust the camera angle and tighten the lock ring.
Connect the cables
1. Connect the camera to the network using a shielded network cable.
AXIS M1011-W/M1031-W: If connecting to a wireless network, the wired connection is temporary in order to configure the camera’s wireless settings. See page 11 for more
information.
2. Connect the supplied indoor power adaptor to the power connector on the camera.
3. Check that the indicator LEDs indicate the correct conditions. See the table on page 15 for
further details. Note that some LEDs can be disabled and may be unlit.
4. Proceed to Assign an IP address, on page 6.
ENGLISH
Page 6

Page 6 AXIS M1011/M1011-W/M1031-W Installation Guide
Assign an IP address
Most networks today have a DHCP server that automatically assigns IP addresses to connected
devices. If your network does not have a DHCP server the AXIS M1011/M1011-W/M1031-W will
use 192.168.0.90 as the default IP address.
If you would like to assign a static IP address, the recommended method in Windows is either AXIS
IP Utility or AXIS Camera Management. Depending on the number of cameras you wish to install,
use the method that best suits your purpose.
Both of these free applications are available on the Axis Network Video Product CD supplied with
this product, or they can be downloaded from www.axis.com/techsup
Method Recommended for Operating system
AXIS IP Utility
See page 7
AXIS Camera Management
See page 8
Notes:
• If assigning the IP address fails, check that there is no firewall blocking the operation.
• For other methods of assigning or discovering the IP address of the
M1031-W
, e.g. in other operating systems, see page 14.
Single camera
Small installations
Multiple cameras
Large installations
Installation on a different subnet
Windows
Windows 2000
Windows XP Pro
Windows 2003 Server
Windows Vista
AXIS M1011/M1011-W/
Page 7

AXIS M1011/M1011-W/M1031-W Installation Guide Page 7
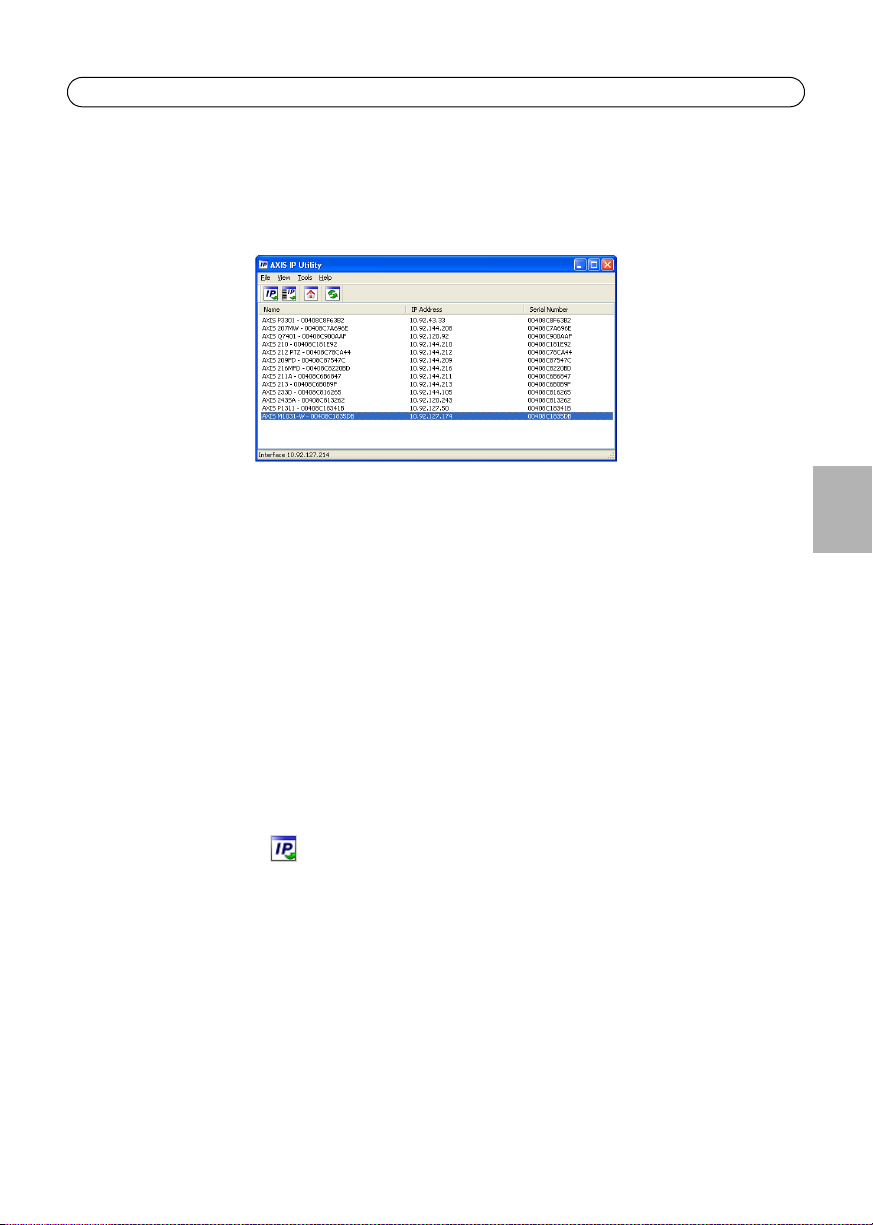
AXIS IP Utility - single camera/small installation
AXIS IP Utility automatically discovers and displays Axis devices on your network. The application
can also be used to manually assign a static IP address
Note that the computer running AXIS IP Utility must be on the same network segment (physical
subnet) as the AXIS M1011/M1011-W/M1031-W.
Automatic discovery
1. Check that the camera is connected to the network and that power has been applied.
2. Start AXIS IP Utility.
3. When the camera appears in the window, double-click it to open its home page.
4. See page 9 for instructions on how to assign the password.
ENGLISH
Assign the IP address manually (optional)
1. Acquire an unused IP address on the same network segment as your computer.
2. Select the camera in the list.
3. Click the button Assign new IP address to the selected device and enter the IP address.
4. Click the Assign button and follow the on-screen instructions. Note that the camera must be
restarted within 2 minutes for the new IP address to be set.
5. Click the Home Page button to access the camera’s web pages.
6. See page 9 for instructions on how to set the password.
Page 8

Page 8 AXIS M1011/M1011-W/M1031-W Installation Guide
AXIS Camera Management - multiple cameras/large installations
AXIS Camera Management can automatically discover multiple Axis devices, show connection
status, manage firmware upgrades and set IP addresses.
Automatic discovery
1. Check that the camera is connected to the network and that power has been applied.
2. Start AXIS Camera Management. When the camera appears in the window, right-click the link
and select Live View Home Page.
3. See page 9 for instructions on how to set the password.
Assign an IP address in a single device
1. Select AXIS M1011 in AXIS Camera Management and click the
Assign IP button
2. Select Assign the following IP address and enter the IP
address, subnet mask and default router the device will use.
3. Click the OK button.
Assign IP addresses in multiple devices
AXIS Camera Management speeds up the process of assigning IP
addresses to multiple devices, by suggesting IP addresses from a
specified range.
1. Select the devices you wish to configure (different models can be
selected) and click the Assign IP button.
2. Select Assign the following IP address range and enter the
range of IP addresses, the subnet mask and default router the
devices will use.
3. Click the OK button.
Page 9

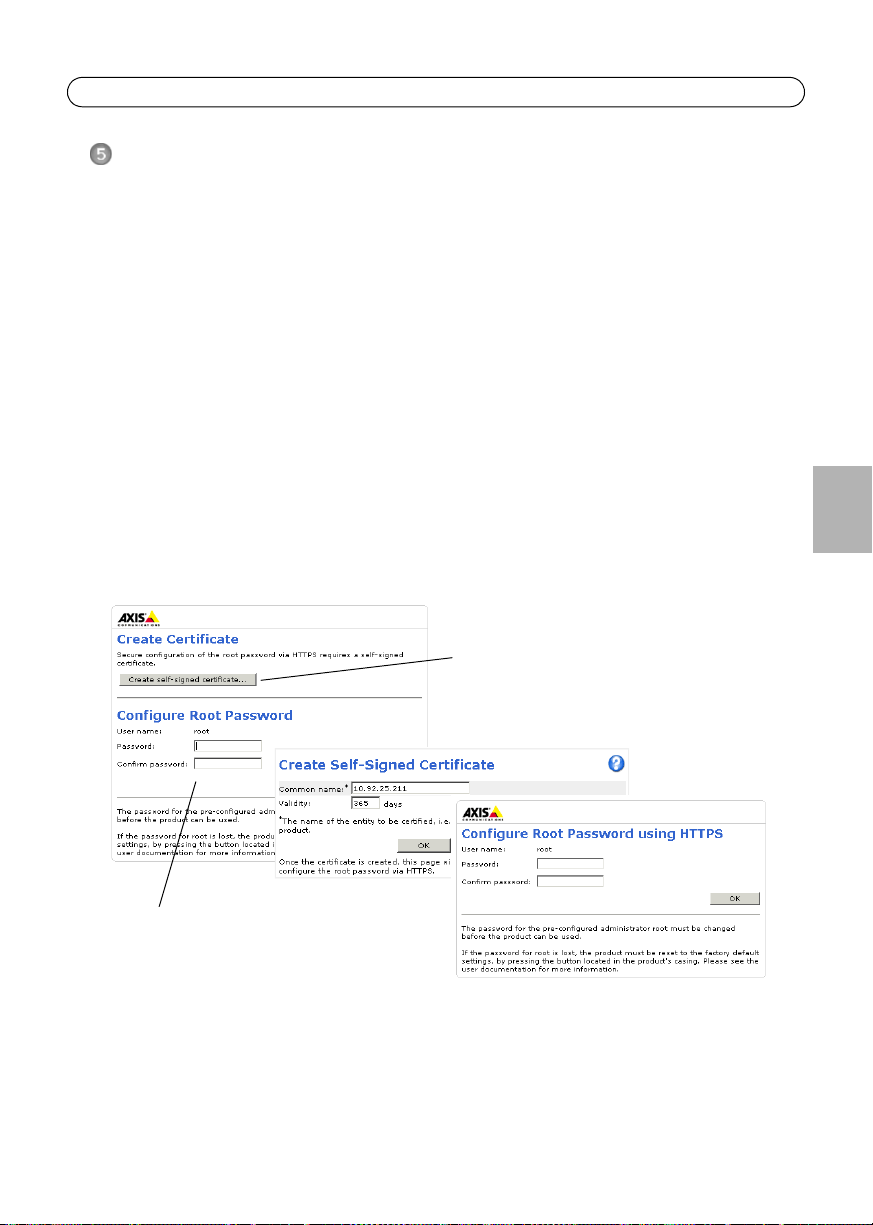
AXIS M1011/M1011-W/M1031-W Installation Guide Page 9
To configure the password directly
via an unencrypted connection, enter
the password here.
To create an HTTPS connection,
start by clicking this button.
Set the password
To gain access to the product, the password for the default administrator user root must be set. This
is done in the ‘Configure Root Password’ dialog, which is displayed when the AXIS M1011/M1011W/M1031-W is accessed for the first time.
To prevent network eavesdropping when setting the root password, this can be done via an
encrypted HTTPS connection, which requires an HTTPS certificate (see note below).
To set the password via a standard HTTP connection, enter it directly in the first dialog shown
below.
To set the password via an encrypted HTTPS connection, follow these steps:
1. Click the Create self-signed certificate button.
2. Provide the requested information and click OK. The certificate is created and the password can
now be set securely. All traffic to and from the AXIS M1011/M1011-W/M1031-W is encrypted
from this point on.
3. Enter a password and then re-enter it to confirm the spelling. Click OK. The password has now
been configured.
ENGLISH
4. To log in, enter the user name “root” in the dialog as requested
Note: The default administrator user name root cannot be deleted.
5. Enter the password as set above, and click OK.
Page 10

Page 10 AXIS M1011/M1011-W/M1031-W Installation Guide
Setup - Provides all the tools for configuring
the camera to requirements.
Help - Displays
online help on all
aspects of using
the camera.
Access the video stream
The Live View page of the network camera is displayed, with links to the Setup tools which allow
you to customize the camera.
If required, click Yes to install AMC (AXIS Media Control), which allows viewing of the video stream
in Internet Explorer. You will need administrator rights on the computer to do this.
Notes:
• HTTPS (Hypertext Transfer Protocol over Secure Socket Layer) is a protocol used to encrypt the traffic
between web browsers and servers. The HTTPS certificate controls the encrypted exchange of
information.
• The default administrator user root cannot be deleted.
• If the password for root is lost or forgotten, the network camera must be reset to the factory default
settings. See Resetting to the Factory Default Settings, on page 16.
AXIS M1011: The installation is now complete.
AXIS M1011-W/M1031-W: Proceed to Configure the wireless connection, on page 11.
Page 11

AXIS M1011/M1011-W/M1031-W Installation Guide Page 11
Configure the wireless connection
AXIS M1011-W/M1031-W is temporarily connected to the wired network to allow configuration of
the camera’s wireless settings before connecting to the wireless network. Configuring the camera
using an unsecured wireless connection is not recommended, as passphrases and keys are sent in
plain text.
Note:
For even greater security, use HTTPS. Once the camera has been connected to the wired network, go
to Setup > System Options > Security > HTTPS and refer to the camera’s online help for
instructions.
Status of Wireless Networks
Go to Setup > Basic Setup > Wireless in the camera’s internal web pages.
This list is the result of a network scan. The network the AXIS M1011-W/M1031-W is currently
linked to is shown in blue. A network using unsupported security is shown in grey. The following
information is provided:
• SSID - The name of a wireless network (or ad-hoc device).
• Mode - An Access Point (Master) or Ad-Hoc device.
• Security - Shows which type of security the network uses. See below for the supported
security types.
• Channel - Shows the wireless channel currently in use.
• Signal strength - Shows the signal strength.
• Bit rate - The current bit rate in Mbit/s. This is only shown for the access point currently in
use.
ENGLISH
Note:
Access points with a disabled SSID Broadcast will not appear unless the SSID is manually
entered.
Page 12

Page 12 AXIS M1011/M1011-W/M1031-W Installation Guide
Wireless Settings
1. Select an access point or ad-hoc device under Status of Wireless Networks, some of the
required information will automatically be entered under Wireless Settings.
2. SSID is the name of the selected wireless network. Leave this field blank if AXIS M1011-W/
M1031-W is to access the nearest unsecured network.
3. Network type - select Master to access the network via an access point or Ad-hoc to access
any other wireless device and create a local network (see note below).
4. Security - select one of the following methods:
• WPA-/WPA2-PSK
• WPA-/WPA2-Enterprise - see instructions below
• WEP - see instructions below
• No security (not recommended)
Keys, passphrases and certificates that are used for security must be entered manually. To
retrieve the necessary details, contact the Network Administrator for the selected access point
or ad-hoc device.
5. Click Save.
Note:
Ad hoc mode allows users to form a wireless LAN without connection via an access point.
The camera can, for example, connect point-to-point to a laptop with wireless network
support. Ad-hoc connection may be useful in certain installations but is not the recommended method.
WPA-/WPA2-PSK - Enter the required Pre-shared Key for the access point, which can be a
hexidecimal number (Manual hex) or a passphrase
WPA-/WPA2-Enterprise - Choose the type of client/server authentication being used by the
access point; EAP-TLS.
EAP-TLS
• Identity - Enter the user identity to
present to the network
• Private key password - Enter the
password for your user identity
• EAPOL version - Select the version
used (1 or 2) in your access point
• Certificates - Upload a CA
certificate to present to the access
point for authentication
Page 13

AXIS M1011/M1011-W/M1031-W Installation Guide Page 13
WEP
Authentication - Select Open or Shared Key, depending on the method used by your access
point. Not all access points have this option, in which case they probably use Open System,
which is sometimes known as SSID Authentication.
Key length - This sets the length of the key used for the wireless encryption, 64 or 128 bit. The
encryption key length may also be shown as 40/64 and 104/128.
Key type - The available key types depend on the selected access point. The following options
are available in the camera:
• Manual - Allows you to manually enter the hex key.
• ASCII - The string must be exactly 5 characters for 64-bit WEP and 13 characters for 128-
bit WEP.
• Passphrase - In 64-bit WEP, the Passphrase generates 4 different keys. For 128-bit WEP,
only 1 key is generated, which is then replicated for all 4 keys. Key generation is not standardized and can differ from brand to brand. Check that the generated keys are identical to
those in your access point - if not, they must be entered manually.
Complete the wireless installation
1. Check that the wireless settings in the camera correspond to the settings in the access point.
2. Disconnect the network cable from the camera.
3. Refresh the web page after 20-30 seconds to confirm the wireless connection. If the camera
cannot be accessed, run AXIS IP Utility and select it from the list.
ENGLISH
Note:
• To establish communication, the wireless settings must be exactly the same in the camera as in the
access point or ad-hoc device.
• Keys, passphrases and certificates that are used for security must be entered manually. Contact your
Network Administrator for the requirements for the selected access point or ad-hoc device.
• Wireless settings must always
the camera first, before changing the settings in the wireless access point. This ensures that the
camera is always accessible when making changes.
• SSID (Service Set Identifier) is sometimes written as ESSID (Extended Service Set Identifier).
AXIS M1011-W/M1031-W: The installation is now complete.
(during installation and at all other times) be configured or changed in
Page 14
Page 14 AXIS M1011/M1011-W/M1031-W Installation Guide
Other methods of setting the IP address
The table below shows the other methods available for setting or discovering the IP address. All
methods are enabled by default, and all can be disabled.
UPnP™
Bonjour
AXIS Dynamic DNS
Service
ARP/Ping
View DHCP server
admin pages
Use in operating
system
Windows
(ME or XP)
MAC OSX
(10.4 or later)
All A free service from Axis that allows you to quickly and simply
All See below. The command must be issued within 2 minutes of
All To view the admin pages for the network DHCP server, see the
Notes
When enabled on your computer, the camera is automatically
detected and added to “My Network Places.”
Applicable to browsers with support for Bonjour. Navigate to the
Bonjour bookmark in your browser (e.g. Safari) and click on the
link to access the camera’s web pages.
install your camera. Requires an Internet connection with no
HTTP proxy. See www.axiscam.net for more information.
connecting power to the camera.
server’s own documentation.
Set the IP address with ARP/Ping
1. Acquire an IP address on the same network segment your computer is connected to.
2. Locate the serial number (S/N) on the AXIS M1011/M1011-W/M1031-W label.
3. Open a command prompt on your computer and enter the following commands:
Windows syntax: Windows example:
arp -s <IP Address> <Serial Number>
ping -l 408 -t <IP Address>
UNIX/Linux/Mac syntax: UNIX/Linux/Mac example:
arp -s <IP Address> <Serial Number> temp
ping -s 408 <IP Address>
arp -s 192.168.0.125 00-40-8c-18-10-00
ping -l 408 -t 192.168.0.125
arp -s 192.168.0.125 00:40:8c:18:10:00 temp
ping -s 408 192.168.0.125
4. Check that the network cable is connected to the camera and then start/restart the camera, by
disconnecting and reconnecting power.
5. Close the command prompt when you see ‘Reply from 192.168.0.125: ...’ or similar.
6. In your browser, type in http://<IP address> in the Location/Address field and press Enter on
your keyboard.
Notes:
• To open a command prompt in Windows: from the Start menu, select Run... and type cmd. Click OK.
• To use the ARP command on a Mac OS X, use the Terminal utility in Application > Utilities.
Page 15

AXIS M1011/M1011-W/M1031-W Installation Guide Page 15
Unit connectors
Network connector - RJ-45 Ethernet connector. Shielded cables recommended.
Power connector - Mini DC connector 5.0-5.1V DC, Max 1.5A. Center pin +.
LED indicators
LED Color Indication
Network Green Steady for connection to a 100 Mbit/s network. Flashes for network activity.
Amber Steady for connection to 10 Mbit/s network. Flashes for network activity.
Unlit No network connection.
Status Green Steady green for normal operation.
Note: The Status LED can be configured to be unlit during normal operation, or to
flash only when the camera is accessed. To configure, go to Setup > System
Options > LED. See the online help files for more information.
Amber Steady during startup, during reset to factory default or when restoring settings.
Red Slow flash for failed upgrade.
Power Green Normal operation.
Amber Flashes green/amber during firmware upgrade.
Wireless Unlit Wired mode.
Green Steady for connection to a wireless network. Flashes for network activity.
Red Steady for no wireless network connection. Flashes when scanning for wireless
networks.
AXIS M1031-W only
AXIS M1031-W is equipped with the following:
PIR sensor - a passive infrared sensor that measures infrared light from passing objects in its field
of view. If configured to do so, the camera can automatically switch on the light when triggered by
the PIR sensor. Sensitivity range up to 5m (16ft).
ENGLISH
Light - the white illumination LED can be configured to be triggered by the PIR sensor or via the
web pages under Setup > Live View Config > Light buttons. Note that the light is designed for
temporary use and should not be permanently lit.
Microphone/ speaker for half duplex audio.
For more information, see the AXIS M1011/M1011-W/M1031-W User’s Manual located on the Axis
web site at www.axis.com or on the Axis Network Video Product CD.
Page 16

Page 16 AXIS M1011/M1011-W/M1031-W Installation Guide
Tip!
Visit www.axis.com/techsup to check if there is updated firmware available for the
AXIS M1011/M1011-W/M1031-W. To see the currently installed firmware version,
see Setup > About in the camera’s web pages.
Resetting to the Factory Default Settings
This will reset all parameters, including the IP address, to the Factory Default settings:
1. Disconnect power from the camera.
2. Press and hold the Control button and reconnect power.
3. Keep the Control button pressed until the Power indicator flashes amber (this may take up to
15 seconds).
4. Release the Control button. When the Power indicator displays green (which can take up to 1
minute) the process is complete and the camera has been reset.
5. Re-assign the IP address, using one of the methods described in this document.
It is also possible to reset parameters to the original factory default settings via the web interface.
For more information, please see the online help or the user’s manual.
Accessing the camera from the Internet
Once installed, your AXIS M1011/M1011-W/M1031-W is accessible on your local network (LAN). To
access the camera from the Internet, network routers must be configured to allow incoming traffic,
which is usually done on a specific port
• HTTP port (default port 80) for viewing and configuration
• RTSP port (default port 554) for viewing H.264 video streams
Please refer to the documentation for your router for further instructions. For more information on
this and other topics, visit the Axis Support Web at www.axis.com/techsup
Further information
The user’s manual is available from the Axis Web site at www.axis.com or from the Axis Network
Video Product CD supplied with this product.
Page 17

AXIS M1011/M1011-W/M1031-W Guide d’installation Page 17
Important !
Ce produit doit être utilisé
conformément aux lois et
dispositions locales en vigueur.
AXIS M1011/-W & AXIS M1031-W
Guide d’installation
Ce guide d’installation explique comment installer la caméra AXIS M1011/-W / AXIS M1031-W
Caméra réseau sur votre réseau. Pour toute autre question relative à l’utilisation de ce produit,
reportez-vous au manuel d’utilisation, que vous trouverez sur le CD joint ou sur le site Web
www.axis.com/techsup.
Procédure d’installation
1. Vérification du contenu de l’emballage par rapport à la liste ci-dessous.
2. Vue d’ensemble du matériel. Voir page 18.
3. Installation du matériel. Voir page 19.
4. Attribution d’une adresse IP. Voir page 20.
5. Configuration du mot de passe. Voir page 23.
6. Configuration de la connexion sans fil. Voir page 25.
(AXIS M1011-W/M1031-W uniquement)
Contenu de l’emballage
Article Modèles/variantes/remarques
Caméra réseau AXIS M1011
AXIS M1011-W
AXIS M1031-W
Adaptateur secteur
d’intérieur
(différentes versions pour
différents pays)
Support de caméra Y compris la rallonge posée et 4 vis/chevilles de fixation
Pince flexible Pour montage sur tablette
CD CD de la caméra réseau AXIS comprenant la documentation,
Documentation Guide d’installation de l’AXIS M1011/M1011-W/M1031-W (le présent
PS-H* ou PS-V
Europe, Royaume-Uni, États-Unis/Japon, Australie, Corée, Argentine, Chine
*prolongateur de câble de 1,8 m pour l’adaptateur secteur, PS-H uniquement
les outils d’installation et les autres logiciels
document)
Document de garantie d’Axis
FRAN
Ç
AIS
Page 18

Page 18 AXIS M1011/M1011-W/M1031-W Guide d’installation
Référence produit (P/N) et
Le numéro de série peut
être demandé pendant l’installation.
Connecteur d’alimentation
Bouton de commande
Connecteur réseau
Témoin DEL d’alimentation
Témoin DEL réseau
Bague de blocage
Microphone
Projecteur
Capteur infrarouge passif
Témoin DEL sans fil
(activé sur les modèles sans fil uniquement)
Objectif avec
Haut-parleur
AXIS M1031-W
AXIS M1011/-W
Vue de dos
témoin DEL d’état
Objectif avec
témoin DEL d’état
(les deux modèles)
Attache-câbles
Socle
Rondelle en caoutchouc
Support
Rallonge
Caméra réseau
Vue de devant
Montage
(en option)
Numéro de série (S/N).
Vue d’ensemble du matériel
Reportez-vous à la page 31 pour tous renseignements sur les connecteurs et les témoins DEL.
Page 19
AXIS M1011/M1011-W/M1031-W Guide d’installation Page 19
Bague de blocage
Rallonge
Support
Montage mural de l’AXIS M1031-W
Montage sur tablette
Pince
Bague de blocage
Vis de fixation
(en option)
de l’AXIS M1031-W
Installation du matériel
IMPORTANT ! L’AXIS M1011/M1011-W/M1031-W n’est pas conçue pour un usage à
!
l’extérieur. Elle ne peut être installée qu’en intérieur.
Montage de la caméra
L’AXIS M1011/M1011-W/M1031-W est fournie avec support et rallonge montés. Démontez le
support suivez les consignes ci-après pour monter la caméra sur un mur ou sur une étagère, selon le
type d’installation prévue.
Montage mural
1. Dévissez la rallonge de manière à libérer le socle du
support.
2. À l’aide des vis fournies, fixez le socle sur une surface
plane (horizontale ou verticale).
3. Fixez le socle et, le cas échéant, la rallonge.
4. Fixez la caméra, ajustez l’angle et serrez la bague de
blocage.
5. Le support est muni d’un attache-câbles permettant de
fixer les câbles une fois le branchement effectué.
FRAN
Ç
AIS
Montage sur tablette
1. Positionnez la pince et serrez solidement la vis de
fixation.
2. Fixez la bague de blocage de la caméra sur la pince.
3. Réglez l’angle de la caméra et serrez la bague de
blocage.
Branchement des câbles
1. Connectez la caméra à votre réseau à l’aide d’un câble
réseau blindé.
AXIS M1011-W/M1031-W: en cas de connexion à un
réseau sans fil, la connexion filaire est temporaire. Elle est utilisée pour la configuration des
paramètres de connexion sans fil de la caméra. Reportez-vous à la page 25 pour tout
complément d’information.
2. Branchez l’adaptateur secteur d’intérieur fourni sur le connecteur d’alimentation de la caméra.
3. Vérifiez que les témoins DEL indiquent les conditions correctes. Pour plus d’informations,
reportez-vous au tableau de la page 31. Notez que certains témoins DEL peuvent être
désactivés, et dès lors éteints.
4. Passez à la section Attribution d’une adresse IP, à la page 20.
Page 20

Page 20 AXIS M1011/M1011-W/M1031-W Guide d’installation
Attribution d’une adresse IP
Aujourd’hui, la plupart des réseaux sont équipés d’un serveur DHCP, qui attribue automatiquement
des adresses IP aux périphériques connectés. Si votre réseau en est dépourvu, la caméra AXIS
M1011/M1011-W/M1031-W utilisera 192.168.0.90 comme adresse IP par défaut.
Si vous souhaitez définir une adresse IP statique sous Windows, nous recommandons l’utilisation de
l’application AXIS IP Utility ou de l’application AXIS Camera Management. Choisissez la méthode
qui vous convient le mieux en fonction du nombre de caméras à installer.
Ces deux applications gratuites sont disponibles sur le CD de la caméra réseau Axis fourni avec ce
produit. Vous pouvez également les télécharger à partir du site www.axis.com/techsup.
Méthode Recommandée pour Système
d’exploitation
AXIS IP Utility
Voir page 21
AXIS Camera Management
Voir page 22
Remarques :
• En cas d’échec de l’attribution d’adresse IP, vérifiez qu’aucun pare-feu ne bloque l’opération.
• Pour connaître les autres méthodes d’affectation ou de détection de l’adresse IP de votre
M1011/M1011-W/M1031-W
la page 29.
Une seule caméra
Petites installations
Plusieurs caméras
Grandes installations
Installation sur un autre sousréseau
Windows
Windows 2000
Windows XP Pro
Windows 2003 Server
Windows Vista
AXIS
, par exemple sous d’autres systèmes d’exploitation, reportez-vous à
Page 21
AXIS M1011/M1011-W/M1031-W Guide d’installation Page 21
AXIS IP Utility – Une seule caméra/petites installations
AXIS IP Utility détecte automatiquement les périphériques Axis de votre réseau et les affiche. Cette
application permet également de définir manuellement une adresse IP statique.
Notez que l’ordinateur exécutant l’application AXIS IP Utility doit se trouver sur le même segment
de réseau (sous-réseau physique) que l’AXIS M1011/M1011-W/M1031-W.
Détection automatique
1. Vérifiez que la caméra est connectée au réseau et sous tension.
2. Démarrez AXIS IP Utility.
3. Lorsque l’icône de la caméra apparaît dans la fenêtre, double-cliquez dessus pour ouvrir la page
d’accueil correspondante.
4. Reportez-vous à la page 23 pour savoir comment configurer le mot de passe.
FRAN
Ç
AIS
Paramétrage manuel de l’adresse IP (en option)
1. Trouvez une adresse IP non utilisée sur le même segment de réseau que celui de votre
ordinateur.
2. Sélectionnez la caméra dans la liste.
3. Cliquez sur le bouton Assign new IP address to the selected device (Attribuer une
nouvelle adresse IP au périphérique sélectionné) et saisissez l’adresse IP.
4. Cliquez sur le bouton Assign (Attribuer) et suivez les instructions à l’écran. La caméra doit être
redémarrée dans les 2 minutes pour que la nouvelle adresse IP soit prise en compte.
5. Cliquez sur le bouton Home Page (Page d’accueil) pour accéder aux pages Web de la caméra.
6. Reportez-vous à la page 23 pour savoir comment configurer le mot de passe.
Page 22

Page 22 AXIS M1011/M1011-W/M1031-W Guide d’installation
AXIS Camera Management – Plusieurs caméras/grandes installations
AXIS Camera Management est capable de détecter automatiquement plusieurs dispositifs Axis,
d’afficher l’état de connexion, de gérer les mises à niveau du micrologiciel et de configurer les
adresses IP.
Détection automatique
1. Vérifiez que la caméra est connectée au réseau et sous tension.
2. Démarrez AXIS Camera Management. Lorsque la caméra apparaît dans la fenêtre, cliquez sur le
lien à l’aide du bouton droit de la souris et sélectionnez Live View Home Page (Page d’accueil
– Vidéo en direct).
3. Reportez-vous à la page 23 pour savoir comment configurer le mot de passe.
Attribution d’une adresse IP à un seul périphérique
1. Sélectionnez AXIS M1011 dans l’application AXIS Camera
Management, puis cliquez sur le bouton Assign IP (Attribuer
une adresse IP).
2. Sélectionnez Assign the following IP address (Affecter
l’adresse IP suivante) et saisissez l’adresse IP, le masque de
sous-réseau et le routeur par défaut que le périphérique
utilisera.
3. Cliquez sur le bouton OK.
Attribution d’adresses IP à plusieurs périphériques
AXIS Camera Management accélère le processus d’attribution
d’adresses IP à plusieurs périphériques en suggérant des adresses IP
parmi une plage spécifiée.
1. Sélectionnez les périphériques à configurer (il peut s’agir de
modèles différents), puis cliquez sur le bouton Assign IP
(Attribuer adresses IP).
2. Sélectionnez Assign the following IP address range (Attribuer la
plage d’adresses IP suivante) et saisissez la plage d’adresses IP, le
masque de sous-réseau et le routeur par défaut que les périphériques utiliseront.
3. Cliquez sur le bouton OK.
Page 23
AXIS M1011/M1011-W/M1031-W Guide d’installation Page 23
Pour configurer directement le mot
de passe via une connexion cryptée,
saisissez ici le mot de passe.
Pour créer une connexion HTTPS,
cliquez sur ce bouton.
Configuration du mot de passe
Pour accéder au produit, le mot de passe de l’administrateur par défaut, root, doit être configuré.
Vous pouvez effectuer cette opération via la boîte de dialogue Configure Root Password
(Configurer le mot de passe root) qui s’affiche la première fois que vous accédez à l’AXIS M1011/
M1011-W/M1031-W.
Pour éviter les écoutes électroniques lors de la configuration du mot de passe root, utilisez une
connexion HTTPS cryptée nécessitant un certificat HTTPS (voir la remarque ci-dessous).
Pour configurer le mot passe avec une connexion HTTP standard, saisissez directement le mot de
passe dans la première boîte de dialogue illustrée ci-dessous.
Pour configurer le mot passe avec une connexion HTTPS cryptée, procédez comme suit :
1. Cliquez sur le bouton Create self-signed certificate (Créer un certificat autosigné).
2. Saisissez les informations demandées, puis cliquez sur OK. Le certificat est créé et le mot de
passe peut maintenant être configuré en toute sécurité. Tout le trafic vers et depuis l’AXIS
M1011/M1011-W/M1031-W est désormais crypté.
3. Saisissez un mot de passe, puis saisissez-le de nouveau pour confirmation. Cliquez sur OK. Le
mot de passe est maintenant configuré.
FRAN
Ç
AIS
4. Pour vous connecter, saisissez le nom d’utilisateur « root » dans la boîte de dialogue à l’invite.
Remarque : le nom d’utilisateur de l’administrateur par défaut, root, ne peut pas être supprimé.
5. Saisissez le mot de passe tel que vous venez de le définir et cliquez sur OK.
Page 24

Page 24 AXIS M1011/M1011-W/M1031-W Guide d’installation
Setup (Configuration) : contient tous les outils
nécessaires pour adapter la caméra à vos besoins.
Help (Aide) :
affiche l’aide en
ligne relative à
l’utilisation de la
caméra.
Accès au flux de données vidéo
La page Live View (Vidéo en direct) de la caméra réseau s’affiche. Elle propose des liens vers
différents outils de configuration vous permettant d’adapter la caméra à vos besoins.
Si nécessaire, cliquez sur Yes (Oui) pour installer AMC (Axis Media Control) afin de pouvoir
visualiser le flux de données vidéo dans Internet Explorer. Vous devez pour cela disposer de droits
d’administrateur sur cet ordinateur.
Remarques :
• Le protocole HTTPS (Hypertext Transfer Protocol over Secure Socket Layer) est utilisé pour crypter le
trafic entre les navigateurs Web et les serveurs. Le certificat HTTPS contrôle l’échange crypté
d’informations.
• Le mot de passe root, attribué par défaut à l’administrateur, ne peut pas être supprimé.
• Si vous perdez ou oubliez le mot de passe root, les paramètres d’usine définis par défaut pour la
caméra réseau doivent être rétablis. Reportez-vous à la section Rétablissement des paramètres
d’usine par défaut, à la page 33.
AXIS M1011 : l’installation est terminée.
AXIS M1011-W/M1031-W : passez à la section Configuration de la connexion sans fil, à la page 25.
Page 25

AXIS M1011/M1011-W/M1031-W Guide d’installation Page 25
Configuration de la connexion sans fil
L’AXIS M1011-W/M1031-W est temporairement connectée au réseau sans fil afin de vous
permettre de configurer les paramètres sans fil de la caméra avant la connexion au réseau sans fil.
Il est déconseillé de configurer la caméra avec une connexion sans fil non sécurisée, car les mots de
passe et les codes sont envoyés en texte en clair.
Remarque :
Pour encore plus de sécurité, utilisez HTTPS. Une fois la caméra connectée au réseau filaire, allez
dans Setup (Configuration) > System Options (Options système) > Security (Sécurité) > HTTPS
et reportez-vous à l’aide en ligne de la caméra pour savoir comment procéder.
État des réseaux sans fil
Allez dans Setup (Configuration) > Basic Setup (Configuration de base) > Wireless (Sans fil) sur
les pages Web internes de la caméra.
La liste d’options suivante est le résultat d’un balayage réseau. Le réseau auquel la caméra AXIS
M1011-W/M1031-W est actuellement associée est affiché en bleu. Si un réseau utilise une
fonction de sécurité non prise en charge, il apparaît en gris. Les informations suivantes sont
fournies :
• SSID : nom du réseau sans fil (ou dispositif ad hoc).
• Mode : point d’accès (principal) ou dispositif ad hoc.
• Security (Sécurité) : type de sécurité utilisé par le réseau. Les types de sécurité pris en
charge sont répertoriés ci-dessous.
• Channel (Canal) : canal sans fil actuellement utilisé.
• Signal strength (Intensité du signal) : intensité du signal.
• Bit rate (Débit binaire) : débit binaire actuel, en Mbits/s. Il n’apparaît que pour le point
d’accès actuellement utilisé.
Remarque :
Les points d’accès pour lesquels la diffusion SSID est désactivée n’apparaissent pas, sauf si
le SSID est saisi manuellement.
FRAN
Ç
AIS
Page 26

Page 26 AXIS M1011/M1011-W/M1031-W Guide d’installation
Paramètres sans fil
1. Sélectionnez un point d’accès ou un dispositif ad hoc sous Status of Wireless Networks (État
des réseaux sans fil). Certaines des informations requises sont automatiquement reprises sous
Wireless Settings (Paramètres sans fil).
2. SSID est le nom du réseau sans fil sélectionné. Laissez ce champ à blanc si vous voulez que
l’AXIS M1011-W/M1031-W accède au réseau non sécurisé le plus proche.
3. Network type (Type de réseau) : sélectionnez Master (Maître) pour accéder au réseau par un
point d’accès ou Ad-hoc pour accéder à n’importe quel autre périphérique sans fil et créer un
réseau local (voir remarque ci-dessous).
4. Security (Sécurité) : sélectionnez l’une des méthodes suivantes :
• WPA-/WPA2-PSK
• WPA-/WPA2-Enterprise – Voir instructions ci-dessous.
• WEP – Voir instructions ci-dessous.
• No security (Pas de sécurité) – Déconseillé.
Les codes, phrases de passe et certificats utilisés à des fins de sécurité doivent être saisis
manuellement. Pour obtenir les renseignements requis, contactez l’administrateur réseau du
point d’accès ou du dispositif ad hoc sélectionné.
5. Cliquez sur Save (Enregistrer).
Remarque :
Le mode ad hoc permet aux utilisateurs de créer un réseau local sans fil, sans connexion
via un point d’accès. La caméra par exemple peut se connecter de point à point à un
ordinateur portable compatible avec les réseaux sans fil. Une connexion ad hoc peut
s’avérer utile dans certaines installations, mais il ne s’agit pas de la méthode conseillée.
WPA-/WPA2-PSK - Saisissez le code prépartagé nécessaire pour le point d’accès. Il peut s’agir
d’un nombre hexadécimal (hex. manuel) ou d’une phrase de passe.
WPA-/WPA2-Enterprise - Choisissez le type d’authentification client/serveur utilisé par le point
d’accès : EAP-TLS.
Page 27

AXIS M1011/M1011-W/M1031-W Guide d’installation Page 27
EAP-TLS
• Identity (Identité) : saisissez
l’identité de l’utilisateur à présenter
au réseau.
• Private key password (Mot de passe
pour la clé privée) : saisissez le mot
de passe de votre identité
d’utilisateur.
• EAPOL version (Version EAPOL) :
sélectionnez la version utilisée (1 ou
2) sur votre point d’accès.
• Certificates (Certificats) :
téléchargez un certificat CA
à présenter au point d’accès pour l’authentification.
FRAN
WEP
Authentication (Authentification) : sélectionnez Open (Ouvert) ou Shared Key (Clé
partagée), selon la méthode utilisée par votre point d’accès. Les points d’accès n’offrent pas
tous cette option, et ceux qui ne l’utilisent pas utilisent probablement l’option Open System
(Système ouvert), parfois appelée SSID Authentication (Authentification SSID).
Key length (longueur de clé) : longueur de la clé utilisée pour le cryptage sans fil (64 ou 128
bits). Il peut aussi arriver que la longueur de la clé de cryptage soit renseignée au format 40/64
ou 104/128.
Key type (Type de clé) : les types de clé disponibles varient en fonction du point d’accès
sélectionné. Les options suivantes sont disponibles sur la caméra :
• Manual (Manuel) : vous permet de saisir manuellement la clé hexadécimale.
• ASCII : lorsque cette méthode est utilisée, la chaîne doit contenir exactement 5 caractères
pour WEP 64 bits et 13 caractères pour WEP 128 bits.
• Passphrase (Phrase de passe) : dans WEP 64 bits, la phrase de passe génère 4 clés
différentes. Pour WEP 128 bits, une seule clé est générée, puis copiée pour les 4 clés. La
génération des clés n’est pas standardisée. Elle peut varier d’une marque à l’autre. Vérifiez
que les clés générées sont identiques à celles de votre point d’accès. Dans le cas contraire,
vous devez les saisir manuellement.
Ç
AIS
Page 28

Page 28 AXIS M1011/M1011-W/M1031-W Guide d’installation
Fin de l’installation sans fil
1. Vérifiez que les paramètres sans fil de la caméra correspondent à ceux du point d’accès.
2. Débranchez le câble réseau de la caméra.
3. Actualisez la page Web au bout de 20 à 30 secondes afin de valider la connexion sans fil. Si
vous ne pouvez pas accéder à la caméra, exécutez AXIS IP Utility et sélectionnez-la dans la liste.
Remarque :
• Pour que la communication s’établisse, les paramètres sans fil doivent être exactement identiques sur
la caméra et sur le point d’accès ou le dispositif ad hoc.
• Les clés, phrases de passe et certificats utilisés à des fins de sécurité doivent être saisis
manuellement. Pour obtenir les renseignements requis pour le point d’accès ou le dispositif ad hoc
sélectionné, contactez votre administrateur réseau.
•Les paramètres sans fil doivent toujours
configurés ou modifiés sur la caméra d’abord, puis au point d’accès sans fil. De cette manière, la
caméra restera toujours accessible pendant que vous effectuerez des modifications.
• SSID (Service Set Identifier) est parfois désigné par ESSID (Extended Service Set Identifier).
AXIS M1011-W/M1031-W : l’installation est terminée.
(pendant l’installation et à tout autre moment) être
Page 29

AXIS M1011/M1011-W/M1031-W Guide d’installation Page 29
Autres méthodes de configuration de l’adresse IP
Le tableau ci-dessous indique les autres méthodes permettant de configurer ou de déterminer
l’adresse IP. Toutes les méthodes sont activées par défaut et peuvent être désactivées.
UPnP™
Bonjour
AXIS Dynamic DNS
Service
ARP/Ping
Affichage des pages
administratives du
serveur DHCP
Utiliser sous le
système
d’exploitation
Windows
(ME ou XP)
MAC OS X
(10.4 ou version
ultérieure)
Tous Service Axis gratuit permettant d’installer rapidement et
Tous Reportez-vous aux instructions ci-dessous. La commande doit
Tous Pour consulter les pages administratives du serveur DHCP réseau,
Remarques
Lorsque cette option est activée sur votre ordinateur, la caméra
est automatiquement détectée et ajoutée au dossier Favoris
réseau.
Pour les navigateurs compatibles avec Bonjour. Accédez au
signet Bonjour dans votre navigateur (par exemple, Safari), puis
cliquez sur le lien pour accéder aux pages Web de la caméra.
facilement votre caméra. Nécessite une connexion Internet sans
proxy HTTP. Pour plus d’informations, rendez-vous sur le site
www.axiscam.net.
être saisie dans les 2 minutes qui suivent la mise sous tension de
la caméra.
reportez-vous à la documentation du serveur.
Configuration de l’adresse IP à l’aide d’ARP/Ping
1. Trouvez une adresse IP sur le même segment de réseau que celui de votre ordinateur.
2. Repérez le numéro de série (S/N) sur l’étiquette de l’AXIS M1011/M1011-W/M1031-W.
3. Ouvrez une invite de commande sur votre ordinateur et saisissez les commandes suivantes :
FRAN
Ç
AIS
Syntaxe pour Windows : Exemple pour Windows :
arp -s <Adresse IP> <Numéro de série>
ping -l 408 -t <Adresse IP>
Syntaxe pour UNIX/Linux/Mac : Exemple pour UNIX/Linux/Mac :
arp -s <Adresse IP> <Numéro de série> temp
ping -s 408 <Adresse IP>
arp -s 192.168.0.125 00-40-8c-18-10-00
ping -l 408 -t 192.168.0.125
arp -s 192.168.0.125 00:40:8c:18:10:00 temp
ping -s 408 192.168.0.125
4. Vérifiez que le câble réseau est connecté à la caméra, puis démarrez/redémarrez cette dernière
en débranchant puis en rebranchant l’alimentation.
5. Fermez l’invite de commande lorsque vous voyez « Reply from 192.168.0.125:...» (Réponse de
192.168.0.125 :) ou un message similaire.
6. Dans votre navigateur, tapez http://<Adresse IP> dans le champ Emplacement/Adresse, puis
appuyez sur la touche Entrée de votre clavier.
Page 30

Page 30 AXIS M1011/M1011-W/M1031-W Guide d’installation
Remarques :
• Pour ouvrir une invite de commande sous Windows : dans le menu Démarrer, sélectionnez Exécuter…
et tapez cmd. Cliquez sur OK.
• Pour utiliser la commande ARP sous Mac OS X, utilisez l’utilitaire Terminal dans Application >
Utilitaires.
Page 31

AXIS M1011/M1011-W/M1031-W Guide d’installation Page 31
Connecteurs de l’appareil
Connecteur réseau - Connecteur Ethernet RJ-45. Il est conseillé d’utiliser des câbles blindés.
Connecteur d’alimentation - Miniconnecteur CC 5,0-5,1 V CC, max. 1,5 A. Broche centrale +.
Témoins DEL
Témoin DEL Couleur Indication
Réseau Vert Continu en cas de connexion à un réseau de 100 Mbits/s. Clignote en cas
d’activité réseau.
Orange Continu en cas de connexion à un réseau de 10 Mbits/s. Clignote en cas
d’activité réseau.
Éteint Pas de connexion au réseau.
État Vert Vert continu en cas de fonctionnement normal.
Remarque : le témoin DEL d’état peut être configuré pour être éteint pendant le
fonctionnement normal ou pour clignoter uniquement en cas d’accès à la
caméra. Pour ce faire, cliquez sur Setup (Configuration) > System Options
(Options système) > LED (DEL). Pour plus d’informations, reportez-vous à l’aide
en ligne.
Orange En continu pendant le démarrage, la réinitialisation des valeurs d’usine par
défaut ou le rétablissement des paramètres.
Rouge Clignote lentement en cas d’échec de la mise à niveau.
Alimentation Vert Fonctionnement normal.
Orange Clignote en vert/orange pendant la mise à niveau du micrologiciel.
Sans fil Éteint Mode filaire.
Vert Continu en cas de connexion à un réseau sans fil. Clignote en cas d’activité
réseau.
Rouge Continu en l’absence de connexion à un réseau sans fil. Clignote lors de la
recherche de réseaux sans fil.
FRAN
Ç
AIS
Page 32

Page 32 AXIS M1011/M1011-W/M1031-W Guide d’installation
AXIS M1031-W uniquement
L’AXIS M1031-W est équipée des dispositifs suivants :
Capteur infrarouge passif – Le capteur infrarouge passif mesure la lumière infrarouge des objets
traversant son champ de vision. Si la caméra est configurée en ce sens, elle peut automatiquement
allumer la lumière en cas de déclenchement par le capteur infrarouge passif. Sensibilité : jusqu’à
5m.
Projecteur – Le projecteur à DEL blanche peut être configuré pour être déclenché par le capteur
infrarouge passif. Vous pouvez également configurer son déclenchement sur les pages Web, sous
Setup (Configuration) > Live View Config (Configuration de la vidéo en direct) > Light buttons
(Boutons projecteur). Notez que le projecteur doit être utilisé de manière temporaire et non pas
permanente.
Microphone/haut-parleur – Pour la transmission audio semi-duplex.
Pour tout complément d’information, reportez-vous au manuel d’utilisation de l’AXIS M1011/
M1011-W/M1031-W que vous trouverez sur le site Web d’Axis, à l’adresse www.axis.com, ou sur le
CD accompagnant votre caméra réseau Axis.
Page 33

AXIS M1011/M1011-W/M1031-W Guide d’installation Page 33
Conseil :
Visitez le site www.axis.com/techsup pour vérifier si des mises à jours micrologicielles
sont disponibles pour la AXIS M1011/M1011-W/M1031-W. Pour connaître la version du
micrologiciel actuellement installée, allez à Setup (Configuration) > About (À propos de)
sur les pages Web de la caméra.
Rétablissement des paramètres d’usine par défaut
Procédez comme suit pour rétablir tous les paramètres d’usine définis par défaut, y compris
l’adresse IP :
1. Débranchez l’alimentation de la caméra.
2. Maintenez le bouton de commande enfoncé et rebranchez l’alimentation.
3. Maintenez le bouton de commande enfoncé jusqu’à ce que le voyant d’alimentation passe à
l’orange et clignote (cela peut prendre jusqu’à 15 secondes).
4. Relâchez le bouton de commande. Une lumière verte émise par le voyant d’alimentation émet
(peut prendre 1 minute) indique que la caméra est revenue aux réglages d’usine définis par
défaut.
5. Réaffectez l’adresse IP suivant l’une des méthodes décrites dans ce document.
Il est également possible de rétablir les paramètres d’origine par défaut à partir de l’interface Web.
Pour plus d’informations, reportez-vous à l’aide en ligne ou au manuel d’utilisation.
Accès à la caméra sur Internet
Une fois installée, votre caméra AXIS M1011/M1011-W/M1031-W est accessible sur votre réseau
local. Pour accéder à la caméra sur Internet, les routeurs réseau doivent être configurés pour
autoriser le trafic entrant, ce qui est généralement réalisé sur un port spécifique :
• Le port HTTP (port 80 par défaut) pour l’affichage et la configuration
• Le port RTSP (port 554 par défaut) pour l’affichage des flux de données vidéo H.264
Pour plus d’informations, consultez la documentation de votre routeur. Pour plus d’informations à
ce sujet ou pour toute autre question, consultez la page d’assistance technique d’Axis à l’adresse
www.axis.com/techsup.
FRAN
Ç
AIS
Plus d’informations
Le manuel de l’utilisateur est disponible sur le site Web d’Axis (www.axis.com) et sur le CD fourni
avec ce produit.
Page 34

Page 35

AXIS M1011/M1011-W/M1031-W Installationsanleitung Seite 35
Wichtig!
Verwenden Sie dieses Produkt
unter Beachtung der geltenden
rechtlichen Bestimmungen.
AXIS M1011/-W & AXIS M1031-W
Installationsanleitung
In dieser Anleitung wird die Installation der AXIS M1011/-W / AXIS M1031-W Netzwerk-Kamera in
einem Netzwerk beschrieben. Alle weiteren Hinweise zur Verwendung des Produkts finden Sie im
Benutzerhandbuch, das auf der mitgelieferten CD oder auf unserer Website unter www.axis.com/
techsup zur Verfügung steht.
Installationsschritte
1. Prüfen Sie, ob alle in der nachfolgenden Liste aufgeführten Komponenten vorhanden sind.
2. Hardwareübersicht. Siehe Seite 36.
3. Installieren Sie die Hardware. Siehe Seite 37.
4. Weisen Sie eine IP-Adresse zu. Siehe Seite 39.
5. Legen Sie das Kennwort fest. Siehe Seite 42.
6. Konfigurieren Sie die WLAN-Verbindung. Siehe Seite 44.
(gilt nur für AXIS M1011-W/M1031-W)
Lieferumfang
DEUTSCH
Komponente Modell/Variante/Anmerkung
Netzwerk-Kamera AXIS M1011
Netzadapter für geschlossene
Räume
(länderspezifisch)
Kamerastandfuß mit eingepasster Verlängerung und vier Befestigungsschrauben/Dübeln
Flexible Halterung für Regalmontage
CD CD für AXIS-Netzwerkvideoprodukte einschließlich Produktdokumentation,
Gedruckte Dokumente AXIS M1011/M1011-W/M1031-W Installationsanleitung (dieses Dokument)
AXIS M1011-W
AXIS M1031-W
PS-H* oder PS-V
Europa, Großbritannien, USA/Japan, Australien, Korea, Argentinien, China
*Verlängerungskabel, 1,8 m, nur für PS-H
Installationswerkzeugen und anderer Software
Axis-Garantieerklärung
Page 36

Seite 36 AXIS M1011/M1011-W/M1031-W Installationsanleitung
Produktnummer (Artikelnr.) und
Die Seriennummer wird für
die Installation benötigt.
Netzanschluss
Steuertaste
Netzwerkanschluss
Betriebsanzeige (LED)
Netzwerkanzeige (LED)
Verschlussring
Mikrofon
Licht PIR-
Anzeige für WLAN-Verbindung (LED)
(ist nur bei drahtlosen Modellen aktiviert)
Objektiv mit
Lautsprecher
AXIS M1031-W
AXIS M1011/-W
Rückansicht
Statusanzeige
(LED)
Objektiv mit
Statusanzeige
(LED)
(beide Modelle)
Kabelhalter
Grundplatte
Gummidichtring
Standfuß
Verlängerung
Netzwerk-Kamera
Vorderansicht
Montage
Sensor
(optional)
Seriennummer (S/N).
Hardwareübersicht
Ausführliche Informationen zu den Anschlüssen und LED-Anzeigen finden Sie auf Seite 50.
Page 37

AXIS M1011/M1011-W/M1031-W Installationsanleitung Seite 37
Verschlussring
Verlängerung
Standfuß
AXIS M1031-W Wandmontage
AXIS M1031-W Regalmontage
Halterung
Verschlussring
Befestigungsschraube
(optional)
Hardware installieren
WICHTIG!
AXIS M1011/M1011-W/M1031-W ist nicht für den Einsatz im Außenbereich
!
geeignet, die Kamera darf nur in Innenräumen installiert werden.
Kamera befestigen
AXIS M1011/M1011-W/M1031-W Die Kamera wird mit montiertem Standfuß und mit
Verlängerung ausgeliefert. Wenn Sie die Kamera an der Wand oder an einem Regal befestigen
möchten, demontieren Sie den Standfuß und befolgenden Sie die folgenden Anweisungen zur
Wand- bzw. Regalmontage.
Wandmontage
1. Schrauben Sie die Verlängerung ab und lösen Sie die
Grundplatte vom Standfuß.
2. Verwenden Sie die mitgelieferten Schrauben, um die
Grundplatte an einer horizontalen oder vertikalen ebenen
Fläche zu montieren.
3. Befestigen Sie den Standfuß und optional die
Verlängerung.
4. Bringen Sie die Kamera anschließend wieder an, stellen Sie
den gewünschten Winkel ein und drehen Sie den
Verschlussring fest.
5. Der Standfuß verfügt zum Schutz der angeschlossenen
Kabel über einen Kabelhalter.
DEUTSCH
Regalmontage
1. Bringen Sie die Halterung in die richtige Position und
2. Setzen Sie den Verschlussring der Kamera auf die
3. Stellen Sie den Kamerawinkel richtig ein und ziehen Sie
ziehen Sie die Befestigungsschraube fest.
Halterung.
den Verschlussring fest.
Kabel anschließen
1. Verbinden Sie die Kamera über ein abgeschirmtes
Netzwerkkabel mit dem Netzwerk.
AXIS M1011-W/M1031-W: Bei WLAN-Verbindungen wird die Kamera nur vorübergehend über
Kabel mit dem Netzwerk verbunden, um die Einstellungen für die drahtlose Verbindung zu
konfigurieren. Weitere Informationen finden Sie unter Seite 44.
2. Schließen Sie den mitgelieferten Netzadapter an den Netzanschluss der Kamera an.
Page 38

Seite 38 AXIS M1011/M1011-W/M1031-W Installationsanleitung
3. Überprüfen Sie, ob die LED-Anzeigen die Betriebszustände korrekt angeben. Weitere
Informationen finden Sie in der Tabelle auf Seite 50. Beachten Sie, dass LEDs deaktiviert sein
können und deshalb nicht leuchten.
4. Fahren Sie mit IP-Adresse zuweisen, auf Seite 39 fort.
Page 39

AXIS M1011/M1011-W/M1031-W Installationsanleitung Seite 39
IP-Adresse zuweisen
In den meisten Netzwerken ist heutzutage ein DHCP-Server eingebunden, der angeschlossenen
Geräten automatisch IP-Adressen zuweist. Wenn Ihr Netzwerk über keinen DHCP-Server verfügt,
wird für die AXIS M1011/M1011-W/M1031-W die Standard-IP-Adresse 192.168.0.90 verwendet.
Zum Zuweisen einer statischen IP-Adresse stehen unter Windows die Programme AXIS IP Utility
und AXIS Camera Management zur Verfügung. Verwenden Sie die Methode, die für die gewünschte
Anzahl der zu installierenden Kameras geeignet ist.
Beide Anwendungen stehen kostenlos auf der mitgelieferten CD für Axis-Netzwerkvideoprodukte
zur Verfügung oder können unter www.axis.com/techsup heruntergeladen werden.
Methode Empfohlen für Betriebssystem
AXIS IP Utility
Siehe Seite 40
AXIS Camera Management
Siehe Seite 41
Hinweise:
• Falls Sie die IP-Adresse nicht zuweisen können, müssen ggf. die Einstellungen der Firewall überprüft
werden.
• Weitere Informationen zu alternativen Methoden zum Festlegen der IP-Adresse von
M1011-W/M1031-W
, (z. B. in anderen Betriebssystemen) finden Sie auf Seite 48.
Einzelne Kamera
Kleine Installationen
Mehrere Kameras
Große Überwachungsanlagen
Installation in einem anderen
Subnetz
Windows
Windows 2000
Windows XP Pro
Windows 2003 Server
Windows Vista
AXIS M1011/
DEUTSCH
Page 40

Seite 40 AXIS M1011/M1011-W/M1031-W Installationsanleitung
AXIS IP Utility - Einzelne Kamera/kleine Installation
AXIS IP Utility erkennt automatisch im Netzwerk vorhandene Axis-Geräte und zeigt diese an. Die
Anwendung kann außerdem zur manuellen Zuweisung einer statischen IP-Adresse verwendet
werden
Beachten Sie, dass sich die AXIS M1011/M1011-W/M1031-W und der Computer, auf dem AXIS IP
Utility ausgeführt wird, im gleichen Netzwerksegment (d. h. physischen Subnetz) befinden müssen.
Automatische Erkennung
1. Stellen Sie sicher, dass die Kamera an das Netzwerk und die Stromversorgung angeschlossen ist.
2. Starten Sie AXIS IP Utility.
3. Doppelklicken Sie auf das Symbol der Kamera, um die entsprechende Startseite zu öffnen.
4. Anweisungen zum Zuweisen des Kennworts finden Sie auf Seite 42.
Manuelle Zuweisung der IP-Adresse (optional)
1. Wählen Sie eine nicht zugewiesene IP-Adresse im selben Netzwerksegment, in dem sich Ihr
Computer befindet.
2. Wählen Sie die Kamera in der Liste aus.
3. Klicken Sie auf die Schaltfläche Assign new IP address to the selected device (Zuweisung
einer neuen IP-Adresse an das ausgewählte Gerät) und geben Sie die IP Adresse ein.
4. Klicken Sie auf die Schaltfläche Assign (Zuweisen) und folgen Sie den Anweisungen auf dem
Bildschirm. Beachten Sie, dass die Kamera innerhalb von 2 Minunten neu gestartet werden
muss, um die neue IP-Adresse festzulegen.
5. Klicken Sie auf Home Page (Startseite), um auf die Webseiten der Kamera zuzugreifen.
6. Anweisungen zum Festlegen des Kennworts finden Sie auf Seite 42.
Page 41

AXIS M1011/M1011-W/M1031-W Installationsanleitung Seite 41
AXIS Camera Management - Mehrere Kameras/große Installation
Mit AXIS Camera Management können automatisch mehrere Axis-Geräte erkannt, der
Verbindungsstatus angezeigt, die Firmware-Aktualisierungen verwaltet und IP-Adressen festgelegt
werden.
Automatische Erkennung
1. Stellen Sie sicher, dass die Kamera an das Netzwerk und die Stromversorgung angeschlossen ist.
2. Starten Sie AXIS Camera Management. Wenn das Symbol der Kamera angezeigt wird, klicken
Sie mit der rechten Maustaste darauf und wählen Sie Live View Home Page.
3. Anweisungen zum Festlegen des Kennworts finden Sie auf Seite 42.
IP-Adresse einem einzelnen Gerät zuweisen
1. Wählen Sie in AXIS Camera Management „AXIS M1011“ und
klicken Sie auf die Schaltfläche Assign IP (IP-Adresse
zuweisen) .
2. Wählen Sie die Option Assign the following IP address
(Folgende IP-Adresse zuweisen) und geben Sie die IP-Adresse,
die Subnetzmaske und den Standardrouter für das Gerät ein.
3. Klicken Sie auf OK.
DEUTSCH
IP-Adressen mehreren Geräten zuweisen
AXIS Camera Management beschleunigt die Zuweisung von IPAdressen an mehrere Geräte, indem IP-Adressen aus einem
angegebenen Bereich vorgeschlagen werden.
1. Wählen Sie die zu konfigurierenden Geräte aus (es können auch
unterschiedliche Modelle gewählt werden) und klicken Sie auf
die Schaltfläche Assign IP (IP-Adresse zuweisen).
2. Wählen Sie die Option Assign the following IP address range
(Folgenden IP-Adressbereich zuweisen) und geben Sie den IPAdressbereich, die Subnetzmaske und den Standardrouter für die Geräte ein.
3. Klicken Sie auf OK.
Page 42

Seite 42 AXIS M1011/M1011-W/M1031-W Installationsanleitung
Um das Kennwort direkt über eine
unverschlüsselte Verbindung zu
konfigurieren, geben Sie es hier ein.
Klicken Sie zum Herstellen einer HTTPSVerbindung zunächst auf diese Schaltfläche.
Kennwort festlegen
Für den Zugriff auf das Produkt muss das Kennwort für den standardmäßigen AdministratorBenutzer root festgelegt werden. Beim erstmaligen Zugriff auf AXIS M1011/M1011-W/M1031-W
wird das Dialogfeld „Configure Root Password“ (Root-Kennwort konfigurieren) geöffnet. In diesem
Dialogfeld können Sie das Kennwort festlegen.
Um ein Abhören der Netzwerkkommunikation während der Festlegung des Root-Kennworts zu
vermeiden, können Sie diesen Vorgang über eine verschlüsselte HTTPS-Verbindung durchführen, die
ein HTTPS-Zertifikat erfordert (siehe folgenden Hinweis).
Wenn Sie das Kennwort über eine standardmäßige HTTP-Verbindung festlegen möchten, geben Sie
es direkt in dem ersten unten angezeigten Dialogfeld ein.
Wenn Sie das Kennwort über eine verschlüsselte HTTPS-Verbindung festlegen, gehen Sie wie folgt
vor:
1. Klicken Sie auf die Schaltfläche Create self-signed certificate (Selbstsigniertes Zertifikat
erstellen).
2. Geben Sie die erforderlichen Informationen ein und klicken Sie auf OK. Das Zertifikat wird
erstellt und das Kennwort kann jetzt sicher festgelegt werden. Der gesamte Datenverkehr von
AXIS M1011/M1011-W/M1031-W wird ab diesem Zeitpunkt verschlüsselt.
3. Geben Sie ein Kennwort ein und wiederholen Sie die Eingabe, um die korrekte Schreibweise zu
bestätigen. Klicken Sie auf OK. Damit ist das Kennwort konfiguriert.
4. Geben Sie in das Anmeldungsdialogfeld den Benutzernamen „root“ wie erforderlich ein.
Hinweis: Der vorgegebene Administrator-Benutzername „root“ kann nicht gelöscht werden.
5. Geben Sie das zuvor festgelegte Kennwort ein und klicken Sie auf „OK“.
Page 43

AXIS M1011/M1011-W/M1031-W Installationsanleitung Seite 43
Setup - Alle zur benutzerspezifischen
Konfiguration der Kamera notwendigen Tools.
Help - Zum
Aufrufen der
Online-Hilfe für
die Kamera.
Auf Videostrom zugreifen
Die Seite „Live-View“ (Live-Ansicht) Netzwerk-Kamera enthält Links zu Setup-Tools, mit denen Sie
die Kamera Ihren Bedürfnissen entsprechend anpassen können.
Klicken Sie bei Bedarf auf Yes (Ja), um AMC (AXIS Media Control) zu installieren. Nach Abschluss
der Installation können Sie Videoströme in Internet Explorer anzeigen. Hierzu müssen Sie über
Administratorrechte für den Computer verfügen.
DEUTSCH
Hinweise:
• Das Protokoll HTTPS (Hypertext Transfer Protocol over Secure Socket Layer) wird verwendet, um den
Datenverkehr zwischen Webbrowsern und Servern zu verschlüsseln. Das HTTPS-Zertifikat steuert den
verschlüsselten Informationsaustausch.
• Der vorgegebene Administrator-Benutzername „root“ kann nicht gelöscht werden.
• Wenn Sie das Kennwort für den Benutzer „root“ vergessen haben, muss die Netzwerk-Kamera auf die
Werkseinstellungen zurückgesetzt werden. Weitere Informationen hierzu finden Sie unter Parameter
auf Werkseinstellungen zurücksetzen, auf Seite 52.
AXIS M1011: Die Installation ist damit abgeschlossen.
AXIS M1011-W/M1031-W: Fahren Sie mit WLAN-Verbindung konfigurieren, auf Seite 44 fort.
Page 44

Seite 44 AXIS M1011/M1011-W/M1031-W Installationsanleitung
WLAN-Verbindung konfigurieren
Bevor Sie eine Verbindung zum WLAN-Netzwerk herstellen, müssen Sie AXIS M1011-W/M1031-W
vorübergehend über Kabel mit dem Netzwerk verbinden, um die Einstellungen für die drahtlose
Verbindung zu konfigurieren. Es ist nicht empfehlenswert, die Kamera über eine ungesicherte
WLAN-Verbindung zu konfigurieren, da Passphrases und Schlüssel in Textform gesendet werden.
Hinweis:
Eine höhere Sicherheit erzielen Sie, wenn Sie HTTPS verwenden. Sobald die Kamera mit dem WLANNetzwerk verbunden ist, wählen Sie Setup > System Options > Security > HTTPS (Setup >
Systemoptionen > Sicherheit > HTTPS). Weitere Anweisungen finden Sie in der Online-Hilfe für die
Kamera.
Status von WLAN-Netzwerken
Wählen Sie auf den internen Webseiten der Kamera Setup > Basic Setup > Wireless (Setup >
Basiskonfiguration > Drahtlos).
Diese Liste ist das Ergebnis einer Netzwerksuche. Das Netzwerk, mit dem AXIS M1011-W/M1031-W
verbunden ist, wird blau angezeigt. Netzwerke mit nicht unterstützten Sicherheitsfunktionen
werden grau angezeigt. Die folgenden Informationen werden bereitgestellt:
• SSID - Der Name eines WLAN-Netzwerks (oder Ad-hoc-Geräts).
• Mode (Modus) - Ein Access Point (Master) oder Ad-Hoc-Gerät.
• Security (Sicherheit) - Zeigt an, welchen Sicherheitstyp das Netzwerk verwendet. Im
Folgenden werden die unterstützten Sicherheitstypen aufgeführt.
• Channel (Kanal) - Zeigt den aktuell verwendeten Kanal für die drahtlose
Netzwerkverbindung an.
• Signal strength (Signalstärke) - Zeigt die Signalstärke an.
• Bit rate (Bitrate) - Zeigt die aktuelle Bitrate in Mbit/s an. Wird nur für den aktuell
verwendeten Access Point angezeigt.
Hinweis:
Access Points mit deaktivierter SSID (Service Set Identification, Netzwerkkennung) werden
nur angezeigt, wenn die SSID manuell eingegeben wurde.
Page 45

AXIS M1011/M1011-W/M1031-W Installationsanleitung Seite 45
Einstellungen für die WLAN-Verbindung
1. Wählen Sie einen Access Point bzw. ein Ad-hoc-Gerät unter Status of Wireless Networks
(Status von WLAN-Netzwerken) aus. Einige Felder unter Wireless Settings (Einstellungen für
die WLAN-Verbindung) werden automatisch ausgefüllt.
2. SSID ist der Name des ausgewählten WLAN-Netzwerks. Lassen Sie dieses Feld leer, wenn AXIS
M1011-W/M1031-W auf das nächstgelegene ungesicherte Netzwerk zugreifen soll.
3. Network type (Netzwerktyp) - Wählen Sie Master, wenn die Kamera über einen Access Point
auf das Netzwerk zugreifen soll, oder wählen Sie Ad-hoc, um eine Verbindung zu einem
anderen drahtlosen Gerät herzustellen und ein lokales Netzwerk aufzubauen (siehe Hinweis
unten).
4. Security (Sicherheit) - Wählen Sie eine der folgenden Methoden:
• WPA-/WPA2-PSK
• WPA-/WPA2-Enterprise - Siehe die Anweisungen unten.
• WEP - Siehe die Anweisungen unten.
• Keine Sicherheit (nicht empfohlen)
Die für die Sicherheit verwendeten Schlüssel, Passphrases und Zertifikate müssen manuell
eingegeben werden. Die für den ausgewählten Access Point oder das ausgewählte Ad-hocGerät benötigten Informationen erhalten Sie von Ihrem Netzwerkadministrator.
5. Klicken Sie auf Save (Speichern).
Hinweis:
Beim Ad-hoc-Modus wird kein Access Point für den Aufbau einer WLAN-Verbindung
benötigt. Die Kamera kann z. B. über eine Punkt-zu-Punkt-Verbindung mit einem Laptop
verbunden werden, das über eine WLAN-Schnittstelle verfügt. Ad-hoc-Verbindungen
können in bestimmten Installationsumgebungen sinnvoll sein, sind aber nicht die
empfohlene Verbindungsmethode.
DEUTSCH
WPA-/WPA2-PSK - Geben Sie den PSK-Schlüssel für den Access Point ein. Der Schlüssel kann
manuell als Hexadezimalwert oder als Passphrase eingegeben werden.
WPA-/WPA2-Enterprise - Wählen Sie EAP-TLS als die vom Access Point verwendete Client-/
Server-Authentifizierung.
Page 46

Seite 46 AXIS M1011/M1011-W/M1031-W Installationsanleitung
EAP-TLS
• Identity (Identität) - Geben Sie die
Benutzeridentität für das Netzwerk
ein.
• Private key password (Privater
Schlüssel) - Geben Sie das Kennwort
für die Benutzeridentität ein.
• EAPOL version (EAPOL-Version) -
Wählen Sie die vom Access Point
verwendete Version (1 oder 2).
• Certificates - (Zertifikate)
Übermitteln Sie ein CAZertifikat an den Access Point für die Authentifizierung
WEP
Authentication (Authentifizierung) - Wählen Sie die Open- oder Shared Key-
Authentifizierung, je nachdem, welche Methode der Access Point verwendet. Nicht alle Access
Points verfügen über diese Option und verwenden dann in der Regel eine Open SystemAuthentifizierung, die auch SSID-Authentifizierung genannt wird.
Key length (Schlüssellänge) - Legt die Länge des Schlüssels fest (64 Bit oder 128 Bit), der für
die drahtlose Verschlüsselung verwendet wird. Die Länge des Verschlüsselungsschlüssels wird
auch im Format 40/64 und 104/128 angezeigt.
Key type (Schlüsseltyp) - Welche Schlüsseltypen verfügbar sind, hängt vom verwendeten
Access Point ab. Es stehen folgende Optionen in der Kamera zur Verfügung:
• Manual(Manuell) - Der Hexadezimalschlüssel kann manuell eingegeben werden.
• ASCII - Die Zeichenfolge für 64-Bit-WEP muss genau 5 Zeichen und für 128-Bit-WEP genau
13 Zeichen lang sein.
• Passphrase - Bei 64-Bit-WEP generiert Passphrase vier verschiedene Schlüssel. Bei 128-Bit-
WEP wird nur ein Schlüssel generiert, der für alle 4 Schlüssel repliziert wird. Die
Schlüsselgenerierung unterliegt keinem Standard und kann von Markenprodukt zu
Markenprodukt unterschiedlich sein. Stellen Sie sicher, dass die generierten Schlüssel mit
den Schlüsseln im Access Point übereinstimmen. Wenn dies nicht der Fall ist, müssen Sie die
Schlüssel manuell eingeben.
Page 47

AXIS M1011/M1011-W/M1031-W Installationsanleitung Seite 47
Schließen Sie die Installation des Drahtlosnetzwerks ab
1. Stellen Sie sicher, dass die Einstellungen für die WLAN-Verbindung in der Kamera mit den
Einstellungen im Access Point übereinstimmen.
2. Ziehen Sie das Netzwerkkabel von der Kamera ab.
3. Aktualisieren Sie die Webseite nach 20–30 Sekunden, um die drahtlose Verbindung zu
bestätigen. Wenn Sie nicht auf die Kamera zugreifen können, führen Sie AXIS IP Utility aus und
wählen Sie die Kamera in der Liste aus.
Hinweis:
• Die Einstellungen für die WLAN-Verbindung in der Kamera müssen für die Herstellung der
Verbindung mit den Einstellungen im Access Point bzw. im Ad-hoc-Gerät übereinstimmen.
• Die für die Sicherheit verwendeten Schlüssel, Passphrases und Zertifikate müssen manuell
eingegeben werden. Die für den ausgewählten Access Point oder das ausgewählte Ad-hoc-Gerät
benötigten Informationen erhalten Sie von Ihrem Netzwerkadministrator.
• Die Einstellungen für die WLAN-Verbindung müssen immer
zuerst in der Kamera und anschließend im Wireless Access Point konfiguriert oder geändert werden.
Auf diese Weise wird sichergestellt, dass bei Änderungen immer auf die Kamera zugegriffen werden
kann.
• SSID (Service Set Identifier) wird auch als ESSID (Extended Service Set Identifier) bezeichnet.
AXIS M1011-W/M1031-W: Die Installation ist damit abgeschlossen.
(d. h. nicht nur während der Installation)
DEUTSCH
Page 48

Seite 48 AXIS M1011/M1011-W/M1031-W Installationsanleitung
Andere Methoden zum Festlegen der IP-Adresse
Diese Tabelle bietet einen Überblick über weitere Methoden, die IP-Adresse festzulegen bzw. zu
ermitteln. Alle Methoden sind standardmäßig aktiviert und können deaktiviert werden.
UPnP™
Bonjour
AXIS Dynamic DNS
Service
ARP/Ping
Admin-Seiten des
DHCP-Servers
anzeigen
Verwendung im
Betriebssystem
Windows
(ME oder XP)
MAC OSX
(10.4 oder höher)
Alle Ein kostenloser Service von Axis, mit dem Sie Ihre Kamera schnell
Alle Siehe unten. Der Befehl muss innerhalb von 2 Minuten erfolgen,
Alle Hinweise zum Anzeigen der Administrationsseiten des DHCP-
Hinweise
Wenn die Funktion auf dem Computer aktiviert ist, wird die
Kamera automatisch erkannt und zur „Netzwerkumgebung“
hinzugefügt.
Kann nur bei Browsern verwendet werden, die Bonjour
unterstützen. Navigieren Sie zum Bonjour-Lesezeichen Ihres
Browsers (z. B. Safari) und klicken Sie auf den Link, um auf die
Webseiten der Kamera zu gelangen.
und einfach installieren können. Eine Internetverbindung ohne
HTTP-Proxyserver ist Voraussetzung. Weitere Informationen
hierzu finden Sie auf www.axiscam.net.
nachdem die Kamera an das Stromnetz angeschlossen wurde.
Servers im Netzwerk finden Sie in der Serverdokumentation.
IP-Adresse per ARP/Ping zuweisen
1. Wählen Sie eine IP-Adresse aus dem Netzwerksegment, in dem sich auch Ihr Computer
befindet.
2. Suchen Sie nach der Seriennummer (S/N) auf dem AXIS M1011/M1011-W/M1031-WProduktetikett.
3. Öffnen Sie auf Ihrem Computer die Eingabeaufforderung und geben Sie die folgenden Befehle
ein:
Windows -Syntax: Beispiel für Windows:
arp -s <IP-Adresse> <Seriennummer>
ping -l 408 -t <IP-Adresse>
Syntax für UNIX/Linux/Mac: Beispiel für UNIX/Linux/Mac:
arp -s <IP-Adresse> <Seriennummer> temp
ping -s 408 <IP-Adresse>
arp -s 192.168.0.125 00-40-8c-18-10-00
ping -l 408 -t 192.168.0.125
arp -s 192.168.0.125 00:40:8c:18:10:00 temp
ping -s 408 192.168.0.125
4. Stellen Sie sicher, dass das Netzwerkkabel mit der Kamera verbunden ist und starten Sie die
Kamera bzw. starten Sie diese neu, indem Sie die Stromversorgung unterbrechen und
wiederherstellen.
5. Schließen Sie die Befehlszeile, sobald „Reply from 192.168.0.125: ...’ oder eine ähnliche
Meldung erscheint.
Page 49

AXIS M1011/M1011-W/M1031-W Installationsanleitung Seite 49
6. Starten Sie einen Browser, geben Sie im Adressfeld „http://<IP-Adresse>“ ein, und drücken Sie
die Eingabetaste auf der Tastatur.
Hinweise:
• So öffnen Sie die Eingabeaufforderung unter Windows: Wählen Sie im Startmenü die Option
„Ausführen...“ und geben Sie „cmd“ ein. Klicken Sie auf „OK“.
• Verwenden Sie zum Eingeben des Befehls „ARP“ unter Mac OS X das Dienstprogramm „Terminal“, das
Sie unter „Anwendung > Dienstprogramme“ finden.
DEUTSCH
Page 50

Seite 50 AXIS M1011/M1011-W/M1031-W Installationsanleitung
Geräteanschlüsse
Netzwerkanschluss - RJ-45-Ethernetanschluss. Die Verwendung von abgeschirmten Kabeln wird empfohlen.
Netzanschluss - Mini-Gleichstromanschluss 5.0-5.1 V Gleichstrom, max. 1,5 A. Mittlerer Anschluss +.
LED-Anzeigen
LED Farbe Bedeutung
Netzwerk Grün Leuchtet dauerhaft bei Verbindung mit einem 100-MBit/s-Netzwerk. Blinkt bei
Gelb Leuchtet dauerhaft bei Verbindung mit einem 10-MBit/s-Netzwerk. Blinkt bei
Leuchtet
nicht
Status Grün Leuchtet bei Normalbetrieb konstant grün.
Gelb Leuchtet dauerhaft beim Einschalten und beim Wiederherstellen der
Rot Blinkt langsam bei Aktualisierungsfehler.
Netz Grün Normaler Betrieb
Gelb Blinkt grün/gelb während Firmware-Aktualisierung.
WLANVerbindun
g
Leuchtet
nicht
Grün Leuchtet dauerhaft bei Verbindung zu einem Drahtlosnetzwerk. Blinkt bei
Rot Leuchtet konstant bei nicht bestehender Verbindung zu einem Drahtlosnetzwerk.
Netzwerkaktivität.
Netzwerkaktivität.
Keine Netzwerkverbindung.
Hinweis: Die Status-LED kann so konfiguriert werden, dass sie bei normalem Betrieb
nicht leuchtet oder nur dann blinkt, wenn auf die Kamera zugegriffen wird. Diese
Konfiguration können Sie unter Setup > System Options > LED (Setup >
Systemoptionen > LED) vornehmen. Weitere Informationen hierzu finden Sie in
der Online-Hilfe.
Werkseinstellungen bzw. von vorherigen Einstellungen.
Drahtgebundener Modus
Netzwerkaktivität.
Blinkt beim Suchen nach
???§§§Drahtlosnetzwerken.
Page 51

AXIS M1011/M1011-W/M1031-W Installationsanleitung Seite 51
AXIS M1031-W-Komponenten
AXIS M1031-W ist mit den folgenden Komponenten ausgestattet:
PIR-Sensor - Ein passiver Infrarotsensor, der das Infrarotlicht beweglicher Objekte im Sichtfeld
messen kann. Sie können die Kamera so konfigurieren, dass über den PIR-Sensor automatisch Licht
eingeschaltet wird. Die Reichweite liegt bei bis zu 5 m.
Strahler - Die Weiß-LED-Strahler können so konfiguriert werden, dass sie vom PIR-Sensor oder über
die Einstellungen auf den Webseiten unter Setup > Live View Config > Light buttons (Setup > Live
View Config > Light buttons) gesteuert werden. Beachten Sie, dass dieses Licht nur gelegentlich und
nicht dauerhaft verwendet werden sollte.
Mikrofon/Lautsprecher für Halbduplex-Audio.
Weitere Informationen hierzu finden Sie im AXIS M1011/M1011-W/M1031-W-Benutzerhandbuch.
Das Benutzerhandbuch ist auf der Axis Website unter „http://www.axis.com“ und auf der CD für
Axis-Netzwerkvideoprodukte verfügbar.
DEUTSCH
Page 52

Seite 52 AXIS M1011/M1011-W/M1031-W Installationsanleitung
Tipp!
Unter „www.axis.com/techsup“ finden Sie Firmware-Aktualisierungen für Ihre AXIS
M1011/M1011-W/M1031-W. Informationen zur aktuellen Firmware-Version finden
Sie unter „Setup > About“ (Setup > Info).
Parameter auf Werkseinstellungen zurücksetzen
Gehen Sie wie folgt vor, um sämtliche Parameter einschließlich der IP-Adresse auf die werkseitigen
Standardeinstellungen zurückzusetzen:
1. Trennen Sie die Kamera von der Stromversorgung.
2. Halten Sie die Steuertaste gedrückt und schließen Sie den Netzstecker wieder an.
3. Halten Sie die Steuertaste so lange gedrückt, bis die Betriebsanzeige gelb blinkt (dies kann bis
zu 15 Sekunden dauern).
4. Lassen Sie die Steuertaste los. Sobald die Betriebsanzeige grün leuchtet (dies kann bis zu 1
Minute dauern), ist die Kamera auf die werkseitigen Standardeinstellungen zurückgesetzt.
5. Legen Sie die IP-Adresse erneut fest. Wenden Sie dabei eine der in diesem Handbuch
beschriebenen Methoden an.
Die Parameter können auch über die Weboberfläche auf die werkseitigen Einstellungen
zurückgesetzt werden. Weitere Informationen dazu finden Sie in der Online-Hilfe und im
Benutzerhandbuch.
Zugriff auf die Kamera über das Internet
Nach der Installation können Sie auf die AXIS M1011/M1011-W/M1031-W-Kamera über Ihr
lokales Netzwerk (LAN) zugreifen. Um auch über das Internet auf die Kamera zugreifen zu können,
müssen Sie die Netzwerk-Router so konfigurieren, dass diese den eingehenden Datenverkehr
zulassen, was üblicherweise durch Zuweisung eines bestimmten Ports geschieht.
• HTTP-Port (standardmäßig Port 80) für die Anzeige und Konfiguration
• RTSP-Port (standardmäßig Port 554) für die Anzeige von H.264-Videoströmen
Ausführliche Informationen dazu finden Sie in der Dokumentation des Routers. Weitere
Informationen zu diesem und anderen Themen erhalten Sie auf der Axis Support-Website unter
„www.axis.com/techsup“.
Weitere Informationen
Das Benutzerhandbuch ist auf der Axis Website unter „http://www.axis.com“ erhältlich und
befindet sich auch auf der mitgelieferten CD für Axis-Netzwerkvideoprodukte.
Page 53

Guida all'installazione AXIS M1011/M1011-W/M1031-W Pagina 53
Importante!
Il prodotto deve essere utilizzato
in conformità alle leggi e alle
disposizioni locali.
AXIS M1011/-W & AXIS M1031-W
Questo documento fornisce le istruzioni necessarie per installare la videocamera AXIS M1011/-W /
AXIS M1031-W Videocamera di rete nella rete in uso. Per ulteriori informazioni sull’utilizzo del
prodotto, consultare la Guida per l'utente disponibile sul CD incluso nella confezione oppure visitare
il sito Web all’indirizzo www.axis.com/techsup.
Procedura di installazione
1. Controllare il contenuto della confezione utilizzando l'elenco fornito di seguito.
2. Panoramica dell'hardware. Vedere la sezione Pagina 54.
3. Installazione dell'hardware. Vedere la sezione Pagina 55.
4. Impostazione di un indirizzo IP. Vedere la sezione
Pagina 57.
5. Assegnazione della password. Vedere la sezione
Pagina 60.
6. Configurazione della connessione wireless. Vedere la
sezione Pagina 62.
(solo per il modello AXIS M1011-W/M1031-W)
Contenuto della confezione
Articolo Modelli/varianti/note
Videocamera di rete AXIS M1011
Alimentatore per interni
(specifico per paese)
Piedistallo Comprensiva di sezione allungabile pre-montata e di 4 viti/perni di
Morsetto elastico Per il montaggio su mensole
CD CD di AXIS Network Video Product, comprensivo della documentazione del
Documentazione cartacea Guida all'installazione della videocamera AXIS M1011/M1011-W/M1031-W
Guida all'installazione
AXIS M1011-W
AXIS M1031-W
PS-H* o PS-V
Europa, Regno Unito, Stati Uniti/Giappone, Australia, Corea, Argentina, Cina
*Cavo di prolunga per alimentatore da 1,8 m, solo per il modello PS-H
montaggio
prodotto,
utensili di installazione e altro software
(questo documento)
Certificato di garanzia Axis
ITALIANO
Page 54

Pagina 54 Guida all'installazione AXIS M1011/M1011-W/M1031-W
Codice prodotto (N/P) e
Il numero di serie è talvolta
richiesto durante l'installazione.
Connettore di alimentazione
Pulsante di comando
Connettore di rete
Indicatore di alimentazione
Indicatore di rete (LED)
Anello di fissaggio
Microfono
Luce Sensore
Indicatore wireless (LED)
(solo sui modelli wireless)
Obiettivo con
Altoparlante
AXIS M1031-W
AXIS M1011/-W
Vista posteriore
LED
indicatore di stato
Obiettivo con
LED
indicatore di stato
(entrambi i modelli)
Fermacavi
Piastra base
Rondella in gomma
della base
Sezione
allungabile
Videocamera di rete
Vista anteriore
Gruppi
PIR
(opzionale)
e numero di serie (S/N)
Panoramica dell’hardware
Per informazioni dettagliate sui connettori e gli indicatori LED, vedere la Pagina 68.
Page 55

Guida all'installazione AXIS M1011/M1011-W/M1031-W Pagina 55
Anello di
fissaggio
Sezione
allungabile
Base
Montaggio a muro della
Montaggio della videocamera
Morsetto
Anello di
fissaggio
Vite di bloccaggio
(opzionale)
su una mensola
AXIS M1031-W
videocamera AXIS M1031-W
Installazione dell'hardware
IMPORTANTE!
AXIS M1011/M1011-W/M1031-W non possono essere usate in ambienti esterni e
!
possono essere installate soltanto in ambienti interni.
Montaggio della videocamera
La videocamera AXIS M1011/M1011-W/M1031-W viene fornita con la base e la sezione allungabile
pre-montate. Smontare la base e, a seconda della configurazione di installazione, seguire le
istruzioni riportate di seguito per montare la videocamera al muro o su un ripiano.
Montaggio a muro
1. Allentare la sezione allungabile per sganciare la
piastra dalla base.
2. Fissare la piastra base su una superficie piana
(orizzontale o verticale) utilizzando le viti in
dotazione.
3. Montare la base ed eventualmente anche la sezione
allungabile.
4. Montare la videocamera, regolare l'angolazione e
serrare l'anello di bloccaggio.
5. La base è munita di un fermacavi per il fissaggio dei
cavi dopo il collegamento.
ITALIANO
Montaggio della videocamera su una
mensola
1. Posizionare il morsetto e serrare la vite di bloccaggio.
2. Montare l'anello di bloccaggio della videocamera sul
morsetto.
3. Regolare l'angolazione della videocamera e serrare
l'anello di bloccaggio.
Collegamento dei cavi
1. Collegare la videocamera alla rete utilizzando un cavo
di rete schermato.
AXIS M1011-W/M1031-W: Se la videocamera deve essere collegata a una rete wireless, è
necessario usare una connessione cablata temporanea per configurare le impostazioni wireless
della videocamera. Per ulteriori informazioni, vedere la Pagina 62.
2. Collegare l’alimentatore per uso interno al connettore di alimentazione sulla videocamera.
Page 56

Pagina 56 Guida all'installazione AXIS M1011/M1011-W/M1031-W
3. Verificare che i LED indichino le condizioni di funzionamento corrette. Per ulteriori dettagli,
vedere la tabella a Pagina 68. Si noti che alcuni LED possono essere disabilitati o spenti.
4. Passare a Assegnazione di un indirizzo IP, alla pagina 57.
Page 57

Guida all'installazione AXIS M1011/M1011-W/M1031-W Pagina 57
Assegnazione di un indirizzo IP
La maggior parte delle reti dispone di un server DHCP che automaticamente assegna gli indirizzi IP
alle periferiche connesse. Se la rete non dispone di un server DHCP, per la videocamera AXIS
M1011/M1011-W/M1031-W viene utilizzato l'indirizzo IP predefinito 192.168.0.90.
Per assegnare un indirizzo IP statico, utilizzare AXIS IP Utility o AXIS Camera Management in
ambiente Windows. In base al numero di videocamere da installare, utilizzare il metodo che meglio
si adatta alle proprie esigenze.
Entrambe le applicazioni sono disponibili gratuitamente sul CD del prodotto oppure possono essere
scaricate dal sito Web all’indirizzo www.axis.com/techsup.
Metodo Consigliato per Sistema operativo
AXIS IP Utility
Vedere la Pagina 58
AXIS Camera Management
Vedere la Pagina 59
Note
• Se l'assegnazione dell'indirizzo IP non è riuscita correttamente, verificare che non ci siano firewall
che blocchino l’operazione.
• Per altri metodi di assegnazione o di rilevazione dell’indirizzo IP per la videocamera
M1011-W/M1031-W
, ad esempio in altri sistemi operativi, vedere la Pagina 66.
Videocamera singola
Piccole installazioni
Più videocamere
Grandi installazioni
Installazione in una diversa subnet
Windows
Windows 2000
Windows XP Pro
Windows 2003 Server
Windows Vista
AXIS M1011/
ITALIANO
Page 58

Pagina 58 Guida all'installazione AXIS M1011/M1011-W/M1031-W
AXIS IP Utility: videocamera singola/piccole installazioni
AXIS IP Utility rileva e visualizza automaticamente le periferiche Axis collegate alla rete.
L'applicazione può inoltre essere utilizzata per assegnare manualmente un indirizzo IP statico.
Si tenga presente che la videocamera AXIS M1011/M1011-W/M1031-W deve essere installata sullo
stesso segmento di rete (subnet fisica) del computer sul quale è in esecuzione AXIS IP Utility.
Rilevamento automatico
1. Verificare che la videocamera sia collegata alla rete e alimentata correttamente.
2. Avviare AXIS IP Utility.
3. Appena viene visualizzata la videocamera, selezionarla con un doppio clic per aprire la home
page.
4. Vedere la Pagina 60 per istruzioni su come assegnare la password.
Assegnazione manuale dell'indirizzo IP (facoltativo)
1. Acquisire un indirizzo IP non utilizzato sullo stesso segmento di rete del computer.
2. Selezionare la videocamera nell'elenco.
3. Fare clic sul pulsante Assign new IP address to the selected device (Assegna uno nuovo
indirizzo IP alla periferica selezionata) e inserire l'indirizzo IP.
4. Fare clic sul pulsante Assign (Assegna) e seguire le istruzioni visualizzate. Si tenga presente che
la videocamera deve essere riavviata entro due minuti per impostare il nuovo indirizzo IP.
5. Fare clic sul pulsante Home Page (Pagina home) per accedere alle pagine Web della
videocamera.
6. Vedere la Pagina 60 per istruzioni su come impostare la password.
Page 59

Guida all'installazione AXIS M1011/M1011-W/M1031-W Pagina 59
AXIS Camera Management: più videocamere/grandi installazioni
È possibile utilizzare AXIS Camera Management per individuare automaticamente la presenza di più
periferiche Axis, mostrare lo stato di connessione, gestire gli aggiornamenti del firmware e
impostare gli indirizzi IP.
Rilevamento automatico
1. Verificare che la videocamera sia collegata alla rete e alimentata correttamente.
2. Avviare AXIS Camera Management. Appena viene visualizzata la videocamera, fare clic con il
pulsante destro sul collegamento e selezionare Live View Home Page (Immagini dal vivo).
3. Vedere la Pagina 60 per istruzioni su come impostare la password.
Assegnazione di un indirizzo IP a una singola
videocamera
1. Selezionare AXIS M1011 in AXIS Camera Management e fare
clic sul pulsante Assign IP (Assegna IP) .
2. Selezionare Assign the following IP address (Assegna il
seguente indirizzo IP) e immettere l'indirizzo IP, la subnet mask
e il router predefinito utilizzati dalla periferica.
3. Fare clic sul pulsante OK.
ITALIANO
Assegnazione degli indirizzi IP a più videocamere
AXIS Camera Management facilita il processo di assegnazione degli
indirizzi IP di più periferiche, suggerendo gli indirizzi IP in base a un
intervallo specifico.
1. Selezionare le videocamere da configurare (è possibile
selezionare più modelli) e fare clic sul pulsante Assign IP
(Assegna IP).
2. Selezionare Assign the following IP address range (Assegna il
seguente intervallo di indirizzi IP) e inserire l'intervallo di indirizzi
IP, la subnet mask e il router predefinito utilizzati dai codificatori video.
3. Fare clic sul pulsante OK.
Page 60

Pagina 60 Guida all'installazione AXIS M1011/M1011-W/M1031-W
Per configurare la password direttamente
tramite una connessione non
crittografata, inserire la password qui.
Per creare una connessione HTTPS,
iniziare facendo clic su questo pulsante.
Impostazione della password
Per ottenere l'accesso al prodotto, è necessario impostare la password dell'utente amministratore
predefinito root. Questa operazione può essere effettuata nella finestra di dialogo ‘Configure Root
Password’ (Configura password root), che viene visualizzata quando si accede alla videocamera
AXIS M1011/M1011-W/M1031-W per la prima volta.
Per evitare l'interruzione della connessione di rete durante l'impostazione della password root, è
possibile eseguire questa operazione tramite la connessione crittografata HTTPS, che richiede una
certificato HTTPS (vedere la nota seguente).
Per impostare la password tramite una connessione HTTP standard, inserirla direttamente nella
prima finestra di dialogo mostrata di seguito.
Per impostare la password tramite una connessione HTTPS crittografata, attenersi alla seguente
procedura:
1. Fare clic sul pulsante Create self-signed certificate (Crea certificato autofirmato).
2. Fornire le informazioni richieste e fare clic su OK. Il certificato viene creato e la password può
essere ora impostata in modo sicuro. Da questo momento in poi tutto il traffico verso e dalla
videocamera AXIS M1011/M1011-W/M1031-W viene cifrato.
3. Inserire una password e reinserirla per confermarla. Fare clic su OK. La password è stata ora
configurata.
4. Per eseguire l’accesso, inserire il nome utente “root” nella finestra di dialogo appena il
programma lo richiede.
Nota: non è possibile eliminare il nome utente predefinito dell'amministratore.
5. Inserire la password impostata in precedenza e fare clic su OK.
Page 61

Guida all'installazione AXIS M1011/M1011-W/M1031-W Pagina 61
Setup (Configurazione): fornisce tutti gli strumenti
necessari per configurare la videocamera.
Help (Guida):
visualizza la
Guida in linea
relativa alla
modalità di
utilizzo della
videocamera.
Accesso al flusso video
Viene visualizzata la pagina Live View (Immagini dal vivo) con i collegamenti agli strumenti di
configurazione che consentono di personalizzare la videocamera.
Se necessario, fare clic su Yes (Sì) per installare AMC (Axis Media Control) che consente di
visualizzare il flusso video in Microsoft Internet Explorer. A questo scopo è necessario disporre dei
privilegi di amministratore.
Note
• HTTPS (Hypertext Transfer Protocol over Secure Socket Layer) è un protocollo utilizzato per
crittografare il traffico tra i browser e i server Web. Il certificato HTTPS controlla lo scambio
crittografato di informazioni.
• Non è possibile eliminare la password root dell'utente amministratore predefinito.
• Se si smarrisce o si dimentica la password root, è necessario reimpostare le impostazioni predefinite
della videocamera. Vedere la sezione Ripristino delle impostazioni predefinite, alla pagina 69.
AXIS M1011: A questo punto l'installazione è completata.
AXIS M1011-W/M1031-W: Passare a Configurazione della connessione wireless, alla pagina 62.
ITALIANO
Page 62

Pagina 62 Guida all'installazione AXIS M1011/M1011-W/M1031-W
Configurazione della connessione wireless
Collegare temporaneamente la videocamera AXIS M1011-W/M1031-W alla rete cablata per
configurare le impostazioni wireless prima di eseguire il collegamento alla rete wireless. Non è
consigliabile usare una connessione wireless non sicura per la configurazione della videocamera
perché in questo caso le frasi di sicurezza e le chiavi vengono inviate in formato testo.
Nota:
Per ulteriore sicurezza, usare HTTPS. Dopo aver collegato la videocamera alla rete cablata,
selezionare Setup > System Options > Security > HTTPS (Configurazione – Opzioni di sistema –
Protezione - HTTP) e consultare la Guida in linea della videocamera per ulteriori istruzioni.
Stato delle reti wireless
Selezionare Setup > Basic Setup > Wireless (Configurazione – Configurazione di base – Wireless)
nelle pagine Web interne della videocamera.
Questo elenco viene visualizzato al termine della ricerca delle reti. La rete a cui la videocamera AXIS
M1011-W/M1031-W è attualmente collegata viene visualizzata in blu. Le reti che presentano una
protezione non supportata vengono visualizzate in grigio. Di seguito sono riportate alcune
informazioni utili.
• SSID - Nome della rete wireless (o della periferica ad hoc)
• Mode (Modalità) – Punto di accesso (principale) o periferica ad hoc.
• Security (Protezione) - Visualizza il tipo di protezione utilizzato dalla rete. Per
informazioni sui tipi di protezione supportati, vedere le sezioni che seguono.
• Channel (Canale) - Canale wireless in uso.
• Signal strength (Intensità del segnale) – Intensità del segnale.
• Bit rate (Velocità in bit) – Velocità corrente in Mbit/s. Questa informazione viene
visualizzata solo per il punto di accesso in uso.
Nota:
I punti di accesso con funzionalità SSID Broadcast (Trasmissione SSID) disattivata vengono
visualizzati solo se si inserisce manualmente il parametro SSID.
Page 63

Guida all'installazione AXIS M1011/M1011-W/M1031-W Pagina 63
Impostazioni wireless
1. Selezionare il numero di punto di accesso o di una periferica ad hoc in Status of Wireless
Networks (Stato delle reti wireless). Alcune delle informazioni richieste vengono inserite
automaticamente nella sezione Wireless Settings (Impostazioni wireless).
2. SSID è il nome della rete wireless selezionata. Lasciare questo campo vuoto per permettere alla
videocamera AXIS M1011-W/M1031-W di accedere alla rete non protetta più vicina.
3. Network type (Tipo di rete) - Selezionare Master (Principale) per accedere alla rete tramite un
punto di accesso oppure Ad-hoc (Ad hoc) per accedere a una qualunque delle periferiche
wireless e creare una rete locale (vedere la nota riportata di seguito).
4. Security (Protezione) – Selezionare uno dei seguenti metodi:
• WPA-/WPA2-PSK
• WPA-/WPA2-Enterprise – Vedere le istruzioni che seguono.
• WEP – Vedere le istruzioni che seguono.
• No security (Nessuna protezione) (scelta non consigliata)
Le chiavi, le frasi di sicurezza e i certificati necessari per la protezione devono essere inseriti
manualmente. Per ottenere i dati dettagliati per il punto di accesso o la periferica selezionati,
rivolgersi all'amministratore della rete.
5. Fare clic su Save (Salva).
Nota:
La modalità ad hoc consente agli utenti di creare una rete LAN senza utilizzare il
collegamento a un punto di accesso. Ad esempio è possibile collegare la videocamera in
modalità punto-punto a un PC portatile utilizzando il supporto della rete wireless. Benché
la modalità di connessione ad hoc sia utile in alcune installazioni, non è il metodo
consigliato.
ITALIANO
WPA-/WPA2-PSK - Inserire la chiave pre-condivisa richiesta per il punto di accesso. Tale chiave
può essere un numero esadecimale (impostato manualmente) oppure una frase di sicurezza.
WPA-/WPA2-Enterprise - Selezionare il tipo di autenticazione client/server utilizzato dal punto di
accesso, ossia EAP-TLS.
Page 64

Pagina 64 Guida all'installazione AXIS M1011/M1011-W/M1031-W
EAP-TLS
• Identity (Identità) – Inserire l'ID
utente da presentare alla rete.
• Private key password (Password
basata su chiave privata) – Inserire la
password da usare per l'ID utente.
• EAPOL version (Versione EAPOL) –
Selezionare la versione usata (1 o 2)
dal punto di accesso.
• Certificates (Certificato) – Caricare
un certificato CA
da presentare al punto di accesso per
l'autenticazione.
WEP
Authentication (Autenticazione) - Selezionare Open (Aperta) o Shared Key (Chiave condivisa),
a seconda del metodo usato dal punto di accesso. Poiché questa funzionalità non può essere
usata su tutti i punti di accesso, si utilizza generalmente il sistema aperto chiamato anche
autenticazione SSID.
Key length (Lunghezza chiave) – Selezionare questa opzione per impostare la chiave usata per
la crittografia wireless, ovvero 64 o 128 bit. La lunghezza della chiave di crittografia viene
talvolta visualizzata come 40/64 e 104/128.
Key type (Tipo di chiave) – I tipi di chiavi disponibili variano a seconda del punto di accesso
selezionato. Per la videocamera sono disponibili le seguenti opzioni:
• Manual (Manuale) – Selezionare questa opzione per inserire manualmente la chiave
esadecimale.
• ASCII - Se si seleziona questa opzione la stringa deve essere costituita esattamente da 5
caratteri per la crittografia WEP a 64 bit e da 13 caratteri per quella a 128 bit.
• Passphrase (Frase di sicurezza) – La crittografia WEP a 64 bit genera 4 chiavi diverse per la
frase di sicurezza. La crittografia WEP a 128 bit crea una sola chiave e la replica per tutte le
altre 4. La creazione delle chiavi non è basata su standard e può variare in base alla marca
del dispositivo. Verificare che le chiavi generate siano identiche a quelle del punto di accesso
e, in caso contrario, inserirle manualmente.
Page 65

Guida all'installazione AXIS M1011/M1011-W/M1031-W Pagina 65
Completamento dell'installazione wireless
1. Verificare che le impostazioni wireless della videocamera corrispondano alle impostazioni del
punto di accesso.
2. Scollegare il cavo di rete dalla videocamera.
3. Aggiornare la pagina Web dopo circa 20-30 secondi per confermare l'utilizzo della connessione
wireless. Se non è possibile accedere alla videocamera, eseguire AXIS IP Utility e selezionare la
videocamera dall'elenco.
Nota:
• Per stabilire una connessione, è indispensabile che le impostazioni wireless della videocamera, del
punto di accesso o del dispositivo ad hoc corrispondano esattamente.
• Le chiavi, le frasi di sicurezza e i certificati necessari per la protezione devono essere inseriti
manualmente. Per informazioni sui requisiti del punto di accesso o del dispositivo ad hoc selezionato,
rivolgersi all'amministratore della rete.
• Configurare o modificare sempre
negli altri casi) prima di modificare le impostazioni del punto di accesso wireless. In questo modo
sarà sempre possibile accedere alla videocamera per effettuare le modifiche.
• SSID (Service Set Identifier) viene talvolta indicato come ESSID (Extended Service Set Identifier).
AXIS M1011-W/M1031-W: A questo punto l'installazione è completata.
l'impostazione wireless sulla videocamera (durante l'installazione e
ITALIANO
Page 66

Pagina 66 Guida all'installazione AXIS M1011/M1011-W/M1031-W
Altri metodi di impostazione dell’indirizzo IP
La seguente tabella descrive gli altri metodi disponibili per impostare o individuare l'indirizzo IP. Per
impostazione predefinita, tutti i metodi sono disponibili e possono essere disabilitati.
UPnP™
Bonjour
AXIS Dynamic DNS
Service
ARP/Ping
Visualizzazione
delle pagine di
amministrazione del
server DHCP
Utilizzo nel sistema
operativo
Windows
(ME o XP)
MAC OSX
(versione 10.4 o
successive)
Tutti i sistemi
operativi
Tutti i sistemi
operativi
Tutti i sistemi
operativi
Note
Se abilitata sul computer, la videocamera viene rilevata
automaticamente e aggiunta a "Risorse di rete".
Si applica a browser con supporto Bonjour. Selezionare il
segnalibro Bonjour nel browser (ad esempio Safari) e fare clic sul
collegamento per accedere alle pagine Web della videocamera.
Servizio gratuito fornito da Axis che consente di installare la
videocamera in modo facile e veloce. È necessaria una
connessione a Internet senza proxy http. Per ulteriori
informazioni, visitare il sito Web all'indirizzo www.axiscam.net.
Vedere le sezioni che seguono. È necessario eseguire il comando
entro 2 minuti dal collegamento dell'alimentazione alla
videocamera.
Per visualizzare le pagine di amministrazione del server DHCP di
rete, vedere la documentazione specifica del server.
Impostazione dell'indirizzo IP con ARP/Ping
1. Acquisire un indirizzo IP sullo stesso segmento di rete cui è connesso il computer in uso.
2. Individuare il numero di serie indicato sull'etichetta della videocamera AXIS M1011/M1011-W/
M1031-W.
3. Aprire una finestra MS-DOS sul computer e digitare i seguenti comandi:
Sintassi di Windows: Esempio di Windows
arp -s <Indirizzo IP> <Numero di serie>
ping -l 408 -t <Indirizzo IP>
Sintassi di UNIX/Linux/Mac: Esempio di UNIX/Linux/Mac
arp -s <Indirizzo IP> <Numero di serie>
temp
ping -s 408 <Indirizzo IP>
arp -s 192.168.0.125 00-40-8c-18-10-00
ping -l 408 -t 192.168.0.125
arp -s 192.168.0.125 00:40:8c:18:10:00 temp
ping -s 408 192.168.0.125
4. Verificare che il cavo di rete sia collegato alla videocamera, quindi avviare/riavviare la
videocamera, scollegando e ricollegando l’alimentazione.
5. Chiudere la finestra MS-DOS appena viene visualizzato il messaggio "Reply from
192.168.0.125: ...’ (Risposta da 192.168.0.125) o altro messaggio simile.
6. Nel browser immettere http://<indirizzo IP> nel campo dell’indirizzo e premere Invio sulla
tastiera.
Page 67

Guida all'installazione AXIS M1011/M1011-W/M1031-W Pagina 67
Note
• Per aprire una finestra MS-DOS in Windows: dal menu Start, scegliere Esegui... e digitare cmd. Fare
clic su OK.
• Per utilizzare il comando ARP in un sistema operativo Mac OS X, usare l'utility Terminal, in
Applicazioni > Utilità.
ITALIANO
Page 68

Pagina 68 Guida all'installazione AXIS M1011/M1011-W/M1031-W
Connettori
Connettore di rete - Connettore Ethernet RJ-45. È consigliato l'uso di cavi schermati.
Connettore di alimentazione - Connettore mini DC da 5,0-5,1V c.c., max 1,5 A. Center pin +.
Indicatori LED
indicatore di
stato
Rete Verde Luce fissa: connessione di rete a 100 Mbit/s. Luce lampeggiante: attività di rete.
Stato Verde Luce verde fissa: condizioni di normale utilizzo.
Alimentazione Verde Normale utilizzo.
Wireless Spento Modalità via cavo.
Colore Indicazione
Giallo Luce fissa: connessione di rete a 10 Mbit/s. Luce lampeggiante: attività di rete.
Spento Assenza di connessione.
Nota: è possibile configurare il LED di stato in modo che rimanga spento in
condizioni di normale utilizzo oppure in modo da ottenere una luce
intermittente quando si effettua l'accesso alla videocamera. Per configurarlo,
selezionare Setup (Configurazione) > System Options (Opzioni di sistema) >
LED. Per ulteriori informazioni, consultare la Guida in linea.
Giallo Luce fissa: durante l’avvio o il ripristino delle impostazioni predefinite o della
configurazione.
Rosso Luce lampeggiante lenta: aggiornamento non riuscito.
Giallo Luce lampeggiante verde/gialla: aggiornamento firmware.
Verde Luce fissa: connessione alla rete wireless. Luce lampeggiante: attività di rete.
Rosso Luce fissa: assenza di connessione alla rete wireless. Luce lampeggiante:
wireless.
Solo per il modello AXIS M1031-W
La videocamera AXIS M1031-W è munita anche di:
Sensore PIR - Sensore a infrarossi passivo che misura la luce a infrarossi che attraversa gli oggetti
presenti nel campo visivo. Se la videocamera è configurata in modo appropriato, è in grado di
accendere automaticamente le luci su richiesta del sensore PIR. L'intervallo di sensibilità massimo è
5 metri.
Spia - Il LED di illuminazione bianco può essere configurato in modo che venga acceso dal sensore
PIR o quando si seleziona Setup > Live View Config > Light buttons (Configurazione –
Configurazione immagini dal vivo – Pulsanti luci) nelle pagine Web. Si noti che questa luce è
progettata per l'uso sporadico e non deve essere lasciata accesa fissa.
Microfono/altoparlante per audio half duplex.
Page 69

Guida all'installazione AXIS M1011/M1011-W/M1031-W Pagina 69
Suggerimento
Visitare il sito di Axis all'indirizzo www.axis.com/techsup per verificare se sono stati
pubblicati aggiornamenti del firmware per la videocamera AXIS M1011/M1011-W/
M1031-W. Per conoscere la versione installata del firmware, vedere Setup >About
Per ulteriori informazioni, vedere la Guida per l'utente della videocamera AXIS M1011/M1011-W/
M1031-W disponibile sul sito Web di Axis all'indirizzo www.axis.com oppure sul CD fornito con il
prodotto.
Ripristino delle impostazioni predefinite
Questa procedura consente di ripristinare le impostazioni predefinite per tutti i parametri, incluso
l'indirizzo IP.
1. Scollegare l'alimentazione dalla videocamera.
2. Tenere premuto il pulsante di comando e ricollegare il cavo di alimentazione.
3. Tenere premuto il pulsante di comando fino a quando l'indicatore di alimentazione emette una
luce gialla lampeggiante (l'operazione può richiedere fino a 15 secondi).
4. Rilasciare il pulsante di comando. Quando l'indicatore di alimentazione diventa verde
(l'operazione può richiedere fino a 1 minuto) la procedura è completata e sono state ripristinate
le impostazioni di fabbrica per la videocamera.
5. Riassegnare l'indirizzo IP utilizzando uno dei metodi descritti in questo documento.
È possibile inoltre ripristinare le impostazioni predefinite mediante l’interfaccia Web. Per ulteriori
informazioni, consultare la Guida in linea o la Guida per l'utente.
Accesso alla videocamera da Internet
Dopo l'installazione, la videocamera AXIS M1011/M1011-W/M1031-W è accessibile nella rete
locale (LAN). Per accedere alla videocamera da Internet, è necessario configurare i router di rete per
consentire il traffico in entrata, che di norma avviene su una porta specifica.
• Porta HTTP (porta predefinita 80) per la visualizzazione e la configurazione
• Porta RTSP (porta predefinita 554) per la visualizzazione di flussi video in formato H.264
Per ulteriori istruzioni, consultare la documentazione del router. Per maggiori informazioni su
questo e altri argomenti, visitare il sito Web per il supporto Axis all'indirizzo www.axis.com/
techsup.
Ulteriori informazioni
La Guida per l’utente è disponibile sul sito Web di Axis all’indirizzo www.axis.com oppure sul CD
fornito con il prodotto.
ITALIANO
Page 70

Page 71

AXIS M1011/M1011-W/M1031-W Guía de instalación Página 71
¡Importante!
Este producto debe utilizarse de
acuerdo a la legislación y
normativas locales.
AXIS M1011/-W & AXIS M1031-W
Guía de instalación
Esta guía de instalación incluye las instrucciones necesarias para instalar la AXIS M1011/-W / AXIS
M1031-W Cámara de red en su red. Para obtener información sobre cualquier cuestión relacionada
con el uso del producto, consulte el Manual del usuario, disponible en el CD que se incluye en este
paquete, o la página www.axis.com/techsup.
Pasos para la instalación
1. Verifique el contenido del paquete con la lista que aparece más abajo.
2. Presentación del hardware. Consulte la página 72.
3. Instalación del hardware. Consulte la página 73.
4. Asignación de una dirección IP. Consulte la página 74.
5. Configuración de la contraseña. Consulte la página 77.
6. Configure la conexión inalámbrica. Consulte la
página 79.
(sólo AXIS M1011-W/M1031-W)
Contenido del paquete
Artículo Modelos/variantes/notas
Cámara de red AXIS M1011
AXIS M1011-W
AXIS M1031-W
Adaptador de corriente para
interiores
(específico del país)
Soporte de cámara Incluye una pieza extensora encajada y 4 tornillos de sujeción/tacos
Pinza flexible Para montaje en estante
CD CD de los productos de vídeo en red de AXIS, incluida la documentación del
Documentación Guía de instalación de AXIS M1011/M1011-W/M1031-W (este documento)
PS-H* o PS-V
Europa, Reino Unido, EE.UU./Japón, Australia, Corea, Argentina, China
*cable alargador de 1,8 m (5,9 pies) para adaptador de corriente, sólo PS-H
producto,
herramientas de instalación y otro software
Documento de garantía de Axis
ESPAÑOL
Page 72

Página 72 AXIS M1011/M1011-W/M1031-W Guía de instalación
Referencia (N/P) y
El número de serie puede ser
necesario durante la instalación.
Conector de alimentación
Botón de control
Conector de red
LED indicador de alimentación
LED indicador de red
Anillo de bloqueo
Micrófono
Luz PIR
LED indicador de inalámbrico
(sólo está activo en los modelos inalámbricos)
Objetivo con
Altavoz
AXIS M1031-W
AXIS M1011/-W
Vista posterior
LED indicador
Objetivo con
LED indicador
(ambos modelos)
Ajuste del cable
Placa de soporte
Arandela de goma
Soporte
Pieza
extensora
Cámara de red
Vista frontal
Montaje
sensor
(opcional)
Número de serie (N/S):
Presentación del hardware
Consulte la página 84 si necesita más información sobre los conectores e indicadores LED.
Page 73

AXIS M1011/M1011-W/M1031-W Guía de instalación Página 73
Anillo de
enfoque
Pieza
extensora
Soporte
AXIS M1031-W
AXIS M1031-W
Abrazadera
Anillo de
enfoque
Tornillo
(opcional)
(instalación en pared)
(instalación en estante)
de sujeción
Instale el hardware
IMPORTANTE:
AXIS M1011/M1011-W/M1031-W no está aprobada para usarse en el exterior; el
!
producto sólo se puede instalar en interiores.
Montaje de la cámara
AXIS M1011/M1011-W/M1031-W se suministra con el soporte y la pieza extensora montados. En
función de la instalación que necesite, desmonte el soporte y siga las instrucciones que indicamos a
continuación para montar en pared o en estante.
Montaje en pared
1. Destornille la pieza extensora para liberar la placa base del
soporte.
2. Utilice los tornillos suministrados para fijar la placa de
soporte a una superficie plana (horizontal o vertical).
3. Fije el soporte y, opcionalmente, la pieza extensora.
4. Inserte la cámara, ajuste el ángulo y atornille el anillo de
bloqueo.
5. El soporte dispone de una fijación de cable para fijarlos una
vez que estén conectados.
Montaje en estante
1. Coloque la abrazadera y apriete el tornillo de sujeción de
modo que quede bien sujeto.
2. Inserte el anillo de bloqueo de la cámara en la abrazadera.
3. Ajuste el ángulo de la cámara y apriete el anillo de bloqueo.
Conexión de los cables
1. Conecte la cámara a la red con un cable de red blindado.
AXIS M1011-W/M1031-W: en el caso de los modelos
inalámbricos, esta conexión es temporal y permite
configurar los parámetros inalámbricos de la cámara.
Consulte la página 79 para obtener más información.
2. Conecte el adaptador de corriente para interiores al
conector de alimentación de la cámara.
3. Compruebe que los indicadores LED indican las condiciones adecuadas. Para obtener
información más detallada, consulte la tabla de la página 84. Tenga en cuenta que algunos LED
pueden deshabilitarse y apagarse.
4. Siga con Asignación de la dirección IP, en la página 74.
ESPAÑOL
Page 74

Página 74 AXIS M1011/M1011-W/M1031-W Guía de instalación
Asignación de la dirección IP
Actualmente, la mayoría de redes disponen de un servidor DHCP que asigna direcciones IP a los
dispositivos conectados de forma automática. Si su red no dispone de un servidor DHCP, AXIS
M1011/M1011-W/M1031-W utilizará 192.168.0.90 como dirección IP predeterminada.
Si desea asignar una dirección IP estática, el método recomendado en Windows es AXIS IP Utility o
AXIS Camera Management. En función del número de cámaras que desee instalar, deberá utilizar el
método que se adapte mejor a sus necesidades.
Ambas aplicaciones son gratuitas y están disponibles en el CD del producto de vídeo en red de Axis
suministrado con este producto o pueden descargarse de www.axis.com/techsup.
Método Recomendado para Sistema operativo
AXIS IP Utility
Consulte la página 75
AXIS Camera Management
Consulte la página 76
Notas:
• Si no puede asignar la dirección IP, compruebe que no haya ningún cortafuegos que bloquee la
operación.
• Para ver otros métodos de asignar o detectar la dirección IP de
, por ej. en otros sistemas operativos, consulte página 83.
W
Cámaras individuales
Instalaciones pequeñas
Varias cámaras
Instalaciones grandes
Instalación en una subred
diferente
Windows
Windows 2000
Windows XP Pro
Windows 2003 Server
Windows Vista
AXIS M1011/M1011-W/M1031-
Page 75

AXIS M1011/M1011-W/M1031-W Guía de instalación Página 75
AXIS IP Utility: para cámaras individuales o instalaciones pequeñas
AXIS IP Utility detecta y muestra automáticamente los dispositivos Axis que existen en la red.
Además, puede utilizarse para asignar manualmente una dirección IP estática.
Recuerde que el equipo que ejecute AXIS IP Utility debe instalarse en el mismo segmento de red
(subred física) que la AXIS M1011/M1011-W/M1031-W.
Detección automática
1. Compruebe que la cámara esté conectada a la red y que recibe alimentación.
2. Inicie AXIS IP Utility.
3. Cuando la cámara aparezca en la ventana, haga doble clic en ella para abrir su página de inicio.
4. Consulte la página 77 para obtener instrucciones sobre cómo asignar la contraseña.
Asignación manual de la dirección IP (opcional)
1. Obtenga una dirección IP que no esté en uso y que se encuentre en el mismo segmento de red
que su equipo.
2. Seleccione la cámara en la lista.
3. Haga clic en el botón Asignar nueva dirección IP al dispositivo seleccionado e introduzca
la dirección IP.
4. Haga clic en el botón Asignar y siga las instrucciones que aparecen en la pantalla. Recuerde
que la cámara debe reiniciarse en los dos minutos siguientes a la configuración de la dirección
IP.
5. Haga clic en el botón Página de inicio para acceder a las páginas Web de la cámara.
6. Consulte la página 77 para obtener instrucciones sobre cómo configurar la contraseña.
ESPAÑOL
Page 76

Página 76 AXIS M1011/M1011-W/M1031-W Guía de instalación
AXIS Camera Management: para varias cámaras e instalaciones
grandes
AXIS Camera Management puede detectar automáticamente varios dispositivos Axis, mostrar el
estado de la conexión, administrar las actualizaciones del firmware y configurar direcciones IP.
Detección automática
1. Compruebe que la cámara esté conectada a la red y que recibe alimentación.
2. Inicie AXIS Camera Management. Cuando la cámara aparezca en la ventana, haga clic con el
botón derecho en el enlace y seleccione Página inicial de Live View.
3. Consulte la página 77 para obtener instrucciones sobre cómo configurar la contraseña.
Asignación de una dirección IP en un dispositivo
individual
1. Seleccione AXIS M1011 en AXIS Camera Management y haga
clic en el botón Asignar IP.
2. Seleccione Asignar la dirección siguiente e introduzca la
dirección IP, la máscara de subred y el enrutador
predeterminado que utilizará el dispositivo.
3. Haga clic en el botón Aceptar.
Asignación de direcciones IP en varios dispositivos
AXIS Camera Management acelera el proceso de asignación de
direcciones IP en varios dispositivos indicando direcciones IP
disponibles dentro de un intervalo especificado.
1. Seleccione los dispositivos que desee configurar (se pueden
seleccionar varios modelos) y haga clic en el botón Asignar
IP.
2. Seleccione Asignar el siguiente intervalo de direcciones IP e
introduzca las direcciones IP, la máscara de subred y el enrutador
predeterminado que utilizará el dispositivo.
3. Haga clic en el botón Aceptar.
Page 77

AXIS M1011/M1011-W/M1031-W Guía de instalación Página 77
Para configurar directamente la
contraseña a través de una conexión
sin cifrar, escriba aquí la contraseña.
Para crear una conexión HTTPS, empiece
haciendo clic en este botón.
Configuración de la contraseña
Para poder acceder al producto, hay que configurar la contraseña del usuario predeterminado para
el administrador root. Al acceder por primera vez a la cámara AXIS M1011/M1011-W/M1031-W,
aparecerá el cuadro de diálogo “Configure Root Password“ (Configurar contraseña de raíz).
Para evitar la intercepción de la contraseña de root cuando se configura, este proceso se puede
realizar a través de una conexión HTTPS cifrada, que precisa un certificado HTTPS (consulte la nota
más abajo).
Para configurar la contraseña a través de una conexión HTTP estándar, escríbala directamente en el
primer cuadro de diálogo que se muestra a continuación.
Para configurar la contraseña a través de una conexión HTTPS cifrada, siga estos pasos:
1. Haga clic en el botón Crear un certificado de autofirma.
2. Proporcione la información que se le solicita y haga clic en OK. Se creará el certificado y se
podrá configurar la contraseña con seguridad. Todo el tráfico hacia y desde AXIS M1011/
M1011-W/M1031-W estará cifrado a partir de este momento.
3. A continuación, escriba una contraseña y vuelva a escribirla para confirmarla. Haga clic en OK
(Aceptar). La contraseña ya se ha configurado.
4. Para iniciar sesión, escriba el nombre de usuario 'root' en el cuadro de diálogo.
Nota: El nombre de usuario predeterminado para el administrador root no se puede borrar.
5. Escriba la contraseña que introdujo anteriormente y haga clic en OK (Aceptar).
ESPAÑOL
Page 78

Página 78 AXIS M1011/M1011-W/M1031-W Guía de instalación
Configuración: proporciona todas las herramientas
necesarias para configurar la cámara según sus
necesidades.
Ayuda: presenta
ayuda en línea
sobre todos los
aspectos del uso
de la cámara.
Acceda al vídeo continuo
La página Live View de la cámara de red aparece con enlaces a las herramientas de configuración
que le permiten personalizar la cámara.
En caso necesario, haga clic en Yes (Sí) para instalar el AMC (AXIS Media Control) y así permitir la
visualización del vídeo continuo en Internet Explorer. Para ello, debe tener derechos de
administrador en su equipo.
Notas:
• HTTPS (Hypertext Transfer Protocol over Secure Socket Layer) es un protocolo usado para cifrar el
tráfico entre navegadores y servidores en red. El certificado HTTPS controla el intercambio cifrado de
información.
• El usuario administrador root predeterminado no se puede borrar.
• Si ha perdido u olvidado la contraseña root, la cámara de red deberá restablecerse a los valores
iniciales de fábrica. Consulte Restablecimiento de la configuración predeterminada de fábrica, en la
página 85.
AXIS M1011: La instalación ha finalizado.
AXIS M1011-W/M1031-W: Siga con Configuración de la conexión inalámbrica, en la página 79.
Page 79

AXIS M1011/M1011-W/M1031-W Guía de instalación Página 79
Configuración de la conexión inalámbrica
La AXIS M1011-W/M1031-W está conectada temporalmente a la red con cables para poder
configurar los parámetros inalámbricos de la cámara antes de efectuar la conexión a la red. No se
recomienda configurar la cámara mediante una conexión inalámbrica que no sea segura, ya que las
contraseñas y claves se envían en texto normal.
Nota:
Para mayor seguridad, utilice HTTPS. Una vez haya conectado la cámara a la red con cables, vaya a
Configuración > Opciones de sistema > Seguridad > HTTPS y busque instrucciones en la ayuda en
línea de la cámara.
Estado de las redes inalámbricas
Vaya a Configuración > Configuración básica > Inalámbrica en las páginas web internas de la
cámara.
La siguiente lista es el resultado de examinar las redes. La red a la que se encuentra asociada en ese
momento la AXIS M1011-W/M1031-W se muestra en color azul. Una red que utiliza seguridad no
compatible se muestra en color gris. Se proporciona la siguiente información:
• SSID: el nombre de una red inalámbrica (o dispositivo ad hoc).
• Modo: un punto de acceso (principal) o dispositivo ad hoc.
• Seguridad: muestra qué tipo de seguridad utiliza la red. Para información sobre tipos de
seguridad compatibles, véase más adelante.
• Canal: muestra el canal inalámbrico que se utiliza actualmente.
• Potencia de la señal: muestra la potencia de la señal.
• Velocidad de transmisión: velocidad de transmisión actual en Mbit/s. Sólo puede
mostrarse el valor correspondiente al punto de acceso en uso actualmente.
Nota:
Los puntos de acceso con difusión de SSID deshabilitada no aparecerán a no ser que se
introduzcan manualmente los valores de SSID.
ESPAÑOL
Page 80

Página 80 AXIS M1011/M1011-W/M1031-W Guía de instalación
Valores inalámbricos
1. Seleccione un punto de acceso o dispositivo ad hoc en Estado de las redes inalámbricas. Parte
de la información necesaria se introducirá automáticamente en Valores inalámbricos.
2. SSID es el nombre de la red inalámbrica seleccionada. Deje este campo en blanco si la AXIS
M1011-W/M1031-W tendrá acceso a la red no segura más próxima.
3. Tipo de red: seleccione Master (principal) para acceder a la red mediante un punto de acceso o
Ad-hoc para acceder a cualquier otro dispositivo inalámbrico y crear una red local (ver nota a
continuación).
4. Seguridad: seleccione uno de los siguientes métodos:
• WPA-/WPA2-PSK
• WPA-/WPA2-Enterprise (ver instrucciones más abajo)
• WEP (ver instrucciones más abajo)
• No security (Sin seguridad) (no se recomienda)
Las claves, contraseñas y certificados utilizados para fines de seguridad deben introducirse
manualmente. Para recuperar los detalles necesarios, contacte con el administrador de red del
punto de acceso o dispositivo ad hoc seleccionado.
5. Pulse Guardar
Nota:
El modo ad hoc permite a los usuarios establecer una LAN inalámbrica sin conexión
mediante un punto de acceso. La cámara puede, por ejemplo, conectar de punto a punto
con un portátil gracias al soporte de red inalámbrica. La conexión ad-hoc puede resultar
útil en determinadas instalaciones pero no es el método recomendado.
WPA-/WPA2-PSK - Escriba la clave precompartida necesaria para el punto de acceso, que puede
ser un número hexadecimal (hexadecimal manual) o una contraseña
WPA-/WPA2-Enterprise - Seleccione el tipo de autenticación cliente/servidor (EAP-TLS) que se
esté utilizando para el punto de acceso.
Page 81

AXIS M1011/M1011-W/M1031-W Guía de instalación Página 81
EAP-TLS
• Identity (Identidad): escriba la
identidad del usuario para presentarla
a la red
• Private key password (contraseña de
clave privada): escriba la contraseña
correspondiente a la identidad de su
usuario
• EAPOL version (versión de EAPOL):
seleccione la versión (1 o 2) que se
utilice en su punto de acceso
• Certificates (Certificados): cargar un
certificado de una CA y presentarlo al punto de acceso para su autenticación
WEP
Autenticación: seleccione Abrir o Clave compartida, según el método que utilice su punto de
acceso. No todos los puntos de acceso disponen de esta opción, en cuyo caso probablemente
utilicen el sistema abierto, que a veces se conoce como autenticación SSID.
Longitud de la clave: determina la longitud de la clave utilizada para el cifrado inalámbrico, 64
ó 128 bits. La longitud de la clave de cifrado puede mostrarse como 40/64 y 104/128.
Tipo de clave: los tipos de clave disponibles dependen del punto de acceso que se utilice. Las
siguientes opciones están disponibles en la cámara:
• Manual: le permite introducir de forma manual la clave hexadecimal.
• ASCII: la cadena debe tener exactamente cinco caracteres en el caso de la WEP de 64 bits y
13 caracteres para la WEP de 128 bits.
• Passphrase (Contraseña): en la WEP de 64 bits, la contraseña genera cuatro claves distintas.
En el caso de la WEP de 128 bits, sólo se genera una clave, que luego se reproduce para el
conjunto de las cuatro claves. La generación de claves no está estandarizada y puede
presentar diferencias entre distintas marcas. Compruebe que las claves generadas son
idénticas a las de su punto de acceso. En caso contrario, deberá introducirlas manualmente.
ESPAÑOL
Finalización de la instalación inalámbrica
1. Compruebe que los valores inalámbricos de la cámara corresponden a los valores del punto de
acceso.
2. Desconecte el cable de red de la cámara.
3. Actualice la página Web tras 20 ó 30 segundos para confirmar la conexión inalámbrica. Si no se
puede acceder a la cámara, ejecute AXIS IP Utility y selecciónelo en la lista.
Nota:
• Para establecer una comunicación, los valores inalámbricos de la cámara deben ser exactamente los
mismos que los del punto de acceso o dispositivo ad hoc.
Page 82

Página 82 AXIS M1011/M1011-W/M1031-W Guía de instalación
• Las claves, contraseñas y certificados utilizados para fines de seguridad deben introducirse
manualmente. Contacte con el administrador de red del punto de acceso o dispositivo ad hoc
seleccionado.
• Los valores inalámbricos deben configurarse o cambiarse siempre
cualquier otro momento) primero en la cámara, antes de cambiar los valores del punto de acceso
inalámbrico. Así se garantiza que la cámara siempre estará accesible cuando realice cambios.
• SSID (Service Set Identifier o “identificador de conjunto de servicios”) en ocasiones se escribe ESSID
(Extended Service Set Identifier o “identificador de conjunto ampliado de servicios”).
(durante la instalación o en
AXIS M1011-W/M1031-W: La instalación ha finalizado.
Page 83

AXIS M1011/M1011-W/M1031-W Guía de instalación Página 83
Otros métodos para configurar la dirección IP
Esta tabla presenta otros métodos disponibles para configurar o detectar la dirección IP. Todos los
métodos están habilitados de forma predeterminada y es posible deshabilitarlos.
UPnP™
Bonjour
Servicio de DNS
dinámico de AXIS
ARP/Ping
Acceso a las
páginas admin. del
servidor DHCP
Uso en sistema
operativo
Windows
(ME o XP)
MAC OSX
(10.4 o posterior)
Todos Servicio gratuito suministrado por Axis que permite instalar la
Todos Véase más adelante. El comando debe emitirse en los dos
Todos Para acceder a las páginas admin. del servidor DHCP en red,
Notas
La cámara se detecta y añade a “Mis sitios de red”
automáticamente, siempre que esta opción esté habilitada en el
equipo.
Aplicable a navegadores compatibles con Bonjour. Navegue
hasta el favorito Bonjour™ del explorador (p. ej., Safari) y haga
clic en el vínculo para acceder a las páginas Web de la cámara.
cámara de forma rápida y sencilla. Es necesario disponer de
conexión a Internet sin proxy HTTP. Para más información,
consulte www.axiscam.net.
minutos posteriores al encendido de la cámara.
consulte la documentación propia del servidor.
Configuración de la dirección IP con ARP/Ping
1. Adquiera una dirección IP en el mismo segmento de red en el que está conectado su equipo.
2. Localice el número de serie (S/N) en la etiqueta de la AXIS M1011/M1011-W/M1031-W.
3. Abra una línea de comando en su equipo y escriba los comandos siguientes:
Sintaxis en Windows: Ejemplo en Windows
arp -s <Dirección IP> <Número de serie>
ping -l 408 -t <Dirección IP>
Sintaxis en UNIX/Linux/Mac: Ejemplo en UNIX/Linux/Mac:
arp -s <Dirección IP> <Número de serie>
temp
ping -s 408 <Dirección IP>
arp -s 192.168.0.125 00-40-8c-18-10-00
ping -l 408 -t 192.168.0.125
arp -s 192.168.0.125 00:40:8c:18:10:00 temp
ping -s 408 192.168.0.125
ESPAÑOL
4. Compruebe que el cable de red está conectado a la cámara y desconecte y vuelva a conectar la
corriente para iniciarla o reiniciarla.
5. Cierre la línea de comando cuando vea "Reply from 192.168.0.125:" (Respuesta de
192.168.0.125:) ...’ o similar.
6. En el explorador, escriba http://<dirección IP> en el campo Ubicación/Dirección y pulse Intro en
el teclado.
Page 84

Página 84 AXIS M1011/M1011-W/M1031-W Guía de instalación
Notas:
• Para abrir una línea de comando en Windows: desde el menú Inicio, seleccione Ejecutar... y escriba
cmd. Haga clic en OK (Aceptar).
• Para utilizar el comando ARP en un sistema operativo Mac OS X, utilice la herramienta Terminal, que
se encuentra en Aplicaciones > Utilidades.
Conectores
Conector de red - Conector Ethernet RJ-45. Se recomienda utilizar cables blindados.
Conector de alimentación - Conector de alimentación: conector mini de CC (5,0-5,1 V CC, máx.
1,5 A). Pin central +.
Indicadores LED
LED Color Indicación
Conector Verde Fijo para indicar la conexión a una red de 100 Mbits/s. Parpadea para indicar
actividad en la red.
Ámbar Fijo para indicar la conexión a una red de 10 Mbits/s. Parpadea para indicar
actividad en la red.
Apagado Desconexión de la red.
Estado Verde Fijo para indicar funcionamiento normal.
Nota: Puede configurarse el LED de estado para que esté apagado durante el
funcionamiento normal o para que parpadee únicamente cuando se accede a la
cámara. Para configurarlo, vaya a Configuración > Opciones del sistema > LED.
Para más información, consulte los archivos de ayuda en línea.
Ámbar Fijo durante el inicio o durante el restablecimiento de los valores o la
configuración iniciales.
Rojo Parpadeo lento si no se puede realizar una actualización.
Indicador Verde Funcionamiento normal.
Ámbar Parpadeo en verde/ámbar durante la actualización del firmware.
Inalámbrica Apagado Modo con cables.
Verde Fijo para indicar conexión a una red inalámbrica. Parpadea para indicar actividad
en la red.
Rojo Fijo para indicar conexión a una red no inalámbrica. Parpadea cuando está
buscando redes inalámbricas.
Page 85

AXIS M1011/M1011-W/M1031-W Guía de instalación Página 85
AXIS M1031-W sólo
AXIS M1031-W está equipada con los siguientes elementos:
Sensor de PIR: un sensor infrarrojo pasivo permite medir la luz infrarroja de los objetos que pasan
por su campo de visualización. Si se configura para ello, la cámara puede encender
automáticamente la luz al activarla el sensor de PIR. Rango de sensibilidad = hasta 5 m (16 pies).
Light (Luz): el LED blanco de iluminación puede configurarse para que se active por medio del
sensor de PIR o de las páginas web con los botones Configuración > Live View Config (Config.
Live View) > Light (Luz). Tenga en cuenta que esta luz está diseñada para un uso temporal y no
debe estar encendida permanentemente.
Micrófono/altavoz para audio semidúplex.
Para más información, consulte el manual del usuario de la cámara AXIS M1011/M1011-W/
M1031-W en el sitio web de Axis (www.axis.com) o en el CD del producto de vídeo en red de Axis.
Restablecimiento de la configuración predeterminada de fábrica
Esta operación restaurará todos los parámetros, incluida la dirección IP, a los valores iniciales:
1. Desconecte la alimentación de la cámara.
2. Mantenga pulsado el botón de Control y vuelva a conectar la alimentación.
3. Mantenga presionado el botón de control hasta que el indicador de alimentación emita una luz
ámbar (puede tardar hasta 15 segundos en encenderse).
4. Suelte el botón Control. Cuando el indicador de alimentación emita una luz verde (lo que puede
tardar hasta 1 minuto), ha finalizado el proceso y se han restablecido los valores iniciales de la
cámara.
5. Vuelva a asignar la dirección IP, utilizando uno de los métodos descritos en este documento.
También es posible restablecer los valores predeterminados de la cámara mediante la interfaz Web.
Si desea más información, consulte la ayuda en línea o el manual del usuario.
ESPAÑOL
Acceso a la cámara desde Internet
Una vez instalada, su AXIS M1011/M1011-W/M1031-W es accesible desde su red local (LAN). Para
acceder a la cámara desde Internet, los enrutadores (Routers) de red deben configurarse para
permitir tráfico entrante, que normalmente se realiza en un puerto específico.
• Puerto HTTP (puerto 80 predeterminado) para visualización y configuración
• Puerto RTSP (puerto 554 predeterminado) para visualización de secuencias de vídeo H.264
Consulte la documentación de su enrutador (Router) para obtener más instrucciones. Si desea más
información sobre éste y otros temas, visite la página Web de soporte de Axis en www.axis.com/
techsup
Page 86

Página 86 AXIS M1011/M1011-W/M1031-W Guía de instalación
Un consejo:
Visite www.axis.com/techsup para comprobar si existe algún firmware actualizado
disponible para su AXIS M1011/M1011-W/M1031-W. Para consultar la versión del
firmware que tiene instalada actualmente, vaya a Configuración > Acerca de en las
Más información
El manual del usuario está disponible en el sitio Web de Axis, www.axis.com, o en el CD de
productos de vídeo en red de Axis suministrado con este producto.
Page 87

AXIS M1011/-W/M1031-W Installation Guide Page 87
Radio Transmission Regulatory Information & EMC
This equipment generates and radiates radio frequency energy, and must be installed and operated while
maintaining a minimum body-to-camera distance of 3 feet (1 meter).
If this equipment causes harmful interference to radio or television reception, which can be determined by
turning the equipment off and on, the user is encouraged to try to correct the interference by one or more of
the following measures: Re-orient or relocate the receiving antenna. Increase the separation between the
equipment and receiver. Connect the equipment to an outlet on a different circuit to the receiver. Consult your
dealer or an experienced radio/TV technician for help. Shielded (STP) network cables must be used with this unit
to ensure compliance with EMC standards.
Tested to comply with FCC Standards FOR HOME OR OFFICE USE. This product must be installed and used in
strict accordance with the instructions given in the user documentation. This Axis product complies with the
following radio frequency and safety standards:
AXIS M1011
USA - This equipment has been tested and found to comply with the limits for a Class B computing device
pursuant to Subpart B of Part 15 of FCC rules, which are designed to provide reasonable protection against such
interference when operated in a commercial environment. Operation of this equipment in a residential area is
likely to cause interference, in which case the user at his/her own expense will be required to take whatever
measures may be required to correct the interference.
Canada - This Class B digital apparatus complies with Canadian ICES-003.
Europe - This digital equipment fulfills the requirements for radiated emission according to limit B of
EN55022, and the requirements for immunity according to EN55024 residential and commercial industry.
Japan - This is a class B product based on the standard of the Voluntary Control Council for Interference from
Information Technology Equipment (VCCI). If this is used near a radio or television receiver in a domestic
environment, it may cause radio interference. Install and use the equipment according to the instruction
manual.
Australia - This electronic device meets the requirements of the Radio communications (Electromagnetic
Compatibility) Standard AS/NZS CISPR22:2002
AXIS M1011-W/M1031-W (Wireless)
USA - Federal Communications Commission FCC
This device complies with Part 15 of FCC Rules. Operation of the device is subject to the following two
conditions:
(1) This device may not cause harmful interference
(2) This device must accept any interference that may cause undesired operation.
Canada - This device complies with RSS-210 of Industry Canada. Operation is subject to the following
conditions:
(1) This device may not cause interference, and
(2) this device must accept any interference, including interference that may cause undesired operation of the
device.
Europe - EU Declaration of Conformity. This device complies with the requirements of the R&TTE Directive
1999/5/EC with essential test suites as per standards:
EN 301 489 General EMC requirements for radio equipment,
ETS 300 328 Technical requirements for radio equipment.
Japan - This product complies with Technical Regulations Conformity Certification of Specified Radio
equipment.
Australia - This electronic device meets the requirements of the Radio communications (Electromagnetic
Compatibility) Standard AS/NZS 4771.
Page 88

Installation Guide Ver.1.10
AXIS M1011/-W/M1031-W Printed: February 2009
© Axis Communications AB, 2008-2009 Part No. 34807
 Loading...