

Page 1

User’s Guide
DigitalMultimediaPlayer
AXN-9705
Page 2

FCC COMPLIANCE STATEMENT
Note: This equipment has been tested and found to comply with the limits for
a Class B digital device, pursuant to Part 15 of the FCC Rules. These limits
are designed to provide reasonable protection against harmful interference
in a residential installation. This equipment generates, uses, and can radiate
radio frequency energy and, if not installed and used in accordance with
the instructions, may cause harmful interference to radio communications.
However, there is no guarantee that interference will not occur in a particular
installation. If this equipment does cause harmful interference to radio or
television reception, which can be determined by turning the equipment off
and on, the user is encouraged to try to correct the interference by one of the
following measures:
- Reorient or relocate the receiving antenna.
- Increase the separation between the equipment and receiver.
- Connect the equipment into an outlet on a circuit different from that to which
the receiver is connected.
- Consult the dealer or an experienced radio/TV technician for help.
FCC Caution: To assure continued compliance, (example – use only shielded
interface cables when connecting to computer or peripheral devices). Any
changes or modications not expressly approved by the party responsible for
compliance could void the user’s authority to operate this equipment.
This device complies with Part 15 of the FCC Rules. Operation is subject to the
following two conditions: (1) this device may not cause harmful interference,
and (2) this device must accept any interference received, including
interference that may cause undesired operation.
Page 3

Adjust the volume
Insert a CF memory
card into the slot
Volume
CF Card Reader
SD/MMC/xD/MS Memory
Card Reader
Insert an SD/MMC/xD/MS
memory card into the slot
USB
Plug an USB Cable
or USB ash drive
DC 9V
Plug the AC adapter
Page 4
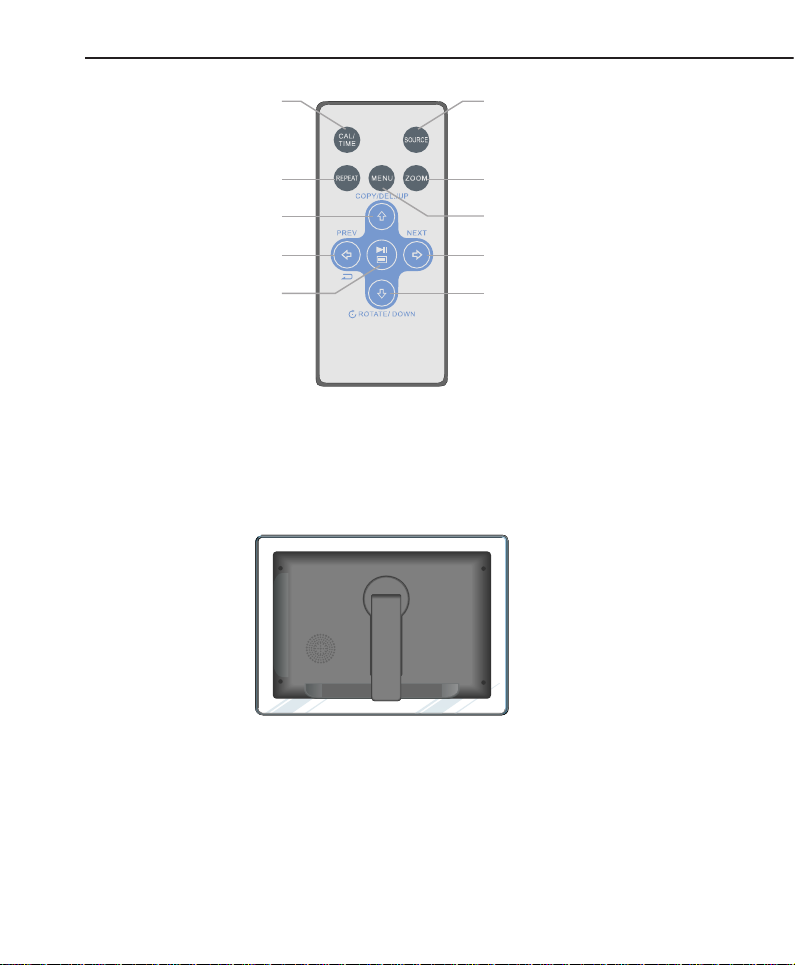
CONTROLS AND CONNECTIONS
CAL/TIME
Switch between the
clock, calendar and
photo display mode
REPEAT
UP/COPY/DEL
LEFT/RETURN
*For detailed feature and function of each key,
please refer to the detailed feature pages.
POSITIONING THE FRAME
SOURCE
Press to switch between
memory card reader,USB, or
internal memory as source
ZOOM
Press to zoom into an image
MENU
NEXT/RIGHT
DOWN/ROTATEPLAY/PAUSE/MODE
The Digital Photo Frame can be used as a free standing display by unfolding the
attached stand to its fully extended position.
NOTE: The stand can be rotated to support the frame in either horizontal or vertical
position. Please ensure the stand is rotated to a position that indicator on the stand
and frames aligned to ensure stability.
The Digital Photo Frame can also be wall-mounted, please use the pre-set slots for
either horizontal or vertical position. (Hardware for mounting is NOT included)
Page 5

Press MENU button to enter main menu. Use the directional keys to highlight the
A. General Setup Page
• BRIGHTNESS: Adjust brightness from -10 to 10
• SLIDE SHOW TIME: Select 05, 10, 30 sec; 01 minute,
or 01 hour display time for each photo
• OSD LANGUAGE: Select the On-Screen-Display language you want
• SLIDE SHOW WITH MP3: ON/OFF
• PHOTO MODE: Normal/Wide Screen
• MATTING: Various Matting pictures for selection and OFF
• DEFAULT: RESET to factory default values
B. Clock Setup Page
• CL
OCK MODE: 12-hour or 24-hour display
• CLOCK SETTING: Adjust the time
• AUTO POWER ON: Set the time when the frame is automatically ON.
• AUTO POWER OFF: Set the time when the frame is automatically OFF.
• ALARM MODE: Enable or disable alarm function
• ALARM SETTING: Adjust the Alarm time
• DATE SETTING: Adjust the Month/DAY/YEAR
C. Exit Setup Page
“SETTINGS” icon then press “Play/Pause/Mode” button to select.
SETUP
Page 6

PHOTO SLIDE SHOW
The Digital Photo Frame will automatically start a photo slide show every time it is
powered on. The source of the picture will be as following:
Memory Card Reader -> USB devices ->Internal Memory
(Note: to manually change file location, press the “Source” button on the remote
control to select the desired location)
During the slide show, you may press the “Play/Pause/Mode” button once to
PAUSE. The frame will stay on the current picture.
While in the PAUSE mode, you can manually change the picture being displayed by press
“Prev./ Return” or “Next” button to view pictures one by one.
Press the “Play/Pause/Mode” again during the PAUSE mode will bring you to a “BROWSE”
mode that will display 12 pictures at once in a “THUMB NAIL” style.
(Note: The thumb nail will start with the current picture being displayed. Use the
arrow keys “prev”, “next”, “up” or “down” to navigate)
Press the “Play/Pause/Mode” button one more time will bring you back to the slide
show mode which starts with the picture you highlighted in “thumb nail” mode.
• Supported photo format: JPEG
4
Page 7

MUSIC PLAYBACK
Press the “MENU” button to access menu screen of the frame.
Use the direction button to select the “AUDIO” icon then press “Play/Pause/Mode”
to conrm.
The frame will display a list of audio le found on the selected source media
(press “SOURCE” button on the remote to change the location of les to be found)
And the frame will start playback from the first file found. And the default playback
method is to play from rst to last then start over.
Press “REPEAT” button on the remote at any time to change playback mode. The
available modes are Repeat-All (Default), Repeat-One (Repeat the same song), Repeat-
Off (Play till the end of les then stop) and Random (the frame will play back les in a
shufed mode)
(NOTE: If you have changed the repeat mode in video playback feature, it would be
carried over to this feature automatically. The repeat mode is displayed at bottom of
your screen)
• Supported audio format: MP3
5
Page 8

VIDEO PLAYBACK
Press the “MENU” button to access menu screen of the frame.
Use the direction button to select the “VIDEO” icon then press “Play/Pause/Mode”
to conrm.
The frame will display a list of video le found on the selected source media
(press “SOURCE” button on the remote to change the location of les to be found)
Use the up/down buttons to select a desired video le, the press “Play/Pause/Mode”
to start playback. The default playback mode will automatically play the next le till the
end, then start over from the beginning.
Press “REPEAT” button on the remote at any time to change playback mode. The
available modes are Repeat-All (Default), Repeat-One (Repeat the same le), RepeatOff (Play till the end of les then stop) and Random (the frame will play back les in a
shufed mode)
(NOTE: If you have changed the repeat mode in audio playback feature, it would be
carried over to this feature automatically. The repeat mode is displayed at bottom of
your screen)
6
Page 9

CLOCK/CALENDAR DISPLAY
Press the “MENU” button to access menu screen of the frame.
Use the direction button to select the “CLOCK” icon then press “Play/Pause/Mode”
to conrm.
The frame will display current time and alarm time.
Press the “MENU” button to access menu screen of the frame.
Use the direction button to select the “CALENDAR” icon then press “Play/Pause/Mode”
to conrm.
The frame will display current date and calendar.
7
Page 10

Press “LEFT/RETURN” button to nish alarm setting. Remember to use the directional
keys to highlight the “ALARM MODE” icon then press “Play/Pause/Mode” button to turn
on alarm mode. The frame will ring at the alarm time you set.
ALARM CLOCK OPERATION
Press “MENU” button to enter main menu. Use the directional keys to highlight the
“SETTINGS” icon then press “Play/Pause/Mode” button to select.
Press “NEXT/RIGHT” button to enter “CLOCK SETUP PAGE”. Press “DOWN/ROTATE”
button 6 times then press “Play/Pause/Mode” button to set alarm time. Use LEFT or
RIGHT button to choose the Hour or Minute, then use UP or DOWN button to change the
digit.
8
Page 11

COPY/DELETE PICTURE
Copying Photos to your frame
To copy photos from a memory card to your frame, locate the photo, press the “Play/
Pause/Mode” button once to pause, and press UP/COPY/ DELETE. It will ask if you
would like to copy the photo. Select YES, and press PLAY/MODE. The frame will then
copy up to 15 photos to the frame’s internal memory.
Note: You can rotate photos clockwise by pressing ROTATE while the photo is on the
screen. Rotated photos are will be stored in their rotated position.
Deleting Photos
Make sure there aren’t any memory cards or USB drives plugged into the frame. To
delete a photo from your frame’s memory, locate the photo and press UP/COPY/DELETE.
Select YES when asked if you want to delete the photo and press PLAY/PAUSE/MODE.
The photo will then be deleted from the frame’s memory
Note: The delete function of the frame will only delete photos saved in the frame’s
memory, not from a memory card.
9
Page 12

properly connected and providing power.
FAQ & Specifications
Q: Why after I pressed POWER on/off button, the screen is still dark?
A: Check to see if the power LED is illuminated that indicates the power supply is
Q: Why the frame won’t recognize my memory card?
A: Please check the type of memory card you are using.
Specifications
Power source: DC 9V
Operating temperature: 5~35 °C
Weight: 0.5 kg
Dimensions (W x D x H): 239 x 167 x 29.5 mm
0
Page 13

Key Features
Feature External Memory Internal Memory
(Cards and or Flash Drives)
Photo slide show with music
Photo slide show
without music
Photo auto-rotation with
frame orientation
Delete photos from memory
Playback music/audio files
Playback video clips
View Photo thumbnails
Photo Zoom
Browse Photos/Images
Widescreen View
√
√ √
√
√
√
√
√
√
√ √
√
Page 14

America Action, Inc. (“AXN”) Product Warranty
Information
What the warranty covers:
America Action, Inc. (“AXN” ) warrants your AXN products against defects in material and
workmanship during the warranty period from the original date of purchase, subject to the
following terms and conditions. If a product proves to be defective in material or
workmanship during the warranty period, AXN will, at its discretion, repair or replace the
product with a similar product provided the purchaser adheres to certain return
authorization procedures and guidelines.
How long the warranty is effective:
AXN products are warranted for one (1) year for parts and ninety (90) days for labor, starting
from the original date of purchase/invoice.
What brand(s) can be covered under the warranty:
Any “ACTION” and “AXION” branded products sold by America Action, Inc.
Whom the warranty protects:
This warranty is valid only for the original purchaser.
What the warranty does not cover:
1. Any product on which the serial number has been defaced, modified or removed.
2. Damage, deterioration or malfunction resulting from:
A. Accident, misuse, neglect, fire, water, lightning, or other acts of nature, unauthorized
product modification, or failure to follow instructions supplied with the product.
B. Repair or attempted repair by anyone not authorized by AXN.
C. Any damage of the product due to shipment.
D. Removal from or installation to the product.
E. Causes external to the product, such as electric power fluctuations or failure.
F. Use of supplies or parts not meeting AXN’s specifications.
G. Normal wear and tear.
H. Battery Leakage.
I. Any other cause which does not relate to a product defect.
3. Cosmetic damage by purchaser, such as markings, discoloration, scratches, dents, gouges
or any other defacement.
4. Physically damaged products by purchaser, such as broken PCB, Housing, damaged LCD
Module.
5. No Defect Found (product returned to AXN as defective but failure is not duplicated by
AXN’s test method).
6. Customer instruction, installation, set up adjustments, or signal reception problems.
7. Rechargeable batteries.
8. Product without proof of purchase. (The proof of purchase should be one of the following
documents: purchase receipt, gift receipt, sales invoice, and packing list that contains the
product model number, price, vendor, and purchase date.)
9. Ninety (90) days after the original purchase date of the AXN product, the customer is
responsible for the shipping fees incurred for the product delivery to and from AXN service
center.
Page 15

How to get service:
1. For additional information on obtaining an extended warranty service, contact your AXN
dealer or AXN’s Customer Service Department by e-mailing to
customerservice@axionzone.com
To obtain warranty service, you will be required to do one of the following: fill out an online
RMA Request Form, print the form, fill it out and fax it to 1-909-869-5545, or call AXN’s
Customer Service number at 1-909-869-6600. You will be asked to provide the following
information:
A. Customer information (name, day-time phone number, and/or residential address).
B. Proof of your purchase (purchase receipt, gift receipt, sales invoice, and/or packing list).
C. Product model number.
D. Product serial number.
E. A description of the problem.
F. Payment information (If any payment is required, you will be asked to provide this
information beforehand. Currently, we only accept personal check, money order or cashier’s
check. The time for us to clear a personal check is approximately 20 days; 10 days for any
money order or cashier’s check.
2. AXN will contact the customer upon receipt of the RMA Request Form, and will issue an
RMA number if the RMA Request Form is completed and delivered as requested.
3. Please take or ship RMA product to AXN or any AXN authorized service center with RMA
number clearly and marked on the outside of the packing. All RMA products should be
returned in secured packaging, preferably in the original package, with the complete set of
accessories. We recommend that you insure the package in case of loss or damage during
shipping.
4. Upon receiving the RMA product, if the correct RMA number is clearly marked on the
packaging, and if the repair payment is pre-paid or is enclosed with the package, depending
on the condition of the defects, AXN will repair or replace all RMA products, and ship the
product back to the customer.
5. For additional information or the name of the nearest AXN service center, please contact
your AXN dealer or AXN Customer Service.
Before contacting us:
In many cases, your product may not need repair. Before contacting us, please consult the
troubleshooting section in your user’s guide or AXN’s FAQ webs page to see if you can easily
remedy the problem yourself.
AXN technical support services:
During the period of product warranty, we support your basic configuration, setup and
troubleshooting questions; and when necessary, we will provide you with all the instructions on
how to return your product for repair.
For customer service and support inquiries, please call 1-909-869-6600 or e-mail us at
customerservice@axionzone.com
REPAIR OR REPLACEMENT AS PROVIDED UNDER THIS WARRANTY IS THE
EXCLUSIVE REMEDY OF THE CONSUMER. AXN SHALL NOT BE LIABLE FOR ANY
Page 16

INCIDENTAL OR CONSEQUENTIAL DAMAGES FOR BREACH OF ANY EXPRESS OR
IMPLIED WARRANTY ON THIS PRODUCT. EXCEPT TO THE EXTENT PROHIBITED
BYAPPLICABLE LAW,ANYIMPLIED WARRANTY OF MERCHANTABILITY OR FITNESS
DURATION TO THE DURATION OF THIS WARRANTY.
Some states do not allow the exclusion or limitation of incidental or consequential damages, or
allow limitations on how long an implied warranty lasts, so the above limitations or exclusion
may not apply to you. This warranty gives you specific legal rights, and you may also have
other rights, which vary from state to state.
AMERICA ACTION INC.
100 EXCHANGE PL
POMONA, CA 91768
PH: (909) 869-6600
FAX: (909) 869-5545
CONTACTUS@AXIONZONE.COM
HTTP://WWW.AXIONZONE.COM
 Loading...