


OWNER’S MANUAL
AXN-8706
7” Portable LCD TV
It is important to read this user manual prior to using your new product for the first time.
Contents |
|
A. Setup .......................................................................... |
3 |
B. Unit and Remote View..................................................... |
5 |
C. Basic and Operation..................................... |
7 |
D. Specification............................................................... |
11 |
E.Troubleshooting.................................................................. |
12 |
2
A. Setup
Features
•7” Portable LCD TV
•Built-in ATSC TV Tuner
•Stereo Sound with Headphone Jack
•Built-in Digital Media Player
•Support Memory Cards (SD/MMC/Memory Stick) and USB 2.0 port
•Built-in rechargeable Lithium-Polymer battery
Package Contents
•7” Portable ATSC TV
•AC Adapter
• Remote Control
• Instruction Manual
• External Antenna
• Car Adapter*
*Note: Power on can not charge, only charge when the portable TV is off.
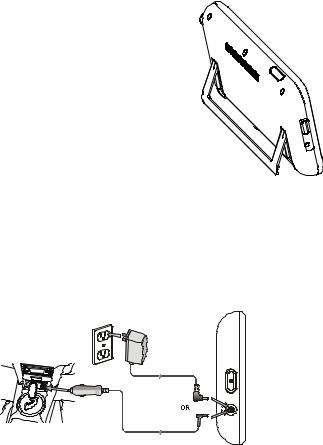
Place your portable TV 

Flip the back stand to place the portable TV on a flat surface.
Power your portable TV
Using the supplied AC adapter, connect the TV’s DC 9V socket to a wall outlet.
Using the vehicle adapter, connect the TV’s DC 9V socket to a vehicle’s lighter socket.
To use battery power, turn the TV OFF and charge the built-in battery for about 4 hours or until the Charge Indicator goes out. Charge the built-in battery for at least 8 hours before using the TV for the first time.
3

Notes: The Charge Indicator lights red during charging, and goes out when the battery is fully charged.
Both AC power and vehicle power can be used for charging the built-in battery.
When fully charged, the TV can operate about 120 minutes in TV mode.
Use the remote
Your remote comes with a battery installed. Remove the plastic tab before using the remote.
When the battery is low, replace it with another CR2025 3V battery. The positive (+) side faces the back of the remote.
Battery Notes:
•Dispose of batteries promptly and properly. Do not burn or bury them.
•Use only fresh batteries of the required size and type.
•If you do not plan to use the remote control for a long time, remove the battery. Batteries can leak chemicals that can damage electronic parts.
•Keep button-cell batteries away from children. Swallowing them can be fatal.
Enjoy the portable TV
1.Press  2 seconds to turn on the TV. The Power Indicator lights green.
2.Press INPUT on remote control to select TV mode.
3.Press CH+ and CHto select the previous or next channel. Note: You must scan for available digital channels when you set
up your TV. If you do not scan for channels, the CH+ and CHbuttons will not function.
4
 PDF creat
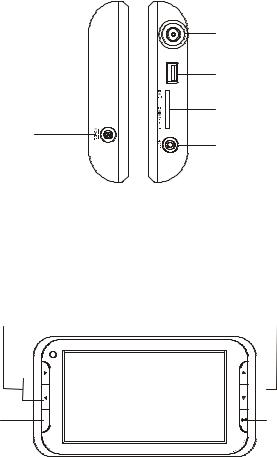
B. Unit and remote View Left and right side
Power on/off 

DC 9V
Plug in the AC adaptor
ANTENNA |
Antenna Jack |
Connect an external antenna |
|
USB |
USB Jack |
|
Insert a USB flash device. |
|
SD/MMC/MS Slot |
|
Insert a card. |
|
Headphone Jack |
|
Connectingtothisheadphonejack |
|
will disable the internal speakers. |
Back side
Volume+/-
Press to raise or lower the volume.  /
/  : Navigation Buttons.
CH+/-
Select the previous and next channel.
 /
/  :Navigation Buttons.
Menu
VOL+ |
CH+ |
||
|
VOL- |
|
|
|
CH- |
||
|
|
|
|
M
Enter
To enter or confirm your selection.
5
 Loading...