

Page 1
OWNER’S MANUAL
AXN-8706
7” Portable LCD TV
It is important to read this user manual prior to using your new
product for the first time.
Page 2

Contents
A.Setup .......................................................................... 3
B.Unit and Remote View..................................................... 5
C.Basic and Operation..................................... 7
D.Specification...............................................................11
E. Troubleshooting..................................................................12
2
Page 3
A. Setup
Features
• 7” Portable LCD TV
• Built-in ATSC TV Tuner
• Stereo Sound with Headphone Jack
• Built-in Digital Media Player
• Support Memory Cards (SD/MMC/Memory Stick) and USB 2.0 port
• Built-in rechargeable Lithium-Polymer battery
Package Contents
• 7” Portable ATSC TV
• AC Adapter
• Remote Control
• Instruction Manual
• External Antenna
• Car Adapter*
*Note: Power on can not charge, only charge
when the portable TV is off.
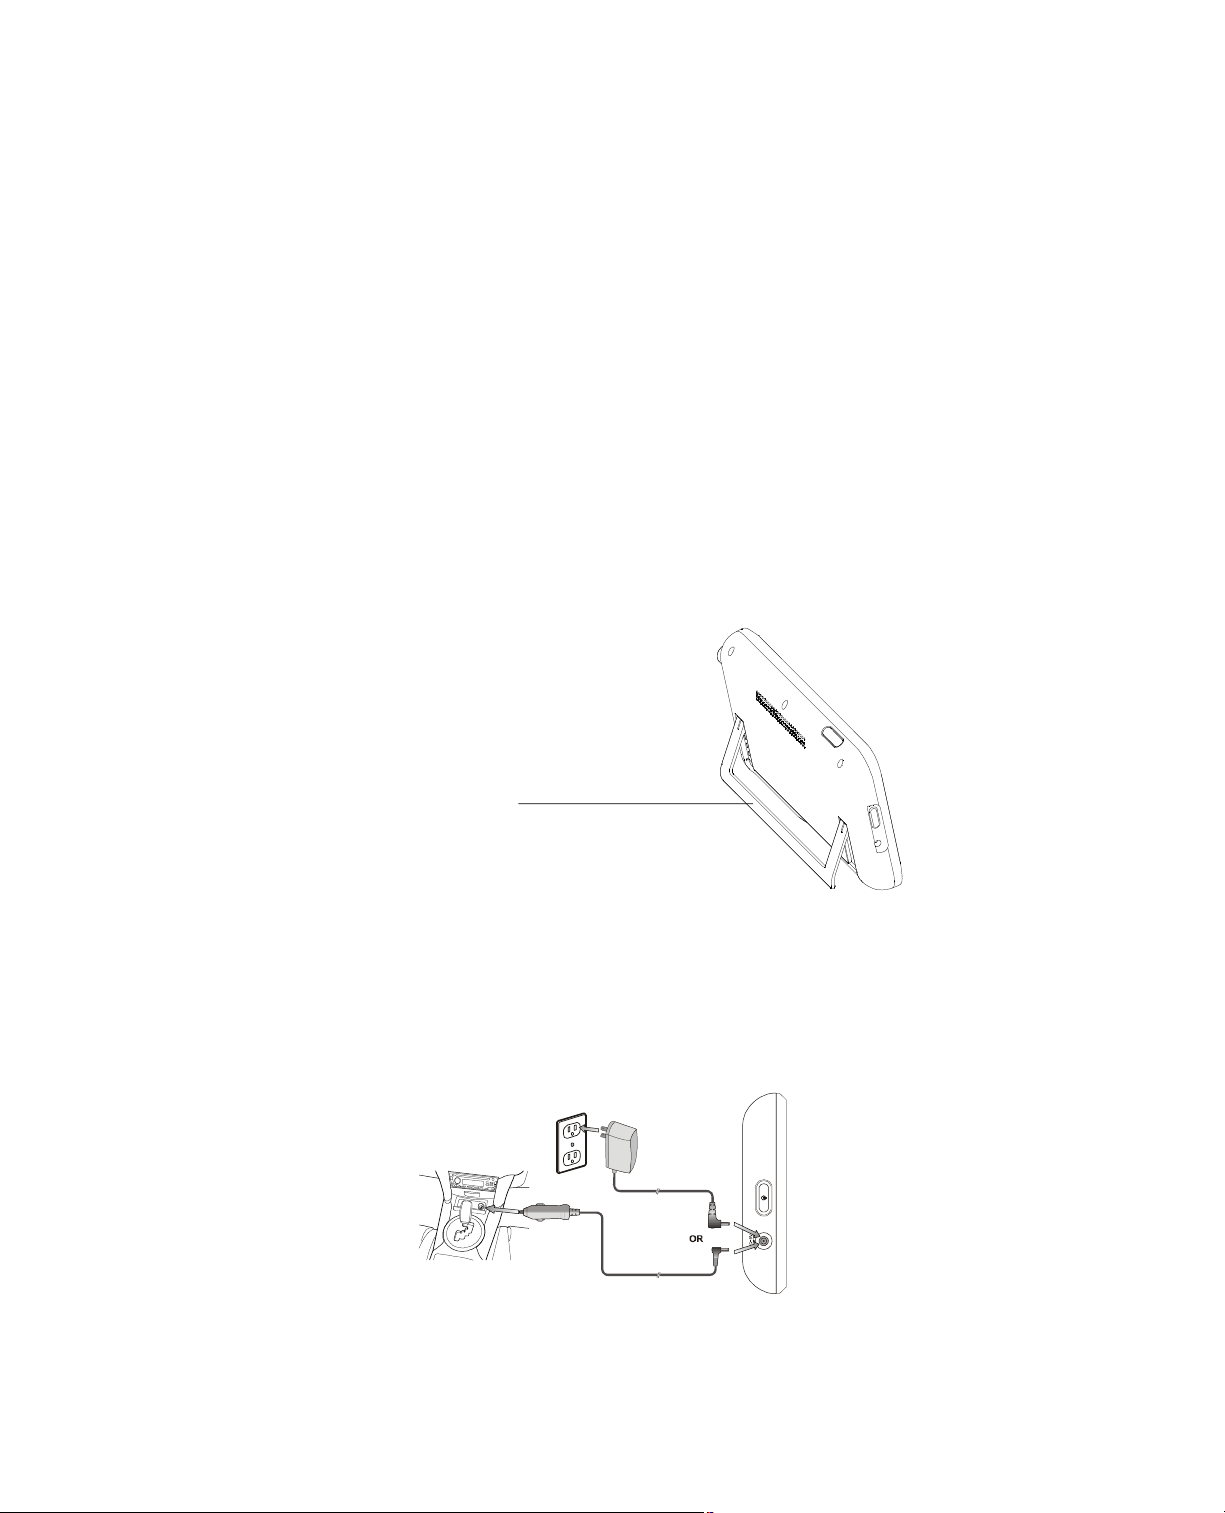
Place your portable TV
Flip the back stand to place the
portable TV on a flat surface.
Power your portable TV
Using the supplied AC adapter, connect the TV’s DC 9V socket to
a wall outlet.
Using the vehicle adapter, connect the TV’s DC 9V socket to a
vehicle’s lighter socket.
To use battery power, turn the TV OFF and charge the built-in
battery for about 4 hours or until the Charge Indicator goes out.
Charge the built-in battery for at least 8 hours before using the TV
for the first time.
3
Page 4

Notes: The Charge Indicator lights red during charging, and goes
out when the battery is fully charged.
Both AC power and vehicle power can be used for charging
the built-in battery.
When fully charged, the TV can operate about 120 minutes
in TV mode.
Use the remote
Your remote comes with a
battery installed. Remove
the plastic tab before using
the remote.
When the battery is low,
replace it with another
CR2025 3V battery.
The positive (+) side
faces the back of the
remote.
Press the tab and pull
to slide out the tray.
Battery Notes:
• Dispose of batteries promptly and properly. Do not burn or bury
them.
• Use only fresh batteries of the required size and type.
• If you do not plan to use the remote control for a long time,
remove the battery. Batteries can leak chemicals that can
damage electronic parts.
• Keep button-cell batteries away from children. Swallowing them
can be fatal.
Enjoy the portable TV
1. Press 2 seconds to turn on the TV. The Power Indicator
lights green.
2. Press INPUT on remote control to select TV mode.
3. Press CH+ and CH- to select the previous or next channel.
Note: You must scan for available digital channels when you set
up your TV. If you do not scan for channels, the CH+ and
CH- buttons will not function.
4
Page 5
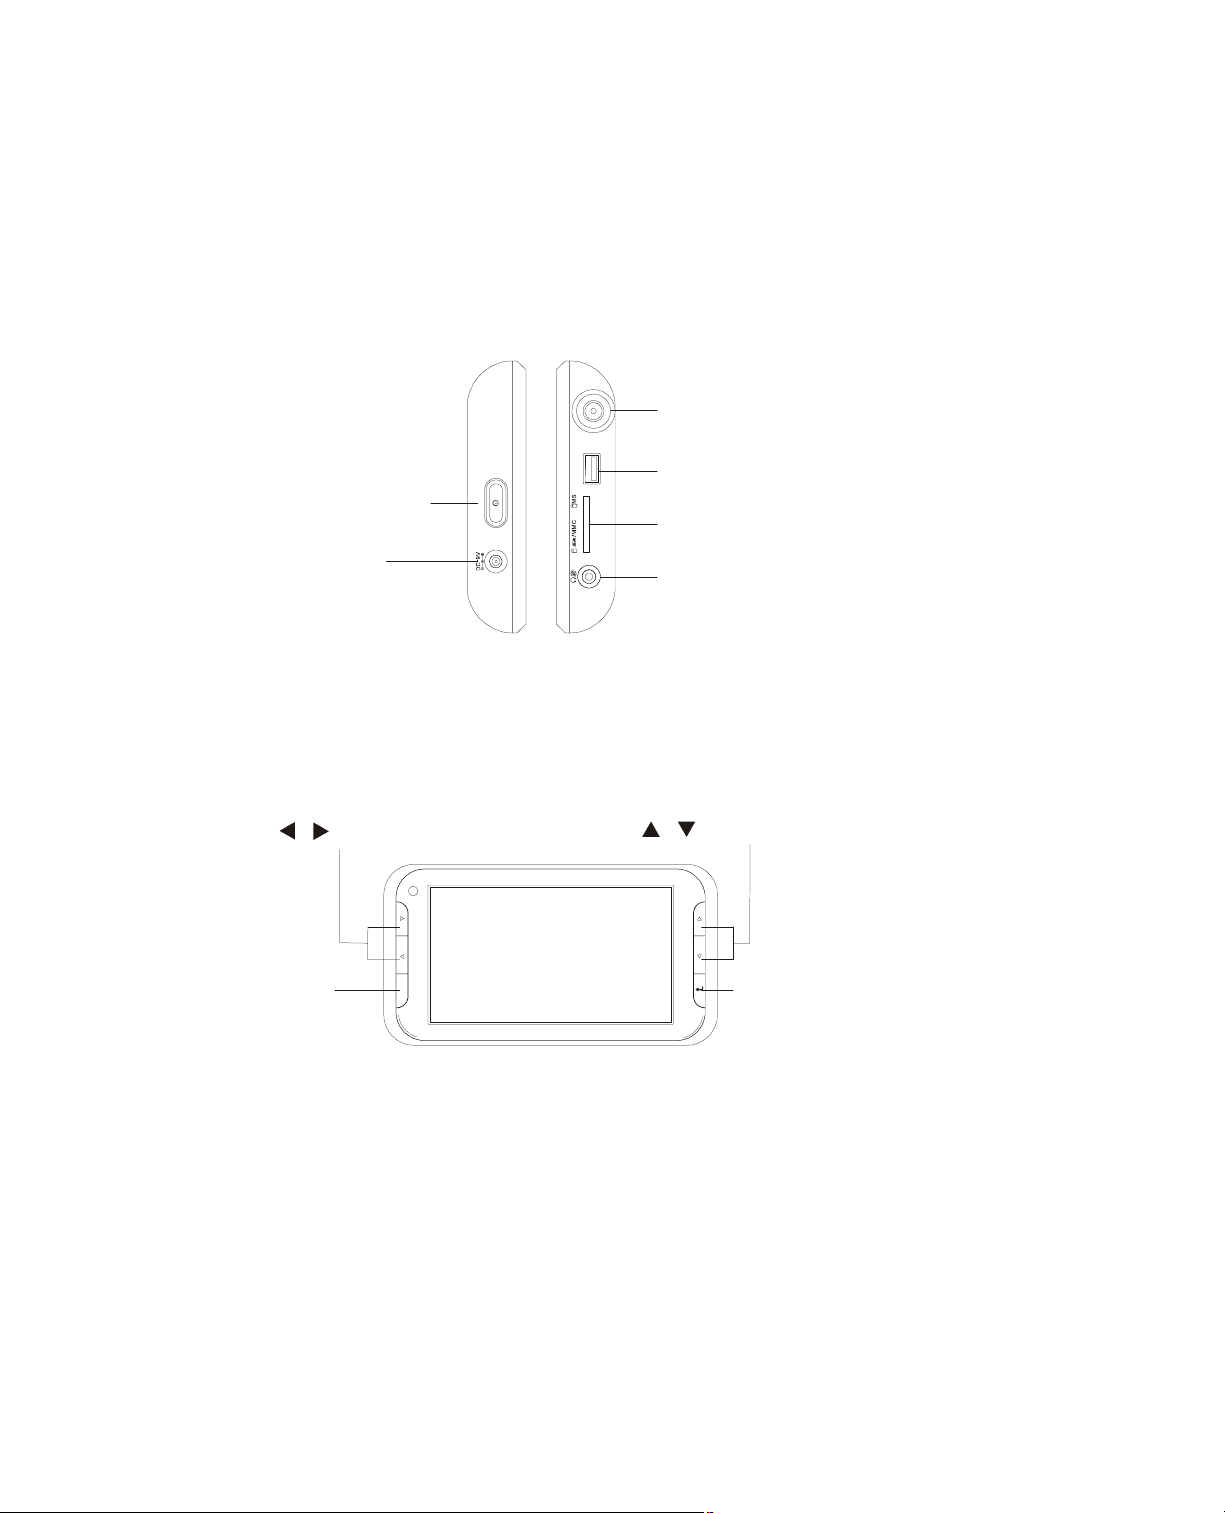
B. Unit and remote View
CH+
CH-
Left and right side
Power on/off
DC 9V
Plug in the
AC adaptor
Back side
Volume+/-
Press to raise or lower the volume.
/ : Navigation Buttons.
Antenna Jack
Connect an external antenna
USB ANTENNA
USB Jack
Insert a USB flash device.
SD/MMC/MS Slot
Insert a card.
Headphone Jack
Connecting to this headphone jack
will disable the internal speakers.
CH+/-
Select the previous and next
channel.
/ :Navigation Buttons.
Menu
VOL+
VOL-
M
Enter
To enter or confirm
your selection.
5
Page 6

Rmote Control
AUTO
Access the
autoscan function.
Power
Turn the TV on or off.
MENU
Activate all menu
DISPLAY
Display channel information and
TV level (ATSC).
GUIDE
Displays program information
for digital stations.
Use and to see previous
and next programs.
VOL+/VOL-
Adjust volume.
and
ENTER
Navigation and
confirm selections
on a menu screen.
NUMBER
Go directly to a channel.
INPUT
Switch between TV and
multimedia function.
MUTE
Turn off/on the sound.
AUDIO
Select from available
audio language.
.
CH+/CH-
Go to the next or
previous channel.
6
Page 7

C. Basic and Operation
Accessing and Changing System Settings
1. Press or to access the settings then press and to select a
setting. Press MENU to go back to the upper menu level.
2. When finished, press MENU to exit the setup menu.
Settings
In the main menu, press or to select Settings, press ENTER to
complete the settings, and press the MENU to return.
Settings mode allows you to change Language, Set Color, Set Menu,
Set Slideshow, Info, Reset and Update Software. Press and
to select, and press MENU to return.
Language: English, French, Spanish. Menu language options.
Set color: Set Contrast, Set Brightness, Set Saturation.
Set Menu: In Set Menu, press and to set Menu Rise Effect and
Menu view. Menu Rise Effect can be set as Straight Style or Whirl
Style. Menu View can be set as level view, Over looking View, or Look
up View.
Set Slideshow: In Set Slideshow, adjust the Transition Effect,Fit to
Display and Duration.
Transition Effect includes styles, such as Alpha Fade, Cube, Drop, Flip
Bar, Flip Square, Magic Cube,Score Board, Swap,IPhone, Photo,
Sequential,Random;
Fit to Display includes Fit To Long, Fit To Short, Fit To Both;
Duration includes Fast (1 Sec), Normal (10 Sec), Slow (100 Sec) or
OFF.
Info: Firmware information.
Reset: Restores the factory settings.
Update Software: SD/MMC/USB Update.
7
Page 8

DTV
In main menu, press key to select DTV feature, press ENTER key
to enter DTV menu. If there is program, it will play interface directly.
Press CH+/CH- key to change other channel, and press to adjust
the volume.
In the main menu of DTV mode, press key to enter PICTURE
interface. Adjust settings of Picture Mode, Contrast, Brightness,
Sharpness, Tint, Color, Color Mode, Zoom Mode.
Press to move the cursor.
Press key to confirm selection and press MENU key to return.
Return
Press to select Return and press to move the cursor then
press ENTER to go back the main menu.
Channel Setup (TV only)
In the Channel interface of DTV,check the present interface information
and the signal quality. Choose Auto Scan to search for programs again
by air or cablel and you can press ENTER on remote control or unit to
autoscan TV channel too.
Setup
The Setup of DTV mode includes the Settings of MENU Language,
Transparent, OSD Time Out, Closed Caption, Restore Default and
return to Main Menu.
Press to move the cursor, press key to select, and press
MENU key to return.
Time
In the main menu of DTV, press Key to select Time function, and
press MENU to return.
Use the key to complete the settings of Sleep Timer, Time zone,
DST(Daylight saving time), Time Format.
Press to move the cursor,choose, press key to confirm
selection and press MENU to return.
Audio
In the main menu of DTV, Press key to select Audio, Adjust Audio
language and Balance . Press key to choose, press ENTER to
confirm, and press MENU to return.
8
Page 9

Slideshown
In the main menu, press the key to select Slideshow,
press ENTER to enter Slideshow mode,or press MENU to return.
In Slideshow mode, available slideshows will be shown.
In the picture browsing interface, press ENTER to display toolbar below,
and press to select related functions. Press ENTER to confirm.
Press MENU to exit toolbar.
File Information
To adjust Volume
Play/Stop
Zoom in/out in X1,
X2,X4,X8 speed
Review the previous
or next picture.
Rotate the picture
on 0/90/180/270
agree.
To adjust
Brightness
Music
In the main menu, press to select MUSIC feature, press ENTER to
confirm, or press MENU to return.
The music window display present music files, press ENTER to start
playing music, and press MENU to return. During playing music, press
to select the previous or next music to play.
The Music playing interface displays the toolbar below, press key to
select related functions.
Random/Repeat one/ Repeat all
Stop and back to list
Play/Pause
Fast Backward
Review the previous
or next music.
Fast Forward
Adjust Volume
File Information
9
Page 10

Video
In the main menu, press to select Video feature, press ENTER to
confirm or press MENU to return.
The window of Video displays all the present movie file list.
Press to select a movie, press ENTER to play the movie, and
press MENU to return. The Toolbar will be displayed when Video playing
press to Select related functions.
.
Play/Pause
Stop
Fast Backward
Fast Forward
Review the previous
or next picture.
Adjust Volume
Repeat / Repeat off
To adjust
Brightness
Full screen display
A
A
Audio Language
Subtitle
Browse
In the main menu, press to select Browse function.
Press ENTER to enter Browse mode, and press MENU to return.
In Browse mode, all present pictures, music,video files and folders are
displayed. Press ENTER to browse the file, and press MENU key to
return.
You can set the open screen logo according to your interest:
Select one photo which you desire and press MENU to display toolbar
(as below). Press the second icon then will display “Are You Sure to
Set This Photo to the Logo?”. You can select “Yes” or “No” to set or
not to set.
In settings mode select Reset back to original setting.
10
Page 11

D. SPECIFICATIONS
Signal System................................................................................. ATSC
Panel size....................................................................................... 7 Inch
Power Supply.......................................................................... DC 9V 1A
Romote battery...................................................... CR2025 3V, 150 mAh
Operating temperature................................................ 41~95°F(5~35°C)
Dimensions (W x H x D).................................... 8.66 x 1.154 x 4.77 inch
Weight............................................................... ..........................0.959 lb
11
Page 12

E. Troubleshooting
Problem
The TV won’t turn on
Poor picture
No sound
Solution
• Charge the battery.
• Check that the AC power cord is properly
connected.
• Test the power outlet by plugging in another
appliance. If the outlet does not work, connect
the TV to another power outlet.
• Your AC Adapter’s center tip must be set to
positive and its plug must fit the Portable TV’s
DC 9V jack. The supplied AC adapter meets
these specifications.
• Move to a window (if inside a structure).
• Use an external antenna.
• Move your portable TV away from other
appliances that cause interference.
• Make sure the TV and connected antenna
are in a fixed position and not used within a
moving vehicle.
• Turn up the volume.
• Press MUTE on the remote to turn off mute.
• Unplug the headphones.
Widescreen doesn’t
work
• Some DTV stations include the side bars on
their broadcast to preserve their screen
format. This is normal.
12
Page 13

America Action, Inc. (“AXN”) Product Warranty Information
What the warranty covers:
America Action, Inc. (“AXN”) warrants your AXN products against
defects in material and workmanship during the warranty period from
the original date of purchase, subject to the following terms and
conditions. If a product proves to be defective in material or workmanship during the warranty period, AXN will, at its discretion, repair or
replace the product with a similar product provided the purchaser
adheres to certain return authorization procedures and guidelines.
How long the warranty is effective:
AXN products are warranted for one (1) year for parts and ninety (90)
days for labor, starting from the original date of purchase/invoice.
What brand(s) can be covered under the warranty:
Any “ACTION” and “AXION” branded products sold by America Action,
Inc.
Whom the warranty protects:
The warranty is valid only for the original purchaser within the continental of USA.
What the warranty does not cover:
1. Any product on which the serial number has been defaced,
modified or removed.
2. Damage, deterioration or malfunction resulting from:
A . Accident, misuse, neglect, fire, water, lighting, or other acts
nature, unauthorized product modification, or failure to follow
instructions supplied with the product.
B. Repair or attempted repair by anyone not authorized by AXN.
C. Any damage of the product due to shipment.
D. Removal from or installation to the product.
E. Causes external to the product, such as electric power
fluctuations or failure.
F. Use of supplies or parts not meeting AXN’s specifications.
G. Normal wear and tear.
H. Battery Leakage.
I. Any other cause which does not relate to a product defect.
13
Page 14

3. Cosmetic damage by purchaser, such as markings, discoloration,
scratches, dents, gouges or any other defacement.
4. Physically damaged products by purchaser, such as broken PCB,
Housing, damaged LCD Module.
5. No Defect Found (product returned to AXN as defective but failure is
not duplicated by AXN’s test method).
6. Customer instruction, installation, set up adjustments, or signal
reception problems.
7. Rechargeable batteries.
8. Product without proof of purchase. (The proof of purchase should be
one of the following documents: purchase receipt, gift receipt, sales
invoice, and packing list that contains the product model number,
price, vendor, and purchase date.)
9. Ninety (90) days after the original purchase date of the AXN product,
the customer is responsible for the shipping fees incurred for the
product delivery to and from AXN service center.
How to get service:
1. For additional information on obtaining an extended warranty
service, contact your AXN dealer or AXN’s Customer Service
Department by e-mailing to customerservice@axionzone.com
To obtain warranty service, you will be required to do one of the
following: fill out an online RMA Request Form, print the form, fill it
out and fax it to 1-909-869-5545, or call AXN’s Customer Service
number at 1-888-210-9483. You will be asked to provide the
following information:
A. Customer information ( name, day-time phone number, and/or
residential address ).
B. Proof of your purchase ( purchase receipt, gift receipt, sales
invoice, and/or packing list ).
C. Product model number.
D. Product serial number.
E. A description of the problem.
F. Payment information ( If any payment is required, you will be
asked to provide this information beforehand. Currently, we only
accept personal check, money order or cashier’s check.
The time for us to clear a personal check is approximately 20
days; 10 days for any money order or cashier’s check.
2. AXN will contact the customer upon receipt of the RMA Request
Form, and will issue an RMA number if the RMA Request Form is
completed and delivered as requested.
14
Page 15

3. Please take or ship RMA product to AXN or any AXN authorized
service center with RMA number clearly and marked on the outside
of the packing. All RMA products should be returned in secured
packaging, preferably in the original package, with the complete set
of accessories. We recommend that you insure the package in
case of loss or damage during shipping.
4. Upon receiving the RMA product, if the correct RMA number is
clearly marked on the packaging, and if the repair payment is pre paid or is enclosed with the package, depending on the condition of
the defects, AXN will repair or replace all RMA products, and ship
the product back to the customer.
5. For additional information or the name of the nearest AXN service
center, please contact your AXN dealer or AXN Customer Service.
Before contacting us:
In many cases, your produce may not need repair. Before contacting
us, please consult the trouble shooting section in your user’s guide or
AXN’S FAQ webs page to see if you can easily remedy the problem
yourself.
AXN technical support services:
During the period of product warranty, we support your basic
configuration, setup and troubleshooting questions; and when
necessary, we will provide you with all the instructions on how to
return your product for repair.
For customer service and support inquiries, please call 1-888-2109483 or e-mail us at customerservice@axionzone.com.
REPAIR OR REPLACEMENT AS PROVIDED UNDER THIS
WARRANTY IS THE EXCLUSIVE REMEDY OF THE CONSUMER.
AXN SHALL NOT BE LIABLE FOR ANY INCIDENTAL OR
CONSEQUENTIAL DAMAGES FOR BREACH OF ANY EXPRESS
OR IMPLIED WARRANTY ON THIS PRODUCT. EXCEPT TO THE
EXTENT PROHIBITED BYAPPLICABLE LAW, ANYIMPLIED
WARRANTY OF MERCHANTABILITY OR FITNESS DURATION TO
THE DURATION OF THIS WARRANTY.
Some states do not allow the exclusion or limitation of incidental or
consequential damages, or allow limitations on how long an implied
warranty lasts, so the above limitations or exclusion may not apply to
you. This warranty gives you specific legal rights, and you may also
have other rights, which vary from state to state.
15
 Loading...